

Instruction Manual
12,000 BTU Portable Air
Conditioner
Model: HPAC12
READ AND SAVE THESE INSTRUCTIONS

Please read and follow the instructions in this user manual even if you feel you are familiar with the product,
and find a place to keep it handy for future reference.
For your convenience record the complete model number (located on the product identification plate) and
the date you received the product, together with your purchase receipt and attach to the warranty and
service information. Retain in the event that warranty service is required.
NOTE: The rating of this product (as marked on the product identification plate) is based on specific loading
tests. Normal use or the use of other recommended attachments may draw significantly less power.
Important Safeguards
When using any electrically powered product, basic safety precautions should always be followed, including
the following:
PLEASE READ ALL INSTRUCTIONS CAREFULLY BEFORE USING THIS PRODUCT
WARNING!: - to reduce the risk of fire, electrical shock or injury to persons or property:
• Read all instructions.
• Always operate the product from a power source of the same voltage, frequency and rating as
indicated on the product identification plate.
• Disconnect the power plug before dismantling, assembling or before cleaning.
• Avoid touching mobile parts of the appliance.
• Do not use the appliance for any other purpose other than its intended use.
• Do not operate this product with a damaged cord or plug, or after the product malfunctions, or
appears damaged in any way. If the supply cord is damaged, it must be replaced by the manufacturer
or its service agent or a similarly qualified person in order to avoid a hazard.
• This appliance is for indoor use only.
• Keep the appliance away from heat sources, and direct sunlight.
• Never insert fingers, pencils, or any other objects through the air vent guards whenever the power
plug is connected, especially while running.
• Always switch off the appliance before unplugging it.
• The appliance is not intended for use by young children or infirm persons unless they have been
adequately supervised by a responsible person to ensure that they can use the unit safely. Young
children should be supervised to ensure that they do not play with the appliance.
• This appliance is not to be used by children or persons with reduced physical, sensory or mental
capabilities, or lack of experience and knowledge unless they have been given supervision or
instruction.
• When using the appliance never leave the appliance unsupervised when in use. Switch off the
appliance if you have to leave for even a short period of time.
• Never use the mains point switch as a switch to start and turn off the air conditioning unit. Use the
provided On/Off switch located on the control panel.
• Do not use this appliance with an extension cord, unless it has been checked and tested by a
qualified electrician or electrical supplier.
• Always place the portable air conditioner on a dry stable surface.
• The air conditioning unit must always be stored and transported upright, otherwise you may cause
irreparable damage to the compressor; in case of any doubt after moving the appliance we suggest
to wait for at least 24 hours before you start the air-conditioning unit.
• Always unplug the appliance before cleaning or changing any parts of the appliance, or when it’s not
in use.

• Never immerse the appliance in water or any other liquid.
• If the power cord is not long enough, an extension cord can be used. The cord should not be in a well
trafficked area as people can trip over the cord and pull the plug out of the socket.
• Clean the appliance according to the User Manual.
• Do not repair the appliance by yourself. Any possible hazard incurred by maintenance of the general
public will void the warranty. The power cord should be replaced by a qualified electrician.
• Please use the accessories provided by the manufacturer; otherwise, the appliance may be
damaged.
Special Recommendations
• Ensure that the appliance is positioned on a flat, large, dry surface without any obstacles nearby. A
minimum distance from furniture and walls is 50cm in all directions.
• The plug should be easily accessible.
• In order to maintain the function of the compressor, the appliance should always be in a vertical
position.
• Do not use the appliance near gas or other flammable liquids.
• Do not block the air outlet or the air inlet ventilation.
• Do not use spray (insecticides, paint) or any other flammable products near the appliance as the
plastic may become deformed. The unit may also sustain electrical damage.
Energy Saving Tips
• Keep blinds and /or draperies, on any windows, closed during the sunniest part of the day.
• Keep the filters clean. Under normal conditions, the filters should be cleaned every 2 weeks. Since
the filters remove airborne particles, more frequent cleaning may be necessary, depending on the
indoor air quality.
• Set the fan speed switch to high cool and the thermostat to the coolest position for the initial start-
up, then set the Fan switch to Low cool and lower the thermostat to a comfortable setting.
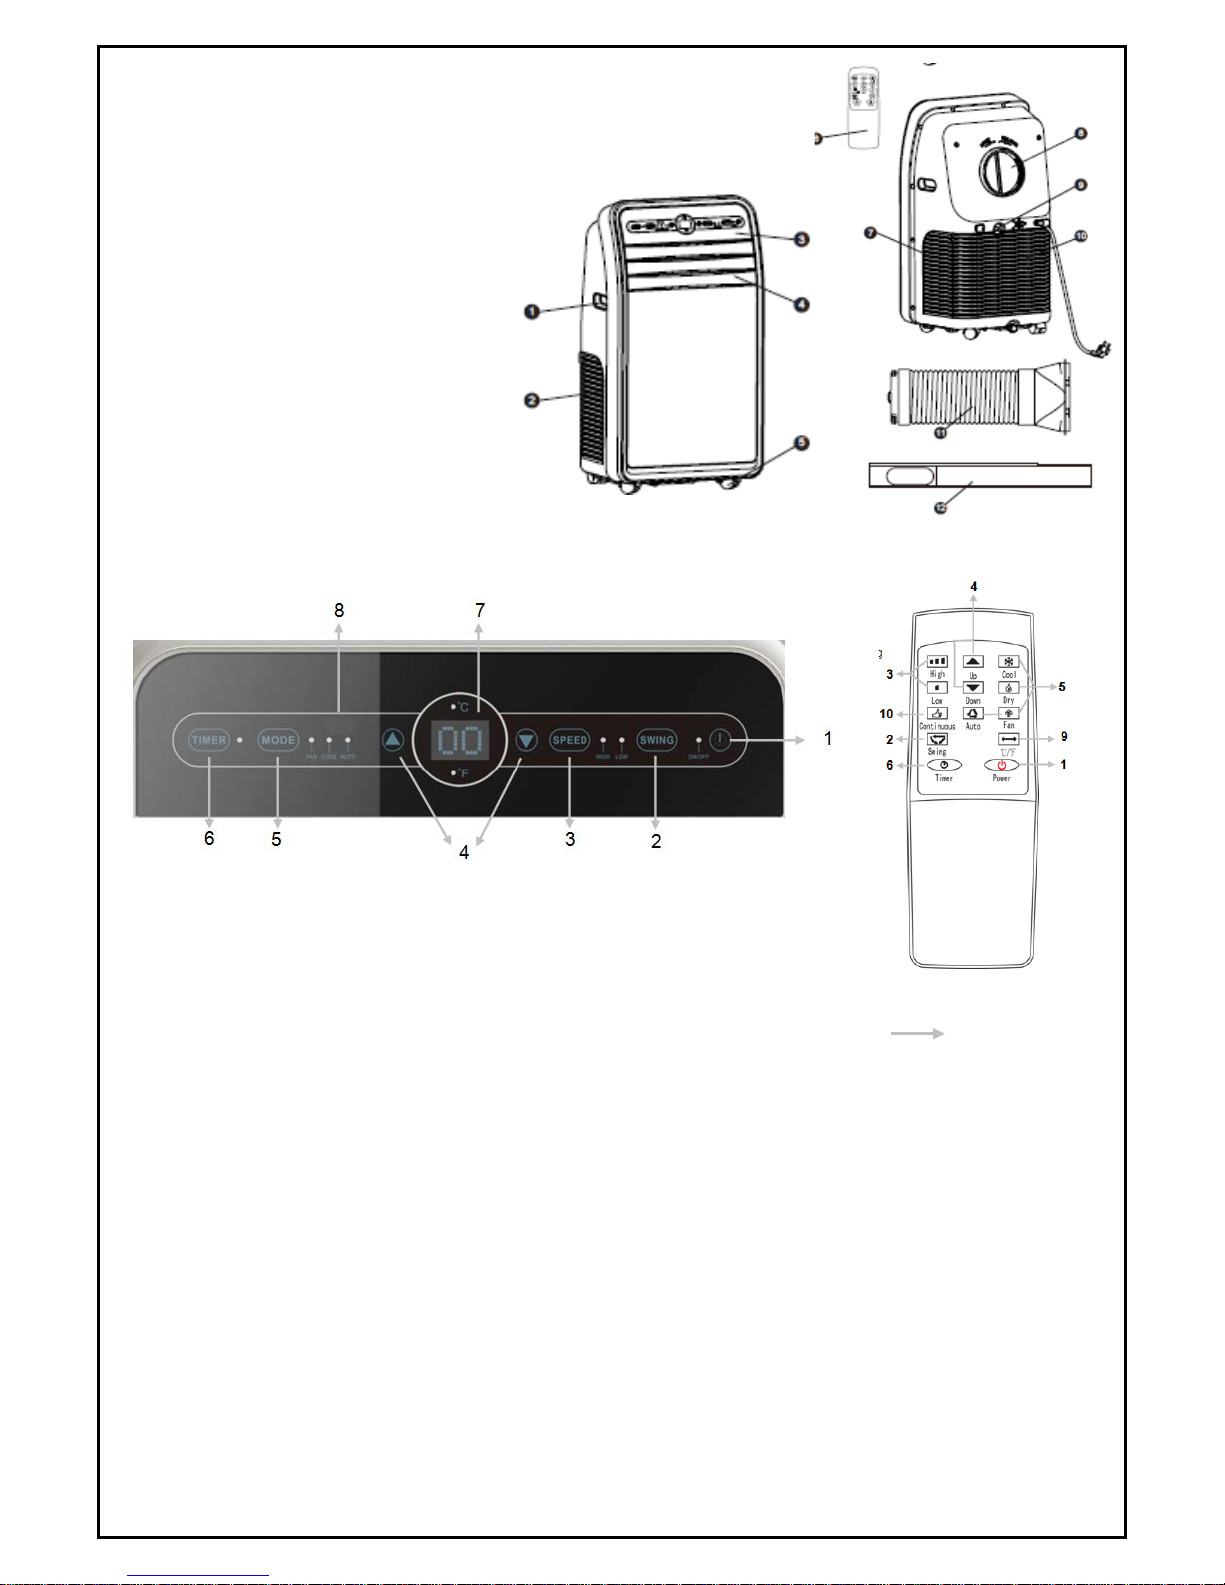
Identification
1. Handle
2. Air inlet (L)
3. Control panel
4. Louver
5. Castor
6. Remote control
7. Air inlet (R)
8. Air outlet
9. Dehumidification drainage nozzle
10. Air inlet grille
11. Exhaust pipe assembly
12. Window slider kit
Control Panel & Remote Control
1. Power On/Off button: Press the button to turn On/Off.
2. Auto-swing button: Press this key at any time after turning on the
appliance to swing the louvers automatically.
3. Speed button: Press the key to choose high/low fan speed.
4. Temperature/time adjusting button: Press the key at cooling mode to increase/reduce the setting
temperature; press it at timing mode to adjust timing ON/OFF time; press Up and Down keys
simultaneously to switch Fahrenheit and Centigrade degree temperature.
5. Mode button: Press the key to choose cooling, fan, dehumidifying and auto-mode
6. Timer button: Press the key at standby mode to set TURN-ON time. Press this key set TURN-OFF time
when the unit is on.
7. Temperature/ time display window: This window displays the adjusted temperature and time.
8. Remote controller receiving window: This window is used to receive signal of remote control.
9. °C/℉ button: Press the key to switch from ℃ to ℉ and vice versa.
10. Max. Cool: Press this button in cooling mode to achieve maximum cooling.

Installation
Placement
Place it on an even dry surface, and keep it at least 50cm away from any surroundings.
Screw the exhaust pipe assembly into the air outlet in the back panel (anticlockwise).
Insert the air exhaust hose into the window slider kit, adjust the opening width of the window so that the
window slider kit width matches properly; the length of the kit is adjustable.

Incorrect installation:
It’s important to keep the exhaust pipe smooth, and with no bends. Incorrect mounting can contribute to
the efficiency of the air conditioner. Ensure that the air can flow freely through the pipe.
Warning: The exhaust pipe is designed especially for this model. Do not replace or lengthen it; otherwise it
will result in failure.
Note: Maximum length of the exhaust pipe is 1500mm. It’s better to keep it the shortest length possible and
keep it horizontal.
Operation
Cooling mode
• When the A/C enters cooling mode after it’s turned on, the cooling indicator will light up.
• Press the Up/Down button to adjust the temperature (17°-30°).
• Press the Speed button to choose High/Low fan speed.
Fan mode
• When pressing the mode button or choosing the fan mode by pressing the remote control, the wind
indicator will light up.
• Press the Speed button to choose High/Low fan speed.
• Temperature cannot be set when fan mode is selected.
Dehumidifying mode
• When pressing the mode button or choosing the dehumidifying mode by
pressing the remote control, the dehumidifying indicator will light up.
• Remove the dehumidification water drainage nozzle, insert the water pipe,
and place the other end of the water pipe into the water vessel (bucket – not
supplied) or into a drainage passage, as shown in the right figure.
• After entering the dehumidifying mode, if the room temperature is more
than 15°, the compressor will work. When room temperature is less than 13°,
the compressor switches OFF; when the temperature increases to more than
15°, the compressor will restart (in order to protect the compressor, it will
restart 3 minutes later).
• In dehumidifying mode, the fan is defaulted to run at low speed, and the fan
speed cannot be adjusted.
• Temperature cannot be set.

NOTE: When choosing the dehumidifying mode, please remove the exhaust pipe, otherwise it will affect the
dehumidifying performance and make the display window show “FL”.
Auto-mode
• When pressing the mode button or choosing auto-mode by pressing the remote control, the auto
indicator will light up.
• After choosing auto-mode, the operation state is determined by ambient temperature: when the
ambient temperature is higher than 25°, the operation state is the same as that of the cooling mode;
when the ambient temperature is lower than 25° the operation state is the same as that of the fan
mode.
Max cool mode
• Press the “Max Cool” button on the remote control whilst in cooling mode to utilize maximum
cooling.
• In Max Cool mode, the A/C will cool regardless of the temperature.
• In Max Cool mode, the fan speed is high, and it cannot be adjusted.
Timer mode
• When the appliance is in standby mood, press the button to turn the timer on. Press the Up and
Down keys to set the timer (0~24H), and the timer indicator will light up.
• Press the timer button to turn off the timer when the unit is on.
Water Drainage
This product is equipped with an automatic water evaporative system. The condenser is cooled with the
circulation of condensed water, which improves cooling efficiency and saves energy.
If the internal vessel is full of water, the display screen will display “FL”, and the
compressor will stop working automatically. After you power off the appliance,
unscrew the water cover, pull out the water plug to drain all of the water out. Once
drained, it will restart again.

Maintenance
Note: in order to avoid electric shock, please turn off the A/C and unplug the plug before maintenance or
repair.
Cleaning
• Switch off and unplug the appliance before cleaning.
• Wipe with a soft damp cloth. Do not use chemical solvents, such as benzene, alcohol and gasoline etc;
otherwise the surface of the A/C will be damaged.
• Prevent any water from coming into contact with the A/C.
Filter
• Wash the filters every two weeks. If it is blocked by dust, the cooling efficiency of the appliance will be
reduced.
• Take out the air inlet grille and pull out the filters from both sides.
• Wash the filters in warm soapy water (neutral detergent), dry it in a shady place once clean.
Seasonal Cleaning
If the A/C will not be used for a long time:
• Straight after use, pull out the water plug and drain the unit.
• Run the A/C on the fan mode for 2 hours until its dry inside.
• Turn off the A/C and unplug.
• Wash the filters and reassemble once dry.
• Remove the exhaust pipe and keep it in a safe place.
• Cover the A/C with a plastic bag and store it in a dry place.
NOTE: Please ensure unit is completely dry before storage to avoid mould smell.

Error Detection
Error Code
Multi-functional defection
E1
Error of the coil’s temperature sensor
E2
Error of indoor temperature sensor
E4
Anti-frozen protection: temperature of the coil is too low and the A/C is
off. When the temperature increases to 8℃, the protection is released
and will start to work again as normal.
Trouble Shooting
Before contacting the retailer for a replacement, check the below first to see if it can solve the problem
Problem
Cause
Solution
The air
conditioner does
not function.
No power supply.
Connect to power supply outlet and switch
on.
“FL” flashes on the display screen
Drain water.
Timer-off is running.
You can turn the unit on three minutes
later.
The air
conditioner
restarts
frequently
In direct sunlight. Close the curtains.
Windows or doors open, lots of
people or there is a heat source in
the room.
Close doors and windows, remove the heat
source.
Dirty filter.
Clean or replace the filter(s).
Air inlet or air outlet blocked.
Remove the blockage.
The unit is too
noisy
Unit stands on an uneven surface.
Place on an even, solid surface (less
vibration).
Compressor is not
working
Self protect of the compressor
Wait for 3 minute and restart again after
the descend of temperature
Caution: Switch off the unit and unplug it immediately if anything abnormal happens. Then
contact a qualified electrician.
Care & Cleaning
To make cleaning easier, you can dismantle some parts of your fan.
• Your appliance must be switched OFF via the main power supply and unplugged before proceeding
with any cleaning.
• Clean the housing with a soft damp cloth.
• Never use flammable or abrasive cleaning agents such as benzene or spirits to clean the appliance.
• Never immerse the appliance in water!
• It is recommended that you clean the water tank every 2-3 weeks and the flume every week.
• Pull out the water tank before cleaning it – pull the plastic tube out of the mist cask properly, and
then take out the mist cask and water tank.
• Use a dry cloth to clean the mist cask. If there are stubborn stains on the mist cask, use a lightly
dampened cloth with mild detergent.

Specifications
Model: HPA C1 2
Permissible excessive operating pressure
(Suction/Discharge): 1.0MPa/3.5MPa
Cooling capacity: 3.5kW
Maximux allowable pressure (Low pressure side/High
pressure side): 1.7MPa/5.5MPa
Refrigerant/Charge: R410a/565g
Air Flow: 420m3/h
Power Supply: 220-240V/50Hz
Noise: 55dB(A)
Rated input (cooling): 1450W
Net weight: 28.5kg
Dimensions (WxHxD): 443x830x340mm
Gross weight: 33kg
Fuse Parameters
Specification: Φ5×20mm
Voltage: 250VAC
Current: 3.15A
Australian Customer Service
GAF Control (Sales) Pty Ltd
P.O Box 19
Altona North Victoria 3025
Phone: 1300 659 489
Hours: 9am-5pm (EST) Mon-Fri
www.gafcontrol.com.au
*This product may vary slightly to the product illustrated due to ongoing product development.
 Loading...