

Hella HMTLCCPWB, HMTLRCPNB, HMTLCCBNB, HMTLCCBWB, HMTLRCPWB Mounting Instructions
...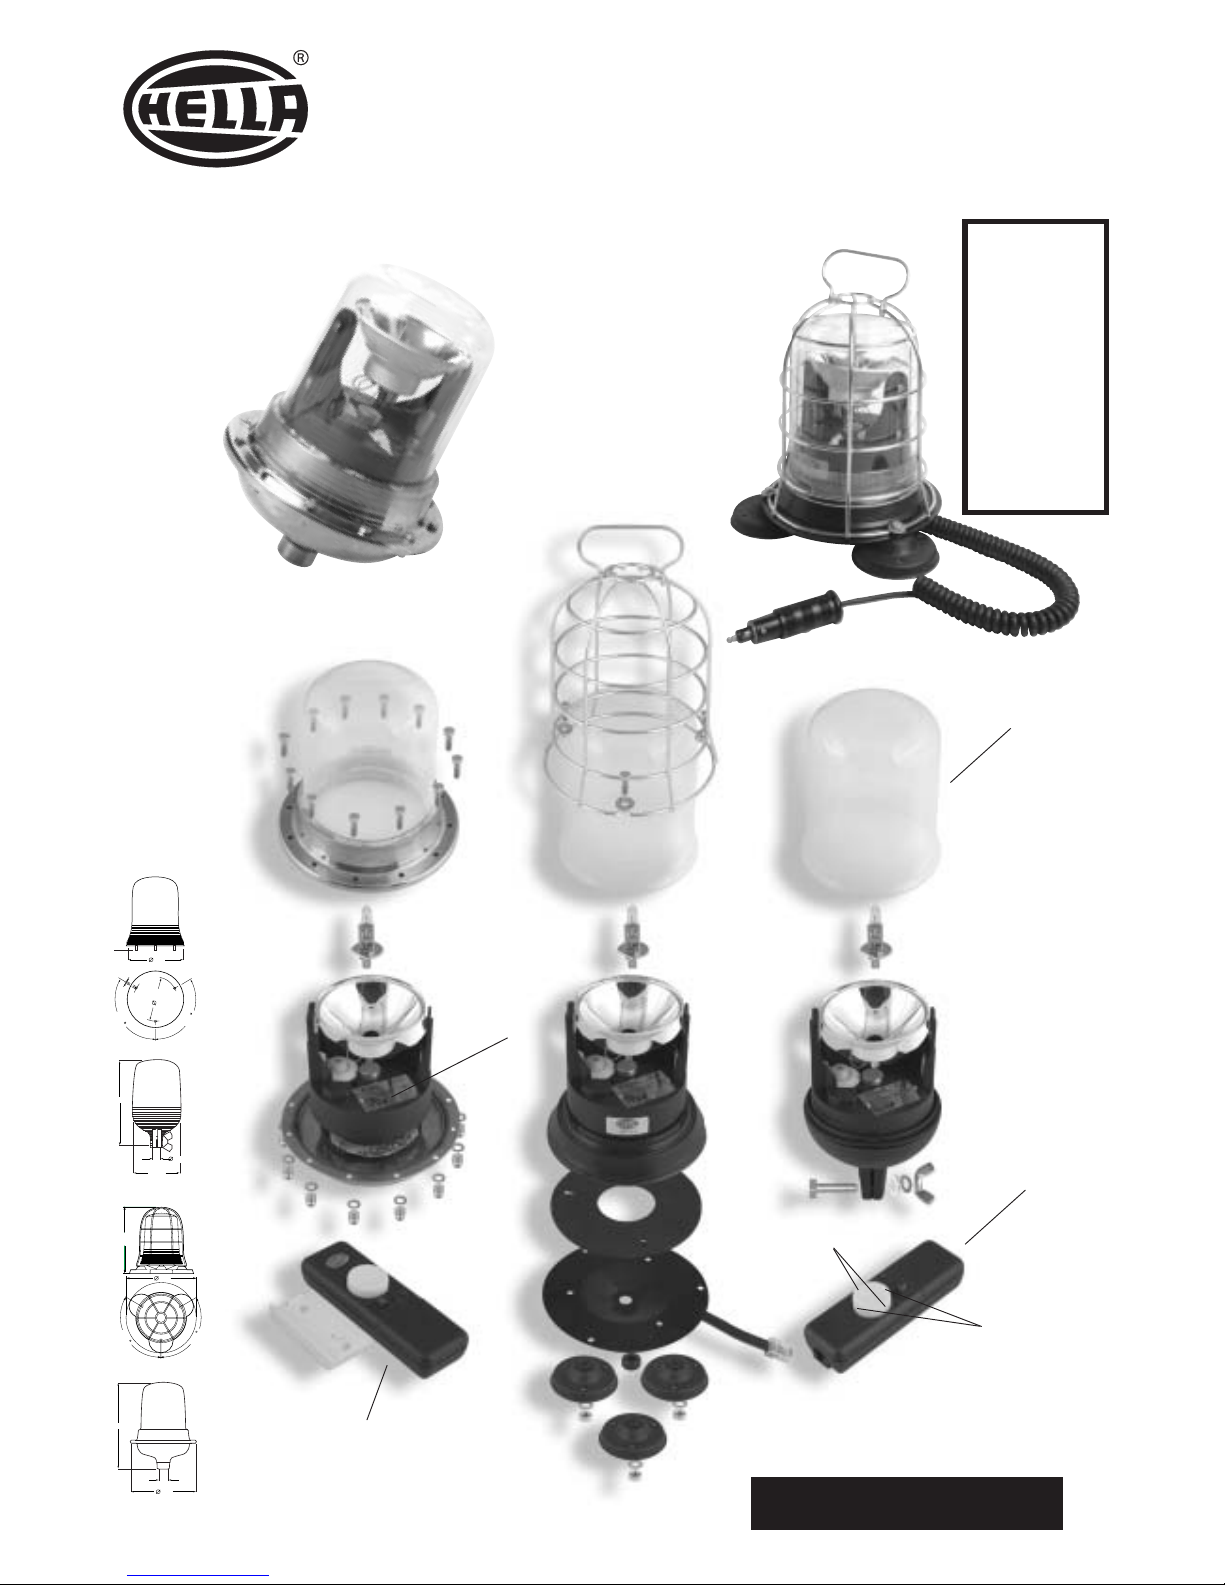
TeleLUX
®
Remote Control Worklamp
Mounting instruction
Please retain for future reference
252
190
3/4 G
130
251
1
2
0
120
250
24
17
190
1
9
0
1
2
0
M6
120
www.hella.com.au
Customer Service: Free Call 1800 061 729
custservice@ha.hella.com
Lens Spare Part:
9.HMTLCLR
Hella Part No.
HMTLCCPNB
HMTLCCPWB
HMTLCCBNB
HMTLCCBWB
HMTLRCPNB
HMTLRCPWB
HMTLRCBNB
HMTLRCBWB
HMTLRCMNB
HMTLRCMWB
HMTLCCSNB
HMTLCCSWB
911-354-09
Cable Remote
Spare Part:
9.HMTLRCC
Radio Remote
Spare Part:
9.HMTLRCR
Vertical rotation
Horizontal rotation
LED & key
Technical data
Voltage
24 VDC
Rated voltage 24 VDC
Operating voltage 24 VDC
Input current (in steady state) 70W 2.9A peak
Mass 2.6kg (Stainless steel)
2.9kg (Polymer body with cage)
Lamp type H1 (P14.55)
Protection code (with suitable plug) IP6K7 (Stainless steel body)
IP55 (Polymer body)
–Installation and Operation Instructions for Remote Worklamps:
Wiring
Make the wiring by connecting the beam to the appropriate terminal block, the product is power by using the side lights switch of the vehicle or the ignition key; install the beam
on the vehicle using the gasket and the set of screws supplied matching the direction of the arrow with the direction of the vehicle. The ISO A versions should be installed on an
appropriate mounting bush positioning the prominent part of the base in the opposite direction to that of the vehicle. (If it is not battery operated use
safety feeders protected against short circuit).
Note:
Rubber vibration damping gasket included,
mount between vehicle surface and base of the lamp.
Remote Control
If, for whatever reason, a duplicate remote control is required, request a Hella remote control. To programme the remote control remove the dome and feed the beam: press the
key on the beam (the LED will come on), and press any key on the remote control. When the LED on the beam goes off the remote control is set. Four different remote controls
can be set for one beam. One remote control can operate more than one beam contemorarily if they are within the radius capacity of the remote control, if so set each beam, as
described, using the same radio remote control.
The beam can contemporarily on two axes (diagonal movments). To obtain this movment you must press the button on the remote control between the single movement
positions.
Globe Replacement
To change the bulb use the remote control to position the projector forward, giving access to the back. After assuring that the projector is in the correct postion, disconnect the
power supply, remove the external dome, disconnect the terminal of the bulb and release the spring support. Replace the bulb ensuring that it is secure and reconnect the
beam. Before replacing the dome ensure the beam is working.
Wiring procedure:
(✔) Tick as completed.
1. (✔) Disconnect the earth cable from the vehicle battery.
2. (✔) Connect a 3mm cable from the high beam terminal 56A of the headlight dipper
2. (✔) switch.
2A. (✔) Connect a 3mm cable from a fused active supply (vehicle fuse box) to one side of
the on/off control switch.
3. (✔) From the remaining terminal of the on/off control switch connect
to teminal 86 of the relay.
4. (✔) Using the 4mm cable connect terminal 30 of the relay via fuse to a major active
supply (starter solenoid, alternator or battery).
5. (✔) Connect terminal 87 of the relay to both lights (globes) using 4mm cable and screw
connector.
6. (✔) Connect terminal 85 of the relay to the vehicle earth using 3mm cable.
7. (✔) SEE NOTE. Connect the earth terminal on the globe holder to the earth cable inside
the lamps (where fitted) or run back to the chassis earth or negative battery terminal.
8. (✔) Thoroughly check all connections and wiring. Only then re-connect earth cable to
battery.
9. (✔) Test and align lights, then finally tighten all mounting bolts.
TeleLUX
®
Remote Control Worklamp
Mounting instruction
Please retain for future reference
© 2003 Hella Australia Pty Ltd
• Hella shall be absolved from
all responsibility for any
modifications performed on
the luminaire
• Use only certified original
equipment for replacement
purposes
 Loading...