

Page 1
MANUEL D'UTILISATION / USER GUIDE
BEDIENUNGSANLEITUNG
Helite
www.helite.com
[email protected]
Distribué par Helite
1, rue de la petite n
21121 Fontaine-Lès-Dijon
Airbag certié / Certied airbag
Zertizierter Airbag
Page 2
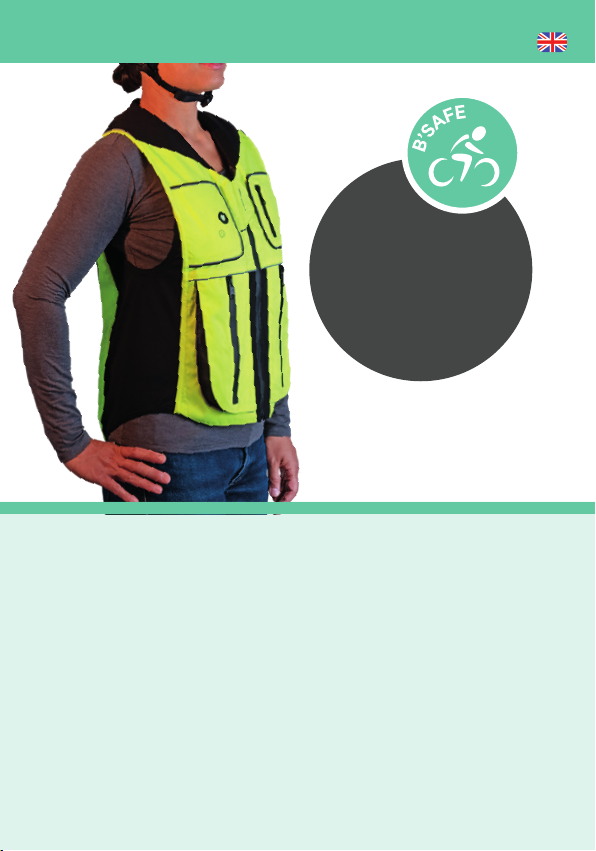
USER GUIDE
THANK YOU
FOR YOUR
PURCHASE
To get the most out of your
B’Safe airbag, please read
this manual carefully.
General information .......................................................................30
First use ................................................................................................. 32
Safety precautions ......................................................................... 35
Technical description ................................................................... 35
Daily use ............................................................................................... 39
Reuse B’Safe after an ination ................................................ 44
Maintenance ...................................................................................... 47
Operation & malfunction ............................................................ 48
Warranty & after sales service ............................................... 49
Disclaimer............................................................................................. 50
Page 3
30
General information
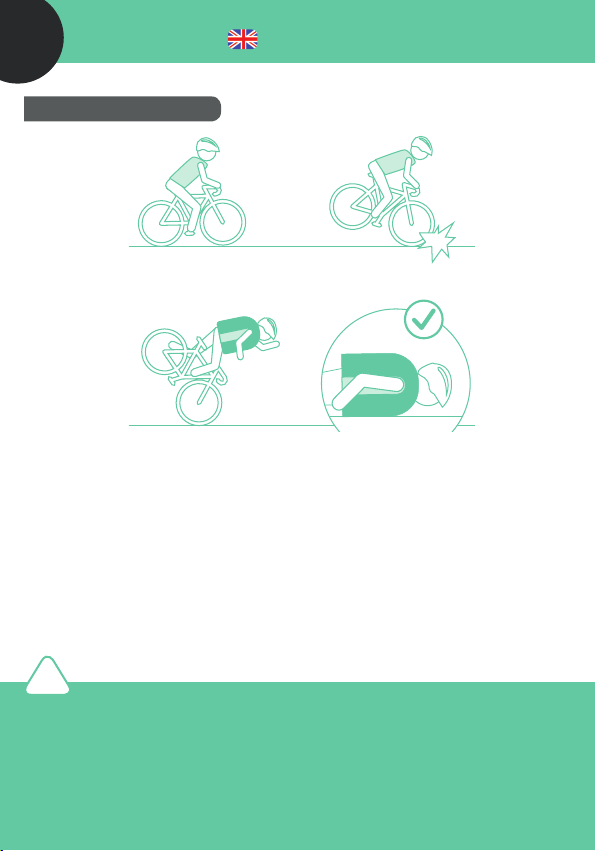
THE CONCEPT
User Guide
1.
Movement analysis
3.
Airbag ination: 80 ms
The B’Safe vest was created to protect urban cyclists in their daily ride.
When an accident or a fall is detected, the airbag inates automatically to protect the
thorax, neck and spin and ensures an optimal protection before impact.
2.
Accident detection
4.
Shock absorption
Person protected
!
ATTENTION
B'Safe is not adapted for the following uses: mountain bike, bicycle acrobatics, BMX,
scooter, motorcycle, running, segways, electric unicycle and self-balancing board.
Page 4
User Guide
THE B’SAFE AIRBAG
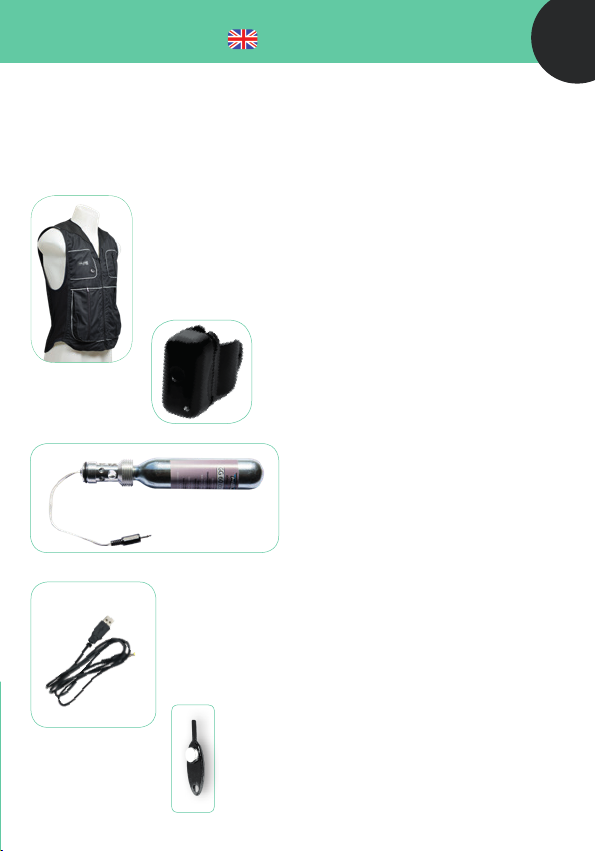
The B’Safe package contains: an airbag vest, a saddle sensor, a CO2 cartridge, a USB
cable and a little magnet.
B’Safe vest: It contains the airbag, a CDU (Crash Detection Unit)
sensor which analyzes the situation in real time (cyclist’s motion,
position and speed) and detects accidents.
SDU saddle sensor (Shock Detection Unit):
It detects shocks on the bicycle. Discreet
and autonomous (life span around 5 years),
it should be installed under the saddle of the
bike (see page 43).
Cartridge: It inates the airbag in the event
of a fall or an accident. It is for single use
only and must be replaced after each
ination.
USB Cable: To recharge the vest battery (see page 40).
CAUTION: only the USB cable is included, you can plug it in
any standard USB charger.
31
Magnet: It should be used for the rst use of the vest
(see page 32 Vest and sensor pairing) and also for
periodic control.
Page 5
32
User Guide
First use
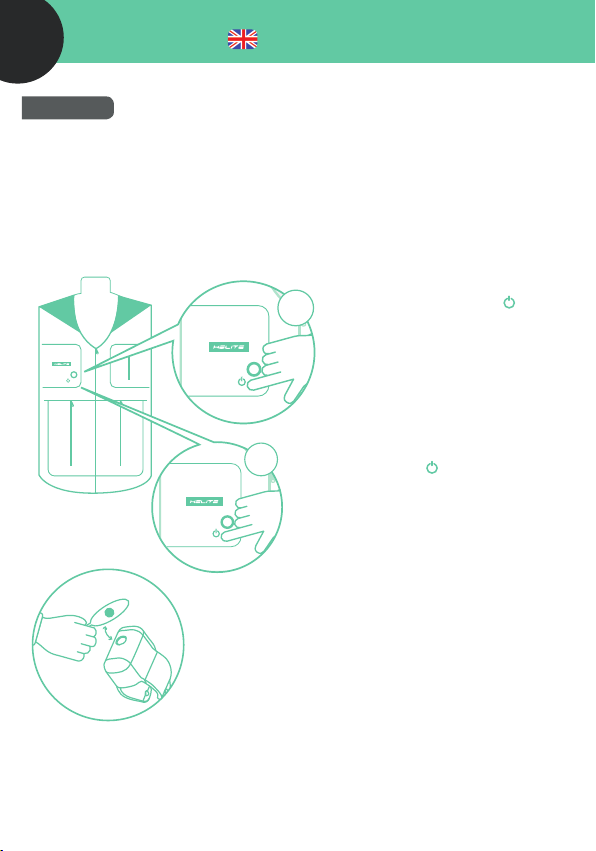
STEP 1: PAIR THE SADDLE SENSOR WITH THE VEST
Before using your B’Safe vest, it is necessary to pair (which means associate) the
vest with the saddle sensor. To do so, you need the vest, the saddle sensor and the
magnet. Make sure the cartridge is connected to the vest.
1. Switch ON the vest by pressing
quickly 3 times the button .
x3
The LED ashes green and you hear
a «beep».
3sec
2. Press the button for 3 seconds until
the LED turns blue. Release the button and
go to the next step.
3. Place the magnet on the saddle sensor over the
round sign. Please note that you only have 30 seconds to
eect this procedure.
• If you hear a LONG BEEP: the vest and the saddle
sensor are paired.
• If you hear a SHORT BEEP: the vest and the saddle
sensor have already been paired.
Page 6
User Guide
GOOD TO KNOW
It is possible to pair several “saddle sensors“ with one vest (5 maximum).
For example, if you have several bicycles, the pairing process has to be done for
each bike.
It is possible to pair as many vests as you like with one saddle sensor.
To check if your vest has recognized the saddle sensor, you just need to place
the magnet on the saddle sensor. A short “beep“ on the vest indicates that it is
recognizing the sensor and that they are connected.
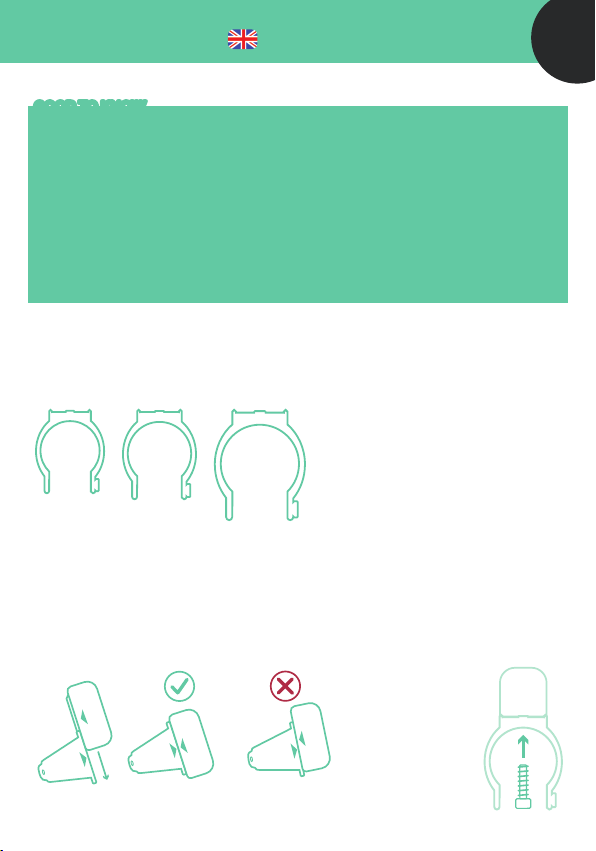
STEP 2: INSTALL THE SADDLE SENSOR ON THE BICYCLE
1. Choose the right bracelet size
Try the dierent sizes.
#1
30mm
2. Assemble the sensor and the bracelet
• Install the sensor on the bracelet by sliding it
inside. The two arrows have to be aligned.
#2
34mm
#3
38mm
The right size has to be adjusted to
the bicycle frame. The big screw has
to pass through.
• When the sensor is aligned,
screw in the small screw to x
the two elements.
This step is
optional if you
want to be able
to take o the
sensor from the
bracelet.
33
Page 7
34
Airbag Activated
Airbag Activated
User Guide
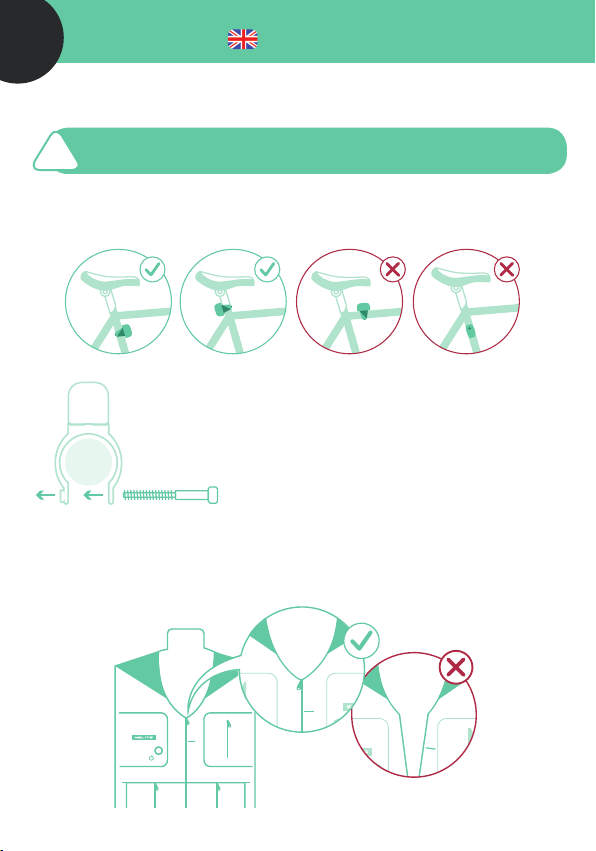
3. Place the sensor on the bicycle
Make sure to thoroughly clean your bicycle frame before installing the
sensor.
!
• Place the sensor on the bicycle frame on the seatpost or on the seat
tube. Make sure that nothing will impact the sensor during the installation
(bike lock, water bottle, etc.).
• Screw in the big screw.
Do not tighten too much. You can stop to screw when it gets dicult
to turn the bracelet with your hand.
STEP 3: WEAR THE VEST
Put on the vest and close the zipper to the top to ensure that you are well protected.
Airbag Activated
Page 8
User Guide
Safety Precautions
PRECAUTIONS Failure to follow the instructions could lead to
!
malfunction or reduce the eectiveness of the airbag system.
Once used, the CO2 cartridge must be replaced with a new Helite cartridge of the
same capacity (50 cc,60 cc, or 100 cc)
The vest should be stored carefully when not used. Keep it away from high
temperatures (over 45°C) and humidity.
Do not wash the vest in a washing machine nor immerse the vest in the water.
Keep out of reach of children.
Do not sew or add any pieces on the vest, it could reduce the eectiveness of the
airbag system.
Do not wear clothes too tight over the vest (for example a bag or a coat).
Do not remove any part of the airbag system or of the cartridge.
The vest is water repellent and not waterproof. In case of heavy rain, it is
recommended to use a rain cape over the vest.
Do not put anything fragile, sharp or pointed in the pockets of the vest. This could
damage the airbag.
Technical description
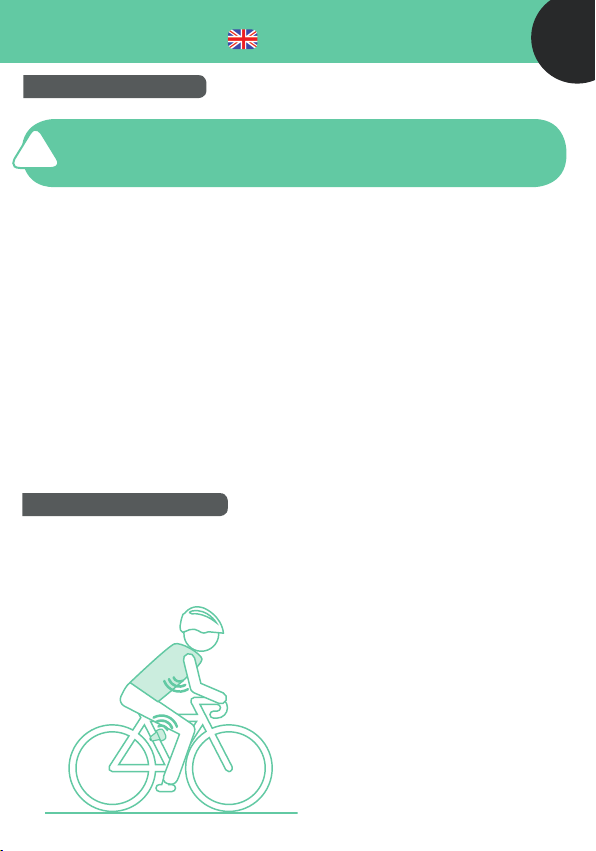
THE ELECTRONIC SYSTEM (SENSORS AND ALGORITHM)
The system uses an algorithm and two
sensors which are able to distinguish
cyclists’ common movements in an
accident. The CDU sensor (crash
detection unit), located inside the vest,
analyzes cyclists’ motion in real time
and the SDU saddle sensor detects
the shock. When an abnormal move
or a shock is detected both sensors
communicate with each other and
analyze the situation.
If an accident is detected, the airbag
inates in 80 ms and the cyclist is
protected.
35
Page 9

36
User Guide
SHOCK AND ACCIDENT DETECTION
The electronic system detects dierent accident situations:
• During the ride (faster than 11km/h)
- Bicycles that hit or are being hit by a signicant obstacle.
- Loss of control of the bike (without shock on the bike).
• Bicycle at a standstill
- Impact on the bicycle and the cyclist is ejected from the bike.
In some accidents, if the movements are too slow, or the amplitude is
!
too weak, it is possible that the detection does not work on time or not
at all.
Accident detection can be aected by:
- absence of GPS signal (tunnel, underground parking, ...)
- low speed (except in case of a shock on the bike)
THE AIRBAG PROTECTION
The vest was designed to ensure an optimal protection for 3 vital areas of the body:
the thorax, the neck and the back.
The airbags are made and tested in Helite‘s workshop in Dijon. They are made of
strong polyamide fabric which is highly resistant and very eective to absorb shocks.
After each ination, the airbag automatically deates slowly and can be used again
BACK
NECK
THORAX
Protection
volume
14-28L
*see p.38
Page 10

User Guide
BATTERY
Saddle sensor: has an autonomy of around 5 years.
To check if the sensor is still activated you can place the magnet over the sensor:
- Green LED on the saddle sensor > Battery OK
- Red LED on the saddle sensor > Battery is low, you must change the saddle sensor.
The vest has 25h of autonomy. The system is totally automatic and energy saving.
The vest should be recharged with the USB cable included in the B’Safe package.
We recommend to recharge the vest once a week. (see page 40 How to recharge
B’Safe?).
THE CO2 CARTRIDGE
B’Safe is sold with a new and usable cartridge ready to work.
The cartridge is for single use only and must be replaced after each ination. We
recommend to store 1 or 2 cartridges and keep them available in the event of an
accident.
It is possible to order CO2 cartridges online on our website www.helite.com or at one
of our dealers.
!
PRECAUTIONS
The CO2 cartridges are for single use only and must be replaced after each ination.
- The CO2 cartridge must be a Helite branded cartridge ( GG 50cc / GG 60cc / GG 100
cc). Do not use any other cartridge to replace the used one.
- The cartridge must be entirely screwed. Only connect the cartridge after you have
entirely screwed it in the black cylinder.
- The cartridge should be stored and used in temperatures below 45°C. Do not leave
full cartridges in the car in high temperatures for example.
- Never let the cartridge fall down.
- If rust or other corrosive marks appear on the outer surface of the cartridge, change
it immediately and discard the cartridge.
- Never cut the cartridge, do not throw into re.
- Keep out of children’s reach.
37
Page 11
38
A
A
B
C
A
B
C
A
A
B
C
A
User Guide
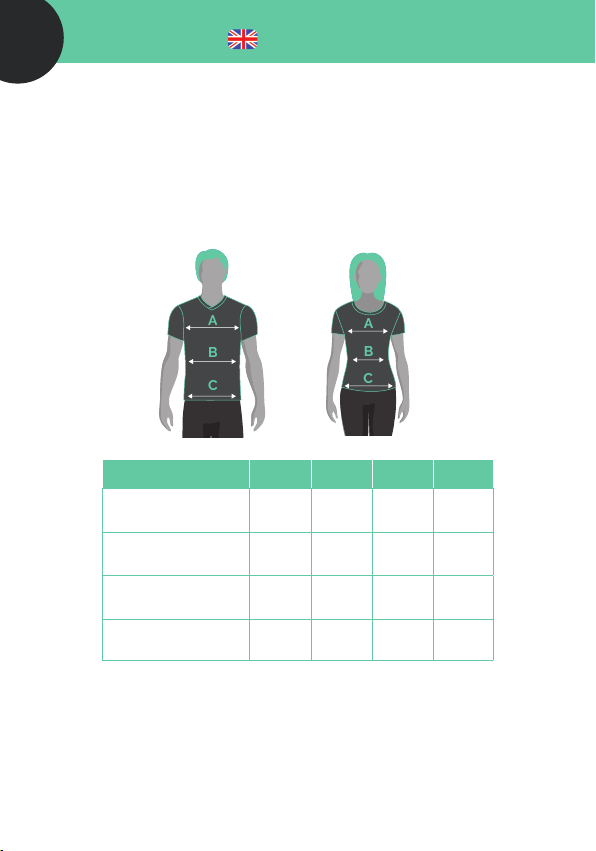
SIZE CHART & COLORS
The vest exists in two colors: Black and Yellow Hi-Vis (high visibility).
It is available in 4 dierent sizes:
SIZE IN INCHES S M L XL
A - Chest line
At the widest level
B - Waist line
At the narrowest level
C - Pelvis line
At the widest level
Cartridge &
protection volume
34-37 37-40 40-43 43-46
28-31 31-35 35-38 38-40
37-43 43-46 46-50 50-52
50cc
14 liters
60cc
17 liters
60cc
17 liters
100cc
28 liters
Page 12
User Guide
Daily use
THE VEST
The vest is 100% autonomous. Once it switches ON, the electronic system works
automatically and analyzes the movements in real time.
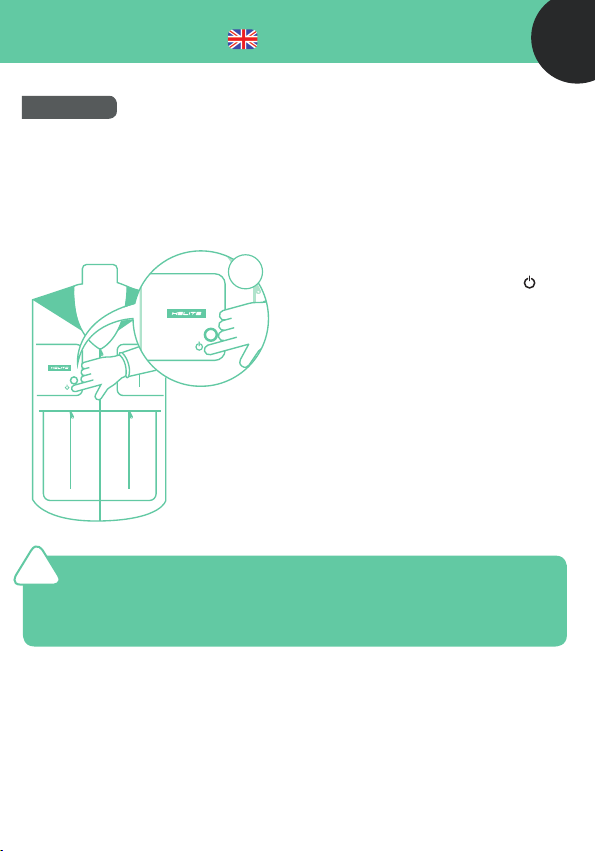
SWITCH ON / OFF THE VEST
x3
Reminder: during your ride, B’Safe is only operational when
!
- the vest is switched ON
- the zipper of the vest is closed to the top to assure you an optimal
protection
The vest can be switched ON / OFF by
pressing quickly 3 times the button
We recommand to switch OFF the vest
when you are not using your bike.
However, there are situations in which
you must switch o the vest.
(see page 41).
.
39
Page 13
40
2
User Guide
WEARING B’SAFE
We recommend to wear B’Safe over your cycling equipment (vest, shirt, etc.)
However, it is possible to wear a backpack or a rain cape over B’Safe if they are not too
tight and therefore do not prevent the airbag from inating correctly.
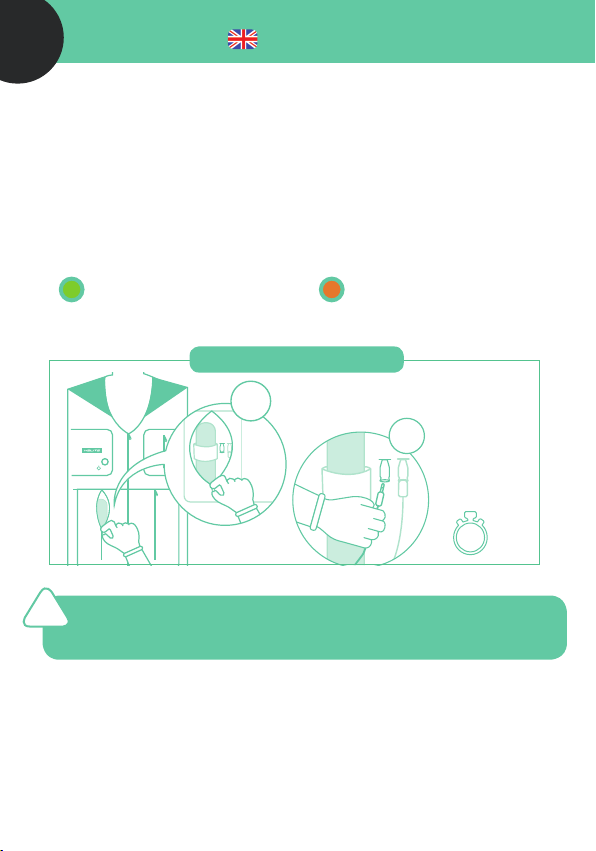
RECHARGING THE VEST
The vest has an autonomy of 25H when it is switched ON (about one week of use).
Please note that even if the vest is switched OFF it will use a bit of energy.
Green LED: the system is operational
During the charging, the LED will remain orange. The charging time is around 3 hours
with the USB cable included in the B’Safe package. As soon as the LED turns green
the charging is completed and you can reuse the vest.
You can use the vest.
How to recharge the vest?
Open the inferior pocket on the right
1
To recharge B’Safe, you must use the Helite USB cable included with B’Safe.
!
Only the cable is included, you have to plug it afterwards into a standard
USB charger ( 5 Volt USB port on your computer or mobile phone charger).
Do not forget to close the pocket.
Orange LED: Low battery
You need to recharge the vest.
Plug the USB
2
cable in the
corresponding
socket
Charging
time:
hours
3
Page 14
User Guide
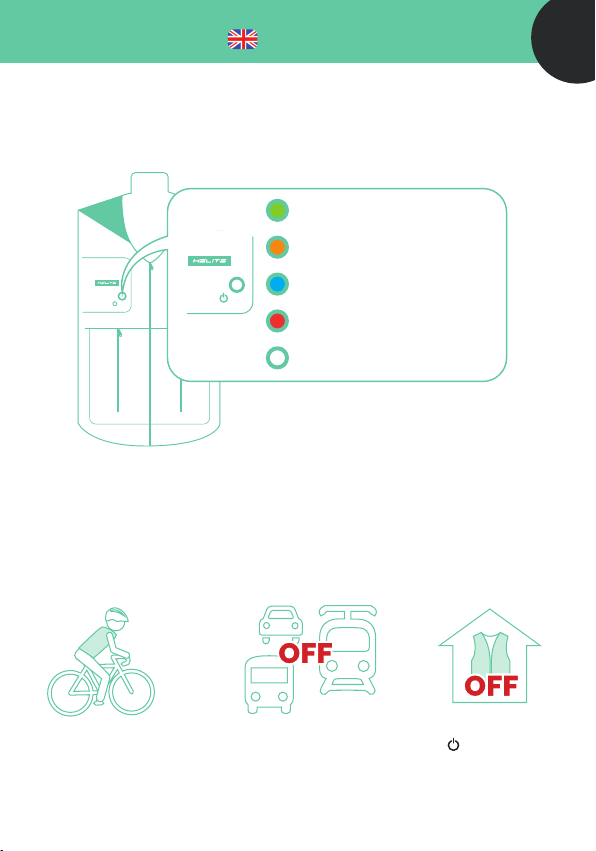
VEST LED DESCRIPTION
To know if the system is working properly, here are the 4 LED colors used and their
dierent signications:
Green LED: System operational
Orange LED: Low battery
Blue LED: Pairing
Red LED: Problem
No LED: Garment off
or in sleep mode
More info on page 48 about the operation of the
LEDs and BEEPS.
WHEN SHOULD YOU SWITCH OFF B’SAFE?
The vest can be switched on or o. It is not necessary to switch o the vest every day.
However, there are some situations in which you must switch o the vest:
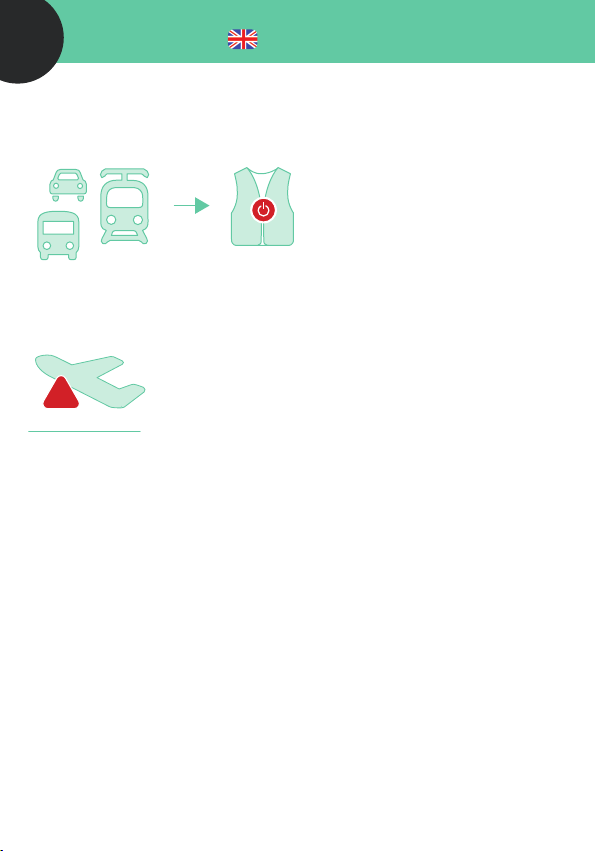
When you use dierent means of transport with your vest (car, metro, tram, train,
bus, etc.)
During a long storage time (in winter for example).
41
ON
REMINDER: to switch o the vest, you need to press the button 3 times.
Page 15
42
!
User Guide
TRAVELLING WITH B’SAFE
- BUS, TRAIN, CAR
No specic restrictions.
Do not forget to switch OFF the
system while using these means of
transport.
- PLANE
You may encounter some diculties with the security service
regarding the gas cartridges used to inate your vest.
!
However, even if it is legally allowed, it is possible that the security service or the
airline will refuse you to board the aircraft with the gas cartridge.
We advise you to print the IATA regulation (available on helite.com «FAQ») and to
show it during the control if you are asked for further explanation.
In any case, the security department of the airport and the airline will
make the nal decision whether to take your equipment on board or not.
On the plane, you always have to turn o your garment and unplug the gas
cartridge.
From a legal point of view (IATA regulations), you are authorized
to travel by airplane with 2 gas cartridges (with a volume of less
than 200cc), in the cabin or in the hold.
Page 16
User Guide
SDU SADDLE SENSOR
Once installed and correctly paired (see page 32), the saddle sensor is totally
autonomous (about 5 years without charging).
SADDLE SENSOR WORKING STATE
However, we recommend to check from time to time (once a month) that the saddle
sensor is working properly.
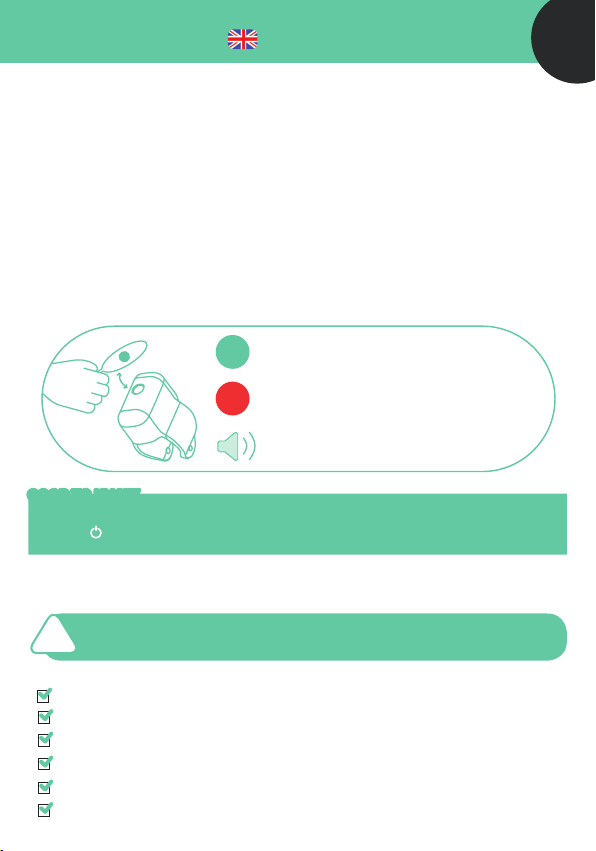
To do so, you need to place the magnet over the round sign of the saddle sensor to
check that the saddle sensor is still activated and that it is still paired with the vest.
Please note that this check should be done in an environment of more than 10°C.
GREEN LED: battery OK
RED LED: low battery = you need to change
the sensor.
A Beep on the vest: the saddle sensor and
the vest are associated.
GOOD TO KNOW
To delete all the sensors that are associated with the vest, press the
for 8 seconds.
button
PRECAUTIONS BEFORE USING THE AIRBAG SYSTEM
43
If one of these conditions is not validated, you may not be protected
!
properly.
the vest is adjusted correctly to your size
the CO2 cartridge is new and connected.
the vest is zipped above the mark Airbag Activation.
the vest is charged (green LED on).
the saddle sensor is paired with the vest.
the green LED is ON and ashes.
Page 17
44
1 2
User Guide
Reuse B’Safe after an ination
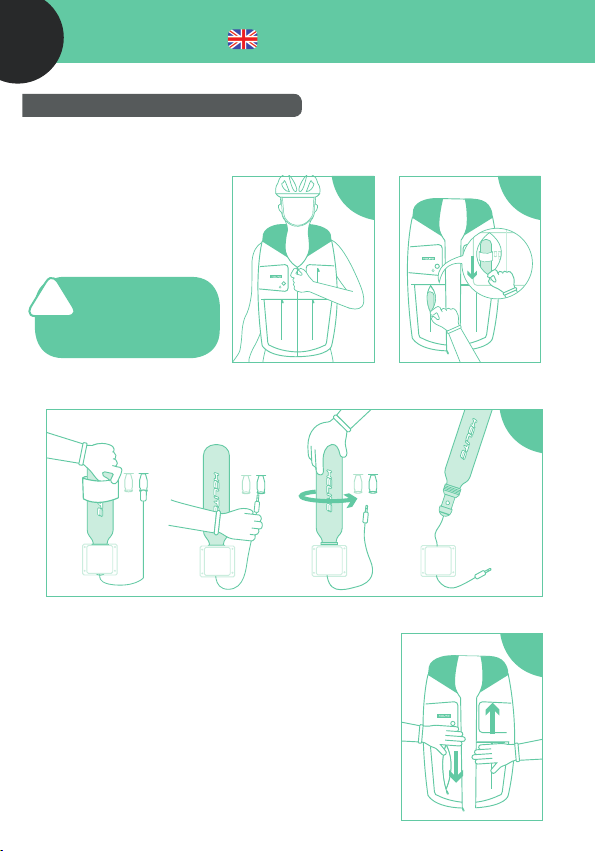
After an ination, it is possible to reuse the vest. There are only a few steps to follow to
reactivate your airbag system. It is really easy and can be done by yourself.
1. Take o the vest.
2. Open the pocket on the
right.
For the steps 2 to
!
5 the vest must
always stay open or
switched o.
3. Remove the empty cartridge.
Remove the elastic
Unplug the
cable.
4. Remove the air inside the vest by pushing with
your 2 hands.
1 2
Unscrew the
cartridge.
Remove the
cartridge
and the
cable.
3
4
Page 18
User Guide
3
1 2
4
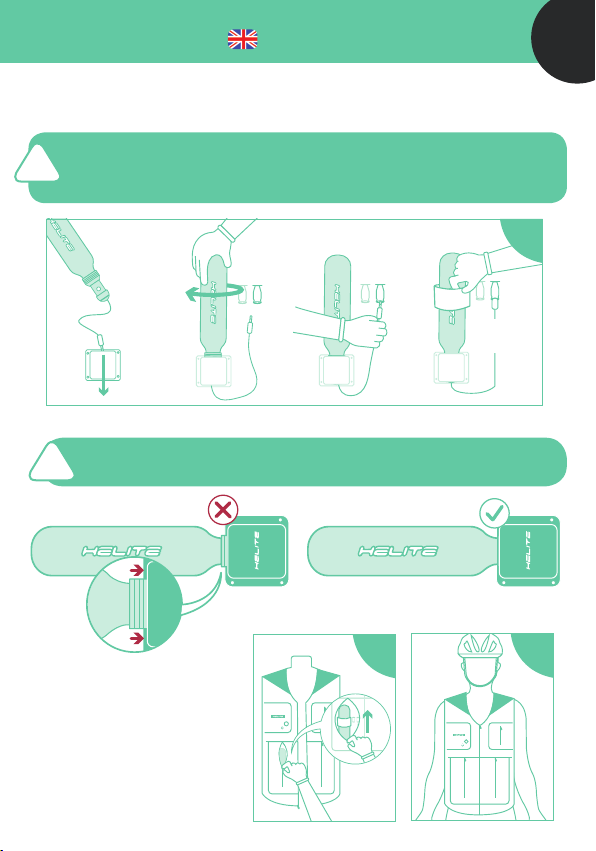
5. Install the new cartridge.
Do not damage the cable while screwing the cartridge.
Only connect the cartridge once it is entirely screwed (see example on the
!
scheme below).
Slide the
cartridge
cable in the
cylinder.
The cartridge must be screwed entirely. Do not apply too much
!
pressure when screwing in the cartridge.
Screw the
cartridge.
Connect the
cartridge.
45
5
Place the
elastics.
6. Close the pocket.
7. The vest can be reused.
6
7
Page 19

46
User Guide
PRECAUTIONS AFTER AIRBAG INFLATION
After ination, the airbag automatically deates slowly.
!
A fast deation (less than 5 sec) may indicate an external damage to the
airbag garment.
If you notice any mark on the garment that may lead to malfunction, contact
us or take the airbag system to an authorised dealer for servicing. Please
note that in the event of serious damage to the airbag garment, it may not
be possible to repair it.
Before reusing the airbag you must check the following points:
the cartridge is replaced by a new Helite cartridge of the same capacity.
the airbag is deated.
the new cartridge is connected with the vest.
Other precautions before use:
the vest is adjusted correctly to your size.
the vest is zipped up to the top.
the vest is charged (green LED on).
the saddle sensor is paired with the vest.
the green LED is ON and ashes.
Page 20
User Guide
Maintenance
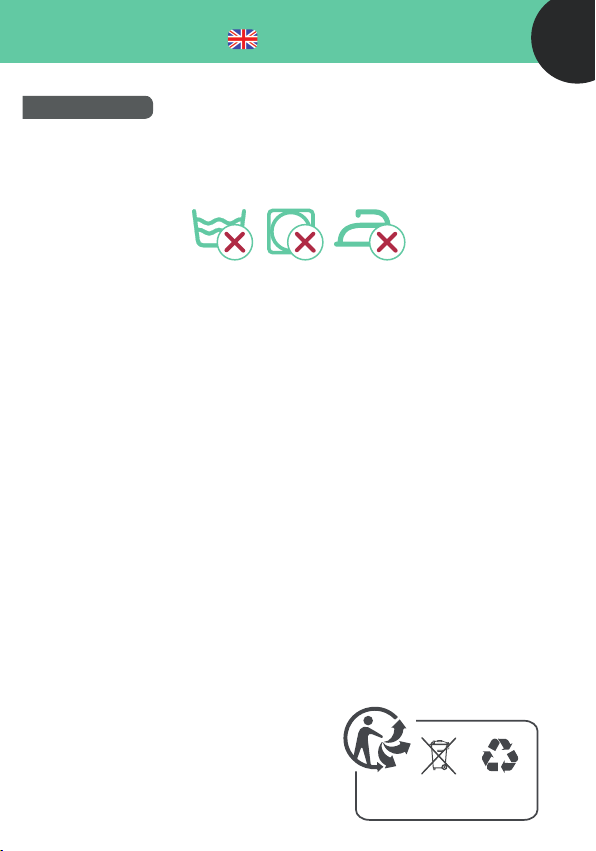
WASHING
The vest is not washable neither in washing machine nor by hand washing. Washing
the vest could seriously damage the electronic system.
If you want to wash your garment, we recommend using a sponge or brush with warm
soapy water.
CARTRIDGE
The cartridge comes with a 10 year warranty. The CO2 cartridges have a long life
span but we recommend to check them annualy. The check consists in weighing
your cartridge on a scale and making sure that the weight is approximately (+/- 3g)
equivalent to the weight written on your cartridge.
Examples:
A cartridge of 50 CC weighs 182 g: its weight should be between 179 g and 185 g.
A cartridge of 60 CC weighs 212 g: its weight should be between 209 g and 215 g.
A cartridge of 100 CC weighs 298 g: its weight should be between 295 g and 301 g.
STORAGE
Follow the guidelines below to enjoy a long and reliable use of your airbag garment
when stored:
• Avoid high temperatures (direct sunlight, if left in a vehicle, near a heat source or
ame).
• Do not cover with anything heavy.
• Do not fold or roll. It is best to store the vest on a hanger.
• Do not close the vest completely.
• Do not leave within reach of rodents or other animals.
• Keep out of children’s reach.
47
RECYCLING
We recycle the empty CO2 cartridges.
Put them aside and send them to the following
address or return them to one of our dealers.
HELITE - 1 rue de la petite n.
21121 Fontaine Lès Dijon, FRANCE
VEST
B’SAFE
USER
GUIDE
Page 21

48
User Guide
Operation & malfunction
Possible operations and malfunctions of the B’Safe vest regarding the B’Safe airbag:
System operational
Green flashing LED / No Beep
Low battery
Orange flashing LED / 4 Beeps
during airbag activation or deactivation
Battery charging
Orange LED / No Beep
You can cycle.
You need to recharge
You can still ride
the vest.
your bike for 2 hours.
Wait until the end of the
charging (Green LED).
Charging completed
Green LED / No Beep
when the charger is still connected
Unplug the charger.
Pairing in progress
Blue LED / 1 Beep every 5 sec
(during 30 sec)
Success of pairing
Blue LED / 1 Beep of 2 sec
(2 short beeps when the sensor is already recognized)
Pairing failed
Red LED / 4 Beeps
(or too many sensors recognized by the vest)
Disconnected Cartridge
Red LED / 1 Beep every second
(while the cartridge is not connected)
You have 30 sec to pair
the saddle sensor.
The vest and the saddle
sensor are paired.
Restart the pairing.
Plug the cartridge in.
If you notice any other malfunctions, please contact your dealer or our after sales
service via email [email protected] or by phone +33 3 80 35 48 26.
Page 22

User Guide
Warranty & after sales services
WARRANTY
The vest comes with a 2 year warranty. You can benet from an extended 2 year
warranty if you register your vest online within 3 months after your purchase on:
my.helite.com.
REPLACEMENT
If you encounter any of the problems described below, consult a dealer or contact
our after sales service.
Problems:
• If the airbag garment or the interior materials (fabric, sheaths) are torn, worn out or
the internal bag is visible.
• If any breaks, cracks or corrosion appear on the trigger mechanism or on the gas
cartridge.
• The system does not switch ON although the vest is charged and activated.
• In the event of deterioration or signicant fading of the materials.
After sales service:
Contact us via mail: [email protected]
Or by phone: +33 3 80 35 48 26
49
Page 23

50
User Guide
Disclaimer
•This product is “Certied CE (compliance with EU Regulation 2016/425) by ALIENOR
CERTIFICATION, Zone du Sanital, 21 Rue Albert Einstein CHATELLERAULT-Franceorganisme notié n° 2754“
• Please note that no body protector can prevent death or serious injuries in certain
accidents.
• Helite and its distributors will be held in no way responsible for any bodily injury
or death, and/or property damage that may occur while using any Helite airbag
garment.
• Helite and its distributors accept no responsibility or liability for any improper
installation and usage of B’Safe.
• Helite and its distributors cannot be held responsible should the airbag garment
not inate
• In some cases, the minimum speed to detect the accident is 11 km/h.
• The vest does not cover 100% of risks during an accident.
• The vest does not detect 100% of accidents.
• The vest does not protect from all upper body injuries.
• B’Safe does not protect parts outside the airbag (the coccyx for example).
• Any modication, misuse or improper storage of the device may cause malfunction.
• This PPE does not contain any allergenic substances. It does not cause any irritation
or discomfort to the user.
Page 24

Page 25
 Loading...