

Page 1
1 Copyright@2016 HeliPal.com. All Rights Reserved
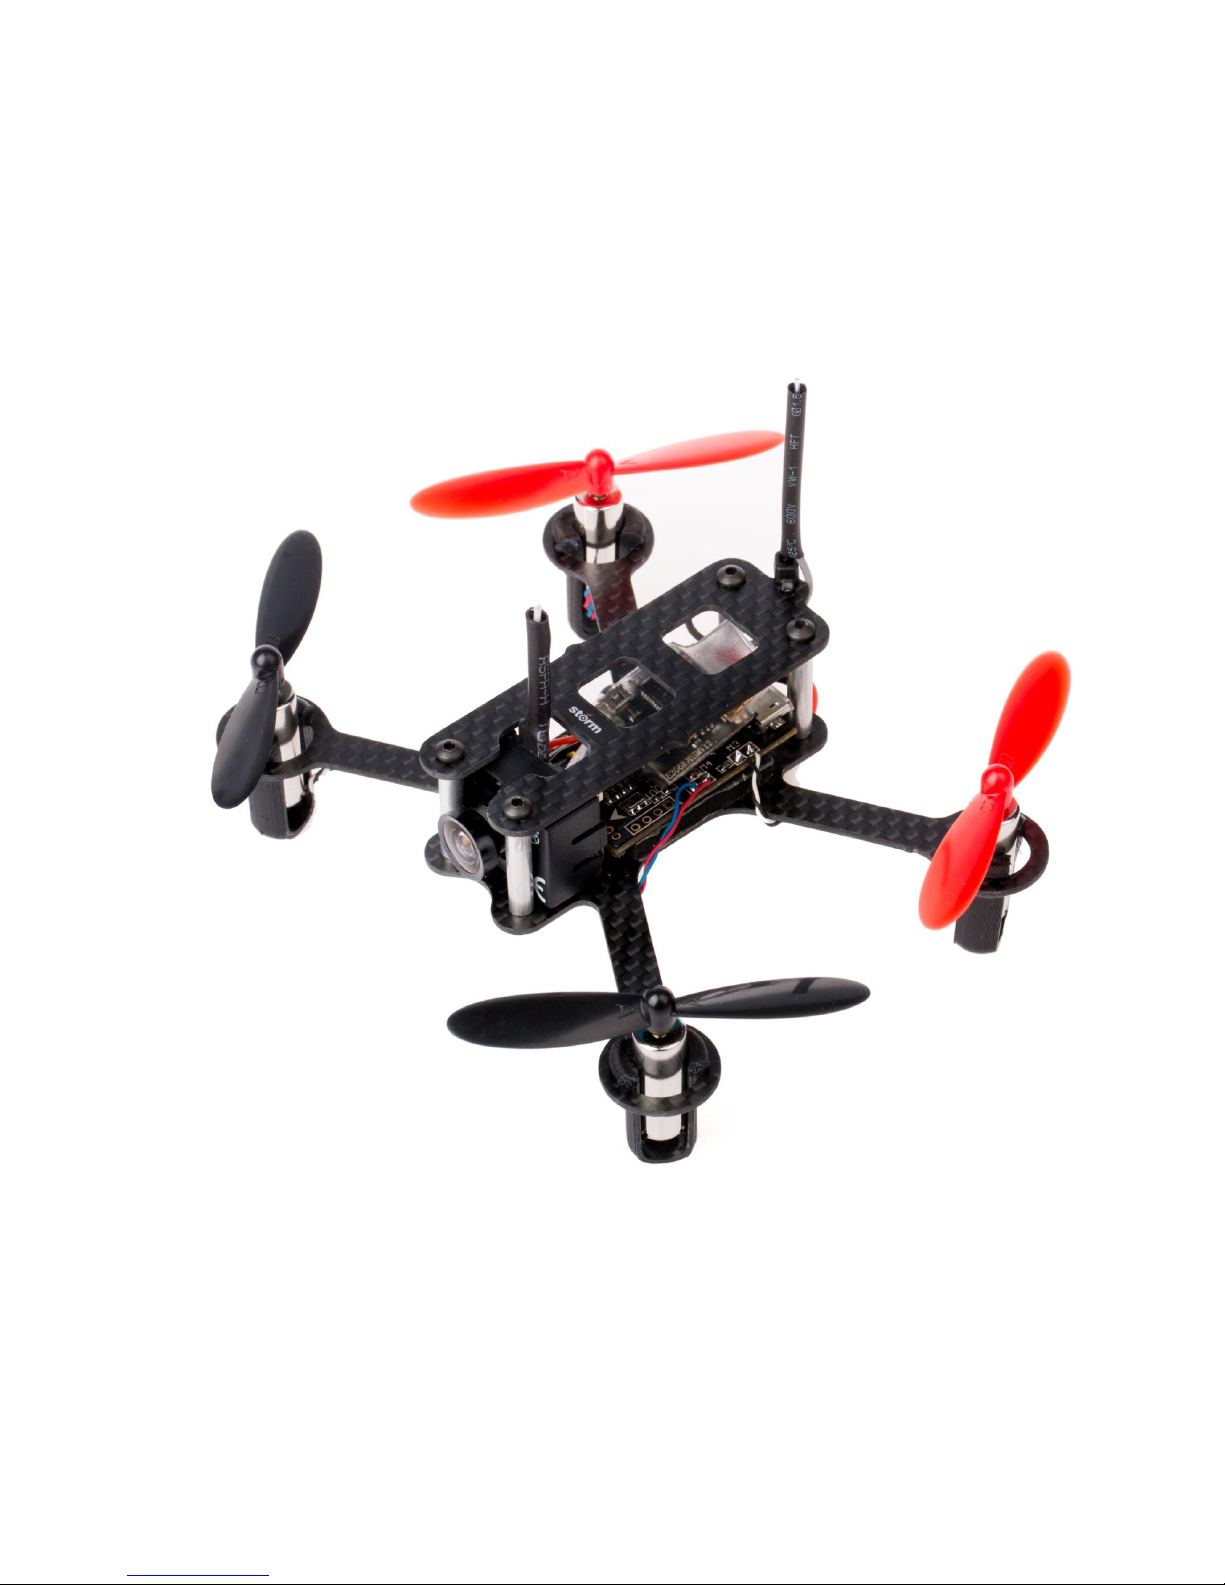
Storm SRD101
with BetaFlight Controller
USER MANUAL
V1.1
Page 2

2 Copyright@2016 HeliPal.com. All Rights Reserved
DISCLAIMER
Please read this disclaimer carefully before using this product. This product is a
hobby with motors but not a toy which is not suitable for people under the age of
18. By using this product, you hereby agree to this disclaimer and signify that you
have read them fully. You agreed that you are responsible for your own conduct
and content while using this product, and for any consequences thereof.
Before you fly the drone
1) Make sure all connections are good, and keep children and animals away
during flying, firmware update, system calibration and parameter setup.
2) Always fly the drone away from unsafe conditions, such as obstacles, crowds,
high-voltage lines, etc.
3) Do not use in bad weathers such as rainy day, snow, windy (more than
moderate breeze), hail, lighting, tornadoes, hurricanes etc.
4) Check whether the propellers and the motors are installed correctly and firmly
before flight. Make sure the rotation direction of each propeller is correct.
5) Check whether all parts of the drone are in good condition before flight. Do not
fly with aging or broken parts.
6) Never overcharge LiPo batteries. Do not charge above 4.2V per cell. When the
battery is fully charged, disconnect it from the charger. Never leave the battery
charger unattended during charging.
7) Never discharge batteries to below 3.3V per cell
8) Remove batteries when not using the drone.
Page 3
3 Copyright@2016 HeliPal.com. All Rights Reserved
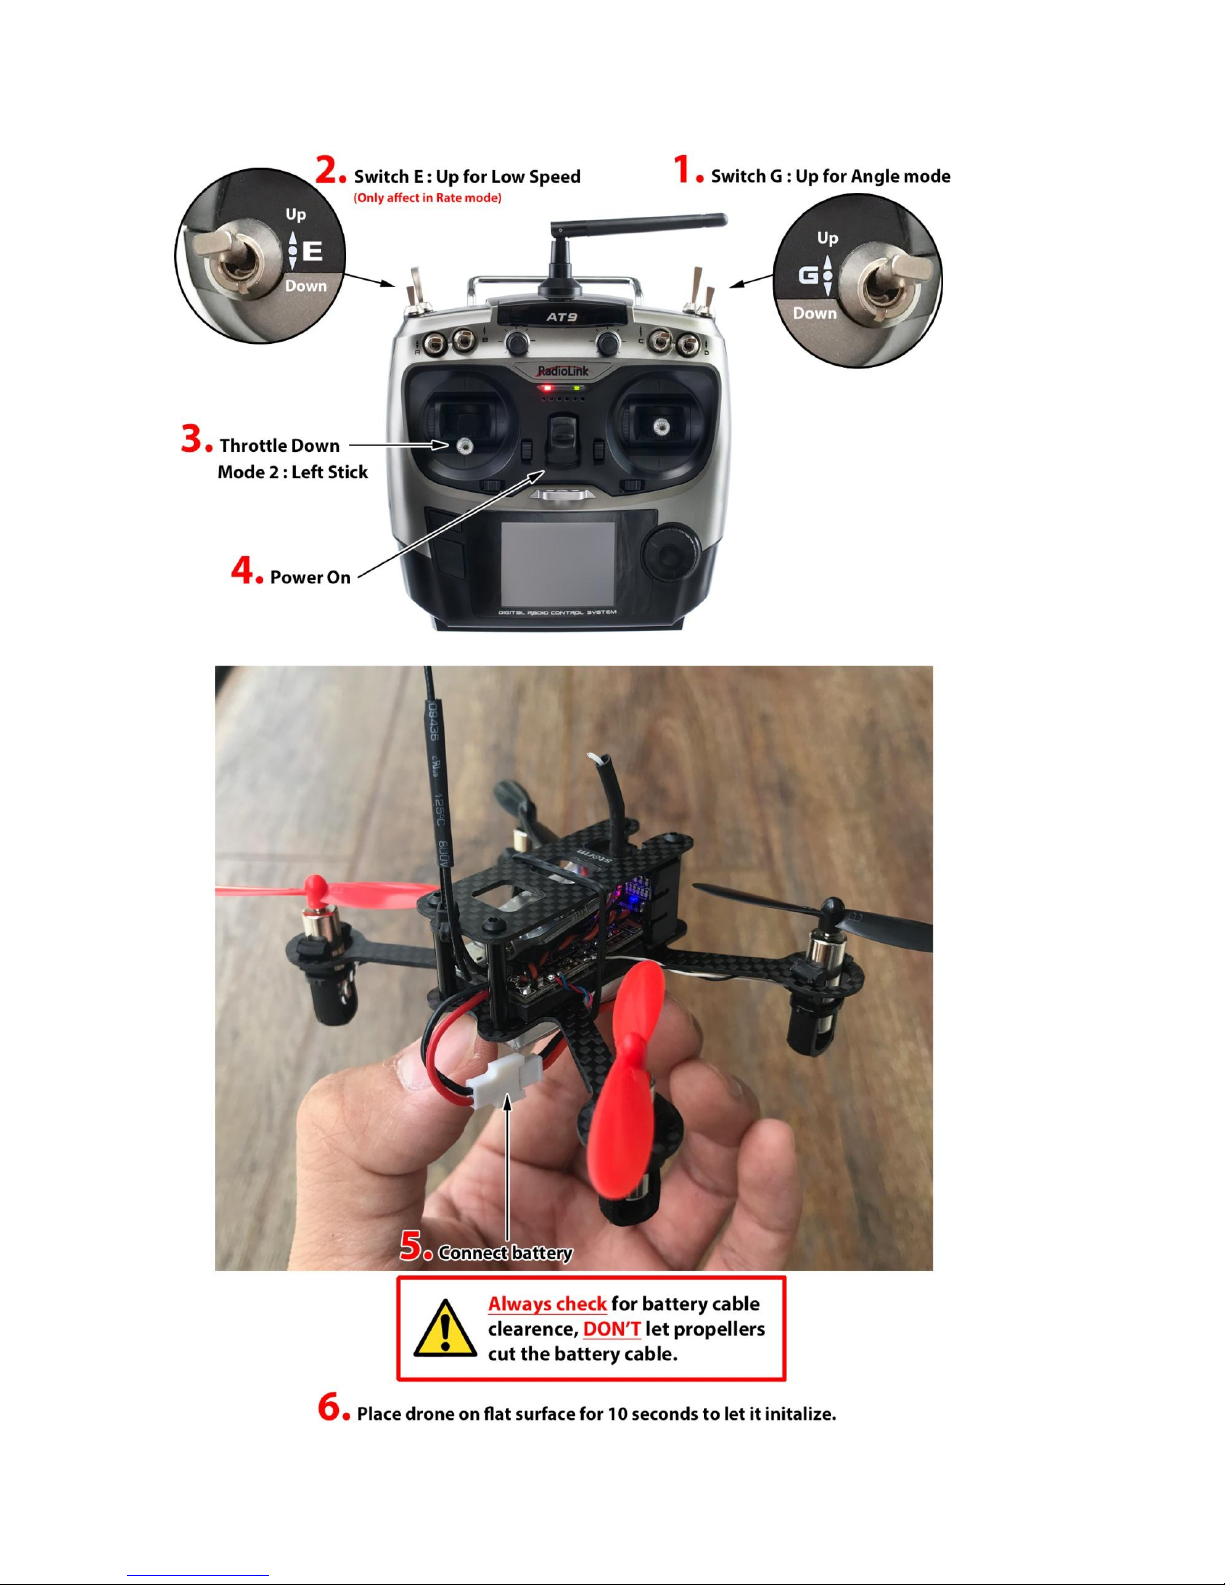
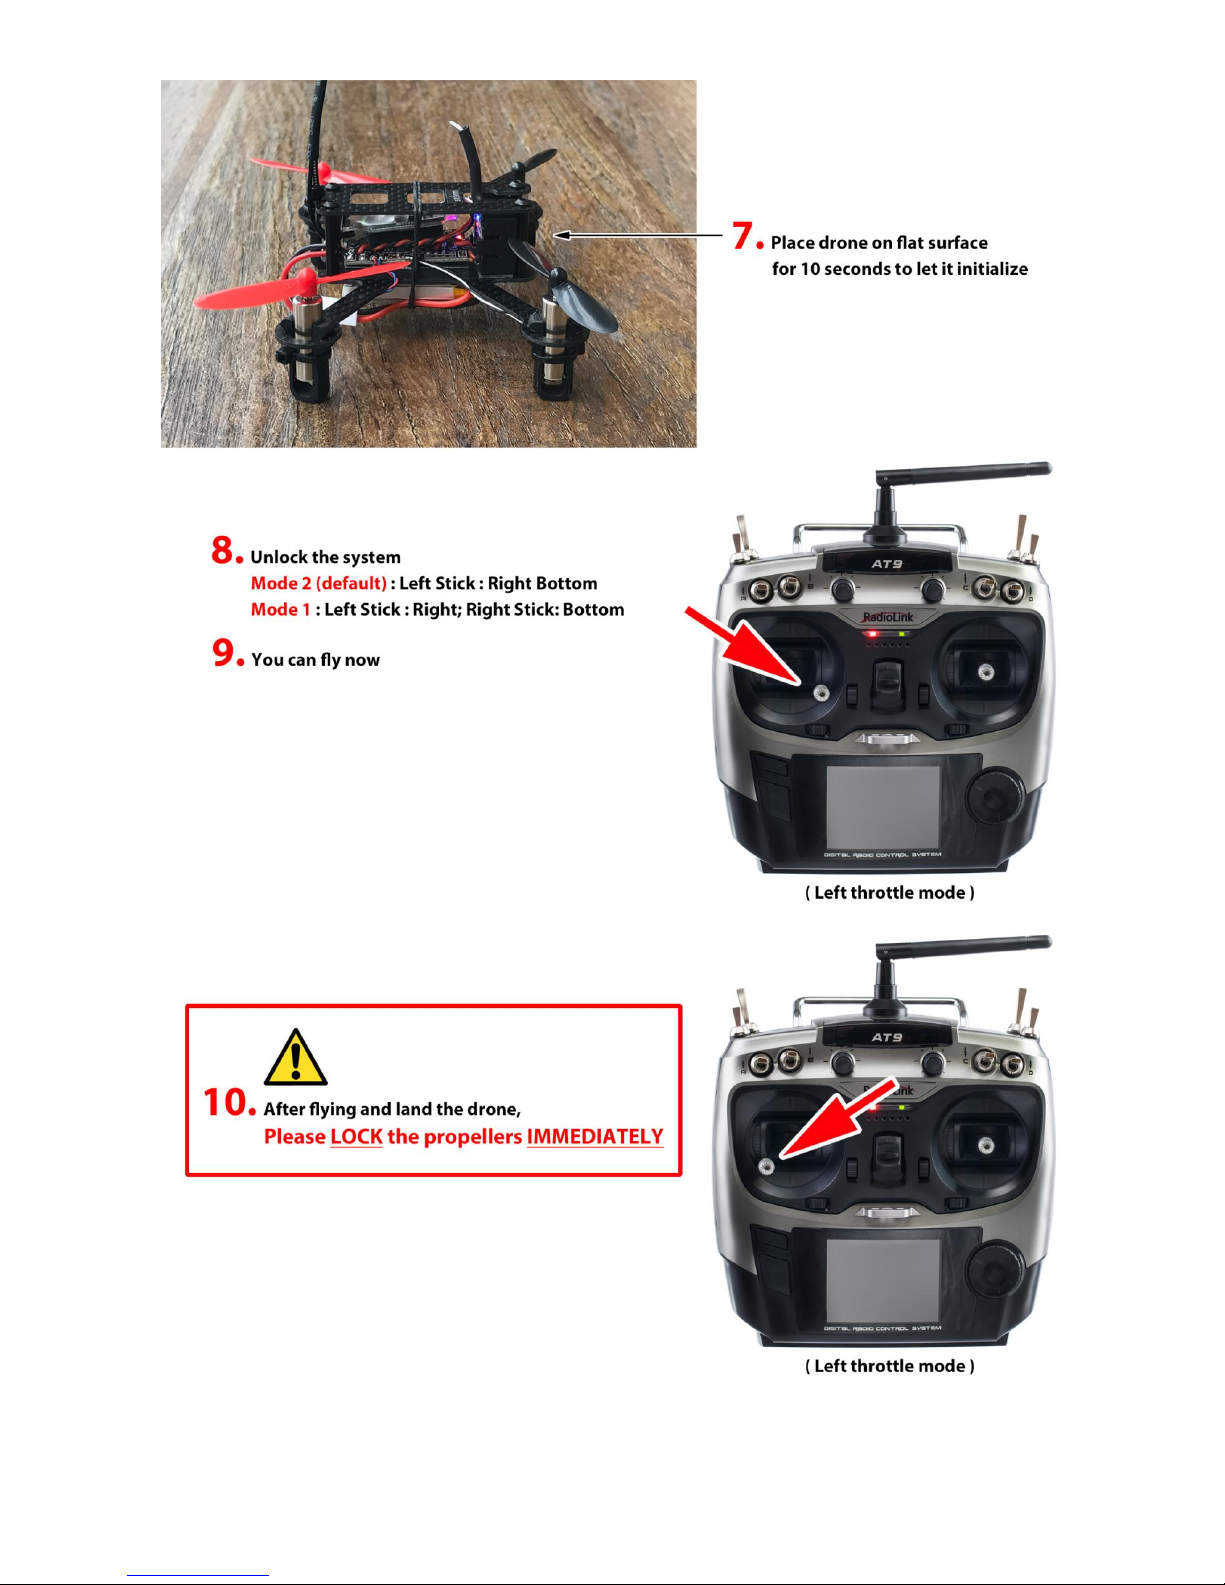
Quick Start - Radiolink AT9 Radio Controller
Page 4
4 Copyright@2016 HeliPal.com. All Rights Reserved
Page 5
5 Copyright@2016 HeliPal.com. All Rights Reserved
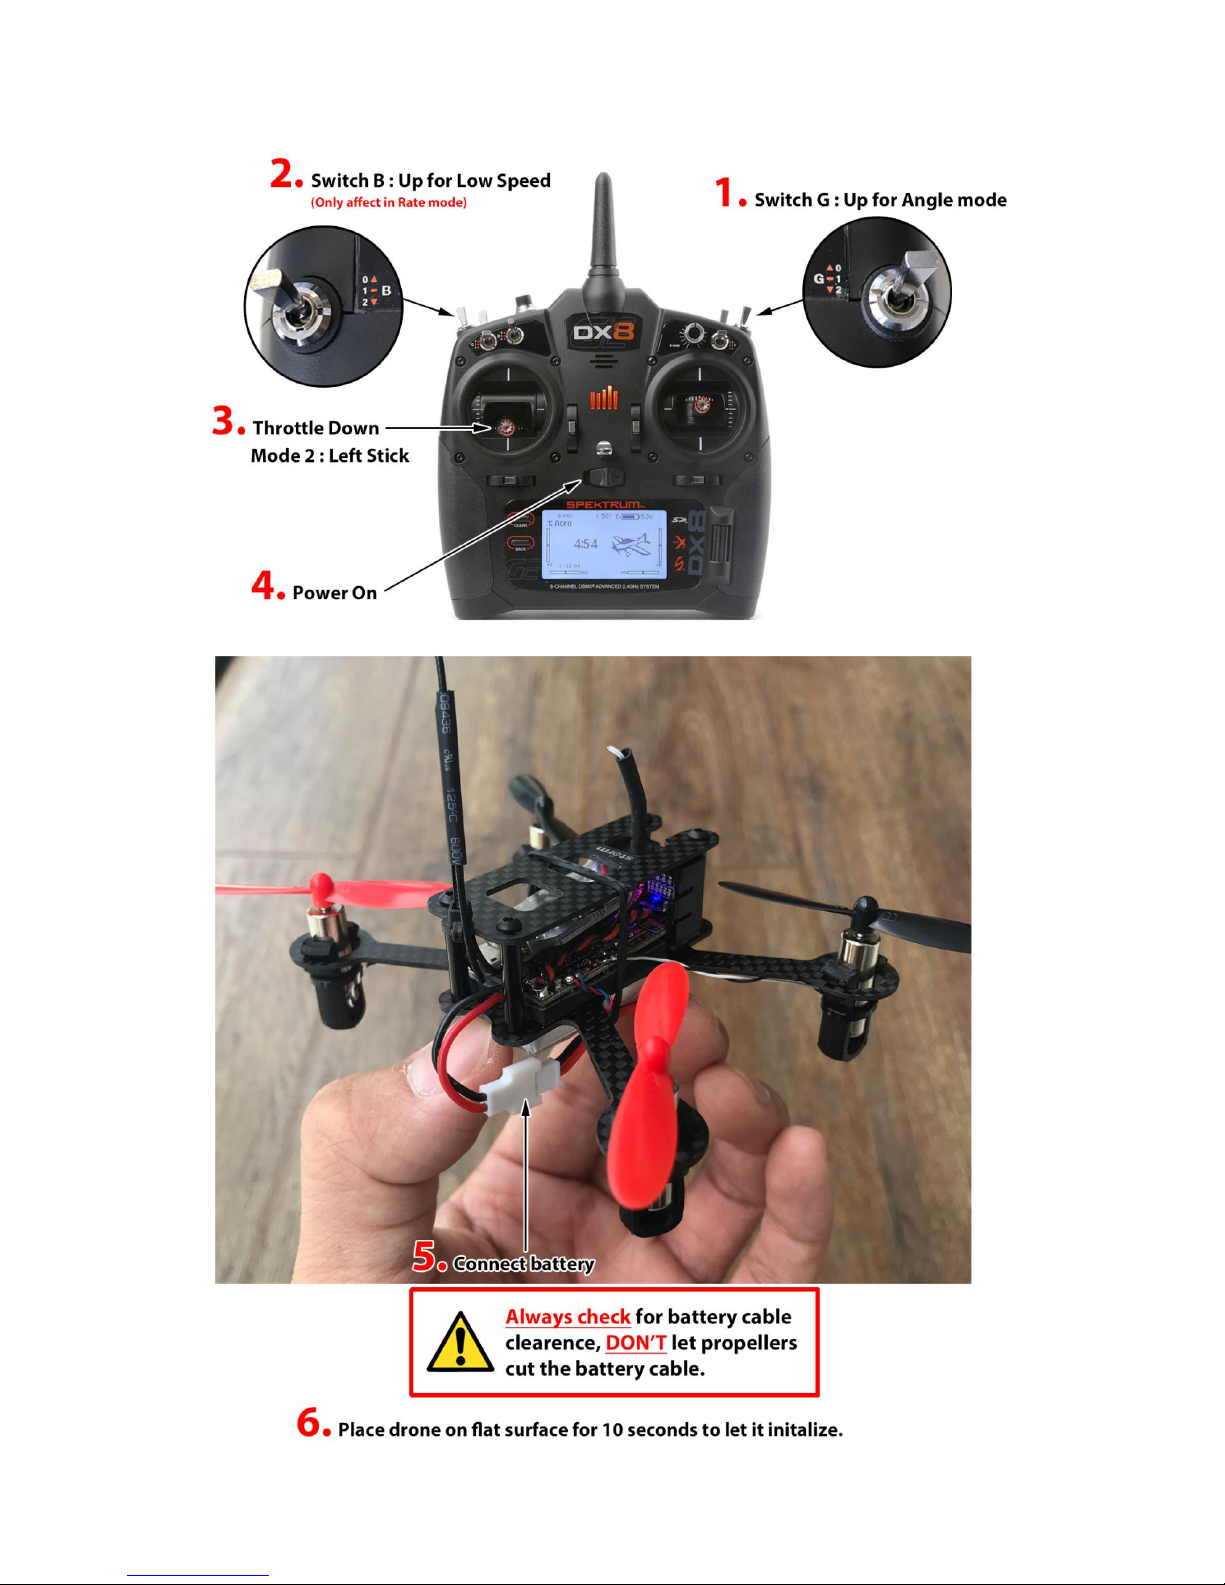
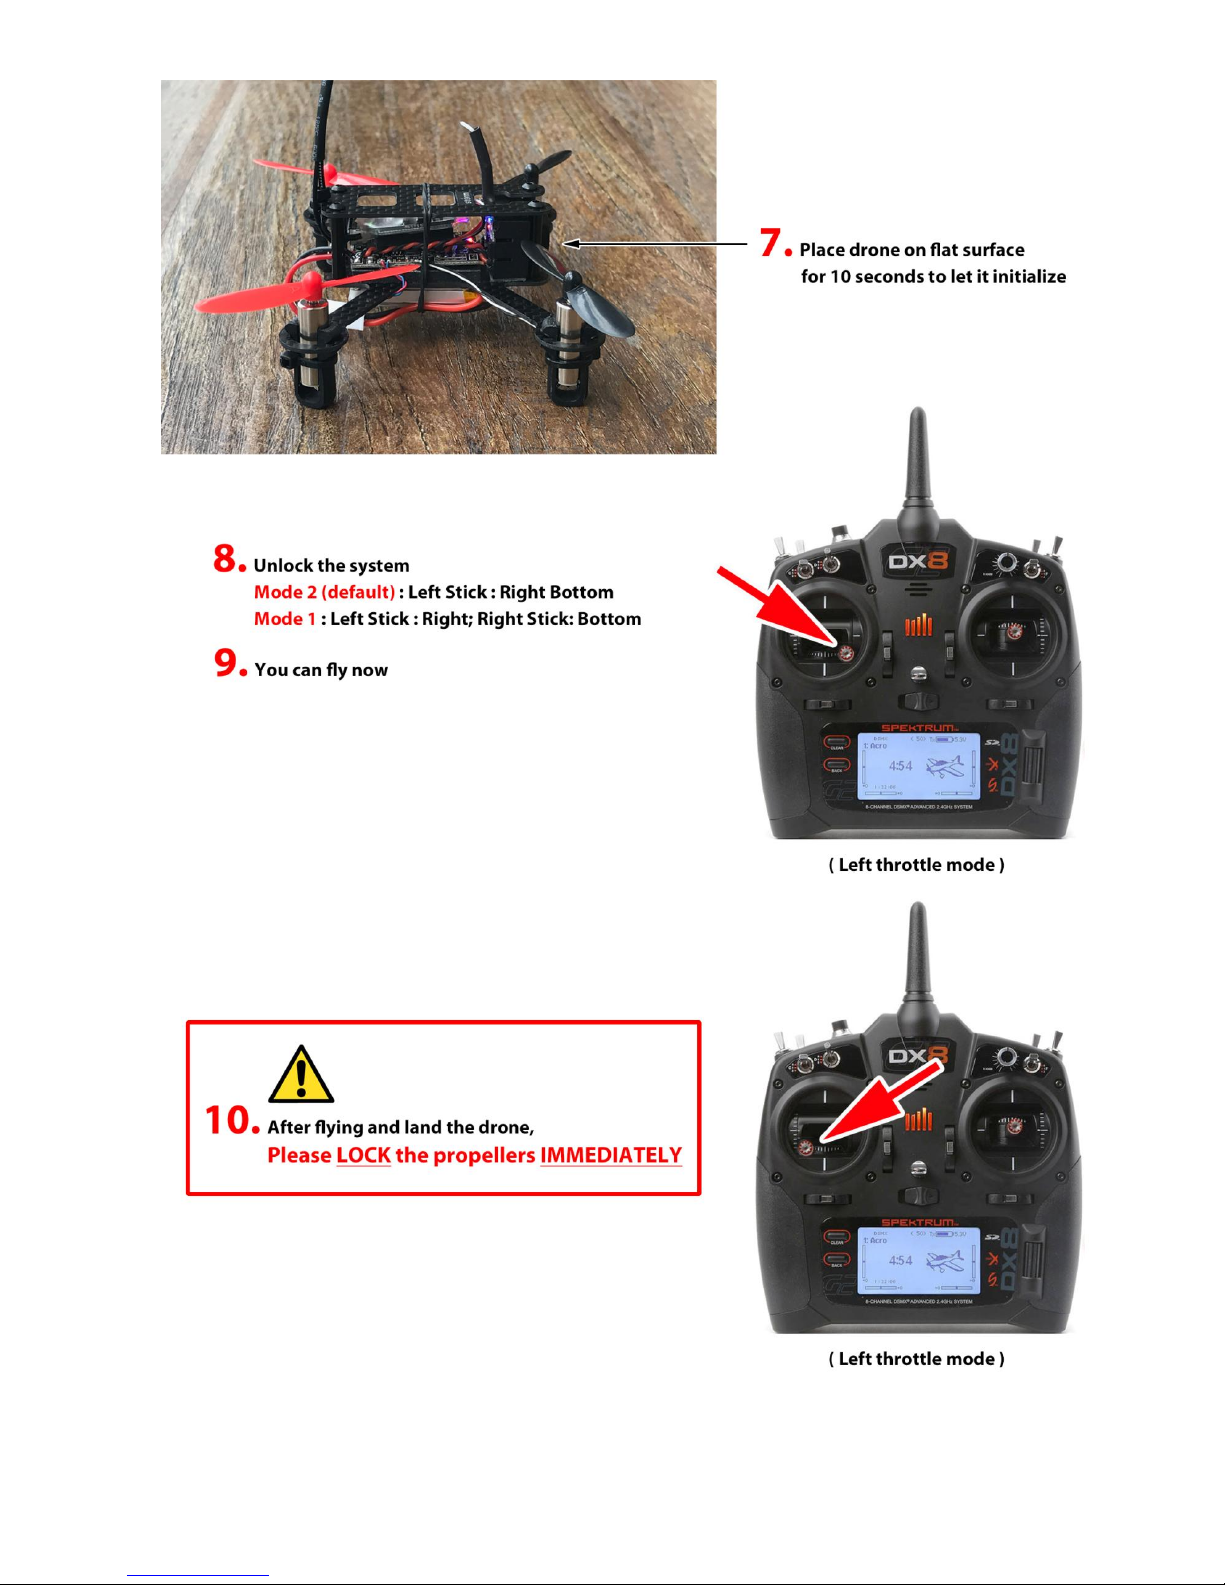
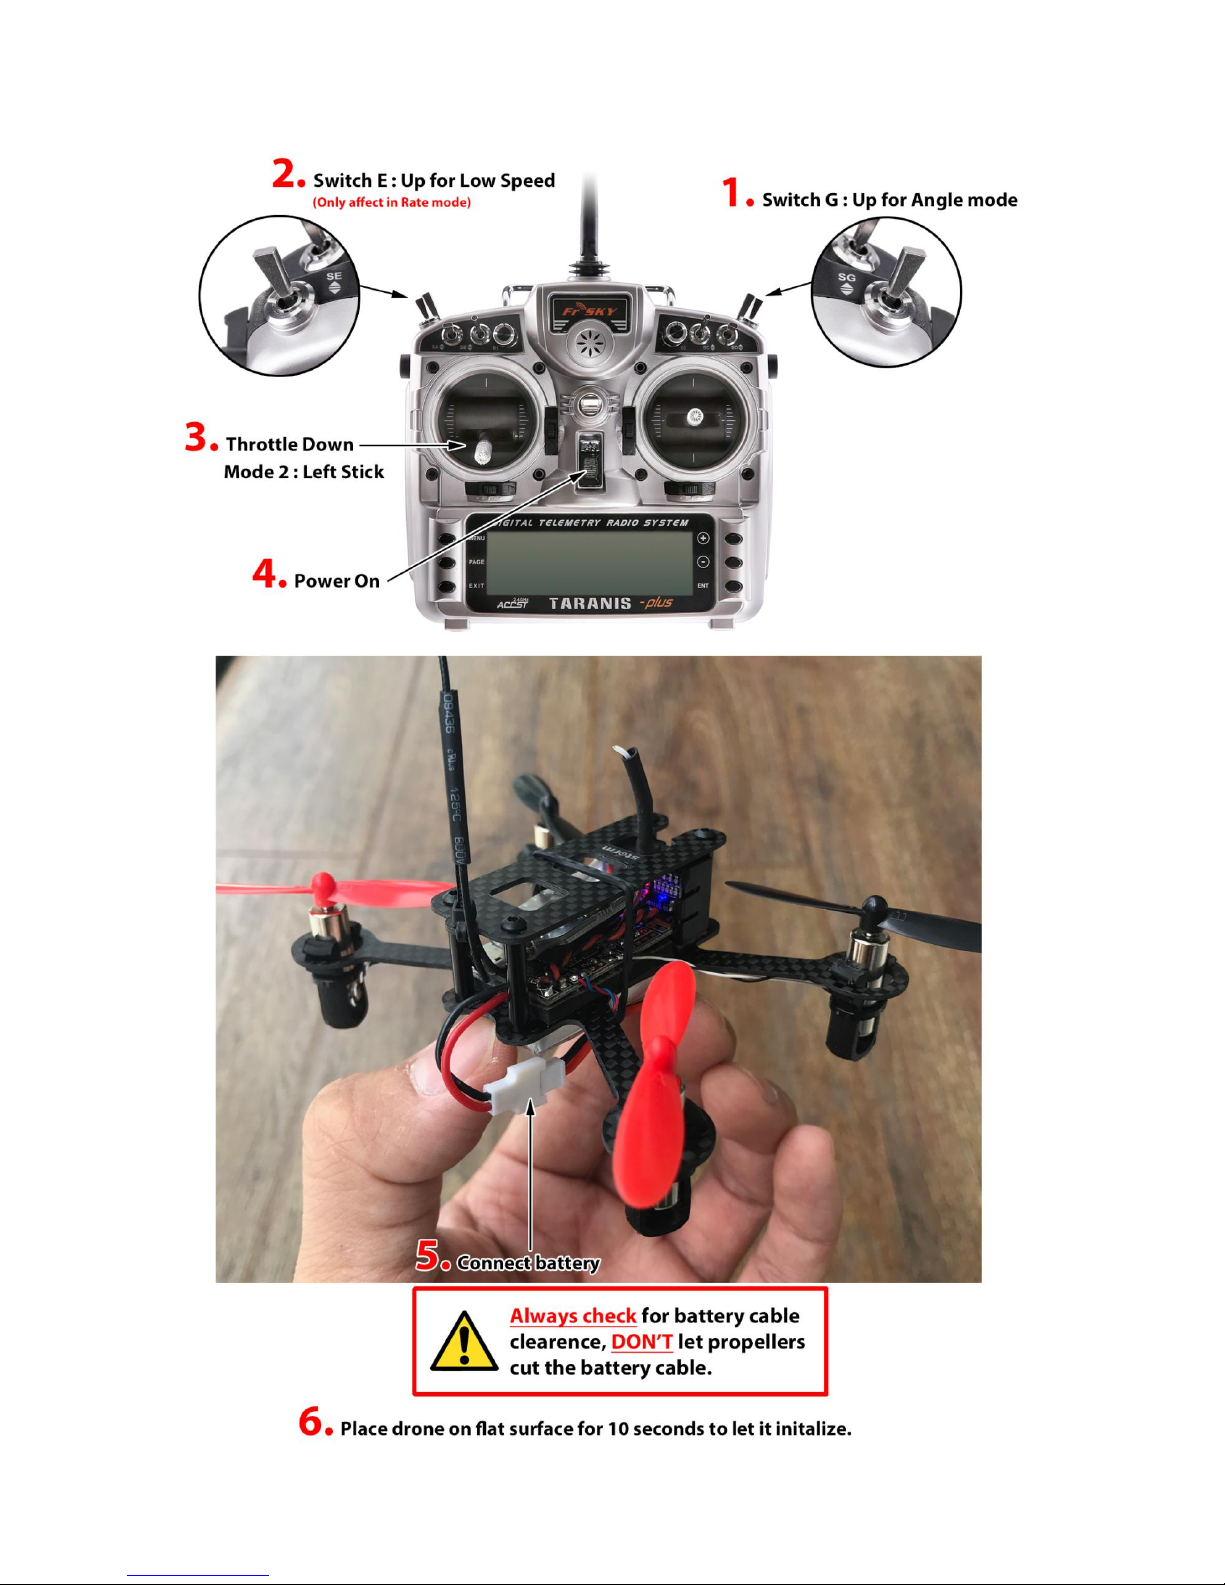
Quick Start - Spektrum DX8MD2 (Gen 2) Radio Controller
Page 6
6 Copyright@2016 HeliPal.com. All Rights Reserved
Page 7
7 Copyright@2016 HeliPal.com. All Rights Reserved
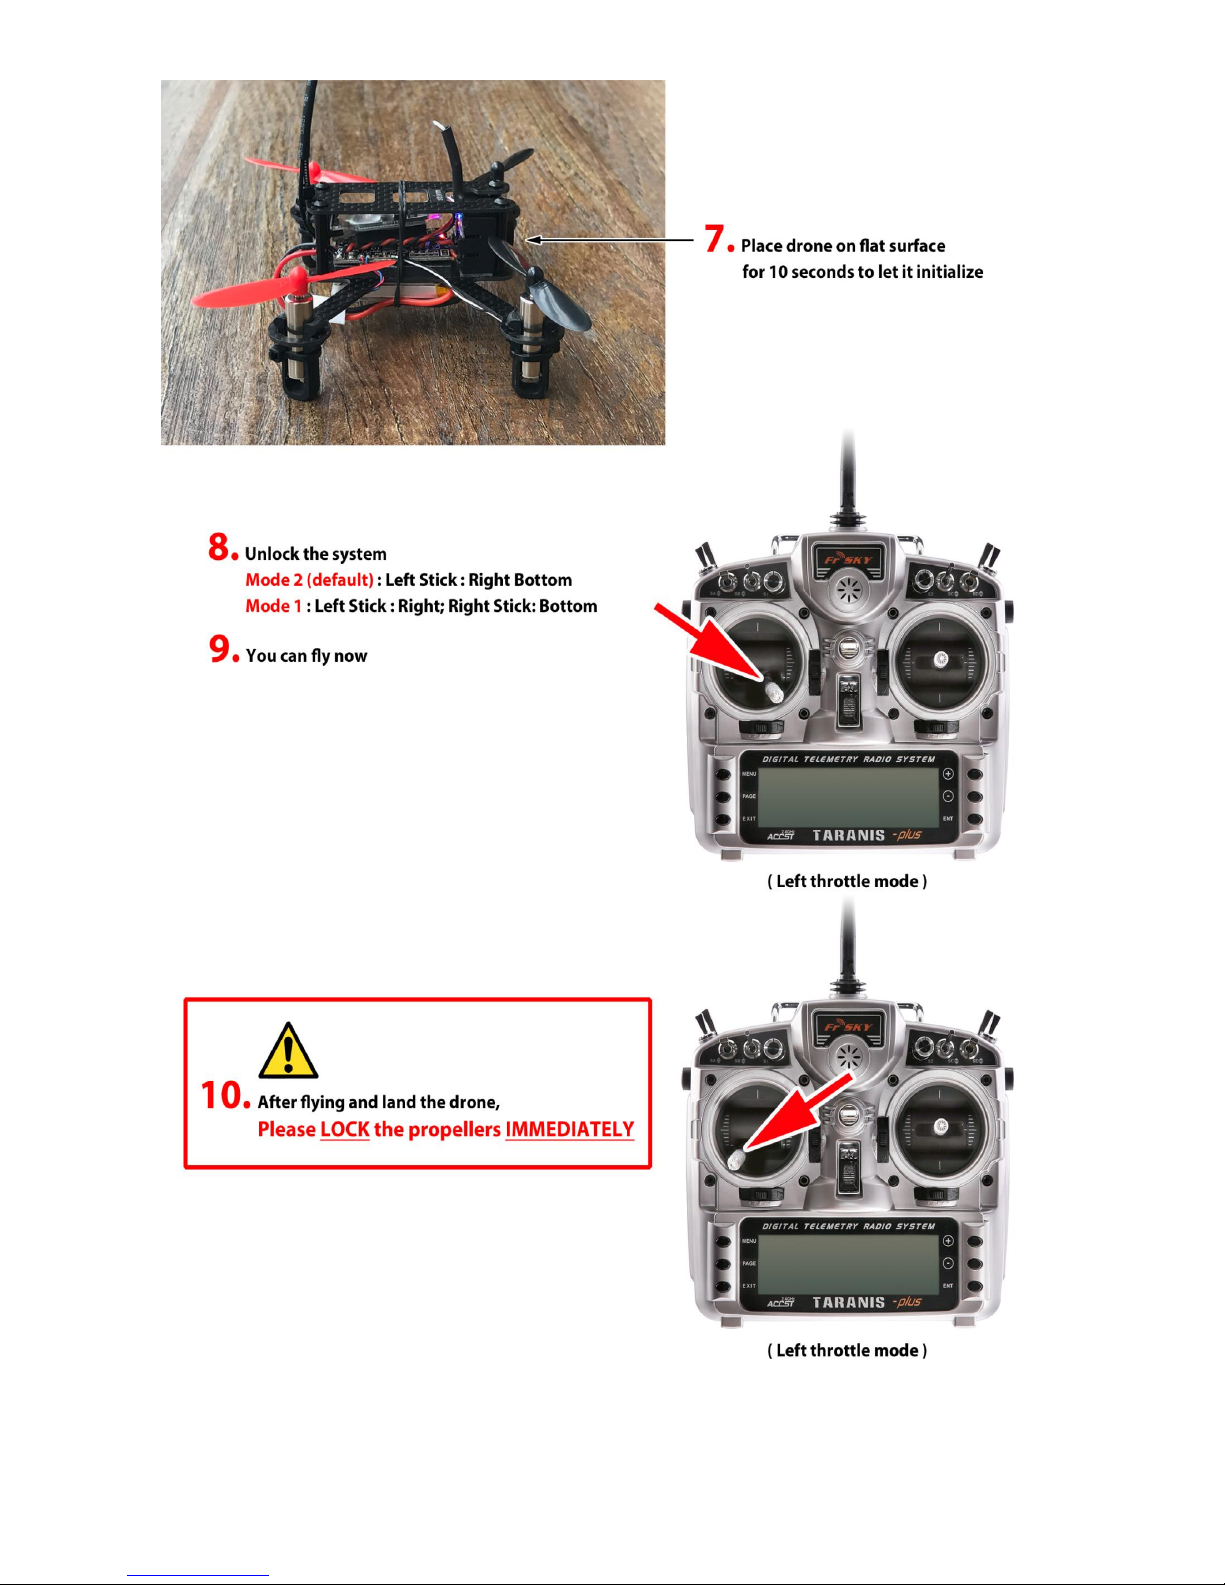
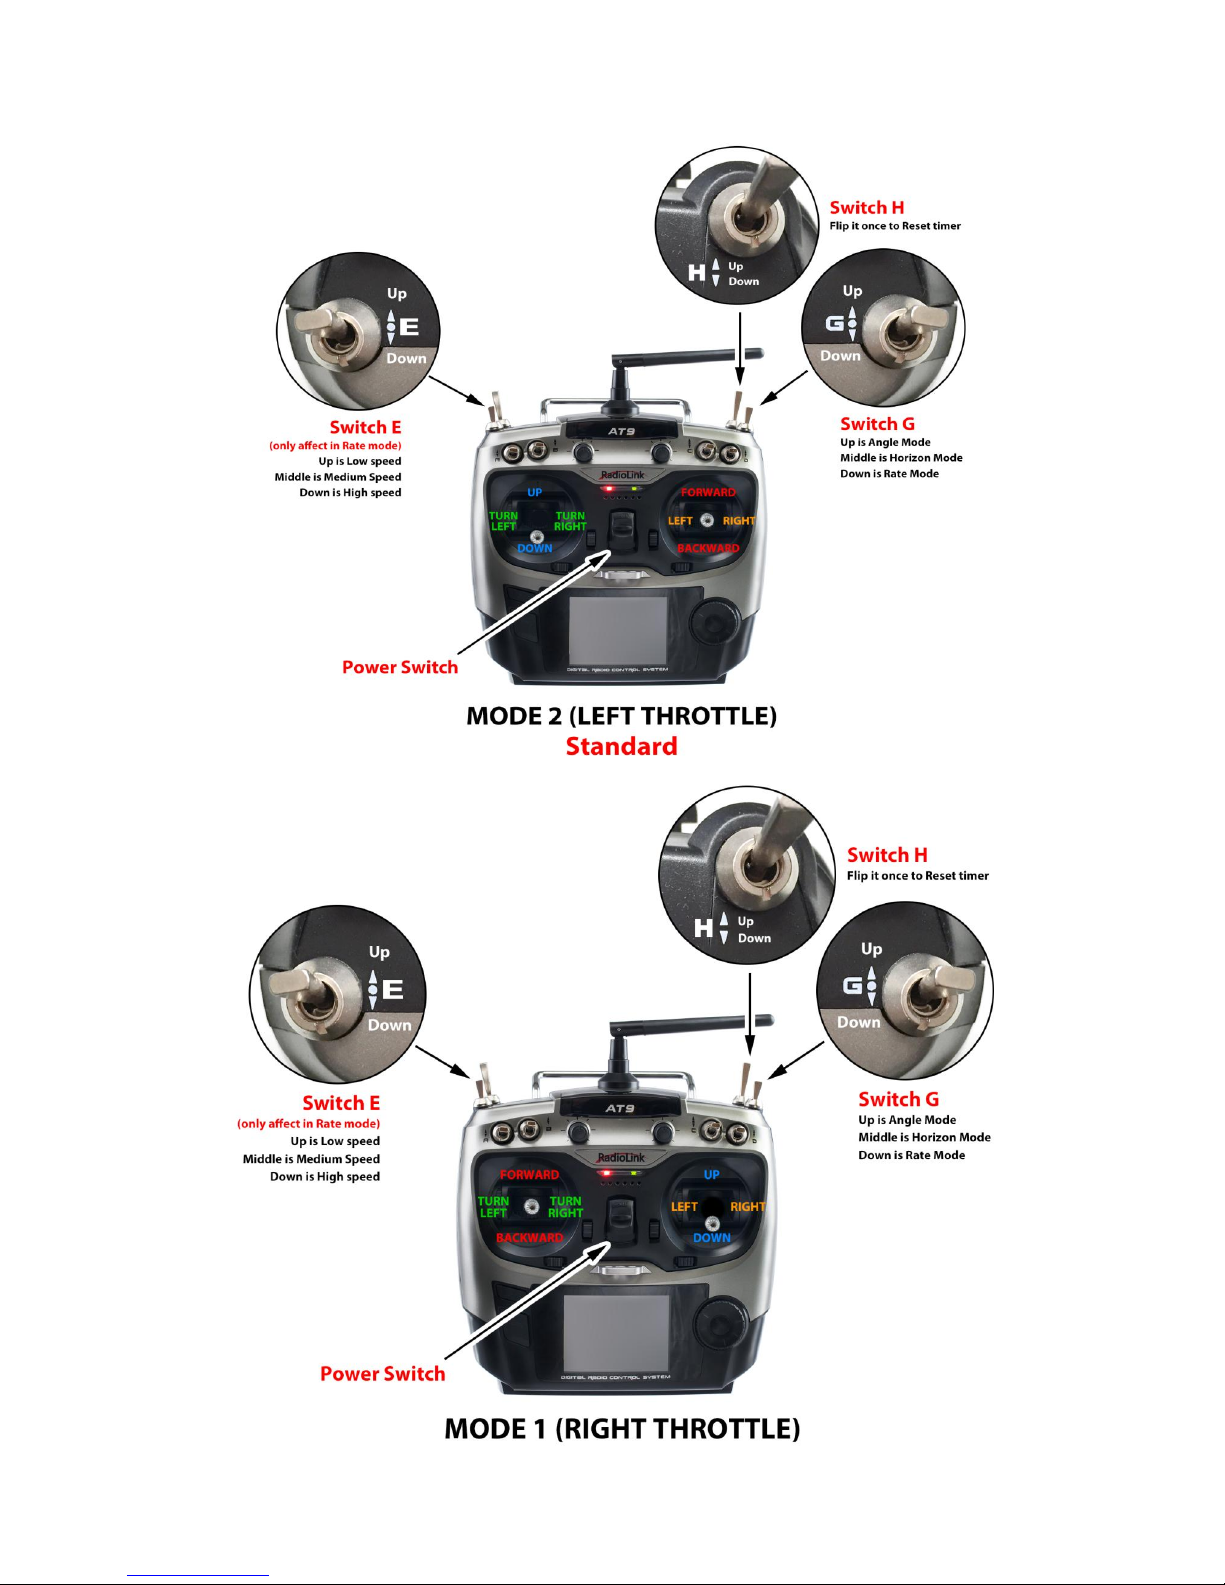
Quick Start - FrSky Taranis X9D Plus Radio Controller
Page 8
8 Copyright@2016 HeliPal.com. All Rights Reserved
Page 9
9 Copyright@2016 HeliPal.com. All Rights Reserved
How to Control - Radiolink AT9 Radio Controller
Page 10
10 Copyright@2016 HeliPal.com. All Rights Reserved
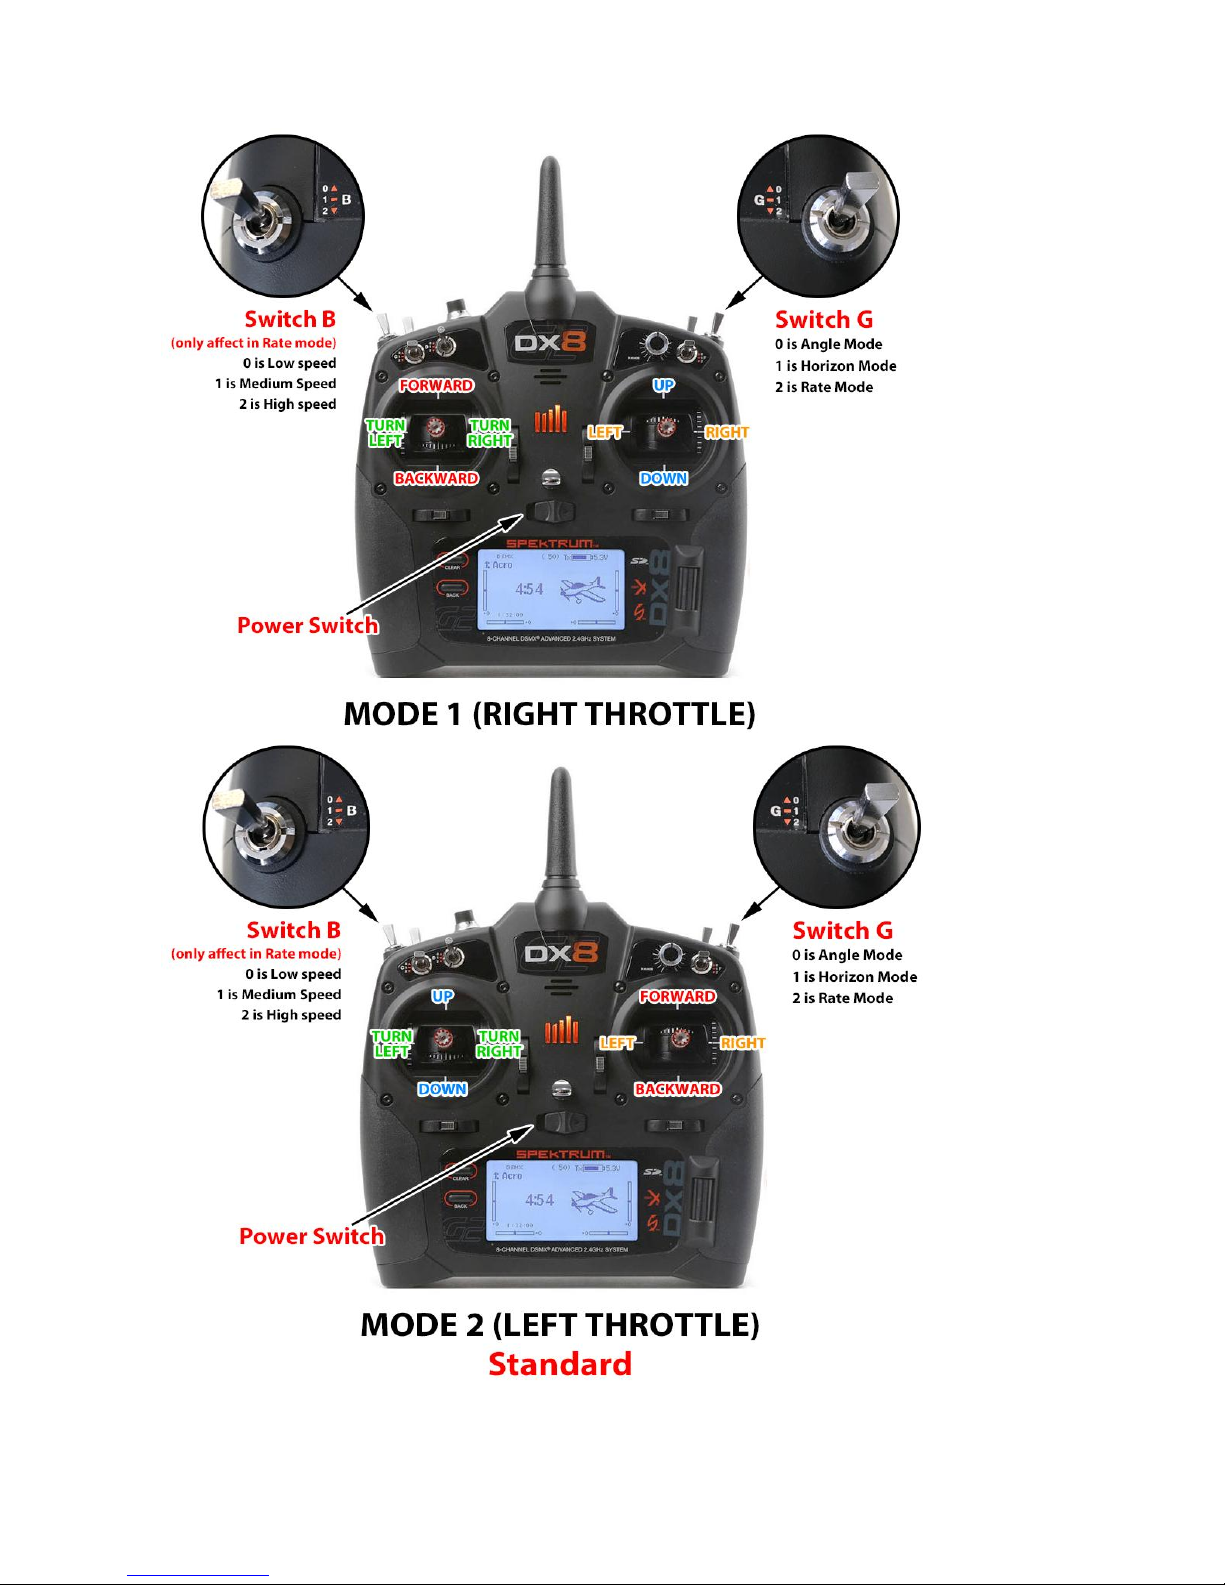
How to Control - Spektrum DX8 MD2 (Gen 2) Radio Controller
Page 11
11 Copyright@2016 HeliPal.com. All Rights Reserved
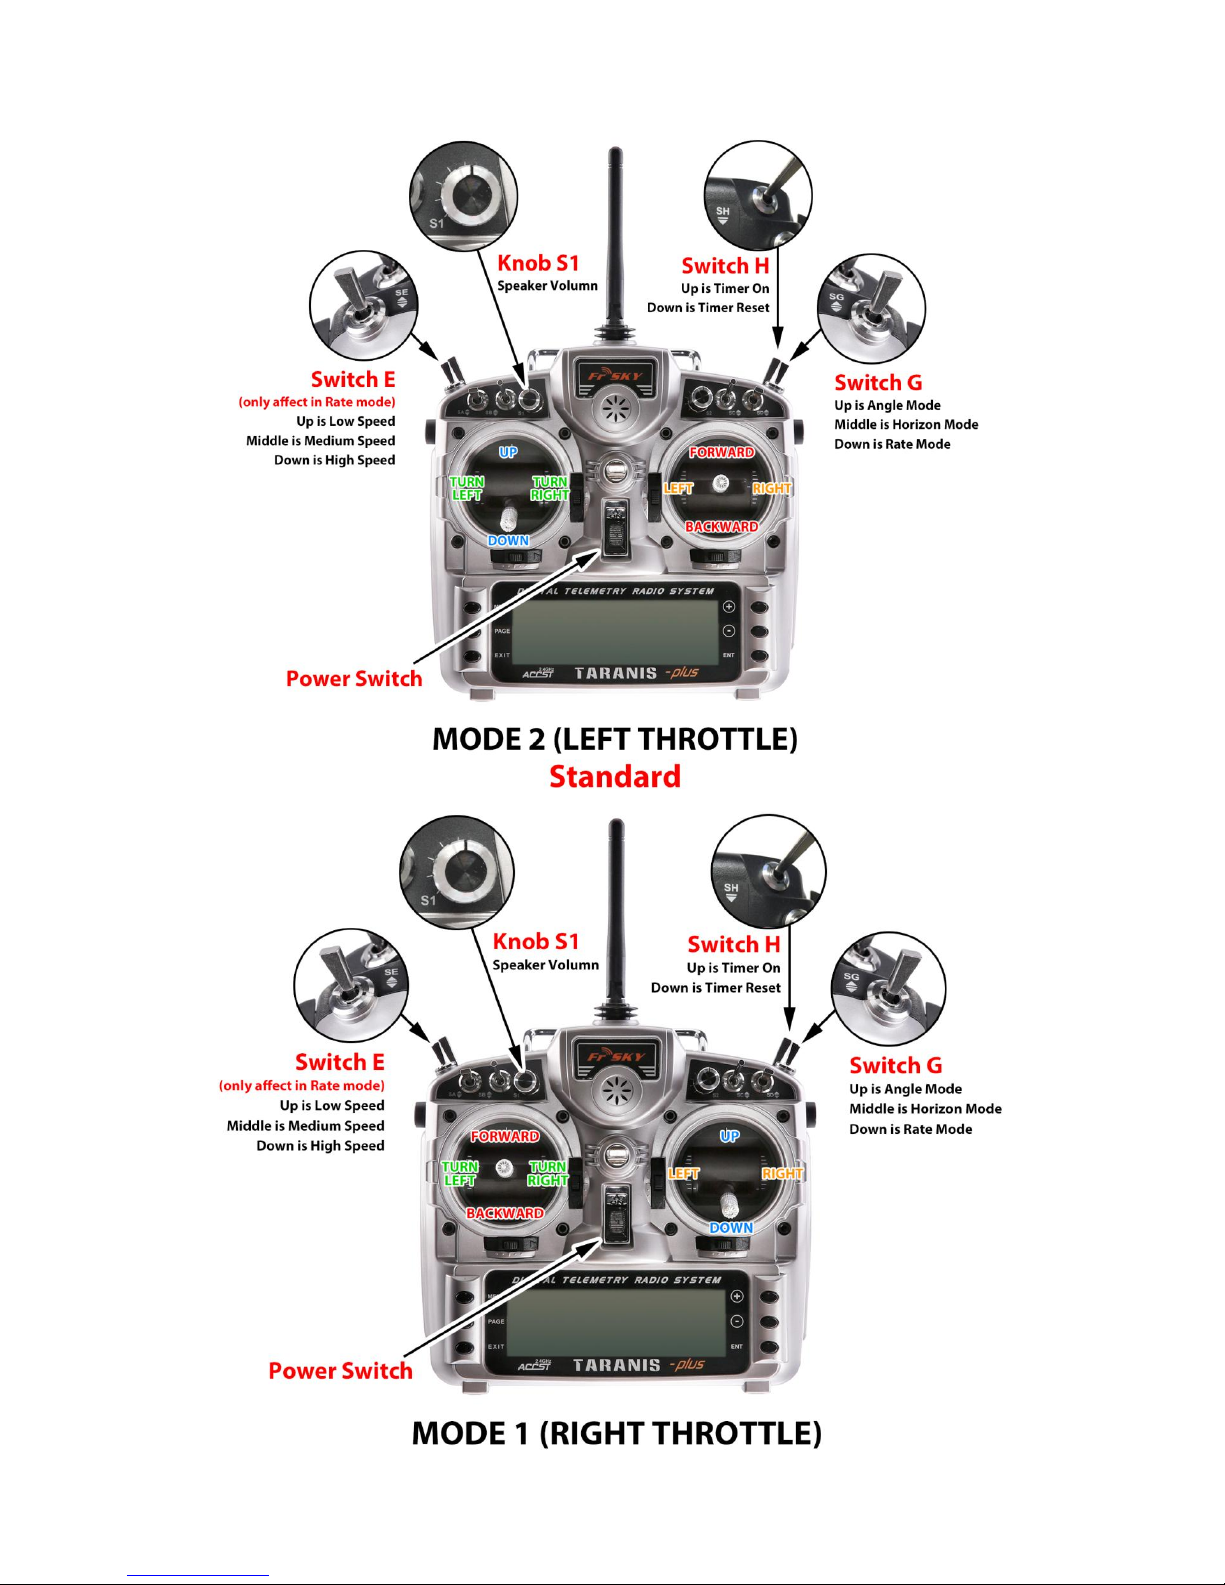
How to Control - FrSky Taranis X9D Plus Radio Controller
Page 12
12 Copyright@2016 HeliPal.com. All Rights Reserved
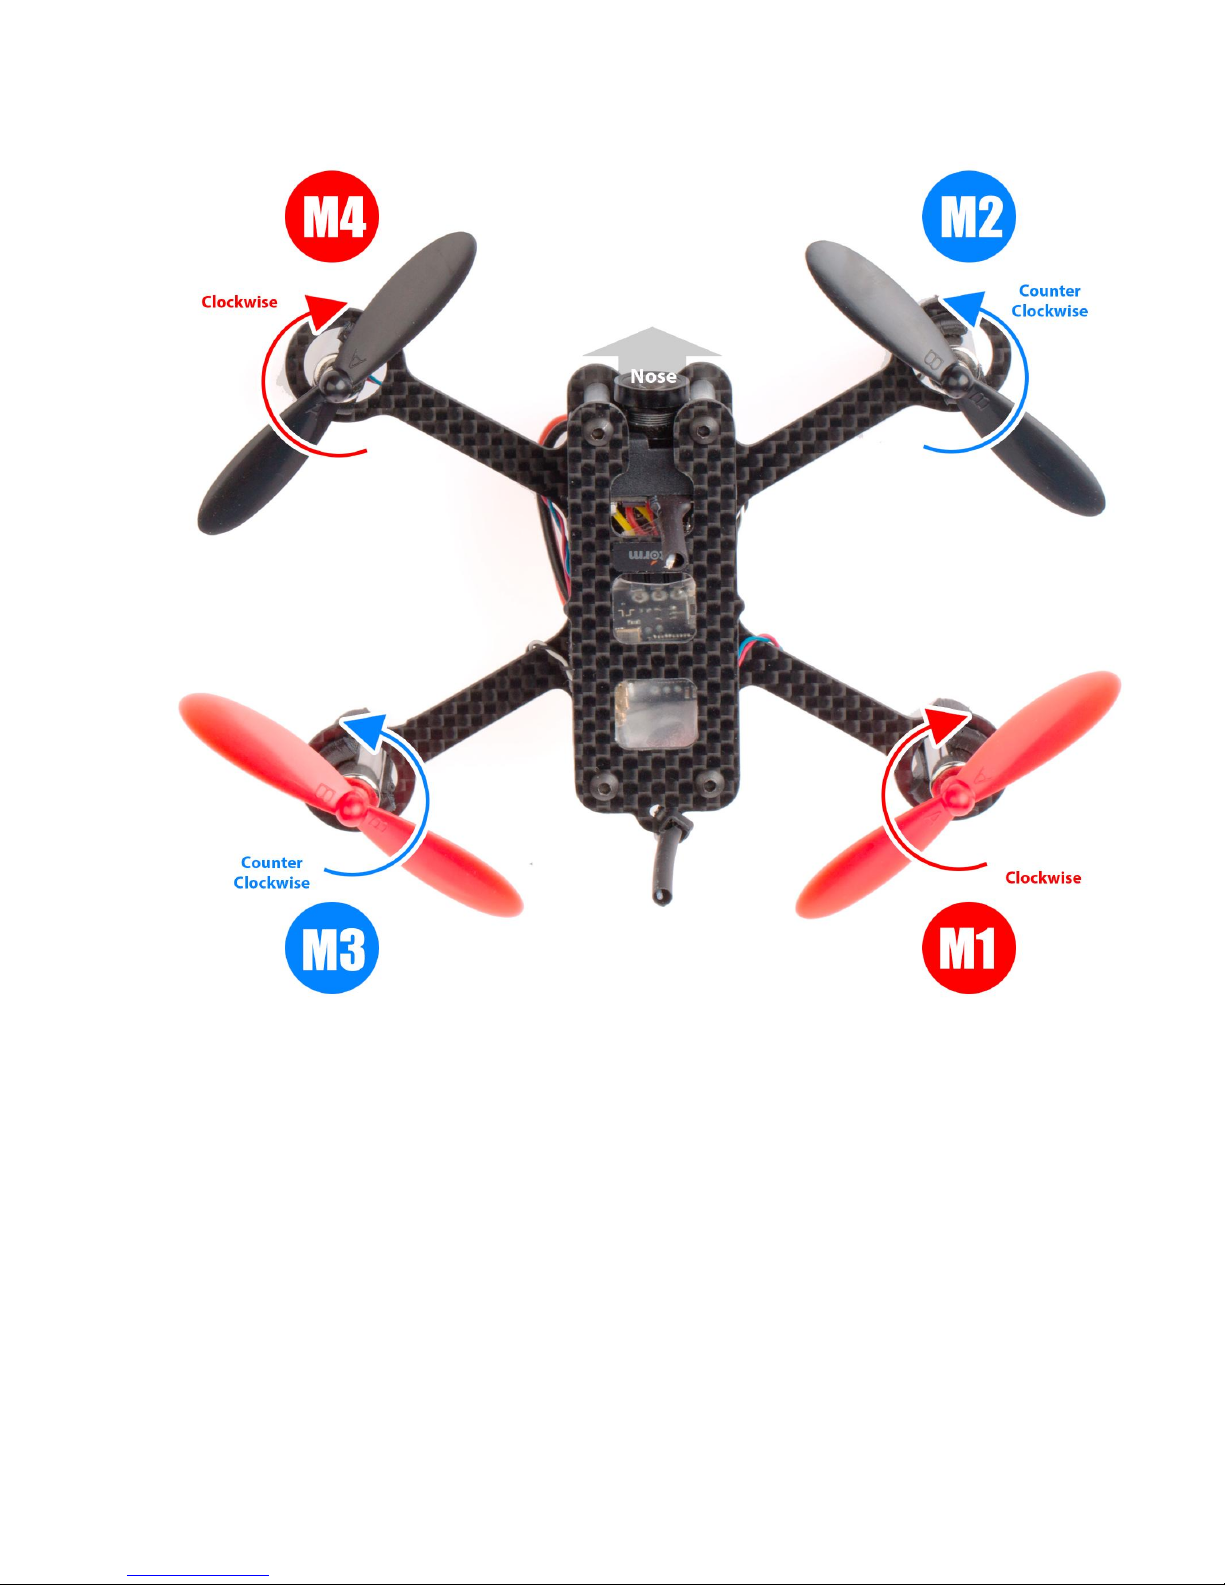
Motors and propellers rotation
Page 13

13 Copyright@2016 HeliPal.com. All Rights Reserved
FPV System
The video transmitter has up to 40 different video channels, available to avoid interference with
other channels.
• Band 1(F)
5740(CH1), 5760(CH2), 5780(CH3), 5800(CH4), 5820(CH5), 5840(CH6), 5860(CH7),
5880(CH8)
• Band 2(E)
5705(CH1), 5685(CH2), 5665(CH3), 5645(CH4), 5885(CH5), 5905(CH6), 5925(CH7),
5945(CH8)
• Band 3(A)
5865(CH1), 5845(CH2), 5825(CH3), 5805(CH4), 5785(CH5), 5765(CH6), 5745(CH7),
5725(CH8)
• Band 4(R / Raceband)
5658(CH1), 5695(CH2), 5732(CH3), 5769(CH4), 5806(CH5), 5843(CH6), 5880(CH7),
5917(CH8)
• Band 5(B)
5733(CH1), 5752(CH2), 5771(CH3), 5790(CH4), 5809(CH5), 5828(CH6), 5847(CH7),
5866(CH8)
If two or more drones are flying at the same time, try to select different video frequency to avoid
video interference. The bigger different in video frequency between drones, the less interference
generated. Always check the supported channels of you FPV reception devices such as monitor,
goggles
Page 14
14 Copyright@2016 HeliPal.com. All Rights Reserved
Binding with Radiolink AT9 Transmitter
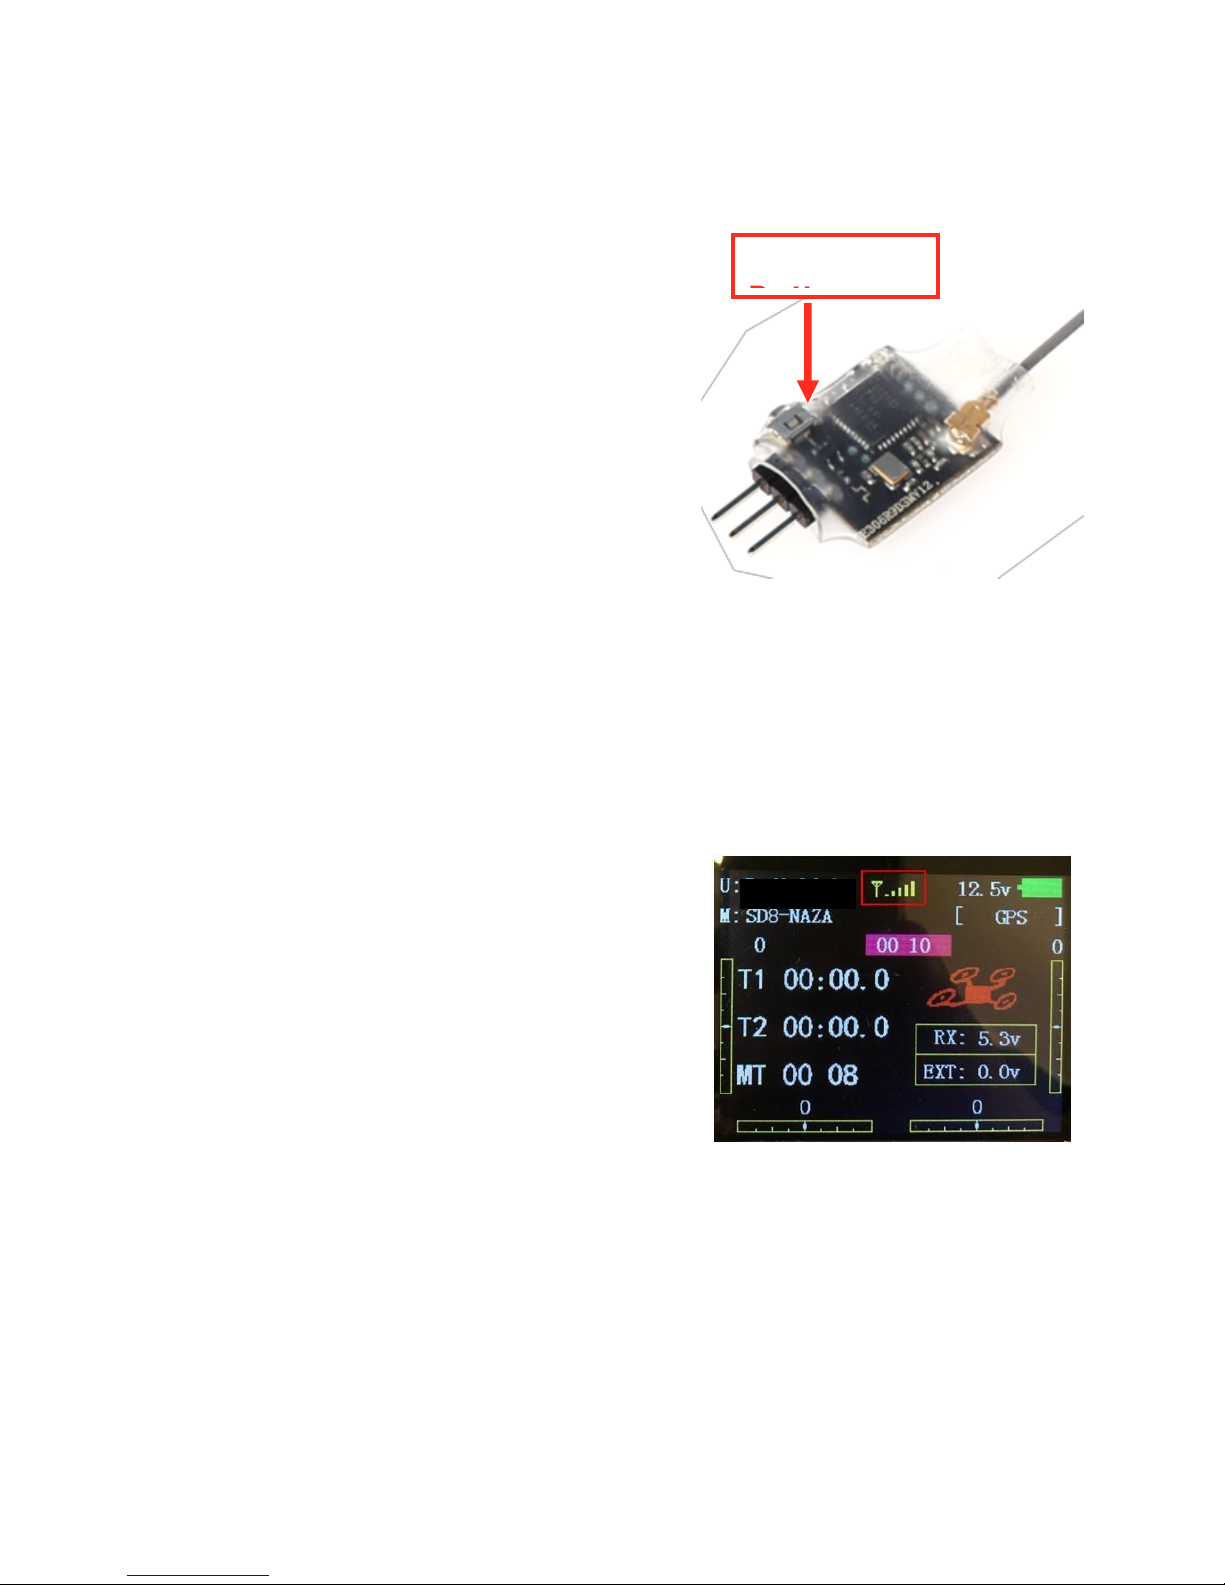
If your drone cannot response to the radio controller, the connection between radio controller and
receiver may lost and you can try to re-bind them by following the procedure.
(Skip Step One if it is already Purple light)
1. Power on the aircraft, then Press and Hold the very
small black button on the side of the receiver, until the
LED goes flashing, then release the button.
2. After a few seconds it will automatically bind with the
transmitter, it's that simple.
Bind
Page 15
15 Copyright@2016 HeliPal.com. All Rights Reserved
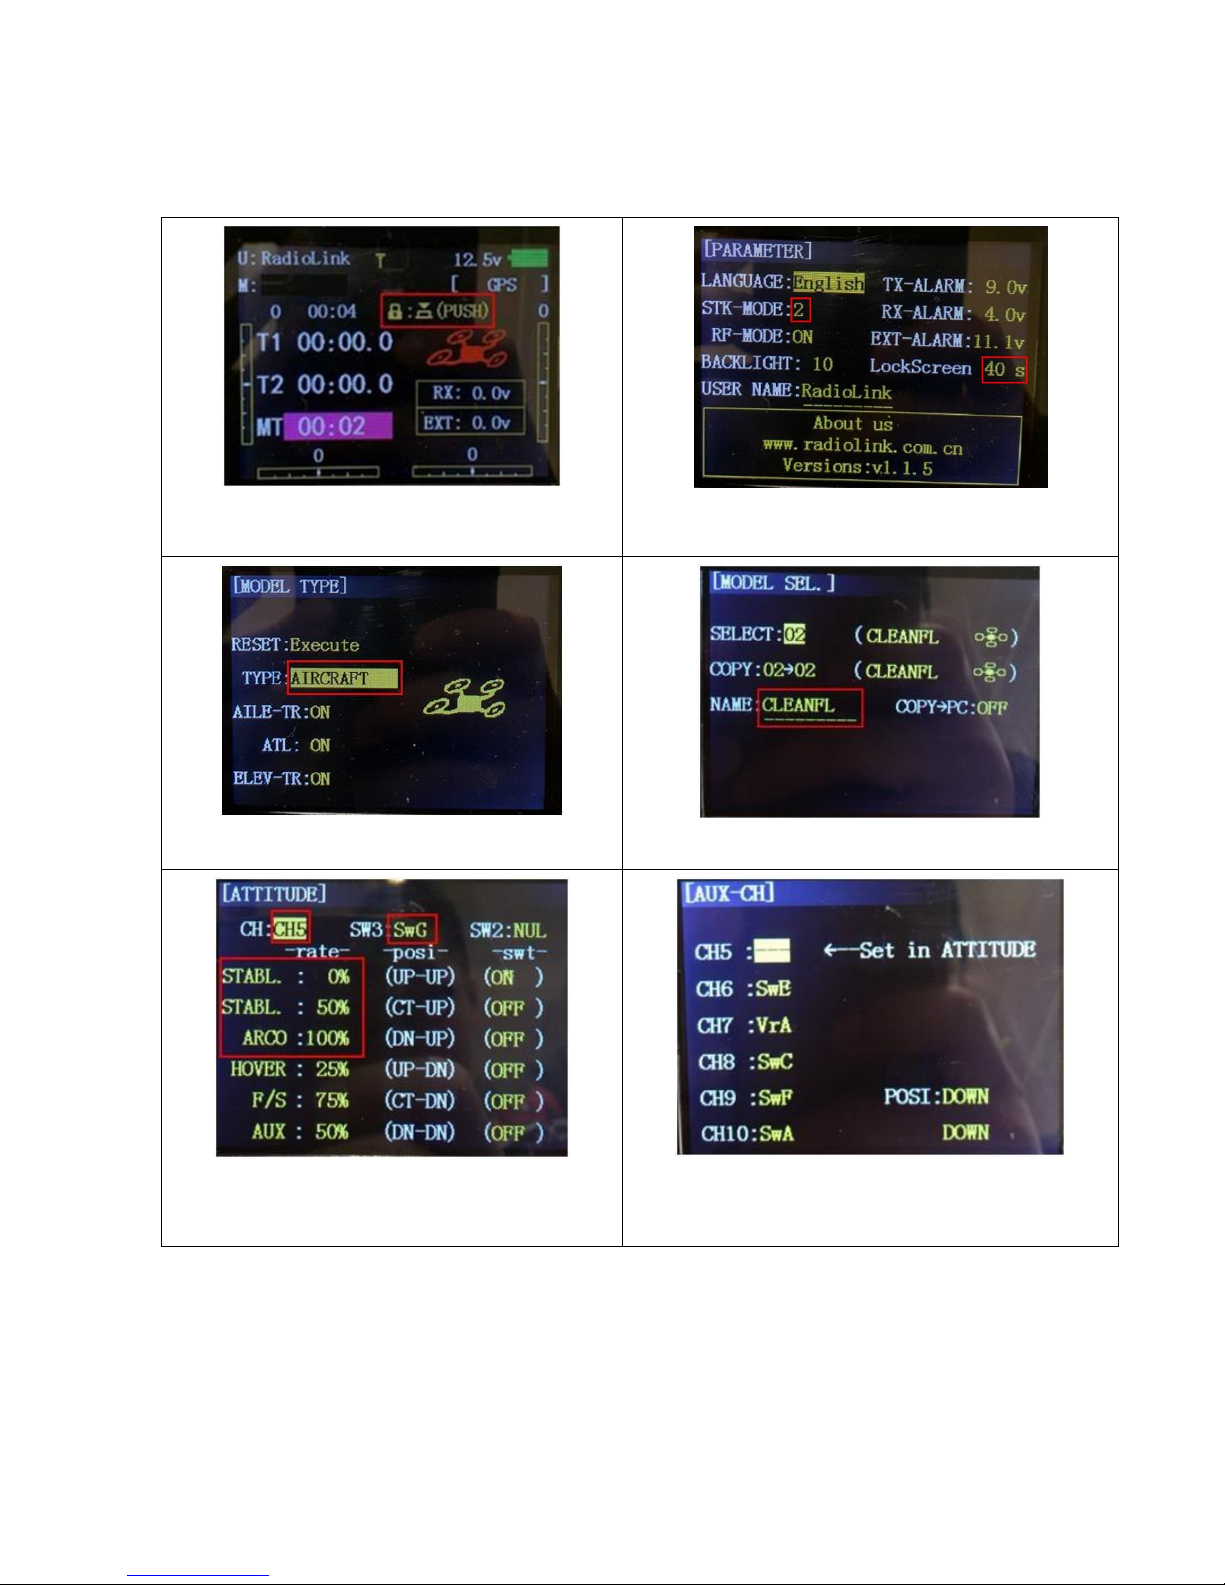
Radiolink AT9 transmitter parameters
If you reset your radio controller (AT9) setting, you can apply the setting below:
1) Press and Hold the controller wheel (With wordings
“PUSH”) to unlock the manual. Press and Hold Mode
Button to go into basic menu page
2) [STK-MODE] = 2 (Stick Mode)
[LockScreen] = 30s (Time to lock screen)
3) [TYPE] = AIRCRAFT
4) [SELECT] = 02
[NAME] = CLEANFL (Any name you want)
5) Go to [AUX-CH] -> ATTITUDE, apply the setting
below:
[CH] = CH5 [SW3] = SwG [SW2] = NUL
[STABL.] = 0% [STABL.] = 50% [ARCO.] = 100%
6) [CH5] = ------- [CH6] = SwE [CH7] = VrA
[CH8] = SwC [CH9] = SwF [CH10] = SwA
Page 16
16 Copyright@2016 HeliPal.com. All Rights Reserved
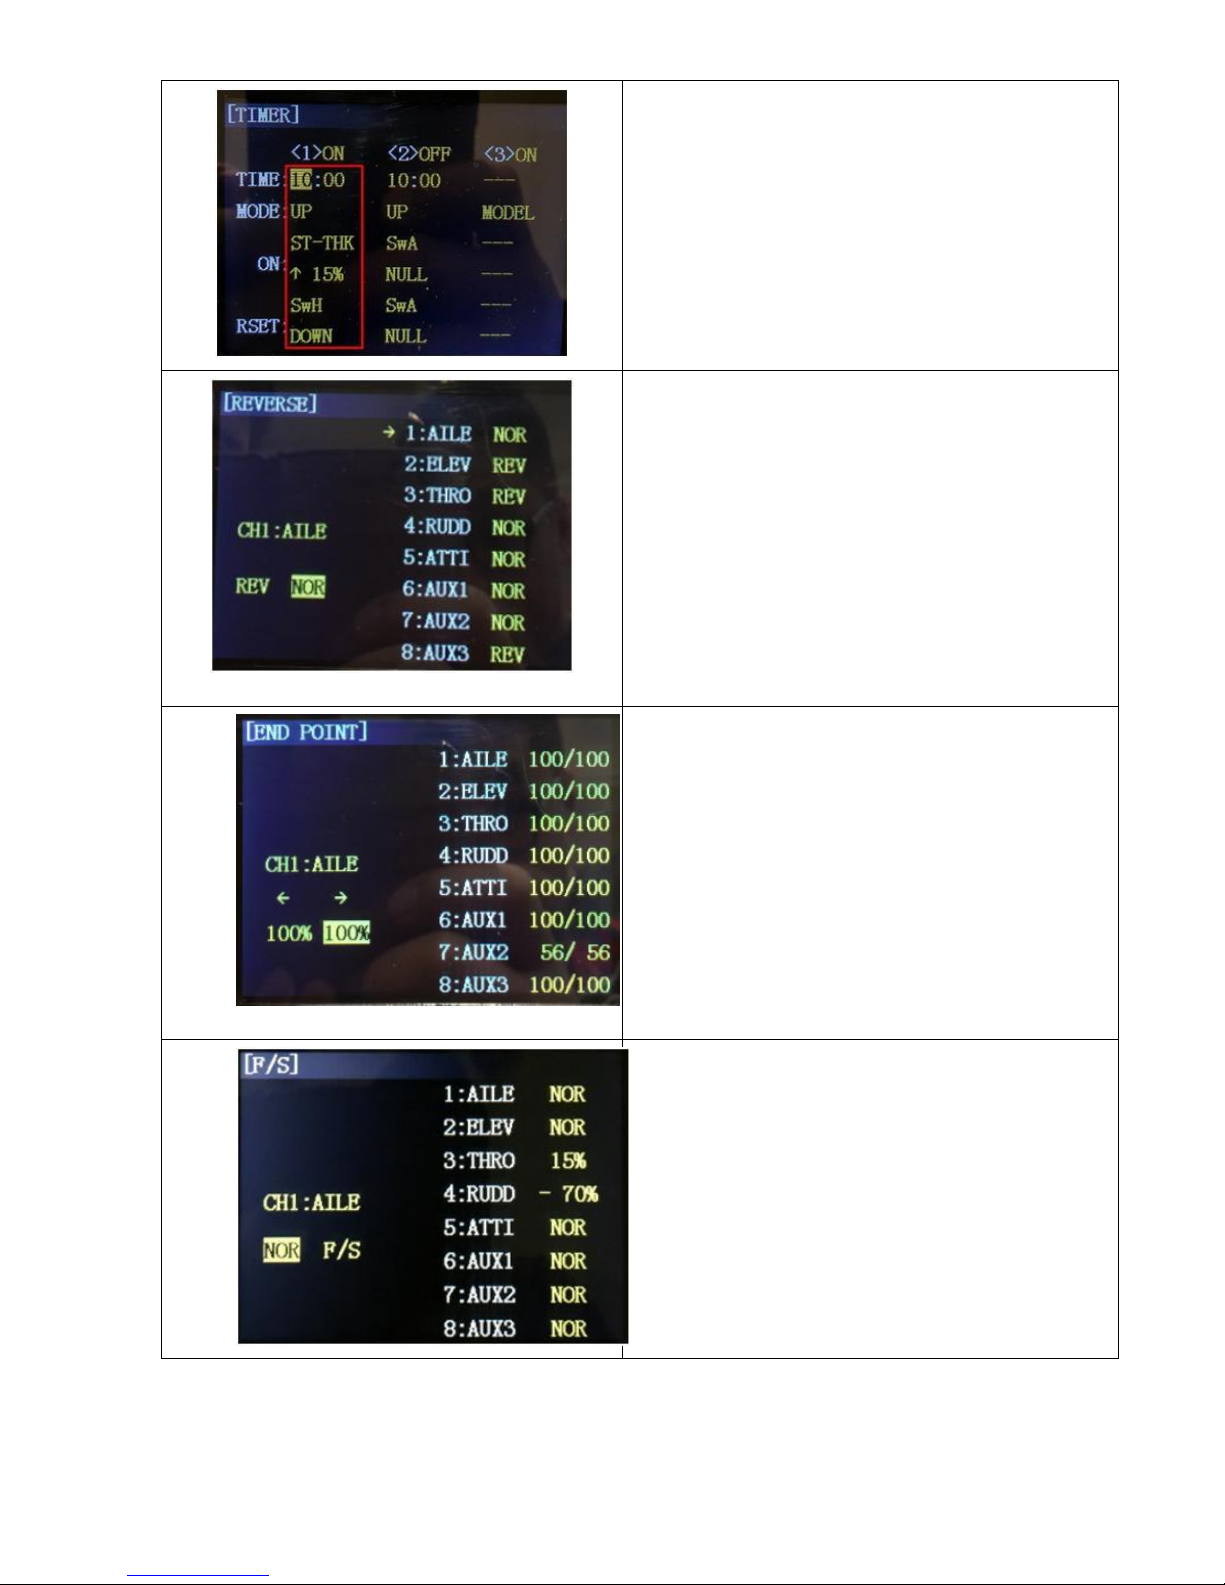
7) [1] [TIME] = 10:00
[1] [MODE] = UP
[1] [ON][1] = ST-THK (Using Throttle Stick to start the
timer)
[1][ON] [2] = 15% ( Move the indicator over the value, set
throttle stick to around 15%, Press and hold “Push” button
to recognize the throttle value and move the wheel to
change the arrow sign)
[1][RESET] [1] = SwH (Using Switch H to responsible for
the reset timer action)
[1][RESET] [2] = DOWN (Using Switch H’s down action to
reset the timer)
8) [1] [AILE] = NOR
[2] [ELEV] = REV
[3] [THRO] = REV
[4] [RUDD] = NOR
[5] [ATTI] = NOR
[6] [AUX1] = NOR
[7] [AUX2] = NOR
[8] [AUX3] = REV
9) [1] [AILE] = 100/100
[2] [ELEV] = 100/100
[3] [THRO] = 100/100
[4] [RUDD] = 100/100
[5] [ATTI] = 100/100
[6] [AUX1] = 100/100
[7] [AUX2] = 56/56
[8] [AUX3] = 100/100
10) Go to [F/S], apply the setting below:
[1] [AILE] = NOR
[2] [ELEV] = NOR
[3] [THRO] = 15%
[4] [RUDD] = -70%
[5] [ATTI] = NOR
[6] [AUX1] = NOR
[7] [AUX2] = NOR
[8] [AUX3] = NOR
Page 17
17 Copyright@2016 HeliPal.com. All Rights Reserved
Binding with Spektrum DX8
MD2 (Gen 2) Transmitter
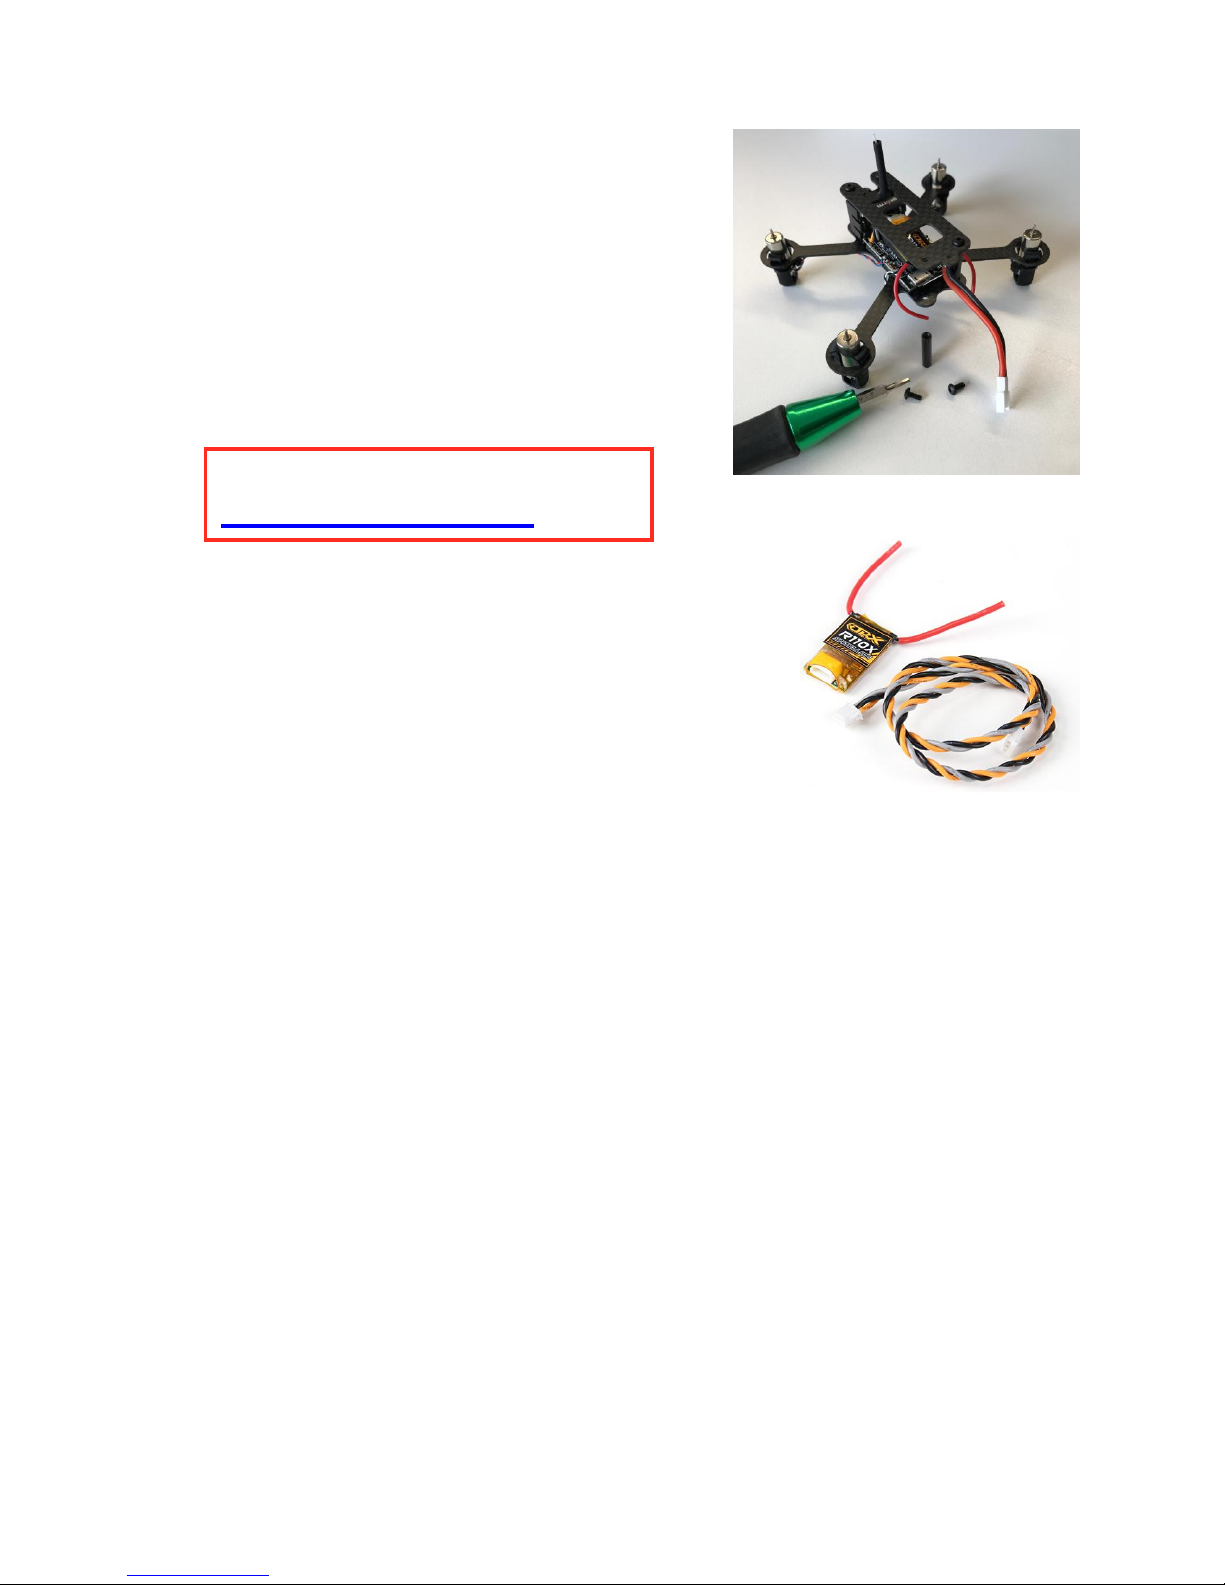
1. REMOVE ALL Propellers first (for safety reason).
2. REMOVE rear left spacer to gain access to USB.
3. Connect the drone to computer thru USB cable, open
BetaFlight Configurator software.
4. In BetaFlight configurator, goto "Ports" page, turn on Serial RX
tab for UART3, then press Save and Reboot
5. Goto "Configuration" page, "Receiver Mode" section, please
choose "RX_SERIAL", and in the "Serial Receiver Provider"
second, please choose SPEKTRM2048 for DSMX protocol,
then press Save and Reboot.
6. In "Receiver" page, make the "Channel Map" to TAER1234, then press Save.
7. Goto CLI page, type "set spektrum_sat_bind = 9" for DSMX.
8. Type "save" and press enter, after the FC reboot remove USB cable to cut power for the FC.
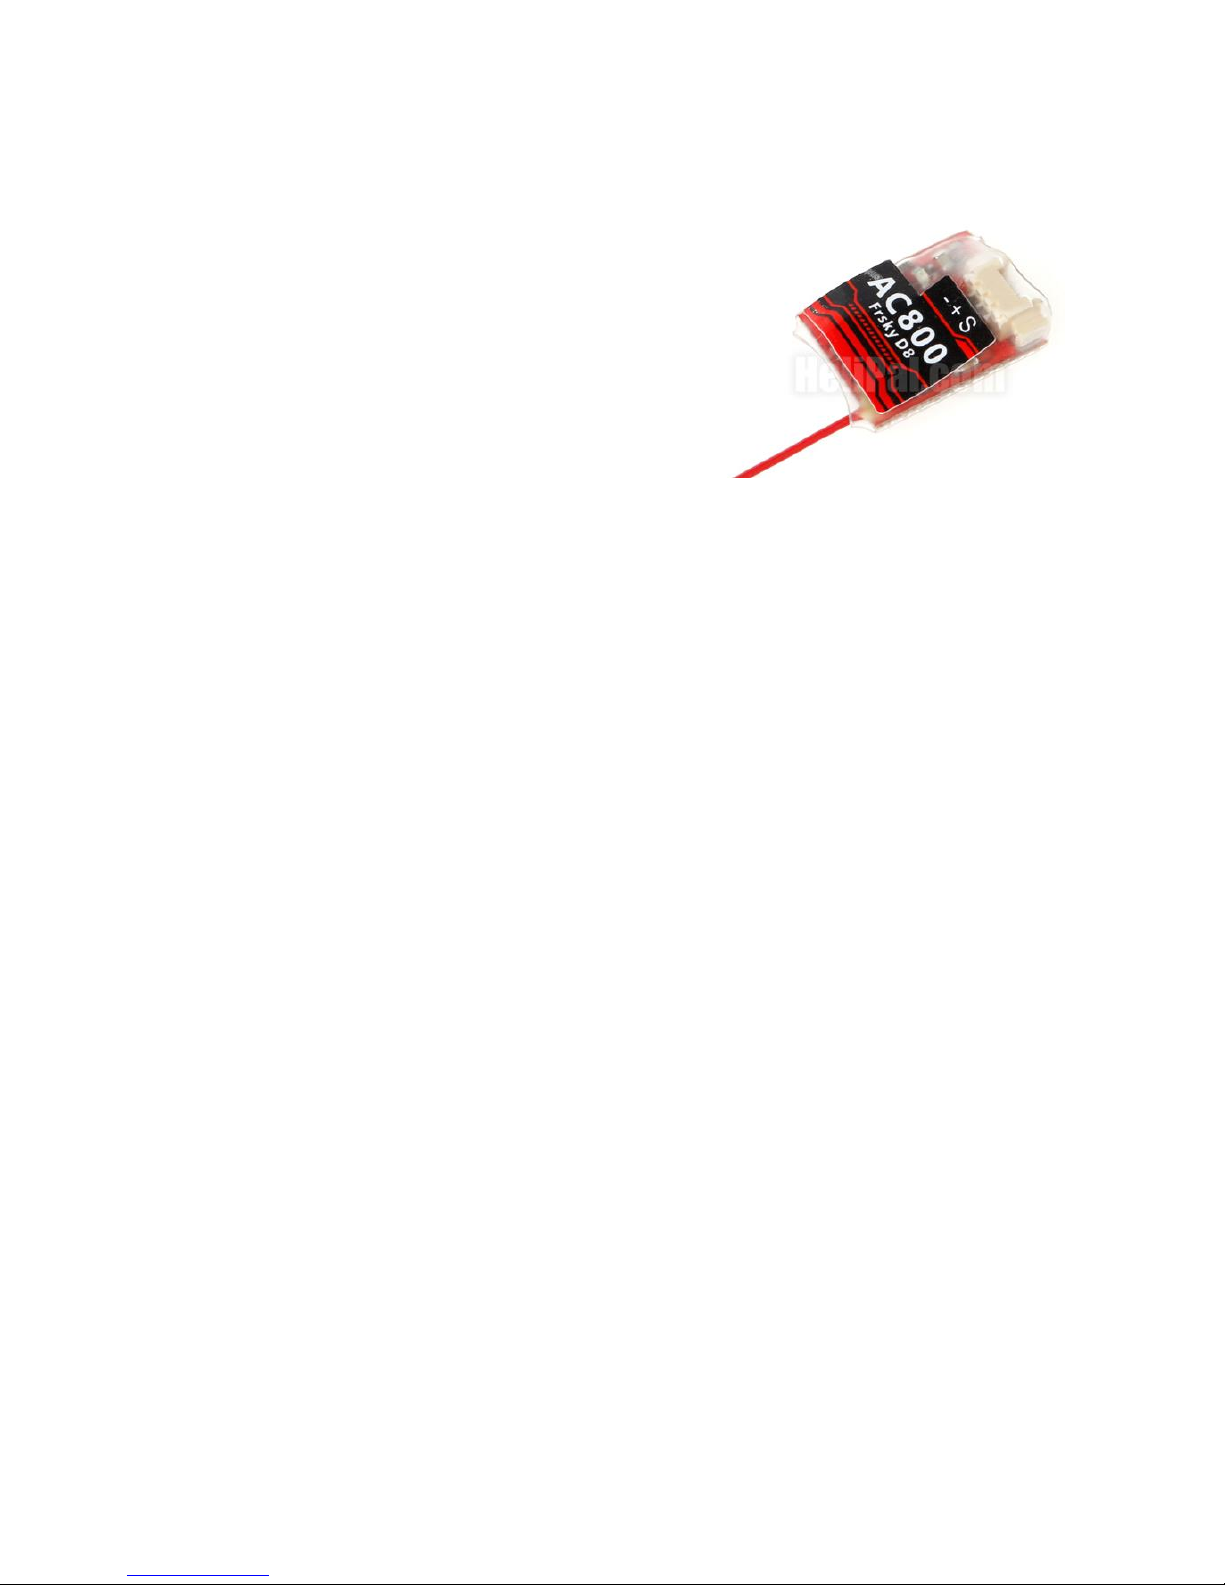
9. Wait a sec and reconnect the USB cable. Now the R110X receiver’s LED should be flashing,
that means it's looking for Transmitter.
10. For your Spektrum DX8 transmitter, MAKE SURE you have the correct parameters on the
transmitter first (* see P.18). Now press and hold BIND button and turn on transmitter, it will
enter binding mode and search for receiver. It should display binding complete on the
transmitter screen.
11. Final step, on the BetaFlight configurator, go to CLI tab and type "set spektrum_sat_bind = 0"
and then type "save". This must be done so that receiver doesn't go back to binding mode.
12. Restart transmitter, disconnect drone from computer and connect battery to reboot.
Download BetaFlight Configurator
http://goo.gl/Gy2nPv
Page 18
18 Copyright@2016 HeliPal.com. All Rights Reserved
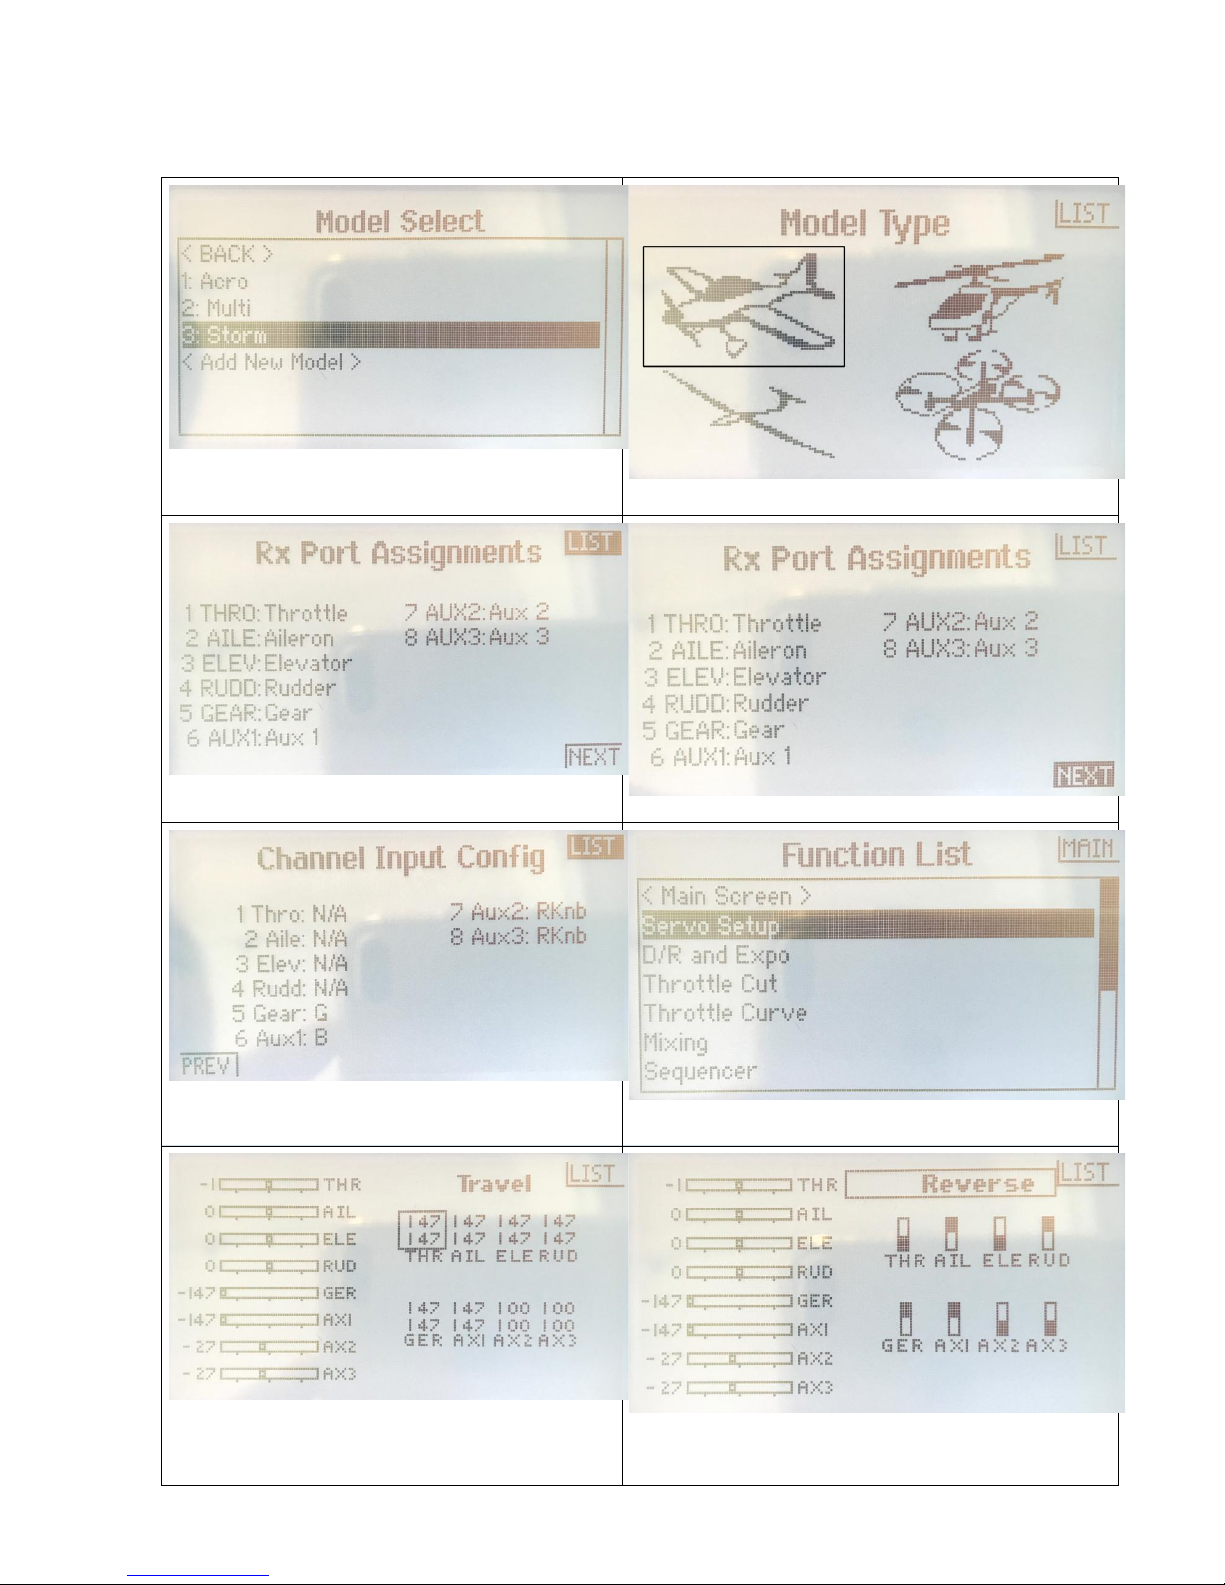
Spektrum DX8 MD2 (Gen 2) Transmitter Parameters
Please make sure your Spektrum DX8 MD2 (Gen 2) transmitter have the following parameters.
1) Press and Hold the roller while turn on transmitter,
goto [Model select] and add a new model for the
drone, rename it as you like. (e.g. Storm)
2) In [Model Type], choose Plane
3) Goto [Channel Assign], make GEAR : Gear and
AUX1 : AUX1
4) Same page, lower right corner, goto NEXT page
5) In the [Channel Input Config] page, make Gear : G
switch and Aux 1 : B switch
6) Press Back button on transmitter panel until you exit
system menu. goto [Servo Setup] page
7) In [Travel] menu, make sure you have those six
channels (THR, AIL, ELE, RUD, GER and AX1) to
have 147 for travel like this picture, otherwise the
drone will not start.
6) Goto [Reverse] menu, make sure AIL, RUD, GER and
AX1 channel are reversed.
Page 19
19 Copyright@2016 HeliPal.com. All Rights Reserved
Binding with FrSky Taranis X9D Plus Transmitter
1. Connect battery to the drone, then wait about
6 seconds, then the LED light will be flashing rapidly,
that means it's ready for binding.
2. Turn on your Taranis X9D Plus transmitter, goto "Model Setup" (Press MENU and PAGE
button once). In the "Internal RF" section, choose Mode = D8, Channel Range = CH1-8,
Receiver No. 01, and then click "Bind", the transmitter will start beeping, wait until receiver
LED turn solid.
3. Power off Transmitter and Receiver.
4. Turn on the transmitter and power on the Receiver, now you should have bound them.
Page 20
20 Copyright@2016 HeliPal.com. All Rights Reserved
FrSky Taranis X9D Plus Transmitter Parameters
For FrSky TARANIS Plus user, you can use the latest OpenTX program to backup/restore your
setting or our own profile. You can find the procedures below:
1. Download OPENTX program by isiting http://www.open-tx.org/downloads.html. Always use
the latest version Use the latest OPENTX 2.1 branch.
2. Download the latest helipal profile for our drone here (Please unzip before use):
www.helipal.com/download/uav/srd-taranis-x9d-plus.zip OR http://goo.gl/PZQeWO
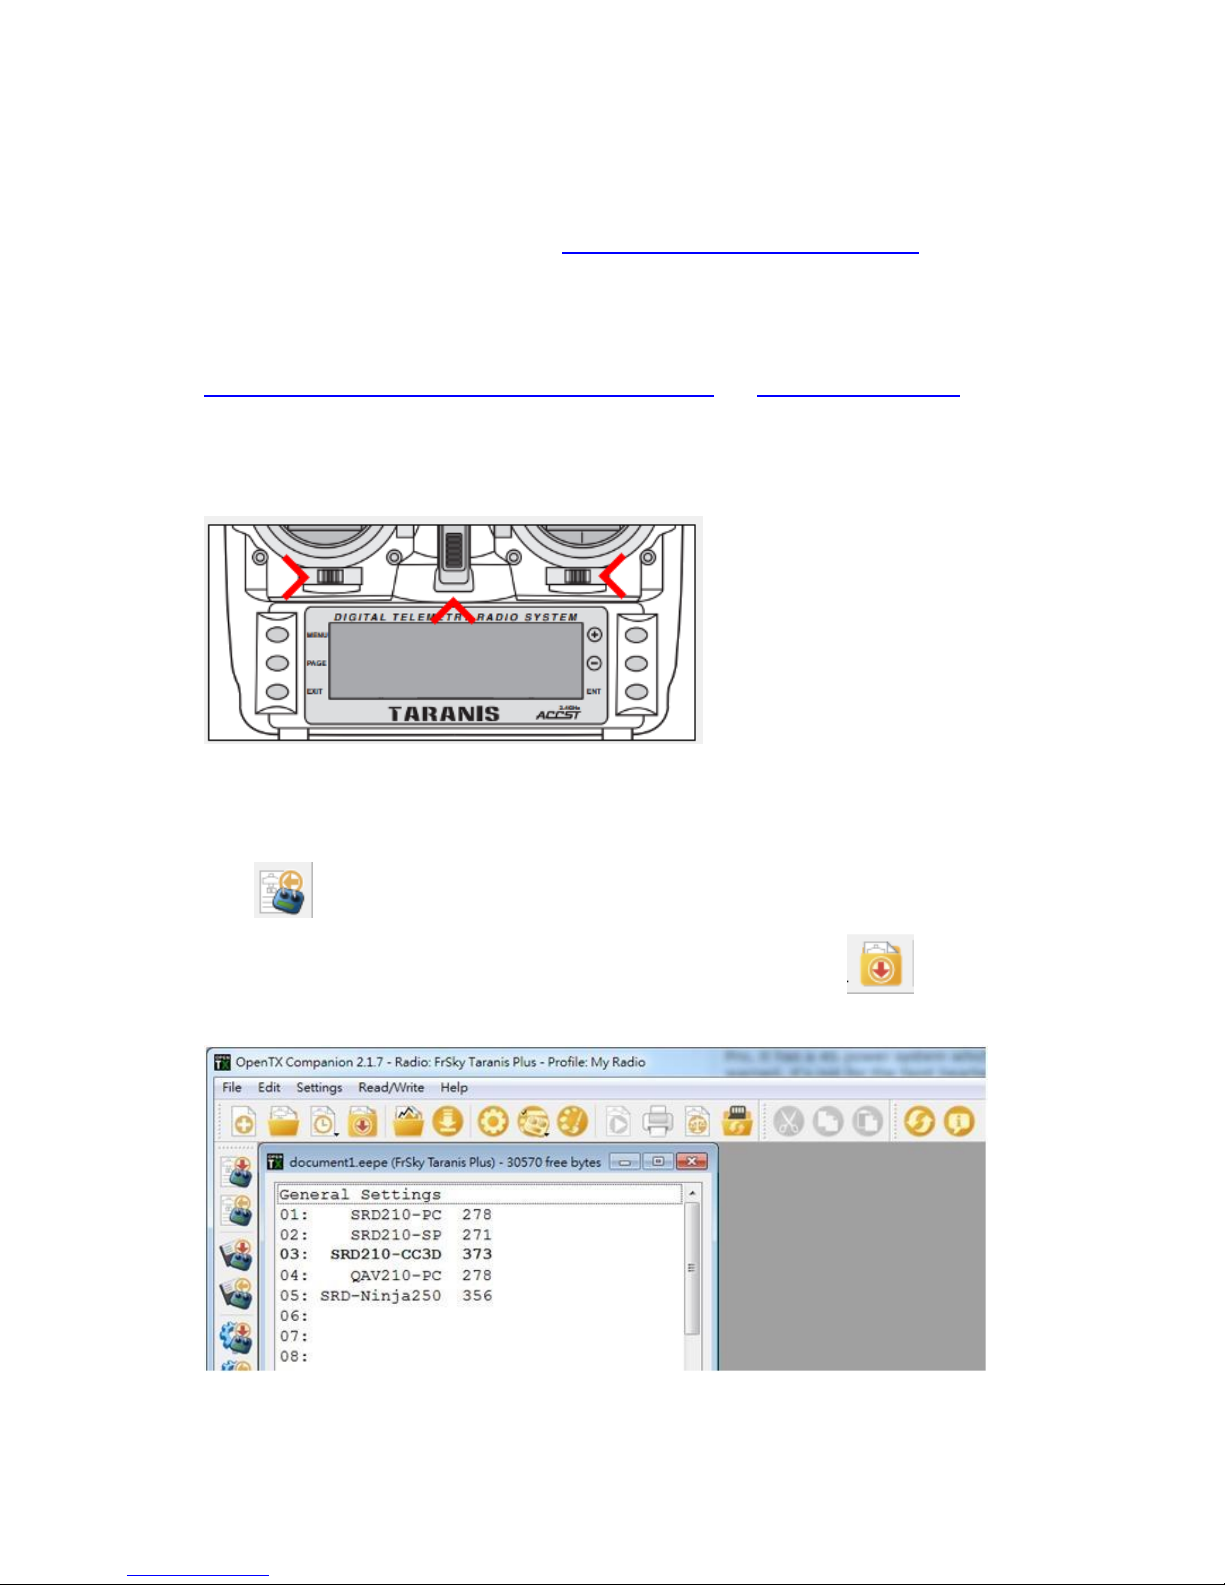
3. Turn on your radio by holding both lower trims towards the center and turn on transmitter
at the same time, you will enter BootLoader mode.
4. Connect your FrSky Taranis X9D Plus transmitter to your PC / Mac via USB cable and the
controller screen will show “USB Connected”.
5. Click to read your radio controller profile
6. Your radio controller profile will be loaded on the screen, always click to save your
existing profile before you make any changes, incase thing goes wrong.
Page 21
21 Copyright@2016 HeliPal.com. All Rights Reserved
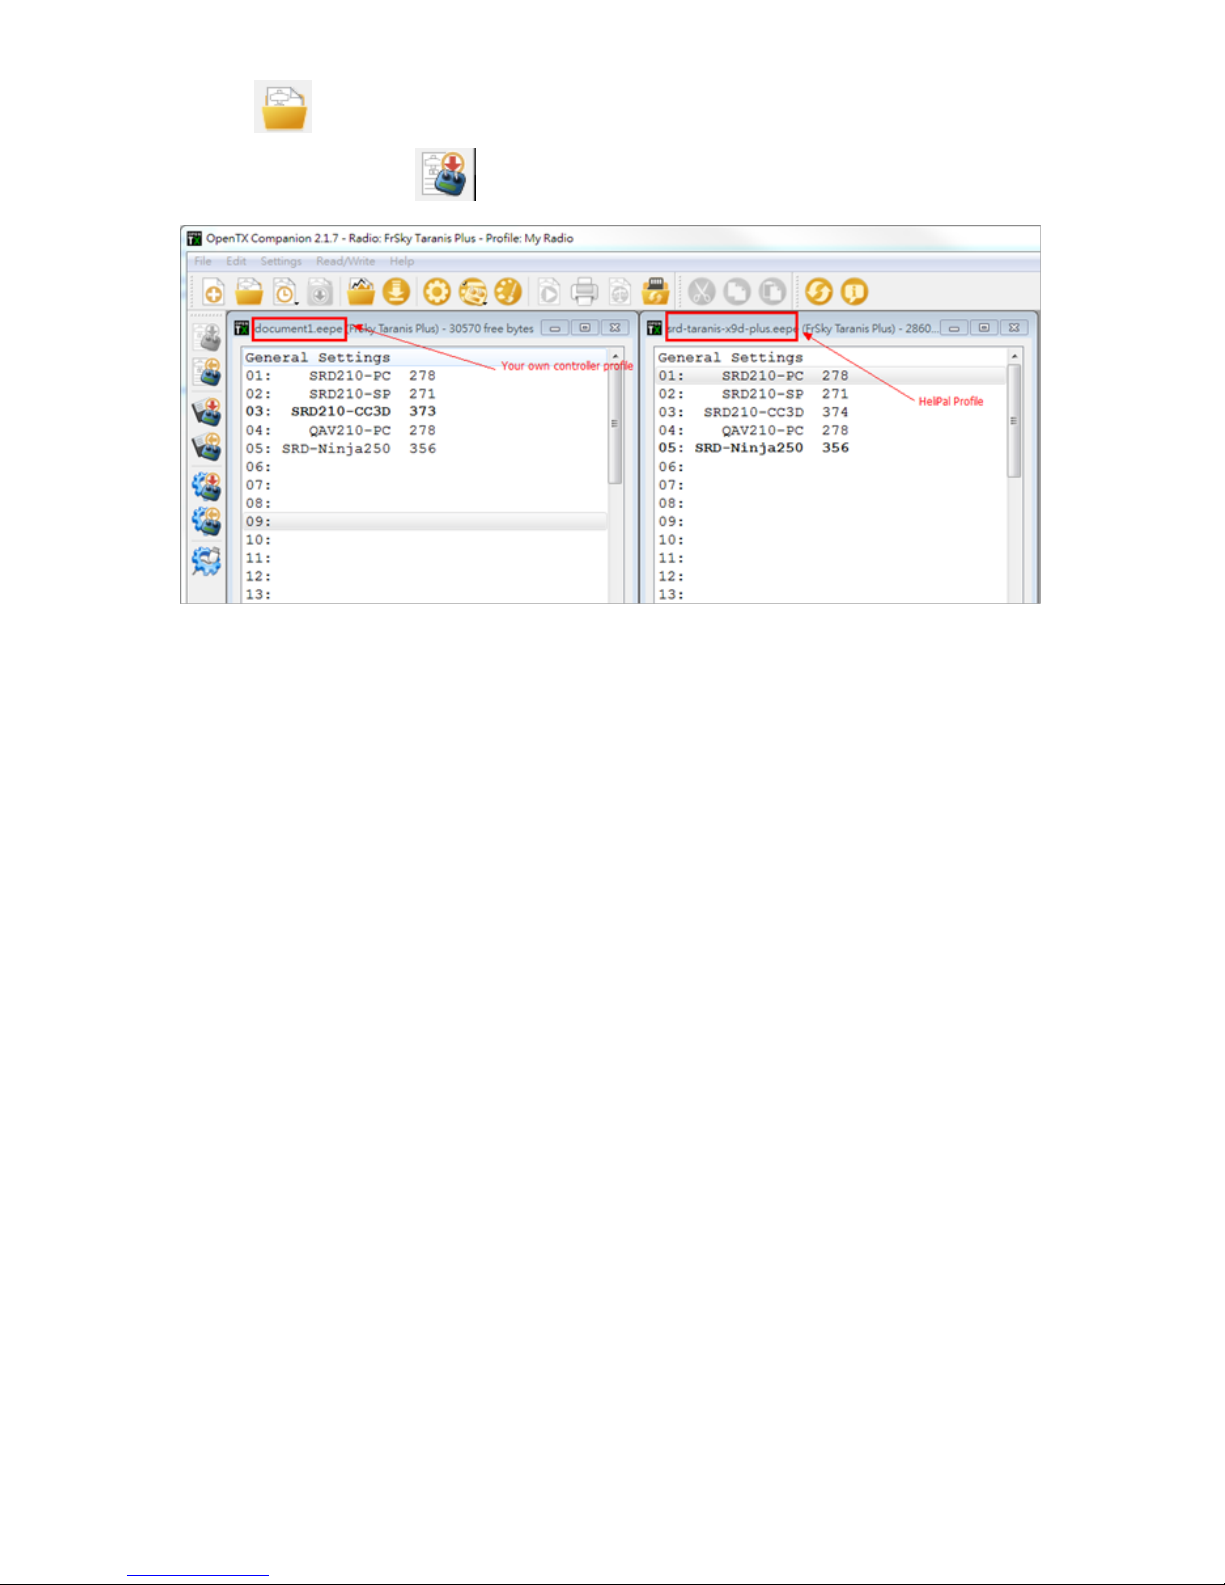
7. Click to open our profile, drag the correct drone memory to your own transmitter.
Remember to click to write the profile back to your radio.
8. Unplug USB cable, switch off transmitter and switch on again.
 Loading...