


Quick
Start
Guide
X3000 HD Network Media Player
X3000 HD NETWORK MEDIA PLAYER
POWER

A
Get to know your HELIOS X3000
Thank you for purchasing the HELIOS X3000 HD Network Media player.
The HELIOS X3000 is built with professional-grade components and state-
of-the-art features. Unlike your standard DVD player, the X3000 is somewhat
of a mini-computer. And like all other computers, it will take some time for
this player to start up because it loads different software. It takes about 10
seconds for the player to fully turn itself on. Once on, please note that it
takes a little bit of time to switch from feature to feature.
Out of the box to-do list:
Check package contents
Your delivered package should include one HELIOS X3000 player, one
remote control (batteries included), one WiFi antenna, one HDMI cable,
one composite video/audio cable, one power cable and one Quick Start
Guide.
For more information on how to use your HELIOS X-Line player, you
can download the complete user manual at www.neodigits.com (see
HELIOS X3000 product page)
B
Connecting HELIOS X3000 to
your video display equipment
The HELIOS X3000 offers 3 different video output options and 15 different
video output resolutions. Proper video setup is critical to ensure optimum
results.
1. Standard-definition video connections
If your display device only supports standard-definition video input (PAL or NTSC), you can
choose to connect your TV with the HELIOS X3000 via composite video cable, S-video cable
or component cable.
2. High-definition video connections
Component video connections:
If your TV has component input and supports one of the resolutions listed below, you can use
a component video cable to connect the player with your TV.
Component video output offers PAL, NTSC, 480p, 576p, 720p, 1080i, 720p/50hz, 1080i/50hz
and 1080p resolutions.
HDMI connections:
If your display device has an HDMI or DVI video connection and supports one the
resolutions listed below, you can connect the HELIOS X3000 via HDMI connection or DVI
connection.
To use a DVI video connection you will need to connect the HDMI output of the player to your
TV with the optional HDMI-to-DVI converter cable.
The HELIOS X3000 has one HDMI digital video output.
From these outputs you can get the following resolutions:
480p/ 576p/ 720p/ 1080i/ 720P 50hz/ 1080i 50hz/ 1080p.
3. Setup video mode
After connecting your TV with the HELIOS X3000 using the appropriate video cable, you may
need to press the <TV Mode> button on the remote control several times until you see a clear
image on your TV screen. Once you get a clear image on the screen, press the <Setup> button
on your remote control to enter the setup menu. From the Setup menu, navigate to the
<system> submenu. Select <video setting> and choose your corresponding video mode from
the drop down menu that appears. To exit the setup menu click <Setup> again.
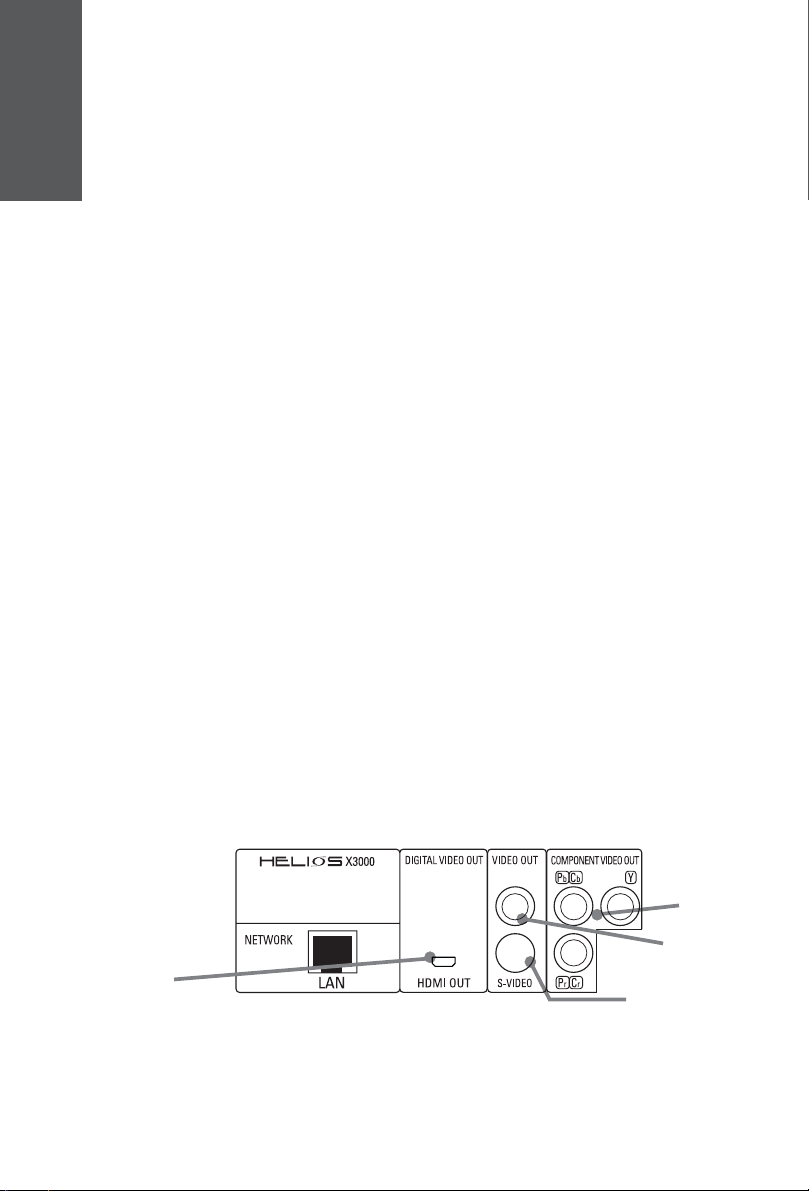
Component
video output
Composite
HDMI Video
output
video output
S-video output
4. To get audio using your HDMI connection
The HELIOS X3000 digital HDMI output can output either a DVI (video only) or HDMI (Audio
and video) signal to your TV.
A DVI TV can not accept a HDMI signal so therefore the default setting is for the HDMI to
output a DVI signal. To enable full HDMI output (audio and video), you must first select a HDMI
resolution in the above step 3. and clear the Connected to DVI TV check box.
Next, press Save and restart the player.
When the player restarts you will have both audio and video over your HDMI connection.

C
C
Connecting the HELIOS X3000
to your audio equipment
The HELIOS X3000 has two different audio output options:
i. Digital via coaxial or optical output.
ii. Analog via stereo or 5.1 channel output.
1. Digital audio output
If your audio system (AV receiver, amplifier, home theatre system or powered
speaker system) is able to receive digital audio input, you can connect your
audio system to the HELIOS X3000 via optical or coaxial connection. Press
<Setup> on your remote control to enter the setup menu. Navigate to the
<system> submenu. From the <system> menu, enter <Audio settings>.
From the resulting drop down menu select <RAW> to output raw digital
signal. This lets your audio system perform the audio decoding, i.e. Dolby
digital or DTS decoding. You can also select <PCM> to output 2 channel
stereo digital audio streaming (for listening to audio CD or music files).
2. Analogue audio output
For analog 2 channel stereo output or 5.1 channel surround audio output,
press <Setup> on your remote control to enter the setup menu and select
<system> from the submenu. Here you can select your preferred sound
output mode by choosing either <Stereo> or <5.1 surround> in the <audio
mode> option. Note that the analogue audio setting will not affect the digital
audio output.
Digital audio
Coaxial output
Digital audio
Optical output
DIGITAL
AUDIO
OUT
COAXIAL
OPTICAL
OUT
OUT
Analog audio
5.1 channel
left/right channel output,
Stereo audio output.
5.1 ch AUDIO OUT
FRONT SURROUND
CENTER
L
R
SUB WOOFER
Analog audio
5.1channel center
channel output
L
Analog audio
5.1channel
surround left/right
channel output
R
Analog audio
5.1 channel
Subwoofer output

Playing DVD/ VCD/ CD and
D
video/ audio/ photo media files
1. Setting your system browser.
The System browser is used to display and navigate around the players system menus
and settings. You have the option of enabling HD (high definition) mode on your Browser
Option.
When the browser is in HD mode, more information (menu listings etc.) can be displayed
on the screen but text and icons will be smaller.
To change the Browser mode, Press <Setup> on the remote control to open the System
Setup. Use the cursor keys to go to the Browser Option. And then press <Enter> to
check or uncheck the box which enables the HD Mode, then select <Save> to reboot
and validate changes.
2. DVD/VCD/CD setup and playback
Press <Setup> on the remote control to enter the setup menu. From
there, select <DVD>. In the <DVD> submenu you can enable DVD
parental control, as well as DVD/ CD auto play.
The auto play function enables the player to automatically begin
playing a disc when there is one detected in the player.
If the <Enable auto play> function is turned off, the player will show
the DVD/CD icon in the main page when it detects a DVD/CD. You
then need to click on the icon to play the disc.
3. To play video/audio/photo media files
The HELIOS X3000 can play video, audio, and photo media files stored in DVD/ CD
recordable discs, memory cards (via USB card reader), external USB hard disks (including
compatible MP3 players), and computers on the local area network (LAN) (see section
D for network connection instructions).
After inserting your DVD, CD recordable disc or USB device into the player, an icon will
appear on the home page. Click on the icon to access its content, and all files will be
displayed on the screen. Select a file and click <enter> to play it. If you want to play all
the files in a folder, go to the first file in the folder and click <play>.
The HELIOS X3000 offers you a unique way of fast forwarding a video file in quick
selection mode. To fast forward 10% of the video file content, you simply have to press
button number <1> on your remote control. To fast forward 20% of the video file content,
press button number <2> on the remote control, and so on. This feature is in addition
to the standard forward/rewind buttons on the remote control.
4. Front Panel Display options
During video and audio playback, pressing <Clear> repeatedly on your remote control
lets you go through different display options on your players front panel.. The following
options are available:
A. Elapsed Time (default) B. Time Remaining
C. File / Track / Chapter number D. Off (no data displayed)
5. Color settings ( for component / HDMI / DVI connection only)
During video playback, you can change the color settings by pressing the <setup> button
repeatedly on your remote control to go through the different options. (you must be
playing a video to do this). The following color attributes can be changed:
A. Brightness B. Contrast C. Saturation
Note, If you are watching video file stored on USB or network, the color changes are
applied automatically. If watching a video stored on disc (DVD / CD) you will need to
stop and then resume play to apply the changes.

Connecting HELIOS X3000 to
your local area network (LAN)
E
or wireless network
The HELIOS X3000 has two network connection methods wired network
and wireless.
1. Wired network connection
Connect the network cable to the LAN RJ45 connector at the back of your
HELIOS X3000. Click <Setup> on your remote to enter the setup menu,
and enter <LAN> to get to the submenu. If your network has a router or a
DHCP server, simply select <automatic> to allow your player to connect
to your network automatically. You can also manually setup the IP, DNS
and Gateway addresses according to your network configuration.
2. Wireless network connection
You can connect HELIOS X3000 to your network wirelessly by first clicking
<Setup> on your remote control. Once you enter the setup menu, choose
<WiFi Setup> to get to the submenu. Once in <wireless> setting, you need
to switch the preferred network to wireless (the default is wired) and then
reboot the player. After rebooting, go to <wireless> setting again to setup
the parameters to your wireless AP (Access Point).
3. Using your HELIOS X3000 to play content from a computer on
your LAN - NeoLink
Because the HELIOS X3000 is somewhat of a mini-computer, it is able to
access computers on your LAN/ WLAN and play content therein. To do so,
however, you will need to install the NeoLink Server software on your
computer(s). The server software can be downloaded from the link below:
http://www.neodigits.com/download/NeoLink.zip
When installing the software, ensure that your firewall or Windows XP firewall
will not prevent you from downloading this software. Remember to open
the TCP/ IP port 8000. Refer to Windows documentation for instructions
if needed.
If you have the NeoLink media server software installed on a computer on your network,
you can play video, audio and photo content stored on the network.
When the HELIOS X3000 is connected to the network it will detect all computers running
the NeoLink Server software.
All server names of computers running the NeoLink will be listed on the home page
displayed on your TV.
To play content from a computer on the network, simply use the cursor on the remote
control to select the server on the list and press <enter>. Then use the NeoLink browser
to select the content you wish to play.
Note:
Through NeoLinks Online Media option you can also access all online content that is
bookmarked on your media server (web pages, Web Radio & TV, RSS feeds, PodCasts
etc)
For more information on NeoLink Server software installation and setup see the NeoLink
user guide.

F
Accessing the HELIOS X3000
via remote control
1 2
3
4
8 9
6
7
18 19
10
13
14 15
17
16
20 21 22 23
24 25 26 27
28 29 30 31
32 33 34
35 36
1.
Power On/Off
2.
Eject: open or close disc tray
3.
Numeric buttons
4.
Clear:
a) Erases the number or data you just entered
b) Front panel display switch when playing contents
5.
Info: Display information about the content been played
6.
Display: Shows or hides OSD menu
7.
DVD top menu: Open DVD title menu
8.
Subtitle: switches between subtitle options
9.
Audio: Switches audio tracks
10.
Mute: Press once to mute. Press twice to undo mute
11.
Volume increase
12.
5
11
12
Volume decrease
13.
Up cursor
14.
Left cursor
15.
Right cursor
16.
Down cursor
17.
OK / Enter
18.
Return: go back to previous menu / page
19.
DVD Menu
20.
Fast backward
21.
Play
22.
Fast forward
23.
Zoom
24.
Previous: Skip backward
25.
Pause
26.
Next: Skip forward
27.
Angle: switches play angles
28.
Repeat: Switches between repeat options during CD /
DVD / VCD playback
29.
Stop
30.
Search:
31.
URL: use to enter a URL address
32.
Player Home: go to the player home page
33.
Server Home: go to the NeoLink server home page
34.
Refresh:
a) Refresh / reload the current page
b) Switches between repeat options during video/audio
file playback.
35.
Setup:
a) open the setup menu
b) open color adjustment menu during video
playback
36.
TV Modes: switched through the player output and
resolution combinations

G
Product Support
1. Firmware upgrade
Note:
Do NOT upgrade the firmware of your HELIOS X3000 without first contacting
NeoDigits customer support staff at esupport@neodigits.com. Firmware
upgrade, if not done properly, can lead to serious malfunctions.
To upgrade the firmware, press <setup> on the remote control and then
navigate to Firmware.
When you press <Enter>, a web page will open with a link to the latest
firmware.
Caution:
Under NO Circumstances should you disconnect the power or switch off
the player while upgrading the firmware.
2. Product support and service
Should you have any questions or service requests regarding your HELIOS
X3000, simply send us an email at esupport@neodigits.com, and our support
staff will respond as soon as possible.
For more information on how to use your HELIOS X-Line player, you
can download the complete user manual at www.neodigits.com (see
HELIOS X3000 product page)
www.neodigits.com
 Loading...