

Page 1
Montagekonsole MK4
Console de montage MK4
Mounting Bracket MK4
MONTAGE- UND BE TRIEBS VORSCHRIFT
NR. 90 522-003
EMPFANG
Die Sendung sofort bei Anlieferung auf Be schä digun gen und Typenrichtigkeit prü fen. Falls Schäden
vorliegen, sind diese um ge hend dem Trans port un terneh men zu melden. Bei nicht fristgerechter Reklamation ge hen evtl. An sprü che verloren.
EINSATZ
Zubehör zu Radial-Rohrventila toren der Typen RR...
und Kleinventilatoren RRK.. Ex zur Be fe sti gung der
Ven tilatoreinheit an Wand bzw. Deckenelementen.
LIEFERUMFANG
MK4 = Best.-Nr. 05824
1x Montageschine, 1x Winkel,
4x Bohrschrauben
MONTAGE
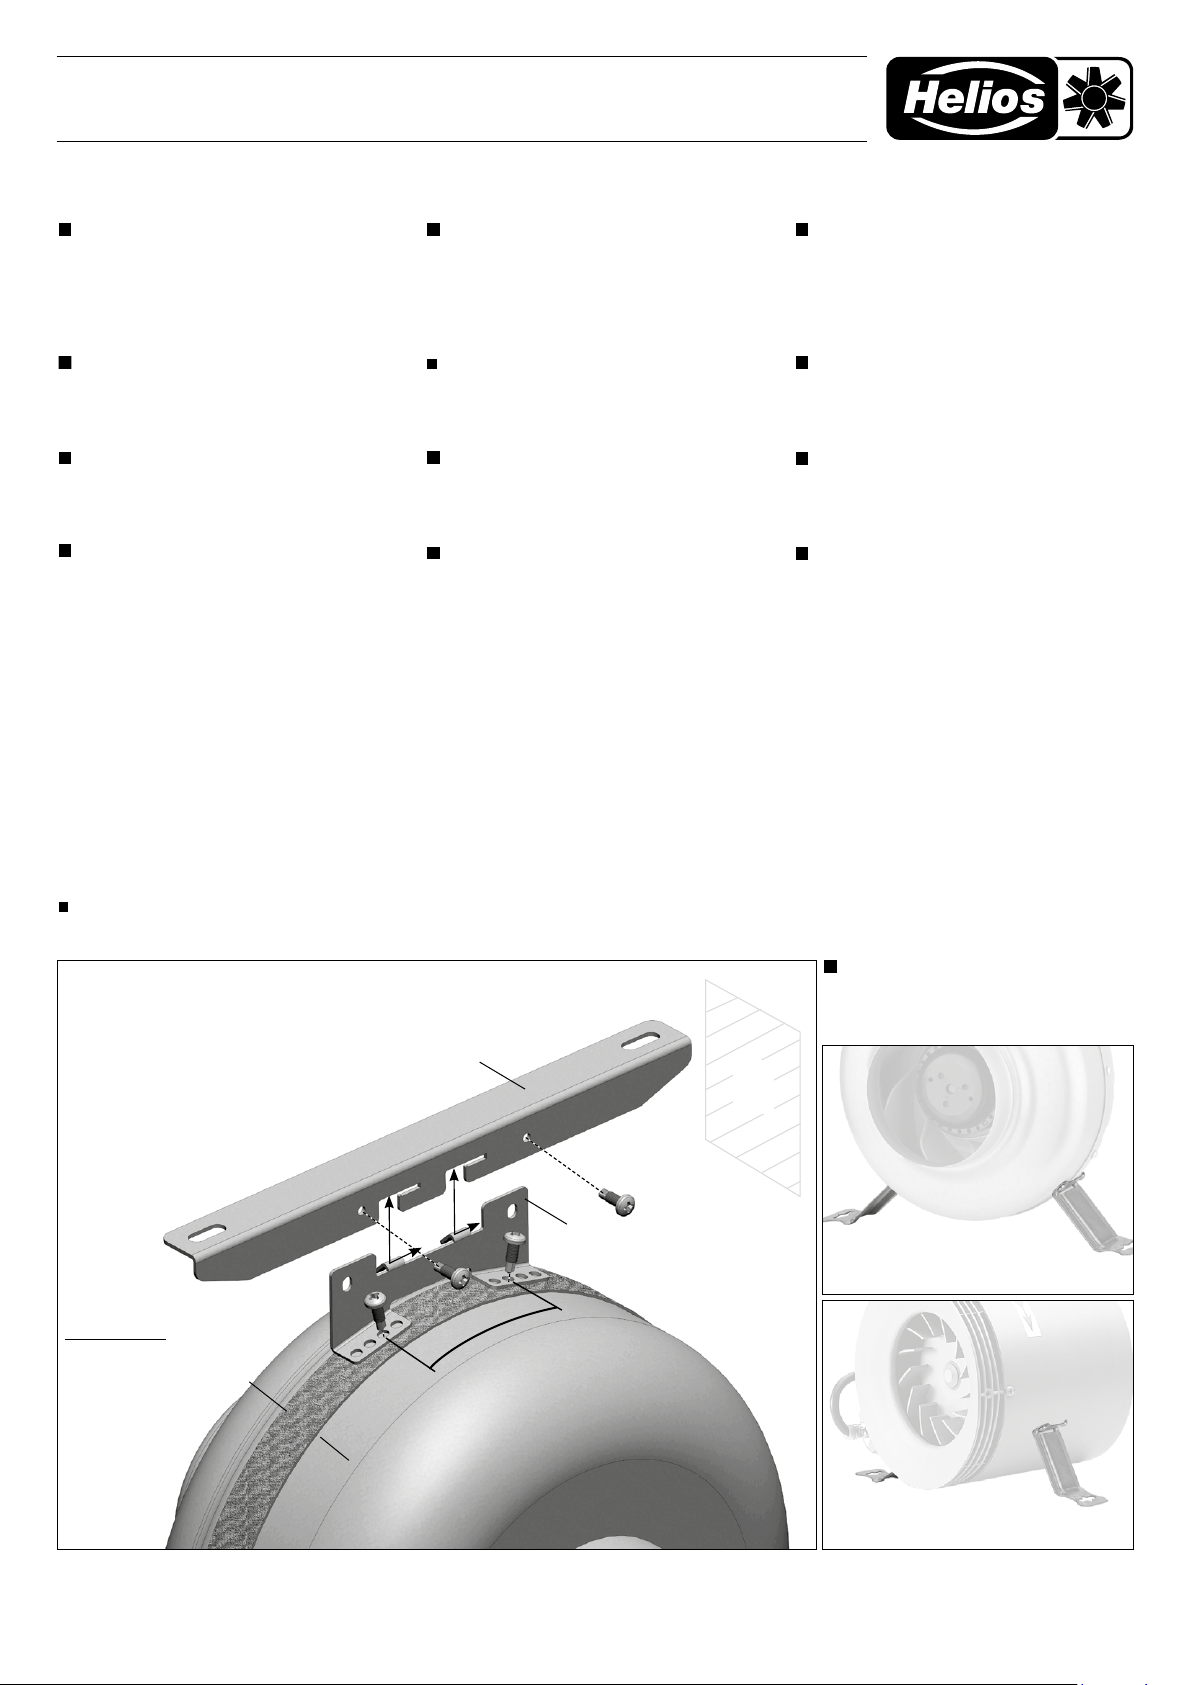
Die Montage kon sole MK 4 (Zubehör) bildet ein
einfaches und praktisches Mittel zur Befestigung des Ventilators an Wand- bzw. Deckenelementen. Hier ist zur Ver hinderung von Körperschallübertragungen eine elastische Unterlage zwischen Wand und MK 4 vorzusehen.
Montageschritte:
– Winkel mit Bohrschrauben im Bereich der Monta gezone am Gehäuse befestigen.
– Montageschiene an Decke schrauben, dabei die
Ausrichtung zur Wand und den Wandabstand be achten (siehe Maßskizze, Abb.5).
– RR.. mit Winkel in Montageschiene einhängen –
Schritt ➊ und – und verschrauben.
OPERATION AND INSTALLATION
INSTRUCTION NR. 90 522-003
RECEIPT
Please check delivery immediately on receipt for
correctness and damage. If damaged, please notify
forwarding agent immediately. In case of delayed
notification, any possible claim may be time bared.
USE
Accessories for centrifugal in- line duct
fans for types RR... and InlineVent® RRK..
Ex for fixing units to wall and ceiling.
SHIPMENT
MK4 = no. de réf. 05824
1x Mounting rail, 1x Bracket,
4x Self-tapping screws
INSTALLATION
Use mounting bracket MK 4 (accessory) to mount
the fan to a wall or ceiling. To avoid vibration transmission to wall/ceiling insert some elastic material
between the bracket and wall/ceiling.
Installation steps:
– Fasten bracket with drilling screw to the casing in
the zone of the assembly area
– Screw mounting rail to ceiling, consider the align
ment to the wall and the wall distance (see dimen sional sketch, Fig.5)
– Hang up RR.. with bracket in mounting rail –
step ➊ and – and screw together.
NOTICE D’ UTILISATION
N° 90 522-003
RÉCEPTION
Dès réception vérifier l' état et la conformité du matériel commandé. En cas d´avaries, faire les réclamations d´usage au-près du transporteur.
Attention: les réclamations hors délai ne seront pas
prises en compte.
UTILISATION
Accessoires pour les ventilateurs centrifuges types
RR... et InlineVent® RRK.. Ex destiné à la fixation au
mur et au plafond.
CONDITIONNEMENT
MK4 = N° Réf. 05824
1x rail support, 1x console
4x vis autoforeuses
MONTAGE
La console de montage MK 4 (accessoire) est un
moyen simple et pratique de fixer le ventilateur au
mur ou au plafond. Pour ce type de montage, il est
nécessaire de prévoir un joint isolant élastique entre
mur et pied-support pour éviter les transmissions
éventuelles de bruit par vibration.
Etapes de montage
– Fixer la console avec les vis autoforeuses sur
l’enveloppe dans la zone de montage adéquate.
– Visser le rail support au plafond, veiller à l’orienta tion et à la distance par rapport au mur
(voir schéma d’encombrement, fig. 5).
– Accrocher le RR.. avec sa console au rail support.
– Etapes ➊ et – puis bloquer l’assemblage avec
les vis.
ANBAU RR.. AN DER DECKE
Assembly RR.. on the ceiling
Montage RR.. au plafond
Montageschiene für Wand oder Deckenmontage
Mounting rail for wall or ceiling suspension
Rail support pour montage au mur ou au plafond
schraerter Bereich:
hatched area:
Zone hachurée:
- Montagezone für Winkel
- Assembly area for bracket
- Zone de montage pour
console
Abb./fig 1
Wand
Wall
Mur
MONTAGEBEISPIEL:
Installation example:
Exemple de montage:
RR.. und RRK Ex
â
â
Winkel
ê
ê
Bracket
Console
4x Bohrschrauben
4x Self-tapping screws
4x vis autoforeuses
Abb./fig 2
V
Schraubenposition V, je nach
Baugröße des Ventilators wählen.
Screw position V, choose depending
on the size of the fan.
Position des vis V, à déterminer
selon taille du ventilateur.
Abb./fig 3
1
Page 2
Montagekonsole MK4
240
www.heliosventilatoren.de
Als Referenz am Gerät griff bereit aufbewahren! Druckschrift-Nr.
Please keep this manual for reference with the unit! Print no.
Garder cette notice à proximité de l’unité! N° Ref.
XX XXX-001/-/V01/0824
Console de montage MK4
Mounting Bracket MK4
Anbau RRK.. Ex - Montagekonsole MK 4
Assembly RRK.. Ex - Mounting bracket MK 4
Montage RRK.. Ex - Console de montage MK 4
x1
Abb./fig 4
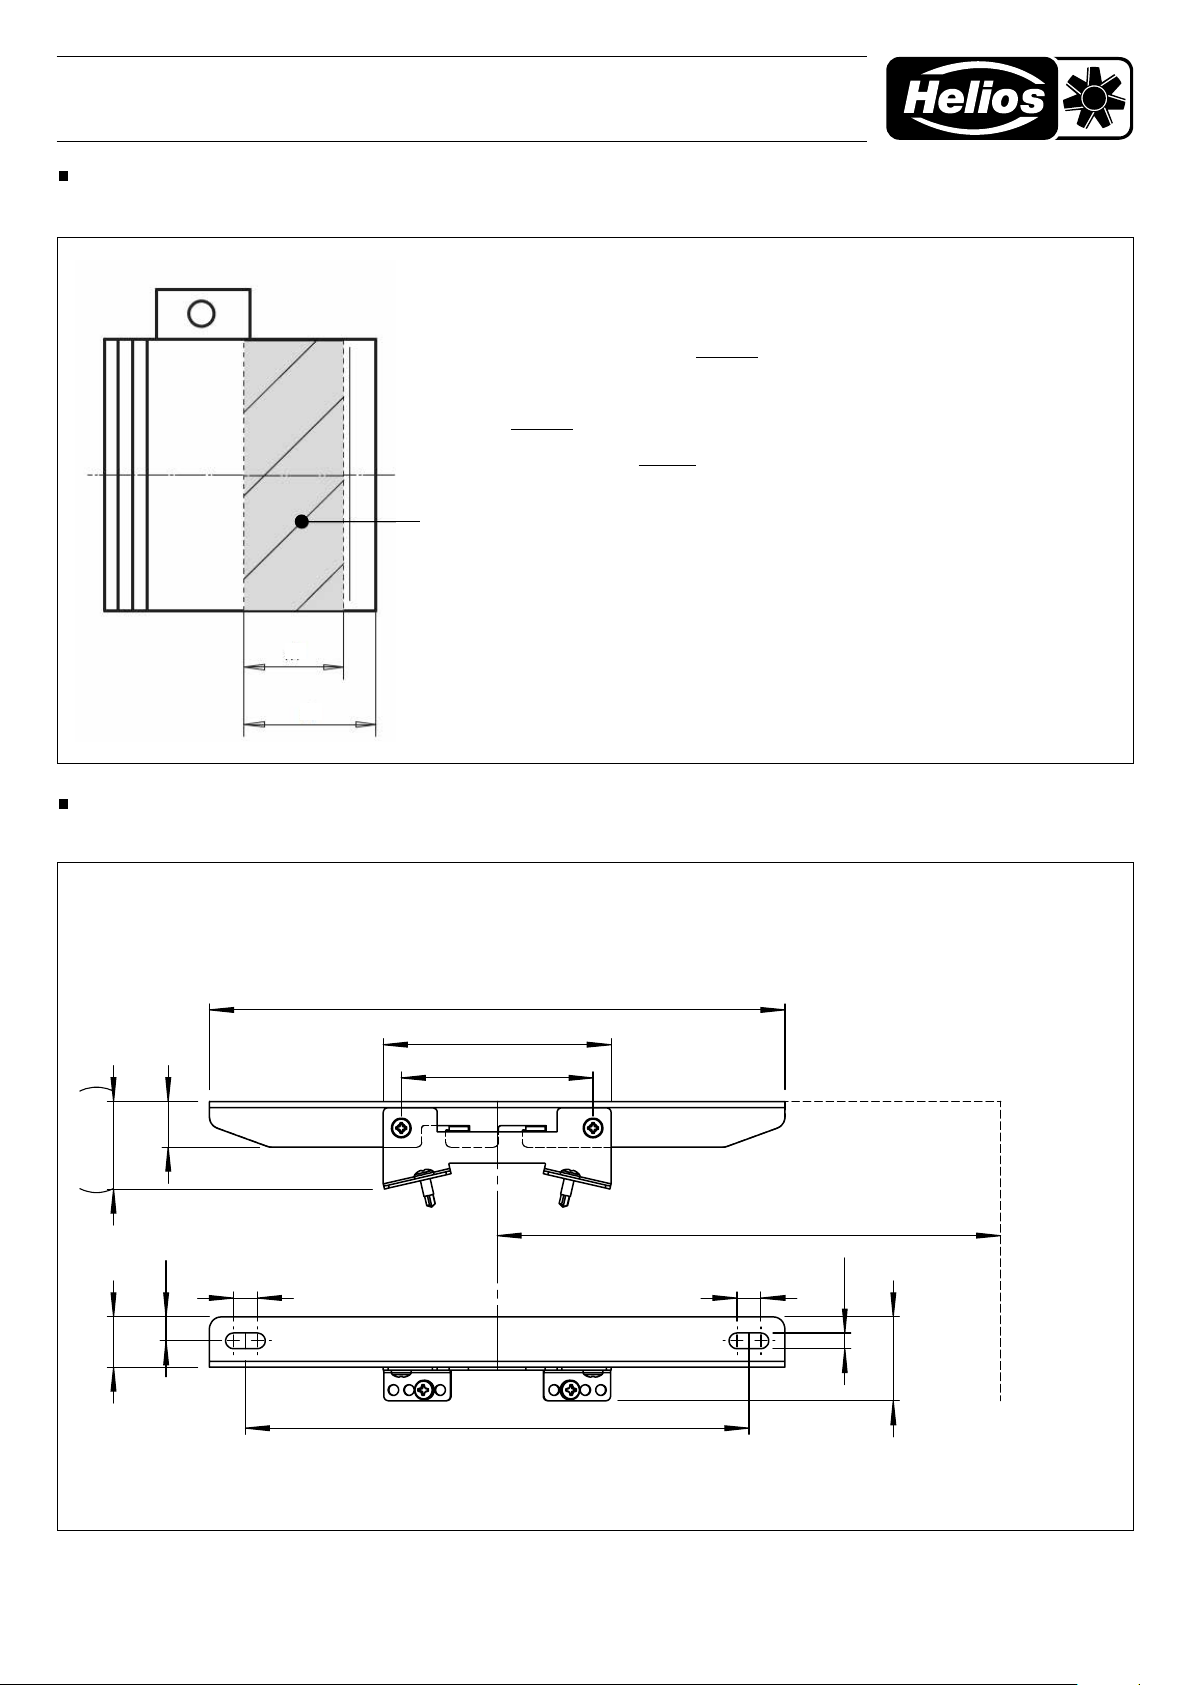
WARNUNG / WARNING / ATTENTION
m
Bei den Explosionsgeschützten Typen RRK.. Ex, dürfen die Bohrschrauben zur Befestigung
der Montagekonsole MK 4 nur in der gekennzeichneten Zone (siehe Bild) angebracht werden!
The drilling screws may be attached for fastening of the mounting bracket MK with explosionproof types RRK ..Ex only in the marked zone (see picture)!
Pour les types antidéflagrants RRK..Ex, les vis de fixation de la console doivent
impérativement être placées dans la zone indiquée (voir schéma).
Montagezone für Konsole MK4
Mounting area base MK4
Zone de montage pour console MK4
RRK 180 Ex
x2 = 60 mm / x1= 40 mm
RRK 200 EX
x2 = 60 mm / x1 = 35 mm
x2
Maßskizze - Montagekonsole MK 4
DIMENSIONAL SKETCH - Mounting bracket MK 4
Encombrement - Console de montage MK 4
19
36,5
~
10
10
RRK 250 EX
x2 = 63 mm / x1 = 38 mm
95
80
ceiling
plafond
Decke
Wandabstand abhängig
vom Ventilatordurchmesser
10
6,5
Abb./fig 5
Wand
wall
mur
21
35
210
Wall distance depends on fan diameter
Distance au mur selon DN du ventilateur
Service und Information
D HELIOS Ventilatoren · Lupfenstraße 8 · 78056 VS-Schwenningen F HELIOS Ventilateurs · 9 rue du Gibier · 67120 Molsheim
CH HELIOS Ventilatoren AG · Tannstrasse 4 · 8112 Otelfi ngen GB HELIOS Ventilation Systems Ltd. · 5 Crown Gate · Wyncolls Road · Severalls Industrial Park ·
A HELIOS Ventilatoren · Siemensstraße 15 · 6063 Rum/Innsbruck Colchester · Essex · CO4 9HZ
Druckschrift-Nr. 90 522-003/24-0293/-/0725
 Loading...