

Helio Electric Cycle Owner's Manual
Helio Cycle Owner’s Manual

Owners manual
This manual contains important safety, performance and maintenance information.
Read it before you ride and keep it handy for future reference.
Copyright © 2004 by eGO Vehicles, Inc. 01 june 2004
“eGO”, “eGO / Helio Cycle”, “eGO / Helio Cycle 2”, “eGO Crescent”, “eGO
Whisperdrive”, “GO FAST”, and “GO FAR” are United States trademarks of eGO
Vehicles, Inc.
Helio, Helio Cycle are trademarks of eGO Vehicles, Inc.
All rights reserved. No part of this publication may be reproduced or transmitted in
any form or by any means, electronic or mechanical, including photocopy, recording,
or any information storage and retrieval system, without permission in writing from
the copyright owner.
Page 2

Contact information:
You are the reason we build Cycles. Our primary concern is your safety and
satisfaction. If you have comments or questions about your Cycle, or if you’d like to
let us know what you think about something or share an idea about how we can
improve our products or services, we’d like to hear from you.
US and World Wide
Call us: +1-401-461-2108
Contact us through our website:
www.egovehicles.com
Write to us at: EGO Vehicles
765 Allens Avenue
Providence, RI 02905, USA
Drop us an email:
info@egovehicles.com
Page 3

Owners manual
If you read just one owner's manual all year, make it this one…
Thank you for buying a Helio Cycle. We wrote this manual to help familiarize you with
the operation and maintenance of your Helio Cycle and we really want you to read it.
We first asked the guys who designed and manufactured your Helio Cycle, our
engineers, to write the owner's manual, which we thought was a great idea since they
know more about it than anyone. Unfortunately, they used loads of technical terms,
and while the information was extremely accurate and detailed, most people found it,
well, boring. Boring just won't do, because like we said, we really want you to read
the manual.
So we translated it into this version, a hopefully not-so-boring one.
There's a lot of really useful information in here. Reading it will help you enjoy your
Helio Cycle more. Perhaps even more importantly, reading it will help prevent you
from damaging your Cycle, or worse, damaging yourself. So if you read just one
owner's manual all year, make it this one.
The name ‘eGO’ is a trademark of eGO Vehicles, Inc. in the United States. However,
the ‘EGO’ mark is owned by a different company in some countries in Europe.
Therefore, eGO Vehicles has decided to market our product under the name ‘Helio’
or ‘Helio Cycle’ in Europe and in some other markets.
This Owners Manual is for the Helio Cycle. In this manual, please note that the use of
the mark ‘EGO’ or ‘eGO / Helio Cycle’ is used purely for descriptive and reference
purposes and refers to both the eGO Cycle and the Helio Cycle. The use of ‘EGO’ in
this manual DOES NOT (unless otherwise specified) indicate that eGO Vehicles
claims to own the ‘EGO’ mark in countries where the ‘EGO’ mark is registered by any
other company.
Page 4

Table of content
Contact information:....................................................................................................3
US and World Wide..................................................................................................3
If you read just one owner's manual all year, make it this one….................................4
Table of content...........................................................................................................5
Cautions and warnings................................................................................................6
Your Electric Helio Cycle.............................................................................................7
Riding your Helio Cycle in Public:.............................................................................8
General Safety Information .........................................................................................9
The Basics:...............................................................................................................9
Helmets..................................................................................................................10
Wet or Icy Weather Riding......................................................................................10
Night Riding............................................................................................................11
A Special Caution for Parents ................................................................................11
Registration Information.........................................................................................12
Assembling your Helio Cycle.....................................................................................13
Unpacking your Helio Cycle ...................................................................................13
Installing the front wheel in the front fork................................................................14
Installing handlebars and front wheel assembly.....................................................14
Adjustments............................................................................................................15
Adjust saddle front/back position and tilt-angle. .....................................................15
Side view mirrors....................................................................................................16
Front fork maintenance .......................................................................................... 16
Before your first ride...............................................................................................16
Features of your Helio Cycle.....................................................................................18
The Instrument Panel.............................................................................................18
Handlebar switches................................................................................................22
The Brakes.............................................................................................................22
The Throttle............................................................................................................23
The Motor...............................................................................................................24
The Cargo Rack..................................................................................................... 25
Tempo-III Speedometer Set-up and Operation Guide............................................26
Before you Ride.........................................................................................................28
The pre-ride safety checklist...................................................................................28
Maintaining your Helio Cycle.....................................................................................29
Routine Maintenance .............................................................................................29
The batteries ..........................................................................................................30
The drive belt..........................................................................................................32
Tires .......................................................................................................................35
The Brakes.............................................................................................................37
The lights................................................................................................................38
Troubleshooting.........................................................................................................39
Ego Vehicles no-nonsense limited warranty..............................................................43
The pre-ride safety checklist......................................................................................44
Notes.........................................................................................................................45
Page 5

Owners manual
Cautions and warnings
Throughout the manual, you'll see L (caution) and 9 (warning) icons. The caution
icons contain information that will help prevent you from damaging your Helio Cycle.
The warning icons contain information that will help prevent you from damaging
yourself. Pay particular attention to these because like they say, it's all fun and
games until somebody loses an eye.
You’ll also see
E (tip) icons. These clue you in to tips about riding and maintaining
your Helio Cycle.
Finally, you'll see ☺ (Zen) icons. These contain meaningful quotes from wise people
about how to live a happier life. We think they're useful, but we realize they're just our
opinions. Paying attention to these is, of course, completely optional.
☺ “A wise man learns even from a fool, but a fool learns from no one.”
- Confucius
Page 6
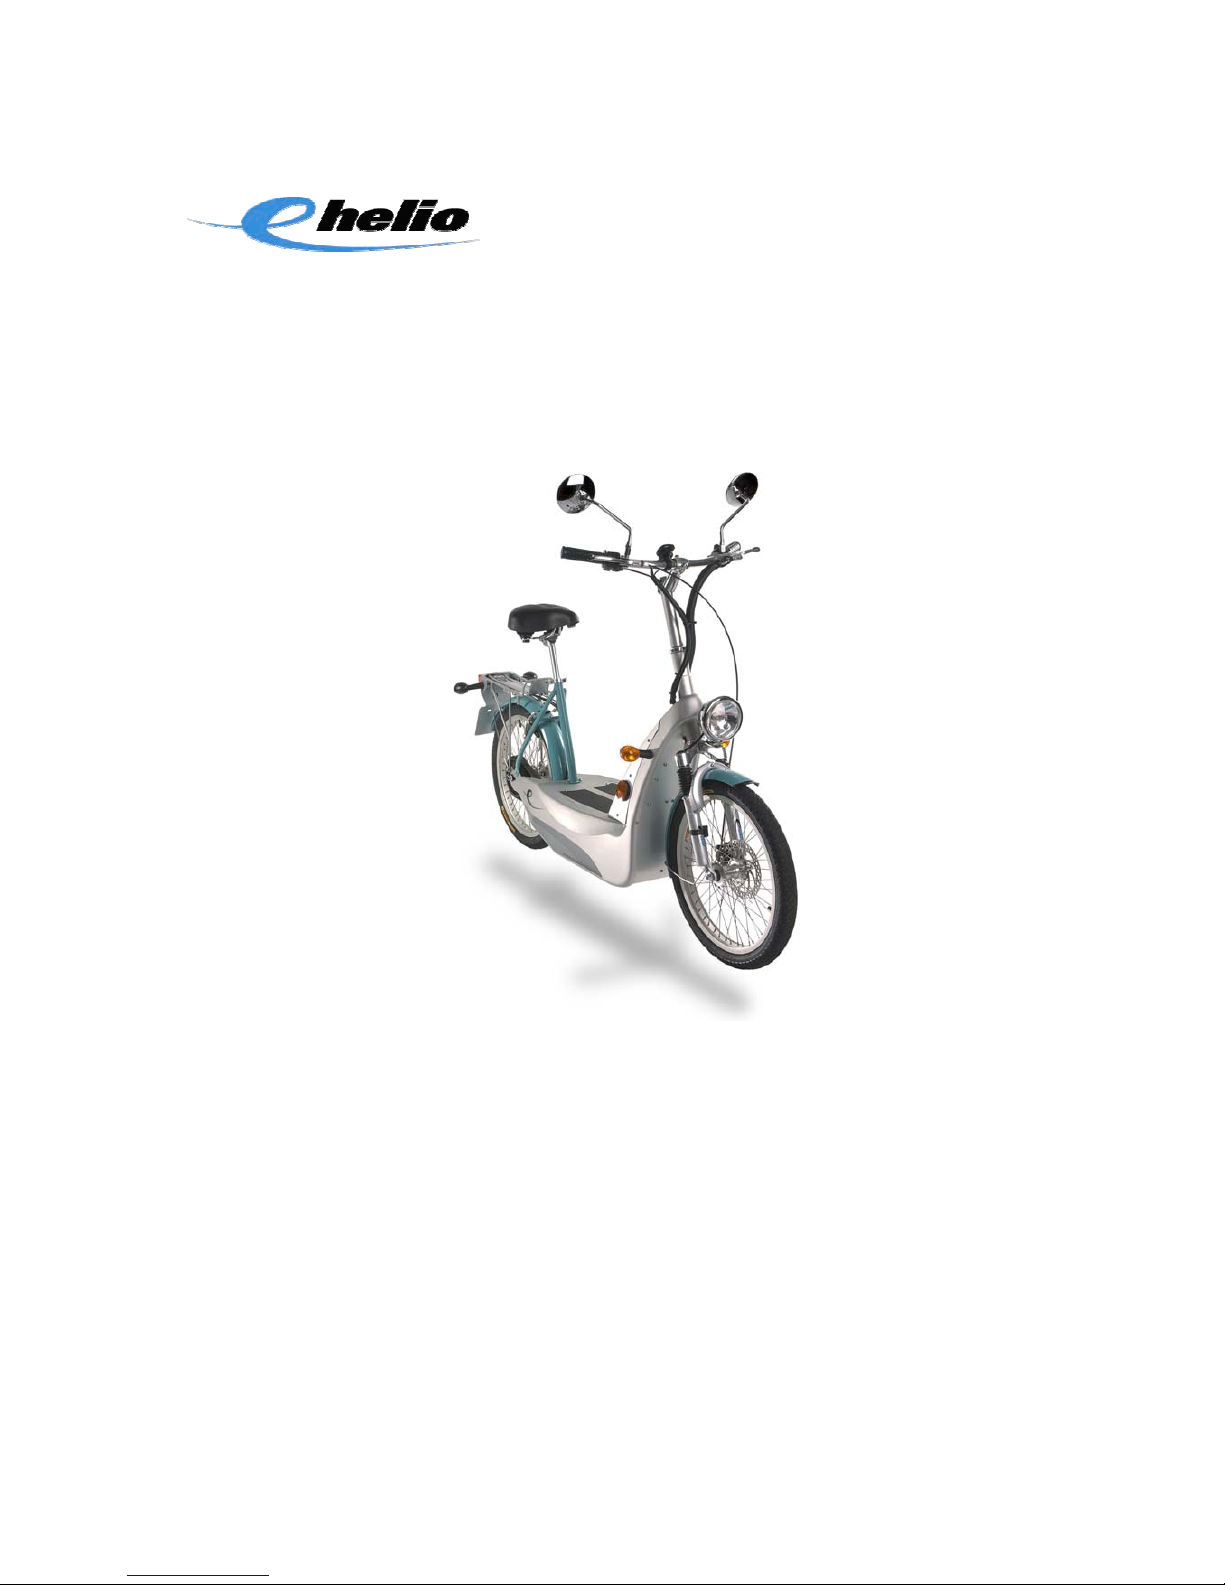
Your Electric Helio Cycle
(The Helio also includes turn signals and other details that are fully explained in this
manual)
Congratulations! We’re glad that you have purchased an electric Helio Cycle. Your
Helio Cycle is a high-quality vehicle designed to be extremely safe and will give you
many years of reliable service.
Your Helio Cycle is simple to use. It’s easier to ride than a bicycle. It has a low
scooter-type chassis that allows step-through mounting and dismounting and a low
center of gravity that makes handling a breeze, even when you’re riding slowly. The
key-controlled Performance Selector allows you to select performance characteristics
to suit your personal riding needs.
Your Helio Cycle is also simple to re-charge. After a ride, just plug it in to any
household outlet and the integrated, on-board, smart-charging system will
automatically re-energize the batteries. Leave it plugged in when you are not using it
and your batteries will thank you with a long life.
Your Helio Cycle is also easy on the environment, since it’s powered by an energyefficient, emission-free electric motor. No smog, no fumes, no greenhouse gasses.
Just plain smart transportation.
Page 7

Owners manual
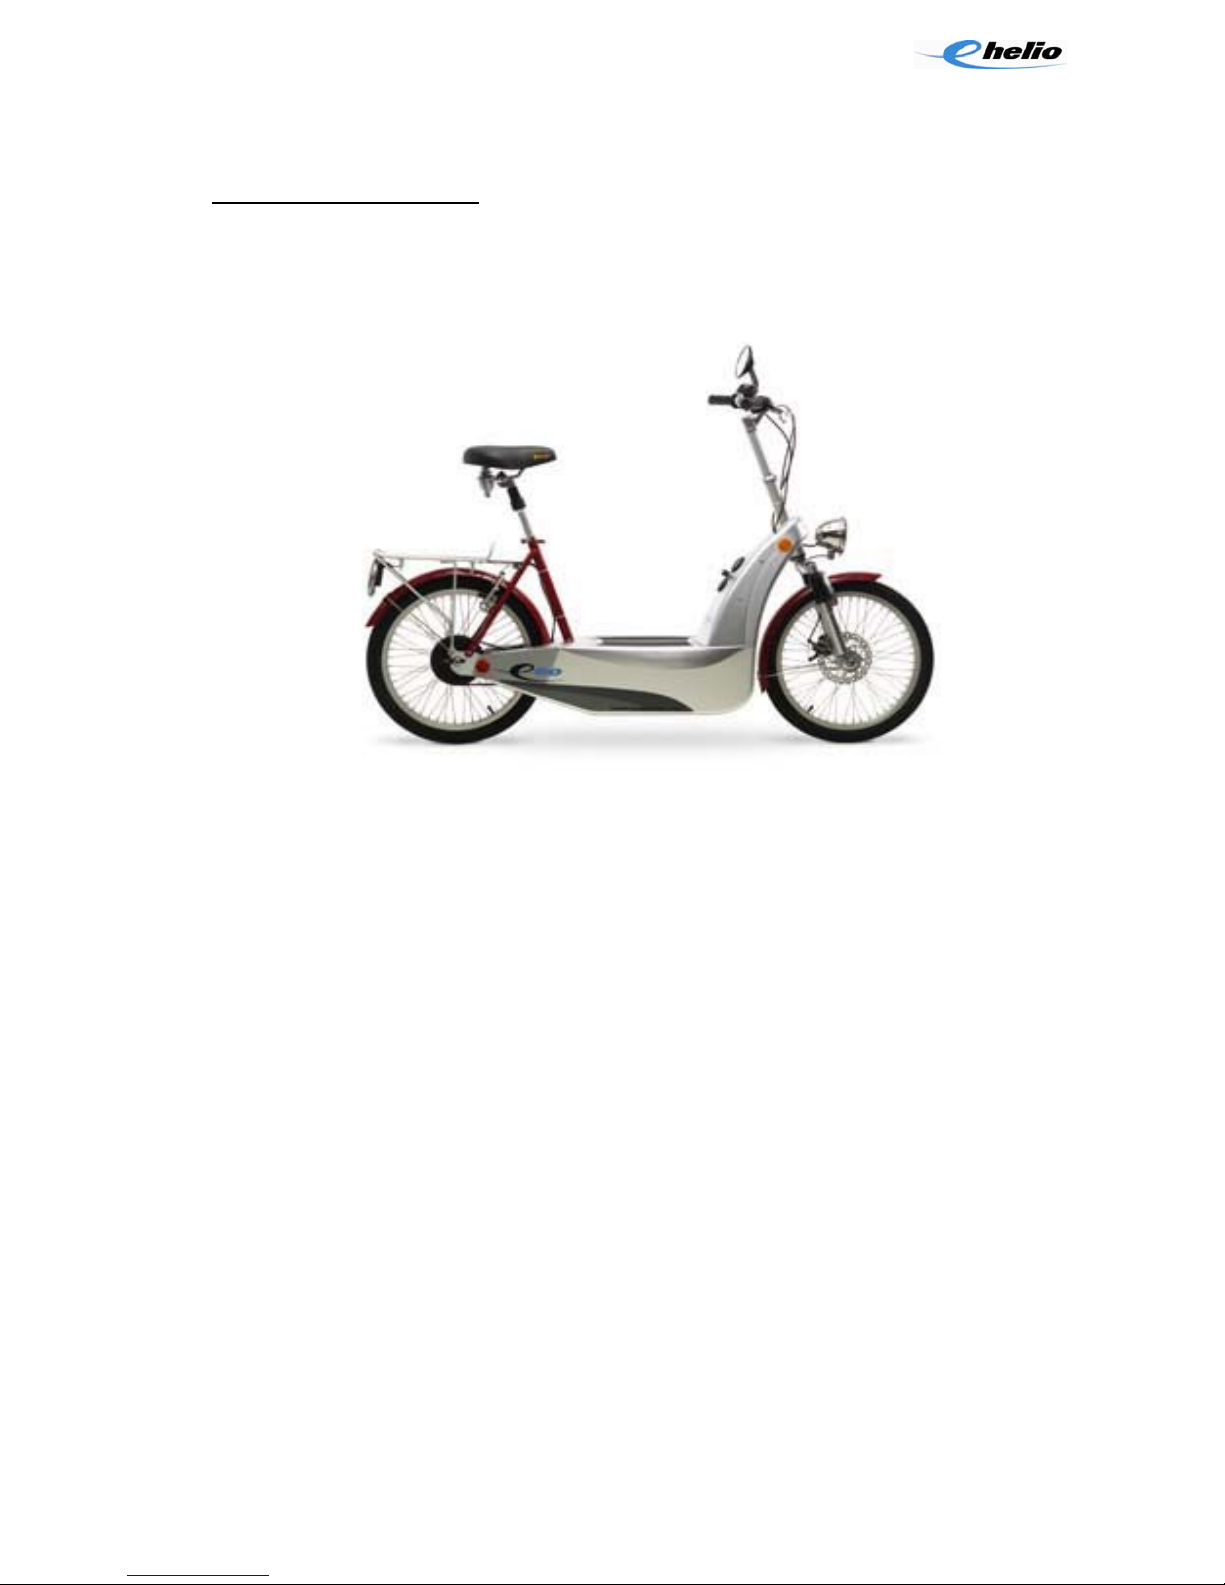
Best of all, your Helio Cycle is also good for your spirit, because it’s really fun to
ride! The large wheels and high-performance tires give it unparalleled cornering and
handling ability. The high-torque motor, twist-grip throttle, automatic braking feature,
and hand brakes allow for extremely responsive and precisely controlled acceleration
and deceleration. It’s so fun to ride that you’ll get bugs in your teeth from smiling!
Riding your Helio Cycle in Public:
We've designed your Helio Cycle to be a practical means of everyday transportation not a toy for up and down the driveway. Your Helio Cycle is perfect for the shorter
trips that make up the majority of travel
Page 8

General Safety Information
We designed your Helio Cycle to be as safe as possible, but there are still many
dangers inherent in riding your Helio Cycle, especially on public roadways. There is a
risk of injury or even death. By choosing to ride your Helio Cycle, you assume the
responsibility for that risk - not the other people on the road, not the people who
maintain the roads, not us, but
YOU. So it’s up to you to become familiar with the
rules of safe riding.
Learning to ride your Helio Cycle is not difficult, but it may not come naturally for you.
If you already know how to ride a bicycle, learning to ride your Helio Cycle will be
straightforward. If you don’t already know how to ride a bicycle, we recommend you
learn before you try to ride your Helio Cycle. Once you’ve mastered the basics of
balancing and steering a bicycle, learning to ride your Helio Cycle will be much
easier.
Even if you’re a pro on a bicycle, keep in mind that your Helio Cycle has the
equivalent power of almost 2 horses! That kind of power takes some getting used to!
Start out slowly (or even ride on a flat grassy area) until you’re comfortable with the
reins.
The Basics:
Always follow the pre-ride safety checklist (see page 44) before every ride.
• Wear an approved helmet.
• Wear sturdy clothes to protect you if you fall. Also, make sure they are not
loose enough to become tangled in moving parts.
• Obey all traffic regulations. Stop at stop signs and red lights, signal your turns,
and be prepared to yield the right-of-way even if it’s legally yours, because in a
collision with a car, right or wrong, you’ll lose.
• Ride defensively. Assume that the people in cars are completely oblivious to
you.
• Keep your speed at a level consistent with traffic and weather conditions.
• Ride on the side of the road, with the traffic.
• Be prepared for parked car doors opening in front of you, pedestrians stepping
into your path, cars pulling out in front of you, or any other event that could
cause you to have to swerve suddenly to avoid a crash.
• Watch for potholes, sewer and storm grates, railway tracks, expansion joints,
road construction, and other obstacles or obstructions that could cause you to
lose your balance.
• Keep in mind that your Helio Cycle tires are more like bike tires than car tires.
Avoid glass or other sharp-edged debris that could puncture the tires. If you do
ride through glass or sharp-edged debris, stop and remove any debris from
the tires and make sure they are undamaged.
• Never ride with headphones. Headphones mask many sounds that may be
extremely important to you, like wailing sirens, squealing brakes, and shrieking
pedestrians.
Page 9

Owners manual
• Never carry a passenger. Your Helio Cycle is designed to carry ONLY ONE
PERSON.
• Thoroughly learn to control the braking, acceleration and steering of your Helio
Cycle before you venture out into traffic.
• Never carry anything that obstructs your vision or makes control of your Helio
Cycle difficult or awkward.
• Never ride your Helio Cycle while under the influence of alcohol or drugs.
• When possible, avoid riding your Helio Cycle in bad weather, when visibility is
obscured, or when you are extremely tired.
Helmets
Even though the law requires you to wear a helmet, common sense dictates that you
should anyway, regardless of what the law says. Most serious cycle injuries involve
head injuries that might have been avoided if the rider had worn a helmet. Get
yourself a high quality approved helmet; make sure it fits correctly; and WEAR IT.
☺ “The graveyards are filled with indispensable men.”
- Charles De Gaulle quoting Shakespeare
Wet or Icy Weather Riding
We recommend that you leave your Helio Cycle at home when the weather gets
nasty, not because the weather will damage your Helio Cycle, but because riding in
foul weather is dangerous. Roads get slippery, traction is reduced, brakes don’t work
as well, and usually, visibility is reduced. If you do need to ride in foul weather, be
especially careful and follow these safety tips:
• WHEN YOUR BRAKES ARE WET, STOPPING POWER IS GREATLY
REDUCED. It may take you twice as far to stop when your brakes are wet! So
when it’s wet outside, ride slower, allow extra stopping distance and avoid
quick or jerky maneuvers. Apply your brakes earlier and more gradually.
• WET SURFACES ARE MORE SLIPPERY THAN DRY ONES. Watch for
“slippery when wet” hazards in the road. Manhole covers, sewer grates, and
even certain types of pavement and stone inlays can become as slick as ice
when wet. Avoid riding over these hazards, especially while steering through
a corner, when you’re especially susceptible to taking a spill.
Also, though your Helio Cycle will not be damaged by rainy rides, avoid riding
through deep puddles that may immerse the chassis underwater. If your Helio Cycle
does get wet, wipe it down with an old towel to protect the finish, and wait until it’s dry
inside and out before you ride it.
9 Icy or wet weather impairs traction, braking and visibility, both for you and
for everything else on the road. The risk of accident is dramatically increased
Page 10

in icy or wet conditions. So if you must ride in these conditions, be extra-super
careful! Do everything you can to avoid injury and death!
Night Riding
Your Helio Cycle is outfitted for riding at night, however, riding at night is dangerous
for two reasons: (1) you can’t see as well, and (2) neither can anyone else. Besides,
you and your Helio Cycle present a much smaller profile than a car, and so naturally,
you’re more difficult to see. Avoid night riding if possible. If you must ride at night,
follow these guidelines:
• Make sure all your lights work and are turned on.
• Wear light colored, reflective clothing and accessories such as reflective vest,
a reflective headband, armbands, and leg bands, and reflective stripes on your
helmet.
• Ride slowly.
• Avoid areas with heavy traffic.
9 Riding at night, at dusk, or when visibility is reduced is dangerous. You can’t
see as well, and neither can anyone else on the road. Avoid it if you can. If you
must ride when visibility is impaired, be extremely careful. And be sure to turn
on your lights.
☺ “Be careful going in search of adventure – it is ridiculously easy to
find.”
- William Least Heat Moon
A Special Caution for Parents
In most places it is illegal for children under the age of 16 to ride an Helio Cycle on
public roads. We discourage the use of an Helio Cycle by anyone under the age of
16. Regardless of the law, or our policy on the matter, as a parent it is your
responsibility to ensure the safety of your child. If you decide to allow your child to
ride an Helio Cycle, both you and your child should read this manual beforehand.
Make sure that the seat and handlebars are adjusted properly for a smaller rider.
Make sure that you and your child have learned and understand how to operate the
Helio Cycle safely. Make sure your child has learned and understands the pre-ride
safety checklist. Make sure your child follows the checklist before each ride. Make
sure that both you and your child understand and obey all relevant motor vehicle laws
as well as the common sense rules of safe and responsible Helio Cycle operation.
And above all else, MAKE CERTAIN THAT YOUR CHILD WEARS A HELMET
WHILE RIDING AN EGO / HELIO CYCLE.
☺ “Example isn’t the main thing in influencing others. It’s the only
thing.”
- Albert Schweitzer
Page 11

Owners manual
Registration Information
Traffic and vehicle laws vary from jurisdiction to jurisdiction. Some jurisdictions have
created special laws covering electric vehicles like the Helio Cycle, but in many
jurisdictions, there are no such laws. Consequently, your Helio Cycle may be covered
by laws originally written for other types of vehicles (like mopeds or even bicycles).
Some of these laws require registration and/or insurance before using an Helio Cycle
on a public road. Many jurisdictions require no special operator’s license, but do
require that you have a driver’s license. In these jurisdictions, you could be ticketed
for operating your Helio Cycle on a public road without the proper license or
registration.
It is your responsibility to find out the laws for your area and to comply with them at
all times. Call your local Police Department or Department of Motor Vehicles to learn
about the laws in your area.
☺ “I would uphold the law if for no other reason than to protect myself.”
- Thomas More
Page 12
Assembling your Helio Cycle
Chances are, you have already assembled your Helio Cycle using the Quick
Assembly Guide. But for completeness, we cover the assembly here as well.
Assembling your Helio Cycle is simple and takes only a few minutes. However, if
you’re unsure of your ability to properly assemble your Helio Cycle or simply don’t
want to do it yourself, your local bicycle shop might be able to help.
A properly sized allen key and hex wrench are required, so we included these tools in
the box. No other tools are required other than scissors to cut away some of the
packaging straps.
9 Obviously, it is extremely important that you assemble your Helio Cycle
correctly. If you don’t, you may not be able to control your Helio Cycle. An
uncontrollable Helio can cause severe injury or even death, so follow the
procedures carefully.
☺ “If you cannot find the time to do a task correctly, how will you find the
time to do it over?”
- unknown
Your Helio Cycle was carefully assembled and thoroughly tested for proper
performance at the factory. To facilitate shipping, we removed the handlebar and
front wheel assemblies and the saddle assembly. The front wheel is also removed
from the front fork. To reassemble your Helio Cycle:
Unpacking your Helio Cycle
1. Find a large, clean, flat surface,
like your garage or driveway, to
unpack your Helio Cycle.
2. With the box upright, remove
the strapping material and open
the top of the box. Then open
the ends of the box allowing the
large side panel to fold down to
the ground.
3. Slide the Helio Cycle out of the
box onto the open cardboard
panel. Locate the small box
with parts inside. Inside you
will find some small parts and the tools needed for assembly.
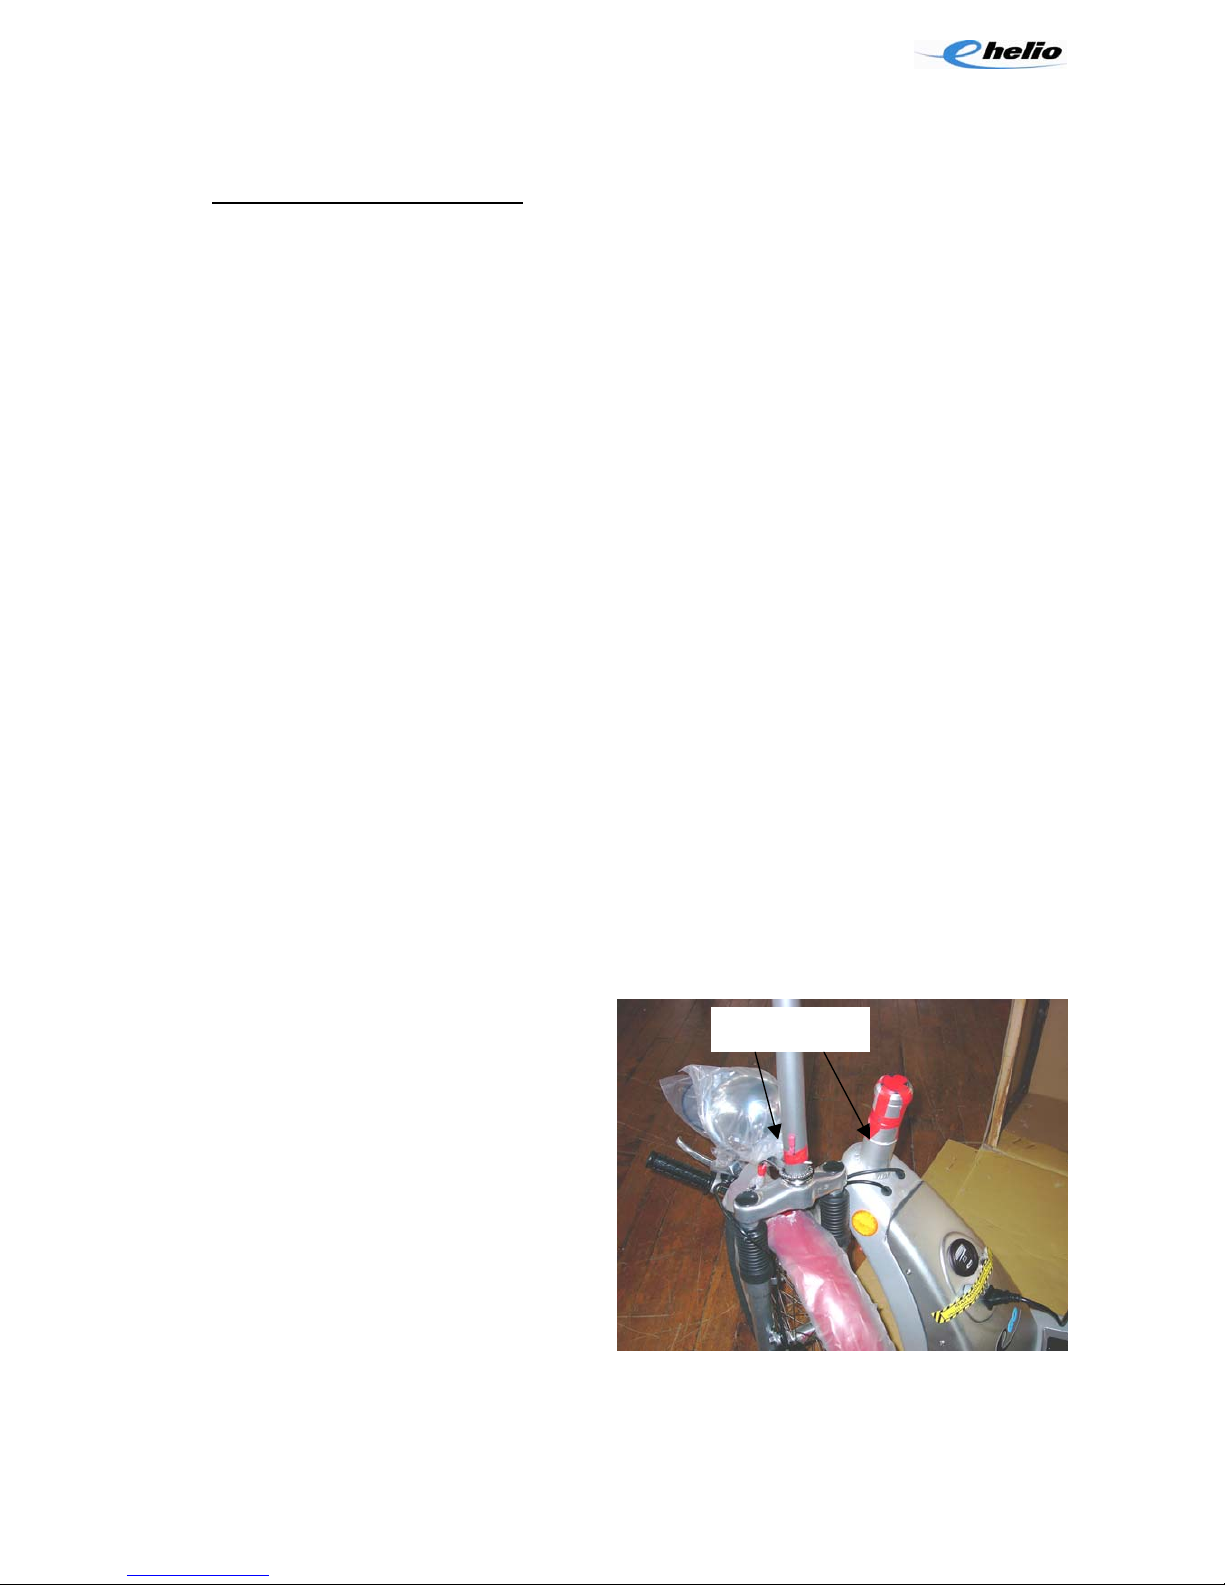
Red Tape
4. Cut away the plastic tie wraps and remove the packaging material.
Page 13

Owners manual
5. Locate the two areas of red tape securing some small bearing parts for
shipping and assembly. Carefully remove the red tape from the fork tube and
the red tape holding the small parts on the head tube of the chassis. Be sure
to leave the bearing parts on the fork tube and neck in the same position and
order.
6. If the bearing parts need to be re-installed
on the fork tube, be sure the balls
face up and the ball bearing retaining ring faces down. If bearing parts
need to be re-installed
on the chassis head tube, be sure the balls face
down.
Installing the front wheel in the front fork
7. Remove the plastic brace
between the ends of the front
fork.
8. Remove the nut and the washers
from each side of the wheel, and
slide the wheel between the fork,
being sure the metal disk inserts
between the disk brake pads.
Remove the paper spacer
between disk pads if present.
9. Once the wheel is in the fork,
place the washers and nut in this
order: 1. Regular Washer, 2.
Safety Washer (flange inserts
into the small hole in the fork), 3. Regular Washer, 4. Wheel retaining nut.
Tighten.
Installing handlebars and front wheel assembly
10. Leaving the Helio Cycle on the cardboard panel, lean the Cycle away from you
on to its side.
11. Slide the fork tube of the front
wheel assembly into the head
tube of the chassis, then stand
the Helio Cycle upright and
support it with the kickstand
(under the wing on the left side of
the Cycle).
12. See top figure for installation of
bearing parts
on the chassis
head tube. Be sure the balls
face down and the ball bearing
retaining ring faces up. (This is
opposite of the bearings on the fork tube – See #6.)
13. Slide the aluminum tube, from the small box onto the fork tube.
14. Place the handlebar stem onto the fork tube. Make sure the cables are not
twisted or crossed.
Page 14
 Loading...