

Page 1

®
INSTRUCTION MANUAL
© 2013 Hobbico®, Inc. HMXR4854
Page 2
®
INTRODUCTION
INTRODUCTION
Thank you for purchasing the Heli-Max Digital Pitch Gauge. This
product is intended to measure the angle on the helicopter’s main
and tail rotor blades during setup. The gauge can also be used
without the mounting plate for other tasks that would require a level.
®
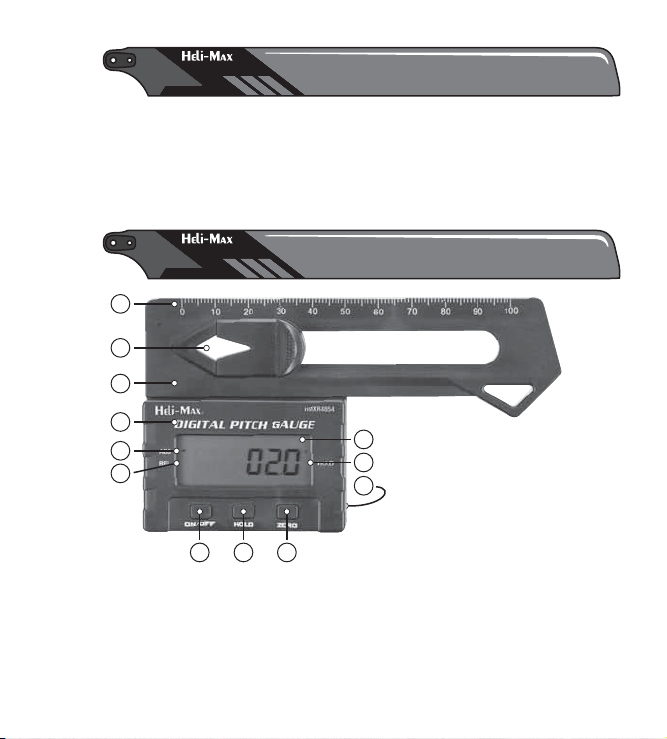
CONTROLS
CONTROLS
1
2
3
4
5
6
7 8 9
1. Ruler
2. Blade Clamp
3. Mounting Plate
4. Digital Pitch Gauge
5. ABS Indicator
6. REL Indicator
10
11
12
7. ON/OFF
8. HOLD Button
9. ZERO Button
10. LCD Display
11. Hold Indicator
12. Battery Compartment Cover
Page 3
OFF/ON Button: Press the button to turn the gauge on or off. The
gauge will turn itself off after 5 minutes of inactivity.
ABS Indicator: The gauge will be in ABS (Absolute Measurement
Mode) when it is turned on. This mode uses 0 degrees as the
reference point for all measurements. When the gauge is in this
mode, you will see a small pointer on the left side of the display
by the ABS sign.
REL Indicator: When the ZERO button is pressed, the gauge will
set the reference point to the angle that the gauge is in at that time.
The small pointer on the left side of the display will be down by
the REL sign. This indicates that the gauge is now in the Relative
Measurement Mode. Pressing the ZERO button again will put the
gauge back in the ABS mode.
HOLD Button: When the HOLD button is pressed, the gauge will
turn off the sensor and hold the reading that is on the display. A
pointer will be visible on the right side of the display by the HOLD
sign when this feature is active. Pressing the ZERO button again
will restore the gauge to normal operation.
®
SETUP
SETUP
Remove the battery compartment cover.
Peel off tape on the battery.
Replace the battery compartment cover.
The pitch gauge is now ready for use.
Page 4

®
OPERATION
OPERATION
For the most accurate pitch reading, the Heli-Max Digital Pitch
Gauge should be reset so it is perpendicular to your helicopter’s
mainshaft. The end of the motor on an electric model, or a flat top/
bottom section of the side frames should be good surfaces to use.
Place the gauge on the area selected and press the ZERO button
to put the gauge in REL mode. When you measure the pitch of the
rotor blades, position the blades so the gauge is facing the same
direction it was when the ZERO button was pressed
Page 5

Turn on Pitch Gauge.
Extend both rotor blades so they are 180° apart.
Slide the gauge onto one of the rotor blades. Position the gauge
as close as possible to the blade grip. For maximum accuracy
when checking the pitch of the other blade, position the gauge
the same distance from the blade grip.
Page 6

®
BATTERY REPLACEMENT
BATTERY REPLACEMENT
Remove battery compartment cover.
Remove discharged batteries.
Install (2) replacement CR2032 batteries. Please note that the
positive side of each battery should be on top.
Replace the battery compartment cover.
The gauge does not need re-calibration after the batteries have
been replaced.
®
STORAGE
STORAGE
If the gauge is not going to be used for a long time period, please
remove the batteries to prevent damage to the contacts.
®
SPECIFICATIONS
SPECIFICATIONS
Operating Voltage: 3. 9~6VDC
Sleep Current: < 7uA
Low Voltage Protection: 4V±0.05
Detectable Pitch Range: -90° ~ 0 ~ +90° (Screen flashes warning)
Blade Chord Range: 15mm to 65mm
Current Consumption: < 4mA
Resolution: 0.1°
Page 7

®
TECHNICAL SUPPORT
TECHNICAL SUPPORT
If you need technical support or have a question, you can reach us
by one of the following means:
Email: helihotline@hobbico.com. Please try to include as much
information as possible when asking your question. Also please
be sure to list your full email address (ex: johndoe@aol.com) as
well as at least one other means of daytime contact in your email.
Telephone: 1-217-398-8970, ext. 5. Available Monday-Friday,
8am-5pm U.S. Central Time.
FAX: 1-217-398-7721.
telephone number or return fax number so that we can contact you.
Regular mail:
mailed letter. Simply write to us, including a brief explanation of your
problem or question along with the product name you are referring
to. Use the Hobby Services address shown on the next page.
If you prefer, we can always respond with a regular
Please be sure to include a daytime
Page 8

®
®
WARRANTY
WARRANTY
Heli-Max guarantees this accessory to be free from defects in both
material and workmanship at the date of purchase. In no case
shall Heli-Max’s liability exceed the original cost of the purchased
item. Further, Heli-Max reserves the right to change or modify this
warranty without notice. If the buyer is not prepared to accept the
liability associated with the use of this product, the buyer is advised
to return this item immediately in new and unused condition to the
place of purchase.
To make a warranty claim, send the defective item to Hobby
Services at this address.
Hobby Services
3002 N. Apollo Dr., Suite 1
Champaign, IL 61822
Please include a letter stating your name, return shipping address,
as much contact information as possible (daytime telephone
number, fax number, e-mail address), a detailed description of the
problem and a photocopy of the purchase receipt.
 Loading...