

Page 1
®
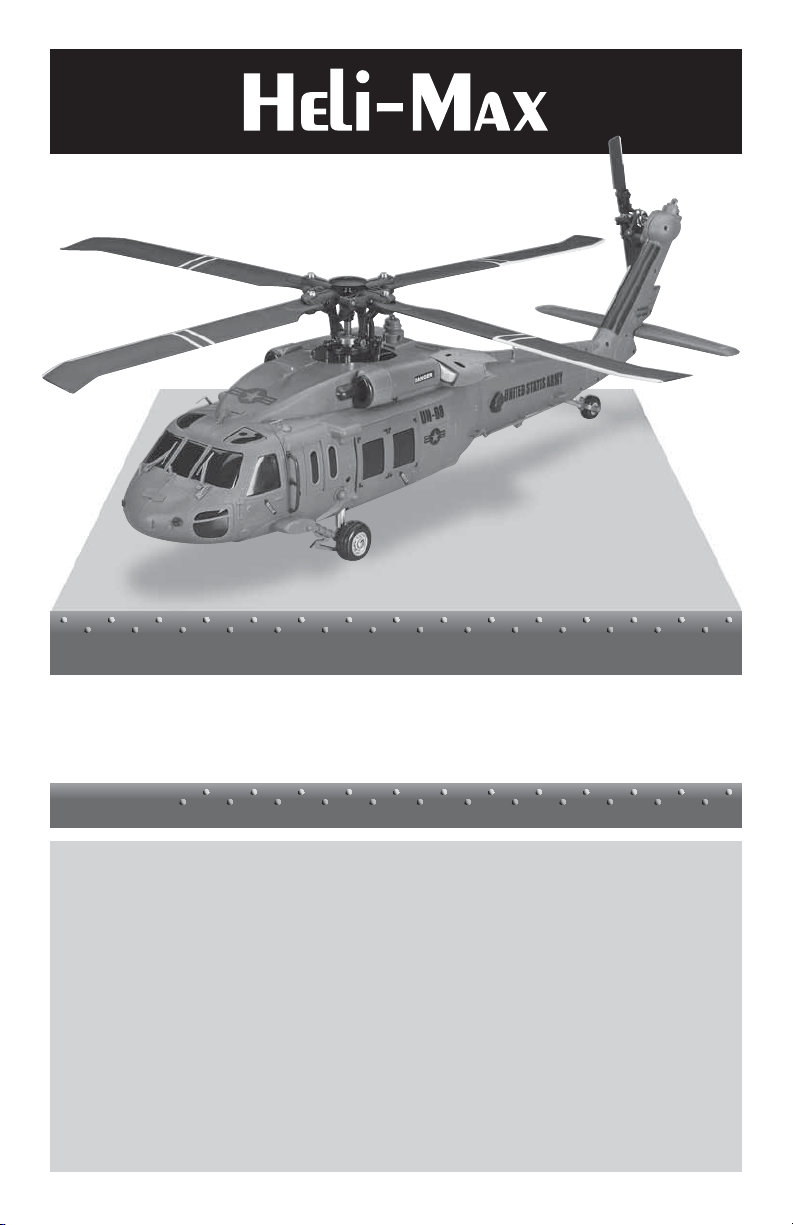
BLACK HAWK 1/43 Scale 4-Blade
Instruction Manual
NOTICE
● The instruction manual, warranties and other associated documentation are subject to
change without notice. Hobbico assumes no responsibility for inadvertent errors in this
manual.
● MAINTENANCE: Due to the complex design of the BLACK HAWK Helicopter this product
is for an intermediate pilot with previous RC helicopter experience. This detailed scale
helicopter has additional and more complex maintenance required than a standard "pod
and boom" helicopter. The various detailed and delicate parts and enclosed mechanical
assemblies require additional time and eort to access for maintenance. If you feel this
product is not for you, please return it to the place of purchase before you use the product.
● Heli-Max products are to be
used by ages 14 and over.
Entire Contents © 2013 Hobbico®, Inc.
BLACK HAWK and the BLACK HAWK helicopter design are
trademarks of Sikorsky Aircraft Corporation. They are
licensed throughout the world to Shanghai Nine Eagles
Electronic Technology Co., Ltd.
HMXE0838 RTF HMXE0839 TxR
Page 2

introduction
Thank you for purchasing the Heli-Max BLACK HAWK Helicopter. We are certain
you will get many hours of enjoyment out of this model. If you should have any
qu estions or c once rns please feel free to contact us at: helih otline@hob bico.c om.
Full Scale BLACK HAWK Information and Specifi cations
The Sikorsky UH-60 BLACK HAWK is a four-bladed, twin-engine, medium-lift
utility helicopter manufactured by Sikorsky Aircraft. The Army designated the
prototype as the YUH-60A and selected the BLACK HAWK as the winner of
the program in 1976, after a fl y-off competition with the Boeing Vertol YUH-61.
The UH-60A entered service with the U.S. Army in 1979, to replace the Bell
UH-1 Iroquois as the Army’s tactical transport helicopter. This was followed by
the fi elding of electronic warfare and special operations variants of the BLACK
HAWK . Im proved UH-60L and UH-60M uti lity variants h ave al so been developed.
Modifi ed versions have also been developed for the U.S. Navy, Air Force, and
Co ast Guard. In addition to U.S. Army use, th e UH- 60 fam ily has been exported
to several nations. BLACK HAWKs have served in combat during confl icts in
Grenada, Panama, Iraq, Somalia, the Balkans, Afghanistan, and other areas
in the Middle East.
General Characteristics
Crew: 2 pilots (fl ight crew) with 2 crew chiefs/gunners
Capacity: 2,640 lb (1,200 kg) of cargo internally, including
11 troops or 6 stretchers, or 8,000 lb (3,600 kg)
(UH-60A) or 9,000 lb (4,100 kg) (UH-60L) of cargo
externally.
Length: 64 ft 10 in (19.76 m)
Fuselage Width: 7 ft 9 in (2.36 m)
Rotor Diameter: 53 ft 8 in (16.36 m)
Height: 16 ft 10 in (5.13 m)
Disc Area: 2,260 ft² (210 m²)
Empty Weight: 10,624 lb (4,819 kg)
Loaded Weight: 22,000 lb (9,980 kg)
Max. Takeoff Weight: 23,500 lb (10,660 kg)
Powerplant: 2 × General Electric T700-GE-701C turboshaft,
1,890 hp (1,410 kW) each
Performance
Never Exceed Speed: 193 knots (222 mph, 357 km/h)
Maximum Speed: 159 kt (183 mph, 295 km/h)
Cruise Speed: 150 kt (173 mph, 278 km/h)
Combat Radius: 368 mi (320 nmi, 592 km)
2
Page 3
Ferry Range: 1,380 mi (1,200 nmi, 2,220 km) with ESSS stub
wings and external tanks
Service Ceiling: 19,000 ft (5,790 m)
Rate of Climb: 1,315 ft/min (4.5 m/s)
Armament
Guns: 2 × 7.62 mm (0.30 in) M240H machine guns, or 2 ×
7.62 mm (0.30 in) M134 minigun, or 2 × .50 in (12.7
mm) GAU-19 gatling guns
Rockets: 70 mm (2.75 in) Hydra 70 rockets
Missiles: AGM-114 Hellfi re laser guided missiles, AIM-92
Stinger air-to-air missiles
Bombs: Can be equipped with VOLCANO minefi eld
dispersal system
For the latest technical updates or manual corrections to the Heli-Max BLACK
HAWK visit the Heli-Max web site at www.helimax-rc.com. Open the “Helicopters”
link, and then select the BLACK HAWK helicopter. If there is any new technical
information, changes or important updates to this model, a “tech notice” box
will appear on the page. Click the “tech notice” box to learn more.
When you see this symbol, please pay special attention and
heed all warnings regarding the information within.
safety precautions
Failure to follow these safety precautions may result in injury
to yourself and others.
● Ke ep your face an d body as well as all spec tators away from the rotating plane
of the blades whenever the battery is connected. Keep loose clothing, shirt
sleeves, ties, scarfs, long hair or loose objects such as pencils or screwdrivers
that may fall out of shirt or jacket pockets away from the rotors. The spinning
blades of a model helicopter can cause serious injury. When choosing a fl ying
site for your BLACK HAWK, stay clear of buildings, trees and power lines.
AVOID fl ying in or near crowded areas. DO NOT fl y close to people or pets.
Maintain a safe distance from the helicopter.
● Your BLACK HAWK should not be considered a toy. Because of its performance
capabilities, the BLACK HAWK, if not operated correctly, could cause injury
to you or spectators and damage to property.
3
Page 4

● Do not alter or modify the model. Doing so may result in an unsafe or un-
fl y a b l e m o d e l .
● When and if repairs are necessary, you must correctly install all components
so that the model operates properly on the ground and in the air. Please check
the operation of the model before every fl ight to insure that all equipment is
operating and that the model has remained structurally sound. Be sure to
check linkages or other connectors often and replace them if they show any
signs of wear or fatigue.
battery warnings
Battery Warnings and Usage Guidelines
Please read and understand the following regarding the usage of Li-Po batteries.
● Through the use of the included LiPo battery you have assumed all risk and
responsibility regarding a LiPo battery and its use.
● ALWAYS unplug your battery from either the charger or helicopter after use.
NEVER store your helicopter with the battery plugged into the helicopter.
● Do not attempt to charge your battery if it becomes swollen or hot.
● It’s best to store your batteries charged and at room temperature. Storing a
fully discharged battery may cause irreversible damage to the battery.
● Never disassemble, puncture or modify the battery pack in anyway.
● Never allow the battery temperature to exceed 150° F [65° C].
● If your batter y begins to swell or “puf f ” dur ing charge or discharge or becomes
damaged in anyway, stop using it and contact Hobby Services at 217-3980007 to learn the proper way to dispose of it.
● Keep track of you batteries at all times.
Charge Warnings
● Only use the included charger with the included LiPo battery. Do not attempt to
use the provided charger with NiCd, NiMH or batteries with other chemistries.
● Do not leave the charger unattended while in use and always charge your
batteries on a fi re-resistant surface.
● Disconnect the battery and remove input power from the charger immediately
if either becomes hot!
● Do not allow water or other foreign objects to enter the charger. Keep the
charger away from moisture and do not submerge in water. Do not block the
air intake holes of the charger; this could cause the charger to overheat.
● Please keep all electronic components out of the reach of children!
4
Page 5
warr a n ty
Heli-Max guarantees this kit to be free from defects in both material and
workmanship at the date of purchase. This warranty does not cover any component
parts damaged by use or modifi cation. In no case shall Heli-Max’s liability
exceed the original cost of the purchased kit. Fur ther, Heli-Ma x res erves the
right to change or modify this warranty without notice. In that Heli-Max has no
control over the fi nal assembly or material used for fi nal assembly, no liability
shall be assumed nor accepted for any damage resulting from the use by the
user of the fi nal user-assembled product. By the act of using the user assembled
product, the user accepts all resulting liability. If the buyer is not prepared
to accept the liability associated with the use of this product, the buyer
is advised to return this kit immediately in new and unused condition to
the place of purchase.
To make a warranty claim, Hobby Services 217-398-0007
send the defective part or 3002 N. Apollo Dr., Suite 1
item to Hobby Services Champaign, IL 61822
at this address. USA
Include a letter stating your name, return shipping address, as much contact
information as possible (daytime telephone number, fax number, e-mail address),
a detailed description of the problem and a photocopy of the purchase receipt.
Upon receipt of the package the problem will be evaluated as quickly as possible.
Required: 8 AA batteries
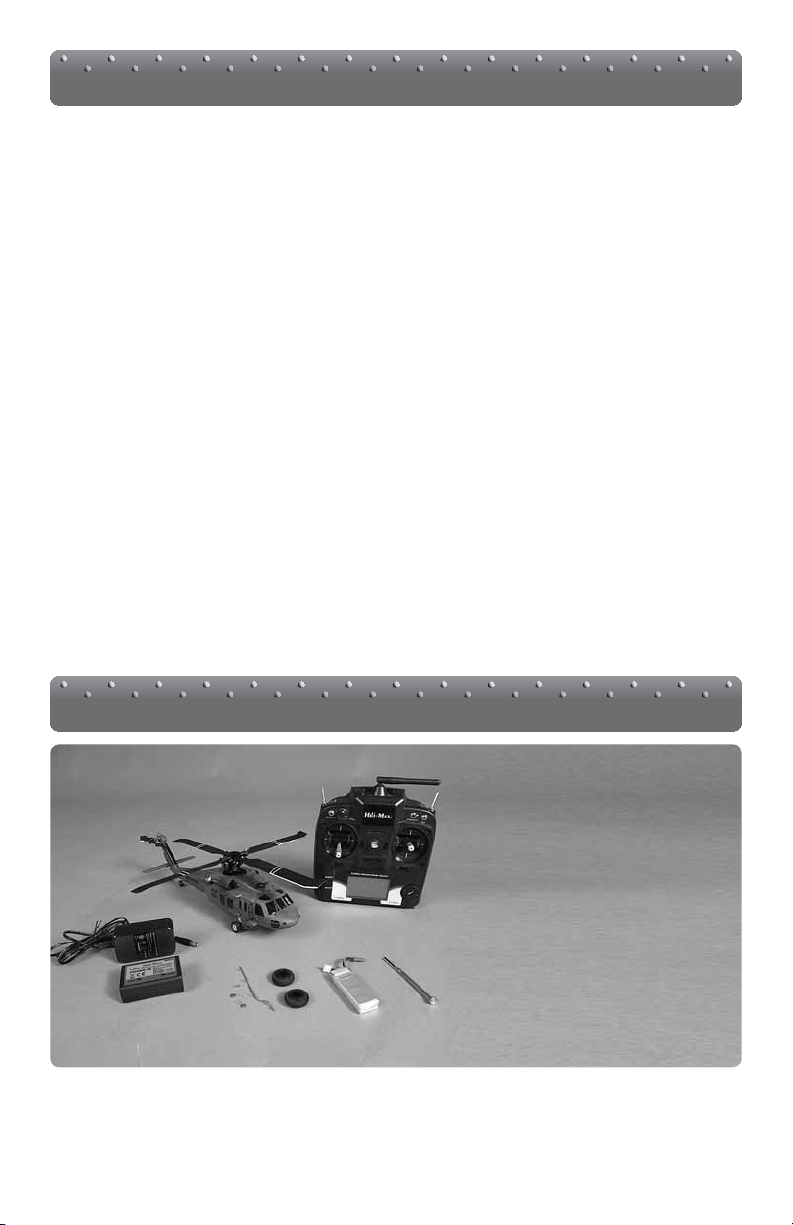
contents
● Heli-Max TX 610 Transmitter
and Manual (Transmitter not
included with Tx-R model)
● BLACK HAWK Helicopter
and Manual
● 600mAh 2S LiPo Flight
Battery
● Charger and wall adaptor
● Low bounce tires
● Replacement detail parts
● Screwdriver
5
Page 6
specifications
General
Scale: 1:43
Management:
Motor: Brushless
Shaft Drive Tail System: Yes
Empty Weight: 175g (6.17 oz)
Weight RTF: 211g (7.44 oz)
Blade Length: 140mm (5.51")
Tail Rotor Diameter: 80mm (3.14")
Overall Length: 425mm (16.73")
Height: 100mm (3.39")
Width: 112mm (4.40")
Motor Controller
Voltage: 7. 4V Max Current: 15 amp (5min)
No Load Current: 0.5A Voltage: 11.1V
No Load Speed: 28500 V/RPM BEC: 1 amp
KV Value: 3800 Slow Start Function: Yes
Size: 22 x 17 Thermal Protection: 90 C 120 C
Weight: 21g Soft Cutoff: Yes
Collective Pitch, 120 degree CCPM, TAGS control
operational warnings
● Please allow a 10 minute cool down period after each fl ight so
the motor controller and motor can cool down. Failure to do
so may cause loss of control due to the controller overheating
and shutting down.
● Inspect the main rotor blades and blade screws before each fl ight for nicks
or loose components. If any damage is found or if the blades have been
damaged, replace the blades before fl ying the model again.
● The motor controller has a soft cut function that will reduce the power output
to protect the fl ight battery. Toward the end of a fl ight you will notice a slight
power reduction. Land the model immediately. The fl ight time of the BLACK
HAWK can be as long as 6 minutes (Standard Hover) but this will vary
depending on your fl ying style.
● After a crash you must inspect all plastic parts on the helicopter for damage
before attempting to fl y the model again.
● Always unplug your battery from the helicopter after use.
6
Page 7

NOTE: If you are new to
Scale Heli fl ying it’s a good
idea to install the included low
bounce tires. These tires allow
a little more shock absorption
as you are learning to fl y and
land your BLACK HAWK.
To change the tires grasp the
gear leg in one hand and peel
away the scale rubber tire.
Slip on the low bounce tire with the smoother of the two rim fl anges facing to
the outside. HINT: To make the tires easer to slip on, make sure they are warm.
Place them in your pocket for a few minutes to warm up before you attempt to
install them.
We have also included a few extra detail parts for your convenience.
7
Page 8

transmitter (rtf model)
Please fully read the transmitter manual included with your helicopter to learn
more about how to use and adjust your TX610.
Important Transmitter Functions
The Throttle Hold Switch (HOLD/
FLAP) is used to disable the power
output of the motor but has no effect
on the other controls. The throttle
hold function is intended for
autorotation landings off power
descent to landing; this maneuver
is really not all that realistic in a
model this size. In addition to
autorotation the throttle hold
function can be used as a safety
switch while handling the model
since it disables power to the motor. Turn the transmitter on and set the throttle
hold switch to the on position. Now you can safely connect the fl ight battery
without having to worry about inadvertently moving the throttle stick once you
place the model on the ground. Verify that the idle up switch is off and the throttle
stick has been moved to its lowest position. Then, simply turn the throttle hold
off. The model is now ready to fl y. Another use for the throttle hold function is
to disable the motor before a crash without having to drop the collective stick,
possibly forcing the model into the ground.
The UP-1 function is enabled and
ready to use. The UP-1 Switch
(UP-1/GEAR) function is used for
aerobatics. If you are a beginner to
aerobatics, remember this switch
sets the motor speed (see your
TX610 manual for details) while
still allowing positive and negative
pitch control. This means if you get
confused fl ying, pulling the throttle
stick back WILL NOT decrease the
power to the motor but rather add
power. Hence it’s a good idea to learn to use the Throttle Hold Switch when
you feel a crash is imminent!
8
Page 9

Stick Controls
Throttle/Collective (Pitch)
Tail ( Rudder)
Left and Right Cyclic (Aileron)
9
Page 10

Forward and Back Cyclic (Elevator)
It’s also important to know that your TX610 transmitter is capable of a system
reset (see how this is done in the TX610 Manual). If you decide to do a system
reset, the factory setup numbers to the Heli-Max BLACK HAWK are listed here.
Below are the factory default parameters (Model Memory 8) for your BLACK
HAWK Helicopter.
Heli-Max 610
Parameter (PARA)
Reverse (REVR)
Dual Rates (D/R)
Exponential (EXPO)
Normal Throttle (N-TH)
Normal Pitch (N-PI)
Idle Up Throttle (I-TH)
Idle Up Pitch (I-PI)
Throttle Hold (HOLD)
Gyro Mixing (GYRO)
Swashplate Type (SWSH)
AILE1ELEV2THRO3RUDD4GYRO5PITC
6
HELI
N
100/80
-
10
0
48
45
N
100/80
-
10
45
55
55
75 switch down 25 switch up
N
72
62
DIAL
61
N
100/80
0
85
65
65
ON 0
90 deg
N
100
70
74
N
10
Page 11

getting the model ready to fly
Install Batteries In The Transmitter
Remove the battery cover
from the back of the transmitter
and install eight “AA” batteries
into the transmitter. Doublecheck the polarity of each
battery before replacing the
battery cover.
Charge the Flight Battery
Plug the wall power supply into
any 110V standard outlet. Plug
the remaining 4mm plug into the
side of the charger box.
The Red LED will light and
the charger will sound a beep
letting you know your charger is
receiving power.
Plug the battery’s balance lead
(the white connector) into the side
of the charger. The charger will
again beep and the green LED
will start to fl ash. Charging is
complete when the charger beeps and the red and green light remain on.
WARNING : NEVER leave your charger unattended when charging and never
leave the battery pack plugged into the charger after completion.
11
Page 12

Turn the Transmitter On
Verify that the HOLD/FLAP and UP-1/GEAR functions are off and slide the
power switch up to turn the transmitter on. If the transmitter is turned on with
the HOLD/FLAP, UP-1/GEAR or throttle stick forward, the screen will show
“3D” or “T-H” and a warning will sound. Turn the HOLD/FLAP and UP-1/GEAR
functions off and/or move the throttle stick to the low position to continue. Now
is a good time to make sure the electronic trim buttons on the transmitter are
ce ntered. We do not need to use them as the Incredib le Heli- Max TAGS system
controls all fl ight center trims.
Install the Flight Battery
Slide the front portion of the
canopy fo r war d to expose the
battery compartment.
12
Slide the battery into the
helicopter. Make sure the
battery is slid all the way into
the battery tray.
Page 13

Plug the battery into the
helicopter. Make sure the
charge /balance lead is t ucked
near the front of the battery
and the battery plug is neatly
tucked away.
Once the fl ight battery has been connected, always handle the
helicopter as if it has full power available.
The helicopter must remain
still for the gyro to initialize
properly. This process can
ta ke up to 5 second s. You w ill
see the LED near the front of
the control board stay steady
on. The LED near the center
of the board will fl ash.
13
It’s a good idea to grasp the
helicopter and rotate it from
si de to side to verify the gyro s
are working. Replace the
canopy; turn off the HOLD/
FLAP switch. The helicopter
is ready to go.
Carefully slide the canopy
back into place and you’re
ready to go.
To learn more about fl ying your
BLACK HAWK skip forward to
the “Start up and Operation”
portion of the manual.
For your reference here is the
default setup for the Heli-Max
TX610 Transmitter.
Page 14

™
Your BLACK HAWK uses the Tactic SLT protocol. This means, with the simple
addition of the Tactic Anylink to your favorite transmitter, you can enjoy your
Heli-Max BLACK HAWK with a familiar transmitter. After the purchase of your
Anylink, make sure to fully read the instructions so you understand how to
properly and safely use the Anylink system.
When using the Anylink you must make sure to follow the proper
mapping procedure for your radio brand. Failing to do so could cause
an uns afe con dition. How to map your transmitter, as we ll a s a l ist of
compatible transmitters, is included with your Anylink. You can fi nd
this and more information on the Tactic website, www.tacticrc.com.
linking
The Tx-R version of the BLACK HAWK requires you to link your transmitter to
the helicopter. When using a Tactic SLT transmitter or Anylink one must follow
the procedure below to complete the task. If you need to link or re-link for any
reason, here is the proper procedure to do so.
1. Turn on the transmitter, making sure all the switches are in the back
position and the throttle is down.
2. Remove the canopy from
the helicopter and locate
the small black button near
the front of the PC board.
3. Place the transmitter in close proximity to the helicopter (1 to 2 feet away).
4. Plug a fully charged the battery into the helicopter.
5. Press and hold the Link button for 3 seconds or until the LED remains on.
6. Monitor the fl ashing LED. When it stays on without fl ashing your
transmitter is now linked to the helicopter. Note: there is a second LED in
14
Page 15

the center of the PCB. When your transmitter is linked and the helicopter
held still this LED will fl ash letting you know your TAGS stabilization
system is working and ready.
Here are some Transmitter setup guidelines to help you get started.
FUTABA: You will fi nd that regardless of the Futaba system you choose the
basic setup is the same. This includes the Futaba 6EX, 7C, T6J, TJ8 as well
as others. We have listed the setup of a Futaba T6J transmitter. It’s also worth
noting that even though the BLACK HAWK uses 120 degree CCPM (Cycliccollective-pitch-mixing) that with the Heli-Max TAGS system you must select
the 90 degree swash arrangement. In a Futaba system this is called H-1 or 1-S
under swash type.
The setups listed will get you going and might suit your fl ying style. If not please
feel free to make adjustments to suit your fl ying style.
Here is a good setup for the Futaba 6J.
Futaba TJ6
Parameter (PARA)
Reverse (REVR)
Dual Rates (D/R)
Exponential (EXPO)
Normal Throttle (N-TH)
Normal Pitch (N-PI)
Idle Up Throttle (I-TH)
Idle Up Pitch (I-PI)
Throttle Hold (HOLD)
Gyro Mixing (GYRO)
Swash Ring
Swashplate Type (SWSH)
Timer (TIMR)
AILE1ELEV2THRO3RUDD4GYRO5PITC
6
HELI
N
100/80
-
10
0
45
70
35
ON
N
100/80
-
10
45
55
70
50
SW A
N
100
72
85
72
ON 0
90
H-1
5 min
N
100/100
0
85
66
80
66
+
60
R
72
60
72
60
+
60
N
15
Page 16

We have also included a basic setup for Spektrum users as well.
Spektrum DX6i
AILE1ELEV2THRO3RUDD4GYRO5PITC
6
N
70
60
72
60
HELI
ON 0
90 deg
5 min
R
100/80
0
85
66
80
66
N
100
72
85
72
N
Parameter (PARA)
Reverse (REVR)
Dual Rates (D/R)
Exponential (EXPO)
Normal Throttle (N-TH)
Normal Pitch (N-PI)
Idle Up Throttle (I-TH)
Idle Up Pitch (I-PI)
Throttle Hold (HOLD)
Gyro Mixing (GYRO)
Swashplate Type (SWSH)
Timer
R
100/80
POS 10
0
45
70
35
R
100/80
POS 10
45
55
70
50
75 switch down 75 switch up
Spektrum is a registered trademark of Horizon Hobby, Inc.
This is a good setup for the Tactic 650. The Tactic 650 is SLT ready and does
not require any Anylink Module.
Tactic 650
AILE1ELEV2THRO3RUDD4GYRO5PITC
6
R
100
0
+
+
+
+
+
+
72
72
85
18
18
16
HELI
100 /100
Factory
Factory
NULL
NULL
110
NULL
5 min
N
100
0
0
NULL
NULL
NULL
NULL
NULL
NULL
100
+
+
+
+
+
+
N
0
85
85
100
35
35
40
N
100
0
EXPO ON
EXPO ON
EXPO ON
Type
Servo Rev
Servo Set
Dual Rate
Expo
TH Cut
TH Hold
TH Curve Normal
TH Curve UP-1
TH Curve UP-2 STUNT
PI Curve Normal
PI Curve UP-1
PI Curve UP-2 STUNT
Gyro
Throttle Mix
Rev Mix
Swash Ring
Program Mix
Timer
Travel
Sub Trim
N
100
0
100/80
-
10
0
+
70
+
100
-
5
-
15
-
20
N
100
0
100 /80
-
10
NULL
NULL
NULL
NULL
NULL
NULL
+
60 switch up +60 switch down
16
Page 17

flying your black hawk
Takeoff
During your fi rst fl ights it is important to have light winds. Also, if you are fl ying
from grass, place a rubber mat or pad down on the grass so the small rotating
parts don’t get hung up in the grass.
Turn off the hold switch and very slowly add power and observe the model. During
“spool up” It is important to note the torque of the main blades can cause the
helicopter to rotate slightly clockwise. This is normal.
Your BLACK HAWK has the incredible Heli-Max TAGS system. The TAGS system
takes care of all center trim function the transmitter. Having said this, you do
not need, or want, to move or adjust the trim buttons during fl ight. If you notice
any slight drifting give it some time. After the helicopter’s swash and servo links
“break-in” the drift will diminish.
Hovering
Once the helicopter is in the air simply try to keep the helicopter in one spot.
This will take some practice. Remember that even a light breeze will have an
effect on the stability of the helicopter, so please take your time, be patient and
wait for a calm day.
Landing: Level the helicopter into a steady hover and slowly decrease power
until the helicopter settles onto the ground. You might notice as the helicopter
is ready to touch down it moves around a little. This is normal as the helicopter
enters ground effect. Remember to unplug the battery from the helicopter after
your fl ight is complete.
Basic Maneuvers
Once you are comfortable with hovering in one place, start working on orientations.
By this we mean to say, hover the helicopter in all positions, nose to the right,
nose to the left and the nose pointing at you (nose-in). Getting good at this
fundamental discipline will allow you to progress much faster in some of the
more advanced fl ying maneuvers.
Slow Pirouettes:
the helicopter slightly sideways and see if you can hold it there. If you become
uncomfortable you will want to bring the tail back towards you. Once you are
comfortable, try moving the helicopter to the side and turning back. Then fl y
back to the other side in straight lines. You can try rotating the helicopter around
360°, which is called a pirouette. The helicopter can drift during this maneuver
so make certain you have plenty of room when you fi rst start practicing.
Add a small amount of tail rotor (left or right) and try rotating
17
Page 18

Forward Flight: Now it’s time to work into basic forward fl ight. Just take the
basic hovering maneuvers listed above and slowly fl y out farther and faster and
always bring the helicopter back after one pass. Practice controlled slow fl ight
in close as well. The more time you spend practicing here, the easier things
will be later on.
Chandelles: Your fi rst step is chandelles. Fly straight across in front of you
and pull up to a 45° angle. Now at the top, when the helicopter slows down to
a stop, apply left or right tail rotor to bring the nose around 180° and continue
back down the 45° angle. As you progress with the maneuver you can pull a
greater angle than 45°, but 90° would be considered a “stall turn”.
parts list
1 HMXE2515 Main Rotor Blade Set Black / White
2 HMXE2522 Main Rotor Blade Grips w/ Pitch Control Linkage
3 HMXE2501 Feathering Shaft
4 HMXE2502 Head Button Black
5 HMXE2503 Head Block Metal Black
6 HMXE2524 Swashplate
7 HMXE2504 Main Shaft
8 HMXE2543 Bearing Set Main Frame MR63 3x6mm
9 HMXE2516 Main Frame
10 HMXE2525 Battery Frame
11 HMXE2517 Main Gear
12 HMXE2526 Tail Servo Mount
13 HMXE2527 Tail Boom Support
14 HMXE2538 Fuselage Mount Set
15 HMXE2535 Servo Head Linkage
16 HMXG8034 Brushless Outrunner Heli Motor 3800KV
17 HMXM2049 SH300 Servo 3.5g 100 mm Lead Length
18 HMXM2045 SH301 Servo 3.5g 180 mm Lead Length
19 HMXM2046 SH301T Servo 3.5g Tail Lock High Speed
20 HMXM2048 Receiver / 3 Axis Gyro E-Board 2.4GHz
21 HMXM2047 Brushless Controller 15A 7.4V - 11.1V BEC 1A
22 HMXP1011 LiPo 2S 7.4V 600mAh
23 HMXE2523 Servo Arms / Ball Studs / Screws (4) each
24 HMXE2518 Torque Tube Gear Front
25 HMXE2519 Tail Shaft Drive Gear Center
26 HMXE2520 Tail Shaft Drive Gear Upper
27 HMXE2528 Tail Rotor Shaft with Gear
28 HMXE2529 Tail Rotor Pitch Control Arm
29 HMXE2530 Tail Linkage Bellcrank
30 HMXE2531 Tail Wheel Black / Green
31 HMXE2505 Tail Rotor Bearing Set
32 HMXE2532 Tail Wire Guide
33 HMXE2533 Horizontal Torque Tube Assembly
34 HMXE2534 Vertical Torque Tube Assembly
35 HMXE2536 Horizontal Tail Rotor Linkage
36 HMXE2537 Vertical Tail Rotor Linkage
37 HMXE2511 Tail Fuselage Left Black / Green
38 HMXE2512 Tail Fuselage Right Black / Green
39 HMXE2513 Horizontal Stabilizer Black / Green
40 HMXE2540 Tail Rotor Pitch Slider
41 HMXE2506 Tail Rotor Hub
42 HMXE2539 Tail Rotor Blade Grips
18
Page 19

43 HMXE2521 Tail Rotor Blade Set
44 HMXE2507 Screw Set
45 HMXE2542 Landing Gear Front Black / Green
46 HMXE2508 Canopy Black / Green
47 HMXE2509 Fuselage Right Black / Green
48 HMXE2510 Fuselage Left Black / Green
HMXE2541 LED Light
HMXJ2025 TX610 SLT 6-Channel Transmitter
HMXM2040 Transmitter Trainer Cord
HMXP1006 AC Charger Adapter
HMXP2018 Charger 2S
exploded view
13
44
22
2
20
21
4
3
5
6
44
17
44
10
10
44
7
7
44
8
15
15
15
18
16
44
16
12
9
8
18
44
44
13
44
11
19
23
19
44
44
14
Page 20

43
41
42
44
41
42
44
43
40
41
28
44
38
38
25
33
26
27
31
37
28
36
37
37
44
34
39
33
24
44
32
29
39
44
30
35
44
47
44
48
45
44
46
45
20
 Loading...