

Page 1
™
Entire Contents © 2010 Hobbico®, Inc. HMXE0807Addn
Page 2
Introduction
Introduction
Your new Heli-Max Novus 125 FP uses Triple Axis Gyro Stabilization (TAGS)
to improve the performance of the model. The TAGS consists of a gyro sensor
on the roll, pitch and yaw axis along with sophisticated algorithms to increase
the stability and performance capability of the model. The TAGS is factory
setup and ready for fl ight. Operating the Novus 125 FP with the TAGS does
require a few extra precautions that must be followed to ensure a safe and
successful fl ight. Please read through this guide completely before fl ying your
Novus 125 FP the fi rst time. You must also read the Novus 125 FP Instruction
Manual in its entirety.
Preparing the Novus 125 FP for Flight
Preparing the Novus 125 FP for Flight
TAGS Initialization
The model must remain completely still during the initialization process to
allow the onboard gyros to initialize properly. Do not try to hold the model
during initialization. The gyros are very sensitive and they will pick up the
small movements. Always connect the fl ight battery and place the model on
the ground before turning the transmitter on.
If you pick the model up after the initialization is complete (for example before
takeoff or after a crash), then you must place the helicopter onto a fl at surface
suitable for takeoff and let it sit for 15 seconds. During this period of time the
swashplate will center automatically.
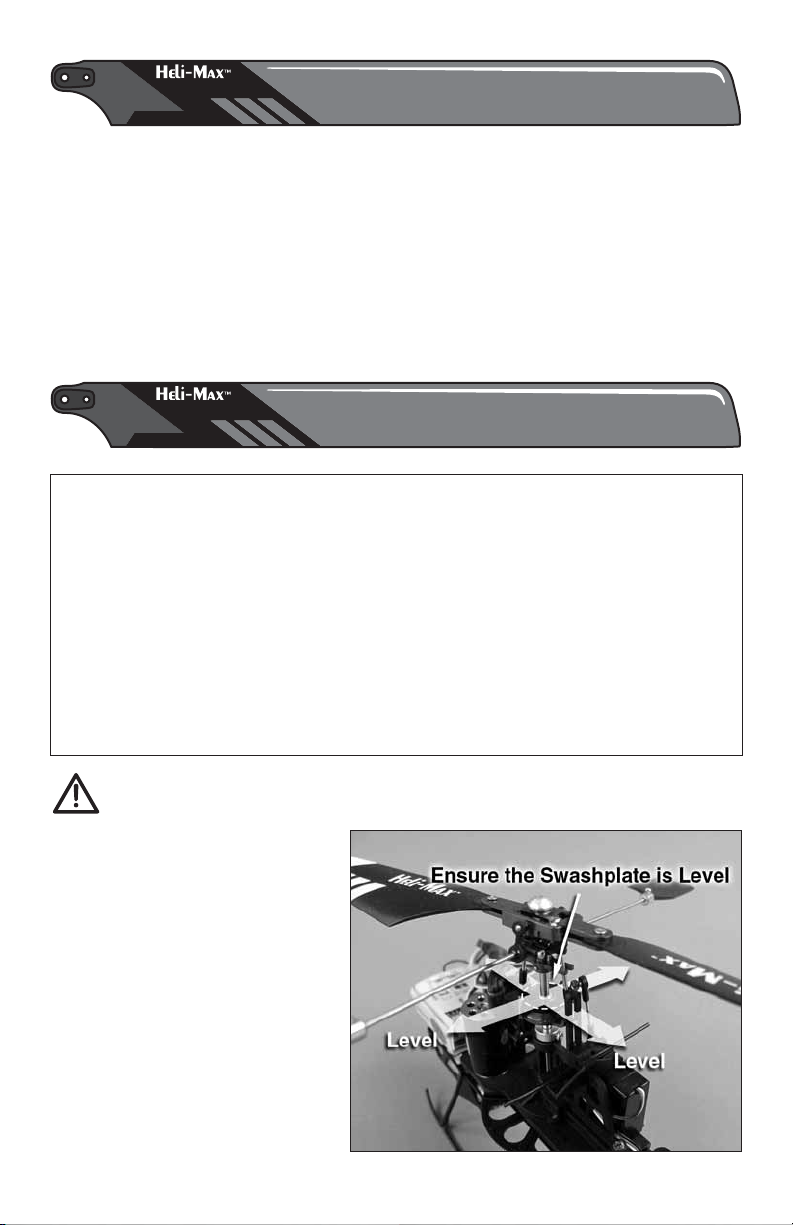
WARNING
Always verify that the swashplate
is level before attempting to take
off. If the swashplate is drifting
slowly then it will be necessary
to disconnect the fl ight battery,
turn the transmitter off and follow
the initialization procedure again.
With the TAGS system enabled
the swashplate will take 15
seconds to re-center if the model
has been moved.
2
Page 3

Trim Adjustments
The TAGS system will handle fl ight trimming automatically for you. A few
clicks of trim may be used during fl ight if the model slowly drifts. If more than
fi ve trim steps are needed on the cyclic controls then it is recommended to
land the model, center the trims and perform the initialization process again.
Do not move the control sticks before or during takeoff as the model may tip
over easily. If necessary, make very small corrections on the cyclic controls. It
is recommended to take off from a hard surface, as this will allow the model
to slide around. Once you become accustomed to the control feel, taking off
from carpet or grass is possible. The TAGS provides a very consistent control
feel regardless of the head speed or fl ight conditions.
Once the model is in fl ight you will fi nd the model is extremely stable and
easy to fl y. Forward fl ight is “hands off” stable and the model is capable of
fl ying up to 35mph. The TAGS adds many benefi ts to the fl ying qualities of
the Novus 125 FP.
Preparing for Flight
Preparing for Flight
Please see pages 12 through 19 in the Novus 125 FP Instruction manual for the
initialization process and fl ying notes.
E-Board Adjustments
E-Board Adjustments
Aileron/Elevator
Servo Extent
This adjustment is factory set
to the ideal setting. The cyclic
extent is used to control the
cyclic sensitivity when left/right
or forward/aft cyclic is operated.
Keep in mind that the Dual Rate
also reduces the maximum
cyclic rate. If you feel that the
high rate cyclic rate is not
sensitive enough, then turn the
adjustment clockwise to increase
the maximum cyclic extent. If you feel the cyclic is insensitive, then turn the
adjustment counter-clockwise to decrease the maximum cyclic extent.
3
Page 4

Rudder Gain
The Rudder Gain is used to adjust the amount of correction that the TAGS
applies to the tail rotor during unintended movements. Finding the ideal gain
setting will take some experimentation. If the tail is slowly drifting, then raise
the gain and test fl y the model. If the tail is quickly oscillating (also known as
wagging), then lower the gain and test fl y the model. Turning the adjustment
clockwise increases the gain and turning the adjustment counter-clockwise
decreases the gain.
Elevator Gain
The Elevator Gain is used to adjust the amount of correction that the TAGS
applies to the Pitch Axis during unintended movements. Finding the ideal gain
setting will take some experimentation. If the Pitch Axis is slowly drifting then
raise the gain and test fl y the model. If the Pitch Axis is quickly oscillating (also
known as wagging), then lower the gain and test fl y the model. Turning the
adjustment clockwise increases the gain and turning the adjustment counterclockwise decreases the gain.
Aileron Gain
The Aileron Gain is used to adjust the amount of correction that the TAGS
applies to the roll axis during unintended movements. Finding the ideal gain
setting will take some experimentation. If the roll axis is slowly drifting, then
raise the gain and test fl y the model. If the roll axis is quickly oscillating (also
known as wagging), then lower the gain and test fl y the model. Turning the
adjustment clockwise increases the gain and turning the adjustment counterclockwise decreases the gain.
WK. – ADJ. Adjust Mode Switch
Use the WK. setting for normal fl ight operation. To lock the swashplate in
the level position while making mechanical adjustments use the ADJ. option.
Always switch back to the WK. mode before fl ying the model.
On – Off Electronic Flight Stabilization System
Enable TAGS - On
Disable TAGS - Off
4
 Loading...