

Page 1
READ THROUGH THIS INSTRUCTION MANUAL
FIRST. IT CONTAINS IMPORTANT INSTRUCTIONS
AND WARNINGS CONCERNING THE ASSEMBLY
AND USE OF THIS MODEL.
HMXZ7005 for HMXE01** V1Entire Contents © Copyright 2004
Champaign, Illinois
(217) 398-8970
E-mail: helicoptersupport@greatplanes.com
INSTRUCTION MANUAL
Mail Rotor Diameter: 350mm (13-3/4”)
Fuselage Length: 340mm (13-3/8”)
Weight: 184g (5.6 oz)
(without training gear)
Battery: 600mAh 7.4V
Lithium Polymer
Transmitter: 4 channel FM
Heli-Max™guarantees this kit to be free from defects in both
material and workmanship at the date of purchase.This warranty
does not cover any component parts damaged by use or
modification. In no case shall Heli-Max’s liability exceed the
original cost of the purchased kit. Further, Heli-Max reserves
the right to change or modify this warranty without notice.
In that Heli-Max has no control over the final assembly or material
used for final assembly, no liability shall be assumed nor accepted
for any damage resulting from the use by the user of the final
user-assembled product. By the act of using the user-assembled
product, the user accepts all resulting liability.
If the buyer is not prepared to accept the liability associated
with the use of this product, the buyer is advised to return
this kit immediately in new and unused condition to the place
of purchase.
To make a warranty claim, send
the defective part or item to
Hobby Services at this address.
Include a letter stating your name, return shipping address, as
much contact information as possible (daytime telephone number,
fax number , e-mail address), a detailed description of the problem
and a photocopy of the purchase receipt. Upon receipt of the
package the problem will be evaluated as quickly as possible.
WARRANTY
Hobby Services
3002 N. Apollo Dr. Suite 1
Champaign IL 61822
USA
WARNING: The RotoFly charger is designed to charge only the LiPo (lithium polymer) battery supplied with the RotoFly.
Do not attempt to charge any other batteries with this charger, as doing so may result in damage to the battery or charger,
and may cause a fire.
™
Page 2
Introduction . . . . . . . . . . . . . . . . . . . . . . . . . . . . . . . . . 2
Charge the battery. . . . . . . . . . . . . . . . . . . . . . . . . . . . 2
Prepare the transmitter . . . . . . . . . . . . . . . . . . . . . . . . 2
Prepare the helicopter for flight . . . . . . . . . . . . . . . . . 3
Install the helicopter battery . . . . . . . . . . . . . . . . . . . . 4
Find a suitable flying site . . . . . . . . . . . . . . . . . . . . . . 4
Description of controls . . . . . . . . . . . . . . . . . . . . . . . . 4
Preflight . . . . . . . . . . . . . . . . . . . . . . . . . . . . . . . . . . . . 5
Moving the RotoFly . . . . . . . . . . . . . . . . . . . . . . . . . . . 6
Hovering the RotoFly. . . . . . . . . . . . . . . . . . . . . . . . . . 6
Forward flight . . . . . . . . . . . . . . . . . . . . . . . . . . . . . . . 6
Parts breakout . . . . . . . . . . . . . . . . . . . . . . . . . . . . . . . 7
Parts page . . . . . . . . . . . . . . . . . . . . . . . . . . . . . . . . . . 8
The RotoFly is an outstanding ready-to-fly electric helicopter for
indoor flying and outdoor flying on calm days.Although it is not
difficult to operate this model helicopter, we recommend that
you read this instruction book thoroughly and carefully .Y ou ma y
also want to ask for assistance from your local model flying club
and/or hobby shop.
WARNING:The RotoFly charger is designed to charge only
the LiPo battery supplied with the RotoFly.Do not attempt to
charge any other batteries with this charger, as doing so
may result in damage to the battery or charger, and may
result in a fire. DO NOT charge the battery while it is
mounted in the helicopter.
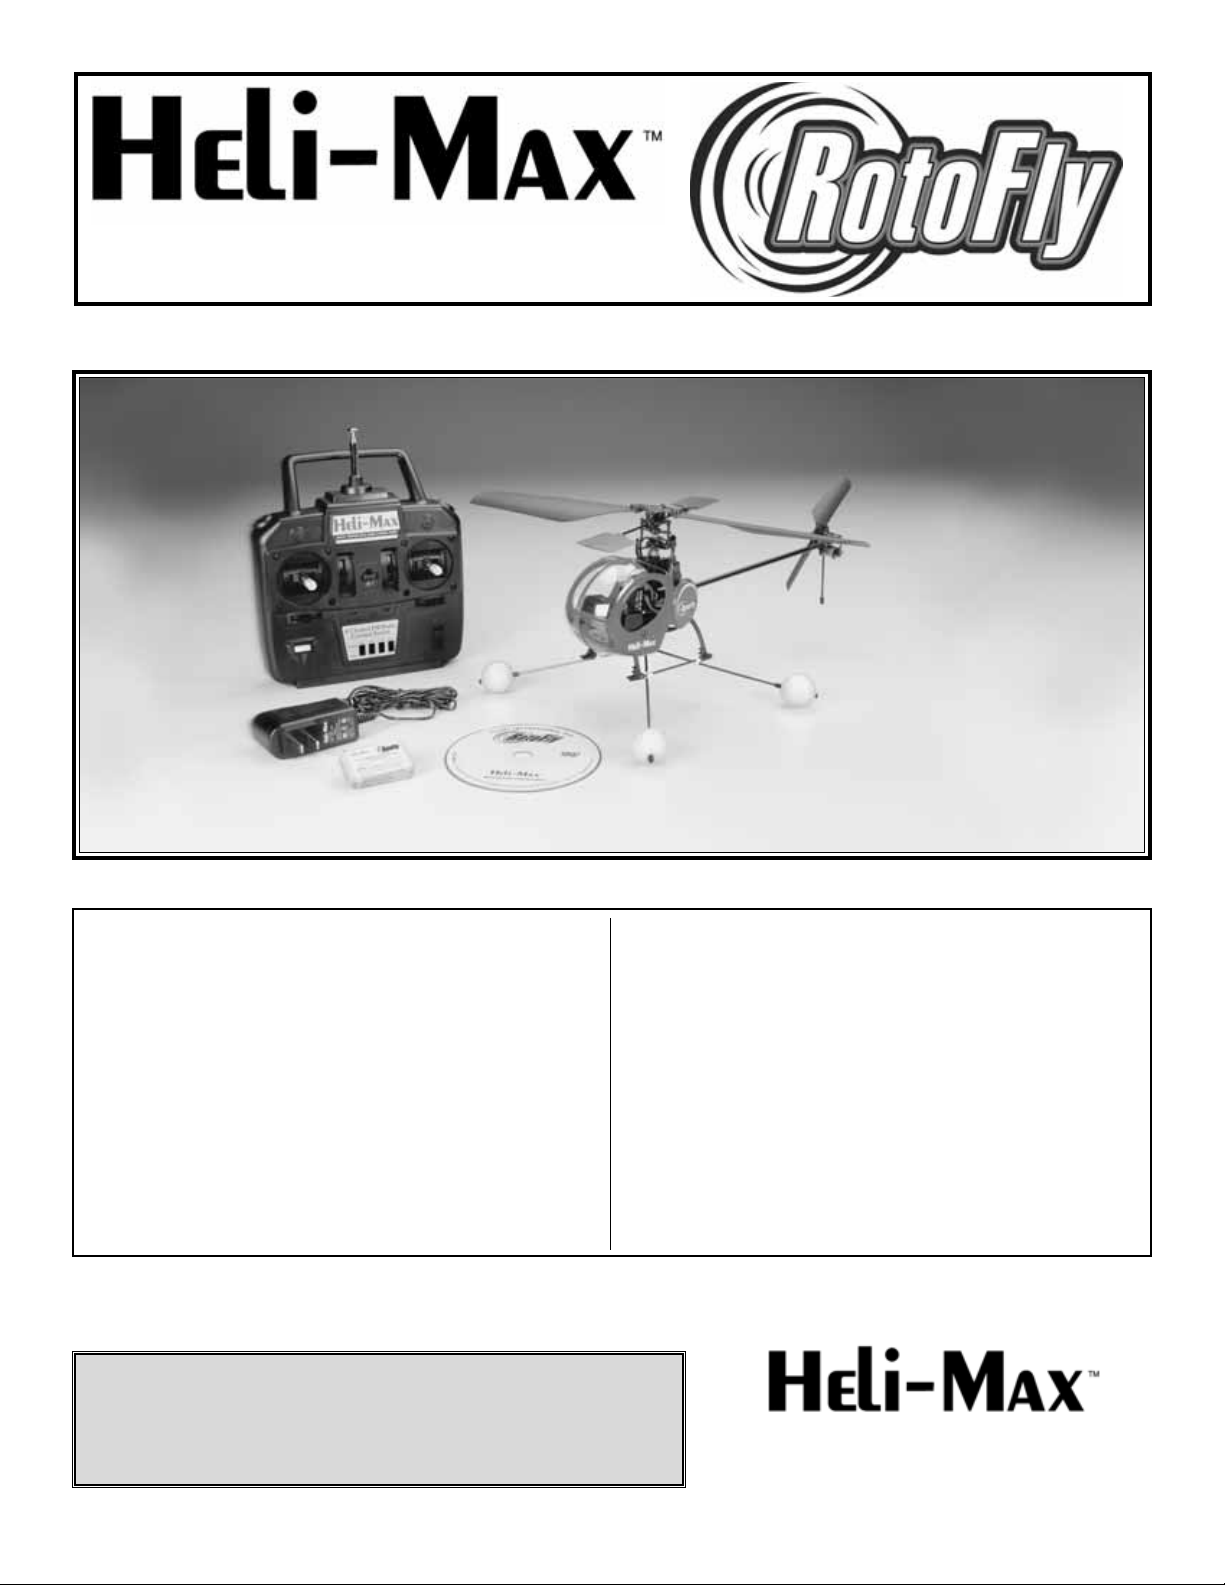
❏ 1.Plug the battery charger into an AC outlet.The light on the
charger should be green. Note: The charger and the training
gear are shipped in the back side of the foam packing.
❏ 2. Plug the battery into the charger. The light on the
charger will turn red. WARNING: Do not leave the battery
unattended while it is charging. If the batter y becomes hot
disconnect it immediately.
❏ 3. When the light on the charger has turned green again
the battery is ready to use. The first charge should take
about an hour. Subsequent charges may take as long as
two hours, depending on much the battery was used since
its last charge.
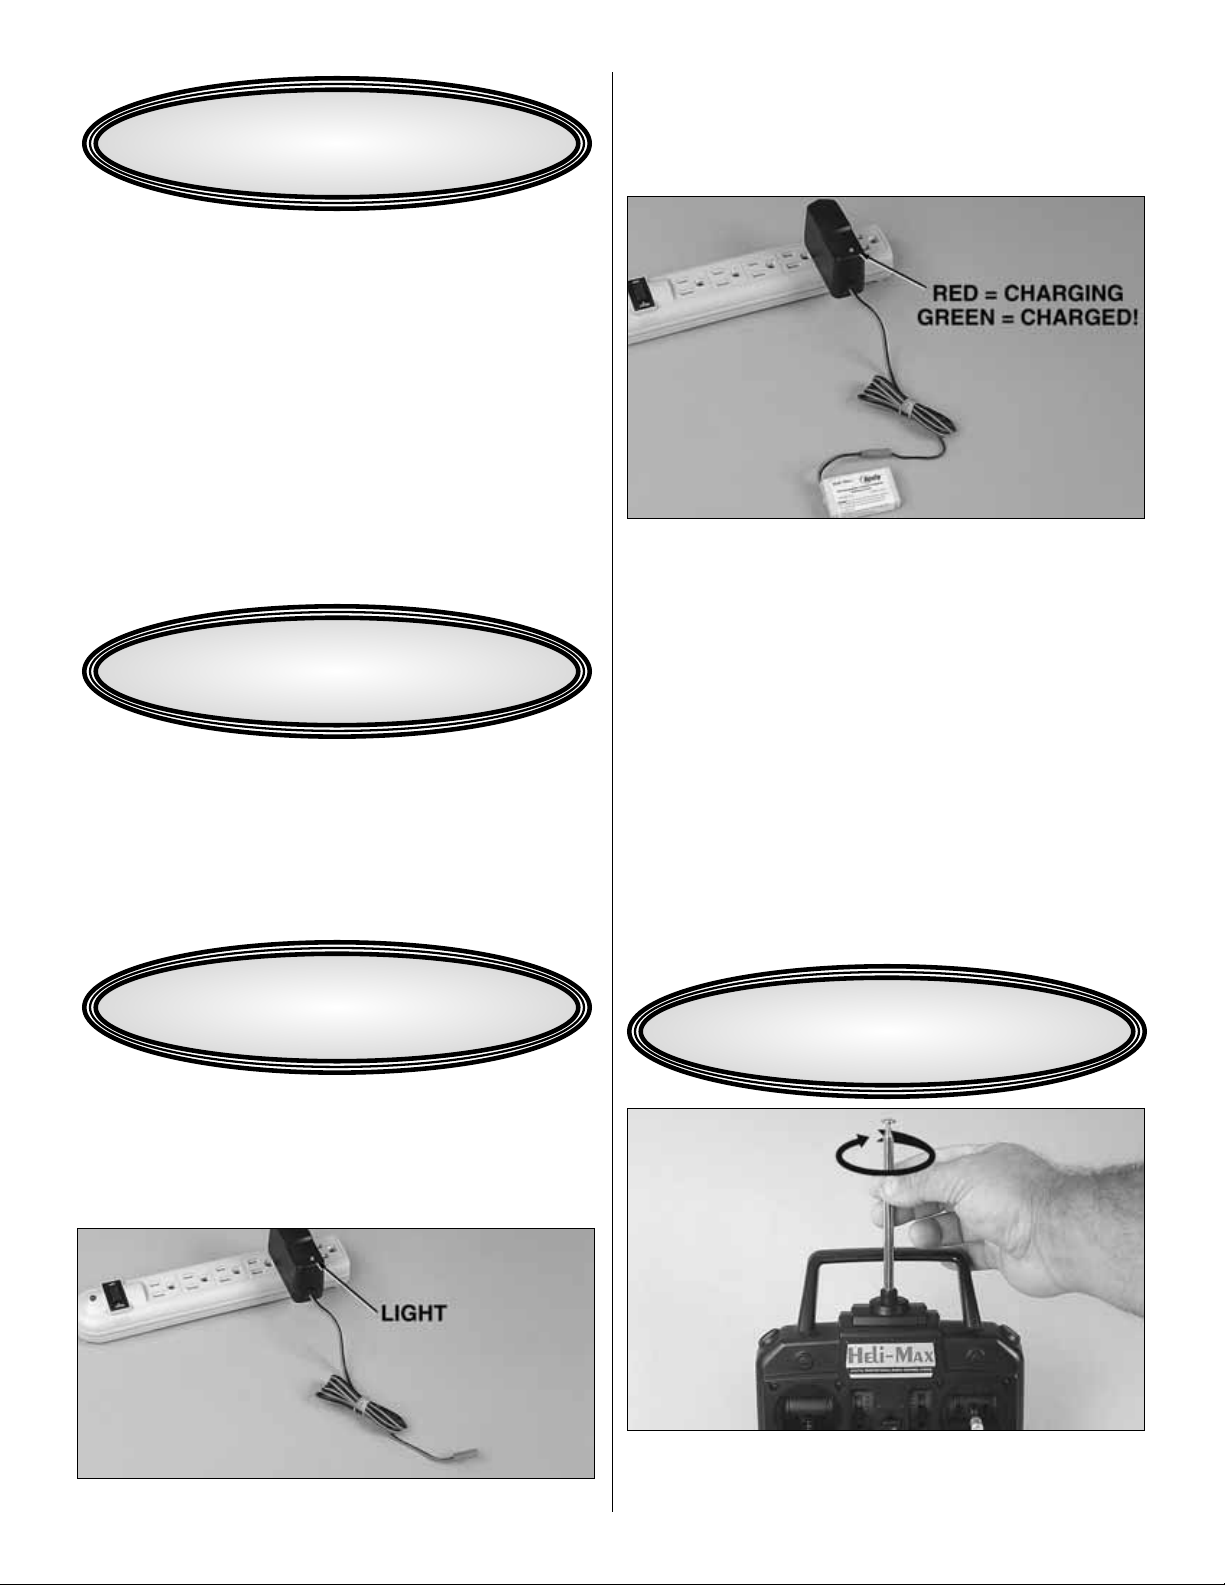
❏ 1. Install the transmitter antenna by inserting it into the
hole in the top of the transmitter and screwing it into place,
using a clockwise rotation.
PREP ARE THE TRANSMITTER
CHARGE THE BA TTER Y
INTRODUCTION
TABLE OF CONTENTS
2
Page 3
❏ 2. Remove the battery cover from the back of the
transmitter. Install eight “AA” batter ies (not included) in the
transmitter. Double-check the direction of each battery
before replacing the battery cover.
❏ 3. Turn on the transmitter and check the LEDs on the
front. The green and red lights should be on. If the green
light is off and the red light is blinking, new “AA” batteries
need to be installed.
❏ 1. Rotate the main blades so that they are pointing away
from each other and perpendicular to the flybar. Note:
Later, when you first fly your helicopter, if it has any
vibrations or shakes this is the first thing to check.
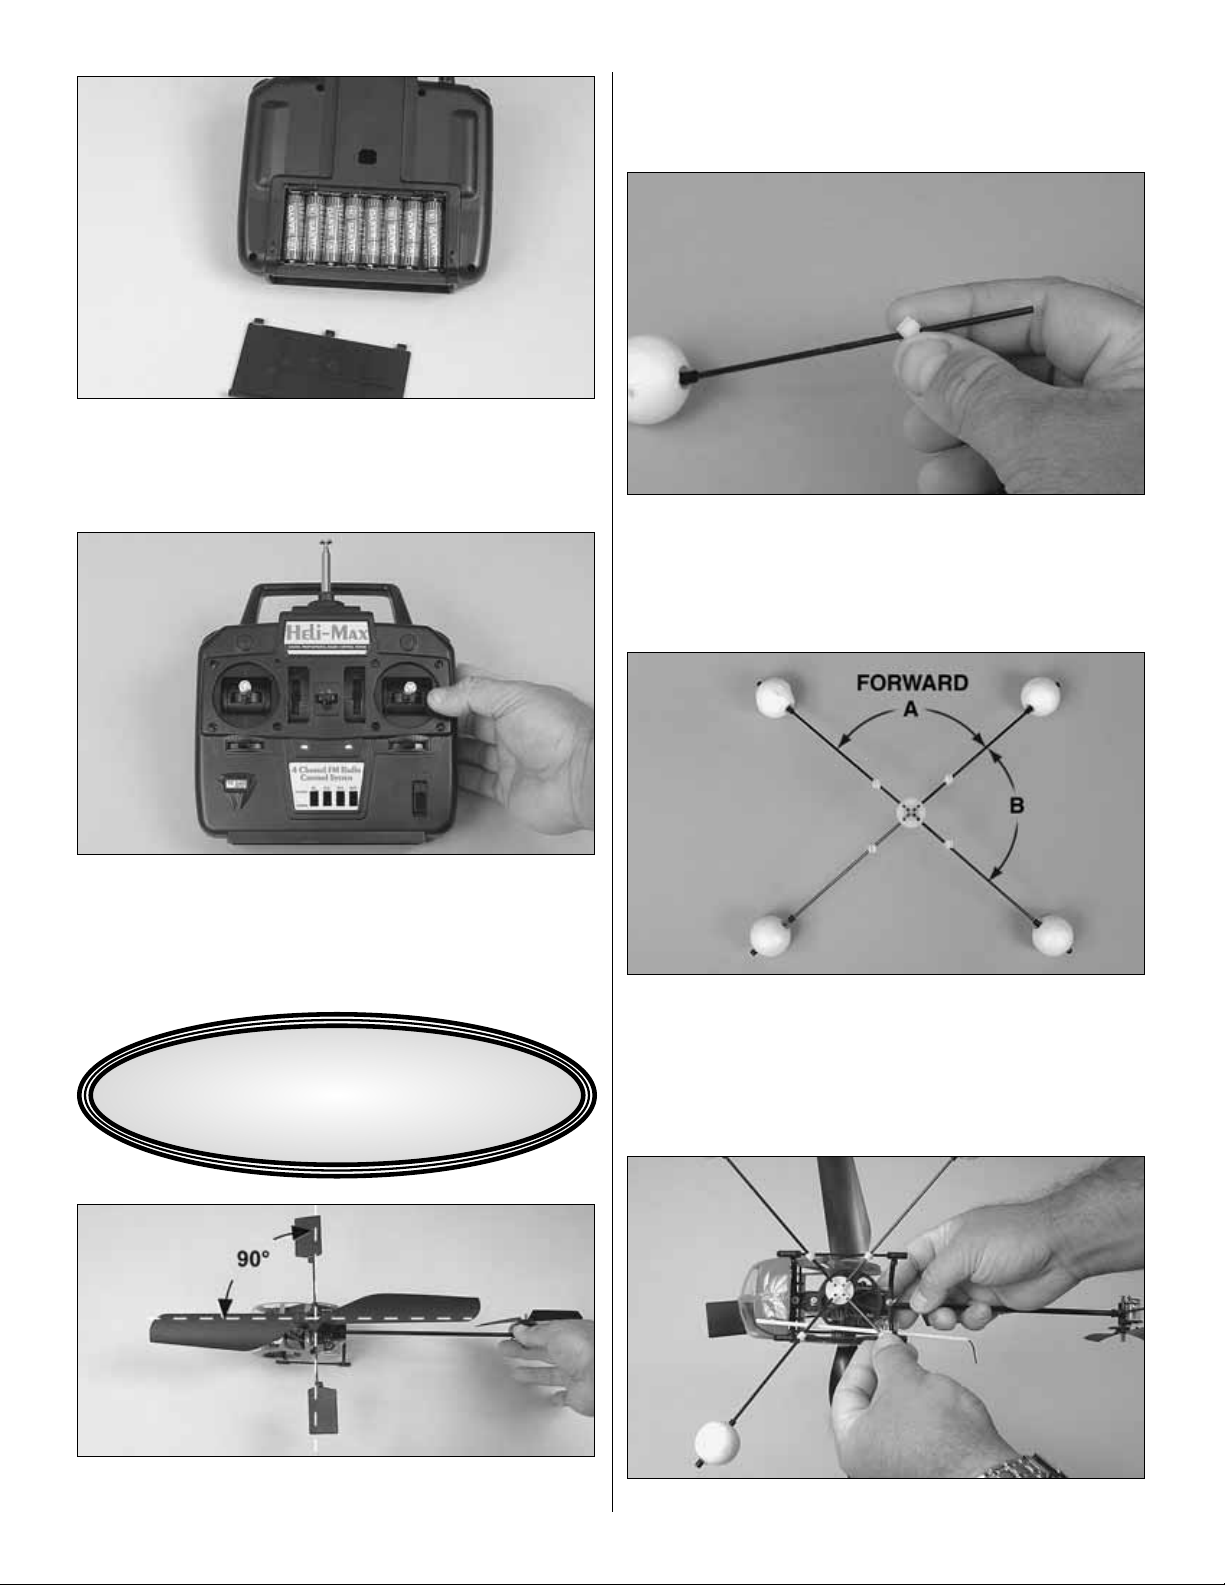
❏ 2. Slide a skid mount onto each training gear leg.
❏ 3. Install the gear legs in the center mount. Note that angle
A is larger than angle B.The larger angle A faces forward.
❏ 4. Snap the training gear onto the landing gear skids.
PREP ARE THE HELICOPTER
FOR FLIGHT
3
Page 4

4
❏ 5.Position the training gear so that the center mount is offset
to the left of helicopter center.This makes the helicopter lean
to the right and helps the helicopter lift off straight.
❏ 1. Remove the canopy by pulling one side off the
horizontal mount, then the other. Note: Be careful to not
widen the canopy too much, as it will separate the seam on
the bottom of the canopy.
❏ 2. Slide the charged battery into the battery mount.
Secure the battery with a rubber band across the top. DO
NOT connect the battery at this time.
❏ 3. Install the canopy by sliding it on to the horizontal mount.
It is best to fly on calm days with no wind.Find an area that
is clear of trees, power lines and other structures.A park or
schoolyard is good; a flying field for R/C helicopters is best.
It is best to find an area with a flat, smooth surface so the
helicopter’s training gear can slide. If you choose to fly
indoors, find a spacious area free of obstacles with a flat,
smooth floor.Make sure the area is at least ten feet square
or larger.
Most importantly, avoid groups of people, especially
children. The moving blades can be dangerous and cause
injury or damage.
Got your site selected? Great! Now let’s learn how to fly.
Piloting begins with learning a little about how your RotoFly
helicopter works. You control the helicopter with your
transmitter, by sending commands to equipment that rides
inside the model. The control sticks are used to maneuver
the helicopter in flight. Here’s how the transmitter sticks
control your helicopter.
THROTTLE
The up and down movement of the left stic k controls the throttle.
This determines the RPM of the main rotor blades, which
ultimately controls the up and down movement of the helicopter .
Moving the throttle stick up makes the helicopter ascend.
Moving the throttle stick down makes the helicopter descend.
DESCRIPTION OF CONTROLS
FIND A SUITABLE FLYING SITE
INST ALL THE HELICOPTER
BATTERY
Page 5

TAIL ROTOR
The side-to-side movement of the left stick controls the tail
rotor.This determines the rotation direction of the helicopter.
Moving the stick left makes the nose of the helicopter rotate
to the left. Moving the stick right makes the nose of the
helicopter rotate to the right.
ROLL CYCLIC
The side-to-side movement of the right stick controls the roll
cyclic of the helicopter.This tilts the helicopter to the left or
right. Moving the stick left tilts the helicopter to the left.
Moving the stick right tilts the helicopter to the right.
PITCH CYCLIC
The forward and back movement of the right stick controls the
pitch cyclic of the helicopter.This tilts the helicopter forward or
backwards.Moving the stick forward tilts the helicopter f orward.
Moving the stick back tilts the helicopter backward.
❏ 1. Make sure no one is operating any type of R/C
equipment on the same frequency as your RotoFly
helicopter. The frequency is identified on the back of your
transmitter. When you know it’s safe, switch the radio
transmitter on and fully extend the antenna.
❏ 2. Confir m that the left stick is all the way down to make
sure the rotor blades do not rotate when the RotoFly‘s
power is turned on. Plug the battery pack into the electronic
speed control located on the helicopter.
❏ 3.Once the plugs are connected, wait ten seconds for the
control board and gyro to initialize. DO NOT move the
helicopter during this process.During this time, a green light
will blink on the control board. When the green light stops
blinking and glows solid, your RotoFly is ready for flight.
Note: If the light does not stop blinking, check that the
throttle stick and the throttle trim are both down.
❏ 4. When you are ready to turn off the RotoFly, ALWAYS
unplug the helicopter battery before turning off the transmitter.
PREFLIGHT
5
Page 6

1. Draw a three foot diameter circle using chalk.This will be
your practice area. Place the RotoFly in the middle of the
circle facing away from you. Be sure to stand about six feet
back from the tail of the helicopter.
2. Advance the throttle gradually until the helicopter begins to
get light. At this point, the helicopter should start to move
without actually lifting off the ground.Since you are just learning
to fly, you don’t want the helicopter to take off from the g round,
so don’t advance the throttle stick any more than necessary.
The helicopter may have a tendency to rotate to the right. This
is normal and is caused by the torque of main blade. Try to
counter the right rotation by holding the rudder stick slightly left.
Remember to use very gradual stick movements.The RotoFly
is very sensitive to your input and only small stick movements
are required for flight.
3. Observe the movement and attitude of the helicopter and
try to keep it within your practice circle. If the helicopter
moves out of the circle, pull the throttle stick down and wait
for the blades to stop spinning. Pick up the helicopter and
place it back into the center of the circle and try again.
4. If the helicopter consistently moves in one direction, you
can use the transmitter trims to correct the movement. For
example, if the RotoFly consistently moves forward when it
gets light, try adjusting the trim tab on the right stick down
slightly.This will counter the forward movement.Remember,
just like the sticks, the trim tabs only require slight
movement.Adjust the trim tabs one click at a time.
5. Work on keeping the helicopter within the practice circle
while keeping it light.Try to give small inputs in order to keep
it in one place. This requires you to counter the movement
of the helicopter. The sooner you notice a movement and
respond to it, the smaller the corrective action needed.
These are the basics of learning to hover.This process will
take some practice.
Once you can confidently keep the helicopter in the practice
area, it’s time to hover with the helicopter lifted off the ground.
1. Advance the throttle until the helicopter gets light. Then,
advance the throttle a little more until your RotoFly is off the
ground, keeping it no more than one foot in altitude.
2.Using the same flying skills pre viously learned, try to keep
it within your practice area. If the helicopter gets away, land
it immediately by reducing the throttle stick.Place it back in
the center of the circle and try again. Learning to hover
takes a great deal of time and practice.
3. Keep working on steps 1 and 2 until you can confidently
hold the RotoFly in the circle. Flying a remote control
helicopter is rewarding and can be difficult.The importance
of being able to safely and consistently hover cannot be
over-stated.
4. When you can maintain a constant one foot altitude, you
can start rotating the tail to either side. Try to rotate the
helicopter so you are now looking at the side of the
helicopter instead of the tail. Try to maintain a hover. Your
goal is to hover from every angle.
5. Now that you mastered the side angles continue to rotate
your helicopter so it is facing you. Although the controls are
the same, your input will appear opposite to the movements
of the helicopter.This is called “control reversal”.When you
push the tail rotor stick to the left, it will cause left rotation
but the helicopter will rotate to your right. So when your
helicopter is facing you, you must learn to reverse the way
you control it. Most pilots find it a little confusing at first, but
with practice it becomes second nature.
6. The next step is to hover your RotoFly while rotating it a
full 360 degrees. Remember to keep it within the practice
circle. Keep practicing until you are confident with your
hovering skills.
Now that you can hov er your helicopter from e v ery angle, it’ s
time to start moving it forward.
1. While hovering one foot off the ground, push the right stick
forward just slightly until your RotoFly begins moving forward.
2. As long as the helicopter is tilted forward, it will continue
to move forward. To stop the forward motion, pull back
slightly on the right stick until the helicopter is level.
3. Reduce the throttle stick and land the helicopter.
4. Practice this several times and then try to move the
RotoFly to the left and right using the same principle.
Remember to use very gradual stick movements. The
RotoFly is very sensitive to your input and only small stick
movements are required for flight.
FORWARD FLIGHT
HOVERING THE ROTOFLY
MOVING THE ROTOFLY
6
Page 7

5. Next, you can practice turning the helicopter during
forward flight.This requires you to give left or right tail rotor
input in order to turn the helicopter. It’s a good idea to
practice flying in circles. Once you can successfully fly
circles in both directions, practice figure eights.
6. Your RotoFly battery pack should give you about ten
minutes of flight time per battery charge. As your battery
pack becomes depleted, you will notice an increase in the
throttle stick position to hover. At this point, you should land
your RotoFly and give the battery ten minutes to cool down
before recharging.
7
Congratulations! You have done it.Welcome to the world of R/C helicopters.
Page 8

8
 Loading...