

Page 1
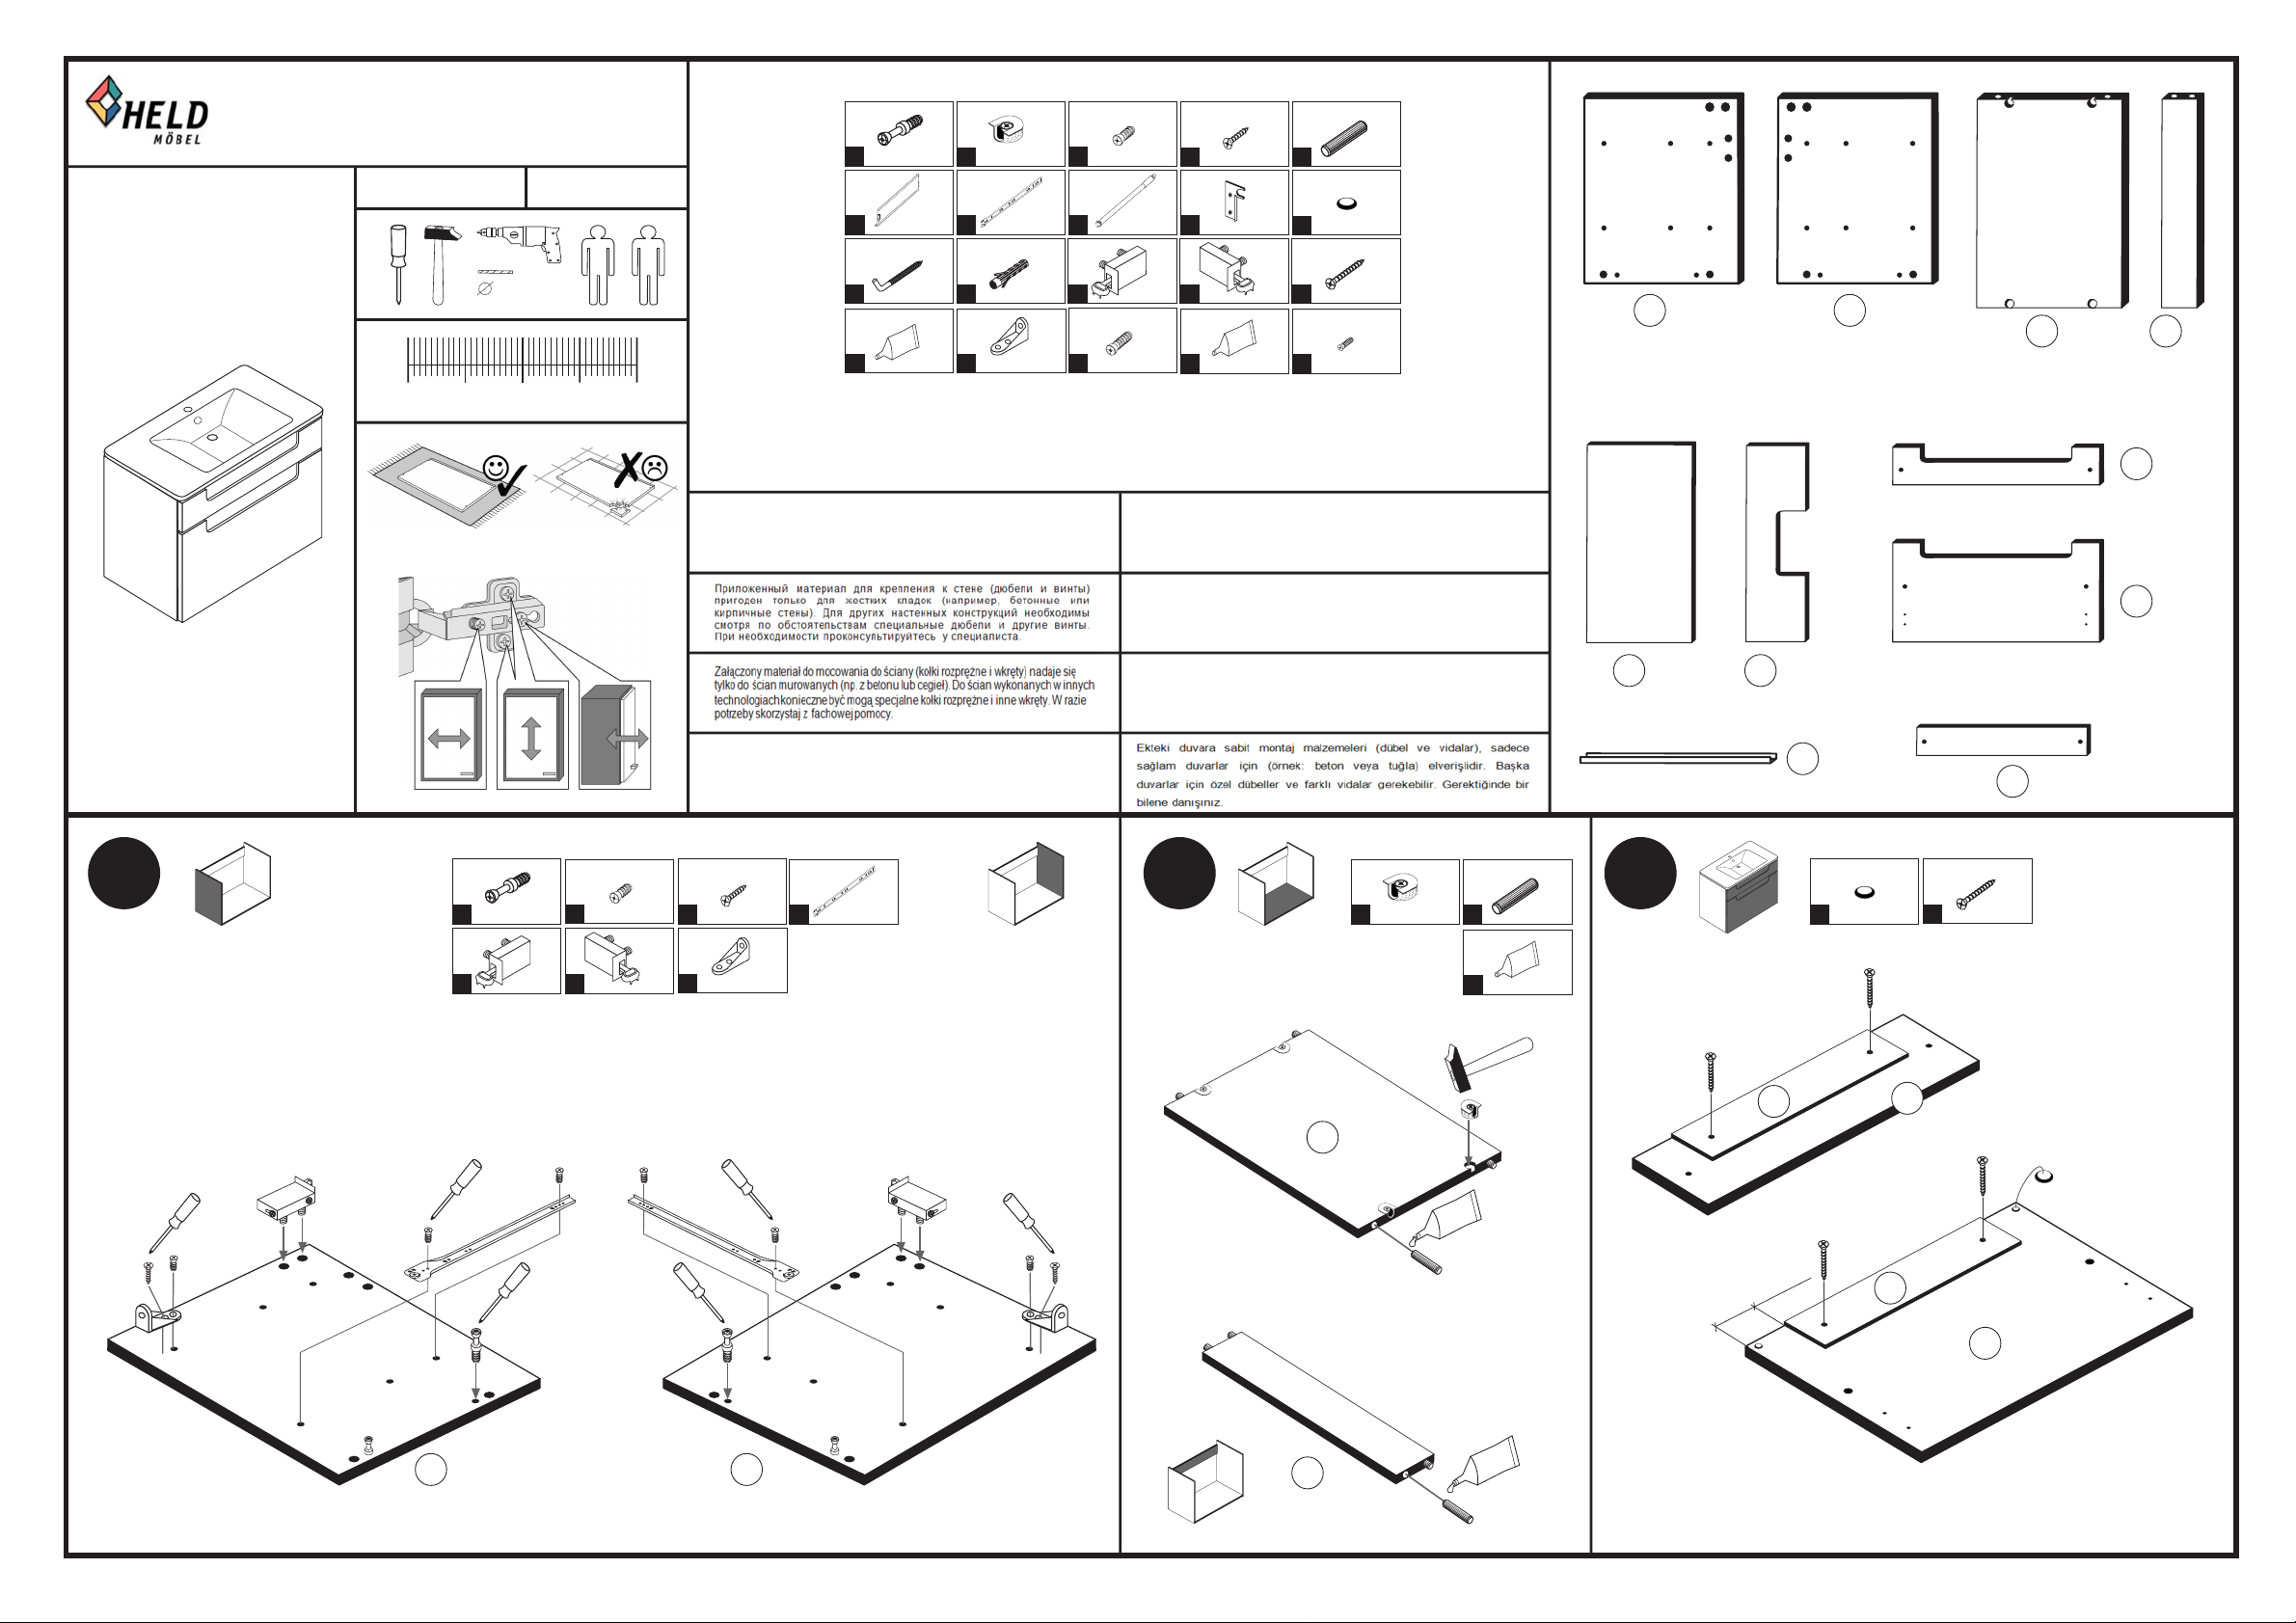
Held Möbel GmbH
Vogelparadies 9
32457 Porta Westfalica
88841.310
0 10 20 30 40
0571 / 79838-10
info@held-moebel.de
www.held-moebel.de
11-07-2016
5 mm
1
6
11
Silikon 25ml
16
4 x
2802
2 x
5281.400
5,8 x 55
2 x
2840
1 x
1970
6,3 x 11
4 x
2
7
5281.400
12
17
2801
2 x
8 x 30
2 x
2842
2 x
2845
3
8
13
18
6 x
2815
2 x
5352.400
R
1 x
2881
6,3 x 16
2 x
2816
14
19
3,5 x 15
14 x
4
9
L
2804
2 x
1 x
2880
1 x
2863
5
10
15
30
8 x 30
8 x
2861
4 x
2865
3,5 x 25
5 x
2806
3 x 13,5
4 x
1123
20
1 x
21
1 x
22
1 x
26
23
1 x
1 x
Das beigefügte Wandbefestigungsmaterial (Dübel und Schrauben) eignet sich nur für
festes Mauerwerk (z.B.: Beton- oder Ziegelwände). Für andere Wandaufbauten sind
eventuell Spezialdübel und andere Schrauben notwendig. Ziehen Sie gegebenfalls
eine Fachkraft zu Rate.
The accompanying wall mounting hardware (anchors and screws) is suitable only
for solid masonry (eg concrete or brick walls). For other wall structures are
possibly special anchor bolts and other necessary. Tighten if necessary, an expert.
6,3 x 11
1 2
1
13
4 x
3
2802
R
1 x
14
2881
6 x
2815
L
1 x
2880
3,5 x 15
2 x
4
17
2804
2 x
2845
7
2 x
5281.400
De begeleidende wandmontage hardware (pluggen en schroeven) is alleen geschikt
voor massief metselwerk (bijvoorbeeld beton of bakstenen muren). Voor andere
muur structuren zijn eventueel bijzondere ankerbouten en andere noodzakelijke.
Draai indien nodig, een deskundige.
Le mur d'accompagnement matériel de montage (chevilles et les vis) ne convient
que pour la maçonnerie solide (par exemple en béton ou des murs de briques).
Pour les structures de mur d'autres sont peut-etre spéciale boulons d'ancrage et
d'autres nécessaires. Serrer le cas échéant, un expert.
Il muro di accompagnamento hardware di montaggio (tasselli e viti) è'e adatto
solo per muratura piena (ad esempio calcestruzzo o muratura). Per le altre strutture
murarie sono forse speciali bulloni di ancoraggio e necessari di altri. Serrare se
necessario, un esperto.
27
1 x
24
1 x
8 x 30
4 x
2
2801
5
19
8 x
2861
1 x
2863
3
25
1 x
28
1 x
29
2 x
3,5 x 25
2 x
10
2865
15
4 x
2806
L R
20
1 x
21
1 x
23
22
1 x
1 x
29
4,8 cm
26
29
27
Page 2
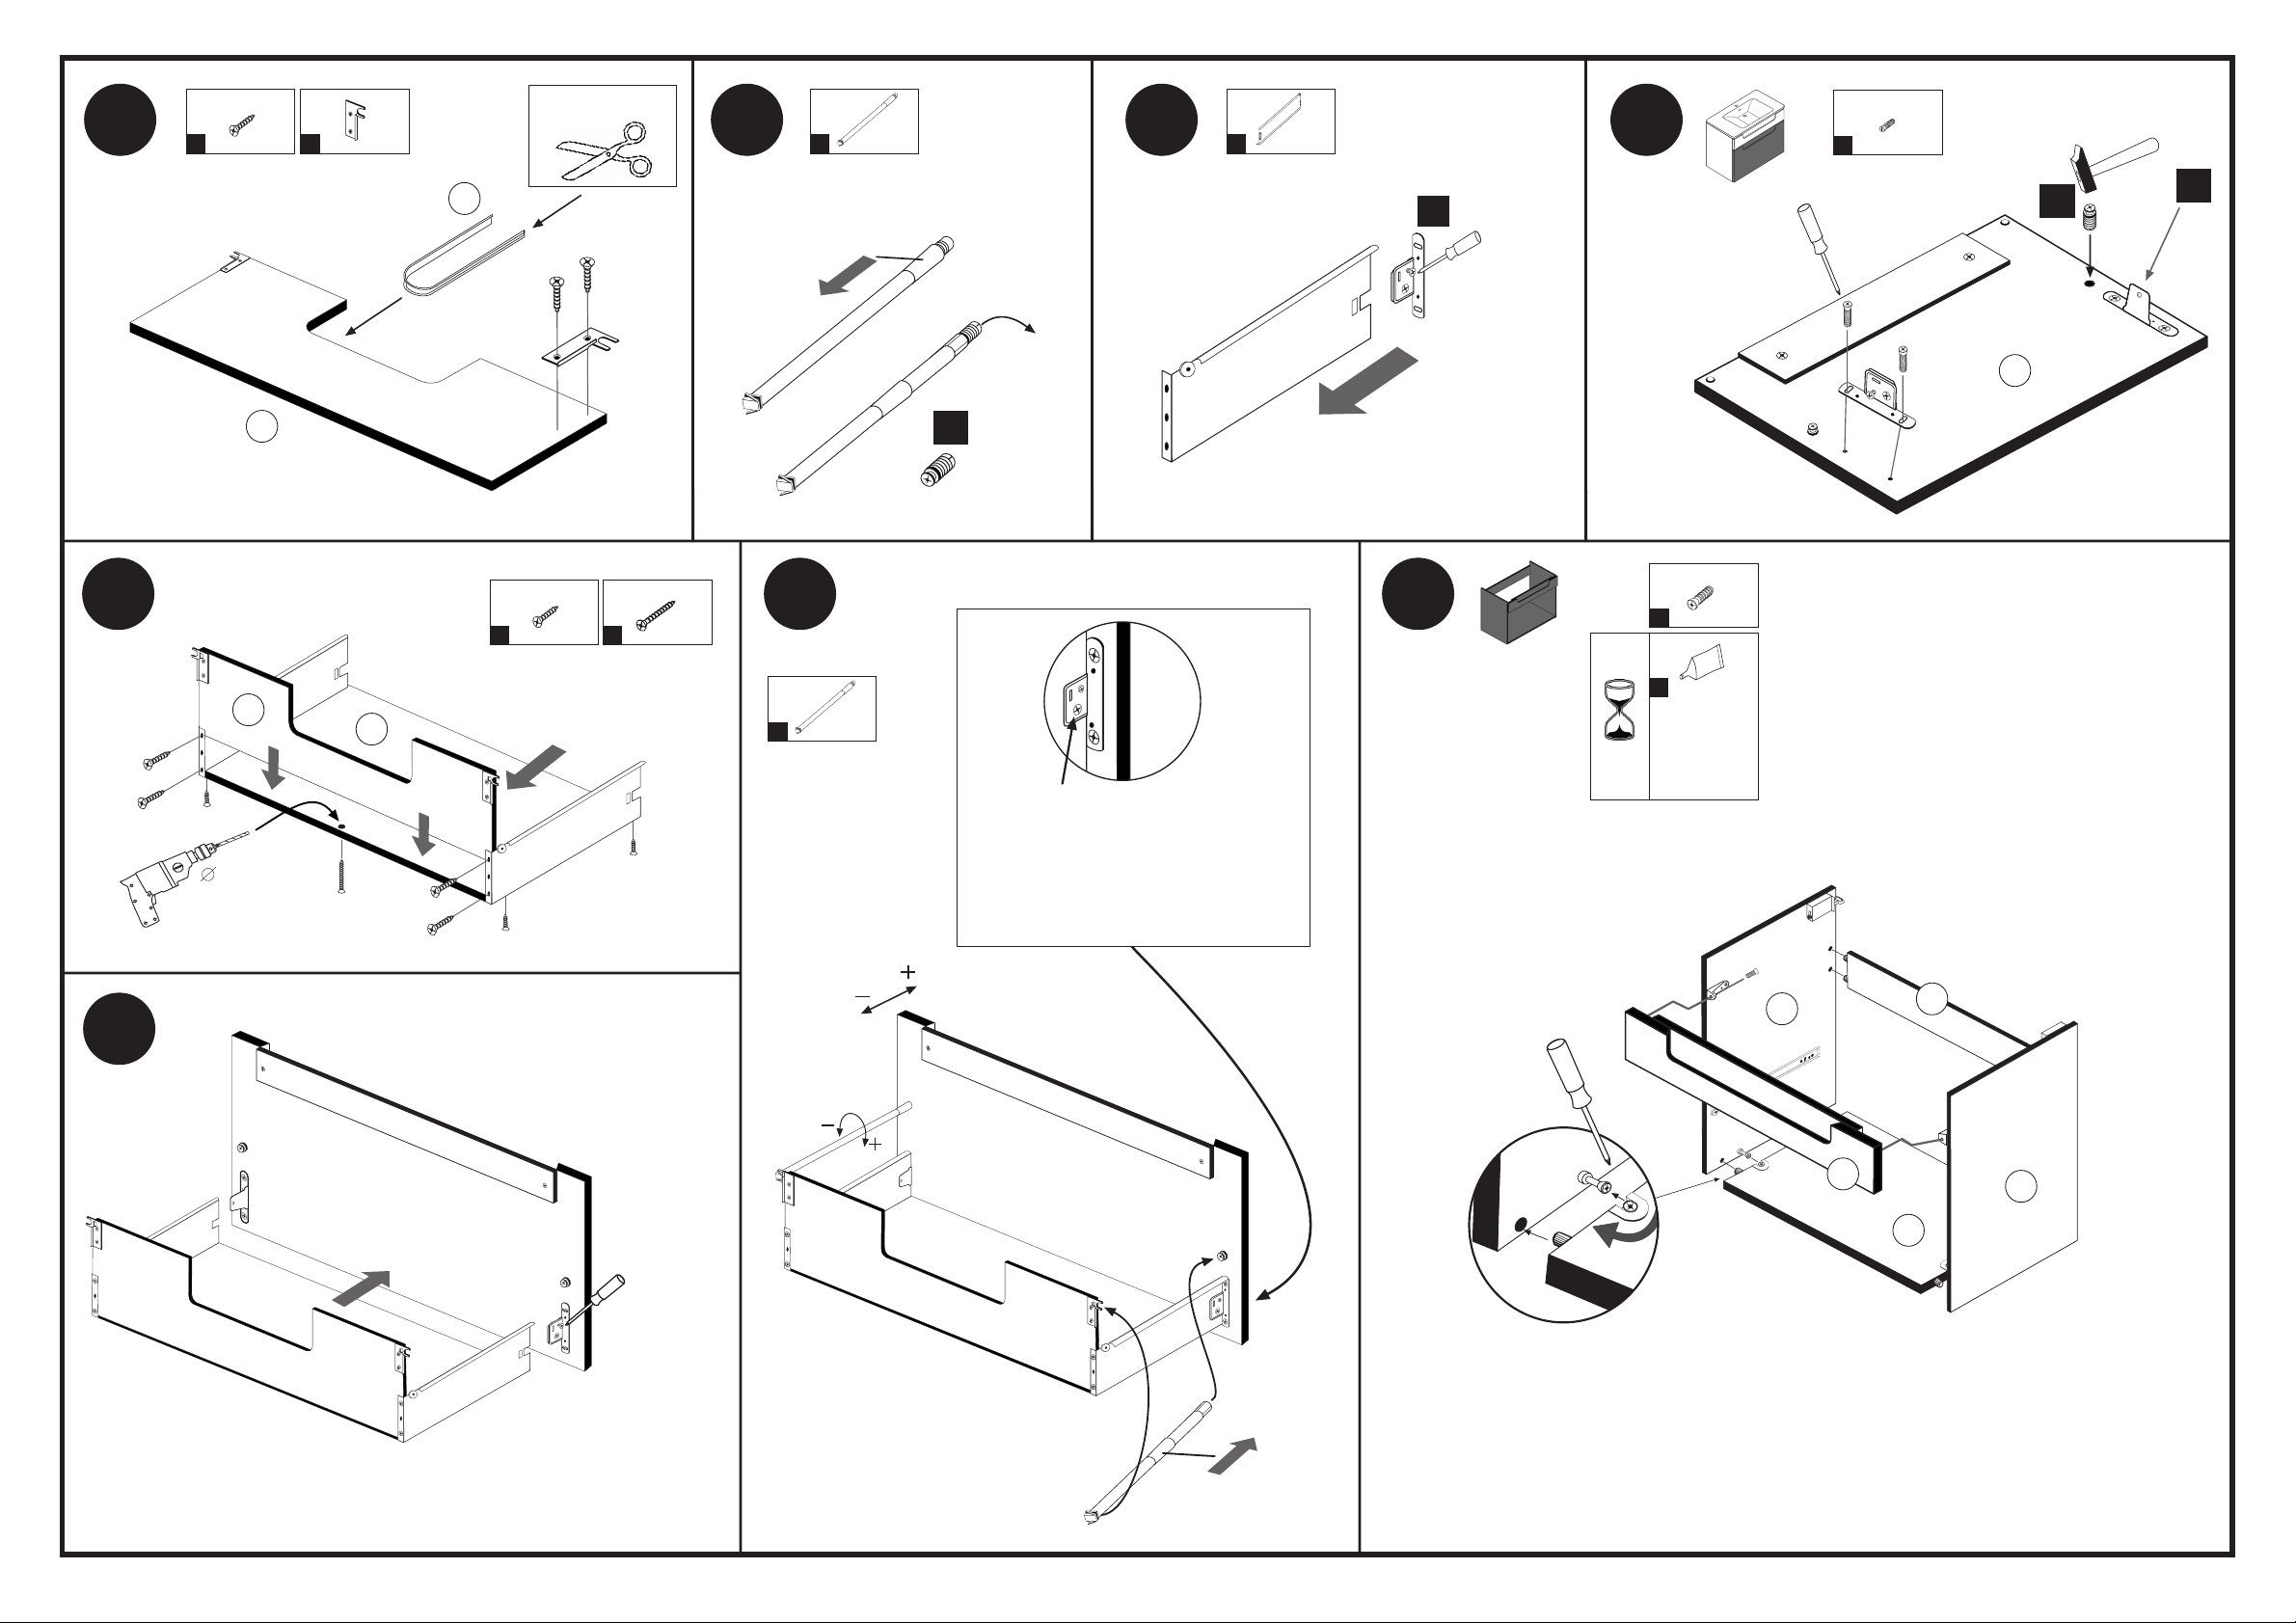
4
3,5 x 15
4 x
4
2804
9
2 x
Überschüssiges Profil
abschneiden !
5
2 x
8
5352.400
6 7
6
2 x
5281.400
3 x 13,5
4 x
30
1123
8
25
5 mm
25
1 x
11
28
6.1
1.
1. Schraube
leicht lösen
2.
8.1
6.1
27
2. Zargenseite von
8.1
3.
3,5 x 15
8 x
4
2804
24
28
29
11
3,5 x 25
1 x
15
2806
10
8
2 x
5352.400
Tipp !
Für ein gleichmäßiges Fugenbild können
Sie den Auszug in der Höhe einstellen.
Drehen Sie hierfür die große Stellschraube
Frontverbinder
trennen
11
20 min.
18
19
6,3 x 16
D Leim
GB Glue
NL Lijm
PL Klej
TR Tutkal
F Colle
I Colla
2 x
2816
1 x
2863
nach rechts bzw. nach links. Der Auszug
bewegt sich dann nach oben bzw. nach
unten.
L
9
20
26
13
22
23
24
1.
13
23
L
21
21
22
2.
1. Zarge auf Frontbefestigung
3.
aufschieben
2. Befestigungsschraube festziehen
Page 3

88841.310
12
13
11
Silikon 25ml
16
5,8 x 55
2 x
2840
1970
1 x
8 x 30
2 x
12
2842
L
L
Waschbeckenmontage
3.
Silikon
1. Silikon auf Stirnkanten der Seiten auftragen
2. Waschbecken auflegen
3. Fuge zwischen Waschbecken und Wand
mit Silikon abdichten
2.
Silikon
1.
Page 4

89935.330
D
Wichtige Pflegehinweise
Bitte beachten Sie die wichtigen Pflegehinweise auf unserer Internetseite
www.held-hilft.de
Pflegehinweise
GB
Important care instructions
Please note the important care instructions on our website
www.held-hilft.de
Pflegehinweise
FR
Instructions d'entretien importantes
S'il vous plaît noter les instructions de soins importants sur notre site Web
PL
Wazne instrukcje dotyczace pielegnacji
Zwróc´uwage na wazne instrukcje dotyczace pielegnacji na naszej stronie internetowej
www.held-hilft.de
Pflegehinweise
SK
Dôležité pokyny na starostlivost´
Dbajte na dôležité pokyny týkajúce sa starostlivosti na našich webových stránkach
www.held-hilft.de
Pflegehinweise
HU
Fontos kezelési utasítások
Kérjük, vegye figyelembe a honlapunkon található fontos kezelési útmutatót
www.held-hilft.de
Pflegehinweise
IT
Importanti istruzioni per la cura
Si prega di notare le importanti istruzioni per la cura sul nostro sito web
www.held-hilft.de
Pflegehinweise
NL
Belangrijke zorginstructies
Let op de belangrijke zorginstructies op onze website
www.held-hilft.de
Pflegehinweise
www.held-hilft.de
Pflegehinweise
RO
Instructiuni importante de îngrijire
Retineti instructiunile importante de îngrijire de pe site-ul nostru
www.held-hilft.de
Pflegehinweise
TR
Önemli bak m talimatlar
Lütfen web sitemizdeki önemli bak•m talimatlar n dikkate al n z
www.held-hilft.de
Pflegehinweise
CZ
Duležité pokyny pro péci
Vezmete prosím na vedomí duležité pokyny pro péci na našich webových stránkáchg
www.held-hilft.de
Pflegehinweise
www.held-hilft.de
RU
Pflegehinweise
 Loading...