

Page 1
www.heinner.com VFC001
Instructions - GB
Instrucțiuni de utilizare - RO
Anleitung - D
Eredeti használati utasítás - HU
Ръководство за употреба - BG
Instrukcja obsługi - PL
Page 2

CIRCULAR SAW
Instruction Manual
Intended Usage
The 185mm Circular Saw is in-tended for use in private households. It is not intended for use in
commercial or industrial environments and is not suitable for use outdoors.
Safety instructions
WARNING!
Please read and understand all instructions.
Failure to follow all instructions listed below may result in electric shock, fire and/or serious personal
injury.
SAVE THESE INSTRUCTIONS
Work Area
Keep your work area clean and well lit.
Cluttered benches and dark areas will invite accidents.
Do not operate power tools in explosive atmospheres such as in the presence of flammable liquids, gases,
or dust. Power tools create sparks which may ignite the dust or fumes.
Keep bystanders, children, and visitors away while operating a power tool. Distraction can cause you to
loose control.
Inner Pendulum Guard
Check lower guard for proper closing before each use. Do not operate the saw if lower guard does not
move freely and close instantly. Never clamp or tie the lower guard into the open position. If saw is
accidentally dropped, lower guard may be bent. Raise the lower guard with the retracting handle and
make sure it moves freely and does not touch the blade or any other part, in all angles and depths of cut.
Check the operation of the lower guard spring. If the guard and the spring are not operating properly, they
must be serviced before use. Lower guard may operate sluggishly due to damaged parts, gummy deposits,
or a build-up of debris.
Lower guard may be retracted manually only for special cuts such as "plunge cuts" and "compound cuts."
Raise lower guard by retracting handle and as soon as blade enters the material, the lower guard must be
released. For all other sawing, the lower guard should operate automatically.
Always observe that the lower guard is covering the blade before placing saw down on bench or floor. An
unprotected coasting blade will cause the saw to walk backwards, cutting whatever is in its path.
Be aware of the time it takes for the blade to stop after switch is released.
Electrical Safety
1 .Power tool plugs must match the outlet.
Never modify the plug in any way. Do not use any adapter plugs with earthed (grounded) power tools.
Unmodified plugs and matching outlets will reduce risk of electric shock.
2. Avoid body contact with earthed or grounded surfaces, such as pipes, radiators, ranges and
refrigerators. There is an increased risk of electric shock if your body is earthed or grounded.
3. Do not expose power tools to rain or wet conditions. Water entering a power tool will increase the risk
of electric shock.
4. When operating a power tool outdoors use an extension cord suitable for outdoor use. Use of a cord
suitable for outdoor use reduces the risk of electric shock.
5. Do not abuse the cord. Never use the cord for carrying, pulling or unplugging the power tool. Keep cord
away from heat, oil sharp edges or moving parts. Damaged or entangled cords increase the risk of electric
shock.
Page 3

CIRCULAR SAW
6. If operating a power tool in a damp location is unavoidable, use a residual current device (RCD)
protected supply. Use of an RCD reduces the risk of electric shock.
NOTE The term residual current device (RCD) may be replaced by the term ground fault circuit interrupter
(GFCI) or earth leakage circuit breaker (ELCB)
Personal Safety
Stay alert, watch what you are doing and use common sense when operating a power tool. Do not use tool
while tired or under the influence of drugs, alcohol, or medication. A moment of inattention while
operating power tools may result in serious personal injury.
Dress properly. Do not wear loose clothing or jewelry. Contain long hair. Keep your hair, clothing, and
gloves away from moving parts. Loose clothes, jewelry, or long hair can be caught in moving parts.
Avoid accidental starting. Be sure switch is in the locked or off position before inserting battery pack.
Carrying tools with your finger on the switch or inserting the battery pack into a tool with the switch on
invites accidents.
Remove adjusting keys or wrenches before turning the tool on. A wrench or a key that is left attached to a
rotating part of the tool may result in personal injury.
Do not overreach. Keep proper footing and balance at all times. Proper footing and balance enable better
control of the tool in unexpected situations.
Use safety equipment. Always wear eye protection. Dust mask, non-skid safety shoes, hard hat, or hearing
protection must be used for appropriate conditions.
Do not wear loose clothing or jewelry.
Contain long hair. Loose clothes, jewelry, or long hair can be drawn into air vents.
Do not use on a ladder or unstable support.
Stable footing on a solid surface petted better control of the tool in unexpected situations.
Tool Use and Care
1 .Use clamps or other practical way to secure and support the work piece to a stable platform. Holding
the work by hand or against your body is unstable and may lead to loss of control.
2. Do not force tool. Use the correct tool for your application. The correct tool will do the job better and
safer at the rate for which it is designed
3. Do not use tool if switch does not turn it on or off. A tool that cannot be controlled with the switch is
dangerous and must be repaired.
4. Disconnect battery pack from tool or place the switch in the locked or off position before making any
adjustments, changing accessories, or storing the tool. Such preventive safety measures reduce the risk of
starting the tool accidentally.
5. Store idle tools out of reach of children and other untrained persons. Tools are dangerous in the hands
of untrained users.
6. When battery pack is not in use, keep it away from other metal objects like: paper clips, coins, keys,
nails, screws, or other small metal objects that can make a connection from one terminal to another.
Shorting the battery terminals together may cause sparks, burns, or a fire.
7. Maintain tools with care. Keep cutting tools sharp and clean. Properly maintained tools with sharp
cutting edges are less likely to bind and are easier to control.
8. Check for misalignment or binding of moving parts, breakage of parts, and any other condition that may
affect the tools operation. If damaged, have the tool serviced before using. Many accidents are caused by
poorly maintained tools.
9. Use only accessories that are recommended by the manufacturer for your model. Accessories that may
be suitable for one tool may create a risk of injury when used on another tool.
10. Keep the tool and its handle dry, clean and free from oil and grease. Always use a clean cloth when
cleaning. Never use brake fluids, gasoline, petroleum-based product, or any strong solvents to clean your
tool.
Page 4

CIRCULAR SAW
Following this rule will reduce the risk of loss of control and deterioration of the enclosure plastic.
Service
1 .Tool service must be performed only by qualified repair personnel. Service or maintenance performed
by unqualified personnel may result in a risk of injury.
2. When servicing a tool, use only identical replacement parts. Follow instructions in the Maintenance
section of this manual.
Use of unauthorized parts or failure to follow maintenance instructions may create a risk of injury.
Circular Saw Specific Precautions
Keep hands away from cutting area and blade. Keep your second hand on auxiliary handle or motor
housing. If both hands are holding the saw, they cannot be cut by the blade.
Do not reach underneath the workpiece.
The guard cannot protect you from the blade below the workpiece.
Adjust the cutting depth to the thickness of the workpiece. Less than a full tooth of the blade teeth should
be visible below the
workpiece.
Never hold piece being cut in your hands or across your leg. Secure the workpiece to a stable platform. It is
important to support the work properly to minimize body exposure, blade binding, or loss of control.
Hold power tool by insulated gripping surfaces when performing an operation where the cutting tool may
contact hidden wiring or its own cord. Contact with a "live" wire will also make exposed metal parts of the
power tool "live" and shock the operator.
When ripping always use a rip fence or straight edge guide. This improves the accuracy of cut and reduces
the chance of blade binding.
Always use blades with correct size and shape (diamond versus round) of arbor holes. Blades that do not
match the mounting hardware of the saw will run eccentrically, causing loss of control.
Never use damaged or incorrect blade washers or bolt. The blade washers and bolt were specially
designed for your saw for optimum performance and safety of operation.
Kickback
Kickback is a sudden reaction to a pinched bound or misaligned saw blade, causing an uncontrolled saw to
lift up and out of the workpiece toward the operator;
When the blade is pinched or bound tightly by the kerf closing down, the blade stalls and the motor
reaction drives the unit rapidly back toward the operator;
3. If the blade becomes twisted or misaligned in the cut, the teeth at the back edge of the blade can dig
into the top surface of the wood causing the blade to climb out of the kerf and jump back toward the
operator.
4. Kickback is the result of saw misuse and/or in correct operating procedures or conditions and can be
avoided by taking proper precautions as given below.
Maintain a firm grip with both hands on the saw and position your arms to resist kickback forces. Position
your body to either side of the blade, but not in line with the blade. Kick back could cause the saw to jump
backwards, but kickback forces can be controlled by the operator, if proper precautions are taken.
When blade is binding, or when interrupting a cut for any reason, release the trigger and hold the saw
motionless in the material until the blade comes to a complete stop.
Never attempt to remove the saw from the work or pull the saw backward while the blade is in motion or
kickback may occur.
Investigate and take corrective actions to eliminate the cause of blade binding.
When restarting a saw in the workpiece, center the saw blade in the kerf and check that saw teeth are not
engaged into the material. If saw blade is binding, it may walk up or kickback from the workpiece as the
saw is restarted.
Page 5
CIRCULAR SAW
Support large panels to minimize the risk of blade pinching and kickback. Large panels tend to sag under
their own weight.
Supports must be placed under the panel on both sides, near the line of cut and near the edge of the
panel.
Do not use dull or damaged blades.
Unsharpened or improperly set blades produce narrow kerf causing excessive friction blade binding and
kickback.
Blade depth and bevel adjusting locking levers must be tight and secure before making cut. If blade
adjustment shifts while cutting, it may cause binding and kickback.
Use extra caution when making a "plunge cut" into existing walls or other blind areas.
The protruding blade may cut objects that can cause kickback.
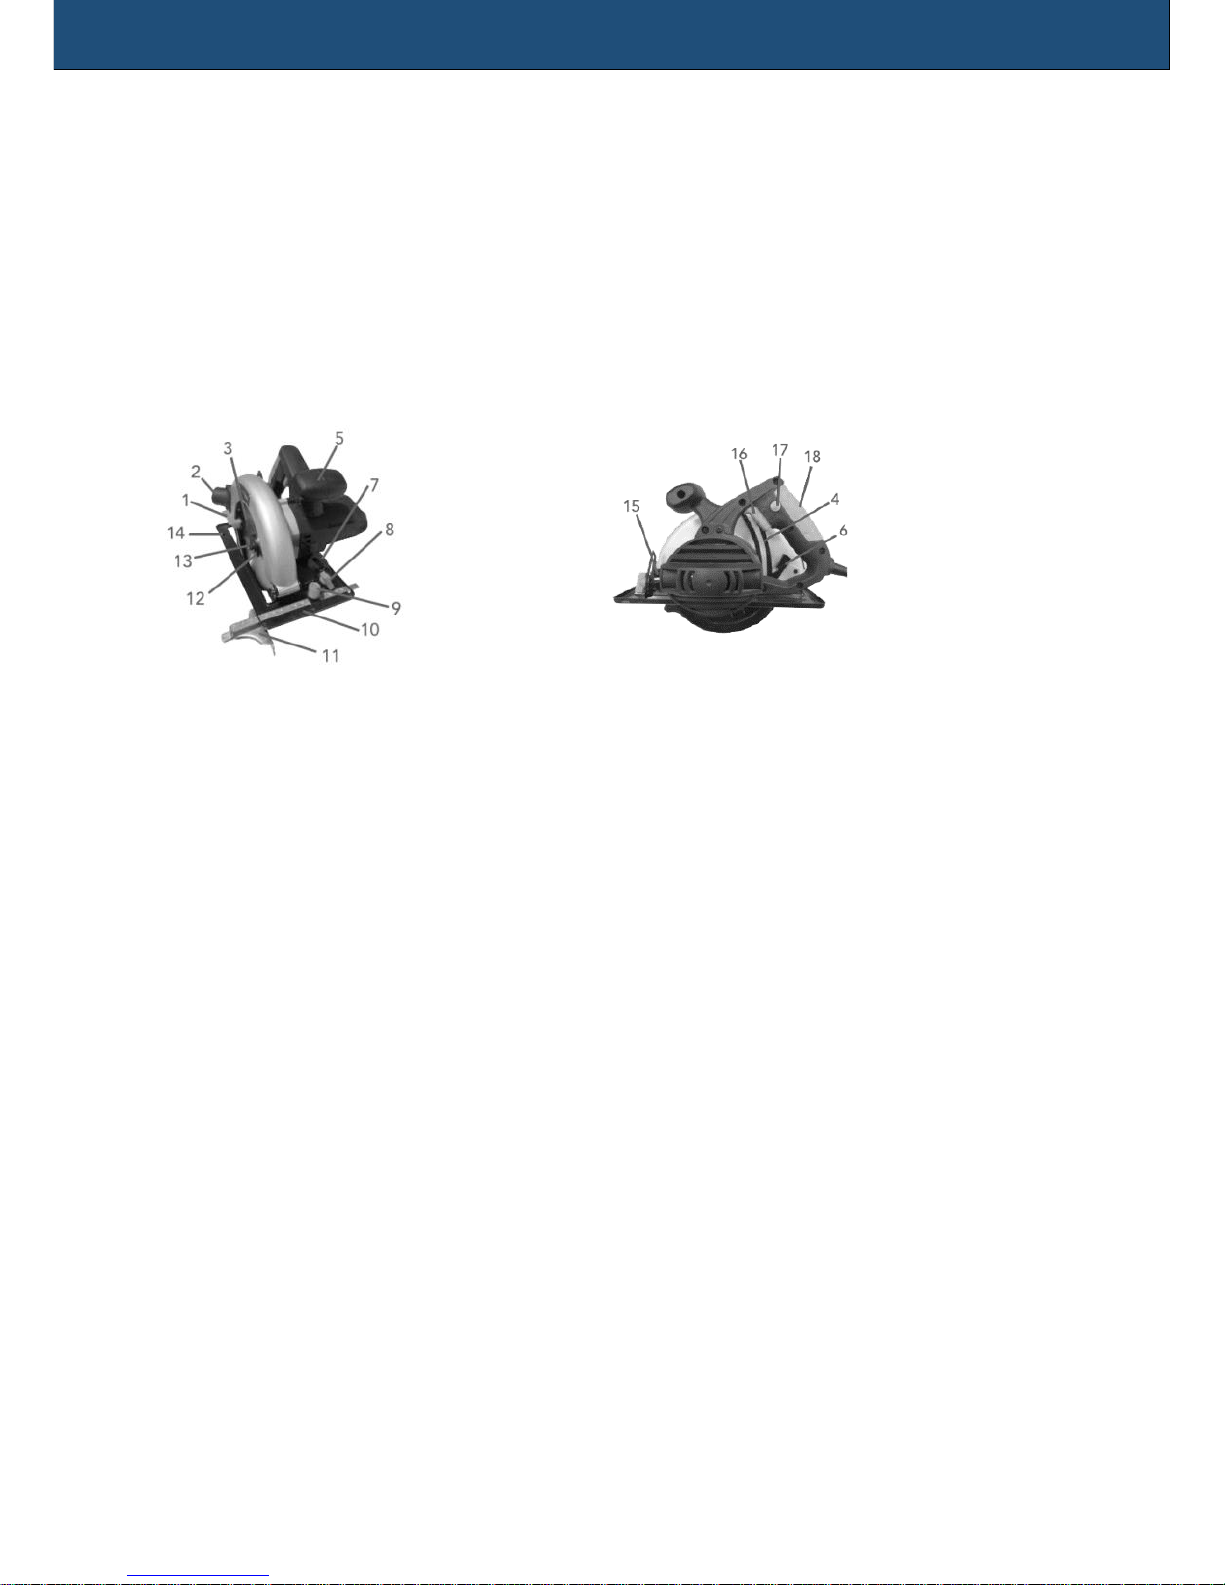
1 .Lower guard leaver
2. Dust extraction outlet
3. Saw blade
4. Depth adjustment scale
5. Auxiliary handle
6. Depth adjustment lock lever
7. Miter scale
8. Angle adjustment
9. Parallel guide lock knob
10. Base plate
11. Parallel guide
12. Outer flange
13. Blade clamp bolt
14. Lower guard
15. Spindle lock button
16. ON/OFF switch
17. Safety-Lock button
18. Main handle
Assembly
Important: Prior to any assembly and adjustment always unplug the tool.
Changing the blade
Warning: Always disconnect the plug from the power mains before making any adjustment or attaching
any accessories.
1 .Place this circular saw on its side on a flat surface. It is advisable to bring the base plate down to its
minimum depth cut to make it easier to change the blade.
2. Push the spindle lock button (15) toward motor housing and hold it firmly.
3. Turn the blade clamp bolt (13) anti-clockwise by using the wrench that supplied with the tool.
4. Remove the blade clamp bolt (13) and outer flange (12).
Page 6

CIRCULAR SAW
5. Raise the lower guard (14) by using the lever for lower guard (1),and the remove the saw blade.
6. Clean the saw blade flanges, then mount the new saw blade onto the output spindle and against the
inner flange.
7. Make sure the saw teeth and arrow on the blade are pointing in the same direction as the arrow on the
lower guard.
8. Reinstall the outer flange, and tighten the blade clamp bolt.
9. Make sure that the saw blade runs freely by turning the blade by hand.
Depth adjustment
Loosen the lock lever for depth adjustment (b).
Hold the base plate flat against the edge of the work piece and lift the body of the saw until the blade is at
the right depth determined by the depth of cut scale (4) (align the scale line).
Tighten the depth adjustment lever.
Angle Adjustment
Loosen the Lock knob for angle adjustment (8)
Adjust the shoe to the desired angle between 0 degree to 45 degree. [See miter scale(7)].
Tighten the angle adjustment lock
Switching on and off
Before engaging the ON/OFF switch (16), check that the saw blade is properly fitted and runs smoothly,
the blade clamp bolt is well tightened.
Connect the plug to the power supply
To switch on the circular saw, press the Safety-Lock button (17) and pull the ON/OFF switch trigger (16).
When you release the switch trigger (16), the tool turns off.
Parallel cut adjustment
Loosen the lock knob of edge guide (9).
Slide the parallel guide (11)through the slots in the shoe to the desired width.
Tighten the lock bolt to fit it in the position.
Ensure that the edge guide rests against the wood along its entire length to give a consistent parallel cuts.
Operation
General Cutting
When starting, always hold the saw handle with one hand and the auxiliary handle (5) with the other
hand. Never force the saw but maintain a light and continuous pressure after completing the cut allow the
saw to come to a complete stop. When cutting is interrupted, resume cutting by allowing the blade to
reach full speed and then reentering the cut slowly.
When cutting across the grain, the fibers of the wood have a tendency to lift and tear, moving the saw
slowly minimizes this effect.
Pocket cutting
Disconnect the plug from the power supply before making any adjustments. Set the depth adjustment
based on the thickness of the line drawing for the cut .raise the lower guard by using the lift lever.
With the blade barely above the material to be cut, start the saw and allow the blade to come to full
speed.
Page 7

CIRCULAR SAW
Gradually lower the blade on to the material to be cut using the front end of the shoe as a pivot point.
When the blade starts cutting, release the lower guard. When the shoe is resting flat on the surface being
cut, proceed cutting in a forward direction to the end of the cut.
Allow the blade to come to a full stop before removing it from the cut.
Never pull the saw backward since the blade will climb out of the cut and kickback will occur.
Turn the saw around and finish the cut in a normal manner, sawing forward. Use a jigsaw or a hand saw to
finish the cut in the corners, if required.
Cutting Large Sheets
Large sheet or boards require support to prevent bends or sags. If you attempt to cut without leveling and
properly supporting the work piece,the blade will tend to bind, causing kickback.
Support the panel or board close to the cut. Be sure to set the blade adjustment so that you can cut
through the material without cutting into the table or workbench.
Suggestion: use two by fours to support the board or panel to be cut. If the piece is too large for the
workbench, use the floor with the two-by fours supporting the wood.
Care & Maintenance
To prevent accidents, always unplug the saw from the power source before cleaning or performing any
maintenance the saw may be cleaned most effectively using compressed air. Always wear safety goggles
when using compressed air. If compressed air is not available, use a brush to remove dust and chips from
the saw.
Motor ventilation vents and switch levers must be kept clean and free of foreign matter. Do not attempt
to clean by inserting pointed objects through openings.
Never use any caustic agents to clean plastic parts. Such as: gasoline, carbon tetrachloride, chlorinated
cleaning solvents, ammonia and household cleaners containing ammonia. Do not use any of these to clean
the saw.
Have an authorized service center examine and/or replace the worn carbon brushes in the event of
excessive parking.
Blades become dull even when cutting regular lumber, a sure sign of a dull blade is the need to force the
saw forward instead of guiding it while making a cut. Take the blade to a service center for sharpening.
Keep the machine clean all the time.
Clean the housing only with a damp cloth. Do not use any solvents! Dry thoroughly afterwards .In order to
maintain battery capacity ,we recommend the battery to be completely discharged every one month and
fully recharged again .Only store with a fully charged battery and top-up the charge from time to time if
stored for a long time. Store in a dry and frost-free place, the ambient temperature should not exceed
400C.
If the supply cord of this power tool is damaged, it must be replaced by a similar cord available through
the service organization or a qualified authoritative technician.
For safety reasons, the machine automatically switches off if the carbon brushes are so worn out that they
no longer have contact with the motor. In that case, the carbon brushes must be replaced by a pair similar
carbon brush available through the after-sales service organization or qualified professional person.
CAUTION: The brushes must always be replaced in pairs.
CAUTION: Always disconnect the machine from the power supply before removing any electrical covers.
Disposal Information
Waste electrical products should not be disposed of with household waste. Please recycle where facilities
exist. Check with your local authority for recycling advice.
Page 8

CIRCULAR SAW
RECYCLING
Electrical and electronic equipment waste (WEEE) might contain dangerous materials which can have a
negative impact on the environment and human health if not collected separately.
This item is in conformity with the European Directive EU WEEE (2012/19/EU) and is marked with an
electronic and electrical waste logo graphically represented in the image below.
This icon shows that WEEE should not be collected with household waste but separately.
We recommend you to consider the following:
- Materials and components used when manufacturing this item are high quality materials
which can be reused and recycled;
- Do not throw away the item with household waste at the end of life;
- Take the item to a collecting point where it will be collected for free;
- Please contact the local authorities for details on the collecting centers.
Conformity with the RoHS Directive: the item you purchased is in conformity with the EU Directive RoHS
(2011/65/UE). It does not contain materials listed as harmful or prohibited in the Directive.
Thank you for helping us protect the environment and our health!
Manufactured for
Network One Distribution
Marcel Iancu St., no. 3-5, Bucharest, 020757
2017
Page 9

CIRCULAR SAW
 Loading...