

Page 1
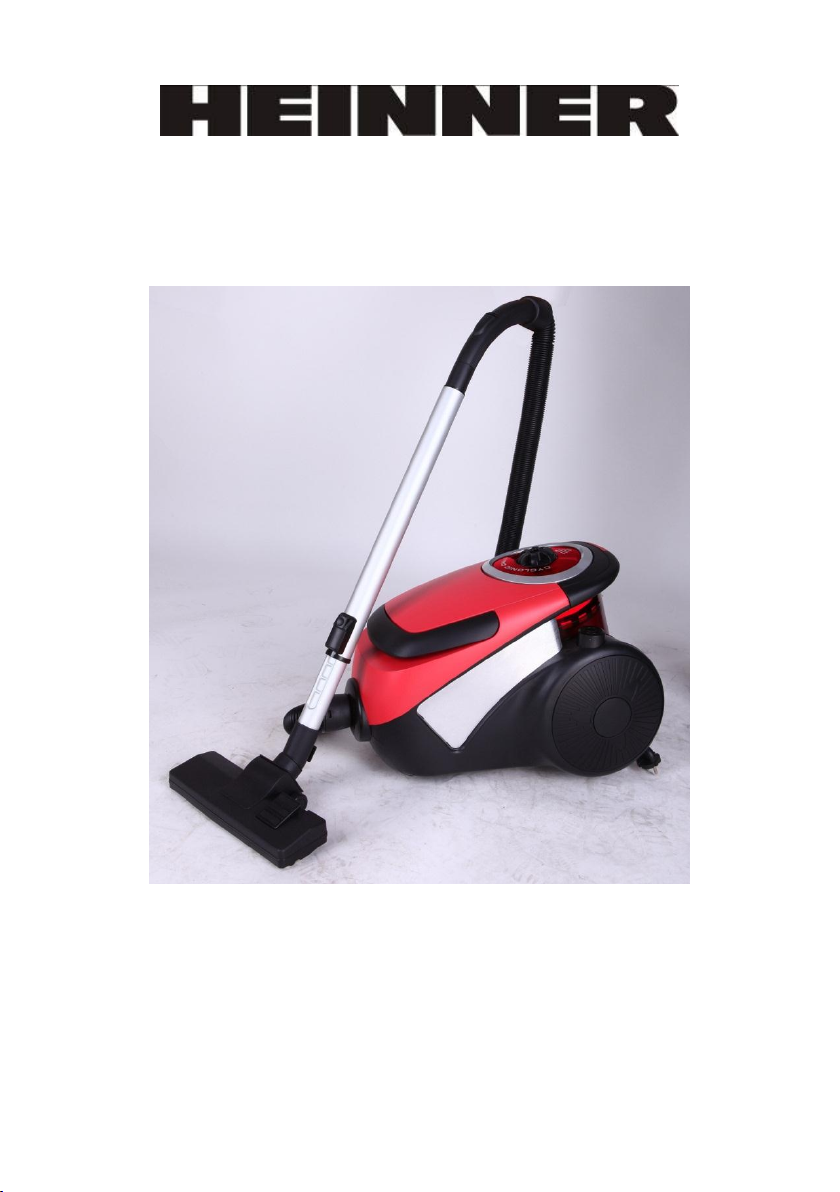
ASPIRATOR filtrare ciclonica
Storm 4040
Alimentare: 220-240V, 50/60Hz
Putere maxima: 2400W
Page 2
MANUAL DE INSTRUCTIUNI
VA RUGAM CITITI ACEST MANUAL CU ATENTIE INAINTE DE FOLOSIREA
PRODUSULUI SI PASTRATI-L PENTRU O CONSULTARE ULTERIOARA.
Descriere generala
IMPORTANT
Cititi cu atentie acest manual de utilizare inainte de folosirea
aparatului si pastrati-l pentru o consultare ulterioara.
Verificati ca tensiunea inscriptionata pe aspirator sa corespunda
tensiunii prizelor inainte de conectarea aparatului.
Nu folositi aparatul daca stecherul, cablul de alimentare sau aparatul
in sine este deteriorat.
Pentru evitarea unui accident, cablul de alimentare deteriorat trebuie
inlocuit de un centru service.
Nu lasati aparatul la indemana copiilor.
Nu aspirati niciodata apa sau alte lichide, substante inflamabile si
cenusa fierbinte.
Nu folositi niciodata produsul fara filtrul de protectie motor. In caz
contrar, motorul va fi afectat iar durata de viata a produsului se va
scurta.
Nu folositi aspiratorul fara dispozitivul de praf.
Pregatirea pentru utilizare
Furtunul
Pentru a conecta furtunul, impingeti -l in aspirator in orificiul special si
rotiti in sensul acelor de ceas. Pentru deconectare, rotiti in sens
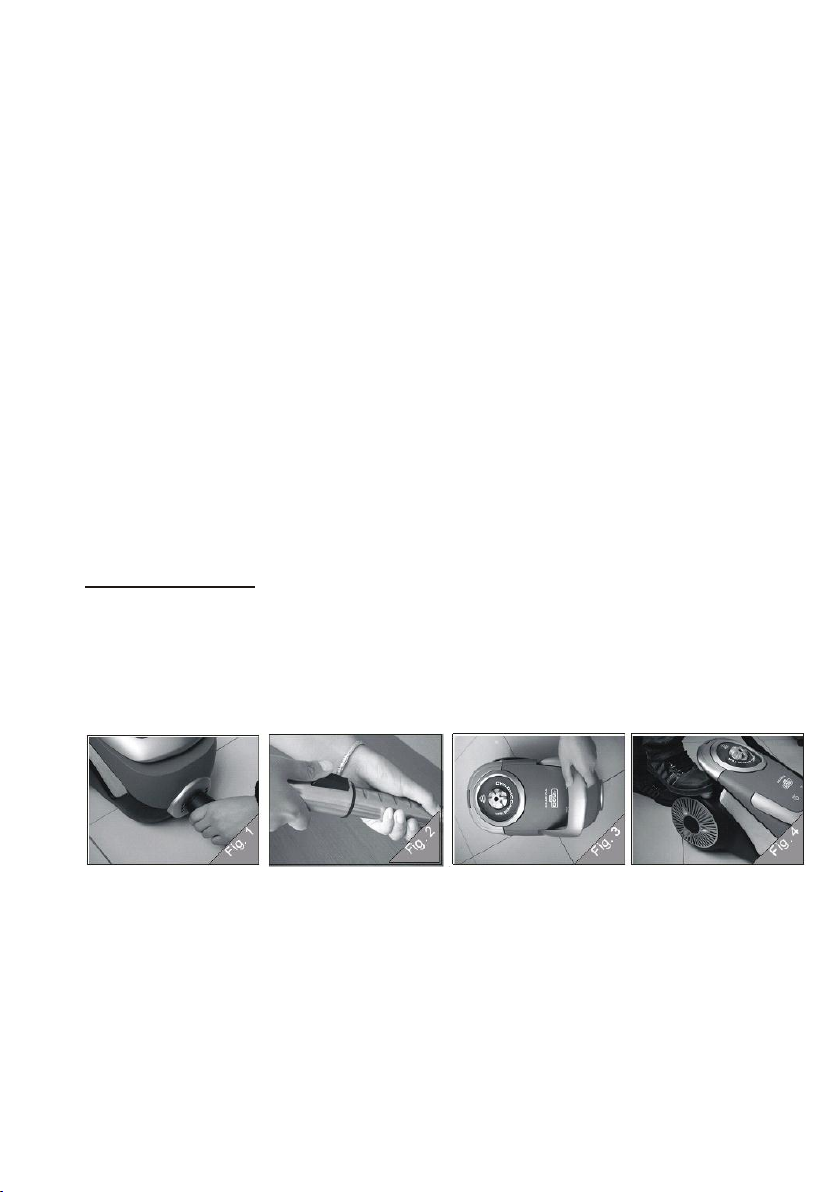
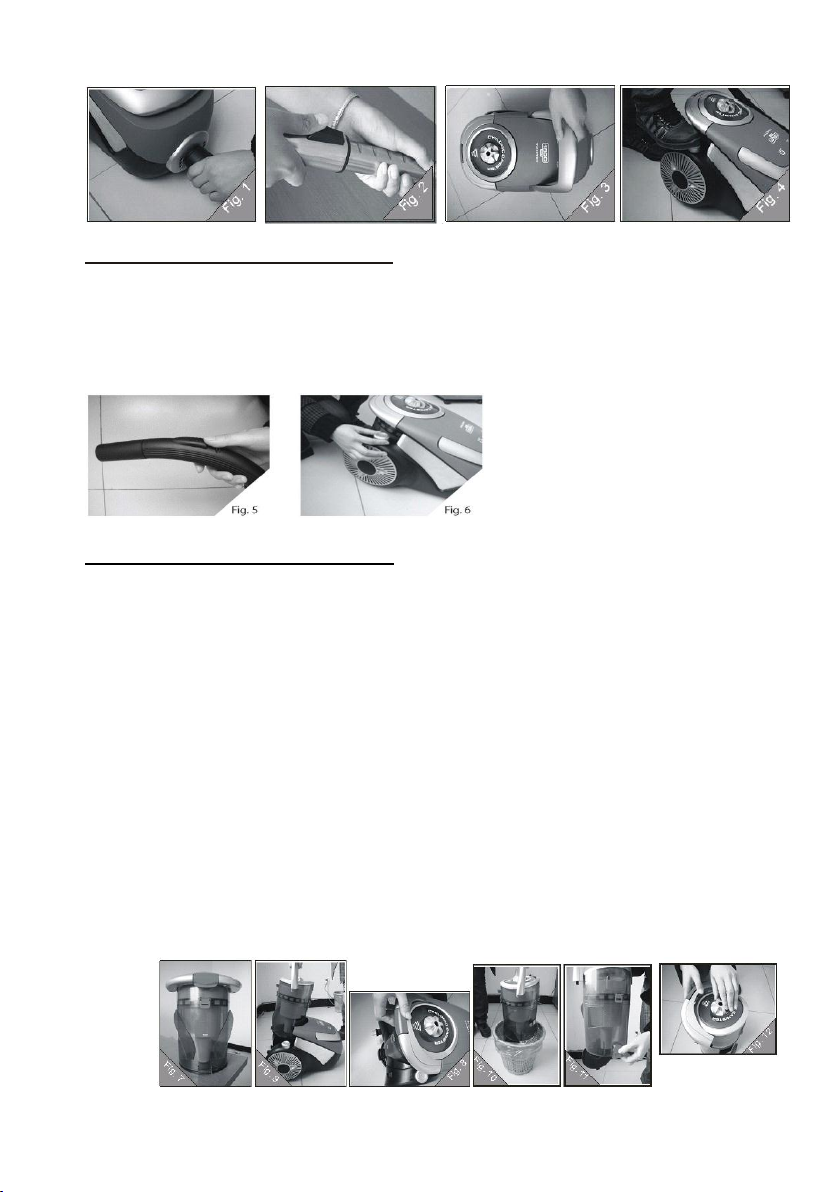
invers acelor de ceas si scoateti-l din aspirator. Vezi Fig.1 .
Ajustati tubul telescopic la lungimea dorita. Impingeti partea cu
gradatii in sus si impingeti partea de jos a tubului in jos - Fig.2
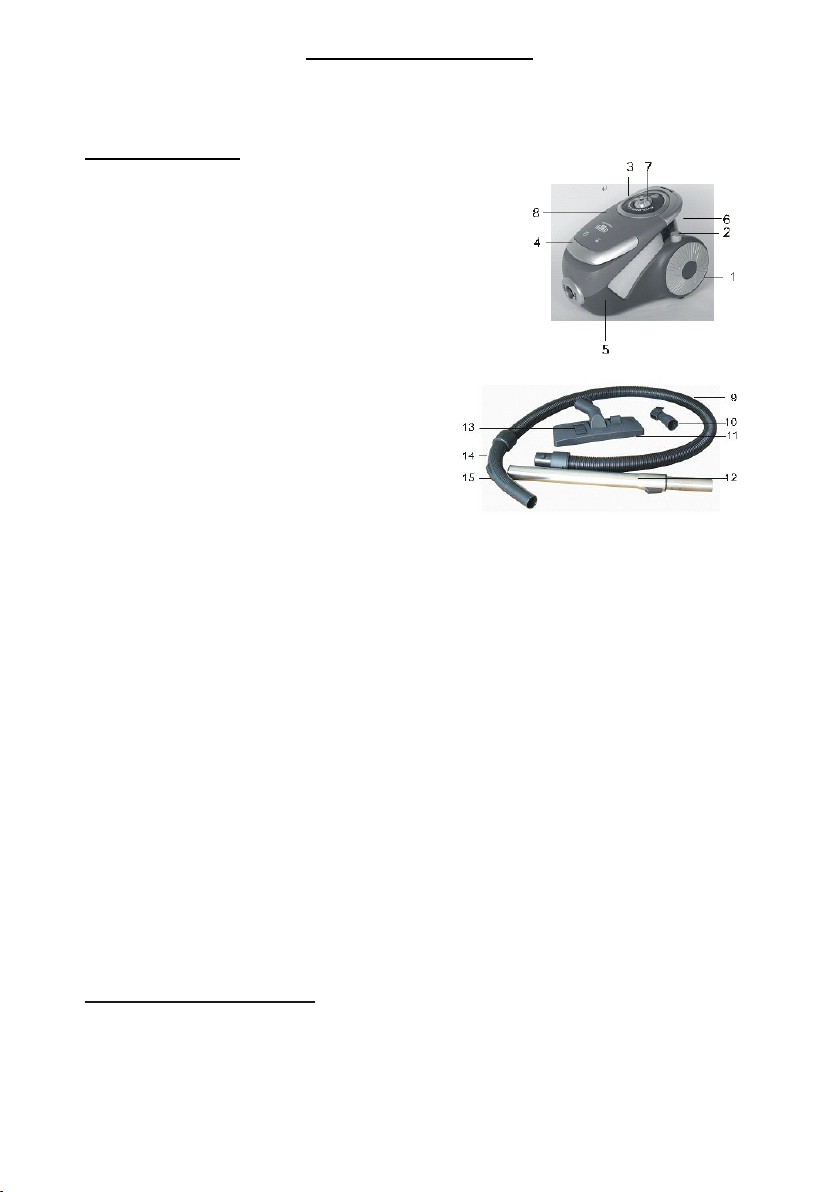
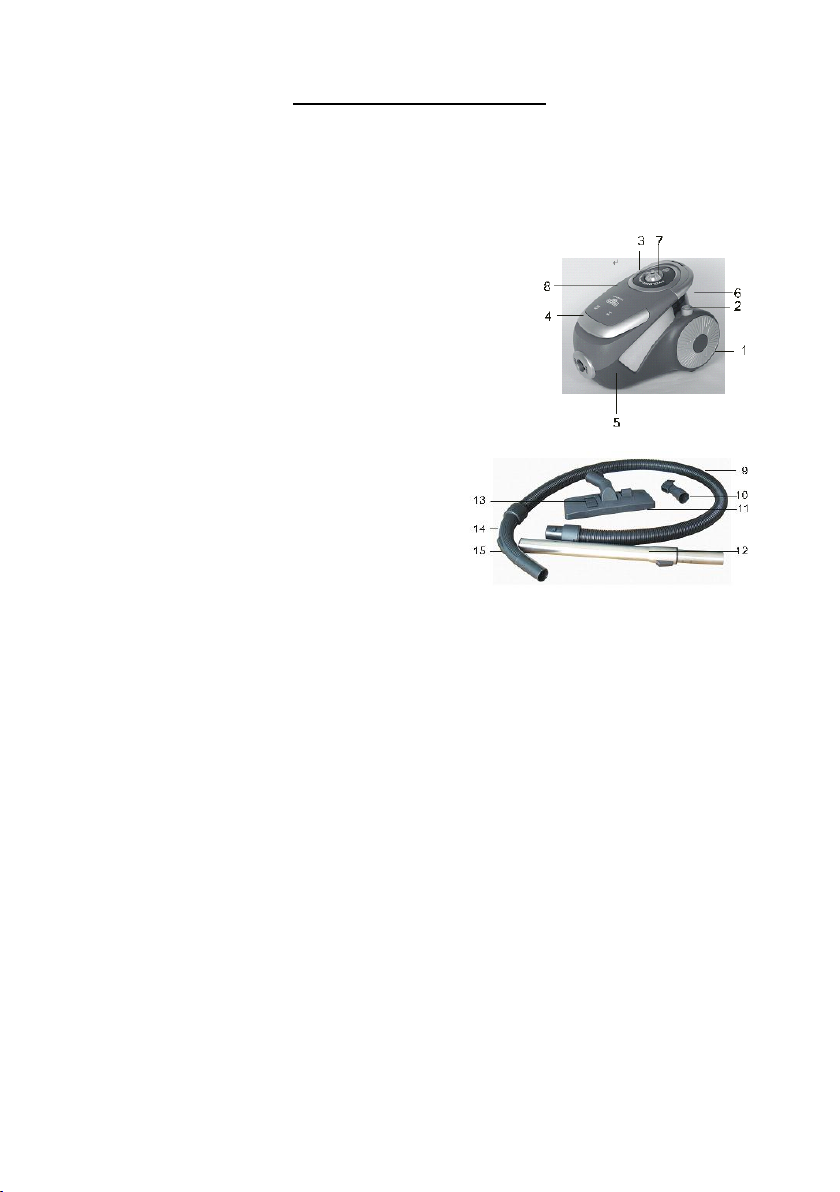
1. Cablu alimentare
15. Cursor putere aspirare
2. Buton de infasurare/desfasurare
automata cabluelectric
3. Buton de pornire/oprire si maner de
ajustare a puterii de aspirare
4. Maner
5. Baza
6. Compartiment praf
7. Buton pentru praf
8. Mufa pentru fixarea furtunului
9. Furtun flexibil
10. Perie integrata si duza
11. Perie mare de podea
12. Tub telescopic
13. Selector covor/suprafata dificila
14. Maner pentru tub
Page 3
Tubul telescopic
Apasati arcul de blocare de pe partea laterala a tubului telescopic si
fixati butonul de fixare in orificiul de pe cealalta parte a tubului.
Conectati tubul telescopic de manerul furtunului, inserati parte mai
ingusta in partea mai larga si rotiti putin.
Peria de podea
Puteti folosi peria de podea pe covor sau pe pardoseala.
Pentru curatarea pardoselei, impingeti cu piciorul butonul de
deasupra periei, pentru ca benzile cu peri sa iasa din interior.
Pentru curatarea covoarelor, apasati pe buton in sens opus, pentru ca
benzile cu peri sa se retraga in interior.
Peria integrata si duza
Aspiratorul dumneavoastra este vandut impreuna cu unul dintre
aceste accesorii. Conectati-le direct de manerul furtunu lui sau de
tubul telescopic.
Folositi duza pentru locuri inguste pentru aspirarea suprafetelor mici,
a colturilor stramte sau a locurilor dificil de curatat.
Folositi peria mica pentru a curata computere, rafturi etc.
Utilizarea aparatului
Aspirarea
- Aspiratorul poate fi purtat prin manerul de deasupra aspiratorului.Vezi Fig.3
1. Trageti cablul in afara si introduceti stecherul in priza.
2. Apasati butonul ON/OFF pentru pornirea aspiratorului.Vezi Fig.4
Ajustarea puterii de aspirare
Puteti ajusta puterea de aspirare cu ajutorul:
- butonului de ajustare a puterii de aspirare situat pe manerul furtunului. Vezi
Fig.5
- butonului de control de pe aspirator (pe anumite modele) Vezi Fig.6
Page 4
Golirea containerului de praf
Goliti containerul pentru praf cel putin atunci cand cantitatea de praf acumulata
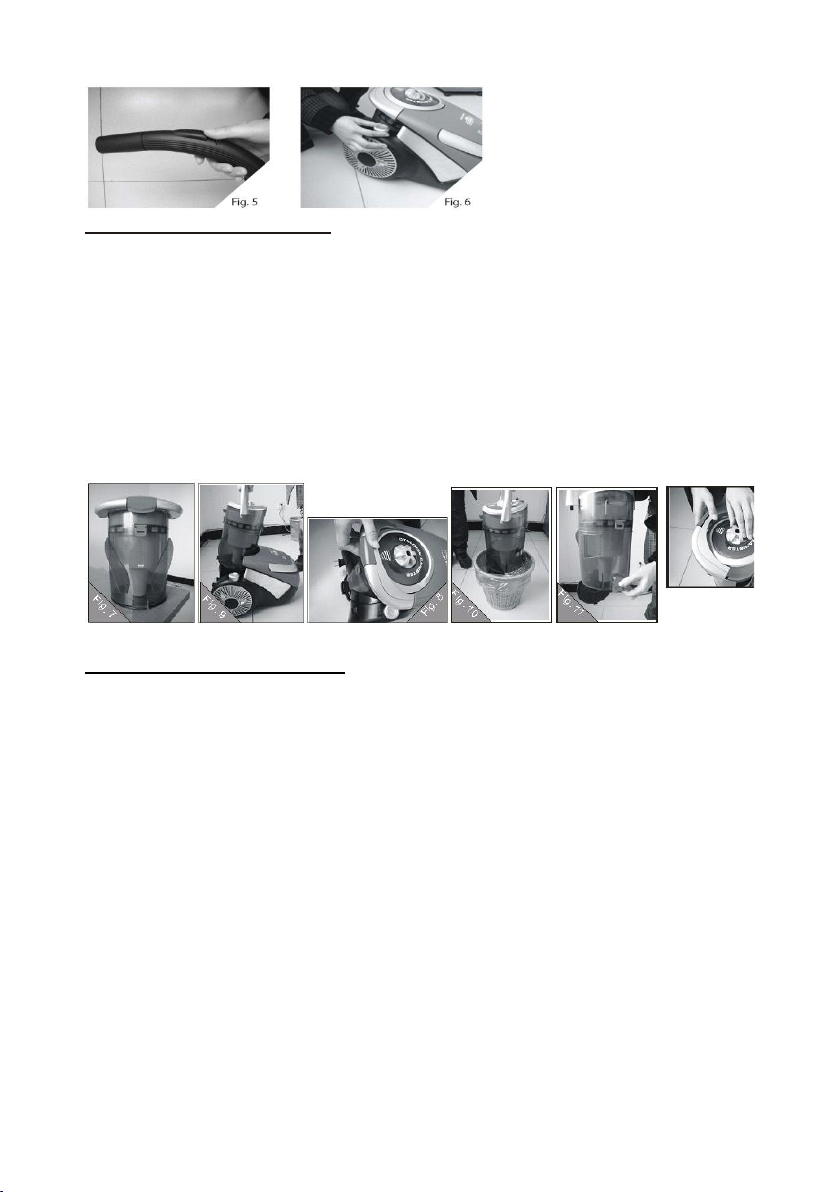
a atins marcajul MAX sau cand puterea de aspirare a scazut. Vezi Fig.7
3. Detasati containerul ridicand butonul „Dust Release“. Vezi Fig.8
4. Ridicati containerul din aspirator cu partea de jos in sus..Vezi Fig.9
5. La golire, tineti-l foarte aproape de cosul de gunoi. Vezi Fig.10
6. Trageti de butonul de deschidere iar baza se deschide. Vezi Fig.11
7. Rasuciti incet butonul de deasupra containerului si goliti de praful ramas
acolo. Vezi Fig.12
8. Inchideti baza si puneti containerul de praf in aspirator. Apasati ferm pana
cand se aude un clic si verificati sa fie bine fixat.
Curatarea filtrului si inlocuirea
Aspiratorul are urmatoarele filtre: filtrul HEPA,filtrul de protectie per-motor si
filtrul de protectie post-motor.
Filtrele se pot bloca dupa o perioada de utilizare si astfel reduc din puterea de
aspirare. Este deci foarte important ca filtrele sa fie schimbate dupa un timp.
Curatarea sau inlocuirea filtrului HEPA
Intotdeauna scoateti din priza aspiratorul inainte de inlocuirea filtrului. Scoateti
containerul de praf.
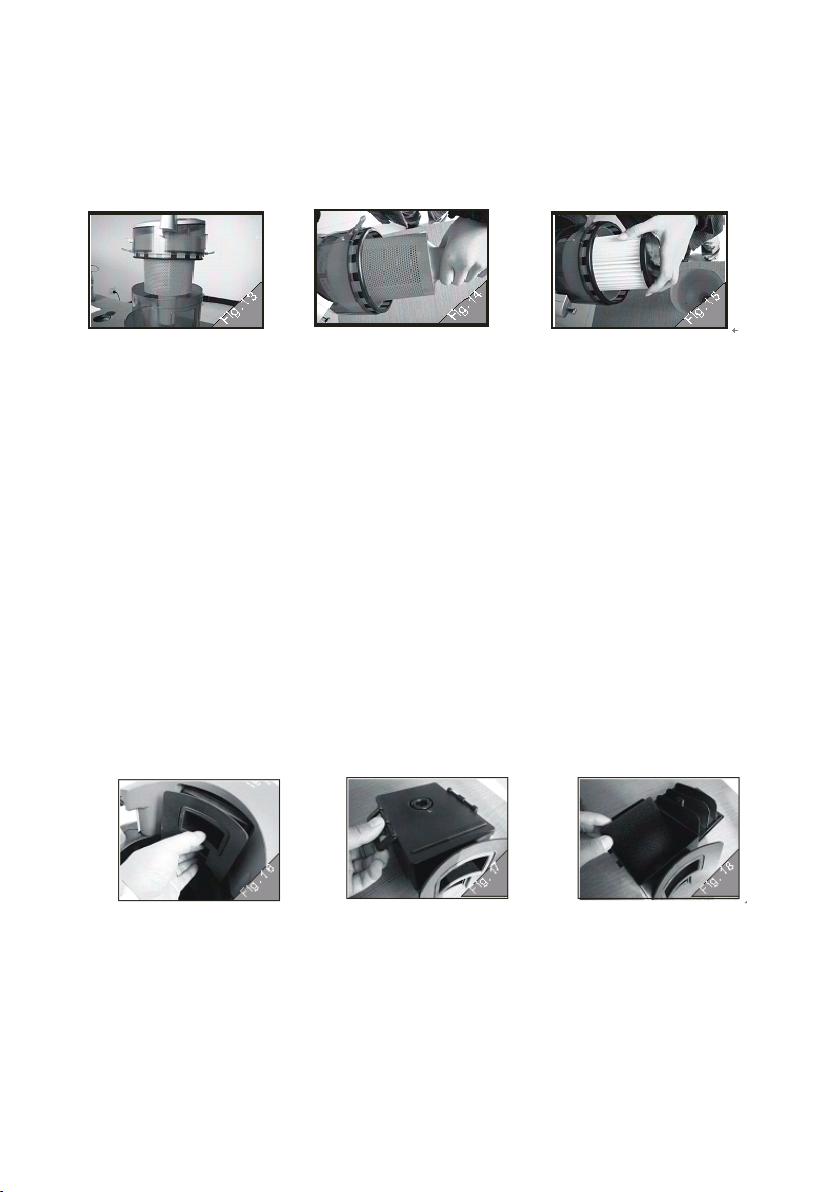
1. Deschideti containerul de praf din ambele parti. Detasati partea superioara
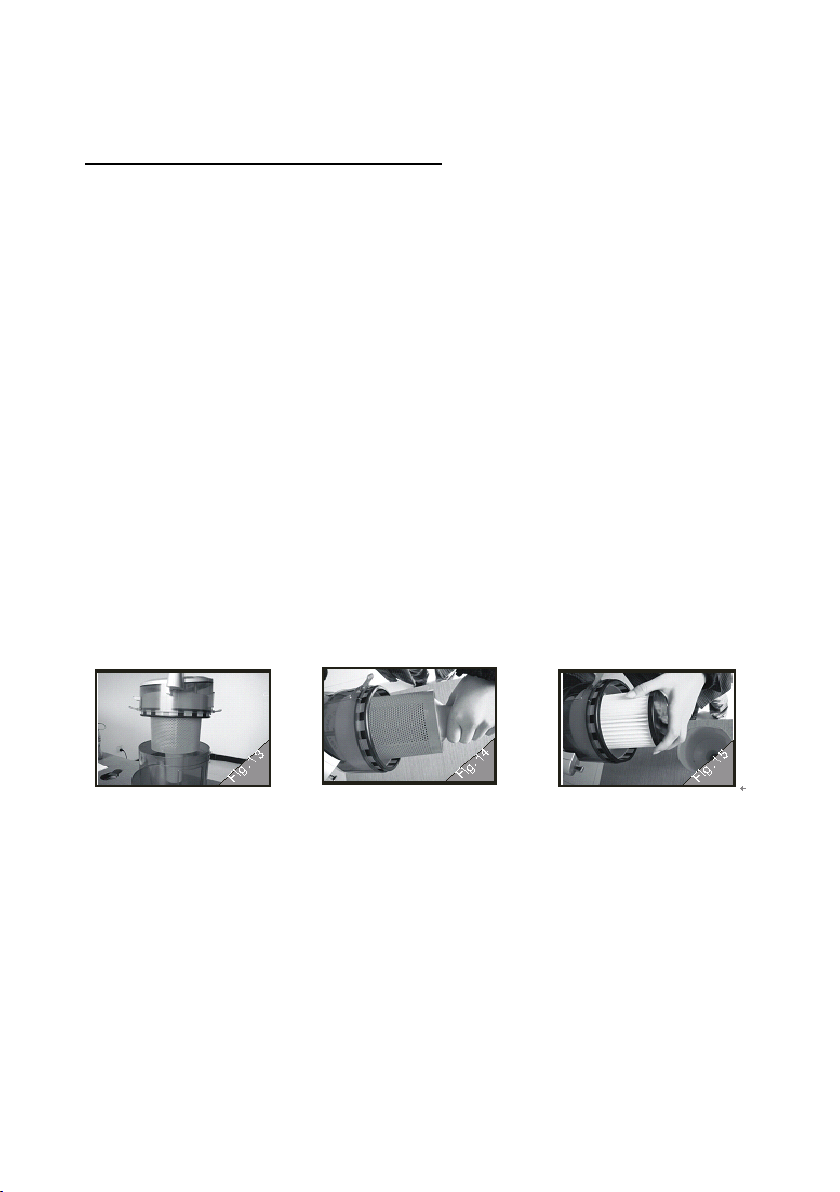
de cea inferioara. Vezi Fig.13
2. Tineti capacul de plasa de protectie si rasuciti in directia acelor de cea,
eliberand astfel plasa de protectie. Vezi Fig.14
3. Tineti filtrul HEPA si rotiti in sensul acelor de ceas si apoi indeparati -l. Vezi
Fig.15
4. Daca filtrul HEPA este foarte murdar, clatiti-l foarte bine sub dus si folositi o
perie.
Page 5
5. Lasati filtrul sa se usuce (aprox. 15 h la temepratura camerei). Folositi din nou
Curatarea sau inlocuirea filtrului de protectie post -motor
Intotdeauna scoateti din priza aspiratorul inainte de inlocuirea filtrului.
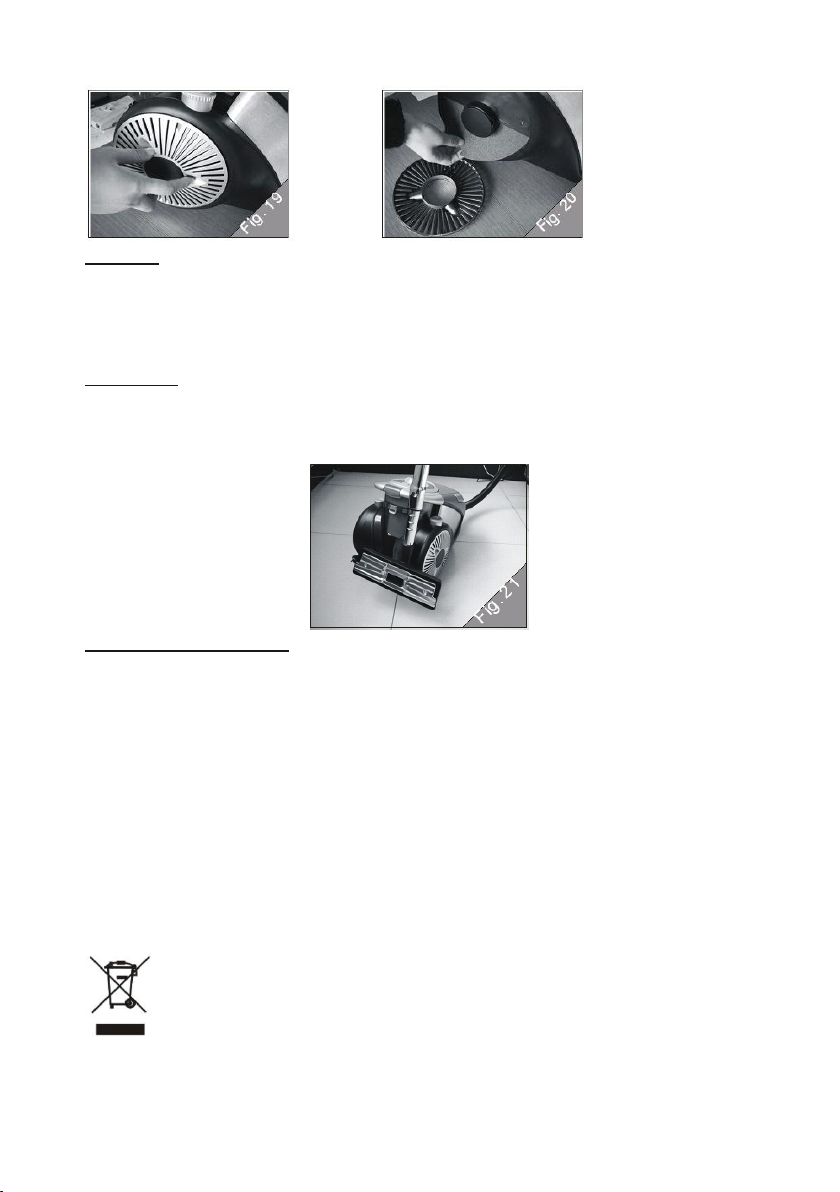
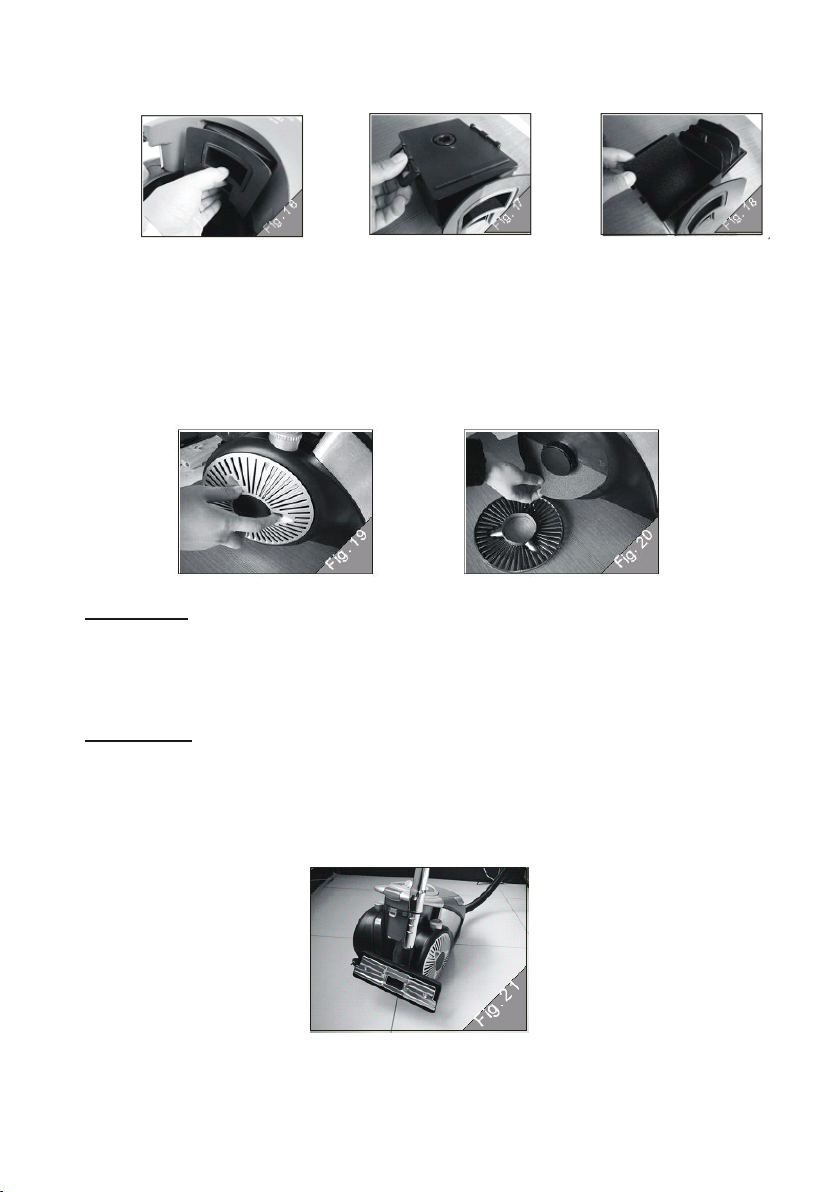
1. Rotiti in sens invers acelor de ceas gratarul de emisie si scoateti-l din
aspirator. Vezi see Fig.19
2. Scoateti filtrul si inserati unul nou in loc. Vezi Fig.20
numai cand este complet uscat. Daca mizeria nu s-a putut indeparta, inlocuiti cu
un filtru HEPA nou.
7. Plasati containerul de praf in asprator. Apasati ferm pana cand se aude un clic
si verificati sa fie bine fixat.
Curatarea sau inlocuirea filtrului de protectie per-motor
Intotdeauna scoateti din priza aspiratorul inainte de inlocuirea filtrului. Scoateti
containerul de praf.
Aspiratorul este echipat cu un filtru de protectie per-motor.
1. Se scoate din aspirator containerul de praf.
2. Apasati butonul ca in fig indicata, trageti locasul pentru filtru afara din
aspirator. Vezi Fig.16
3. Deschideti acest compartiment ridicand de cele doua aripioare
laterale.Vezi Fig.17
4. Scoateti filtrul si inserati unul nou in compartiment si apoi apasati cele
doua aripioare pentru fixare. Fig.18.
5. Inserati la loc compartimentul filtrului, apasand ferm pana se aude un
clic si se fixeaza bine.
Nota: Filtrul protectie per-motor nu se spala. Daca este doar putin murdar, este
suficient sa fie curatat scuturandu-l deaspura unui cos de gunoi; totusi, este
recomandata schimbarea regulata a filtrului.
3. Puneti la loc gratarul de emisie, rotind in sensul acelor de ceas.
Page 6
Curatare
Intotdeauna scoateti din priza aspiratorul inainte de curatarea oricaror
componente.
Nu spalati nicio componenta a aspiratorului in masina de spalat vase; daca este
necesar, curatati cu o laveta umeda.
Depozitare
1.Opriti aspiratorul si scoateti din priza.
2.Apasati pe butonul de infasurare a cablului.
3. Aspiratorul poate fi depozitat in pozitie verticala. Vezi Fig21
Rezolvarea problemelor
Puterea de aspirare este mica.
Verificati ca filtrul HEPA sau cel per-motor sa nu fie blocat sau prea
murdar. Daca este necesar, curatati sau inlocuiti filtrele.
Verificati ca butonul de ajustare de pe maner sa unu fie deschis.
Verificati controlul de putere asirare de pe aspirator (la modele care
incorporeaza acest buton) si setati-l la o putere mai mare.
Verificati peria de podea sau cea mica sau furtunul sa nu fie blocate.
Pentru a indeparta blocajul, demontati componenta si incercati sa
deblocati.
ELIMINAREA DESEURILOR IN MOD RESPONSABIL FATA DE MEDIU
Poti ajuta la protejarea mediului!
Va rugam sa respectati regulamentele si legile locale: duceti
echipamentele electrice nefunctionale catre un centru de colectare al
echipamentelor electrice uzate.
Page 7

Importator: Asesoft Distribution
Europolis Logistic Park, Italia Street, 1-7, Chaijna, Ilfov, Romania
Tel: +4021 256 00 86, www.heinner.ro, www.asesoftdistribution.ro
Page 8
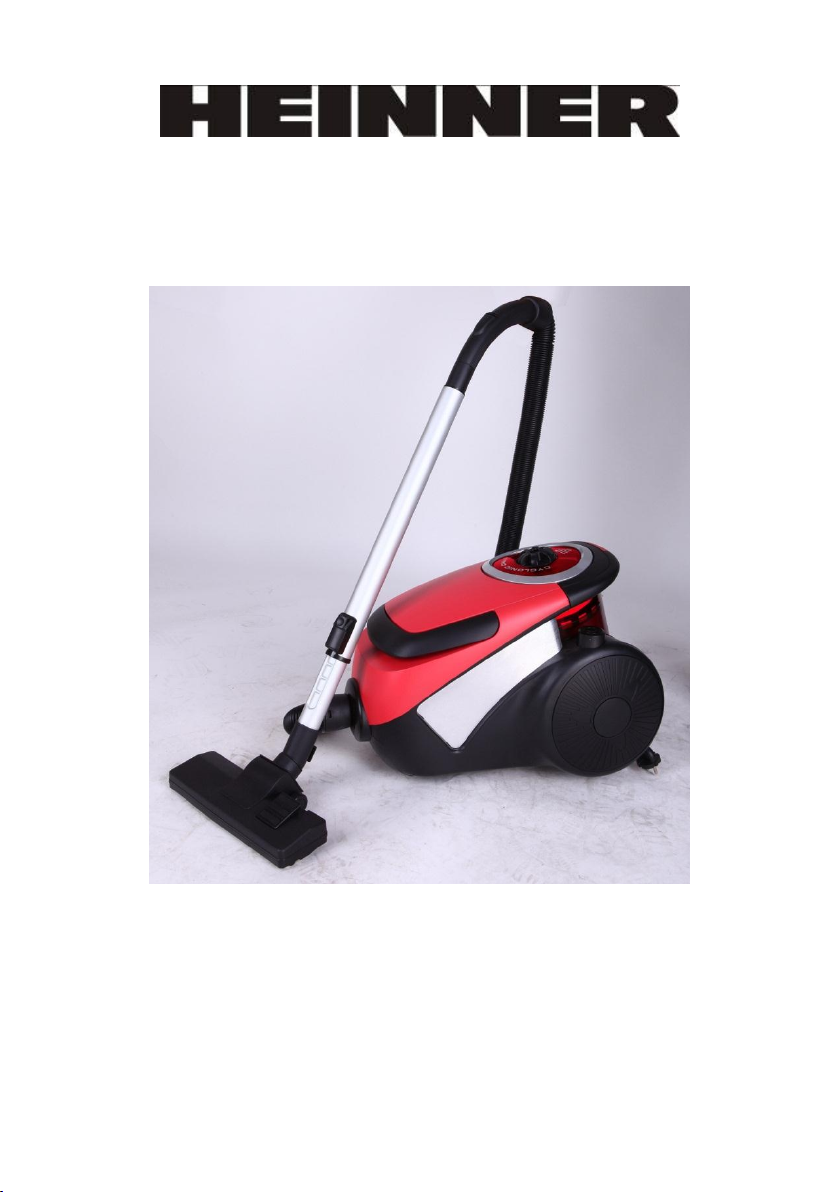
VACUUM CLEANER
Storm 4040
Voltage: 220-240V, 50/60Hz
Max power: 2400W
Page 9
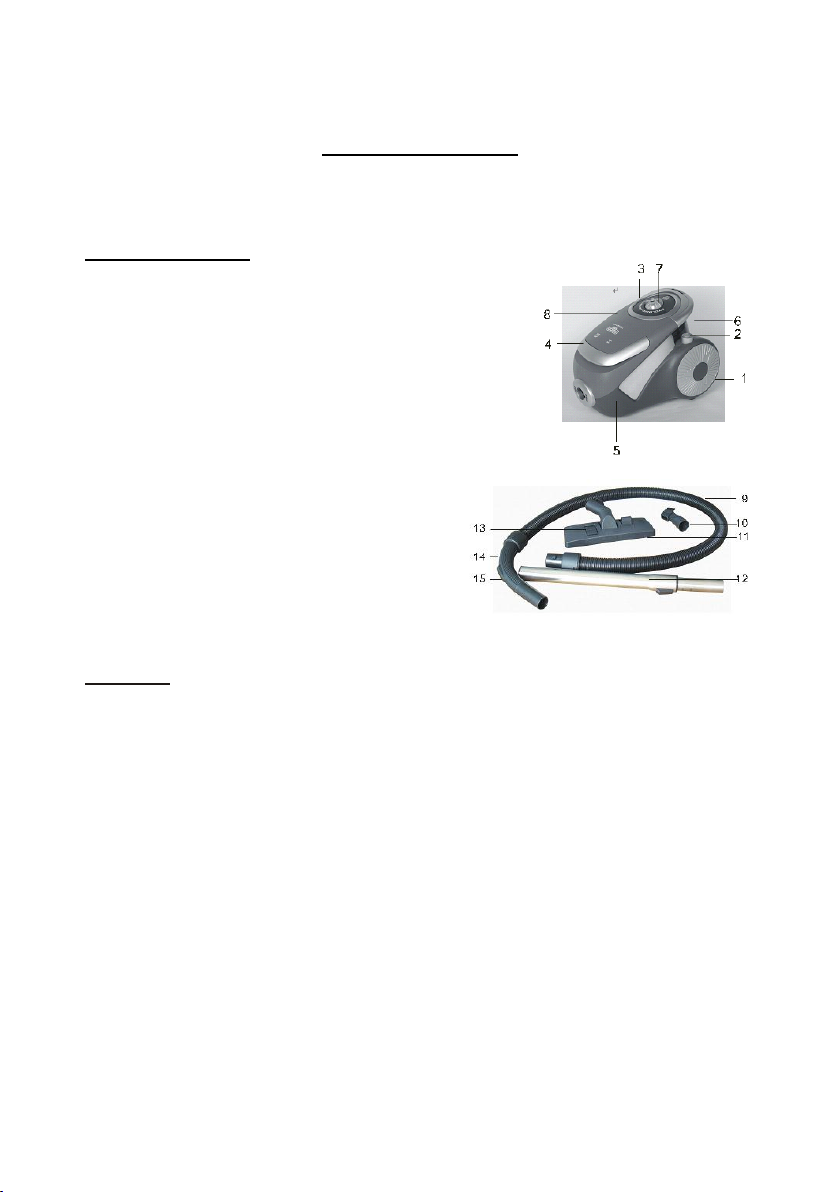
1.Power cord
INSTRUCTION MANUAL
PLEASE READ THIS MANUAL CAREFULLY BEFORE USING AND KEEP IT PROPERLY
FOR FUTURE REFERENCE
General Description
2.Cord rewinder release button
3.On/off switch & suction power adjustment
knob
4.Carry handle
5. Lower house
6. Dust container
7. Dust knocking knob
8. Front cover
9. Flexible Hose
10.Integrated brush and nozzle
11.Floor brush
12.Tube
13. Hard floors/carpet selector
14. Hand grip
15. Suction power slider
Important
Read this user manual carefully before you use the appliance, and
save the manual for future reference
Check if the voltage indicated on the appliance corresponds to
the local mains voltage before you connect the appliance;
Do not use the appliance if the plug, the cord or the appliance itself is
damaged;
If the mains cord of the appliance is damaged, you must replace
it, in order to avoid a hazard;
Keep the appliance out of the reach of children;
Never sweep water or any other liquid, never suck up flammable
substances and do not suck up ashes until they are cold;
Do not point the hose, the tube or any other accessory at the eyes or
ears nor put it in your mouth when it is connected to the vacuum cleaner
and the appliance is switched on.
Never use the appliance without the motor protection filter. This would
Page 10

damage the motor and would shorten the life of your appliance.
Never use this appliance without a dust bag.
Preparing for use
Hose
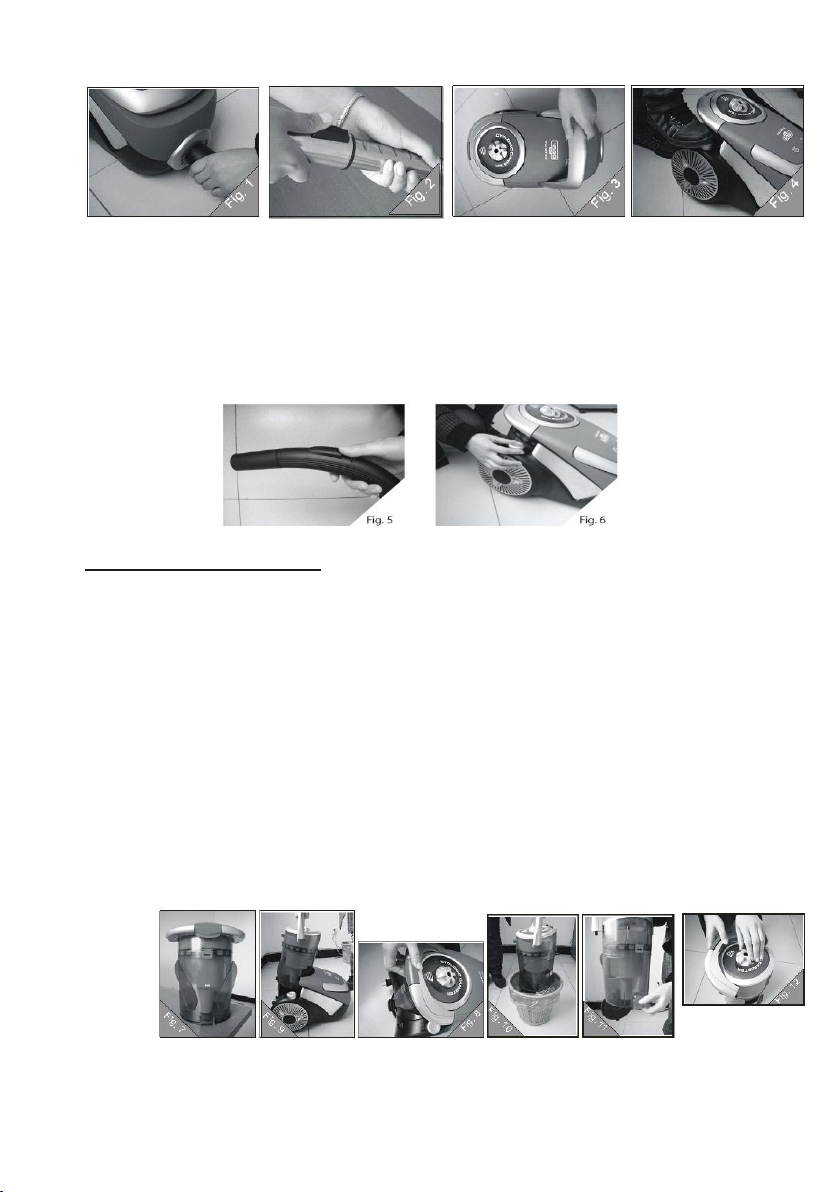
To connect the hose, push it into the appliance and turn it to click.
To disconnect the hose, press the hook on the 2 side of hose heard, then pull it
out of the appliance. See Fig.1
Telescopic tube
Press the spring loaded lock button on the telescopic tube part and slide
the lock button into the opening of the other tube part.
Connect the telescopic tube part to the handgrip of the hose, then
insert the narrow section into the wider section and turn a little.
Adjust the telescopic tube to the length that you find most comfortable
during vacuumming. See Fig.2
Floor brush
You can use the floor brush on the carpet or on the hard floors.
To clean hard floors, push the rocker switch on top of the floor brush
with your foot, in order to make the brush strips come out of the brush
housing.
To clean the carpet, push the rocker switch on the other side to make the
brush strips pop back in the housing.
Integrate brush & nozzle
Your vacuum cleaner comes with one of these accessories.
Connect the integrate brush and nozzle directly to the handgrip or to the tube.
1. Use the crevice nozzle to vacuum the small area or to clean narrow corners
or hard-to-reach places.
2. Use the brush nozzle to clean computers, bookshelves etc.
Using the appliance
You can carry the vacuum cleaner by the handle placed on the top front of the
appliance. See Fig.3
1. Pull the electric cord out of the appliance and insert the mains plug into the
wall socket.
2. Press the On/Off button on top of the appliance . See Fig.4
Page 11
Adjust suction power
You can adjust the suction power:
Using the suction power slider on the handgrip of the hose. See Fig.5
Using the suction power control placed on the vacuum cleaner (Specific types
only).See Fig.6
Emptying the dust container
You must empty the dust container at least when the swept quantity of dirt in the
dust container has reached the MAX mark or suction power has droped. See Fig.7
1. Release the dust container by lifting up Dust container handle from the
top of dust container. See Fig.8
2. Lift the dust container out of the vacuum cleaner. See Fig.9
3. To the dust container, hold it lower over a dust bin. See Fig.10
4. Push the open button: the bases opens and the dust runs into the dust
bin. See Fig.11
5. Slightly twist the dust knocking knob on top of dust container. Knock the
remaining dust loose. See Fig.12
6. Close the base and place the dust container back in the vacuum cleaner.
Press the dust container firmly into its bracket until it audibly clicks into
place. Then check the dust container to be securely seated.
Page 12
Cleaning the filter and replacement
The filters can become blocked after some time of using and can thereby reduce
the suction power. It is therefore important that the above mentioned filters are
replaced from time to time.
Cleaning or Replacing the HEPA filter
Always unplug the appliance before you replace the filter. Lift out the dust
container from vacuum cleaner.
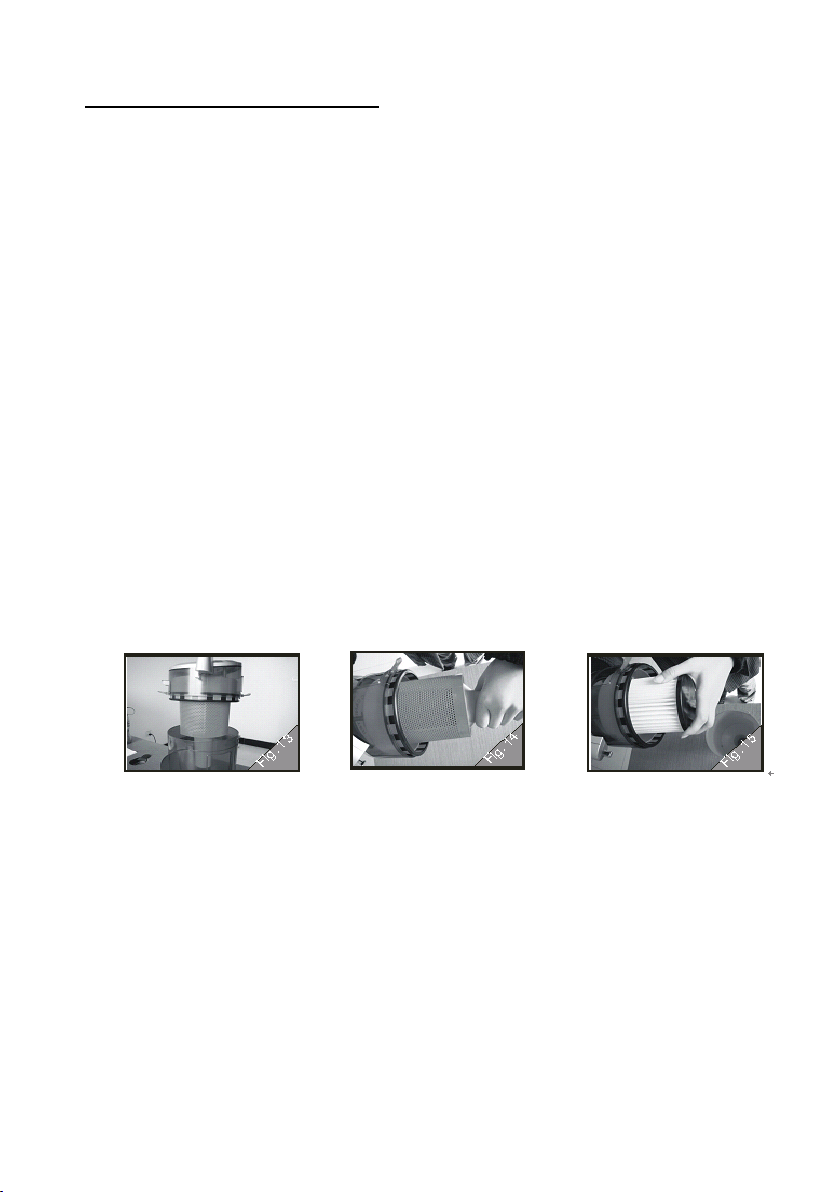
1. Open the dust container base. Clockwise twister the HEPA hold, depart the
HEPA frame from dust container. See Fig.13;
2. Hold the mesh protect cover and turn clockwise, release the mesh protect
cover. See Fig.14
3. Hold the HEPA filter and turn clockwise, remove the HEPA filter from dust up part. See
Fig.15
4. If the HEPA filter is very dirty, rinse it thoroughly with a shower head and use
a brush to clean the dirt on HEPA filter;
5. Then leave the filter to dry (approximative 15 hours at room temperature).
You can only use it again when it is completely dry. If the dirt cannot be
removed, insert a new HEPA filter;
6. Place the HEPA Filter and mesh protect cover back to dust up cover;
7. Place the dust container on the vacuum cleaner. Press the dust container
firmly into its bracket until it audibly clicks into place. Then check if the dust
container is securely seated.
Cleaning or Replacing the per motor protecting filter
Always unplug the appliance before you replace the filter.lift out the dust
container from vacuum cleaner.
Your vacuum cleaner is equipped with the per motor protecting filter.
1. Lift the dust container from vacuum cleaner.
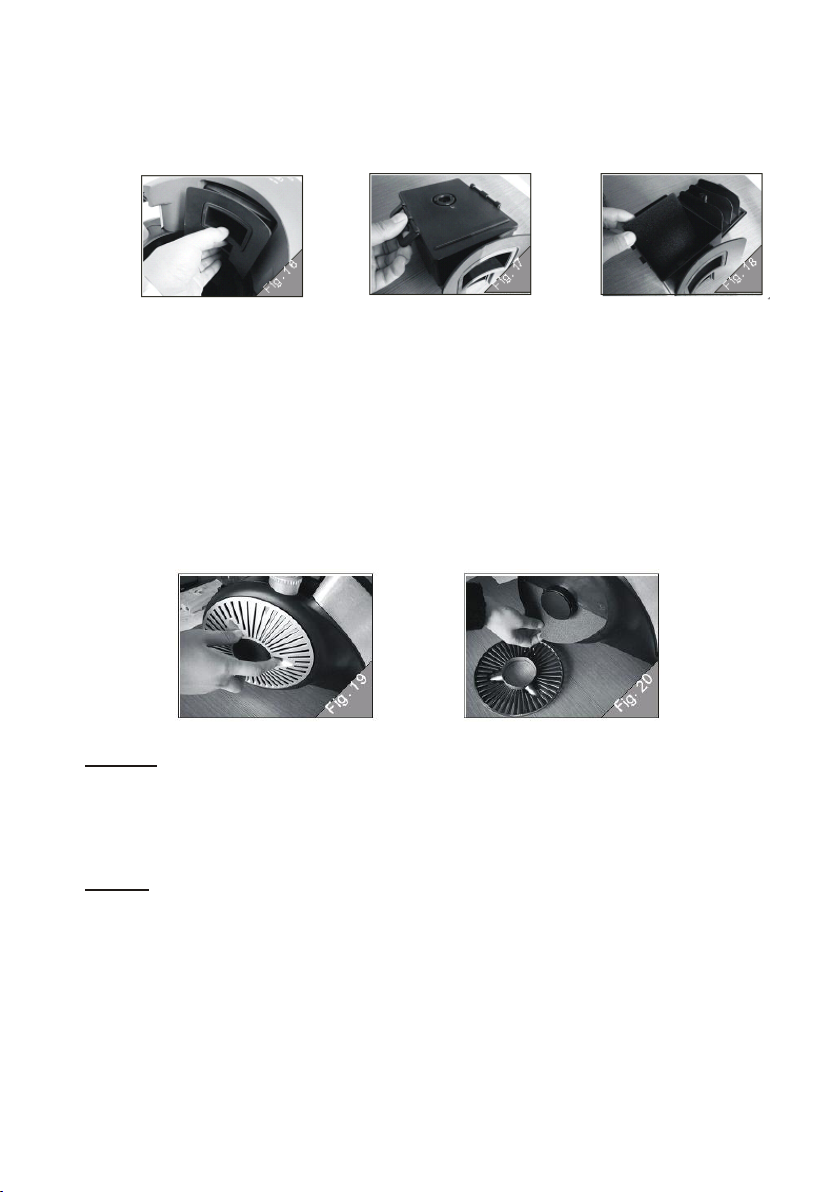
2. Press the button as photo shown, pull out the filter holder out of the
appliance.see Fig.16
3. Open the filter holder by lift up two wing on 2 side.as photo show.see
Fig.17
4. Remove the filter and Insert a new filter into the holder.and click the 2 wing
in the position. See Fig.18.
5. Insert the holder by pull. And pressing firmly unit it audibly and noticeaby
clicks into place.
Page 13
Note: The per-motor protecting filter is not washalbe. If it is only slightly dirty, it
can also suffice to knock the filter over a dust bin, however, we recommend you
replace the filter regularly.
Cleaning or Replacing the post motor filter
Always unplug the appliance before you replace the filter.
1. Apart the exhaust grill by hold the lock handle and remove it from
vacuum cleaner. See Fig.19
2. Remove the filter and insert a new filter into the frame. See Fig.20
3. Place the exhaust grill into vacuum cleaner .
Note: The post motor protecting filter is not washalbe. If it is only slightly dirty, it
is sufficient to knock the filter over a dust bin. However, we recommend you to
replace the filter regularly.
Cleaning
Always switch off and unplug the appliance before you clean any parts.
Do not clean any part of the vacuum cleaner in the dishwasher. If
neccessary, clean the parts with a moist cloth.
Storage
1. Switch off the appliance and remove the mains plug from the wall
socket.
2. Press the cord rewind button to rewind the cord.
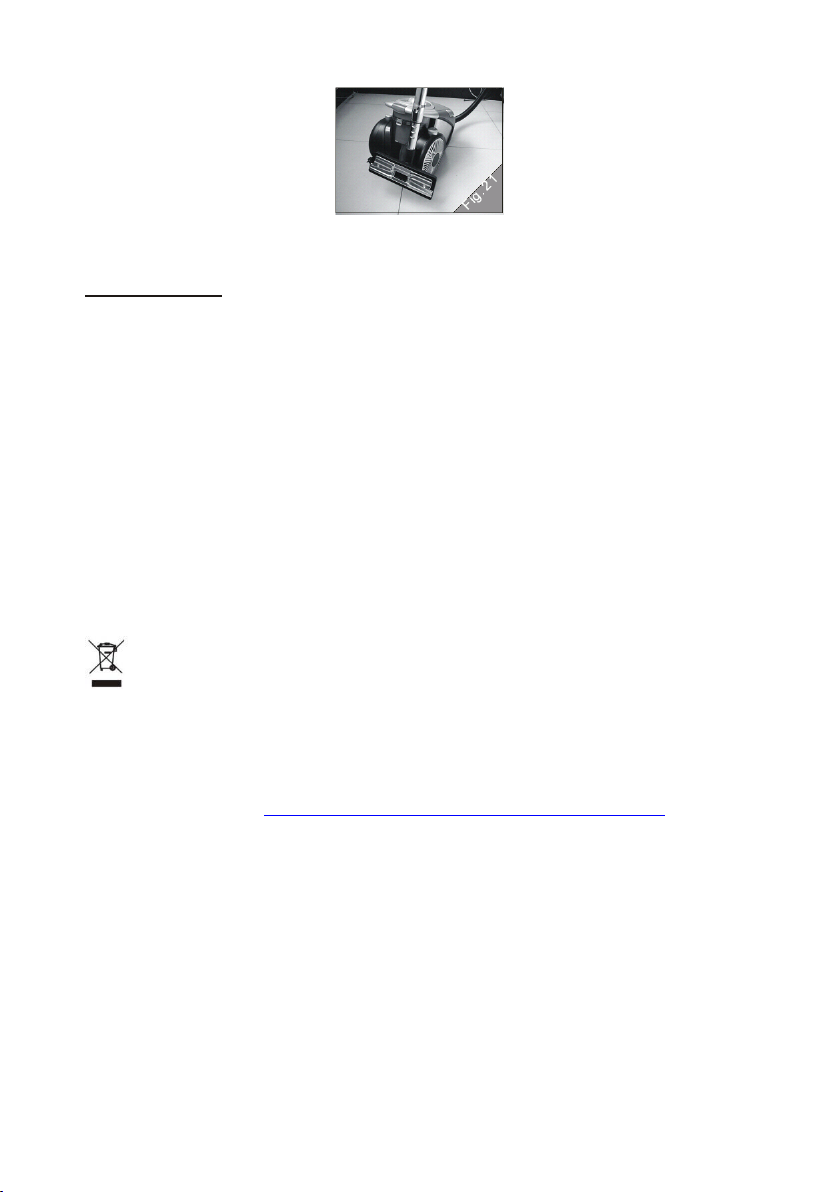
You can storage the appliance in vertical parking position. See Fig 21.
Page 14
Troubleshooting
The suction power is insufficient
Perhaps the HEPA filter or per motor protecting filter is too dirty and
blocked. If neccessary, clean or replace the HEPA filter or per motor
protecting filter.
Perhaps the suction power slide on the handgrip is open. Close the slide.
Perhaps the electronic suction power control (specific types only) has
been set to a low
setting. Set the control to a higher setting.
Perhaps the floor brush, nozzle tube or hose is blocked up. To remove
the obstruction, disconnect the block up item and try to clean it.
Environment friendly disposal
You can help protect the environment!
Please remember to respect the local regulations: hand in the non-
working electrical equipment’s to an appropriate waste disposal center.
Importer: Asesoft Distribution
Europolis Logistic Park, Italia Street, 1-7, Chaijna, Ilfov, Romania
Tel: +4021 256 00 86, www.heinner.com, www.asesoftdistribution.com
Page 15
ПРАХОСМУКАЧКА С ЦИКЛОНИЧНА
СИСТЕМА
Storm 4040
Захранване: 220-240V, 50/60Hz
Максимална мощност: 2400W
Page 16
МОЛЯ, ПРОЧЕТЕТЕ ТОВА РЪКОВОДСТВО ВНИМАТЕЛНО ПРЕДИ ДА
1. Захранващ кабел
ИЗПОЛЗВАТЕ УРЕДА И ГО ЗАПАЗЕТЕ ЗА ПОСЛЕДВАЩИ СПРАВКИ.
Общо описание:
2. Бутон за навиване/развиване на
електрическият кабел
3. Бутон за включване/изключване и настройка
на силата на всмукване
4. Дръжка
5. Основа
6. Разделение за прах
7. Бутон за изваждане на прахта
8. Горна част
9. Подвижен маркуч
10. Интегрирана четка и накрайник
11. Голяма четка за под
12. Телескопична тръба
13. Селектор килими/трудни повърхности
14. Дръжка за тръбата
15. Бутон за силата на всмукване
ВАЖНО
Прочетете внимателно тези инструкции преди да използвате уреда и ги
запазете за последващи справки.
Преди да свържете уреда, проверете дали изписаното
Не използвайте уреда ако щекера, кабела или уреда са
За да узбегнете евентуална злополука, повреденият кабел
Дръжте далеч от деца.
Не всмуквайте вода или други течности, запалими вещества
Не доближавайте маркуча или други аксесоари близо до
Никога не използвайте продукта без защитният филтър на мотора.
Не изолзвайте прахосмукачката без приставката за прах.
РЪКОВОДСТВО ЗА УПОТРЕБА
напрежение на прахосмукачката съответства с това на
контактите.
повредени.
трябва да бъде поправен от специализират сервизен
център.
или гореща пепел.
очите или ушите, докато тези са свързани с уреда, а уреда е
включен в контакта.
В противен случай, рискувате да скъсите живота на уреда.
Page 17

Четка за под
Можете да използвате четката за под за почистване на килими
или на подови настилки.
За почистване на подови настилки, натиснете с върха на крака
бутона който е на горната страна на четката, за да се
покажат ресниките на четката.
За почистването на килими, натиснете в обратна посока
бутона на четката, за да се скрият ресните.
Интегрирана четка и накрайник
Вашата прахосмукачка е доставена с един от тези аксесоари.
Свържете ги директно с дръжката на маркуча или на
телескопичната тръба.
Използвайте накрайника за почистване на тесни и малки
пространства или на трудно достъпни за почистване места.
Използвайте малката четка за почистване на рафтове, мебели,
т.н.
Употреба на прахосмукачката
Почистване
Прахосмукачката може да бъде местена за дръжката, която се намира на
горната страна на прахосмукачката. Виж Fig.3 1.
1. Издърпайте кабела навън и включете щекера в контакта.
Подготовка за употреба
Маркуча
За да свържете маркуча, трябва да го сложите в прахосмукачката и да го
завъртите в посока на часовниковата стрелка. За разглобяване, завъртете
в обратна посока на часовниковата стрелка, натискайки двете странични
клеми на капака на маркуча и го извадете от прахосмукачката. Виж Fig.1.
Телескопична тръба
Натиснете блокиращият бутон на тръбата и закрепете бутона в
позиция отворен.
Свържете телескопичната тръба за дръжката на маркуча, поставете
по-тясната страна в по-широката и завъртете леко.
Настройте маркуча на желаната дължина, бутайки частта с ресни
нагоре, а горната част надолу – Виж Fig.2
2. Натиснете бутона ON/OFF (вкл./изкл.) за да включите прахосмукачката.
Виж Fig.4
Page 18
Настройка на силата на всмукване
Можете да настроите силата на всмукване с помощта на:
бутона за настройка на силата на всмукване, който се намира
на дръжката на маркуча. Виж Fig.5
контролният бутон на прахосмукачката (за някои модели). Виж
Fig.6
Изпразване на контейнера за прах
1. Изпразнете контейнера за прах най-късно когато събраното
колиочество прах достигне маркировката MAX или когато спадне
мощността на всмукване. Виж Fig.7
2. Отстранете контейнера повдигайки бутона „Dust Release“(бутона за
изваждане на прахта). Виж Fig.8
3. Повдигнете контейнера от прахосмукачката с долната страна
нагоре. Виж Fig.9
4. При изпразване дръжте контейнера много близо до коша за
боклук. Виж Fig.10
5. Дръпнете дръжката за отваряне и основата. Виж Fig.11
6. завъртете бавно бутона, който е над контейнераи изчистете
останалият там прах. Виж Fig.12
7. Затворете основата и сложете контейнера в прахосмукачката.
Натиснете докато се чуе прещракване и проверете дали е добре
закрепен.
Page 19
Почистване на филтъра и подмяната му
Прахосмукачката има следните филтри: филтър HEPA, преден защитен
филтър за мотора, заден защитен филтър за мотора. Филтрите могат да се
блокират след известно време на употреба и така намаляват всмукателната
сила. Следователно, много е важно от време на време филтрите да се
сменят. Почистване и подмяна на филтъра HEPA
Винаги изключвайте прахосмукачката от контакта преди да смените
филтъра. Извадете контейнера за прах.
1. Отворете контейера за прах от двете страни. Отстранете горната
част от долната. Виж Fig.13
2. Хванете капака на защитната мрежа и завъртете в посока на
часовниковата стрелка, така ще освободите защитната мрежа. Виж
Fig.14
3. Хванете филтъра HEPA и завъртете в посока на часовниковата
стрелка и после отстранете. Виж Fig.15
1. 4.Ако филтъра HEPA е много мръсен, изплакнете го добре под
течаща вода и използвайте четка.
4. Оставете филтъра да изсъхне (приблизително 15 часа на стайна
температура). Използвайте отново само когато е напълно изсъхнал.
Ако мърсотията не е могла да се изчисти, подменете филтъра HEPA
с нов.
5. Поставете контейнера в прахосмукачката. Натиснете докато се чуе
прещракване и проверете дали е закрепен добре.
Почистване и подмяна на предният защитен филтър на мотора
Винаги изключвайте прахосмукачката от контакта преди да смените филтъра.
Извадете контейнера за прах.
Прахосмукачката е снабдена със преден защитен филтър „per-motor“.
1. Контейнера за прах се вади от прахосмукачката.
2. Натиснете бутона като на фиг. 16, дръпнете рамката за филтъра
извън прахосмукачката. Виж Fig.16
3. Отворете това отделение повдигайки двете странични крилца.
Виж Fig.17
4. Извадете филтъра и поставете новият в отделението, след което
натиснете двете крилца за фиксация. Fig.18.
5. Поставете на място отделението на филтъра, натискайки здраво
докато се чуе прещракване и се закрепи добре.
6. Бележка: Предният филтър per-motor не се мие. Ако е леко
мръсен, достатъчно е да го изтупате над коша за боклук;
Page 20
Почистване и подмяна на задният защитен филтър на мотора
Винаги изключвайте прахосмукачката от контакта преди да смените
филтъра.
1. Завъртете решетката в обратна посока на часовниковата стрелка и
2. Извадете филтъра и поставете новият. Fig.20
3. Сложете обратно решетката завъртайки в посока на часовниковата
въпреки това се препоръчва редовната смяна на филтъра.
го извадете от прахосмукачката. Виж Fig.19
стрелка.
Почистване
Винаги изключвайте прахосмукачката от контакта преди да почистите която
и да е част. Не мийте нито една част в миялната машина; ако е необходимо
почистете с влажна кърпа.
Съхранение
1. Спрете прахосмукачката и изключете от контакта.
2. Натиснете бутона за навиване на кабела.
3. Прахосмукачката може да бъде съхранявана във вертикално положение.
Виж Fig21
Page 21

Разрешаване на възможни проблеми:
Всмукателната мощност е малка.
Проверете филтъра HEPA или задният защитен филтър на мотора
да не са блокирани или твърде мръсни. Ако е необходимо сменете
филтрите.
Проверете бутона за настройка, който се намира на дръжката на
маркуча да не е отворен. Ако е така, затворете го.
Проверете контролният бутон за силата на всмукване, който се
намира на прахосмукачката (за моделите, които имат такъв бутон)
и ако е необходимо, настройте го на по -висока степен.
Проверете четката за под, малката четка или маркуча да не са
запушени. За да отстраните запушването трябва да разглобите
съответната част и да се опитате да го отпушите.
ОТСТРАНЯВАНЕ НА ОТПАДЪЦИТЕ ПО ОТГОВОРЕН ЗА ОКОЛНАТА СРЕДА
НАЧИН
Пазете околната среда: този уред не трябва да се изхвърля заедно с
битовите отпадъци. Моля, изхвърляйте на специалните за това места
или занесете в центрове за рециклиране на подобни отпадъци.
www.heinner.com
 Loading...