

Page 1
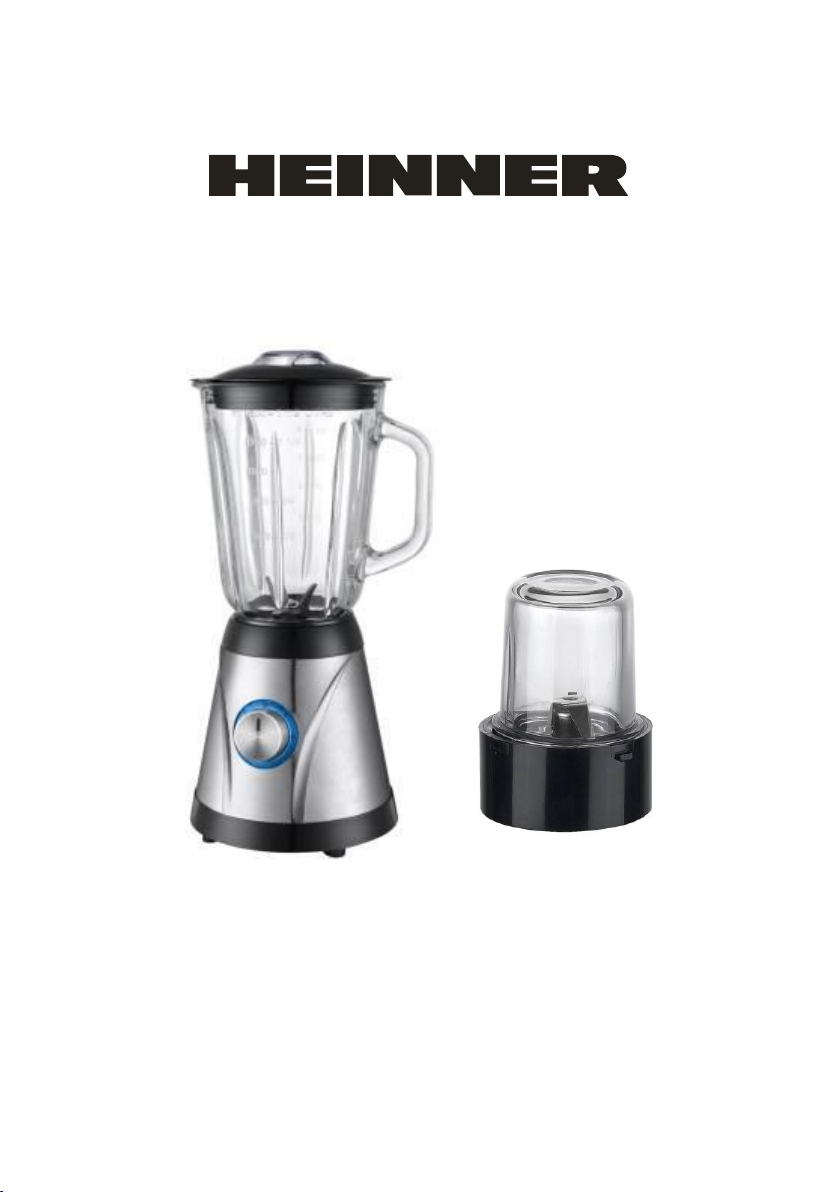
BLENDER DE MASA cu RASNITA
OptiMix Plus 650
Alimentare: 220-240V, 50Hz
Putere: 600W
Page 2

Pentru a asigura o mai buna functionare a produsului, va rugam sa cititi
instructiunile inainte de utilizare. Pastrati instructiunile pentru o consultare
ulterioara.
ATENTIE:
1. Operarea gresita sau manuirea necorespunzatoare poate dauna
aparatului si poate produce ranirea utilizatorului.
2. Unitatea poate fi folosita doar in scopurile destinate. Producatorul nu isi
asuma raspunderea pentru pagubele produse de folosirea
necorespunzatoare a aparatulului.
3. Inaintea conectarii la sursa de curent electric, verificati daca tipul de
curent si tensiunea sunt corespunzatoare celor inscrise pe aparat.
4. Nu cufundati blenderul si cablul in apa sau alte lichide. Daca din
greseala aparatul a fost introdus in apa, scoateti imediat din priza si
consultati un profesionist inainte de reutilizare. Pericol de
electrocutare!
5. Nu incercati sa deschideti unitatea motorului si nu introduceti niciun fel
de obiecte inauntru!
6. Nu utilizati blenderul avand mainile ude, sau pe o podea umeda, ori
cand in mediu este umezeala.
7. Nu conectati stecherul la priza cu mana umeda.
8. Verificati cablul, stecherul si adaptorul in mod regulat. Daca stecherul
sau cablul este deteriorat, trebuie inlocuit de producator, agentul sau de
service ori de persoane calificate, pentru a evita un accident.
9. Nu folositi aparatul daca cablul sau stecherul e deteriorat sau daca
unitatea cade pe podea, ori s-a deteriorat in alt fel. In aceste cazuri,
duceti aparatul la un centru de service pentru verificare si reparatie,
daca este cazul.
10. Nu incercati niciodata sa reparati unitatea singur. Exista pericol de
electrocutare!
1
Page 3

11. Nu lasati cablul sa atarne peste colturi ascutite si tineti-l departe de
obiecte fierbinti sau flacari. Trageti de stecher daca doriti sa scoateti din
priza aparatul.
12. Cablul, precum si prelungitorul, daca este cazul, trebuie pozitionate
astfel incat sa nu cauzeze riscul de a impiedica pe cineva, sau sa fie tras
brusc din priza.
13. Daca este folosit un cablu de extensie lung, trebuie sa fie compatibil cu
sursa de alimentare de curent electric. Altfel va cauza supraincalzirea
cablului si/sau a prizei.
14. Puneti unitatea pe o suprafata solida, plana si termo-rezistenta, nu in
apropierea flacarilor sau a obiectelor incinse (aragaz, cuptor, plita etc) si
nu la indemana copiilor.
15. Aparatul nu este destinat folosirii in aer liber sau in scopuri comerciale.
16. Copii nu pot sesiza pericolul utilizarii necorespunzatoare a aparatelor
electrice, asa ca trebuie supravegheati sa nu se joace cu acestea.
17. Acest aparat nu este destinat folosirii de catre persoane (inclusiv copii)
cu capacitati mentale, senzoriale sau fizice reduse, sau cu lipsa de
experienta si cunostinte, decat daca sunt supravegheati si instruiti in
prealabil de catre o persoana responsabila de securitatea lor.
18. Scoateti stecherul din priza inainte de a curata aparatul, sau atunci cand
acesta nu este in functiune.
19. Atentie! Aparatul are curent electric atat timp cat este conectat la priza.
20. Atentie la manuirea lamelor de taiat la golirea bolului si in timpul
curatarii.
21. Opriti aparatul si deconectati de la priza inainte de a schimba accesoriile
sau de a atinge parti mobile in miscare.
22. Opriti unitatea inainte de a scoate cablul din priza.
23. Folositi accesorii sau piese de schimb numai de la producator sau
reprezentantul sau local.
2
Page 4

24. Nu ridicati aparatul tinand de cablu.
ATENTIE:
Inainte de curatare, unitatea trebuie oprita pentru a evita accidentele. Daca
stecherul sau cablul se deterioreaza, nu folositi aparatul si nu incercati sa il
dezasamblati ci apelati la un centru service.
25. Nu scoateti componente din sectiunea motorului.
26. Atunci cand se amesteca lichide fierbinti/alimente, se poate produce un
exces de presiune in blender, capacul poate sari si se poate imprastia
amestecul fierbinte. De aceea, recomandam evitarea amestecarii
lichidelor/alimentelor fierbinti si introducerea acestora numai in
cantitati foarte mici in blender.
27. Blenderul nu este destinat produselor si alimentare tari precum alune in
coaja, carne inghetata, oase etc., fapt care ar putea duce la deteriorarea
lamelor sau la blocarea motorului.
MASURI SPECIALE DE SECURITATE
Atentie: Lamele sunt foarte ascutite. Pericol de accidentare! In timp ce
lamele sunt in miscare, nu atingeti si nu puneti obiecte inauntru!
A se folosi numai cu accesorii furnizate de producator.
Unitatea trebuie utilizata numai atunci cand este fixat bine capacul.
3
Page 5
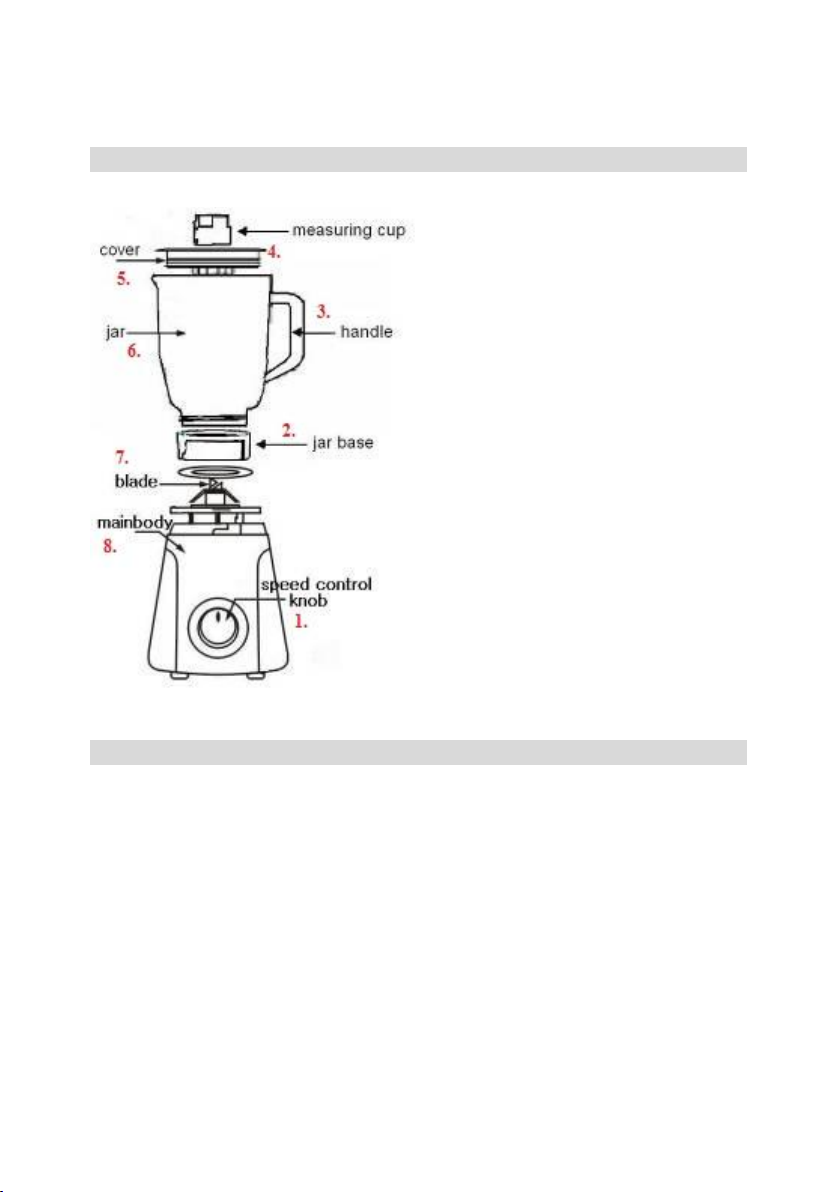
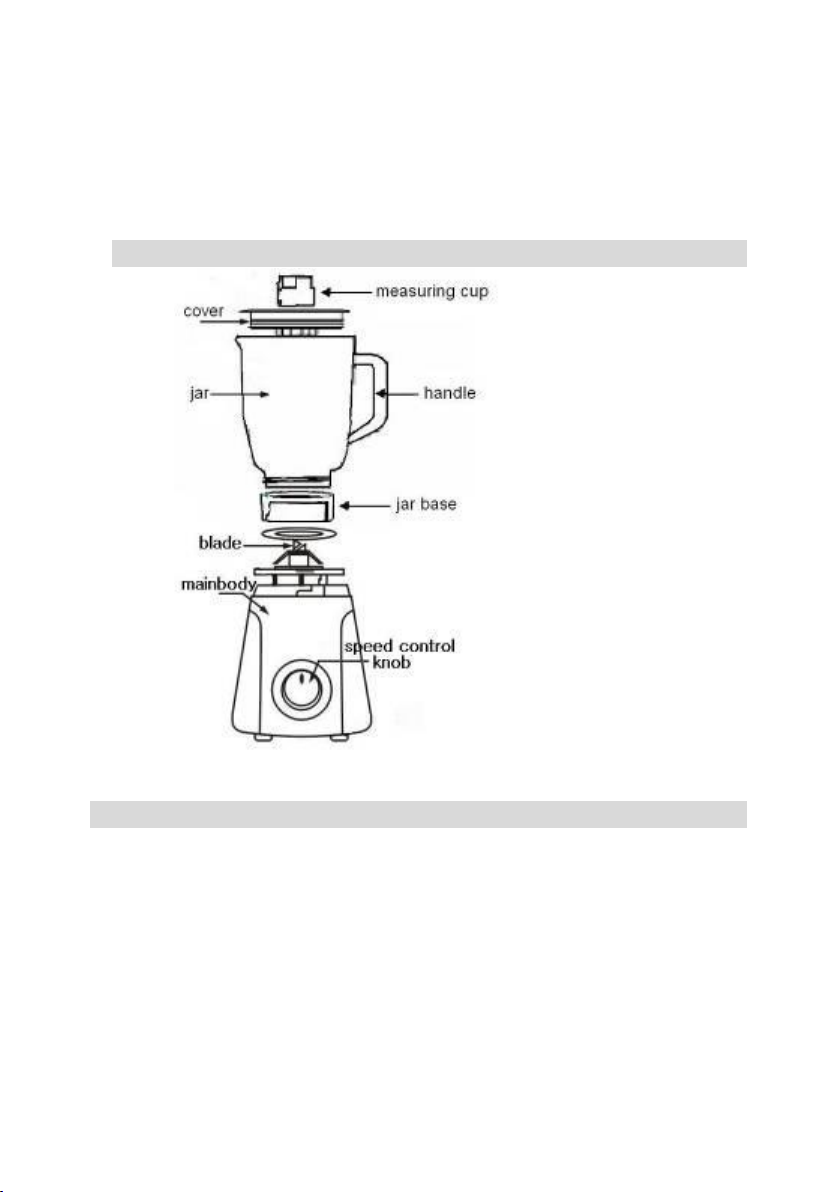
COMPONENTE
1. Buton reglare viteza
2. Baza carafei
3. Maner
4. Unitate de masura
5. Capac
6. Bol
7. Lama
8. Corp principal
ASAMBLARE
1. Curatati cana de masurare, capacul si bolul inainte de prima utilizare.
2. Inainte de instalare, asigurati-va ca aparatul este oprit si scos din priza.
3. Intai rotiti baza bolului in baza lamelor, apoi fixati baza lamelor in bol iar in
final scuturati usor bolul astfel incat sa se blocheze in locul destinat.
4. Fixati apoi bolul pe corpul principal, si rotiti-l incet in sensul acelor de
ceasornic, pentru a se fixa bine de sectiunea motorului. Umpleti bolul cu
alimentele dorite. Asigurati-va ca nivelul apei nu trece peste marginea
acesteia (capacitatea maxima este 1500 ml apa). NU FOLOSITI APARATUL
FARA A INTRODUCE ALIMENTE IN CARAFA!
4
Page 6
5. Puneti capacul peste blender si apasati-l. Puneti si sistemul de inchidere de
siguranta.
6. Plasati cana de masurat in centrul capacului, rotiti in sens invers acelor de
ceasornic.
UTILIZARE
1. Conectati la sursa de curent electric.
2. Acest aparat are un mecanism de siguranta, daca nu sunt asamblate
componentele bine nu va functiona.
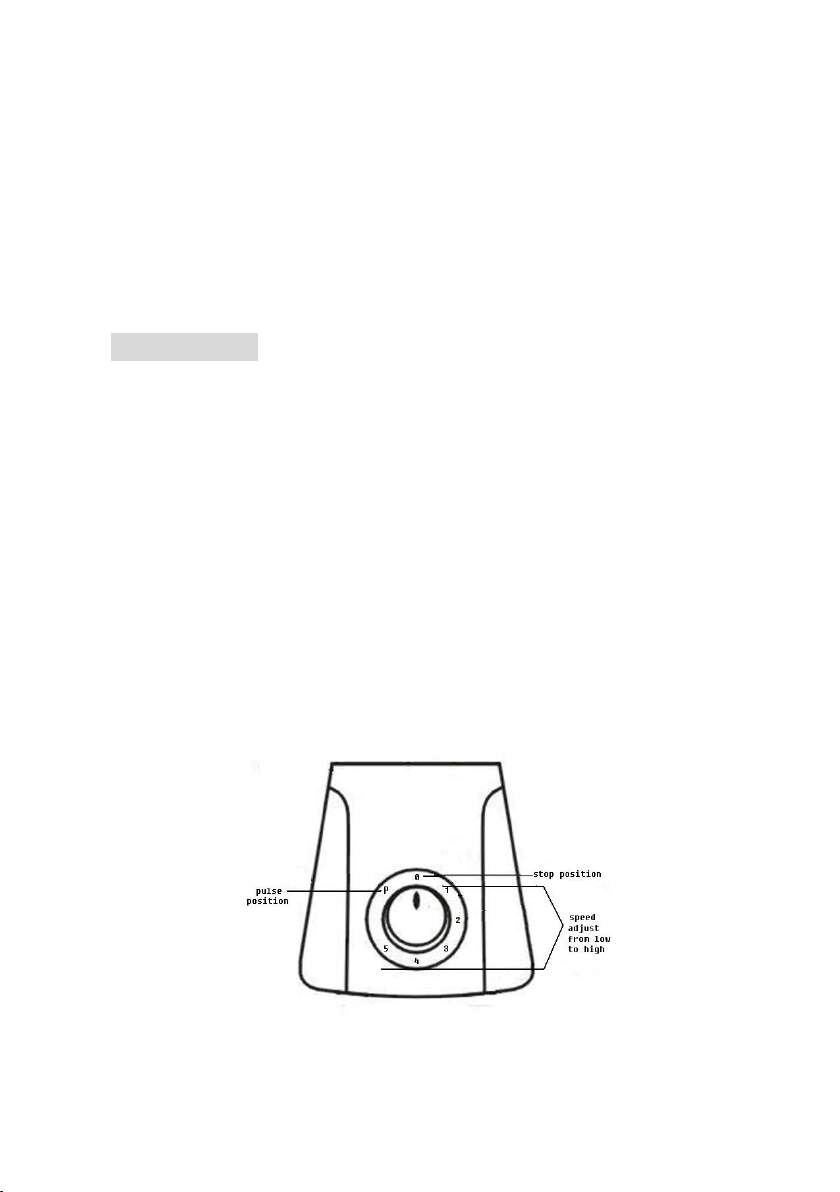
3. Rotiti butonul “P/0/1/2/3/4/5” la pozitia 0 pentru a va asigura ca aparatul
este scos din functiune.
4. Umpleti bolul cu alimentele dorite.
5. Puneti capacul deasupra bolului si fixati-l. Plasati cana de masurat in
centrul capacului, rotiti in sens invers acelor de ceasornic.
6. Fixati apoi bolul de corpul principal, si rotiti-l incet in sensul acelor de
ceasornic, pentru a se fixa bine de sectiunea motorului si aparatul este
complet asamblat.
7. Rotiti butonul la viteza dorita (1-5). P=puls
8. In timpul functionarii, becul albastru este aprins.
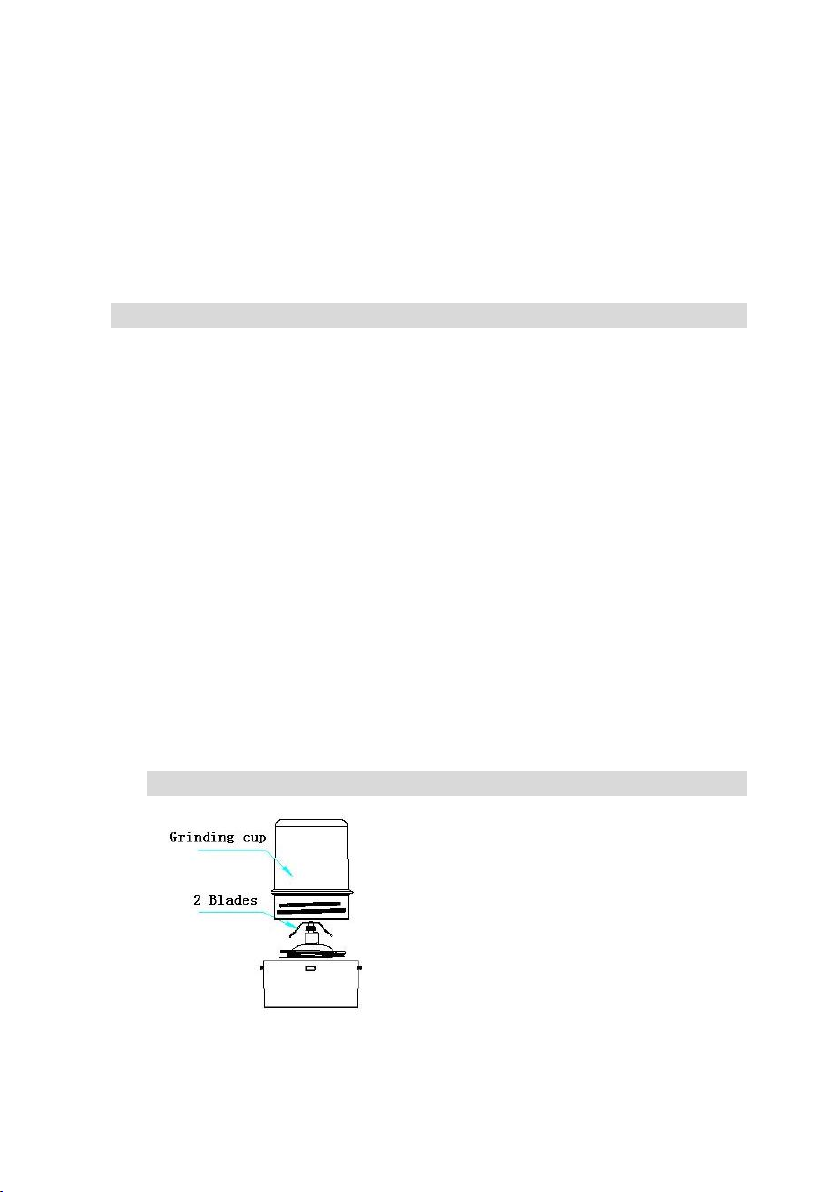
INSTALAREA RASNITEI
5
Page 7

1. Curatati rasnita inainte de folosire.
2. Asigurati-va ca aparatul este oprit si neconectat la priza.
3. Puneti in rasnita alimentul dorit.
4. Asezati inelul de etansare la baza lamelor, apoi asezati baza lamelor
la rasnita si fixati de unitatea motor.
5. Asezati rasnita pe unitate si rotiti usor in sensul acelor de ceas
pentru a se atasa de unitate.
NU FOLOSITI RASNITA FARA NICI UN ALIMENT INAUNTRU.
UTILIZAREA RASNITEI
1. Conectati la priza.
2. Acest produs este prevazut cu system de siguranta si nu va functiona
daca rasnita nu este atasata correct de unitate.
3. Aduceti butonul de viteza P/0/1/2/3/4/5 la pozitia 0 pentru a va asigura
ca unitatea este oprita.
4. Umplet rasnita cu alimentul dorit.
5. Asezati rasnita pe unitate si rotiti usor in sensul acelor de ceas pentru
a se atasa de unitate.
6. Setati nivelul de viteza dorit.
7. In timpul functionarii, lumina albastra din jurul butonului de putere
este aprinsa.
AJUSTAREA VITEZEI:
P—puls – Lama de inox functioneaza cu viteza cea mai mare, potrivita pentru
gheata.
1—Lama functioneaza cu viteza cea mai mica.
2— Lama functioneaza cu viteza mai mare decat viteza 1 dar mai mica decat
viteza 3.
3—Lama functioneaza cu viteza mai mare decat viteza 2 dar mai mica decat
6
Page 8
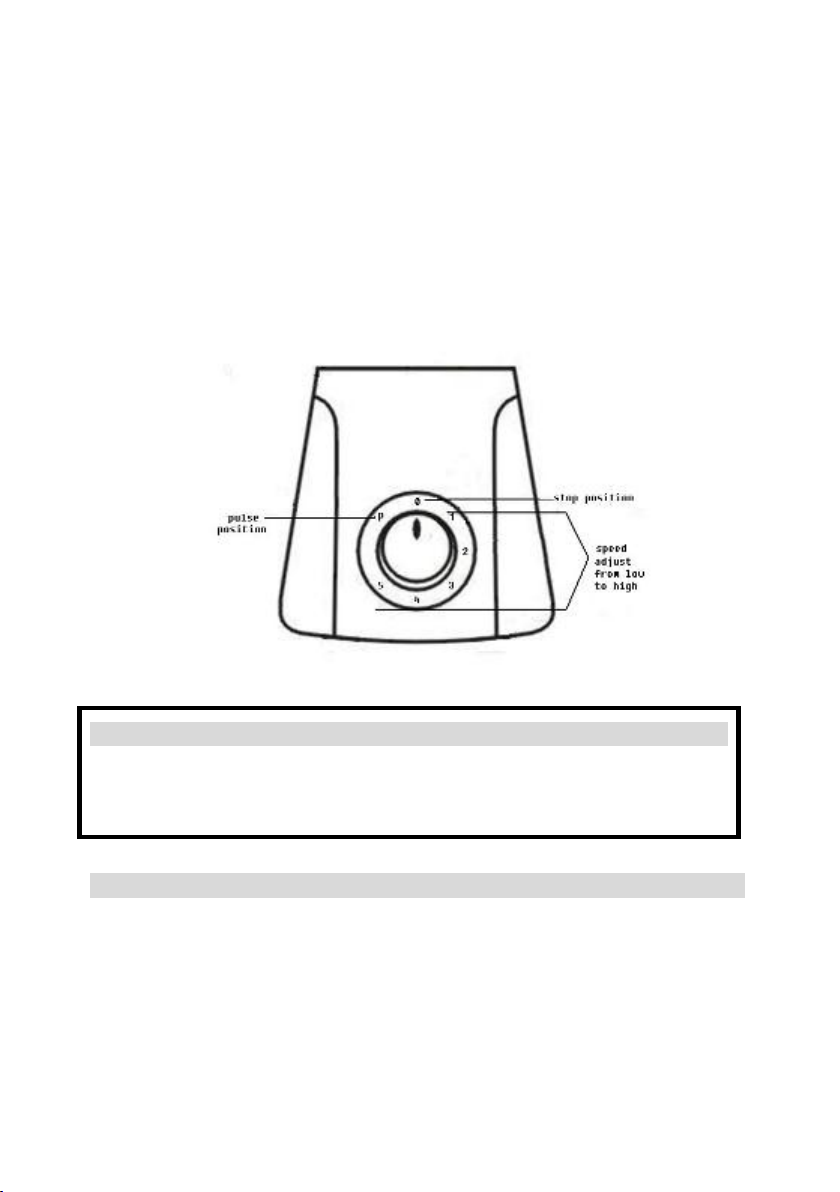
viteza 4.
Atentie:
1. Supraincarcarea poate bloca functionarea.
2. Nu folositi blenderul mai mult de 2 minute o data.
4—Lama functioneaza cu viteza mai mare decat viteza 3 dar mai mica decat
viteza 5.
5—Lama functioneaza cu viteza mai mare decat viteza 4 si este cea mai mare
viteza.
0—oprirea aparatului.
CURATARE SI DEPOZITARE
1. Consultati si masurile de precautie.
2. Nu curatati cu apa corpul principal (unde se afla motorul), cablul de
alimentare si stecherul.
3. Curatati-le cu o laveta moale si umeda, cu putin detergent de vase.
7
Page 9
4. Umpleti carafa pe jumatate cu apa calda si putin detergent. Lasati
blenderul sa functioneze pe viteza 2 pana se curata.
5. Baza lamelor poate fi curatata separat. Rotiti in sensul invers acelor de
ceas. Scoateti lamele impreuna, cu inelul de fixare deasupra.
6. Curatati carafa, capacul, sistemul de inchidere, baza si lamele cu apa
calda si detergent. Lasati-le sa se usuce bine inainte de refolosire.
Atentie! Lamele dinauntrul carafei sunt foarte ascutite!
7. Nu folositi agenti de curatare foarte puternici.
8. Aparatul este destinat exclusiv folosirii in gospodarie.
9. Nu atingeti lamele ascutite. La curatare, stergeti cu un prosop, pentru a
evita o posibila accidentare.
10. A nu se folosi in scopuri comerciale. Serviciul de intretinere nu va fi
valabil in acest caz.
ELIMINAREA DESEURILOR IN MOD RESPONSABIL FATA DE MEDIU
Poti ajuta la protejarea mediului!
Va rugam sa respectati regulamentele si legile locale: duceti
echipamentele electrice nefunctionale catre un centru de colectare al
echipamentelor electrice uzate.
Importator: Asesoft Distribution
Europolis Logistic Park, Italia Street, 1-7, Chaijna, Ilfov, Romania
Tel: +4021 256 00 86, www.heinner.com, www.asesoftdistribution.ro
8
Page 10
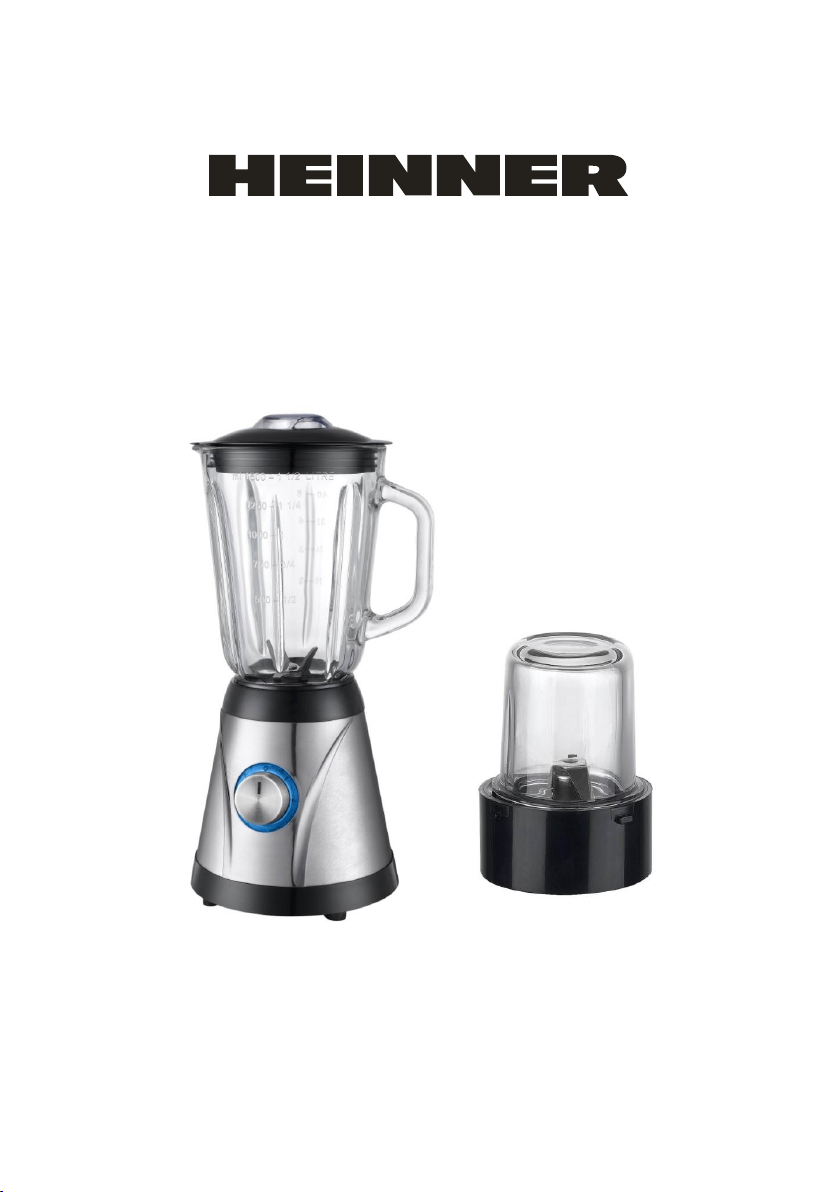
STAND BLENDER WITH GRINDER
OptiMix Plus 650
Voltage: 220-240V, 50Hz
Power: 600W
.
9
Page 11

ATTENTION:
Wrong operation and improper handling can cause problems with the
appliance and injury to the user.
The unit may be used only for the intended purposes. No liability is
accepted for damages arising from improper use or faulty handling.
Before connecting to the mains, please check whether the type of
supply and the mains voltage match with the details given on the
nameplate on the appliance.
Do not immerse the appliance and mains plug in water or other fluids.
Should the appliance still fall in water some time, pull out the power
plug immediately and have the appliance checked by an expert before
using it again. There is danger to life from electrical shock!
Do not try to open the housing yourself! Do not introduce any kind of
objects into the housing.
Do not use the appliance with wet hands, on moist floor or when the
ambience is humid.
Do not hold the mains plug with wet or moist hands.
Check the mains plug and mains adapter regularly for damages. If the
supply cord or plug is damaged, it must be replaced by manufacturer, its
service agent or similarly qualified persons in order to avoid a hazard.
Do not operate the appliance, if power cable or the mains plug shows
damage or the unit falls to the floor or has been damaged otherwise. In
such cases, bring the unit to the workshop for checking and repairs, if
necessary.
Do not ever try to repair the unit yourselves. There is danger from
electrical shock!
Do not let the power cord hang over sharp edges and keep it away from
hot objects and open flames. Pull the plug itself to remove it from the
plug socket.
10
Page 12

Installation of a spike protector will offer additional protection with a
nominal trigger current of not more than 30 Ma in the house
installation. Please consult your installing electrician.
The cable as well any extension cable required should be laid such that
there will not be any risk of anyone pulling it inadvertently or tripping
over it.
If a long extension cable is used, it must be suitable for the power
supply in question. Otherwise it causes overheating of the cable and/ or
plug.
Set the unit on a rigid, flat and heat-proof surface, not near open
flames(such as gas oven) and operate it out of reach of children.
This appliance is suitable neither for commercial use nor for use
outdoors.
Children cannot sense the dangers caused by improper handling of
electrical devices.
Children should be supervised to ensure that they do not play with the
appliance.
This appliance is not intended for use by persons (including children)
with reduced physical, sensory or mental capabilities, or lack of
experience and knowledge, unless they have been given supervision or
instruction concerning use of the appliance by a person responsible for
their safety.
Pull out the plug out of the socket, when the appliance is not in use and
also before cleaning.
Caution! The appliance is on power so long as it is connected to the
power circuit.
Care shall be taken when handling the sharp cutting blades, emptying
the bowl and during cleaning.
Avoid to potential injury from misuse
11
Page 13

Switch off the appliance and disconnect from supply before changing
Caution:
Switch off the unit before clean it to avoid creepage and other dangers. When
the plug or power cord have damage, do not use the unit, even not to
disassembly by yourself, must be inform the after- service center to handle.
accessories or approaching parts that move in use.
Switch off the unit before pulling out the mains plug.
Use only spare parts from the manufacturer or his local dealer.
Never carry the unit by its power cord.
Do not remove individual housing components.
When mixing hot liquids/foods excess pressure may build up inside the
blender, and this could make the lid come off and the contents splash
out. We therefore recommend that you avoid mixing excessively hot
foods and that you only put very small quantities of hot liquids or foods
into the blender.
Do not use the blender for very hard food products, such as bones,
shelled nuts, frozen meats etc., which could either damage the blade or
cause the motor to seize.
SPECIAL SECURITY PRECAUTIONS
Caution: The blades of the jug are very sharp. There is a danger of injury!
While the blades are turning, never touch the jug from the inside and
never put any objects inside.
Only use equipment endorsed by the manufacturer.
Only use the unit with tightly closed cover and inserted closure.
The unit is equipped with a security function. The unit can only be
switched on if the jug is put on the engine base properly. If the unit
12
Page 14
cannot be switched on, pull the power cable and check the connection
between jug and engine base.
PARTS ITEM
INSTALLATION
1. Clean the measuring cup, cover and jar (except main body) and so on
before first using.
2. To make sure the unit is turned off and not to connect before installation.
3. First ring the jar sealed ring into blade base, then enclose the blade base
into jar, last rock the jar slightly causing it to lock into place.
4. Fit the blender glass jar onto the main body, and turn it slightly in a
clockwise so it locks with the motor section. Fill the jug with the desired
13
Page 15

foods. Please ensure the water not spill over from cup. ( Maximal water
capacity cannot exceed 1500 ml)DO NOT USE THE UNIT WITHOUT ANY
MATERIAL INSIDE.
5. Put the cover on top of the jar and push it down. Insert the closure into the
cover and turn till it locks into place.
6. Place the measuring cup on the center of cover, anticlockwise rock the
measuring cup slightly.
OPERATION
1. Connect the power.
2. This unit has safety design, it does not work if the jar is not installed on
main body properly.
3. Turn the turning knob P/0/1/2/3/4/5 to position 0 in order to make sure the
unit is turned off.
4. Fill the jug with the desired foods
5. Put the cover on top of the jar and fix it. Place the measuring cup on the
center of cover, anticlockwise rock the measuring cup slightly.
6. Put the blender glass jar onto the main body, and turn it slightly in a
clockwise so it locks with the motor base.and the machine was fully
assembled.
7. Turning the knob to required speed (P—pulse, grade 1 to 5 means speed of
blades from low to high).
8. During working mode, the blue light around the knob is on.
14
Page 16
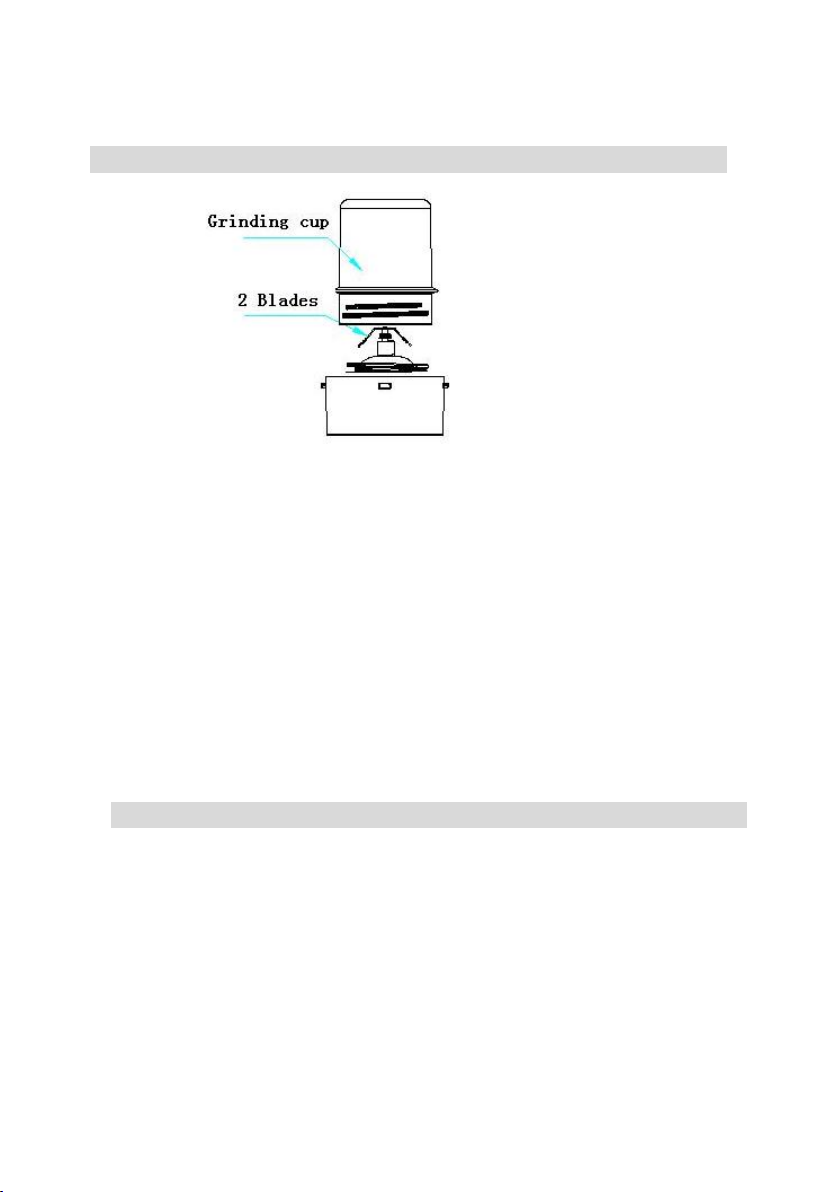
HOW TO INSTALL THE GRINDER
1. Clean the grinding cup before first using.
2. To make sure the unit is turned off and not to connect before
installation.
3. Fill the cup with the desired foods. Ring the cup sealing ring into blade
base, then enclose the blade base into the cup, last rock the cup slightly
causing it to lock into place.
4. Fit the grinding cup onto the main body, and turn it slightly in a
clockwise so it locks with the motor section. DO NOT USE THE UNIT
WITHOUT ANY MATERIAL INSIDE.
HOW TO OPERATE THE GRINDER
1. Connect the power.
2. This unit has safety design, it does not work if the cup is not installed
on main body properly.
3. Turn the turning knob P/0/1/2/3/4/5 to position 0 in order to make sure
the unit is turned off.
4. Fill the cup with the desired foods
5. Put the grinding cup onto the main body, and turn it slightly in a
15
Page 17
clockwise so it locks with the motor base.and the machine was fully
assembled.
6. Turning the knob to required speed (P—pulse, grade 1 to 5 means
speed of blades from low to high).
7. During working mode, the blue light around the knob is on.
SPEED ADJUST:
P—pulse –Stainless steel blade operate with transitorily highest speed,
suitable for ice.
1—Stainless steel blade operate with low speed.
2—Stainless steel blade operate with higher speed than grade 1 but lower
speed than grade 3..
3—Stainless steel blade operate with higher speed than grade 2 but lower
speed than grade 4.
4—Stainless steel blade operate with higher speed than grade 3 but lower
speed than grade 5.
5—Stainless steel blade operate with higher speed than grade 4 and it is
the highest speed of the machine.
0—turn off the unit.
16
Page 18

Caution:
1. Over-filled can block the operation, please turn off the unit and do
not connect the plug, take out some of material, then operating.
2. Do not use unit continuous more than 2 minutes.
Warning:
Do not to touch the sharp blade. When clean, please wipe by dishcloth, to
avoid accidentally injure.
CLEANING AND STORAGE
In addition to this, you must refer to the security precautions.
Do not clean Motor main body, power cord and plug with water.
Clean the engine base with a soft, wet piece of cloth and some mild
cleaning agent.
Fill the jug half-full with hot water and a little cleaning agent. Let the unit
run on speed 2 until the jug is clean.
The base with the blades can be taken apart. Screw of the base
counter-clockwise. Take out the blades together with sealing ring facing
upwards.
Now clean the jug, cover, closure, base and blades with sealing ring with
hot water and some cleaning agent. Dry well before re-using.
Caution! The blades inside of the jug are very sharp.
Never use aggressive cleaning agents.
17
Page 19
NOTE:
1. Unit suitable for household.
2. Do not use for commerce. Otherwise the maintain service will invalid.
Environment friendly disposal
You can help protect the environment!
Please remember to respect the local regulations: hand in the
non-working electrical equipment’s to an appropriate waste disposal
center.
Importer: Asesoft Distribution
Europolis Logistic Park, Italia Street, 1-7, Chaijna, Ilfov, Romania
Tel: +4021 256 00 86, www.heinner.com
18
Page 20
БЛЕНДЕР С МЕЛНИЧКА
OptiMix Plus 650
Захранване: 220-240V, 50Hz
Мощност: 600W
За да се осигури по-добро функциониране на продукта, моля прочетете
19
Page 21

инструкциите преди употреба. Запазете инструкциите за бъдещи справки.
ВНИМАНИЕ:
Грешната или неподходяща манипулация може да повредят уреда или
да причинят наранявания на потребителя.
Уреда може да бъде ползван само по предназначение. Производителя
не поема никаква отговорност за щети, причинени от неравилна
употреба на уреда.
Преди да свържете уреда в ел. мрежа проверете дали напрежението
отговаря на изписаното на етикета на уреда.
Не потапяйте блендера и кабела във вода или други течности. Ако по
погрешка уреда попадне във вода, веднага го изключете от контакта и
се консултирайте със специалист преди да го използвате отново.
Опасност от токов уред!
Не се опитвайте да отворите корпуса на мотора и не слагайте никакви
предмети в него!
Не използвайте блендера с мокри ръце, на мокри повърхности или във
влажна среда.
Не свързвайте щекера в контакта с мокра или влажна ръка.
Проверявайте редовно кабела, щекера и адаптора. Ако щекера или
кабела са повредени, трябва да бъдат подменени от производителя,
сервиза или квалифицираните лица, за да се избегнат инцидентите.
Никога не се опитвайте да поправяте уреда сами. Има опасност от
токов удар!
Не оставяйте кабела да виси над остри ъгли и го дръжте далеч от
горещи предмети или открит пламък. Ако искате да изключите уреда
от контакта, дръпнете щекера.
Кабела, както и удължителя, ако има такъв, трябва да бъдат поставени
така, че да не причинят риск от спъване или от рязко издърпване от
20
Page 22

контакта.
Ако се използва удължител, той трябва да е съвместим със
захранващата система. В противен случай, ще причини прегряване на
кабела и/или на контакта.
Поставете уреда на права и стабилна повърхност, далеч от пламъци
или нагорещени предмети (печка, котлон, т.н.). Дръжте далеч от деца.
Уреда не е предназначен за употреба на открити пространства или за
търговски цели.
Децата не могат да осъзнаят опасностите свързани с неправилната
употреба на електрическите уреди, затова трябва да бъдат
наблюдавани да не си играят с него.
Този уред не е предназначен за ползване от лица (в това число и деца)
с намалени умствени, сензорни или физически способности или с
липса на опит и познания, освен ако са наблюдавани от отговорно за
тяхната сигурност лице.
Извадете щекера от контакта преди да почистите уреда или тогва
когато не се използва.
Внимание! По уреда тече ток толкова дълго колкото е включен в
контакта.
Внимание, при работа с ножовете за рязане, при изпразването на
купата и по време на почистването му.
Спрете уреда и го изключете от контакта, преди да смените
приставките.
Спрете уреда преди да извадите кабела от контакта.
Използвайте приставки или резервни части само от производител или
местен представител.
Не повдигаите уреда държейки го за кабела.
Не вадете части от отделението с мотора.
Когато се рабъркват горещи течности/продукти може да се появи
21
Page 23

налягане в блендера, капака може да изхвръкне и може да се
ВНИМАНИЕ:
Преди почистване, уреда трябва да бъде изключен за да се избегнат
всякакви злополуки. Ако кабела или щекера се повредят/износят, не
използвайте уреда и не се опитвайте да го разглобявате, а се обърнете
към сервизен център.
рапръснат горещите продукти. Поради това, препоръчваме да
избягвате разбъргването на горещи течности/продукти и да слагате
такива в много малки количества в блендера.
Блендера не е предназначен за твърди продукти като лешници с
черупка, замразено месо, кости, т.н., което може да повреди
ножовете или да блокира мотора.
СПЕЦИАЛНИ МЕРКИ ЗА СИГУРНОСТ
Внимание: Ножовете са много остри. Опасност от наранявания!
Докато ножовете се движат не ги докосвайте и не слагайте
предмети в блендера.
Да се използва само с аксесоари доставени от производител.
Уреда трябвада се използва само когато капака е добре фиксиран.
22
Page 24
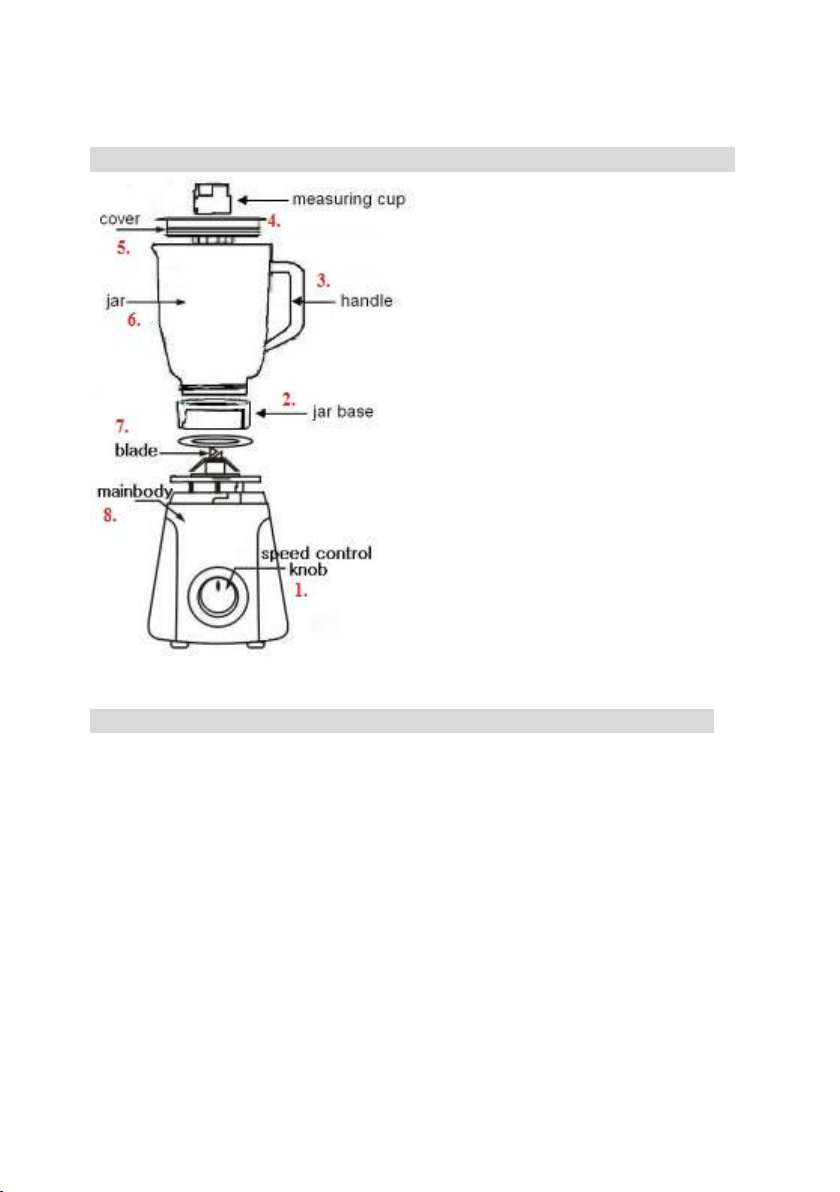
СЪСТАВНИ ЧАСТИ
1. Бутон за настройка на скоростта
2. Основа на купата
3. Дръжка
4. Мерителна купа
5. Капак
6. Купа
7. Острие
8. Основно тяло
СГЛОБЯВАНЕ
1. Почистете мерителната купа, капака и купата преди първата употреба.
2. Преди сглобяване, уверете се че уреда е спрян и изключен от контакта.
3. Първо завъртете купата в основата на остриетата, след това фиксирайте
основата на остриетата в купата и накрая разклатете леко купата, за да
се блокира в предназначеното място.
4. След това фиксирайте купата за основното тяло и го завъртете в посока
на часовниковата стрелка, за да се закрепи за частта с мотора.
Напълнете купата с продукти. Уверете се, че нивото на водата не
минава над ръба (максималният капацитет на купата е 1500 мл. вода).
НЕ ПУСКАЙТЕ УРЕДА БЕЗ ДА СТЕ СЛОЖИЛИ ПРОДУКТИ В КУПАТА!
23
Page 25

5. Сложете капака на блендера и го натиснете. Сложете и системата за
безопастно затваряне.
6. Поставете мерителната кана в центъра на капака, завъртете в обратна
посока на часовниковата стрелка.
УПОТРЕБА
1. Свържете с електрическата система.
2. Този уред има защитна система и ако отделните части не са добре
сглобени, уреда няма да функционира.
3. Завъртете бутона “P/0/1/2/3/4/5” за позиция 0, за да сте сигурни, че уреда
е изключен.
4. Напълнете купата с желаните продукти.
5. Сложете капака на купата и го закрепете. Поставете мерителната купа в
средата на капака, завъртете в обратна посока на часовниковата
стрелка.
6. След това, закрепете купата за основният корпус и завъртете бавно в
посока на часовниковата стрелка, за да се закрепи добре за частта с
мотора. Сега, уреда е напълно сглобен.
7. Завъртете бутона на желаната скорост (1-5). P=пулс/турбо
8. По време на работа, синята лампа свети.
24
Page 26
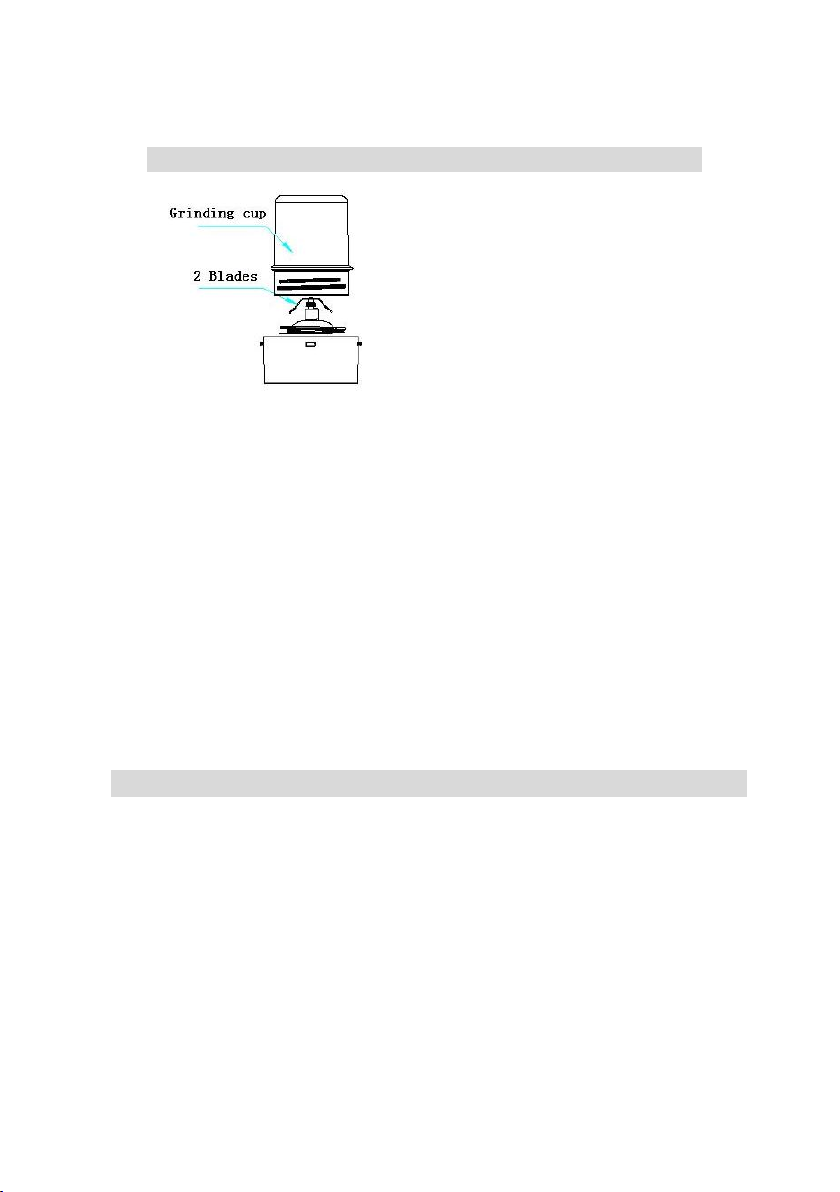
МОНТАЖ НА МЕЛНИЧКАТА
1. Почистете мелничката преди употреба.
2. Уверете се, че уреда е спрян и изключен от контакта.
3. Сложете в мелничката желаният продукт.
4. Поставете уплътнителният пръстен в основата на ножовете на
мелничката, след което поставете ножовете и закрепете за
частта с мотора.
5. Поставете мелничката на уреда и завъртете в посока на
часовниковата стрелка, за да се закрепи за уреда.
НЕ ИЗПОЛЗВАЙТЕ БЕЗ ПРОДУКТИ В УРЕДА.
РАБОТА С МЕЛНИЧКАТА
1. Свържете с контакт.
2. Този уред има защитна система и ако отделните части не са добре
сглобени, уреда няма да функционира.
3. Завъртете бутона “P/0/1/2/3/4/5” за позиция 0, за да сте сигурни, че
уреда е изключен.
4. Напълнете мелничката с желаният продукт.
5. Поставете мелничката на уреда и завъртете в посока на
часовниковата стрелка, за да се закрепи за уреда.
25
Page 27
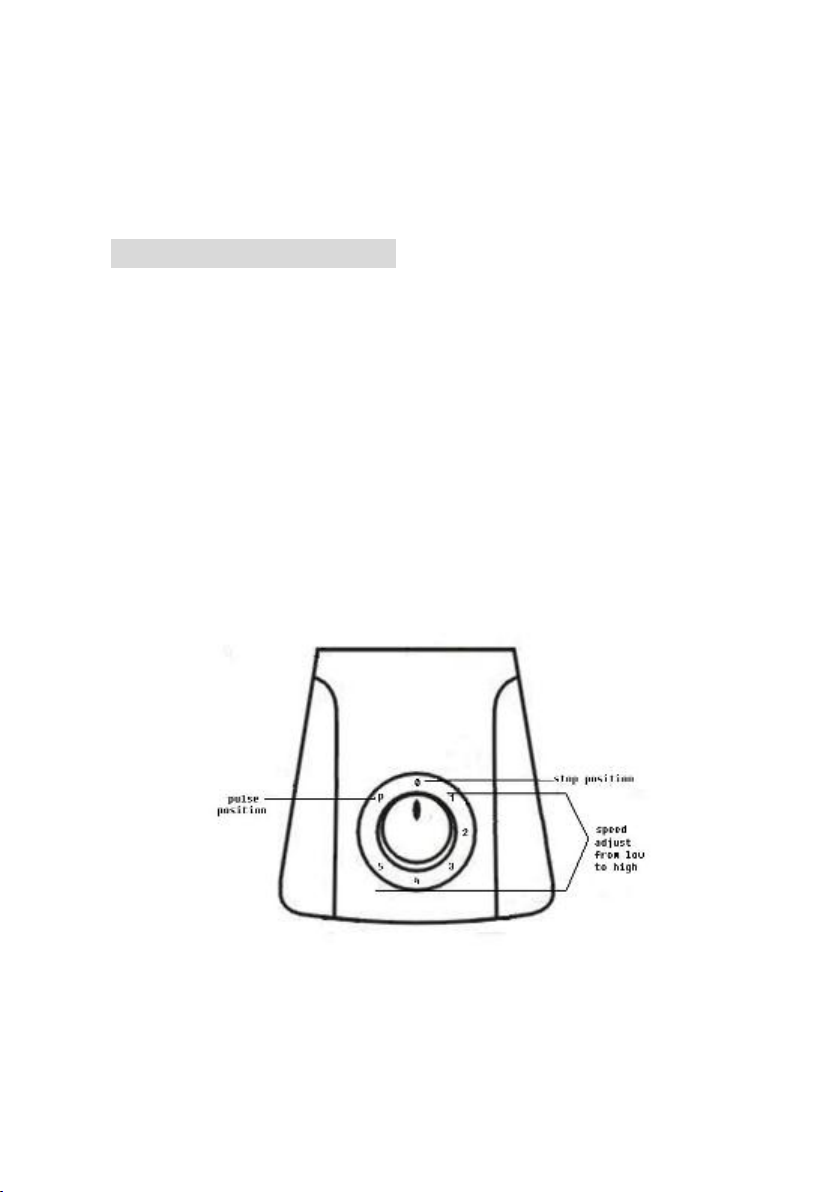
6. Настройте желаната скорост.
7. По време на работа, синята лампа до бутона за мощност свети.
НАСТРОЙКА НА СКОРОСТТА:
P— пулс – Ножът от неръждаема стомана работи на най-голямата скорост,
която е подходяща за лед.
1— Ножът работи на най-ниската скорост.
2— Ножът работи на скорост по-висока от скорост 1, но по-ниска от
скорост 3.
3—Ножът работи на скорост по-голяма от скорост 2, но по-малка от
скорост 4.
4— Ножът работи на скорост по-голяма от скорост 3, но по-малка от
скорост 5.
5— Ножът работи с най-голямата скорост.
0—спиране на уреда.
26
Page 28

Внимание:
1. Препълването може да блокира работата на уреда.
2. Не използвайте блендера непрекъснато за повече от две
минути.
ОЧИСТВАНЕ И СЪХРАНЕНИЕ
Консултирайте и предпазните мерки.
Не почиствайте основният корпус с вода (където се намира мотора),
захранващият кабел и щекера.
Почистете ги с влажна мека кърпа с малко препарат за съдове.
Напълнете купата наполовина с топла вода и малко препарат. Оставете
блендера да работи на скорост 2 докато се почисти.
Основата на ножовете може да бъде почистена отделно. Завъртете в
посока на часовниковата стрелка. Извадете ножовете заедно с
уплътнителният пръстен.
Почистете купата, капака, затварящата система, основата и ножовете с
топла вода и препарат за почистване. Оставете ги да изсъхнат преди
повторна употреба. Внимание! Ножовете от вътрешната страна на
купата са много остри!
Не използвайте много силни препарати.
Уреда е предназначен за домашна употреба.
Не докосвайте остриетата. При почистване, избършете с хавлиена кърпа,
за да избегнете евентуални инциденти.
Да не се използва за търговски цели. В противен случай, услугата за
поддръжка няма да бъде валидна.
27
Page 29

ИЗХВЪРЛЯНЕТО НА ОТПАДЪЦИТЕ ПО ОТГОВОРЕН НАЧИН КЪМ ОКОЛНАТА СРЕДА
Можете да помогнете за опазване на околната среда!
Молим Ви да спазвате местните закони и правила: занесете
нефункциониращите електрически уреди в пунктовете за
събиране на отпадъци от електрическо оборудване.
www.heinner.ro
28
 Loading...