

Page 1
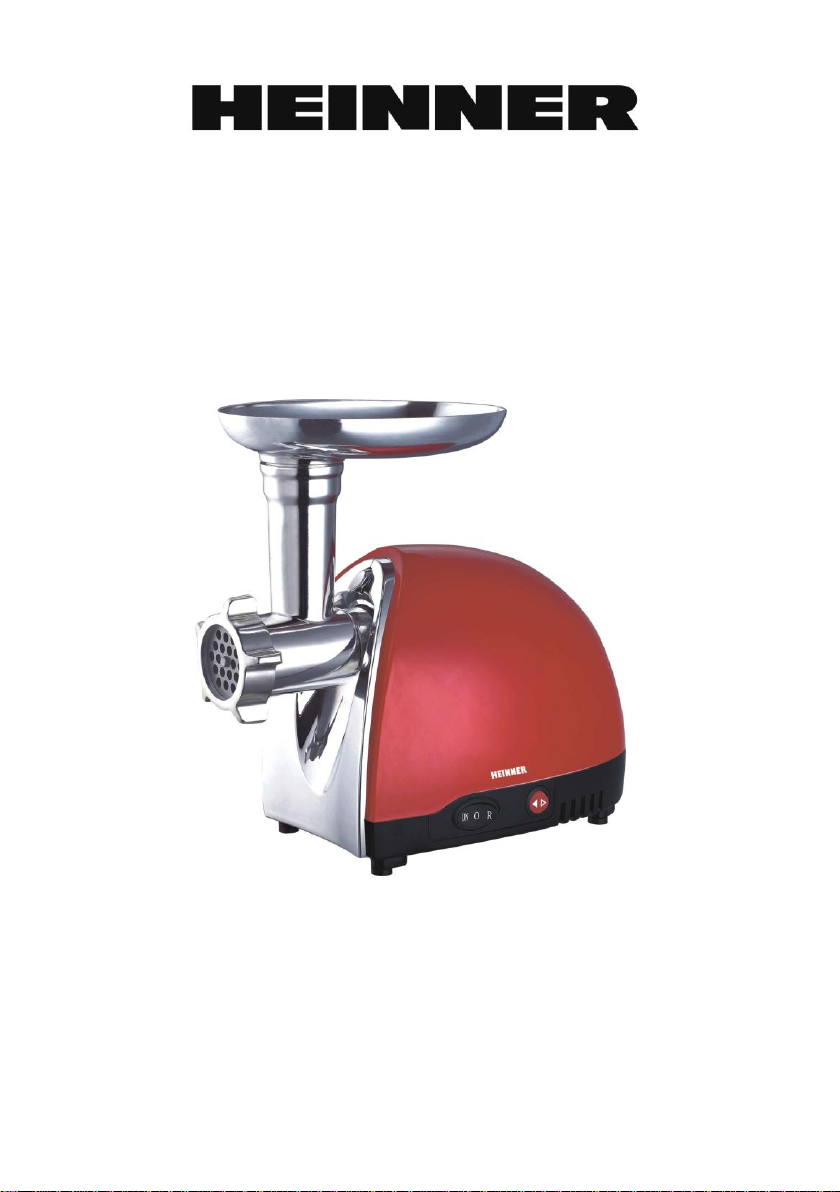
MEAT GRINDER
Model: MGL12B-RED/WH
INSTRUCTION MANUAL
Please read carefully and keep the instruction well
Voltage: 220-240V, 50/60Hz, Max power: 1200W
Rated power: 500W
In order to avoid rust we advise you to lubricate the cutter
unit and the grinding discs with some vegetable oil.
Page 2
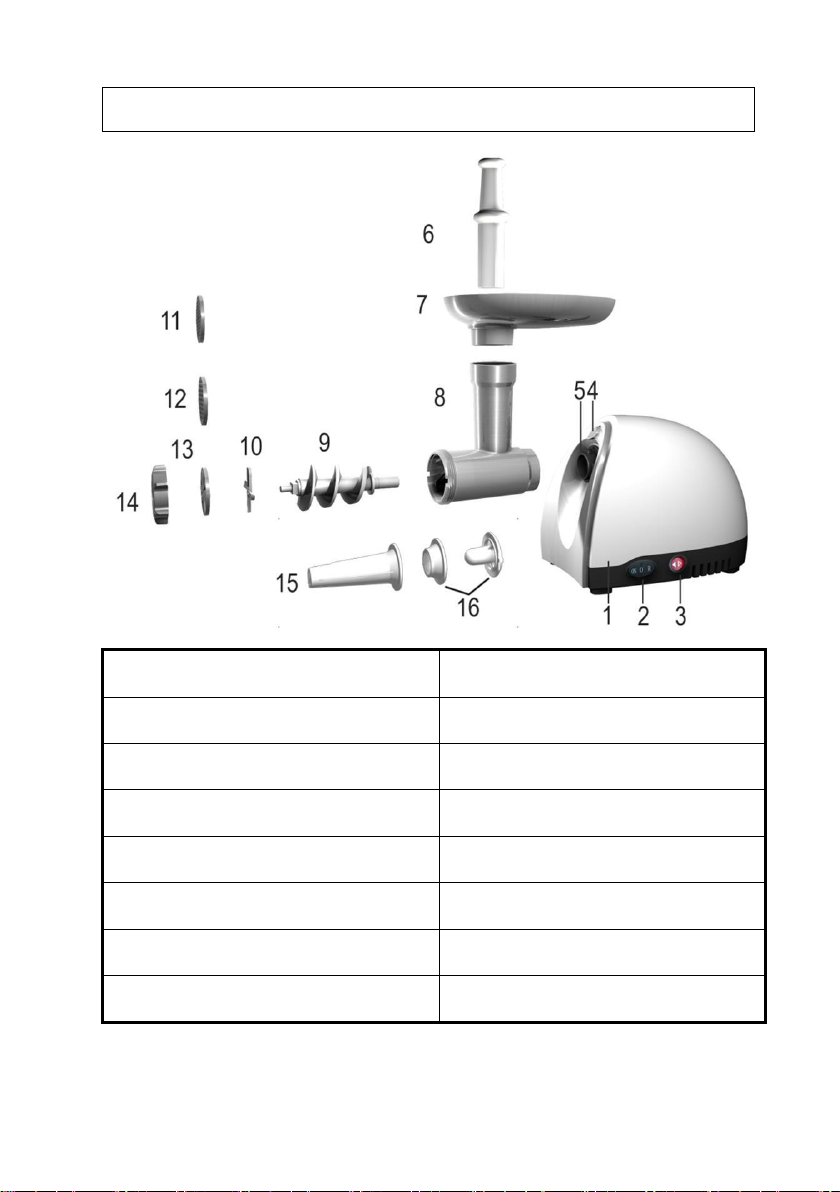
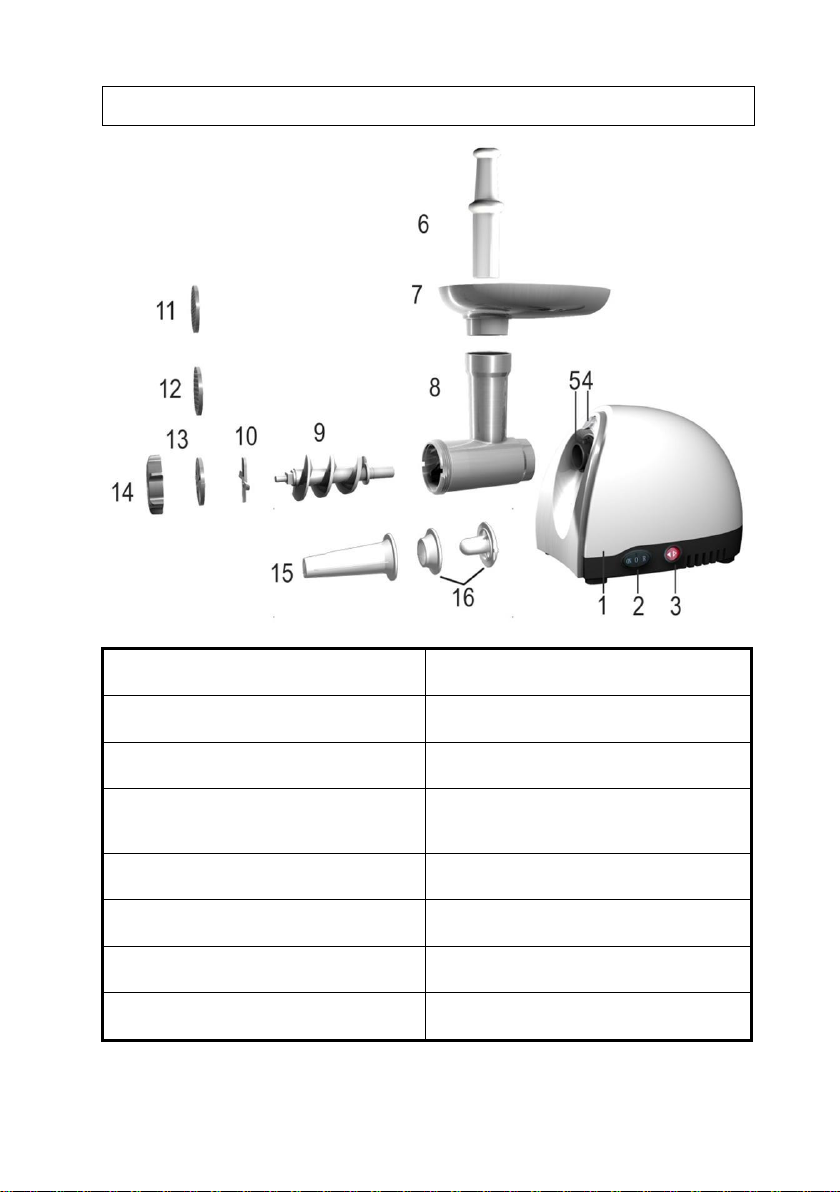
DESCRIPTION
1、Body
9、 Snake
2、ON/0/R (ON/OFF/ Reverse)
10、Cutting blade
3、Inertia switch
11、Cutting plate (fine)
4、Fasten button
12、Cutting plate(medium)
5、Tube inlet
13、Cutting plate (coarse)
6、Food pusher
14、Fixing ring
7、Hopper plate
15、Sausage
8、Head Tube
16、Kebbe
Page 3

INTRODUCTION
IMPORTANT
This appliance is equipped with a thermostat system. This
system will automatically cut off the power supply to the
appliance in case of overheating.
If you appliance suddenly stops running:
1. Pull the mains plug out of the socket.
2. Press the switch button to turn off the appliance.
3. Let the appliance cool down for 60 minutes.
4. Put the mains plug in the socket.
5. Switch the appliance on again.
6. Please contact your dealer of an authorized service
center if the thermostat system is activated too often.
7. If you plug in, the indicator light will be on.
CAUTION: In order to avoid a hazardous situation, this
appliance must never be connected to a time switch.
1. Read these instructions for use carefully and look at the
illustrations before using the appliance.
2. Keep these instructions for future reference.
3. Check if the voltage indicated on the appliance
corresponds to the local mains voltage before you
connect the appliance.
4. Never use any accessories of parts from other
manufacture. Your guarantee will become invalid if such
accessories or parts have been used.
5. Do not use the appliance if the mains cord, the plug or
other parts are damaged.
Page 4

6. If the mains cord of this appliance is damaged ,it muse
always be replaced by manufacture or a service center
authorized, in order to avoid hazardous situations.
7. Thoroughly clean the parts that will come into contact
with food before you use the appliance for the first time .
8. Unplug the appliance immediately after use.
9. Never use you finger or an objection to push
ingredients down the feed tube while the appliance is
running. Only the pusher is to be used for this
purpose.
10. Keep the appliance out of the reach of children.
11. Never let the appliance run unattended.
12. Switch the appliance off before detaching and install any
accessory.
13. Wait until moving parts have stopped running before you
remove the parts of the appliance.
14. Never immerse the motor unit in the water or any other
liquid, nor rinse it under the tap. Use only a moist cloth to
clean the motor unit.
15. Do not attempt to grind bones, nuts or other hard items.
16. Never reach into the cutter housing. Always use the
pusher.
17. Never operation the appliance continuously for more
than 3 minutes at 600W.
18. Accessories shall include instructions for their safe use.
19. It shall warn of potential injury from misuse.
20. This appliance is not intended for use by persons
(including children) with reduced physical, sensory or
mental capabilities, or lack of experience and knowledge,
unless they have been give supervision or instruction
concerning use of the appliance by a person responsible
Page 5
for their safety.
INSTRUCTION FOR USE
21. Children should be supervised to ensure that they do not
play with the appliance.
22. If the appliance is locked, please press Reversal button
(REV). The meat locked in cutter housing is untrodden,
so the appliance can renew its usual condition.
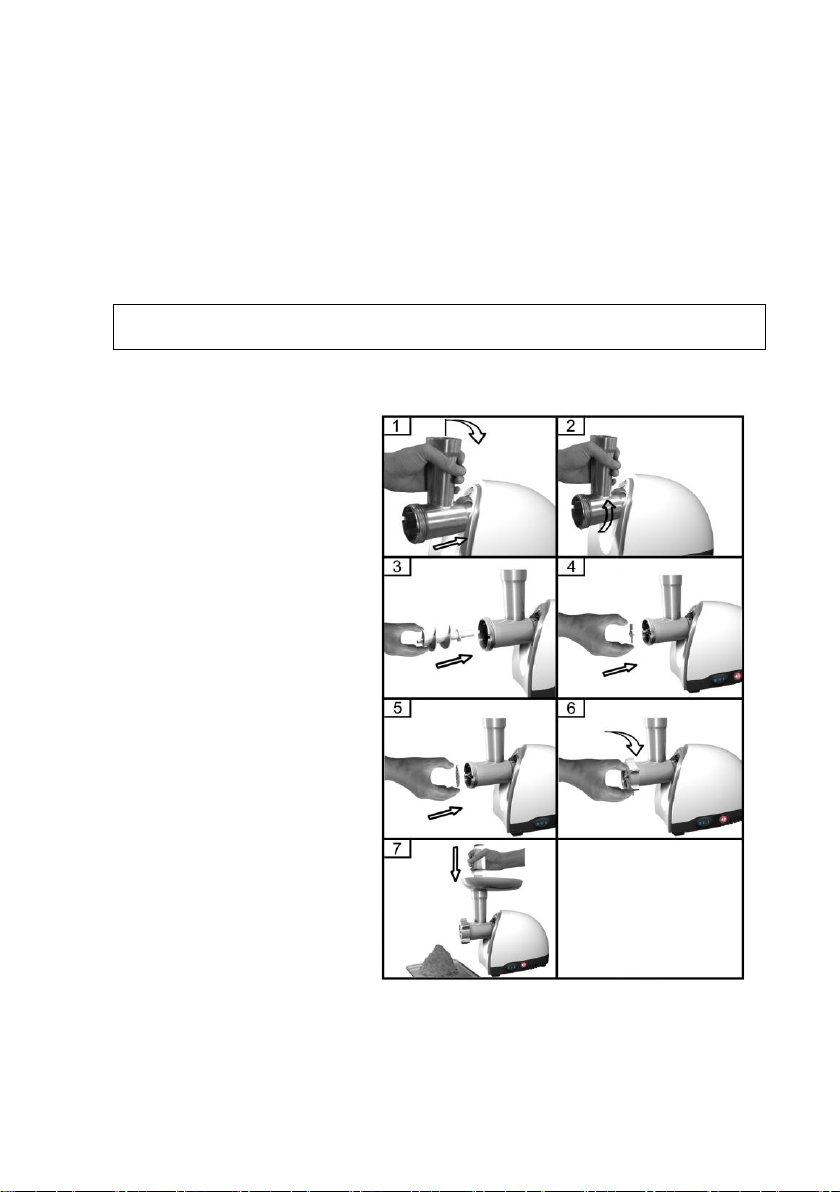
Assembling
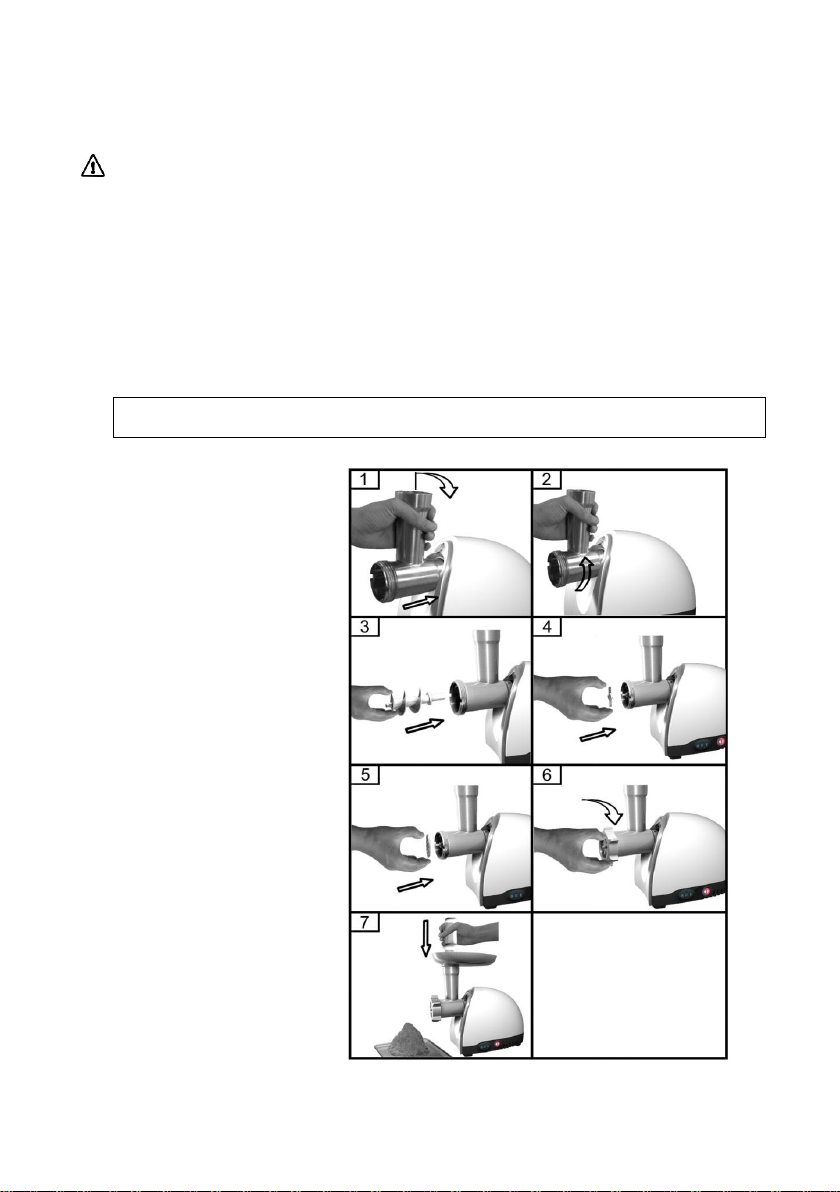
1. Press the fasten
button,hold the
head and insert it
into the inlet when
inserting please pay
attention the head
must be slanted as
per arrow indicated
on the top, see
(fig.1), then move
the head
anticlockwise so
that the head being
fastened tightly.
(fig.2)
2. Place the snake into
the head, long end
first, and turn to feed the screw slightly until it is set into
the motor housing. (fig.3)
Page 6

3. Place the cutting blade onto the snake shaft with the
blade facing the front as illustrated (fig.4).If it is not fitted
properly, meat will not be grinded.
4. Place the desired cutting plate next to the cutting blade,
fitting protrusions in the slot. (fig.5)
5. Support or press the center of the cutting plate with one
finger then screw the fixing ring tight with another hand
(fig.6). Do not over tighten.
6. Place the hopper plate on the head and fix it into
position.
7. Locate the unit on a firm place.
8. The air passage at the bottom and the side of the
motor housing should be kept free and not blocked.
Mincer
1. Insert the worm shaft into the cutter housing, the plastic
end first.
Place the cutter unit onto the worm shaft. (The cutting
edges should be at the front ) Place the medium
grinding disc or coarse grinding disc (depending on the
consistency you prefer) onto the worm shaft. (Make
sure the notch of the grinding disc fit onto the
projections of the mincer head.) Turn the screw ring in
the direction of the arrow on the cutter housing until it is
properly fastened.
2. Attach the cutter housing to the motor unit.
3. Place the tray on the upright part of the cutter housing.
4. Now the appliance is ready for mincing.
Page 7
Cut the meat into 10cm-long, 2cm-thick strips. Remove
bones, pieces of gristle and sinews as much as possible.
(Never use frozen meat!)
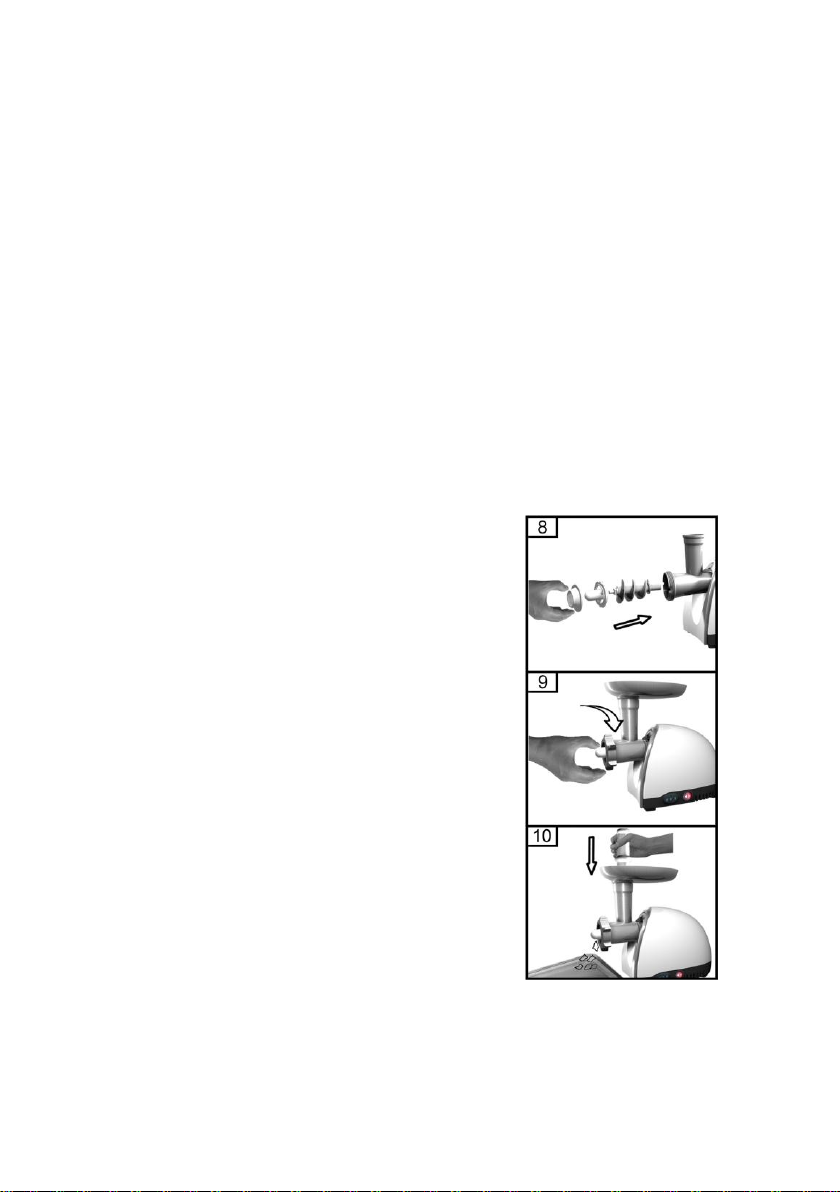
Put the meat in the tray. Use the pusher to gently push the
meat into the cutter hosing. (For steak tartare , mince the
meat with the medium grinding disc twice. ) (fig.7)
Plug the unit on and switch/ knob to "" , then switch
ON/0/R knob to " ON " position. After use it,Plug the unit on
and switch / knob to "" ,then switch ON/0/R knob to "
R " position.
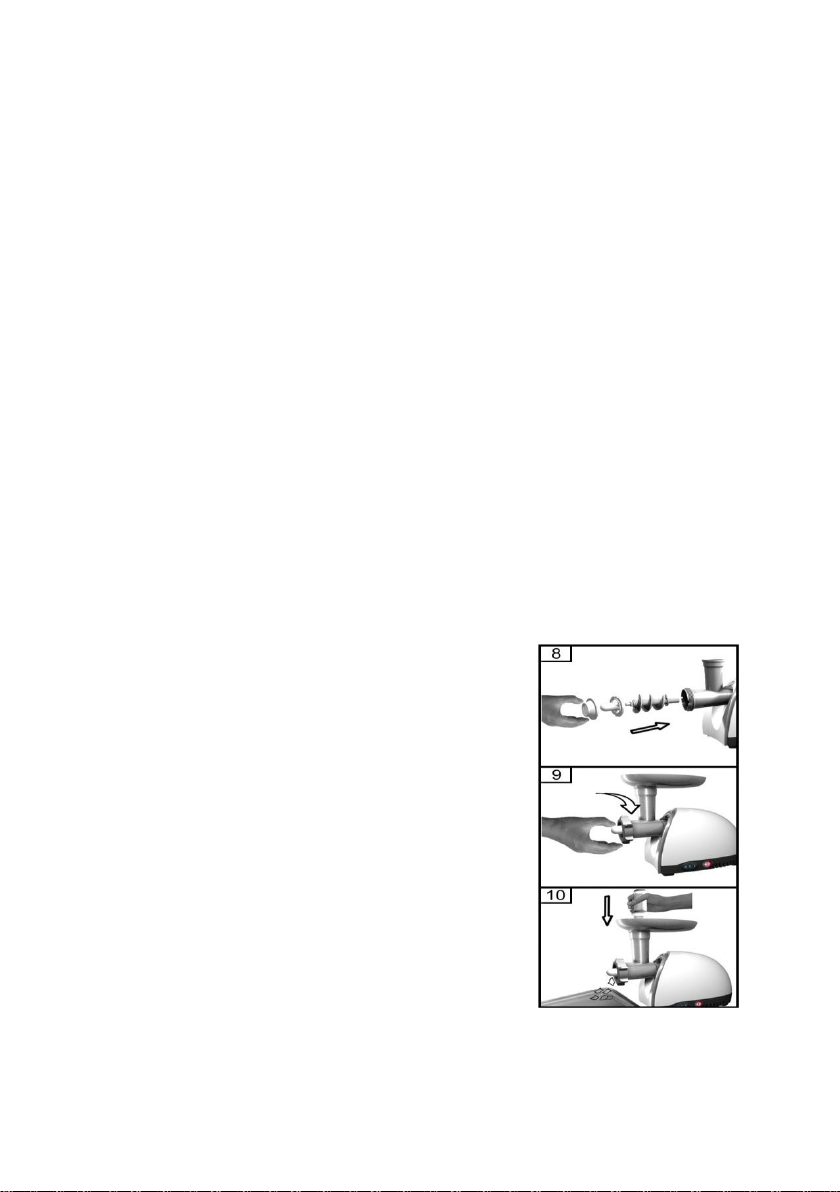
Making kebbe
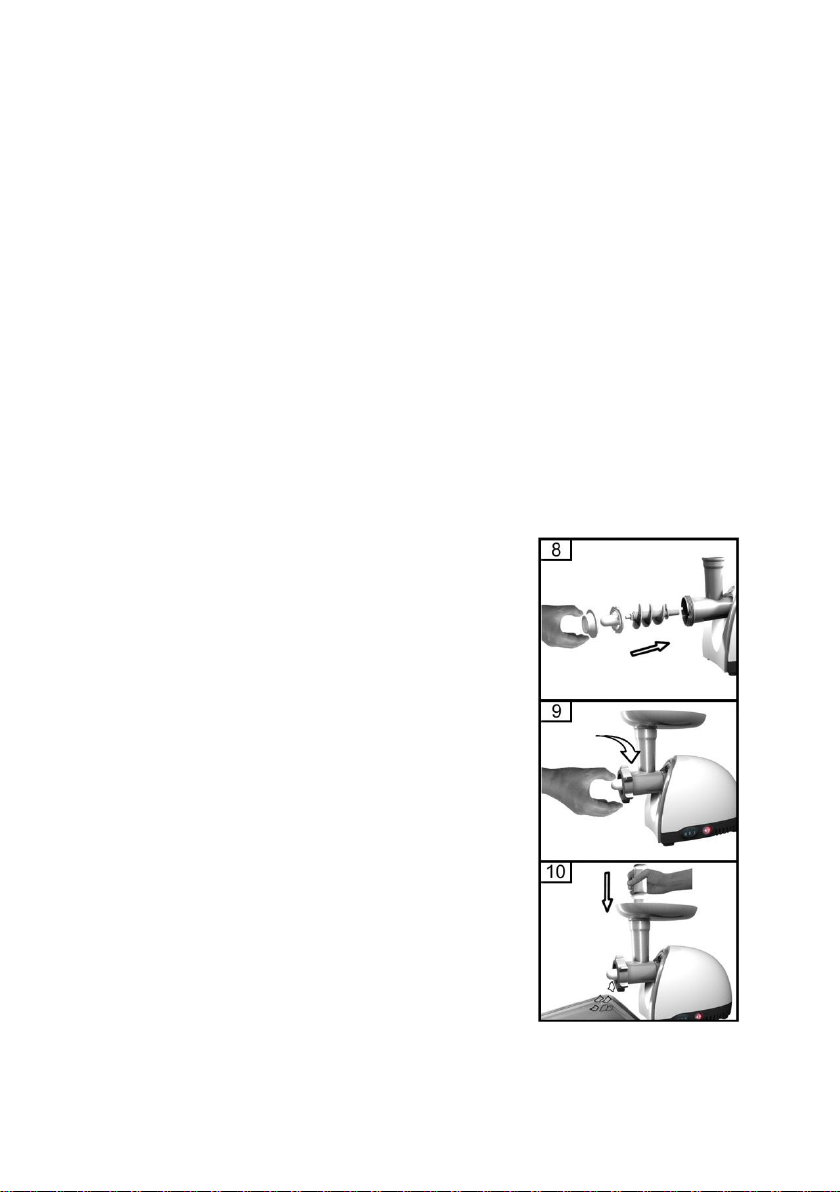
1. Insert the worm shaft into the
cutter housing, the plastic end
first.(fig.8)
Place the cone in the cutter
housing.
Place the former on the cutter
housing and screw the ring on
the cutter housing.(fig.9)
2. Attach the cutter housing to the
motor unit.
3. Place the tray on the upright part
of the cutter housing.
4. Now the appliance is ready for
making kebbe.(fig.10)
Feed the prepared kubbe mixture
through the kebbe maker. Cut the continuous hollow cylinder
into the desired lengths and user as required.
Page 8
Kebbe is a traditional Middle Eastern dish made primarily of
lamp and bulgur wheat which are minced together to form a
paste the mixture is extruded through the kubbe maker and
cut into short lengths.The tubes can then be stuffed with a
minced meat mixture, the ends pinched together and then
deep fried.
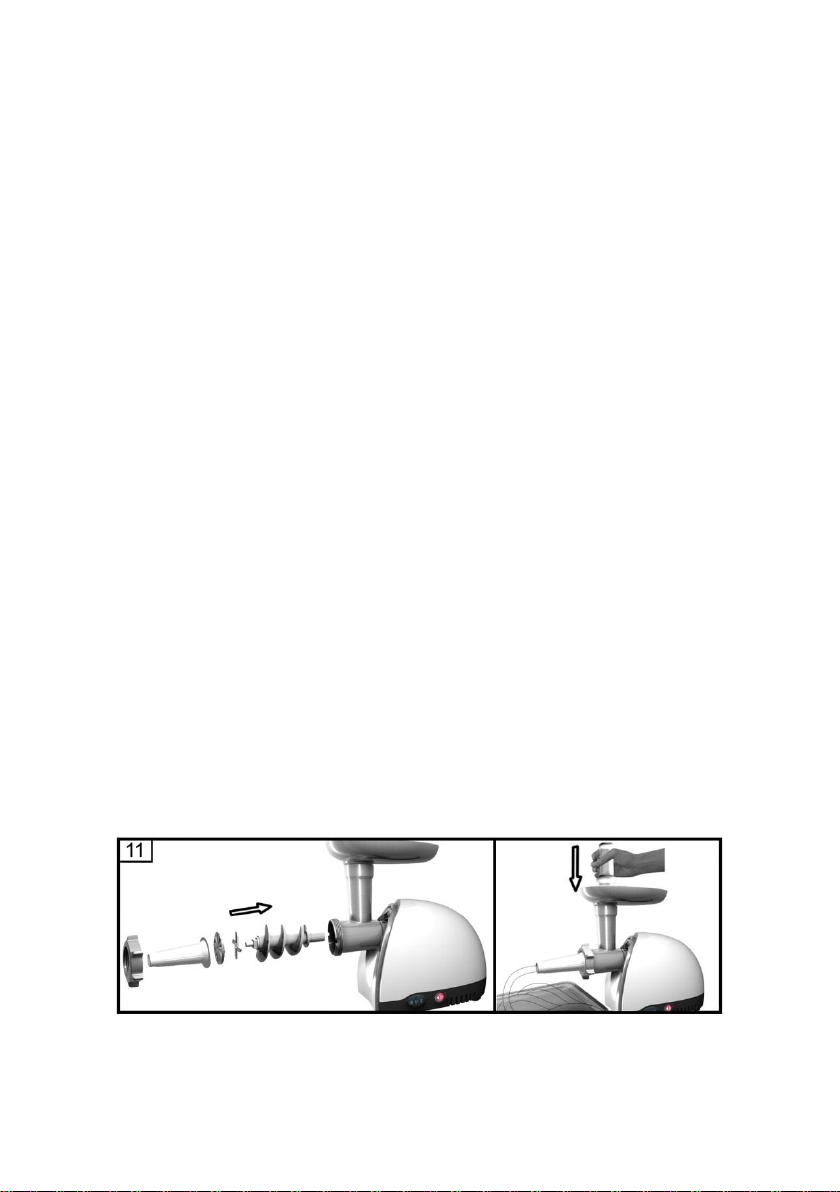
Making sausages
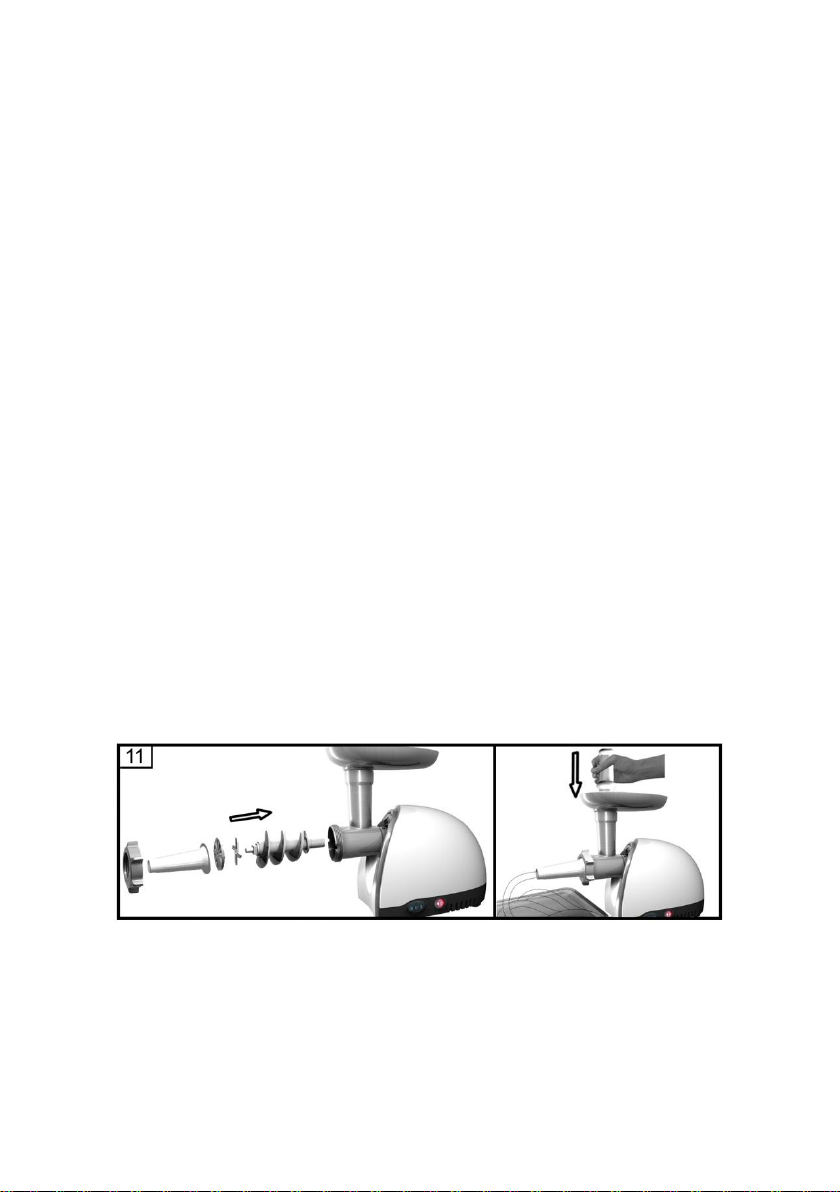
1. Mince the meat
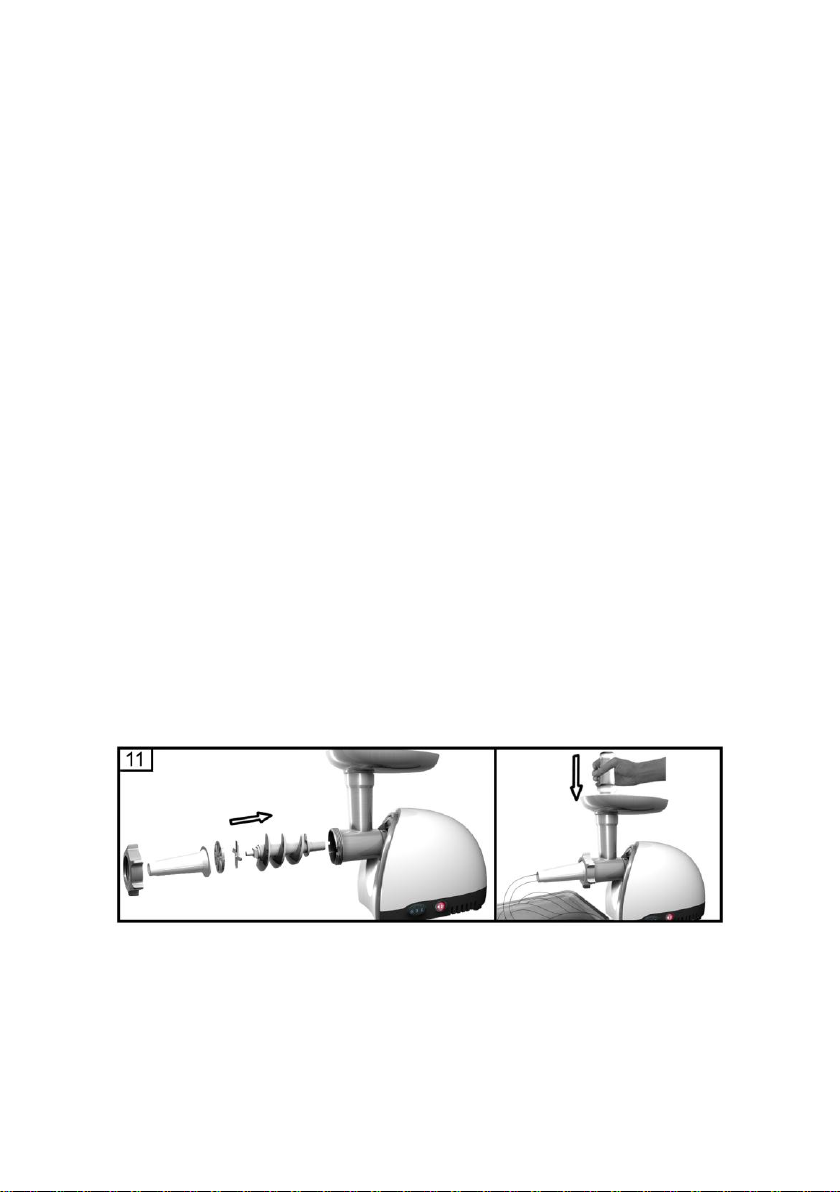
Insert the worm shaft into the cutter housing , the plastic
end first.(fig.11)
Place the separator in the cutter housing.
Place the sausage horn on the cutter housing and screw
the ring on the cutter housing.
(Make sure the notches of the separator fit onto the
projections of the mincer head.)
2. Attach the cutter housing to the motor unit.
3. Place the tray on the upright part of the cutter housing.
4. Now the appliance is ready for making sausages.
Put the ingredients in the tray. Use the pusher to gently push
the meat into the cutter housing.
Page 9
Put the sausage skin in lukewarm water for 10 minutes.
HOW TO CLEAN YOUR APPLIANCES
Then slide the wet skin onto the sausage horn. Push the
(seasoned) minced meat into the cutter housing. If the skin
gets stuck onto the sausage horn, wet it with some water.
Meat left behind in the cutter
housing may be removed from the
inside of the appliance by passing a
slice of bread through the cutter
housing.
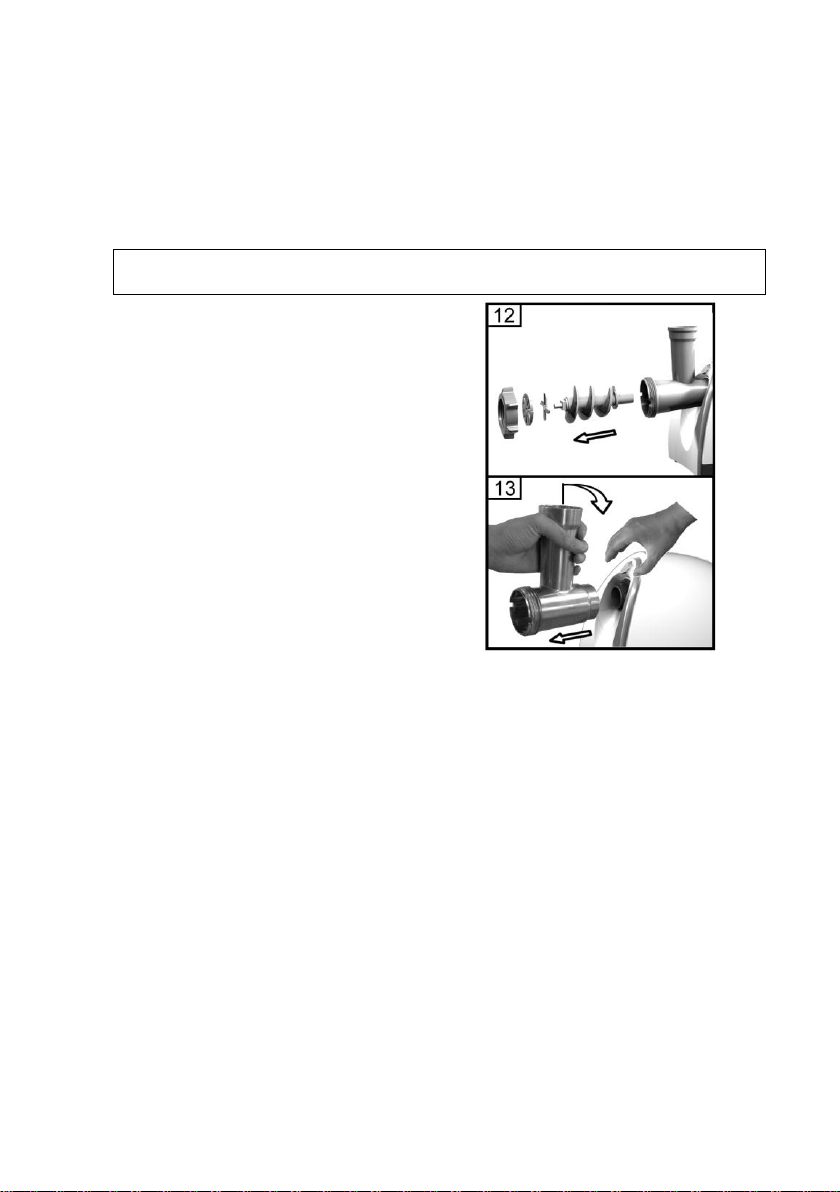
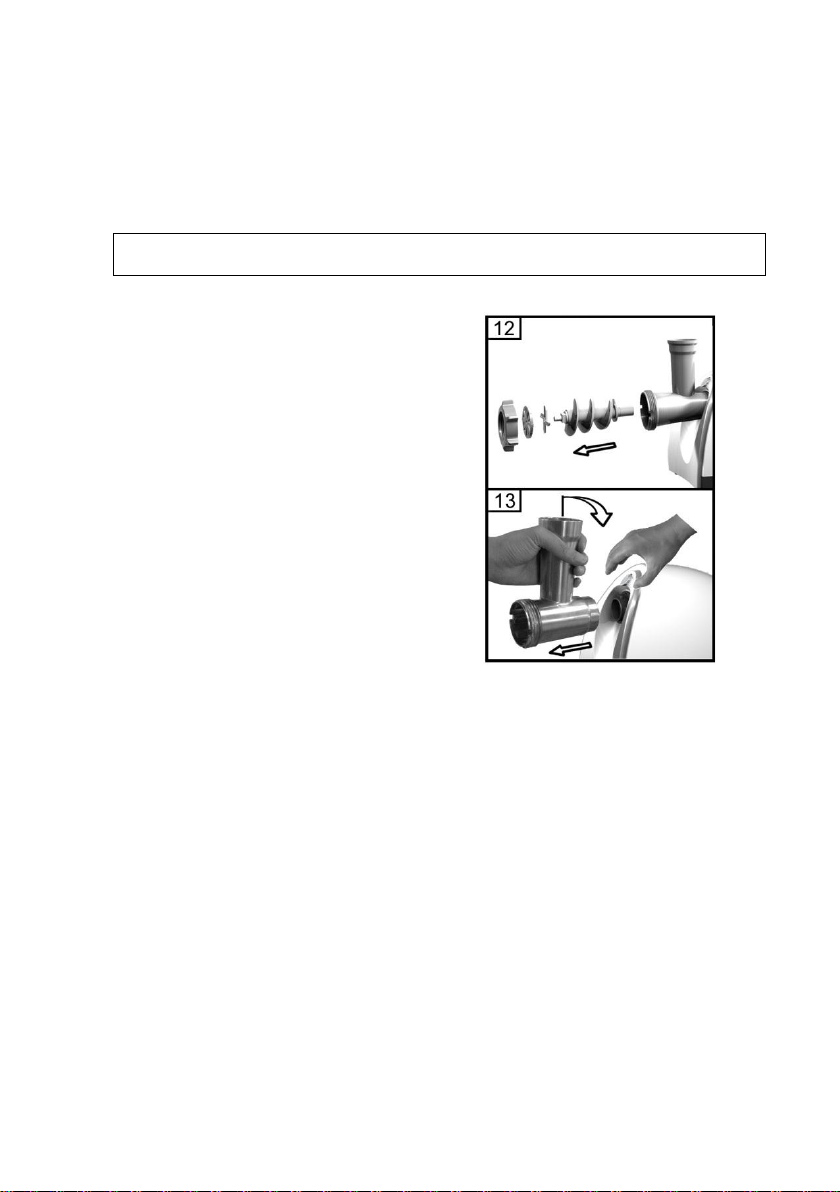
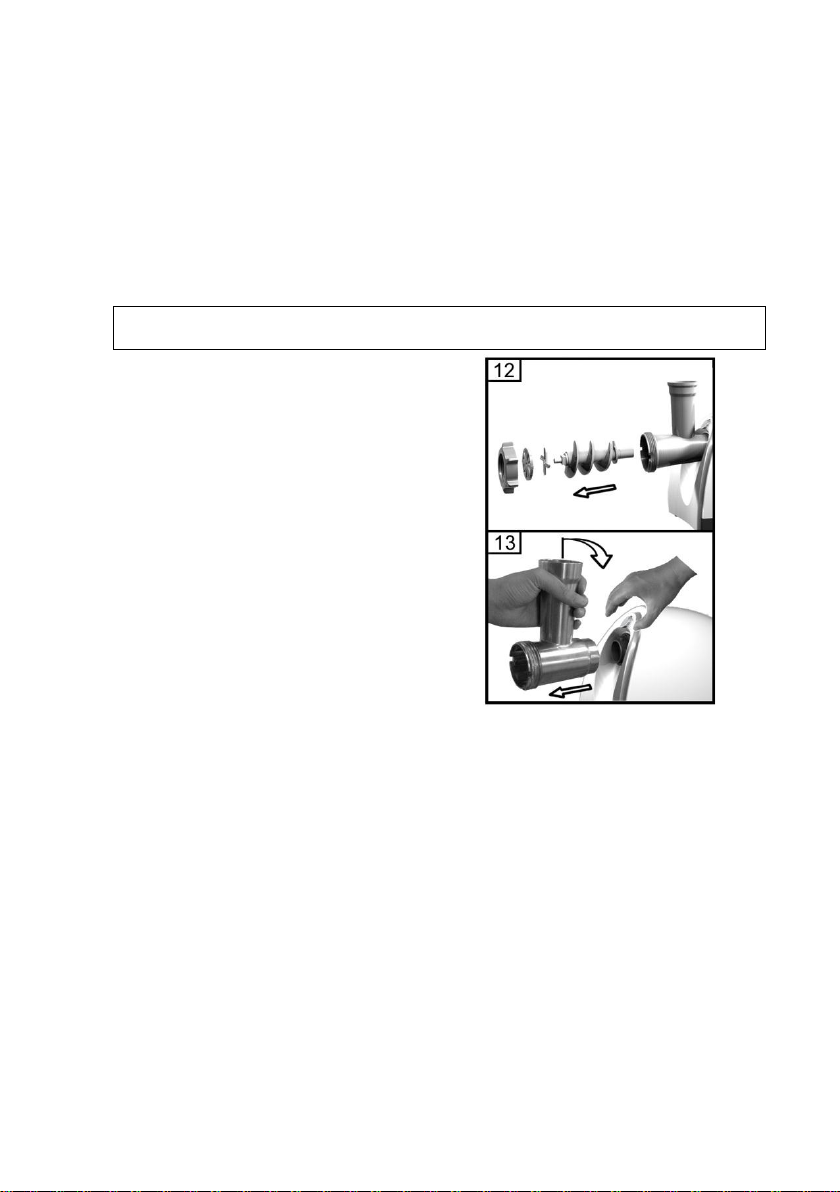
1. Before you clean the appliance,
switch the appliance off and
remove the plug from the
socket.(fig.12)
2. Press the release button and
turn the whole cutter housing in
the direction of the arrow. Remove the pusher and the
tray.(fig.13)
3. Unscrew the screw ring and remove all parts of the cutter
housing. Do not clean the parts in the dishwasher!
4. Wash all parts that have come into contact with meat in
hot soapy water. Clean them immediately after use.
5. Rinse them with clear hot water and dry them
immediately.
6. We advise you to lubricate the cutter unit and the
grinding discs with some vegetable oil.
Page 10
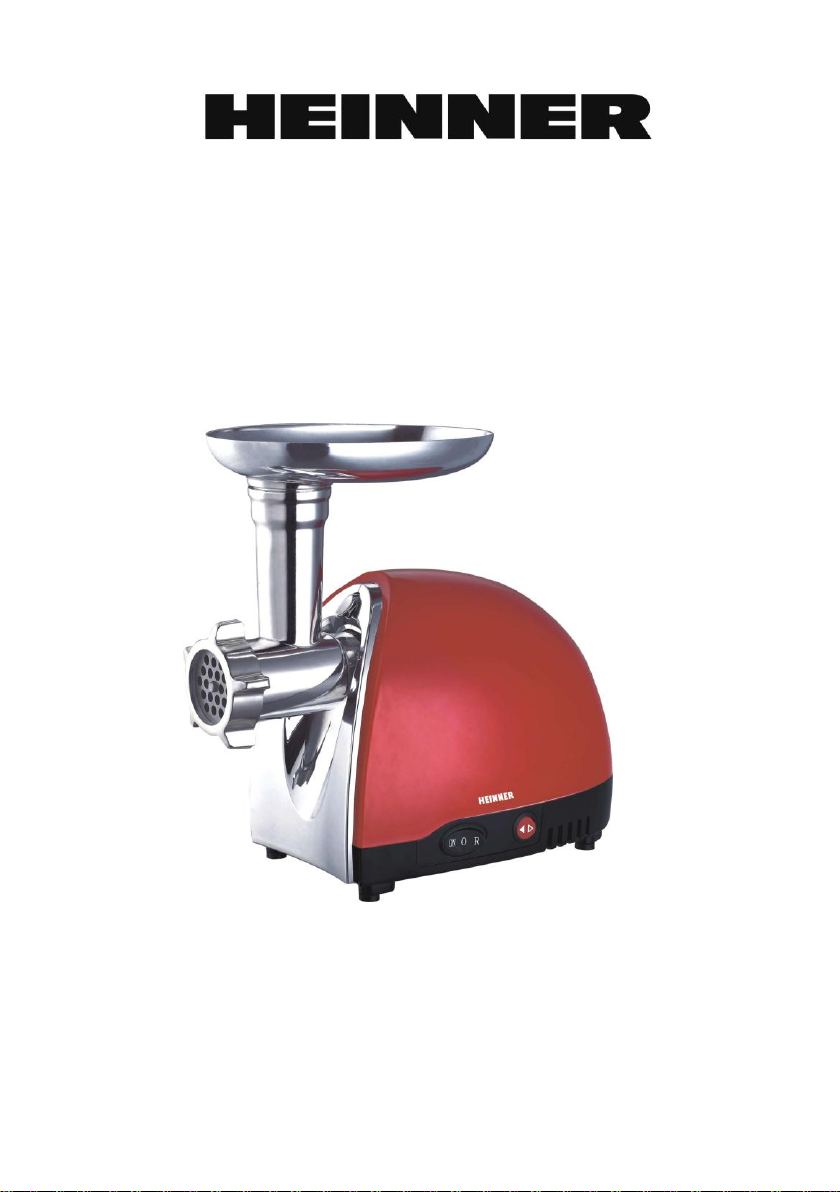
MASINA DE TOCAT CARNE
Model: MGL12B-RED/WH
MANUAL DE INSTRUCTIUNI
Va rugam sa cititi cu atentie si sa pastrati instructiunile
Alimentare: 220-240V, 50/60Hz, Putere maxima: 1200W
Putere de referinta: 500W
Pentru a evita ruginirea, va recomandam sa ungeti cu ulei sitele
si melcul de taiat dupa fiecare utilizare.
Page 11
DESCRIERE
1、Corp (Partea centrala)
9、 Spirala de tocat
2、ON/0/R (ON/OFF/Reverse)
10、Cutit
3、Comutatorul de inertie
11、Sita de taiere (fina)
4 、 Buton de fixare tub de
mixare
12、Sita de taiere (medie)
5、Tub de admisie
13、Sita de taiere (aspra)
6、Dispozitiv de impingere
14、Inel de fixare
7、Tava
15、Con pentru carnati
8、Tub de mixare
16、Accesorii kebbe
Page 12

IMPORTANT
INTRODUCERE
Acest aparat este echipat cu un sistem termostat, acest sistem
va intrerupe automat alimentarea cu energie electrica a
aparatului in caz de supraincalzire.
Daca dispozitivul dumneavoastra nu functioneaza:
1. Scoateti stecherul din priza.
2. Apasati comutatorul pe OFF pentru a decupla aparatul.
3. Lasati aparatul sa se raceasca timp de 60 de minute.
4. Introduceti stecherul in priza.
5. Porniti aparatul, mutand comutatorul pe pozitia ON.
Daca sistemul termostat este activat foarte des, va rugam
contactati furnizorul dumneavostra de service autorizat.
Daca dispozitivul este conectat la o sursa de alimentare,
indicatorul luminos va fi aprins.
ATENTIE: Pentru a evita o situatie riscanta, acest aparat nu
trebuie conectat la o priza ce functioneaza pe baza de timer.
Inainte de folosire va rugam sa va asigurati ca ati indepartat
toate ambalajele
1. Cititi aceste instructiuni cu atentie si consultati ilustratiile
inainte de a utiliza aparatul.
2. Pastrati aceste instructiuni pentru o consultare ulterioara.
3. Inainte de a conecta dispozitivul la o sursa de alimentare,
verificati daca tensiunea electrica indicata pe aparat
corespunde cu tensiunea electrica a alimentarii locale.
Aparatul trebuie alimentat doar de la o sursa cu
impamantare.
Page 13

4. Nu folositi niciodata accesorii sau parti ale altor produse.
In caz contrar, garantia nu va mai fi valabila.
5. Nu utilizati aparatul daca stecherul, cablul de alimentare
sau alte componente sunt deteriorate.
6. In cazul in care cablul de alimentare al aparatului este
deteriorat, acesta trebuie sa fie inlocuit de furnizor sau de
un centru de service autorizat, pentru a evita situatiile
riscante.
7. Inainte de prima utilizare, curatati cu atentie componentele
care vor intra in contact cu mancarea.
8. Deconectati aparatul de la sursa imediat dupa utilizare.
9. Este interzisa impingerea ingredientelor cu degetul
sau cu alte obiecte pe tubul de alimentare in timp ce
aparatul este in functiune. Pentru acest scop, folositi
dispozitivul de impingere.
10. Nu lasati aparatul la indemana copiilor.
11. Nu lasati niciodata aparatul in functiune nesupravegheat.
12. Deconectati aparatul (mutand comutatorul pe pozitia OFF)
inainte de a detasa sau instala orice accesoriu.
13. Inainte de a detasa componentele aparatului, asteptati ca
toate partile mobile sa se opreasca din miscare.
14. Nu cufundati niciodata partea centrala ce contine motorul
in apa sau alt lichid. De asemenea, nu clatiti aceasta parte
sub jetul de la robinet. Pentru curatare, folositi o laveta
umeda.
15. Nu incercati sa tocati oase, nuci sau alte obiecte tari.
16. Nu incercati sa introduceti mana in locasul pentru lamele
de taiat. Folositi intodeauna dispozitivul de impingere.
17. Nu folositi aparatul mai mult de 3 minute intr-o singura
serie.
18. Accesoriile vor include instructiuni pentru o folosire in
Page 14
siguranta,
INSTRUCTIUNI DE FOLOSIRE
19. Acestea vor avertiza impotriva folosirii incorecte.
20. Acest aparat nu este destinat folosirii de catre persoane
(inclusiv copii) cu capacitati fizice, senzoriale sau mentale
reduse, sau cu lipsa de experienta sau cunostinta, Copiii
trebuie supravegheati pentru a nu se juca cu dispozitivul.
21. Daca aparatul este blocat, apasati butonul de reversie
(REV). Carnea blocata in spatiul de taiere nu este tocata,
asa ca aparatul poate relua operatiunea.
Asamblare
1. Apasati butonul
de fixare, tineti
de tubul de
mixare si
introduceti-l in
orificiu; in acest
timp, tubul de
mixare trebuie
inclinat conform
sagetii
indicatoare (vezi
fig.1), apoi
trebuie rasucit in
sens invers
acelor de
ceasornic,
Page 15

pentru ca sa fie fixat bine; in acelasi timp, trebuie eliberat
butonul de fixare si se va auzi un click. (fig. 2)
2. Plasati spirala de tocat in zona tubul de mixare si rasuciti
incet pana ce surubul ajunge in carcasa motorului. (fig.3)
3. Puneti cutitul pe axul cilindrului, cu lama spre fata ca in
fig.4. Daca cutitul nu este pozitionat corect, carnea nu va fi
tocata.
4. Apoi puneti sita de taiere dorita langa cutit, fixand in orificii
protuberantele. (fig.5)
5. Sprijiniti sau apasati centrul placii de taiere cu un deget,
apoi insurubati inelul de fixare strans cu cealalta mana
(fig.6). Nu strangeti exagerat de tare.
6. Plasati tava de alimentare pe tubul de mixare si fixati-o.
7. Plasati masina de tocat pe un loc stabil.
8. Canalul pentru aer de dedesubtul aparatului si partea
laterala a carcasei motorului nu trebuie blocate.
Tocarea carnii
1. Introduceti spirala de tocat in tubul de mixare cu capatul
de plastic inainte.
Plasati cutitul pe spirala de tocat (Marginile ascutite
trebuie sa fie in fata). Plasati sita de taiere dorita (in
functie de consistenta pe care vreti s-o obtineti) pe spirala
de tocat dupa cutit (Crestatura discului de tocat trebuie sa
se potriveasca pe fantele capului de tocat). Rasuciti inelul
de insurubare in directia sagetii aflate pe carcasa sitelor
de taiat pana cand este fixata bine.
2. Atasati tubul de mixare de unitate.
3. Plasati tava pe partea verticala a tubului de mixare
Page 16
4. Acum masina este pregatita pentru tocarea carnii.
Taiati carnea in fasii de 10 cm lungime, 2 cm grosime.
Indepartati oasele, cartilajele si tendoanele pe cat posibil.
Nu folositi niciodata carne inghetata!
Puneti carnea in tava. Folositi dispozitivul de impingere pentru a
impinge usor carnea in carcasa lamelor de taiere. (Pentru
friptura tartar, tocati carnea cu discul de taiere mediu, de doua
ori (fig.7).
Introduceti stecherul in priza si schimbati butonul /pe
pozitia "", apoi pozitionati butonul ON/0/R pe “ON”. Dupa
utilizarea aparatului, deconectati aparatul si schimbati
butonul /pe pozitia "", apoi pozitionati butonul
ON/0/R pe pozitia “R”.
Prepararea kebbe
1. Introduceti spirala de tocat in tubul
de mixare, cu partea de plastic
inainte.(fig.8)
Plasati conul pe spirala de taiat si
insurubati inelul de fixare pe
carcasa.(fig.9)
2. Atasati tubul de mixare la unitatea
motorului.
3. Plasati tava in partea verticala a
tubului de mixare.
4. Aparatul este pregatit pentru
prepararea kebbe.(fig.10)
Page 17
Introduceti preparatul de kebbe prin filtrul de kebbe. Taiati
bucatile cilindrice astfel obtinute la lungimea dorita.
Kebbe este un preparat alimentar traditional din Orientul
Mijlociu, compus in principal din grau de diferite soiuri care este
amestecat, formand o pasta. Mixul este trecut prin filtrul de
kebbe si taiat in bucati de lungime mica. Bucatile cilindrice
astfel obtinute sunt umplute cu carne tocata, capetele sunt unite
si apoi preparatul se prajeste.
Prepararea carnatilor
1. Tocati carnea.
Introduceti spirala de tocat in tubul de mixare, cu partea de
plastic inainte (fig.11).
Plasati cutitul si sita de taiere dorite.
Plasati conul pentru prepararea carnatilor pe spirala de
tocat si insurubati inelul de fixare, nestrangand exagerat de
tare.(Crestatura separatorului trebuie sa se potriveasca pe
fantele capului de tocat)
2. Atasati tubul de mixare pregatit, la unitatea motorului.
3. Plasati tava in partea verticala a tubului de mixare.
4. Aparatul este pregatit pentru prepararea carnatilor.
Puneti ingredientele in tava. Folositi dispozitivul de impingere
pentru a impinge incet carnea in carcasa lamelor de taiat.
Puneti membrana pentru carnati in apa calduta pentru 10
minute. Apoi introduceti membrana uda pe conul pentru carnati.
Page 18
Apasati carnea tocata si condimentata in carcasa lamelor de
INSTRUCTIUNI DE CURATARE
taiat. Daca membrana se blocheaza pe con, ea trebuie umezita
cu apa.
Carnea ramasa in tubul de mixare
poate fi indepartata dinauntrul
aparatului trecand o felie de paine
prin tocator.
1. Inainte de a curata aparatul,
deconectati-l de la sursa (fig12)
2. Apasati butonul de eliberare si
rasuciti tubul de mixare in directia
sagetii. Indepartati dispozitivul de
impingere si tava. (fig.13)
3. Desurubati inelul de fixare si
indepartati toate componentele
carcasei. Nu spalati componentele in masina de spalat
vase!
4. Spalati cu apa fierbinte si detergent toate partile care au
intrat in contact cu carnea. Curatati-le imediat dupa ce ati
folosit aparatul.
5. Clatiti componentele cu apa curata fierbinte si uscati-le
imediat.
6. Sfat: Ungeti cu ulei cutitul si sitele de taiere.
Pentru a prelungi viata produsului va rugam tineti cont de
sfaturile de mai jos:
NU TOCATI CARNE CONGELATA
Page 19
NU TOCATI OASE SAU ALTE ALIMENTE DURE
NU FOLOSTI MASINA IN REPRIZE LUNGI MAI MARI DE 3
MINUTE; FOLOSITI IN REPRIZE DESE SI SCURTE
Protejati mediul inconjurator: acest aparat nu se
arunca impreuna cu gunoiul menajer. Va rugam
contactati cel mai apropiat centru de reciclare.
Importator si distribuitor:
Network One Distribution
Parcul Logistic Europolis, str. Italia, nr.1-7, Com. Chiajna, Jud.
Ilfov
www.nod.ro
www.heinner.ro
Page 20
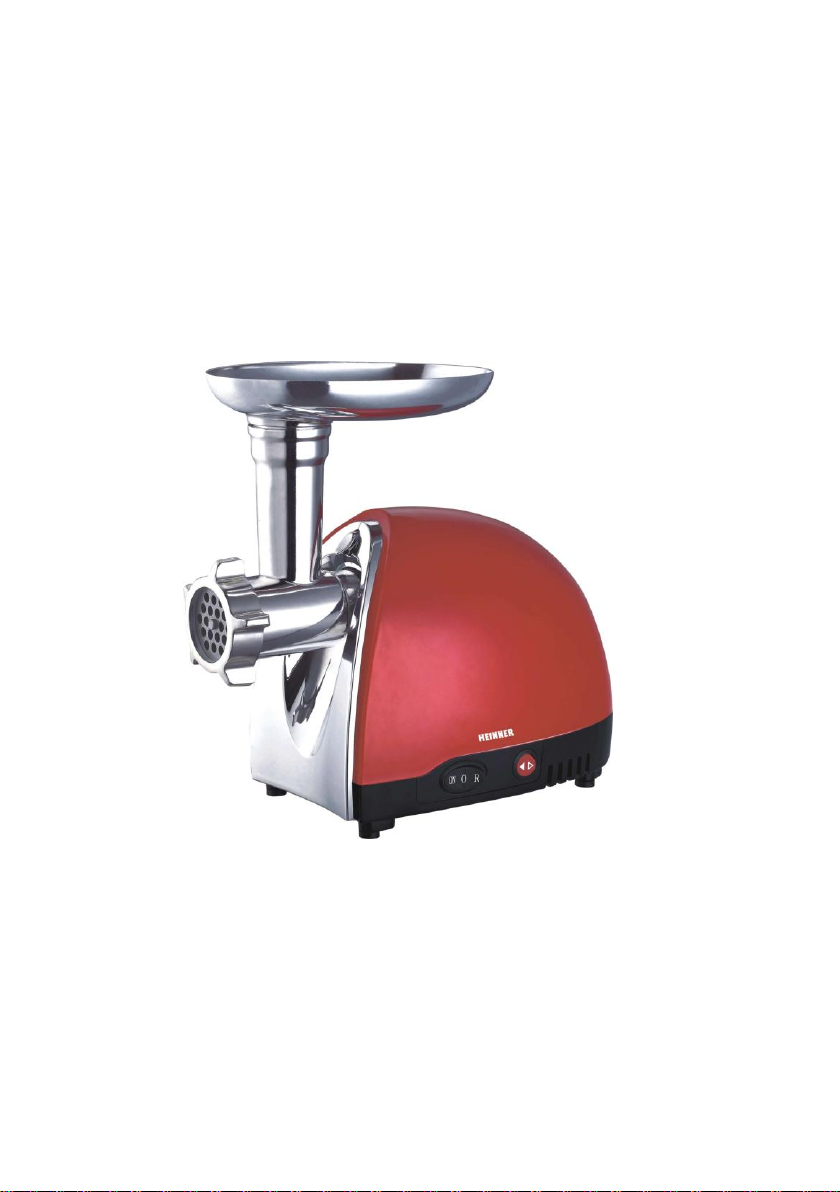
МЕСОМЕЛАЧКА
Модел: MGL12B-RED/WH
Моля, прочетете внимателно инструкциите и ги запазете .
Захранване: 220-240V, 50/60Hz,
Максимална мощност: 1200W
Ефективна мощност: 500W
За да избегнете ръжясването, препоръчваме да мажете с
олио решетките и ножа след всяка употреба.
Page 21
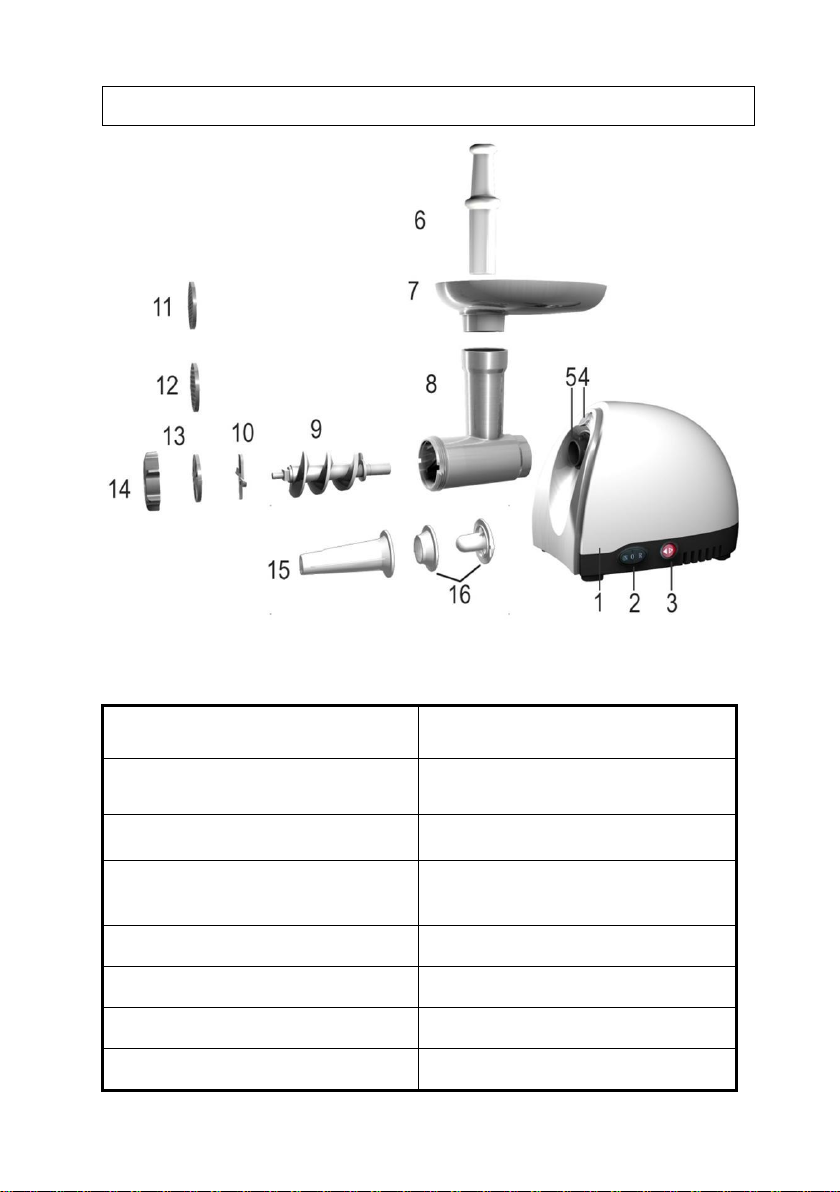
ОПИСАНИЕ
1、Тяло (Централна част)
9、 Спирала за меляне
2 、 ON/0/R (ON/OFF/ Reverse)
(Влкючено/Изключено/ Назад)
10、Нож
3、Превключвател
11、Решетка за рязане (финна)
4、Бутон за закрепване на
тръбата за смесване
12、Решетка за рязане (средна)
5、Входяща тръба
13、Решетка за рязане (груба)
6、Бутало
14、Закрепващ пръстен
7、Тава
15、Конус за наденички
8、Тръба за смесване
16、Аксесоари за kebbe
Page 22

ВАЖНО
ВЪВЕДЕНИЕ
Този уред е снабден със термостат, който ще спре
автоматично захранването с ел. енергия в случай на
пренагряване.
Ако вашият уред не функционираa:
1. Извадете щекера от контакта.
2. Натиснете бутона OFF(Изключено) за да разглобите
уреда.
3. Оставете уреда да изстине за около 60 минути.
4. Сложете щекера в контакта.
5. Пуснете уреда премествайки превключвателя на
положение ON.
Ако термостата се включва много често, моля свържете се с
ауторизиран сервиз.
Ако уреда е включен в електроизточник, светлинният
индикатор ще бъде включен.
ВНИМАНИЕ: За да избегнете някоя опасна ситуация, този
уред не трябва да се включва в контакти които работят на
таймери. Преди употреба, моля да се подсигурите, че сте
премахнали всички опаковки.
1. Прочетете внимателно тези инструкции и разгледайте
илюстрациите преди да използвате уреда.
2. Пазете тези инструкции за бъдещи справки.
3. Преди да свържете уреда към електрозахранването
проверете дали напрежението посочено на уреда
съвпада с напрежението на местната ел. система. Уреда
Page 23

трябва да се захранва само от заземен електроизточник.
4. Никога не използвайте аксесоари или части от други
продукти. В противен случай, гаранцията няма да бъде
валидна.
5. Не използвайте уреда ако щекера, захранващият
кабел или други компоненти са увредени.
6. В случай, че захранващият кабел на уреда е повреден,
той трябва да бъде сменен от производителя или от
ауторизиран сервизен център, за да се избегнат
рисковите ситуации.
7. Преди първата употреба, почистете внимателно
компонентите които влизат в контакт с храната.
8. Изключете уреда от контакта веднага след употреба.
9. Забранено е натискането на продуктите в тръбата с
пръсти или други предмети докато уреда работи. За тази
цел използвайте буталото.
10. Дръжте далеч от деца.
11. Никога не оставяйте уреда да работи без наблюдение.
12. Изключете уреда (премествайки превключвателя на
положение OFF) преди да махнете който и да е
раглобяем аксесоар.
13. Преди да махнете компонентите на уреда, изчакайте
всички подвижни части да спрат да се движат.
14. Никога не потапяйте централната част на уреда
(мотора) във вода или други течности. Също така НЕ
мийте тази част под течаща вода. За почистване
използвайте влажна кърпа.
15. Не се опитвайте да мелите кости, орехи или други
твърди предмети.
16. Не се опитвайте да слагате ръката в мястото за
остриетата. Винаги използвайте буталото.
Page 24
17. Не използвайте уреда без прекъсване за повече от
ИНСТРУКЦИИ ЗА УПОТРЕБА
три минути.
18. Този уред не е предназначен за употреба от лица
(включително деца) с намалени физически, умствени
или сензорни недостатъци или с липса на опит или
познания за употребата на уреда. Пазете далеч от деца.
Не допускайте децата да си играя с уреда, те трябва да
бъдат наблюдавани.
19. Ако уреда е блокиран натиснете бутона Назад
(REV). Блокираното месо в пространството за рязане не
е смляно, така че уреда може да продължи работата.
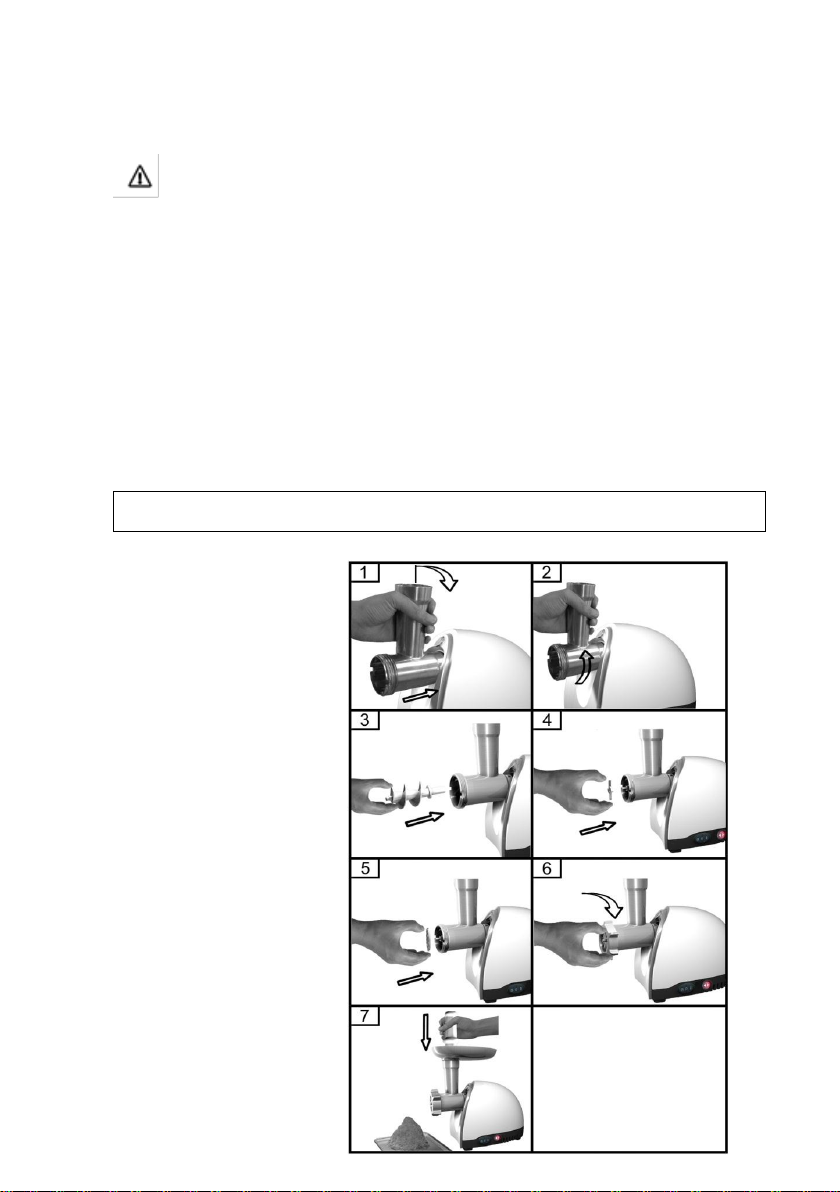
Сглобяване
1. Натиснете
бутона за
закепване, вземете
тръбата за
смесване и я
поставете; през
това време тръбата
за смесване трябва
да бъде наклонена
както е показано на
фиг.1(виж фиг.1),
след което трябва
да завъртите в
Page 25

обратна посока на часовниковата стрелка, за да бъде
закрепена добре. През това време трябва да се освободи
закрепващият бутон, при което ще се чуе прещракване
(фиг.2).
2. Поставете спиралата за меляне в тръбата за
смесване и завъртете бавно докато винта стигне до корпуса
(фиг.3)
3. Сложете ножа на остта на цилиндъра с острието
отпред, така както е показано във фиг. 4. Ако ножа не е
поставен правилно, месото няма да бъде смляно.
4. След това, сложете желаната решетка за рязане до
ножа, закрепвайки я на място (фиг.5).
5. Подкрепете или натиснете с един пръст центъра на
плаката за рязане, след което с другата ръка завийте добре
пръстена за закрепване (фиг.6). Не завивайте прекалено
силно.
9. Поставете тавата на тръбата за смесване и я закрепете.
10. Поставете месомелачката на стабилно място.
Канала за въздух от долната страна и страничната част
на корпуса не трябва да се блокират.
Меляне на месото
1. Поставете спиралата за меляне в тръбата за
смесване с пластмасовата част напред.
2. Поставете ножа на спиралата (Острите краища
трябва да бъдат навън). Поставете желаната
решетка на спиралата (в зависимост от желаната
консистенция) след ножа. Завъртете пръстена за
решетката в посока на часовниковата стрелка,
Page 26
докато се закрепи добре.
3. Закрепете смесващата тръба за тялото.
4. Поставете тавата на вертикалната част на тръбата
за смесване.
5. Сега, месомелачката е подготвена за меляне на
месото.
Нарежете месото на ивици дълги 10 см. и 2 см широки.
Отстранете костите, хрущялите и сухожилята доколкото е
възможно.
Никога не използвайте замразено месо!
Сложете месото в тавата. Използвайте буталото за
натискане на месото към остриетата (За татарски кюфтета,
мелете два пъти месото на средната решетка (фиг.7).
Поставете щекера в контакта и сменете бутона/на
положение "", след което настройте бутона ON/0/R на
“ON”. След употреба на уреда, изключете го и сменете
бутона /на положение "", след което поставете
бутона ON/0/R на положение “R”.
Приготвяне на kebbe
(тип ливански кюфтета)
1. Поставете спиралата в тръбата
за смесване с пластмасовата част
напред (фиг.8). Поставете конуса
на спиралата и завъртете
пръстена за корпуса (фиг.9).
2. Закрепете тръбата за смесване
към корпуса с мотора.
3. Сложете тавата на вертикалната страна на
Page 27
тръбата за смесване.
4. Уреда е подготвен за приготвяне на kebbe (фиг.10).
Поставете сместта за kebbe и нарежете цилиндричните
парчета на желатана дължина.
Kebbe е традиционално ориенталско ястие, съставено от
различни зърнени култури които се смесват образувайки
тестена смес. Сместта се минава през филтъра за kebbe и
се реже на къси парчета. Цилиндричните парчета се пълнят
с кайма, като крайщата се залепват, след което парчетата
се пържат.
Приготвяне на наденици
1. Смелете месото
Поставете спиралата в тръбата за смесване с
пластмасовата страна напред (fig.11). Поставете ножа и
желаната решетка. Поставете конуса за приготвяне на
надениците на спиралата и завъртете закрепващият
пръстен, без да го затягате прекалено силно (Разреза
на разделителя трябва да съвпада с режещият край).
2. Закрепете тръбата за смесване за основното тяло.
3. Поставете тавата във вертикалната част на тръбата
за смесване.
4. Уреда е подготвен за приготвяне на наденици.
Сложете продуктите в тавата. Използвайте буталото за
Page 28
натискане на месото към остриетата.
ИНСТРУКЦИИ ЗА ПОЧИСТВАНЕ
Сложете мембраните за надениците в топла вода за около
10 минути. След това, поставете мократа мембрана на
конуса за наденици. Натиснете нарязаното и подправено
месо към остриетата. Ако мембраната се заклещи на
конуса, тя трябва да бъде намокрена с вода.
Останалото месо в тръбата за
смесване може да бъде отстранена
като минете фелия хляб през
мелачката.
1. Преди на почистите уреда,
изключете го от
електрическата мрежа.
(фиг. 12)
2. Натиснете бутона за
освобождаване и завъртете
тръбата за смесване в
посока на стрелката.
Махнете буталото и тавата. (фиг.13)
3. Развийте пръстена и махнете всички части на
корпуса. Не мийте частите в миялна машина!
4. Измийте с гореща вода и почистващ препарат
всички части, които са влезли в контакт с месото.
Почистете ги веднага след като сте използвали
уреда.
5. Изплакнете елементите с чиста и гореща вода и
изсушете веднага.
6. Съвет: намажете ножа и решетките за рязане с
олио.
Page 29
За да удължите живота на продукта, моля имайте предвид
следните съвети:
НЕ МЕЛЯЙТЕ ЗАМРАЗЕНО МЕСО
НЕ МЕЛЯЙТЕ КОСТИ ИЛИ ДРУГИ ДВЪРДИ ПРОДУКТИ
НЕ ИЗПОЛЗВАЙТЕ МЕСОМЕЛАЧКАТА ЗА ИНТЕРВАЛИ
ПО-ДЪЛГИ ОТ ТРИ МИНУТИ; ИЗПОЛЗВАЙТЕ Я ЗА
КРАТКИ И ЧЕСТИ ИНТЕРВАЛИ
ОТСТРАНЯВАНЕТО НА ОТПАДЪЦИТЕ ПО ОТГОВОРЕН ЗА ОКОЛНАТА
СРЕДА НАЧИН
Пазете околната среда: този уред не трябва да
се изхвърля заедно с битовите отпадъци. Моля,
изхвърляйте на специалните за това места или
занесете в центрове за рециклиране на
подобни отпадъци.
www.heinner.com
 Loading...