

Page 1
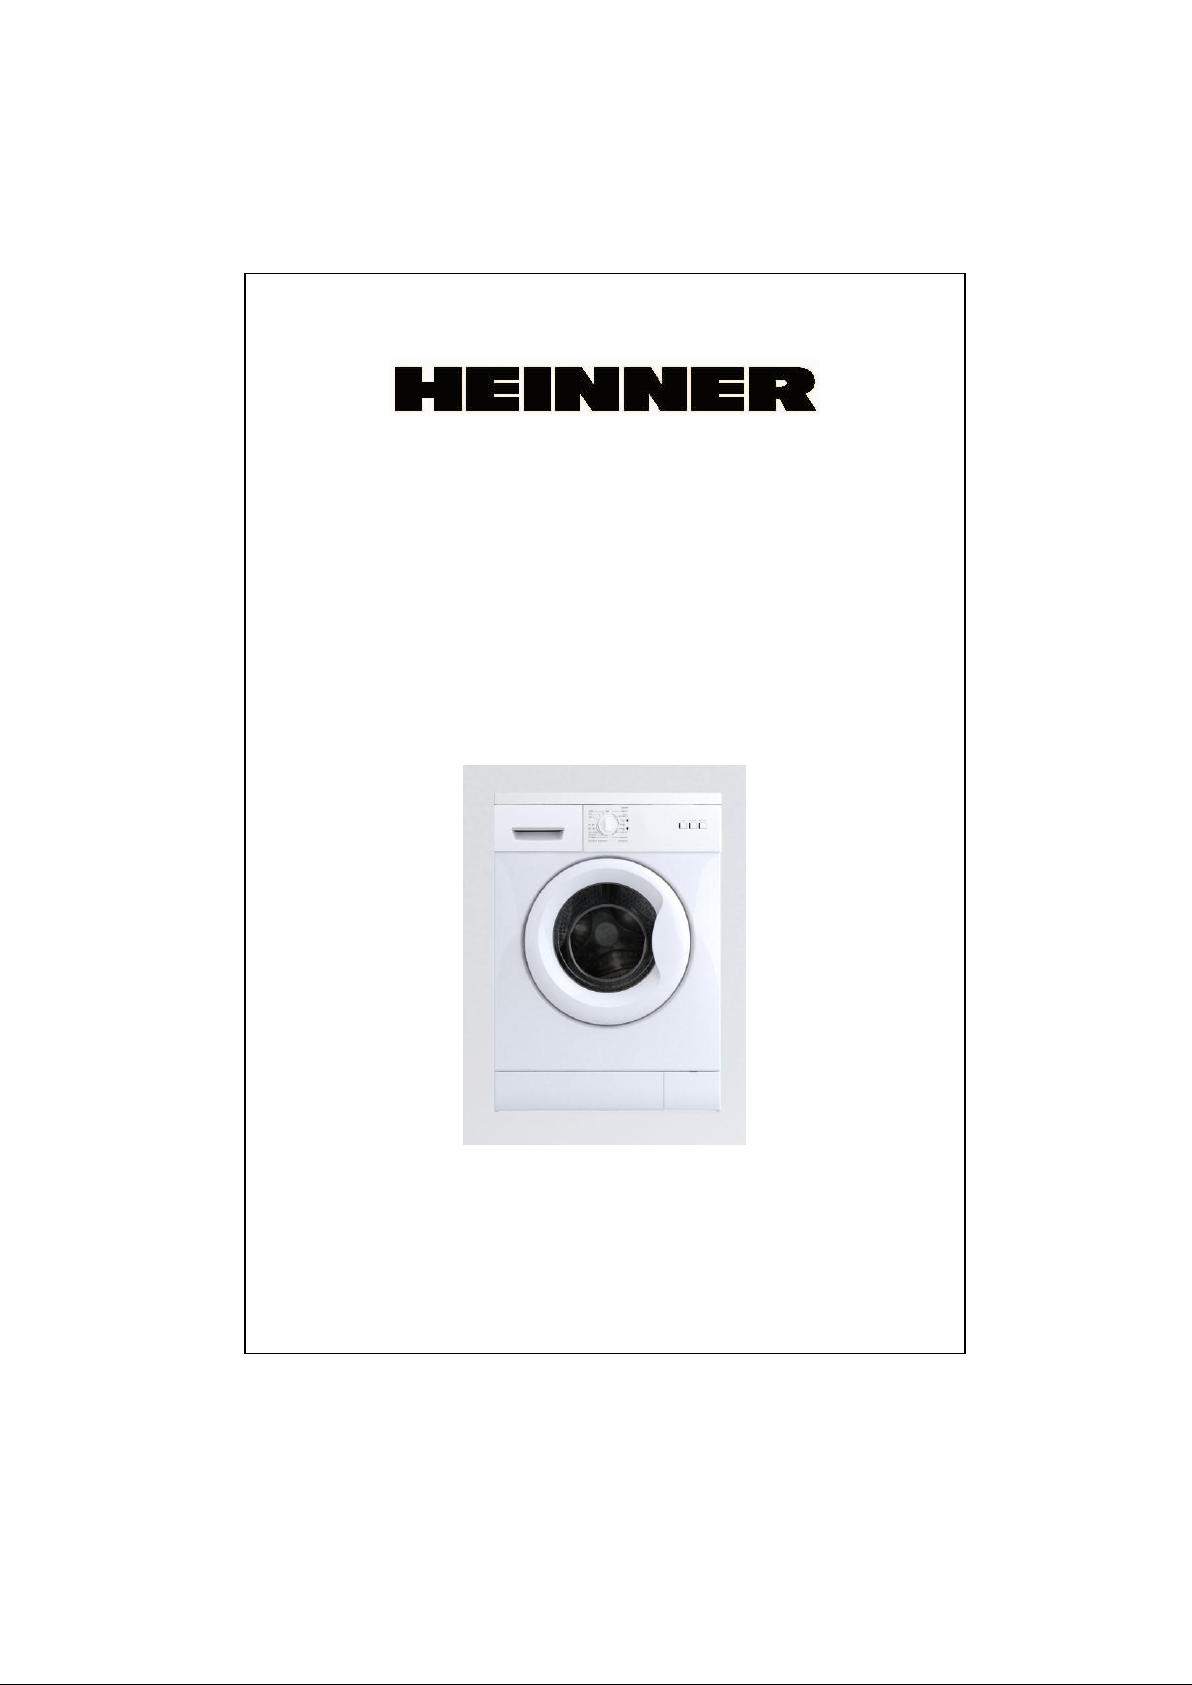
MANUAL DE UTILIZARE
MASINA DE SPALAT
HWM 5100
Alimentare: 220-240V~50Hz
Va rugam sa cititi cu atentie manualul inainte de a utiliza aparatul
Page 2

CUPRINS
SECTIUNEA 1: INAINTE DE UTILIZARE
Atentionari de siguranta
Recomandari
SECTIUNEA 2: INSTALARE
Indepartarea suruburilor de la transport
Reglarea picioarelor
Conectarea electrica
Conectarea sistemului de alimentare cu apa
Conectarea sistemului de evacuare a apei
SECTIUNEA 3: SPECIFICATII TEHNICE
SECTIUNEA 4: PANOU DE COMANDA
Buton Start/Pause
Indicatori luminosi
Butoane
Butonul de reglare a temperaturii
Butonul de programe
SECTIUNEA 5: SPALAREA RUFELOR
Inainte de spalare
Operarea masinii de spalat
SECTIUNEA 6: CURATARE SI INTRETINERE
Filtre la intrarea apei
Filtru de pompare
Sertarul pentru detergent
Fisa pentru sifon
Cabinet
Cuva
Prevenirea/ Indepartarea ruginii
SECTIUNEA 7: INFORMATII PRACTICE
SECTIUNEA 8: EVITAREA MICILOR ERORI
SECTIUNEA 9: SISTEMUL DE DETECTARE AUTOMATA A
ERORILOR
SECTIUNEA 10: SIMBOLURI INTERNATIONALE PENTRU
SPALARE
1
Page 3

SECTIUNEA 1:INAINTE DE UTILIZARE
ATENTIONARI DE SIGURANTA
Nu utilizati un trilpu-stecher sau prelungitor.
Nu introduceti stecherul in priza daca cablul prezinta defectiuni.
Daca cablul este defect, trebuie inlocuit de catre producator sau un
centru autorizat, pentru prevenirea accidentelor.
Cand scoateti din priza, trageti de stecher, niciodata de cablu.
Nu introduceti stecherul in priza daca aveti mainile ude.
Nu atingeti masina cu mainile sau picioarele ude.
Nu deschideti compartimentul pentru detergent in timpul functionarii.
Nu incercati sa deschideti cu forta usa masinii in timpul functionarii.
Nu atingeti furtunurile in timpul utilizarii, datorita temperaturii ridicate
care se poate atinge in cursul functionarii masinii.
In caz de eroare sau defectiune, intai scoateti masina din priza si
inchideti robinetul de apa. Nu incercati sa o reparati singuri. Va
rugam adresati-va celui mai apropiat centru de service.
Nu uitati ca ambalajul in care primiti masina de spalat poate fi
periculos pentru copii ; nu le permiteti sa se joace cu acesta.
Nu lasati copiii sa se joace la masina de spalat.
Feriti-va animalele de companie de masina de spalat.
Masina de spalat trebuie utilizata doar de catre adulti, in urma
asimilarii informatiilor din acest manual.
Masina de spalat este destinata exclusiv uzului casnic. Pierdeti
garantia daca utilizati acest aparat in scopuri comerciale.
Aparatul electrocasnic nu trebuie pus pe un covor care poate bloca
ventilatia cu aer pe partea de la baza produsului.
RECOMANDARI
Daca ramane in contact cu aerul pentru mult timp, detergentul sau
balsamul de rufe din compartimentul special se va usca si se va lipi
de sertar. Pentru a evita acest lucru, introduceti detergentul sau
balsamul chiar inainte de utilizarea masinii.
Se recomanda utilizarea programului de pre-spalare numai in cazul
rufelor foarte murdare.
Va rugam sa nu depasiti capacitatea maxima de incarcare cu rufe.
Daca nu folositi masina un timp indelungat, deconectati-o de la priza,
inchideti robinetul de alimentare cu apa si lasati usa cuvei deschisa,
pentru a permite uscarea interioara si a preveni formarea mirosurilor
neplacute.
2
Page 4
Acest aparat nu este destinat utilizarii de catre persoane (inclusiv
copii) cu capacitati fizice, senzoriale sau mintale reduse, sau care nu
au experienta si cunostintele necesare, cu exceptia cazului in care
sunt supravegheate sau instruite de catre persoana responsabila cu
siguranta acestora. Copiii trebuie supravegheati pentru a nu se juca
cu aparatul
Ca o consecinta a procedurilor de control, e posibil sa mai ramana
putina apa in masina. Acest lucru nu constituie un pericol.
SECTIUNEA 2: INSTALARE
Inainte de a folosi masina de spalat, urmariti atent urmatoarele instructiuni:
INDEPARTAREA SURUBURILOR DE LA TRANSPORT
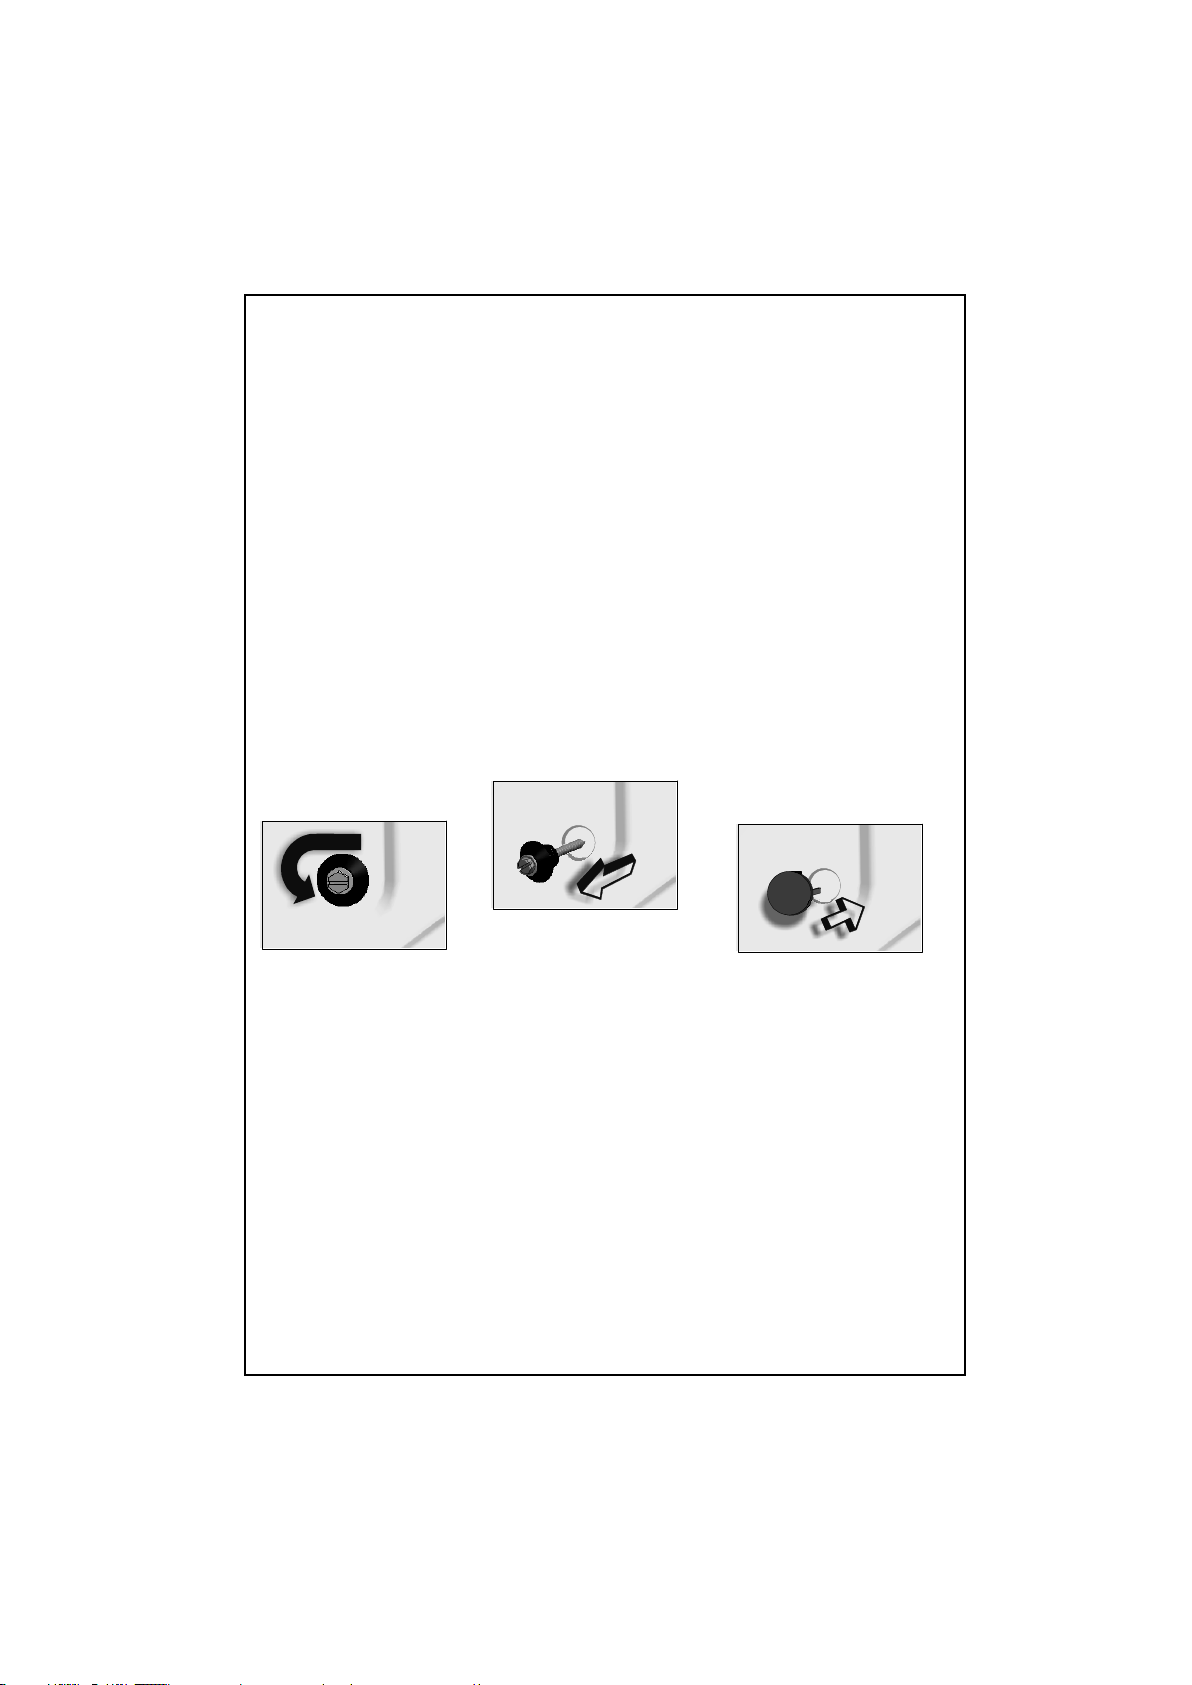
Suruburile de la transport, situate in partea posterioara a masinii,
trebuie indepartate inainte de utilizarea propriu-zisa a masinii de
spalat.
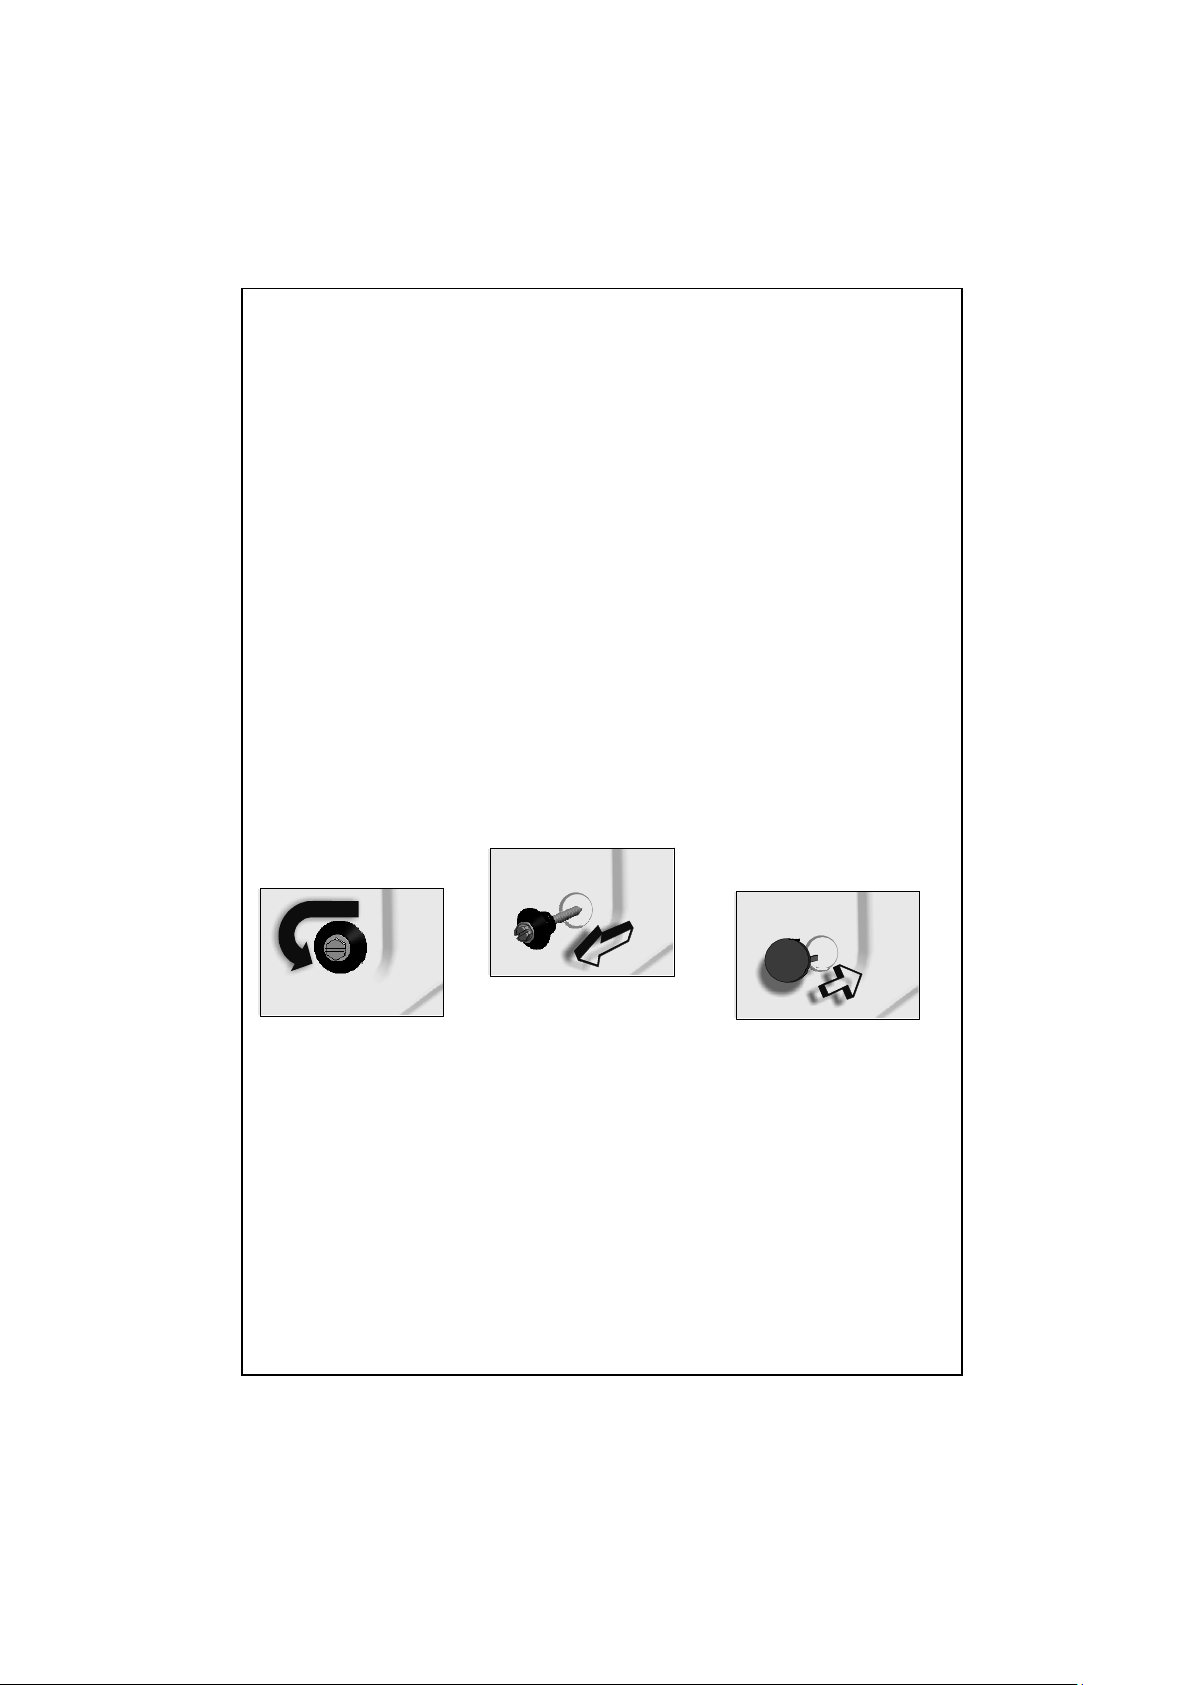
Desfaceti suruburile rotindu-le in sensul invers acelor de ceas, cu o
surubelnita adecvata. (DESEN-1)
Indepartati suruburile prin tragere. (DESEN-2)
In gaurile lasate dupa desfacerea suruburilor, introduceti dopurile de
plastic, pe care le gasiti in geanta cu accesorii. (DESEN-3)
Suruburile de la transport, pe care le-ati indepartat, trebuie pastrate la
indemana, in eventualitatea in care trebuie sa transportati din nou
masina catre o alta locatie.
DESEN-2
DESEN-1 DESEN-3
REGLAREA PICIOARELOR
Nu instalati masina pe covoare, carpete sau suprafete similare.
Pentru ca masina Dvs sa functioneze silentios si sa nu aiba vibratii,
trebuie asezata pe o suprafata orizontala, nealunecoasa si rezistenta.
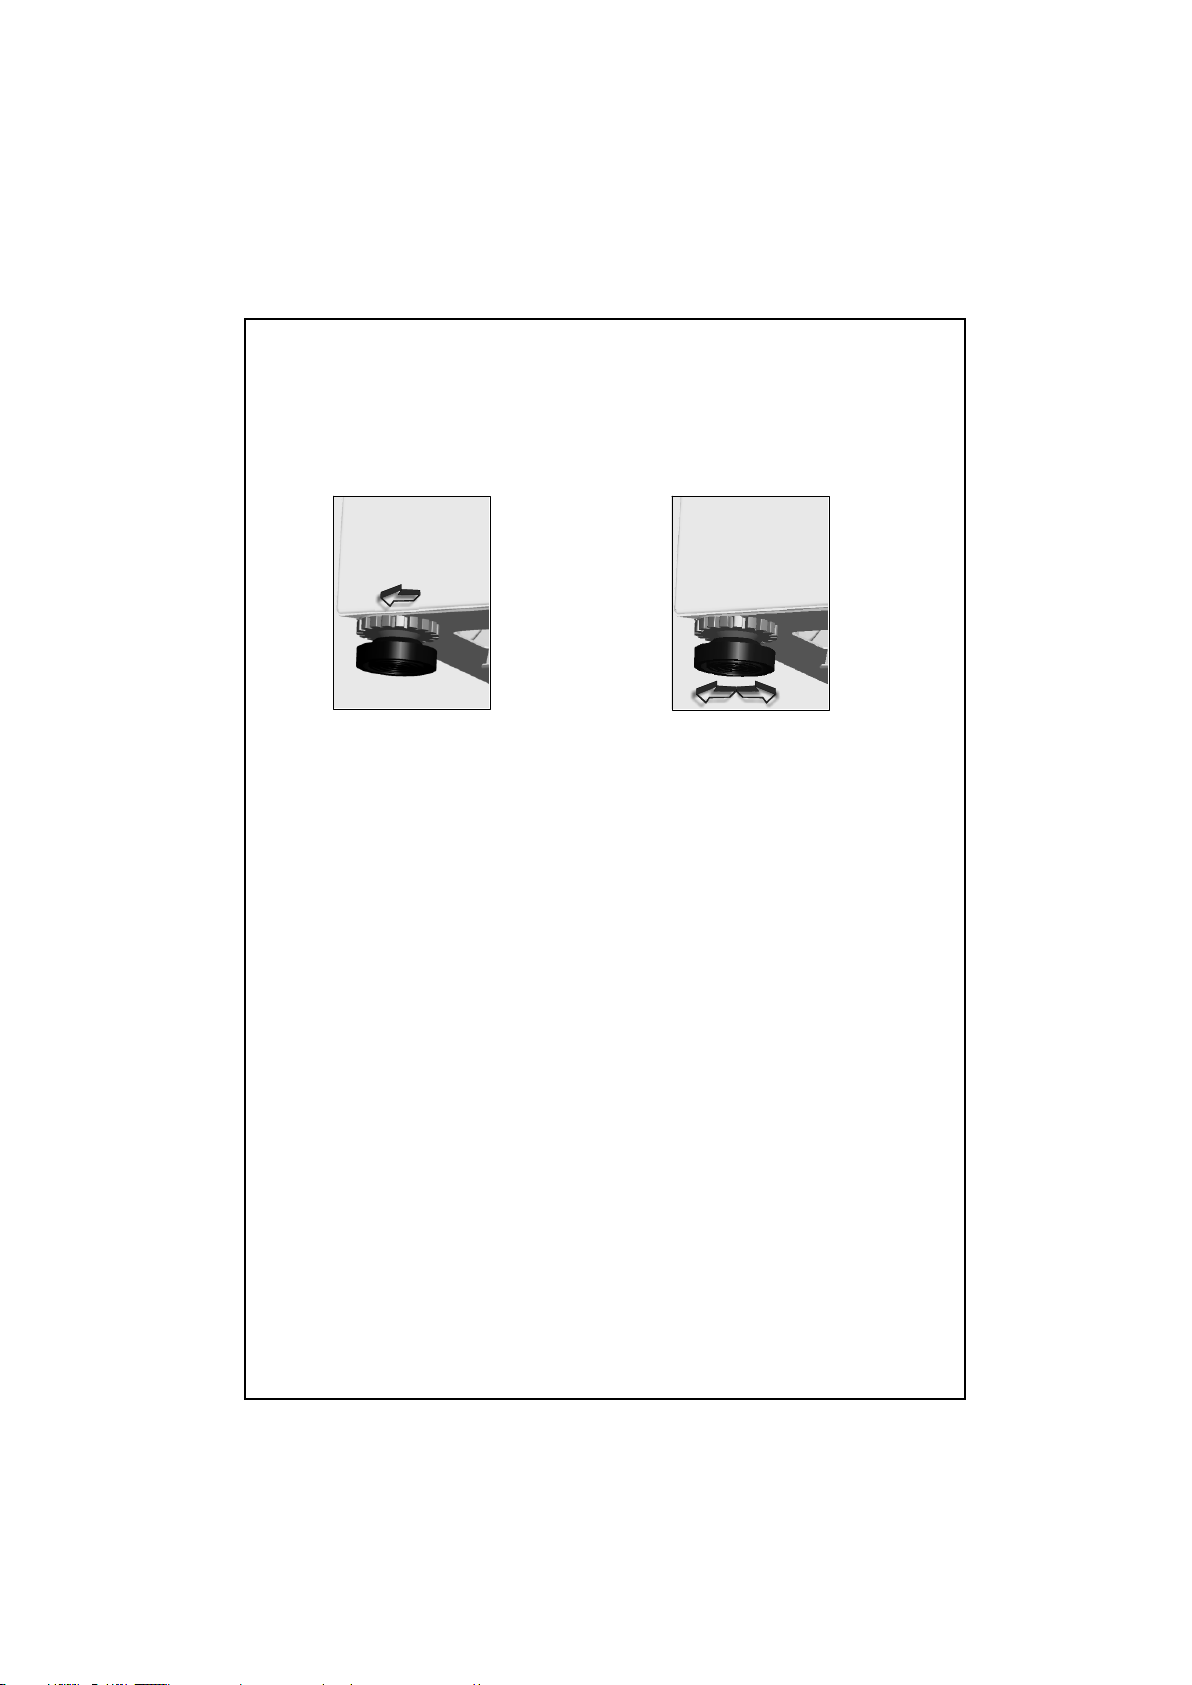
Puteti regla echilibrul in care sta masina, prin reglarea inaltimii
picioarelor.
Mai intai, desurubati capacul de plastic, de reglare.
Reglati inaltimea picioarelor (in sus si in jos).
3
Page 5
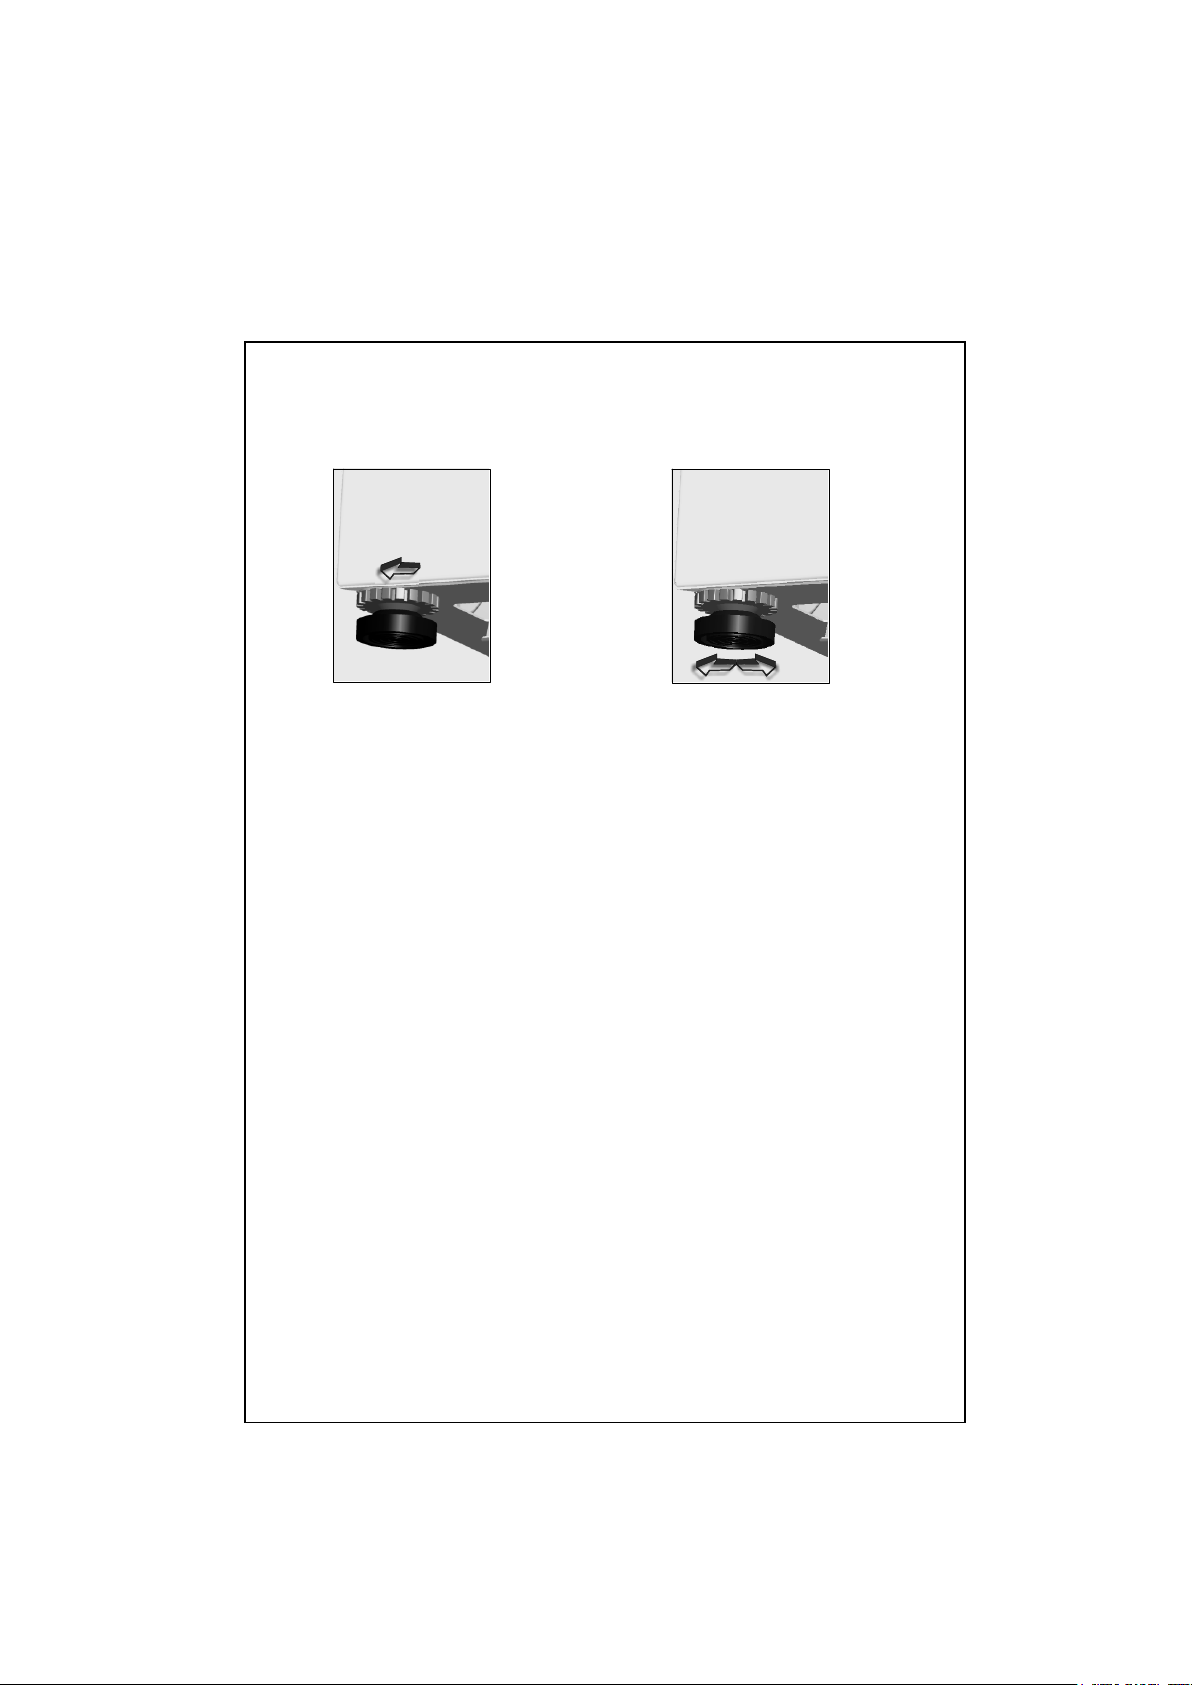
Cand ati reusit sa echilibrati masina, strangeti capacele de plastic,
prin rotire.
Nu asezati sub masina cartoane, bucati de lemn sau materiale
similare pentru a regla pozitia masinii, fata de neregularitatile
suprafetei pe care sta.
CONECTAREA ELECTRICA
Masina Dvs de spalat functioneaza la 220-240 V si 50 Hz.
Un stecher special cu impamantare a fost atasat la cablul masinii dvs
de spalat. Acest stecher trebuie conectat neaparat la o priza cu
impamantare cu 10 Amperi. Valoarea fluxului sigurantei de la linia
electrica la care este atasata priza trebuie sa aiba tot 10 Amperi.
Daca nu aveti astfel de prize si sigurante in casa Dvs, apelati la un
electrician calificat pentru a face aceste modificari.
Compania noastra nu este responsabila pentru defectiunile
aparute drept consecinta a utilizarii masinii de spalat fara priza
cu impamantare.
CONECTAREA SISTEMULUI DE ALIMENTARE CU APA
Masina Dvs este prevazuta cu un singur orificiu de intrare, si anume
pentru apa rece.
Pentru a preveni scurgeri de apa la punctele de conectare/ imbinare,
folositi garnitura inclusa in pachetul unde se afla furtunul. (Fixati
garnitura la furtunul de apa, la capatul dinspre robinet).
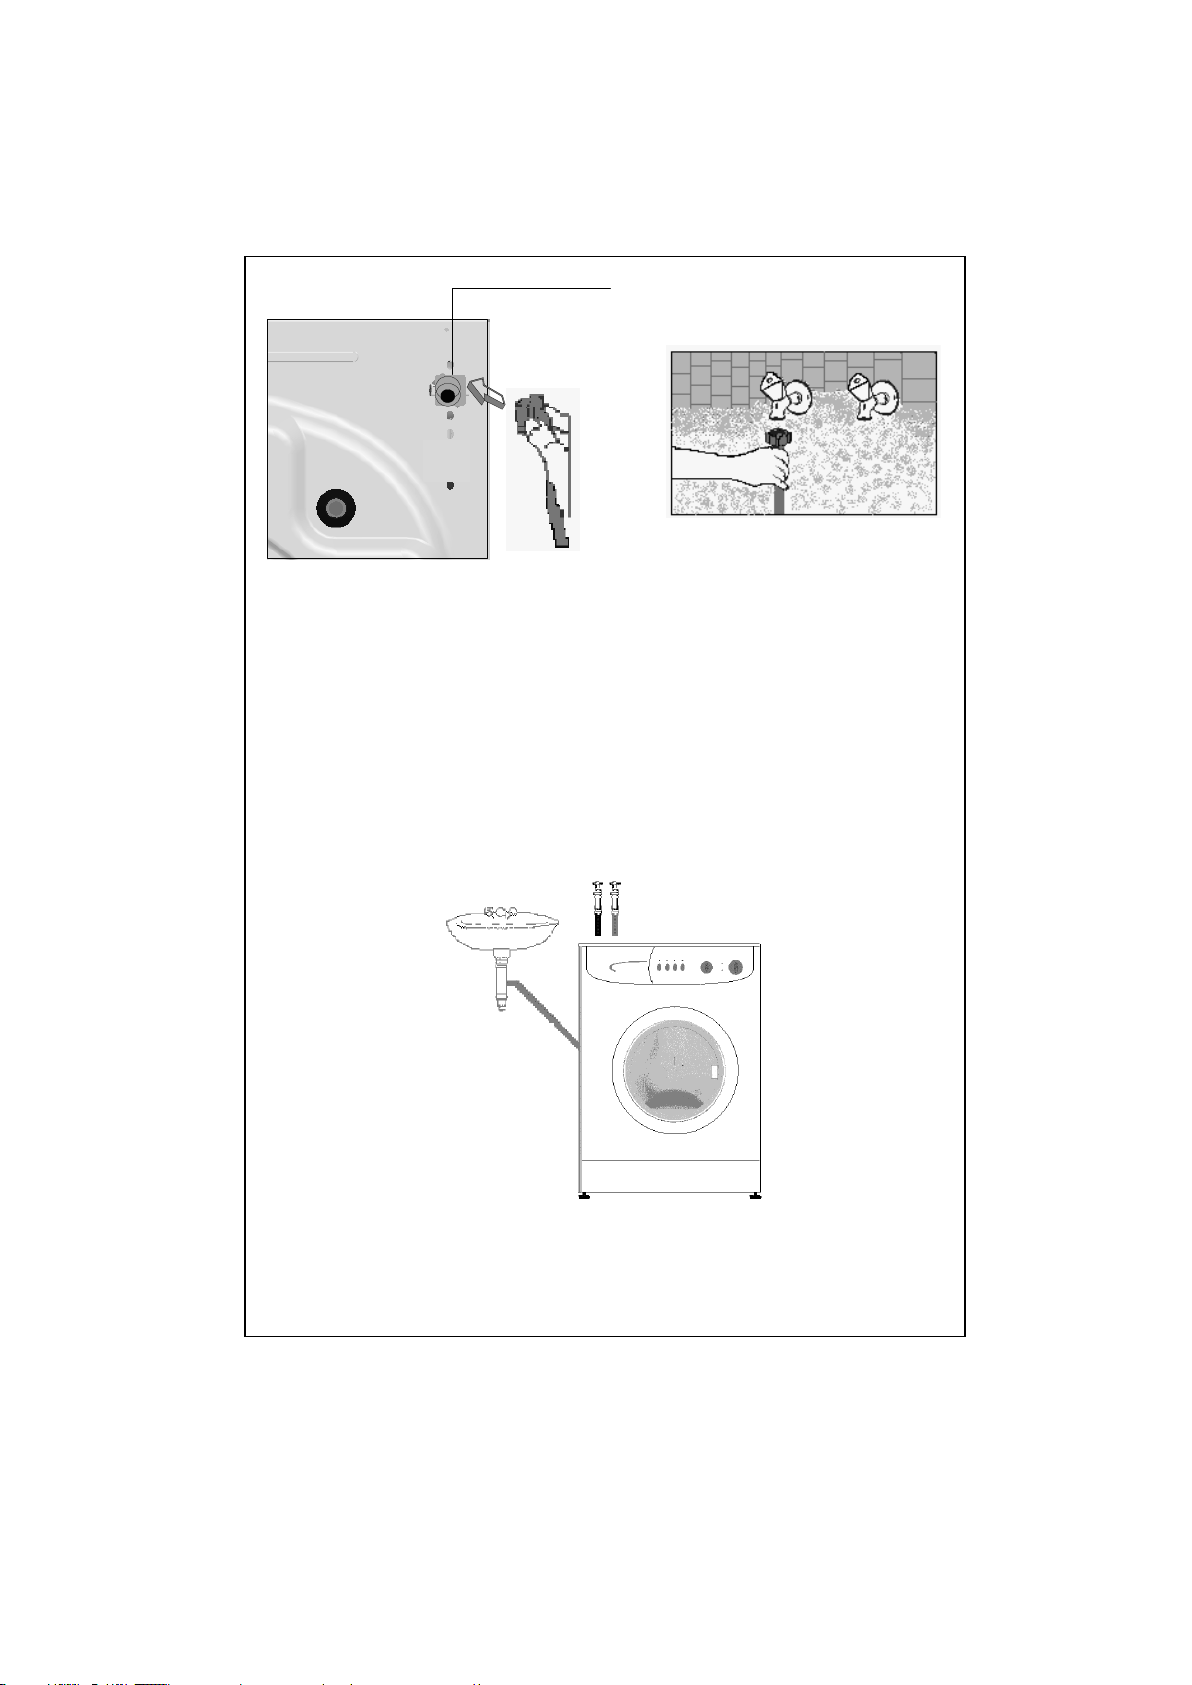
Conectati un capat al furtunului de apa la orificiul de intrare din
spatele masinii, si celalalt capat la robinet. Daca aveti incertitudini
asupra capatului corect, apelati la un instalator profesionist, pentru a
efectua conectarea la sursa de apa in mod corect.
Eficienta masinii sporeste daca apa are o presiune de 0,1-1 Mpa.(0,1
MPa inseamna un debit de 8 litri pe minut, cu robinetul deschis
complet).
Dupa ce terminati conectarile, verificati daca exista scurgeri de apa la
punctele de imbinare, deschizand complet robinetul.
Asigurati-va ca furtunurile de apa nu sunt indoite, sparte sau strivite
de vreun obiect.
Montati furtunurile de apa la un robinet de apa 3”/4.
4
Page 6
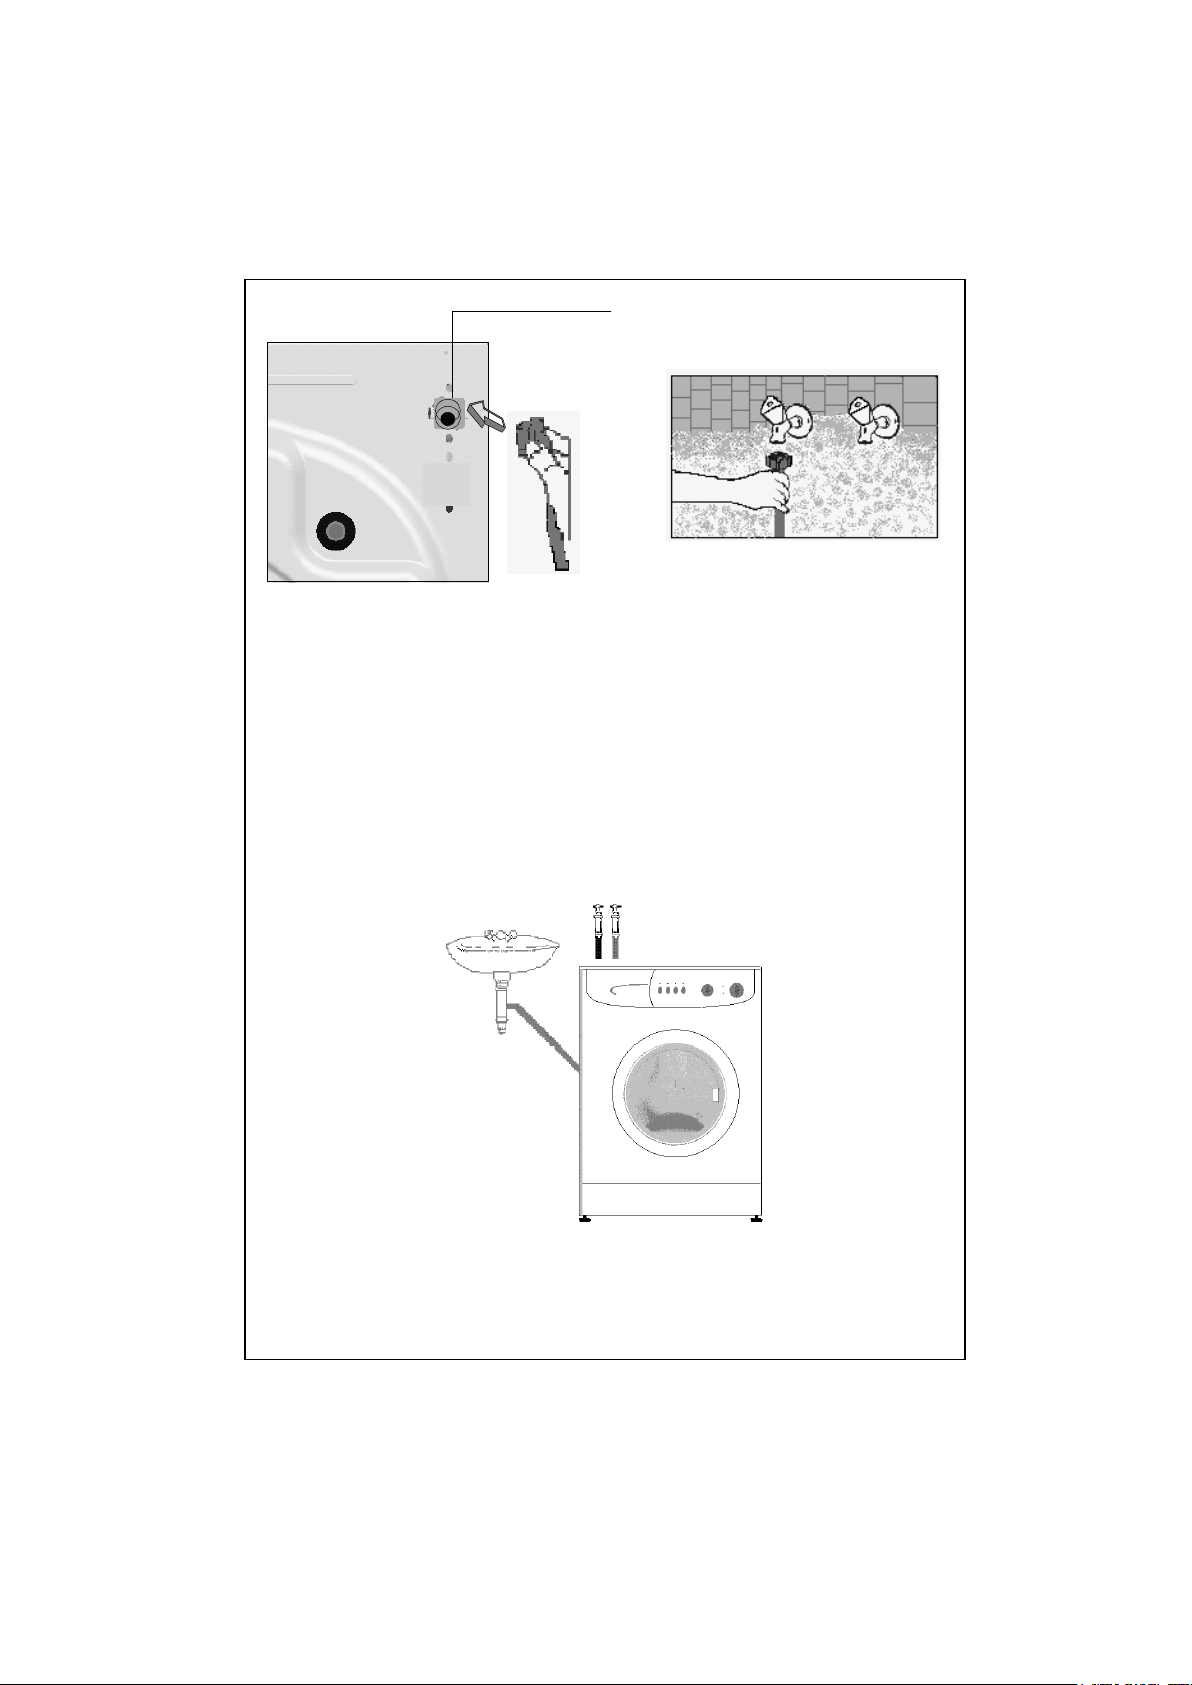
Valva pentru apa rece
CONECTAREA SISTEMULUI DE EVACUARE A APEI
Asigurati-va ca furtunurile de apa nu sunt indoite, intoarse, strivite
sau suprasolicitate prin intindere excesiva.
Furtunul de evacuare trebuie montat la o inaltime de minim 60 cm,
maxim 100 cm fata de sol.
Capatul furtunului de evacuare poate fi orientat direct catre orificiul de
scurgere al apei murdare sau cu ajutorul unui dispozitiv, se poate
monta in sifonul de la chiuveta.
Nu incercati sa prelungiti furtunul de evacuare, adaugand alte
componente aditionale.
5
Page 7
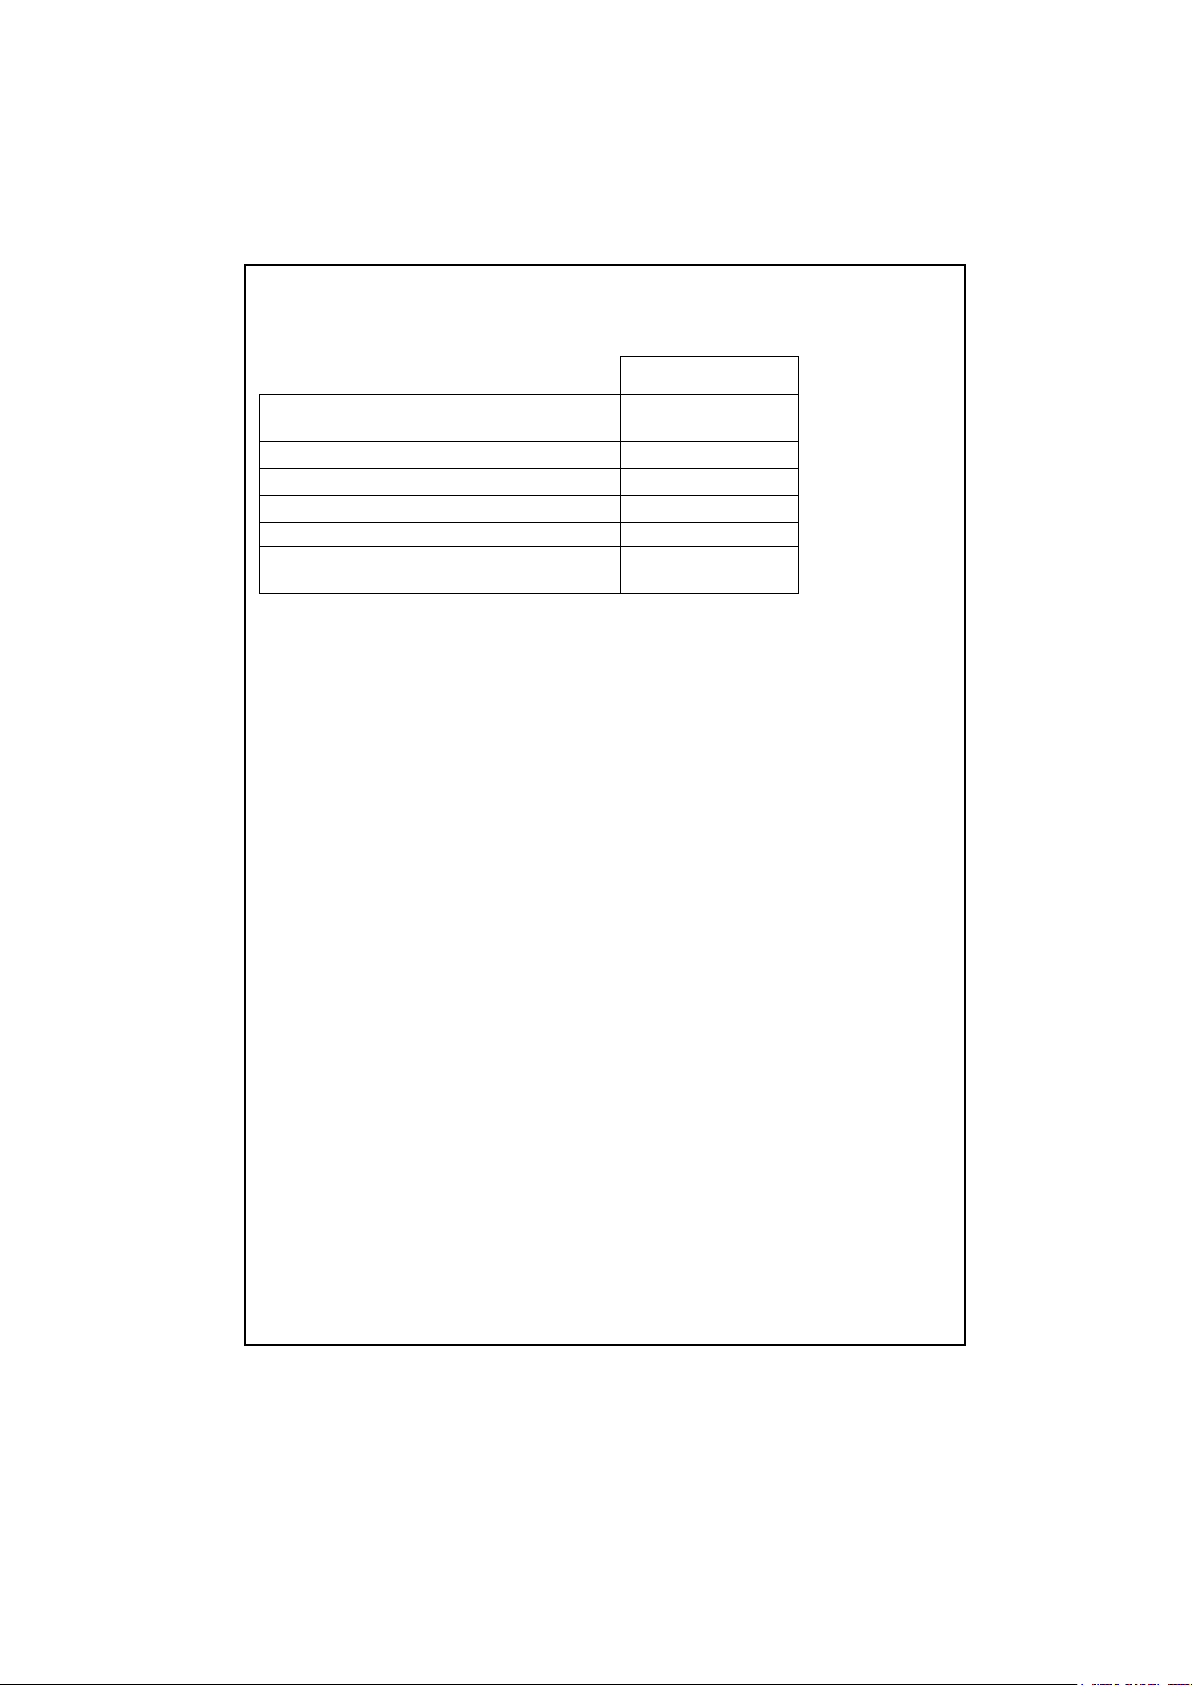
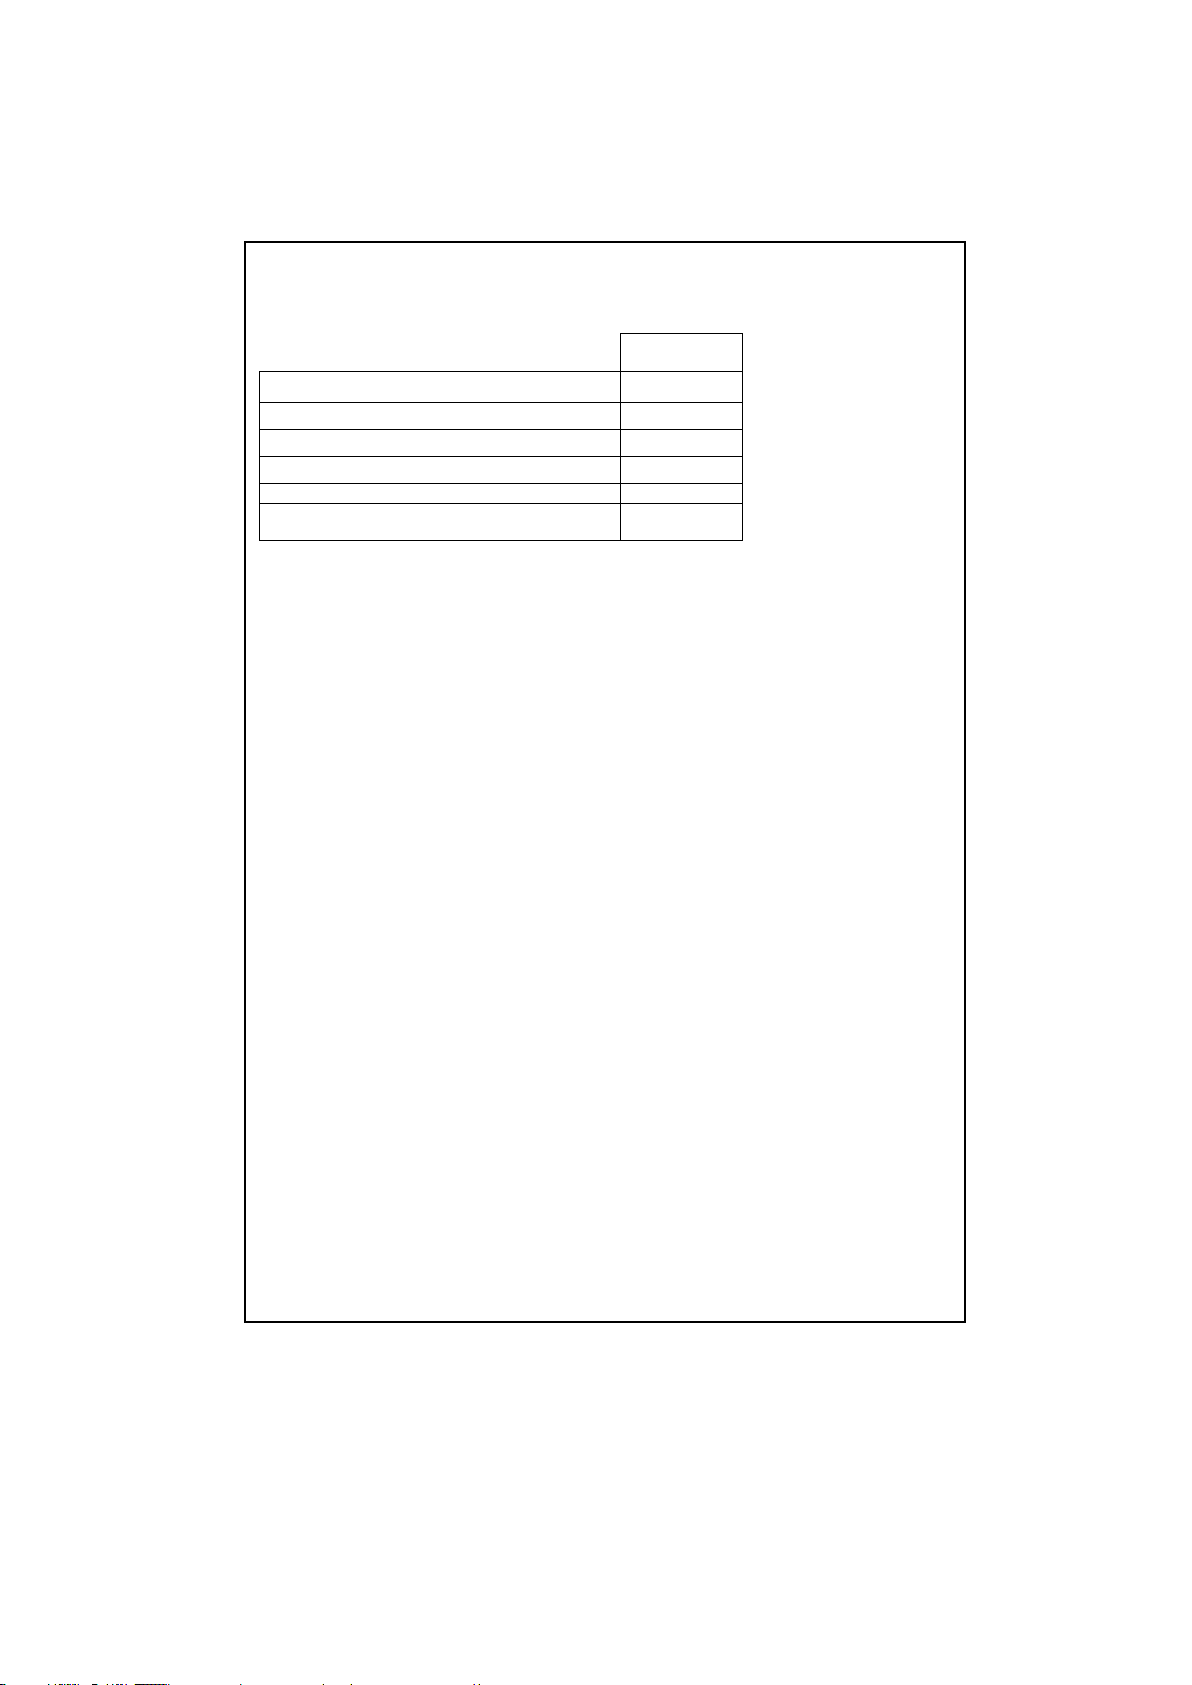
SECTIUNEA 3:SPECIFICATII TEHNICE
442/542/
642/842/1042
Capacitate maxima de rufe uscate
(kg)
5
Cantitate de rufe recomandata (kg)
4,5
Inaltime (cm)
85
Latime (cm)
59,6
Adancime (cm)
51
Ciclu maxim de stoarcere ( rotatii/
min) *
400/500/
600/800/1000
(*) ciclul maxim de stoarcere variaza in functie de modelul ales.
6
Page 8
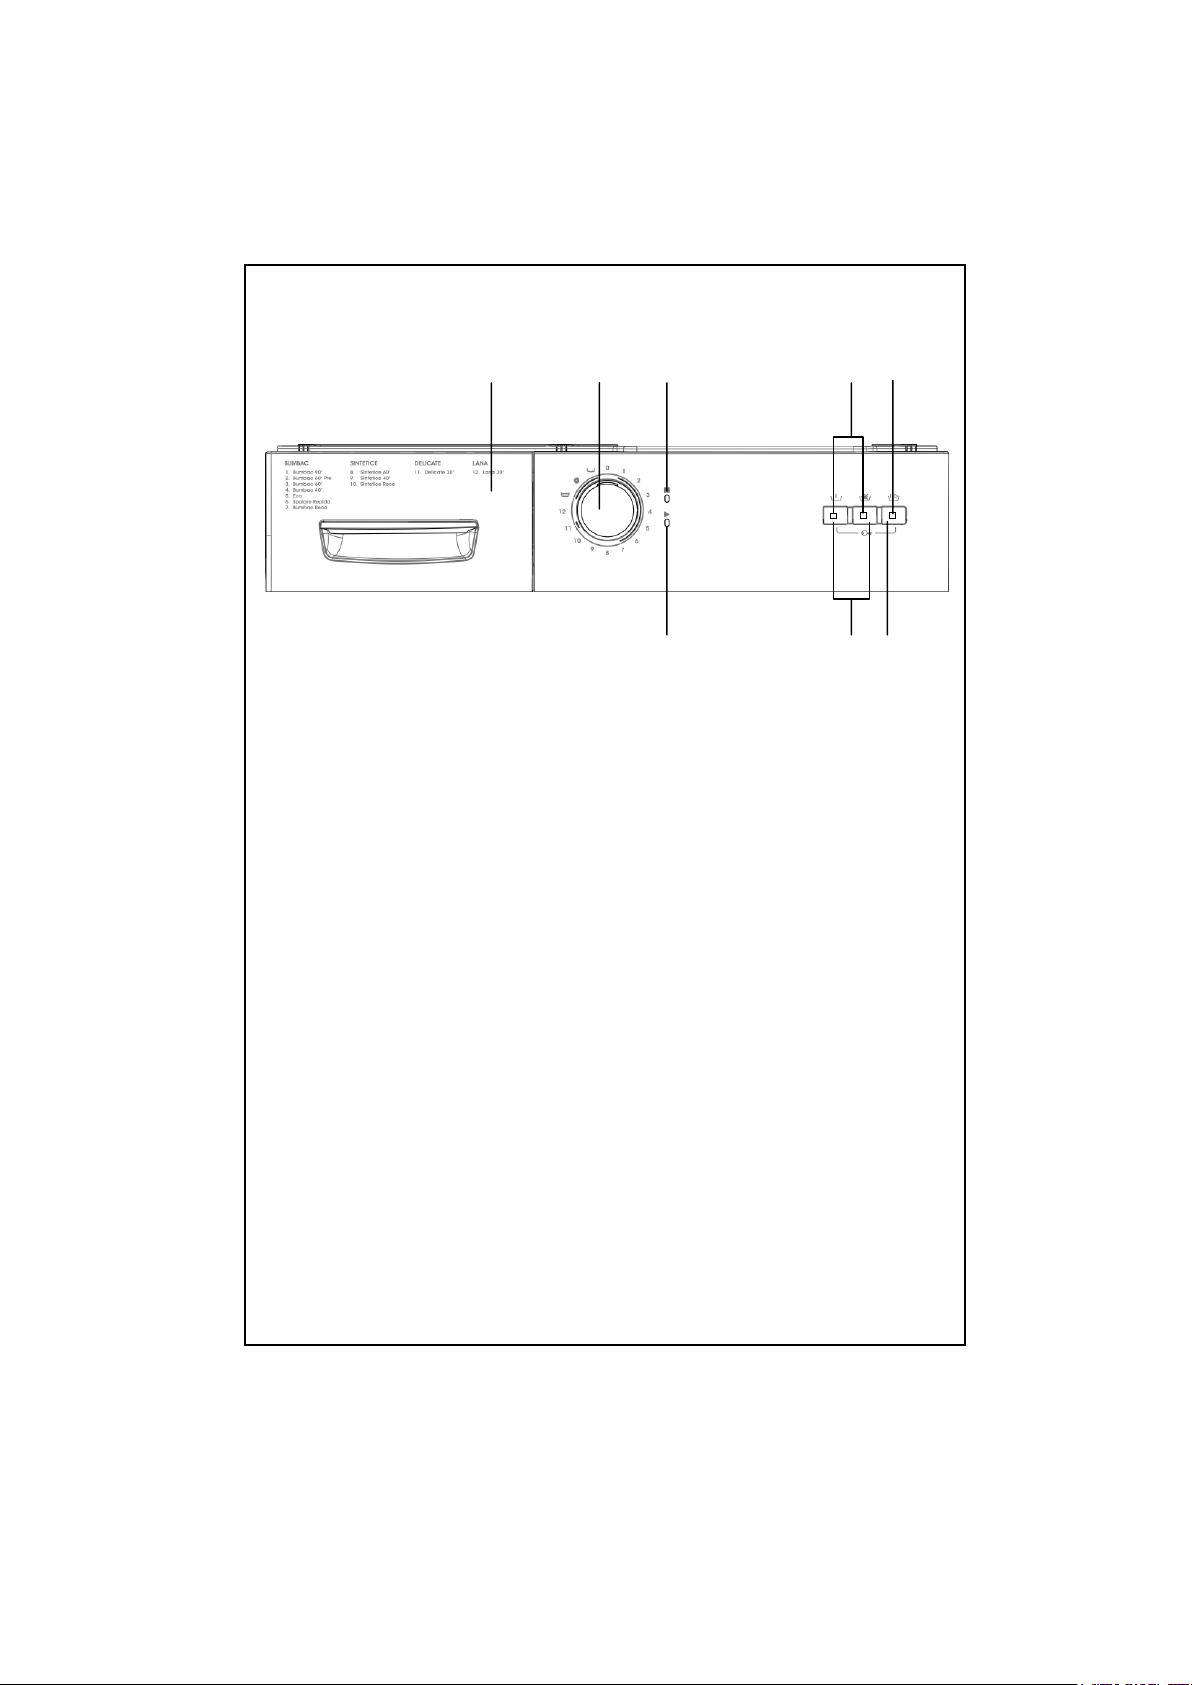
SECTIUNEA 4:PANOUL DE CONTROL
1 2 3 4 5
1 2 3 4 5
6 7 8
1 Compartiment pentru detergent 5 Indicator Start/Pauza
2 Buton programe 6 Indicator Setare program
3 Indicator Sfarsitul programului 7 Butoane pentru diverse functii
4 Indicatori luminosi pentru diverse functii 8 Buton Start/pauza
Produsul nostru are card electronic si butoane digitale.
Pentru a activa o functie, apasati usor butoanele.
7
Page 9
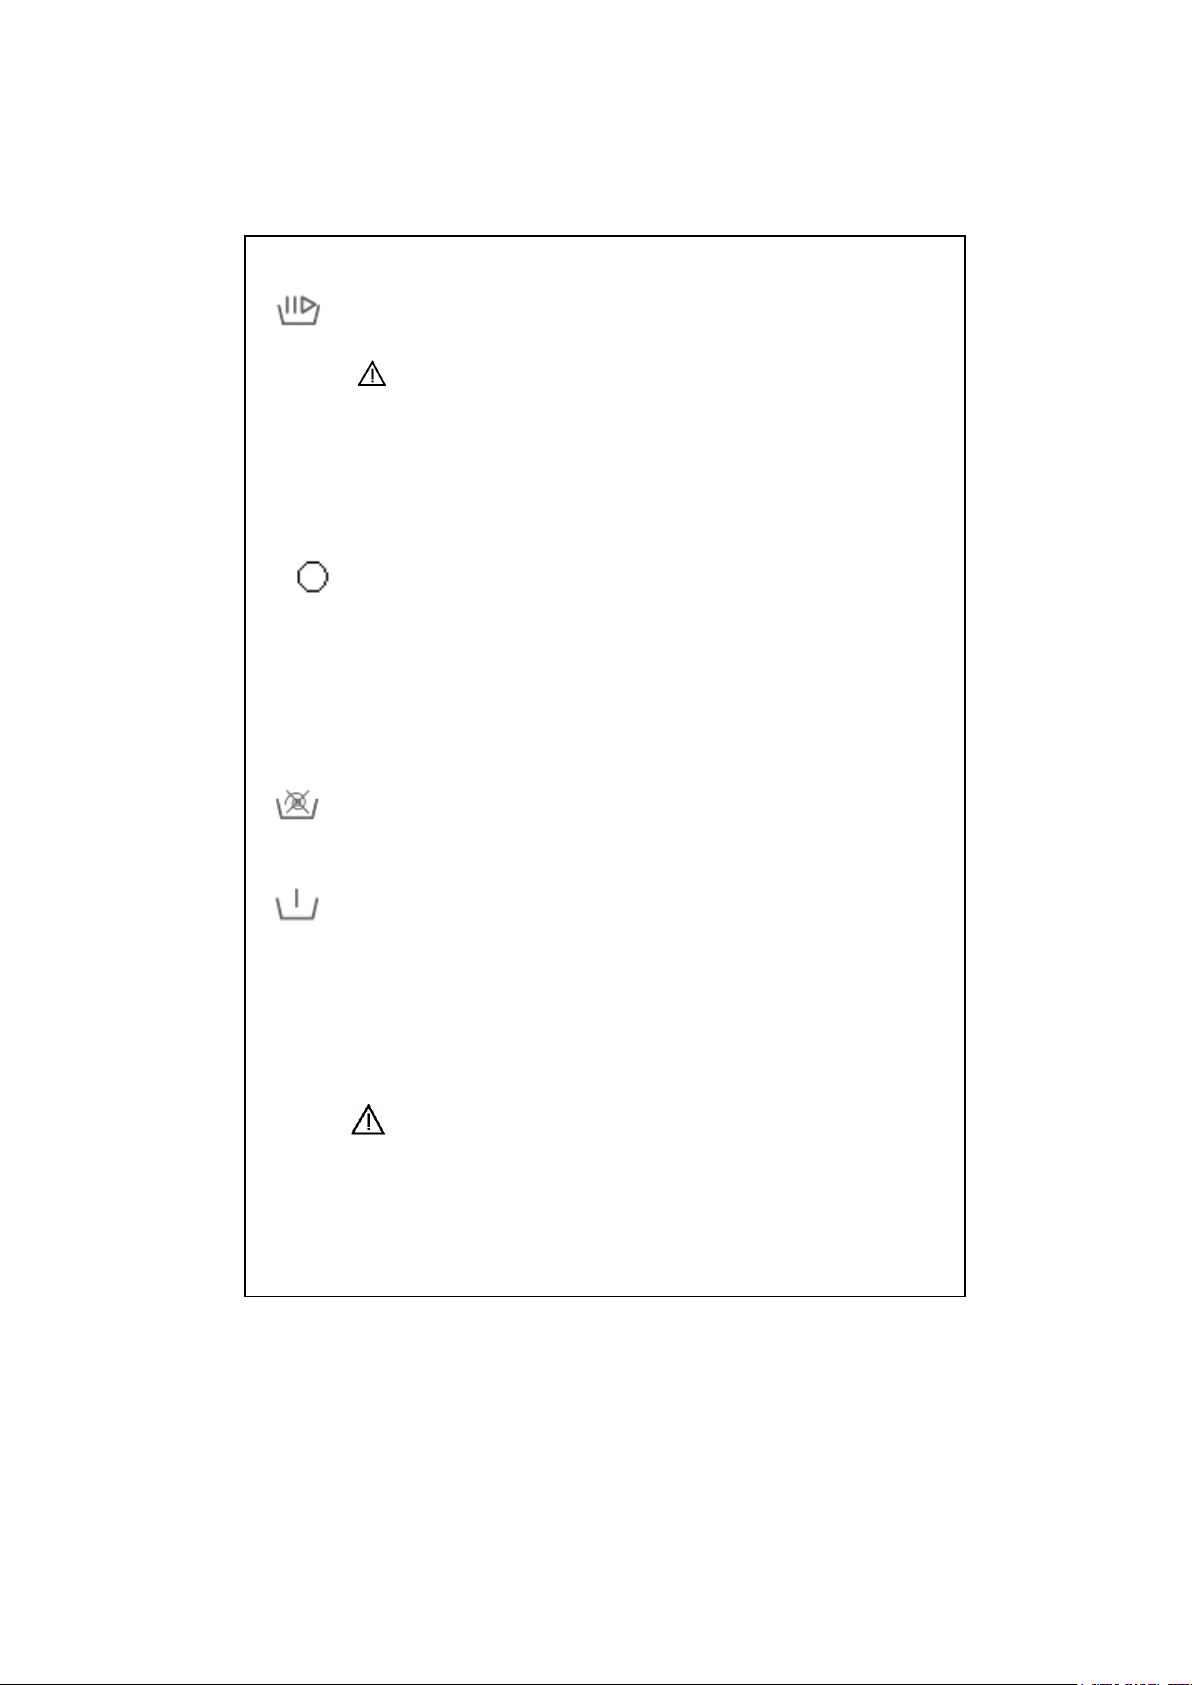
BUTON START/PAUSE
Pentru a porni un program selectat sau a face o pauza pe durata
functionarii.
ATENTIE!
Este necesar ca butonul de programe sa fie in pozitia O (Off/
inchis) inainte de a selecta un program sau de a schimba unul
aflat in derulare.
INDICATORI LUMINOSI
Cand apasati butonul Start/Pause sau orice alt buton, lumina
indicatorului corespunzator se aprinde. Acesta se stinge atunci
cand apasati din nou butonul Start/Pause sau atunci cand
procesul functiei selectate a luat sfarsit.
Indicatorii luminosi pot indica si o defectiune in sistem. Vezi pag. 9
BUTOANE FUNCTII
Fara stoarcere
Acest program este recomandat pentru rufele delicate, care nu ar
trebui stoarse. Apasand acest buton, anulati ciclul de stoarcere,
inclus in programul respectiv.
Prespalare
Cu ajutorul acestei functii puteti activa o operatiune suplimentara
de spalare pentru rufele foarte murdare. Atunci când utilizati
aceasta functie trebuie sa introduceti detergentul in
compartimentul pentru prespalare al sertarului pentru detergent.
Daca functia suplimentara a masinii dumneavoastra contine
aceasta optiune si veti spala rufele intr-un program de prespalare,
indicatorul de deasupra butonului functiei se va aprinde automat.
Chiar daca apasati butonul functiei pentru a anula aceasta
caracteristica, nu va fi anulata la o functie de spalare cu optiune
de prespalare.
ATENTIE!
Functiile variaza in functie de modelul achizitionat. Daca ati uitat
sa folositi functii suplimentare si masina incepe ciclul de spalare,
apasati butonul pentru funtii suplimentare, daca indicatorul
acestuia este aprins. Functiile suplimentare se vor activa. Daca
indicatorul nu este aprins, functiile suplimentare nu vor fi activate.
8
Page 10
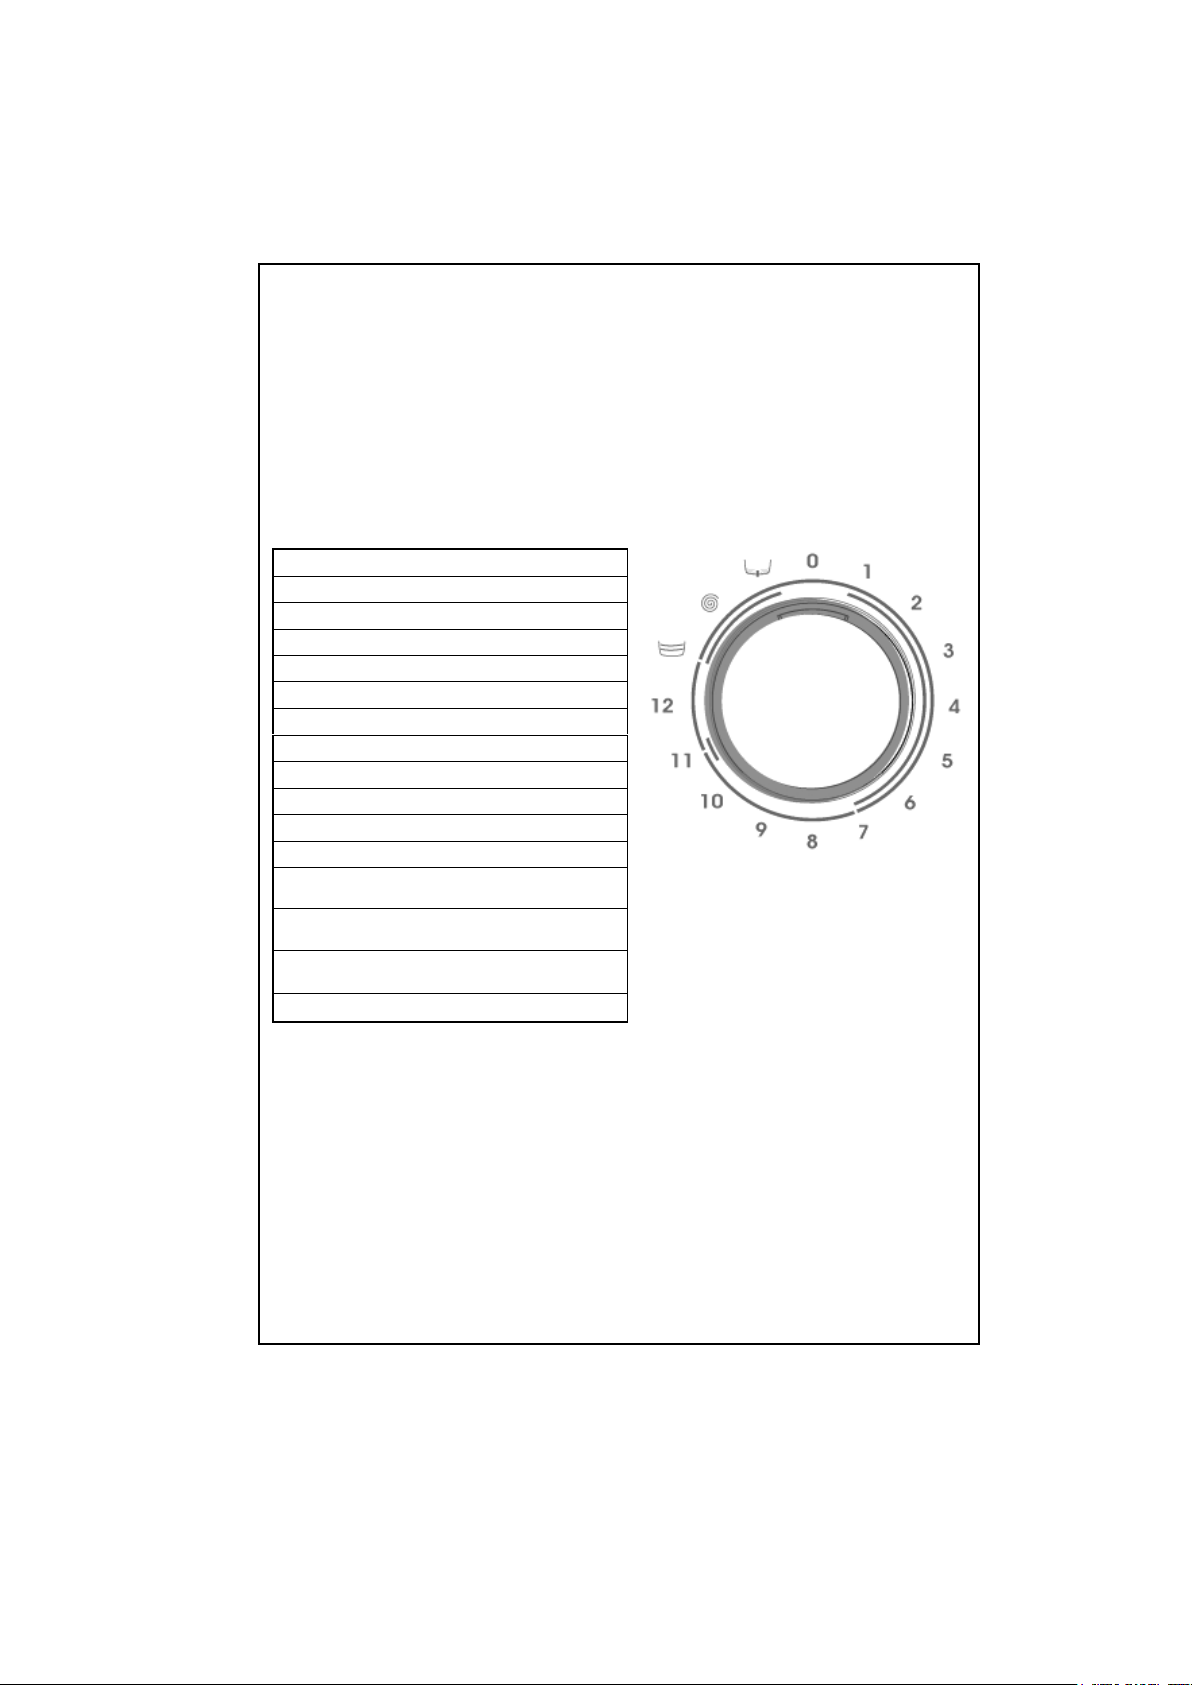
BUTONUL DE PROGRAME
Cu acest buton, puteti selecta programul cu care doriti sa spalati rufele. Puteti
roti butonul in ambele directii. Trebuie sa fiti atenti la faptul ca semnul de
setare de pe butonul de programe trebuie sa se afle exact in dreptul
programului pe care doriti sa il selectati. Daca rotiti butonul in dreptul
semnului O (Off/ Inchis) in timp ce masina functioneaza, programul selectat
de Dvs va ramane incomplet.
1-Bumbac 90°C
2-Bumbac 60°C cu prespalare
3-Bumbac 60°C
4-Bumbac 40°C
5-Spalare ecologica
6-Spalare rapida
7-Bumbac – apa rece
8-Sintetice 60°C
9-Sintetice 40°C
10-Sintetice –apa rece
11-Delicate 30°C
12-Lana 30°C
Clatire
Stoarcere
Evacuare
OFF/ Inchis
9
Page 11

SECTIUNEA 5: SPALAREA RUFELOR
Conectati masina la priza.
Deschideti robinetul de apa.
Prima spalare
In urma testelor efectuate pe linia de productie, in fabrica, este posibil sa mai
fi ramas o mica cantitate de apa in interiorul masinii Dvs de spalat. Se
recomanda ca prima spalare sa se efectueze fara rufe inauntru, pentru ca
aceasta apa sa poata fi evacuata. Turnati o jumatate de masura de detregent
universal in compartimentul 2 si selectati programul pentru Bumbac, la 90°C.
INAINTE DE SPALARE
Sortarea rufelor
Sortati rufele in functie de: material (bumbac, sintetice, fibre delicate,
lana, etc), temperatura recomandata pentru spalare (pe eticheta) si
gradul de murdarie.
Nu spalati niciodata rufele albe impreuna cu cele colorate.
Hainele noi, colorate, e posibil sa se decoloreze la prima spalare, asa
ca e recomandabil sa le spalati separat.
Asigurati-va ca nu exista obiecte metalice in buzunarele hainelor Dvs.
Inchideti fermoarele si nasturii hainelor.
Indepartati carligele de plastic sau metal de la perdele/ draperii sau
introduceti-le intr-o plasa speciala pentru spalat si legati bine.
10
Page 12

Intoarceti pe dos hainele cum sunt: pantaloni, tricouri, maiouri.
Rufele de dimensiuni mici, cum sunt sosetele si batistele, ar trebui
introduse intr-o plasa speciala pentru spalare.
Maxim 90 ˚C Maxim 60 ˚C Maxim 30 ˚C Nu se spala
in masina de spalat
Introducerea rufelor in masina
Deschideti usa masinii de spalat.
Asezati rufele in cuva, prin imprastiere.
Introduceti fiecare rufa, pe rand.
Cand inchideti usa masinii de spalat, asigurati-va ca nu s-a prins vreo
rufa in usa.
Inchideti usa masinii de spalat si asigurati-va ca ati inchis-o bine; in
caz contrar, masina nu va incepe sa functioneze.
Introducerea detergentului
Cantitatea de detergent pe care o introduceti in masina depinde de
urmatoarele criterii:
Consumul de detergent se modifica in functie de gradul de murdarie
al rufelor. Pentru rufele usor murdare, nu efectuati prespalare si
puneti o cantitate mica de detergent in compartimentul 2 al
sertarului.
Pentru rufele foarte murdare, selectati un program care include si
prespalare, umpleti ¼ din detergent in compartimentul 1, si restul
turnati-l in compartimentul 2 al sertarului.
In masina de spalat, folositi numai detergenti special destinati
masinilor automate. Cantitatile de detergent recomandate pentru
rufe sunt inscrise pe ambalajul detergentilor respectivi.
Consumul de detergent creste direct proportional cu gradul de
duritate al apei.
Consumul de detergent creste direct proportional cu cantitatea de
rufe introdusa in masina.
Turnati balsamul de rufe in compartimentul special destinat din
sertarul pentru detergent. NU depasiti nivelul MAX; altfel, balsamul
se va raspandi in apa de spalat prin sifon.
Balsamurile de rufe cu densitate mare trebuie diluate cu putina apa
inainte de a fi turnate in masina de spalat, deoarece obstructioneaza sifonul si se pierde in apa de spalat.
11
Page 13

Puteti folosi detegenti lichizi la toate programele fara prespalare.
Turnati detergentul lichid in compartimentul 2 ; cantitatea acestuia
depinde de recomandarile de pe ambalaj.
OPERAREA MASINII DE SPALAT
Selectarea programelor si caracteristicile acestora
Selectati programul si functiile suplimentare, in corespondenta cu rufele pe
care doriti sa le spalati, conform Tabel- 1.
Start/Pause
Apasand acest buton, porniti programul pe care l-ati selectat sau il intrerupeti
pe cel aflat in derulare.
Pornirea unui program
Reglati butonul de programe pentru a selecta programul dorit.
Indicatorul Setare program se va aprinde.
Daca doriti, puteti selecta si una sau mai multe functii suplimentare.
Porniti programul pe care l-ati selectat, apasand butonul Start/Pause.
Schimbarea unui program
Daca ati selectat un program si nu vreti sa il continuati:
Apasati butonul Start/Pause.
Rotiti butonul de programe pana la pozitia O (off/ inchis).
Rotiti butonul de programe pana in dreptul programului pe care il
doriti. (consultati si Tabelul-1 pentru selectarea programului).
Indicatorul Setare program se va aprinde.
Apasati butonul Start/Pause button, si programul nou selectat va
incepe sa se deruleze.
Anularea unui program
Daca doriti sa terminati un program inainte de a ajunge la final:
Apasati butonul Start/Pause.
Rotiti butonul de programe pana la pozitia O (off/ inchis).
Rotiti butonul de programe la “Evacuare” sau “Stoarcere”
Indicatorul Setare program se va aprinde.
Porniti programul selectat prin apasarea butonului Start/Pause.
Terminarea programului
Masina de spalat se va opri automat atunci cand programul selectat
de Dvs ajunge la final.
Indicatorul Sfarsitul programului se va aprinde.
Rotiti butonul de programe pana la pozitia O (off/ inchis).
12
Page 14

Usa se va debloca in cca 2 minute dupa terminarea programului.
Deschideti usa, tragand manerul acesteia spre Dvs si scoateti rufele
din cuva.
Dupa ce scoateti toate rufele, lasati usa cuvei deschisa, pentru ca
interiorul acesteia sa se usuce bine.
Deconectati masina de spalat de la priza.
Inchideti robinetul de apa.
ATENTIE!
Daca in timpul derularii unui program, alimentarea cu energie electrica se
intrerupe in mod repetat, masina de spalat isi va continua programul de la
etapa unde a fost intrerupta. Acest lucru nu dauneaza masinii de spalat.
Functia Interzis copii
Optiunea de blocare pentru copii e folosita pentru a proteja ciclul de spalare
de efectele atingerii nedorite a butoanelor in timpul ciclului. Optiunea de
blocare pentru copii se activeaza apasând primul si cel de-al treilea buton de
pe panoul de control timp de mai mult de trei secunde. Cand optiunea de
blocare pentru copii e activata, LED-urile de pe butoanele de functii clipesc
pentru a indica faptul ca optiunea de blocare pentru copii e activa. Pentru a
dezactiva optiunea, aceleasi butoane (primul si al treilea) ar trebui apasate
din nou mai mult de trei secunde. Dezactivarea optiunii e afisata prin clipirea
LED-ului pe butonul de Pornire/Pauza.
SECTIUNEA 6: CURATARE SI INTRETINERE
Deconectati masina de la priza.
Inchideti robinetul de apa.
FILTRE LA INTRAREA APEI
La furtunul de alimentare cu apa, la capatul conectat la robinet exista filtre
care impiedica intrarea particulelor de murdarie sau obiectelor straine in apa
care ajung in masina de spalat; la fel, si la orificiile de intrare a apei. Daca
masina nu poate sa isi traga suficienta apa, desi robinetul de apa este
deschis, e necesar sa curatati aceste filtre.
13
Page 15
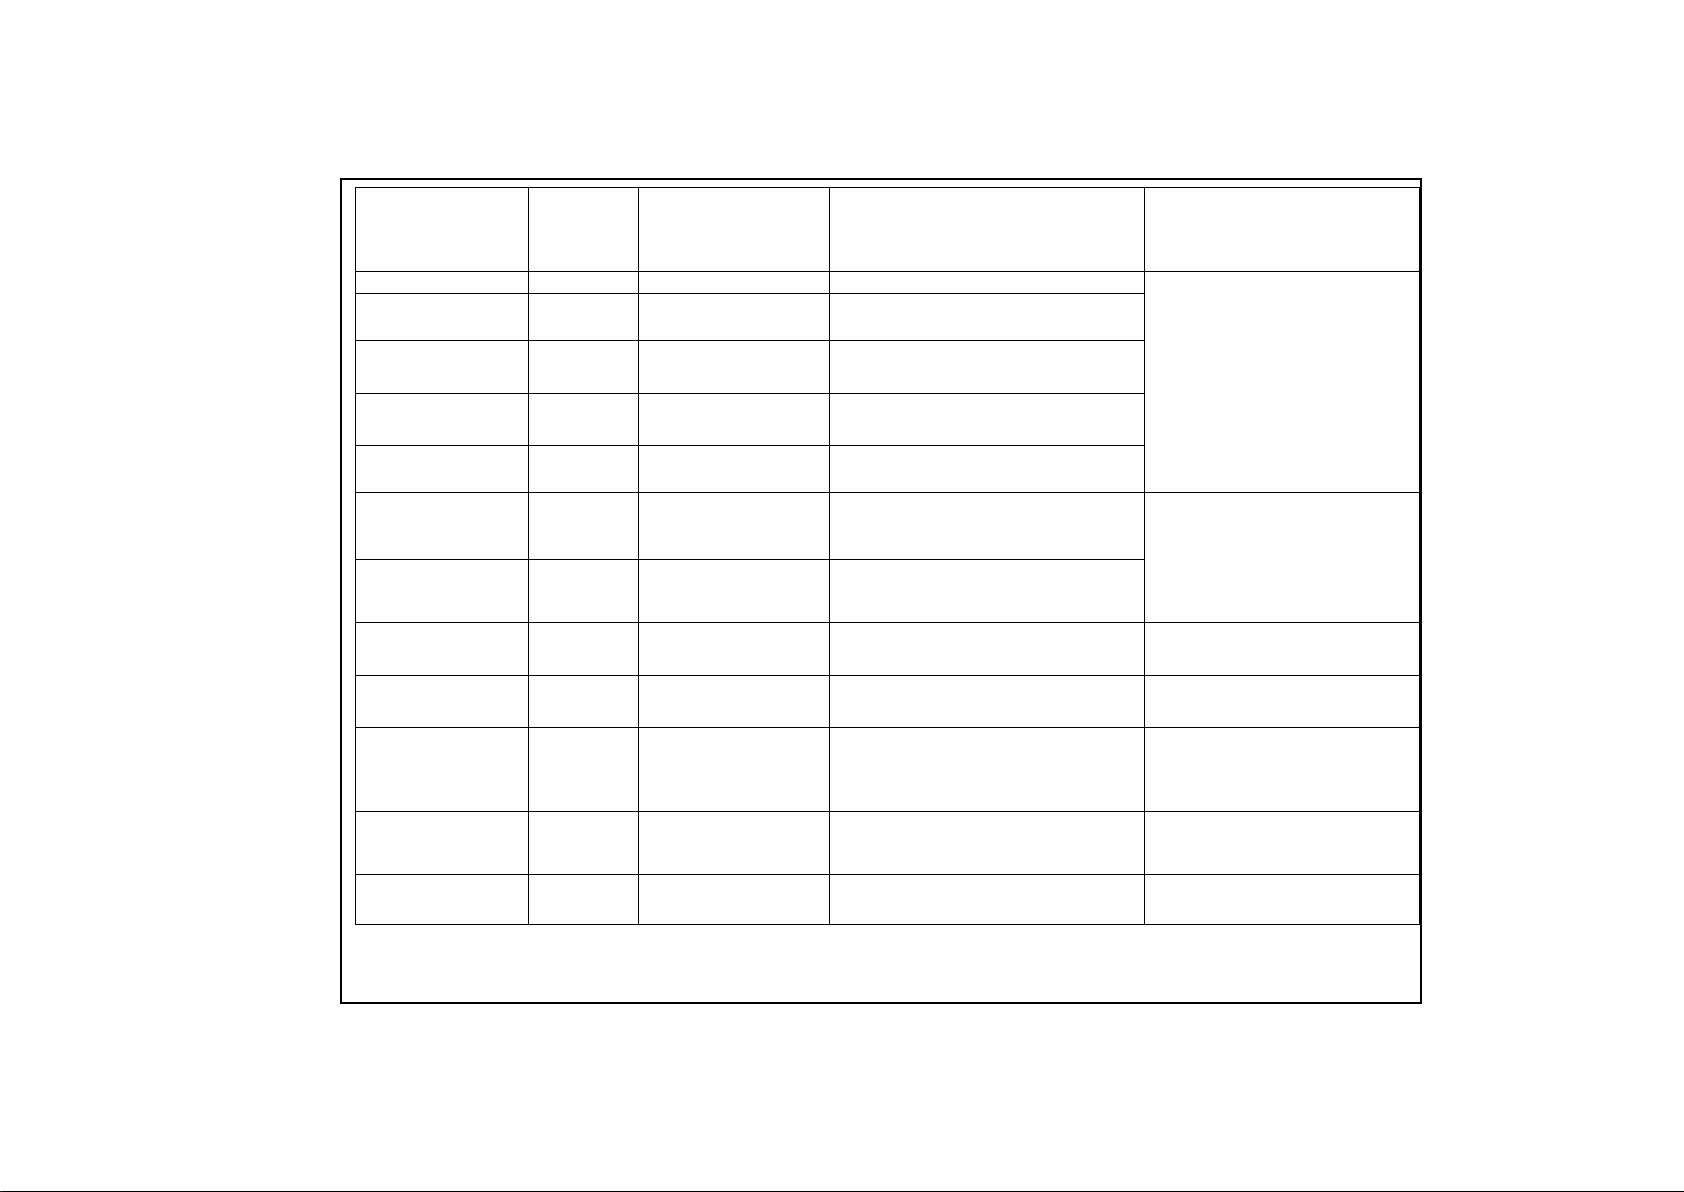
PROGRAM
COMPAR
T.
DETERGE
NT
CAPACITATE
MAXIMA RUFE
USCATE (kg)
TIPURI DE RUFE
EXPLICATII
1-BUMBAC 90˚
2
5
Murdare, tesatura din bumbac sau in
Lenjerie de corp, lenjerie de
pat, fete de masa, tricouri,
camasi, prosoape (max.2,5 kg)
2-BUMBAC 60˚
(PRESPALARE)
1+2
5
Foarte murdare, din bumbac sau in,
colorate
3- BUMBAC 60˚
2
5
Murdare, din bumbac, in si colorate
4-BUMBAC 40˚
2
5
Murdare, din bumbac, in si colorate
5-SPALARE
ECOLOGICA
2
5
Murdare, din bumbac, colorate si in
6-SPALARE
RAPIDA
2
2,5
Putin murdare, din bumbac, colorate
si in
7-BUMBAC APA
RECE
2
5
Putin murdare, din bumbac, colorate
si in. Se spala fara ca masina sa
incalzeasca apa.
8-SINTETICE 60˚
2
3
Murdare, sintetice, sau tesaturi
mixte, cu procent sintetic
Sosete sau bluze de nylon
9-SINTETICE 40˚
2
3
Putin murdare, sintetice, sau tesaturi
mixte, cu procent sintetic
Sosete sau bluze de nylon
10-SINTETICE
APA RECE
2
3
Rufe delicate, putin murdare,
sintetice, sau tesaturi mixte, cu
procent sintetic. Se spala fara
incalzirea apei.
Sosete sau bluze de nylon
11-DELICATE 30˚
2
2
Rufe delicate, putin murdare, din
bumbac, colorate, sintetice sau
procent sintetic
Tesaturi mixte de matase,
camasi, bluze, polyester,
poliamida, tesaturi mixte.
12-LANA 30˚ 2 2
Rufe de lana murdare, care se pot
spala si manual, si la masina
Toate tesaturile de lana
TABEL-1
14
Page 16
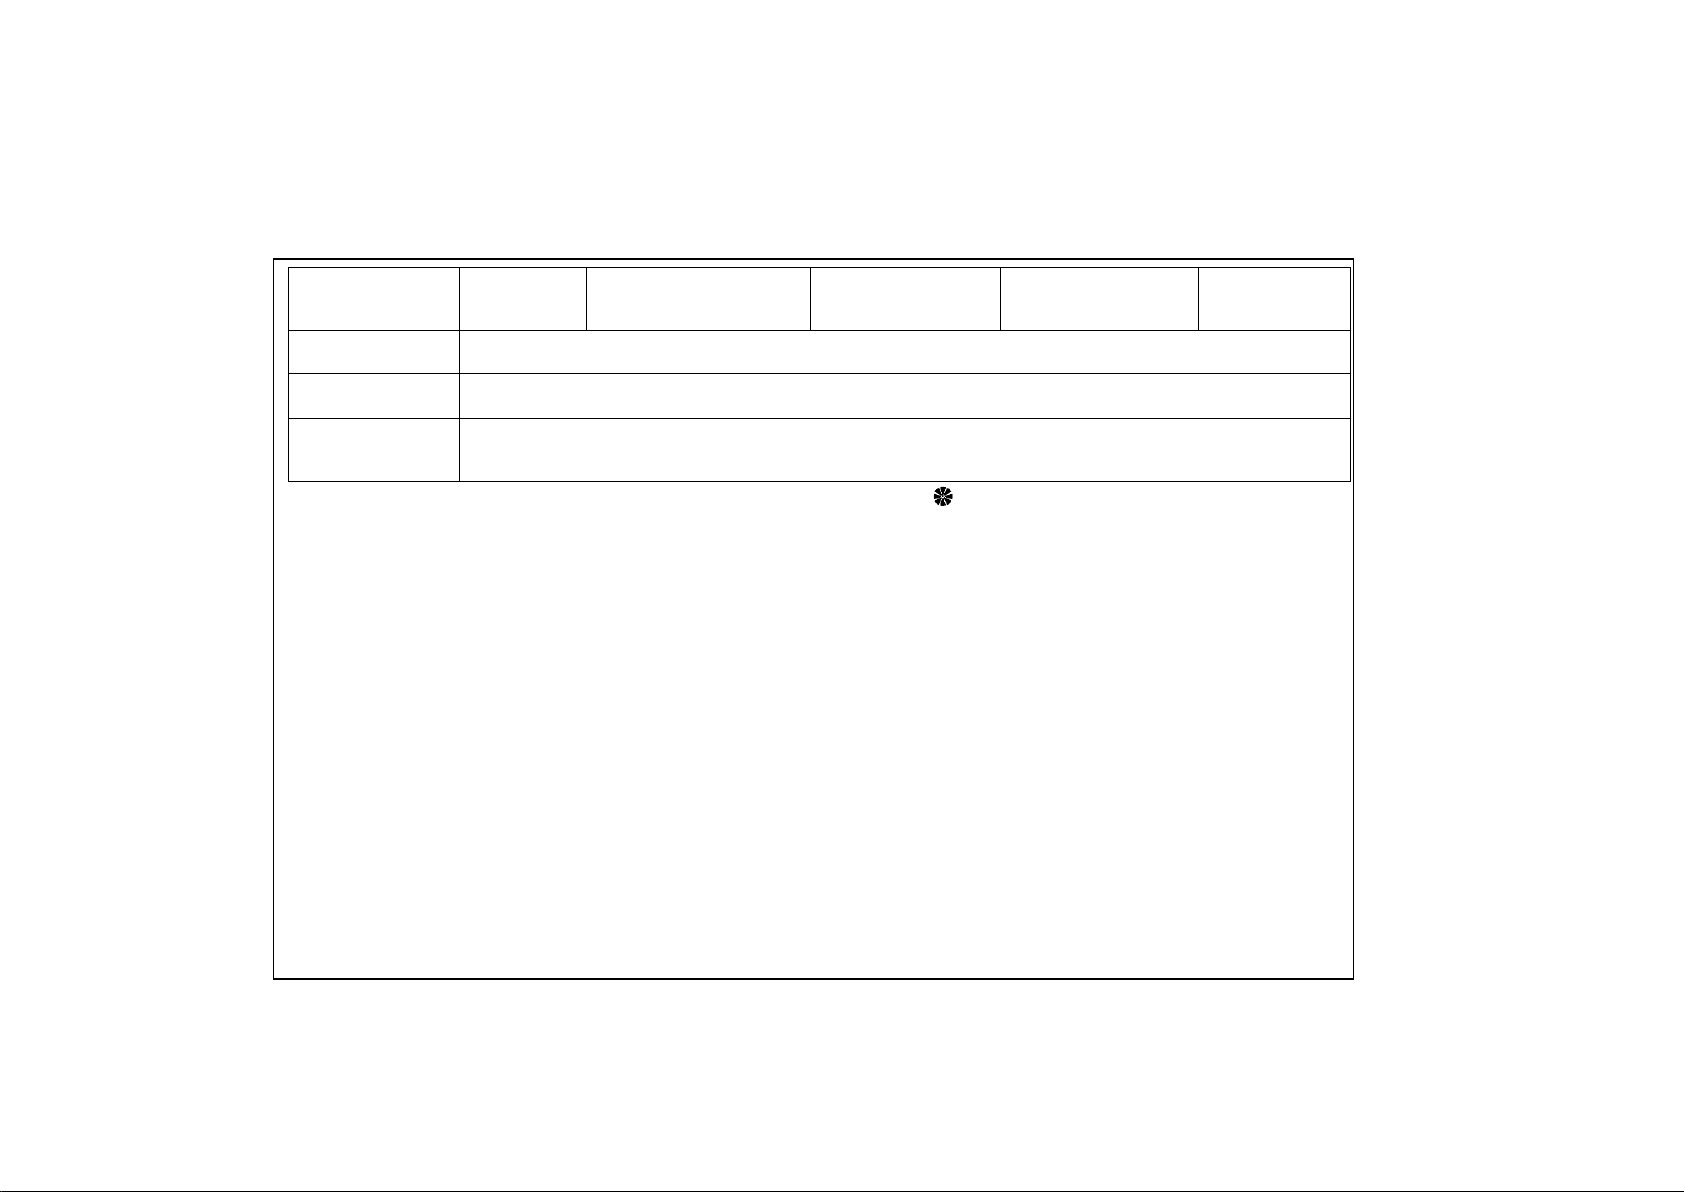
PROGRAM
COMPART.
DETERGEN
T
BUTON PENTRU
FUNCTII
SUPLIMENTARE
CAPACITATE
MAXIMA RUFE
USCATE (kg)
TIPURI DE RUFE
EXPLICATII
CLATIRE
Cand aveti nevoie de o clatire suplimentara pentru rufele Dvs, dupa terminarea procesului de spalare, puteti
folosi acest program pentru toate tipurile de rufe, indiferent de tesatura.
STOARCERE
Cand aveti nevoie de o stoarcere suplimentara pentru rufele Dvs, dupa terminarea procesului de spalare,
puteti folosi acest program pentru toate tipurile de rufe, indiferent de tesatura.
EVACUARE
Acest program se foloseste pentru evacuarea apei murdare dupa incheierea procesului de spalare. Daca
doriti ca apa din interiorul masinii sa fie evacuata inainte de terminarea programului de spalat, puteti folosi
acest program.
TABEL-1 CONTINUARE
(*) Puteti folosi balsam de rufe la oricare din aceste programe (exceptie: programele de stoarcere si evacuare a apei). Cand
calculati cantitatea de balsam, consultati recomandarile producatorului balsamului respectiv. Turnati balsamul in compartimentul
special prevazut din cadrul sertarului pentru detergent..
Valorile duratei programului, a consumului de energie si de apa pot varia in functie de greutatea si tipul incarcaturii, de functiile
suplimentare selectate, de temperatura apei de la robinet si de cea ambientala.
15
Page 17
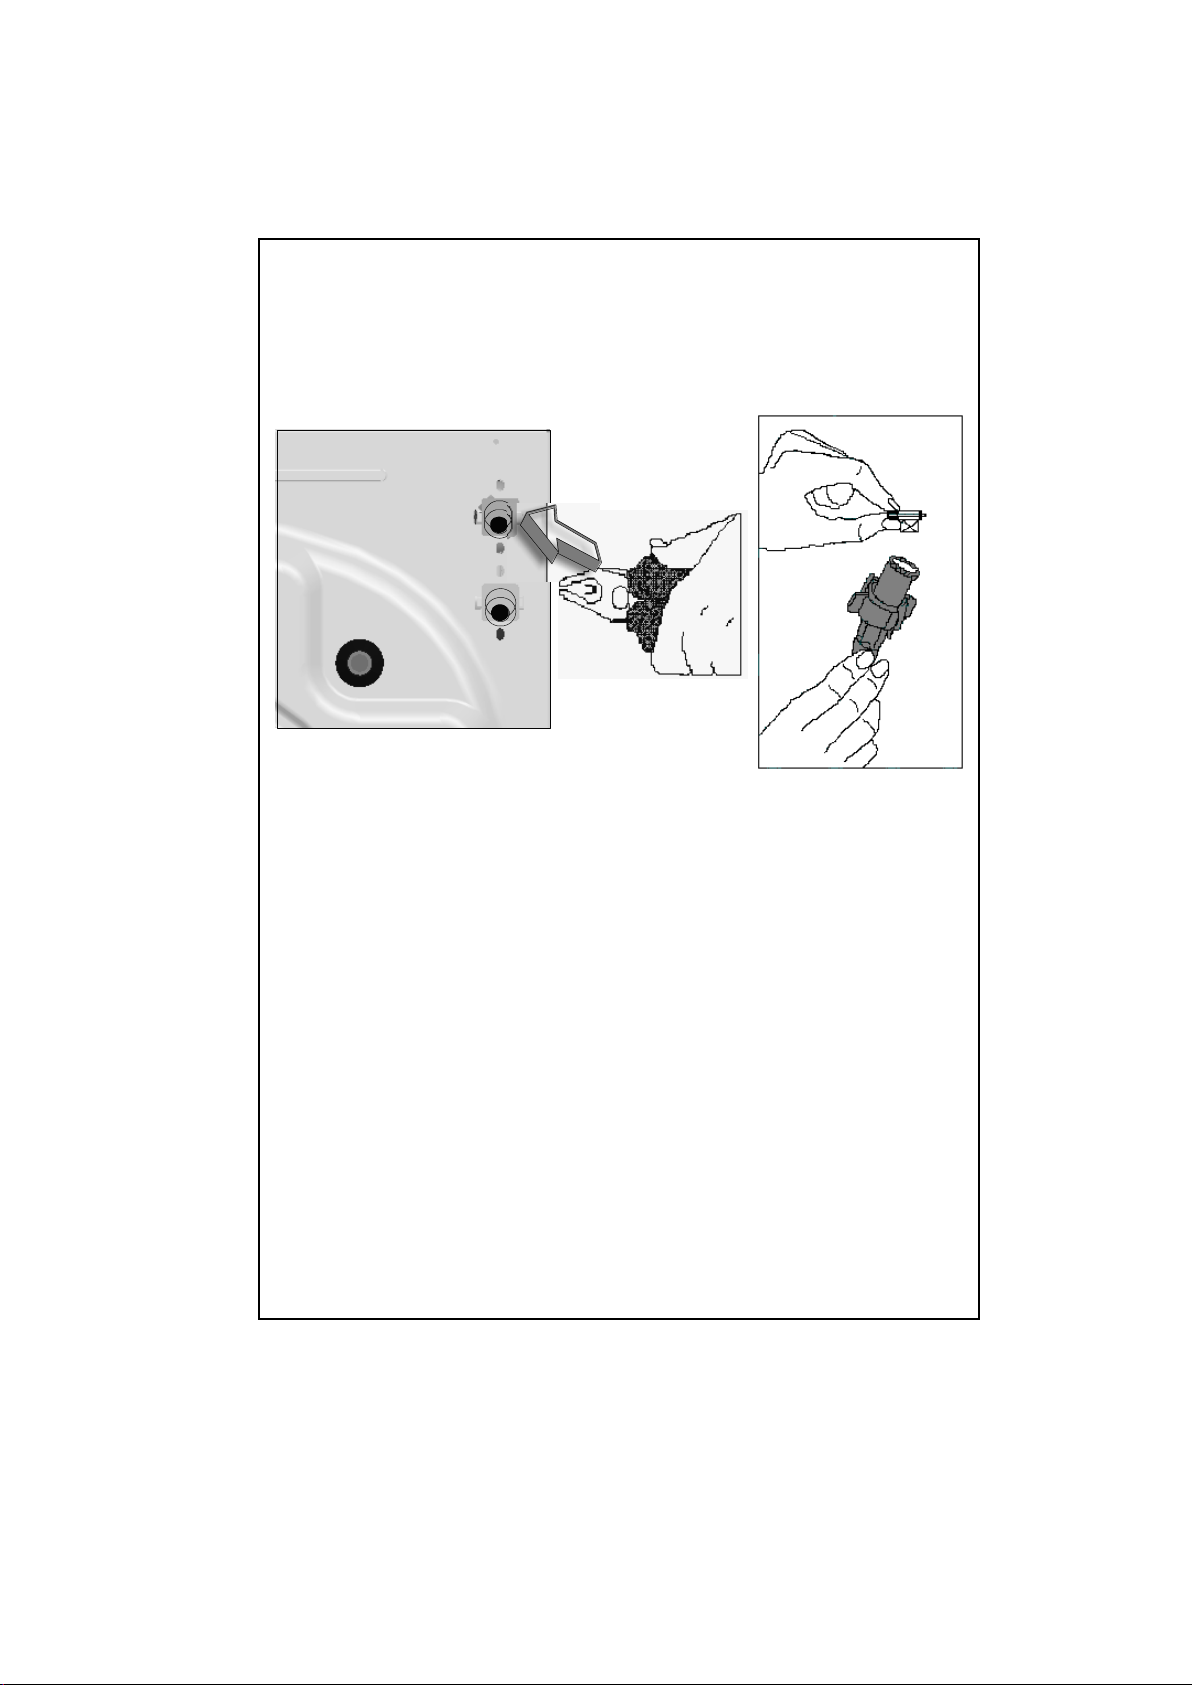
Scoateti furtunul de alimentare din spatele masinii.
Scoateti filtrele cu un patent si frecati bine cu o perie.
Curatati filtrele furtunului, situate la capatul dinspre robinet, dupa ce
le scoateti manual, impreuna cu garnitura.
Dupa ce curatati filtrele, asezati-le in pozitia in care erau initial.
FILTRUL POMPEI
Sistemul filtrului pompei prelungeste durata de viata a pompei
dumneavoastra, care este utilizata pentru drenarea apei murdare. Acesta
impiedica intrarea calcarului in pompa. Se recomanda curatarea filtrului
pompei la 2-3 luni. Pentru curatarea filtrului pompei:
Deschideti capacul, tragand de maner.
Inainte de deschiderea capacului filtrului, asezati un recipient in fata
capacului filtrului pentru a impiedica scurgerea apei ramase in
masina.
Slabiti capacul filtrului prin rotirea acestuia in sens contrar acelor de
ceasornic si scurgeti apa.
Indepartati orice materii straine din filtru.
Verificati manual rotirea pompei.
Dupa curatarea pompei, fixati capacul filtrului prin rotirea acestuia in
sensul acelor de ceasornic.
Puneti capacul la loc.
Nu uitati ca in cazul in care nu puneti bine la loc capacul filtrului, se
va scurge apa.
16
Page 18
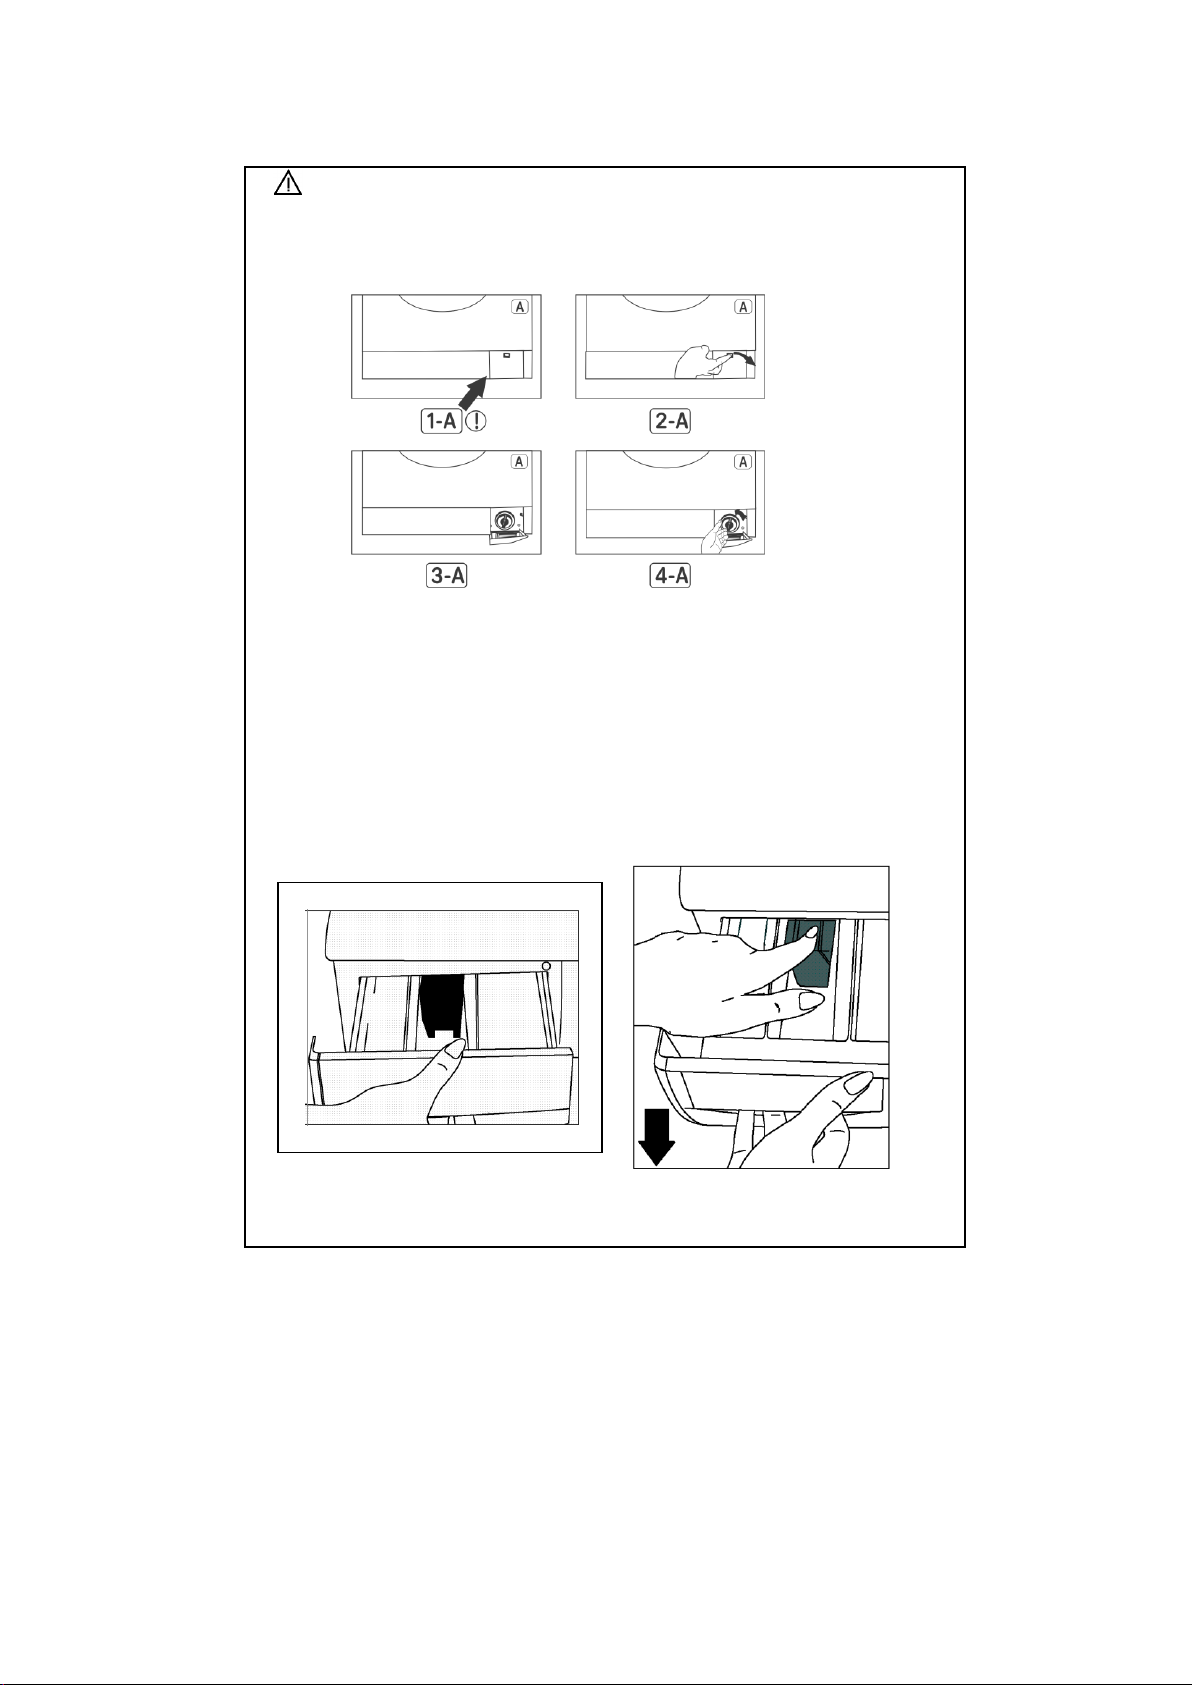
ATENTIE!
Pericol de oparire!
Datorita faptului ca e posibil ca pompa sa fie inca fierbinte, asteptati intai sa
se raceasca.
SERTARUL PENTRU DETERGENT
In timp, detergentii pot forma sedimente in sertarul de detergent Pentru a
curata aceste sedimente, scoateti din cand in cand sertarul pentru detergent.
Pentru aceasta:
Trageti sertarul pana la capat (DESEN-1)
Ridicati partea frontala a sertarului, continuati sa trageti, pana reusiti sa il
scoateti afara (DESEN-2)
Spalati-l cu o periuta de dinti mai veche si foarte multa apa..
Dupa ce se usuca, asezati sertarul de detergent inapoi, urmand
procedura inversa celei pe care ati folosit-o cand l-ati scos.
DESEN-1 DESEN-2
17
Page 19
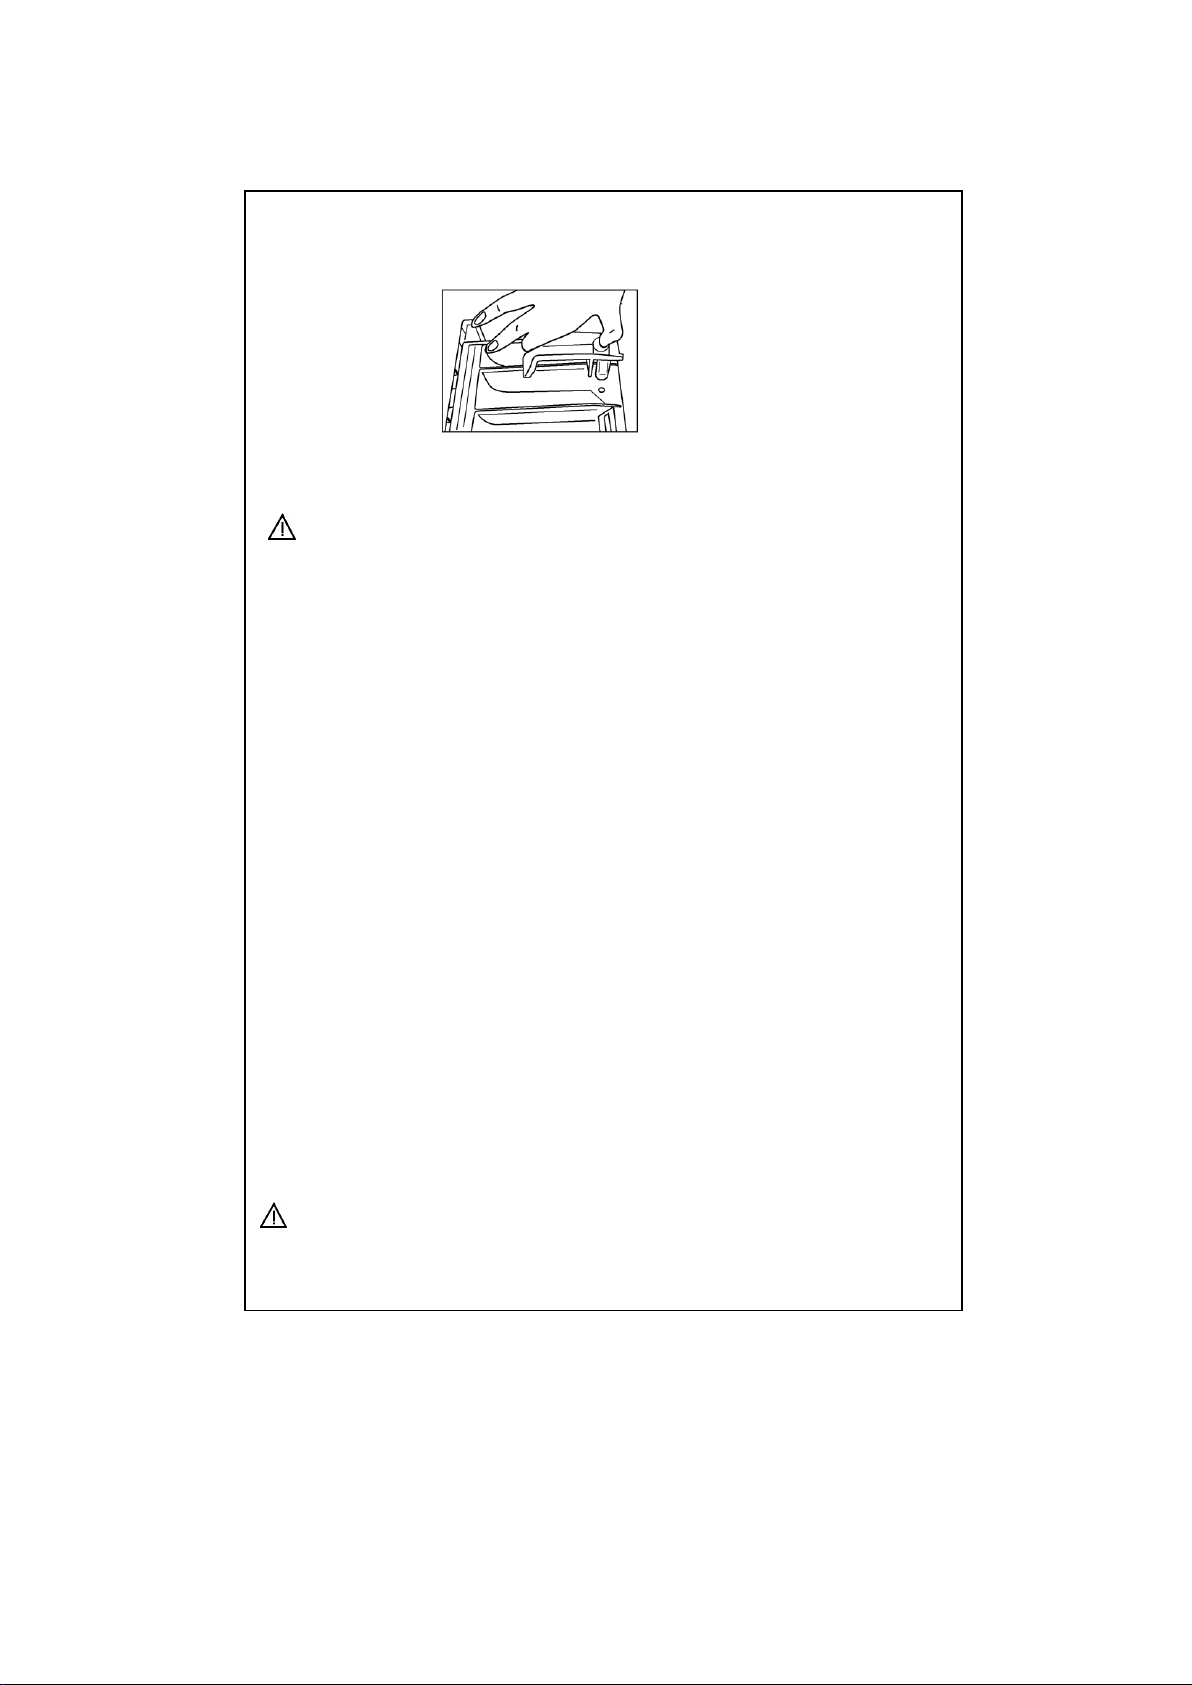
FISA PENTRU SIFON
Scoateti sertarul pentru detergent. Scoateti fisa de la sifon si curatati cu grija
reziduurile de balsam. Asezati apoi fisa in pozitia corecta. Verificati daca ati
pozitionat-o bine.
CABINETUL
Stergeti suprafata exterioara a cabinetului cu apa calduta si un detergent
care sa nu dauneze acesteia. Clatiti cu apa curata si stergeti cu un material
moale si uscat.
ATENTIE!
Daca masina este instalata intr-un loc unde temperatura camerei poate
cobori sub 0 ˚C, urmati aceste instructiuni atunci cand nu utilizati masina :
Conectati masina la priza.
Inchideti robinetul de apa si deconectati furtunul de alimentare de la
robinet.
Asezati capatul furtunului de evacuare si al celui de alimentare jos,
intr-un vas.
Rotiti butonul de programe in dreptul celui de Evacuare.
Indicatorul Setare program se va aprinde.
Porniti programul, apasand butonul Start/Pause.
Cand se termina programul (se aprinde indicatorul Terminare
program), scoateti masina din priza.
Cand terminati acest proces, apa ramasa inauntru va fi evacuata, prevenindu-se astfel formarea de gheata in interiorul masinii. Cand veti utiliza din
nou masina, asigurati-va ca temperatura mediului respectiv este mai mare
de 0 ˚C.
CUVA
Nu lasati obiecte metalice (ace, agrafe, monezi) in interiorul masinii de spalat,
deoarece vor favoriza formarea de rugina. Pentru a elimina petele de rugina,
folositi un agent de curatare fara clor si urmati instructiunile producatorului
respectivei substante. Nu folositi niciodata burete de sarma sau obiecte care
pot produce zgarieturi, deoarece acestea favorizeaza la randul lor aparitia
ruginei.
INDEPARTAREA PIETREI
Daca folositi detergentul in cantitatea recomandata, nu va fi nevoie sa
indepartati piatra. Totusi, daca doriti sa aplicati procedura respectiva, folositi
substante disponibile in comert si fiti atenti la atentionarile producatorilor.
ATENTIE!
Substantele pentru eliminarea pietrei contin acizi; acestia ar putea
provoca modificarea culorii rufelor Dvs, dar si diverse efecte adverse
asupra masinii de spalat.
18
Page 20
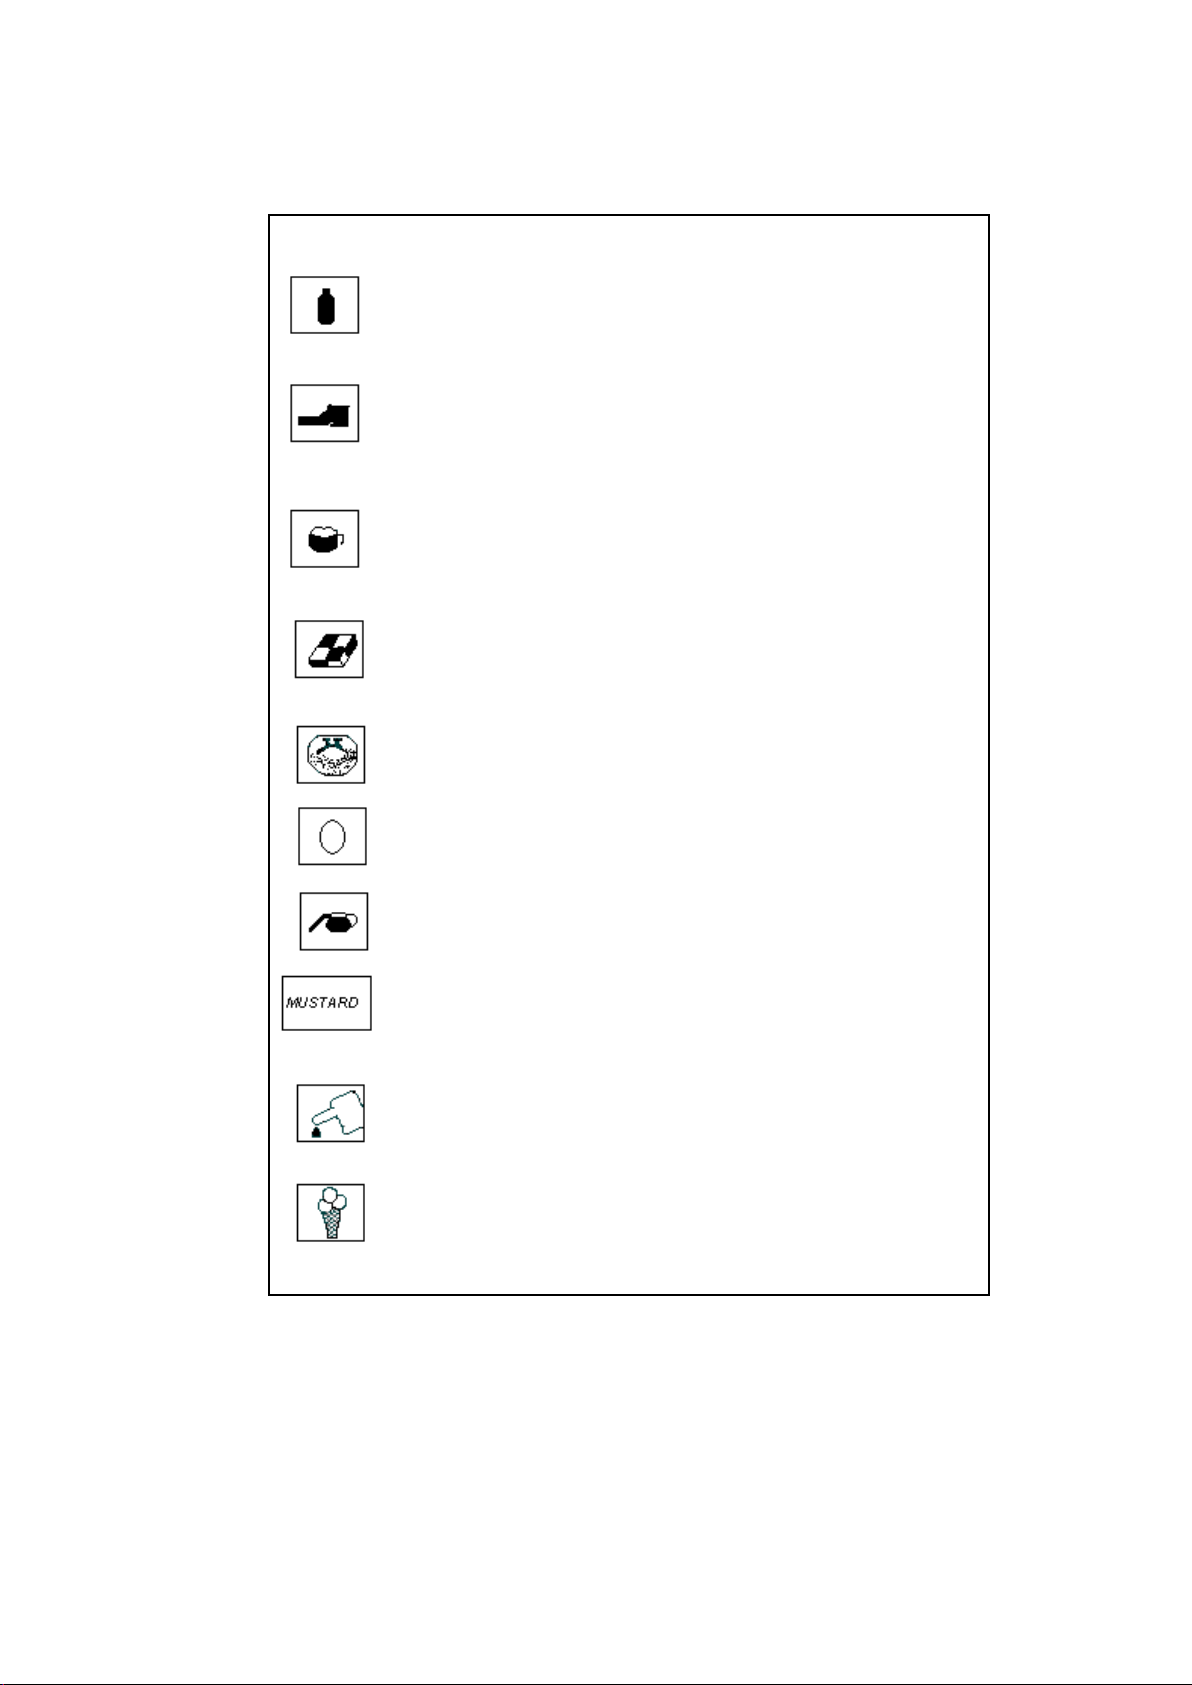
SECTIUNEA 7: INFORMATII PRACTICE
Bauturi alcooloce: Portiunea patata trebuie intai spalata cu apa
rece, apoi stersa cu glicerina si apa si clatita cu o solutie de otet
cu apa.
Crema de pantofi: Frecati usor pata, fara sa stricati materialul,
apoi frecati cu detergent si clatiti. Daca nu dispare, frecati cu o
solutie alcatuita din 1/3 alcool pur (96 de grade) si 2/3 apa, apoi
clatiti cu apa calduta.
Ceai si cafea: Intindeti suprafata patata deasupra unui
vas/chiuvetei si turnati apa fierbinte (in limita temperaturii maxime
suportate de materialul respectiv – vezi eticheta). Daca materialul
suporta, spalati cu lesie.
Ciocolata si cacao: Inmuiati in apa rece, frecati cu sapun sau
detergent, spalati la temperatura maxima pe care o suporta
materialul respectiv. Daca pata nu iese, stergeti cu apa oxigenata
(in proportie de 3%).
Sos de tomate: Frecati usor cu unghia petele uscate, fara sa
stricati tesatura, apoi lasati in apa rece timp de cca 30 min si
frecati cu detergent.
Ou: Indepartati resturile uscate de pe pata si stergeti cu un
burete sau un material moale, umezit in apa rece. Frecati cu
detergent si spalati cu lesie diluata.
Pete de grasime si ulei: Intai stergeti reziduurile. Frecati cu
detergent si apoi spalati cu apa calduta si sapun.
Mustar: Intai aplicati glicerina pe pata. Frecati cu detergent si
apoi spalati. Daca pata persista, stergeti cu alcool (la rufe sintetice
si colorate, o solutie de 1/3 alcool si 2/3 apa)
Pete de sange: Puneti rufa in apa rece 30 minute. Daca pata nu
dispare, inmuiati intr-o solutie de apa si amoniac (3 linguri de
amoniac in 4 litri de apa), timp de 30 minute.
Smantana, frisca, inghetata: Inmuiati rufa in apa rece si frecati
portiunea patata cu detergent. Daca pata persista, aplicati lesie pe
material. (Nu folositi lesie la rufe colorate)
19
Page 21
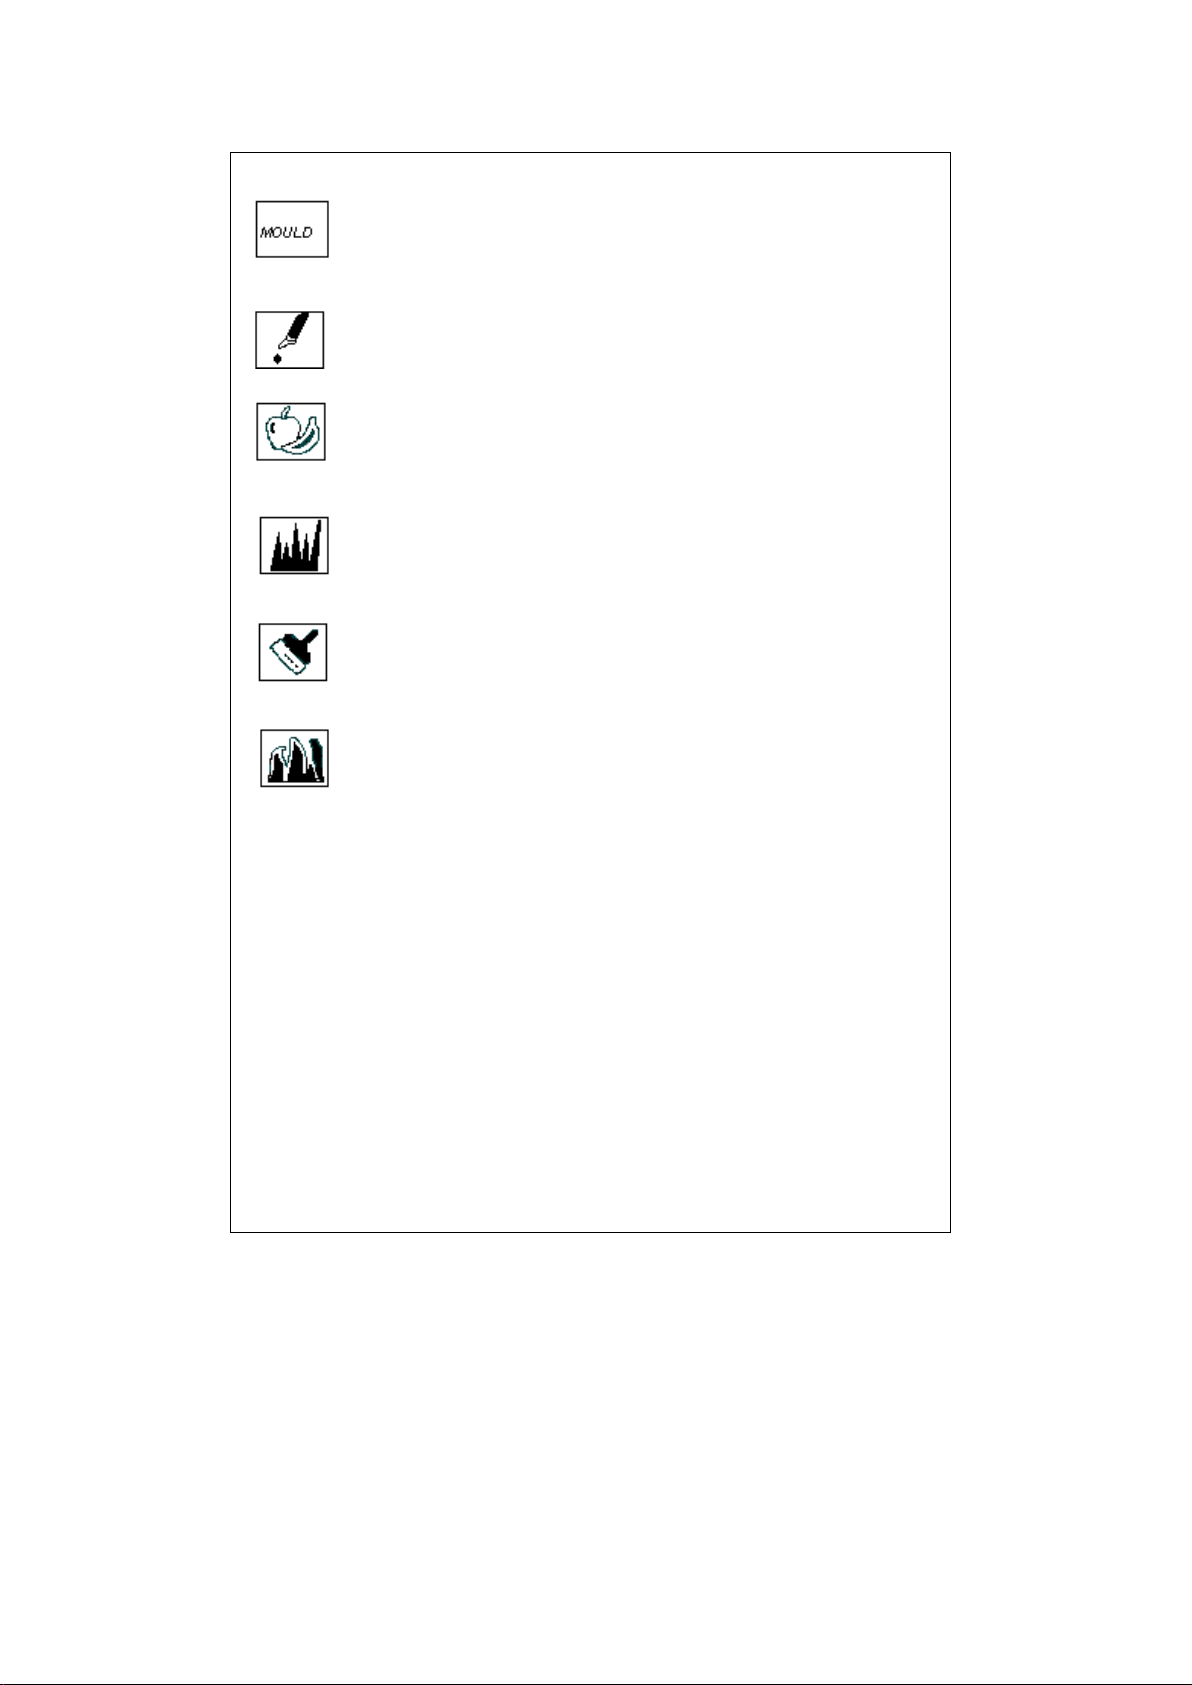
Mucegai: Petele de mucegai trebuie indepartate cat mai
repede posibil. Pata se spala cu detergent, si daca nu dispare,
trebuie stearsa cu apa oxigenata (in proportie de 3%).
Cerneala: Tineti suprafata patata sub jet de apa rece pana cand
nu mai curge apa colorata. Apoi frecati cu apa, combinata cu suc
de lamaie si detergent si spalati dupa 5 minute.
Fructe: Intindeti suprafata patata deasupra unui vas/chiuvetei si
turnati apa rece, in niciun caz apa fierbinte. Stergeti cu apa rece si
aplicati glicerina. Asteptati cca 1-2 ore si clatiti dupa ce ati frecat
cu cateva picaturi de otet.
Pete de iarba: Frecati pata cu detergent. Daca tesatura permite,
folositi lesie. Frecati hainele de lana cu alcool. (Pentru rufe
colorate, folositi o solutie din 1/3 alcool pur si 2/3 apa)
Vopsea: Pata trebui inlaturata inainte de a apuca sa se usuce,
aplicand diluant pe ea. Apoi trebuie frecata cu detergent si
spalata.
Pete de arsura: Daca tesatura permite utilizarea de lesie,
adaugati lesie in apa de spalat. Pentru tesaturi din lana, rufele
inmuiate in apa oxigenata trebuie acoperite in dreptul petei si se
calca cu un material uscat deasupra. Trebuie spalat si clatit foarte
bine.
SECTIUNEA 8: EVITAREA MICILOR ERORI
Orice reparatie de care are nevoie masina Dvs de spalat trebuie efectuata de
catre personal calificat in acest sens. Cand este necesara o reparatie sau nu
reusiti sa identificati cauza unei probleme aparute, procedati astfel:
Scoateti masina din priza.
Inchideti robinetul.
Apelati la cel mai apropiat centru de service autorizat.
20
Page 22
DEFECTIUNE
CAUZA PROBABILA
METODE DE
REMEDIERE
Masina nu
functioneaza.
Nu este conectata la
priza.
Introduceti stecherul in
priza.
Siguranta e defecta.
Schimbati siguranta
Nu aveti curent electric
Verificati daca aveti
curent electric
Nu ati apasat butonul
Start/Pause
Apasati butonul
Start/Pause.
Butonul de programe
este in pozitia O (off/
inchis).
Rotiti butonul de
programe in dreptul
programului dorit.
Usa nu este bine
inchisa.
Inchideti bine usa.
Trebuie sa auziti un
click.
Masina nu se
alimenteaza cu apa.
Robinetul e inchis.
Deschideti robinetul
Furtunul de alimentare
e indoit.
Verificati furtunul
Furtunul de alimentare
este obstructionat.
Curatati filtrul. (*)
Filtrul orificiului de
intrare e blocat
Curatati filtrul. (*)
Usa nueste bine
inchisa
Inchideti bine usa.
Trebuie sa auziti un
click.
Masina nu evacueaza
apa.
Furtunul de evacuare
este indoit sau
obstructionat
Verificati furtunul
Filtrul pompei este
blocat.
Curatati filtrul pompei.
(*)
Rufele din cuva nu
sunt bine echilibrate
Distribuiti rufele din
cuva in mod echilibrat.
Masina vibreaza.
Picioarele masinii nu
sunt reglate corect.
Reglati picioarele. (**)
Nu ati indepartat
suruburile de la
transport.
Indepartati suruburile
de la transport.. (**)
(*) Vezi Sectiunea 6, referitoare la curatarea si intretinerea masinii de spalat.
(**) Vezi Sectiunea 2, referitoare la instalarea masinii de spalat.
21
Page 23
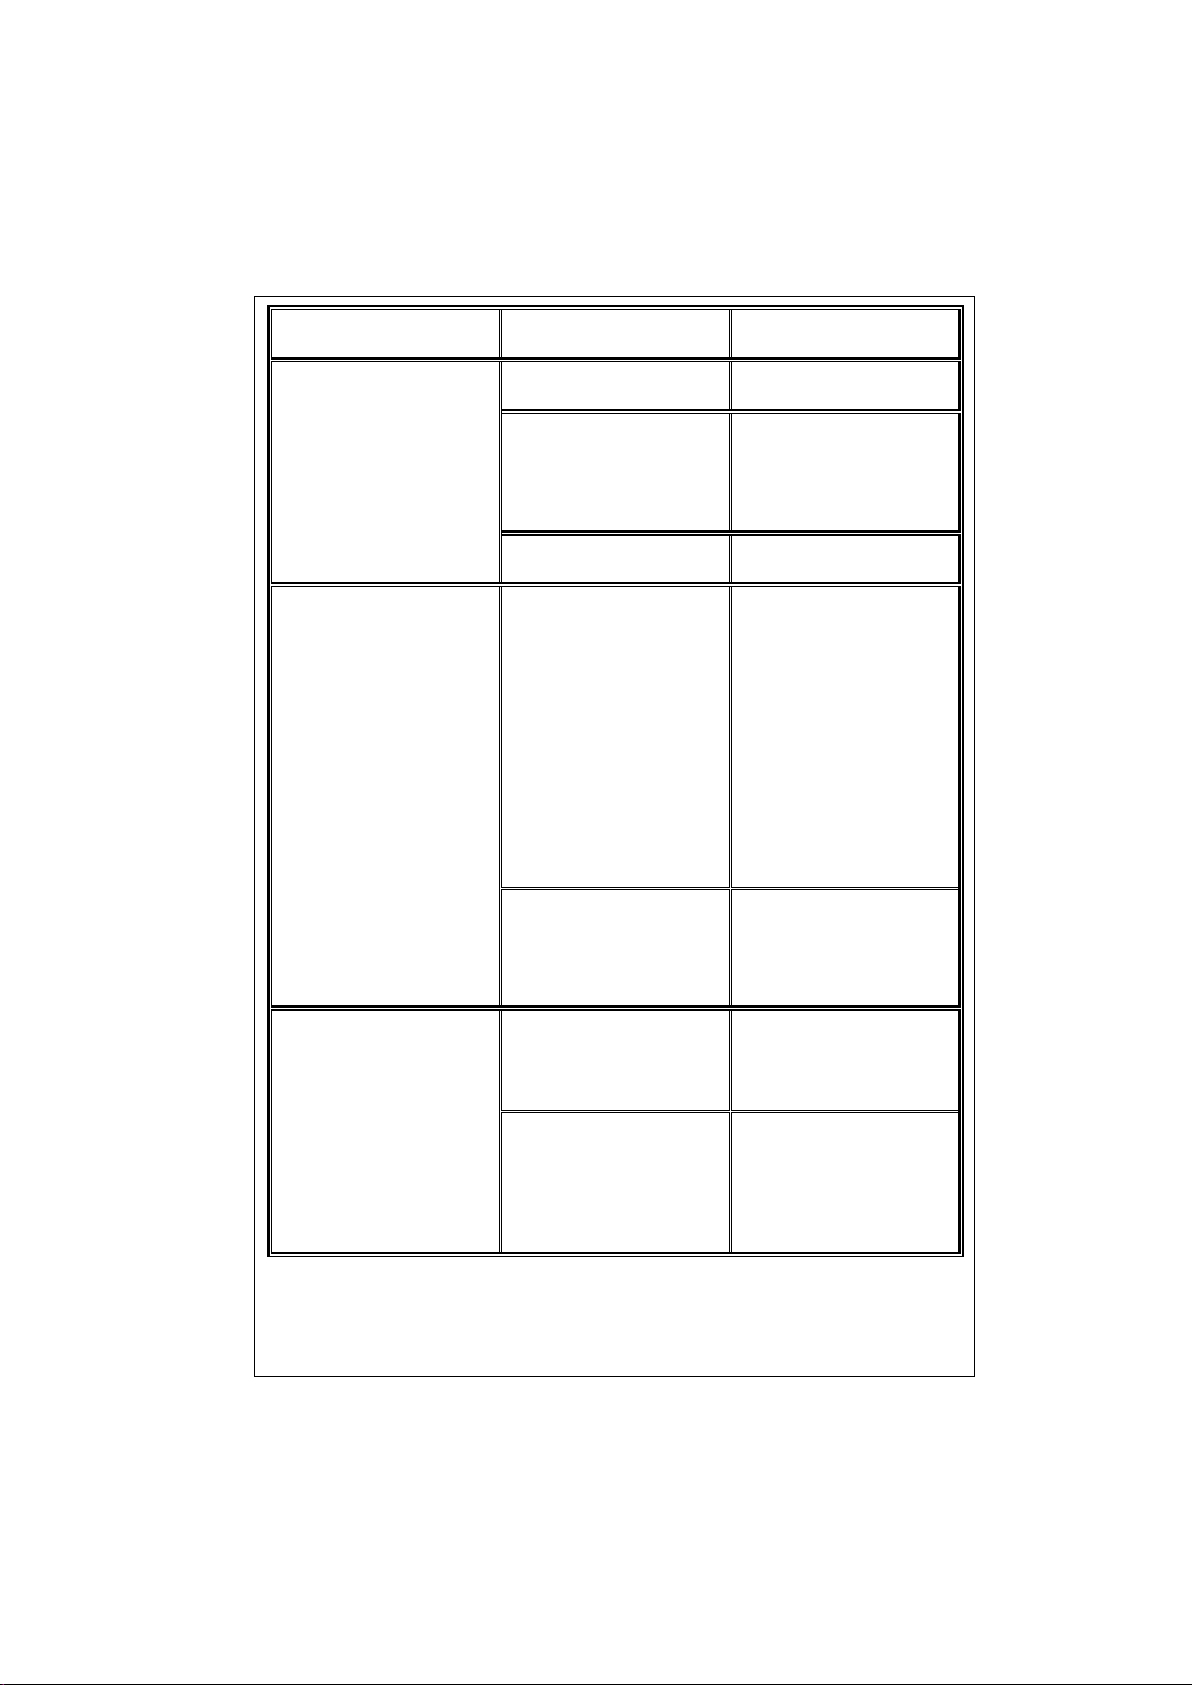
DEFECTIUNE
CAUZA PROBABILA
METODE DE
REMEDIERE
Masina vibreaza.
Cantitatea de rufe din
cuva e prea mica.
Nu previne operarea
masinii
Cantitatea de rufe din
cuva e prea mare sau
rufele nu sunt
distribuite in mod
echilibrat.
Nu depasiti cantitatea
maxima admisa si
distribuiti rufele in mod
echilibrat.
Masina se atinge de un
alt obiect.
Nu sprijiniti masina de
un obiect dur.
Spuma excesiva in
cuva.
Ati folosit prea mult
detergent.
Apasati butonul
Start/pause. Pentru a
limita formarea de
spuma, diluati o lingura
de balsam in 0,5 litri de
apa si turnati in sertarul
de detergent. Apasati
butonul Start/pause
dupa 5-10 minute.
Reglati cantitatea de
detergent in mod
corespunzator la
urmatoarea spalare.
Ati folosit un detergent
inadecvat.
Folositi numai
detergentii destinati
utilizarii in masinile de
spalat automate.
Nu obtineti rezultate
satisfacatoare in urma
spalarii.
Rufele sunt prea
murdare pentru
programul selectat de
Dvs.
Selectati un program
adecvat. (vezi Tabel-1)
Cantitatea de
detergent a fost
insuficienta.
Folositi mai mult
detergent, dar in
conformitate cu
recomandarile
producatorului de
detergent.
22
Page 24
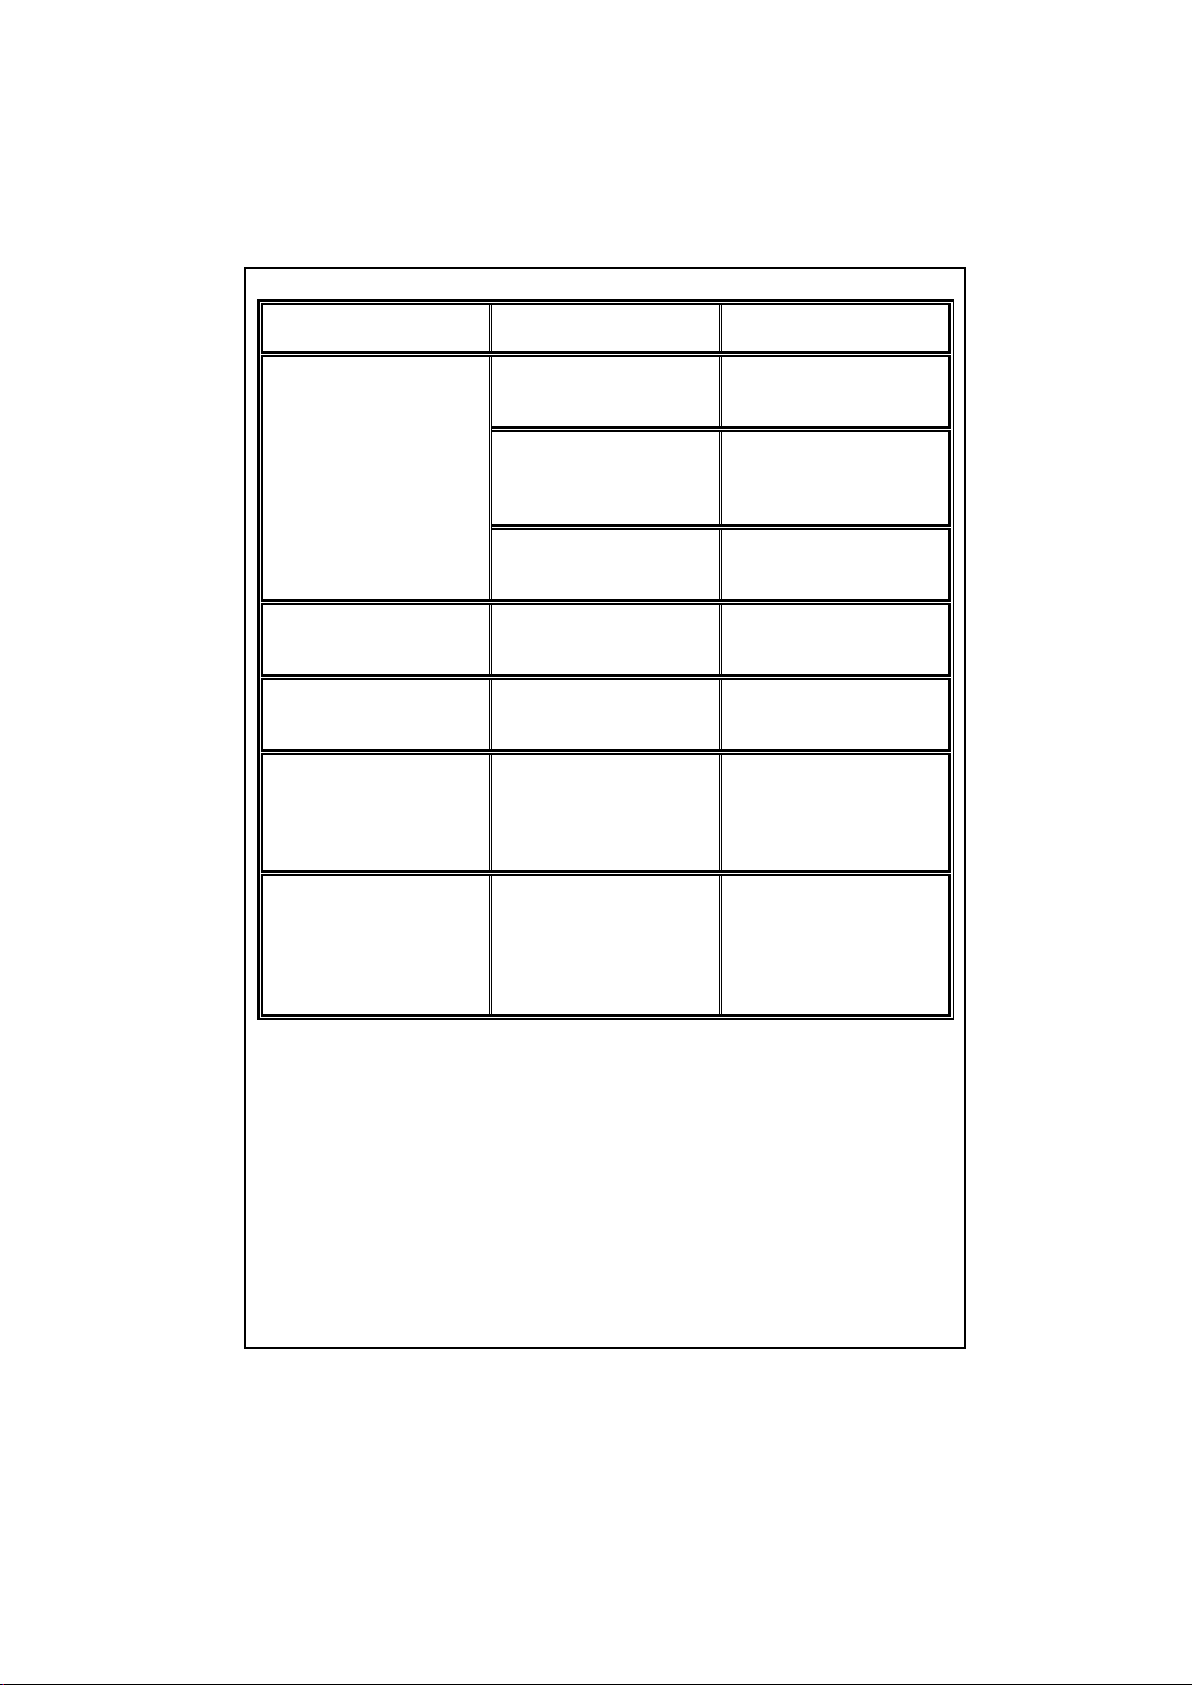
DEFECTIUNE
CAUZA PROBABILA
METODE DE
REMEDIERE
Nu obtineti rezultate
satisfacatoare in urma
spalarii.
Ati depasit capacitatea
maxima de incarcare
cu rufe.
Nu depasiti capacitatea
maxima.
Gradul de duritate al
apei este prea mare
Folositi detrgentul in
cantitatea
recomandata de
producatorul acestuia.
Rufele nu sunt bine
distribuite in masina.
Imprastiati rufele in
masina intr-o maniera
echilibrata.
Apa este evacuata din
masina imediat dupa
alimentare.
Capatul furtunului de
evacuare este prea jos
fata de masina.
Asezati furtunul in
pozitia
corespunzatoare.(**)
Nu se vede apa in
cuva in timpul utilizarii.
Nu este o defectiune.
Apa se afla in partea
inferioara a cuvei.
-
Exista urme de
detergent pe rufe.
Unii detergenti contin
particule mai mari care
nu s-au dizolvat si s-au
lipit pe rufe, sub forma
unor pete albe.
Selectati programul de
Clatire si mai clatiti o
data, sau curatati
rufele cu o perie, dupa
ce se usuca.
Rufele prezinta pete gri
Aceste pete pot fi
cauzate de ulei, frisca
sau unguenti.
La urmatoarea spalare,
utilizati cantitatea
maxima de detergent
recomandata de
producatorul de
detergent.
(**) Vezi Sectiunea 2, referitoare la instalarea masinii de spalat.
23
Page 25
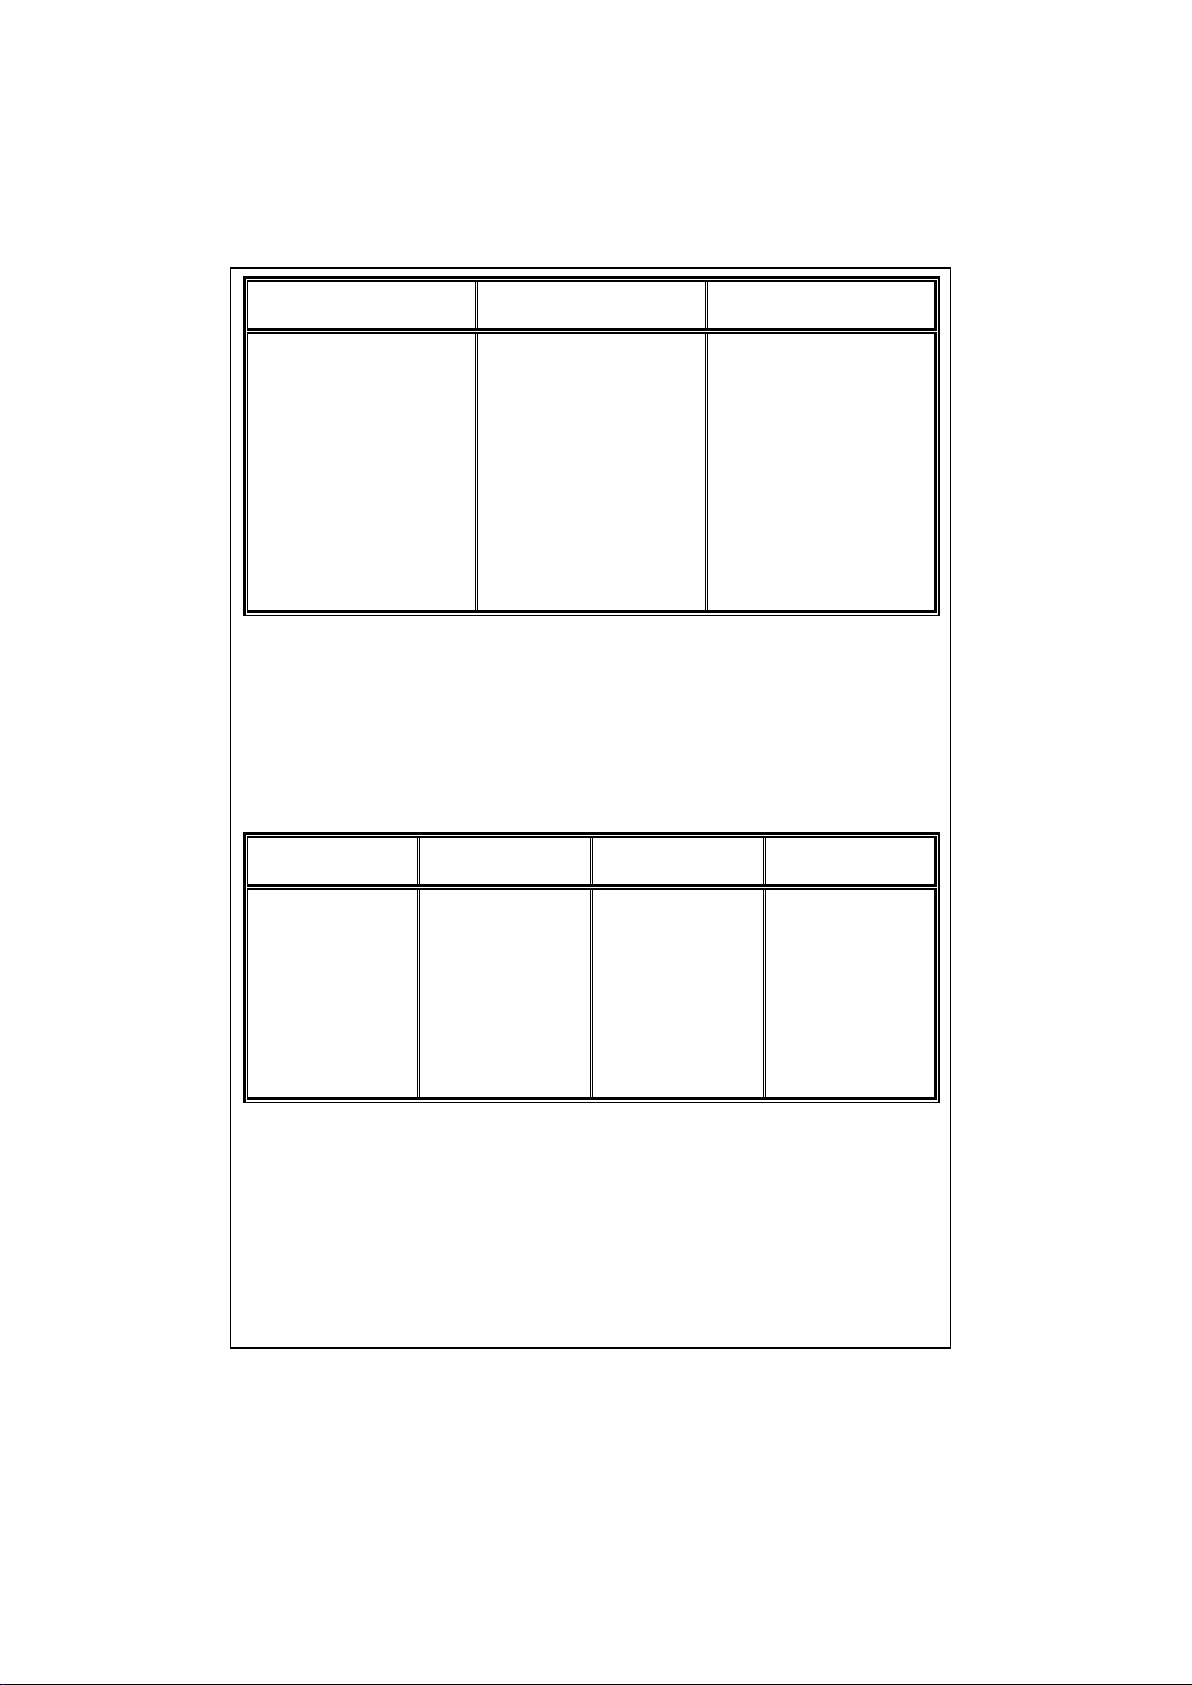
DEFECTIUNE
CAUZA PROBABILA
METODE DE
REMEDIERE
Procesul de stoarcere
nu incepe sau incepe
cu intarziere.
Nu este o defectiune.
Acest lucru se
datoreaza probabil
controlului echilibrarii
incarcaturii de rufe din
masina.
Sistemul de control al
incarcaturii cu rufe va
incerca sa distribuie
rufele din cuva intr-o
maniera omogena.
Dupa aceasta, va
incepe si procesul de
stoarcere. La
urmatoarea spalare,
asezati rufele in cuva
intr-o maniera mai
echilibrata.
SECTIUNEA 9: SISTEMUL DE DETECTARE AUTOMATA A
ERORILOR
Masina Dvs este echipata cu sisteme de control permanent al proceselor de
spalare; aceste sisteme vor lua masurile de precautie necesare impotriva
erorilor, dar va si anunta asupra aparitiei acestora.
COD
EROARE
INDICATOR
EROARE
POSIBILA
CAUZA
METODA DE
REMEDIERE
Err 01
Indicatorul
Start/Pause
lumineaza
intermitent.
Usa nu este bine
inchisa.
Inchideti corect
usa, in asa fel
incat sa auziti un
click. Daca
problema persista,
opriti masina,
scoateti din priza
si apelati imediat
la un centru de
service autorizat.
24
Page 26
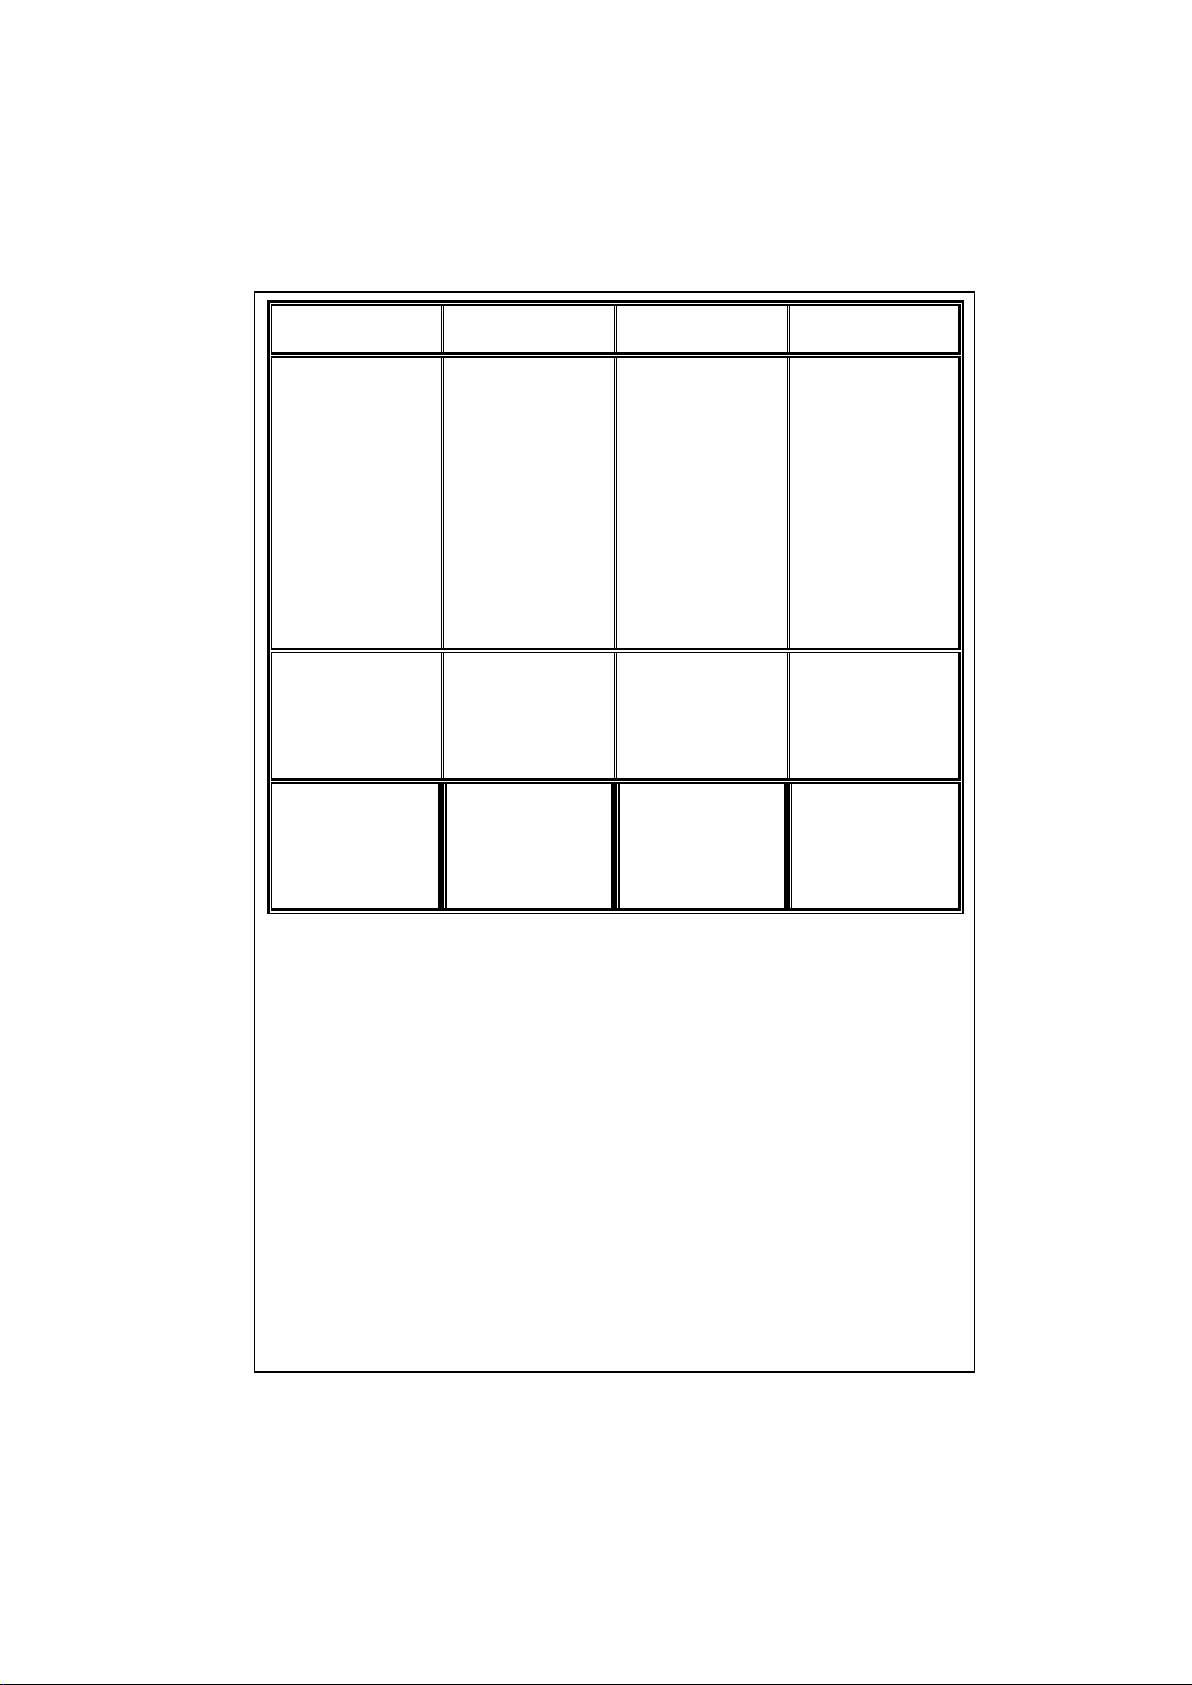
COD
EROARE
INDICATOR
EROARE
POSIBILA
CAUZA
METODA DE
REMEDIERE
Err 02
Indicatorul
Setare program
lumineaza
intermitent.
Nivelul apei din
masina se afla sub
dispozitivul de
incalzire. E posibil
ca presiunea
sursei de
alimentare sa fie
scazuta sau fluxul
de apa sa fie
blocat.
Deschideti
complet robinetul
de apa. Verificati
daca apa nu este
cumva oprita.
Daca problema
persista, masina
se va opri in mod
automat dupa un
timp. Scoateti din
priza, inchideti
robinetul si apelati
la un centru de
service autorizat.
Err 03
Indicatoarele
Start/pause si
Setare program
lumineaza
intermitent.
Pompa s-a
defectat sau filtrul
de la pompa este
obstructionat.
Curatati filtrul de la
pompa. Daca
problema persista,
apelati la un
centru de service
autorizat. (*)
Err 04
Indicatorul
Terminare
program
lumineaza
intermitent.
Eroare de
comunicare
Opriti masina si
scoateti din priza.
Inchideti robinetul
si apelati la un un
centru de service
autorizat.
(*) Vezı Sectiunea 6, referitoare la curatarea si intretinerea masinii de spalat.
25
Page 27
COD
EROARE
INDICATOR
EROARE
POSIBILA
CAUZA
METODA DE
REMEDIERE
Err 05
Indicatoarele
Start/Pause si
Terminare
program
lumineaza
intermitent.
Dispozitivul de
incalzire a apei
sau senzorul de
caldura s-a
defectat.
Opriti masina si
scoateti din priza.
Inchideti robinetul
si apelati la un un
centru de service
autorizat.
Err 06
Indicatoarele
Setare program si
Terminare
program
lumineaza
intermitent.
Defectiune la
motor
Opriti masina si
scoateti din priza.
Inchideti robinetul
si apelati la un un
centru de service
autorizat.
Err 07
Indicatoarele
Start/Pause,
Setare program
Si Terminare
program sunt
aprinse in
permanenta
Eroare de
configurare.
Opriti masina si
scoateti din priza.
Inchideti robinetul
si apelati la un un
centru de service
autorizat.
Err 08
Indicatoarele
Start/pause,
Setare program si
Terminare
program
lumineaza
intermitent.
Eroare de sistem
Opriti masina si
scoateti din priza.
Inchideti robinetul
si apelati la un un
centru de service
autorizat.
Err 09
Indicatoarele
Setare program
si Terminare
program sunt
aprinse in
permanenta.
Voltajul retelei
electrice e prea
scazut sau prea
ridicat.
Daca voltajul
retelei electrice
este mai mic de
150V sau mai
mare de 260V,
masina de spalat
se va opri
automat. Cand
voltajul normal
este restabilit,
masina isi va
continua
programul.
26
Page 28
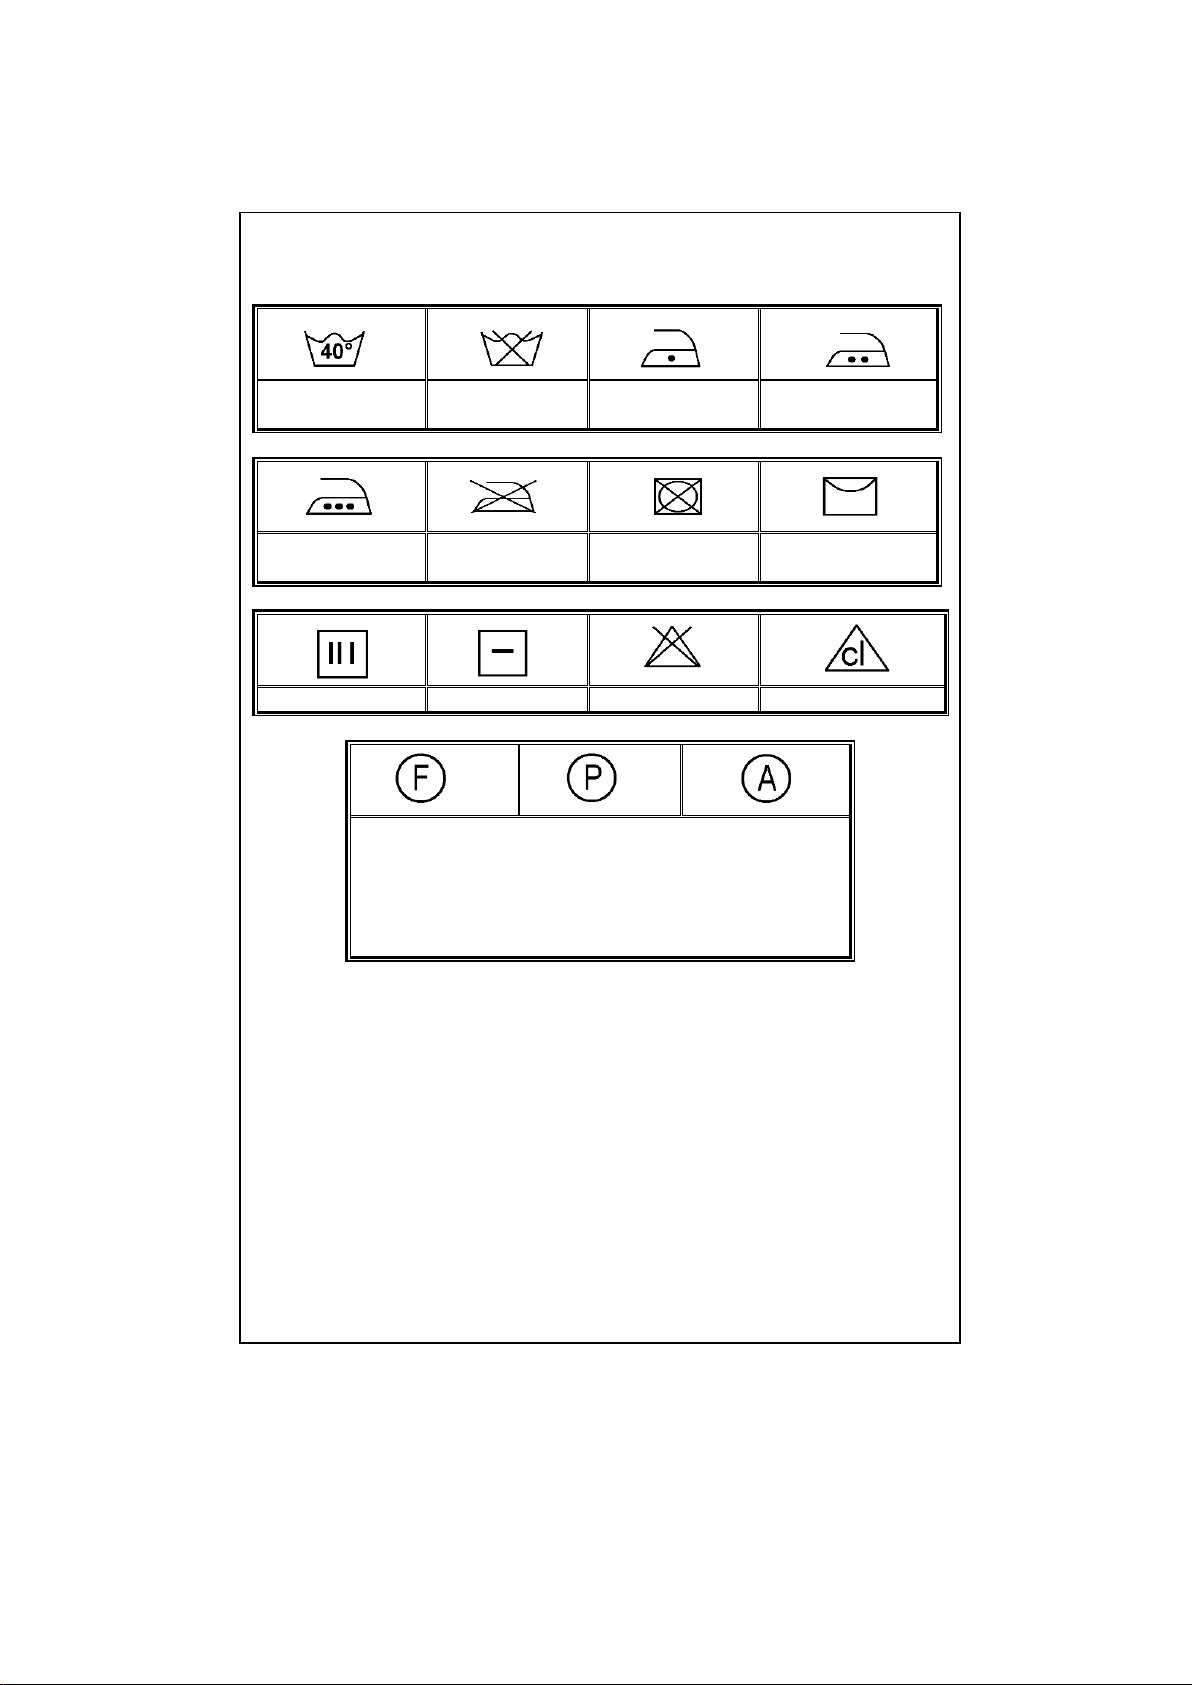
SECTIUNEA 10: SIMBOLURI INTERNATIONALE PENTRU
SPALARE
Temperatura de
spalare.
NU spalati
(spalare manuala)
Temperatura
redusa la calcat.
Temperatura
medie la calcat.
Temperatura
ridicata la calcat.
Nu calcati.
Nu stoarceti.
Atarnati pentru
uscare.
Lasati la scurs.
Uscati intins.
Fara inalbitor.
Folositi inalbitor.
Acestea sunt simboluri pentru moduri de curatare
chimica a rufelor. Literele reprezinta instructiuni
despre tipul agentului de curatare care trebuie folosit.
Hainele care au aceste simboluri pe eticheta nu
trebuie spalate la masina, decat daca exista si
simboluri care permit acest lucru.
27
Page 29
FIŞĂ PRODUS
Capacitate nominală (Bumbac 60° încărcătură întreagă) (kg)
5.0
Clasă de eficienţă energetică
A+
Consum energie (kWh/an)*
167
Consum apă (L/an)**
9240
Clasă de eficienţă pentru uscarea prin centrifugare
C
Zgomot (Spălare) (dB(A))
58
Zgomot (Centrifugare) (dB(A))
77
Viteză max centrifugare (rpm)***
1000
Conţinut umezeală rămas (%)***
62
Consum energie (bumbac 60° încărcătură maximă)(kWh/ciclu)
0.85
Consum energie (bumbac 60° încărcătură parţială)(kWh/ciclu)
0.66
Consum energie (bumbac 40° încărcătură parţială)(kWh/ciclu)
0.52
Consum apă (bumbac 60° încărcătură maximă)(L/ciclu)
43
Consum apă (bumbac 60° încărcătură parţială)(L/ciclu)
41
Consum apă (bumbac 40° încărcătură parţială)(L/ciclu)
41
Consum energie (mod oprit)(W)
1.00
Consum energie (mod pornit)(W)
2.00
Durată program (min) (bumbac 60° încărcătură maximă)
190
Durată program (min) (bumbac 60° încărcătură parţială)
145
Durată program (min) (bumbac 40° încărcătură parţială)
140
•
Programul nr. 3 (program standard 60 ° C bumbac) şi programul nr. 4 (program standard
40 ° C bumbac) sunt programele standard de spălare la care se referă informaţiile de pe
etichetă şi din fişă, şi anume că aceste programe sunt potrivite pentru spălarea lenjeriei
din bumbac puţin murdară şi că sunt cele mai eficiente programe în termeni de consum
combinat de energie şi apă.
•
Temperatura reală a apei poate diferi de temperatura declarată a ciclului.
•
Valorile duratei programului, a consumului de energie şi de apă pot varia în funcţie de
greutatea şi tipul încărcăturii, de funcţiile suplimentare selectate, de temperatura apei de
la robinet şi de cea ambientală.
*
Pe baza ciclurilor de spălare 220 standard din programele de bumbac la 60°C şi 40°C cu
încărcătură maximă şi parţială şi consumul modurilor de putere redusă. Consumul de
energie real va depinde de modul de folosire al aparatului.
**
Pe baza ciclurilor de spălare 220 standard din programele de bumbac la 60°C şi 40°C cu
încărcătură maximă şi parţială. Consumul de apă real va depinde de modul de folosire al
aparatului.
***
Pe baza rezultatelor testelor cu un program standard 60 ° C pentru bumbac cu
încărcătură maximă şi parţială şi cu un program standard 40 ° C pentru bumbac cu
încărcătură parţială.
ELIMINAREA DESEURILOR IN MOD RESPONSABIL FATA DE MEDIU
Poti ajuta la protejarea mediului!
Va rugam sa respectati regulamentele si legile locale: duceti echipamentele electrice
nefunctionale catre un centru de colectare al echipamentelor electrice uzate.
Importator: Asesoft Distribution
Europolis Logistic Park, Italia Street, 1-7, Chaijna, Ilfov, Romania
Tel: +4021 256 00 86, www.heinner.com
Page 30
INSTRUCTION MANUAL
WASHING MACHINE
HWM 5100
Voltage: 220-240V~50Hz
Please read this instruction manual carefully before using the appliance
Page 31

THE CONTENTS
SECTION 1:BEFORE USING
Safety warnings
Recommendations
SECTION 2:INSTALLATION
Removal of transportation screws
Adjustment of feet
Electrical connection
Water supply connection
Water drain connection
SECTION 3:TECHNICAL SPECIFICATIONS
SECTION 4:CONTROL PANEL
Start/Pause button
Function indicator lights
Function buttons
Temperature knob
Program knob
SECTION 5:WASHING YOUR LAUNDRY
Before washing
Running the machine
SECTION 6:MAINTENANCE AND CLEANING
Water inlet filters
Pump filter
Detergent drawer
Siphon plug
The cabinet
The drum
Remove of your machine from lime
SECTION 7: PRACTICAL INFORMATION
SECTION 8:AVOIDING MINOR FAULTS
SECTION 9:AUTOMATIC FAILURE DETECTION SYSTEM
SECTION 10:INTERNATIONAL WASHING SIGNS
28
Page 32

SECTION 1:BEFORE USING
SAFETY WARNINGS
Do not use a multiple socket or extension cord.
Do not insert a plug with damaged or broken cord into the socket.
If the cord is damaged it should be replaced by the manufacturer or
appointed service agent in order to avoid a hazard.
Never remove the plug from the socket by pulling from the cord
section. Remove the plug by holding.
Do not plug the power supply with wet hands.
Never touch the machine with wet hands or feet.
Never open the detergent drawer while the device is running.
Never force to open the door of the machine while the machine is
running.
Since the machine can reach high temperatures while running, do not
touch the drain hose and water during draining.
In case of any failure, first unplug the device and close the water tap.
Do not attempt to repair.Please apply to the nearest authorized
service station.
Do not forget that the packing material of your machine may be
hazardous for children.
Do not let your children play with the washing machine.
Keep your pet away from your machine.
Your machine should only be used by adults within the information
written in this manual.
Your machine is designed for use in house environment. Warranty
will be invalid if you use it for commercial purposes.
The appliance should not be put on a carpet which can block the air
ventilation on the bottom side.
RECOMMENDATIONS
The detergent or softener in contact with air for a long time will dry
and stick to your detergent drawer.To avoid this put your detergent
and softener into the detergent drawer just before washing.
It is recommended that you use pre-washing program for only very
dirty clothes.
Please do not exceed the maximum loading capacity.
The appliance is not intended for use by people (including children)
with reduced physical,sensor yor mental capabilities , or lack of
experience and knowledge , unless they have been given supervision
or instruction concerning use of the appliance by a preson
responsible for their safety.Children should be supervised to ensure
that they don’t play with the appliance.
29
Page 33
If you will not use your machine for a long time, unplug your machine,
close the water supply and leave the door open in order to keep the
inside of the machine dry and for prevention from unpleasant odour.
As a result of the quality control procedures, a certain amount of
water may remain in your machine. This is not harmful for your
machine.
SECTION 2: INSTALLATION
You must pay attention to the following issues before using your washing
machine.
REMOVAL OF TRANSPORTATION SCREWS
Transportation screws, which are located at the back side of the
machine, must be removed before running the machine.
Loosen the screws by rotating counterclockwise by a suitable wrench.
(DIAGRAM-1)
Remove the screws by pulling them.(DIAGRAM-2)
To the holes where the transport screws have been removed, insert
the plastic transport screw taps found in the accessories bag.
(DIAGRAM-3)
The transportation screws, that have been removed from the machine
should be kept in hand for any other transportation necessities.
DIAGRAM-2
DIAGRAM-1 DIAGRAM-3
ADJUSTMENT OF FEET
Do not install your machine on rugs or similar surfaces.
For your machine to work silently and without any vibration, it should
be settled on a flat, non-slippery and tough ground.
30
Page 34
You can adjust the balance of your machine from its feet.
First, loosen the plastic adjustment nut.
Adjust by rotating the feet upwards or downwards.
After the balance has been reached, tighten the plastic adjustment
nut again by rotating it upwards.
Never put cartons, wooden blocks or similar materials under the
machine to balance the irregularities on the level of the ground.
ELECTRICAL CONNECTION
Your washing machine works with 220-240V and 50Hz.
A special grounded plug has been attached to the network cable of
your washing machine. This plug must definitely be inserted to a
grounded socket with 10 ampere. The fuse flow value of the
electricity line attached to this should also be 10 ampere. If you have
no such sockets and fuses in your house, let it be made by a qualified
electrician.
Our company will not be responsible for any damages that may
occur as a result of usage without grounding.
WATER SUPPLY CONNECTION
Your machine has a single water (cold) inlet.
To prevent from the leakages on the connection joints, 1 seal is
included in the hose packing.(Fit this seal on the end of the water
inlet hose at the tap side.)
Connect the end with bracket of the water inlet hose to the water inlet
valve at the rear of the machine and the other end to your tap. In
situations where you are not assured, let a qualified plumber make
the connection works.
Water pressure of 0,1-1 MPa from your tap will enable your machine
to work more efficiently.(0,1 MPa pressure means water flow of more
than 8 liters in 1 minute from a fully opened tap)
After connections are completed, check for the non-leakage of the
connection joints by turning on your tap completely.
Be sure that water inlet hoses are not folded, broken or crushed.
Mount the water inlet hoses to a 3”/4, geared water tap.
31
Page 35
Cold water inlet
WATER DRAIN CONNECTION
Be sure that water inlet hoses are not folded, twisted, crushed or
elongated by stretching.
Water drain hose should be mounted at a height of minimum 60 cm,
maximum 100 cm from the ground.
The end of the water drain hose may directly be fitted to the dirty
water outlet hole or a special apparatus mounted on the outlet
bracket of the wash-stand.
Never attempt to extend the water drain hose by adding extra parts.
32
Page 36
SECTION 3:TECHNICAL SPECIFICATIONS
442/542/
642/842/1042
Maximum dry laundry capacity (kg)
5
Recommended loading (kg)
4,5
Height (cm)
85
Width (cm)
59,6
Depth (cm)
51
Maximum spin cycle ( rpm )
400/500/
600/800/1000
(*) Maximum spin cycles depend on the model you’ve chosen
33
Page 37
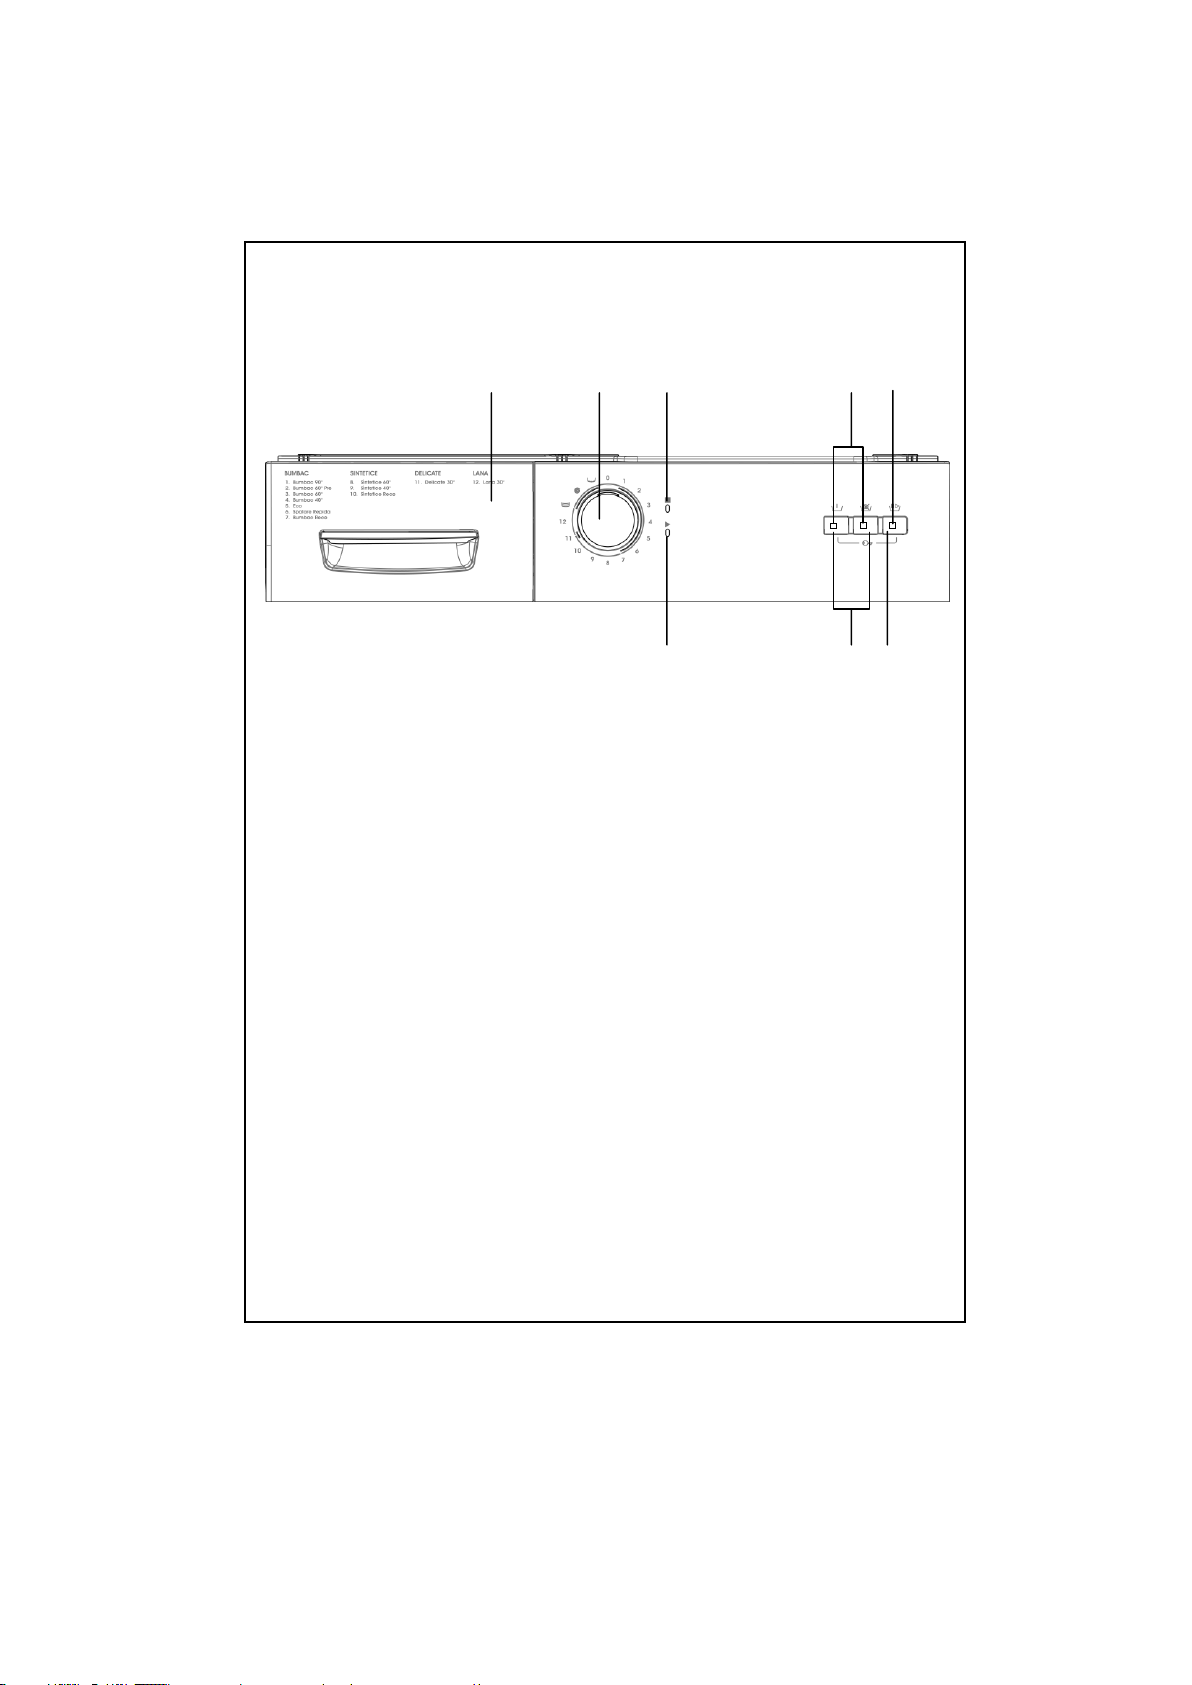
SECTION 4:CONTROL PANEL
1 2 3 4 5
6 7 8
1 Detergent drawer 5 Start/pause light
2 Program knob 6 Program ready light
3 Program end light 7 Function buttons
4 Function indicator lights 8 Start/pause button
Our product has electronic card and soft-touch buttons.To activate the
functions touch the buttons slightly.
34
Page 38
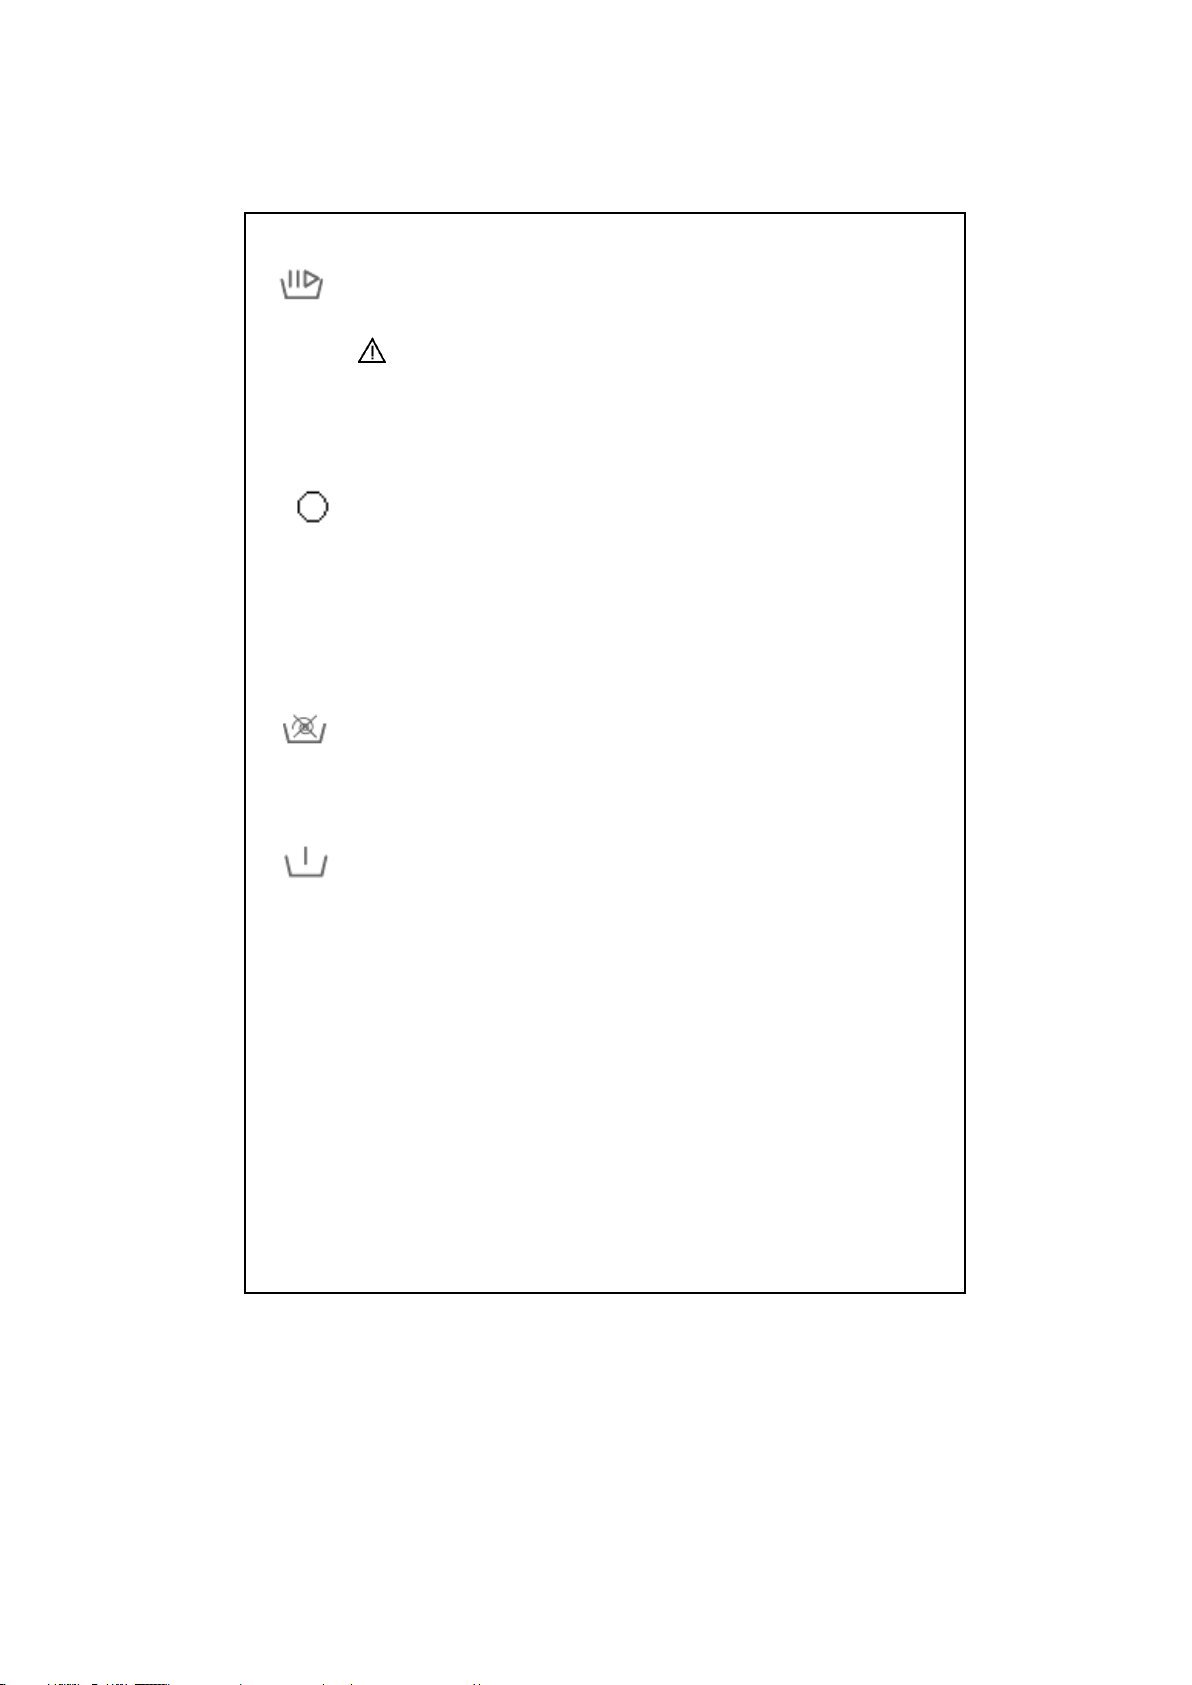
START/PAUSE BUTTON
Used to start a selected program or pause during running.
WARNING!
It is required for the program knob to be brought to O(off)
position before selecting the program or changing a continuing
program.
FUNCTION INDICATOR LIGHTS
When the start/pause button or any function button is pressed,the
corresponding light turns on.The light turns off when the function
button or start/pause button is re-pressed, or when the process
the selected function is completed.
The function indicator lights are also used in failure detection system
mentioned in section 9.
FUNCTION BUTTONS
No spin
This program is recommended to be used for your sensitive
clothes on which no spinning should be done. By pressing this
function button, you can cancel the spinning process which is
included in the program.
Prewash
With this function you can start an additional wash operation
for heavily soiled laundry. When you use this function you
must put detergent into the prewash compartment of the
detergent drawer. If the additional function features of your
machine contain this option and you will wash your laundry in
a prewash programme, the lamp above the function button
will automatically light up. Even if you press the function
button to cancel this feature it will not be cancelled at a wash
function with a prewash operation
35
Page 39
WARNING!
Functions vary depending on the model you have chosen.If you
forgot to use additional function and your machine starts to wash
push the additional function button if the indicator light is on.
Additional function will be activated.If the indicator light is not
on,additional function will not be activated.
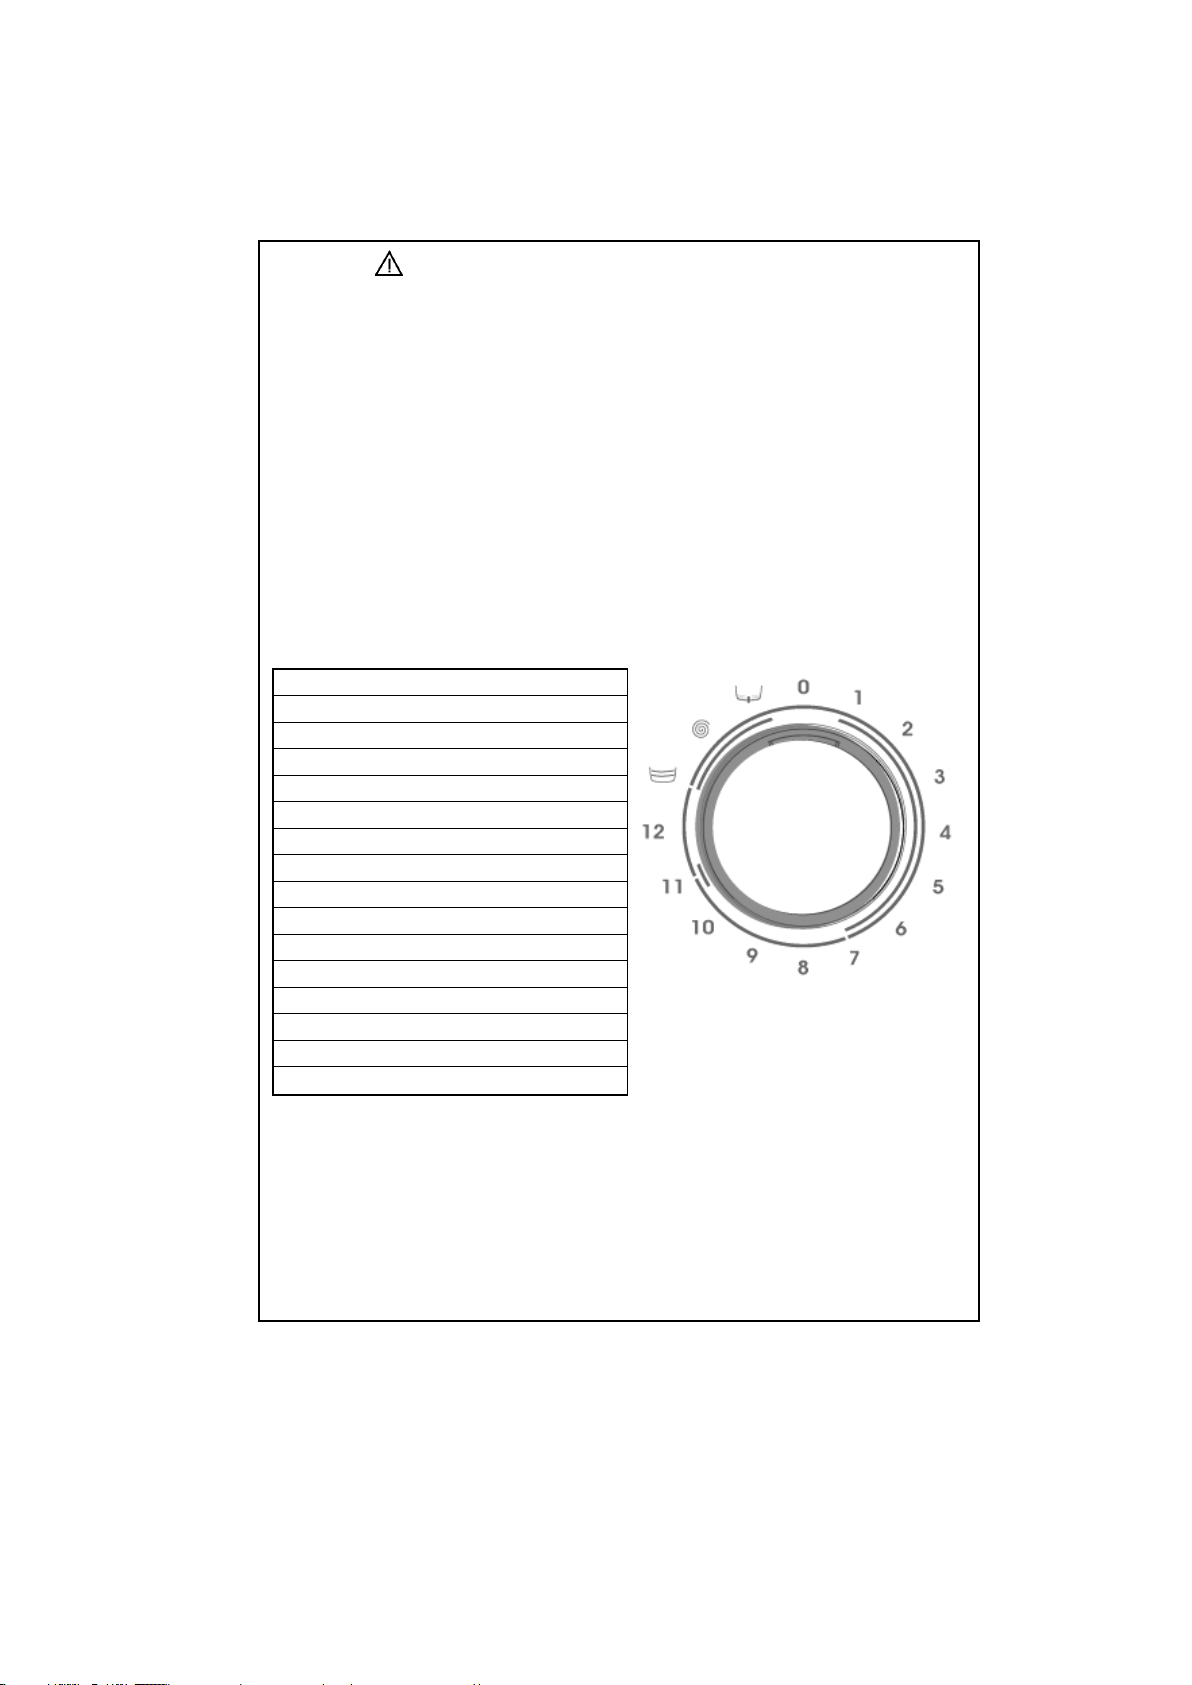
PROGRAM KNOB
With the program knob, you can select the program with which you desire to
wash your clothes. You can adjust the program selection process by turning
the program knob in both directions. You must be careful that the adjustment
sign of the program knob is exactly on the program you want to select. When
you bring the program knob to O(off) position, while your machine is running,
your program will remain incomplete.
1-Cotton 90°C
2-Cotton 60°C with prewash
3-Cotton 60°C
4-Cotton 40°C
5-Eco wash
6-Quick wash
7-Cotton cold
8-Synthetic 60°C
9-Synthetic 40°C
10-Synthetic cold
11-Delicate 30°C
12-Wool 30°C
Rinsing
Spin
Draining
OFF
36
Page 40

SECTION 5: WASHING YOUR LAUNDRY
Plug the machine.
Open the tap water.
First wash cycle
There may be water left inside your machine after factory tests and trials.It is
recommended that the first wash cycle should be made without any laundry
so that carry out this water; pour half a measuring cup of normal allpurpose
detergent into compartment 2 and select cotton program at 90°C.
BEFORE WASHING
Discrimination of your laundry
Discriminate your clothes according to their types (cotton, synthetic,
sensitive, woolen, etc.),washing temperatures and level of dirtiness.
Never wash your white and coloured clothes together.
Since your new coloured clothes may shed dye on the first wash,
wash them separately.
Be careful that no metal pieces are found on or in the pockets of your
clothes, remove if there is any.
Zip and button your clothes.
Remove the plastic or metal hooks of the curtains and laces or place
them inside a washing bag and tie.
37
Page 41

Pull the textiles like trousers,knitted fabric,t-shirt and sweat shirt
inside out.
Wash your small clothes like socks and handkerchiefs in a washing
bag.
Wash up tol 90 ˚C Wash up to 60 ˚C Wash up to 30 ˚C Not washable in
washing machine
Placement of the clothes into the machine
Open the door of your machine.
Fill your clothes in your machine in a well-spread manner.
Place each cloth separately.
When you shut the door of your machine, be careful that no cloth is
jammed between the cover and the gasket.
Shut the door of your machine tightly otherwise your machine will not
start the washing process.
Filling detergent in the machine
The quantity of the detergent that you will fill in your machine depends on the
following criteria:
Your detergent consumption will change according to the dirtiness
level of your clothes. For your slightly dirty clothes, do not pre-wash
and put a small amount of detergent in the compartment no.2 of the
detergent drawer.
For your excessively dirty clothes, select a program with pre-
washing, fill ¼ portion of the detergent you will put in compartment
1 in the detergent drawer and the remaining portion in compartment
2.
In your machine,use the detergents developed especially for
automatic washing machines. The quantities that will be used for
your clothes are written on the packing of the detergents.
As the hardness of your water increases, the amount of the
detergent to be consumed will also increase.
As the amount of your clothes increases, the amount of the
detergent to be consumed will also increase.
Fill your softener in the softener compartment in your detergent
drawer. Do not exceed the MAX level. Otherwise, the softener will
diffuse in the washing water via the siphon.
The softeners with high density should be diluted with some water
before filling in the drawer. That is because the softener with high
density obstructs the siphon and prevents the flow of the softener.
38
Page 42

You can use fluid detergents in all programs without pre-washing.
For this, mount the fluid detergent level plate in the second
compartment of the detergent drawer and arrange the amount of
fluid detergent according to the levels on this plate.
RUNNING THE MACHINE
Program selection and features
Select the program and additional functions appropriate for your clothes from
Table-1.
Just for the fist run please choose a program and press Start/pause button for
4 seconds,before putting your load in.This is necessary for unloading the
water that is left after the production and tests.
Start/Pause
By pressing this button, you can start the program you have selected or
pause a running program.
Starting the program
Adjust the program knob to a program you desire.
The program ready light will be on.
If you want, you can select one or more additional functions.
Run the program which you have selected by pressing the
Start/Pause button.
Changing the program
If you have selected a program and you do not want if to continue:
Press the start/pause button.
Bring the program knob to O(off) status.
Adjust the program knob to the program you desire.(You can select
the program that you desire from Table-1).
The program ready light will be on.
By pressing the start/pause button, run the program which you have
selected.
Cancellation of the Program
If you desire to end a running program early:
Press the start/pause button.
Turn the program knob to O(off) status.
Turn the program knob to “Draining” or “Spinning” programs.
The program ready light will be on.
Run the program you have selected by pressing the start/pause
button.
Program ending
Your machine will automatically stop when the program you have
selected ends.
39
Page 43

The door will be unlocked in approximately two minutes after the
program ends.You can open the door by pulling the handle of the
door towards yourself and take out your clothes.
After you unload your clothes leave the door open to dry the interior
of your machine.
Unplug your machine.
Close the water tap.
WARNING!
If the power is off end on again after a while on any stage of the washing
program, your machine will continue the program from the point where it was
interrupted. This is not harmful for your machine.
Child lock
Child lock is used in order to protect the washing cycle from the effects of
unwanted button activations during the cycle.Child lock is activated by
pressing the first and third button on the control panel at the same for more
than 3 sec.When child lock is activated,LEDs on the function buttons blink to
indicate that child lock is active.In order to deactive child lock, the same
buttons (1st and 3rd) should be pressed again for more than 3
seconds.Deactivation of child lock is shown by blinking of LED on Start/Pause
button.
SECTION 6: MAINTENANCE AND CLEANING
Unplug your machine.
Close the water tap.
WATER INLET FILTERS
On the tap part of your machine’s water inlet hose and at the ends of water
inlet valves, there are filters to prevent entrance of the dirt and foreign
materials in the water to the machine. If the machine is unable to receive
sufficient water although your water tap is opened, these filters should be
cleaned.
40
Page 44
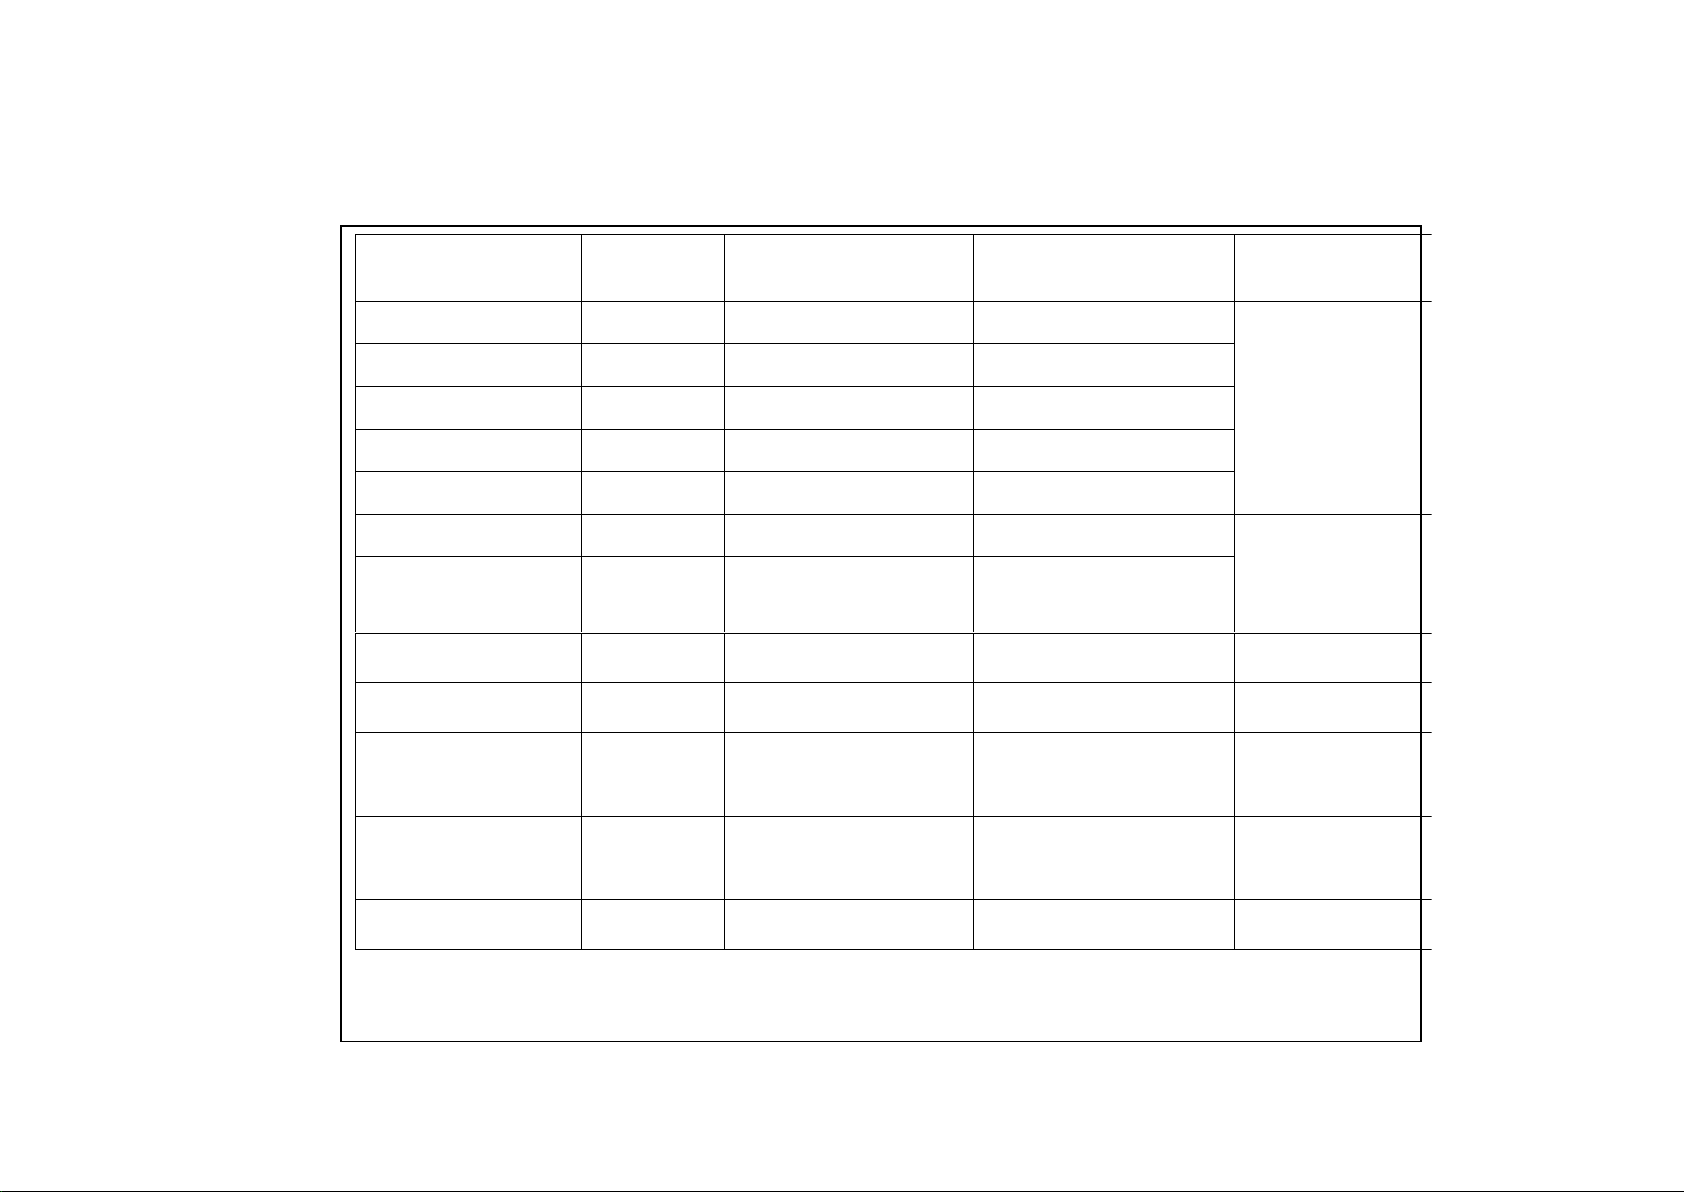
PROGRAM
DETERGENT
COMPART.
MAX DRY LOAD CAPACITY (kg)
TYPE OF LAUNDRY
EXPLANATIONS
1-COTTON 90˚
2
5
Dirty, boil, cotton and linen
textile
Underwears, sheet,
table cloth, t-shirt,
shirt, towel (max.2,5
kg)
2-COTTON 60˚
(PREWASH)
1+2
5
Very dirty, cotton, coloured
and linen textile
3-COTTON 60˚
2
5
Dirty, cotton, coloured and
linen textile
4-COTTON 40˚
2
5
Dirty, cotton, coloured and
linen textile
5-ECO WASH
2
5
Dirty, cotton, coloured and
linen textile
6-QUICK WASH
2
2,5
Slightly dirty, cotton, coloured
and linen textile
7-COTTON COLD
2
5
Slightly dirty cotton, coloured
and linen textile. Washed
without heating the tap water.
8-SYNTHETIC 60˚
2
3
Dirty, synthetic or synthetic
mixture textile
Nylon socks, blouse
9-SYNTHETIC 40˚
2
3
Slightly dirty, synthetic or
synthetic mixture textile
Nylon socks, blouse
10-SYNTHETIC COLD
2
3
Slightly dirty, synthetic or
synthetic mixture sensitive
laundry.Washed without
heating the tap water.
Nylon socks, blouse
11-DELICATE 30˚
2
2
Slightly dirty, cotton,
coloured, synthetic or
synthetic mixture sensitive
laundry
Silk mixture, shirt,
blouse, polyester,
poliamid, mixture
textile
12-WOOL 30˚
2
2
Dirty, hand and machine to
wash wool laundry
All wool laundry
TABLE-1
41
Page 45
PROGRAM
DETERGENT
COMPART.
ADDITIONAL FUNCTION
BUTTON
MAX DRY LOAD
CAPACITY (kg)
TYPE OF LAUNDRY
EXPLANATIONS
RINSING
When you need an additional rinsing to be done to your clothes after the washing process, you can use this
program for all kinds of clothes.
SPINNING
When you need an additional spinning to be done to your clothes after the washing process, you can use this
program for all kinds of clothes.
DRAINING
This program is used to drain the dirty water inside after the washing process of your machine. If you want
the water inside your machine to be drained before the program ends, you can use this program.
TABLE-1 CONTINUE
(*) You can use softeners in all programs (except spinning and draining programs) optionally. When you arrange the quantity of the softener, comply with the warning of
the softener producer. Fill your softener in its (softener) compartment of the detergent drawer.
Program duration, energy consumption and water consumption values may vary according to wash load weight and type, selected extra functions, tap water and
ambient temperature.
42
Page 46
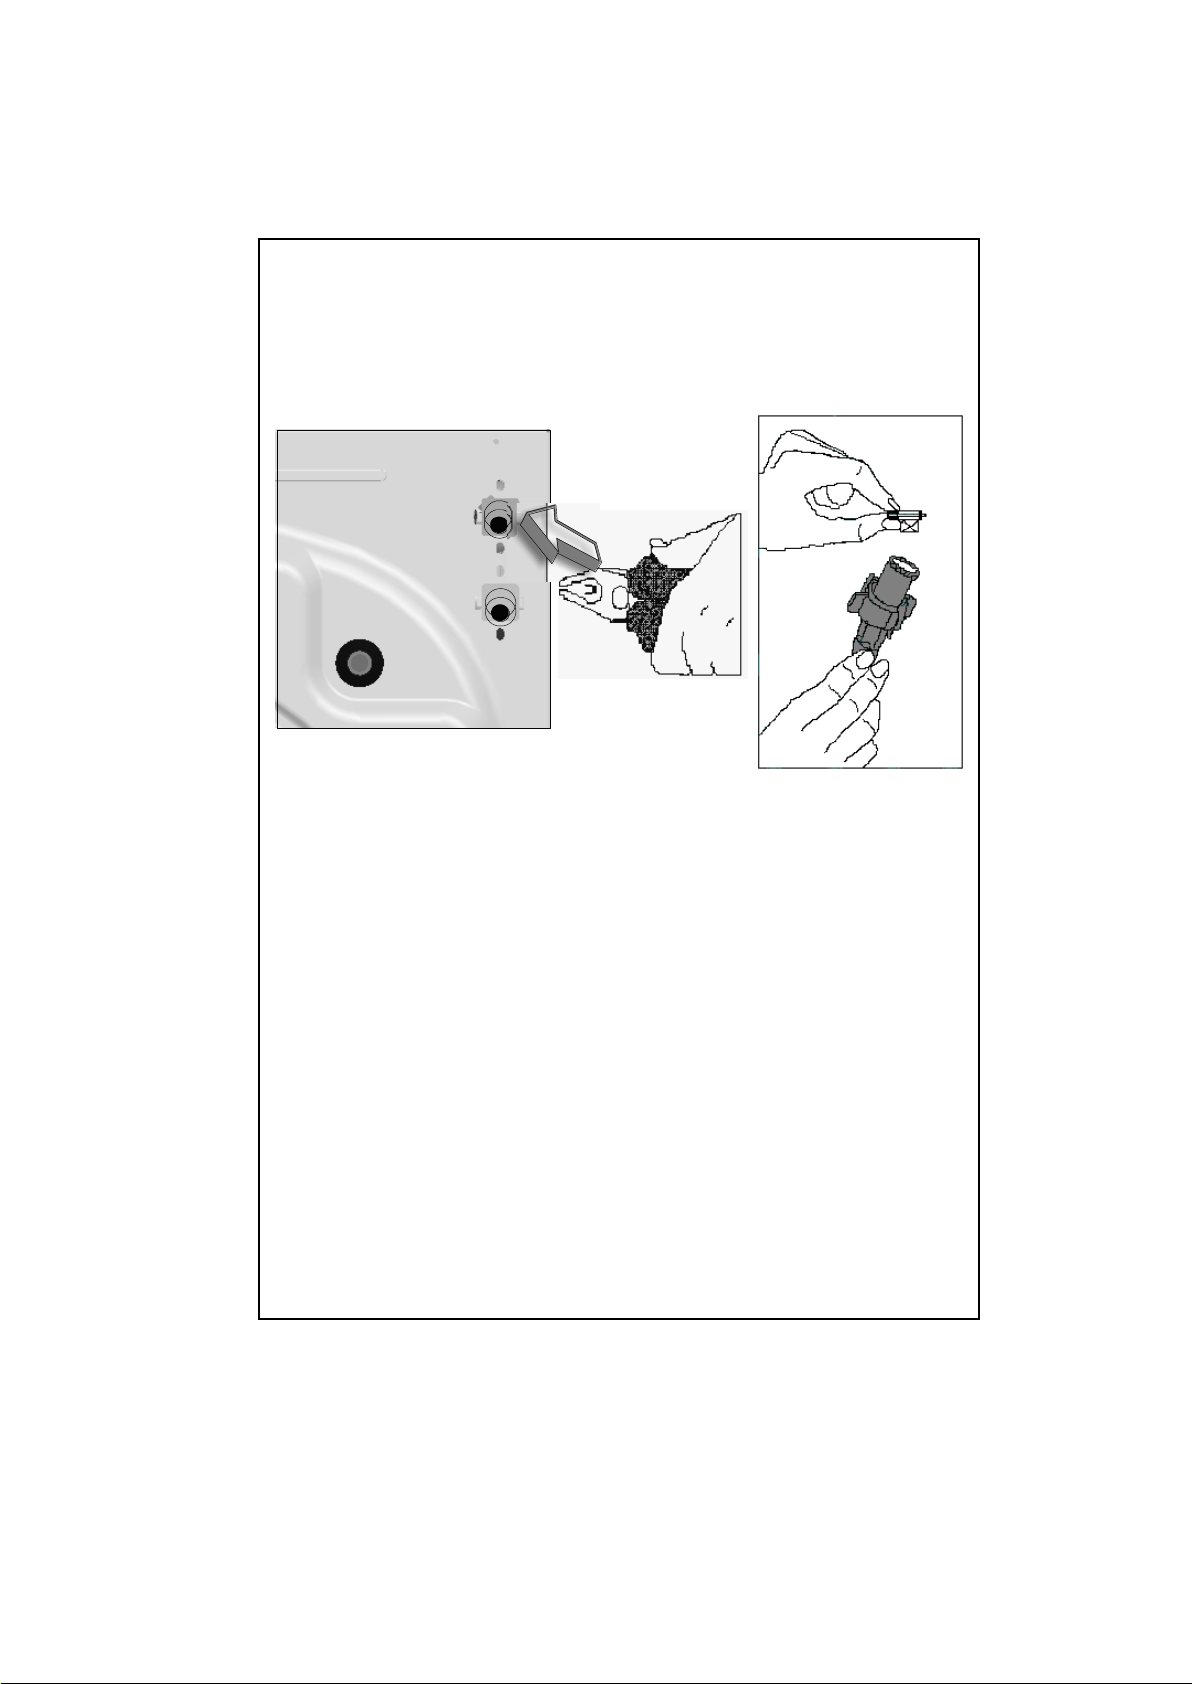
Remove the water inlet hose.
Remove the filters found on the water inlet valves by using a pincer
and wash thoroughly with a brush.
Clean the filters of the water inlet hoses located on the tap side by
removing manually together with the seal.
After you clean the filters, you can fit them the same way as you have
removed.
PUMP FILTER
The pump filter system elongates the life of your pump, which is used to drain
the dirty water. It prevents lint to enter the pump. Cleaning of your pump filter
in every 2-3 months is recommended. To clean your pump filter:
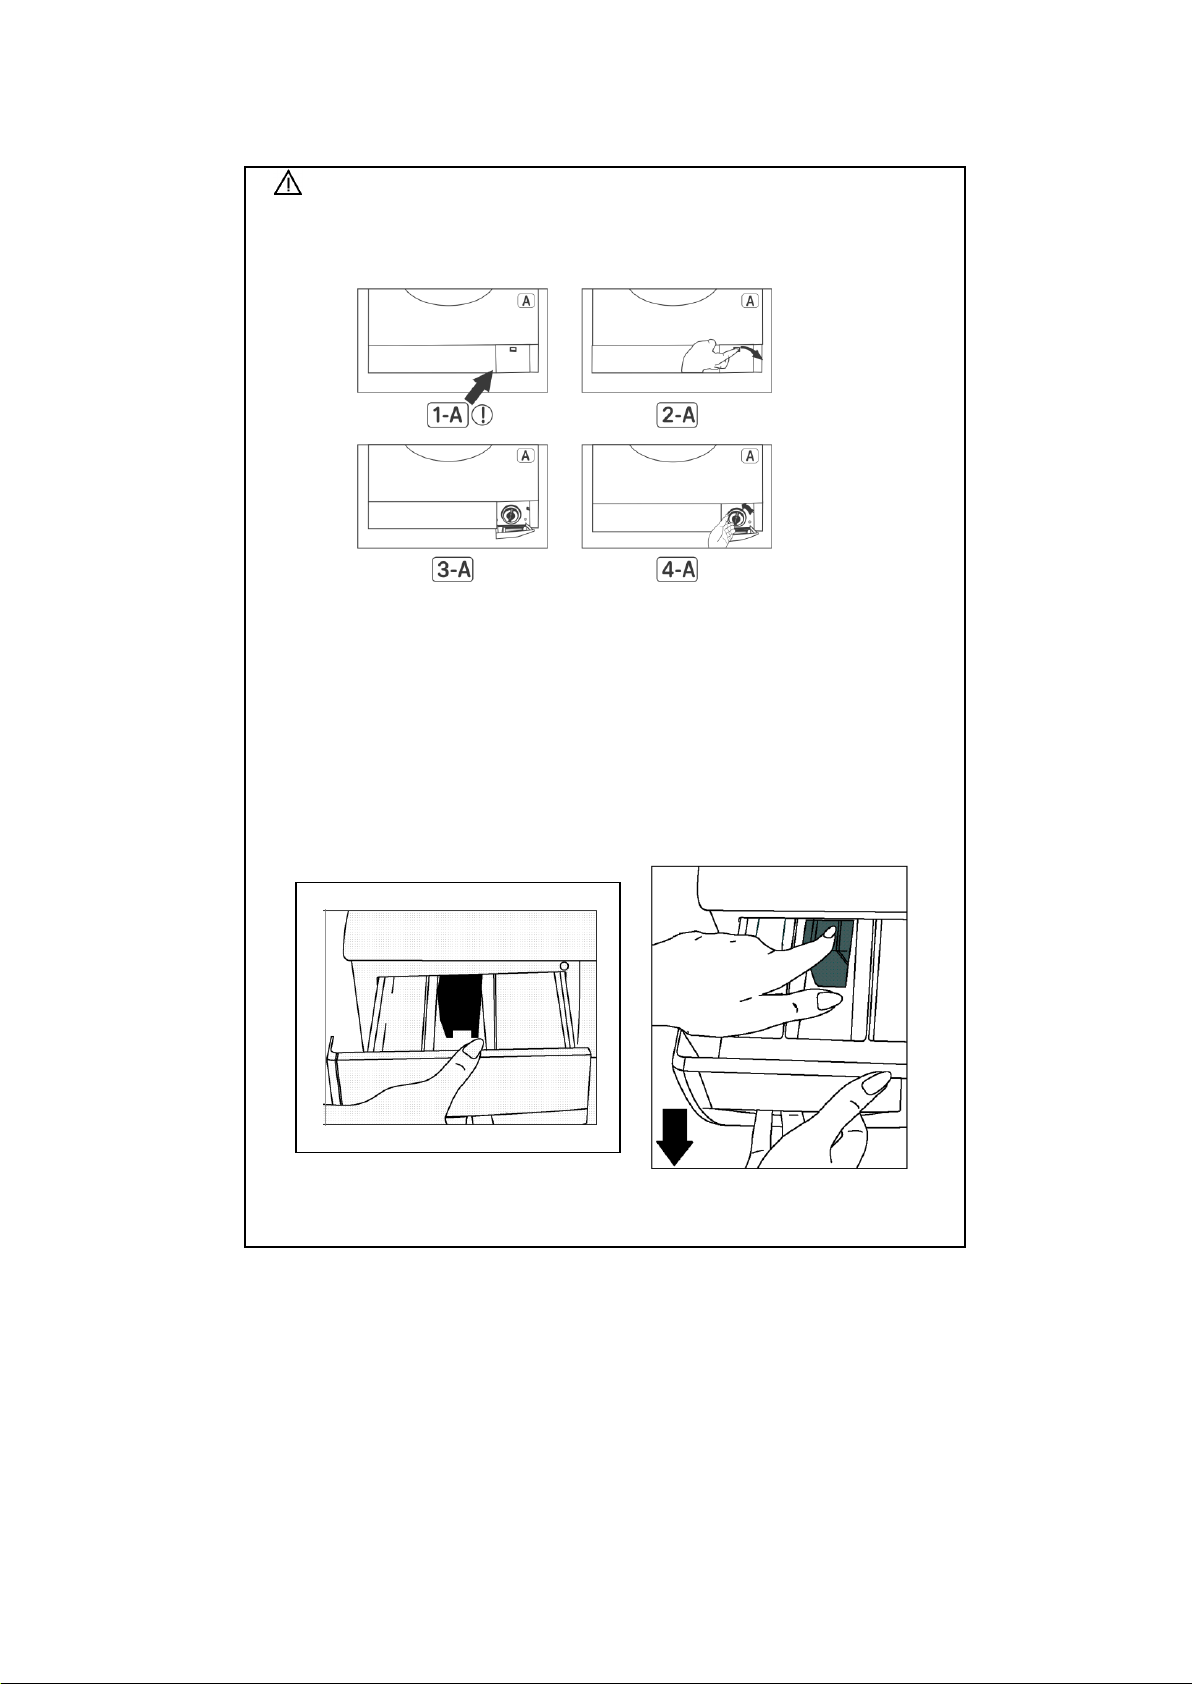
Open the kickplate’s cover, by pulling the handle.
Before opening the filter cover,place a cup in front of the filter cover
to prevent flow of the remaining water in the machine.
Loosen the filter cover by rotating it counter clockwise and drain the
water.
Remove the foreign materials from the filter.
Check for the rotation of the pump manually.
After you have cleaned the pump, fit the filter cover by rotating
clockwise.
Put the kickplate cover into the place.
Do not forget that if you do not fit in the filter cover properly, it will
leak water.
43
Page 47
WARNING!
Danger of being scalded!
Since the water inside the pump maybe hot, wait for it to cool.
DETERGENT DRAWER
Detergents may form a sediment in your detergent drawer or in housing of the
detergent drawer in time. To clean the sediment, pull out the detergent drawer
from time to time.To pull out the detergentdrawer:
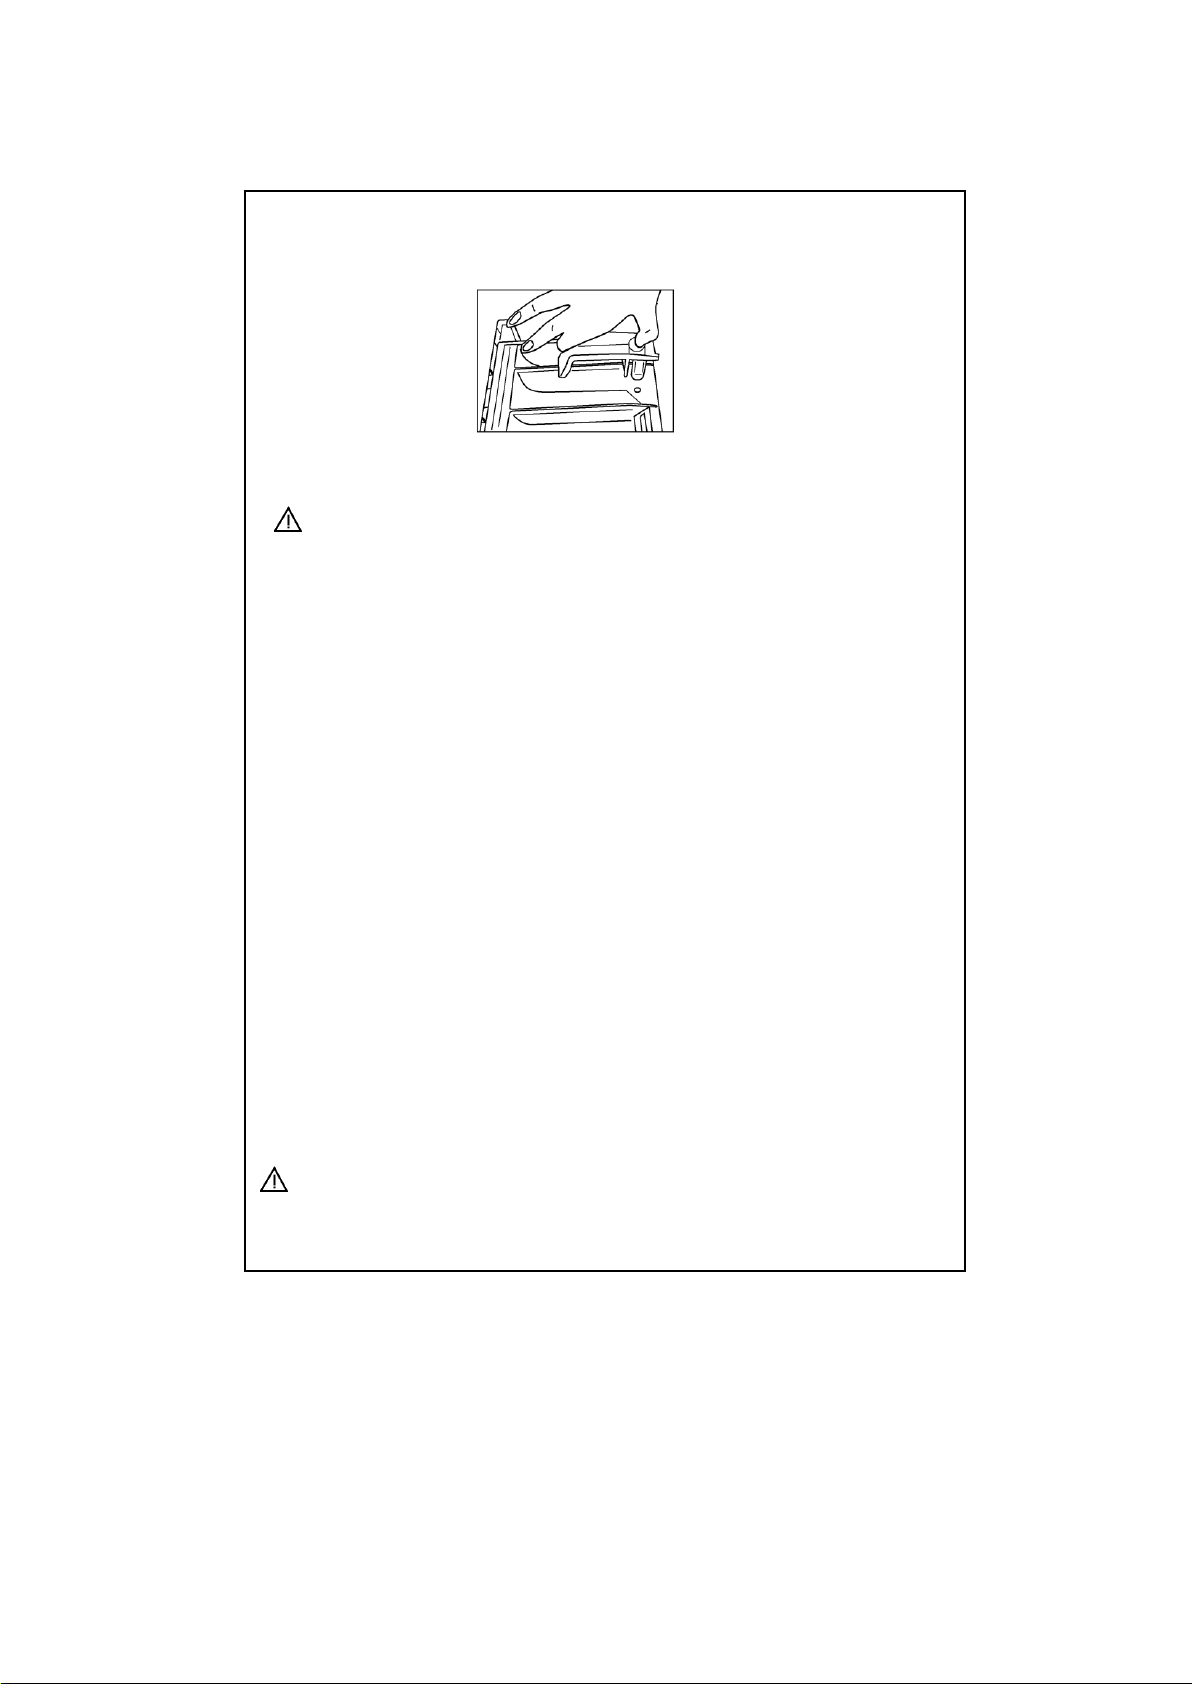
Pull the detergent drawer to the end.(DIAGRAM-1)
Lift the front of the drawer, continue to pull until the drawer is pull
out.(DIAGRAM-2)
Wash will an old toothbrush and excessiveamount of water.
Take off the leftover detergent avoid to drop into your machine.
After drying the detergentdrawer put into the housing in the same manner
you pull out.
DIAGRAM-1 DIAGRAM-2
44
Page 48
SIPHON PLUG
Pull out the detrgent drawer. Remove the siphon plug and clean the residues
of the softener thoroughly. Fit the cleaned siphon plug in its location. Check if
it placed properly.
THE CABINET
Clean the exterior surface of the cabinet of your machine with lukewarm water
and a cleaning substance that will not irritate the cabinet. After rinsing with
clean water, wipe it with a soft and dry cloth.
WARNING!
If the machine is installed in a location where the ambient temperature can fall
below 0 ˚C, do the following when it will not be in use:
Plug in the machine.
Close the water tap and pull out the water inlet hose or hoses from
the tap.
Place the ends of the water drain and water inlet hoses in a cup on
the ground.
Adjust the program knob to “Draining” program.
The program ready light will be on.
Run the program by pressing the start/pause button.
Unplug your machine when the program is over (program end light is
on).
When you complete these proces, the remaining water inside the machine will
be drained and thus formation of ice in the machine will be prevented. When
you operate your machine again, be sure that the ambient temperature is
above 0 ˚C.
THE DRUM
Do not leave metal parts like needles, staples or coins inside your machine.
These pieces cause formation of rust stains in the drum. To eliminate these
stains of rust, use a cleaning substance without chlorium and follow the
warnings of the cleaning substance producer. For cleaning of the rust stains,
never use dish-washing wires or similar rough objects.
REMOVE OF LIME FROM YOUR MACHINE
If you arrange the amount of the detergent you use in your machine properly,
there will be no need for lime removal. However, if you desire to apply the
removal procedure, use the lime protectors in the market and pay attention to
their warnings.
WARNING!
The lime eliminating substances contain acids and this may cause colour
modifications in your clothes along with an adverse effect on your machine.
45
Page 49
SECTION 7:PRACTICAL INFORMATION
Alcoholic beverages: The stain point, should first be washed
with cold water, than should be wiped with glycerine and water
and be rinsed with water mixed with vinegar.
Shoe Polish: The stain should be slightly scratched without
ruining the cloth, rubbed with detergent and rinsed. In case it is not
eliminated, it should be rubbed with 1 unit of pure alcohol (96
degrees) mixed in 2 units of water and then washed with
lukewarm water.
Tea and coffee: Stretch the stained area of your cloth on the top
of a container and pour water as hot as the type of your cloth can
endure on it. If the type of your cloth is suitable,wash it with lye.
Chocolate and cocoa: By leaving your clothes in cold water and
rubbing with soap or detergent, wash it in the highest temperature
that the type of your cloth can endure. If there is still a stain of oil
left, wipe with oxygenated water (in proportion of 3%).
Tomato paste:After scraping the dried pieces without ruining the
cloth, leave in cold water for about 30 minutes and wash by
rubbing with detergent.
Meat broth-egg: Eliminate the dried stain residues and wipe with
a sponge or soft cloth wetted in cold water. Rub with detergent
and wash with diluted lye.
Grease and oil stains: First wipe the residues. Rub the stain with
detergent and then wash with lukewarm soapy water.
Mustard: First apply glycerine to the stained area. Rub with
detergent and then wash. If the stain still does not disappear, wipe
with alcohol (On synthetic and coloured cloth, a mixture of 1 unit
alcohol, 2 units water should be used)
Blood stain: Lay your clothes in cold water for 30 minutes. If the
stain still does not disappear, lay in mixture of water and ammonia
(3 table-spoons of ammonia in 4 liters of water)for 30 minutes.
Cream, ice-cream and milk: Lay your clothes in cold water and
rub the stained area with detergent. If the stain has still not
disappeared, apply lye on the fabric of your clothes in proper
proportion.(Do not use lye on coloured clothes.)
46
Page 50
Mould: Mould stains should be cleaned as soon as possible. The
stain should be washed with detergent, and if it does not
disappear, it should be wiped with oxygenated water (in
proportion of 3%).
Ink: Hold the stained area under cold water and wait until the inky
water completely runs off. Then rub with water diluted with lemon
juice and detergent, wash after waiting for 5 minutes.
Fruit: Stretch the stained area of your clothes on the top of a
container and pour cold water on it. Do not pour hot water on the
stain. Wipe with cold water and apply glycerine. Wait for 1-2 hours
and rinse after wiping with a few drops of white vinegar.
Grass stain: Rub the stained part with detergent. If the type of
fabric is suitable for use of lye, wash it with lye. Rub your woolen
clothes with alcohol.(For coloured ones, a mixture of 1 unit pure
alcohol and 2 units of water).
Oil Paint:The stain should be eliminated before it dries by
applying thinner on it. Then it should be rubbed with detergent and
washed.
Burnt stain: If your cloth is suitable for use of lye, you can add lye
into your washing water. For woolen fabric, a cloth damped in
oxygenated water should be covered on the stain and it should be
ironed with a dry cloth on it. It should be washed after rinsing well.
SECTION 8: AVOIDING MINOR FAULTS
All repairing which must be done on the machine should be done by
authorized service. When a repairing is required for your machine or you are
unable to eliminate the failure with the help of the information given below:
Unplug the machine.
Close the water tap.
Apply to the nearest authorized service station.
47
Page 51
FAILURE
PROBABLE CAUSE
METHODS OF
ELIMINATION
Your machine does not
operate.
It is unplugged.
Insert the plug into the
socket.
Your fuse is defected.
Change your fuse.
The electric power is
off.
Check the electric
power.
Start/pause button has
not been pressed.
Press the start/pause
button.
The program knob is in
O(off) status.
Bring the program
knob on the desired
status.
The door is not shut
properly.
Shut the door properly.
You should hear the
click.
Your machine does not
receive water.
Water tap is closed.
Open water tap.
The water inlet hose
may be bent.
Check the water inlet
hose.
The water inlet hose is
obstructed.
Clean the filters of
water inlet hose. (*)
The valve inlet filter is
obstructed.
Clean the valve inlet
filters. (*)
The door is not shut
properly.
Shut the door properly.
You should hear the
click.
Your machine is not
draining water.
The drain hose is
obstructed or bent.
Check the drain hose.
The pump filter is
obstructed.
Clean the pump filter.
(*)
The clothes are not
placed inside the
machine in a wellbalanced manner.
Spread the clothes
inside the machine in
an orderly and wellbalanced manner.
Your machine is
vibrating.
The feet of your
machine are not
adjusted.
Adjust the feet. (**)
Transportation screws
are not removed.
Remove transportation
screws. (**)
(*)See the section concerning the maintenance and cleaning of your machine.
(**)See the section concerning installations your machine.
48
Page 52
FAILURE
PROBABLE CAUSE
METHODS OF
ELIMINATION
Your machine is
vibrating.
There is a small
amount of clothes in
the device.
It does not prevent
operation of the
machine.
Excessive amount of
clothes are filled in the
machine or the clothes
are not placed in a
well-balanced manner.
Do not exceed the
recommended quantity
of clothes and spread
your clothes in the
machine in a wellbalanced manner.
Your machine touches
a ripid object.
Prevent your
machine’s leaning on a
tough place .
Excessive foam in the
detergent drawer.
Too much detergent
has been used.
Press the start/pause
button.In order to stop
the foam,dilute one
table-spoon of softener
in half liter of water and
pour it in the detergent
drawer.Press the
start/pause button after
5-10 minutes.Arrange
the amount of the
detergent properly in
the next washing
process.
Wrong detergent has
been used.
Use only the
detergents produced
for full automatic
machines.
The washing result is
bad.
Your laundry too dirty
for the program you
have selected.
Select a suitable
program. (see Table-1)
The amount of
detergent used is not
sufficient.
Use more detergent
according to the
detergent.
49
Page 53
FAILURE
PROBABLE CAUSE
METHODS OF
ELIMINATION
The washing result is
not good.
Clothes exceeding the
maximum capacity
has been filled in your
machine.
Put the clothes in your
machine in a manner
not to exceed its
maximum capacity.
Your water may be
hard.
Use the amount of
detergent according to
the declaration of the
detergent producer.
Distribution of the
clothes in your
machine is not wellbalanced.
Spread the clothes
inside the machine in
an orderly and wellbalanced manner .
The water is drained
from the machine as
soon as it is filled.
The end of the water
drain hose is in a
position too low
according to the
machine.
Place the water drain
hose in an appropriate
height.(**)
No water is seen in the
drum during washing.
No failure. The water is
at the lower part of the
drum.
-
There are residues of
detergent on the
clothes.
The pieces of some
detergents which do
not dissolve in water
may stick to your
clothes as white stains.
By calibrating your
machine for “Rinsing”
program,make an
additional rinsing or
eliminate the stains
After drying with the
help of a brush.
There are gray stains
on the clothes.
These stains may be
caused by oil,cream or
ointment .
In the next washing
operation, use the
maximum detergent
amount declared by
the detergent producer.
(**) See the section concerning instalations your machine.
50
Page 54
FAILURE
PROBABLE CAUSE
METHODS OF
ELIMINATION
The spining process is
not done or starts with
delay .
No failure. The
unbalanced load
control may works in
that way.
The unbalanced load
control system will try
to distribute your
clothes in a
homogenous manner.
After your clothes are
distributed, passage to
spining process will be
realized.In the next
washing process,place
your clothes into the
machine in a wellbalanced manner.
SECTION 9: AUTOMATIC FAILURE DETECTION SYSTEM
Your machine is equipped with systems which will both take the necessary
precautions and warn you in case of any failure by controlling it self constantly
during the washing processes.
FAILURE
CODE
FAILURE
INDICATOR
PROBABLE
FAILURE
THE PROCESS
TO BE DONE
Err 01
The start/pause
light blinks.
The door is not
shut properly.
Shut the door
properly so that
you hear the
click. If the
problem
persists, turn off
the machine
unplug and
apply to the
nearest
authorized
service
immediately.
51
Page 55
FAILURE
CODE
FAILURE
INDICATOR
PROBABLE
FAILURE
THE PROCESS
TO BE DONE
Err 02
The program
ready light
blinks.
The water level
in your machine
is below heater.
The pressure of
your water
supply may be
low or locking.
Turn on the tap
to the end.Water
may be cut,
check it.If the
problem is still
continuing,your
machine will
automatically
stop after a
while.Unplug
your machine,
turn off the tap
and apply to the
nearest
authorized
service.
Err 03
The start/pause
light and
program ready
light blinks .
The pump has
failed or the
pump filter is
obstructed.
Clean the pump
filter.If the
problem
persists,apply to
the nearest
authorized
service.(*)
Err 04
The program
end light blinks .
Communication
error
Shut down your
machine and
unplug. Turn off
your tap and apply
to the nearest
authorized service.
(*) See the section regarding the maintenance and cleaning of your
machine.
52
Page 56
FAILURE
CODE
FAILURE
INDICATOR
PROBABLE
FAILURE
THE PROCESS
TO BE DONE
Err 05
The start/pause
light and program
end light blink.
The heater of your
machine or the
heat sensor has
failed.
Shut down your
machine and
unplug. Turn off
your tap and apply
to the nearest
authorized service.
Err 06
The program
ready light and
program end light
blink.
The motor has
failed.
Shut down your
machine and
unplug. Turn off
the tap and apply
to the nearest
authorized service.
Err 07
The program
start/pause light,
ready light and
program end light
stays on
permanently.
Configuration
error.
Shut down your
machine and
unplug. Turn off
the tap and apply
to the nearest
authorized service.
Err 08
The start/pause
light,program
ready light and
program end light
blink.
Fault error
Shut down your
machine and
unplug. Turn off
the tap and apply
to the nearest
authorized service.
Err 09
The program
ready light and
program end light
stays on
permanently.
The network
voltage is too high
or too low.
If the network
voltage is lower
than 150V or
higher than 260V,
your machine will
automatically stop.
When the network
voltage is
recovered, your
machine will
continue its
operation.
53
Page 57
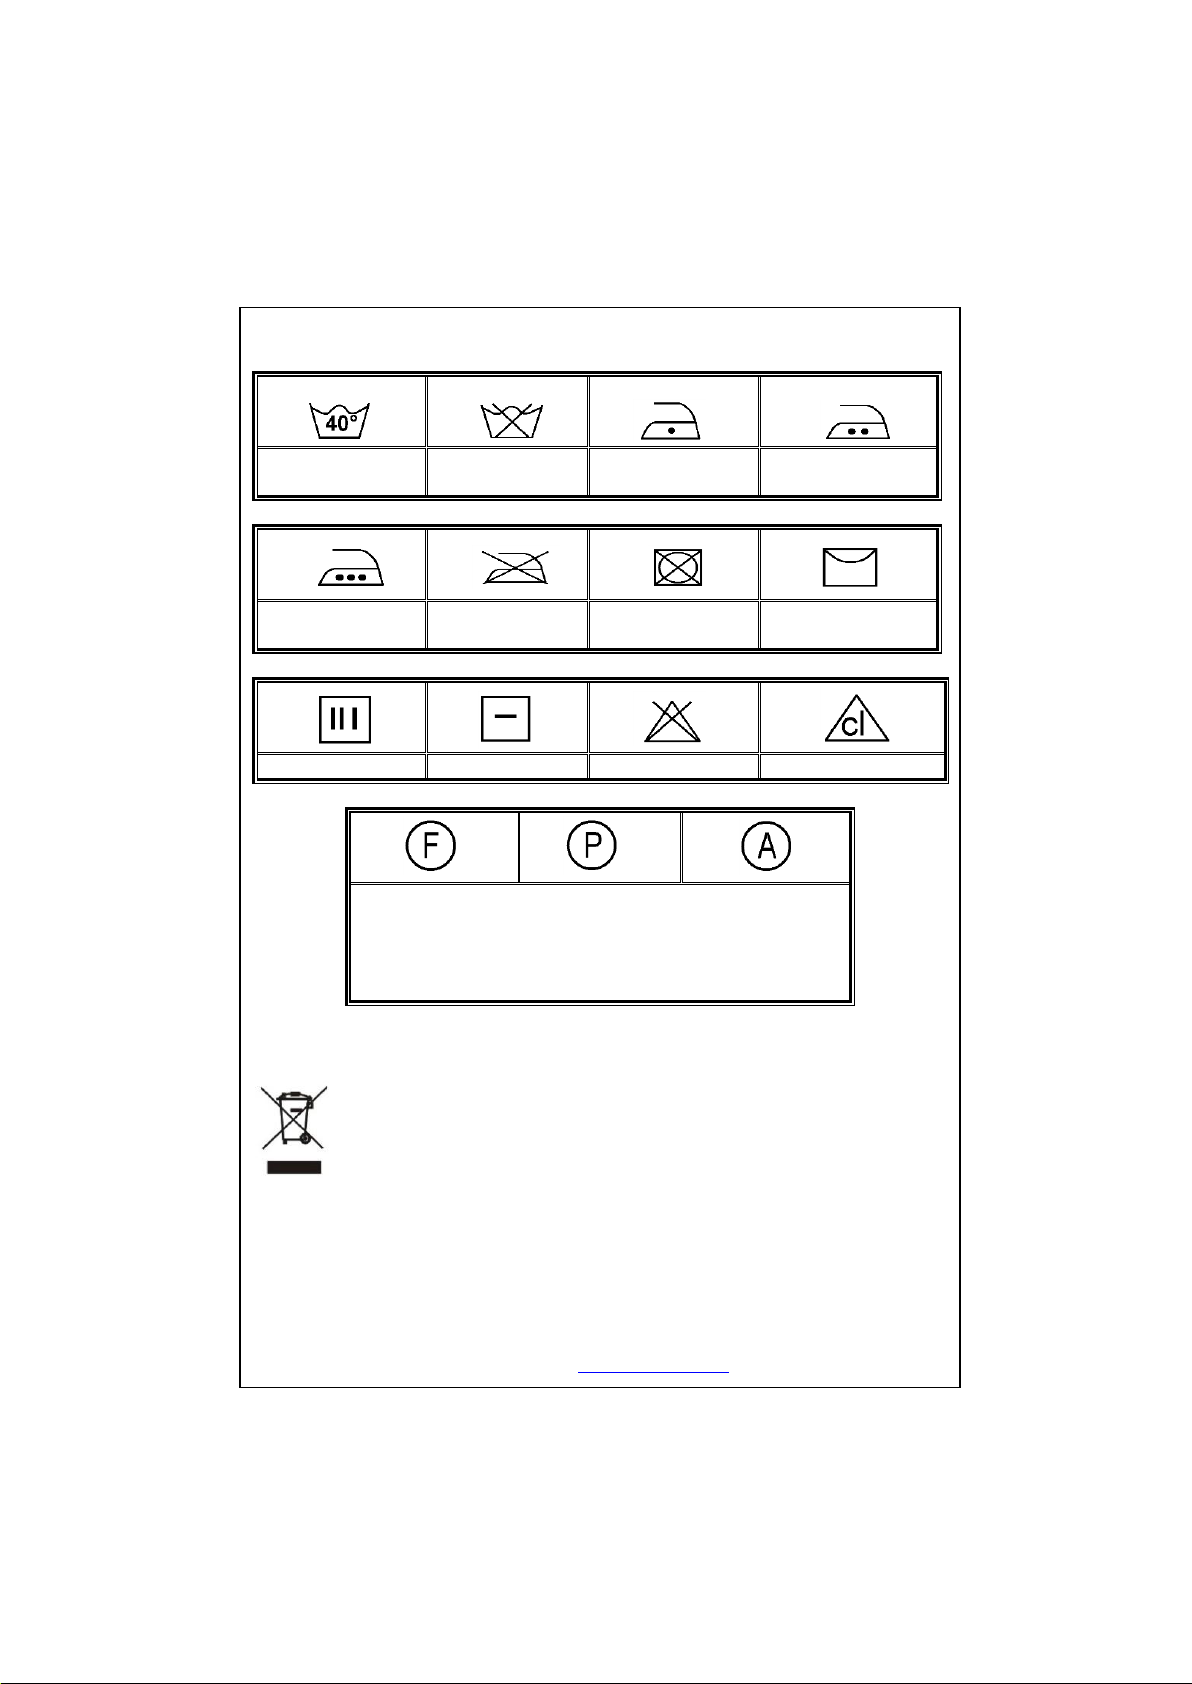
SECTION 10: INTERNATIONAL WASHING SIGNS
Washing
temparature.
Do not wash
(hand wash)
Lukewarm iron.
Medium hot iron.
Hot iron.
Do not iron.
Do not tumble
dry.
Hang to dry.
Drip dry.
Dry flat.
Do not bleach.
Handy to bleach.
All of these are dry cleaning symbols. The letters are
to instruct the cleaner what type of solvent to be used.
Garments bearing these symbols should not be
washed in your machine unless the label says
otherwise.
Environment friendly disposal
You can help protect the environment!
Please remember to respect the local regulations: hand in the non-
working electrical equipment’s to an appropriate waste disposal
center.
Importer: Asesoft Distribution
Europolis Logistic Park, Italia Street, 1-7, Chaijna, Ilfov, Romania
Tel: +4021 256 00 86, www.heinner.com
54
Page 58
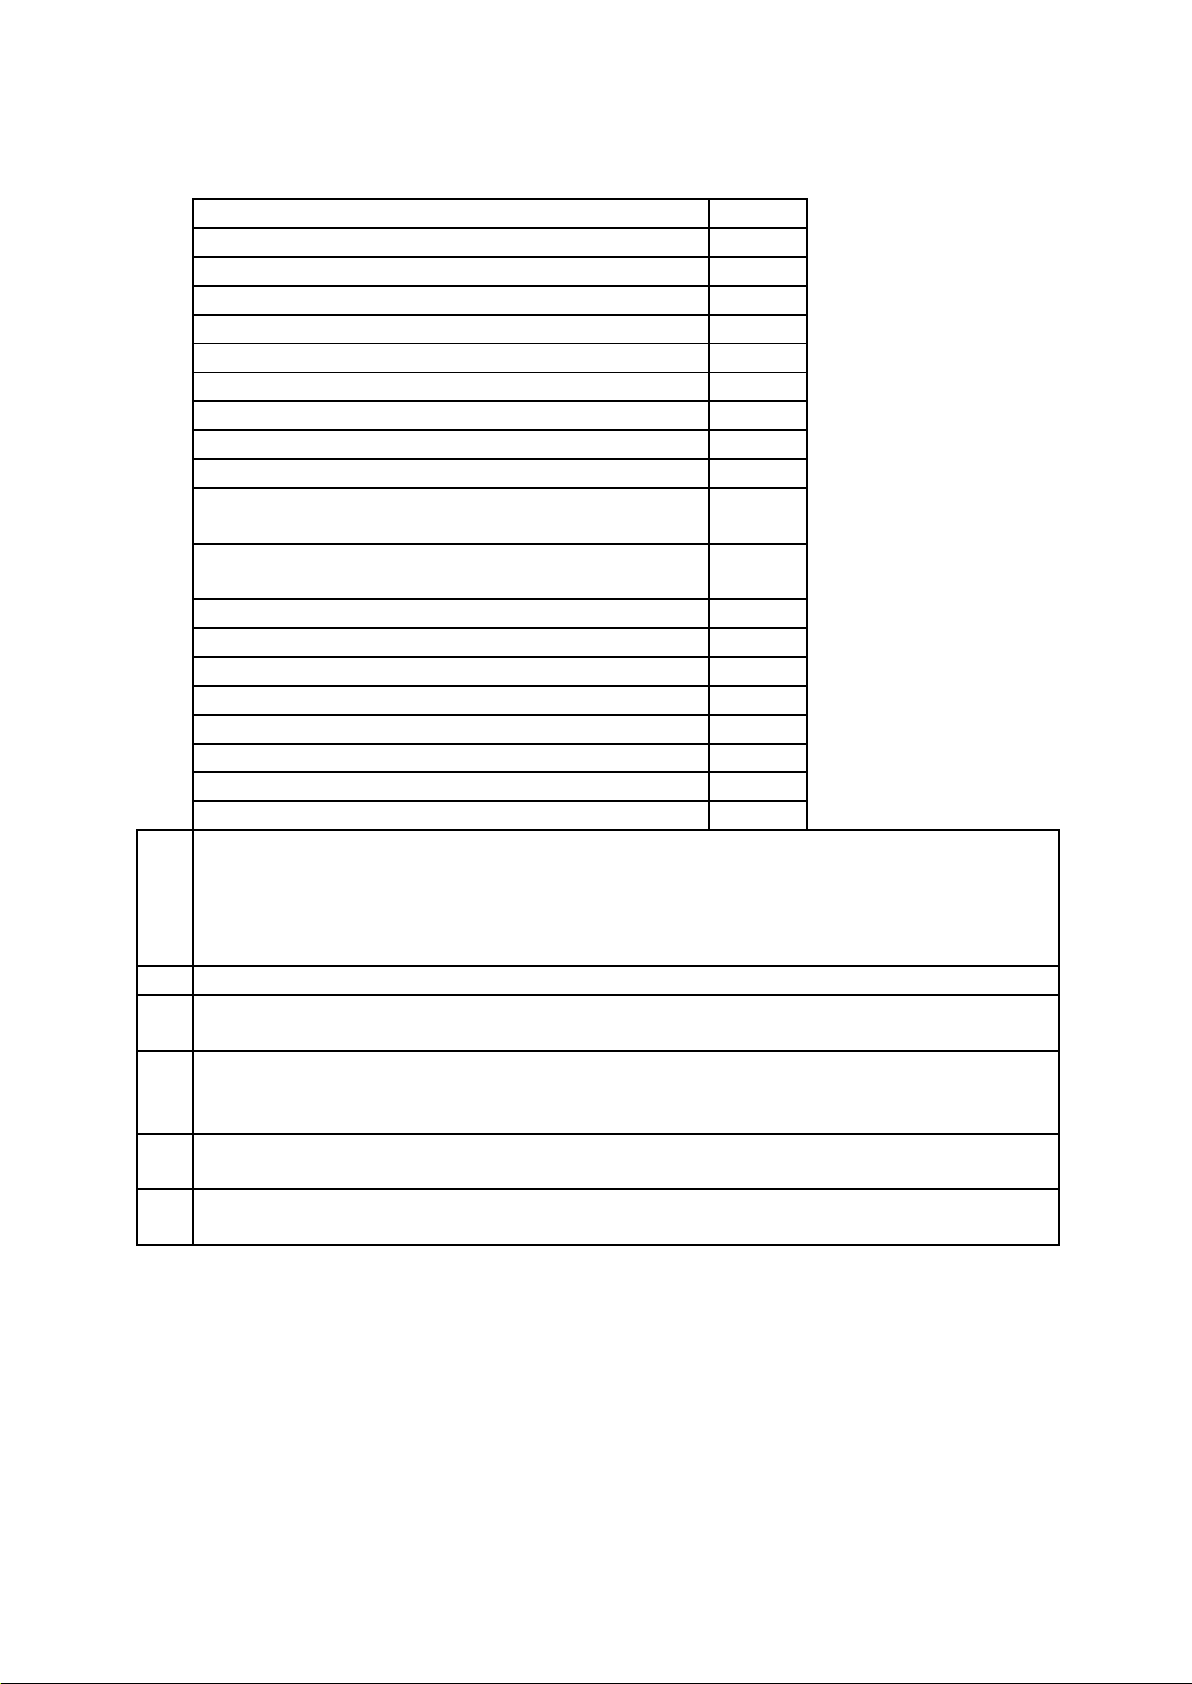
PRODUCT FICHE
Rated capacity (Cotton 60° full load) (kg)
5.0
Energy efficiency class
A+
Energy consumption (kWh/annum)*
167
Water consumption (L/annum)**
9240
Spin-drying efficiency class
C
Noise (Washing) (dB(A))
58
Noise (Spinning) (dB(A))
77
Max spin speed (rpm)***
1000
Remaining moisture content (%)***
62
Energy consumption (cotton 60° full load)(kWh/cycle)
0.85
Energy consumption (cotton 60° partial
load)(kWh/cycle)
0.66
Energy consumption (cotton 40° partial
load)(kWh/cycle)
0.52
Water consumption (Cotton 60° full load)(L/cycle)
43
Water consumption (Cotton 60° partial load)(L/cycle)
41
Water consumption (Cotton 40° partial load)(L/cycle)
41
Power consumption (off-mode)(W)
1.00
Power consumption (left-on mode)(W)
2.00
Program duration (min) (cotton 60° full load)
190
Program duration (min) (cotton 60° partial load)
145
Program duration (min) (cotton 40° partial load)
140
•
Programme number 3 (Standard 60 ° C cotton programme) and programme number 4
(standard 40 ° C cotton programme) are the standard washing programmes to which the
information on the label and the fiche relates, that these programmes are suitable to clean
normally soiled cotton laundry and that they are the most efficient programmes in terms of
combined energy and water consumptions.
•
The actual water temperature may differ from the declared cycle temperature.
•
Program duration, energy consumption and water consumption values may vary according to
wash load weight and type, selected extra functions, tap water and ambient temperature.
*
Based on 220 standard washing cycles for cotton programmes at 60°C and 40°C at full load
and partial load, and the consumption of the low-power modes. Actual energy consumption
will depend on how the appliance is used.
**
Based on 220 standard washing cycles for cotton programmes at 60°C and 40°C at full load
and partial load. Actual water consumption will depend on how the appliance is used.
***
Based on test results of standard 60 ° C cotton programme at full load and partial load, and
standard 40 ° C cotton programme at partial load.
Page 59
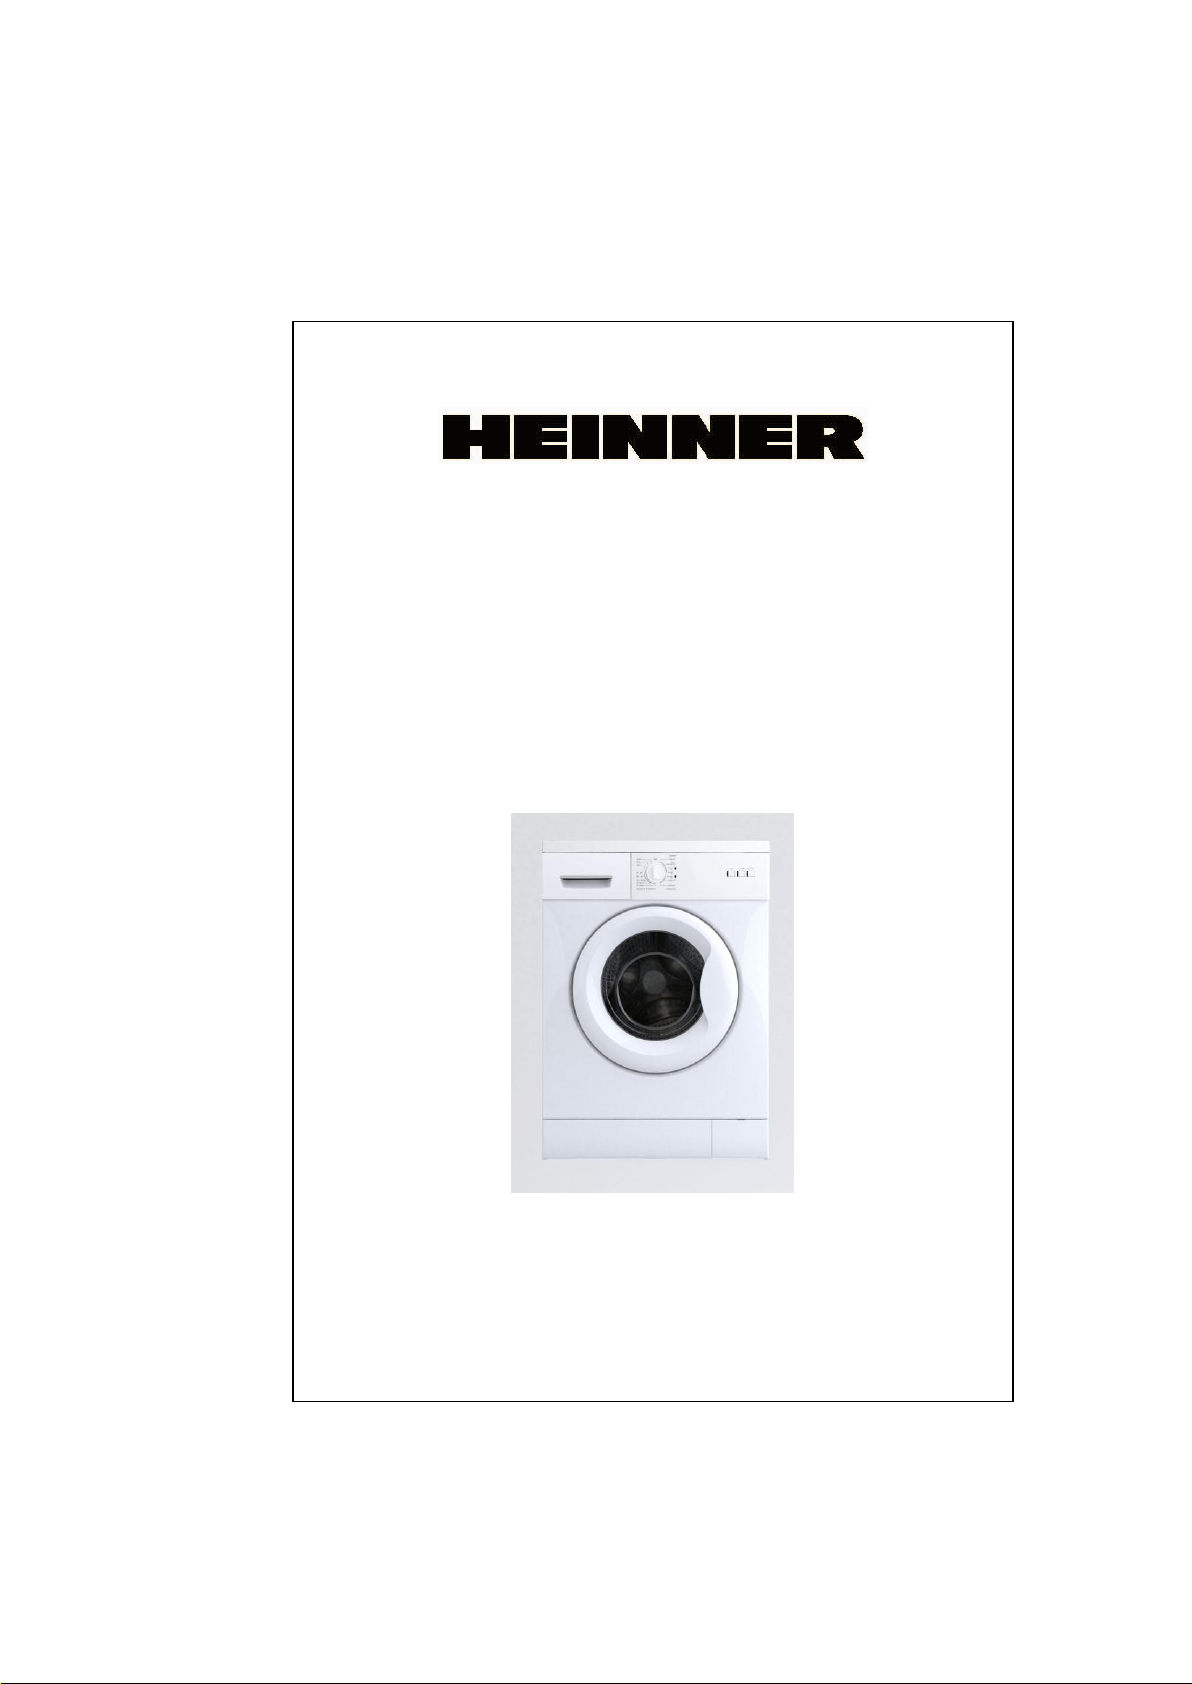
РЪКОВОДСТВО ЗА УПОТРЕБА
ПЕРАЛНА МАШИНА
HWM 5100
Захранване: 220-240V~50Hz
Моля, прочетете внимателно инструкциите преди употреба на уреда.
Page 60

СЪДЪРЖАНИЕ
РАЗДЕЛ 1: ПРЕДИ УПОТРЕБА
Предупреждения за безопасност
Препоръки
РАЗДЕЛ 2: МОНТАЖ
Отстраняване на винтовете от транспорта
Настройка на крачетата
Електрическо свързване
Свързване към водоснабдителната система
Свързване към отводнителната система
РАЗДЕЛ 3: ТЕХНИЧЕСКИ ХАРАКТЕРИСТИКИ
РАЗДЕЛ 4: КОМАНДНО ТАБЛО
Бутон Старт/Пауза
Светлинни индикатори
Бутони
Бутон за регулиране на температурата
Бутон за програмите
РАЗДЕЛ 5: ПРАНЕ НА ДРЕХИ
Преди пране
Работа с пералната машина
РАЗДЕЛ 6: ПОЧИСТВАНЕ И ПОДДРЪЖКА
Филтри при входа за водата на пералнята
Филтър на помпата
Чекмеджето за перилният препарат
Сифона
Cabinet
Барабан
Предотвратяване/премахване на ръжда
РАЗДЕЛA 7: ПРАКТИЧЕСКИ ИНФОРМАЦИИ
РАЗДЕЛ 8: ИЗБЯГВАНЕ НА МАЛКИТЕ ГРЕШКИ
РАЗДЕЛ 9: СИСТЕМА ЗА АВТОМАТИЧНО ОТКРИВАНЕ НА
ГРЕШКИТЕ
РАЗДЕЛ 10: МЕЖДУНАРОДНИ ЗНАЦИ ЗА ПРАНЕ
57
Page 61

РАЗДЕЛ 1: ПРЕДИ УПОТРЕБА
ПРЕДУПРЕЖДЕНИЯ ЗА БЕЗОПАСНОСТ
Не използвайте троен щекер или разклонител.
Не включвайте щекера в контакта ако кабела е дефектен.
Ако кабела е дефектен трябва да бъде сменен от производителя
или от ауторизиран сервиз, за да се избгнат инциденти.
Когато изключвате от контакта, дръпнете щекера, никога кабела.
Не включвайте щекера в контакта ако ръцете или краката ви са
мокри.
Не отваряйте отделението за препарат докато пералнята
работи.
Не се опитвайте да отворите вратата на пералнята със сила
докато тя работи.
Не докосвайте маркучите по време на работа, защото
температурата се повишава по време на работа на пералнята.
В случай на грешка или дефект, първо изключете пералнята от
контакта и затворете крана за вода. Не се опитвайте да
поправите сами пералнята. Моля, обърнете се към най-близкият
ауторизиран сервиз.
Не забравяйте, че опаковката, в която получавате пералнята
може да бъде опасна за децата; не им позволявайте да си играят
с нея.
Не позволявайте децата да си играят с пяралнята.
Пазете домашните любимци от пяралнята.
Пералнята трябва да бъде ползвана само от възрастни, след
рабиране на информациите от това ръководство за употреба.
Перлнята е предназначена само за домашна употреба. Ако
използвате този уред за търговски цели, ще изгубите гаранцията.
Уреда не трябва да бъде поставян на килим, който може да
блокира вентилацията на въздуха от долната страна на
пералнята.
ПРЕПОРЪКИ
Ако прах за пране или балсама останат дълго време в контакт с
въздуха, те ще изсъхнат и ще залепнат за чекмеджето. За да
избегнете това, поставете праха за пране или балсама
непосредствено преди използването на пералнята.
Препоръчва се използването на програмата за предпране само в
когато дрехите са много мръсни.
Моля, не превишавайте максиманият капацитет за зареждане с
дрехи.
Ако не използвате пералнята дълно време, изключете я от
контакта, затворете крана за вода и оставете вратата на
барабана отворена, за да може да изсъхне отвътре и да се
предотврати появата на неприятни миризми.
58
Page 62
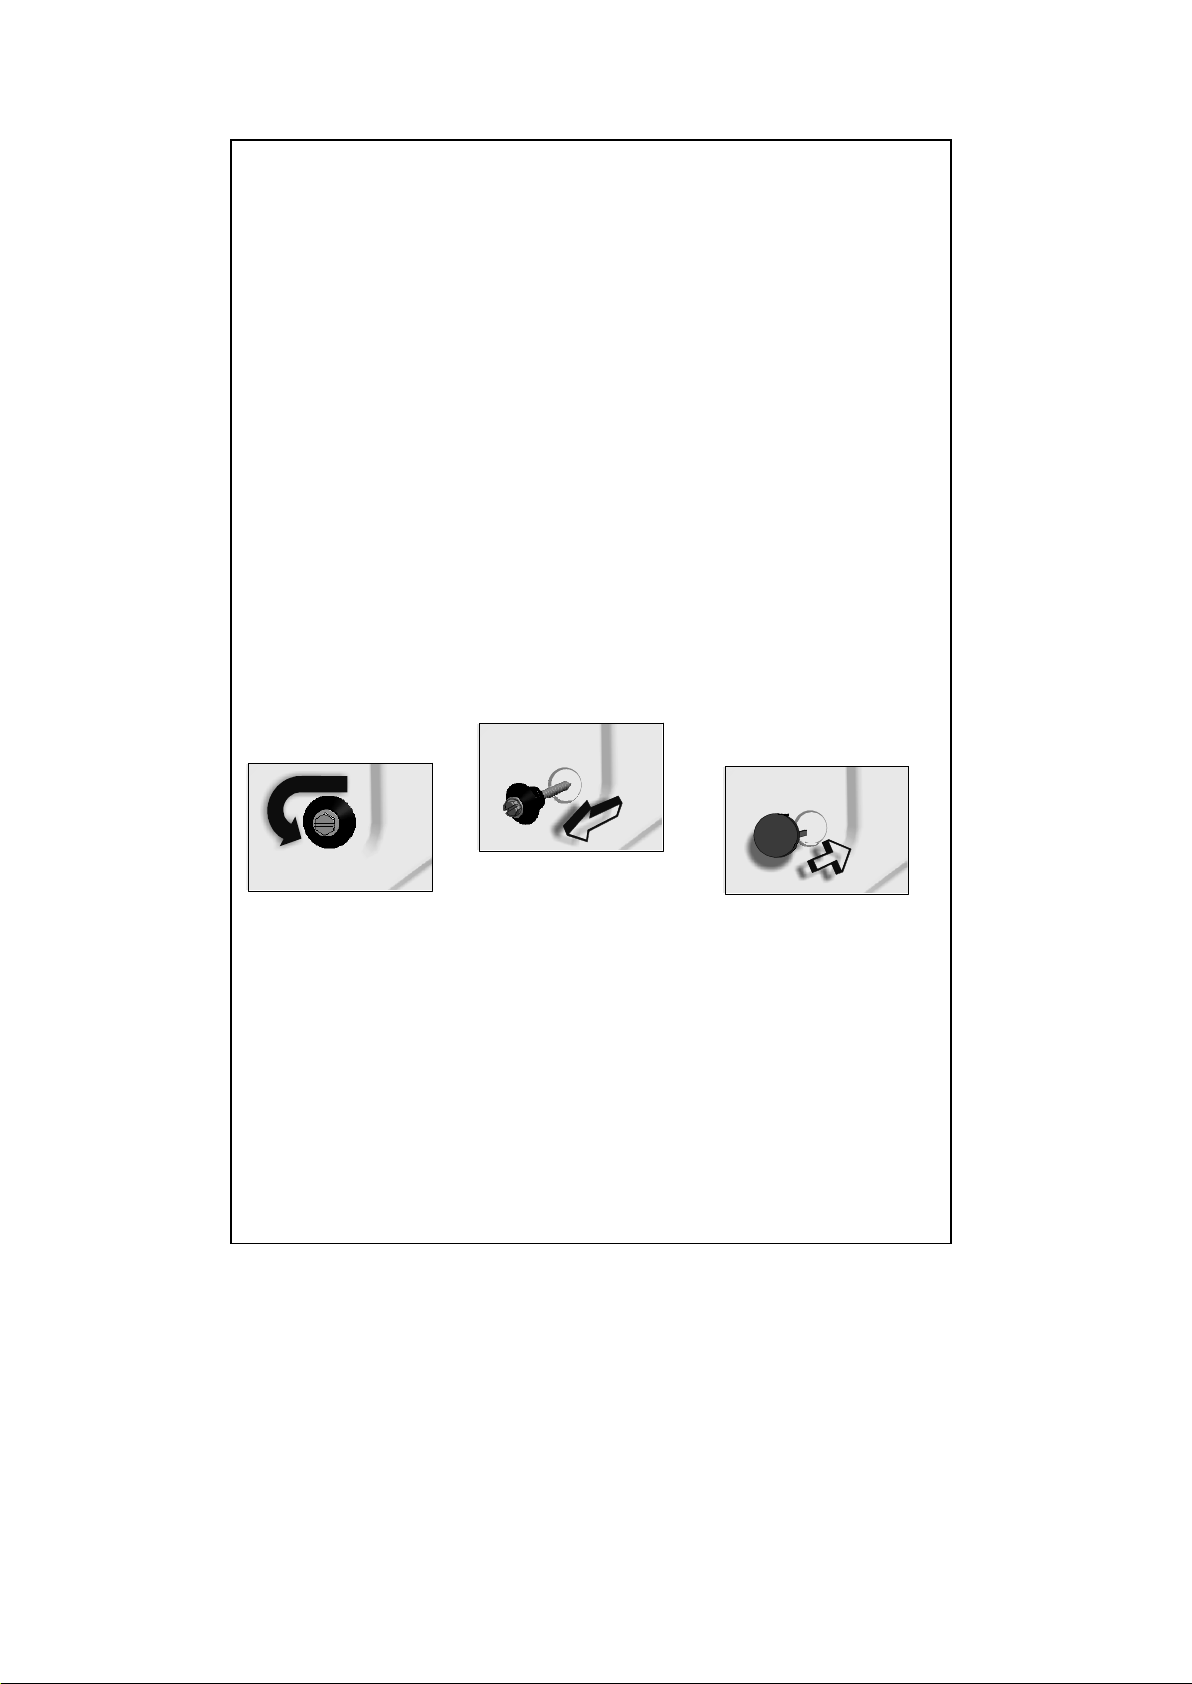
Този уред не е предназначен за употреба от лица(включително
деца) с намалени физически, сензорни или умствени
способности, или от лице които нямат необходимите познания, с
узключение на случаите в които са наблюдавани или обучени от
отговорно за тяхната сигурност лице. Дръжте далеч от деца.
Наблюдавайте децата да не си играят с уреда.
Възможно е да остане малко вода в пералнята, като следствие
на процедурите за контрол Това не представлява заплаха.
РАЗДЕЛ 2: МОНТАЖ
Преди да използвате пералнята, следвайте внимателно индструкциите:
ОТСТРАНЯВАНЕ НА ВИНТОВЕТЕ ОТ ТРАНСПОРТА
Винтовете от транспорта, намиращи се на задната страна на
пералнята, трябва да се отстранят преди деиствителната
употреба на пералнята.
Отвиите винтовете с подходяща отвека въртейки ги в обратна
посока на часовниковата. (РИСУНКА-1)
Отстранете винтовете чрез издърпване. (РИСУНКА-2)
В дупките останали след махането на винтовете поставете
пластмасовите тапи, които ще намерите в чантата с аксесоари.
(РИСУНКА-3)
Винтовете от транспорта, които свалихте, трябва да се пазят под
ръка, в случай че трябва да транспортирате отново пералнята на
друго място.
РИСУНКА -1 РИСУНКА-2 РИСУНКА -3
НАСТРОЙКА НА КРАЧЕТАТА
Не монтирайте пералнята на килими, мокети или подобни
повърхности.
За да функционира тихо пералнята Ви, трябва да бъде
поставена на хоризонтална, стабилна и нехлъзгаща се
повърхност.
Можете да регулирате баланса на мащината чрез регулиране на
визочината на крачетата.
Първо отвийте пластмасовият капак за регулиране.
Настройте височината на крачетата (нагоре и надолу).
59
Page 63
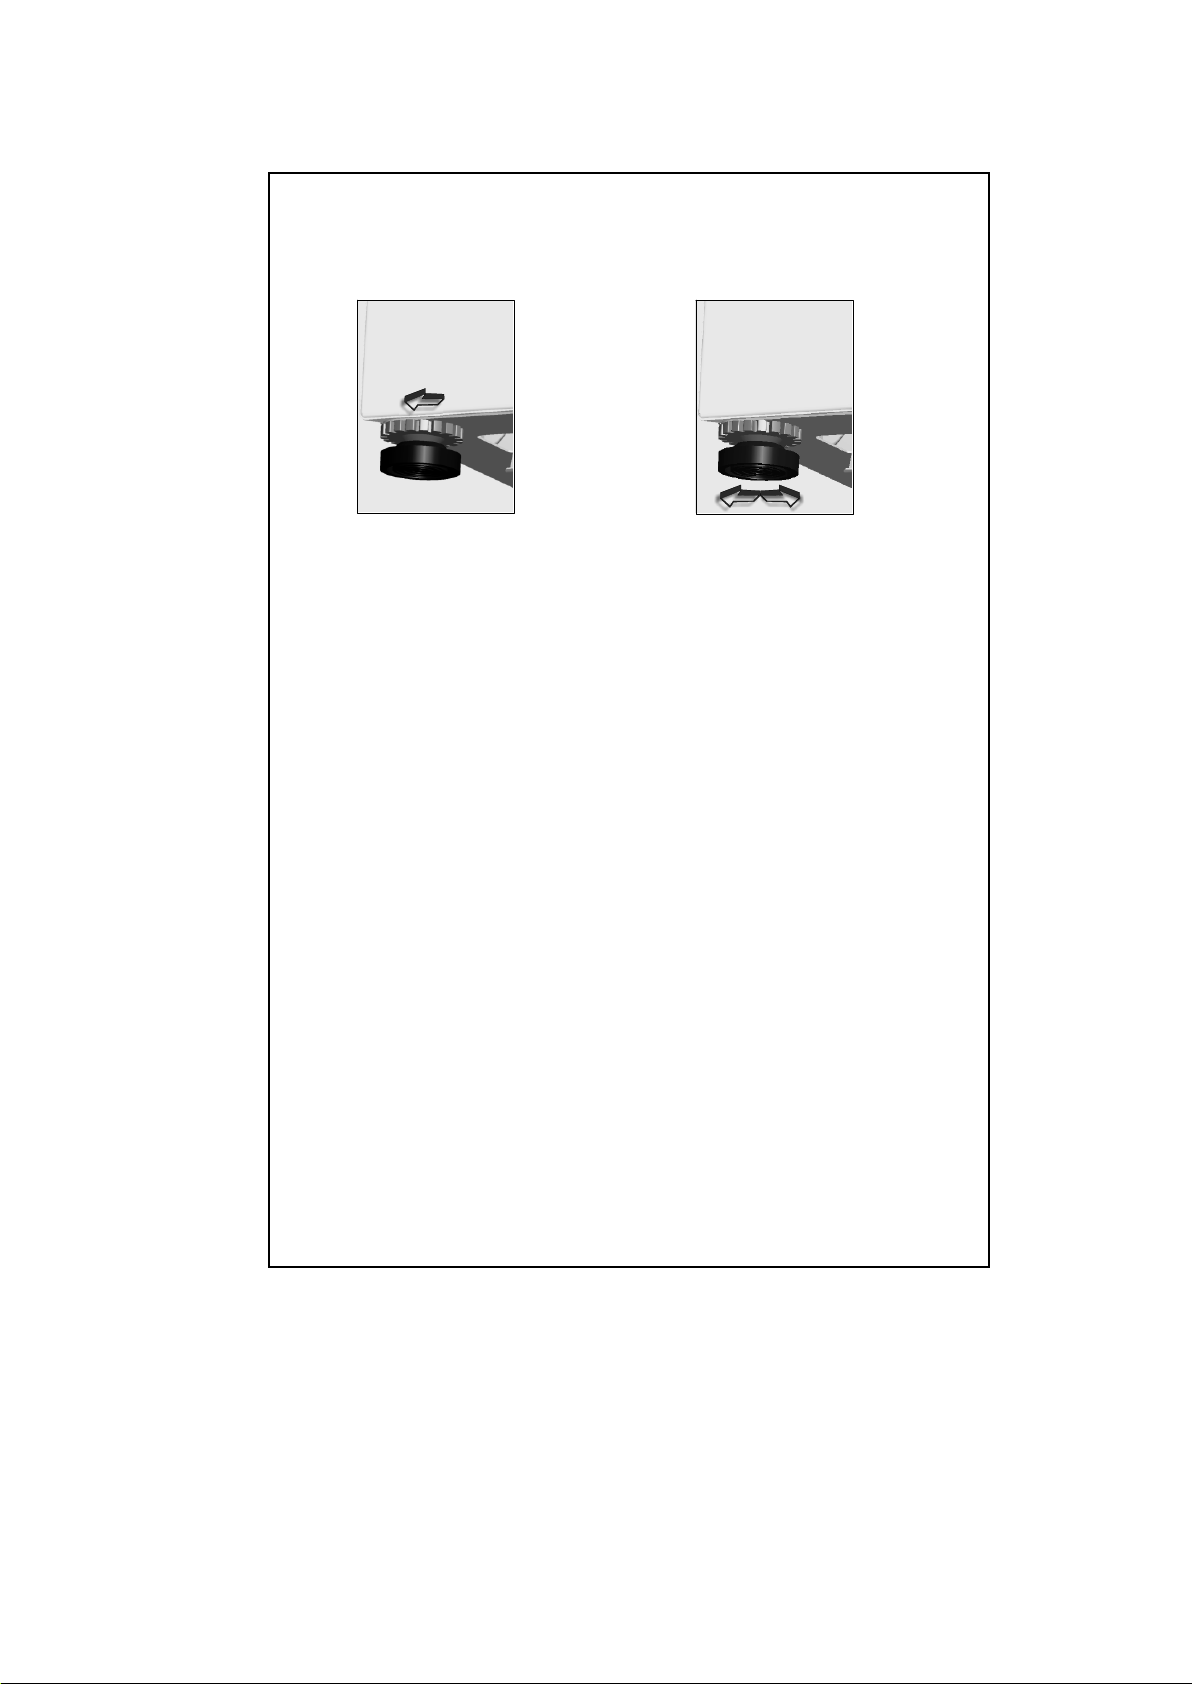
Когато успеете да регулирате баланса на пералнята, завийте
пластмасовите капачета, чрез завъртане.
Не поставяйте под пералнята картони, дървени парчета или
подобни материали за да настроите положението на пералнята
спрямо повърхността на която стои.
ЕЛЕКТРИЧЕСКО СВЪРЗВАНЕ
Вашата перална машина работи на 220-240 V si 50 Hz.
Един специален заземяващ щекер е прикачен за кабела на
пералнята. Този щекер трябва да бъде свързан непременно с
контакт, който е със заземяване с 10 ампера. Потока по
електропровода от бушона също трябва да има 10 ампера. Ако
нямате подобни контакти и бушони в дома Ви, обърнете се към
квалифициран електротехник, за да направи тези промени
Нашата компания не е отговорна за дефекти появили се в
следствие на употребата на пералнята без заземен контакт.
СВЪРЗВАНЕ КЪМ ВОДОСНАБДИТЕЛНАТА СИСТЕМА
Вашата пералня е предвидена с един единствен входен отвор и
по-точно за студена вода.
За да предотвратите течова от свръзките, използвайте
уплътнителя влкючен в пакета където се намира маркуча.
(Закрепете уплътнителя за края на маркуча за вода откъм
кранчето).
Свържете единият край на маркуча за вода в отвора на гърба на
пералнята и другият краи за кранчето. Ако имате неясноти за
правилният край на маркуча, обърнете се към професионален
водопроводчик, за да извърши правилно свързването към
водоснабдителната система.
Ефективността на пералнята се повишава ако водата има
налягане от 0,1-1 Mpa.(0,1 MPa означава дебит от 8 литра на
минута, с напълно отворен кран).
След като завършите свързването, проверете дали има течове
на местата на свързване, отваряйки напълно крана за водата.
Уверете се, че маркучите за вода не са подгънати, спукани или
затиснати от някой предмет.
Монтирайте маркучите за вода към кран за вода 3”/4.
60
Page 64
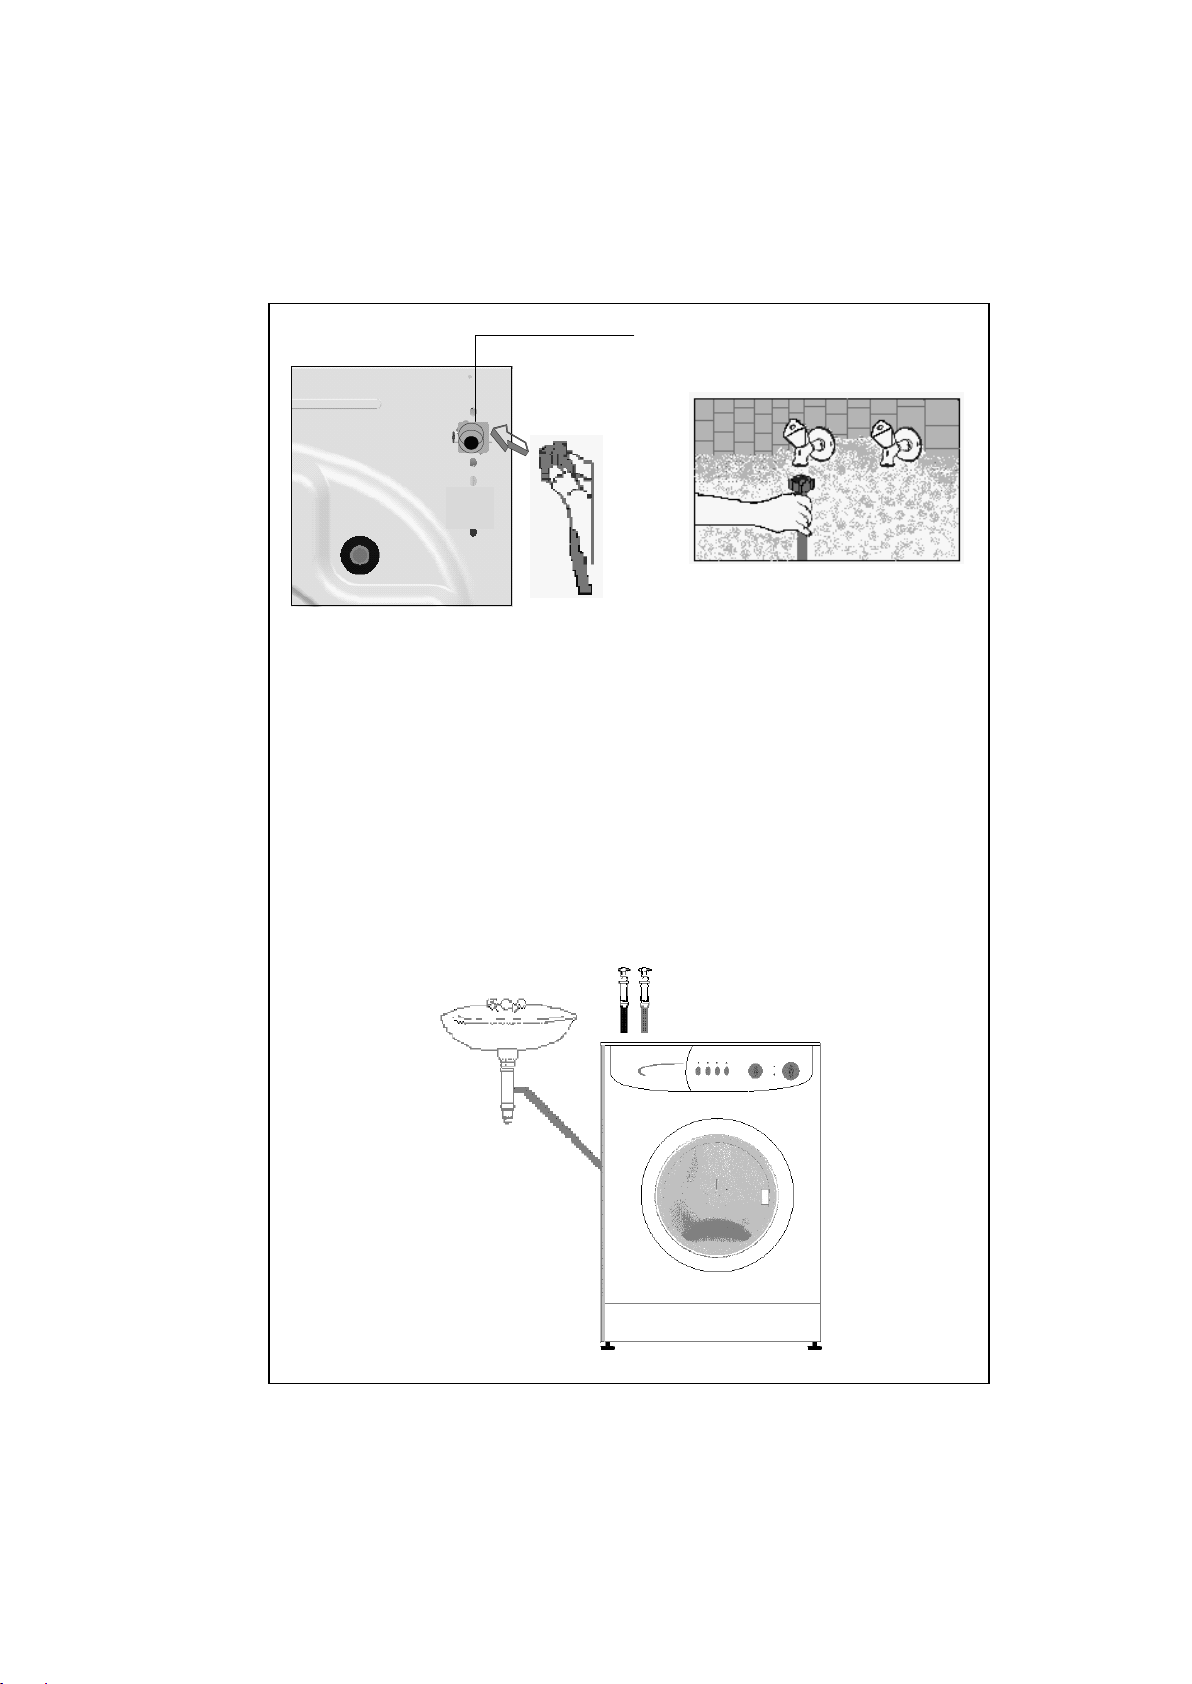
Вентил за студена вода
СВЪРЗВАНЕ КЪМ ОТВОДНИТЕЛНАТА СИСТЕМА
Уверете се, че маркучите за вода не са повити, обърнати,
затиснати или претоварени от прекалено опъване.
Маркуча за източване на водата трябва да бъде монтиран на
минимално разстояние от 60 см., максимално 100 см. спрямо
пода.
Края на източващият маркуч може да бъде сложен директно в
отвора за изтичане на мръсната вода или може да бъде
монтиран с помощтта на специално устройство за сифона на
мивката.
Не се опитвайте да удължите източващият маркуч, добавяйки
други допълнителни части.
61
Page 65
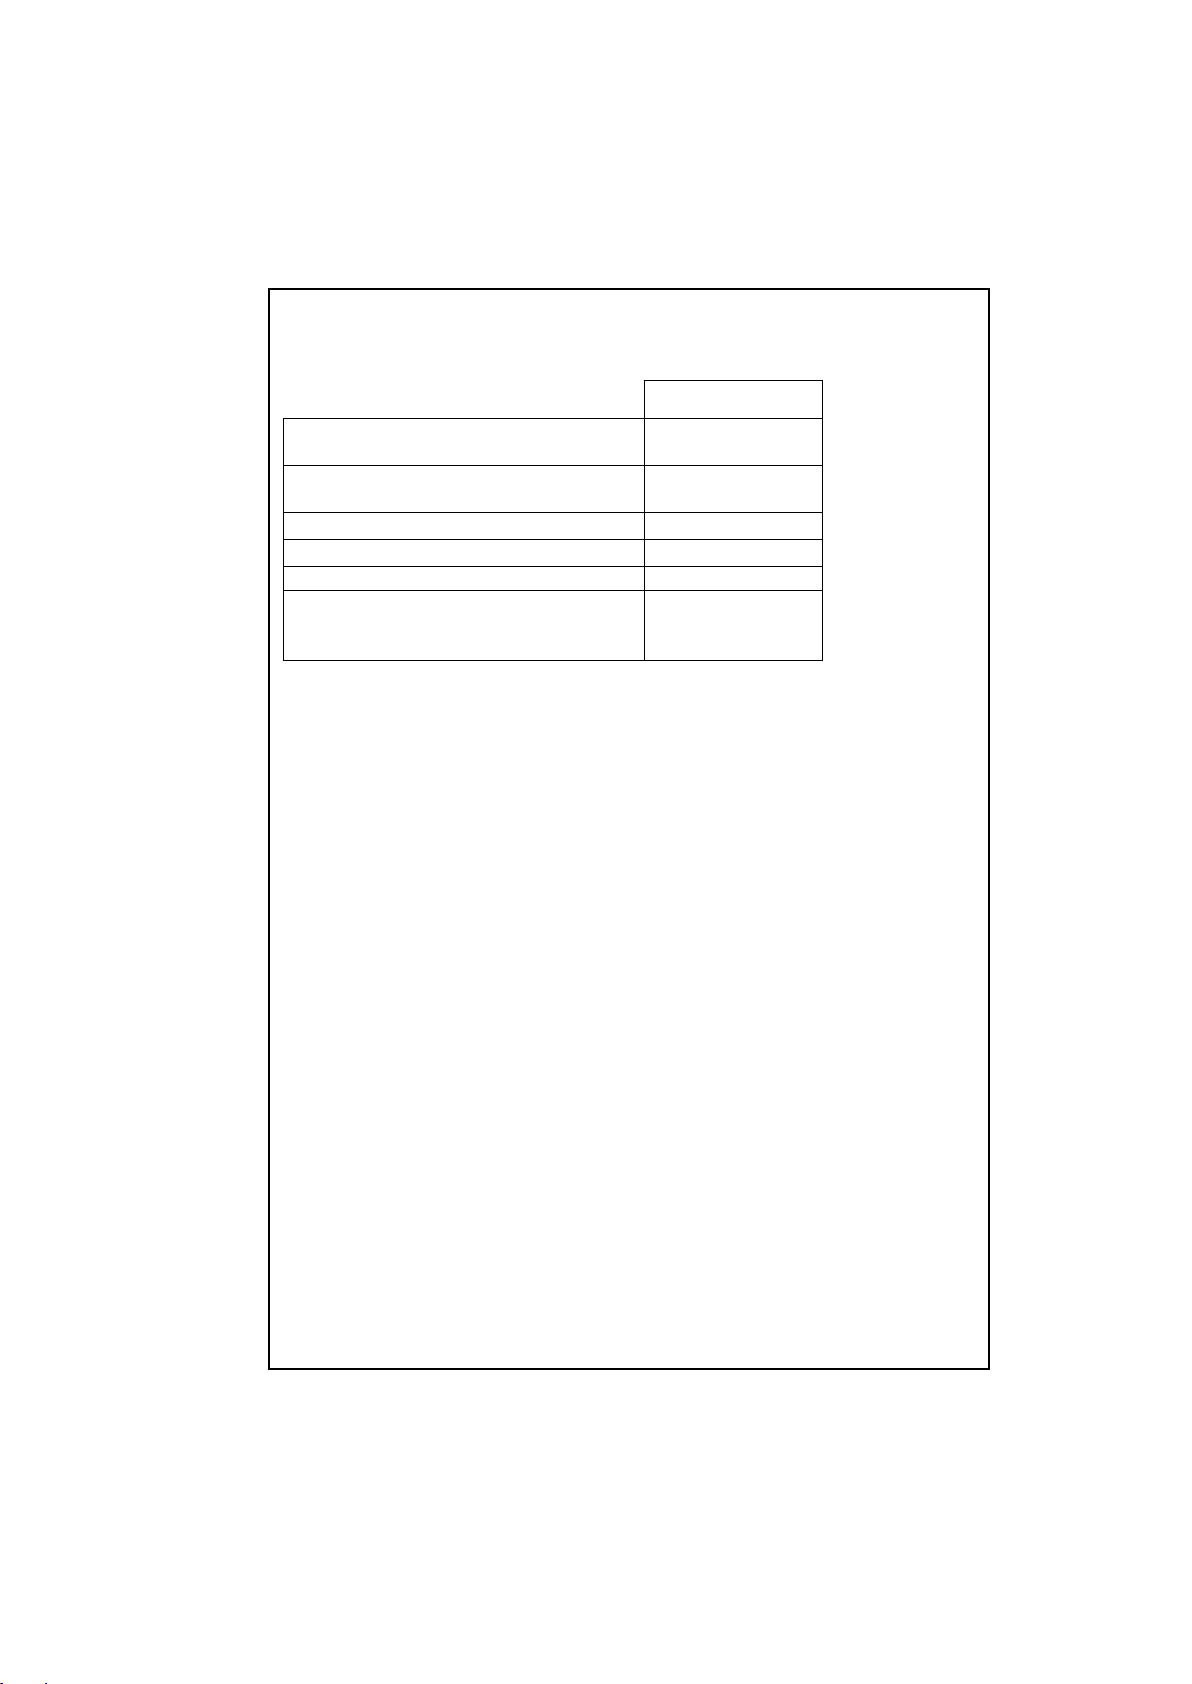
РАЗДЕЛ 3:ТЕХНИЧЕСКИ ХАРАКТЕРИСТИКИ
442/542/
642/842/1042
Максимален капацитет за съхи
дрехи (kг.)
5
Препоръчано количество дрехи
(kg)
4,5
Височина (cм.)
85
Щирочина (cм.)
59,6
Дълбочина (cм.)
51
Максимален цикъл на
центрофугиране ( завъртания/
мин.) *
400/500/
600/800/1000
(*) цикъла на центрофугиране варира в зависимост от избраният модел.
62
Page 66
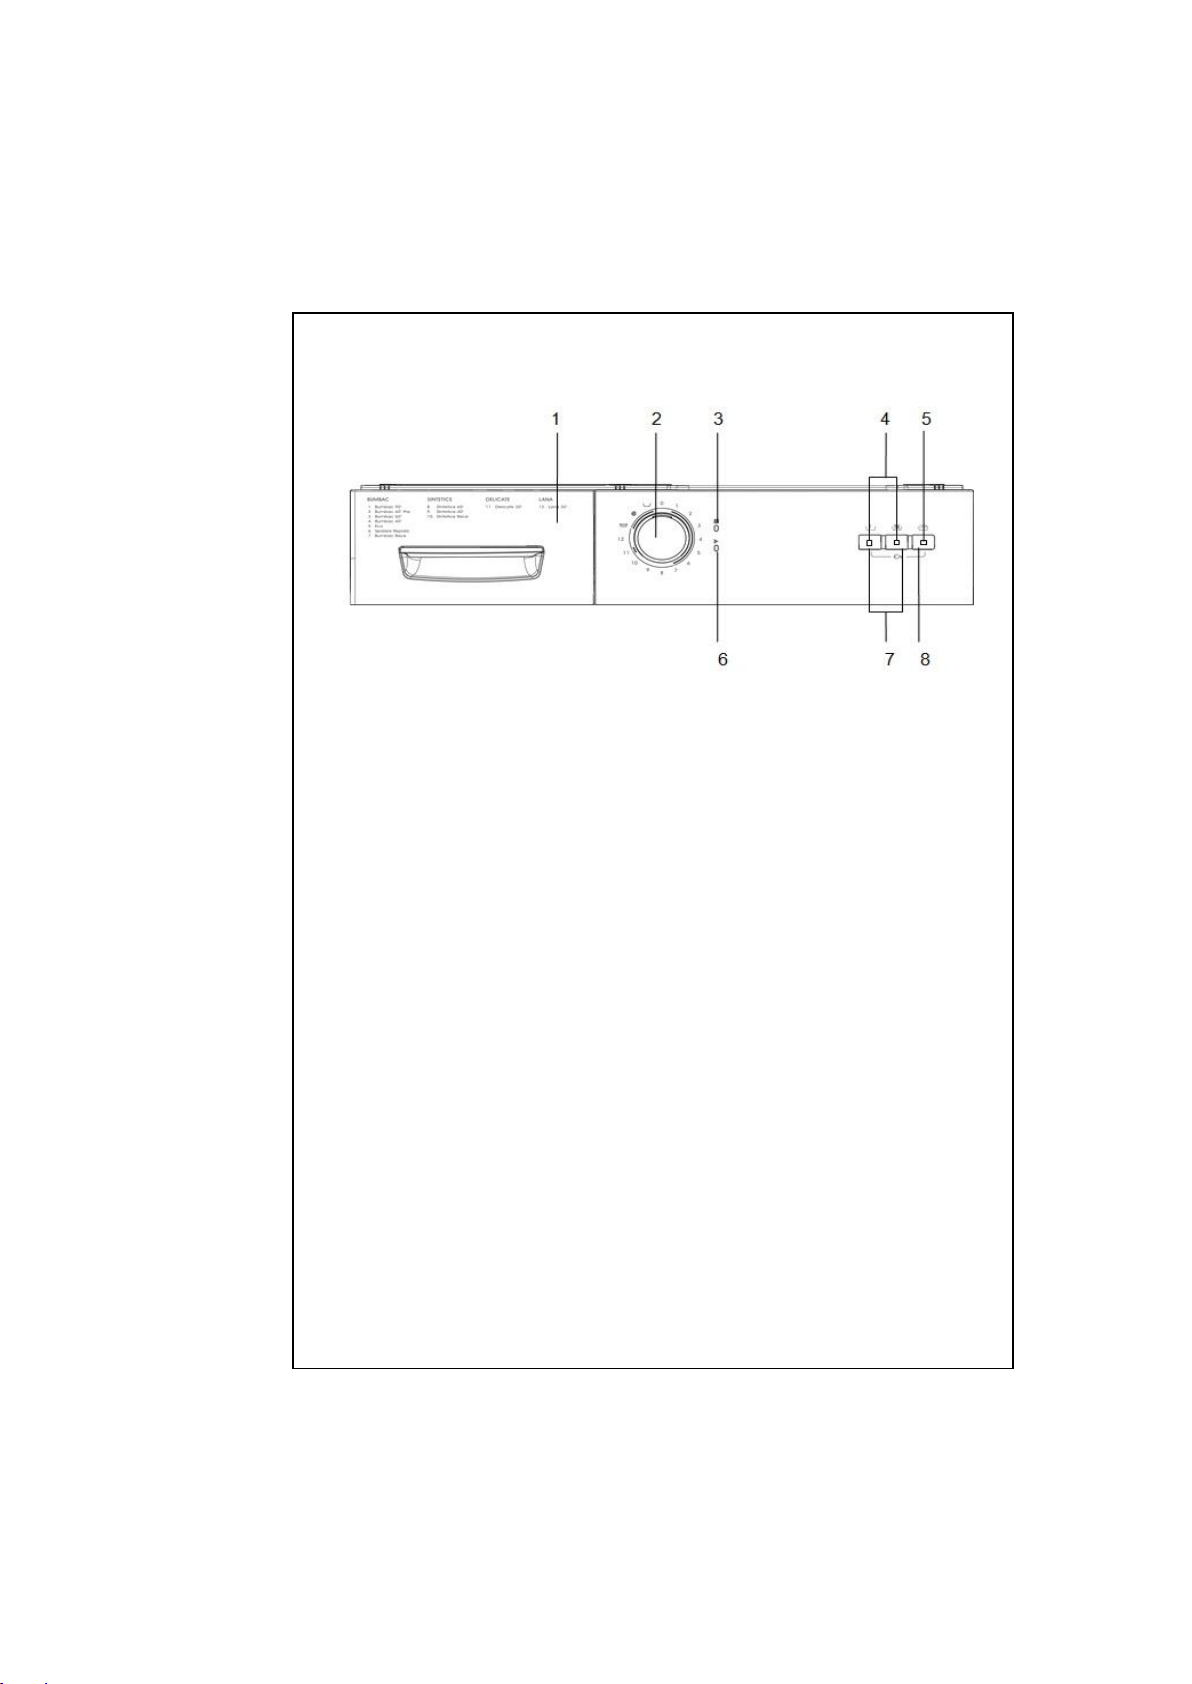
63
РАЗДЕЛ 4: КОНТРОЛНО ПАНО
1. 1 Чекмедже за прах за пране/препарат
2. 2 Бутон програми
3. 3 Индикатор за Края на програмата
4. 4 Светлинни индикатори за различни функции
5. 5 Индикатор Старт/Пауза
6. 6 Индикатор Настройка програма
7. 7 Бутони за различни функции
8. 8 Бутон Старт/Пауза
Нашият продукт има електронна карта и дигитални бутони. За да
активирате някоя финкция, натиснете леко бутоните.
Page 67
БУТОН СТАРТ/ПАУЗА
За да пуснете избраната програма или за да направите
пауза по време на работа.
ВНИМАНИЕ!
Необходимо е бутона за програмите да бъне на положение O
(Off/Изключен) преди да изберете някоя програма или преди да смените
програма на която вече работи.
СВЕТЛИННИ ИНДИКАТОРИ
Когато натискате бутона Старт/Пауза или който и да е друг
бутон, светлината на съответният индикатор се включва. Индикатора
угасва, тогава когато натиснете отново бутона Старт/Пауза или когато
избраната функция е приключила.
Светлинните индикатори могат да обозначат и дефект в
системата. Виж страница 65.
ФУНКЦИОНАЛНИ БУТОНИ
Без центруфуга
Тази програма е предназнаена за деликатни тъкани, които не
би трябвало да бъдат изцеждани. Натискайки този бутон, анулирате
цикъла за центруфуга и съответната програма.
Предпране
С помощта на тази функция можете да активирате една
допълнителна операция за пране на много мръсните дрехи. Когато
използвате тази функция трябва да сложите праха за пране в
разделението за предпране на чекмеджето. Ако функцията на вашата
пералня има тази опция и перете дрехите на програма за предпране,
индикатора над бутона на тази функция ще светне автоматично.
Дори и да натиснете бутона за анулиране на тази характеристика, тя
няма да бъде анулирана при функция за пране с опция за предпране.
ВНИМАНИЕ!
Функциите варират в зависимост от закупеният модел. Ако сте
забравили да изберете допълнителни функции и пералнята е започнала
цикъла за пране, натиснете бутона за допълнителната функция, ако
индикатора му всети. Допълнителните функции ще се активират. Ако
индикатора не свети, допълнителните функции няма да бъдат
активирани.
64
Page 68
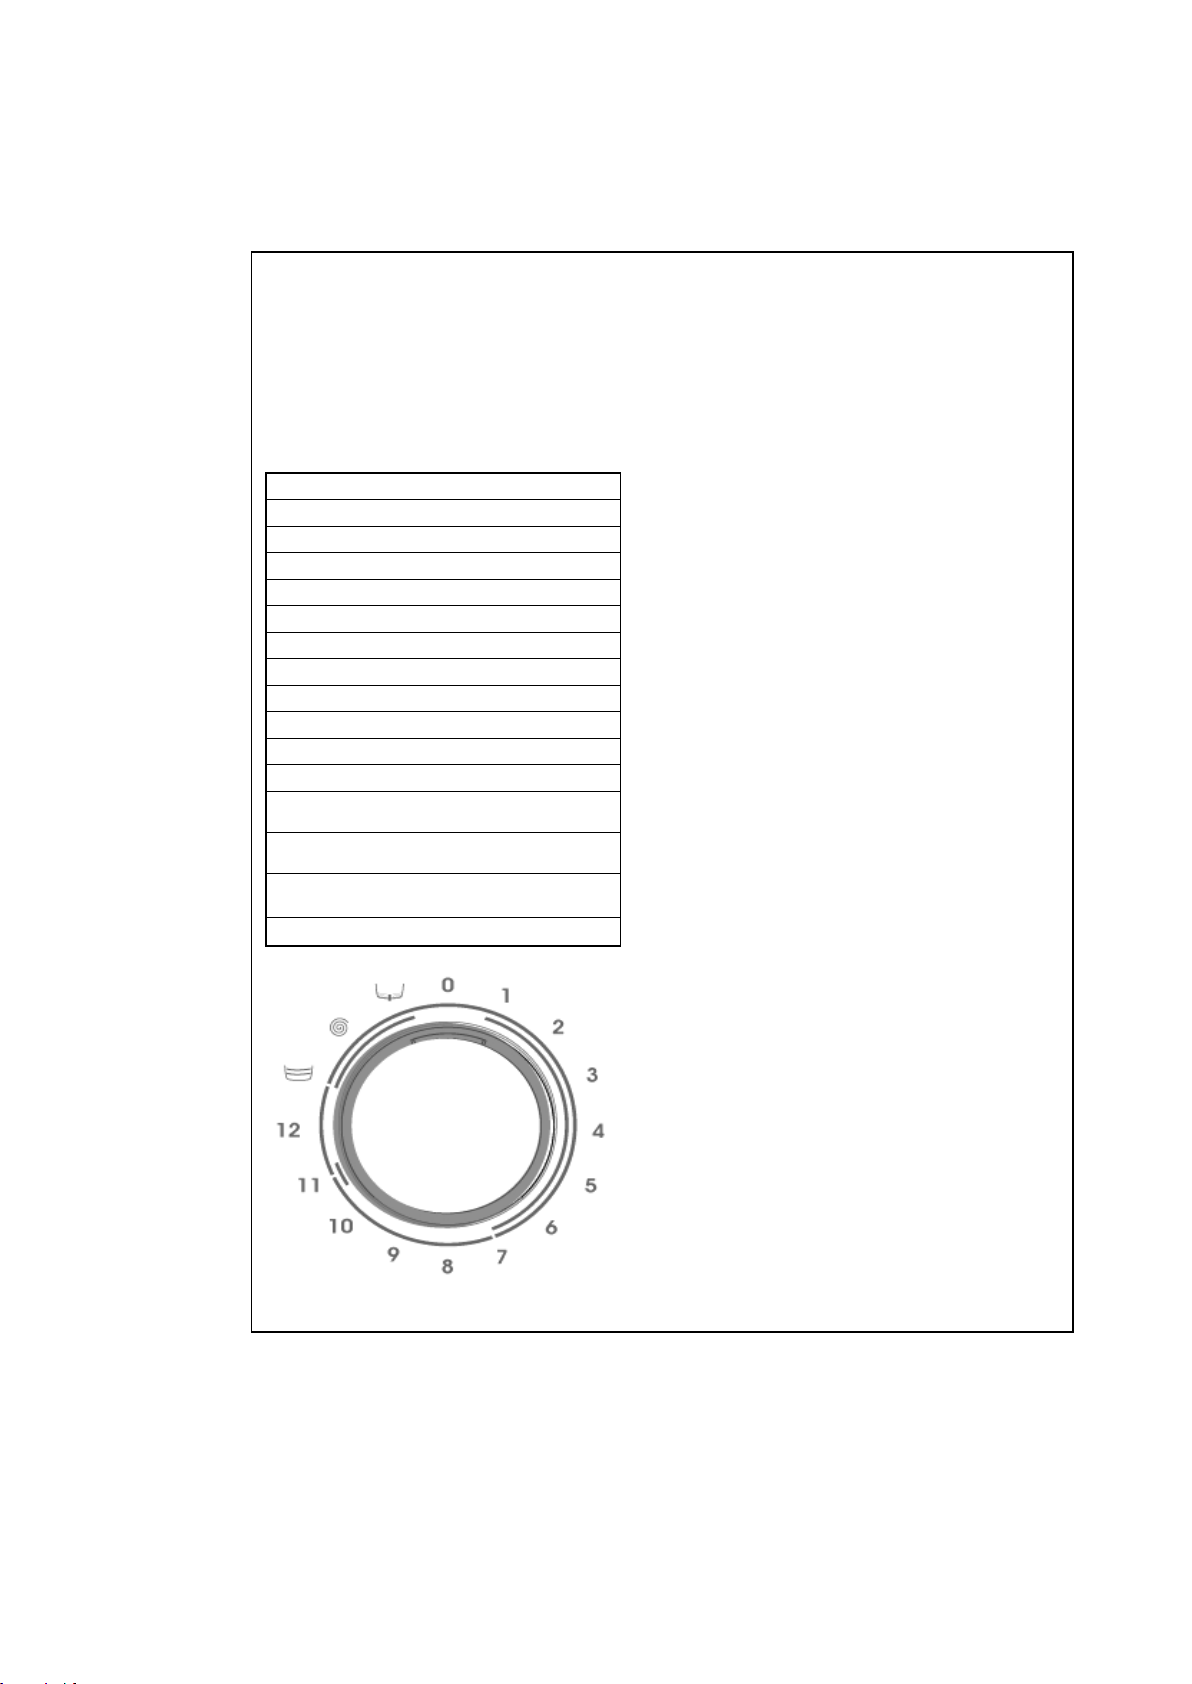
BUTONUL DE PROGRAME
С този бутон, можете да избирате програмата на която искате да перете дрехи.
Може да въртите бутона в двете посоки. Трябва да бъдете внимателни с факта, че
знака на бутона за програми трябва да бъде точно до програмата която желаете да
изберете. Ако завъртите бутона до знака O (Off/Изключено) докато пералнята
работи, избраната от вас програма ще остане незавършена.
1-Памук 90°C
2-Памук 60°C с предпране
3-Памук 60°C
4-Памук 40°C
5-Екологично пране
6-Бързо пране
7-Памук – студена вода
8-Синтетика 60°C
9-Синтетика 40°C
10-Синтетика –apa rece
11-Деликатни тъкани 30°C
12-Вълна 30°C
Плакнене
Центруфугиране
Евакуация
OFF/ Изключено
65
Page 69

РАЗДЕЛ 5: ПРАНЕ НА ДРЕХИТЕ
Включете пералнята в контакта.
Пуснете крана за водата.
Първо пране
В следствие на извършениете тестове при призводствената линия във
фабриката, възможное да е останало малко количество вода във
пералнята. Препоръчва се първото пране да се извърши без дрехи в
пералнята, за да може да се източи тази вода. Сипете половин мярка
универсален прах за пране във второто разделение и изберете
програма Памук на 90°C.
ПРЕДИ ПРАНЕ
Сортиране на прането
Сортирайте дрехите в зависимост от: материала (памук,
синтетика, деликатни тъкани, вълна, т.н.), препоръчаната
температура за пране (на етикета) и степента на замърсяване.
Никога не перете белите дрехи с цветните.
Възможно е новите дрехи и цветните да се обезцветят/пуснат
боя при първото пране, така че се препоръчва да ги перете
отделно.
Уверете се, че няма метални предмети в джобовете на на
дрехите.
Затворете джобовете и копчетата на дрехите.
Махнете пластмасовите или метални кукичики от пердетата/
завесите или ги поставете в специална торбичка за пране и я
вържете добре.
66
Page 70

Обърнете наопаки дрехите като: панталони, тениски, потници
Прането с малки размери, като чорапи и ностни кърпи, би
трябвало да се сложат в специална торбичка за пране.
Максимум 90 ˚C Максимум 60 ˚C Максимум 30 ˚C Не се
пере в пералня
Поставяне на прането в пералнята
Отворете вратата на пералнята.
Поставете дрехите в барабана като ги рапръснете.
Поставете дрехие една по една.
Когато затвяряте вратата на пералнята, уверете се че не е
затисната някоя дреха с врата.
Затворете вратата на перанята и се уверете че сте я затворили
добре, в противен случай пералнята няма да започне да работи
Поставяне на репарата/праха за пране
Количеството прах за пране, което слагате в пералнята зависи от
следните критерии:
Използването на препарат за пране се променя според
степента на замърсяване на дрехите. За леко замърсените
дрехи не използвайте предпране и сложете малко количество
прах за пране във второто разделение на чекмеджето.
За мого мръсните дрехи, изберете програма, която включва и
предпране. Напълнете ¼ от праха за пране в първото
разделение, а остатъка сложете във второто разделение на
чекмеджето.
Използвайте за пералнята само препарати за пране, които са
специално предназначени за автоматични перални.
Препоръчаните количества препарат за пране са изписани на
опаковката на съответните препарати за пране.
Потреблението на препарат ръсте правопропорционално със
степента на твърдостта на водата.
Потреблението на препарат расте правопропорционално с
количеството дрехи поставено в пералнята.
Изсипете балсама за дрехи в специалното за това разделение
от чекмеджето за праха за пране. НЕ превишавайте
максималното ниво; в противен случай балсама ще се
разпръсне във водата през сифона.
Балсамите за дрехи с висока гъстота трябват да бъдат
разредени с малко вода преди да бъдат сипани в пералнята,
защото пречи на сифона и се губи във водата за пране.
67
Page 71

Можете да ползвате течни препарати при всички програми без
предпране. Изсипете течният препарат в разделение 2;
количеството зависи от препоръките на опаковката.
РАБОТА С ПЕРАЛНАТА МАШИНА
Избиране на програмите и техните характеристики
Изберете програмата и допълнителните функции, в зависимост от
дрехите, които искате да изперете според Таблица -1.
Срат/Пауза
Натискайки този бутон, ще включите програмата която сте избрали или
ще я прекъснете ако работи.
Пускане на някоя програма
Настройте бутона за да зберете желаната програма.
Индикатора Настройка програм ще светне.
Ако желаете, можете да изберете една или повече
допълнителни функции.
Включете програмата която сте избрали натискайки бутона
Старт/Пауза.
Смяна на някоя програма
Ако сте избрали една програма и не желаете да продължи:
Натиснете бутона Стоп/Пауза.
Завъртете бутона за програмите до позиция O (off/ изключен).
Завъртете бутона за програмите до програмата която желаете.
(направете справка с Таблица-1 за избор на програма).
Индикатора Настройка програма ще светне.
Натиснете бутона Старт/Пауза и новата програма ще започне да
работи.
Отмяна на програма
Ако желаете да приключите някоя програма преди да е свършила:
Натиснете бутона Старт/Пауза.
Завъртете бутона за програмите до положение O (off/ изключен).
Завъртете бутона за програмите на „Източване” sau
“Центруфуга”
Индикатора Настройка програма ще светне.
Включете избраната програма чрез натискане на бутона
Старт/Пауза.
Приключване на програмата
Пералнята ще спре автоматично когато избраната от Вас
програма стигне на финал.
Индикатора Край на програмата ще светне.
Завъртете бутона за програми до положение O (off/ изключен).
68
Page 72

Вратата ще се отблокира след около 2 минути след приключване
на програмата. Отворете врата, дърпайкидръжката към Вас и
извадете дрехите от барабана.
След като извадите всики дрехи, оставете вратата на барабана
отворена, за може да изсъхне добре от вътрешната страна
добре.
Изключете пералнята от контакта.
Затворете крана за вода.
ВНИМАНИЕ!
Ако по време на работата на някоя програма, захранването с ел. енергия
се прекъсне многократно, пералнята ще продължи работа от където е
била прекъсната. Това не поврежда пералната машина.
Функция забранено за деца
Опцията за блокиране за деца се използва за защита на цикъла на
пране от ефектите които могат да се получат от нежелани докосвания на
бутоните по време на работа. Опцията за блокиране се активира след
натискането на първият и третият бутон от паното в продължение на
повече от три секунди. Когато опцията за деца е активирана,
светлинните индикатори започват да мигат, за да означат, че функцията
за деца е активирана. За да дезактивирате опцията, трябва да
натиснете отново същите бутони (първият и третият) за повече от три
секунди. Дезактивирането на опцията се отбелязва чрез мигане на
бутона Включване/Пауза.
РАЗДЕЛ 6: ПОЧИСТВАНЕ И ПОДДРЪЖКА
Изключете пералнята от контакта.
Затвотрете крана за вода.
ФИЛТРИ ПРИ ВХОДА ЗА ВОДАТА В ПЕРАЛНЯТА
При захранващият маркуч с вода, в края на маркуча който е свързан с
карана за вода има филтри които пречат на замърсяванията и чуждите
тела във водата да попаднат в пералната машина. Ако пералнята не
може да дърпа достатъчно вода въпреки че крана е отвъртян до край,
трябва да почистите тези филтри.
69
Page 73
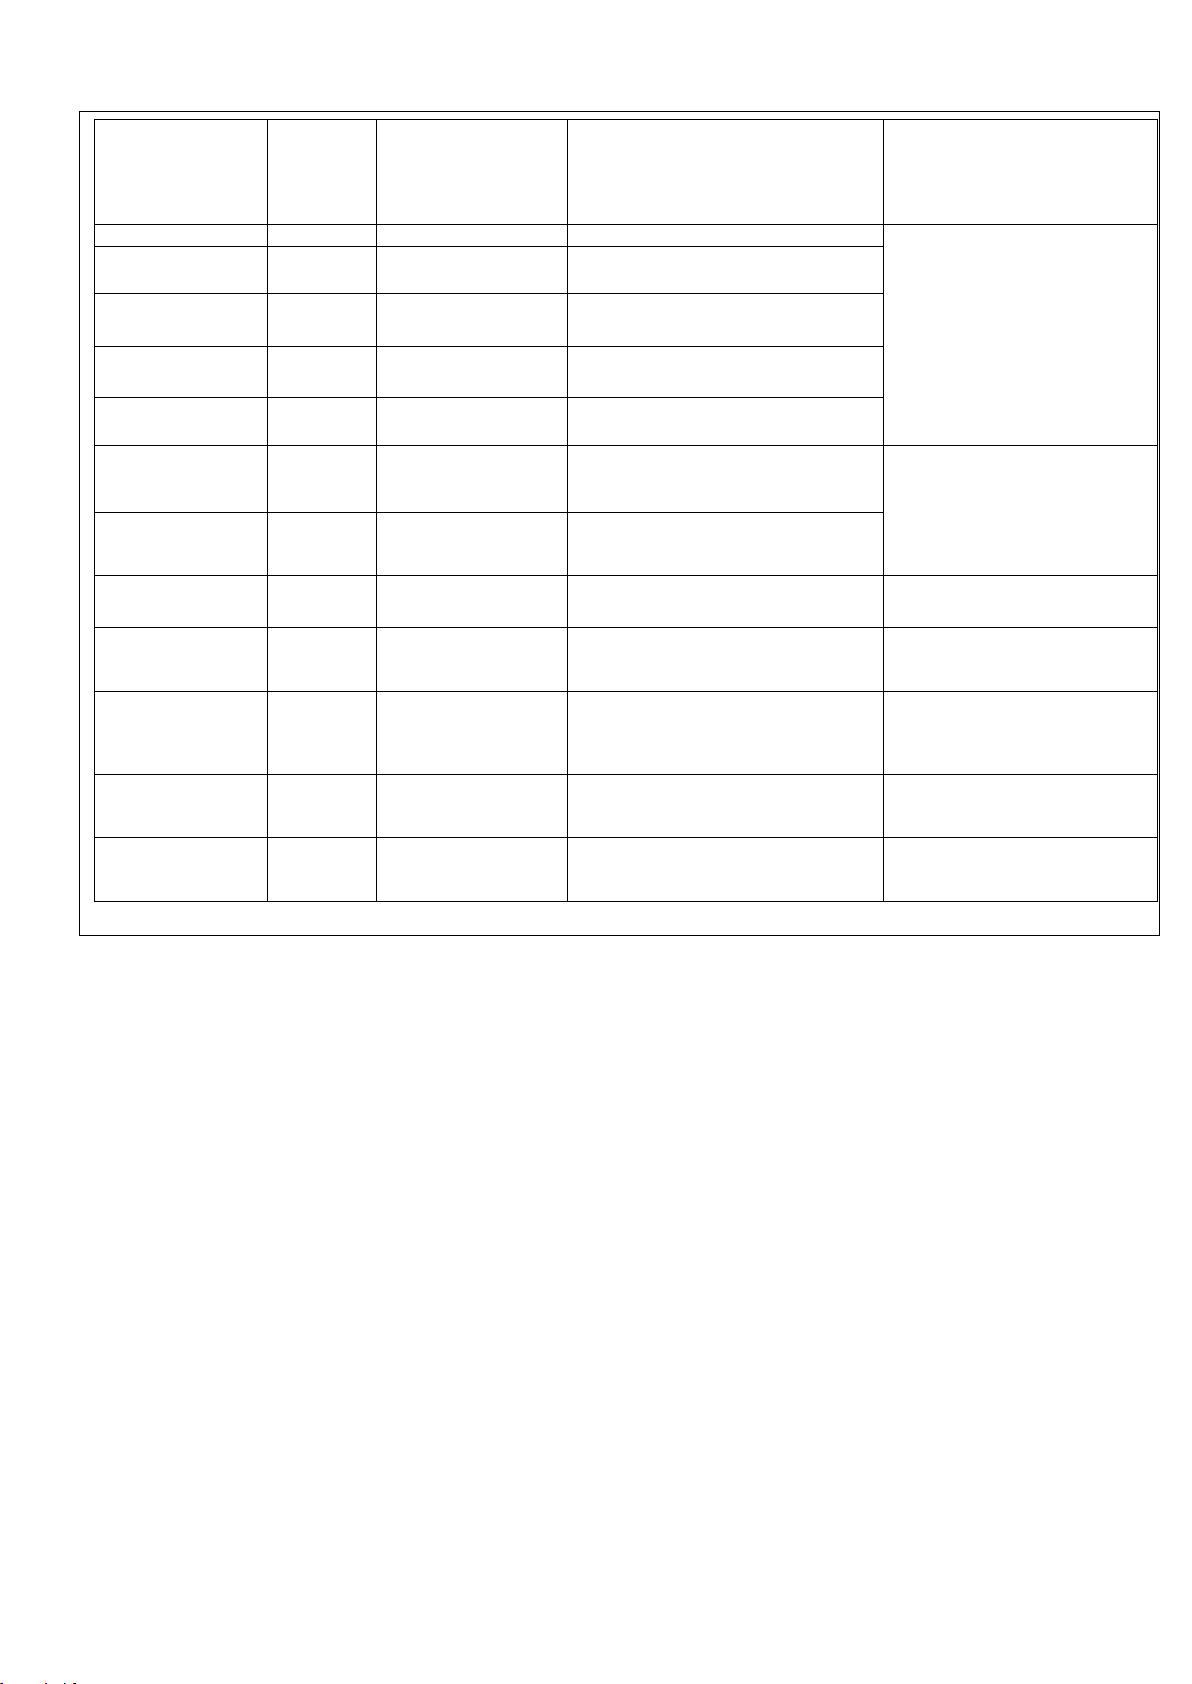
ПРОГРАМА
РАЗДЕЛЕ
НИЕ
ПРЕПАР
АТ ЗА
ПРАНЕ
МАКСИМАЛЕН
КАПАЦИТЕТ СУХО
ПРАНЕ (kg)
ТИПОВЕ ДРЕХИ
ПОЯСНЕНИЯ
1-ПАМУК 90˚ 2 5
Мръсни, памучни тъкани.
Бельо, чавшафи, покривки,
тениски, ризи, кърпи, хавлии
(max.2,5 kg)
2-ПАМУК 60˚
(ПРЕДПРАНЕ)
1+2
5
Много мръсни, памучни или
ленени, цветни.
3- ПАМУК 60˚
2
5
Мръсни, памучни, ленени и
цветни.
4-ПАМУК 40˚
2
5
Мръсни, памучни, ленени и
цветни.
5-ЕКОЛОГИЧНО
ПРАНЕ
2
5
Мръсни, памучни, цветни и и
ленени.
6-БЪРЗО ПРАНЕ
2
2,5
Малко мръсни памучни, цветни и
ленени.
7- ПАМУК
СТУДЕНА ВОДА
2
5
Малко мръсни памучни, цветни, и
ленени. Перат се без пералнята
да загрява водата.
8- СИНТЕТИКА
60˚
2
3
Мръсни синтетични или смесени
тъкани с процент синтетика.
Чорапи или блузи от найлон
9- СИНТЕТИКА
40˚
2
3
Малко мръсни синтетични или
смесени тъкани с процент
синтетика.
Чорапи или блузи от найлон
10-СИНТЕТИКА
СТУДЕНА ВОДА
2
3
Деликатни материи, леко мръсни,
синтетични, или смесени тъкани с
процент синтетика. Перат се без
да се загрява водата.
Чорапи или блузи от найлон
11-ДЕЛИКАТНИ
ТЪКАНИ 30˚
2
2
Деликатни дрехи, леко мръсни от
памук, цветни, синтетични или с
процент синтетика.
Смесени тъкани от коприна,
ризи, блузи, полиестър,
полиамид, смесени тъкани.
12-ВЪЛНА 30˚
2
2
Мръсни вълнени дрехи, които
могат да се перат на ръка и в
пералня.
Всички вълнени тъкани.
ТАБЛИЦА-1
69
Page 74

ПРОГРАМА
РАЗДЕЛЕН
ИЕ
ПРЕПАРАТ
ЗА ПРАНЕ
БУТОН ЗА
ДОПЪЛНИТЕЛНИ
ФУНКЦИИ
МАКСИМАЛЕН
КАПАЦИТЕТ ЗА
СУХО ПРАНЕ (kg)
ТИПОВЕ ДРЕХИ
ПОЯСНЕНИЯ
ИЗПЛАКВАНЕ
Когато имате нужда от допълнително изплакване за вашите дрехи, след приключване на прането,
мцете да използвате тази програма за всички видове дрехи, независимо от тъканите.
ЦЕНТРУФУГА/ИЗ
ЦЕЖДАНЕ
Когато имате нуцда от допълнително изцеждане на вашите дрехи, след приключване на прането,
можете да използвате тази програма за всички видове дрехи, независимо от тъканите.
ИЗТОЧВАНЕ
Тази програма се използва за източване на мръсната вода след приключването на процеса на пране.
Ако желаете водата от барабана да бъде източена преди да е приключила програмата за пране,
можете да използвате тази програма.
ТАБЛИЦА-1 ПРОДЪЛЖЕНИЕ
(*) Може да използвате балсам за дрехи на която и да е от тези програми (изключение: програмата за изцеждане и
източване на водата). Когато определяте количеството балсам, консултирайте се с препоръките на производителя на
съответният балсам. Изсипете балсама в специалното разделение от чекмеджето за препарат за пране.
Стойностите на продълженителността на програмата, консумацията на ел. енергия и вода могат да варират в зависимост
от типа на зареждане, от избраните допълнителни функции, температурата на водата от водопроводната система и
температурата на атмосферата.
70
Page 75
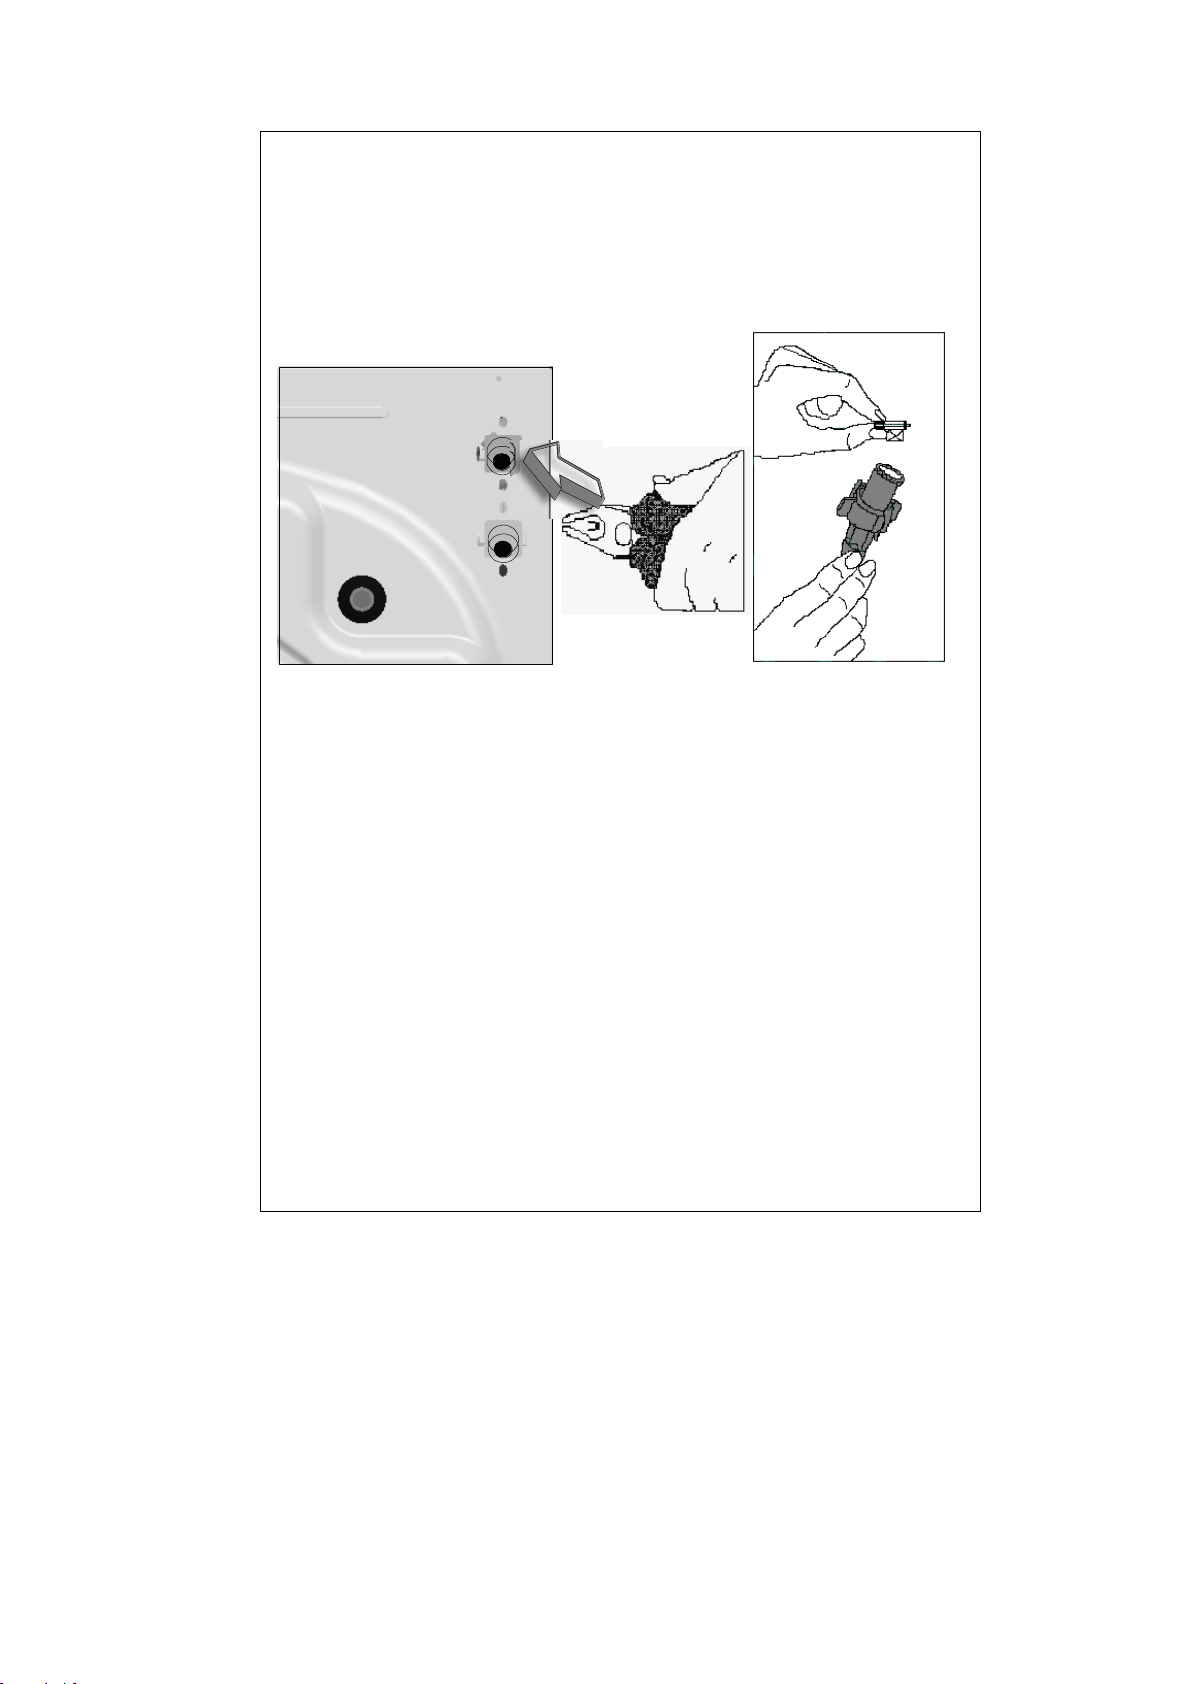
Извадете захранващият маркуч от задната страна на пералнята.
Извадете филтрите с клещи и изчеткайте добре с четка.
Почистете филтрите на маркуча намиращи се на края откъм
крана за вода, след което ги извадете с ръка заедно с
уплътнителя.
След като почистите филтрите, поствете ги в първоначалното
положение.
ФИЛТЪРА НА ПОМПАТА
Филтъра на помпата продължава живота на вашата помпа, която се
използва за дренажа на мръсната вода. Той пречи на варовика да
попадне в помпата. Препоръчва се почистване на помпата на 2-3
месеца.:
Отворете капака, дърпайки дръжката.
Преди да отворите капака на филтъра, поставете един съд
пред капака на филтъра, за да предотвратите потичането на
останалата в пералнята вода.
Отхлабете капака като го завъртите в обратна посока на
часовниковата стрелка и източете водата.
Отстранете всички чужди тела от филтъра.
Проверете ръчно въртенето на помпата.
След почистването на помпата, закрепете капака на филтъра
като го завъртите е посока на часовниковата стрелка.
Сложете капака на място.
Не забравяйте, че ако не поставите добре капака на филтъра
ще потече вода.
71
Page 76
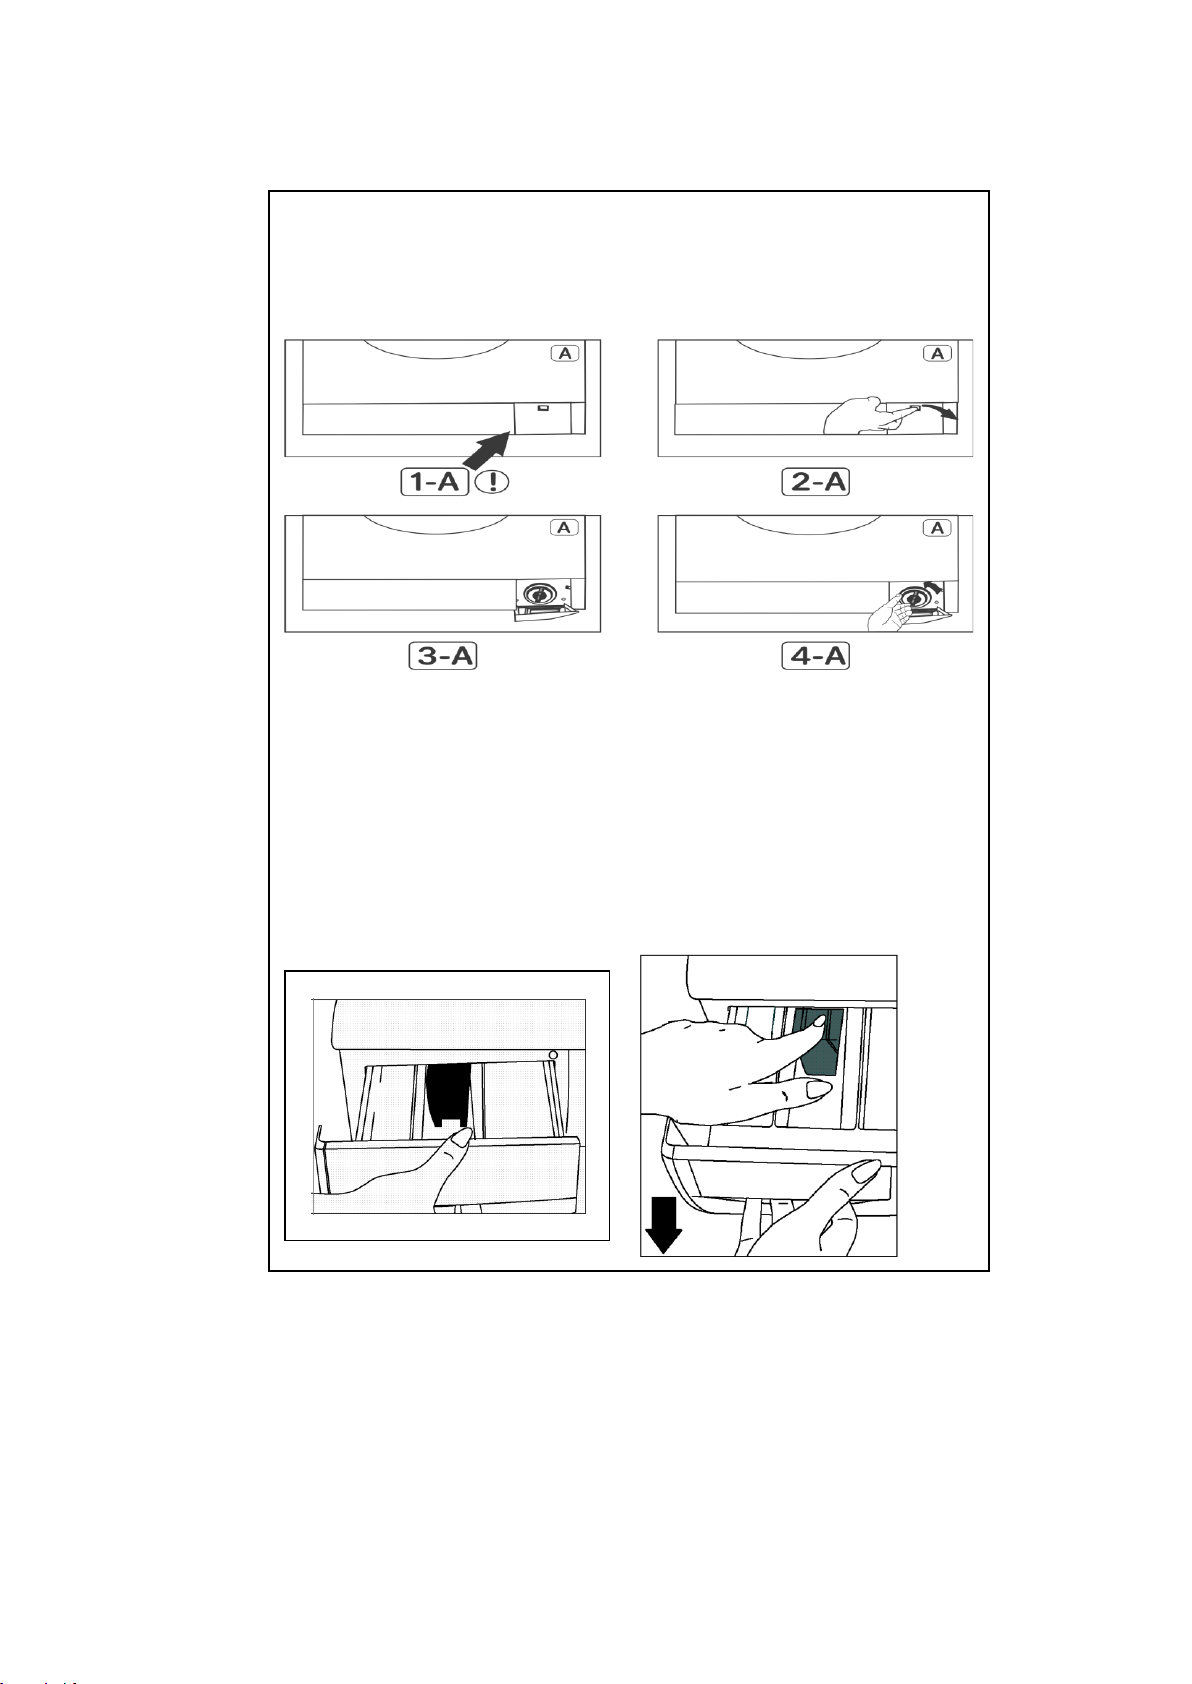
ВНИМАНИЕ!
Опасност от изгаряне!
Възможно е помпата да бъде все още гореща, изчакайте първо да
изстине.
ЧЕКМЕДЖЕТО ЗА ПЕРИЛНИЯТ ПРЕПАРАТ
С времето, перилните препарати могат да образуват утайки в
чекмеджето за препарата за пране; изваждайте от време на време
чекмвджето. За това трябва да:
Издърпайте чекмеджето докрай. (РИСУНКА-1)
Повдигнете предната част на чекмеджето, продължете да дърпате
докато решите да ги извадите (РИСУНКА -2)
Измиите го със стара четка за зъби и много вода.
След като изсъхне, поставете чекмеджето на място, следвайки
обратната процедура, която следвахте при изваждането му..
71
Page 77
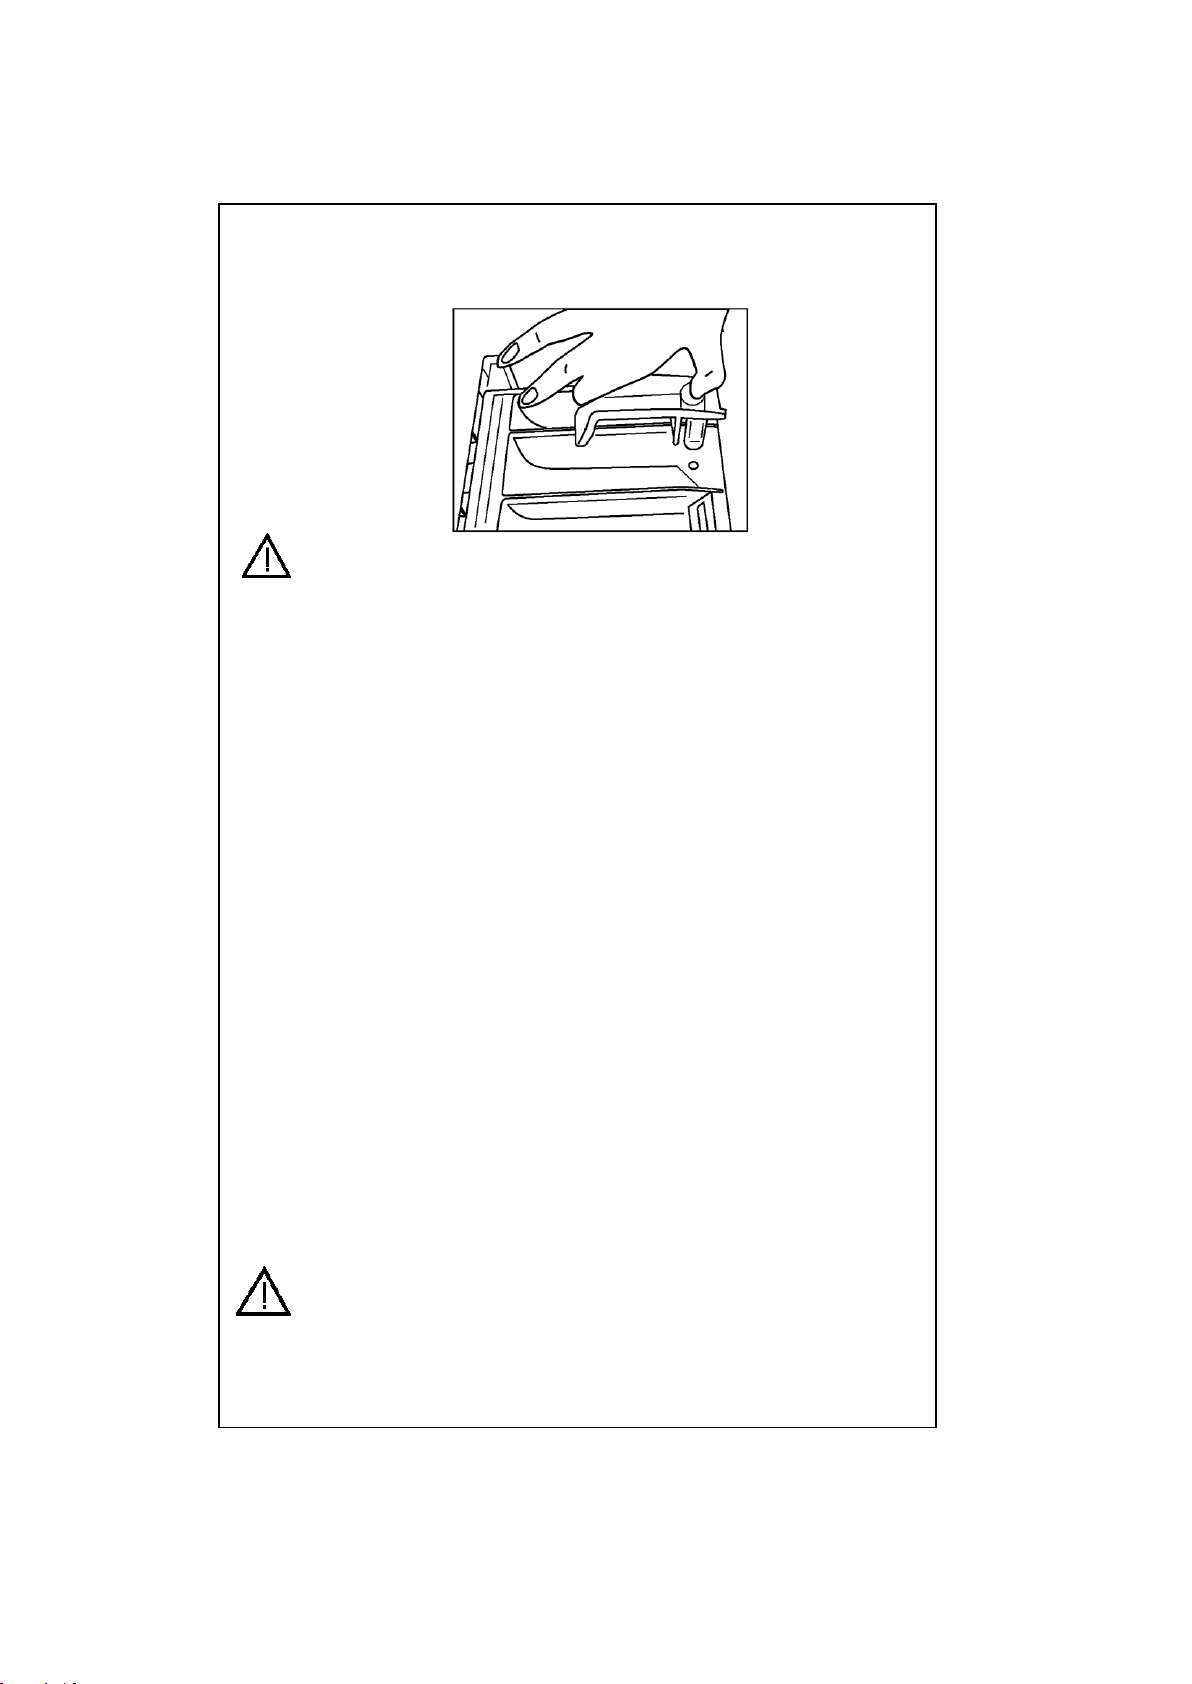
Преградата за балсам
Извадете чекмеджето за перилният препарат. Извадете преградата за
балсама и я почистете внимателно от остатъците. След което я
поставете на място. Проверете дали сте я поставили правилно.
ВНИМАНИЕ!
Ако пералнята е монтирана на място където стайната температура
може да спадне под 0 ˚C, следвайте инструкциите когато не използвате
пералнята:
Свържете пералнята в контакта.
Затворете краяна за вода и извадете маркуча от крана.
Поставете края на захранващият и източващият маркуч в съд.
Завъртете бутона за програмите на Източване.
Индикатора Настройка програма ще се включи.
Пуснете програмата, натискайки бутона Старт/Пауза.
Когато програмата приключи (индикатора Приключване светва),
изключете пералнята от контакта.
Когато приключите този процес, останалата вода в пералнята ще бъде
източена, предотвратявайки по този начин образуването на лед във
вътрешността на пералнята. Кото ще използвате отново пералнята,
ъверете се че температурата на околната среда е по-висока от 0 ˚C.
БАРАБАН
Не оставяйте метални предмети (игли, фиби, монеди) във вътрешността
на пералнята, тъй като това предразполага към образуване на ръжда.
За да отстраните петната от ръжда, използвайте препарата за
почистване без хлор и следвайте изнструкциите на производитела на
съответният препарат. Никога не използвайте телена гъба или предмети
които могат на причинят надрасквания, тъй като те предразполагат към
появата на ръжда.
ОТСТРАНЯВАНЕ НА КАМЪКА
Ако използвате препарата в прпоръчаното количеств, няма да бъде
необходимо да отстранявате камък. Все пак, ако желаете да приложите
съответната процедура използвйте субстанциите от търговската мрежа
и бъдете внимателни на предупрежденият от страна на производителя.
ВНИМАНИЕ!
Субстанциите, които премахват камъка съдържат киселини, които
могат да причинят промяна на цвета на дрехите, а и ралични
страничи ефекти върху пералнята.
71
Page 78
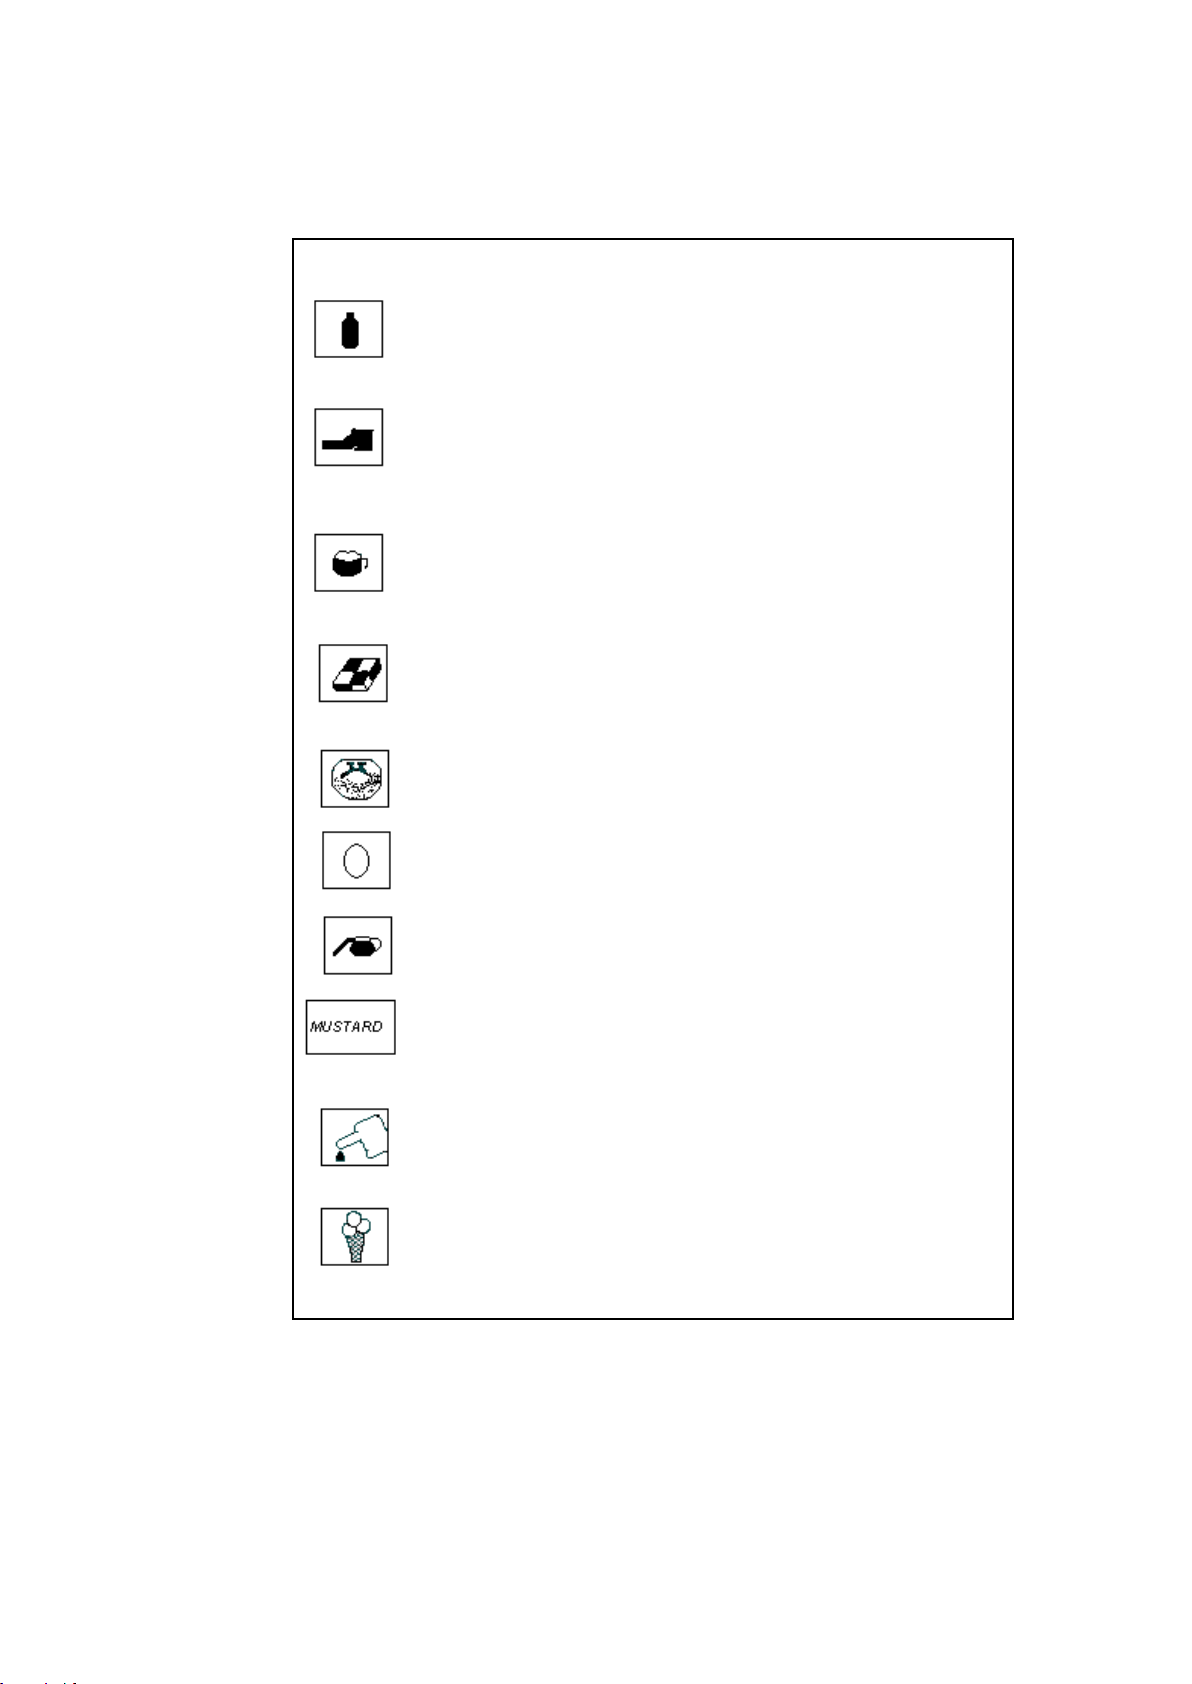
РАЗДЕЛ 7: ПРАКТИЧЕСКИ ИНФОРМАЦИИ
Алкохолни напитки: Захабеното място трябва да се изпере
първо със студена вода, след което да се забърше с глицерин
и вода и изплакната с оцет и вода.
Боя за обувки: Разтъркайте леко петното без да повредите
материата, след което разтъркайте с препарат и изплакнете.
Ако петното не изчезне, разтъркайте с разтвор от 1/3 чист
алкохол (96 градуса) и 2/3 вода, след което с хладка вода.
Чай и кафе: Опънете зацапаната част над един съд/чешмата
и полейте гореща вода (в рамките на максимума позволен за
съответният материал – виж етикета).
Шоколад и какао: Накиснете в студена вода, разтъркайте
със сапун или прах за пране и изперете на максимално
позволената температура за съответният материал. Ако
петното не излезе, избътршете с кислородна вода (в
съотношение 3%).
Доматен сос: Разтъркайте леко с нокът засъхналите петна,
без да развалите материята, алед което оставете във студена
вода около 30 мин. и разтъркайте с препарат за пране.
Яйце: Отстранете остатъците от петното и избършете с гъба
или мек навлажнен със студена вода материал.
Петна от мазнина и олио: Първо, избършете остатъците,
след което измиите с хладка вода и сапун.
Горчица: Първо, сложете глицерин на петното. Разтъркайте с
прах за пране и след това изперете. Ако петното е упорито,
избършете с алкохол (за синтетичните дрехи и цветните,
разтвор от 1/3 алкохол и 2/3 вода).
Петна от кръв: Сложете дрехата в студена вода за 30
минути. Ако петното не изчезне, накиснете в разтвор от вода и
амоняк (3 лъжици амоняк и 4 литра вода), за 30 минути.
Сметана, сладолед: Накиснете дрехата в студена вода и
ратъркайте захабената част със прах за пране.
72
Page 79
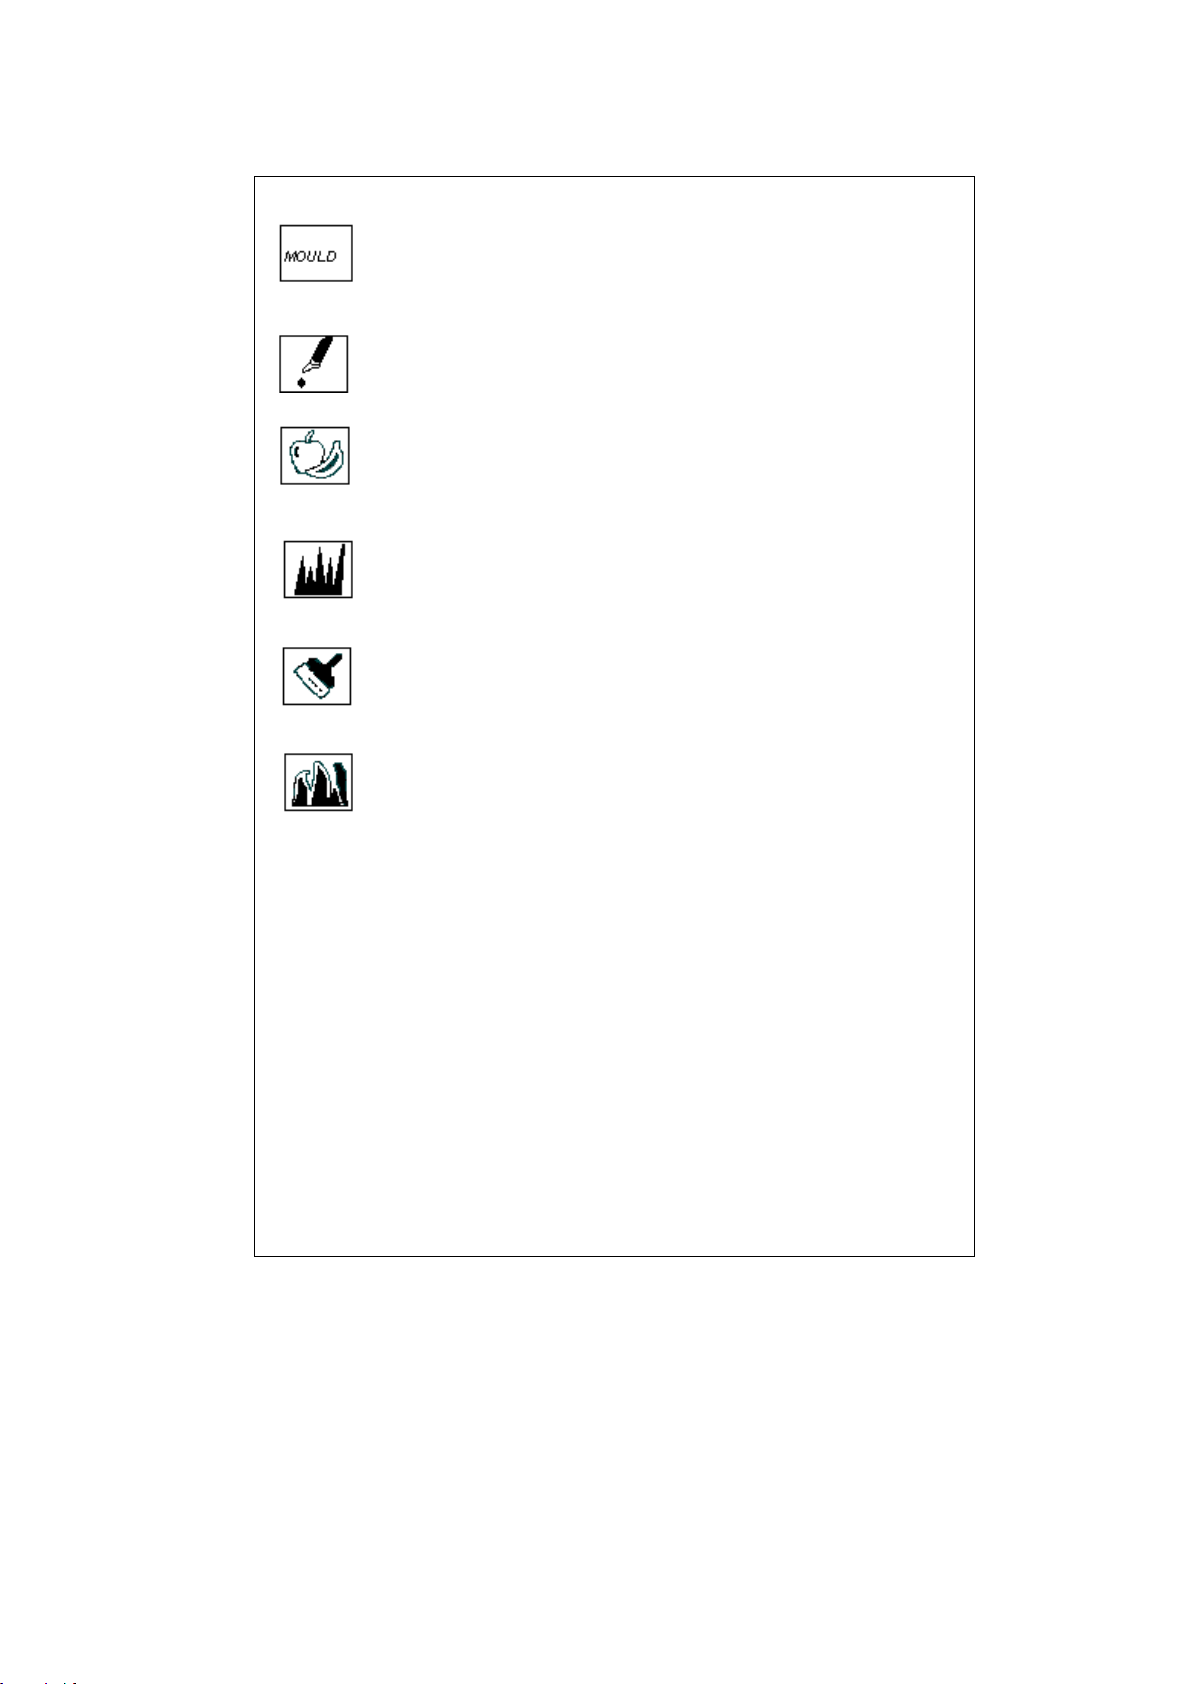
Мухъл: Петната от мухъл трябва да отстраните възможно
най-бързо. Петното се чисти с прах за пране и ако не изчезне
трябва да да го забършете с кислородна вода (концентрация
от 3%).
Мастило: Дръжте зацапаното място под струя вода докато
престане да се оцветява водата. След това разтъркайте с
вода смесена с лимонов сок и прах за пране и изперете след
5 минути.
Плодове: Опънете захабеното място над един съд/мивка и
изсипете студена вода, в никакъв случай гореща вода.
Избършете със студена вода и нанесете глицерин. Изчакайте
около 1-2 часа и изплакнете след като сте разтъркали с
няколко капки оцет.
Петна от трева: Разтъркайте петното с прах за пране.
Разтъркайте вълнениете дрехи с алкохол. (За цветни дрехи
използвайте разтвор от 1/3 чист алкохол и 2/3 вода).
Боя: Петното би трябвало да се отстрани преди да засъхне,
прилагайки по него разредител. След това трябва да бъде
разтъркате с прах за пране и да изперете.
Петна от изгаряния: За вълнени тъкани, накиснатите дрехи в
кислородна вода трябва да се покрият на мястото на петното
и да се изгладят слагайки сух материал отгоре. Изперете и
изплакнете добре.
РАЗДЕЛ8: ИЗБЯГВАНЕ НА МАЛКИТЕ ГРЕШКИ
Всяка поправка, от която има нужда вашата пералня трябва да бъде
извършвана от квалифициран персонал. Когато е необходима поправка
или не успявате да установите причината за появил се проблем,
направете следното:
Изключете пералнята от контакта.
Затворете крана за водата.
Обърнете се към най-близкият ауторизиран сервиз.
73
Page 80
ДЕФЕКТ
ВЕРОЯТНА
ПРИЧИНА
МЕТОДИ ЗА
ОТСТРАНЯВАНЕ НА
ПРИЧИНАТА
Пералнята не работи.
Не е включена в
контакта.
Поставете щекера в
контакта.
Бушона е дефектен.
Сметене бушона.
Немате ток.
Проверете дали
имате ел.ток.
Не сте натистали
бутона Старт/Пауза.
Натиснете бутона
Стар/Пауза.
Бутона за програмите
е в положение O (off/
изключен).
Завъртете бутона за
програми на някоя
програма.
Врата не е добре
затворена.
Затворете добре
вратата. Трябва да
чуете леко
прещракване.
Пералнята не се
пълни с вода.
Крана за вода е
затворен.
Отвиите крана.
Захранващият маркуч
е прегънат.
Проверете маркуча.
Захранващият маркуч
е блокиран.
Почистете
филтъра.(*)
Филтъра при входа за
водата е запушен.
Почистете
филтъра.(*)
Варата не е добре
затворена.
Затворете добре
вратата. Трябва да
чуете леко
прещракване.
Пералнята не източва
водата.
Източващият маркуч
е подгънат или
затиснат.
Проверете маркуча.
Филтъра на помпата
е запушен.
Почистете филтъра
на помпата. (*)
Дрехите в барабана
бе са добре
разпределени.
Разпределете
равномерно дрехите
в барабана.
Пералнята вибрира.
Краката на пералнята
не са настроени.
Настройте крачетата.
(**)
Не сте отстранили
винтовете от
транспорта.
Отстранете
винтовете от
транспорта. (**)
(*) Виж Раздел 6, отностно почистването о поддръжката на пералнята.
(**) Виж Раздел 2, относно монтирането на пералнята.
74
Page 81
ДЕФЕКТ
ВЕРОЯТНА
ПРИЧИНА
МЕТОДИ ЗА
ОТСТРАНЯВАНЕ НА
ПРИЧИНАТА
Пералнята вибрира.
Количеството дрехи в
барабана е твърде
малко.
Не пречи на работата
на пералнята.
Количеството дрехи в
барабана е твърде
голямо или дрехите
не са разпределени
равномерно.
Не превишавайте
масимално
позволеното
количество и
разпределете
дрехите равномерно.
Пералнята се докосва
до друг предмет.
Не допирайте
пералнята до двърди
предмети.
Прекалено много
пяна в барабана.
Използвали сте
твърде много
препарат за пране.
Натиснете бутона
Старт/Пауза. За да
намалите
образуването на
пяна, разредете една
лъжица балсам в 0,5
л. вода и го сипете в
чекмеджето за
препарат. Натиснете
бутона Старт/Пауза
след 5-10 минути.
Променете
количеството
препарат при
следващото пране.
Изплзвали сте
неподходящ препарат
за пране.
Използвайте само
препарати
предназначени за
употреба в
автоматични перални
машини.
Не получавате
желаните резултати
след пране.
Дрехите са прекалено
мръсни за избраната
от вас програма.
Изберете подходяща
програма. (Виж –
Таблица-1)
Количеството
перилен препарат не
Използвайте повече
перилен препарат, но
в съответствие с
препоръките на
75
Page 82
ДЕФЕКТ
ВЕРОЯТНА
ПРИЧИНА
МЕТОДИ ЗА
ОТСТРАНЯВАНЕ НА
ПРИЧИНАТА
Не получавате
желаните резултати
след пране.
Надвишили сте
максималното
допустимо
количество за
зареждане с дрехи.
Не надвишавайте
максималното
количество.
Степента на твърдост
на водата е твърде
висока
Folositi detrgentul in
cantitatea
recomandata de
producatorul acestuia.
Дрехите не са добре
разпределени в
пералнята.
Imprastiati rufele in
masina intr-o maniera
echilibrata.
Водата се източва от
пералнята веднага
след като е била
напълнена.
Края на маркуча за
източване е
прекалено ниско
спрямо пералнята.
Поставете маркуча на
подходящото
положение.(**)
Не се вижда вода в
барабана по време на
употреба.
Не е дефект. Водата
се намира в долната
част на барабана.
-
Има следи от
перилен препарат пе
дрехите.
Някои перилни
препарати съдържат
по-големи частици,
които не са се
разтворили и са се
залепили за дрехите
под форма на бели
петна.
Изберете програмата
за Плакнене и
изплакнете още
веднъж или
почистете дрехите с
четка след като
изсъхнат.
Има сиви петна по
дрехите.
Тези петна могат да
бъдат от масло,
сметана или
мехлеми.
При следващото
пране, използвайте
максималното
количество перилен
препарат
препоръчано от
производителя на
препарата.
(**) Виж секция 2, относно инсталирането на пералната машина.
76
Page 83
ДЕФЕКТ
ВЕРОЯТНА
ПРИЧИНА
МЕТОДИ ЗА
ОТСТРАНЯВАНЕ НА
ПРИЧИНАТА
Процеса на
изцеждане не
започва или започва
със закъснение.
Не е дефект. Това
вероятно се дължи на
контрола на
балансиране на
товара на пералнята.
Системата за контрол
на товара с дрехи ще
се опита да
разпредели дерехите
в барабана. След
това ще започне
процеса на
изцеждане. При
следващото пране
поставете дрехите
равномерно.
РАЗДЕЛ 9: СИСТЕМА ЗА АВТОМАТИЧНО ОТКРИВАНЕ НА
ГРЕШКИТЕ
Вашата пералня е снабдена със систем за постоянен контрол на
процеса на пране; тези ситеми ще предприемат необходимите
предпазни мерки против грешките, но ще ви сигнализира на появата им.
КОД
ГРЕШКА
ИНДИКАТОР
ГРЕШКА
ВЪЗМОЖНА
ГРЕШКА
МЕТОД ЗА
ОТСТРАНЯВА
НЕ НА
ГРЕШКАТА
Err 01
Индикатора
Старт/Пауза
мига.
Вратата не е
добре затворена.
Затворете
правилно
вратата, така че
да чуете
прещракване.
Ако проблема
продължава,
спрете
пералнята,
изключете я от
контакта, и се
обърнете към
ауторизиран
сервиз.
77
Page 84
КОД
ГРЕШКА
ИНДИКАТОР
ГРЕШКА
ВЪЗМОЖНА
ГРЕШКА
МЕТОД ЗА
ОТСТРАНЯВА
НЕ НА
ГРЕШКАТА
Err 02
Индикатора
Настройка
програма мига.
Нивото на водата
в пералнята се
намира под
устройството за
загряване.
Възможно е
налягането на
източника на
вода да е ниско
или да е
блокиран притока
на вода.
Отворете докрай
крана за водата.
Проверете дали
водата не е
спряна. Ако
проблема
продължава,
пералнята ще
спре
автоматично.
Изключете я от
контакта,
затворете крана
за вода и се
обърнете към
аутоеризиран
сервизен център.
Err 03
Индикатори
Старт/Пауза и
Настройка
програма могат.
Помпата се е
повредила или
филтъра на
помпата е
запушен.
Почистете
филтъра на
помпата. Ако
проблема
продължава,
обърнете се към
ауторизиран
сервиз. (*)
Err 04
Индикатора Край
на програмата
мига.
Грешка в
комуникацията.
Спрете
пералнята и я
изключете от
контакта.
Затворете крана
за вода и се
обърнете към
ауторизиран
сервиз.
(*) Виж Раздел 6, отностно почистването и поддръжката на пералнята.
78
Page 85
КОД
ГРЕШКА
ИНДИКАТОР
ГРЕШКА
ВЪЗМОЖНА
ГРЕШКА
МЕТОД ЗА
ОТСТРАНЯВАНЕ НА
ГРЕШКАТА
Err 05
Индикаторите
Старт/Пауза и
Край на
програмта мигат.
Устройството за
загряване на
водат или
топлинният
сензор са
повредени.
Спрете пералнята и я
изключете от контакта.
Затворете крана за вода и
се обърнете към
ауторизиран сервиз.
Err 06
Индикаторите
Настрийка
програма и Край
на програмата
мигат.
Дефект на
мотора.
Спрете пералнята и я
изключете от контакта.
Затворете крана за вода и
се обърнете към
ауторизиран сервиз.
Err 07
Индикаторите
Старт/Пауза,
Настройка
програма и Край
програма светят
постоянно.
Грешка в
конфигурацията.
Спрете пералнята и я
изключете от контакта.
Затворете крана за вода и
се обърнете към
ауторизиран сервиз.
Err 08
Индикаторите
Старт/Пауза,
Настройка
програма и Край
програма могат.
Системна грешка
Спрете пералнята и я
изключете от контакта.
Затворете крана за вода и
се обърнете към
ауторизиран сервиз.
Err 09
Индикаторите
Настройка
програма и Край
програма светят
постоянно.
Мрежовото
напрежение е
твърде ниско или
твърде високо.
Ако напрежението на ел.
мрежа е по-ниско от 150V
или по-голямо от 260V,
пералнята ще спре
автоматично. Когато
напрежението възвърне
нормални стойности,
пералнята ще продължи
програмата.
79
Page 86
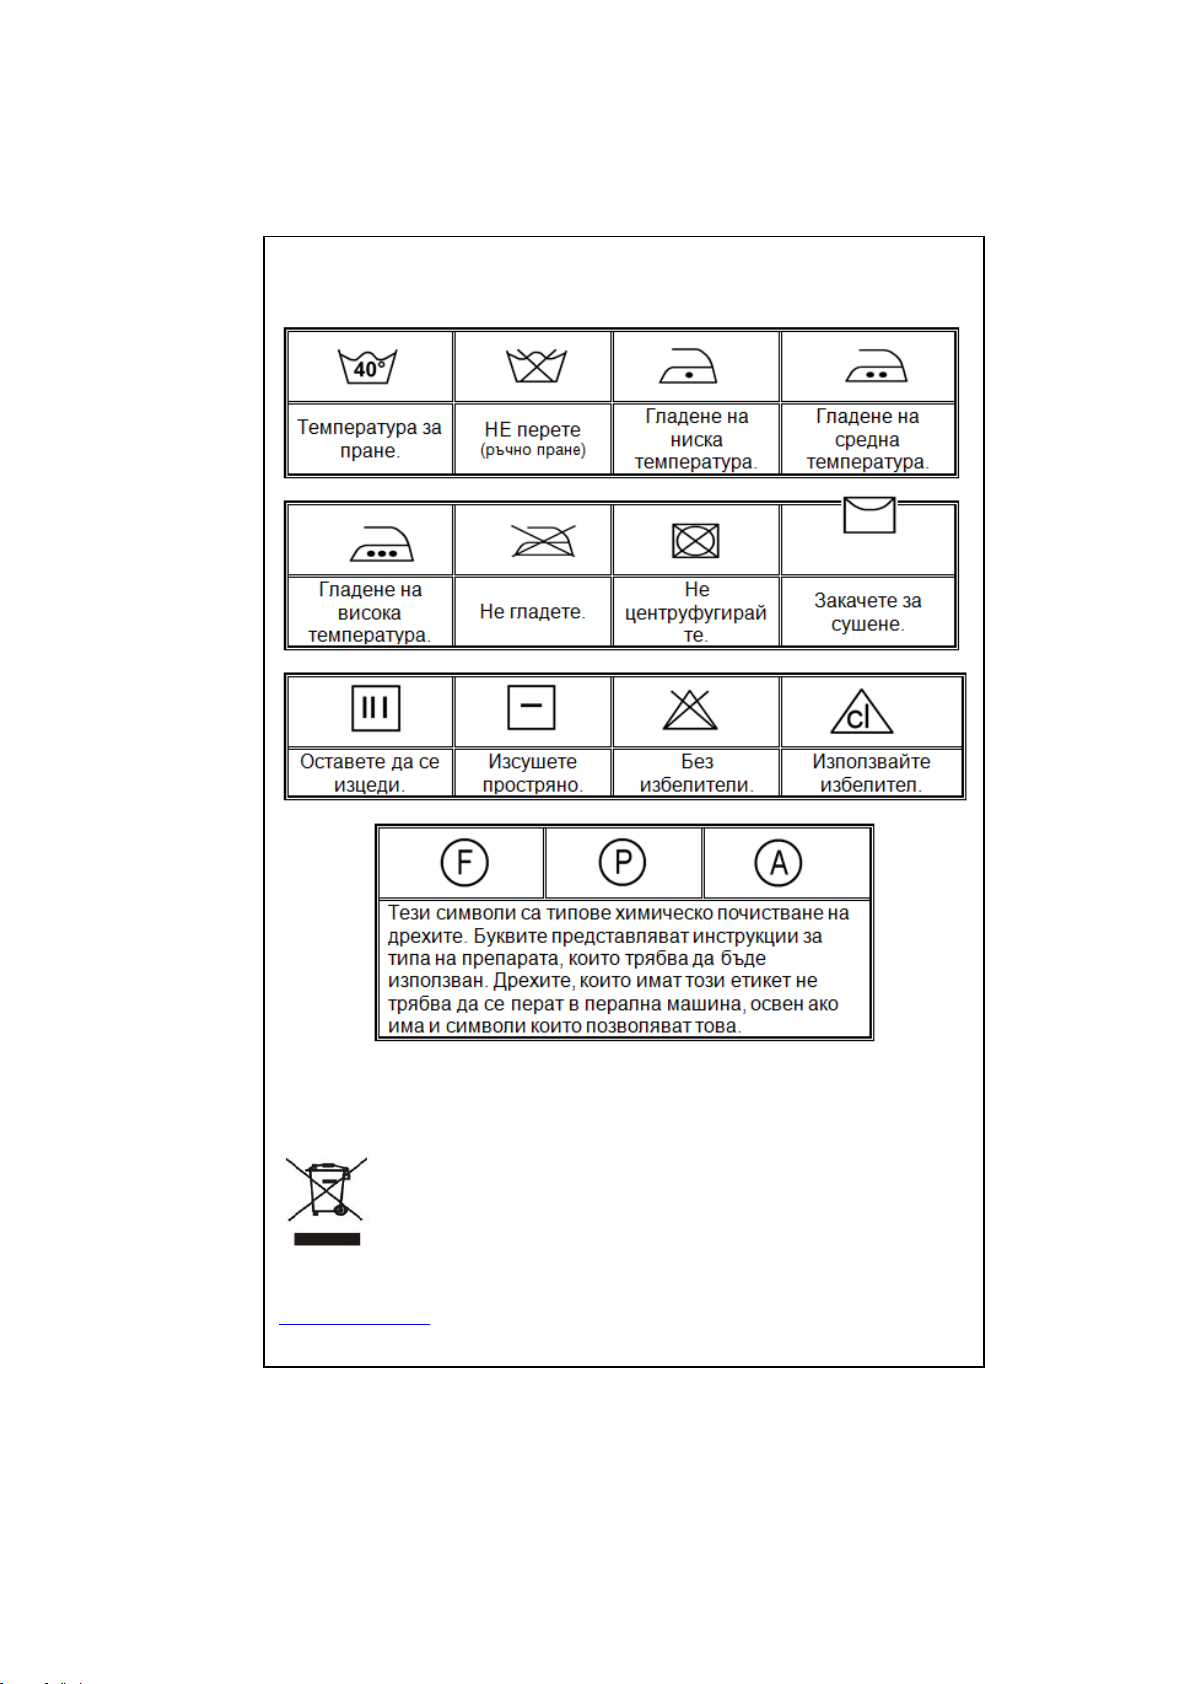
РАЗДЕЛ 10: МЕЖДУНАРОДНИ ЗНАЦИ ЗА ПРАНЕ
ОТСТРАНЯВАНЕТО НА ОТПАДЪЦИТЕ ПО ОТГОВОРЕН ЗА ОКОЛНАТА СРЕДА
НАЧИН
Можете да помогнете за опазването на околната среда!
Моля, спазвайте местните правила и закони: занесете нефункционалните
електрически уреда в специалните събирателни пунктове.
www.heinner.com
Page 87
ИНФОРМАЦИОНЕН ЛИСТ НА ПРОДУКТА
Капацитет (Памук 60° пълно зареждане) (кг.)
5.0
Енергиен клас
A+
Разходна енергия (kWh/година)*
167
Консумация на вода (л./година)**
9240
Клас за ефективност при изцеждането чрезз центруфугиране
C
Шум (Пране) (dB(A))
58
Шум (Центруфугиране) (dB(A))
77
Максимална скорост на центруфугата(rpm)***
1000
Съдържание на остатъчна влага (%)***
62
Разходна енергия (памук 60° максимално зареждане)(kWh/цикъл)
0.85
Разход на енергия (памук 60° частично зареждане)(kWh/цикъл)
0.66
Разход на енергия (памук 40°частично зареждане)(kWh/цикъл)
0.52
Консумация на вода (памук 60°максимално зареждане)(л./цикъл)
43
Консумация на вода (памук 60°частично зареждане)(л./цикъл)
41
Консумация на вода(памук 40°частично зареждане)(л./цикъл)
41
Разход на енергия (спиране)(W)
1.00
Разход на енергия (пускане)(W)
2.00
Продължителност на програма (мин.) (памук 60° максимално
зареждане)
190
Продължителност на програма (мин.) (памук 60° частично зареждане)
145
Продължителност на програма (мин.) (памук 40° частично зареждане)
140
•
Програма нр. 3 (стандартна програма 60 ° C памук) и програма номер 4 (стандартна програма 40 ° C
памук) са стандартните програми за пране, за които се отнасят информациите от етикета и от
информационният лист, и по-точно, че тези програми са подходящи за пране на леко мръсно
спално памучно бельо и са най-ефикасните програми по отношение на комбинираната консумация
на енергия и вода.
•
Реалната температура на водата може да е различна от декларираната температура на цикъла.
•
Стойностите на продължителността на програмата, разхода на енергия и вода могат да са варират в
зависимост от тежестта и типа на товара, от допълнително избраните функции, от температурата на
водата от чешмата и атмосферната температура.
*
На основата на стандартният цикъл за пране 220 от програмите за памук на 60°C şi 40°C с
максимално и частично зареждане и рецимите за ниско потребление на енергия. Реалната
консумациа на енергия ще зависи от начина на употреба на уреда.
**
На основата на стандартният цикъл за пране 220от програмите за памук на 60°C şi 40°C с
максимално и частично зареждане. Реалната консумацията на вода ще зависи от начина на
употреба ба уреда.
***
На основа на резултатите от тестовете с една стандартна програма 60 ° C за памук с максимално и
частично зареждане и с една стандартна програма 40 ° Cза памук с частично зареждане.
 Loading...