

Page 1
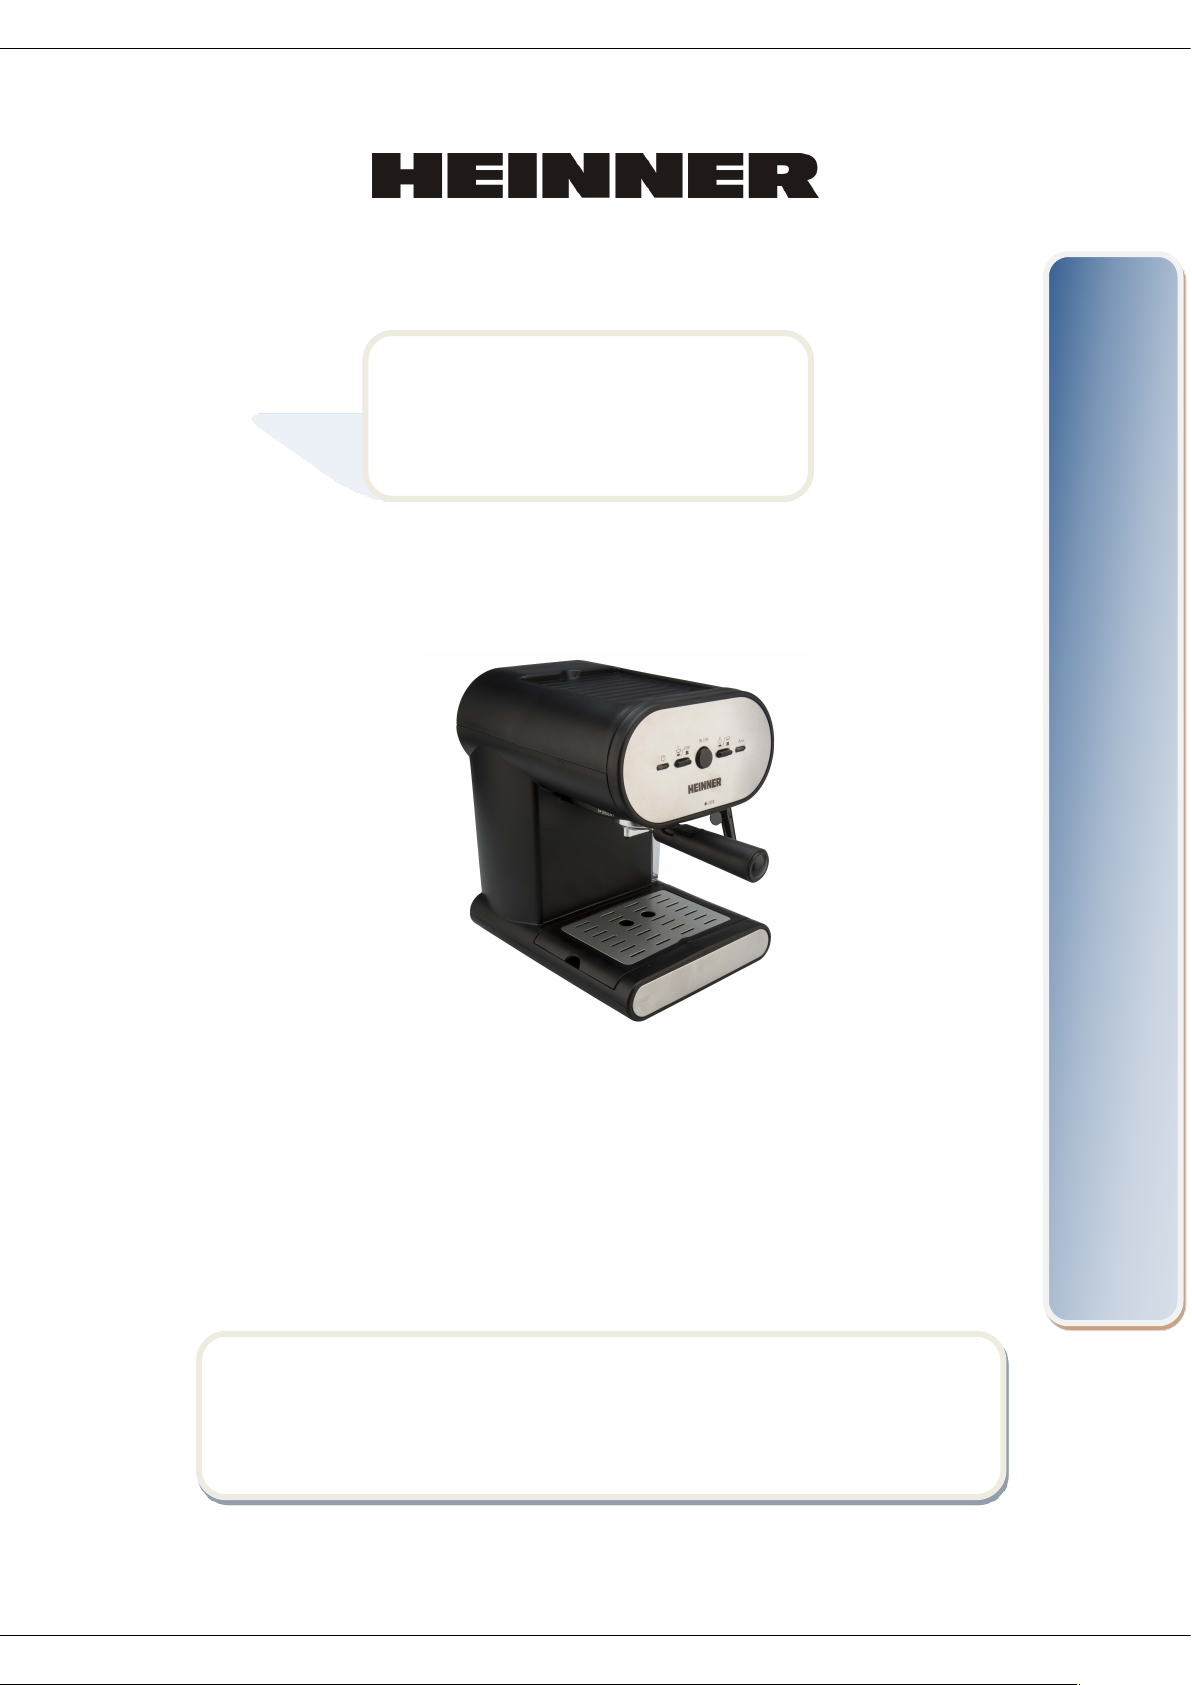
ESPRESSOR
Model: HEM-250
www.heinner.ro
Espressor cu pompa de presiune mare (15 bar)
Capacitate: 1 L
Culoare: Negru + inox
Putere: 1050 W
Page 2
www.heinner.com 1050W, 50-60Hz, 220-240V
Va rugam sa cititi cu atentie instructiunile si sa pastrati manualul pentru informari ulterioare.
Acest manual este conceput pentru a va oferi toate instructiunile necesare referitoare la
instalarea, utilizarea si intretinerea aparatului.
Pentru a opera unitatea corect si in siguranta, va rugam sa cititi acest manual cu instructiuni
cu atentie inainte de instalare si utilizare.
I. INTRODUCERE
II. CONTINUTUL PACHETULUI DUMNEAVOASTRA
Espressor
Manual de utilizare
Certificat de garantie
Va multumim pentru alegerea acestui produs!
1
Page 3
www.heinner.com 1050W, 50-60Hz, 220-240V
III. MASURI DE SIGURANTA
1. Cititi toate instructiunile de utilizare.
2. Inainte de utilizare, verificati daca voltajul prizei de perete corespunde cu
voltajul trecut pe placuta de caracteristici.
3. Acestui aparat i-a fost incorporat un stecher cu impamantare. Asigurati-va ca
priza de perete din casa dumneavoastra este impamantata.
4. Pentru a va proteja impotriva incendiului, a socurilor electrice si a vatamarilor
corporale, nu introduceti cablul de alimentare sau stecherul in apa sau in alte
lichide.
5. Scoateti stecherul din priza inainte de curatare sau atunci cand nu folositi
aparatul. Permiteti aparatului sa se raceasca complet inainte de a-l utiliza din
nou, de a atasa componente sau de a-l curata.
6. Nu operati niciun aparat al carui cablu de alimentare sau stecher este
deteriorat sau care este scapat pe jos sau avariat in orice fel. Returnati aparatul
la cel mai apropiat service autorizat pentru examinare, reparatie sau reglare
electrica sau mecanica.
7. Utilizarea accesoriilor care nu sunt recomandate de producatorul aparatului
poate cauza incendiu, electrocutari sau vatamari corporale persoanelor.
8. Asezati aparatul pe o suprafata plana sau pe o masa, nu atarnati cablul de
alimentare peste marginea mesei.
9. Asigurati-va ca acest cablu de alimentare nu atinge suprafetele aparatului care
se incalzesc.
10. Nu asezati aparatul pe suprafete fierbinti sau in aproprierea focului pentru a
evita deteriorarea acestuia.
11. Pentru a-l deconecta de la reteaua electrica, scoateti stecherul din priza de
perete. Apucati intotdeauna de stecher. Nu trageti niciodata de cablu.
12. Nu utilizati aparatul in alt scop decat acela pentru care a fost destinat si
asezati-l intr-un loc uscat.
13. Aveti grija ca aburii sa nu va arda.
14. Nu atingeti suprafetele fierbinti ale aparatului (cum ar fi tubul pentru aburi sau
filtrul din metal cand aparatul functioneaza). Folositi manerul sau butoanele.
15. Nu lasati espressorul sa functioneze fara apa.
16. Nu indepartati port filtrul din metal atunci cand aparatul prepara cafea.
17. Inainte de utilizare introduceti stecherul in priza de perete. Opriti aparatul
inainte de a-l scoate din priza.
2
Page 4
www.heinner.com 1050W, 50-60Hz, 220-240V
18. Acest aparat nu este destinat utilizarii de catre persoane (inclusiv copii) cu
capacitati fizice, senzoriale sau mentale reduse, sau lipsite de experienta sau
putere de intelegere, daca nu sunt supravegheati sau daca nu li se ofera
instructiuni referitoare la utilizarea aparatului de catre o persoana responsabila cu
siguranta lor.
19. Copiii trebuie supravegheati pentru a nu se juca cu aparatul.
20. Acest aparat este destinat utilizarii in gospodarii si medii similare precum:
– zone de bucatarie in magazine, birouri si alte medii de lucru;
– ferme;
– de catre clienti in hoteluri, moteluri si alte medii de tip rezidential;
– medii de tip pensiune (bed and breakfast).
21. Nu utilizati aparatul in aer liber.
22. Pastrati aceste instructiuni
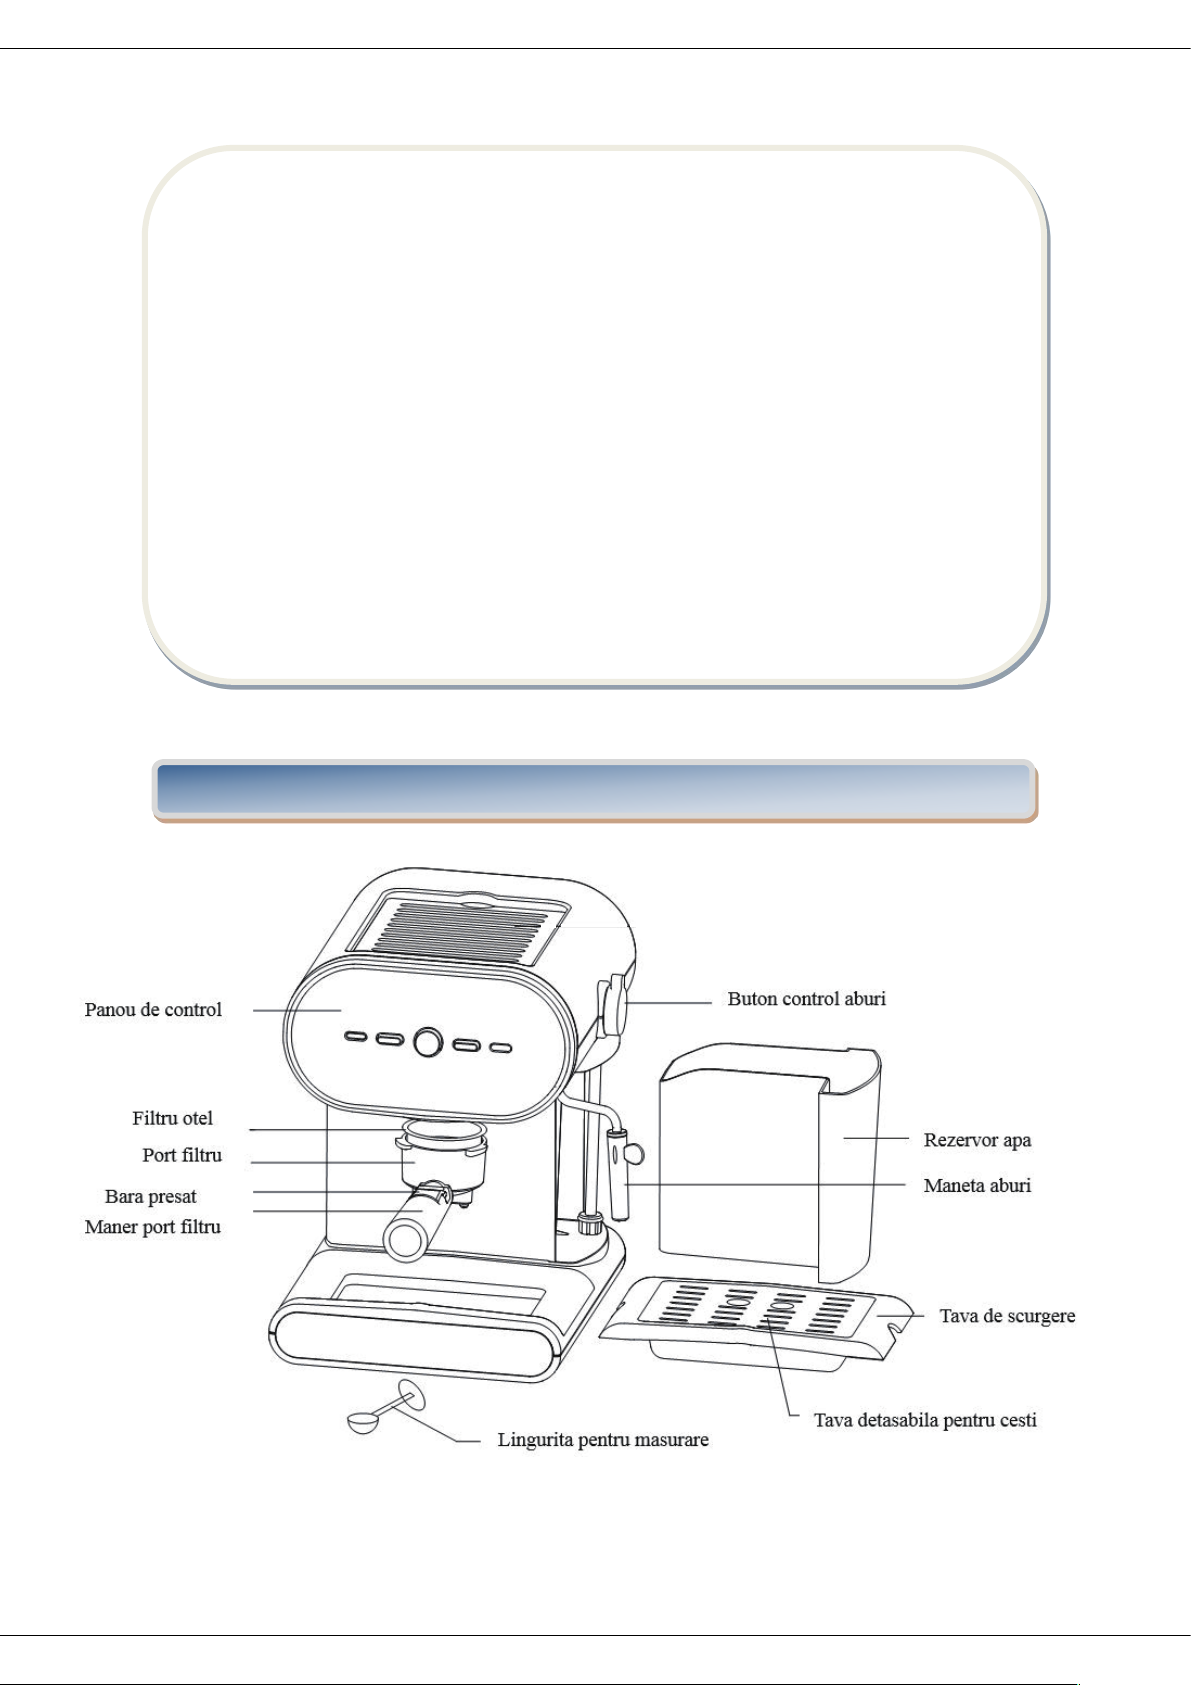
IV. DESCRIEREA APARATULUI
3
Page 5
www.heinner.com 1050W, 50-60Hz, 220-240V
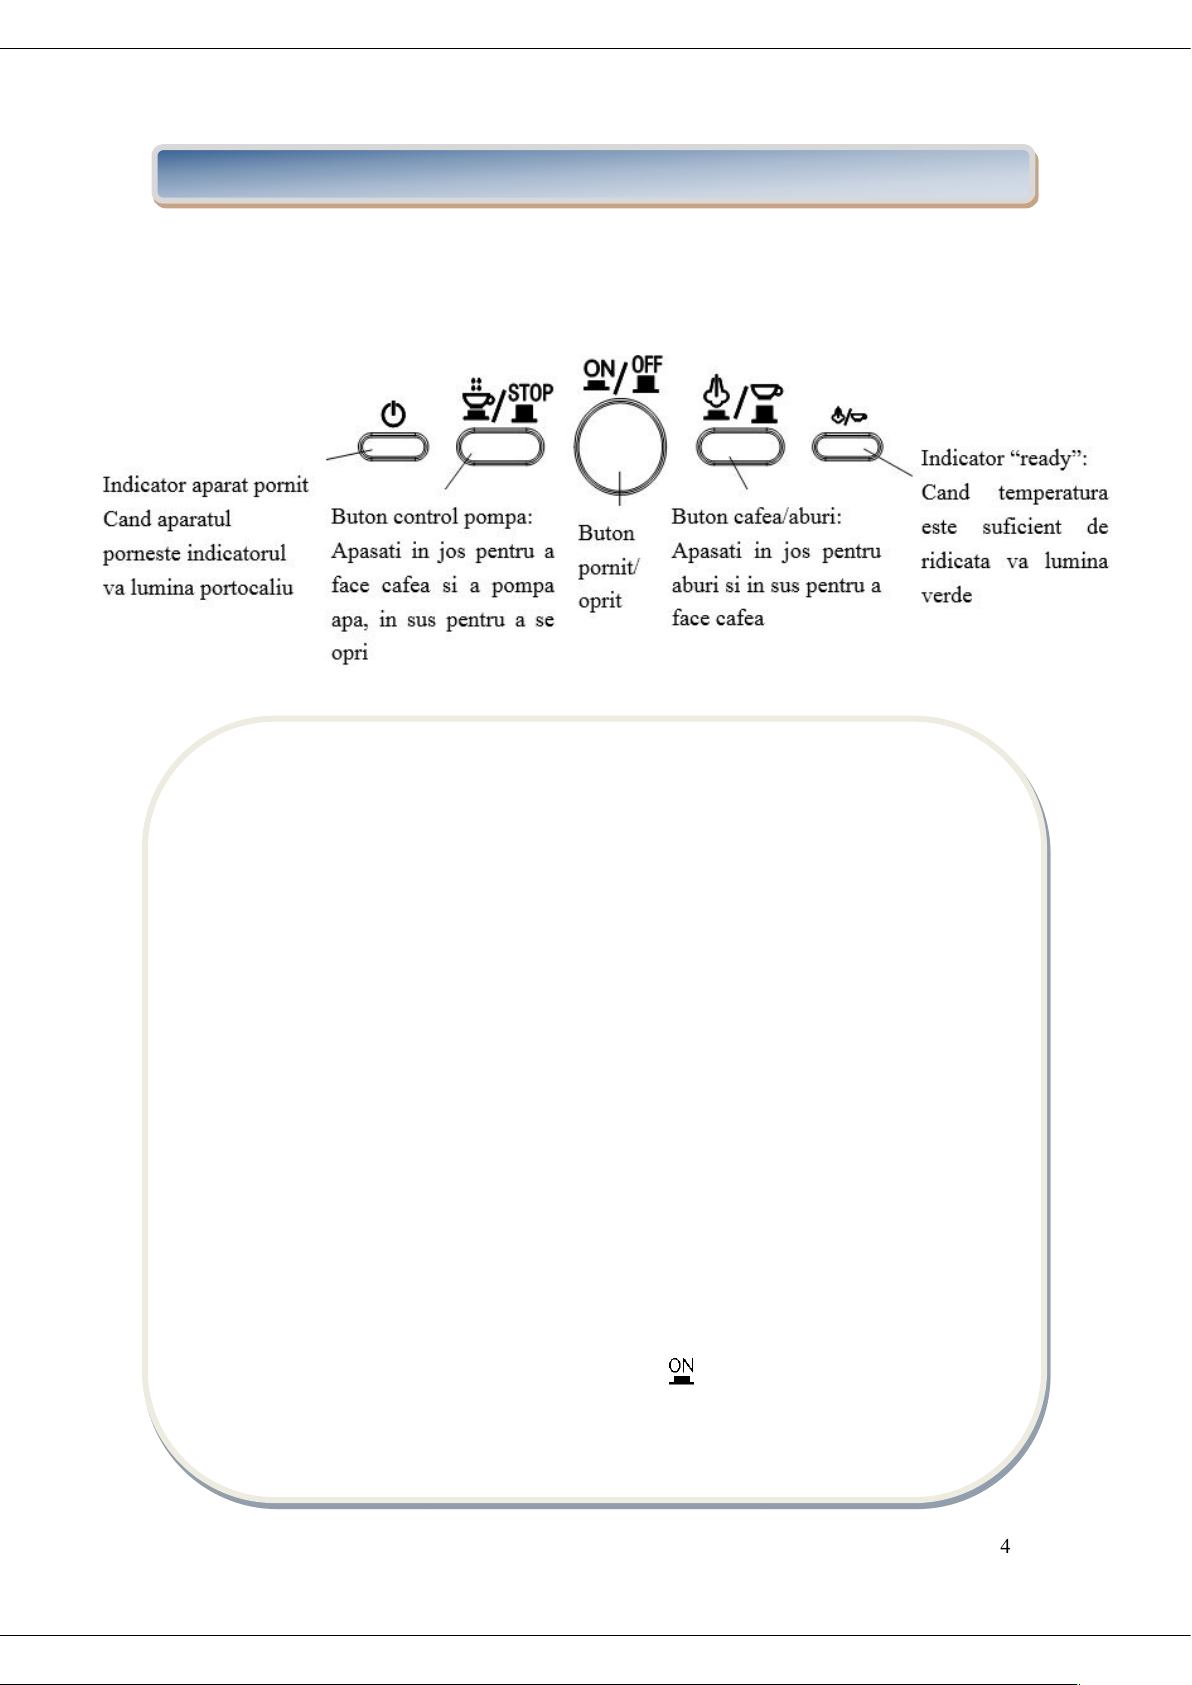
Panoul de control:
V. INSTRUCTIUNI DE UTILIZARE
Inainte de prima utilizare:
Pentru a va asigura ca prima ceasca de cafea are un gust excelent, trebuie sa clatiti
espressorul cu apa calda, dupa cum urmeaza:
1. Trageti rezervorul de apa in partea dreapta a espressorului. Turnati apa in
rezervorul de apa, nivelul apei nu trebuie sa depaseasca semnul “MAX” din
rezervor. Puneti tubul de distributie a apei in rezervor si apoi introduceti-l in
espressor.
Nota: Aparatul are rezervorul detasabil pentru a se putea curata mai usor, puteti umple
mai intai rezervorul cu apa si apoi sa-l introduceti in aparat.
2. Asezati filtru din otel in port filtrul de metal (fara cafea), apoi introduceti port
filtrul in aparat din pozitia “Insert” (introducere) si fixati-l rotindu-l in sensul
invers al acelor de ceasornic pana ajunge in pozitia “Lock” (blocare).
3. Asezati o ceasca de espresso pe tava detasabila. Asigurati-va ca manerul de
control al aburilor se afla in pozitia minima
Nota: Deoarece aparatul nu este dotat cu nicio ceasca sau cana, pregatiti dvs. una.
4. Conectati-l la reteaua electrica, apasati butonul ON/OFF (pornit/oprit) in
pozitia inferiorara si anume pozitia “ ”. Led-ul de indicare a pornirii
aparatului va lumina (portocaliu)
4
Page 6
www.heinner.com 1050W, 50-60Hz, 220-240V
5. Apasati butonul de control al pompei in pozitia inferioara si anume pozitia
“ ”, pompa va distribui apa, cand apa curge afara opriti pompa apasand
din nou butonul de control in pozitia “
STOP
”.
6. Asigurati-va ca butonul de cafea/aburi se afla in pozitia superioara si anume in
pozitia si asteptati un moment, aparatul incepe sa se pre-incalzeasca
pana cand led-ul indicator pentru cafea/aburi va lumina (verde, ceea ce
inseamna ca procesul de pre-incalzire s-a terminat).
7. Apasati pompa in pozitia inferioara si anume din nou in pozitia “ ” si apa
va curge afara.
8. Dupa ce apa a curs pentru 1 minut, apasati butonul de control al pompei in
pozitia “
STOP
”, puteti turna apa in fiecare recipient si apoi sa le curatati cu
atentie. Acum puteti incepe sa faceti cafea.
Nota: Este posibil sa auziti un zgomot atunci cand apa se pompeaza pentru prima oara,
este ceva normal, aparatul elimina aerul dinauntru. Dupa aproximativ 20 de secunde
sunetul va inceta.
Pre-incalzire:
Pentru a prepara o ceasca buna de espresso fierbinte, este recomandat sa pre-incalziti
aparatul inainte de a face cafeaua, inclusiv port filtrul si ceasca, astfel incat
componentele reci sa nu influenteze savoarea cafelei.
1. Scoateti rezervorul de apa detasabil si umpleti-l cu cantitatea dorita de apa,
dar nu depasiti nivelul marcajelor “MAX” si “MIN” din rezervor. Introduceti
apoi rezervorul corespunzator in aparat.
5
Page 7
www.heinner.com 1050W, 50-60Hz, 220-240V
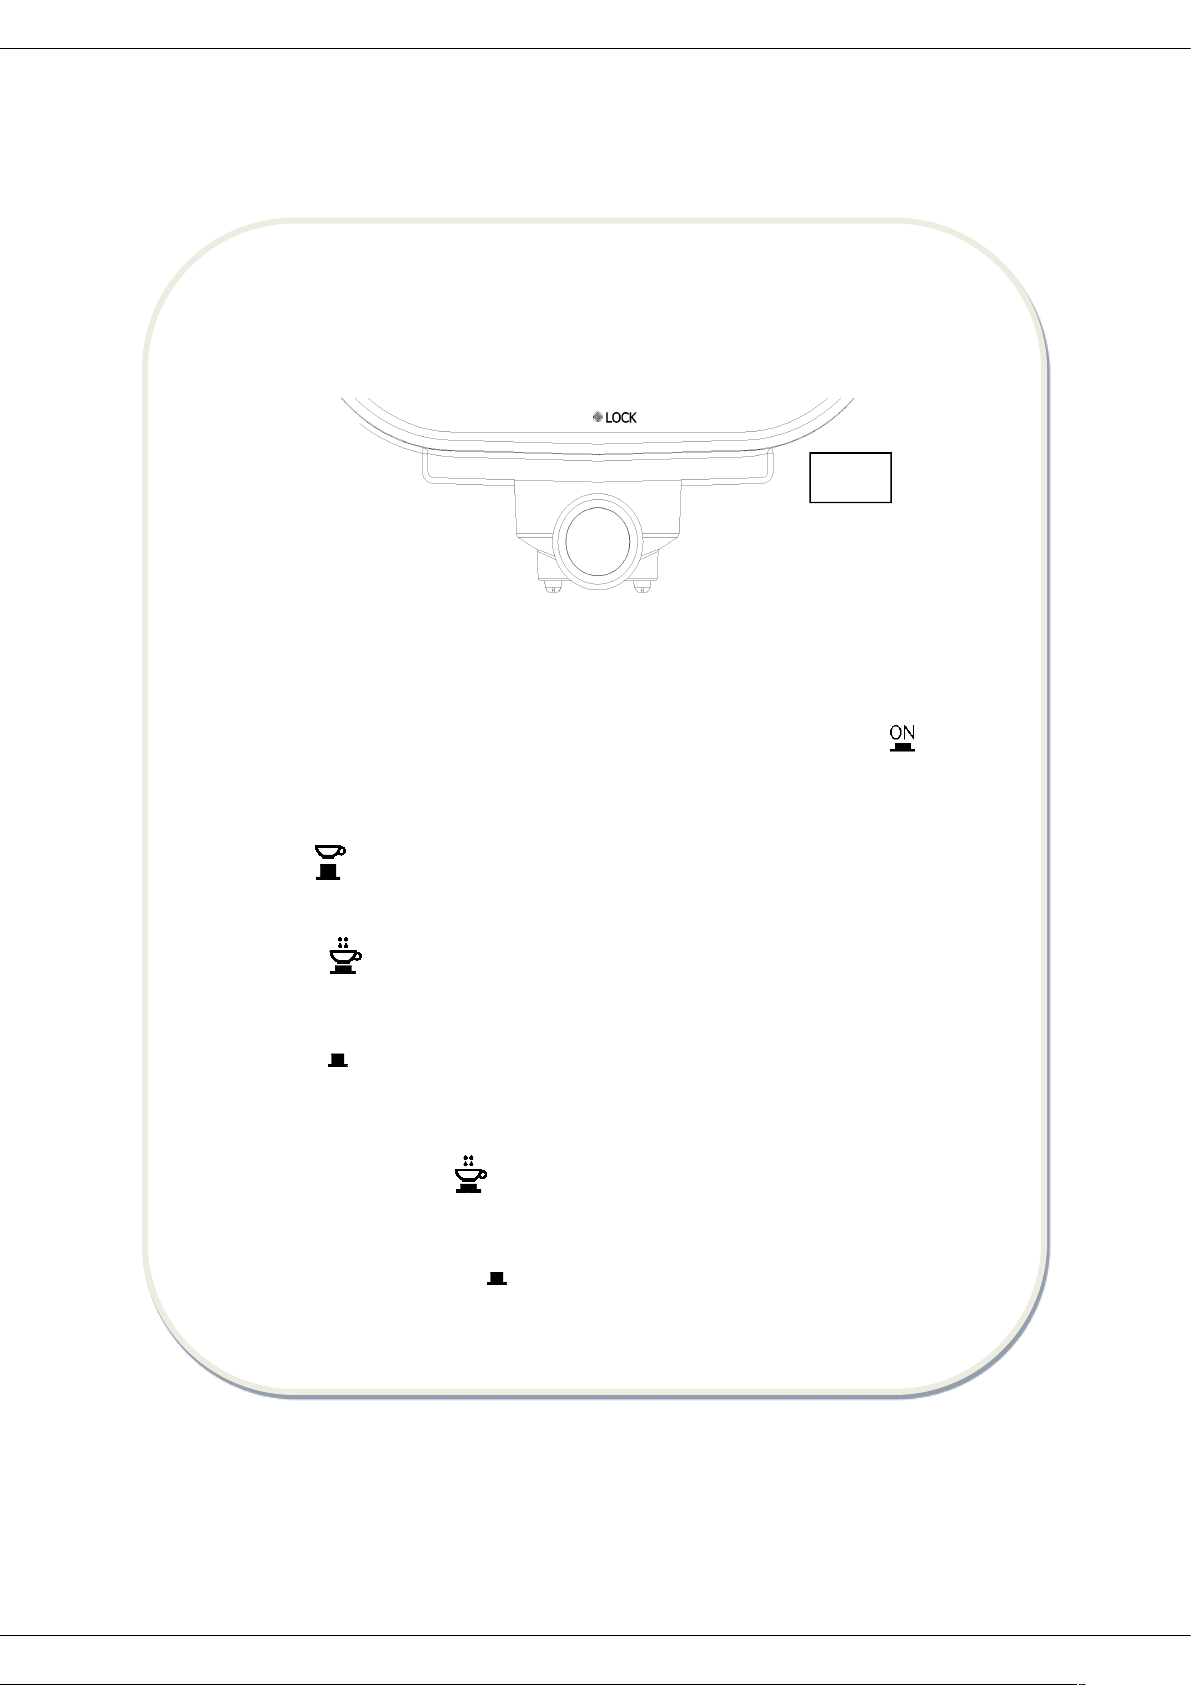
2. Asezati filtrul in port filtru, introduceti-l pe acesta in aparat din pozitia
“Insert”, si fixati-l in espressor rotindu-l in sensul invers al acelor de
ceasornic pana in pozitia “Lock”. (Vezi fig. 1).
3. Asezati o ceasca de cafea pe tava detasabila.
4. Conectati aparatul la reteaua electrica. Asigurati-va ca butonul de control al
aburilor se afla in pozitia minima.
5. Apasati butonul ON/OFF in pozitia inferioara si anume in pozitia “ ”, led-ul
de indicare a pornirii aparatului va lumina (portocaliu), asigurati-va ca
butonul pentru cafea/aburi se afla in pozitia superioara si anume in pozitia
.
6. Apasati butonul de control al pompei in pozitia inferioara si anume in pozitia
“ ”, cand apa curge afara, opriti imediat pompa apasand din nou
butonul de control al pompei in pozitia superioara si anume in pozitia
“
STOP
”. Scopul acestui pas este de a pompa apa din rezervor in carcasa.
7. Atunci cand led-ul indicatorului “ready” (pregatit) lumineaza (verde), trebuie
sa apasati din nou butonul de control al pompei in pozitia inferioara si
anume pozitia “ ”, aici va curge apa calda.
8. Dupa ce a curs apa pentru 20 de secunde, apasati butonul de control al
pompei in pozitia “
STOP
”. Procesul de pre-incalzire s-a efectuat.
FIG.1
6
Page 8
www.heinner.com 1050W, 50-60Hz, 220-240V
Prepararea unui Espresso:
1. Scoateti port filtrul rotindu-l in sensul acelor de ceasornic.
2. Adaugati cafea macinata in filtru cu ajutorul linguritei pentru masurare, o
lingurita de cafea macinata este suficienta pentru aproximativ o ceasca de
cafea de cea mai buna calitate, apoi presati bine praful de cafea.
3. Introduceti apoi port filtrul in aparat din pozitia “Insert”, si fixati-l bine in
aparat rotindu-l in sensul invers al acelor de ceasornic pana in pozitia
“Lock”. (Vezi fig. 1).
4. Turnati apa fierbinte in ceasca. Asezati ceasca fierbinte (ceasca dvs.) pe tava
detasabila.
5. Asigurati-va ca butonul de control al aburilor se afla in pozitia minima, iar
butonul pentru cafea/aburi in pozitia superioara si anume in pozitia .
6. In acest moment led-ul indicatorului “ready” lumineaza (verde), iar odata ce
acesta lumineaza trebuie sa apasati butonul de control al pompei in pozitia
inferioara si anume in pozitia “ ”, asteptati un moment, cafeaua va
curge in ceasca.
7. Trebuie sa apasati butonul de control al pompei in pozitia superioara si
anume in pozitia “
STOP
” atunci cand cafeaua dorita este obtinuta sau cand
culoarea cafelei se schimba in mod evident.
8. Dupa ce terminati de preparat cafeaua, apasati butonul ON/OFF, led-urile
indicatoarelor pornit/oprit si “ready” se sting iar espressorul se opreste din
functionare. Cafeaua dvs. este gata acum.
ATENTIE: Nu lasati espressorul nesupravegheat in timpul prepararii cafelei, deoarece
cateodata este nevoie sa-l operati manual!
Nota: In timpul prepararii cafelei sau a scoaterii aburilor, este normal ca led-ul
indicatorului “ready” sa se stinga, acest lucru inseamna doar ca incalzitorul se incinge
pentru a mentine temperatura la valorile standard.
9. Puteti scoate afara port filtrul din metal rotindu-l in sensul acelor de
ceasornic, apoi eliminati toate resturile de cafea din filtru.
10. Lasati componentele sa se raceasca complet apoi clatiti-le sub jet de apa.
7
Page 9
www.heinner.com 1050W, 50-60Hz, 220-240V
Prepararea unui Cappuccino:
Puteti obtine o ceasca de cappuccino cu un topping din spuma de lapte.
Nota: in timpul aburilor port filtrul trebuie asamblat in pozitia corespunzatoare.
1. Preparati mai intati un espresso folosind cantitatea specificata in sectiunea
“Preaparea unui Espresso”, si asigurati-va ca butonul de control al aburilor
se afla in pozitia minima.
2. Apasati butonul cafea/aburi in pozitia inferioara si anume in pozitia ,
asteptand pana cand led-ul indicatorului “ready” lumineaza (verde).
3. Umpleti o cana cu aproximativ 100 grame de lapte pentru fiecare cappuccino
preparat, este recomandat sa folositi lapte nedegresat la temperatura din
frigider (nu fierbinte!).
Nota: Este recomandat ca diametrul canii sa nu fie mai mic de 70±5mm, retineti ca
volumul laptelui se va dubla, aveti grija ca inaltimea canii sa fie suficienta.
4. Introduceti tubul pentru aburi in lapte aproximativ 2 cm, apoi rasuciti incet
butonul de control al aburilor in sensul invers al acelor de ceasornic, vor
iesi aburi din tub. Spuma de lapte se formeaza miscand vasul in cerc de sus
in jos.
Nota: nu rasuciti niciodata rapid butonul de control al aburilor, deoarece aburii se vor
acumula intr-un timp scurt ceea ce mareste riscul aparitiei unei explozii.
5. Dupa ce va atingeti scopul, puteti rasuci butonul de control al aburilor in
pozitia minima.
Nota: stergeti aburii cu un burete umed imediat ce acestia inceteaza sa se mai formeze,
dar aveti grija sa nu va ardeti
6. Apasati butonul ON/OFF in pozitia superioara adica in pozitia “
” pentru a
opri alimentarea cu curent a aparatului.
7. Turnati spuma de lapte peste cafeaua espresso preparata, acuma
cappuccino-ul este gata. Indulciti-l daca doriti, presarati peste spuma un pic
de pudra de cacao.
8
Page 10
www.heinner.com 1050W, 50-60Hz, 220-240V
Nota: dupa ce se formeaza aburii, va recomandam sa lasati espressorul sa se raceasca
pentru cel putin 5 minute inainte de a prepara o noua cafea. In caz contrar in cafeaua
dvs. se va putea simti miros de ars. Daca doriti sa preparati imediat inca o cafea, urmati
urmatorii pasi: In primul rand apasati butonul aburi/cafea in pozitia ; introduceti
tubul de aburi intr-o ceasca; in al doilea rand apasati butonul de control al pompei in
pozitia porniti butonul de control al aburilor si va curge apa din tubul de aburi si
duza; dupa ce led-ul indicatorului “ready” se stinge, apasati butonul de control al
pompei in pozitia
STOP
, apoi rasuciti butonul de control al aburilor in pozitia minima.
Atunci cand led-ul indicatorului “ready” lumineaza, puteti incepe din nou sa preparati
cafea
Spuma de lapte/ producerea aburilor pentru incalzirea lichidelor:
Tubul de aburi poate fi folosit pentru spuma de lapte si pentru prepararea bauturilor
calde precum ciocolata calda, ceai sau apa.
Metoda:
1. Scoateti rezervorul de apa si umpleti-l cu cantitatea de apa dorita, cantitatea
apei nu trebuie sa depaseasca nivelul “MAX” marcat pe rezervor.
Introduceti apoi rezervorul inapoi in aparat.
2. Conectati aparatul la reteaua electrica.
3. Apasati butonul ON/OFF in pozitia inferioara si anume in pozitia “ ”,
indicatorul va lumina (portocaliu).
4. Apasati butonul de control al pompei in pozitia inferioara si anume in pozitia
“ ”, asigurati-va ca butonul cafea/aburi se afla in pozitia superioara si
anume in pozitia , pompa va distribui apa iar cand apa va curge afara
opriti pompa imediat.
5. Apasati butonul cafea/aburi in pozitia inferioara si anume in pozitia si
asteptati un moment, aparatul incepe sa se incalzeasca pana cand se
aprinde indicatorul verde care arata ca procesul de incalzire s-a terminat.
9
Page 11
www.heinner.com 1050W, 50-60Hz, 220-240V
6. Introduceti tubul de aburi in lichid pentru a-l incalzi. Daca doriti sa faceti spuma de
lapte, introduceti tubul de aburi aproximativ 2 cm in lapte. Invartiti incet butonul
de control al aburilor in sensul invers al acelor de ceasornic pentru a incepe sa
faca aburi.
7. Dupa ce rezultatul dorit este obtinut, puteti invarti butonul de control al aburilor in
pozitia minima.
8. Apasati butonul ON/OFF in pozitia superioara si anume in pozitia “
” pentru a
opri alimentarea aparatului.
VI. INTRETINEREA SI CURATAREA
1. Intrerupeti alimentarea cu curent electric si lasati espressorul sa se raceasca
complet inainte de curatare.
2. Stergeti cu regularitate carcasa espressorului cu un burete rezistent la
umezeala si curatati rezervorul de apa, tava de scurgere si tava detasabila,
apoi uscati fiecare componenta.
Nota: Nu curatati aparatul cu alcool sau solventi. Nu introduceti niciodata aparatul in
apa pentru curatare.
3. Scoateti port filtrul din metal rasucindu-l in sensul acelor de ceasornic,
eliminati resturile de cafea dinauntru, apoi puteti sa-l curatati cu ajutorul
unui curatator dar la sfarsit trebuie sa-l clatiti cu apa curata.
4. Curatati toate componentele detasabile cu apa si uscati-le bine.
Curatarea depunerilor minerale:
1. Pentru a va asigura ca espressorul dvs. functioneaza eficient, tevile sunt
curate si cafeaua are o aroma exelenta, trebuie sa curatati o data la 2-3 luni
depozitele minerale ramase.
2. Umpleti rezervorul cu apa si detartrant pana la nivelul MAX (proportia apei si
a detartrantului este de 4:1. Va rugam folositi “detartrant de uz casnic”,
puteti folosi acidul citric (cumparat de la farmacie) in locul detartrantului (o
suta de parti apa si trei parti acid citric).
10
Page 12
www.heinner.com 1050W, 50-60Hz, 220-240V
3. Conform programului de pre-incalzire, puneti port filtrul de metal (fara cafea
inauntru) si cana la locul acestora. Incalziti apa la “PRE-INCALZIRE”.
4. Apasati butonul ON/OFF in pozitia inferioara si anume in pozitia “ ”,
indicatorul pornit/oprit va lumina (portocaliu), apasati butonul de control
al pompei in pozitia inferioara si anume , asigurati-va ca butonul de
cafea/aburi se afla in pozitia superioara si anume iar atunci cand
incepe sa curga apa opriti pompa apasand butonul de control al pompei in
pozitia “
STOP
”, asteptati un moment, espressorul incepe sa se incalzeasca.
5. Atunci cand indicatorul “ready” lumineaza (verde), inseamna ca procesul de
incalzire s-a terminat. Apasati butonul de control al pompei in pozitia
inferioara si anume “ ”si preparati doua cesti de cafea (aproximativ
2Oz). Apoi opriti pompa si asteptati 5s.
6. Apasati butonul de cafea/aburi in pozitia inferioara si anume si asteptati
pana cand indicatorul verde lumineaza. Faceti aburi pentru 2 minute, apoi
intoarceti butonul de control al aburilor in pozitia minima pentru a opri
producerea aburilor. Apasati butonul ON/OFF in pozitia superioara si
anume “
” pentru a opri complet aparatul, lasati detartrantul in aparat
cel putin 15 minute.
7. Reporniti aparatul si repetati pasii 4-6 cel putin de 3 ori.
8. Apoi apasati butonul cafea/aburi in pozitia superioara si anume , cand
indicatorul verde lumineaza, apasati butonul de control al pompei in
pozitia inferioara si anume “ ” si asteptati pana este eliminat tot
detartrantul.
9. Umpleti apoi rezervorul cu apa pana la nivelul MAX (nu adaugati cafea),
repetati pasii 4-6 de 3 ori (nu este necesar sa asteptati 15 min ca la punctul
6), asteptati pana cand toata apa este eliminata din rezervor.
10. Repetati pasul 9 de cel putin 3 ori pentru a clati bine tevile.
11
Page 13
www.heinner.com 1050W, 50-60Hz, 220-240V
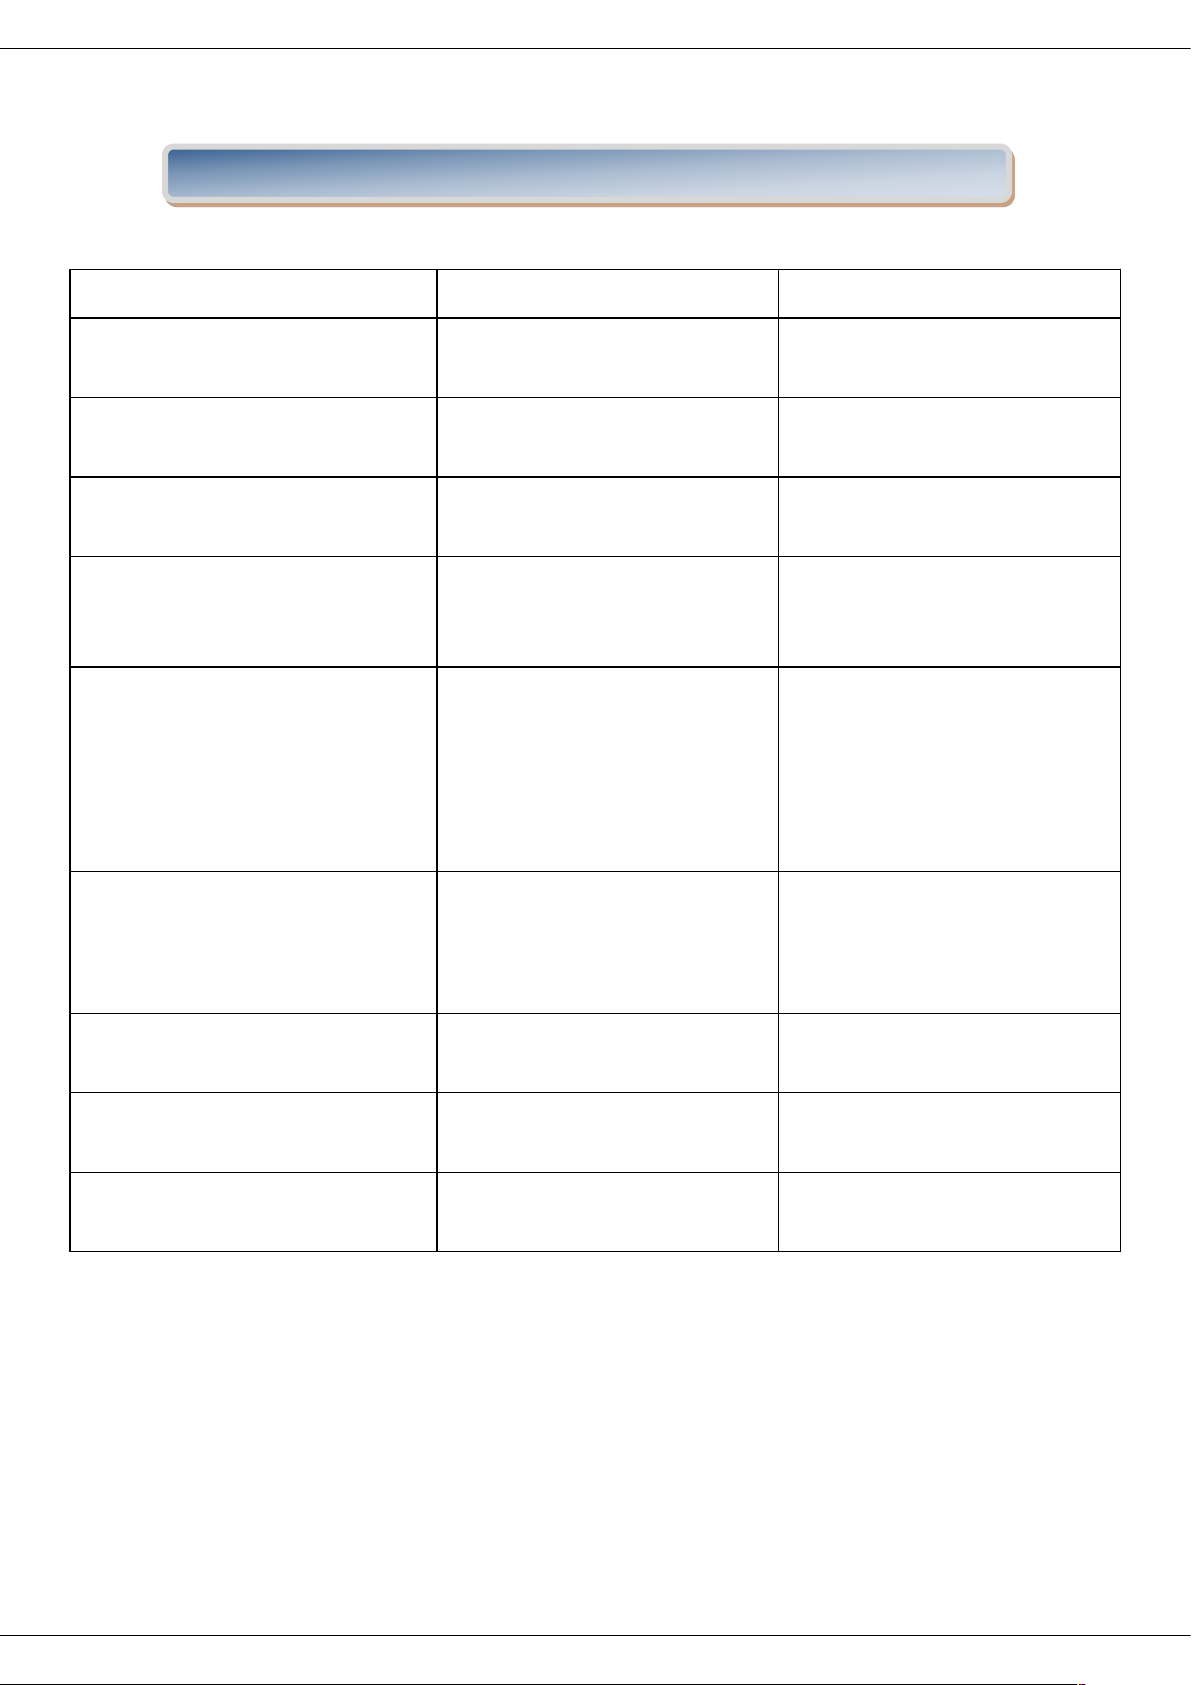
Problema
Cauza
Rezolvare
Curge apa din partea inferioara a
espressorului.
Este foarte multa apa in tava de
scurgere.
Curatati tava de scurgere.
Espressorul nu functioneaza.
Contactati service-ul autorizat
pentru reparatie.
Curge apa prin partea exterioara a
filtrului.
Pe marginea filtrului se afla niste
cafea macinata.
Inlaturati cafeaua macinata de pe
marginea filtrului.
Cafeaua are gust acru (de otet).
Nu ati clatit corespunzator aparatul
dupa ce ati curatat depunerile
minerale.
Clatiti aparatul de cateva ori
urmand instructiunile sectiunii
“Inainte de prima utilizare”.
Cafeaua macinata a fost
depozitata intr-un loc calduros sau
umed pentru o perioada lunga de
timp. Cafeaua s-a stricat.
Folositi cafea macinata proaspat
sau depozitati cafeaua intr-un loc
racoros, uscat. Dupa ce ati deschis
un pachet de cafea macinata,
resigilati-l si depozitati-l in frigider
pentru a-i mentine prospetimea.
Espressorul nu mai functioneaza.
Nu este conectat la reteaua
electrica.
Introduceti corect stecherul in priza
de perete, daca aparatul tot nu
functioneaza, contactati un service
autorizat pentru reparatie.
Aburii nu formeaza spuma.
Indicatorul “ready” nu este aprins.
Doar dupa ce se aprinde indicatorul
“ready” aburii pot forma spuma.
Ceasca este prea mare sau forma
nu se potriveste.
Folositi cesti inalte si inguste.
Ati folosit lapte degresat
Folositi lapte nedegresat sau
degresat pe jumatate.
VII. IDENTIFICARE/ REZOLVARE PROBLEME
12
Page 14
www.heinner.com 1050W, 50-60Hz, 220-240V
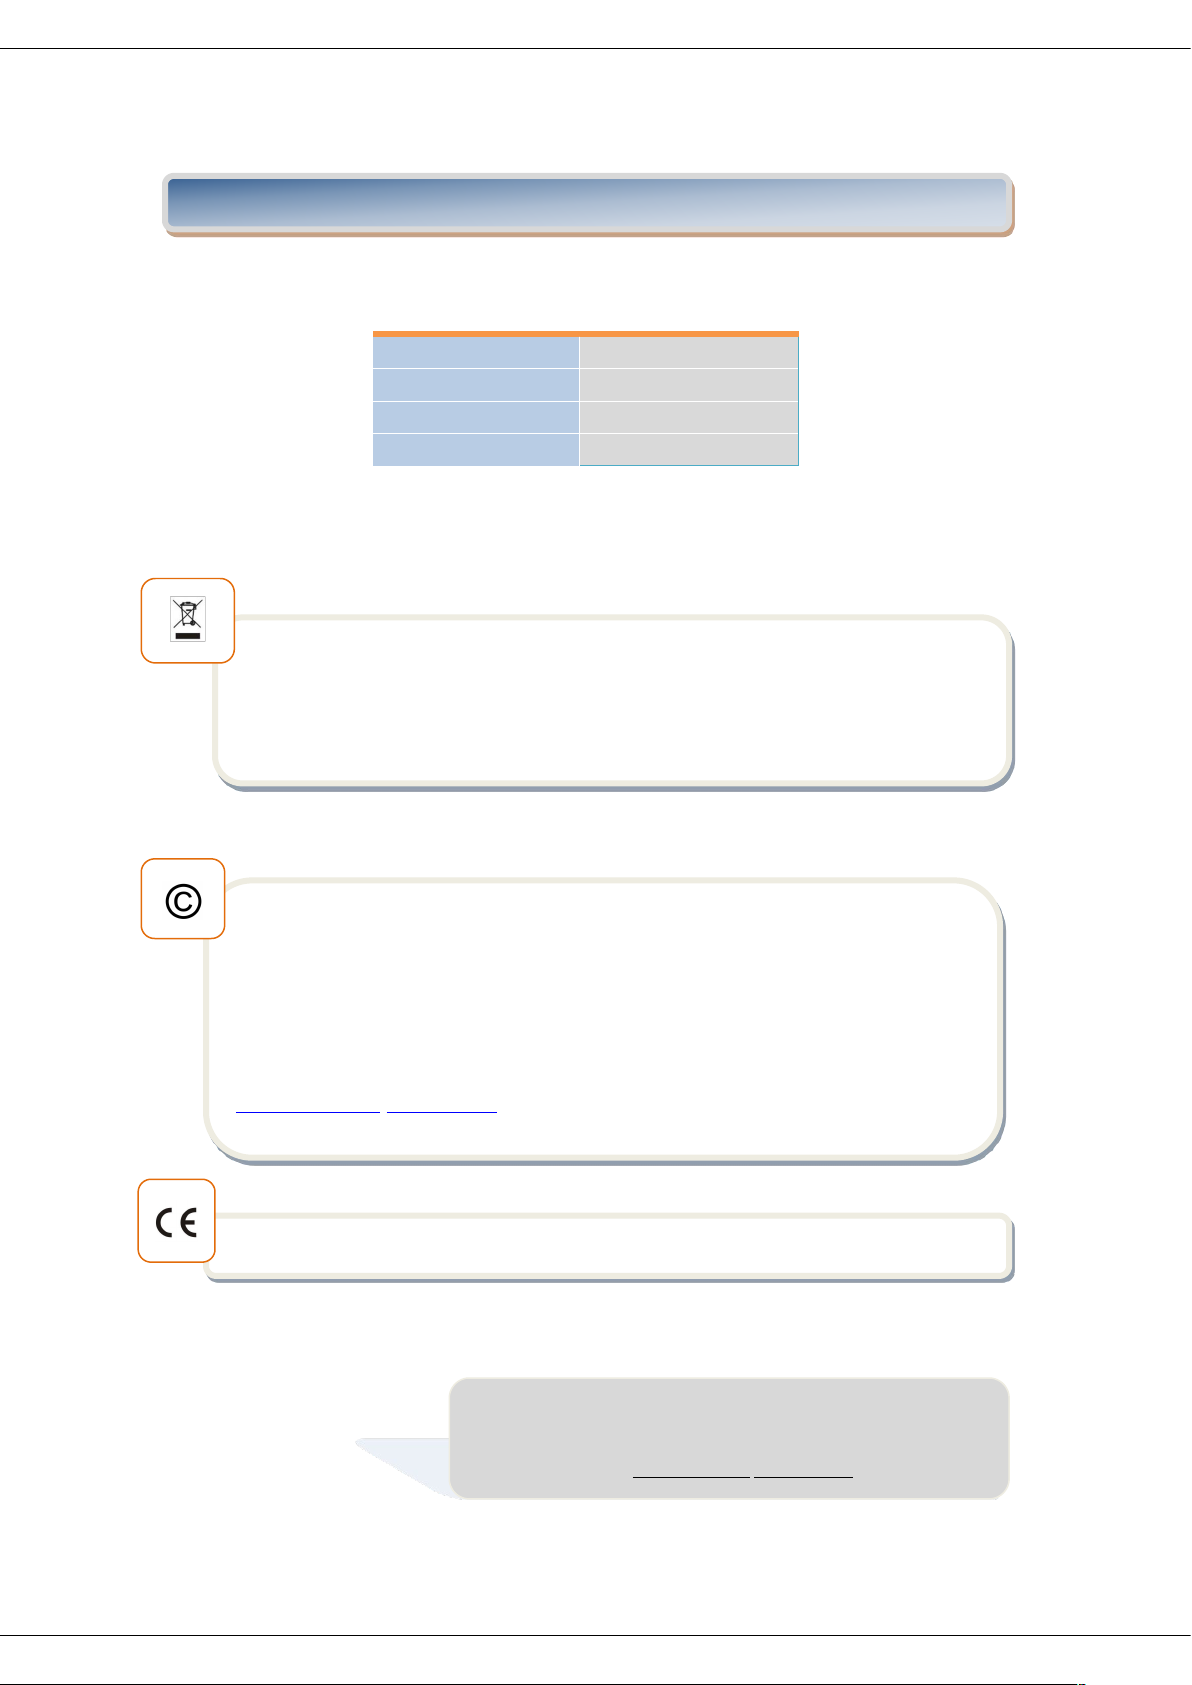
Putere
1050W
Alimentare
220-240V, 50/60Hz
Capacitate
1 L
Culoare
Inox + negru
VIII. FISA TEHNICA
ELIMINAREA DESEURILOR IN MOD RESPONSABIL FATA DE MEDIU
Poti ajuta la protejarea mediului!
Va rugam sa respectati regulamentele si legile locale: duceti echipamentele electrice nefunctionale
catre un centru de colectare al echipamentelor electrice uzate.
Importator: Network One Distribution
Europolis Logistic Park, Italia Street, 1-7, Chaijna, Ilfov, Romania
Tel: +40 21 211 18 56, www.heinner.ro , www.nod.ro
HEINNER este marca inregistrata a companiei Network One Distribution SRL. Celelalte branduri,
denumirile produselor sunt marci înregistrate ale respectivilor deţinători.
Nicio parte a specificatiilor nu poate fi reprodusa sub orice formă sau prin orice mijloc, utilizata
pentru obtinerea unor derivate precum traduceri, transformari sau adaptari, fara permisiunea
prealabila a companiei NETWORK ONE DISTRIBUTION.
Copyright © 2013 Network One Distibution. All rights reserved.
http://www.heinner.com, http://www.nod.ro
Acest produs este proiectat si realizat in conformitate cu standardele si normele Comunitatii Europene
13
Page 15
www.heinner.com 1050W, 50-60Hz, 220-240V
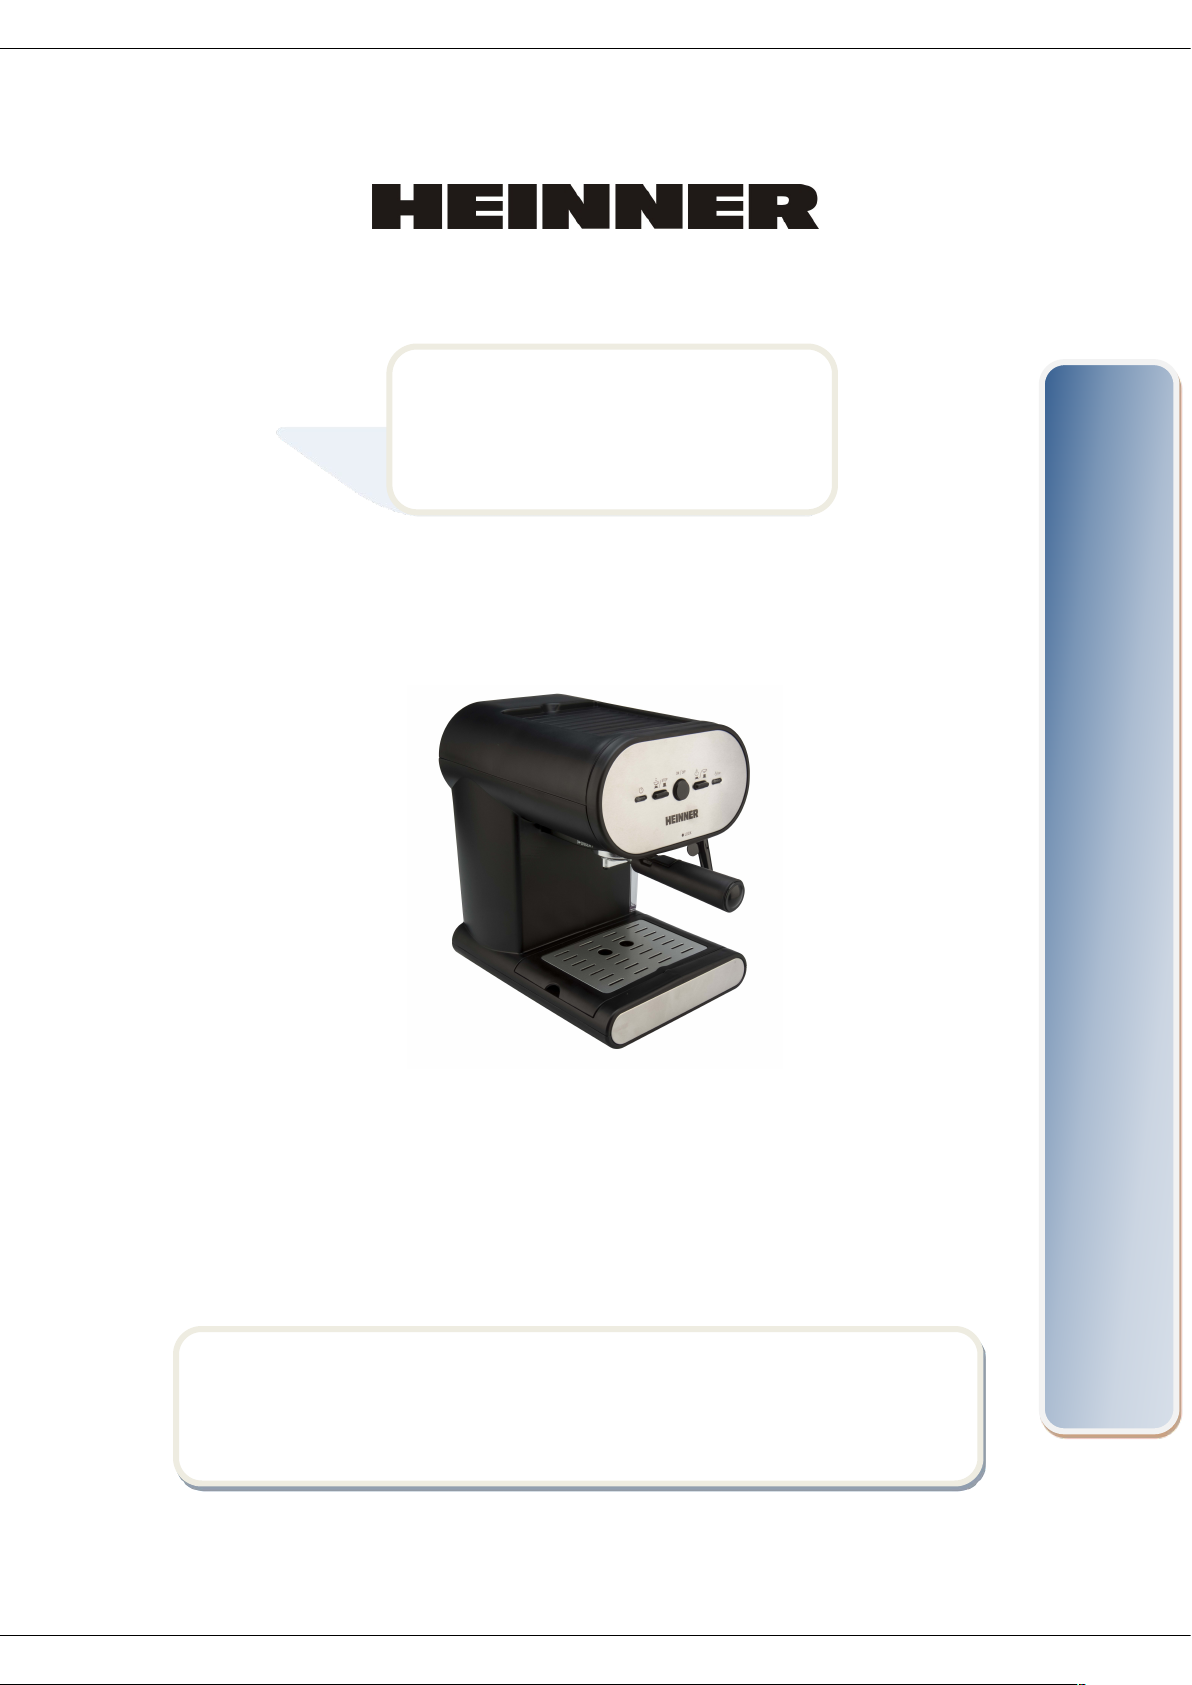
ESPRESSO MAKER
Model: HEM-250
www.heinner.com
Espresso maker with high pressure pump (15 bar)
Capacity: 1 L
Color: Black + stainless steel
Power: 1050 W
14
Page 16
www.heinner.com 1050W, 50-60Hz, 220-240V
Thank you for purchasing this product!
I. INTRODUCTION
Before using the appliance, please read carefully this instruction manual and keep it for future
reference.
This instruction manual is designed to provide you with all required instructions related to the
installation, use and maintenance of the appliance.
In order to operate the unit correctly and safety, please read this instruction manual carefully before
installation and usage.
II. CONTENT OF YOUR PACKAGE
Espresso maker
User manual
Warranty card
III. SAFETY PRECAUTIONS
1. Read all instructions.
2. Before using check that the voltage of wall outlet corresponds to rated voltage marked on
the rating plate.
3. This appliance has been incorporated with a grounded plug. Please ensure the wall outlet in
your house is well earthed.
4. To protect against fire, electric shock and injury to persons do not immerse cord, plug, in
water or other liquid.
15
Page 17

www.heinner.com 1050W, 50-60Hz, 220-240V
5. Remove plug from wall outlet before cleaning and when not in use. Allow appliance cool
down completely before taking off, attaching components or before cleaning.
6. Do not operate any appliance with a damaged cord or plug or after the appliance
malfunctions, or is dropped or damaged in any manner. Return appliance to the nearest
authorized service facility for examination, repair or electrical or mechanical adjustment.
7. The use of accessory attachments not recommended by the appliance manufacturer may
result in fire, electric shock or injury to persons.
8. Place appliance on flat surface or table, do not hang power cord over the edge of table or
counter.
9. Ensure the power cord do not touch hot surface of appliance.
10. Do not place the coffee maker on hot surface or beside fire in order to avoid to be
damaged.
11. To disconnect, remove plug from wall outlet. Always hold the plug. But never pull the
cord.
12. Do not use appliance for other than intended use and place it in a dry environment.
13. Be careful not to get burned by the steam.
14. Do not touch the hot surface of appliance (such as steam wand, and the steel mesh just
boiling). Use handle or knobs.
15. Do not let the coffee maker operate without water.
16. Do not remove the metal funnel when appliance is brewing coffee.
17. Connect plug to wall outlet before using and turn any switch off before plug is removed
from wall outlet.
18. This appliance is not intended for use by persons (including children) with reduced
physical, sensory or mental capabilities, or lack of experience and knowledge, unless they
have been given supervision or instruction concerning use of the appliances by a person
responsible for their safety.
19. Children should be supervised to ensure that they do not play with the appliance.
20. This appliance is intended to be used in household and similar applications such as:
– staff kitchen areas in shops, offices and other working environments;
– farm houses;
– by clients in hotels, motels and other residential type environments;
– bed and breakfast type environments.
21. Do not use outdoors
16
Page 18
www.heinner.com 1050W, 50-60Hz, 220-240V
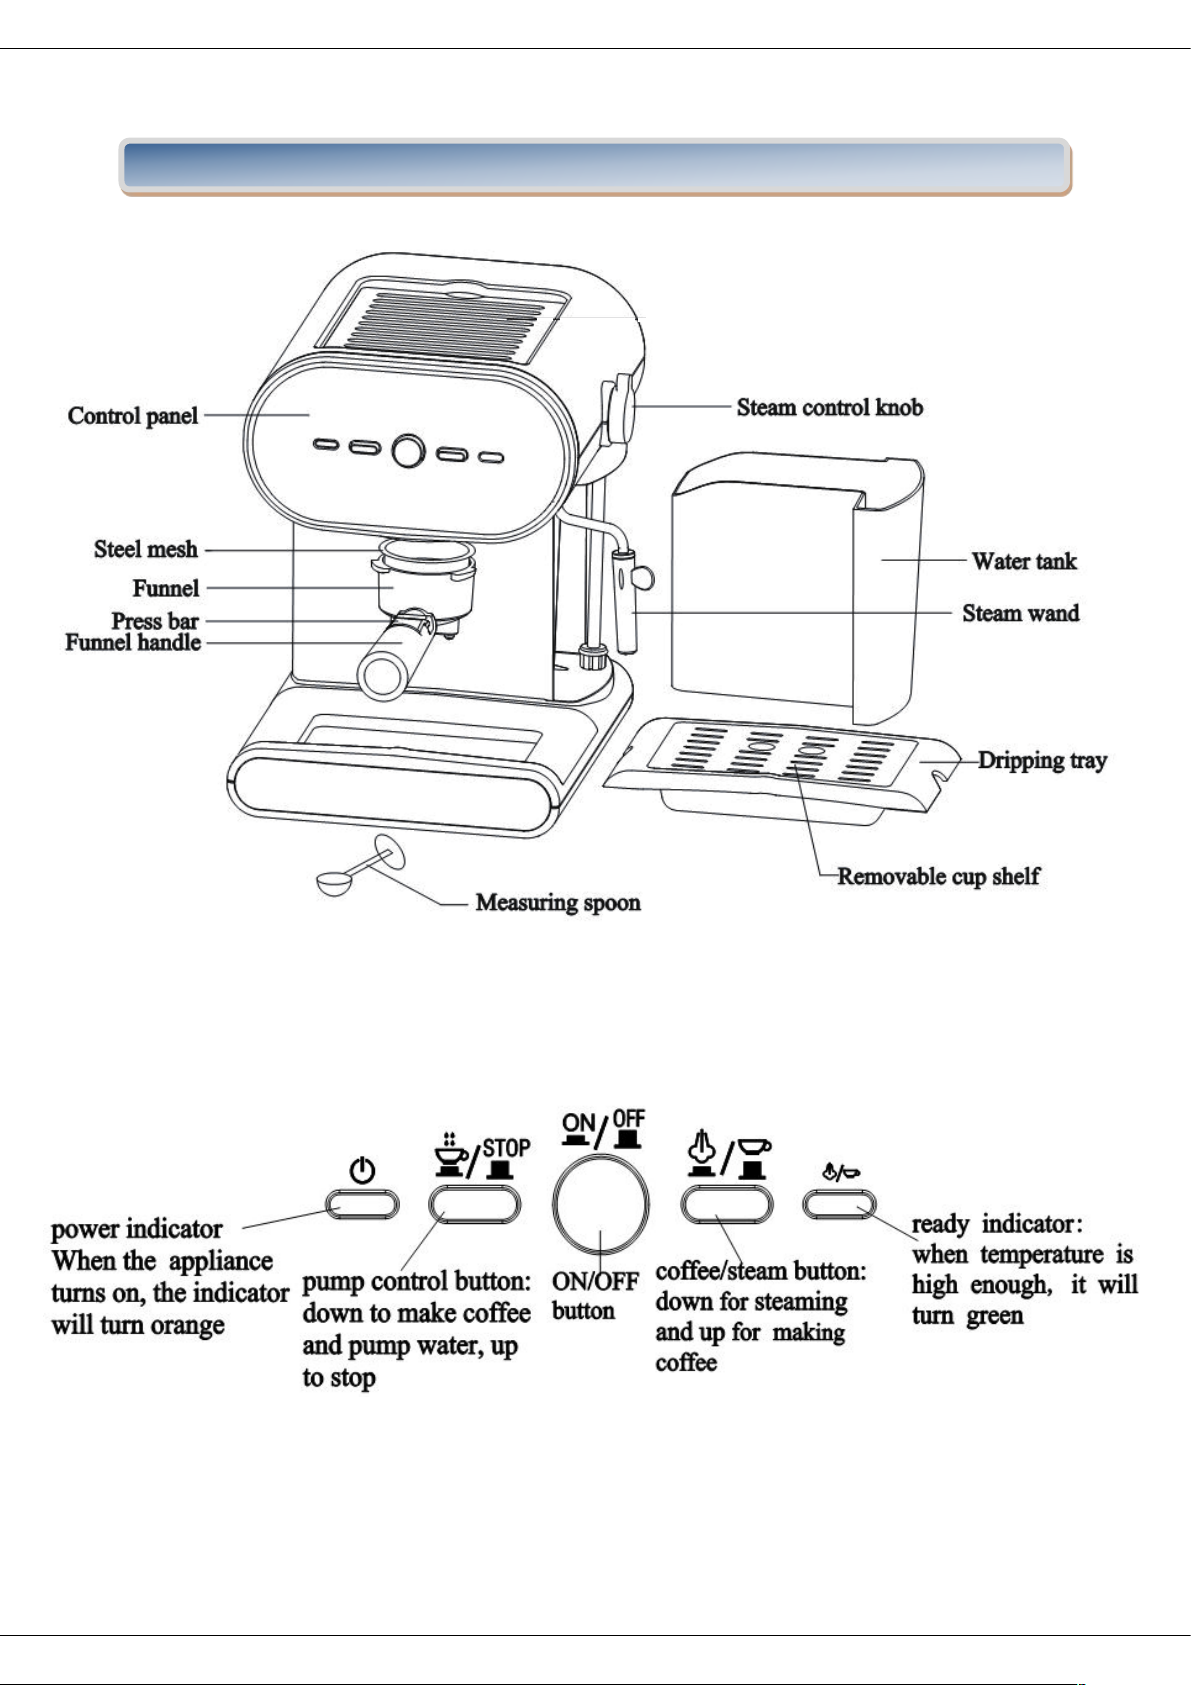
Control panel:
IV. PRODUCT DESCRIPTION
17
Page 19
www.heinner.com 1050W, 50-60Hz, 220-240V
V. USING INSTRUCTION
Before first use:
To ensure the first cup of coffee tastes excellent, you should rinse the coffee maker with
warm water as following:
1. Pull out the water tank at the right side of the coffee maker. Pour water into water
tank, the water level should not exceed the “MAX” mark in the tank. Put the water
pipe into the water tank then insert it into the coffee maker.
Note: the appliance is supplied with a removable tank for easy cleaning, you can fill the tank
with water firstly, and then insert the tank into the appliance.
2. Set steel mesh into metal funnel (no coffee in steel mesh), then insert the funnel into
the appliance from the “Insert” position, and you can fix them into coffee maker
firmly by turning it anticlockwise until it is at the “Lock” position.
3. Place an espresso cup you have prepared on removable cup shelf. Make sure the
steam control knob is at the minimum position.
Note: As the appliance is not equipped with any cup or jug, prepare a your own jug or cup.
4. Connect into power source, press down the ON/OFF button to the lower position
which is the “ ” position. The power indicator (orange) will be illuminated.
5. Press down the pump control button to the lower position which is the “ ”
position, the pump will pump water, when there is water flowing out and close the
pump by pressing the pump control button again to the “
STOP
” position.
6. Make sure the coffee/steam button is on the higher position which is the
position and wait for a moment, the appliance begins to be pre-heated until the
coffee/steam indicator (green) illuminate, it means that the pre-heating is finished.
7. Press the pump to the lower position which is the “ ” position again, and water will
flow out.
8. After water has flown for 1 minute, press the pump control knob to “
STOP
” position,
you can pour out the water in each container then clean them thoroughly, now you
can start brewing coffee.
18
Page 20
www.heinner.com 1050W, 50-60Hz, 220-240V
Note: There may be noise when pumping the water for the first time, it is normal, as the
appliance is releasing the air in the appliance. After about 20s, the noise will disappear.
Pre-heating:
To make a cup of good hot Espresso coffee, it is recommended to preheat the appliance
before making coffee, including the funnel and cup, so that the coffee flavour will not be
influenced by the cold parts.
1. Remove the removable water tank and fill it with desired water, the water level
should be between the “MAX” mark and the “MIN” mark in the tank. Then insert the
tank into the appliance properly.
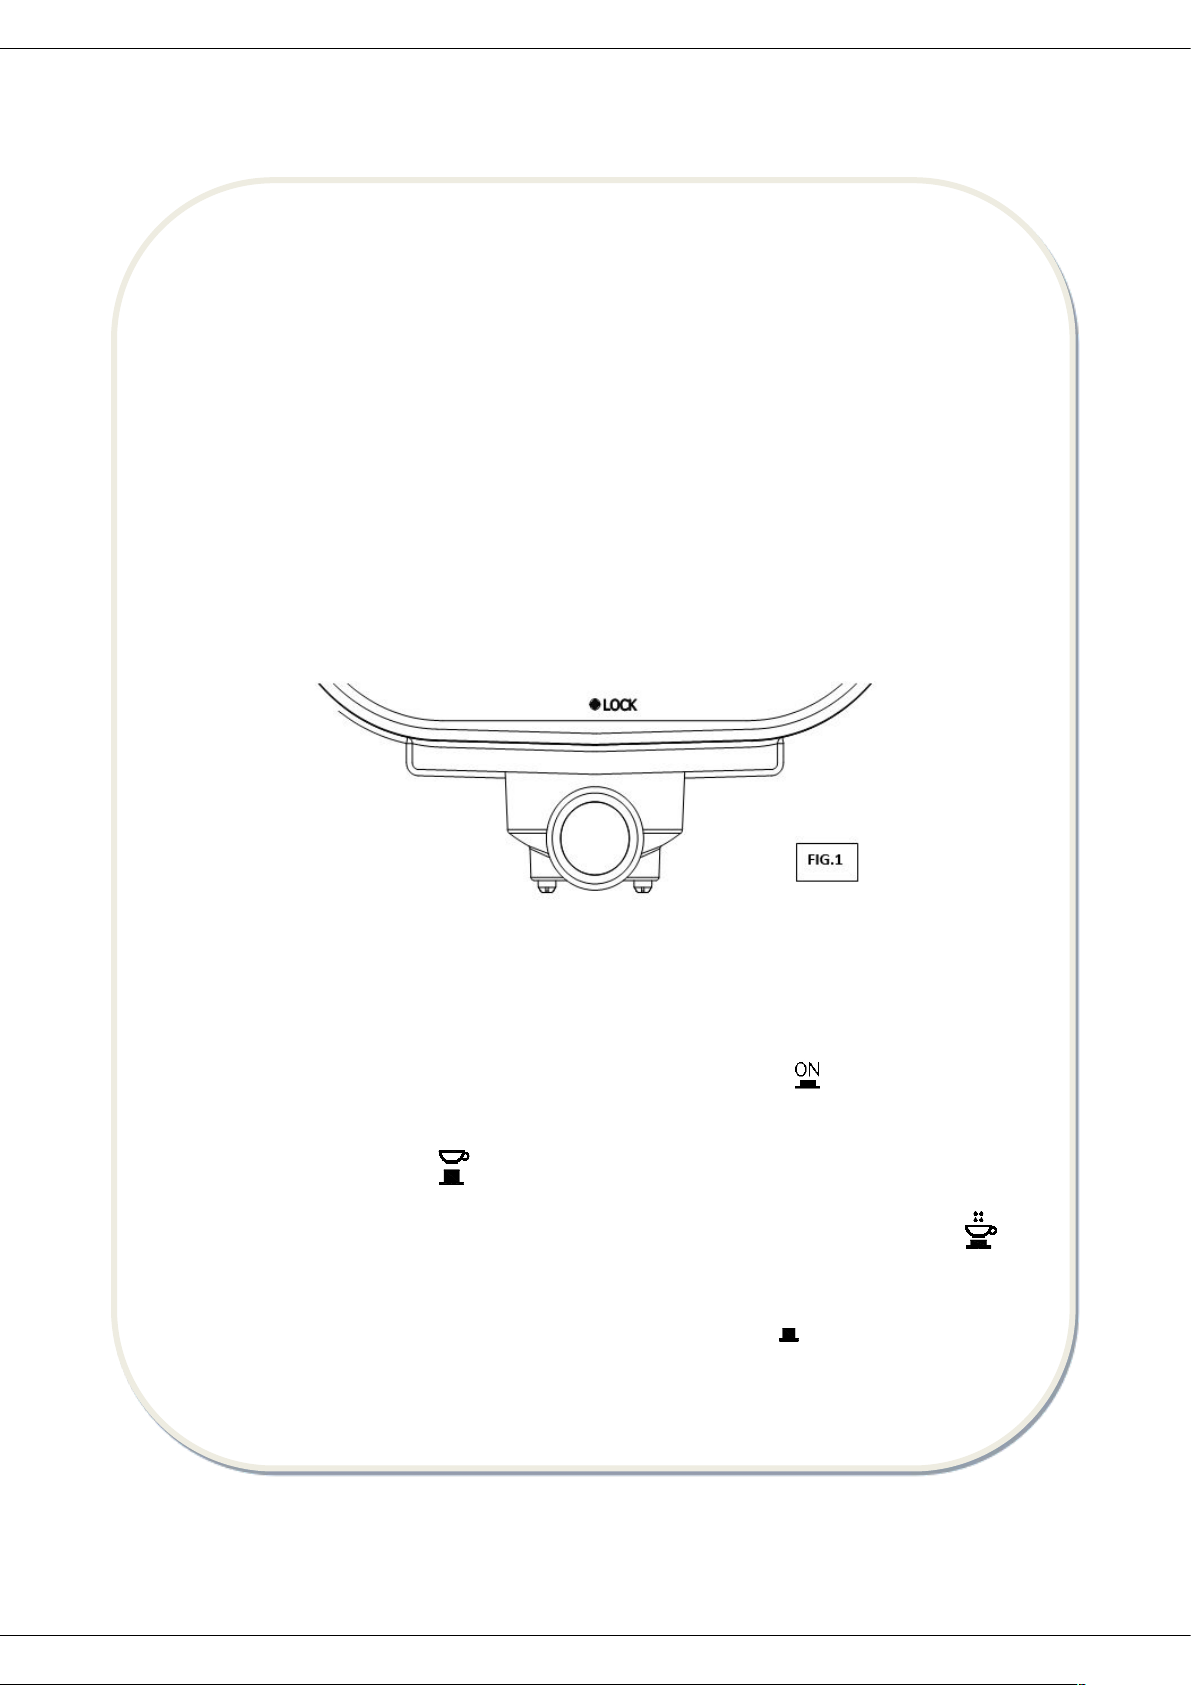
2. Set steel mesh into metal funnel, then insert the funnel into the appliance from the
“Insert” position, and you can fix them into coffee maker firmly by turning it
anticlockwise until it is at the “Lock” position.(See fig. 1)
3. Place an espresso cup you have prepared on removable cup shelf.
4. Then connect the appliance into power supply. Make sure the steam control knob is at
the minimum position.
5. Press the ON/OFF button to the lower position which is the “ ” position, the power
indicator (orange) will illuminate, make sure the coffee/steam button is on the higher
position which is the position.
6. Press down the pump control button to the lower position which is the “ ”
position, when there is water flowing out, close the pump immediately by pressing
the pump control button again to the higher position of “
STOP
”. The purpose of the
step is to pump the water of the tank into the housing
19
Page 21
www.heinner.com 1050W, 50-60Hz, 220-240V
7. When the ready indicator (green) is illuminated, you should press down the pump
control button to the lower position which is the “ ” position again, there will be
hot water flowing out.
8. After water has flown for 20S, press the pump control knob to “
STOP
” position. The
pre-heating is finished.
Make an espresso:
1. Remove the funnel by turning it clockwise.
2. Add ground coffee to steel mesh with measuring spoon, a spoon ground coffee
power can make about a cup of top-grade coffee, then press the ground coffee
powder tightly with the tamper.
3. Then insert the funnel into the appliance from the “Insert” position, and you can fix
them into coffee maker firmly by turning it anticlockwise until it is at the “Lock”
position.(See fig. 1).
4. Pour out the hot water in the cup. Then place the hot cup (yourself cup) on
removable cup shelf.
5. Make sure the steam control knob is at the minimum position, and the coffee/steam
button is on the higher position which is the position.
6. At the time, the ready indicator (green) is illuminated, once the green lamp
illuminate, you should press down the pump control button to the lower position
which is the “ ” position, wait a moment, there will be coffee flowing out
7. You should press and release the pump control button to the higher position which is
the “
STOP
” position manually when desired coffee is obtained or the colour of coffee
changes weak obviously.
8. After finishing making coffee, press the ON/OFF button, and the power indicator and
ready indicator go out and the coffee maker stops working, your coffee is ready now
WARNING: do not leave the coffee maker unattended during making coffee, as you need
operate manually sometimes.
20
Page 22
www.heinner.com 1050W, 50-60Hz, 220-240V
Note: During brewing coffee or making steam, it is normal that the ready indicator is likely to
extinguish, it only means that the heater is heating up to keep the temperature at the
standard range.
9. You can take the metal funnel out by turning clockwise, then pour the coffee residue
out with the steel mesh pressed by press bar.
10. Let them cool down completely, then rinse under running water
Make a cappuccino:
You can get a cup of cappuccino by topping a cup of espresso with frothing milk.
Note: during making steam, the metal funnel must be assembled in position.
1. Prepare espresso first with container big enough according to the part “MAKE
ESPRESSO COFFEE”, and make sure that the steam control knob is at the minimum
position.
2. Press down the coffee/steam button to the lower position which is the position,
waiting for until the ready indicator (green) illuminate.
3. Fill a jug with about 100 grams of milk for each cappuccino to be prepared, you are
recommended to use whole milk at refrigerator temperature (not hot!).
Note: In choosing the size of jug, it is recommend the diameter is not less than 70±5mm, and
remember that the milk volume will be doubled, make sure the height of jug is enough.
4. Insert the steam wand into the milk about two centimeters, then turn the steam
control knob slowly in anti-clockwise, steam will come out from the steam wand.
Froth milk is produced by moving vessel round from up to down.
Note: never turn the steam control knob rapidly, as the steam will accumulate rapidly in
short time which may increase the potential of the risk of explosion.
5. When the required purpose is reached, you can turn the steam control knob to the
minimum position.
Note: clean steam outlet with wet sponge immediately after steam stops generating, but
care not to be burnt!
6. Press and release the ON/OFF button to the higher position which is the “
”
position to cut off the power source
21
Page 23
www.heinner.com 1050W, 50-60Hz, 220-240V
7. Pour the frothed milk into the espresso prepared, now the cappuccino is ready.
Sweeten if desired, sprinkle the froth with a little cocoa powder.
Note: after steaming, we recommend you allow the maker to cool down at least for 5 min
before making coffee again. Otherwise burnt odor may occurred in your Espresso coffee. If
you want to make coffee immediately, follow the next steps: First, press the steam/coffee
button to position; dip the steam wand into a cup; secondly, press the pump control
button to position and turn on the steam control knob and there will be water flow out
from steam wand and funnel; after the ready indicator extinguish, press the pump control
button to
STOP
position, then turn the steam control knob to minimum position. When the
ready indicator illuminate, you can start to brew coffee again.
Frorhing milk/ producing steam to heat liquids:
The steam wand can be used to froth milk and make hot beverages like drinking chocolate,
water or tea.
1. Remove the removable tank and fill it with desired water, the water level should not
exceed the “MAX” mark in the tank. Then insert the tank into the appliance properly.
2. Then connect the appliance to power supply.
3. Press down the ON/OFF button to the lower position which is the “ ” position, the
power indicator (orange) illuminate.
4. Press down the pump control button to the lower position which is the “ ”
position, make sure the coffee/steam button is at the higher position which is
the position, the pump will pump water, when there is water flowing out, close
the pump immediately.
5. Press down the coffee/steam button to the lower position which is the position
and wait a moment, the appliance begins to heat until the green lamp illuminate, it
means the heating is finished.
6. Dip the steam wand into the liquid to be heated. If you want to froth milk, dip the
steam wand about 2 centimeters into the milk. Turn the steam control knob in
anti-clockwise slowly to start making steam.
22
Page 24
www.heinner.com 1050W, 50-60Hz, 220-240V
7. Then the desired result is got, you can turn the steam control knob to the minimum position.
8. Press and release the ON/OFF button to the higher position which is the “
” position to
cut off the power source.
VI. CLEANING AND MAINTENANCE
1. Cut off power source and let the coffee maker cool down completely before
cleaning.
2. Clean housing of coffee maker with moisture-proof sponge often and clean
water tank, drip tray and removable shelf regularly then dry them.
Note: Do not clean with alcohol or solvent cleanser. Never immerse the housing in
water for cleaning.
3. Detach the metal funnel by turning it clockwise, get rid of coffee residue inside,
then you can clean it with cleanser, but at last you must rinse with clear water.
4. Clean all the attachments in the water and dry thoroughly.
Cleaning minearal deposits:
1. To ensure your coffee maker can operate efficiently, internal piping is clean and
the peak flavor of coffee, you should clean away the mineral deposits left every
2-3 months.
2. Fill the tank with water and descaler to the MAX level (the proportion of water
and descaler is 4:1, details refers to the instruction of descaler. Please use
“household descaler”, you can use the citric acid (obtainable from chemist’s or
drug stores) instead of the descaler (one hundred parts of water and three
parts of citric acid).
23
Page 25
www.heinner.com 1050W, 50-60Hz, 220-240V
3. According to the program of pre-heating, put the metal funnel (no coffee
powder in it) and carafe (jug) in place. Brew water per “PRE-HEATING”.
4. Press down the ON/OFF button to the lower position which is the “ ”
position, the power indicator (orange) will be illuminated, you should press the
pump control button to the lower position which is the position, make
sure the coffee/steam button is on the higher position which is the
position, when there is water flowing out and close the pump by pressing the
pump control button again to the “
STOP
” position, and wait for a moment, the
coffee maker begins to be heated.
5. When the ready indicator (green) illuminate, it shows the heating is finish.
Pressing down the pump control button to the lower position which is the
“ ” position and make make two cups coffee (about 2Oz). Then close the
pump and wait for 5s.
6. Press down the coffee/steam button to the lower position which is the
position, waiting for until the green indicator is illuminated. Make steam for
2min, then turn the steam control knob to the minimum position to stop
making steam. Press and release the ON/OFF to the higher position which is
the “
” position to stop the unit immediately, make the descalers deposit in
the unit at least 15 minutes.
7. Restart the unit and repeat the steps of 4-6 at least 3 times.
8. Then pressing and release the coffee/steam button to the higher position
which is the position, when the green lamp is illuminated, press down the
pump control button to the lower position which is the “ ” position to brew
until no descaler is left.
9. Then brewing coffee (no coffee powder) with tap water in the MAX level,
repeat the steps of 4-6 for 3 times (it is not necessary to wait 15 minutes in
step of 6), then brewing until no water is left in the tank.
10. Repeat the step of 9 at least 3 times to make sure the piping is cleanly.
24
Page 26
www.heinner.com 1050W, 50-60Hz, 220-240V
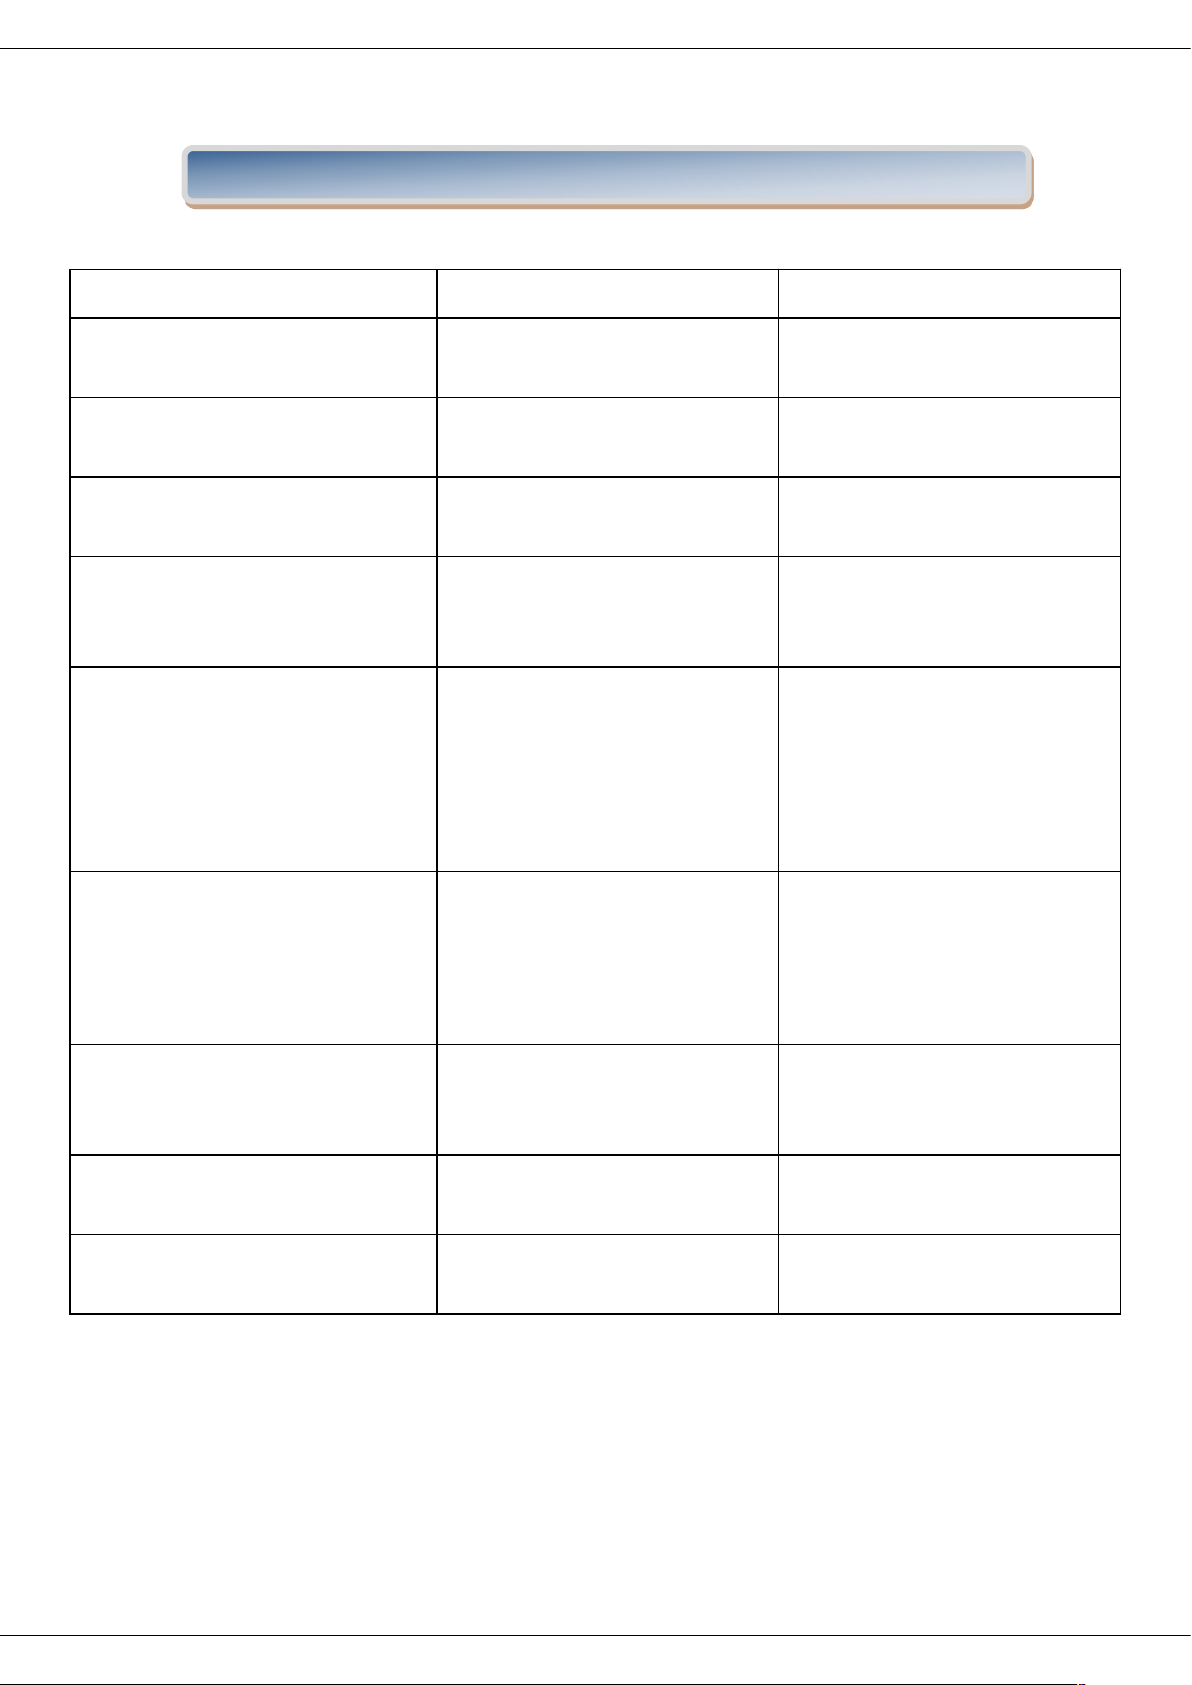
Symptom
Cause
Corrections
Water leaks from the bottom of
coffee maker.
There is much water in the drip
tray.
Please clean the drip tray.
The coffee maker is malfunction.
Please contact with the authorized
service facility for repairing.
Water leaks out of outer side of filter.
There is some coffee powder on
filter edge.
Get rid of them.
Acid (vinegar) taste exists in Espresso
coffee.
No clean correctly after cleaning
mineral deposits.
Clean coffee maker per the content
in “before the first use” for several
times.
The coffee powder is stored in a
hot, wet place for a long time. The
coffee powder turns bad.
Please use fresh coffee powder, or
store unused coffee powder in a
cool, dry place. After opening a
package of coffee powder, reseal it
tightly and store it in a refrigerator
to maintain its freshness.
The coffee maker cannot work any
more.
The power outlet is not plugged
well.
Plug the power cord into a wall
outlet correctly, if the appliance
still does not work, please contact
with the authorized service facility
for repairing.
The steam cannot froth.
The steam ready indicator is not
illuminated.
Only after the steam ready
indicator is illuminated, the steam
can be used to froth.
The container is too big or the
shape is not fit.
Use high and narrow cup.
You have used skimmed milk
Use whole milk or half-skimmed
milk
VII. TROUBLESHOOTING
25
Page 27
www.heinner.com 1050W, 50-60Hz, 220-240V
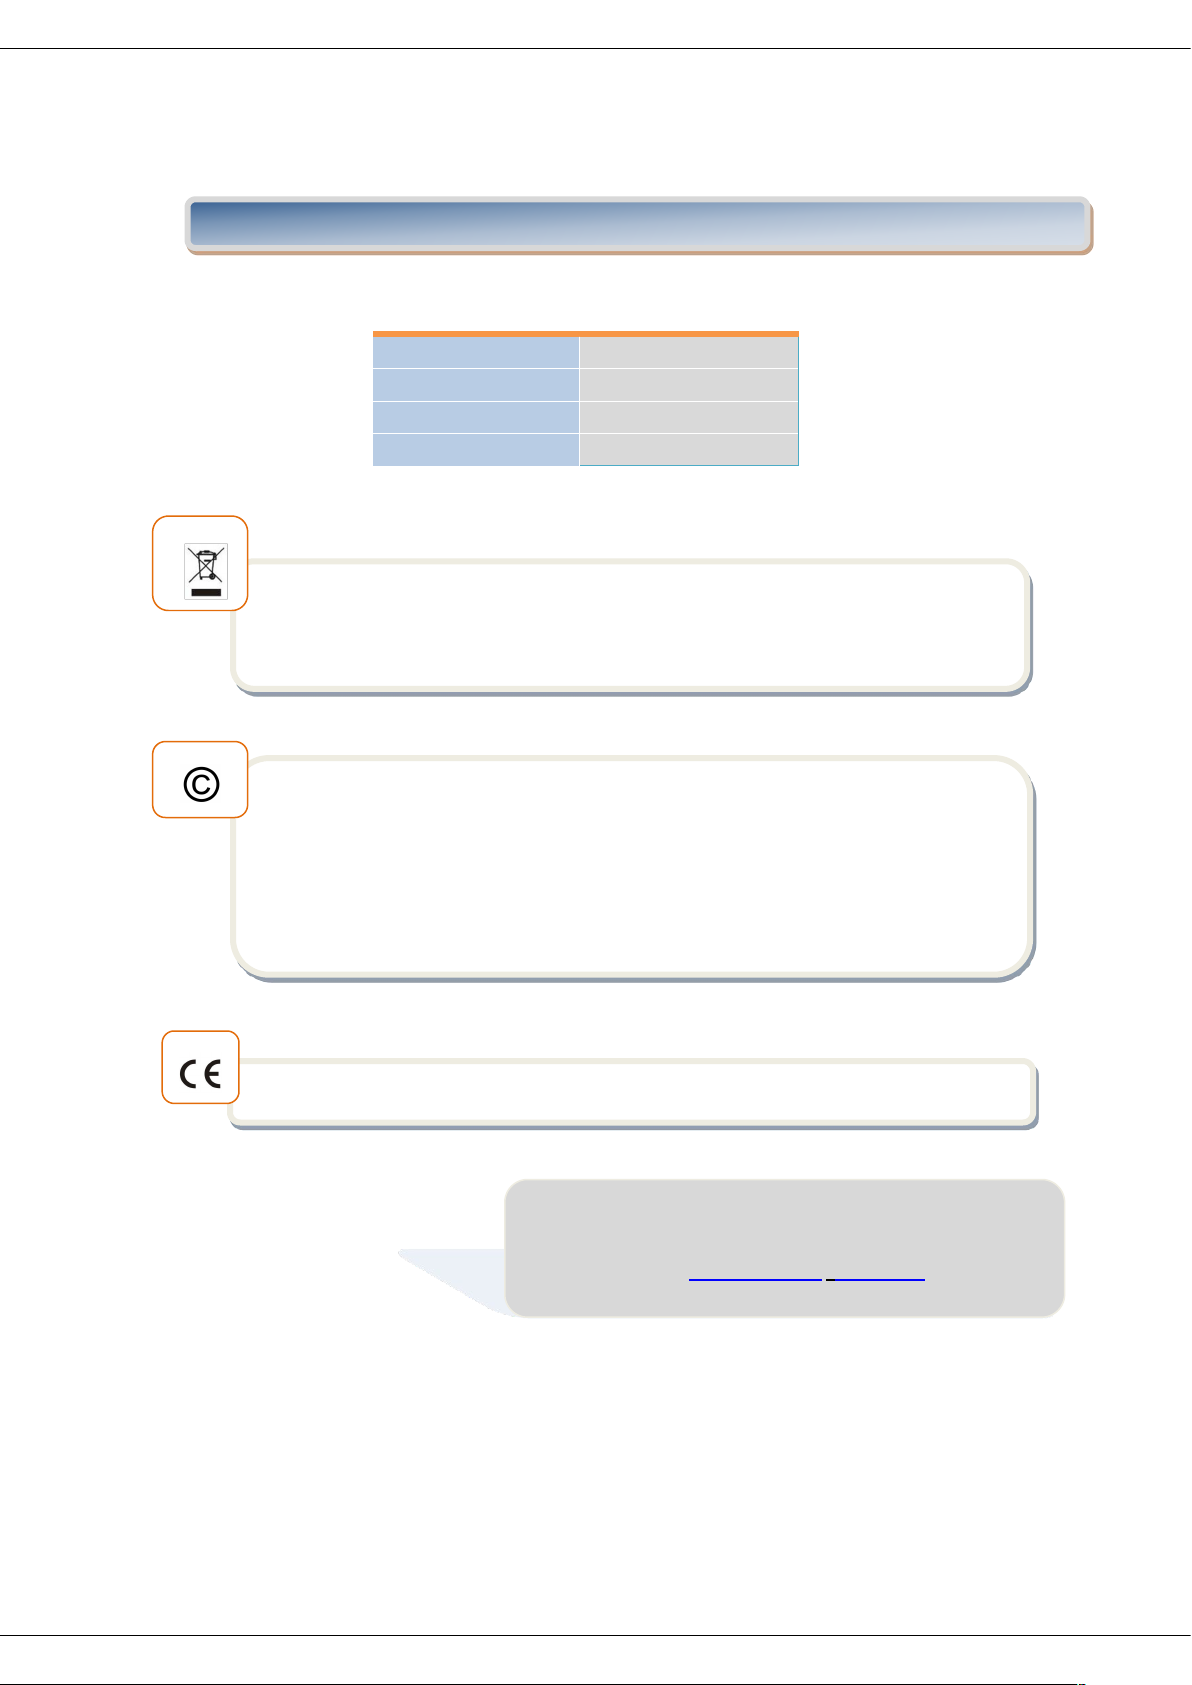
Power
1050W
Voltage
220-240V, 50/60Hz
Capacity
1 L
Color
Black + stainless steel
VIII. TECHNICAL FICHE
Environment friendly disposal
You can help protect the environment!
Please remember to respect the local regulations: hand in the non-working electrical equipment’s to
HEINNER is a registered trademark of Network One Distribution SRL. Other brands and product
names are trademarks or registered trademarks of their respective holders.
No part of the specifications may be reproduced in any form or by any means or used to make any
derivative such as translation, transformation, or adaptation without permission from NETWORK
ONE DISTRIBUTION.
This product is in conformity with norms and standards of European Community
Importer: Network One Distribution
Europolis Logistic Park, Italia Street, 1-7, Chaijna, Ilfov, Romania
Tel: +40 21 211 18 56, www.heinner.com , www.nod.ro
26
Page 28
www.heinner.com 1050W, 50-60Hz, 220-240V
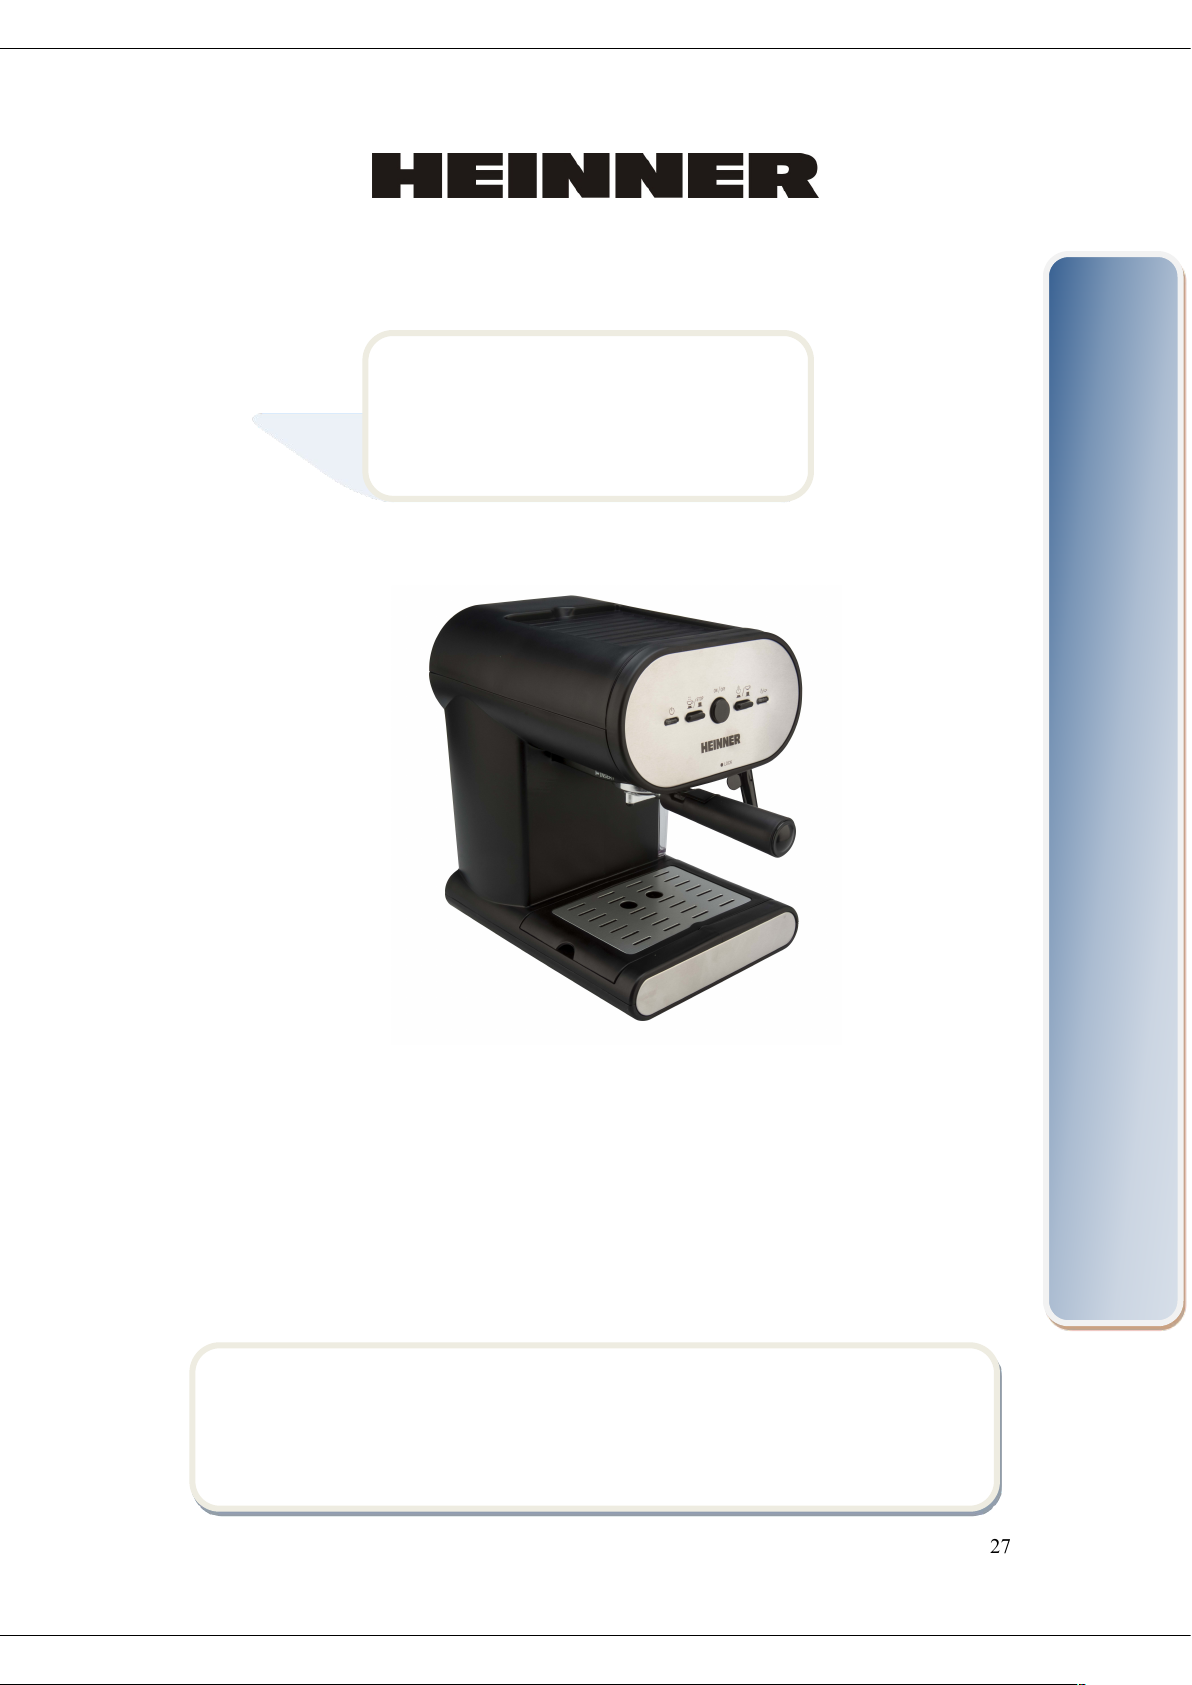
ЕСПРЕСО МАШИНА
Модел: HEM-250
www.heinner.ro
Еспресо машина с помпа под високо налягане (15 бара)
Капацитет: 1 л.
Цвят: Черен + инокс
Мощност: 1050 W
27
Page 29
www.heinner.com 1050W, 50-60Hz, 220-240V
Моля, прочетете внимателно инструкциите и запазете ръководството за
евентуални справки в бъдеще.
Това ръководство за употреба е съставено, за да Ви предостави всички необходими
инструкции относно монтажа, употребата и поддръжката на уреда.
За правилна и беопасна експлоатация на уреда, прочетете внимателно това
ръководство с инструкции преди монтаж и употреба.
I. ВЪВЕДЕНИЕ
II. СЪДЪРЖАНИЕ НА ПАКЕТА
Еспресо машина
Ръководство за употреба
Гаранционна карта
Благодарим Ви за избора на този продукт!
28
Page 30
www.heinner.com 1050W, 50-60Hz, 220-240V
III. ПРЕДПАЗНИ МЕРКИ
1. Прочетете всики инструкции за употреба.
2. Преди употреба, проверете дали напрежението на контакта съответства с
отбелязаното на апарата.
3. Това устройство има вграден извод за заземяване. Уверете се, че мрежата
е заземена.
4. За да сер предпазите от пожари, къси съединения и телесни аранявания
не поставяйте щекера в течности.
5. Преди ппочистване извадете щекера от контакта. Изчкайте апарата да се
охлади преди да го използвате поввторно, преди да прикачите аксесоари
или преди почистване.
6. Не използвайте уреди с повреден кабел или ако сте изпуснали щекера на
земята или е повреден по някакъв начин. Занесете уреда до най-близкия
оторизиран сервизен център за проверка и вевентуално поправка.
7. Употребата на аксесоари които не са препоръчани от производителя може
да причини пожар, токово удари или телесни наранявания.
8. Поставете уреда на гладка повърхност или маса, не оставяйте кабела да
виси от края на масата.
9. Уверете се, че захранващият кабел не докосва повърхностите на апарата
които се нагорещяват.
10. Не поставяйте уреда на горещи повърхности или в близост до открит огън,
за да избегнете повреждането му.
11. За да го изклюите от ел. мрежа, извадете щекера от контакта. Винаги
хващайте щекера. Никога не дърпайте кабела.
12. Не използвайте апарата за други цели освен по предназначение и го
дръжте на сухо място.
13. Внимавайте да не се изгорите от парата.
14. Не докосвайте горещите повърхности на апарата (като например тръбата
за пара или металния филтър). Използвайте дръбката или бутоните.
15. Не оставяйте еспресо машната да функционира без вода.
16. Не махайте поставката заметалния филтър когато апарата приготвя кафе.
17. Преди употреба поставете щекера в контакта. Изключете уреда преди да
извадите щекера от контакта.
29
Page 31
www.heinner.com 1050W, 50-60Hz, 220-240V
18. Този уред не е предназначен за употреба от лица
(в това число деца) с намалени физически, сензорни, или умствени
способности или без опит или способност за разбиране ако не са
наблюдавани от отговорно за тяхната безопасност лице.
19. Децата трябва да бъдат наблюдавани, за да не си играят с уреда.
20. Този апарат е предназнаен за употтреба в домашни условия и подобни като:
– кухни в магазини, бюра и други работни пространства;
– ферми;
–за употреба от клиенти на хотели мотели и други жилищни среди;
– хотелски условия (bed and breakfast).
21. Не използвайте апарана на открито.
22. Пазате тези интрукции.
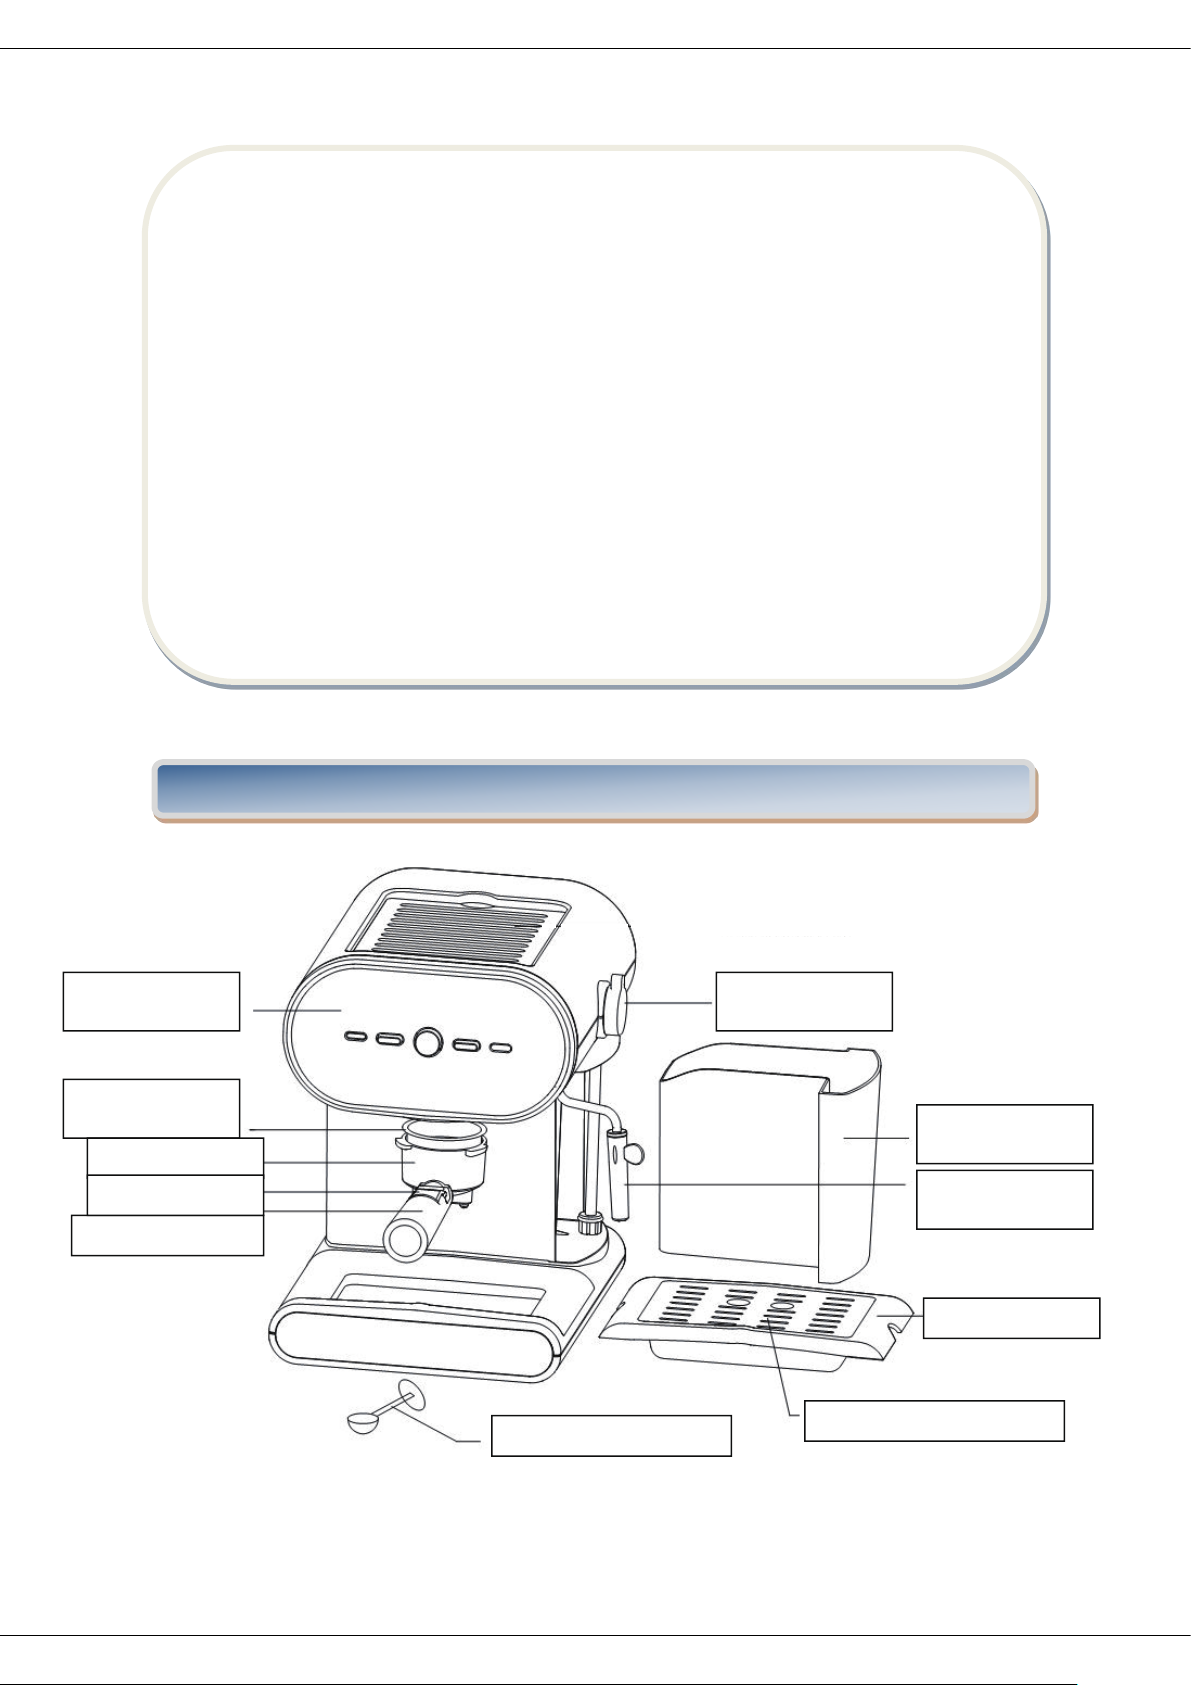
IV. ОПИСАНИЕ НА УРЕДА
Поставка за филтъра
Дръжка на поставката
Преса
Мерителна лъжичка
Подвижна тава за чашки
Тавичка за оттичане
Контролно пано Бутон контрол пара
Стоманен филтър
Резервоар за вода
Парен лост
30
Page 32
www.heinner.com 1050W, 50-60Hz, 220-240V
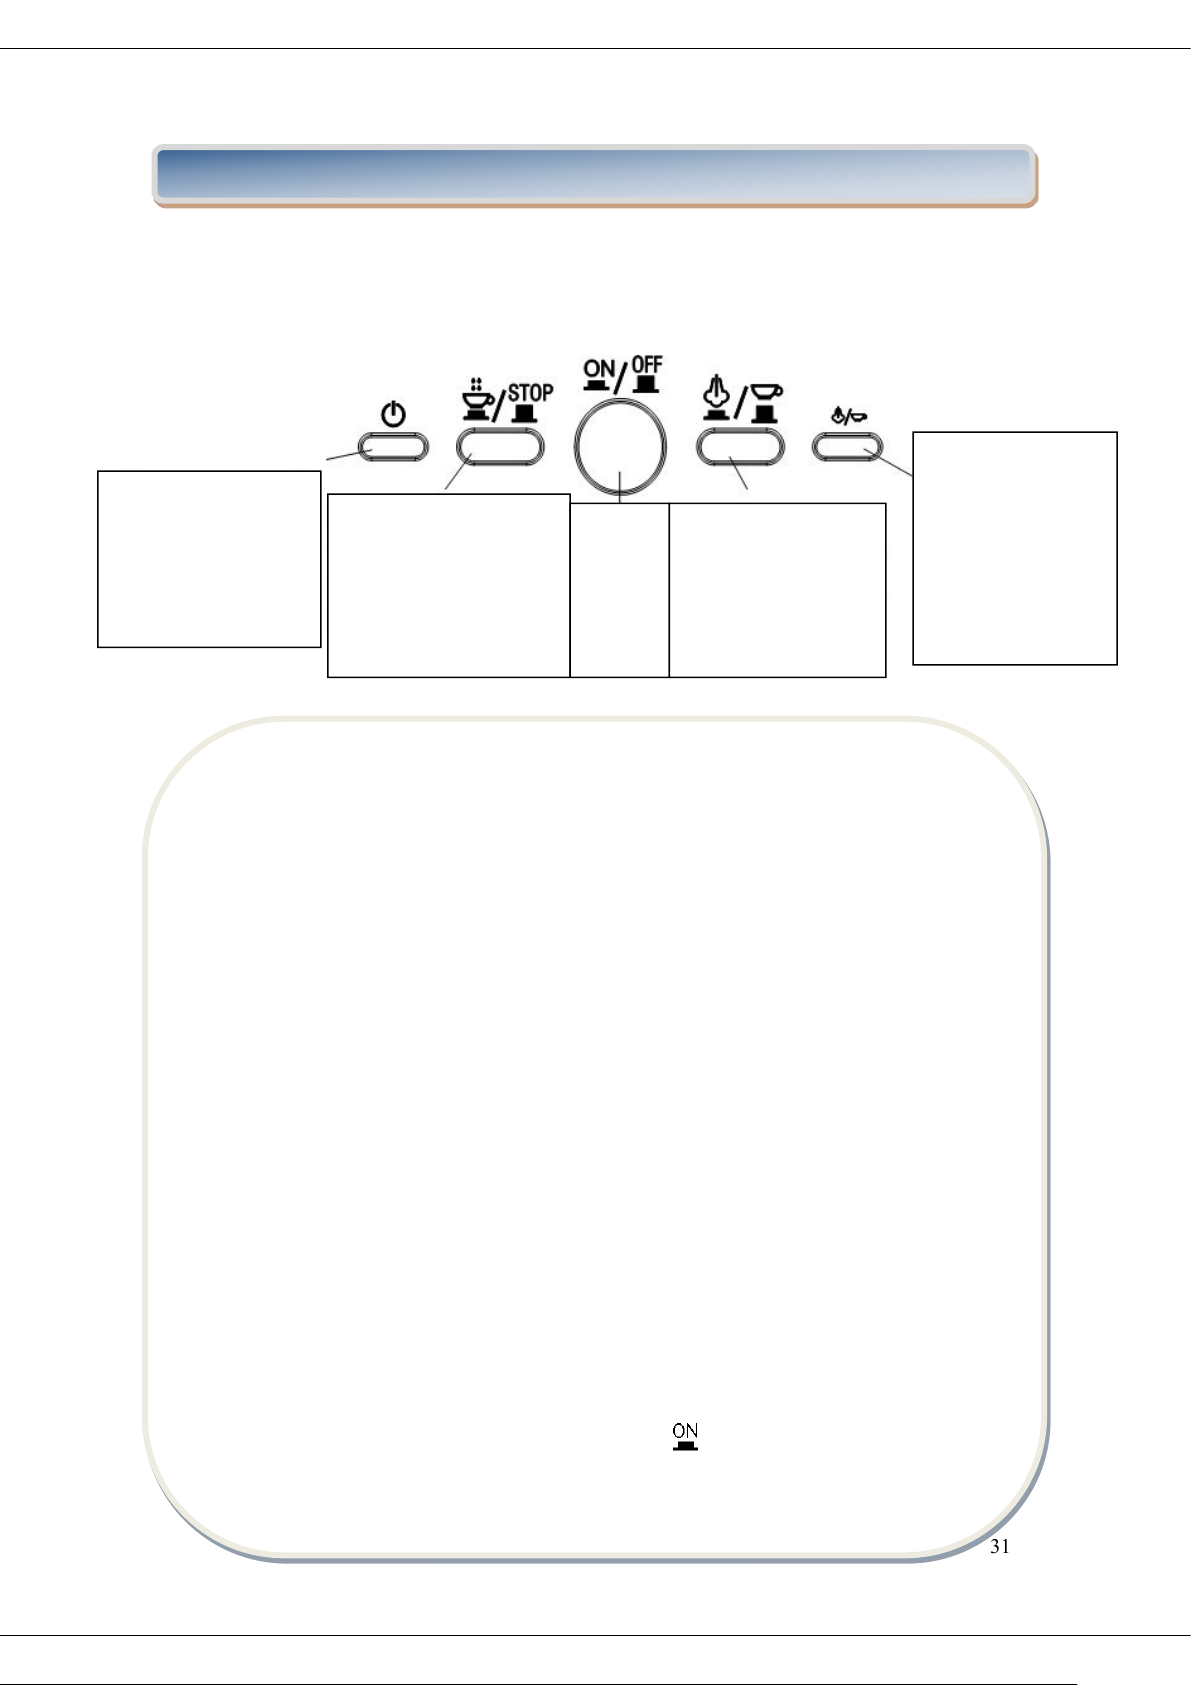
Контролно пано:
V. ИНСТРУКЦИИ ЗА УПОТРЕБА
Преди първата употреба:
За да сте сигурни че първата чаша кафе ще има отличен вкус трябва да изплактене
еспресо машината с топла вода както следва:
5. Издърпайте везервоара за вода в дясно на еспресо машината. Сипете
вода в резервоара, нивото на водата в резервоара не трябва да
надминава знака “MAX”. Сложете тръбата за разнос на водата в
резервоара и след това поставете резервоара в апарата.
Бележка: Апарата има разглобяем резервоар, за по-лесно почистване. Първо
можете да напълноте резервоара с вода и след това да го поставите с апарата.
6. Поставте филтъра в поставката (бе кафе), след което сложете поставката в
апарата от положение “Insert” (поставяне) и я закрепете завъртайки я в
обратна посоко на часовниковата стрелка докато стигне до положение
“Lock” (блокирана).
7. Поставете чаша за кафе на подвижната тава. Учерете се, че дръжката за
контрол на парата се намира в минимално положение.
Бележка: Тъй като апарата не е снабден с чаша за кафе, вие трябва да прготвите
една.
8. Включете апарата в електрическата мрежа, натиснете бутона ON/OFF
(включен/изкючен) на положение “ ”. Светлинният индикатор за
включване на апарата ще светне в оранжево.
Индикатор включен уред
Когато уреда се включи,
индикатора ще свети
оранжево.
Контролен бутон помпа:
Натиснете надолу, за да
направи кафе и да изпомпа
вода, нагоре за да спре.
Бутон
включено
/изключе
но
Бутон кафе/пара:
Натиснете надолу за пара
и нагоре за кафе
Индикатор
„ready”(готово): Когато
температурата е
достатъчно висока,
индикатора ще свети в
зелено
31
Page 33
www.heinner.com 1050W, 50-60Hz, 220-240V
9. Натиснете контролния бутон на помпата на най-слабото положение
“ ”, помпата ще разнесе водата, когато водата започне да тече
спрете помпата натикайки отново бутона в положение “
STOP
”.
10. Учерете се, че бутона за кафе/пара се намира в положение и
изчакайте малко. Апарата ще започне да загрява докато светлинният
индикатор за кафе/пара светне (в зелено, което означава, че процеса
на загряване е приключил).
11. Натиснете бутона за помпата в положение “ ” и водата ще започне да
тече.
12. След като водата е текла около една минута, натиснете контролния бутон
на помпата в положение “
STOP
”, можете да сипете вода във всеки съд
и след това да ги почистите внимателно. Сега можете да започнете да
правите кафе.
Бележка: Възможно е да чуете шум когато водата се изпомпва за първи път, това е
нормално, апарата премахва останалия въздух. След около 20 секунди шума ще
спре.
Предварително подгряване:
За да приготвите чаша добро горещо кафе, препопъчваме предварително да
загреете апарата, включително и поставката на филтъра, така че студените части
да не повлияят на вкуса на кафето.
2. Извадете резервоара и го напълнете с желаното количество вода, о не
надвишавайте нивото на знаците “MAX” и “MIN” на резервоара.
След това поставете обратно резервоара в апарата.
32
Page 34
www.heinner.com 1050W, 50-60Hz, 220-240V
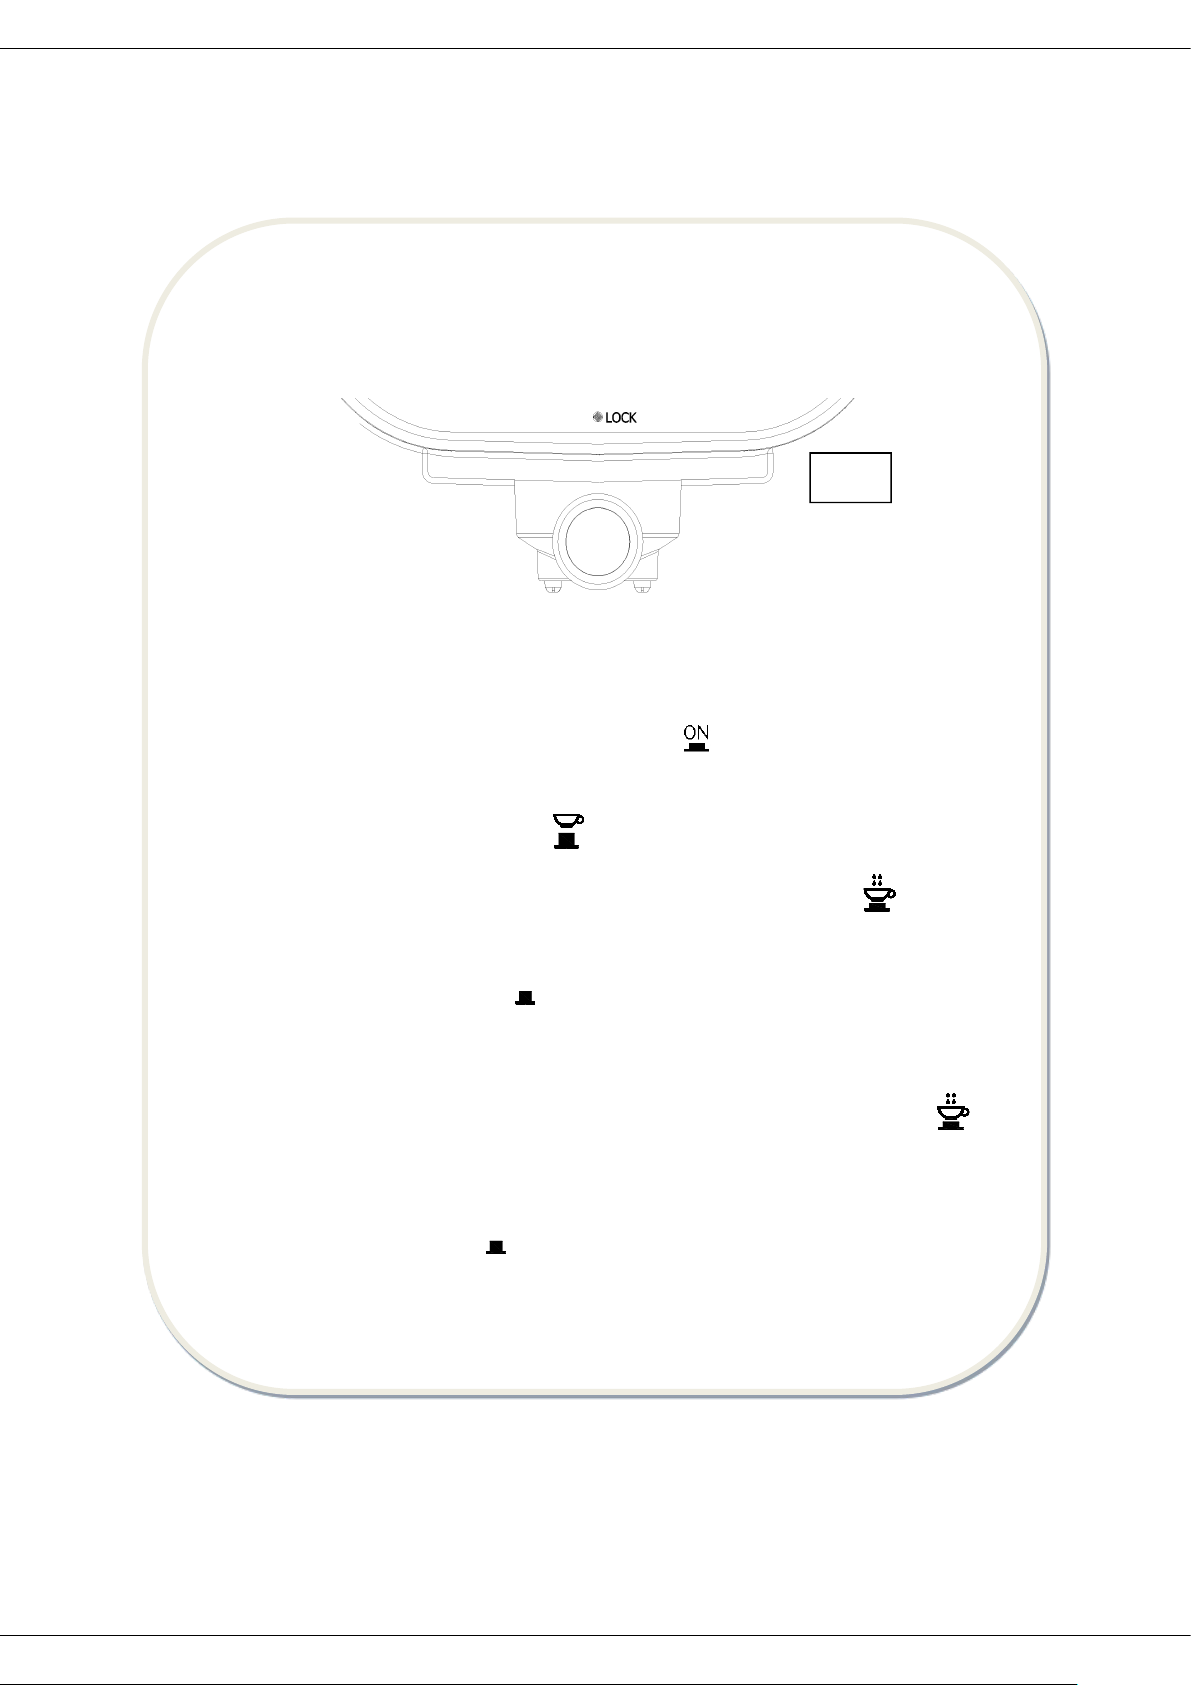
Поставете филтъра в поставката, сложете го в апарата в положение
“Insert”, и го закрепете в еспресо машината завъртайки го в обратна
посока на часовниковата стрелка до положение “Lock”. ( Виж fig. 1).
9. Поставете една чаша за кафе на подвижната тава.
10. Включете апарата в електрическата мрежа. Уверете се, че бутона за
контрол на парата се намира на най-ниското положение.
11. Натиснете бутона ON/OFF в положение “ ”, светлинният индикатор ще
светне (оранжево), уверете се, че бутона за кафе/пара се намира на
максимално положение .
12. Натиснете контролния бутон на помпата в положение “ ”, когато
водата започне да тече изключете веднага помпата натискайки отново
бутона на помпата “
STOP
”. Целта на тази стъпка е да се изпомпа вода
от резервоара в апарата.
13. Когато лампата на индикатора “ready” (готов) светне (зелено), трябва да
натиснете отново контролния бутон на помпата в положение “ ”,
така ще потече топла вода.
14. След като е текла вода за около 20 секунди, натиснете бутона на помпата
в положение “
STOP
”. Процеса за предварително подгряване е
приключил.
FIG.1
33
Page 35
www.heinner.com 1050W, 50-60Hz, 220-240V
Приготвяне на еспресо:
1. Извадете поставката на филтъра завъртайки го.
2. Сложете мляно кафе във филтъра с помощта на мерителната лъжичка,
след което натиснете добре кафето. Една лъжичка е достатъчна за
приблизително едно кафе.
3. Поставете поставката на филтъра в апарата от положение “Insert” и я
завъртете с обратна посока на часовниковта стрелка до положение
“Lock”. (Виж fig. 1).
4. Изсипете гореща вода в чашката. Поставете горещата чашка (вашата
чашка) на тавата.
5. Уверете се, че контролния бутон за парата се намира на минимално
положение, а бутона за кафе/пара в положение .
6. В този момент светлинният индикатор “ready” ще светне (зелено), а след
като светне трябва да натиснете контролния бутон на помпата “ ”,
изчакайте малко, кафето ще започне да тече.
7. Трябва да натиснете контролния бутон на помпата в положение “
STOP
”,
когато желаното кафе е получено или когато се смени видимо цвета на
кафето.
8. След като приключите с приготвянето накафето, натиснете бутона
ON/OFF, лампичките на индикаторите включено/изключено и “ready”
ще изгаснат, а еспресо машината ще се изключи. Вашето кафе е готово.
ВНИМАНИЕ: Не оставяйте еспресо машината без наблюдение по време на работа,
тъй като е необходими да я изключите ръчно!
Бележка: Докато се приготвя кафето или докато излизат пари е нормално
лапмичката на индикатора “ready” да се изключва, това означава че нагревателя
загрява, за да поддържа температурата на стандартните стойности.
9. Извадете поставката филтъра завъртайки я в посока на часовниковата
стрелка, след което изхвърлете остатъците от кафето.
10. Оставете частите да изстинат напълно, след което ги изплакнете.
34
Page 36
www.heinner.com 1050W, 50-60Hz, 220-240V
Приготвяне на капучино:
Можете да получите капучино с топинг млечен каймак.
Бележка: филтъра трябва да бъде монтиран в правилно положение
1. Първо пригответе еспресо кафе използвйки указаното количество в
раздел “Прикотвяне на еспресо кафе”, и се уверете че бутона за парата
се намира на минимум.
2. Натиснете бутона кафе/пара в положеиеa , изчаквайки докато
лаппата на индикатора “ready” светне (зелено).
3. Напънете чашите с около 100 грама мляко за всяко капучино.
Препоръчва се да използвате пълномаслено мляко директно от
хладилника (да не е горещо).
Бележка: Препоръчва се диаметъра на чашата да не бъде по-малък от 70±5мм,
запомнете, че обема на млякото ще се удвои. Ъверете се, че каната е достатъчно
висока.
4. Поставете тръбата за пара в млякото около 2 см., след което завъртете
бутона за парата в обратна посока на часовниковата стрелка, ще
излезе пара от тръбата. Мления каймак се образува въртейки чашта в
кръг отгоре надолу.
Бележка: никога не завъртайте бързо бутона за парата, тъй като парата ще се
събере бързо, което увеличава риска от експолозия.
5. След като получите желания ефект, завъртете контролния бутон на
парата в минимално положение.
Бележка: избършете тръбата с гъба веднага след като спре парата, о внимавайте
да не се изгорите.
6. Натиснете бутона ON/OFF в положение “
”, за да срете захранването
на уреда.
7. Изсипете каймака върху прготвеното кафе. Капучиното е готово.
Подсладете го по жлание,поръссете отгоре с какао на прах.
35
Page 37
www.heinner.com 1050W, 50-60Hz, 220-240V
Бележка: след като се формира парата, препоръчваме да оставите еспресо
машината да се охлади за около 5 мин. преди да приготвите ново кафе. В
противен случай кафето може да има мирис на изгорено. Ако желаете да
приготвите веднага още едно кафе следвайте стъпките: Първо натиснете бутона
пара/кафе на помпата в положение ; поставете тръбата за пара в една чашка,
след което натиснете бутона на помпата в положение включете бутона за
парата и ще потече вода от тръбата, след което лампата “ready” ще угасне,
натиснете бутона за помпата в положение
STOP
, след което завърте бутона за
парата на минимално положение. Когато индикатора “ready” светне, можете
отново да приготвите кафе.
Млечен каймак/ получаване на пара за затопляне на течностите:
Тръбата за пара може да бъде използвана за получаване на млечен каймак и за
прогтвяне на топли напитки като горещ шоколад, чай или вода.
Метод:
1. Извадете резервоара и го напълнете ес желаното количество вода,
водата не трябва да надминава маркировката на резервоара “MAX”.
Поставете обратно резервоара в апарата.
2. Включете апарата в електрическата мрежа.
3. Натиснете бутона ON/OFF в положение “ ”, индикатора ще светне
(оранжево).
4. Натиснете бутона на помпата в положение “ ”, уверете се че бутона
кафе/пара се намира в положение ,помпата ще пренесе водата и
когато водата потече навън, изключете ведната помпата.
5. Натиснете бутона каф/пара в положение и изчакайте малко, апарата
ще започне да се затопля докато се включи зеленият индикатор, което
показва е процеса на загряване е приключил.
36
Page 38
www.heinner.com 1050W, 50-60Hz, 220-240V
6. Поставете тръбата за пара в течността за да я загреете. Ако желаете да
направите млечен каймак, поставете тръбата в млякото на около 2 см.
Завъртете бутона за парата в обратна посока на часовиковата стрелка, за да
започне да пуска пара.
7. След като получите желания резултат, завъртете контролния бутон за парата
на минимално положение.
8. Натиснетр бутона ON/OFF в положене “
” за да спрете захранването на
апарата.
VI. ПОЧИСТВАНЕ И ПОДДРЪЖКА
1. Прекъснете електрическото захранване на апарата и го оставете да
изстине напълно преди да го почистите.
2. Забършете повърхността на еспресо машината, подвижната тава и тавата
за оттичане с устойчива на влага кърпа, след което подсушете всяка
част.
Бележка: Не почиствайте апарата с алкохол или разредидели. Никога не
поставяйте апарата във вода.
3. Извадете металната поставка на филтъра завъртайки я с обратна посока
на часовниковата стрелка.
4. Измихте с вода всички подвижни части.
Почистване на минералните наслагвания:
1. За да сте сигурни че еспресо машината функционира ефикасно трябва да
го почиствате от минералните наслагвание веднъж на 2-3 месеца.
2. Напълнете резервоара с вода и препрат против котлен камък до
максималното ниво MAX (съотношението на водата и препарата
трябва да бъде 4:1. Моля използвайте “препарат против котлен камък
за домашна употреба”, можете да използвате лимонена киселина
вместо препарат (сто части вода и три части лимонена киселина).
37
Page 39
www.heinner.com 1050W, 50-60Hz, 220-240V
3. Сожете филтъра празен, без кафе и включете програмата за
предварително загряване.
4. Натиснете бутона ON/OFF “ ”, индикатора включен/изключен ще
светне (оранжево), натиснете бутона на помпата в положени ,
уверете се, че бутона за кафе/пара е в положение и когато
потече вода натиснете бутона на помпата с положение “
STOP
”,
изчакайте малко, апарата ще започне да загрява.
5. Когато индикатора “ready” светне (зелено), означава че процеса на
загряване е приключил. Натиснете бутона на помпата в положение
“ ” и напълнете две чашки с кафе (приблизително 2Oz). Изключете
помпата и изчакайте 5 сек.
6. Натиснете бутона за кафе/пара в положение и изчакайте да светне
зелената лапма. Изпуснете парата за около 2 минути, след което
изключете бутона за пара. Натиснете бутона ON/OFF “
” pза да
изключите напълно апарата и оставете препарата поне 15 минути в
апарата.
7. Включете отново апарата и повторете стъпки 4-6 поне три пъти.
8. Натиснете бутона кафе/пара в положение , когато зеленият
индикатор светне, натиснете бутона на помпата с положение “ ” и
изчакайте докато се източи всичкия препарат.
9. Напълнете отново резервоара с вода до MAX (не добавяйте кафе),
повторете стъпки 4-6 тру пъти (не е необходимо да изчаквате 15
минути като на точка 6), изакайте докато всичката вода се източи от
резервоара.
10. Повторете стъпка 9 поне три пъти, за да изплакнете добре тръбите.
38
Page 40
www.heinner.com 1050W, 50-60Hz, 220-240V
Проблем
Причина
Прешение
Тече вода от долната част на
еспресо машината.
Има много вода в тавичката за
оттичане.
Почистете тавичката.
Апарата не функционира.
Свържете се с оторизирания
сервиз за поправка.
Тече вода от външната страна на
филтъра.
По края на филтъра има мляно
кафе.
Махнете мляното кафе от ръба
на филтъра.
Кафето има кисел вкус (на оцет).
Не сте изплакнали добре апарата
след почистването му от
котления камък.
Изплакнете апарата няколко пъти
следвайки инструкциите “Преди
първата употреба”.
Мляното кафе е било
съхранявано на топло и влажно
място за дълъг перод от време.
Кафето е развалено.
Иползвайте прясно смляно кафе
или го съхранявайте на
прохладно и сухо място. След
като сте разопаковали пакет
мляно кафе, затворете го добре и
го съхранявайте в хладилник за
да се запази прясно.
Апарата не функционира.
Не е включен в електрическата
мрежа.
Включете щекера в
електрическата мрежа, ако пак
не проработи, обърнете се към
оторизиран сервиз.
Парата не образува пяна.
Индикатора “ready” не е
включен.
Само след като е включи
индикатора “ready” парата може
да образува пяна/каймак.
Чашата е прекалено голяма или
формата ѝ е неподходяща.
Използвайте високи и тесни
чашки.
Използвали сте обезмаслено
мляко.
Използвайте пълномаслено
мляко или полуобезмаслено.
VII. ОТКРИВАНЕ/РАЗРЕШАВАНЕ НА ПРОБЛЕМИИ
39
Page 41
www.heinner.com 1050W, 50-60Hz, 220-240V
Мощност
1050W
Захранване
220-240V, 50/60Hz
Капацитет
1 L
Цвят
Инокс + черен
VIII. ТЕХНИЧЕСКИ ЛИСТ
ИЗХВЪРЛЯНЕ НА ОТПАДЪЦИТЕ ПО ОТГОВОРЕН НАЧИН КЪМ ОКОЛНАТА СРЕДА
Можеш да помогнеш за опазване на околната среда!
Моля, спазвайте местните закони и правила: занесете нефункциониращите електрически уреди
в пунктовете за събиране на отпадъци от електрическо оборудване.
www.heinner.ro , www.nod.ro
HEINNER е регистрирана марка на компанията Network One Distribution SRL. Другите марки,
наименованията на продуктите са регистрирани марки на съответните собственици.
Нито една част на спецификациите не може да бъде възпроизвеждана под каквато и да е
форма или по какъвто и да е начин, използвана за получаването на производни като преводи,
промени или адаптации без предварителното разрешение на компанията NETWORK ONE
DISTRIBUTION. Всички права запазени!
Copyright © 2013 Network One Distibution. All rights reserved.
http://www.heinner.com, http://www.nod.ro
Този продукт е проектиран и реализиран в съответствие със стандартите и изискванията на
Европейската Общност.
40
 Loading...