

Page 1
Manual de instrucţiuni
CONVECTOR
Tip : HCH-218-TF
Vă rugăm să citiți cu atenție manualul, înainte de a utiliza aparatul
Alimentare : 220-240V~50Hz
Putere: 1800W
Page 2

INSTRUCŢIUNI GENERALE DE SIGURANŢĂ:
1. Înainte de folosire, citiţi cu atenţie toate instrucţiunile.
2. Vă rugăm ca, înainte de utilizare, să verificaţi întotdeauna tensiunea reţelei de
alimentare! Ea trebuie să corespundă cu cea indicată pe eticheta produsului.
3. Nu puneţi în funcţiune aparatul, dacă s-a deteriorat cablul sau ştecherul.
4. Ţineţi aparatul şi cablul departe de sursele de căldură, obiecte ascuţite sau de orice
altceva, care le poate provoca daune.
5. Pentru a evita pericolul, cablul de alimentare deteriorat poate fi schimbat numai de
către fabricant, agentul de service al acestuia sau persone calificate similar.
6. Înaintea conectării la reţeaua de alimentare, asiguraţi-vă ca aparatul să fie deconectat.
7. Când aparatul nu este în uz, înaintea curăţării sau schimbării accesoriilor, deconectaţi-l
de la reţea, şi scoateți ştecherul din priză.
8. Pentru a deconecta aparatul, întoarceţi comutatorul la poziţia “OFF”, apoi scoateţi
ştecherul din priză. Nu trageţi de cablul pentru deconectare, deoarece acest lucru ar
putea deteriora aparatul.
9. Nu instalaţi radiatorul direct sub o priză.
10. Nu puneţi radiatorul în funcţiune, în locuri unde se foloseşte sau se stochează benzină,
vopsea sau alte lichide inflamabile.
11. Se foloseşte numai în interior.
12. Pentru a evita supraîncălzirea, nu acoperiţi radiatorul.
13. Pentru prevenirea unui incendiu posibil, nu blocaţi în nici un fel alimentarea cu aer sau
dispersarea aerului .
14. Nu atingeţi suprafeţele fierbinţi.
15. Nu introduceţi, respectiv nu lăsaţi să intre obiecte străine în deschizăturile de ventilaţie
sau de dispersare a aerului, deoarece acest lucru poate cauza electrocutare, incendiu sau
deteriorarea aparatului.
16. Întotdeauna asiguraţi-vă că aveţi mâinile uscate, înainte de a pune aparatul în
funcţiune sau de a regla vreun întrerupător de-al acestuia, ori înainte de a atinge priza sau
conexiunile de la reţeaua de alimentare.
17. Acest aparat nu poate fi folosit de către persoane cu capacităţi fizice, senzoriale sau
mentale reduse (nici de copii), sau de persoane cărora le lipsesc experienţa sau
cunoştinţele în legătură cu aparatul, cu excepţia cazului în care persoana responsabilă
pentru siguranţa lor nu se oferă să le supravegheze sau să îi instruiască în legătură cu
folosirea aparatului.
18. Copiii trebuie supravegheaţi pentru a vă asigura că nu se joacă cu aparatul.
19. Nu lăsaţi niciodată aparatul nesupravegheat atunci când este conectat la reţeaua de
Page 3
alimentare.
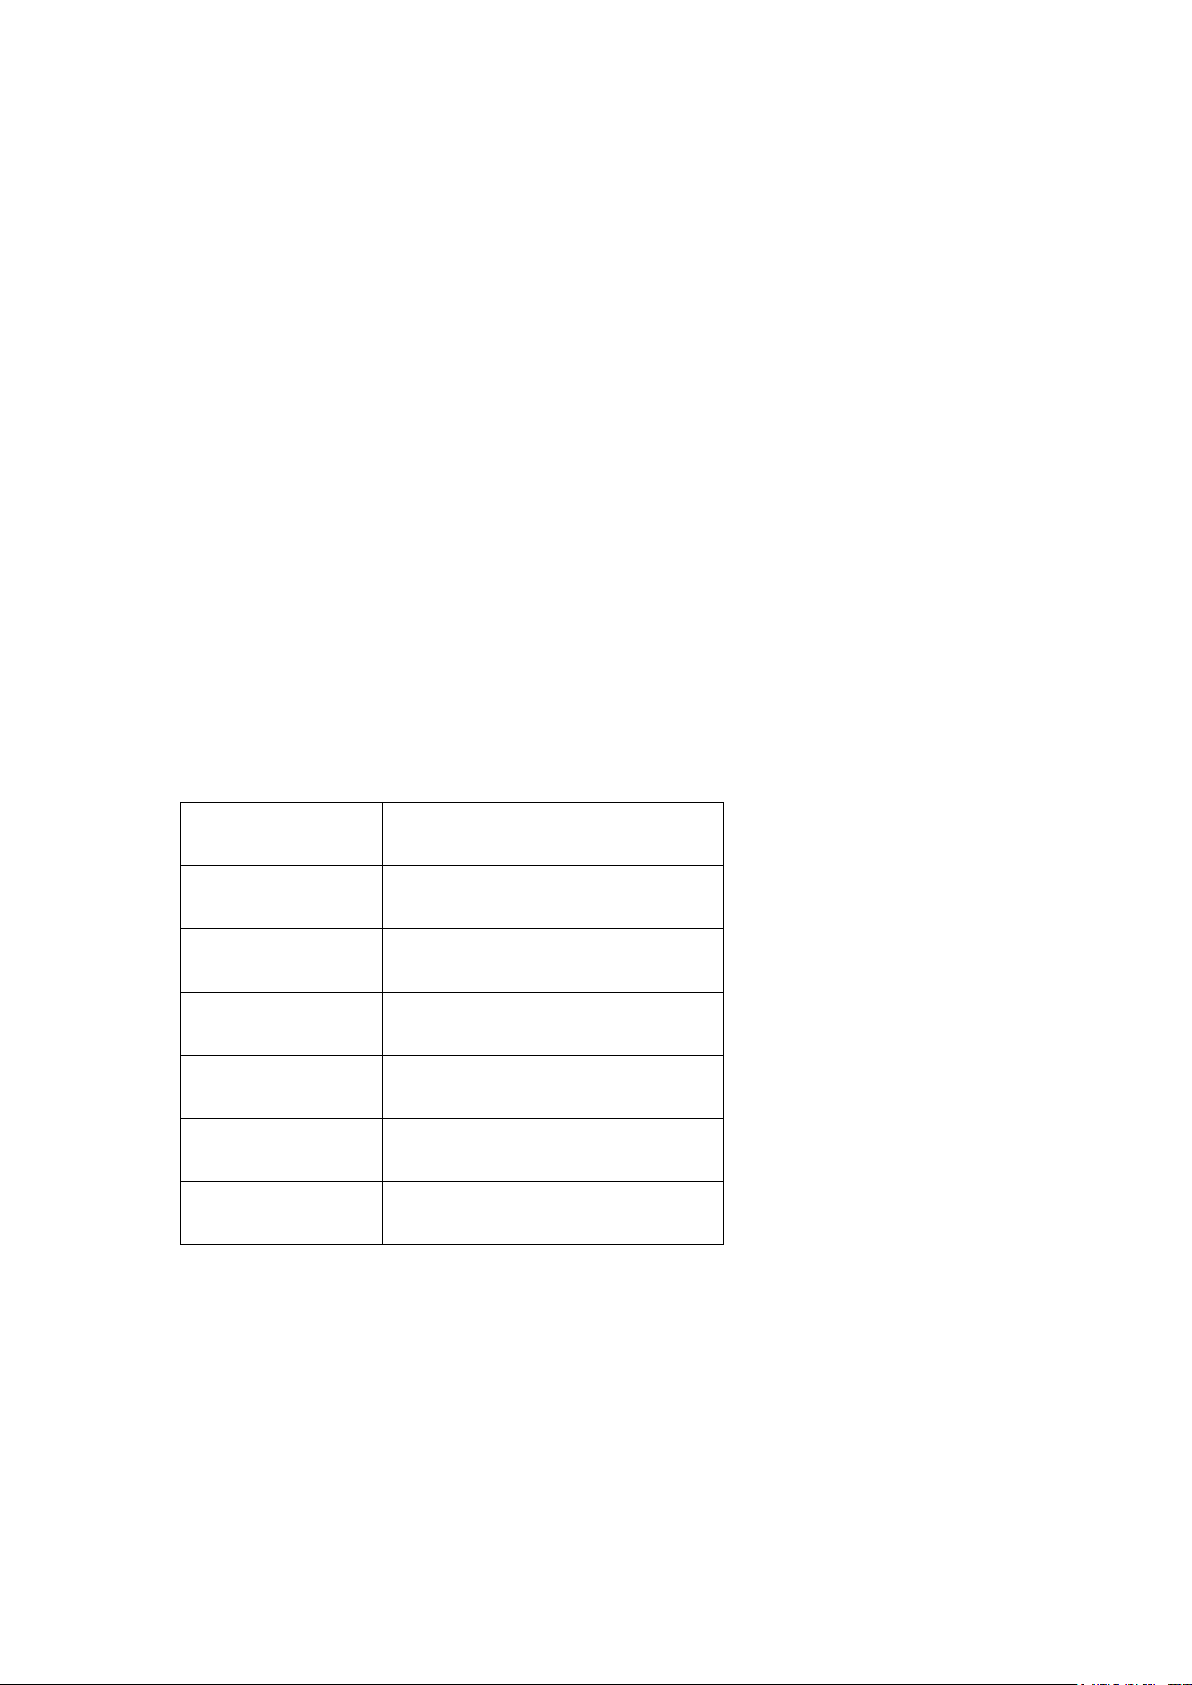
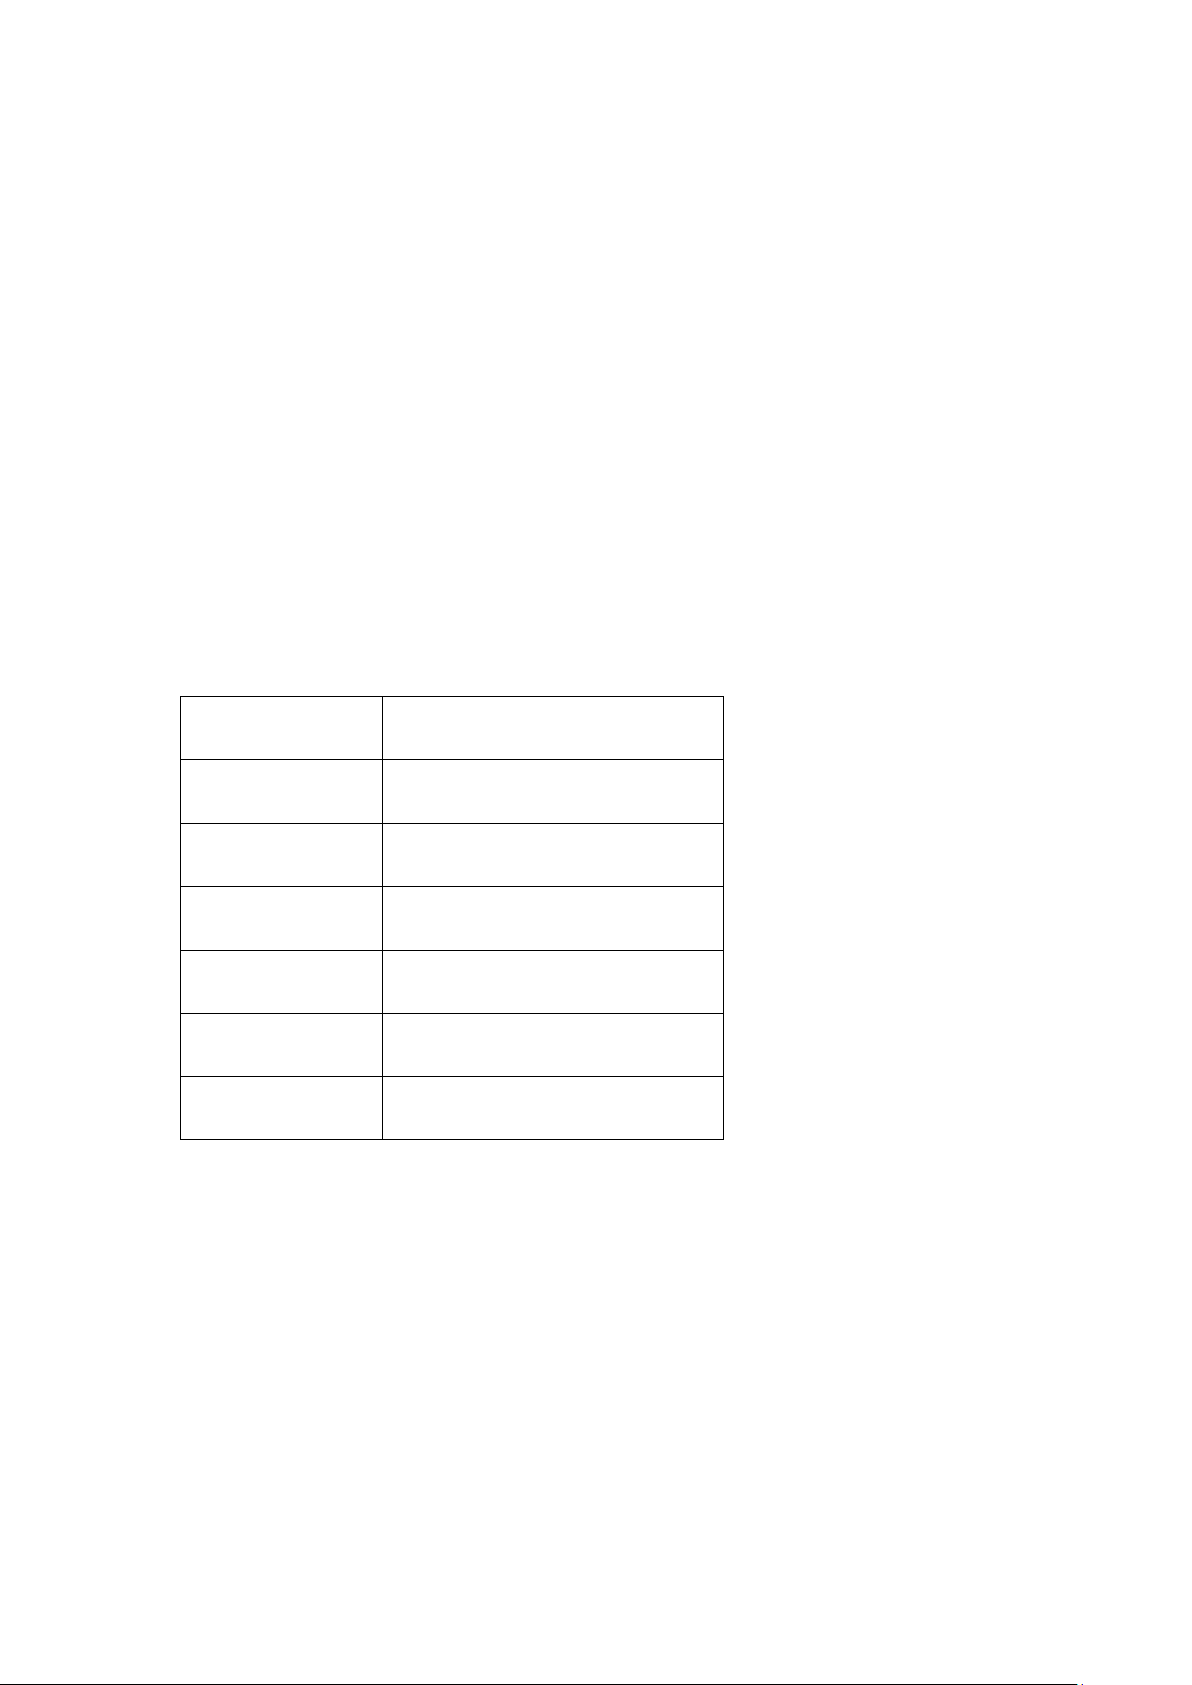
Model
HCH-320
Tensiune de
alimentare
220-240 V ~
Frecvenţa reţelei
50/60 Hz
Putere
1800W
Clasa de protecţie
I
Grad de protecţie
IP20
Nivel de zgomot
<60dB
20. Depunerile de praf şi de puf din radiator sunt cea mai obişnuită cauză a supraîncălzirii.
Îndepărtaţi aceste depuneri în mod regulat, după ce scoateţi aparatul din priză, apoi
aspiraţi deschizăturile de ventilaţie şi grilajele.
21. Nu puneţi radiatorul pe covoare și nu puneţi cablul sub covoare. Aşezaţi cablul
departe de zonele de circulaţie, astfel încât nimeni să nu se împiedice în el.
22. Nu folosiţi aparatul de încălzit în apropierea unei vane de baie, a unui duş sau
rezervor de apă.
23. Nu îl puneţi la loc până ce radiatorul nu s-a răcit, depozitaţi-l într-un loc răcoros şi
uscat atunci când nu este în folosinţă.
24. ATENŢIE: Trebuie evitată conectarea la ore nepotrivite a alimentării la curent a
aparatului de încălzit, din acest motiv nu este permis să se folosească acest aparat cu
mecanism de comutare exterioară cum ar fi cu ceas de contact. De asemenea, nu este
permis nici să fie conectat la un circuit electric deconectat periodic, apoi pus din nou sub
tensiune de furnizorul de curent.
SPECIFICAŢII:
Page 4
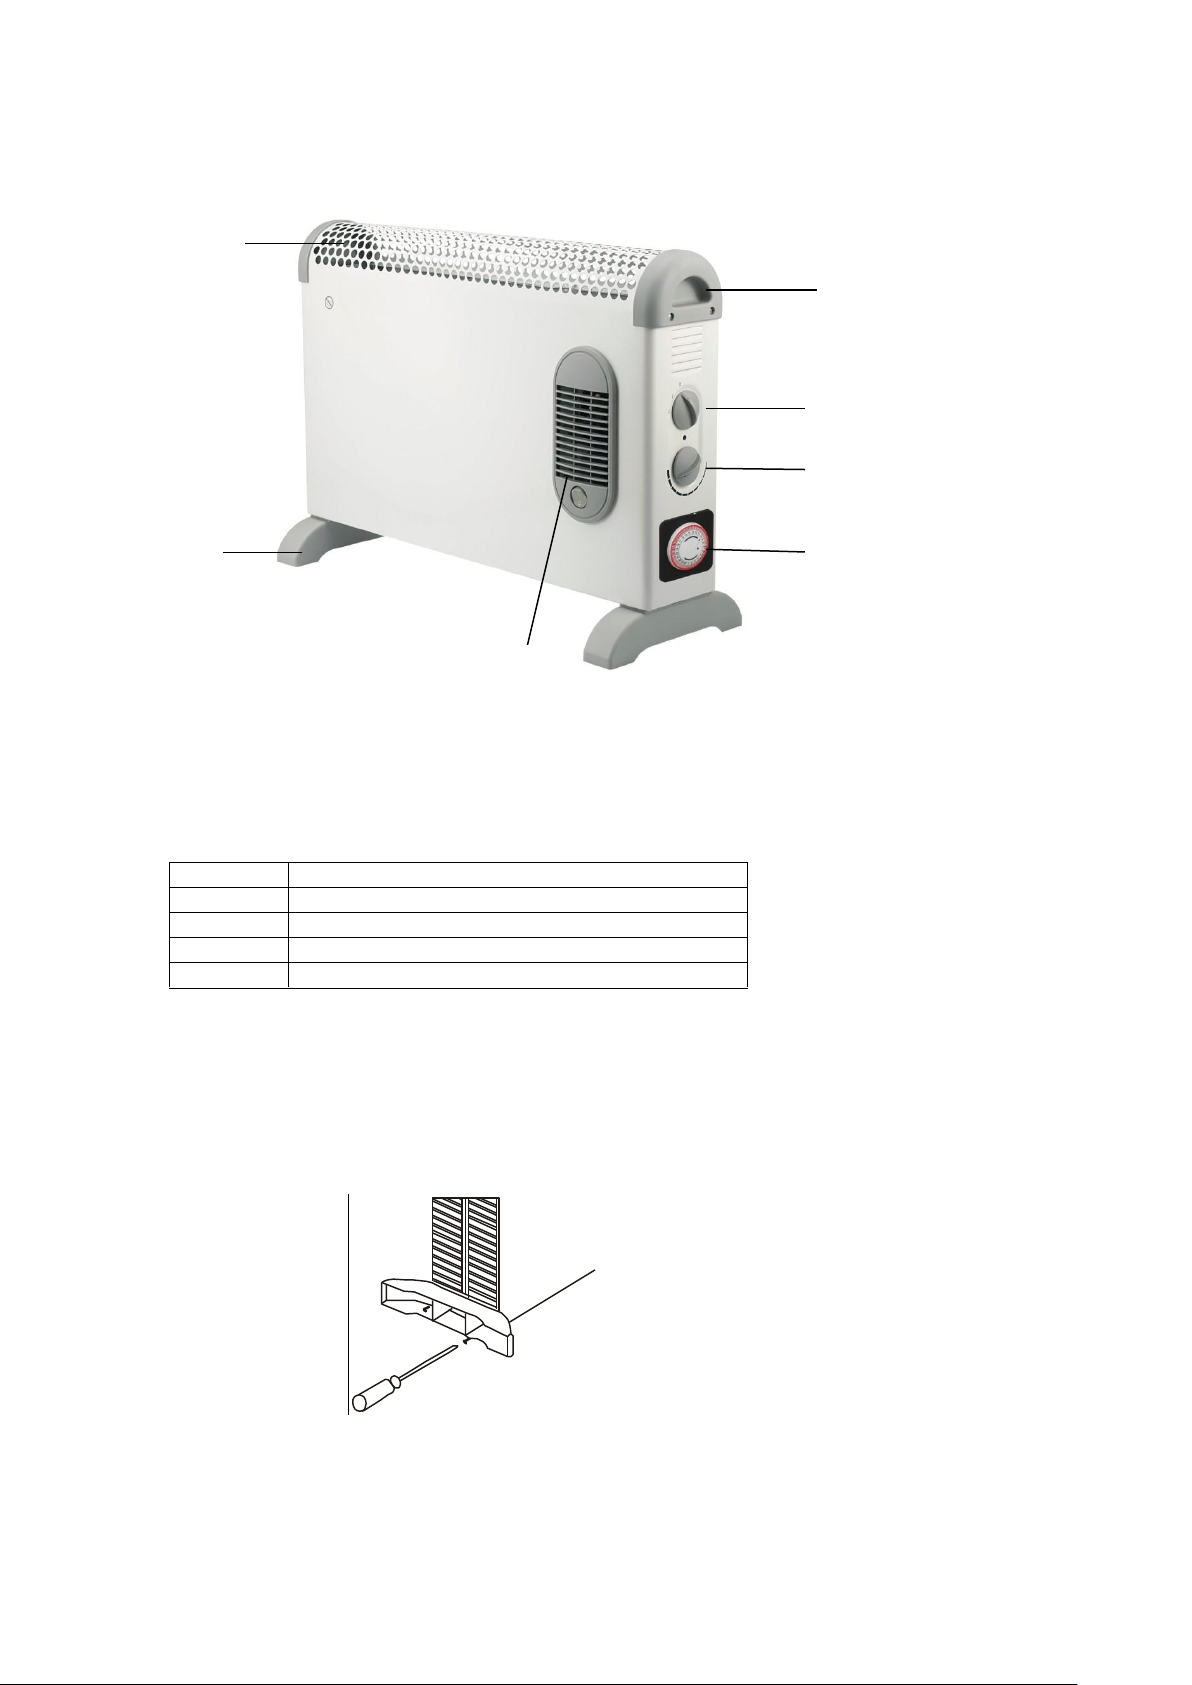
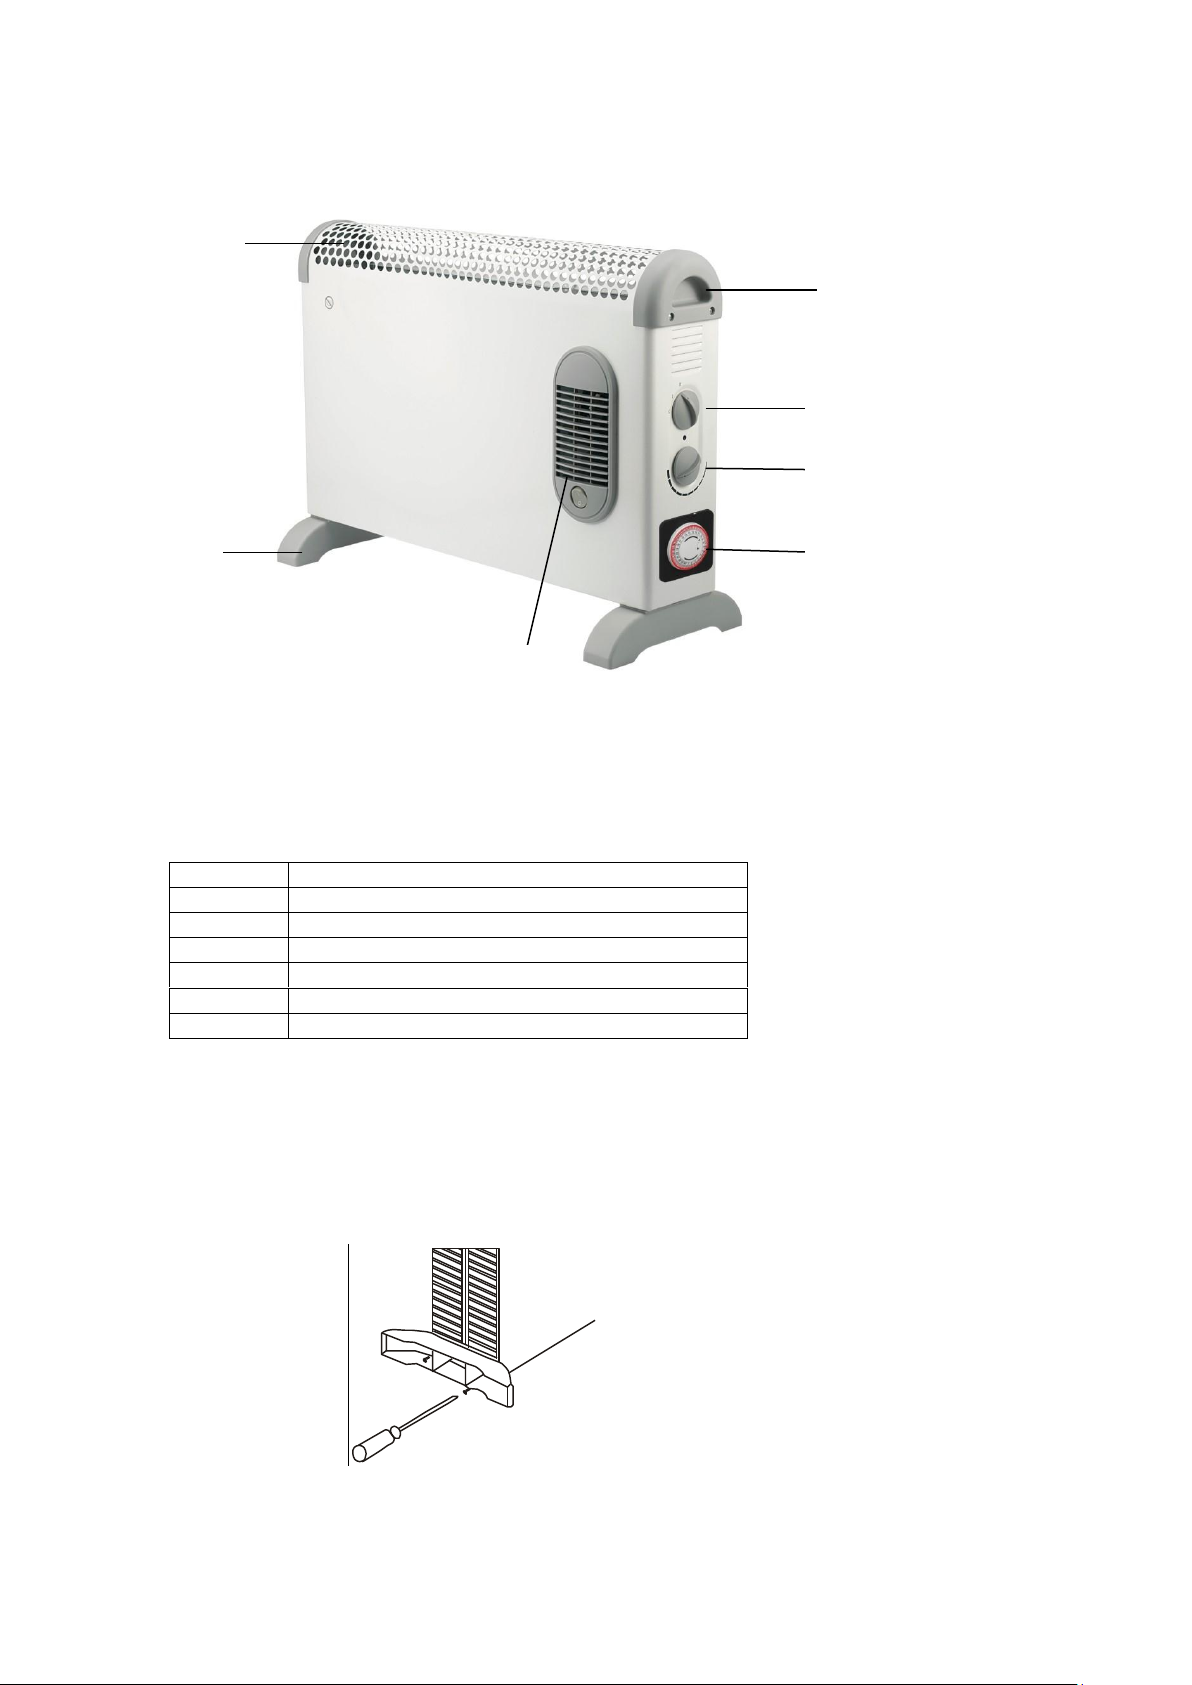
Denumirea părţilor componente (Fig. 1):
1
Grila de evacuare a aerului
2
Mâner
3
Comutator
4
Întrerupător de comandă a termostatului
5
Picior
Fig. 2
Fig. 1
1 2 3 4 5 7 6
MONTAJ:
220. PENTRU POZIŢIA “AŞEZAT PE PODEA”: (Fig. 2)
Ataşaţi cele două picioare de plastic, cu şuruburile livrate, la partea de jos a
aparatului.
Asigurați-vă că amplasaţi convectorul pe o suprafaţă plană.
Page 5
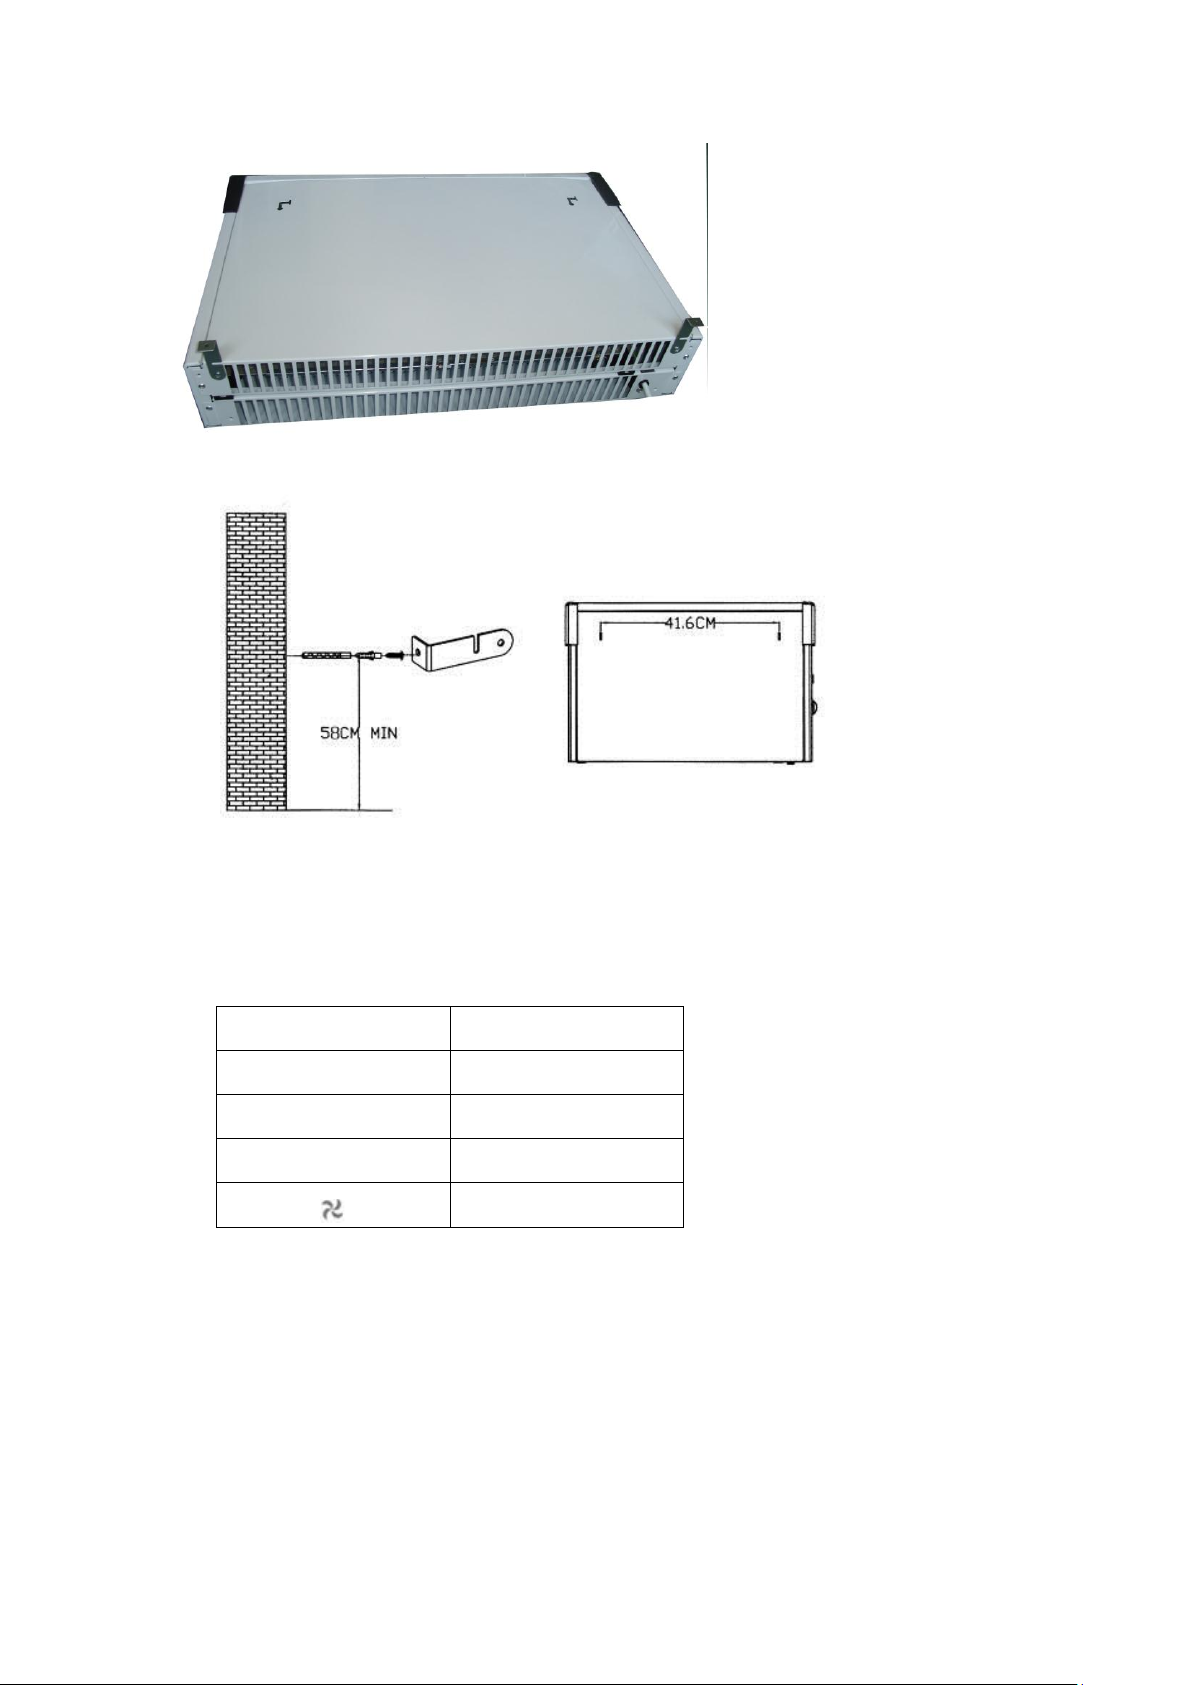
2. PENTRU MONTAREA PE PERETE:
Fig. 3
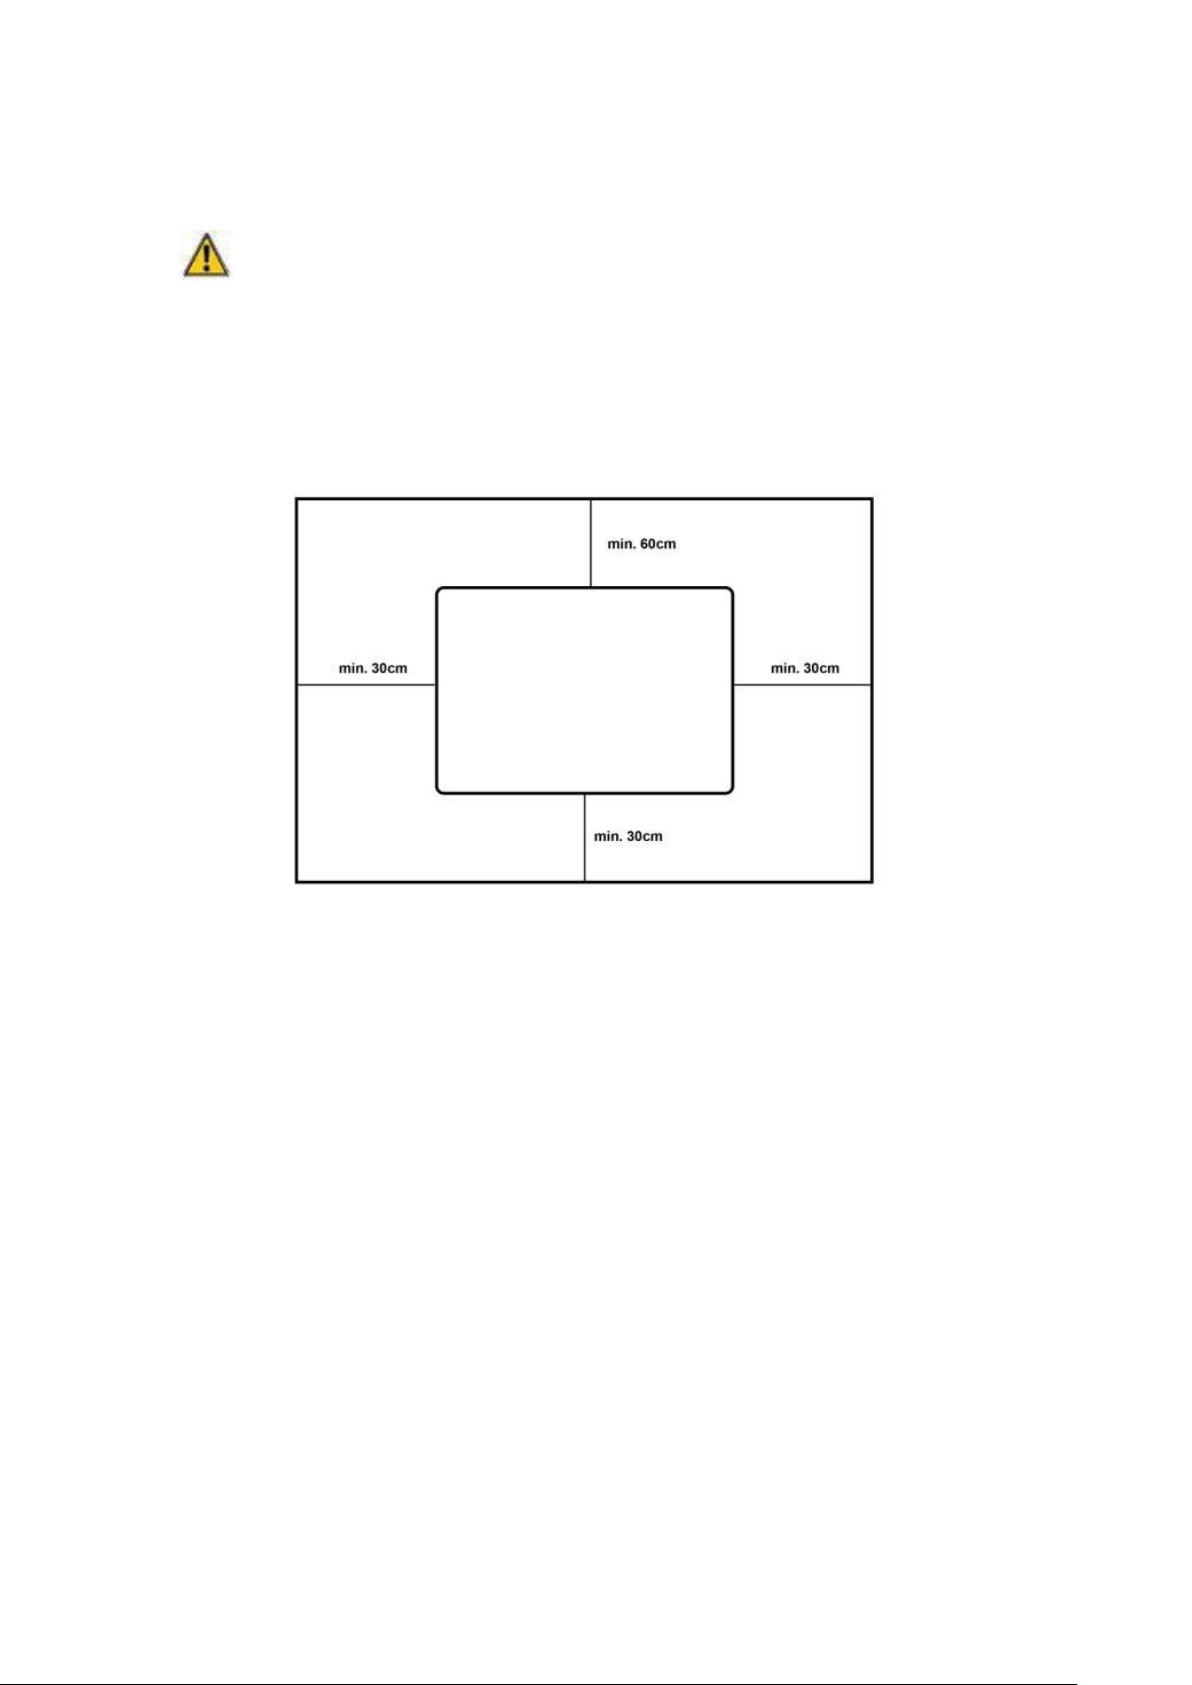
- Găsirea unui amplasament adecvat (Fig.3):
Dispozitivul trebuie instalat în aşa fel încât fluxul de aer să nu fie obstrucţionat.
1). Instalarea trebuie efectuată de un reprezentant al service-ului sau de persoane cu
calificare similară, pentru a evita orice pericol.
2). Respectaţi distanţele minime între dispozitiv şi pereţi, podea, mobilier etc. (cum este
inficat în Fig. 3)
- Instalarea şi fixarea dispozitivului: (Fig.4 – Fig.5)
1). Fixaţi cele două suporturi în partea de jos şi spate a unităţii. (Fig. 4)
2). Fixaţi pe perete cele două suporturi din partea de sus. (Fig. 5)
3). Executaţi cele două găuri din partea de jos şi introduceţi ancorarea din plastic.
4). Puneţi convectorul in console şi fixaţi cele două suporturi din partea de jos.
Atenţie:
Verificaţi de două ori distanţa de siguranţă dintre podea şi aparat.
Page 6
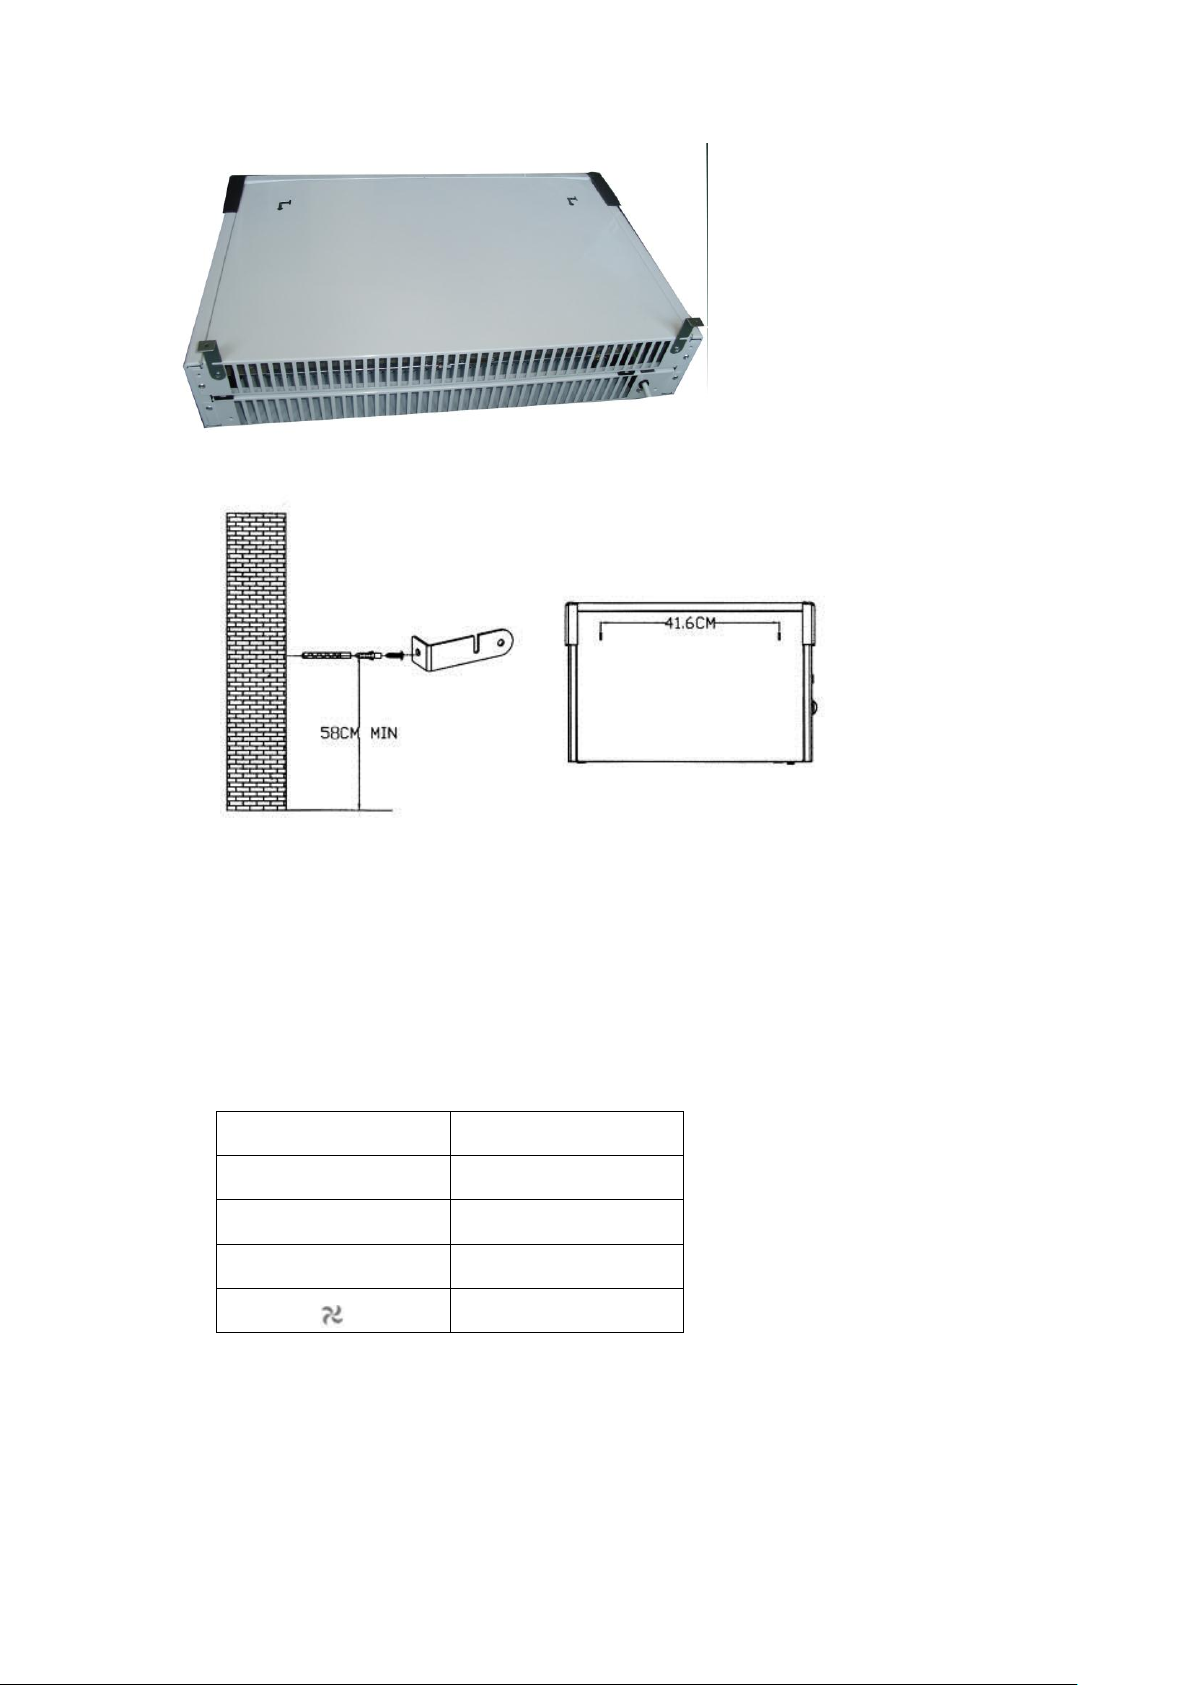
Fig. 4
Model
HCH-218-TF
0
Off(Stop)
I
900 W
II
1800 W
Turbo
Fig. 5
UTILIZARE:
Conectaţi aparatul la o priză cu contact de protecţie, respectiv cu conectare la pinul
de împământare.
Treceţi întrerupătorul pe poziţia de încălzire
Rotiţi butonul termostatului în sensul acelor de ceasornic, până la atingerea
temperaturii maxime.
Odată atinsă temperatura camerei, rotiţi încet butonul termostatului în sens antiorar,
până când auziţi un declic şi atunci radiatorul se va opri din funcţionare.
Page 7
Radiatorul se va reconecta şi deconecta automat pentru a menţine temperatura
camerei la valoarea pe care aţi setat-o.
Deconectaţi comutatoarele pentru a opri funcţionarea. Scoateţi apoi ştecărul din
priză.
TURBO
Rotiți comutatorul de pe panoul principal al radiatorului « », pentru funcția de
ventilator, în timp ce termostatul este pe poziția: “pornit”.
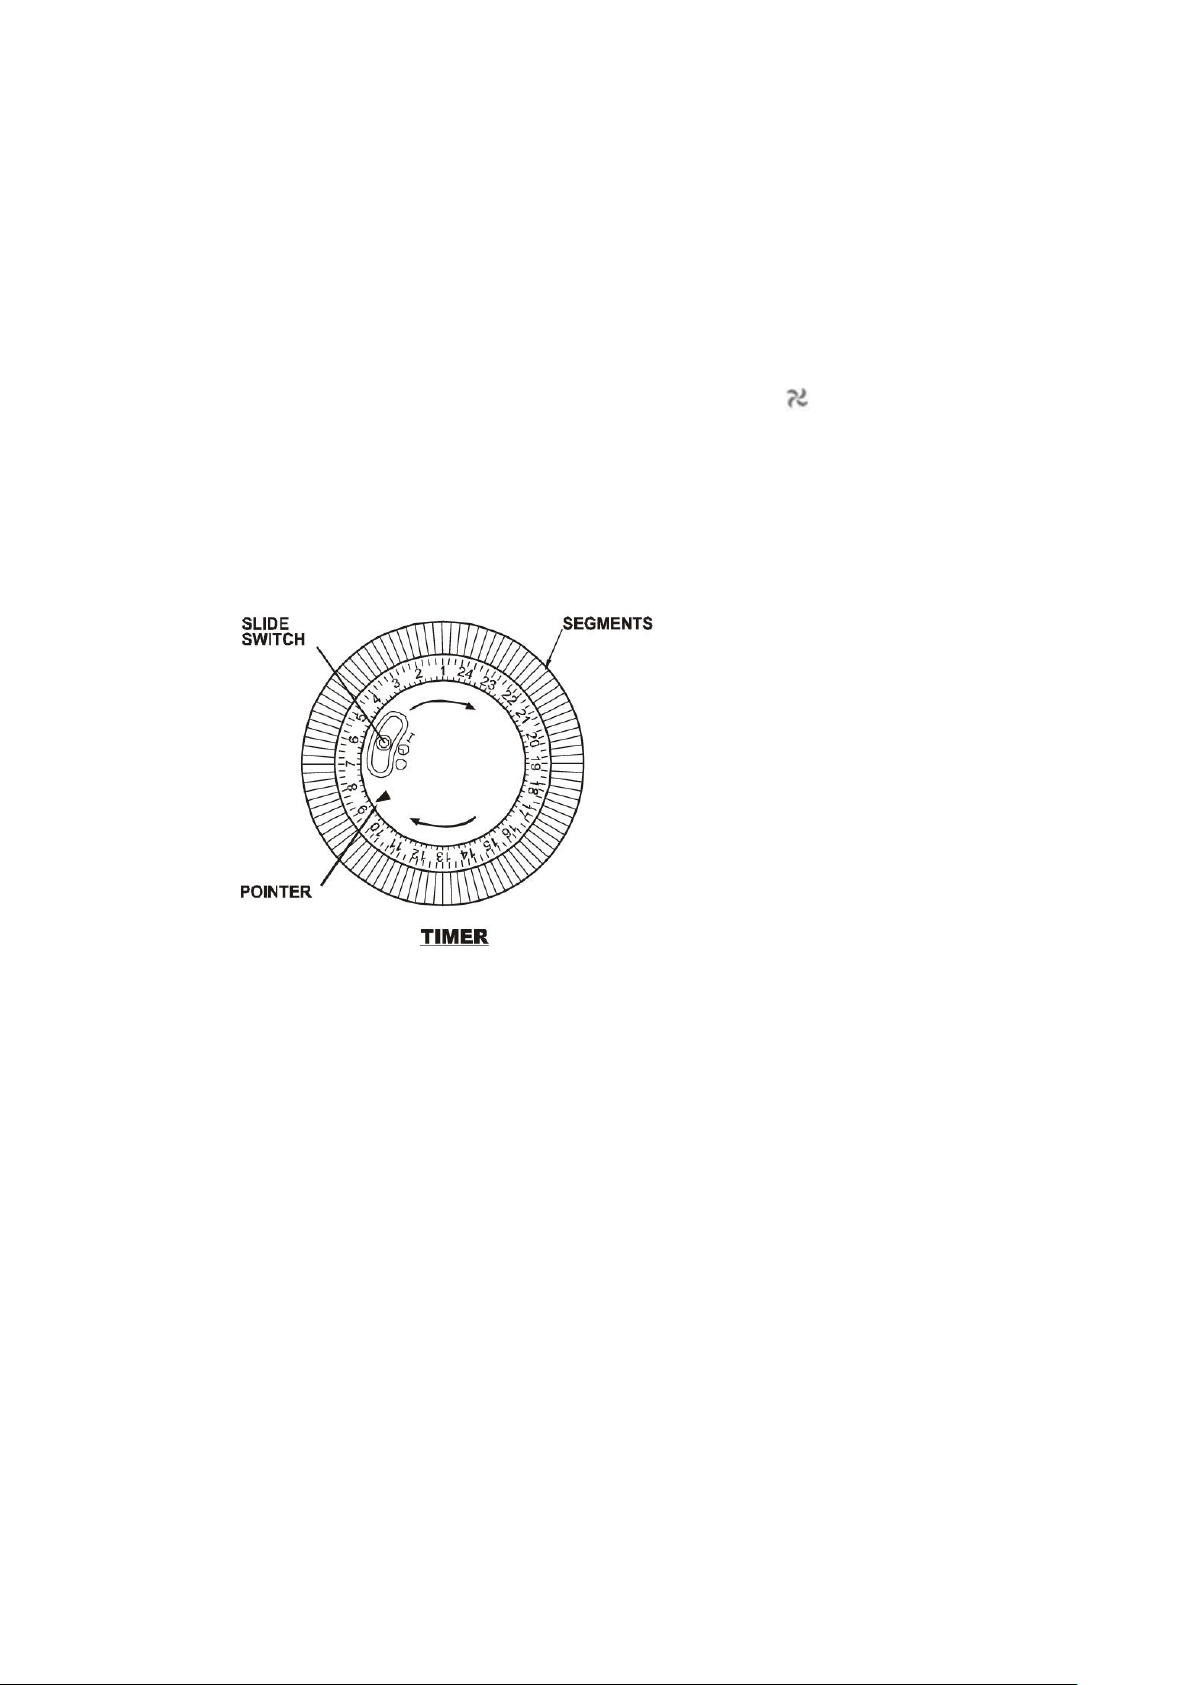
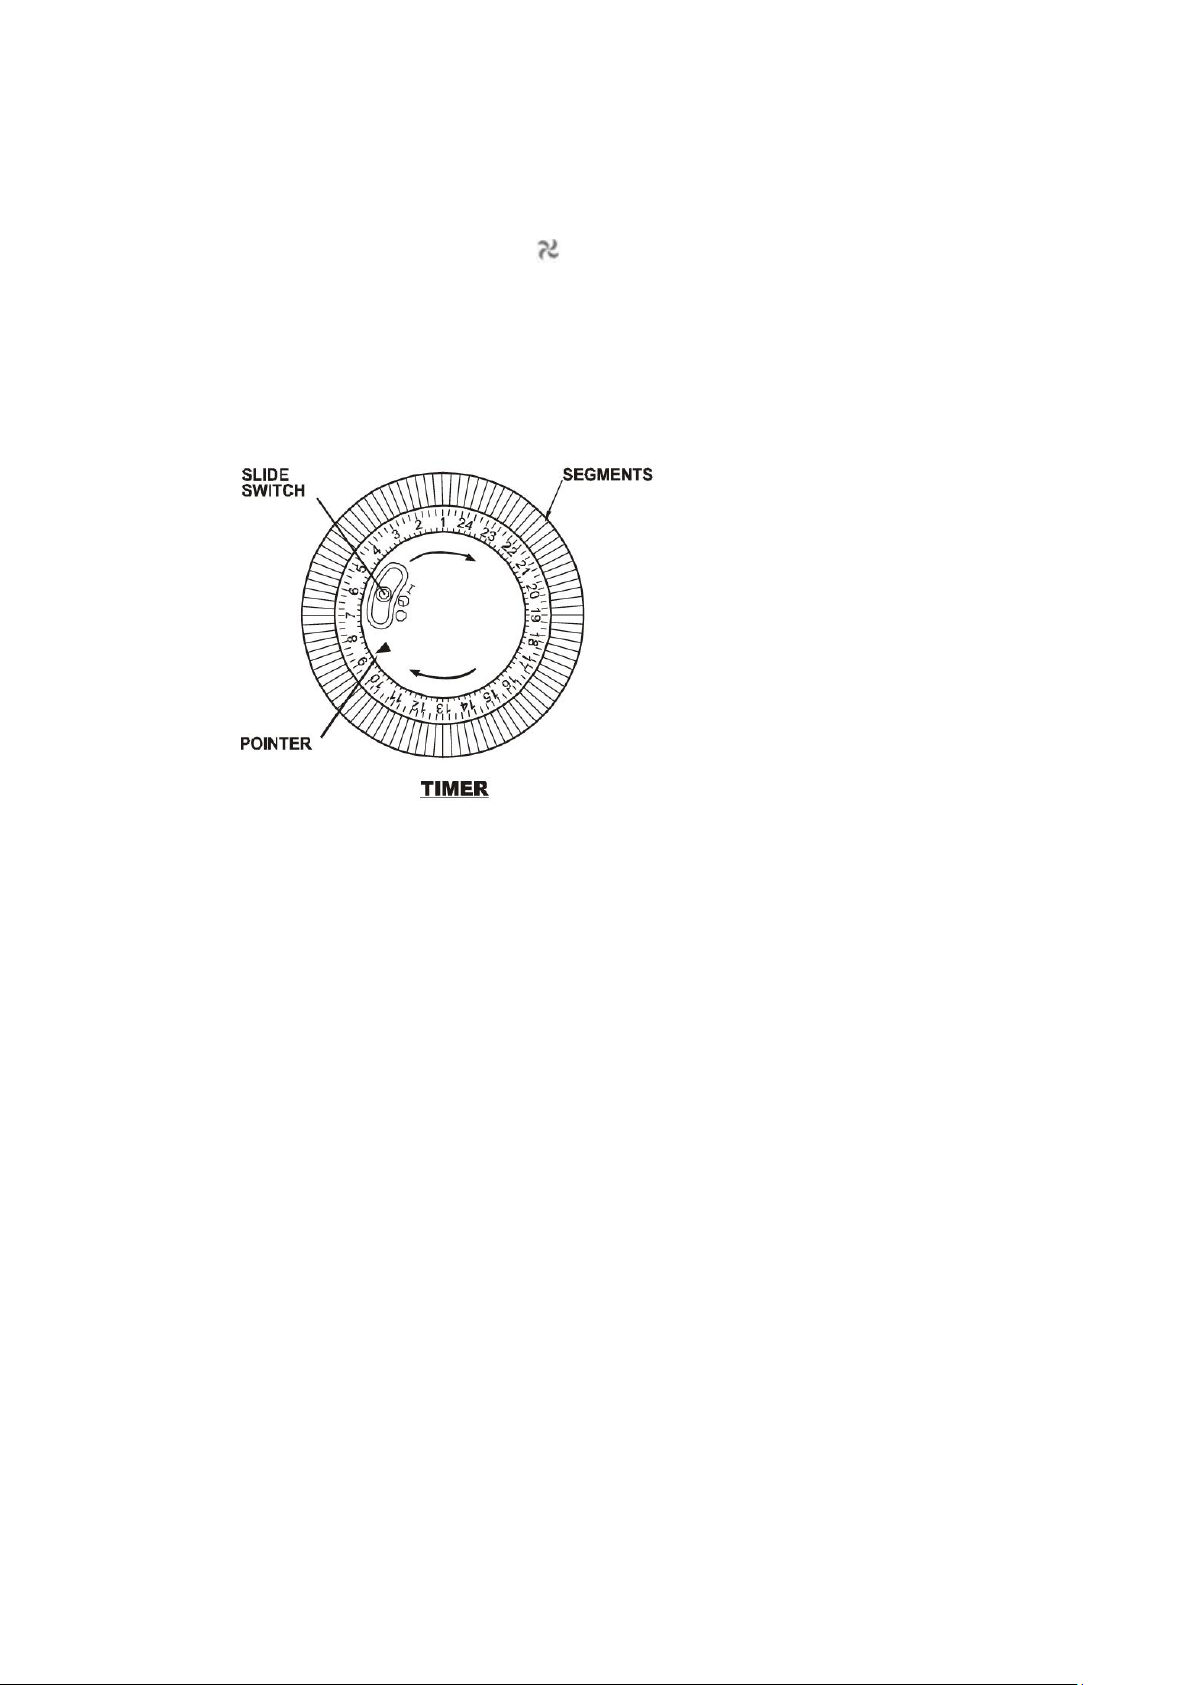
OPERARE TIMER (Fig. 6):
Fig.6
- Temporizatorul prezintă comutator, pentru 3 setări:
În poziția centrală, marcată cu simbolul ceasului, temporizatorul va porni și va opri
radiatorul la intervalele de timp setate (Vezi instrucțiunile de setare a temporizatorului,
de mai jos);
Poziția marcată cu “I”, reprezintă setarea de prioritate a timer-ului. În acest caz,
temporizatorul va continua să lucreze, dar energia electrică va fi oferită constant,
aceasta permițând ca radiatorul să funcționeze în tot intervalul de timp solicitat;
În poziția indicată de “0“, timer-ul twill să funcționeze, dar radiatorul nu primește
energie electrică.
- Setarea temporizatorului
Asigurați-vă de comutatorul temporizatorului să fie în poziția centrală, în dreptul
simbolului cu ceas.
Rotiți inelul exterior al temporizatorului în sensul acelor de ceasornic, până când
ajungeți cu valoarea timpului dorit în dreptul indicatorului de pe timer. Spre exemplu:
dacă doriți să setați timer-ul pentru ora 8p.m., rotiți inelul exterior până când ajungeți cu
cifra 20 în dreptul indicatorului (pointer)
Page 8

Setarea completă a radiatorului presupune fixarea segmentelor din jurul inelului
exterior al timer-ului, în conformitate cu necesitatea perioadei de funcționare;
După setare, radiatorul va funcționa în fiecare zi conform timpilor programați;
Dacă este necesar ca radiatorul să funcționeze continuu, comutatorul timerului trebuie
setat în poziția “I”;
Dacă intervine necesitatea resetării temporizatorului, comutatorul timerului trebuie
readus în poziție centrală.
ECHIPAMENT DE SIGURANŢĂ CONTRA SUPRAÎNCĂLZIRII
Aparatul Dumneavoastră de încălzit dispune de un echipament de siguranţă, care
deconectează încălzirea, în cazul în care apare fenomenul de supraîncălzire. Dacă
aparatul se opreşte, deconectaţi-l de la reţea, lăsați-l să se răcească complet, apoi
verificaţi gurile de intrare şi expulzare ale aerului, pentru a observa dacă nu cumva s-au
înfundat, așteptând să reporniti radiatorul.
Dacă aparatul de încălzit nu funcţionează nici în continuare sau sistemul de
twill ve deconectează din nou radiatorul, duceţi aparatul la cel mai apropiat service de
specialitate pentru verificare sau twill ve.
ÎNTREŢINERE:
1. Deconectaţi întotdeauna aparatul şi lăsaţi-l să se răcească complet înainte de a
efectua orice operaţiune de întreţinere.
2. Folosiţi un aspirator pentru a elimina praful de pe grătare.
3. Curăţaţi exteriorul unităţii cu o cârpă umedă şi apoi uscaţi-l ştergând cu o cârpă
uscată. Nu cufundaţi niciodată unitatea în apă, şi nici nu lăsaţi să picure apă în ea.
DEPOZITARE:
1. Deconectaţi întotdeauna aparatul, lăsaţi-l să se răcească complet şi curăţaţi-l, înainte
de a-l depozita.
2. Dacă nu folosiţi aparatul o perioadă mare de timp, puneţi-l, împreună cu manualul de
instrucţiuni, în cutia originală de ambalare şi depozitaţi-o într-un loc uscat şi ventilat.
3. Pe durata depozitării, nu plasaţi obiecte grele pe partea de sus a cutiei deoarece
aceasta ar putea deteriora aparatul.
Poti ajuta la protejarea mediului!
Va rugam sa respectati regulamentele si legile locale: duceti echipamentele electrice
nefunctionale catre un centru de colectare al echipamentelor electrice uzate.
Importator: Asesoft Distribution
Europolis Logistic Park, Italia Street, 1-7, Chaijna, Ilfov, Romania
Tel: +4021 256 00 86, www.heinner.ro , www.asesoftdistribution.ro
Page 9
Instruction manual
CONVECTOR HEATER
Model : HCH-218-TF
Please read this instruction manual carefully before using the appliance
Voltage : 220-240V~50Hz
Power: 1800W
Page 10

GENERAL SAFETY WARNINGS :
1. Read all instructions carefully before using.
2. Make sure the voltage is the same as that indicated on the rating plate of the appliance.
3. Do not operate this appliance if the cable or plug becomes damaged.
4. Keep the appliance and cable away from sources of heat, sharp objects or anything that
may cause damage.
5. If the twill damaged, it must be replaced by the manufacturer, its service agent or
similarly qualified persons in order to avoid a hazard.
6. Ensure the appliance is switched off before connecting to the mains power supply.
7. Switch off the power supply and disconnect from mains supply when not in use, before
cleaning or other maintenance.
8. To disconnect the appliance, switch it “OFF”, and then remove the plug from outlet. Do
not pull the cord to disconnect the plug.
9. The heater must not be located immediately below a socket-outlet.
10. Do not operate in areas where gasoline, paint or other flammable liquids are used or
stored.
11. Indoor use only.
12. In order to avoid overheating, do not cover the heater.
13. To prevent a possible fire, do not block air intakes or exhaust in any manner.
14. Don’t touch the hot surfaces.
15. Do not insert or allow foreign objects to enter any ventilation or exhaust opening, as
this may cause an electric shock, fire or damage to the appliance.
16. Always ensure that hands are dry before operating or adjusting any switch on the
product or touching the plug and socket-outlet.
17. This appliance is not intended for use by persons (including children) with reduced
physical, sensory or mental capabilities, or lack of experience and knowledge, unless they
have been given supervision or instruction concerning use of the appliance by a person
responsible for their safety.
18. Children should be supervised to ensure that they do not play with the appliance.
19. Do not leave this appliance unattended when it’s in use.
20. The most common cause of overheating is deposits of dust or fluff in the appliance.
Ensure these deposits are removed regularly by disconnect the appliance and vacuum
cleaning air vents and grilles.
21. Do not place the heater on carpet, don’t place the cable under carpets. Arrange cord
away from traffic areas so that twill not be tripped over.
22. Do not use this heater in the immediate surroundings of a bath, a shower or a
Page 11
swimming pool.
Model
HCH-218-TF
Rated Voltage
220 – 240 V ~
Rated Frequency
50/60 Hz
Rated Power
1800W
Protective Class
I
IP Code
IP20
Noise level
<60dB
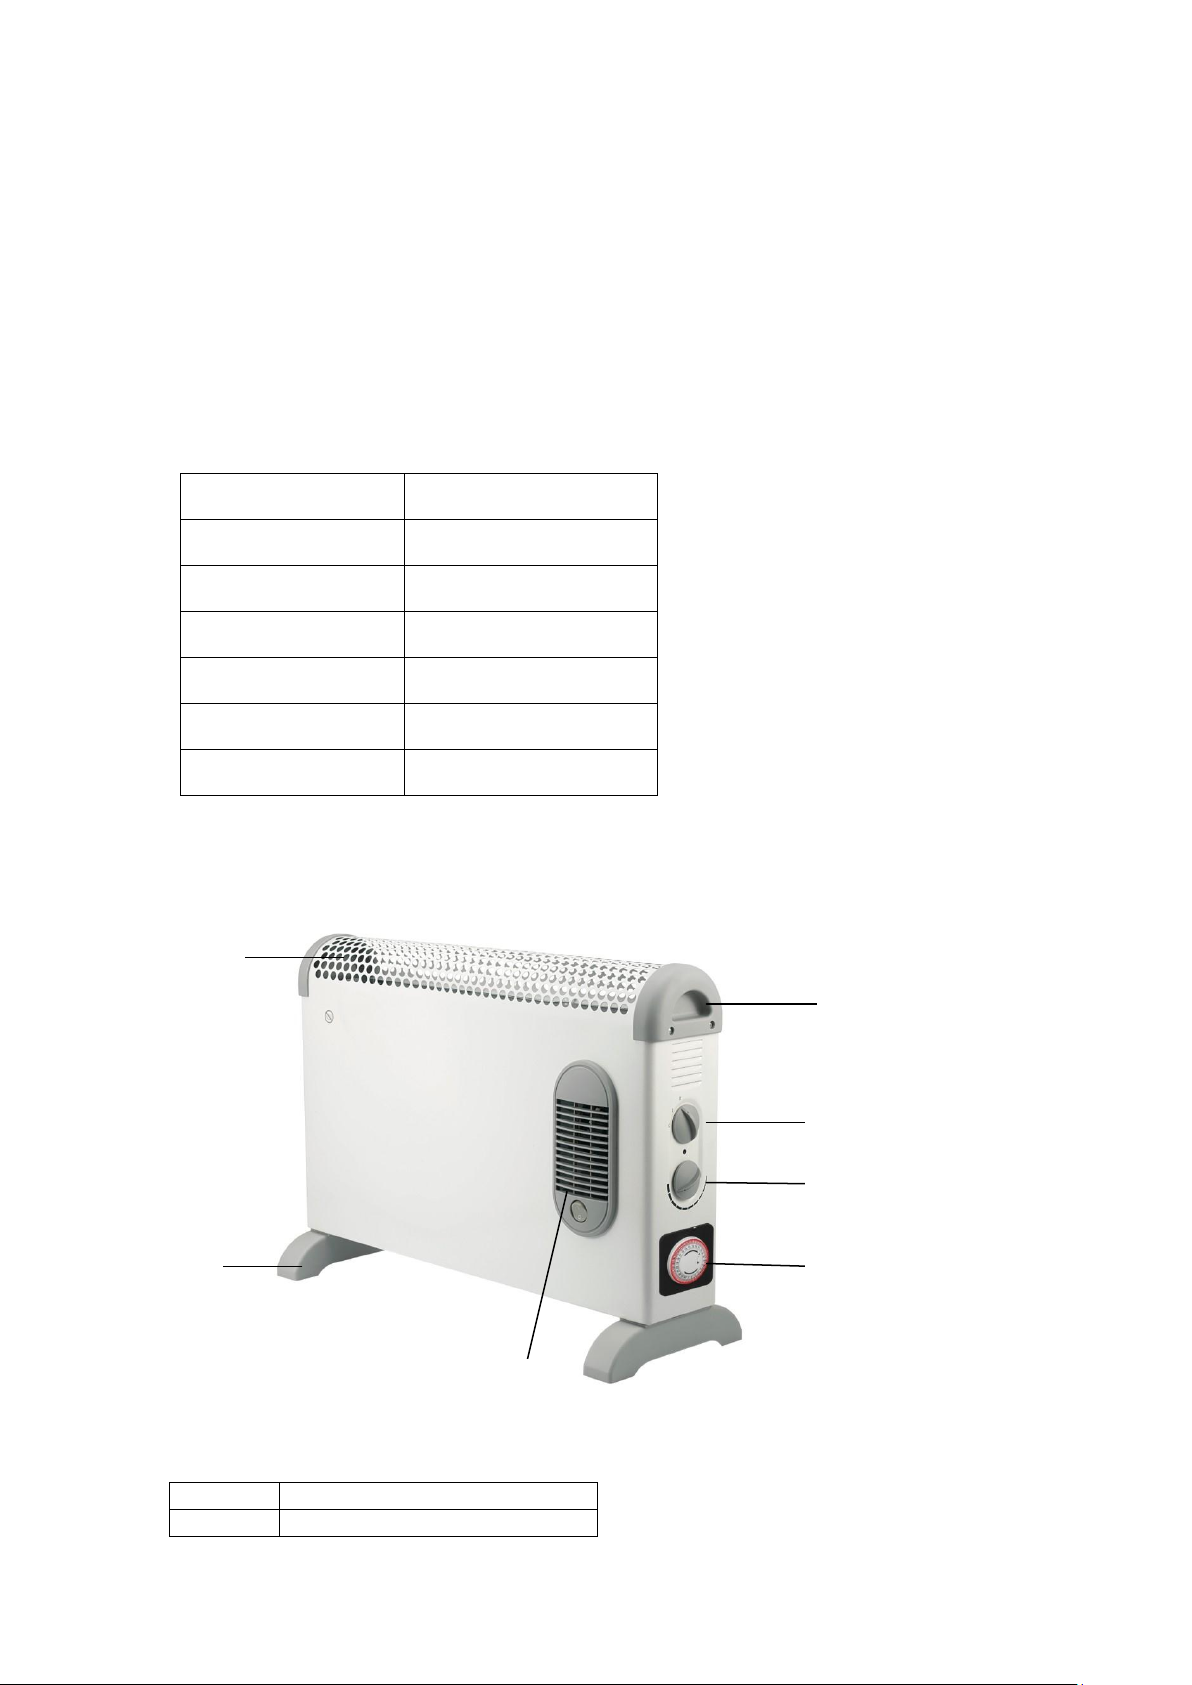
1
Air outlet
2
Handle
Fig. 1
1 2 3
4
5 7 6
23. Do not store away until the heater cools down, store the heater in cool dry location
when not in use.
24. CAUTION : In order to avoid a hazard due to inadvertent resetting of the thermal
cutout, this appliance must not be supplied through an external switching device, such as
a timer, or connected to a circuit that is regularly switched on and off by the utility.
TECHNICAL SPECIFICATIONS:
List of Main Parts (Fig. 1):
Page 12
3
Power Switch
4
Thermostat
5
Timer
6
Turbo
7
Foot
Fig. 2
ASSEMBLY:
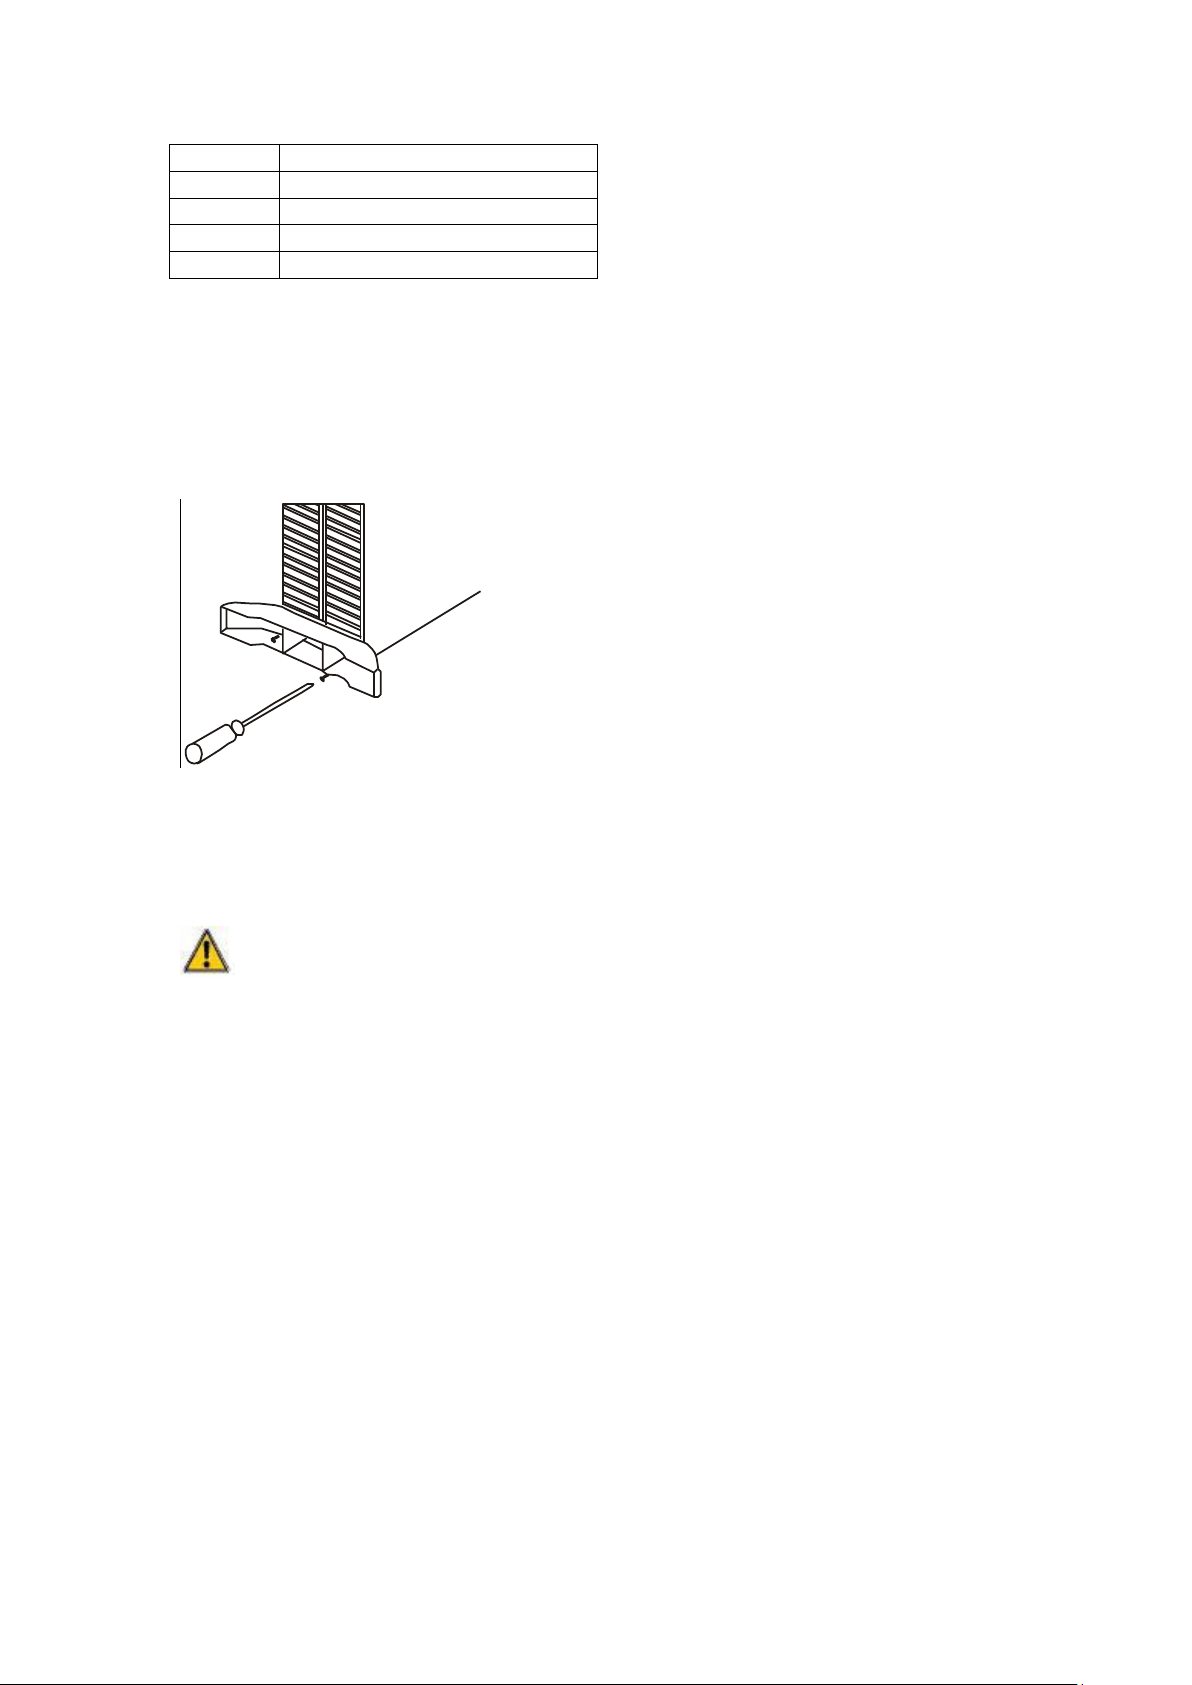
1. FOR FREE STANDING: (Fig. 2)
Attach the two plastic feet to the bottom of the appliance with the delivered screws.
Be sure to place the convection heater on a flat surface.
2. FOR WALL MOUNTING:
- Finding a suitable location (Fig.3):
The device must be installed so that airflow is not obstructed.
1). The installation must be done by the service agent or similarly qualified persons in
order to avoid a hazard.
2). Respect the minimal distances between the device and the walls, the ground, the
ceiling etc. (as requested in Fig 3)
Page 13
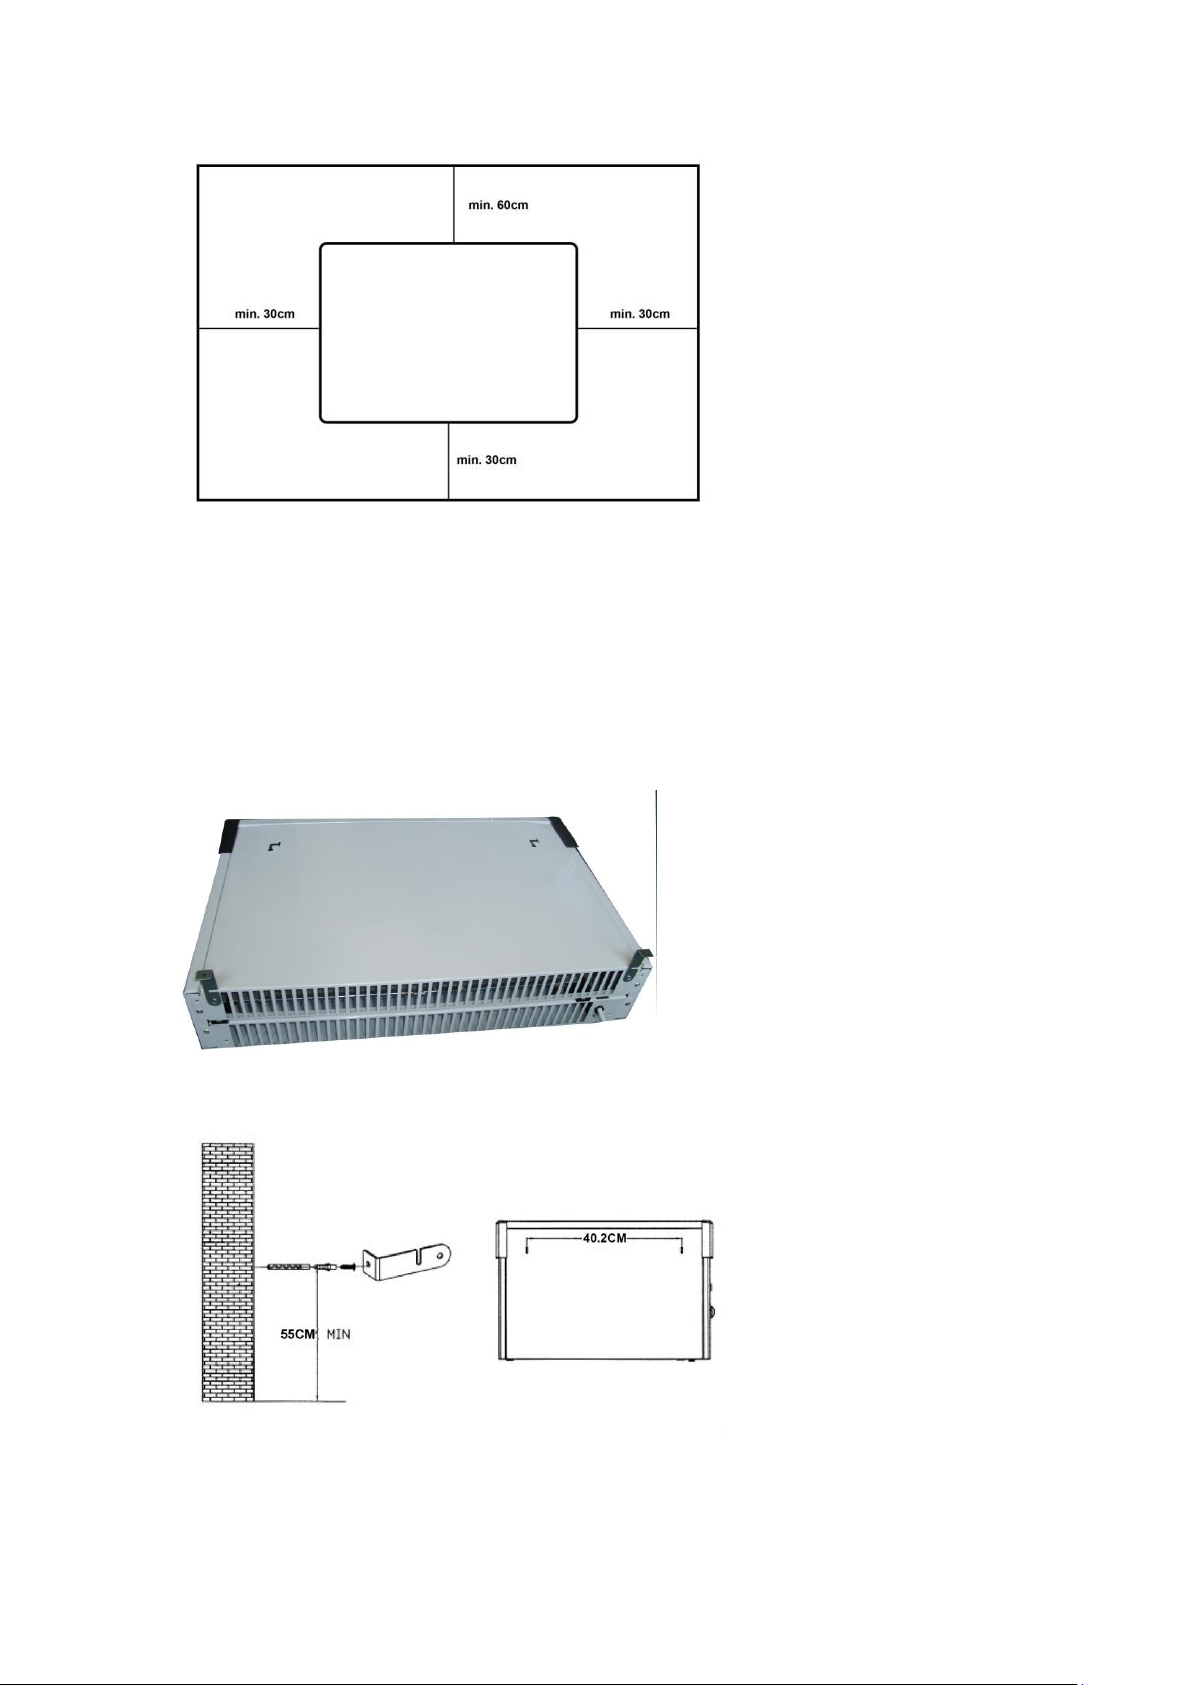
Fig. 3
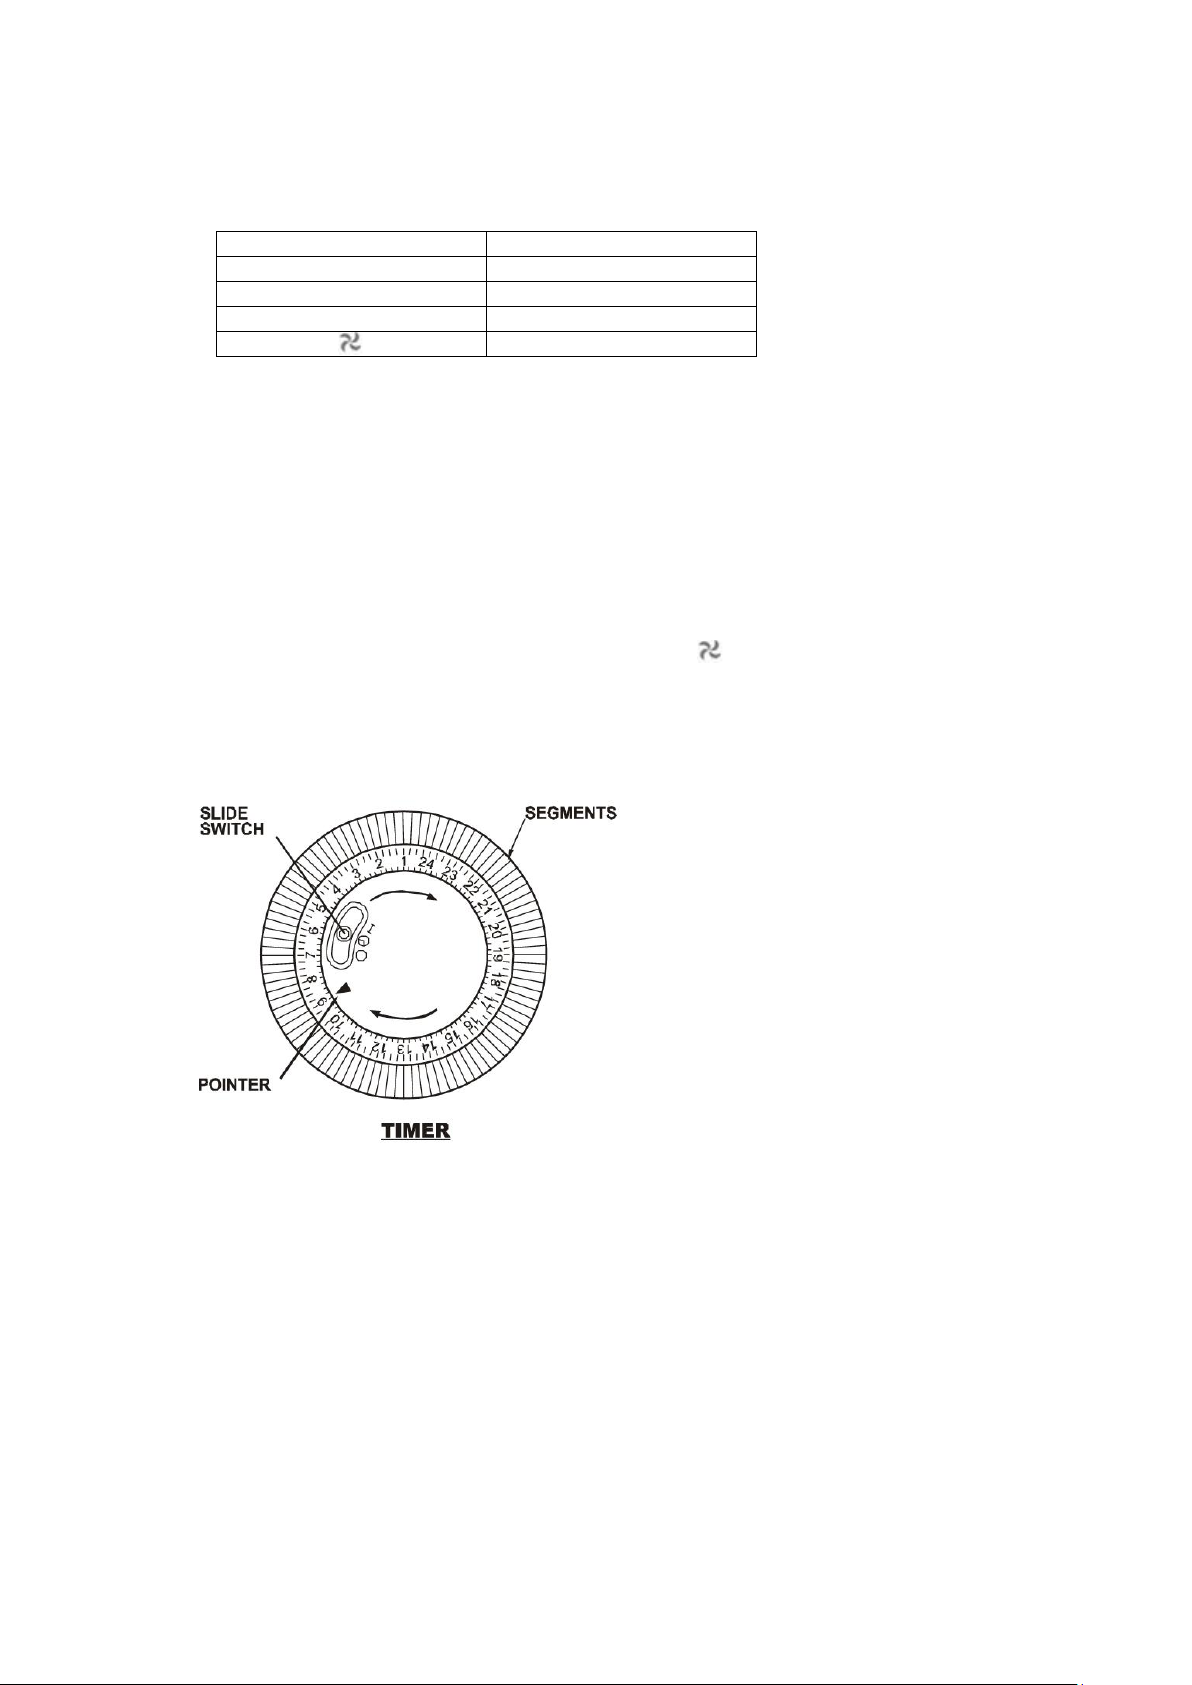
- Installing and fixing the device: (Fig.4 – Fig.5)
1). Fix the two brackets to the bottom and rear of the unit (Fig. 4)
2). Fix the two brackets on the wall (Fig. 5).
3). Drill the two bottom holes on the wall and insert the plastic anchorage.
4). Hang the convector to the brackets and fix the two bottom brackets.
Caution:
Double check the safe distance between the floor and the appliance.
Fig. 4
Fig. 5
UTILIZATION:
Page 14
Connect the appliance to safety socket (with earth pin connection).
Model
HCH-218-TF
0
Off(Stop)
I
900 W
II
1800 W
Turbo
Turn on switch to the heating position.
Turn the thermostat knob in the direction of clockwise until reaching the maximum
temperature.
Once the room temperature is reached, slowly turn the thermostat knob in the
direction of anticlockwise until you hear a click and then the heater will stop working.
The heater will turn on and off automatically to maintain the room temperature you
have set.
Turn off the switches to stop working. Unplug the appliance then after.
TURBO
Turn on the switch on the front face of the heater « » for fan function when the
thermostat is on working position.
TIMER OPERATION (FIG 6) :
- The centre of the timer has 3 position slide switch.
In the centre position (denoted by the clock symbol) the timer will switch the heater
The position denoted by the “I” is a timer override postion, the timer will continue to
In the postion denoted by the “0”, the timer continues to run but no power is
- Setting the timer:
Ensure the slide switch on the timer is at the mid position next to the clock symobl.
Rotate the outer ring of the timer in a clockwise direction until the current time is
on and off at times set by the segments. (See setting the timer below)
run but power will be supplied continuously to the heater, this enable the heater to
be on all the time if required.
supplied to heater.
Page 15
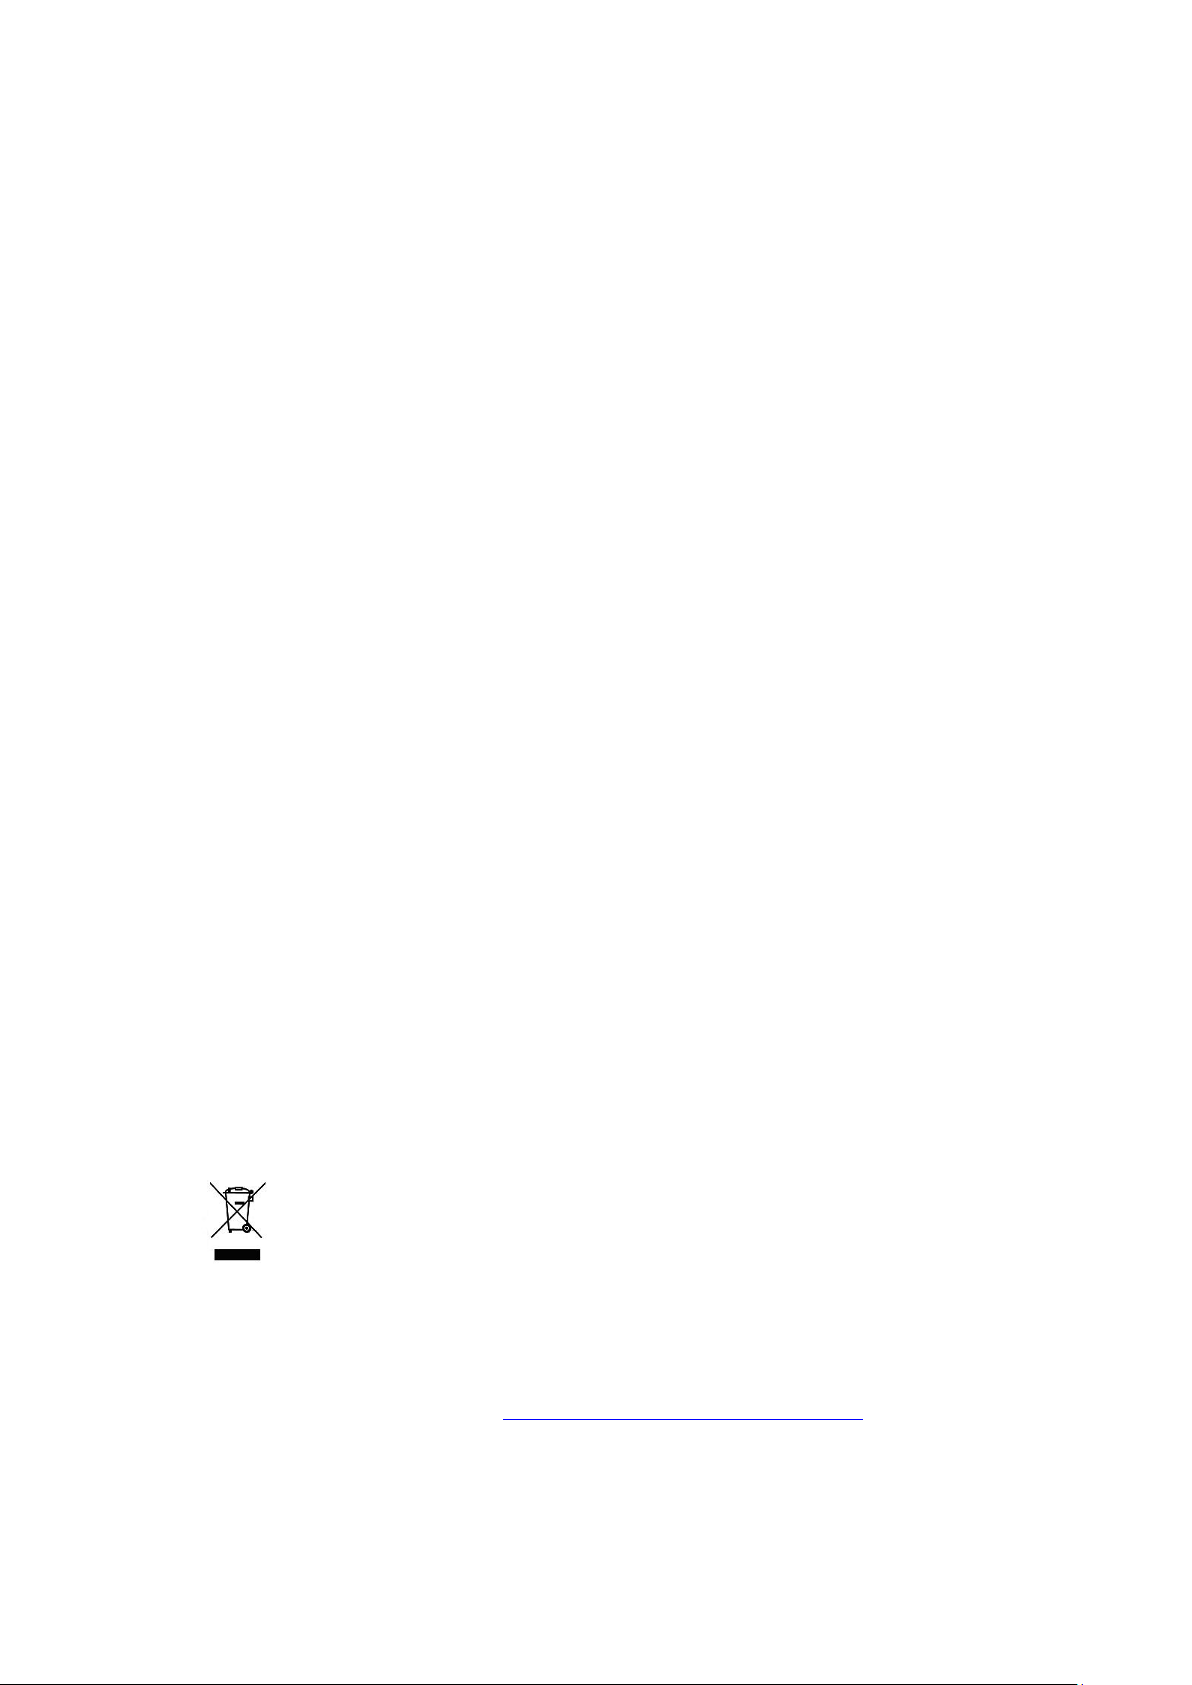
lined up with the arrow pointer, i.e. if setting the timer at 8 p.m, rotate the outer ring
until the number 20 is in line with the arrow pointer.
Set the time the heater is required to run by pulling the segments around the outer
ring forward appropriate to the running period required.
When set, the heater will operate each day during the times programmed.
If the heater is required to run continuously, the slide switch on the timer should be
set to the “I” position.
If it is subsequently required to revert back to timer operation, the slide switch on
the timer should be set to the central position.
Note: When using the timer mode, duely consideration should be given to the fact that the
heater may come on whilst unattended.
OVERHEAT SAFETY DEVICE:
Your heater is fitted with a safety device to switches off the heater in the event of
overheating. If the safety device operated, please turn the heater off, unplug the appliance
and let it completely cool, inspect for blockage of air inlet or outlet, attempting to restart
the heater then after.
If the heater fails to operate or the safety device switches the heater off again, return
heater to your nearest service center for examination or repair.
MAINTENANCE:
1. Always disconnect the appliance and let it completely cool before any maintenance.
2. Use a vacuum cleaner to remove dust on grilles.
3. Clean the outside of the unit with a damp cloth and then dry it with a dry cloth. Never
immerse the unit in water, nor let water drip into the unit.
STORING:
1. Always disconnect the appliance, let it completely cool and clean it before storing.
2. If you do not use the device for a long period, put back the unit and the instruction
manual to the original carton and store in a dry and ventilated place.
3. Do not place any heavy items on top of carton during storing as this may damage the
appliance.
Environment friendly disposal
You can help protect the environment!
Please remember to respect the local regulations: hand in the non-working electrical
equipment’s to an appropriate waste disposal center.
Importer: Asesoft Distribution
Europolis Logistic Park, Italia Street, 1-7, Chaijna, Ilfov, Romania
Tel: +4021 256 00 86, www.heinner.com, www.asesoftdistribution.ro
Page 16
Инструкции за употреба
КОНВЕКТОРЕН РАДИАТОР
Модел: HCH-218-TF
Прочетете внимателно инструкциите преди употреба на уреда
Захранване: 220-240V~50Hz
Мощност: 1800W
Page 17

ОСНОВНИ УКАЗАНИЯ ЗА БЕЗОПАСНОСТ:
1. Преди употреба прочетете внимателно всички инструкции.
2. Моля, преди употреба винаги проверявайте напрежението на ел. система!
Напрежението трябва да съответства с посоченото на етикета на продукта.
3. Не пускайте в действие уреда, ако кабела или щекера са повредени.
4. Пазете уреда и кабела далеч от узточници на топлина, остри предмети или нещо
друго, което може да повреди уреда.
5. За да избегнете потенциалните опасности, повреденият кабел трябва да бъде
сменян само от производителя, от представител на ауторизираният сервиз или
подобни квалифицирани лица.
6. Преди свързването в електрическата система, моля, уверете се че уреда е
изключен (позиция OFF).
7. Когато уреда не се използва, преди почистване или смяна на аксесоарите,
изключете го и извадете щекера от контакта.
8. За да изключите уреда завъртете бутона на позиция “OFF”, след което извадете
щекера от контакта. Не дърпайте кабела, защото това може да повреди уреда.
9. Не поставяйте радиатора директно под контакти.
10. Не оставяйте радиатора да работи на места където се използва или се
съхранява бензн, бои или други леснозапалими течности.
11. Само за употреба в затворени помещения.
12. За да избегнете риска от прегряване не покривайте радиатора.
13. За да избегнете евентуален пожар, не трябва да блокирате по никакъв начин
въздушните отвори.
14. Не докосвайте горещите повърхности.
15. Не позволявайте да влизат чужди тела в отворите на вентилацията, защото това
може да причини токов удар, пожар или повреди на уреда.
16. Уверете се, че ръцете ви са сухи, преди да пуснете уреда или да регулирате
някой прекъсвач на уреда, или преди да докоснете щекера и връзките към
електрическата мрежа.
17. Този уред не може да бъде използван от лица с намалени физически или
умствени способности (както и деца) или от лица, които нямат достатъчно
познанства относно уреда, с узключение на случаите, в които отговорното лице се
ангажира да ги обучи и наблюдава.
18. Децата трябва да бъдат наблюдавани, за да сте сигурни че не си играят с уреда.
19. Не оставяйте уреда без наблюдение, когато е включен в електрическата мрежа.
20. Най-разпространената причина за пренагряването на радиатора е прахта, която
Page 18
се натрупва в нея. Уверете се, че тези натрупвания се почистват редовно, след като
Модел
HCH-320
Захранващо
напрежение
220-240 V ~
Честота на
мрежата
50/60 Hz
Разход на
енергия
1800W
Клас на защита
I
Степен на защита
IP20
Ниво на шума
<60dB
изключите от контакта, проветрете/аспирирайте въздушните отвори.
21. Не поставяйте радиаторa на килими, не поставяйте кабела под килими.
Поставете кабела извън общите части, така че никой да не се препъне в него.
22. Никога не използвайте радиатора на места, на които може да влезе в допир с
вода, като например баня, душ кабини, кухни.
23. Не прибирайте радиатора на съхранение докато не е изстинала напълно.
Съхранявайте на съхо и проветриви място.
24. ВНИМАНИЕ: Трябва да избягвате свързването на уреда с ел. мрежа в
неподходящи часове. Поради тази причина не е позволено да се използва
радиатора с външни превключватели, като например контакт с часовник. Също така
не е позволено да свързвате уреда с ел. верига, която се изключва периодично.
ТЕХНИЧЕСКИ ХАРАКТЕРИСТИКИ:
Page 19
Наименование на съставните части (Fig. 1):
1
Въздушен отвор
2
Дръжка
3
Превключвател
4
Контролен прекъсвач на терморегулатора
5
Таймер
6
Вентилатор
7
Краче на вентилатора
Fig. 2
Fig. 1
1 2 3 4 5 7 6
МОНТАЖ:
1. ЗА ПОЗИЦИЯ “ПОСТАВЕН НА ПОДА” (Fig. 2)
Прикачете с винтовете двете пластмасови крачета за долната част на уреда.
Уверете се, че сте поставили радиатора върху плоска повърхност.
Page 20
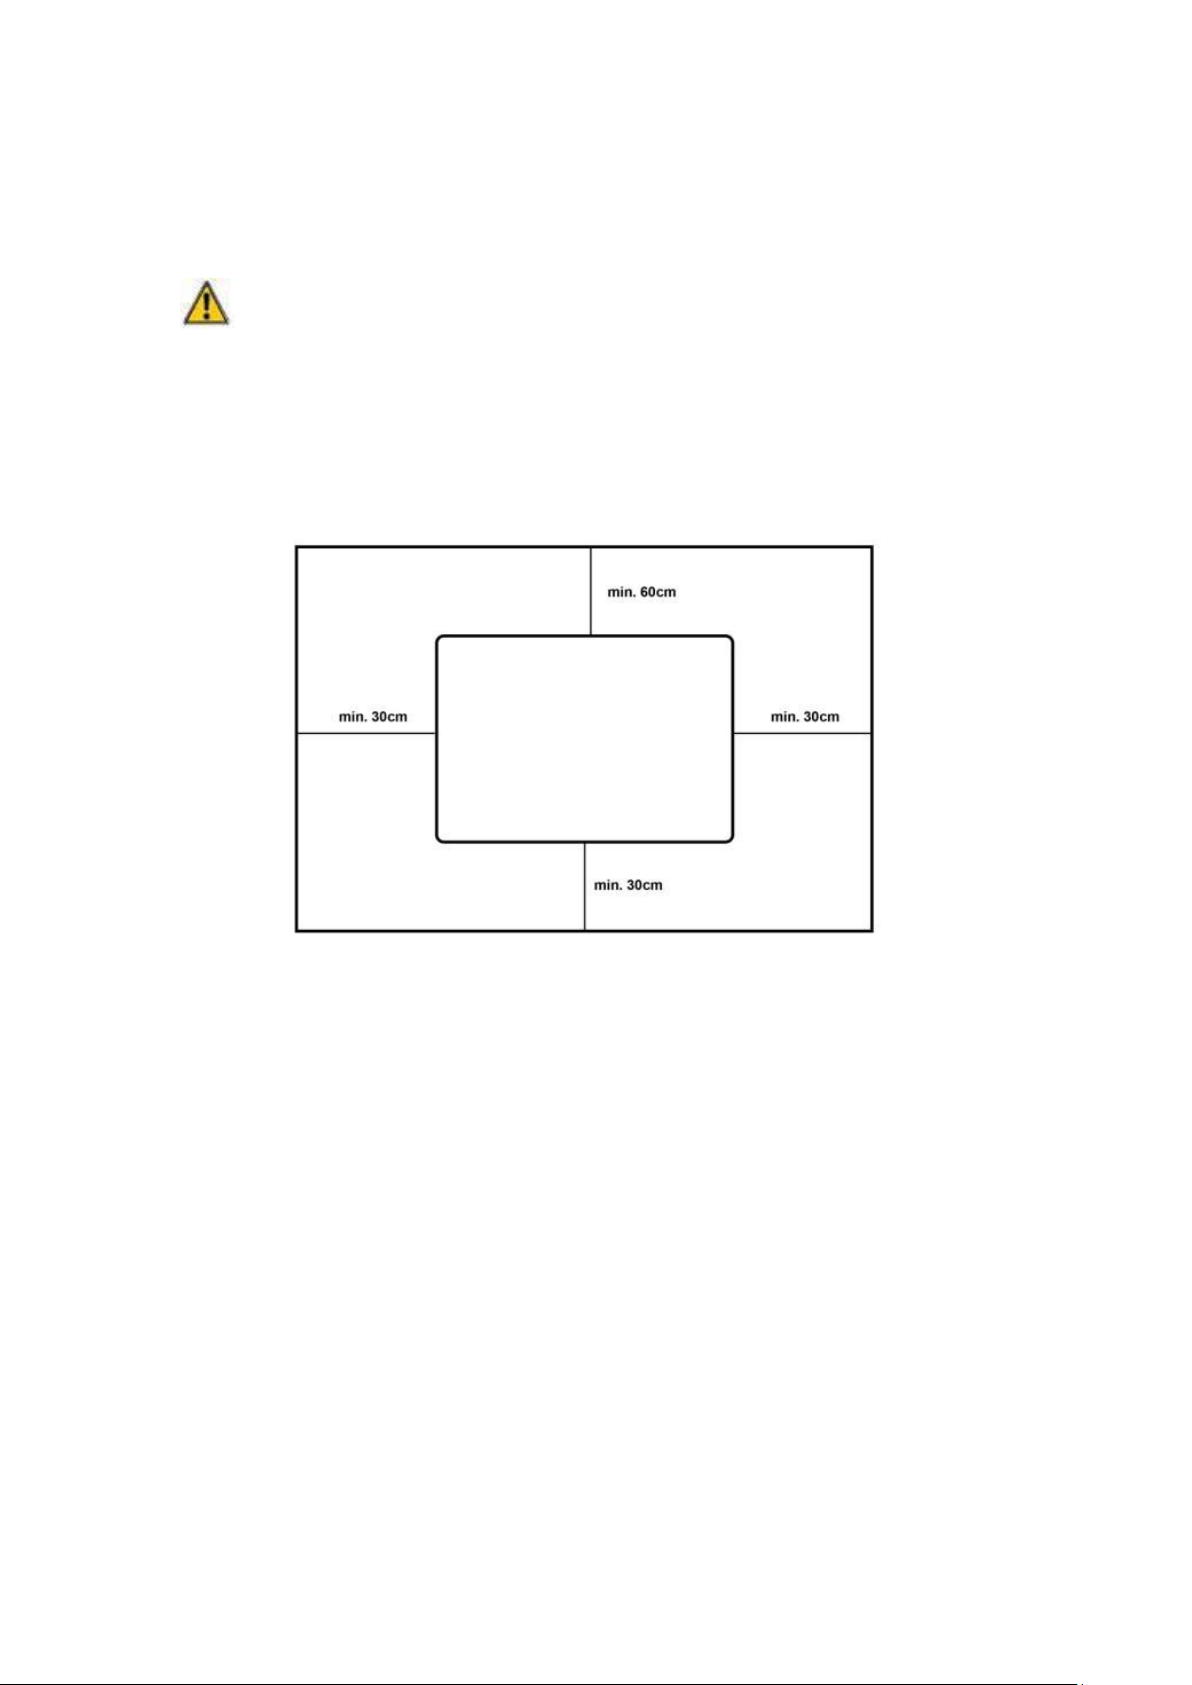
Fig. 3
2. МОНТАЖ НА СТЕНА:
- Намирането на подходящо място (Fig.3):
Уреда трябва да бъде монтиран така, че да не се спира въздушният поток.
1). Монтажа трябва да бъде извършен от представител на ауторизиран сервиз, за да
се избегнат евентуални инциденти.
2). Спазвайте минималните разстояния между уреда и стените, пода, мебелите,
т.н. (така както е показано на Fig. 3).
- мотаж на уреда: (Fig.4 – Fig.5)
1. Закрепете двете скоби в долната задна част на уреда (Fig. 4)
2. Закрепете за стената двете скоби от горната страна. (Fig. 5)
3. Поставете радиатора на стената. Отбележете местата на двете скоби от
долната страна.
4. Отместете радиатора от стената.
5. Направете двете дупки в долната страна и поставете пластмасовите опори.
6. Поставете отново радиатора на стената, като фиксирате двете опори от
долната страна.
Внимание:
Проверете два пъти разстоянието за сигурност между уреда и пода.
Page 21
Модел
HCH-218-TF
0
Off(Stop)
I
900 W
II
1800 W
Turbo
УПОТРЕБА НА УРЕДА:
Включете уреда в заземен контакт.
Включете прекъсвача в позиция за нагряване.
Fig. 4
Fig. 5
Завъртете бутона в посока на часовниковата стрелка до достигане на
максимална температура.
След като се достигне стайната температура, завъртете бавно бутона на
термостата в обратната посока докато чуете леко прещракване, тогава
радиатора ще спре да работи.
Радиатора ще се включва и изключва автоматично, за да поддържа стайната
температура на стойностите, които сте настроили.
Изключете превключвателя за да спрете радиатора и го изключете от контакта.
Page 22
Вентилатор
Завъртете таймера в позиция « », за да започне работа вентилатора, докато
терморегулатора е настроен за работа.
РАБОТА С ТАЙМЕРА (Fig. 6):
Fig.6
- Таймера представлява превключвател за три настройки:
В средното положене, отбелязано с знака на часовник, таймера ще пуска и спира
радиатора на интервали от време настроени предварително (Виж инструкциите
по-горе за таймера).
Позицията отбелязана с “I”, представлява настройката за предимство на таймера.
В този случай, терморегулатора ще продължава да работи, като ел. енергията ще
бъде доставяна постоянно, за да може радиатора да работи през целият период
от време, който е зададен предварително.
В позицията отбелязана с “0“, таймера продължава да работи, но радиатора не
се захранва с електрическа енергия.
- Настройка на терморегулатора
Уверете се, че превключвателя на терморегулатра се намира в средно
положение, до знака на часовника.
Завъртете външният пръстен на таймера в посока на часовниковата стрелка
докато достигнете желаната стойност. Например: ако желаете да настроите
таймера за 8p.m., завъртете външният пръстен докато стигнете до цифра 20 на
индикатора (показалеца).
Пълната настройка на радиатора предполага фиксирането на сегментите, които
са около външният пръстен на таймера, в съответствие с вашите нужди.
След настройката, радиатора ще работи всеки ден според програмираното
Page 23

време.
Ако трябва радиатора да работи постоянно, превключвателя трябва да се
настрои на позиция “I”.
Ако се наложи да се пренастрои таймера, превключвателя трябва да се настрои
на средната позиция.
ЗАЩИТНА СИСТЕМА ПРОТИВ ПРЕНАГРЯВАНЕ
Вашият радиатор е снабден със защитна система против пренагряване, който
прекъсва нагряването в случай, че се появи пренагряване на радиатора. Ако уреда
спре, трябва да го изключите от контакта, след което проверете входните и изходните
отвори за въздуха, за да видите дали не са зпушени. Изчакайте поне пет минути за
да се рестартира системата за защита, след което включете радиатора. Ако
радиатора не заработи, или отново се изключи от защитната система, трябва да го
занесете до най-близкият ауторизиран сервиз за проверка и/или ремонт.
ПОДДРЪЖКА:
1. Преди да извършите каквато и да е работа по поддръжката на уреда, трябва да
го изключите и да го оставите да се охлади напълно.
2. Използвайте прахосмукачка, за да отстраните праха от ребрата на радиатора.
3. Почистете външната част на радиатора с влажна кърпа, след което го
подсушете със суха кърпа.
4. Не поставяйте уреда във вода и не позволявайте да капе вода по него.
СЪХРАНЕНИЕ
1. Преди да приберете радиатора на съхрнение, трябва да го изключите от ел.
мрежата и да го оставите да изстине напълно.
2. Ако не използвате радиатора за по-дълъг период от време, сложете го в
оригиналната кутия заедно с инструкциите и го приберетe на сухо и проветриво
място.
3. Не поставяйте тежки предмети върху кутията, тъй като е възможно да се
повреди радиатора.
Можете да помогнете за опазване на околната среда!
Моля, спазвайте местните наредби и закони: занесете нефункциониращите
електрически уреди в пунктовете за събиране на отпадъци.
www.heinner.com
 Loading...