

Page 1
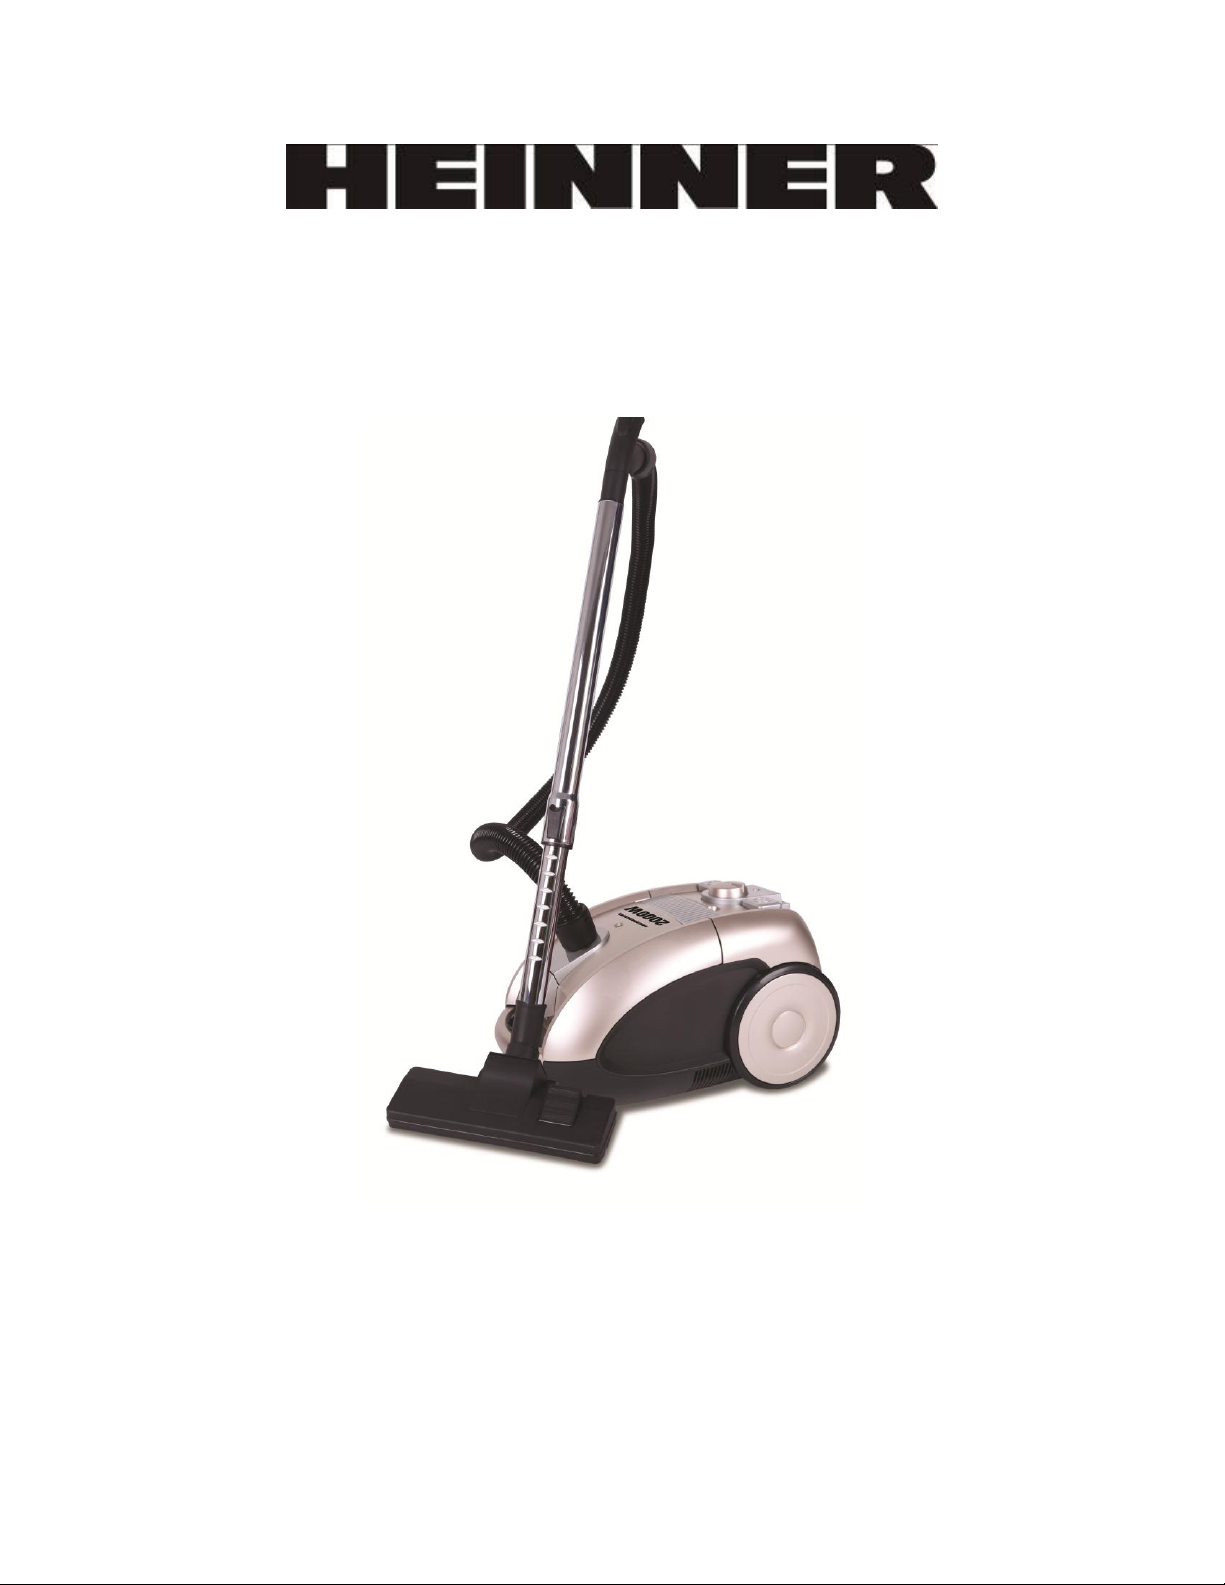
ASPIRATOR CU SAC
Genuine 2518
Alimentare: 220-240V, 50/60Hz
Putere maxima: 2000W
Page 2
VA RUGAM SA CITITI CU ATENTIE INSTRUCTIUNILE INAINTE DE UTILIZAREA ASPIATORULUI SI
SA LE PASTRATI PENTRU O CONSULTARE ULTERIOARA
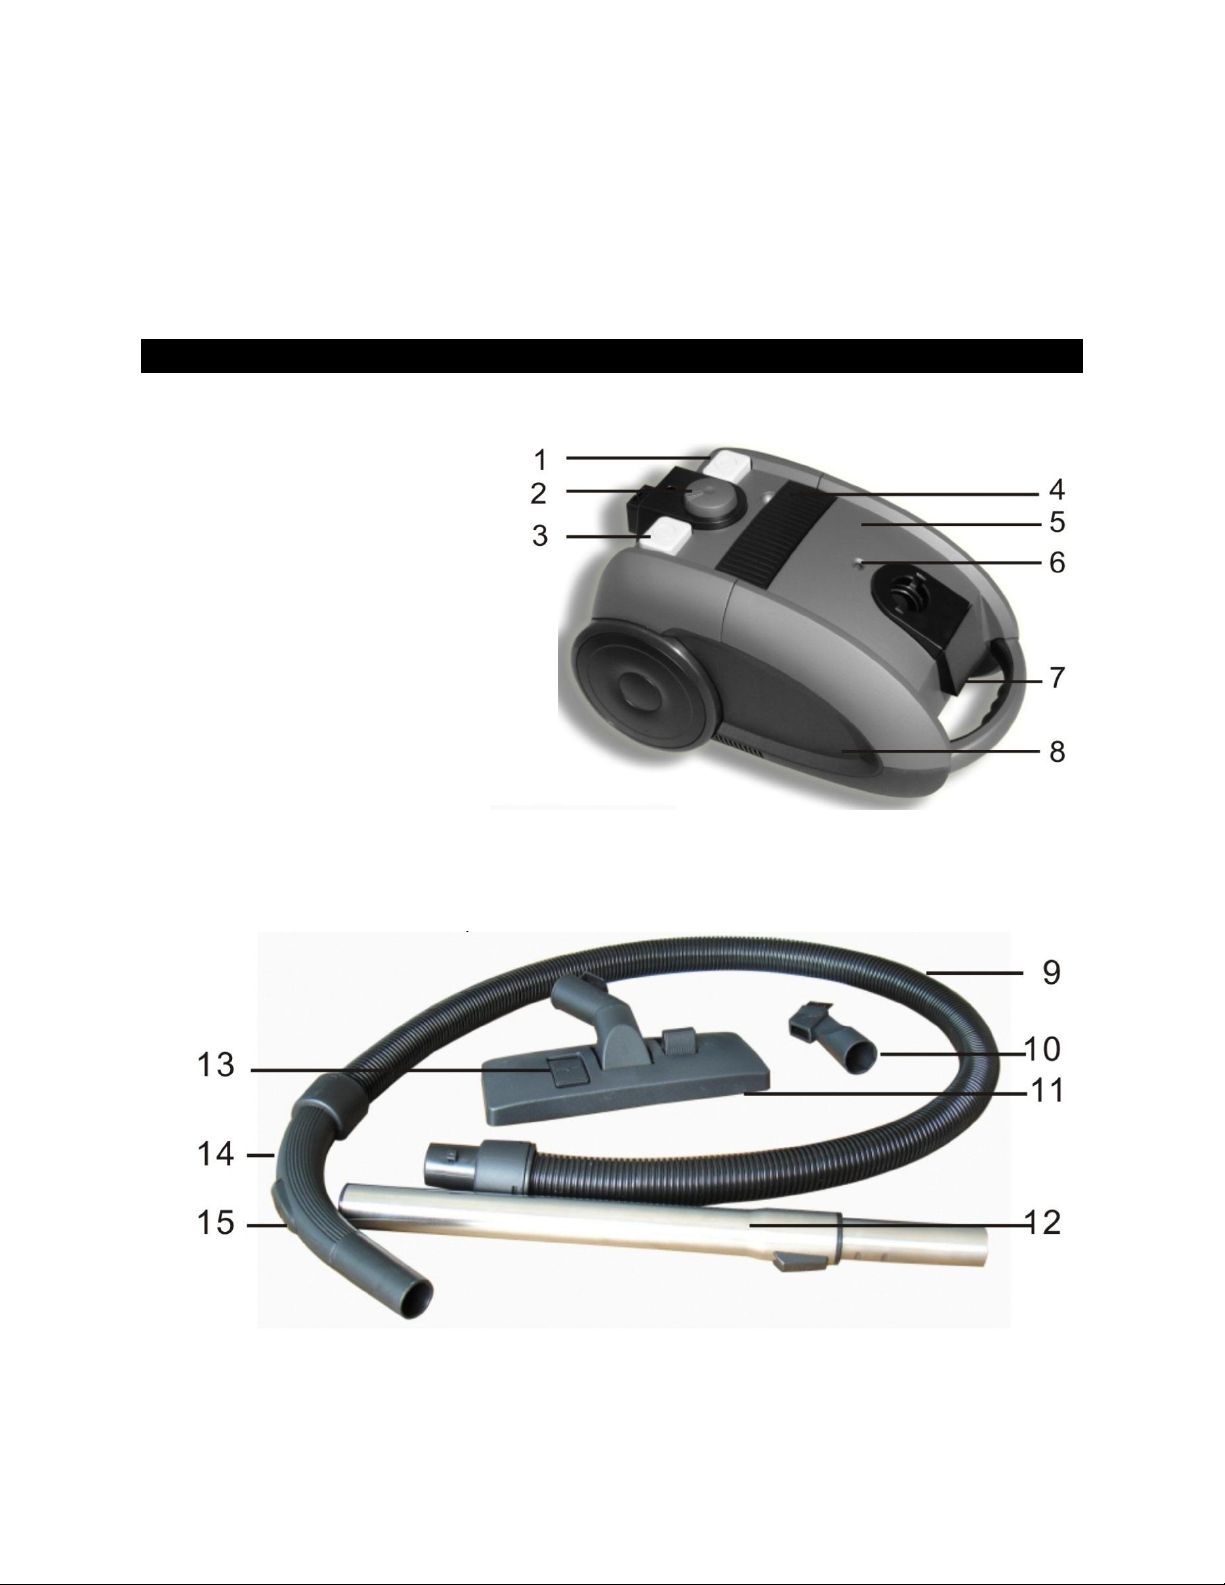
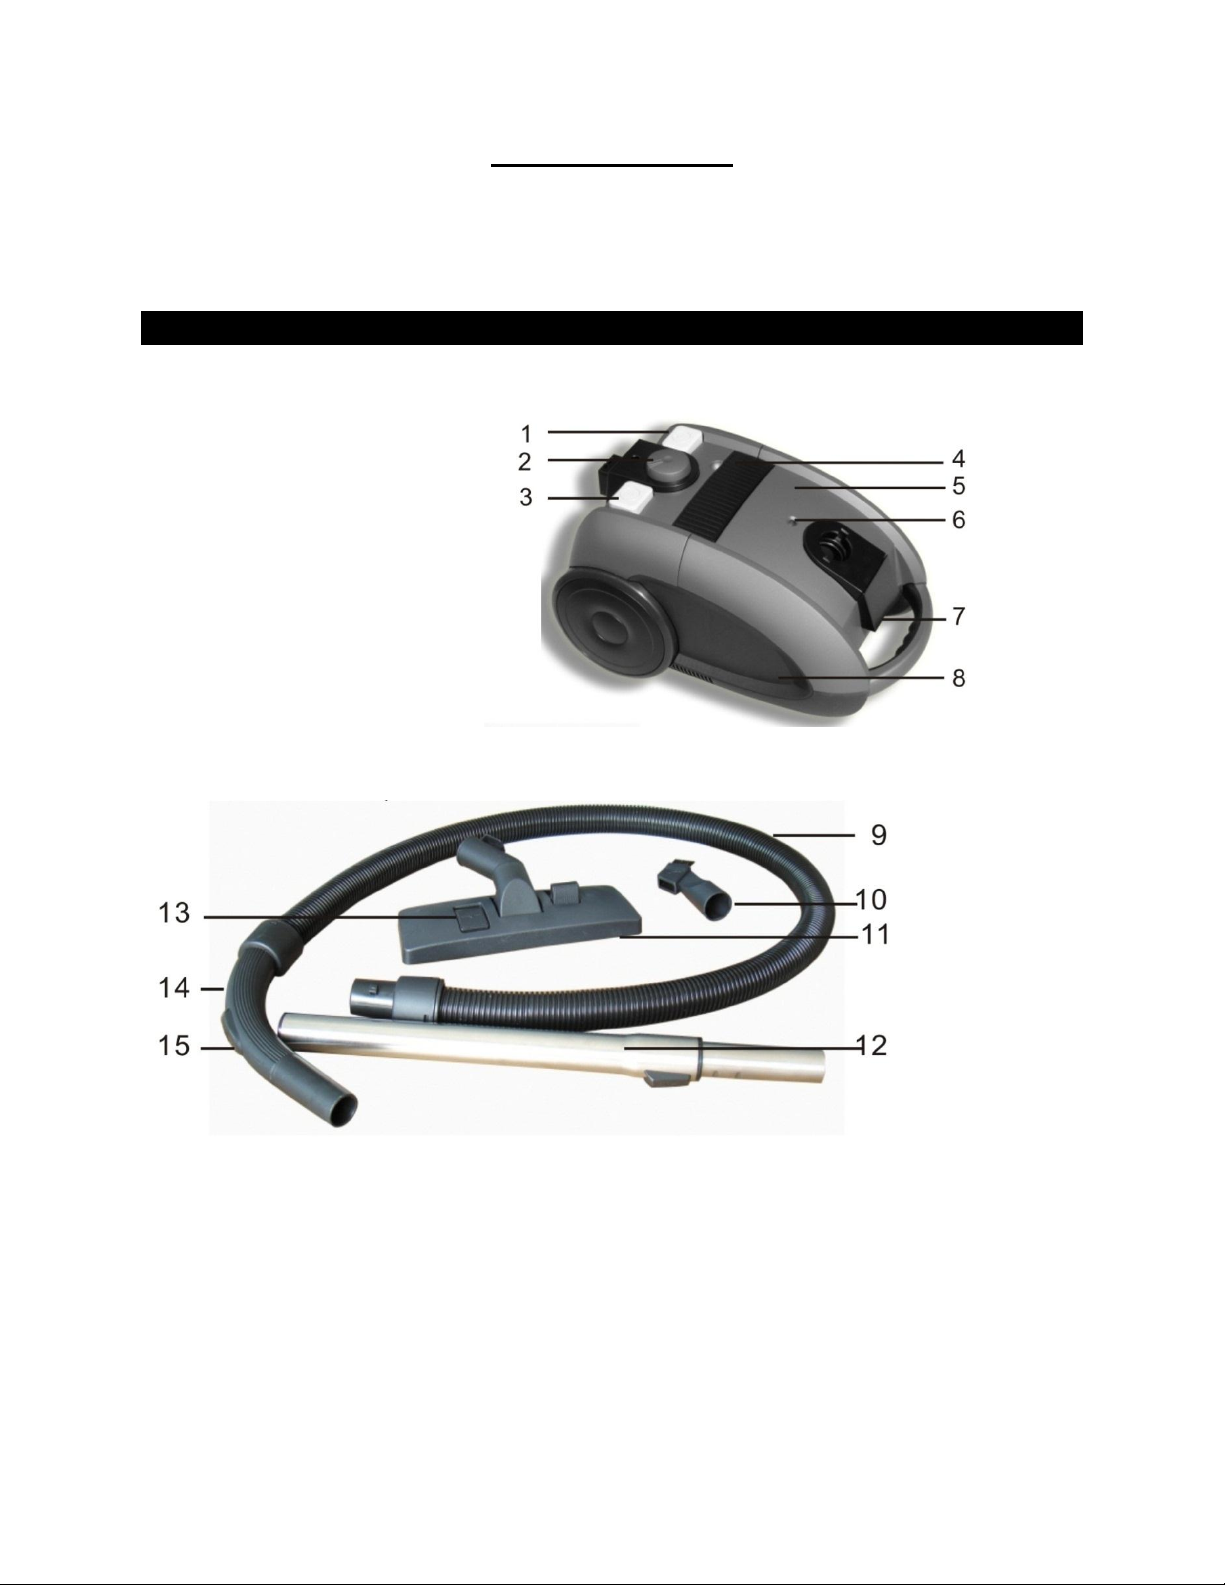
DESCRIEREA APARATULUI
1. Buton infasurare cablu
2. Reglare putere aspirare
3. Intrerupator ON/OFF
4. Compartiment accesorii
5. Capac
6. Indicator stare sac praf
7. Incuietoare
8. Compartiment sac praf
9. Furtun
10. Perie integrata si duza
11. Perie de podea
12. Tub
13. Selector podea/covor
14. Maner
15. Valva putere aspirare
Page 3

IMPORTANT
Cititi cu atentie acest manual de utilizare inainte de a folosi aspiratorul si pastrati-l pentru o
consultare ulterioara.
Inainte de a conecta la priza, verificati daca tensiunea inscriptionata pe aparat
corespunde tensiunii prizelor.
Nu utilizati aparatul daca stecherul, cablul sau aparatul insusi este deteriorat.
Daca se deterioreaza cablul, acesta trebuie inlocuit de catre un service autorizat
pentru a evita orice pericol.
Nu lasati la indemana copiilor.
Nu aspirati niciodata apa sau alt lichid, substante inflamabile si cenusa (fierbinte).
Atunci cand utilizati aspiratorul pentru aspirarea cenusei, nisipului fin, prafului de
ciment sau substantelor similare, porii sacului de hartie se infunda; drept urmare,
indicatorul de praf va arata ca sacul este plin. Inlocuiti sacul/scuturati, chiar daca nu
este plin.
Nu utilizati niciodata aparatul fara filtrul de protectie motor. Acest lucru dauneaza
motorului si scurteaza durata de viata a aspiratorului.
Nu utilizati niciodata aparatul fara sac de colectare praf.
Pregatirea utilizarii
Furtunul
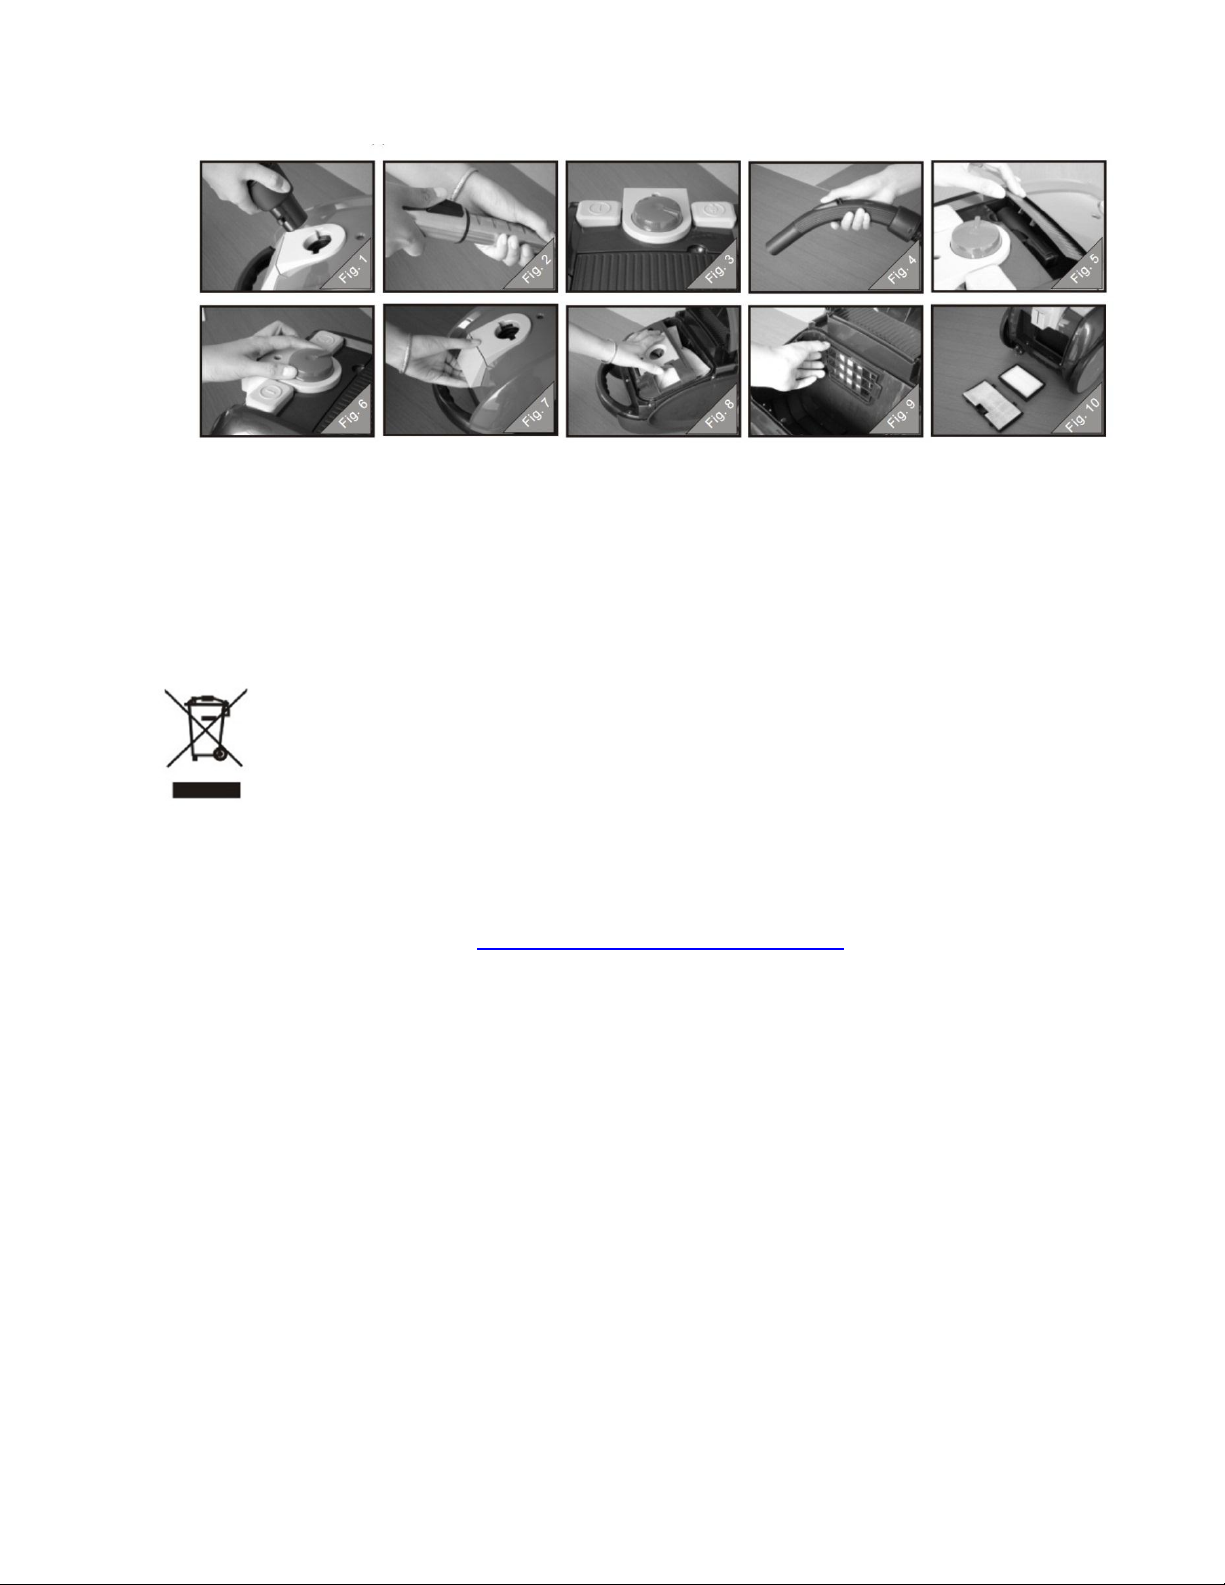
Pentru conectarea furtunului, impingeti in orificiul special de pe aspirator si rasuciti in
sensul acelor de ceas. Pentru deconectare, rasuciti in sens invers si trageti de furtun. Vezi
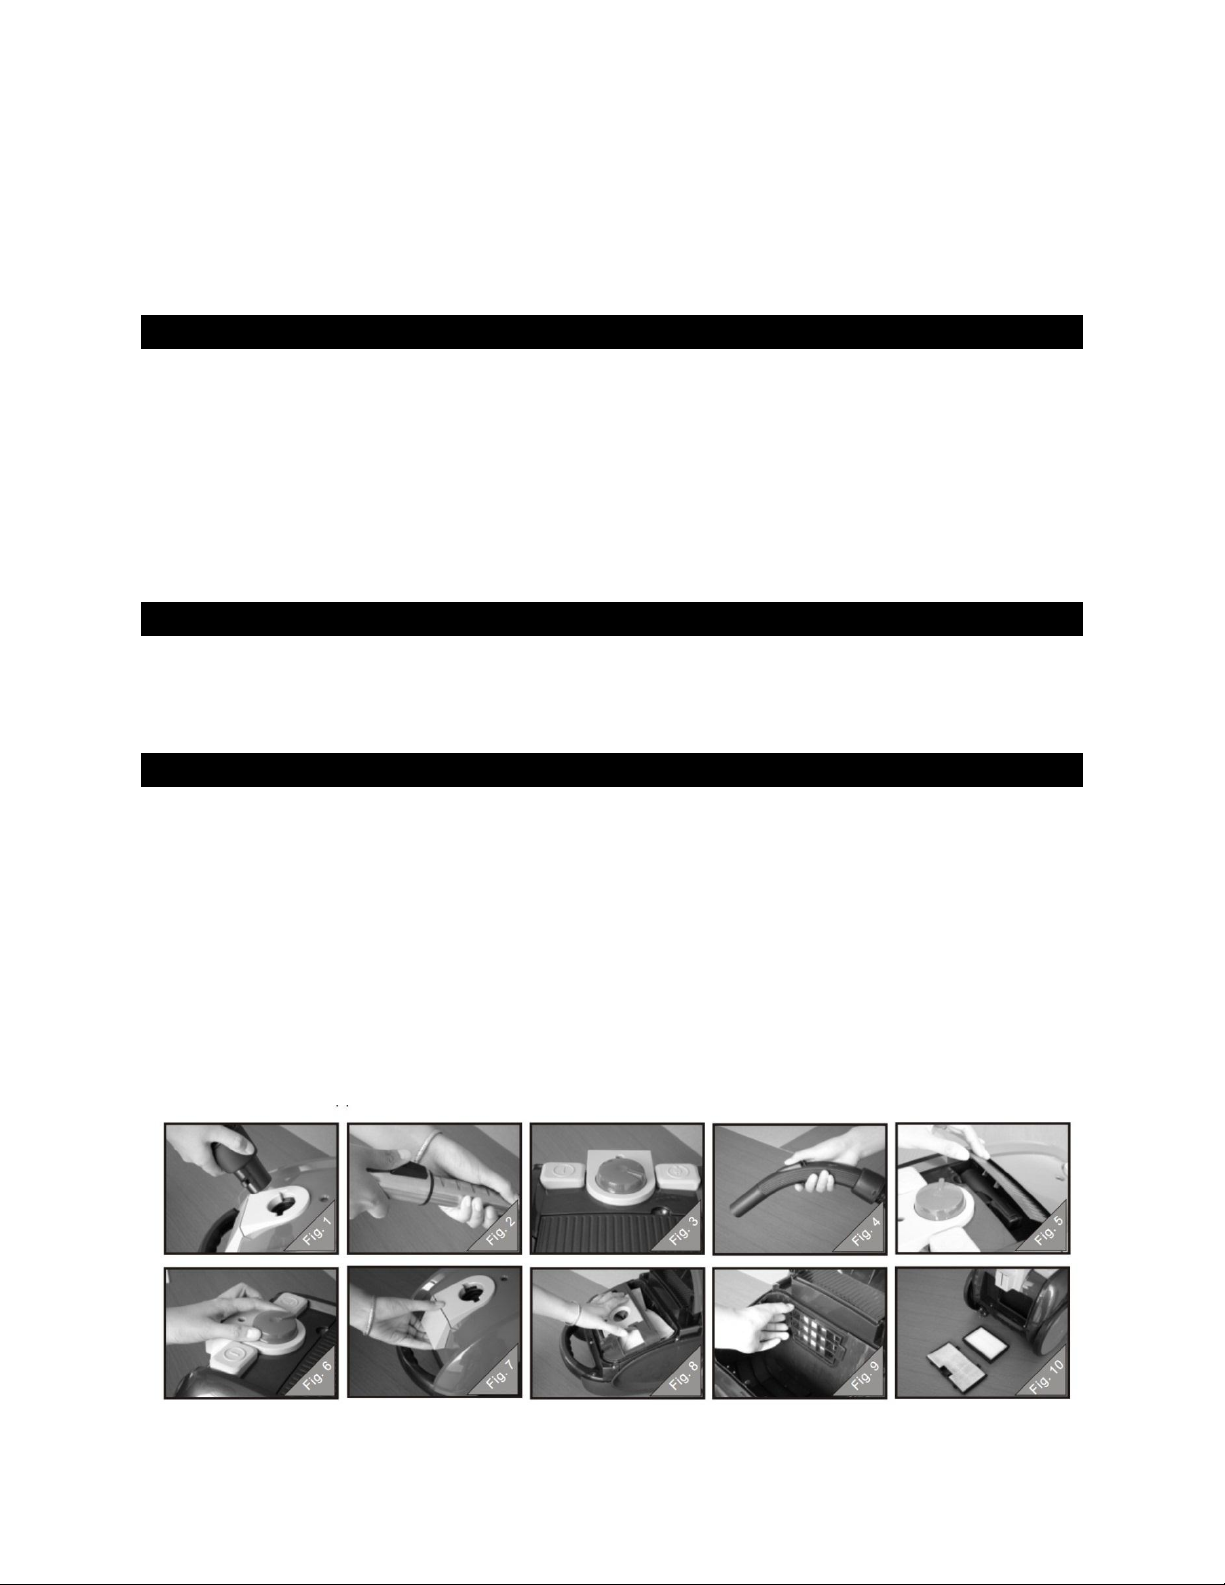
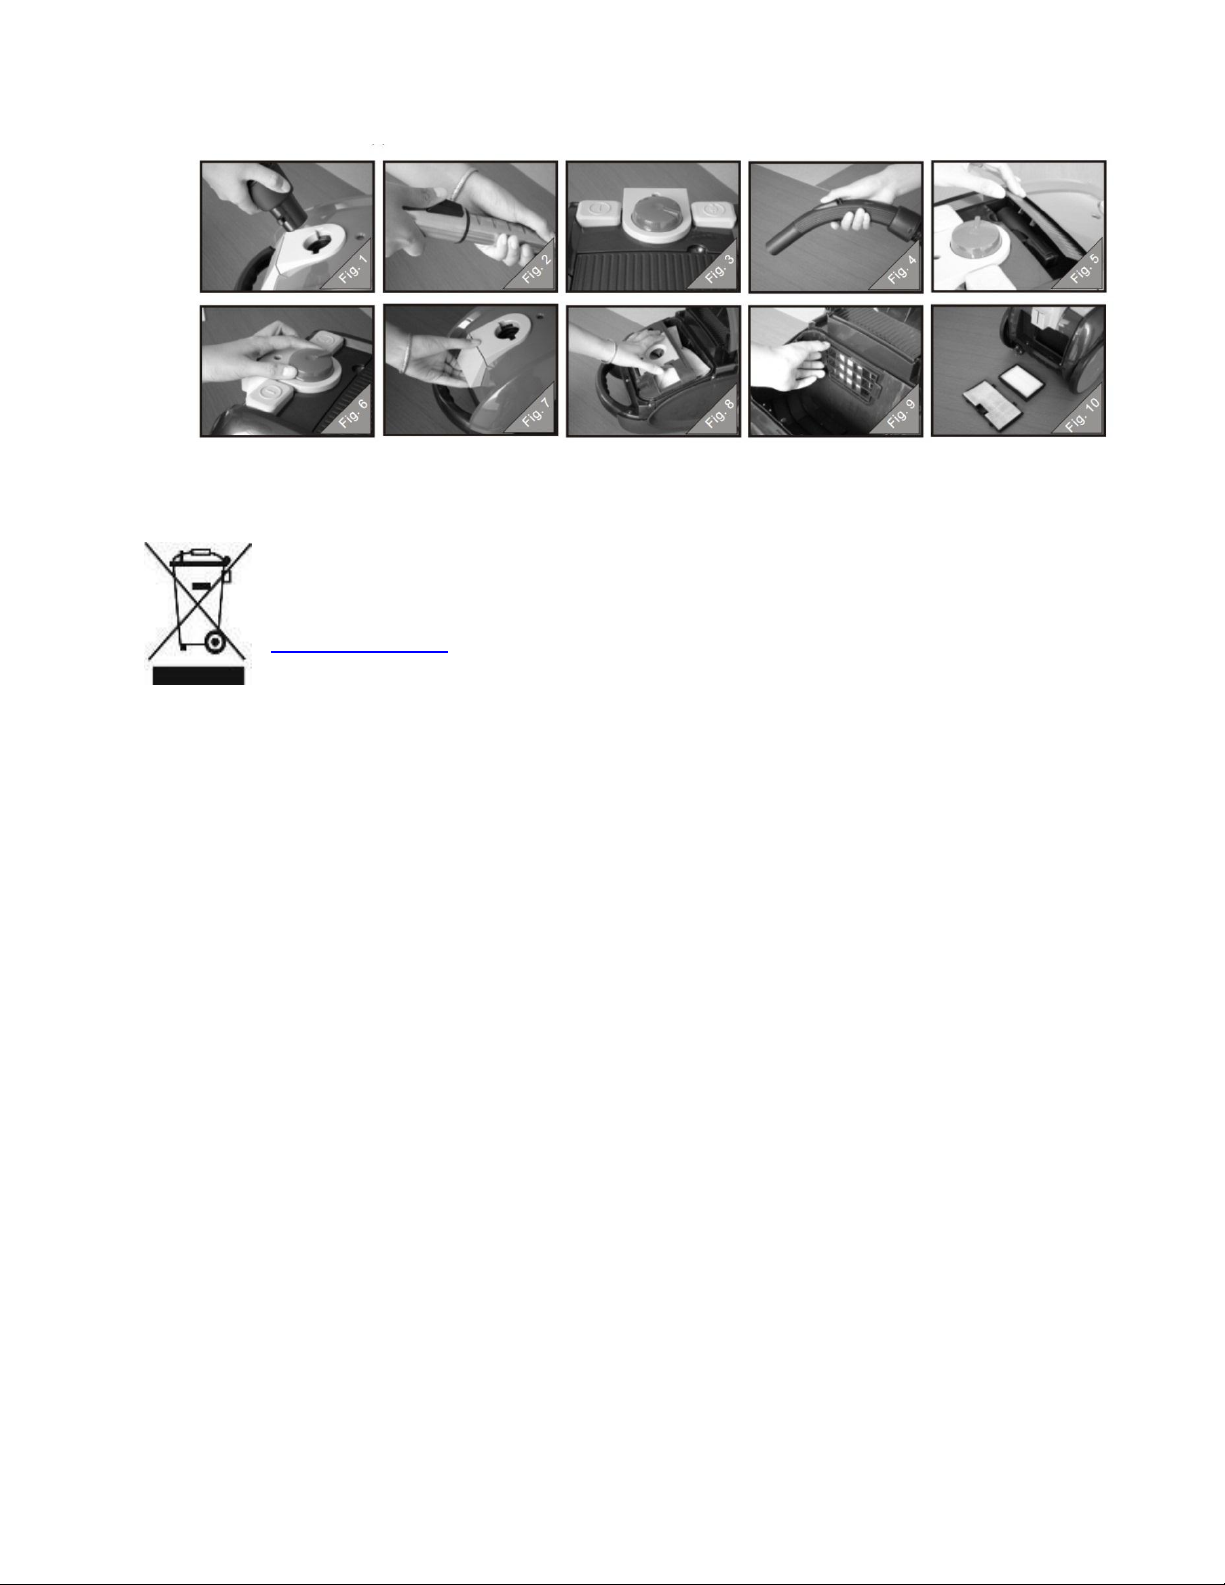
Fig1.
Tub telescopic (doar pentru anumite modele)
- Apasati pe butonul cu arc de blocare de pe partea laterala a tubului si fixati-l in orificiul
de pe cealalta parte a tubului. Vezi Fig2.
- Conectati tubul telescopic la manerul furtunului, introducand partea mai ingusta in
partea mai larga si rasucind putin.
- Ajustati lungimea tubului in functie de nevoie.
- Impingeti butonul de pe tub in sus si partea inferioara a tubului in jos.
Peria de podea
- Puteti utiliza peria pentru curatarea covoarelor sau a pardoselii.
- Pentru curatare pardoseala/gresie/etc, apasati butonul de pe perie cu piciorul, pentru a
face ca benzile cu peri sa iasa.
Page 4

- Pentru curatarea covoarelor/mochete etc, apasati pe buton in sens invers pentru a face ca
benzile cu perii sa dispara.
Perie integrata & duza
- Aspiratorul dumneavoastra este echipat cu unul dintre aceste accesorii, depozitat in
compartimentul accesorii, vezi Fig.5.
- Conectati direct la manerul furtunului sau la tub.
1. Folositi accesoriul pentru locuri inguste pentru a aspira colturi inguste sau alte locuri greu
de atins.
2. Folositi peria mica pentru a curata computere, rafturi de carti etc.
Utilizarea aspiratorului
Aspirare
Puteti transporta aspiratorul de manerul aflat pe capacul frontal.
1. Trageti cablul din aspirator si inserati stecherul in priza.
2. Apasati butonul ON/OFF de pe aspirator cu piciorul. Vezi Fig.3.
Daca vreti sa opriti putin, inserati crestatura de pe peria de podea pe locul special de pe
aspirator pentru a aseza tubul intr-o pozitie convenabila.
Ajustarea puterii de aspirare
Se poate face prin:
- Valva de ajustare a puterii de aspirare de pe manerul furtunului. Vezi Fig4.
- Pentru anumite modele, prin butonul de ajustare a puterii de aspirare de pe aspirator. Vezi
Fig.6.
Inlocuire
Inlocuirea sacului de praf
Cand indicatorul arata rosu, este momentul sa inlocuiti sacul de praf.
- Ridicati capacul, tragand in afara siguranta. Vezi Fig7.
- Scoateti suportul sacului, glisati sectiunea de fixare de-a lungul liniei de ghidare si aruncati
sacul de gunoi. Vezi Fig.8.
- Introduceti un nou sac si apoi puneti la loc suportul sacului.
- Inchideti capacul compartimentului.
Intotdeauna scoateti din priza aparatul inainte de a inlocui un sac de praf sau filtru.
Curatarea/inlocuirea filtrului de motor
Aspiratorul dumneavoastra este echipat cu un filtru de protectie motor. Acesta trebuie
inlocuit o data la un an.
Page 5

Curatarea/inlocuirea filtrului de evacuare
Aspiratorul dumneavoastra este echipat cu un filtru de evacuare aer. Acesta trebuie inlocuit
o data la un an.
1. Deschideti capacul filtrului de evacuare aer si scoateti filtrul din aparat.
2. Introduceti un filtru nou in suport. Vezi Fig.10.
Verificati compartimentul filtrului sa fie pus la loc corect inainte de utilizarea aspiratorului.
Curatare
Intotdeauna opriti aparatul si scoateti din priza inainte de a curata vreo parte.
Nu spalati nicio componenta a aspiratorului in masina de spalat vase. Daca este necesar,
curatati aspiratorul cu o carpa umeda.
Depozitare
1. Opriti aparatul si scoateti din priza.
2. Apasati pe butonul de infasurare cablu pentru infasurarea automata a acestuia.
3. Puteti depozita aspiratorul in 2 moduri:
- pozitie parcare orizontala: inserati crestatura de pe peria de podea in orificiul special de pe
aparat pentru a fixa tubul si apoi puneti aspiratorul in locul dorit.
- pozitie parcare verticala: introduceti carligul de pe tub in orificiul de dedesubtul
aparatului.
Probleme
Puterea de aspirare este insuficienta.
- Poate ca sacul de praf este plin. Inlocuiti sacul, daca este necesar.
- Poate ca filtrele trebuie inlocuite. Inlocuiti filtrele, daca este necesar.
- Poate ca valva de ajustare de pe manerul furtunului este deschideti. Inchideti valva.
- (pentru anumite modele) Poate ca butonul de ajustare a fost setat la o valoare mica.
Ajustati butonul la o putere mai mare.
- Poate ca peria de podea, peria mica sau furtunul este blocat.
Scoateti din priza, deconectati componenta blocata si conectati-l (daca se poate) in sens
invers. Porniti aspiratorul pentru ca aerul sa forteze obiectul in directia opusa.
Page 6
ELIMINAREA DESEURILOR IN MOD RESPONSABIL FATA DE MEDIU
Poti ajuta la protejarea mediului!
Va rugam sa respectati regulamentele si legile locale: duceti echipamentele electrice
nefunctionale catre un centru de colectare al echipamentelor electrice uzate.
Importator: Network One Distribution
Europolis Logistic Park, Italia Street, 1-7, Chaijna, Ilfov, Romania
Tel: +4021 256 00 86, www.heinner.ro, www.asesoftdistribution.ro
Page 7
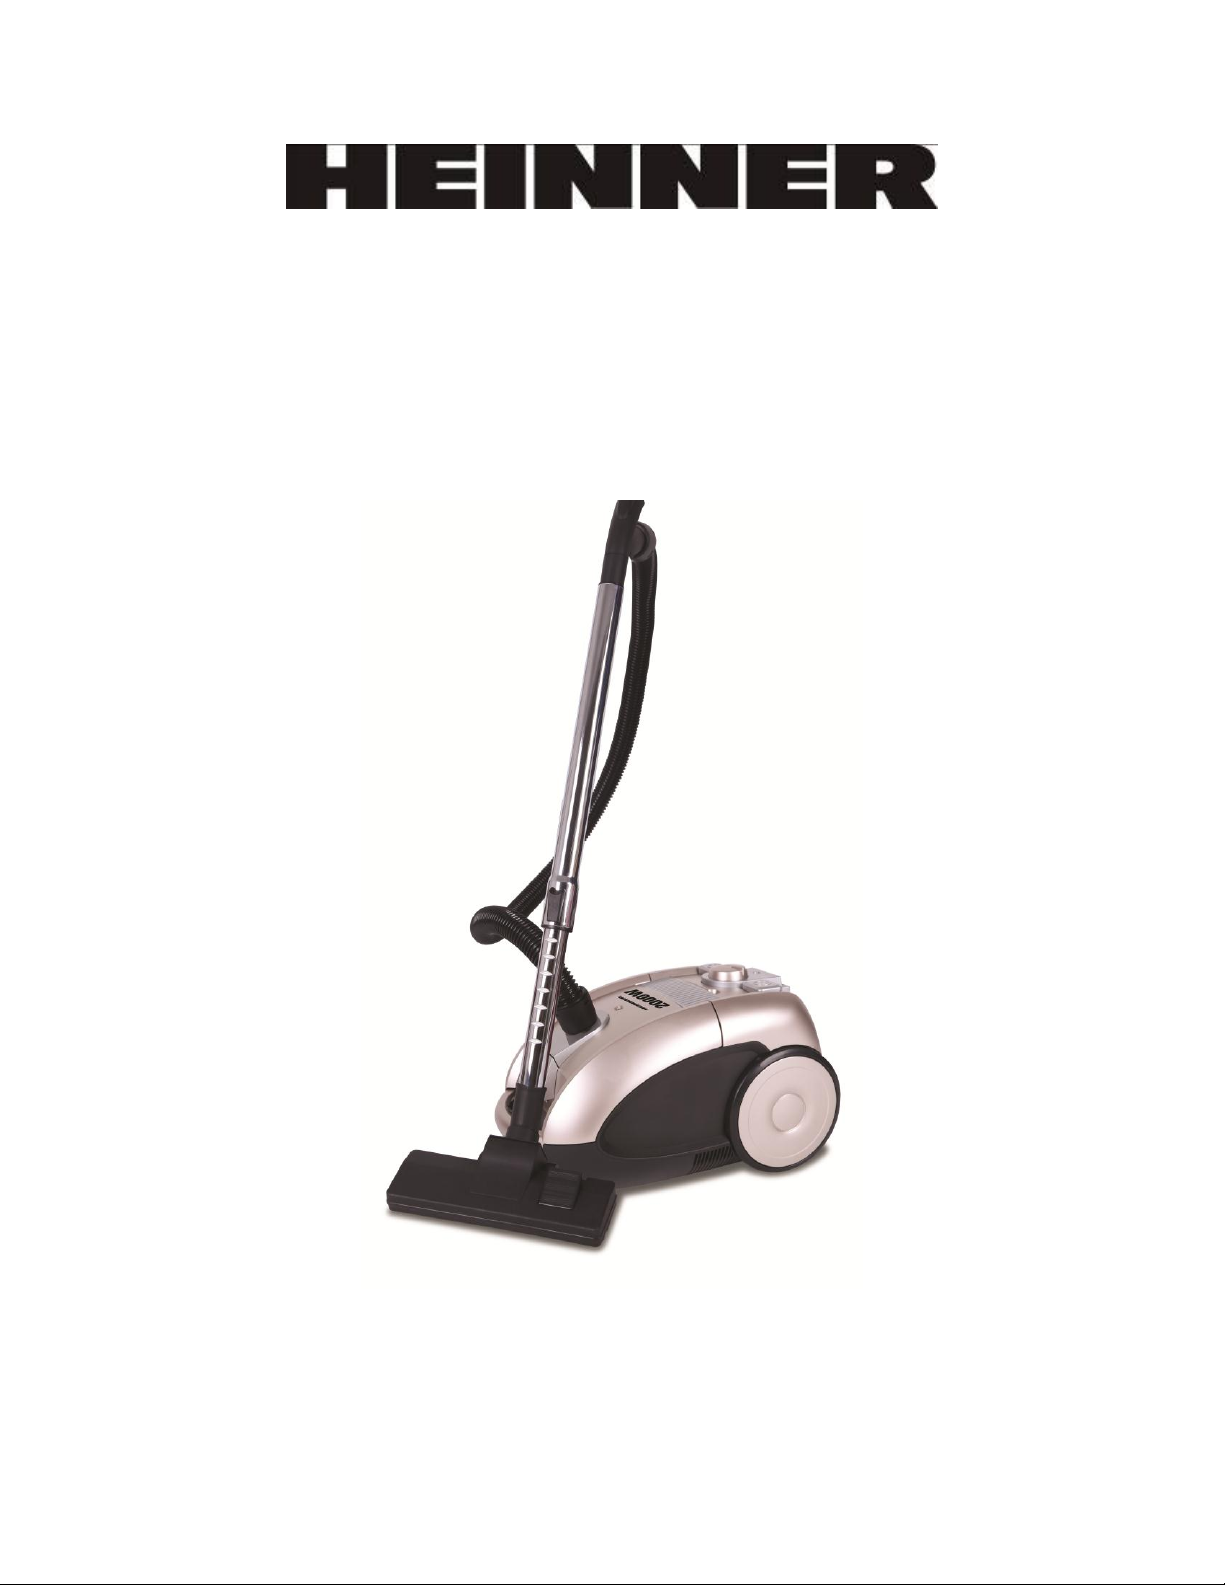
VACUUM CLEANER
Genuine 2518
Voltage: 220-240V, 50/60Hz
Power: 2000W
Page 8
INSTRUCTIONS MANUAL
PLEASE READ THIS MANUAL CAREFULLY BEFORE USING AND KEEP IT PROPERLY FOR
FUTURE REFERENCE
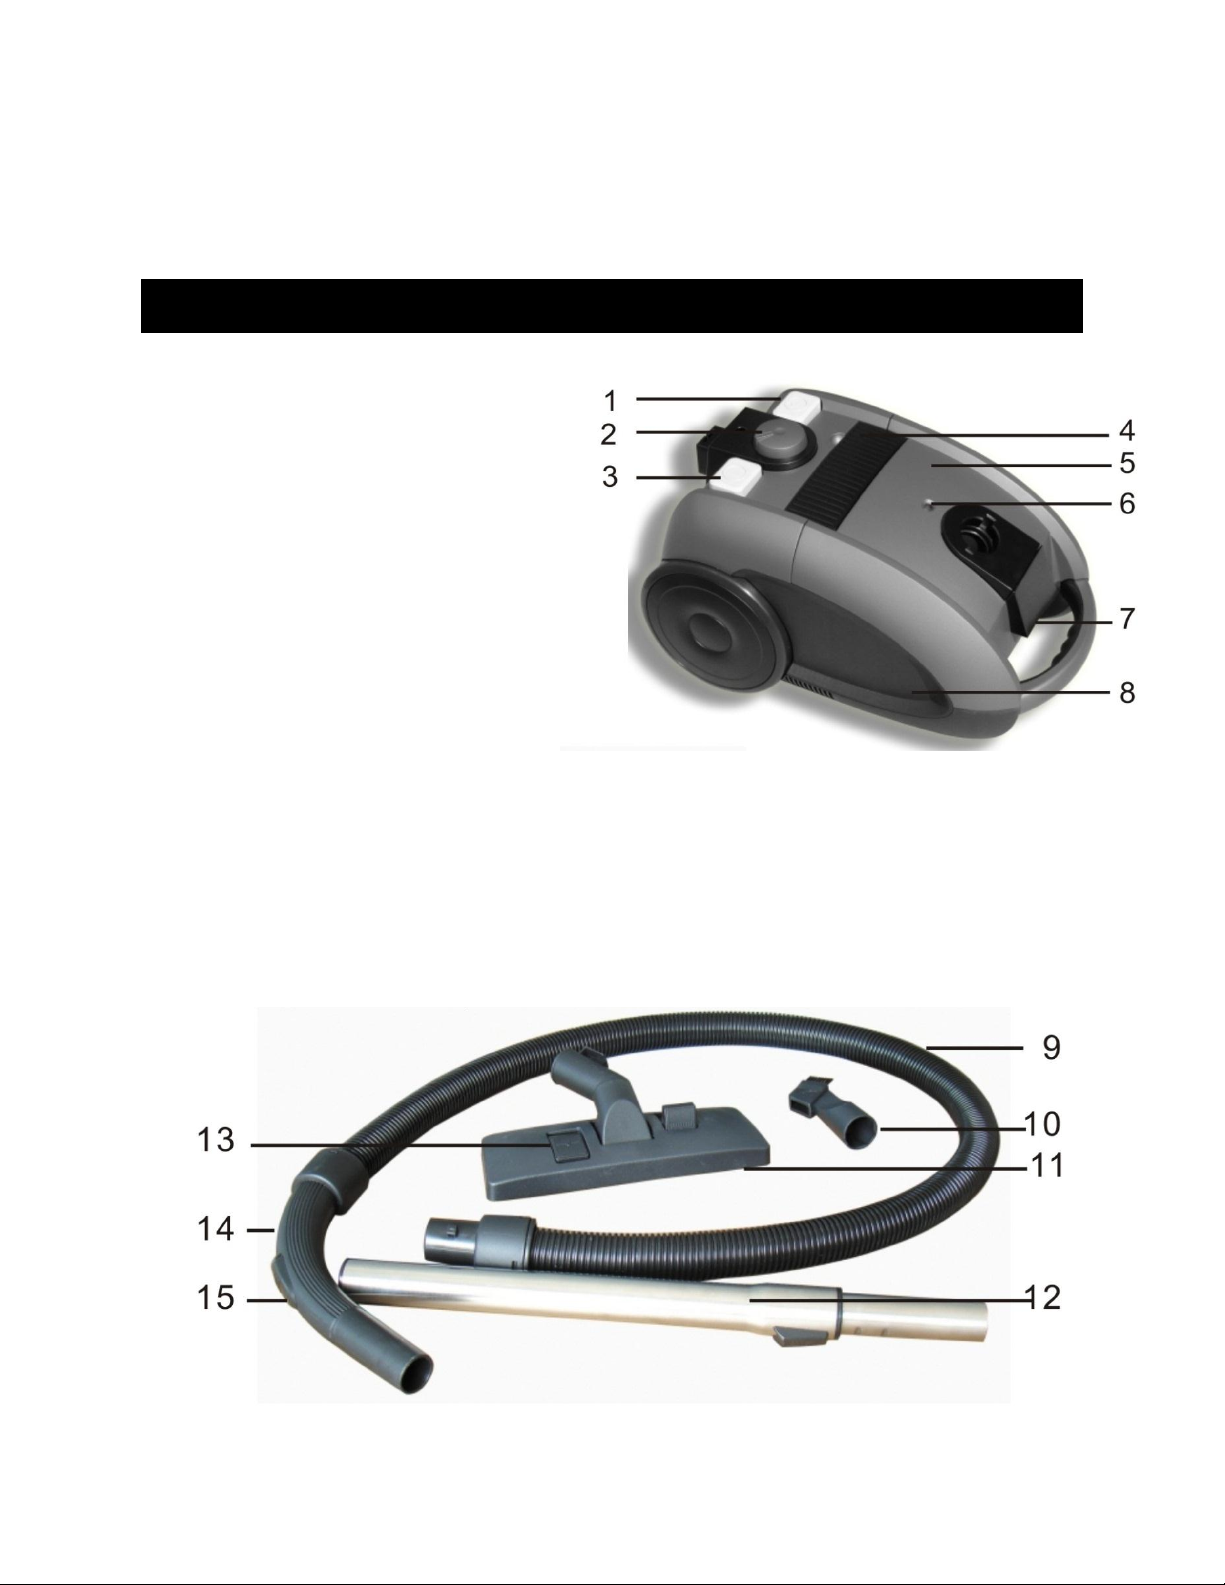
DESCRIPTION OF THE APPLIANCE
1. Cord rewinder switch
2. Suction power regulation
3. On/off switch
4. On board tool combinet
5. Front cover
6. Dust full indicator
7. Lock pin
8. Dust bag compartment
9. Flexible hose
10. Integrated brush and nozzle
11. Floor brush
12. Tube
13. Hard floors/carpet selector
14. Hand grip
15. Suction power slider
Page 9

IMPORTANT
Read this user manual carefully before you use the appliance and save it for future reference
Check if the voltage indicated on the appliance corresponds to the local mains voltage
before you connect the appliance.
Do not use the appliance if the plug, the cord or the appliance itself is damaged.
If the mains cord of the appliance is damaged, you must replace it in order to avoid a
hazard.
Keep the appliance out of the reach of the children.
Never pour water or other liquid. Never pour flammable substances and do not pour ashes
until they are cold.
Do not point the hose, the tube or any other accessory at the eyes or ears nor put it in your
mouth when it is connected to the vacuum cleaner and the vacuum cleaner is switched on.
When you use the appliance to vacuum ashes, fine sand, lime cement dust and similar
substance, the pores of the paper dust bag become clogged, as a result, the dust bag full
indicator will indicate that the paper dust bag is full, replace the dust bag, even if it is not
full yet.
Never use the appliance without the motor protection filter, this damages the motor and
shortens the life of the appliance.
Never use this appliance without a dust bag.
Preparing for use
Hose
To connect the hose, push it into the appliance and turn it clockwise. To disconnect the hose, turn it anticlockwise and pull it out of the appliance: see Fig 1.
Plastic tube (specific types only)
- To connect the tube parts to each other, insert the narrow section into the wider section and turn a little.
- To connect the tube to the handgrip of the hose, insert the narrow section to the wider section and turn
a little.
- To disconnect the tube or tube parts. Pull and turn a little.
- Use the same method to connect and disconnect the accessories.
Telescopic tube (specific types only)
- Press the spring loaded lock button on the telescopic tube part and slide the lock button into the opening
in the other tube part; see Fig 2.
- Connect the tube part to the handgrip of the hose, insert the narrow section into the wider section and
turn a little.
- Adjust the telescopic tube to the length that you find most comfortable during vacuuming.
Floor brush
- You can use this brush on the carpet of on the hard floors.
- To clean the hard floors, push the rocker switch on the top of the floor brush with your foot to make the
brush strips come out of the brush housing.
- To clean carpet, push the rocker switch on the other side to make the brush strips disappear into the
housing.
Page 10

Intergrated brush & nozzle
- Your vacuum cleaner comes with one of these accessories: it is stored in the tool combinet
of units, see Fig 5.
- Connect the intergrate brush and nozzle directly to the handgrip or to the tube.
1. Use the crevice nozzle to vacuum the small area or clean narrow corners or hard-to-reach
palces.
2. Use the brush nozzle to clean computers, bookshelves etc.
Using the appliance
Vacuum Cleaning
You can carry the vacuum cleaner by the handle at the front of the appliance.
1. Pull the cord out of the appliance and insert the mains plug into the wall socket.
2. Press the on/off button on the top of the appliance with your foot or switch on the appliance. See Fig 3.
If you want to pause for a moment, insert the ridge on the floor brush into the parking slot to set the tube in
a convenient position.
Adjusting suction power
- You can adjust the suction power with the suction power slide on the handgrip of the hose. See Fig 4
- The electronic suction power control on the vacuum cleaner (specific types only) See Fig 6.
Replacement
Replacing the dust bag
When the indicator light goes red, then it is the time to change the dust bag.
- Lift the front cover pulling the lock pin outwards. See Fig7
- Take out the dust bag holder, slide the stiff card section out along the guides and then throw the bag
away. See Fig 8
- Insert a new bag by sliding the stiff card section out along the guides and then place the dust bag
holder in its lid.
Always unplug the appliance before you replace a filter.
Cleaning /replacing the motor filter
Your vacuum cleaner is equipped with the motor protecting filter, replace the filter once in a year.
1. Open the cover and pull the filter out of the appliance. See Fig 9
2. Insert a new filter into the holder.
Cleaning/replacing the exhaust air filter
Your vacuum cleaner is equipped with the exhaust air filter, replace the filter once in a year.
1. Open the exhaust filter cover and pull the filter out of the appliance.
2. Replace the filter in its compartment and fit it. See Fig 10.
Make sure the filter compartment is correctly placed before using the cleaner.
Cleaning
Page 11
Always switch off and unplug the appliance before you clean any parts.
Do not clean any part of the vacuum cleaner in the dishwasher. If necessary, clean the parts
with a moist cloth.
Clean the appliance with a damp cloth.
Storage
1. Switch off the appliance and remove the mains plug from the wall socket.
2. Press the cord rewind button to rewind the cord.
3. You can store the appliance in two ways.
- Horizontal parking position: insert the ridge on the floor brush into the parking
slot to park the tube and then put the appliance away.
- Vertical parking position: insert the hook on the tubes into the parking slot
underneath of the appliance, then put it away.
Environment
Do not throw away the appliance with the normal household waste at the end of its life, but
hand it in to an official collection point for recycling. By doing this, you help to preserve the
environment.
Troubleshooting
The suction power is insufficient
- perhaps the dust bag is full: If necessary, replace the dust bag.
- perhaps the filters need to be replaced: If necessary, replace the filters.
- perhaps the suction power slide on the handgrip is open: Close the slide.
- perhaps the electronic suction power control (specific types only) has been set to a low
setting: Set the control to a higher setting.
- perhaps the floor brush, nozzle tube or hose is blocked up: To remove the obstruction,
disconnect the block uo item and connect it (as far as possible) the other way round.
Switch on the vacuum cleaner to force the air through the blocked-up item in the
opposite direction.
Page 12

You can help protect the environment!
Please remember to respect the local regulations: hand in the non-working electrical equipment’s
to an appropriate waste disposal center.
Importer: Network One Distribution
Europolis Logistic Park, Italia Street, 1-7, Chaijna, Ilfov, Romania
Tel: +4021 256 00 86, www.heinner.com , www.asesoftdistribution.com
Page 13
ПРАХОСМУКАЧКА С ТОРБА
Genuine 2518
Захранване: 220-240V, 50/60Hz
Максимална мощност: 2000W
Page 14
ПРОЧЕТЕТЕ ВНИМАТЕЛНО РЪКОВОДСТВОТО ЗА УПОТРЕБА НА ПРАХОСМУКАЧКАТА И ГО
ЗАПАЗЕТЕ ЗА БЪДЕЩИ СПРАВКИ
ОПИСАНИЕ НА УРЕДА
1. Бутон за навиване на
кабела
2. Настройка на сила на
всмукване
3. Прекъсвач ON/OFF
4. Отделение аксесоари
5. Капак
6. Индикатор състояние на
торбата за прах
7. Заключване
8. Отделение торба за прах
9. Маркуч
10. Интегрирана четка и дюза
11. Четка за под
12. Тръба
13. Селектор за под/килим
14. Дръжка
15. Клапа за всмукателната сила
Page 15

ВАЖНО
Прочетете внимателно инструкциите за употреба на прахосмукачката и ги запазете за
бъдещи справки.
Преди да включите прахосмукачката в контакта проверете дали съвпада
напрежението изписано на уреда с напрежението на контактите.
Не използвайте устройството ако щекера, кабела или самата прахосмукачка са
повредени.
Ако захранващият кабел се повреди трябва да бъде заменен от ауторизиран
сервиз, за да се избегне каквато и да е заплаха.
Пазете прахосмокачката далеч от деца.
Не използвайте прахосмукачката за почистване на мокри повърхности или
аспириране на вода или други течности, запалими вещества или гореща пепел.
Когато почиствате пепел, фин пясък, цимент на прах и подобни вещества,
порите на хартиената торба се запушват, поради което индикатора за прах ще
показва че торбата е пълна. Сменете торбата дори да не е пълна.
Никога не използвайте прахосмукачката без защитният филтър на мотора,
защото в противен случай ще се съкрати живота на прахосмукачката.
Никога не използвайте прахосмукачката без торбата за прах.
Подготовка за употреба
Маркуча
За свързване на маркуча, вмъкнете го в устройството и завъртете в посока на
часовниковата стрелка. За да откачите маркуча от прахосмукачката трябва да
завъртите в посока обратна на часовниковата стрелка и да издърпате. Виж Fig.1.
Телескопична тръба (само за някои модели)
- Натиснете блокиращият бутон разположен на странино на тръбата и го фиксирайте
от другата страна на тръбата. Виж Fig2.
- Свържете тръбата с дръжката на маркуча, въведете по-тясната страна в по-
шириката и завъртете леко.
- Настройте дължината според нуждата.
- Натиснете бутона нагор, а вътрешната аст на тръбата надолу.
Четка за под
Page 16

- Можете да използвате четката за поистване на килими и подови настилки.
- За почистване на подови настилки/гресия/т.н. натиснете с крак бутона на четката, за
да се покажат ресничките.
- За почистване на килими/мокети, т.н., натиснете бутона в обратна посока за да се
скрият ресничките.
Интегрирана четка и дюза
- Вашата прахосмукачка е снабдена с един от тези аксесоари, които се съраняват в
отделението за аксесоари. Виж Fig.5.
- Свържете директно с дръжката на маркуча или с тръбата.
1. Използвайте аксесоара за тясни места, за почистване на ъгли или други
труднодостъпни места.
2. Използвайте малката четка за почистване на рафтове, первази, мебели, т.н.
Употреба на уреда
Прахосмукиране
Можете да местите прахосмукачката държейки я за дръжката, която се намира на
предния капак.
1. Издърпайте кабела и го включете в контакта.
2. Натиснете с крак бутона ON/OFF (Вкл./Изкл.) . Виж Fig.3.
Ако искате да спрете за малко, поставете четката в специално определеното мясно на
прахосмукачката.
Настройка на силата на всмукване
Може да се направи чрез:
- Дюзата за настройка на мощността намираща се на дръжката на маркуча. Виж Fig4.
- За някои модели, чрез бутона за настройка на силата за всмукване. Виж Fig.6.
Подмяна
Подмяна на торбата за прах
Когато индикатора показва червено, трябва да смените торбата за прах.
- Повдигнете капака, издърпвайки навън защитата. Виж Fig7.
- Извадете държача на торбата, плъзнете частта за закрепване по посока на водещата
стрелка и изхвърлете торбата с прахта. Виж Fig.8.
- Поставете нова торба, след което поставете на място държача на торбата.
- Затворете капака на отделението.
Винаги изключвайте прахосмукачката от контакта преди да смените торбата за прах.
Page 17

Почистване/подмяна на филтъра на мотора
Вашата прахосмукачка е снабдена с филтър за защита на мотора, който трябва да бъде
сменян веднъж годишно.
Почистване/подмяна на изходния филтър
Вашата прахосмукачка е снабдена с изпускателен въздушен филтър, които трябва да
бъде сменян веднъж годишно.
1. Отворете капака на въздушния филтър и извадете филтъра от устройството.
2. Поставете нов филтър в държача. Виж Fig.10.
Проверете филтъра дали е поставен правилно преди да ползвате прахосмукачката
отново.
Почистване на прахосмукачката
Винаги изключвайте прахосмукачката от контакта преди да почистите която и да е част
от нея. Не мийте нито една част на прахосмукачката в миялната машина. При
необходимост почистете с влажна кърпа.
Съхранение
1. Спрете устройството и го изключете от контакта.
2. Натиснете бутона за навиване на кабела, за да се навие автоматично.
3. Може да съхранявате прахосмукачката по два начина:
- в хоризонтално положение: поставете четката за под в специалното отделение, за да
фиксирате тръбата и после поставете прахосмукачката в желаната позиция.
-във вертикално положение: закачете куката на тръбата в дупката под устройството.
Проблеми
Мощността на всмукване е недостатъчна.
- Проверете торбата за прах, която може да бъде пълна. Сменете торбата ако е
неоходимо.
- Може да трябва да се сменят филтрите. Сменете филтрите ако е необходимо.
- Проверете клапата за настройка на мощността на всмукване, която се намира на
маркуча да не е отворена. Затворете клапата.
- (за някои модели) Може бутона за настройка на силата да е бил настроен на слаба
степен. Настройте бутона на по-висока степен.
- Може маркуча, четката за под, четката за тесни пространства или тръбата да са
запушени от някакъв предмет. Изключете от контакта, разглобете запушената част,
почистете и я монтирайте.
Page 18
ОТСТРАНЯВАНЕТО НА ОТПАДЪЦИТЕ ПО ОТГОВОРЕН ЗА ОКОЛНАТА СРЕДА НАЧИН
Пазете околната среда: този уред не трябва да се изхвърля заедно с битовите
отпадъци. Моля, изхвърляйте на специалните за това места или занесете в
центрове за рециклиране на подобни отпадъци.
www.heinner.com
 Loading...