

Page 1
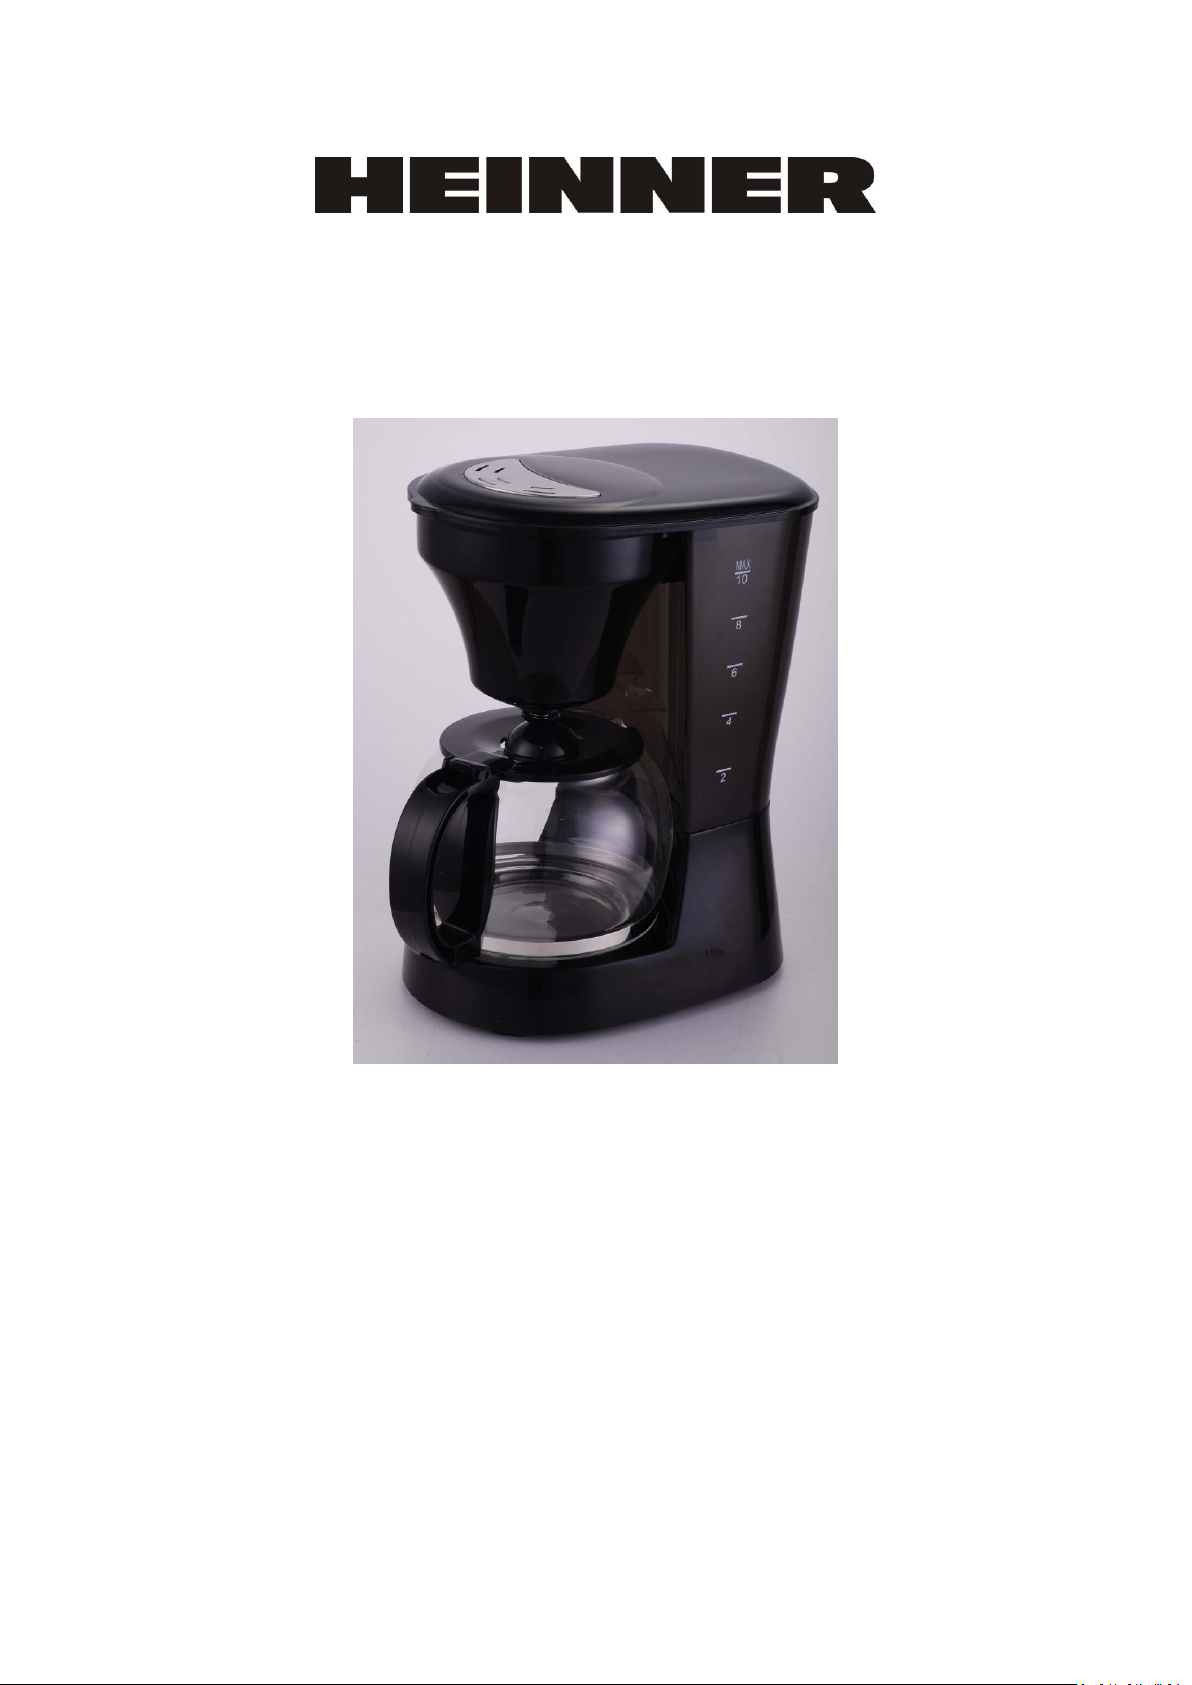
CAFETIERA
Aroma 220
Alimentare : 220-240V~50/60Hz
Putere: 800W
Cititi cu atentie manualul inainte de a utiliza aparatul
Instructiuni generale de siguranta
Page 2

1
MASURI DE PROTECTIE IMPORTANTE
La utilizarea aparatelor electrice, trebuie respectate masuri minime de siguranta, inclusiv urmatoarele:
1. Cititi toate instructiunile.
2. Verificati ca tensiunea inscriptionata pe aparat sa corespunda cu tensiunea prizelor, inainte de a
conecta aparatul.
3. Nu introduceti aparatul, cablul sau stecherul in apa.
4. Supravegheati aparatul atunci cand functioneaza in preajma copiilor.
5. Intotdeauna scoateti din priza aparatul atunci cand nu este folosit si inainte de curatare. Lasati
produsul sa se raceasca inainte de a adauga sau a lua accesorii si inainte de a curata.
6. Pentru siguranta dumneavastra, verificati periodic starea cablului; in cazul in care este deteriorat,
pentru a evita orice pericol, inlocuirea acestuia trebuie facuta de un service autorizat (al
producatorului sau altul).
7. Utilizarea accesoriilor nerecomandate de producatorul aparatului prezinta riscul incendiului, al
electrocutarii si al ranirii personale.
8. A nu se folosi in aer liber.
9. Nu lasati cablul sa atarne peste marginea mesei sau a blatului sau sa atinga suprafete fierbinti.
10. Nu puneti aparatul pe sau langa plita electrica sau pe baza de gaze, sau unde ar putea atinge
cuptorul ori cuptorul cu microunde.
11. Nu folositi aparatul in alt scop decat cel destinat.
12. Nu curatati cu produse chimice, abrazive etc.
13. Pentru deconectare, setati toate butoanele pe pozitia OFF, scoateti stecherul din priza (nu trageti
niciodata de cablu).
14. Va puteti opari daca indepartati capacul in timpul prepararii cafelei. Aburul fierbinte poate
produce ranirea grava.
15. Anumite parti ale aparatului sunt fierbinti in timpul utilizarii, asa ca nu atingeti cu mana. Folositi
manerele si butoanele.
16. Nu lasati niciodata carafa goala pe plita aparatului, pentru ca se poate sparge.
17. Nu utilizati aparatul atunci cand carafa arata semne de spargere sau crapaturi sau atunci cand
manerul acesteia este slabit. Folositi carafa doar pentru acest aparat. Utilizati cu atentie, carafa fiind
foarte fragila.
18. Acest aparat nu este destinat folosirii de catre persoane (inclusiv copii) cu capacitati fizice, senzoriale
sau mentale reduse, decat daca sunt instruite si supervizate de o persoana responsabila de siguranta
lor.
19. Copiii trebuie supravegheati cu atentie, astfel incat sa nu se joace cu aparatul.
Page 3
2
20. Nu plasati pe o suprafata fierbinte sau rece.
21. Nu lasati filtrul de cafea sa functioneze fara apa.
22. Acest aparat este destinat folosirii in casa sau in locuri similare:
a. bucatarii ale personalului in magazine, birouri si alte locuri de munca;
b. ferme;
c. de catre clienti in hoteluri, moteluri si alte locuinte rezidentiale;
d. pensiuni bed&breakfast.
23. Pastrati aceste instructiuni.
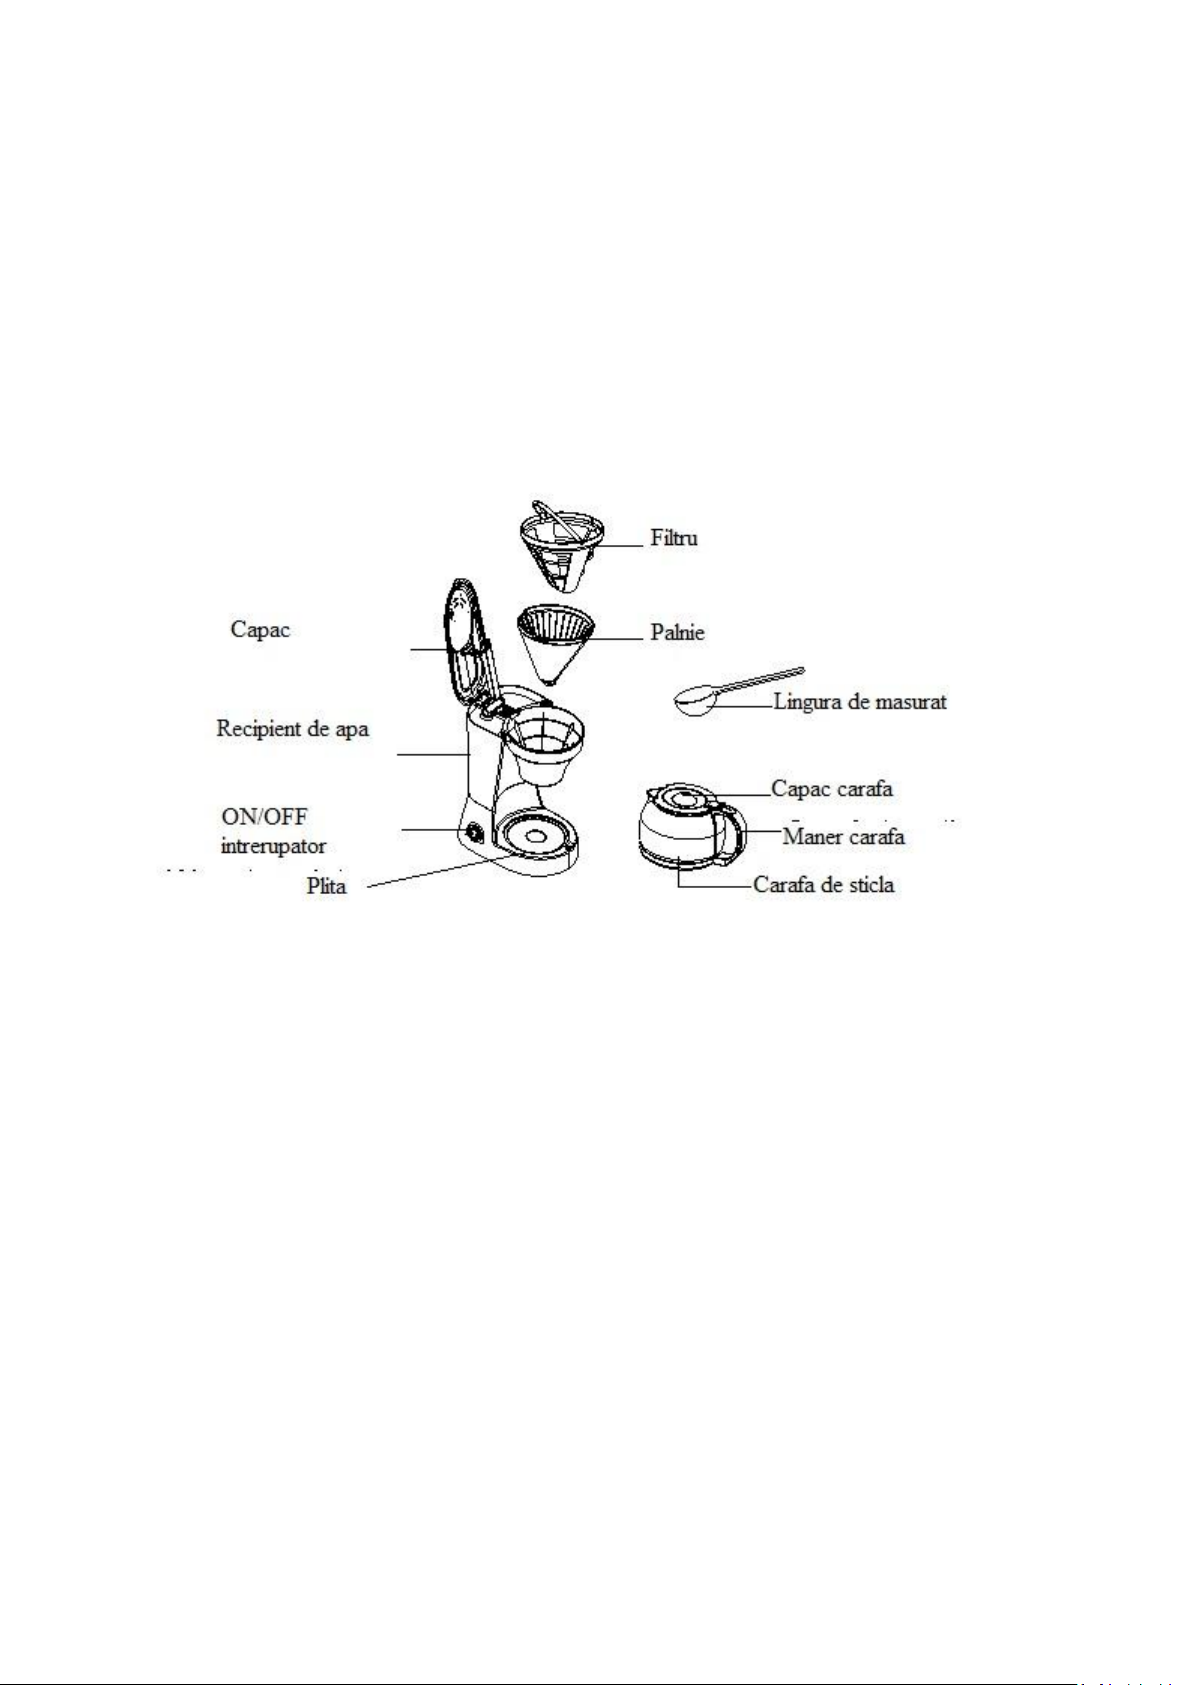
COMPONENTELE APARATULUI
INAINTEA PRIMEI UTILIZARI
Verificati ca toate accesoriile sa fie complete si ca unitatea sa nu fie deteriorata. Umpleti recipientul
pentru apa pana la nivelul MAX si porniti aparatul de cateva ori, fara cafea, apoi aruncati apa. Curatati si
uscati toate componentele detasabile conform instructiunilor din sectiunea “CURATARE SI
INTRETINERE”.
UTILIZAREA FILTRULUI DE CAFEA
1) Deschideti capacul si umpleti recipientul de apa cu apa potabila rece.
Nota: Nu umpleti recipientul peste capacitatea indicata. Filtrul poate prepara o cantitate
de cafea egala cu 10 cesti intr-un ciclu.
2) Puneti palnia in suportul ei si asigurati-va ca e asamblata corect, apoi puneti filtrul in palnie.
3) Puneti o cantitate potrivita de cafea pulbere in filtru. La o ceasca de cafea se pune o lingurita
rasa de cafea, dar puteti ajusta dupa gustul personal. Inchideti capacul.
Page 4

3
4) Puneti carafa de sticla cu capacul pus pe plita orizontal. Asigurati-va ca linia centrala a carafei
este aliniata cu cea a palniei.
5) Introduceti stecherul in priza.
6) Apasati intrerupatorul pe pozitia “I”, indicatorul se va lumina si aparatul va incepe sa
functioneze. Puteti intrerupe procesul apasand la pozitia “0”. Lumina indicatorului va
disparea. Dupa ce apasati din nou intrerupatorul, aparatul va relua procesul de preparare al
cafelei.
Nota: aparatul este dotat cu o functie de pauza-si-servire; daca doriti, in orice moment al
ciclului de preparare, puteti indeparta temporar carafa pentru a turna o ceasca de cafea.
Ciclul de preparare nu va fi intrerupt si cafeaua nu va picura din aparat. Pur si simplu puneti
la loc carafa pentru reinceperea procesului. Nu scoateti carafa pentru mai mult de 30 de
secunde si nu lasati carafa goala pe plita incinsa.
7) Scoateti carafa pentru a servi cafeaua la sfarsitul prepararii.
Nota: Cafeaua pe care o veti obtine va fi mai putina cantitativ decat cantitatea de apa introdusa
initial, pentru ca o parte din apa este absorbita de pulberea de cafea.
Atentie: La turnarea cafelei, unghiul de inclinare al carafei nu trebuie sa fie mai mare de 45 de
grade de la pozitia verticala,; turnati cafea incet pana la golirea carafe, altfel cafeaua se va
scurge pe la capac si poate rani pe cineva!
8) Dupa preparare, aparatul se va porni automat la pozitia de pastrare a cafelei calde pana cand
il veti opri cu totul. Timpul de pastrare la cald nu trebuie sa depaseasca o ora. Pentru o
calitate maxima, serviti imediat dupa preparare.
9) Intodeauna opriti aparatul si scoateti din priza atunci cand nu il folositi.
CURATARE SI INTRETINERE
Caution: Intotdeauna scoateti aparatul din priza si lasati sa se raceasca inainte de a curata. Nu
introduceti aparatul, cablul sau stecherul in apa
1) Curatati toate partile detasabile in apa fierbinte.
2) Curatati suprafata externa a produsului cu o carpa moale si umeda pentru indepartarea petelor.
Nota: Nu incercati sa curatati interiorul recipientului de apa, pentru ca vor ramane acolo reziduuri.
Doar curatati cu apa rece in mod periodic.
3) Se pot forma picaturi de apa pe suprafata de deasupra palniei, ce pot picura pe baza aparatului
in timpul functionarii. Pentru a controla acest lucru, stergeti cu o carpa curata si uscata dupa
fiecare utilizare.
4) Asamblati componentele si pastrati pentru urmatoarea utilizare.
INDEPARTAREA REZIDUURILOR MINERALE
Pentru a pastra aparatul intr-o buna functionare pentru o lunga perioada de timp, trebuie sa curatati din
cand in cand depozitele de minerale lasate de apa, in functie de calitatea acesteia.
Page 5

4
Preparare
Cafea pulbere
1 lingurita rasa=5gr./0.17oz.
1 ceasca=5fl.oz.
Folositi mai multa sau mai putina cafea dupa
12 cesti
9 lingurite
10 cesti
7.5 lingurite
8 cesti
6 lingurite
1. Umpleti rezervorul cu apa si dizolvant de piatra pana la nivelul MAX. (Raportul apa : dizolvant
trebuie sa fie 4:1. Folositi acid citric - 100 parti apa si 3 parti acid citric).
2. Puneti carafa pe plita aparatului.
3. Asigurati-va ca filtrul (fara cafea) si palnia sunt corect asamblate.
4. Porniti aparatul si lasati sa functioneze cu solutia de curatare.
5. Dupa ce “a preparat” o solutie de o ceasca, opriti aparatul.
6. Lasati solutia sa stea asa pentru 15 minute si repetati pasii 3-5.
7. Porniti aparatul si lasati sa se filtreze toata solutia, pana la golirea rezervorului.
8. Clatiti, lasand aparatul sa functioneze cu apa simpla, de cel putin trei ori.
SFATURI PENTRU PREPARAREA CAFELEI DE BUNA CALITATE
1. Un aparat de facut cafeaua curat este esential pentru prepararea cafelei cu gust bun. Curatati
periodic aparatul. Utilizati intotdeauna apa rece si proaspata.
2. Pastrati cafeaua pulbere in locuri uscate si racoroase. Dupa deschiderea unui pachet, inchideti
bine si tineti-l la frigider pentru a pastra prospetimea.
3. Pentru un gust optim, cumparati boabe de cafea si macinati-le chiar inainte de preparare.
4. Nu refolositi pulberea de cafea pentru ca aroma este redusa. Nu este recomandata reincalzirea
cafelei.
5. Fenomenul de producere al uleiului se produce daca se folosesc boabe de cafea foarte prajite.
6. Selectarea si masurarea cafelei:
Folositi lingurita de masurat.
Folositi cafea macinata mediu.
Harta masurarii cafelei:
Page 6

5
6 cesti
4.5 lingurite
preferinte.
4 cesti
3 lingurite
Nr
PROBLEMA
CAUZA
SOLUTIA
1
Lumina ON nu se aprinde.
Aparatul nu este introdus in
priza
Conectati la priza.
2
Cafeaua nu se prepara.
A. Aparatul nu este in priza
B. Pana de curent
C. Rezervorul de apa este gol
D. Cosul de filtru nu este
introdus corect.
E. Decantorul nu este
pozitionat corect pe plita.
A. Conectati aparatul.
B. Asteptati sa revina curentul
C. Verificati rezervorul
D. Introduceti corect filtrul.
E. Plasati decantorul corect pe
plita
3
Nu se prepara decat apa.
Nu exista cafea pulbere in filtru.
Adaugati cafea in filtru
4
Cafeaua se prepara prea incet.
Aparatul are nevoie de
curatare.
Curatati conform instructiunilor
5
Filtrul da pe dinafara
A. Filtrul nu e pozitionat corect
B. Decantorul nu este
pozitionat corect pe plita
C. A fost introdusa prea multa
pulbere
D. Decantorul a fost indepartat
pentru mai mult de 30 de
secunde de pe plita.
A. Introduceti corect filtrul.
B. Plasati decantorul corect pe plita
C. Scoateti filtrul, scoateti cafeaua.
Inlocuiti filtrul de hartie. Daca
este filtru permanent, clatiti.
Reincepeti procesul.
D. Opriti aparatul si scoateti-l din
priza. Lasati sa se raceasca,
stergeti ce a dat peste. Nu
puneti carafa pe plita uda,
pentru ca poate crapa.
6 Cafeaua nu e fierbinte
A. Pana de curent
B. Auto shut-off s-a activat (la
anumite modele).
A. Asteptati sa revina curentul.
B. Pentru cele mai bune rezultate,
preparati o alta cana fierbinte de
cafea.
7
Cafeaua are un gust rau
A. Pulberea de cafea folosita
nu era pentru un filtru de
cafea.
B. Nu a fost respectata masura
C. Aparatul are nevoie sa fie
curatat
A. Folositi doar cafea pulbere
recomandata pentru utilizarea la
aparate automate.
B. Folositi masura corecta de cafea.
C. Curatati conform instructiunilor.
8
Pulberea se scurge in cafeaua
preparata
A. Filtrul nu este asezat corect.
B. Filtrul s-a invechit
A. Pozitionati corect filtrul
B. Inlocuiti filtrul.
PROBLEME – CAUZE SI SOLUTII
Page 7

6
ELIMINAREA DESEURILOR IN MOD RESPONSABIL FATA DE MEDIU
Poti ajuta la protejarea mediului!
Va rugam sa respectati regulamentele si legile locale: duceti echipamentele electrice
nefunctionale catre un centru de colectare al echipamentelor electrice uzate.
Importator: Asesoft Distribution
Europolis Logistic Park, Italia Street, 1-7, Chaijna, Ilfov, Romania
Tel: +4021 256 00 86, www.heinner.com, www.asesoftdistribution.ro
Page 8
7
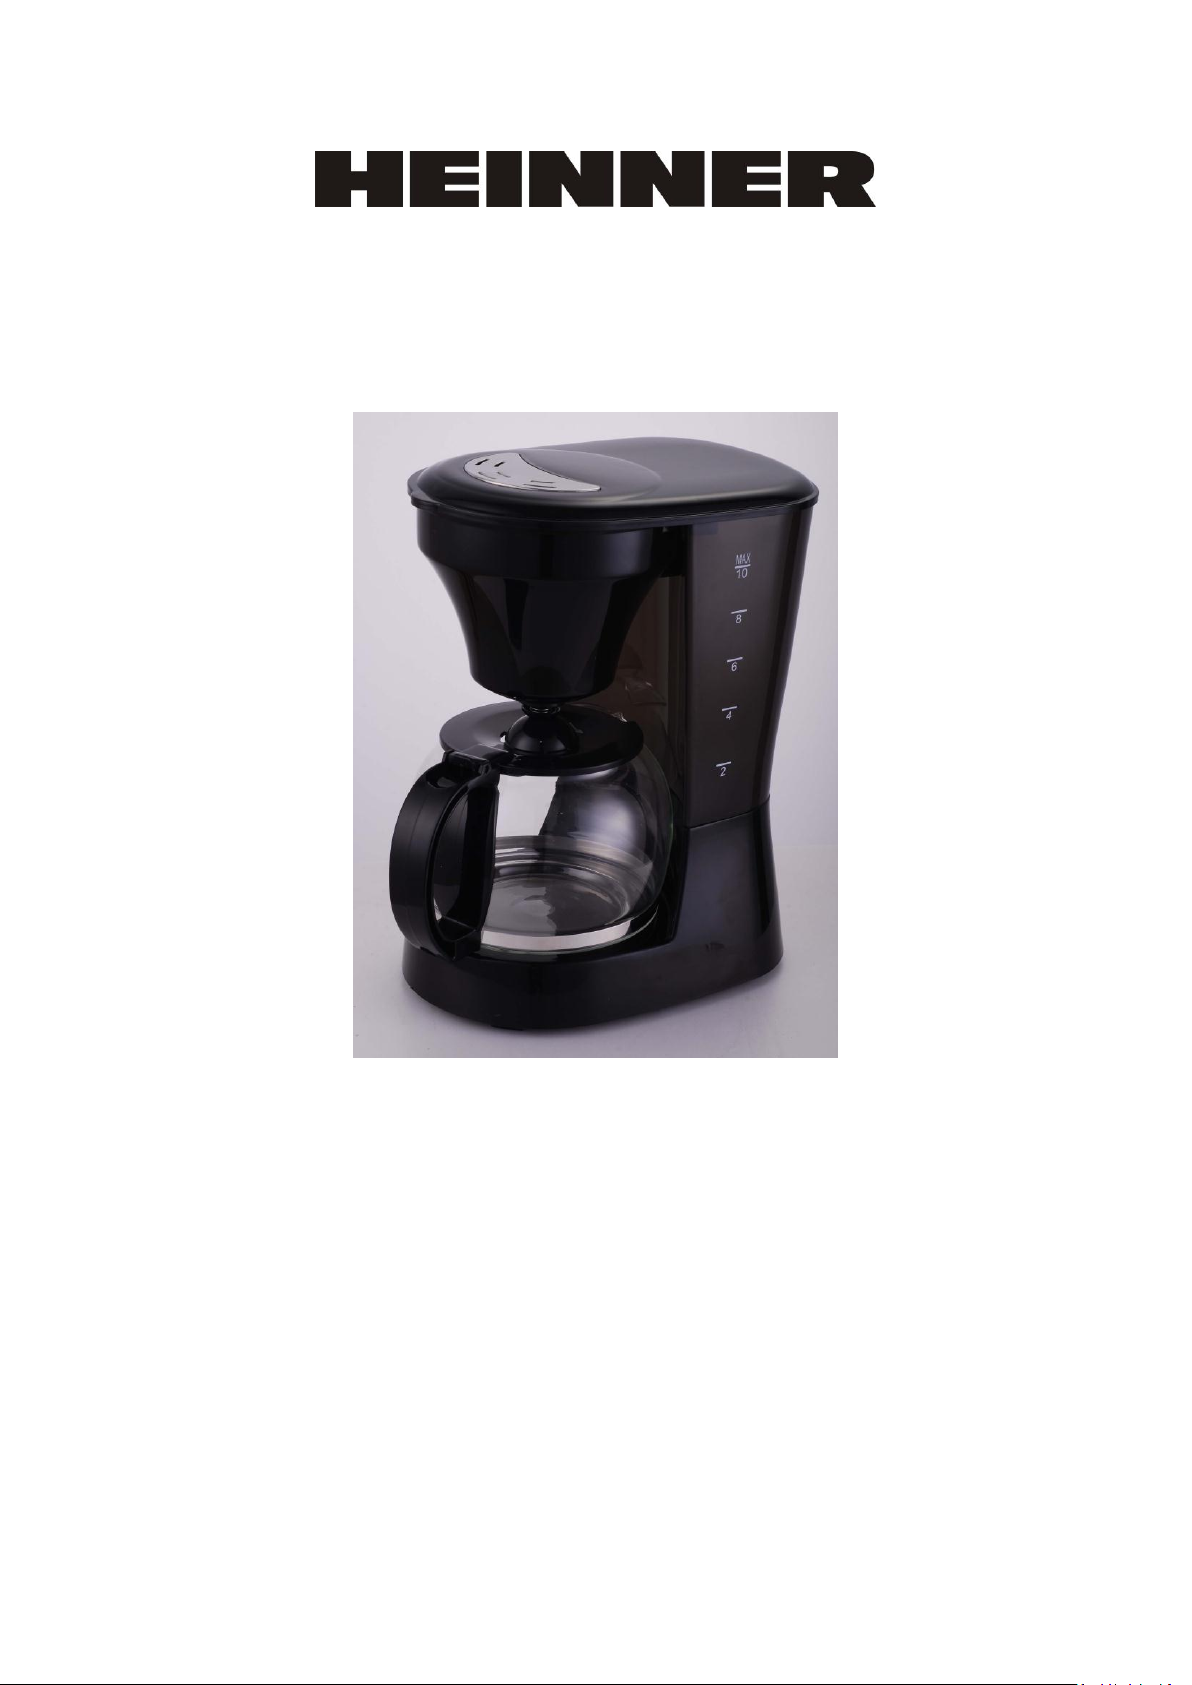
COFFEE MAKER
Aroma 220
Voltage: 220-240V~50/60Hz
Power: 800W
Please read this instruction manual careful before use it
General Safety Instructions
Page 9

8
IMPORTANT SAFEGUARDS
When using electrical appliances, basic precautions should always be followed, including the following:
1. Read all instructions.
2. Make sure that your outlet voltage corresponds to the voltage stated on the rating label of the
coffee maker.
3. To protect against fire, electric shock and injury to persons do not immerse cord, plug, or the
unit in water or other liquid.
4. Close supervision is necessary when any appliance is used by or near children.
5. Unplug from outlet when not in use and before cleaning. Allow to cooling before putting on or
taking off parts, and before cleaning the appliance.
6. If the supply cord is damaged, it must be replaced by the manufacturer or its service agent or a
similarly qualified person in order to avoid a hazard.
7. The use of accessory not recommended by the appliance manufacturer may result in fire, electric
shock or injury to persons.
8. Do not use outdoors.
9. Do not let cord hang over the edge of table or counter, or touch the hot surface.
10. Do not place on or near a hot gas or electric burner, or in a heated oven.
11. Do not use appliance for other than intended use.
12. Do not clean container with cleansers, steel wool pads, or other abrasive material.
13. To disconnect, turn any control to “Off”, remove plug from wall outlet. Always hold the plug. But
never pull the cord.
14. Scalding may occur if the cover is removed during the brewing cycles. Be careful not to get
burned by the steam.
15. Some parts of appliance are hot when operated, so do not touch with hand. Use handles or
knobs only.
16. Never leave the empty carafe on the warming plate otherwise the carafe is liable to crack.
17. Never use the appliance if the carafe shows any signs of cracks or carafe having a loose or weakened
handle. Only use the carafe with this appliance. Use carefully as the carafe is very fragile.
18. This appliance is not intended for used by persons (including children) with reduced physical, sensory
or mental capabilities, or lack of experience and knowledge, unless they have been given supervision
or instruction concerning use of the appliances by a person responsible for their safety.
19. Children should be supervised to ensure that they do not play with the appliance.
20. Do not set a hot container on a hot or cold surface.
Page 10
9
21. Do not let the coffee maker operate without water.
22. This appliance is intended to be used in household and similar applications such as:
i. staff kitchen areas in shops, offices and other working environments;
ii. farm houses;
iii. by clients in hotels, motels and other residential type environments;
iv. bed and breakfast type environments.
23. Save these instructions.
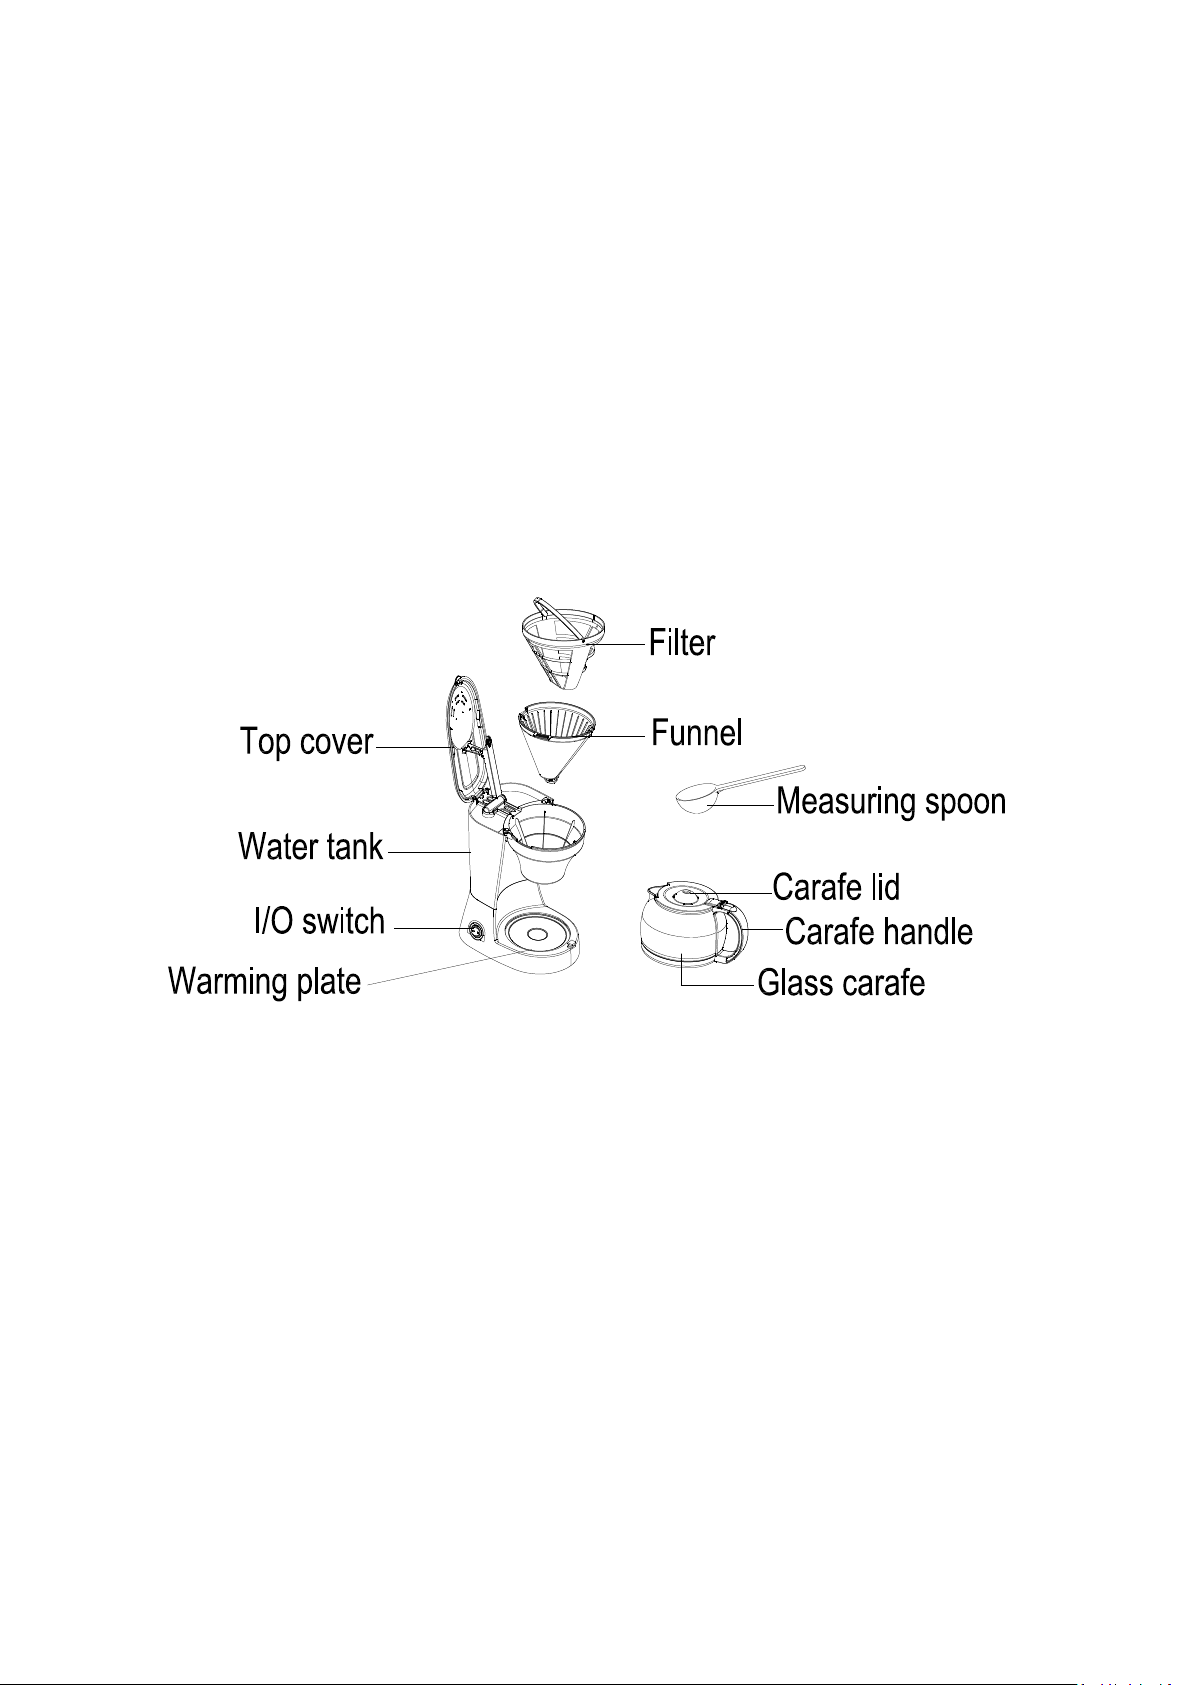
KNOW YOUR COFFEE MAKER
BEFORE FIRST USE
Check that all accessories are complete and the unit is not damaged. Fill water into water tank to the
MAX level and brew water for several times without coffee powder, then discard the water. Clean and
dry all detachable parts thoroughly according to the section “CLEANING AND MAINTENANCE”
USING YOUR COFFEE MAKER
1. Open the top cover and fill the water tank with cold drinking water
Note: Do not fill water tank with water to exceed max level as indicated on water gauge. The
appliance can brew max 10 cups of coffee every brewing cycle
2. Place the funnel into funnel holder and make sure the funnel is assembled in place, and
then put the filter into funnel correctly.
3. Add proper coffee powder into filter. Usually a cup of coffee need a level spoon of coffee
powder, but you may adjust according to personal taste, and then close the top lid.
Page 11

10
4. Insert glass carafe with lid in place onto warming plate horizontally, ensure center line of
carafe aligns with that of funnel.
5. Plug the unit into an outlet.
6. Press switch to the “I” position, the indicator in it will be illuminated and the appliance
will begin working. The brewing process can be interrupted by pressing the switch to the
“0” position at any time and the indicator in it will go off, indicating your coffee maker is
off. Once the switch is pressed again to the “I” position, the appliance will continue to
brew.
Note: the appliance is designed with a pause-and-serve feature, if you wish, at any time during
brewing cycle, you can temporarily remove carafe to pour and serve a cup of hot coffee. The
brewing cycle will not be interrupted and no coffee will drip from the appliance, simply replace
glass carafe onto warming plate to restart the brewing cycle, But do not remove glass carafe for
longer than 30s, never return empty carafe onto warming plate when it is still warm.
7. Remove carafe to serve when finish brewing
Note: the coffee you get will be less than the water you have added as some water is absorbed by
coffee powder.
Caution: When pour coffee, the momentary inclined angle of carafe shall not be more than 45 degree
from the vertical position, you shall pour the coffee slowly until the carafe is empty, otherwise the
coffee in the carafe will rush to the bottom of carafe lid, and the coffee will flow out from two edges of
lid and hurt person!
8. After brewing, the appliance will automatically switch to the keep warm mode, which will
continue to keep your coffee warm until you turn off the appliance. It is suggested that
warming time shall be not more than 1 hour. For an optimum coffee taste, serve it just
after brewing.
9. Always turn the coffee maker off and unplug the appliance when not in use.
CLEANING AND MAINTENANCE
Caution: Be sure to unplug this appliance before cleaning. To protect against electrical shock, do not
immerse cord, plug or unit in water or liquid.
1) Clean all detachable parts after each use in hot sudsy water.
2) Wipe external surface of product with a soft, damp cloth to remove stains.
Note: Do not attempt to clean the inside of water tank, as this will leave a residue of lint and may clog
your coffee maker, simply rinse with cold water periodically.
3) Water droplets may buildup in the area above the funnel and drip onto the product base during
brewing. To control the dripping, wipe off the area with a clean, dry cloth after each use of the product.
4) Replace all parts and keep for next use.
Page 12

11
REMOVING MINERAL DEPOSITS
To keep your coffee maker operating efficiently, periodically you should clean away the mineral deposits
left by the water according to the water quality in your area and the use frequency, we recommend
removing mineral deposits as follows:
1. Fill the tank with water and descale to the max level as indicated on water gauge (the
scale of water and descale is 4:1, the detail refers to the instruction of descale. Please use
“household descale”, you may also use the citric acid instead of the descale (the one hundred
parts of water and three parts of citric acid).
2. Insert glass carafe onto the warming plate.
3. Make sure filter (without coffee powder) and funnel are assembled in place.
4. Switch on the appliance and allow it to “brew” de-scaling solution.
5. After “brew” one-cup solution, switch off the appliance.
6. Leave the solution stay for 15 minutes and repeat step 3-5.
7. Switch on the appliance and run off the solution until the water tank is completely empty.
8. Rinse by operating the appliance with water at least 3 times.
HINTS FOR GREAT-TASTING COFFEE
1. A clean coffee maker is essential for making great-tasting coffee. Regularly clean the coffee
maker as specified in the “CLEANING AND MAINTENANCE” section. Always use fresh, cold water
in the coffee maker.
2. Store unused coffee powder in a cool, dry place. After opening a package of coffee powder,
reseal it tightly and store it in a refrigerator to maintain its freshness.
3. For an optimum coffee taste, buy whole coffee beans and finely grind them just before brewing.
4. Do not reuse coffee powder since this will greatly reduce the coffee’ flavor. Reheating coffee is
not recommended as coffee is at its peak flavor immediately after brewing.
5. Clean the coffee maker when over-extraction causes oiliness. Small oil droplets on the surface of
brewed, black coffee are due to the extraction of oil from the coffee powder.
6. Oiliness may occur more frequently if heavily roasted coffees are used.
7. Selecting and Measuring Ground Coffee:
For best results, use a level tablespoon for ground coffee measurement.
Make sure you use medium grind coffee for a perfect brew.
Page 13
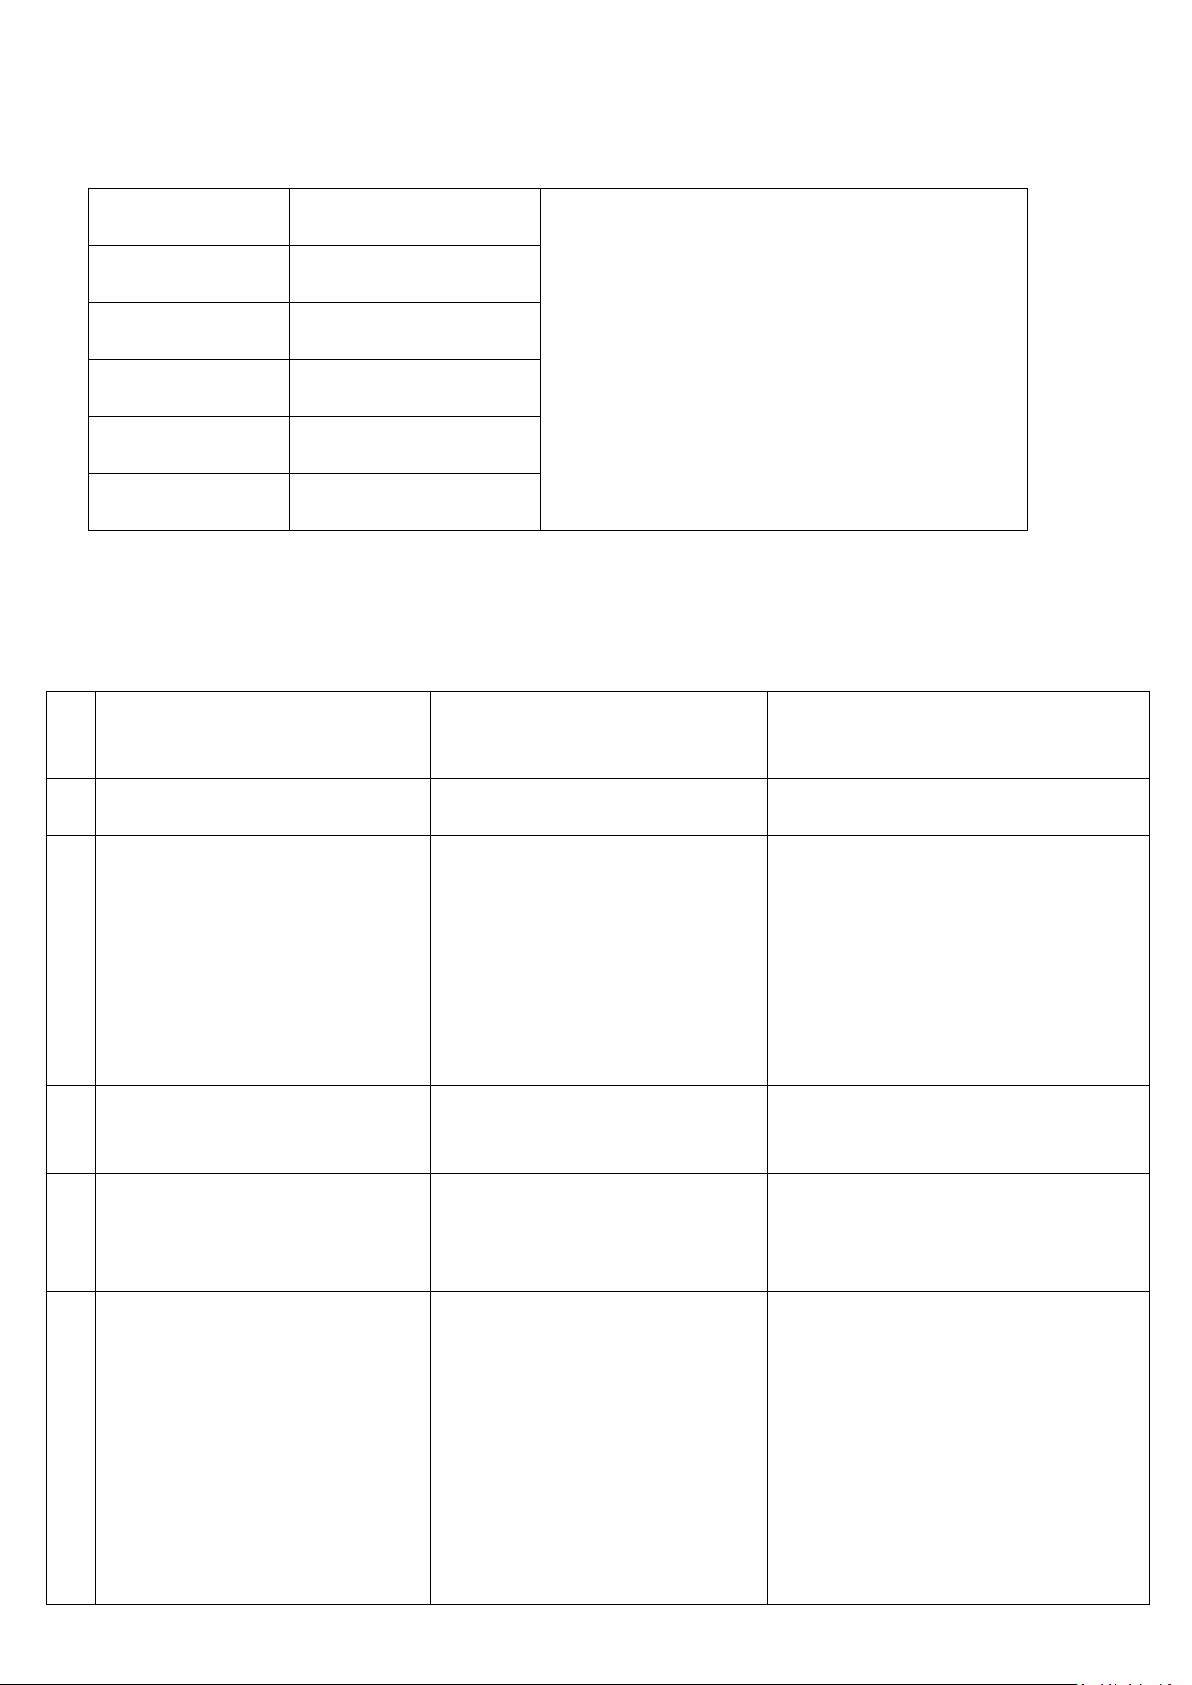
12
To Brew
Ground Coffee
1 level tablespoon (tbsp)=5gr./0.17oz.
1 cup=5fl.oz. of brewed coffee
Use more or less coffee to suit your taste
12 Cups
9 tbsp.
10 Cups
7.5 tbsp.
8 Cups
6 tbsp.
6 Cups
4.5 tbsp.
4 Cups
3 tbsp.
N
o.
FAULT
CAUSE
SOLUTION
1
The ON light does not light up
The appliance is unplugged
Plug unit in
2
The coffee is not brewing
F. The appliance is unplugged
G. There’s a power outage
H. The water reservoir is empty
I. The filter basket is not
properly inserted
J. The decanter is not placed
all the way in on the
warming plate
F. Plug Unit in
G. Wait for power to be restored
H. Check the water window
I. Insert filter basket correctly
J. Place decanter correctly on
warming plate
3
The coffee maker only brews
water
There are no coffee grounds in
the filter basket
Add the desired amount coffee
ground
4
The coffee maker brews slowly
The coffee maker needs
cleaning
Clean coffee maker as described in
“CLEANING AND MAINTAINING”
section
5
The filter basket overflows
E. The filter basket is not
properly inserted
F. The decanter is not placed
all the way in on the
warming plate
G. The decanter lid is not on
decanter
H. Too much coffee ground
were placed in the filter
E. Insert filter basket
correctly .
F. Place decanter correctly on the
warming plate
G. Place lid on the decanter
H. Remove filter, discard grounds. If
paper filter, replace. If
permanent filter, rinse. Begin
Suggested Coffee Measurement Chart:
FAULT, CAUSE AND SOLUTION
Page 14
13
I. The decanter was removed
from the warming plate for
more than 30 seconds
brewing process again
I. Turn off and unplug the unit.
Allow to cool, wipe up the spill.
Do not set hot decanter back on
the wet warming plate or it
might crack
6 The coffee is not hot
C. There is a power outage
D. Auto shut-off has been
activated.(Programmable
models only)
C. Wait for power to be restored
D. For best results, brew a fresh pot
of coffee
7
The coffee tastes bad
D. Coffee grounds other than
for an automatic drip coffee
maker were used
E. The ground coffee to water
ratio was unbalanced
F. The coffee maker needs
cleaning
D. Use coffee grind recommended
for automatic drip coffee makers
E. Use correct ground coffee to
water ratio
F. Clean coffee maker as described
in “Cleaning and maintaining”
Section
8
The Grounds are in the coffee
9. The filter is not properly
seated in the basket
10. The filter collapsed
C. Seat filter properly within the
filter basket
D. Remove filter and replace
Environment friendly disposal
You can help protect the environment!
Please remember to respect the local regulations: hand in the non-working electrical
equipment’s to an appropriate waste disposal center.
Importer: Asesoft Distribution
Europolis Logistic Park, Italia Street, 1-7, Chaijna, Ilfov, Romania
Tel: +4021 256 00 86, www.heinner.com, www.asesoftdistribution.ro
Page 15
14
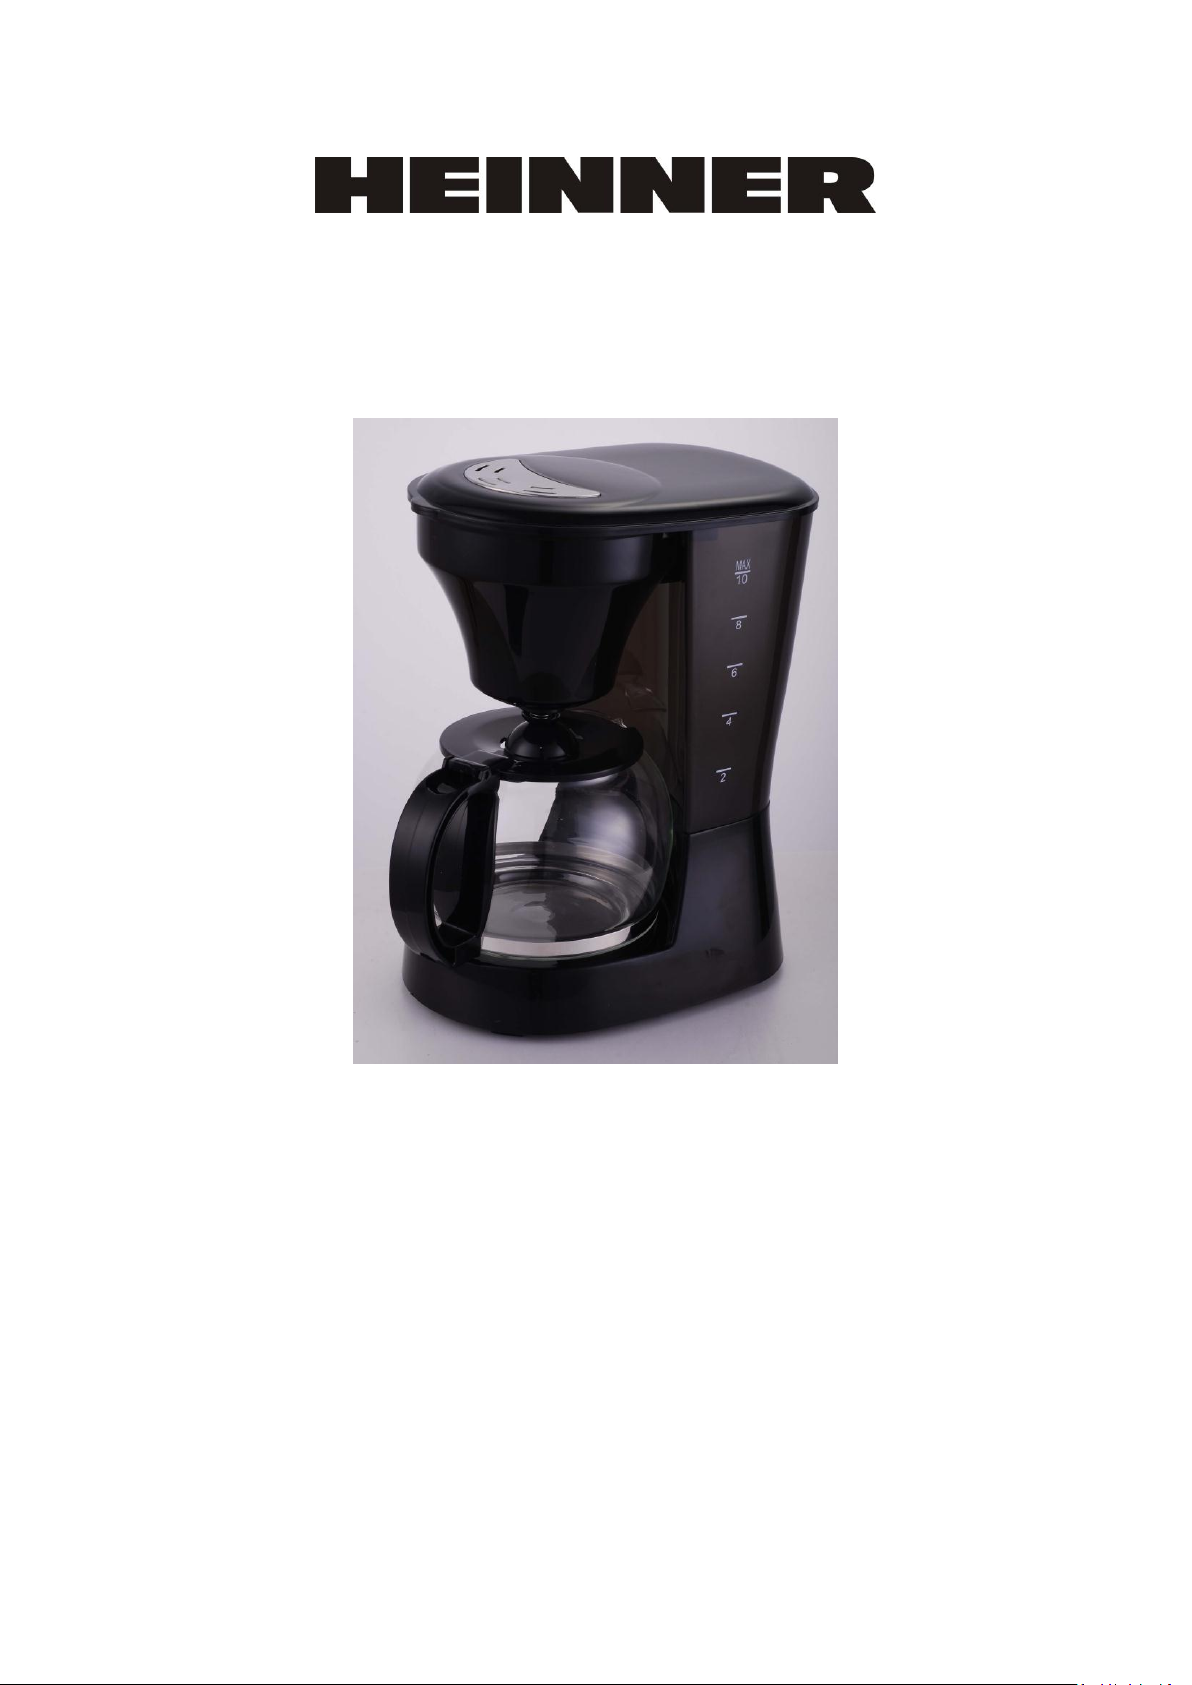
КАФЕВАРКА
Aroma 220
Захранване : 220-240V~50/60Hz
Мощност: 800W
Прочетете внимателно ръководството за употреба преди да използвате уреда.
Общи инструкции за безопасност.
Page 16

15
ВАЖНИ МЕРКИ ЗА БЕЗОПАСНОСТ
При употребата на електрически уреди, минималните мерки за безопасност трябва да бъдат
спазвани, включително следните:
1. Прочетете всички инструкции.
2. Преди да включите уреда, проверете дали изписаното на уреда напрежение съответства с
напрежението на контактите.
3. Не поставяйте уреда, кабела или щекера във вода.
4. Наблюдавайте уреда когато работи в близост до деца.
5. Винаги изключвайте уреда, когато не се използва и преди почистване. Оставете продукта
да изстине преди добавите или извадите аксесоари или преди почистване.
6. За вашата сигурност, периодично проверявайте състоянието на кабела; в случай че е
повреден, за да избгнете всякаква опасност, смяната му трябва да бъде направена от
ауторизиран сервиз (на производителя или друг).
7. Употребата на непрепоръчаните от производителя аксесоари представляват риск от
пожари, токово удари и телесни наранявания.
8. Да не се използва на открито.
9. Не оставяйте кабела да виси от краищата на масата или на кухненският блат или да се
допира до горещи повърхности.
10. Не оставяйте уреда на или до керамичната горварска плоча или някъде където може да се
докосне до фурната или микровълновата печка.
11. Не използвайте уреда за други цели освен посочените.
12. Не почиствайте с химически продукти, абразивни, т.н.
13. За изключване, настройте всички бутони на позиция OFF, извадете щекера от контакта
(никога не дърпайте за кабела).
14. Можете да се опарите, ако махнете капака по време на приготвяне на кафето. Горещата
пара може да предизвика сериозно нараняване.
15. Определени части на уреда са горещи по време на употреба, така че не пипайте с ръка.
Използвайте дръжките и бутоните.
16. Никога не оставяйте празна каната на плоскостта на уреда, защото може да се счупи.
17. Не използвайте уреда когато каната има признаци на счупване или пукнатини или когато
дръжката й е отхлабена. Използвайте каната само с този уред. Използвайте внимателно, тъй
като каната е лесно чуплива.
Page 17
16
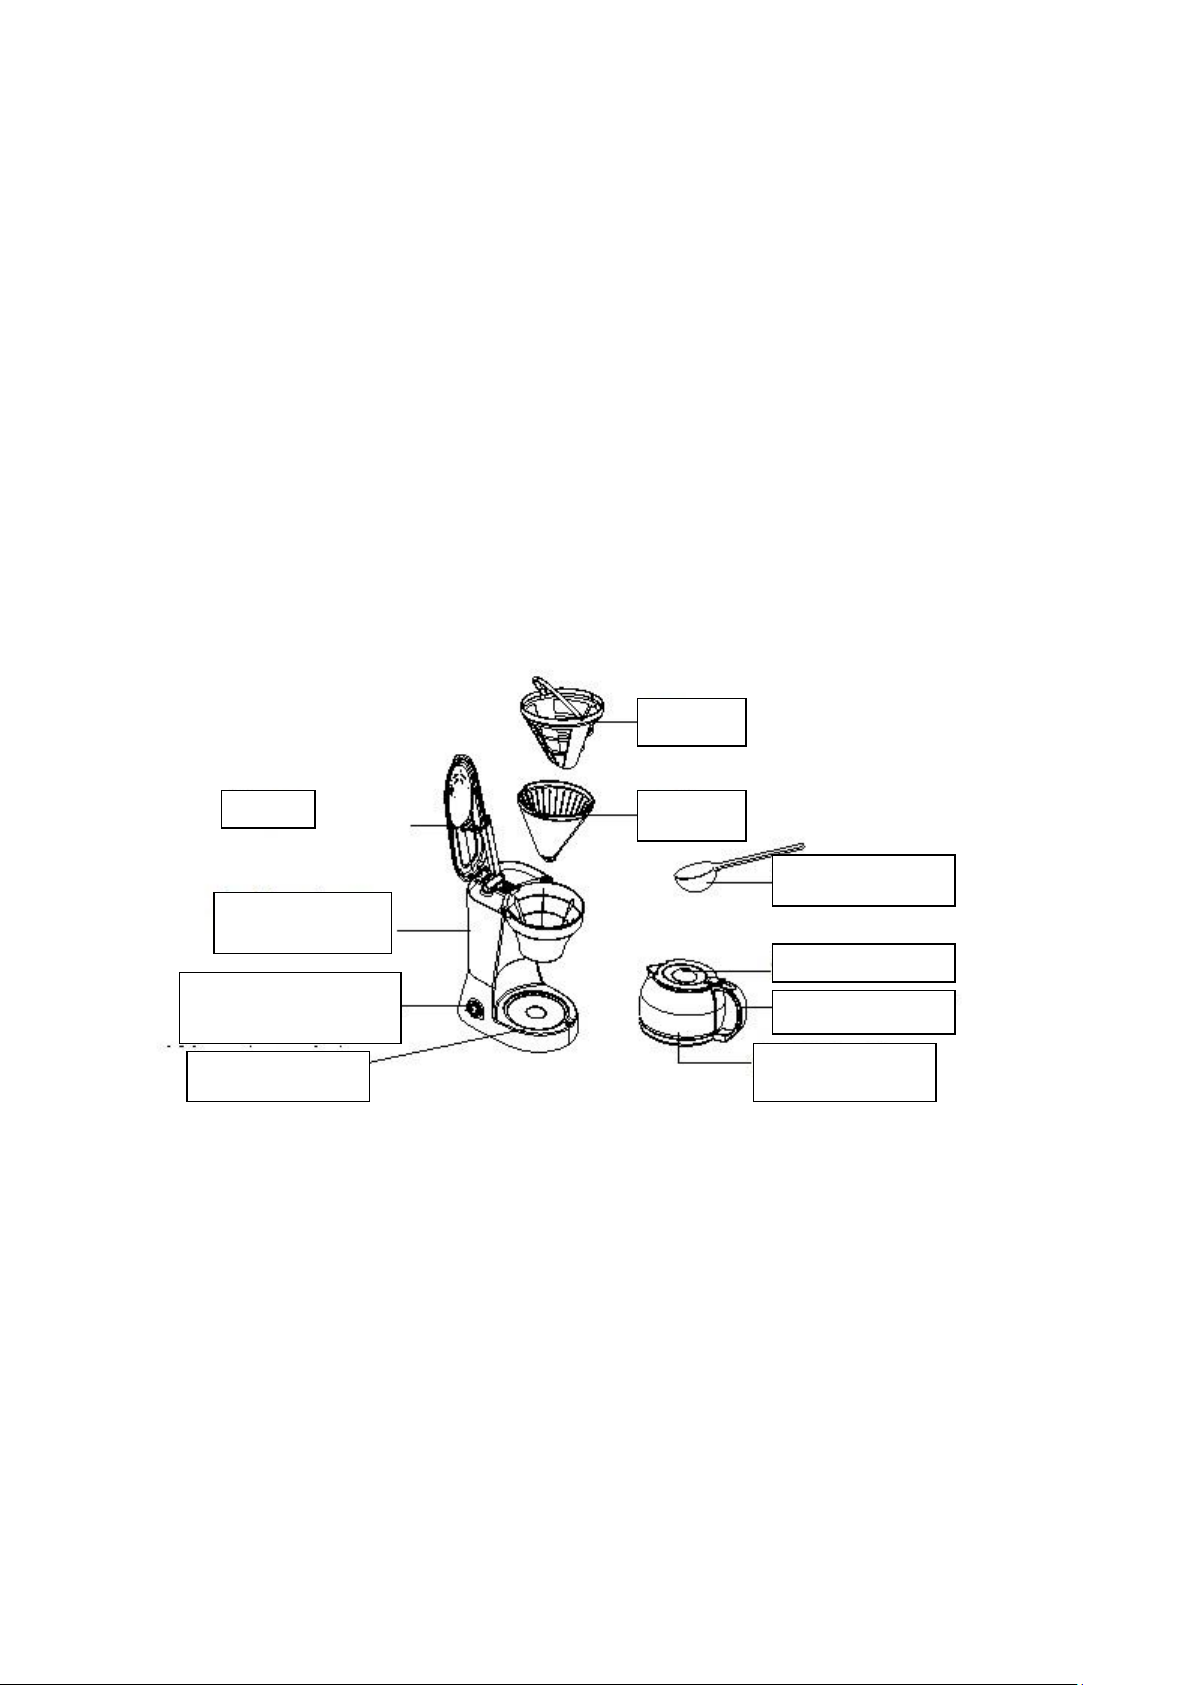
Съд за вода
Филтър
Фуния
Прекъсвач ON/OFF
(Вкл./Изкл.
Основа
Мерителна
Дръжка кана
Стъклена кана
18. Този уред не е предназначен за употреба от лица (включително деца) с намалени физически,
сензорни или умствени способности, освен ако не са инструктирани и наблюдавани от
отговорно за тяхната сигурност лице.
19. Дръжте далеч от деца! Децата трябва да бъдат наблюдавани, за да не си играят с уреда.
20. Не оставяйте на гореща или студена повърхност.
21. Не оставяйте филтъра за кафе да работи без вода.
22. Този уред е предназначен за употреба в домашни условия или в подобни места:
a. Служебни кухнио в офиси или други работни места;
b. ферми;
c. от клиенти на хотели, мотели или други жилищтни места;
d. настанявания bed&breakfast.
23. Пазете тези инструкции.
ЧАСТИ НА УРЕДА
ПРЕДИ ПЪРВАТА УПОТЕБА
Проверете дали всички аксесоари са в наличност и уреда да не е повреден. Напълнете съда за
вода до максималното ниво MAX и включете уреда няколко пъти, след което изхвърлете водата.
Почистете и подсушете всички разглобяеми части според инструкциите от раздел „ПОЧИСТВАНЕ И
ПОДДРЪЖКА“.
УПОТРЕБА НА ФИЛТЪРА ЗА КАФЕ
1. Отворете капака и напълете съда за вода със студена питейна вода.
Бележка: Не пълнете съда за вода над указаното ниво. За един работен цикъл,
филтъра може да приготви 10 чаши кафе.
Page 18

17
2. Сложете фунията на място и се уверете че е поставена правилно, след което сложете
филтъра.
3. Сложете във филтъра съответното количество мляно кафе. За една чашка кафе се слага
една равна лъжица кафе, но можете да променяте по вкус. Затворете капака.
4. Сложете стъклеата кана с капака на основата. Уверете се, че централната линия на каната е
изравнена с тази на фунията.
5. Включете щекера в контакта.
6. Включете прекъсвача на позиция “I”, светлинният индикатор ще започне да работи.
Можете да прекъснете процеса на работа натискайки на позиция “0”. Светлината на
индикатора ще изчезне. След като натиснете отново прекъсвача, уреда ще възобнови
процеса на приготвяне на кафето.
Бележка: уреда е снабден с функция пауза и сервиране; ако желаете, във всеки
момент от оприготвянето на кафе можете да отстраните временно каната , за
да отсипете чашка кафе. Цикъла за приготвяне няма да бъде прекъснат и кафето
няма да капе от уреда. Просто сложете на място каната за възобновяване на
процеса. Не вадете каната за повече от 30 секунди и не оставяйте каната празна
и затворена.
7. Извадете каната за да си сипете кафе. .
Бележка: Количеството кафе, което ще получите е бъде по-малко в сравнение с
количеството вода което сте сложили в началото, защото част от водата е
абсорбирана от кафето.
Внимание: При изсипването на кафето, ъгъла нанаклон на каната не трябва да бъде
по-голям от 45 градуса във вертикално положение; изсипете бавно кафето, в
противен случай кафето ще се изсипе покраи капака и може да нарани някой!
8. След приготвяне на кафето, уреда ще се включи автоматично в режим на подгряване на
кафето докато изключите напълно уреда. Времето за поддържане на топлината не трябва
да надвишава един час. За максимално качество консумирайте веднага след приготвяне.
9. Винаги спирайте уреда и го изключвайте от контакта, когато не го използвате.
ПОЧИСТВАНЕ И ПОДДРЪЖКА
Внимание: Винаги изключвайте уреда от контакта и го оставете да изстине преди да го
почистите. Не поставяйте уреда, кабела или щекера във вода.
1. Почистете всички разглобяеми части във гореща вода.
2. Почистете външната повърхност на уреда с мека влажна кърпа за да отстраните петната.
Бележка: Не се опитвайте да почиствате вътрешната страна на съда за вода, защото
ще останат остатъци. Само почиствайте периодично със студена вода.
3. Могат да се образуват капки вода върху фунията, които могат да капят по основата на
уреда по време на работа. За да контролирате това, избършете с чиста кърпа след всяка
употреба.
Page 19

18
4. Съберете компонентите и запазете за следващата употреба.
ОТСТРАНЯВАНЕ НА МИНЕРАЛНИТЕ ОСТАТЪЦИ
За да запазите уреда в добро състояние за по-дълго време, трябва от време на време да да
почиствате минералните остатъци от водата в зависимоат от нея.
1. Напълнете резервоара с вода и разтворител за Umpleti rezervorul cu apa si dizolvant de piatra
pana la nivelul MAX. (Съотношение вода: разтворителя трябва да бъде 4:1. Използвайте
лимонена киселина – 100 части вода и 3 части лимонена киселиа).
2. Сложете каната на основата на уреда.
3. Уверете се, че филтъра (без кафе) и фунията са плавилно сглобени.
4. Включете уреда и го оставете да работи със почистващият разтвор.
5. След като изтекло количество за една чашка, изключете уреда.
6. Оставете разтвора да престои така 15 минути и повторете стъпките 3-5.
7. Включете уреда и оставете да се филтрира целият разтвор докато се изпразни резервоара.
8. Изплакнете, оставяйки да работи с чиста вода поне три пъти.
СЪВЕТИ ЗА ПРИГОТВЯНЕТО НА КАЧЕСТВЕНО КАФЕ
1. От голямо значение е да бъде почистена кафеварката за приготвянето на кафе с добър вкус.
Периодично почиствайте уреда. Използвайте студена и прясна вода.
2. Пазете мляното кафе на сухи и прохладно места. След отварянето на един пакет, затворете
го добре и го дръжте в хладилника, за да се съхрани прясно по-дълго време.
3. За максимално добър вкус , купете кафени зърна и ги меляйте точно преди приготвяне на
кафето.
4. Не използвайте повторно смляното кафе, защото аромата вече е намален. Не се
препоръчва притоплянето на кфето.
5. Явлението на поява на малсло се появява ако се използват много изпечене кафени зърна.
6. Избиране и мерене на кафето:
Използвайте мерителната лъжица.
Използвайте средно смляно кафе.
Таблица за имаерване на кафето:
Page 20

19
Приготвяне
Мляно кафе
1 равна лъжичка=5гр..
1 ceasca=150мл.
Използвайте повече или по-малко кафе
според желанията.
12 чашки
9 лъжички
10 чашки
7.5 лъжички
8 чашки
6 лъжички
6 чашки
4.5 лъжички
4 чашки
3 лъжички
Nr
ПРОБЛЕМ
ПРИЧИНА
РЕШЕНИЕ
1
Светлинният индикатор ON не
се включва.
Уреда не е включен в
контакта.
Включете в контакта.
2
Не се приготвя кафе.
A. Уреда не е включен в
контакта.
B. Тока е спярян.
C. Резервоара за вода е
празен.
D. Филтъра не е поставен
правилно.
E. Каната не е поставена
правилно на основата.
A. Включете уреда.
B. Изчакайте да дойде тока.
C. Проверете тока.
D. Поставете правилно
филтъра.
E. Поставете правилно каната
на основата/плочата.
3
Тече само вода.
Няма мляно кафе във
филтъра.
Добавете кафе във филтъра.
4
Кафето се приготвя прекалено
бавно.
Уреда има нужда от
почистване.
Почистете според указанията.
5
Филтъра има течове
J. Филтъра не е поставен
правилно.
K. Каната не е поставена
правилно.
L. Било е сложено прекалено
много кафе.
M. Каната е била извадена за
повече от 30 секунди от
основата.
J. Поставете правилно филтъра.
K. Поставете правилно каната на
основата.
L. Извадете филтъра, извадете
кафето. Сменете хартиеният
филтър. Ако е постоянен
филтър, измийте го. Започнете
отново процеса на приготвяне.
M. Спрете уреда и изключете от
контакта. Оставете уреда да
изстине, избършете течовете.
Не слагайте каната на основата
ако е влажна, защото може да
се спука.
ПРОБЛЕМИ – ПРИЧИНИ И РЕШЕНИЯ
Page 21
20
6 Кафето не е горещо.
E. Тока е спрял.
F. Автоматичното
изключване се е
активирало( при някои
модели).
E. Изчакайте да дойде тока.
F. За най-добри резултати,
пригответе друга кана с
горещо кафе.
7
Кафето има лош вкус.
G. Използваното кафе на
зърна не е било за
кафеварка.
H. Не е било спазено
количеството
I. Уреда има нужда от
почистване.
G. Използвайте само мляно кафе
препоръчано за употреба с
автоматични уреди.
H. Използвайте правилното
количество кафе.
I. Почистете според указанията.
8
Смляното кафе се стича в
каната с кафе.
C. Филтъра не е правилно
поставен.
D. Филтърът е остарял.
E. Поставете правилно филтъра.
Сменете филтъра.
ИЗХВЪРЛЯНЕТО НА ОТПАДЪЦИТЕ ПО ОТГОВОРЕН ЗА ОКОЛНАТА СРЕДА НАЧИН
Можете да помогнете за опазване на околната среда!
Моля, спазвайте местните правила и закони: занесете отпадъците от електрически уреди в специализиран
събирателен пункт.
www.heinner.com ,
 Loading...