

HEINE omega 500, omega 500 unplugged User Manual
HEINE Optotechnik GmbH & Co. KG
Kientalstr. 7 · 82211 Herrsching · Germany
Tel. +49 (0) 81 52 / 38 - 0
Fax +49 (0) 81 52 / 38 - 2 02
E-Mail: info@heine.com · www.heine.com
med 0912 2016-06-30
HEINE OMEGA® 500
HEINE OMEGA
®
500 UNPLUGGED
with LED and XHL Illumination

HEINE OMEGA® 500
HEINE OMEGA
®
500 UNPLUGGED
with LED and XHL Illumination
DEUTSCH 3
ENGLISH 7
FRANÇAIS 11
ESPAÑOL 15
ITALIANO 19
SVENSKA 23
NEDERLANDS 27
NORSK 31
SUOMI 35
PORTUGUÊS 39
3/44
med 0912 2016-06-30
DEUTSCH
HEINE OMEGA® 500
HEINE OMEGA® 500 UNPLUGGED
mit LED und XHL Beleuchtung
Lesen Sie vor der Anwendung des HEINE OMEGA® 500 diese
Gebrauchsanweisung sorgfältig durch und bewahren Sie sie zum
späteren Nachschlagen auf.
Allgemeine Gewährleistung
Anstelle der gesetzlichen Gewährleistungsfrist von 2 Jahren übernimmt
HEINE für seine Geräte (ausgenommen Verbrauchsmaterialien wie z.B.
Lampen, Einmalgebrauchsartikel und Ladebatterien) eine Garantie von
5 Jahren ab Warenauslieferung ab Werk. Diese Garantie gilt für einwandfreies Arbeiten bei bestimmungsgemäßer Verwendung und Beachtung der
Gebrauchsanweisung. Während der Dauer der Gewährleistung und Garantie
werden auftretende Fehler und Mängel am Gerät kostenlos beseitigt, soweit
sie nachweislich auf Material-, Verarbeitungs- und/oder Konstruktionsfehlern
beruhen. Rügt ein Besteller während der Gewährleistung einen Sachmangel,
so trägt er stets die Beweislast dafür, dass das Produkt bereits bei Erhalt der
Ware mangelhaft war. Diese gesetzliche Gewährleistung und die Garantie
beziehen sich nicht auf solche Schäden, die durch Abnutzung, fahrlässigen
Gebrauch, Verwendung von nicht original HEINE Teilen / Ersatzteilen (insbesondere Lampen, da diese speziell für HEINE Instrumente nach folgenden
Kriterien entwickelt wurden: Farbtemperatur, Lebensdauer, Sicherheit,
optische Qualität und Leistung), durch Eingriffe nicht von HEINE autorisierter
Personen entstehen oder wenn Vorschriften in der Gebrauchsanweisung vom
Kunden nicht eingehalten werden.
Jegliche Modifikation der HEINE Geräte mit Teilen oder zusätzlich angebrachten Teilen, die nicht der HEINE Originalspezifikation entsprechen, führt
zu einer Erlöschung der Gewährleistung auf die einwandfreie Funktion der
Geräte und damit des Garantieanspruchs wegen Mängel, soweit dies auf die
Veränderung oder Ergänzung zurückzuführen ist. Weitere Ansprüche, insbesondere Ansprüche auf Ersatz von Schäden, die nicht am HEINE Produkt
selbst entstanden sind, sind ausgeschlossen.
Warn- und Sicherheitsinformation
WARNUNG! Dieses Symbol macht auf eine möglicherweise gefährliche
Situation aufmerksam. Die Nichtbeachtung kann zu leichten oder mittleren Verletzungen führen.
(Hintergrundfarbe gelb, Vordergrundfarbe schwarz.)
HINWEIS! Dieses Symbol wird für Informationen bezüglich Installation,
Betrieb, Wartung oder Reparatur verwendet, die wichtig, jedoch nicht mit
Gefahren verbunden sind.
Zweckbestimmung
Das indirekte Ophthalmoskop HEINE OMEGA
®
500 ist ein Netz- oder Batterie-
betriebenes Instrument für medizinisches Fachpersonal. HEINE OMEGA
®
500
besitzt eine Beleuchtungseinrichtung sowie eine Untersuchungsoptik zur
Untersuchung von Media, Kornea, Kammerwasser, Linse, Glaskörper und
der Retina.
Produktübersicht
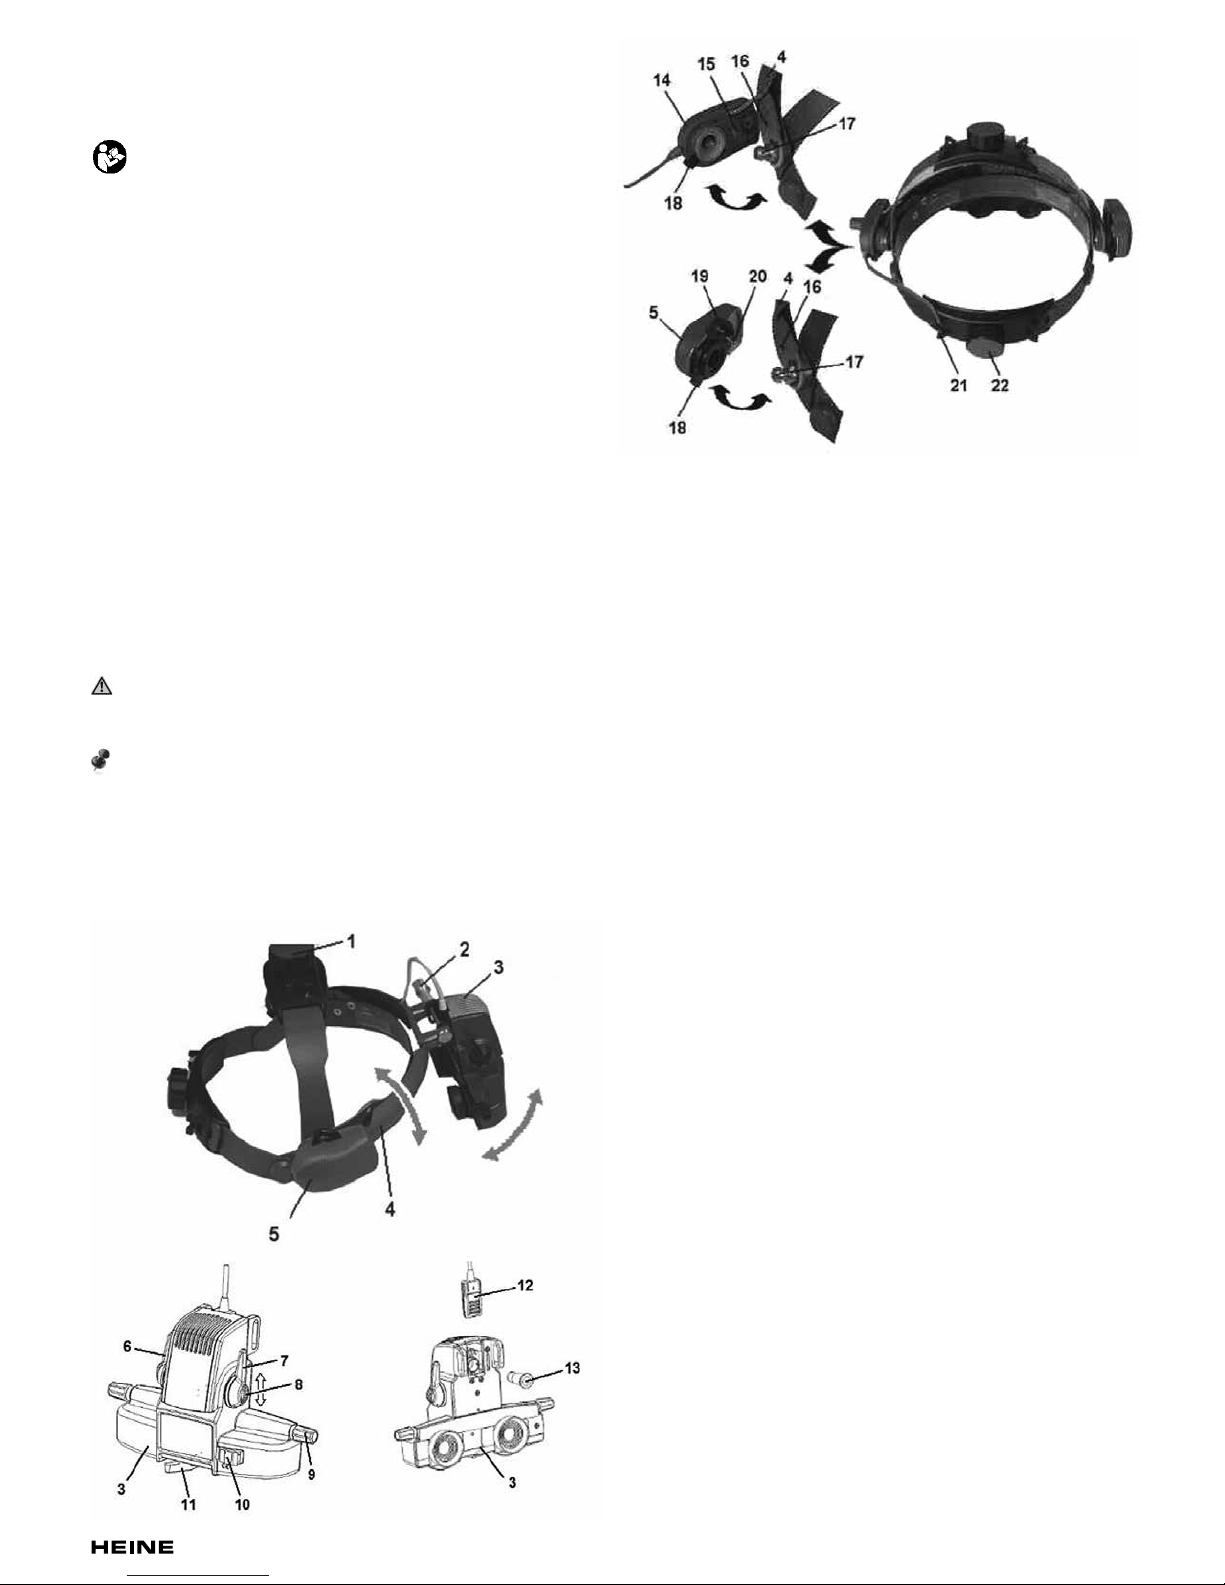
1 Kopfband-Höhen-Verstell-Knopf
2 Justierknopf
3 Optikeinheit
4 Optikträger
5 Rasthebel
6 Filterhebel
7 Blendenhebel
8 Rastschieber
9 Drehknopf
10 Halterung für Mitbeobachteraufsatz
11 Bedienhebel
12 Lampenabdeckung
13 Lampe
14 Helligkeitsregler HC 50 L
15 Führungszapfen
16 Bohrung für Führungszapfen
17 Zapfen
18 Entriegelung
19 Rastplatte
20 Führungszapfen
21 Kabelführung
22 Kopfband Größen-Verstell-Knopf
23 Segmentabdeckung
24 Verbindungskabel HC 50 L mit UNPLUGGED-Steckerbuchse
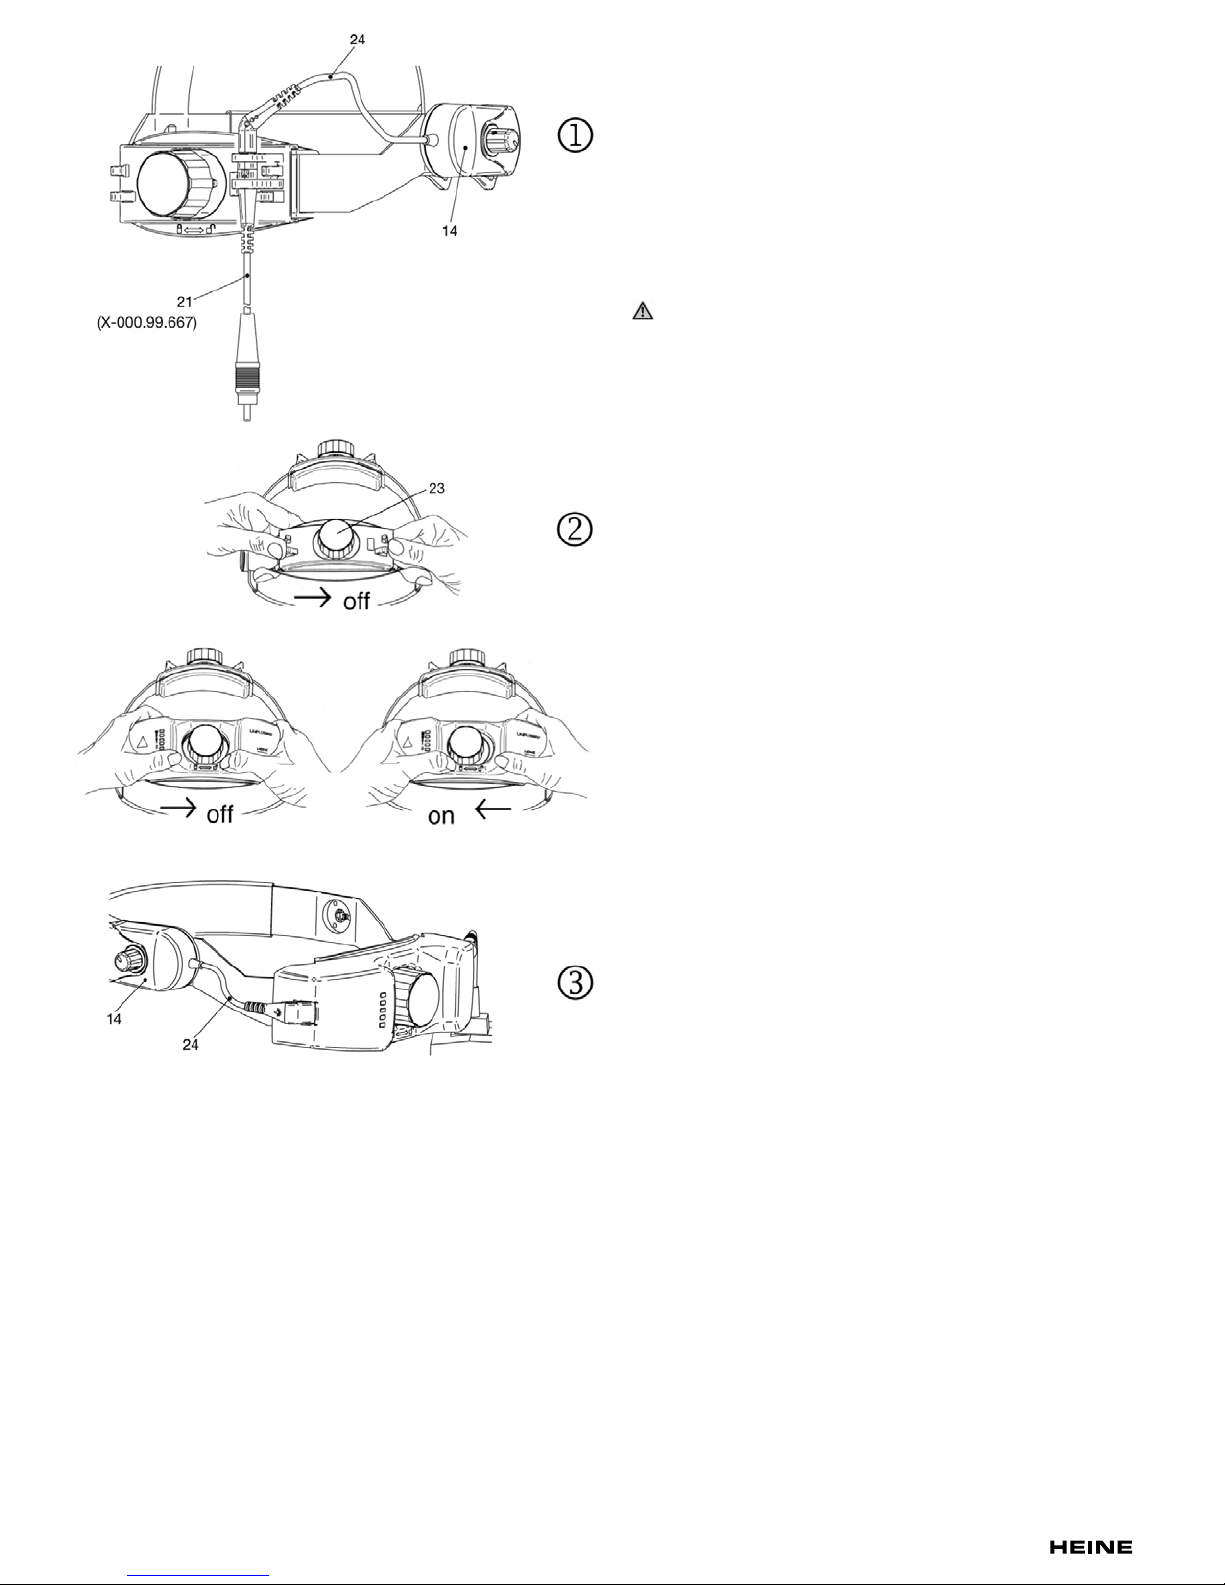
Inbetriebnahme des HEINE OMEGA
®
500
Das HEINE OMEGA
®
500 kann mit HEINE LED oder 5 Watt XHL Beleuchtung
betrieben werden.
Betrieb mit dem HEINE® mPack oder EN50:
Für den Betrieb des HEINE OMEGA
®
500 mit dem HEINE® mPack oder
HEINE
®
EN50 verbinden Sie das kurze Kabel (24) des Helligkeitsreglers
HC 50 L (14) mit dem Verbindungskabel (Cinch) und befestigen Sie dieses
an der Kabelführung (21). Schließen Sie das Verbindungskabel (Cinch) am
HEINE
®
mPack oder HEINE® EN50 an und stellen Sie mit dem Helligkeitsregler HC 50 L (14) die Helligkeit am Instrument ein (Abb. 1).
Betrieb mit mPack UNPLUGGED:
Für den Betrieb des HEINE OMEGA
®
500 mit dem HEINE® mPack
UNPLUGGED entfernen Sie am Kopfband zuerst die hintere Segmentabdeckung (23). Dazu schieben Sie die Segmentabdeckung in Pfeilrichtung
vom Kopfband (Abb. 2).
Dann montieren Sie das HEINE
®
mPack UNPLUGGED am Kopfband. Dazu
unterstützen Sie mit der linken Hand das Kopfband und schieben mit dem
rechten Daumen das HEINE
®
mPack UNPLUGGED nach links, bis es hörbar
einrastet. Schließen Sie das kurze Verbindungskabel (24) vom Helligkeitsregler HC 50 L (14) am HEINE
®
mPack UNPLUGGED an. Einschalten und
Helligkeitsregelung des Instruments über den Drehknopf am Helligkeitsregler
HC 50 L (14), (Abb. 3).
Betrieb mit Steckertrafo für HC 50 L Kopfbandregler:
Für den Betrieb des HEINE OMEGA
®
500 mit dem Steckertransformator
verbinden Sie das kurze Kabel (24) des Helligkeitsregler HC 50 L (14) mit dem
Verbindungskabel (UNPLUGGED-Stecker) und befestigen Sie dieses an der
Kabelführung (21). Schließen Sie das Verbindungskabel (Cinch-Stecker) am
HEINE Steckertrafo an und stellen Sie mit dem Helligkeitsregler HC 50 L (14)
die Helligkeit am Instrument ein (Abb. 1).

4/44
med 0912 2016-06-30
Handhabung des HEINE OMEGA® 500
Grundeinstellung:
Schalten Sie das Instrument über den Drehknopf (Helligkeitsregler) am Helligkeitsregler HC 50 L ein. Blendenhebel (7) und Filterhebel (6) in die obere
Position zum Anschlag bringen (großes, weißes Leuchtfeld). Bedienhebel (11)
in Mittelstellung bringen. Vertikale Leuchtrichtung, Drehknopf (9) etwa auf die
Mitte des Einstellbereichs drehen. Stellen Sie die Okulare auf Ihre PD oder auf
Skalenmitte ein.
Einstellung der Helligkeit:
Verwenden Sie das OMEGA 500 mit LED-Beleuchtung, stellen Sie bitte zuerst
eine hellere Lichtintensität mit dem HC 50 L ein, die Sie anschließend dimmen.
Rastschieber:
Die Blendenhebel (7) und Filterhebel (6) können mit dem Rastschieber (8)
verriegelt werden, um ein versehentliches Verstellen der Bedienhebel zu
vermeiden.
Blendenhebel:
Mit dem Blendenhebel (7) können 3 verschieden große Leuchtfelder und ein
diffuses Leuchtfeld eingestellt werden. Die Wahl des Leuchtfeldes richtet sich
unter anderem nach der Größe der Patientenpupille. Für lichtempfindliche
Patienten und für bestimmte Untersuchungen, z.B. in der Peripherie, kann
das diffuse Leuchtfeld vorteilhaft sein.
Filterhebel:
Mit dem Filterhebel (6) lassen sich unabhängig von dem gewählten Leuchtfeld
ein Interferenz-Rotfreifilter, ein Blaufilter und ein Gelbfilter in den Beleuchtungsstrahlengang einschalten.
Synchrone Verstellung von Konvergenz und Parallaxe:
Diese Eigenschaft stellt durch eine gleichzeitige Verstellung des Beobachtungs- und Beleuchtungsstrahlenganges eine Untersuchung bei jeder Pupillengröße mit bestmöglicher Stereopsis bzw. Qualität sicher. Stellen Sie bei
dilatierter Pupille den Bedienhebel (11) auf der Unterseite des Instrumentes
auf die Position für „große Pupille“ ein (großer Kreis). Bei kleinen Pupillen
stellen Sie diesen Hebel einfach auf die andere Position für „kleine Pupillen“
ein (kleiner Kreis). Der Bedienhebel (11) kann kontinuierlich in seinem Verstellbereich eingestellt werden, um die Stereopsis und den Beleuchtungsstrahlengang für alle Pupillengrößen zu optimieren. Mit dem Drehknopf (9) kann der
Beleuchtungsstrahl vertikal geschwenkt werden.
Mitbeobachteraufsatz:
Der optional lieferbare Mitbeobachter-Aufsatz wird bei Bedarf auf die Halterung (10) am Binokularteil aufgeschoben.
Lampenwechsel (nicht erforderlich für LED-Version):
Lassen Sie das Gerät vor dem Lampenwechsel abkühlen.
Trennen Sie das Gerät von der Stromversorgung. Lösen Sie den Justierknopf
(2), so dass die Optikeinheit (3) frei beweglich ist. Schieben Sie die Lampenabdeckung (12) nach oben. Ziehen Sie dabei nicht am Kabel. Schwenken Sie
die Optikeinheit (3) so weit, dass Sie die Lampe (13) aus der Fassung ziehen
können. Wischen Sie die Kuppe der neuen Lampe ggf. sorgfältig mit einem
weichen Tuch ab. Setzen Sie die neue Lampe so ein, dass der Justierstift am
Lampensockel in der Aussparung der Fassung sitzt. Setzen Sie die Lampenabdeckung (12) zurück in die Führung der Optikeinheit (3) und schieben Sie
die Lampenabdeckung bis in die unterste Position.
Handhabung des HEINE OMEGA
®
500 Kopfbands
Position des Optikträgers festlegen:
Der Optikträger (4) ist schwenkbar und lässt sich mit Rasthebel (5) in mehreren Positionen verriegeln (hochgeschwenkt: Ruheposition, abgeschwenkt:
Arbeitsposition (1 und 2). Zum Entriegeln müssen Sie auf den Rasthebel (5)
drücken und ihn gleichzeitig drehen. Versuchen Sie nicht, den Optikträger
gewaltsam auf- oder abzuschwenken. Üben Sie diesen Vorgang mehrmals,
um sich mit der Handhabung vertraut zu machen.
Bei richtiger Justierung und ruckfreiem Abschwenken muss die Optikeinheit
immer in die gleiche Arbeitsposition zurückkehren.
Befestigen des Helligkeitsreglers:
Achten Sie beim Aufsetzen des Helligkeitsreglers HC 50 L (14) darauf, dass
der Führungszapfen (15) in der dafür vorgesehenen Bohrung (16) des Optikträgers (4) sitzt. Klemmen Sie das Verbindungskabel zwischen Stromquelle
und Kopfbandregler HC 50 L in die Kabelführung (21) auf der Rückseite des
Kopfbandes.
Befestigen des Rasthebels:
Achten Sie vor dem Aufsetzen des Rasthebels (5) darauf, dass die Rastplatte
(19) vollständig nach oben geschwenkt ist. Drücken Sie hierzu auf die Rastplatte (19) und drehen diese gleichzeitig nach oben. Stellen Sie sicher, dass
der Optikträger (4) sich in der unteren Position befindet und der Führungszapfen (20) in die dafür vorgesehene Bohrung (16) eingreift. Drücken Sie erst
dann den Rasthebel (5) gegen den Zapfen (17), bis er einrastet.
Lösen des Kopfbandreglers HC 50 L und Rasthebels zum Umbau:
Sie können die Bedienelemente Kopfbandregler HC 50 L (14) und Rasthebel
(5) bei Bedarf auf der linken oder rechten Seite des Kopfbandes befestigen.
Drücken Sie zum Lösen auf die Entriegelung (18) und ziehen Sie gleichzeitig
die Bedienelemente vom Kopfband ab.
Justierung der Optik:
Lösen Sie den Justierknopf (2), so dass die Optikeinheit (3) frei beweglich
ist (der Knopf lässt sich nach Abschrauben und Vertauschen der Achse auch
für Linkshand-Bedienung anordnen). Setzen Sie das Instrument auf und
justieren Sie Umfang- und Höhenverstellung (22) (bzw. 1) auf bequemen und
rutschfreien Sitz des Kopfbandes. Der hintere Kopfbandteil ist schwenkbar
und selbstrastend. Führen Sie die Optikeinheit so nah wie möglich vor Ihre
Augen und beobachten Sie, ohne zu akkommodieren, den Leuchtfleck auf einer Fläche im Abstand von 30 – 40 cm. Ein kleiner Gegenstand (z. B. Bleistift)
muss scharf erkennbar sein (in den Okularen sind Linsen mit 2 D eingesetzt).
Brillenträger blicken durch evtl. vorhandenes Fernteil). Richten Sie die Optikeinheit so aus, dass der Leuchtfleck vertikal im Blickfeld zentriert erscheint,
und arretieren Sie den Justierknopf (2). (Gegebenenfalls muss der Sitz des
Kopfbandes korrigiert oder durch Drücken des Rasthebels (5) und Schwenken
des Optikträgers (4) eine andere Arbeitsposition gewählt werden). Eine horizontale Dezentrierung des Leuchtflecks lässt sich durch geringfügiges Drehen
des Kopfbandes beseitigen. Justieren Sie die PD-Einstellung, indem Sie
abwechselnd mit dem rechten und dem linken Auge ein Objekt im Leuchtfleck
betrachten und das zugehörige Okular so verschieben, dass das Objekt exakt
im Zentrum des Blickfeldes erscheint. Nehmen Sie das Instrument ab und
überzeugen Sie sich, dass die PD symmetrisch eingestellt ist. Wiederholen
Sie ggf. die Einstellung. Die richtige Justierung der Optikeinheit ist vor allem
für die Untersuchung durch enge Pupillen äußerst wichtig. Eine Änderung der
Einstellung ist im Allgemeinen nur bei Benutzer-Wechsel erforderlich. Jedem

5/44
med 0912 2016-06-30
Instrument sind zwei Plangläser beigefügt, die bei Bedarf nach Abschrauben
der Okulare gegen die 2 D-Linsen ausgetauscht werden können.
Reinigung und Desinfektion
Vor allen Arbeiten ist der Netzstecker zu ziehen. Für das Abwischen der Oberflächen des Instruments und der Ophthalmoskopierlupe kann ein weiches,
Flusen freies Tuch genutzt werden. Ein Abwischen mit feuchtem Tuch ist
möglich. Sofern hierzu ein Haushaltsreiniger verwendet wird, soll dieser für
Oberflächen aus Kunststoff geeignet sein.
Desinfektionsmittel müssen in jedem Fall eine Freigabe für Medizinische
Geräte aus Kunststoff ausweisen, um Materialveränderungen vorzubeugen.
Alkoholbasierte Desinfektionsmittel können benutzt werden um die Ophthalmoskopierlupe zu desinfizieren. Die Lampe, falls nötig, ausschließlich mit
einem trockenen Tuch abwischen.
Sprühdesinfektion, das Tauchen in Lösungen und maschinelle Aufbereitung
sind nicht zulässig.
Wir haben die Materialverträglichkeit mit Incidin
®
Liquid und Bacillol® plus
getestet und empfehlen die Verwendung dieser Mittel.
Das Reinigen und Desinfizieren des OMEGA 500 ist nur mit feuchtem
Tuch erlaubt.
Eine Sterilisation von OMEGA 500 ist nicht zulässig.
Wartung
Für das OMEGA 500 ist keine regelmäßige Wartung erforderlich. Tauschen
Sie ggf. verbrauchte XHL Leuchtmittel aus.
Service
OMEGA 500 Ophthalmoskope sind servicefrei.
Entsorgung
Das Produkt muss einer getrennten Sammlung von Elektro- und
Elektronikgeräten zugeführt werden. Es sind die jeweils landesspezifischen Entsorgungsregeln zu beachten.
Technische Daten
Gewicht: 470 g (Instrument)
Umgebungsbedingungen beim Gebrauch:
Temperatur: +5 °C bis +35 °C
Rel. Luftfeuchtigkeit: 30% bis 90%
Luftdruck: 800 hPa bis 1060 hPa
Umgebungsbedingungen bei Lagerung:
Temperatur: -20 °C bis +50 °C
Rel. Luftfeuchtigkeit: 10% bis 95%
Luftdruck: 700 hPa bis 1060 hPa
Umgebungsbedingungen bei Transport:
Temperatur: -40 °C bis +70 °C
Rel. Luftfeuchtigkeit: 10% bis 95%
Luftdruck: 500 hPa bis 1060 hPa
Allgemeine Hinweise und Warnungen
Das indirekte Ophthalmoskop OMEGA 500 erfüllt in seiner Originalverpackung die Transportbedingungen nach ISO 15004-1.
Das OMEGA 500 stimmt mit der Norm ISO 10943:2011 überein.
Allgemeine Hinweise
Überprüfen Sie OMEGA 500 vor jedem Gebrauch hinsichtlich seiner
einwandfreien Funktion. Nehmen Sie das Gerät nicht in Betrieb, wenn
dieses sichtbare Schäden aufweist.
OMEGA 500 darf in starken Magnetfeldern wie z.B. MRI nicht verwendet
werden.
Untersuchen Sie mit möglichst geringer Helligkeit und stellen Sie sicher,
dass die Beleuchtung nach jeder Untersuchung ausgeschaltet wird. Die
ärztliche Sorgfaltspflicht ist stets zu beachten.
Lampe nicht entfernen, wenn sie heiß ist. Lassen Sie den Lampenkörper
auskühlen.
Blendgefahr! Mit Lupen nicht in helle Lichtquellen blicken.
Brandgefahr! Setzen Sie die Ophthalmoskopierlupe keinem direkten
Sonnenlicht aus.
Der mPack UNPLUGGED Akku ist zu entfernen, wenn das Gerät längere
Zeit nicht in Betrieb genommen wird.
Eine Änderung des ME-Geräts ist nicht erlaubt.
Das OMEGA 500 darf nicht in Sauerstoff angereicherter Umgebung
verwendet werden.
Verwenden Sie ausschließlich HEINE Ophthalmoskopierlupen.
Verwenden Sie ausschließlich Leuchtmittel in Kombination mit HC 50 L,
die von HEINE für das OMEGA 500 freigegeben sind (X-004.88.111,
X-008.87.200). Andere Leuchtmittel können sich in der Helligkeit
unterscheiden, mit der Folge von Augenschädigungen oder falschen
Diagnosen.
Verwenden Sie ausschließlich von HEINE freigegebene Stromquellen,
um eine Überhitzung des Instruments auszuschließen.
Benutzen Sie OMEGA 500 nur, wenn das Linsensystem ausreichend
sauber ist.
Senden Sie das Instrument ausschließlich zur Reparatur an HEINE, um
die Gefahr von elektrischen Schlägen, Verbrennungen und Verletzungen
der Augen aufgrund unsachgemäßer Reparatur oder Manipulation zu
vermeiden.
Bei OMEGA 500 handelt es sich um ein hochwertiges optisches Präzisionsgerät. Behandeln Sie das OMEGA 500 daher stets sorgfältig und
bewahren Sie es an einem sauberen, trockenen Ort auf. Säubern Sie das
OMEGA 500 regelmäßig, um beste Voraussetzungen für Ihre Diagnostik
zu schaffen.
Lassen Sie OMEGA 500 genügend Zeit, um sich bei starken Temperaturänderungen an die Umgebungstemperatur anpassen zu können.
Wechseln Sie die Okularlinse bitte nur in sauberer Umgebung, um eine
Verschmutzung des Geräteinneren zu vermeiden.
Eine einwandfreie Funktion ist nur mit Original- Ersatzteilen und Zubehör
von HEINE gewährleistet.
Die Anzeige am Schaltnetzteil bzw. die Ladeanzeige auf der Rückseite des
mPack UNPLUGGED Akkus sind die Betriebsanzeige vom OMEGA 500.
Phototoxizität
Das OMEGA 500 Ophthalmoskop ist als Gruppe 2 Instrument gemäß
EN ISO 15004-2:2007 klassifiziert. Die Klassifizierung erfolgt zusammen
mit der HEINE A.R. 16D/Ø54mm Ophthalmoskopierlupe.
Das Licht dieses Instruments ist möglicherweise schädlich. Das Risiko
einer Augenschädigung erhöht sich mit der Bestrahlungsdauer. Eine
Bestrahlungsdauer mit diesem Instrument bei maximaler Intensität von
länger als 21 Minuten mit LED Beleuchtung und 15 Minuten mit 5W XHL
Beleuchtung.
Elektromagnetische Verträglichkeit
Medizinische elektrische Geräte unterliegen hinsichtlich der elektromagnetischen Verträglichkeit (EMV) besonderen Vorsichtsmaßnahmen.
Tragbare und mobile Hochfrequenz-Kommunikations-Einrichtungen können
medizinische elektrische Geräte beeinflussen. Das HEINE OMEGA
®
500 ist
für den Betrieb in einer wie unten angegebenen elektromagnetischen Umgebung bestimmt. Der Anwender des HEINE OMEGA
®
500 sollte sicherstellen,
dass es in einer derartigen Umgebung betrieben wird.
Das ME-Gerät darf nicht unmittelbar neben oder mit anderen Geräten
gestapelt angeordnet verwendet werden. Wenn der Betrieb nahe oder
mit anderen Geräten gestapelt erforderlich ist, sollte das ME-Gerät
beobachtet werden, um seinen bestimmungsgemäßen Betrieb in dieser
Anordnung zu überprüfen.
Aussendungs-
Messungen
Überein-
stimmung
Elektromagnetische
Umgebung – Leitlinien
HF Aussendungen
nach CISPR 11
Gruppe 1 Das ME-Gerät verwendet HF-
Energie ausschließlich zu seiner
internen Funktion. Daher ist
seine HF-Aussendung sehr gering und es ist unwahrscheinlich,
dass benachbarte elektronische
Geräte gestört werden.
HF Aussendungen
nach CISPR 11
Klasse B Das ME-Gerät ist für den
Gebrauch in allen Einrichtungen
einschließlich denen im Wohnbereich und solchen,
geeignet, die unmittelbar an ein
öffentliches Versorgungsnetz
angeschlossen sind, das auch
Gebäude versorgt, die zu Wohnzwecken benutzt werden.
Aussendung von
Oberschwingungen
nach IEC 61000-3-2
Klasse A Beleuchtungseinrichtung mit
Regelung.
Aussendungen von
Spannungsschwan-
kungen/Flicker nach
IEC 61000-3-3
Erfüllt

6/44
med 0912 2016-06-30
Empfohlene Schutzabstände zwischen tragbaren und mobilen HFKommunikationsgeräten und dem HEINE OMEGA
®
500
Das ME-Gerät ist für den Betrieb in einer elektromagnetischen Umgebung
bestimmt, in der gestrahlte HF-Störgrößen kontrolliert werden.
Der Anwender des ME-Geräts kann helfen, elektromagnetische Störungen
dadurch zu verhindern, dass er den Mindestabstand zwischen tragbaren und
mobilen HF-Kommunikationsgeräten (Sendern) und dem ME-Gerät, wie unten
entsprechend der Ausgangsleistung des Kommunikationsgerätes empfohlen,
einhält.
Erläuterung der verwendeten Symbole
Auf dem Gerät bzw. auf der Verpackung finden sich folgende Symbole:
Nennleistung
des Senders [W]
Schutzabstand nach Sendefrequenz [m]
150 kHz bis
80 MHz
d = 1,2√P
80 MHz bis
800 MHz
d = 1,2√P
800 MHz bis
2,5 GHz
d = 2,3√P
0,01 0,1 0,1 0,2
0,1 0,4 0,4 0,7
1 1,2 1,2 2,3
10 3,7 3,7 7,4
REF
SN
Tabelle 2 Leitlinien und Herstellererklärung – Elektromagnetische Aussendungen – für alle MEG
Leitlinien und Herstellererklärung – Elektromagnetische Störsendungen
Das MEG ist für den Betrieb in einer wie unten angegebenen elektromagnetischen Umgebung bestimmt.
Der Kunde oder der Anwender des MEG sollte sicherstellen, dass es in einer derartigen Umgebung betrieben wird.
StörfestigkeitsPrüfungen
IEC 60601-Prüfpegel
ÜbereinstimmungsPegel
Elektromagnetische Umgebung – Leitlinien
Entladung statischer
Elektrizität (ESD)
nach IEC 61000-4-2
± 6kV Kontaktentladung
± 8kV Luftentladung
± 6kV Kontaktentladung
± 8kV Luftentladung
Fußböden sollten aus Holz oder Beton bestehen oder mit Keramikfliesen versehen sein. Wenn der Fußboden mit synthetischem Material
versehen ist, muss die relative Luftfeuchte mind. 30% betragen.
Schnelle transiente
elektrische Störgrößen/
Bursts nach IEC 61000-4-4
± 2kV für Netzleitungen
± 1kV für Eingangs- und
Ausgangsleitungen
± 2kV für Netzleitungen
± 1kV für Eingangs- und
Ausgangsleitungen
Die Qualität der Versorgungsspannung sollte der einer typischen
Geschäfts- oder Krankenhausumgebung entsprechen.
Stoßspannungen/
Surges nach
IEC 61000-4-5
± 1kV Spannung
Außenleiter - Außenleiter
± 2kV Spannung
Außenleiter - Erde
± 1kV Spannung
Außenleiter - Außenleiter
± 2kV Spannung
Außenleiter - Erde
Die Qualität der Versorgungsspannung sollte der einer typischen
Geschäfts- oder Krankenhausumgebung entsprechen.
Spannungseinbrüche,
Kurzzeitunterbrechungen
und Schwankungen der
Versorgungsspannung
nach IEC 61000-4-11
<5% U
T
(>95% Einbruch
der U
T
) für 1/2 Periode
40% U
T
(60% Einbruch
der U
T
) für 5 Perioden
70% U
T
(30% Einbruch
der U
T
) für 25 Perioden
<5% U
T
(>95% Einbruch
der U
T
) für 5s
<5% U
T
(>95% Einbruch
der U
T
) für 1/2 Periode
40% U
T
(60% Einbruch
der U
T
) für 5 Perioden
70% U
T
(30% Einbruch
der U
T
) für 25 Perioden
<5% U
T
(>95% Einbruch
der U
T
) für 5s
Die Qualität der Versorgungsspannung sollte der einer typischen
Geschäfts- oder Krankenhausumgebung entsprechen. Wenn der
Anwender des MEG fortgesetzte Funktion auch beim Auftreten
von Unterbrechungen der Energieversorgung fordert, wird
empfohlen das EUT aus einer unterbrechungs- freien Stromversorgung oder einer Batterie zu speisen.
Magnetfeld bei der
Versorgungsfrequenz
(50Hz/60Hz)
nach IEC 61000-4-8
3 A/m 3 A/m Magnetfelder bei der Netzfrequenz sollten den typischen Werten, wie
sie in der Geschäfts- und Krankenhausumgebung vorzufinden sind,
entsprechen.
Anmerkung: U
T
ist die Netzwechselspannung vor der Anwendung der Prüfpegel.
CE Kennzeichnung
Artikelnummer
Seriennummer
Getrennte Sammlung von Elektro- und Elektronikgeräten
Erlaubter Temperaturbereich für Lagerung und Transport.
Anwendungsteil des Typs BF
Erlaubte Luftfeuchtigkeit während Lagerung und Transport.
Instrumenten Anschluss
Netzteilanschluss (9VDC)
Bitte lesen und befolgen Sie die Gebrauchsanweisung,
und bewahren Sie diese zum späteren Nachschlagen auf.
Hintergrundfarbe blau, Vordergrundfarbe weiß.
Hersteller
Herstellungsdatum
Vorsicht Bruchgefahr
Trocken lagern
Grüner Punkt (länderspezifisch)
7/44
med 0912 2016-06-30
HEINE OMEGA® 500
HEINE OMEGA® 500 UNPLUGGED
with LED and XHL Illumination
Please read and follow the instructions for use of HEINE OMEGA® 500
and keep them for future reference.
General Conditions of Warranty
Instead of the statutory warranty time period of 2 years, HEINE will grant a
guarantee of 5 years from the date of the consignment of the goods ex works,
concerning its equipment (excluding disposables, e.g. bulbs, single-use
articles, and rechargeable batteries).
The guarantee covers irreproachable workmanship, on condition of the proper
use of the equipment and the observation of the operating instructions. During
the warranty- and guarantee time period, errors and deficiencies arising on
the equipment will be rectified free of charge, in so far as such are evidenced
by defective materials, processing and/or constructional errors. Should buyer
complain of a material deficiency during the warranty time period, then the
onus of proof is always to be on the orderer, that the product was defective
already upon receipt of the goods. The statutory warranty and the guarantee
do not apply to loss or damage caused by wear and tear, negligent use, the
non-employment of original HEINE components and/or spares (in particular
bulbs, as these have been especially developed for HEINE instruments in
accordance with the following criterions: colour temperature, useful service
life, safety, optical quality and performance. The statutory warranty and the
guarantee do not apply to interventions by persons not authorised by HEINE
or when the operating instructions are not observed by the customer. Any
modification of a HEINE product with parts or additional parts which do not
conform to the original HEINE specification will invalidate the warranty for
the correct function of the product and further invalidate any warranty claims
which result from such a change or modification. Further claims, in particular
claims for replacement of loss or damage, which are experienced otherwise
than directly on the HEINE product itself, are hereby excluded.
For U.S. only:
Federal law restricts this device to sale by or on the order of a
Physician or Practitioner.
Warnings and Safety Information
Caution! Indicates potential hazardous situations. Ignoring the
corresponding instructions may lead to dangerous situations of mild
to moderate extent. (Background color yellow, foreground color black.)
Note! Note indicates valuable advice in terms of installation, operation,
maintenance or repair. Notes are important, but not related to hazardous
situations.
Intended Use
The indirect Ophthalmoscope HEINE OMEGA
®
500 is an AC-powered or
battery powered device for medical professionals, containing illumination and
viewing optics intended to examine the media, cornea, aqueous, lens,
vitreous and the retina of the eye.
Product overview
1 Headband height adjustment knob
2 Adjustment knob
3 Optics unit
4 Optics overband
5 Position control
6 Filter Control
7 Aperture Control
8 Control Locks
9 Rotary knob
10 Mount for Teaching Mirror
11 Operating lever
12 Bulb cover
13 Lamp
14 Brightness control HC 50 L
15 Guide pin
16 Hole for guide pin
17 Pin
18 Release
19 Detent plate
20 Guide pin
21 Cable guide
22 Headband size adjustment knob
23 Segment cover
24 HC 50 L connecting cable with UNPLUGGED socket
Setting up the HEINE OMEGA
®
500
HEINE OMEGA
®
500 can be used with HEINE LED or 5 Watt XHL bulbs.
Operation with the HEINE® mPack or EN50:
To operate the HEINE OMEGA
®
500 with the HEINE® mPack or HEINE® EN50,
connect the short cable (24) from the HC 50 L brightness control (14) to the
connecting cable (Cinch) and secure it in the cable guide (21). Connect the
connecting cable (Cinch) to the HEINE
®
mPack or the HEINE® EN50 and set
the brightness on the instrument with the HC 50 L brightness control (14),
(Fig. 1).
Operation with the mPack UNPLUGGED:
To operate the HEINE OMEGA
®
500 with the HEINE® mPack UNPLUGGED,
first remove the cover from the rear segment (23) on the headband. To do
this, slide the segment cover from the headband in the direction of the arrow
(Fig. 2). Next, fit the HEINE
®
mPack UNPLUGGED to the headband. To do
this, hold the headband with your left hand and using your right thumb, slide
the HEINE
®
mPack UNPLUGGED to the left until it latches audibly. Connect
the short cable (24) from the HC 50 L brightness control (14) to the HEINE
®
mPack UNPLUGGED. Switching on and adjustment of brightness are carried
out by means of the rotary knob on the HC 50 L brightness controller (14), (Fig. 3).
Operation with Power supply for HC 50 L brightness controller:
To operate the HEINE OMEGA
®
500 with power supply, please connect the
short cable (24) of the brightness controller HC 50 L (14) with the connection
cable (UNPLUGGED connector) secure it in the cable guide (21). Connect the
connecting cable (Cinch plug) with the power supply and set the brightness
using the brightness controller HC 50 L (14) on the instrument (Fig. 1).
ENGLISH
8/44
med 0912 2016-06-30
HEINE OMEGA® 500 operation
Basic Adjustments:
Switch the instrument on by means of the rotary knob (brightness control)
on the HC 50 L brightness controller. Aperture wheel (7) and filter wheel (6)
should be rotated upwards to select the large aperture with white light. Control
(11) should be in the middle position. The beam control (9) should be in the
mid-position. Slide the eyepieces into position to match your P.D. or select the
mid-position on the scale.
Setting the brightness:
If you use OMEGA 500 with LED, please adjust a slightly higher brightness
initially and reduce the brightness afterwards.
Control Locks:
The aperture and filter controls can be locked into position by means of the
lock (8) to avoid unintentional operation.
Aperture Control:
3 different aperture sizes and a diffuser aperture can be selected by means
of the aperture control (7). The choice of aperture depends mainly on the size
of the patient’s pupil. The diffuser is useful for photophobic patients and the
examination of the periphery.
Filter Control:
The filter control (6) can be used to select an interference red-free filter, a blue
or a yellow filter which can be introduced into the illumination beam.
Synchronized adjustment of Convergence and Parallax:
This feature ensures the best possible stereopsis and image quality for any
pupil size by simultaneous adjustment of the observation and illumination
beams. For a dilated pupil, move the control (11) underneath the instrument to
the large circle position. For a small pupil, move the control to the small circle
position. The control (11) can be positioned anywhere between these two
settings to select the optimum parallax and stereopsis (convergence) for any
pupil size. The illumination beam can be adjusted vertically by the control (9).
Teaching Mirror:
The optional teaching mirror can be slid onto the fixture (10) of the optics.
Changing the bulb (does not apply to OMEGA 500 LED):
First allow the instrument to cool down.
Disconnect the instrument from the power source. Unscrew the control (2) so
that the optics unit (3) is free to move. Slide the bulb cover (12) upwards. Do
not pull on the cord. Swivel the optics unit (3) to enable the bulb (13) to be
pulled out of the bulbholder. Clean the glass dome of the new bulb carefully
with a soft cloth. Insert the new bulb so that the locating pin on the bulb body
fits into the guide in the bulbholder. Re-fit the bulb cover (12) into the optics
unit (3) and slide the bulb cover back down into position.
Handling HEINE OMEGA
®
500 Headband
Selecting the position of the optics overband:
The overband (4) swivels and can be fixed into the following positions by
means of the position lock (5) (upwards for the rest position, down for working
positions 1 or 2). To release the overband, press the position lock control (5)
and rotate it. Do not try to force the overband up or down. With practice a
comfortable working position can be selected and, when properly adjusted,
the optics unit will always return to the desired working position.
Fitting the headband rheostat HC 50 L:
When fitting, ensure that the guide pin (15) of the headband rheostat HC 50 L
(14) locates correctly in the opening (16) of the overband (4). Locate the
connecting cord between the power source and the headband rheostat in the
cord clip (21) at the back of the headband.
Fitting the position control:
Before fitting the position control (5) ensure that the positioning plate (19) is
swiveled upwards as far as possible. To do this, press the positioning plate
(19) and swivel it upwards simultaneously. Ensure that the optics over-band
is in the lower position and that the guide pin (20) locates in the opening
(16). Now press the position control (5) on to the guide (17) until it clicks into
placed.
Removing the headband rheostat HC 50 L and position control:
The control of the HC 50 L (14) and the position control (5) can be fitted on the
right- or left-hand side of the headband according to preference. To remove,
press the release (18) and pull the control off the headband.
Adjusting the optics:
Unscrew the control (2) so that the optics unit (3) is free to move. (The
position of this control can be reversed for left-handed operation if required).
Place the instrument on your head and adjust the height and circumference
by means of the adjusters (22) and (1) until a comfortable fit is achieved. The
rear part of the headband can be pivoted and is self-latching. Adjust the
optics to a position as close as possible to your eyes and view the light spot
at a distance of about 30 – 40 cm without accommodating. A small, pencilsized object should be sharply-focused (the eyepieces incorporate 2D lenses.
Spectacle wearers should examine through the “far” part of the spectacle
lens). Adjust the optics unit so that the light spot appears centered vertically
in position of the headband or to choose an alternative working position by
pressing your view and screw the adjuster knob in (2). (It may be necessary
to correct the lever (5) and swiveling the optics overband into a different
position. If the light spot needs horizontal adjustment, simply rotate the
headband slightly to the side. Adjust and fine-tune the PD setting by closing
first one then the other eye and observing an object in the middle of the light
spot while adjusting the appropriate eyepiece. Repeat until the object is in the
middle of the field of view, and a single image is obtained. Take off the instru
ment and check that the PD is symmetrically adjusted. If not, repeat the
selection procedure as above. Correct adjustment of PD is particularly
important when examining through a small pupil. Each user should adjust
the setting to match his-own PD. Every instrument includes two plano lenses,
which can be exchanged for the 2D lenses which are fitted as standard
equipment. Always use the OMEGA 500 with plano or the 2D lenses. Make
sure that you change the plano lenses under clean conditions to avoid that
particles enter the optics.
Cleaning and disinfection
Before cleaning, disconnect from the power source. Use a suitable cloth only
to wipe the surfaces of the instrument and the ophthalmoscopy lenses. The
instrument and the loupe may be wiped clean with a damp cloth. Any cleaning
agent used must be suitable for use on plastic surfaces. An alcohol-based
surface disinfectant can be used to clean the instrument ophthalmoscopy lense.
The use of a spray disinfectant and soaking or disinfection in a machine are
9/44
med 0912 2016-06-30
not permitted. Please only use disinfectants based on alcohol. The lamp can
be cleaned, with a dry cloth if necessary.
If touched a patients eye with the loupe you can also disinfect the loupe by
Incidin
®
Liquid and Bacillol® plus.
We recommend to use Incidin
®
Liquid und Bacillol® plus to disinfect the device.
Cleaning and disinfection is allowed with a damp cloth only.
Sterilisation of OMEGA 500 is not allowed.
Maintenance
OMEGA 500 Indirect Ophthalmoscopes do not require regular maintenance.
Change XHL bulbs if necessary.
Service
OMEGA 500 Indirect Ophthalmoscopes do not require regular service.
Disposal
The product must be recycled as separated electrical and electronic
devices. Please observe the relevant state-specific disposal regulations.
Technical specification
Weight: 470 g (Instrument)
Environmental conditions operation:
Temperature: +5 °C to +35 °C
Relative humidity: 30% to 90%
Air pressure: 800 hPa to 1060 hPa
Environmental conditions storage:
Temperature: -20 °C to +50 °C
Relative humidity: 10% to 95%
Air pressure: 700 hPa to 1060 hPa
Environmental conditions transport:
Temperature: -40 °C to +70 °C
Relative humidity: 10% to 95%
Air pressure: 500 hPa to 1060 hPa
General Notes and Warnings
The indirect opthalmoscope OMEGA 500 in its original packaging meets the
requirements for transport according to ISO 15004-1.
OMEGA 500 meets the requirements according to EN ISO 10943:2011.
General Notes
Check the correct operation of the OMEGA 500 at regular intervals. Do
not use the equipment if it shows visible signs of damage.
OMEGA 500 is not allowed to be entered into strong magnetic fields like
MRI scanners.
Use as little light as possible for the examination and ensure that the
light is switched off after each examination. Please always consider your
medical duty of care.
Do not remove the bulb when it is hot. Please allow the bulb to cool down
prior handling.
Do not look into bright light sources by means of loupes. Hazard of glare.
Avoid the ophthalmoscope lens to be exposed to direct sunlight. Hazard
of fire.
Remove mPack UNPLUGGED Battery if you do not use OMEGA 500 for
a longer time.
It is not allowed to modify OMEGA 500.
Do not use OMEGA 500 in oxygen enriched environment.
Use only original HEINE ophthalmoscope lenses.
Use only original HEINE bulbs (X-004.88.111, X-008.87.200) in combi-
nation with HC 50 L. Other bulbs could influence the light and lead to
an overexposure or underexposure of light, resulting in eye damages or
wrong diagnoses.
Use only Power sources specified by HEINE for the use of the OMEGA
500. Other power sources could influence the light and lead to an overexposure or underexposure of light, resulting in eye damages or wrong
diagnoses or lead to overheating of the device.
Only use the OMEGA 500 when the lenses are clean.
Electric shocks or burns can be prevented by only sending the device to
HEINE for repair.
OMEGA 500 is a precise optical instrument. Please handle OMEGA 500
with care and store it in a clean place. Please clean the OMEGA 500
optics in regular intervals to ensure best diagnostic conditions.
Let OMEGA 500 accommodate to ambient conditions when the instrument is cold.
Change the ocular lens only in a clean environment in order to avoid dust
to enter the OMEGA 500.
We can only guarantee the performance of the instrument when fitted
with original HEINE accessories and spare parts.
The LED indicator of the power supply or the charge indicator on the
backside of the mPack UNPLUGGED Battery are the operating indicator
of the OMEGA 500.
Phototoxicity
Because prolonged intense light exposure can damage the retina, the
use of the device for ocular examination should not be unnecessarily
prolonged, and the brightness setting should not exceed what is needed
to provide clear visualization of the target structures. This device should
be used with filters that eliminate UV radiation (< 400 nm) and, whenever
possible, filters that eliminate short-wavelength blue light (<420 nm).
The retinal exposure dose for a photochemical hazard is a product of the
radiance and the exposure time. If the value of radiance were reduced
in half, twice the time would be needed to reach the maximum exposure
limit. While no acute optical radiation hazards have been identified for
direct or indirect ophthalmoscopes, it is recommended that the intensity
of light directed into the patient’s eye be limited to the minimum level
which is necessary for diagnosis. Infants, aphakes and persons with
diseased eyes will be at greater risk. The risk may also be increased if the
person being examined has had any exposure with the same instrument
or any other ophthalmic instrument using a visible light source during the
previous 24 hours. This will apply particularly if the eye has been exposed
to retinal photography.
OMEGA
®
500 Ophthalmoscope is classified as a Group 2 instrument
according to EN ISO 15004-2:2007. The classification was performed
together with HEINE A.R. 16D/Ø54mm Ophthalmoscopy loupe.
Caution – The light emitted from this instrument is potentially hazardous.
The longer the duration of exposure, the greater the risk of ocular damage.
Exposure to light from this instrument when operated at maximum
intensity should not exceed 21 minutes with the LED light and 15 minutes
with the 5Watt XHL light.
Electromagnetic Compatibility
Medical electric devices are subject to special precautionary measures with
regard to electromagnetic compatibility (EMC). Portable and mobile high
frequency communication equipment can affect medical electric devices. The
HEINE OMEGA
®
500 LED is intended for use in the electromagnetic envi-
ronment specified below. The user of the HEINE OMEGA
®
500 LED should
assure that it is used in such an environment.
The ME device may not be stacked directly near or used directly beside
other devices. If the ME device is to be operated in a stack or with other
devices, the device should be watched to ensure it operates properly in
this location.
Outgoing
Measurements
Compliance
Electromagnetic
environment – Guidelines
RF emissions acc. to
CISPR 11
Group 1 The equipment uses only RF
energy for its internal function.
Therefore, its RF emissions
are very low and are not likely
to cause any interference in
nearby electronic equipment.
RF emissions acc. to
CISPR 11
Class B The ME device is suitable for
use in all facilities (e.g. hospitals and medical practices),
including domestic situations
and those directly connected
to the public low-voltage
power supply network that
supplies buildings for domestic
purposes.
Harmonic emissions
acc. to IEC 61000-3-2
Class A Illumination equipment with
controls.
Voltage fluctuations/
flicker emissions acc.
to IEC 61000-3-3
Fulfilled
10/44
med 0912 2016-06-30
Recommended working clearances between portable and mobile RF
communication devices and the HEINE OMEGA
®
500
The ME device is intended for use in an electromagnetic environment in which
radiated RF disturbances are controlled.
The user of the ME device can help to prevent electromagnetic faults by
observing the minimum disturbance between portable and mobile RF
communication devices (transmitters) and the ME device, as recommended
in accordance with the output performance of the communication device.
Explanation of utilized symbols
The following symbols are used on the device or on the packaging:
Rated maximum
output of
transmitter [W]
Working clearance according to transmission frequency [m]
150 kHz to
80 MHz
d = 1,2√P
80 MHz to
800 MHz
d = 1,2√P
800 MHz to
2,5 GHz
d = 2,3√P
0,01 0,1 0,1 0,2
0,1 0,4 0,4 0,7
1 1,2 1,2 2,3
10 3,7 3,7 7,4
Table 2 Guidelines and Manufacturer’s Declaration – Electromagnetic emissions for all ME devices
Guidance and manufacturer declaration - Electromagnetic emissions
THE ME device is intended to be operated in an electromagnetic environment as specified below.
The customer or use of the ME device must ensure that it is operated in such an environment.
Noise immunity tests IEC 60601 test level Compliance level Electromagnetic environment – Guidelines
Electrostatic discharge (ESD)
acc. to IEC 61000-4-2
± 6 kV contact discharge
± 8 kV air discharge
± 6 kV contact discharge
± 8 kV air discharge
Floors should be wood, concrete or covered with
ceramic tiles. If floors are covered with synthetic
material, the relative humidity should be at least
30 %.
Electrostatic transients / bursts
acc. to IEC61000-4-4
± 2 kV for mains cables
± 1 kV for input and output lines
± 2 kV for mains cables
± 1 kV for input and output lines
The supply voltage quality should be that of a
typical commercial or hospital environment.
Surge voltage or surges
acc. to 1EC61000-4-5
± 1 kV voltage phase – phase,
± 2 kV voltage phase – earth
± 1 kV voltage phase – phase
± 2 kV voltage phase – earth
Mains power quality should be that of a typical
commercial or hospital environment.
Voltage dips, short in-terruptions
and voltage variations on power
supply input lines acc. to
IEC 61000-4-11
< 5% U
T
, (>95% dip in UT)
for 1/2 period
40% U
T
, (60% dip in UT)
for 5 periods
70% U
T
, (30% dip in UT)
for 25 periods
<5% U
T
, (>95% dip in UT)
for 5 seconds
< 5% U
T
, (>95% dip in UT)
for 1/2 period
40% U
T
, (60% dip in UT)
for 5 periods
70% U
T
, (30% dip in UT)
for 25 periods
<5% U
T
, (>95% dip in UT)
for 5 seconds
Mains power quality should be that of a typical
commercial or hospital environment. If the user
of the ME device requires continued operation
during power mains interruptions, it is recommended that the EUT be powered by a UPS
(uninterruptible power supply) or a battery.
Magnetic field for the power
frequency (50/60 Hz)
acc. to IEC61000-4-8
3 A/m 3 A/m Power frequency magnetic fields should be at
levels characteristic of a typical location in a
typical commercial or hospital environment.
Comment: U
T
is the a.c. supply voltage prior to application of the test level.
REF
SN
Production date
Risk of breakage
Dry storage
“Grüner Punkt” (country-specific)
The CE marking indicates that the product conforms to the provisions of Directive 93/42/EWG concerning medical products.
Catalogue number
Serial number
Product bearing this symbol may not be disposed of together
with general household waste, but instead requires separate
disposal.
Temperature limitation for storage and transport.
Type BF equipment
Maximum humidity for storage and transport.
Instrument connector
Power supply connector (9VDC)
Please read and follow the instructions for use of and keep
them for future reference.
(Background color blue, foreground color white)
Manufacturer
11/44
med 0912 2016-06-30
FRANÇAIS
HEINE OMEGA® 500
HEINE OMEGA® 500 UNPLUGGED
with LED and XHL Illumination
Avant de mettre en service l’ophtalmoscope HEINE OMEGA® 500,
lire attentivement le présent mode d’emploi et le conserver pour
pouvoir le consulter ultérieurement.
Garantie générale
Au lieu du délai de garantie légale de 2 ans, HEINE accorde pour ses
appareils (à l’exception du matériel de consommation tel que les lampes,
les articles à usage unique et les batteries rechargeables) une garantie
de 5 ans à compter de la livraison des marchandises au départ de l’usine.
Cette garantie assure un fonctionnement irréprochable dans le cadre d’une
utilisation conforme aux prescriptions et du respect du manuel d’utilisation.
Au cours de la durée de la garantie, les erreurs et défauts survenant sur
l’appareil sont éliminés gratuitement dans la mesure où il est prouvé qu’ils
sont dus à des erreurs de matériel, d’usinage et / ou de construction. En cas
de réclamation pour vice matériel exprimée par un client durant le délai de
garantie, le fardeau de la preuve repose toujours sur le client qui doit alors
prouver que le produit était déjà défectueux au moment de la réception. Les
présentes garantie légale et garantie contractuelle ne s’appliquent pas aux
dommages liés à l’usure, à l’utilisation négligente, à l’emploi de pièces ou
pièces de rechange non originales HEINE (en particulier en ce qui concerne
les lampes, car celles-ci sont spécialement développées pour les instruments
HEINE conformément aux critères suivants : température de la couleur, durée
de vie, sécurité, qualité optique et puissance), à des interventions par des
personnes non autorisées par HEINE ou dans le cas où le client ne respecte
pas les prescriptions du manuel d’utilisation. Toute modification des instruments HEINE avec des pièces ajoutées ou modifiées qui ne correspondent
pas à la version originale des instruments entraine une annulation immédiate
de la garantie de bon fonctionnement et ainsi du droit à la garantie. Toute
autre réclamation, en particulier les réclamations de remboursement de
dommages sur des produits autres que le produit HEINE, est exclue.
Mises en garde et consignes de sécurité
AVERTISSEMENT ! Cette mention indique une situation potentiellement
dangereuse. Le non-respect des consignes peut entraîner des accidents
corporels mineurs à modérés. (Fond : jaune ; symbole : noir)
REMARQUE ! Le mot « REMARQUE » est utilisé pour donner des
informations importantes concernant l’installation, l’exploitation, la
maintenance ou la réparation, mais non liées à un danger.
Utilisation prévue
L’ophtalmoscope indirect HEINE OMEGA
®
500 est un instrument sur secteur
ou sur batterie destiné aux professionnels de santé. L’ophtalmoscope HEINE
OMEGA
®
500 se compose d’un dispositif d’éclairage ainsi que d’un système
optique de précision pour l’examen de l’iris, de la cornée, de l’humeur aqueuse,
du cristallin, du corps vitré et de la rétine.
Vue d’ensemble du produit
1 Bouton de réglage de hauteur du bandeau
2 Bouton de réglage
3 Unité optique
4 Support d’optique
5 Levier de verrouillage
6 Levier de filtre
7 Levier de diaphragme
8 Poussoir d’encliquetage
9 Bouton rotatif
10 Fixation pour miroir de second observateur
11 Levier de commande
12 Couvre-ampoule
13 Ampoule
14 Régulateur de luminosité HC 50 L
15 Tenon de guidage
16 Orifice pour tenon de guidage
17 Pivot
18 Déverrouillage
19 Plaque d’encliquetage
20 Tenon de guidage
21 Guide-câble
22 Bouton de réglage de tour de tête
23 Cache-segment
24 Câble de connexion HC 50 L avec prise UNPLUGGED
Mise en service de l’ophtalmoscope HEINE OMEGA
®
500
L’ophtalmoscope HEINE OMEGA
®
500 peut être utilisé avec les éclairages
HEINE LED ou 5 watts XHL.
Fonctionnement avec HEINE® mPack ou EN50 :
Pour faire fonctionner le HEINE OMEGA
®
500 avec le HEINE® mPack ou
le HEINE
®
EN50, connecter le câble court (24) du régulateur de luminosité
HC 50 L (14) avec le câble de connexion (Cinch) et le fixer sur le guide-câble
(21). Raccorder le câble de connexion (Cinch) sur le HEINE
®
mPack ou
HEINE
®
EN50 et régler l’intensité lumineuse à l’aide du régulateur de
luminosité HC 50 L (14) sur l’instrument (figure 1).
Fonctionnement avec mPack UNPLUGGED :
Pour faire fonctionner le HEINE OMEGA
®
500 avec le HEINE® mPack
UNPLUGGED, enlever d’abord le cache-segment (23) à l’arrière du bandeau.
Pour ce faire, pousser le cache-segment dans le sens de la flèche pour le
retirer du bandeau (figure 2).
Ensuite, monter le HEINE
®
mPack UNPLUGGED sur le bandeau. À cet effet,
soutenir le bandeau de la main gauche et pousser le HEINE
®
mPack
UNPLUGGED avec le pouce droit vers la gauche jusqu’à ce qu’il s’encliquète
de manière audible. Raccorder le câble de connexion court (24) du régulateur
de luminosité HC 50 L (14) sur le HEINE
®
mPack UNPLUGGED. Allumer
l’instrument et régler la luminosité au moyen du bouton rotatif du régulateur
de luminosité HC 50 L (14) (figure 3).
Utilisation avec transformateur à fiche :
Pour utiliser l’ophtalmoscope HEINE OMEGA
®
500 avec le transformateur à
fiche, connecter le câble court (24) du régulateur de luminosité HC 50 L (14)
avec le câble de connexion (fiche UNPLUGGED) et le fixer sur le guide-câble
(21). Raccorder le câble de connexion (fiche Cinch) sur le transformateur à
fiche HEINE et régler l’intensité lumineuse à l’aide du régulateur de luminosité
HC 50 L (14) sur l’instrument (figure 1).

12/4 4
med 0912 2016-06-30
Manipulation du HEINE OMEGA® 500
Réglage de base :
Allumer l’instrument au moyen du bouton rotatif du régulateur de luminosité
HC 50 L. Placer le levier de diaphragme (7) et le levier de filtre (6) en butée
en position haute (grande ouverture, champ lumineux blanc). Placer le levier
de commande (11) en position médiane. Pour le réglage vertical du faisceau,
tourner le bouton rotatif (9) à peu près au milieu de la plage de réglage.
Régler les oculaires sur votre écart inter-pupillaire ou au milieu de la
graduation.
Réglage de la luminosité :
Si vous utilisez l’OMEGA 500 avec l’éclairage LED, réglez d’abord une intensité
lumineuse plus forte sur le HC 50 L, puis réduisez-la.
Poussoir d’encliquetage :
Il est possible de verrouiller le levier de diaphragme (7) et le levier de filtre (6)
avec le poussoir d’encliquetage (8) afin d’éviter tout déplacement intempestif
des leviers de commande.
Levier de diaphragme :
Le levier de diaphragme (7) permet de choisir entre 3 différentes ouvertures
ou d’opter pour un champ lumineux diffus. Le choix de l’ouverture dépend
entre autres de la taille de la pupille du patient. Le champ lumineux diffus
est utile pour les patients photophobiques et pour certains examens, en
périphérie par exemple.
Levier de filtre :
Le levier de filtre (6) permet d’interposer dans le faisceau lumineux un
filtre interférentiel éliminant le rouge, un filtre bleu ou un filtre jaune,
indépendamment de l’ouverture choisie.
Réglage synchrone de la convergence et de la parallaxe :
Cette propriété assure la meilleure stéréoscopie et la meilleure qualité possibles
quelle que soit la taille de la pupille grâce à un réglage simultané des faisceaux
d’éclairage et d’observation. Pour une pupille dilatée, amener le levier de
commande (11) au-dessous de l’instrument en position « grande pupille »
(grand cercle). Pour une petite pupille, il suffit de placer ce levier sur l’autre
position, « petite pupille » (petit cercle). Le levier de commande (11) peut être
positionné n’importe où entre ces deux positions pour optimiser la stéréoscopie
et le faisceau d’éclairement pour toutes les tailles de pupille. Le bouton rotatif
(9) permet d’orienter le faisceau lumineux verticalement.
Miroir de second observateur :
Le miroir de second observateur (en option) peut se glisser au besoin dans la
fixation (10) sur la pièce binoculaire.
Changement d’ampoule (n’est pas nécessaire pour la version LED) :
Laisser l’instrument refroidir avant de procéder au changement
d’ampoule.
Débrancher l’appareil de l’alimentation électrique. Dévisser le bouton de
réglage (2) jusqu’à ce que l’unité optique (3) soit libre. Faire glisser le couvreampoule (12) vers le haut. Ne pas tirer sur le cordon. Pivoter l’unité optique
(3) pour pouvoir retirer l’ampoule (13) de son support Essuyer soigneusement
le globe de la nouvelle ampoule avec un chiffon doux si nécessaire. Insérer
la nouvelle ampoule de telle sorte que l’ergot du culot de l’ampoule vienne
se loger dans le guide du support. Remettre le couvre-ampoule (12) en place
dans l’unité optique (3) en le faisant glisser dans la bonne position.
Manipulation du bandeau HEINE OMEGA
®
500
Déterminer la position du support d’optique :
Le support d’optique (4) est pivotant et peut être verrouillé dans les positions
suivantes au moyen du levier d’encliquetage (5) (vers le haut : position de
repos, vers le bas : position de travail 1 et 2). Pour déverrouiller, appuyer sur le
levier d’encliquetage (5) et tourner simultanément. Ne pas essayer de pivoter
le support d’optique vers le haut ou vers le bas en forçant. Répéter à plusieurs
reprises cette opération pour se familiariser avec la manipulation du bandeau.
Avec un réglage correct et un pivotement en douceur, l’unité optique doit
toujours revenir dans la même position de travail.
Mise en place du régulateur de luminosité :
Lors de la mise en place du régulateur de luminosité HC 50 L (14), vérifier
que le tenon de guidage (15) se loge correctement dans l’orifice (16) prévu
à cet effet dans le support d’optique (4). Fixer le câble de connexion entre la
source de courant et le régulateur HC 50 L dans le guide-câble (21) à l’arrière
du bandeau.
Mise en place du levier d’encliquetage :
Avant de mettre en place le levier d’encliquetage (5), s’assurer que la plaque
d’encliquetage (19) est entièrement pivotée vers le haut. Pour ce faire, appuyer
sur la plaque d’encliquetage (19) et la tourner simultanément vers le haut.
Vérifier que le support d’optique (4) est en position basse et que le tenon
de guidage (20) s’engage dans l’orifice (16) prévu à cet effet. Pousser alors
le levier d’encliquetage (5) contre le pivot (17) jusqu’à ce qu’il s’enclenche
correctement.
Retrait du régulateur HC 50 L et du levier d’encliquetage pour le changement
de côté :
Les éléments de commande, régulateur HC 50 L (14) et levier d’encliquetage
(5), peuvent être fixés indifféremment sur le côté droit ou gauche du bandeau.
Pour ce faire, appuyer sur le déverrouillage (18) et retirer simultanément les
éléments de commande du bandeau.
Réglage de l’optique :
Dévisser le bouton de réglage (2) pour que l’unité optique (3) soit libre (la
position de ce bouton peut être inversée une fois le bouton dévissé pour
l’utilisation par un gaucher si nécessaire). Placer l’instrument sur votre tête et
régler le tour de tête et la hauteur grâce aux boutons (22) et (1) jusqu’à obtention d’une position confortable. La partie arrière du bandeau est orientable et
se referme automatiquement. Amener l’unité optique dans la position la plus
proche possible de vos yeux et observer le spot lumineux sur une surface
distante de 30 à 40 cm sans faire d’efforts d’accommodation. La mise au point
doit être parfaite sur un petit objet (un crayon par exemple) (les oculaires
comportent des lentilles 2D). Les porteurs de lunettes doivent regarder dans
la partie « vision de loin » de leurs verres correcteurs le cas échéant. Régler
l’unité optique de façon à ce que le spot lumineux apparaisse centré verticalement dans le champ de vision et bloquer le bouton de réglage (2). (Il peut
être nécessaire de corriger la position du bandeau ou de choisir une position
de travail différente en appuyant sur le levier d’encliquetage (5) et faisant
pivoter le support d’optique (4)). Si le spot lumineux nécessite un décentrage
horizontal, faire simplement glisser légèrement le bandeau de côté. Régler
l’écartement inter-pupillaire en fermant d’abord un œil puis l’autre et regarder
un objet dans le spot lumineux tout en réglant l’oculaire correspondant de
façon à ce que l’objet apparaisse exactement au centre du champ de vision.
Retirer l’instrument de votre tête et vérifier que l’écartement inter-pupillaire est
réglé de manière symétrique. Recommencer si nécessaire le réglage. Un bon
13/44
med 0912 2016-06-30
réglage de l’unité optique est avant tout particulièrement important pour les
examens en présence de pupilles étroites. En règle générale, il n’est nécessaire de modifier le réglage qu’en cas de changement d’utilisateur. Chaque
instrument dispose de deux verres plats que l’on pourra échanger avec les
lentilles 2D au besoin après avoir dévissé les oculaires.
Nettoyage et désinfection
Avant toute intervention, débrancher la fiche secteur. On pourra utiliser un
chiffon doux non pelucheux pour essuyer les surfaces de l’instrument, de la
loupe d’ophtalmoscopie. Un essuyage avec un chiffon humide est possible.
Tout produit nettoyant ménager utilisé doit être compatible avec les surfaces
en plastique.
Les désinfectants doivent dans tous les cas être homologués pour les dispositifs médicaux en plastique afin d’en prévenir l’altération.
On pourra utiliser des désinfectants à base d’alcool pour désinfecter la loupe
d’ophtalmoscopie. Si nécessaire, essuyer l’ampoule exclusivement avec un
chiffon sec.
La désinfection par aspersion, l’immersion dans des solutions ou le traitement
en machine ne sont pas admis.
Nous avons testé la compatibilité des matériaux avec Incidin
®
Liquid et
Bacillol
®
plus et nous recommandons l’utilisation de ces produits.
Il est interdit de stériliser l’OMEGA 500.
Maintenance
L’ophtalmoscope OMEGA 500 ne nécessite pas de maintenance régulière.
Le cas échéant, remplacer l’éclairage XHL usagé.
Entretien
L’OMEGA 500 ophtalmoscope est sans entretien.
Élimination des déchets
Le produit doit être mis au rebut dans le cadre du tri sélectif des appareils
électriques et électroniques. Il convient de respecter les lois en vigueur
concernant l’élimination des déchets.
Caractéristiques techniques
Poids : 470 g (instrument)
Conditions environnementales d’utilisation :
Température : +5 °C à +35 °C
Humidité rel. : 30% à 90%
Pression atmosphérique : 800 hPa à 1060 hPa
Conditions environnementales Stockage :
Température : -20 °C à +50 °C
Humidité rel. : 10% à 95%
Pression atmosphérique : 700 hPa à 1060 hPa
Conditions environnementales Transport :
Température : -40 °C à +70 °C
Humidité rel. : 10% à 95%
Pression atmosphérique : 500 hPa à 1060 hPa
Normes appliquées
DIN EN ISO 15004-01
DIN EN ISO 10943 :2011
Consignes générales
Vérifier avant chaque utilisation le bon fonctionnement de l’OMEGA 500.
Ne pas utiliser l’appareil s’il présente des dommages apparents.
L’OMEGA 500 ne doit pas être utilisé dans des champs magnétiques
forts, IRM par exemple.
Procéder aux examens avec la luminosité la plus faible possible et veiller
à éteindre l’éclairage après chaque examen. Il convient de respecter le
devoir de diligence du médecin.
Ne pas retirer l’ampoule lorsqu’elle est chaude. Laisser l’ampoule
refroidir.
Ne pas fixer des sources de lumière intense du regard avec les loupes.
Risque d’aveuglement !
Risque de brûlure ! Ne pas exposer la loupe d’examen directement à la
lumière du soleil.
Il convient de retirer l’accu mPack UNPLUGGED si l’appareil n’est pas
utilisé pendant une période prolongée.
Aucune modification de cet appareil électromédical n’est admise.
L’OMEGA 500 ne doit pas être utilisé dans un environnement enrichi
en oxygène.
Employer exclusivement des loupes d’ophtalmoscopie HEINE dont
l’utilisation avec l’OMEGA 500
®
est homologuée.
Employer exclusivement en association avec le HC 50 L des éclairages
homologués par HEINE pour l’OMEGA
®
500 (X-004.88.111, X-008.87.200).
Les autres éclairages peuvent présenter une luminosité différente, avec
pour conséquence des lésions oculaires ou un diagnostic erroné.
Utiliser exclusivement des sources de courant homologuées par HEINE
afin d’éviter une surchauffe de l’instrument.
N’utiliser l’OMEGA 500 que si le système de lentilles est suffisamment
propre.
Envoyer l’instrument pour réparation exclusivement chez HEINE afin
d’éviter le risque de chocs électriques, de brûlures ou de lésions oculaires par suite d’une réparation ou d’une manipulation non conformes.
L’OMEGA 500 est un dispositif optique de haute précision. Il convient
donc de manipuler l’OMEGA 500 avec précautions et de le conserver
dans un endroit propre et sec. Nettoyer régulièrement l’OMEGA 500 afin
de créer les meilleures conditions pour le diagnostic.
Laisser à l’OMEGA 500 assez de temps pour s’adapter à la température
ambiante en cas de changements de température extrêmes.
Ne procéder au changement de lentille d’oculaire que dans un environnement propre afin d’éviter de salir l’intérieur de l’appareil.
Le bon fonctionnement de l’appareil n’est garanti qu’avec les pièces de
rechange et accessoires de la marque HEINE.
L’indication sur le bloc d’alimentation ou l’indication de charge à l’arrière de
l’accu mPack UNPLUGGED indiquent le fonctionnement de l’OMEGA 500.
Phototoxicité
L’ophtalmoscope HEINE OMEGA 500 est classé instrument du groupe 2
au sens de la norme EN ISO 15004-2:2007. Cette classification correspond à la loupe d’ophtalmoscopie HEINE A.R. 16D/Ø54 mm.
La lumiere produite par cet instrument peut etre nocive. Le risque de
lesion oculaire s’accroit avec la duree d’exposition au rayonnement.
Une duree d’exposition au rayonnement de plus de 21 minutes avec
l’eclairage LED et 15 minutes avec l’eclairage 5 W XHL sans loupe
d’ophtalmoscopie HEINE A.R. 16D/O54 mm avec cet instrument a
l’intensite maximale entrainera un depassement du seuil de danger.
Compatibilité électromagnétique
Les appareils électromédicaux sont soumis à des mesures de précautions
particulières concernant la compatibilité électromagnétique (CEM).
Les équipements portables et mobiles de communication à haute fréquence
peuvent perturber les appareils électromédicaux. Le HEINE OMEGA
®
500
est destiné à être utilisé dans un environnement électromagnétique tel que
défini ci-après. L’utilisateur du HEINE OMEGA
®
500 devra s’assurer qu’il utilise
l’instrument dans un environnement conforme à ces indications.
Cet appareil électromédical ne doit pas être utilisé à proximité immédiate
d’autres appareils ni en empilement avec d’autres appareils.
Si l’appareil doit être utilisé à proximité d’autres appareils ou en empilement avec d’autres appareils, il convient de vérifier qu’il fonctionne de
manière conforme dans cette configuration.
Mesures
d’émissions
Conformité
Environnement électromagnétique
– recommandations
Émissions HF d’après
la norme CISPR 11
Groupe 1 Cet appareil électromédical utilise
l’énergie HF pour son fonctionnement interne uniquement. Par
conséquent ses émissions HF sont
très faibles et ne devraient pas
provoquer de perturbations des
appareils électroniques se trouvant
à proximité.
Émissions HF d’après
la norme CISPR 11
Classe B Cet appareil électromédical est
adapté à une utilisation dans tous
les établissements, y compris les
locaux à usage d’habitation et ceux
directement raccordés à un réseau
public d’électricité alimentant des
bâtiments à usage résidentiel.
Émissions de courants
harmoniques d’après la
norme CEI 61000-3-2
Classe A Dispositif d’éclairage avec
régulation.
Émissions de
fluctuations de tension/
papillotements d’après
la norme CEI 61000-3-3
assurée

14/44
med 0912 2016-06-30
Distances de séparation recommandées entre les appareils portables et
mobiles de communication HF et le modèle HEINE OMEGA
®
500
Cet appareil électromédical est destiné à être utilisé dans un environnement
électronique dans lequel les perturbations HF rayonnées sont maîtrisées.
L’utilisateur peut contribuer à éviter les interférences électromagnétiques en
respectant une distance minimale conforme aux recommandations ci-après
entre l’appareil électromédical et les appareils (émetteurs) portables et
mobiles de communication HF, en fonction de la puissance de sortie de ces
derniers.
Explication des symboles utilisés
Les symboles suivants figurent sur l’appareil ou sur l’emballage :
Puissance
nominale de
l’émetteur [W]
Distance de séparation en fonction de la
fréquence d’émission [m]
150 kHz à
80 MHz
d = 1,2√P
80 MHz à
800 MHz
d = 1,2√P
800 MHz à
2,5 GHz
d = 2,3√P
0,01 0,1 0,1 0,2
0,1 0,4 0,4 0,7
1 1,2 1,2 2,3
10 3,7 3,7 7,4
Tableau 2 Recommandations et déclaration du fabricant – émissions électromagnétiques pour l’ensemble des appareils électromédicaux
Recommandations et déclaration du fabricant – émissions de perturbations électromagnétiques
Cet appareil électromédical est destiné à être utilisé dans un environnement électromagnétique tel que défini ci-après.
Le client ou l’utilisateur de l’appareil électromédical devra s’assurer qu’il utilise l’instrument dans un environnement conforme à ces indications.
Essais d’immunité Niveau d’essai CEI 60601 Niveau de conformité
Environnement électromagnétique –
recommandations
Décharges électrostatiques
d’après la norme
CEI 61000-4-2
± 6 kV au contact
± 8 kV dans l’air
± 6 kV au contact
± 8 kV dans l’air
Les sols doivent être en bois, en béton ou en
carreaux de céramique. Si le sol est recouvert
d’un matériau synthétique, l’humidité relative doit
être d’au moins 30 %.
Transitoires rapides / salves
d’après la norme
CEI 61000-4-4
± 2 kV pour les câbles secteur
± 1 kV pour les lignes
d’entrée et de sortie
± 2 kV pour les câbles secteur
± 1 kV pour les lignes
d’entrée et de sortie
La qualité de l’alimentation doit être celle d’un
environnement commercial ou hospitalier
classique.
Tensions de choc/surtensions
d’après la norme
CEI 61000-4-5
± 1 kV en mode différentiel
± 2 kV en mode commun
± 1 kV en mode différentiel
± 2 kV en mode commun
La qualité de l’alimentation doit être celle d’un
environnement commercial ou hospitalier
classique.
Creux de tension, coupures
brèves et variations de tension
d’alimentation d’après la norme
CEI 61000-4-11
< 5% U
T
(> 95% de baisse de UT)
pendant 1/2 période
40% U
T
(60% de baisse de UT)
pendant 5 périodes
70% U
T
(30% de baisse de UT)
pendant 25 périodes
<5% U
T
(>95% de baisse de UT)
pendant 5 s
< 5% U
T
(> 95% de baisse de UT)
pendant 1/2 période
40% U
T
(60% de baisse de UT)
pendant 5 périodes
70% U
T
(30% de baisse de UT)
pendant 25 périodes
<5% U
T
(>95% de baisse de UT)
pendant 5 s
La qualité de l’alimentation doit être celle d’un
environnement commercial ou hospitalier
classique. Si l’utilisateur de l’appareil électromédical a besoin d’un maintien en fonctionnement
même en cas de coupure de l’alimentation en
énergie, il est conseillé de raccorder l’appareil
concerné à une alimentation sans coupure ou
de l’alimenter au moyen d’une batterie.
Champ magnétique à la
fréquence d’alimentation
(50 Hz/ 60 Hz) d’après la
norme CEI 61000-4-8
3 A/m 3 A/m Les champs magnétiques à la fréquence du
réseau devront correspondre aux valeurs
classiques attendues dans un environnement
commercial ou hospitalier.
Remarque : U
T
est la tension du courant alternatif sur secteur avant l'application du niveau d’essai.
REF
SN
Marquage CE
Référence
Numéro de série
Tri sélectif des appareils électriques et électroniques.
Indique la plage de température dans laquelle le colis doit être
stocké et transporté.
Partie appliquée de type BF
Humidité admise pendant le transport et le stockage.
Connecteur-adaptateur – Instrument
Connecteur-adaptateur – Alimentation en tension (9VDC)
Lire et suivre le mode d’emploi et le conserver pour pouvoir le
consulter ultérieurement. (Fond : bleu ; symbole : blanc)
Fabricant
Date de fabrication
Fragile ! Manipuler avec soin
Conserver au sec
Point vert (spécifique à chaque pays)
 Loading...