

HEINE LED LoupeLight, LED MicroLight, ML4 LED Instructions For Use Manual
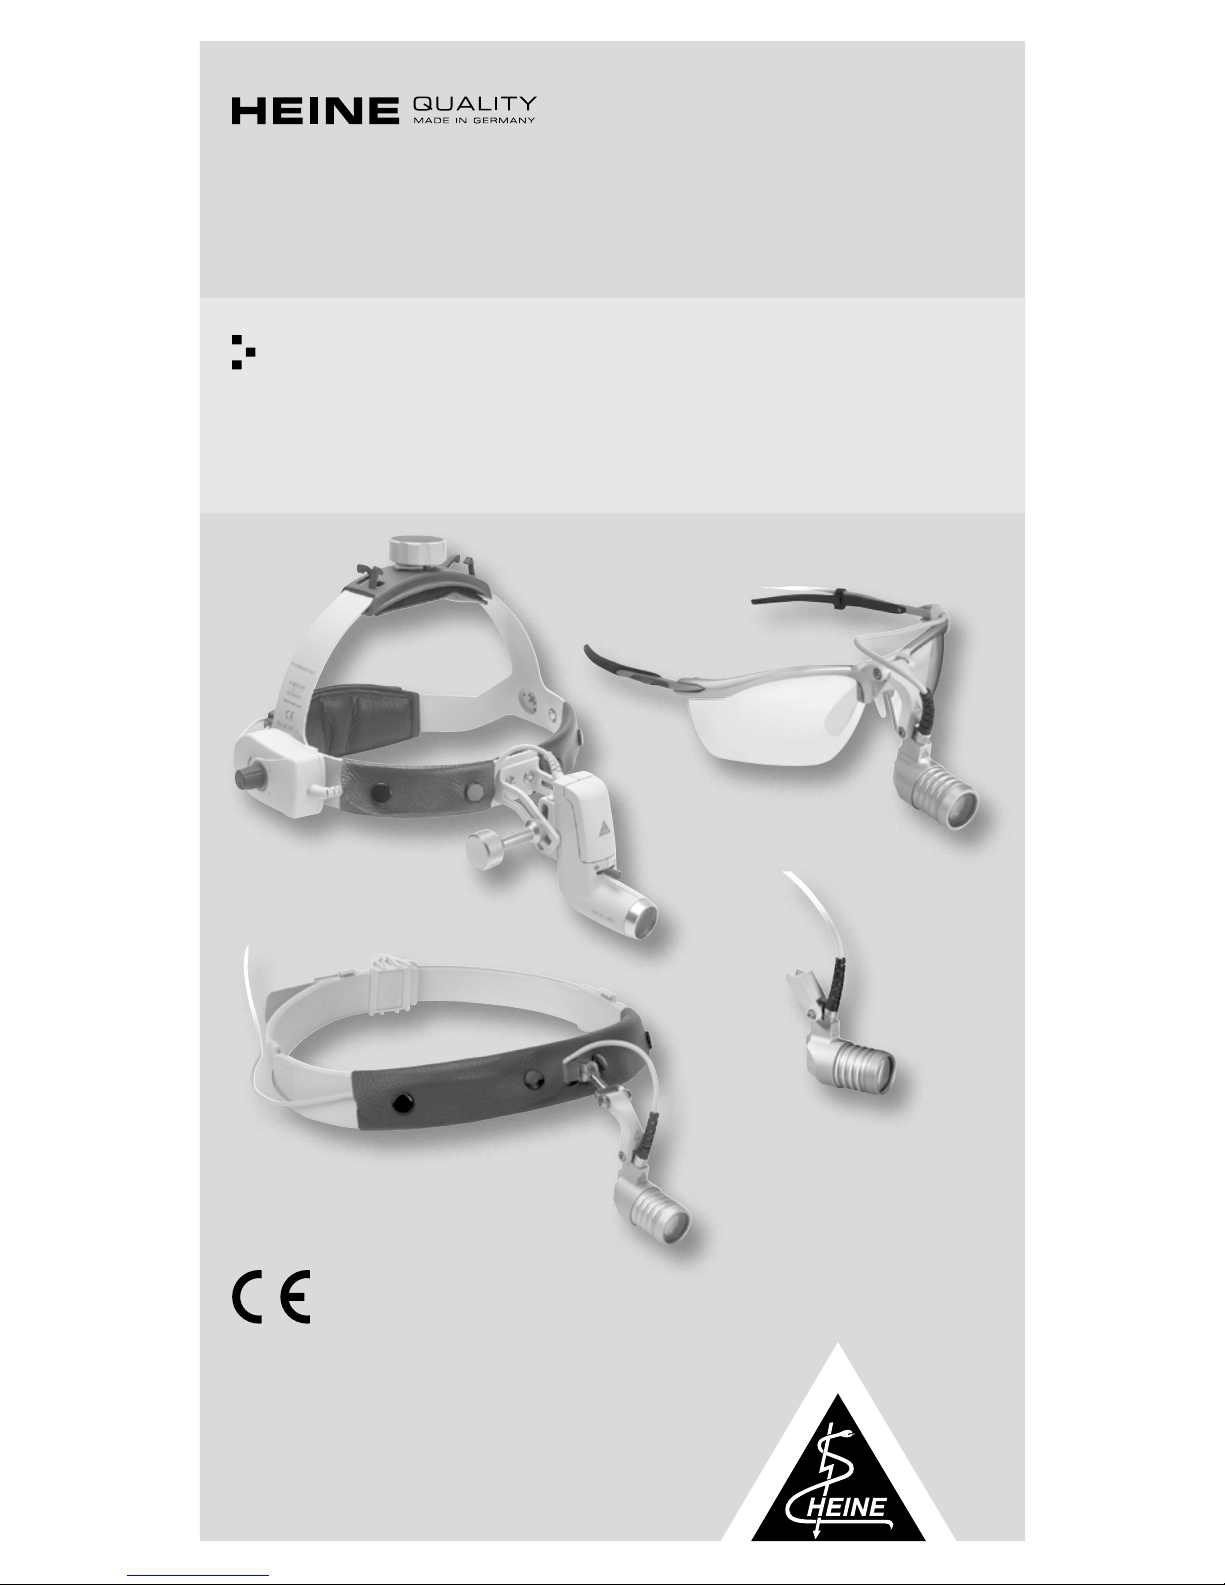
HEINE Headlights
HEINE Optotechnik GmbH & Co. KG
Kientalstr. 7 · 82211 Herrsching · Germany
Tel. +49 (0) 81 52 / 38 - 0
Fax +49 (0) 81 52 / 38 - 2 02
E-Mail: info@heine.com · www.heine.com
med 0714 2014-12-02
V-200.00.033

HEINE Headlights
DEUTSCH 3
ENGLISH 9
FRANÇAIS 15
ESPAÑOL 21
ITALIANO 27
SVENSKA 33
NEDERLANDS 39
DANSK 45
SUOMI 51
PORTUGUÊS 57
med 0714 2014 -12- 02
3/72
DEUTSCH
HEINE Kopeuchten
Diese Gebrauchsanweisung gilt für folgende HEINE Kopeuchten:
ML4 LED, LED LoupeLight, LED MicroLight
Bitte lesen Sie diese Gebrauchsanweisung sorgfältig durch und bewahren Sie sie
zum späteren Nachschlagen auf.
Zweckbestimmung
Die HEINE Kopfleuchten sind akku- oder netzbetriebene Geräte, die zur Beleuchtung bei
Diagnose und während eines therapeutischen oder chirurgischen (nur ML4 LED) Eingriffs
bestimmt sind. Ihre Anwendung darf nur durch autorisiertes, medizinisches Fachpersonal
erfolgen. Leuchten Sie mit dem Gerät nicht in die Augen.
Warn- und Sicherheitsinformationen
WARNUNG! Dieses Symbol macht auf eine möglicherweise gefährliche Situation
aufmerksam. Die Nichtbeachtung kann zu leichten oder mittleren Verletzungen
führen. (Hintergrundfarbe gelb, Vordergrundfarbe schwarz.)
HINWEIS! Dieses Symbol wird für Informationen bezüglich Installation, Betrieb,
Wartung oder Reparatur verwendet, die wichtig, jedoch nicht mit Gefahren
verbunden sind.
Inbetriebnahme
Betreiben Sie die ML4 LED ausschließlich mit
dem HEINE
®
mPack, dem mPack UNPLUGGED
oder dem Steckertransformator für Kopfbandregler.
Betreiben Sie die LED LoupeLight bzw. die
LED MicroLight ausschließlich mit dem
HEINE
®
mPack LL.
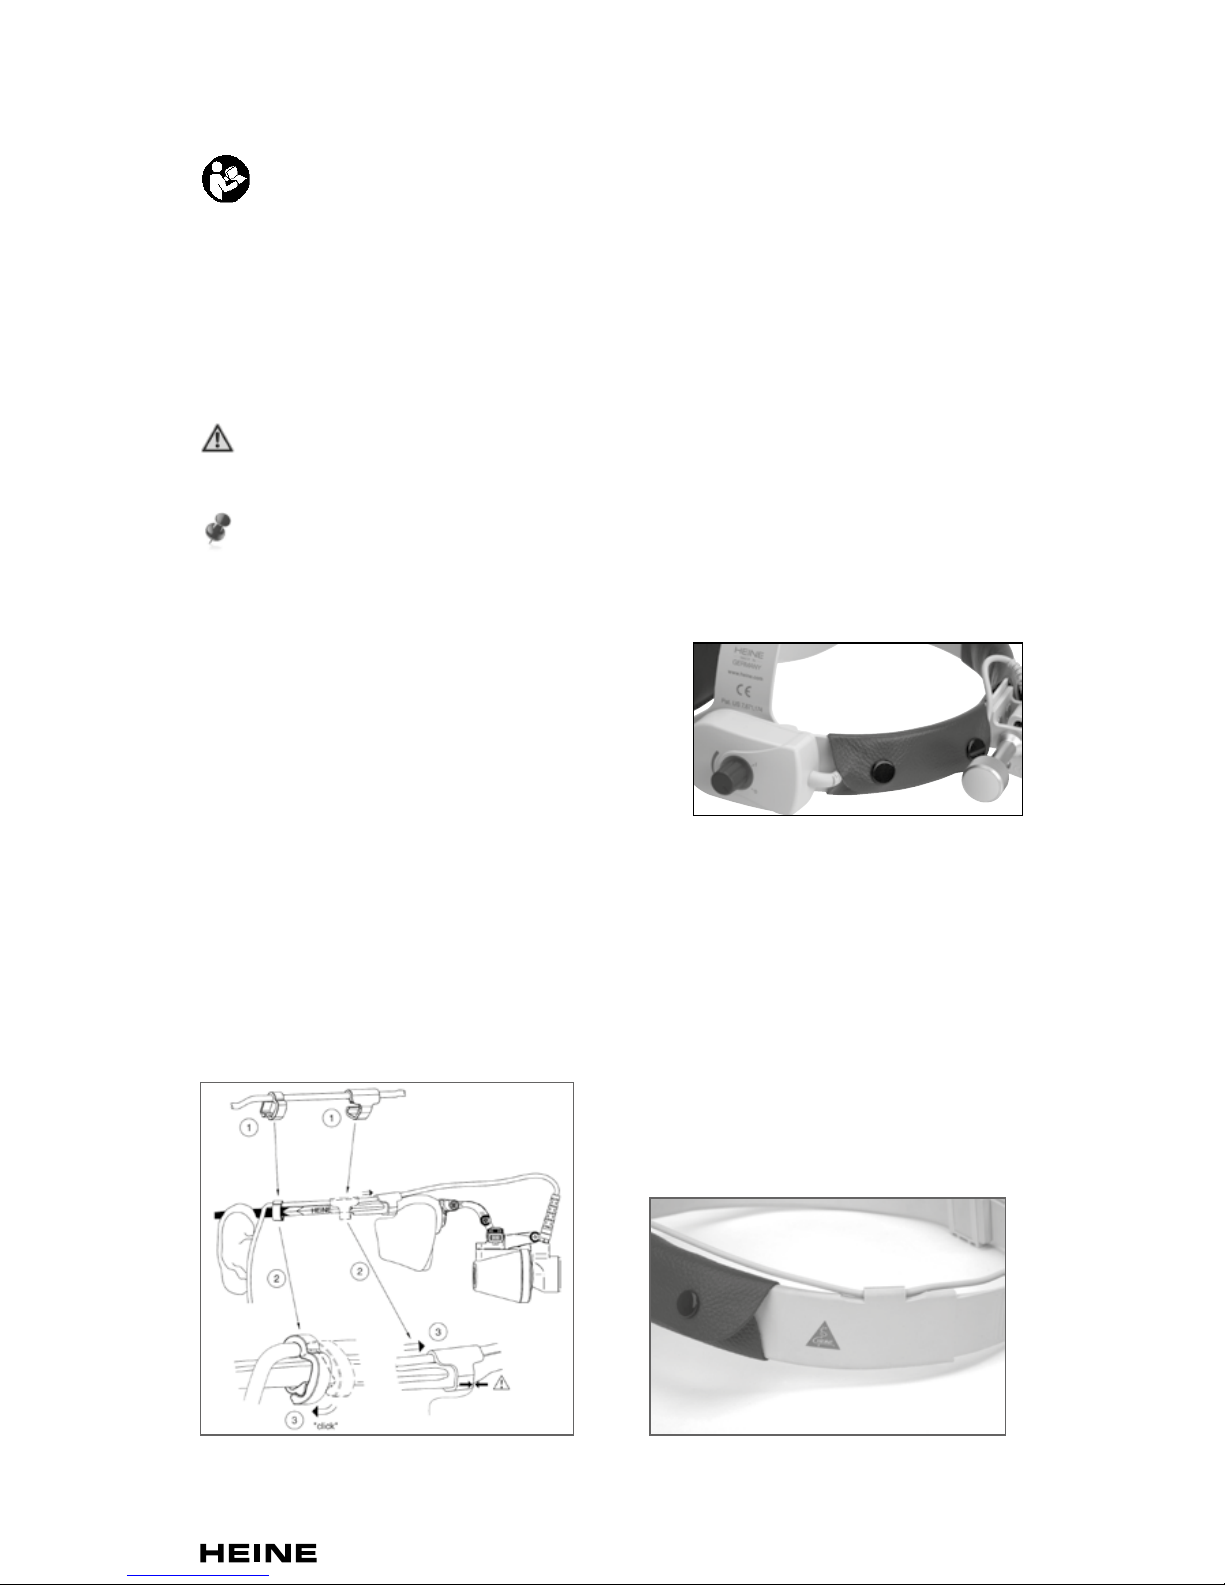
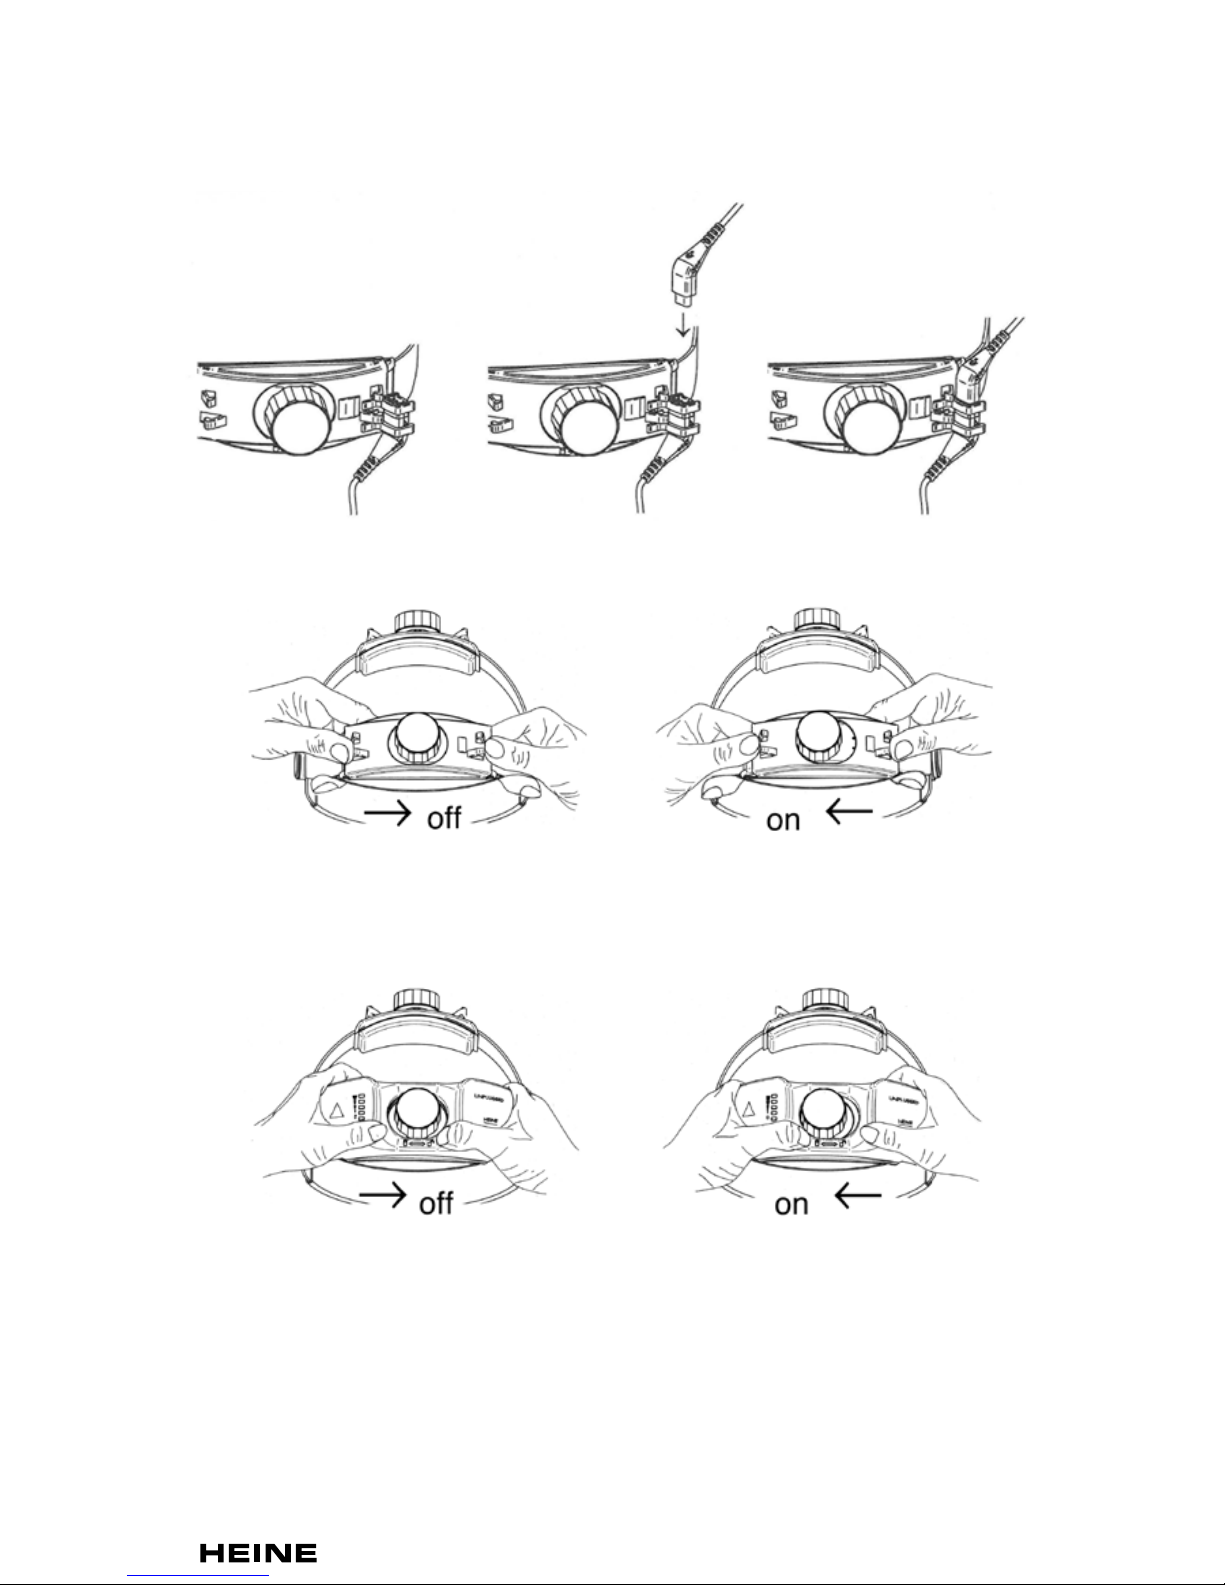
Achten Sie darauf, dass das Kabel am Kopfband
der ML4 LED fest in den dafür vorgesehenen
Laschen befestigt ist (s. Abb. 1).
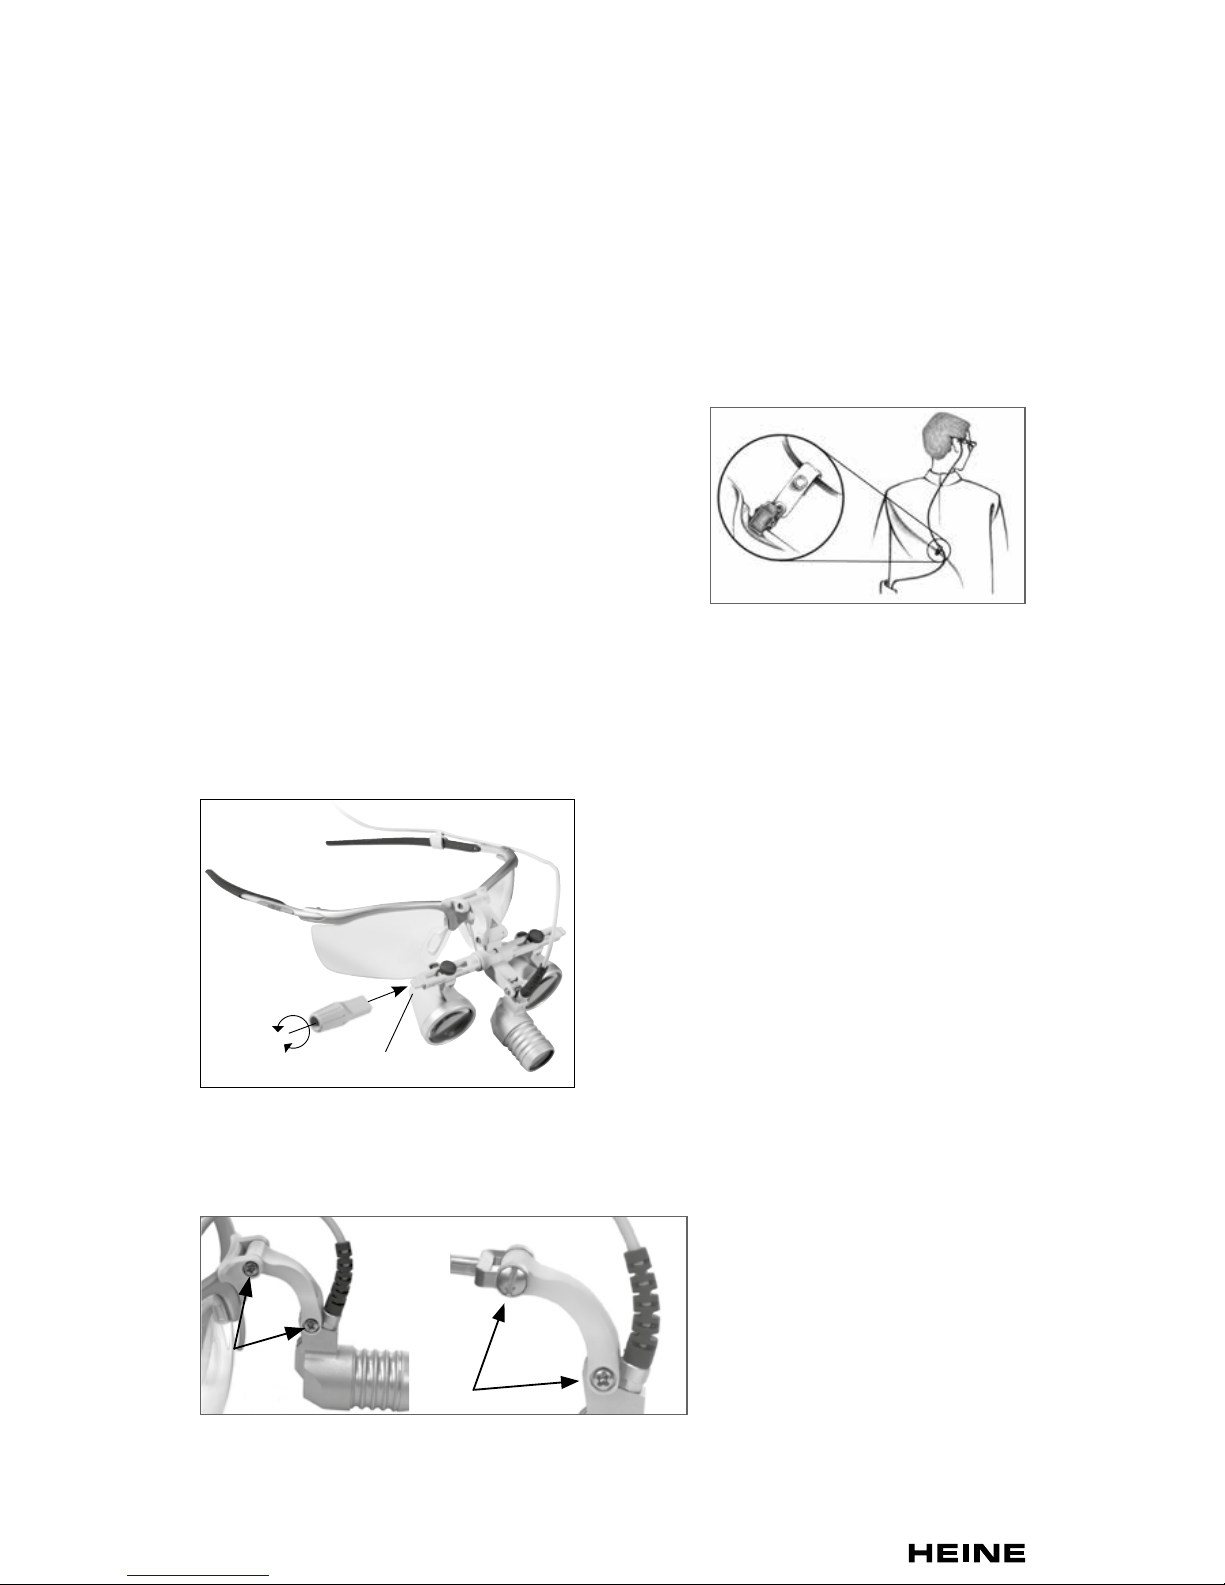
Achten Sie auf eine sichere Kabelführung (s. Abb. 2 und 3) bei LED LoupeLight und
LED MicroLight.
Vermeiden Sie hohe mechanische Belastungen und das Knicken des elektrischen
Versorgungskabels der Kopfleuchten.
Verwenden Sie den HEINE Steckertransformator (Kat.-Nr. X-095.16.330) ausschließlich
für die HEINE
®
ML4 LED.
Abb. 2 Sichere Kabelführung S-Frame Abb. 3 Sichere Kabelführung
Kopfband Lightweight
Abb. 1 Sichere Kabelführung
Kopfband ML4 LED

med 0714 2014 -12- 02
4/72
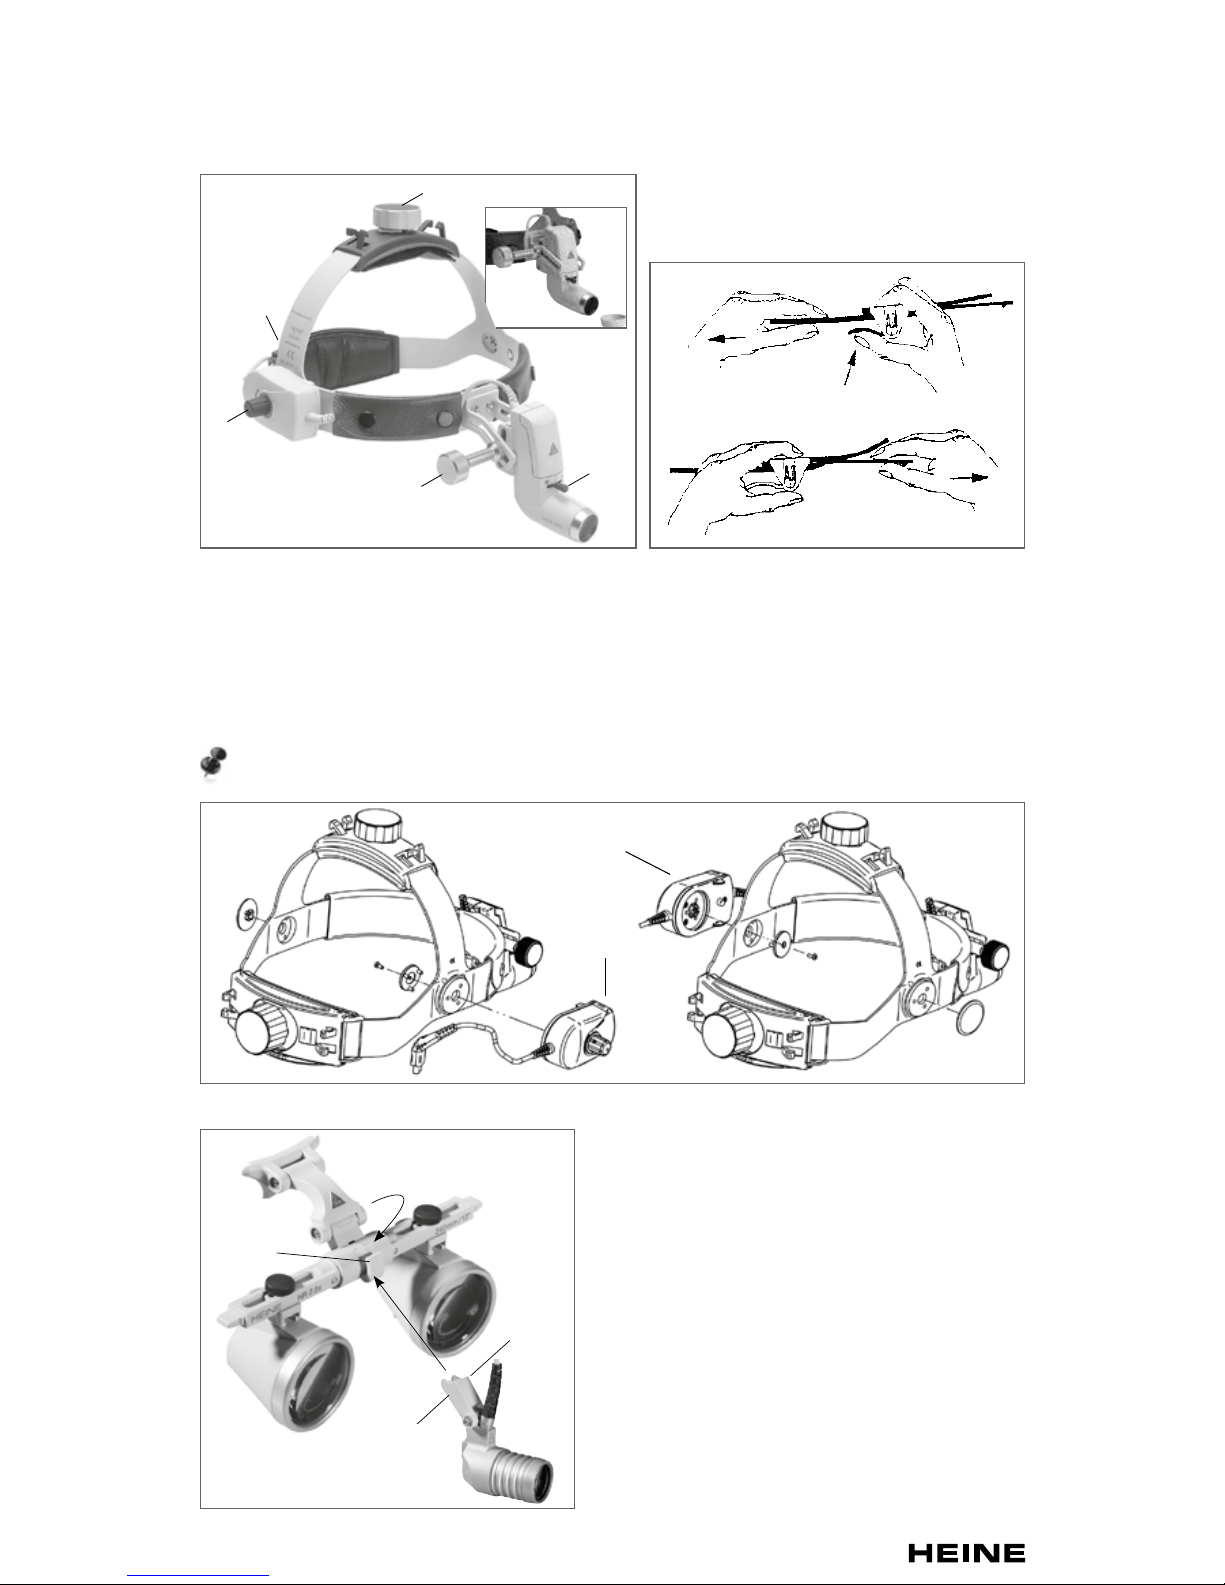
Anpassung des Kopfbands Professional L (s. Abb. 4): Zur Anpassung an den Kopfumfang lässt sich das Kopfband durch Drehen der Drehräder oben (1) und hinten (2)
erweitern oder verengen.
Anpassung des Kopfbands Lightweight (s. Abb. 5): Zur Anpassung an den Kopfumfang
lässt sich das Kopfband durch Drücken auf den Hebel (1) erweitern und durch Ziehen am
freien Ende (2) verengen.
Abb. 4 Kopfband Professional L (s. große Abb.) Abb. 5 Kopfband Lightweight
Optikschutzdeckel (s. kleine Abb.)
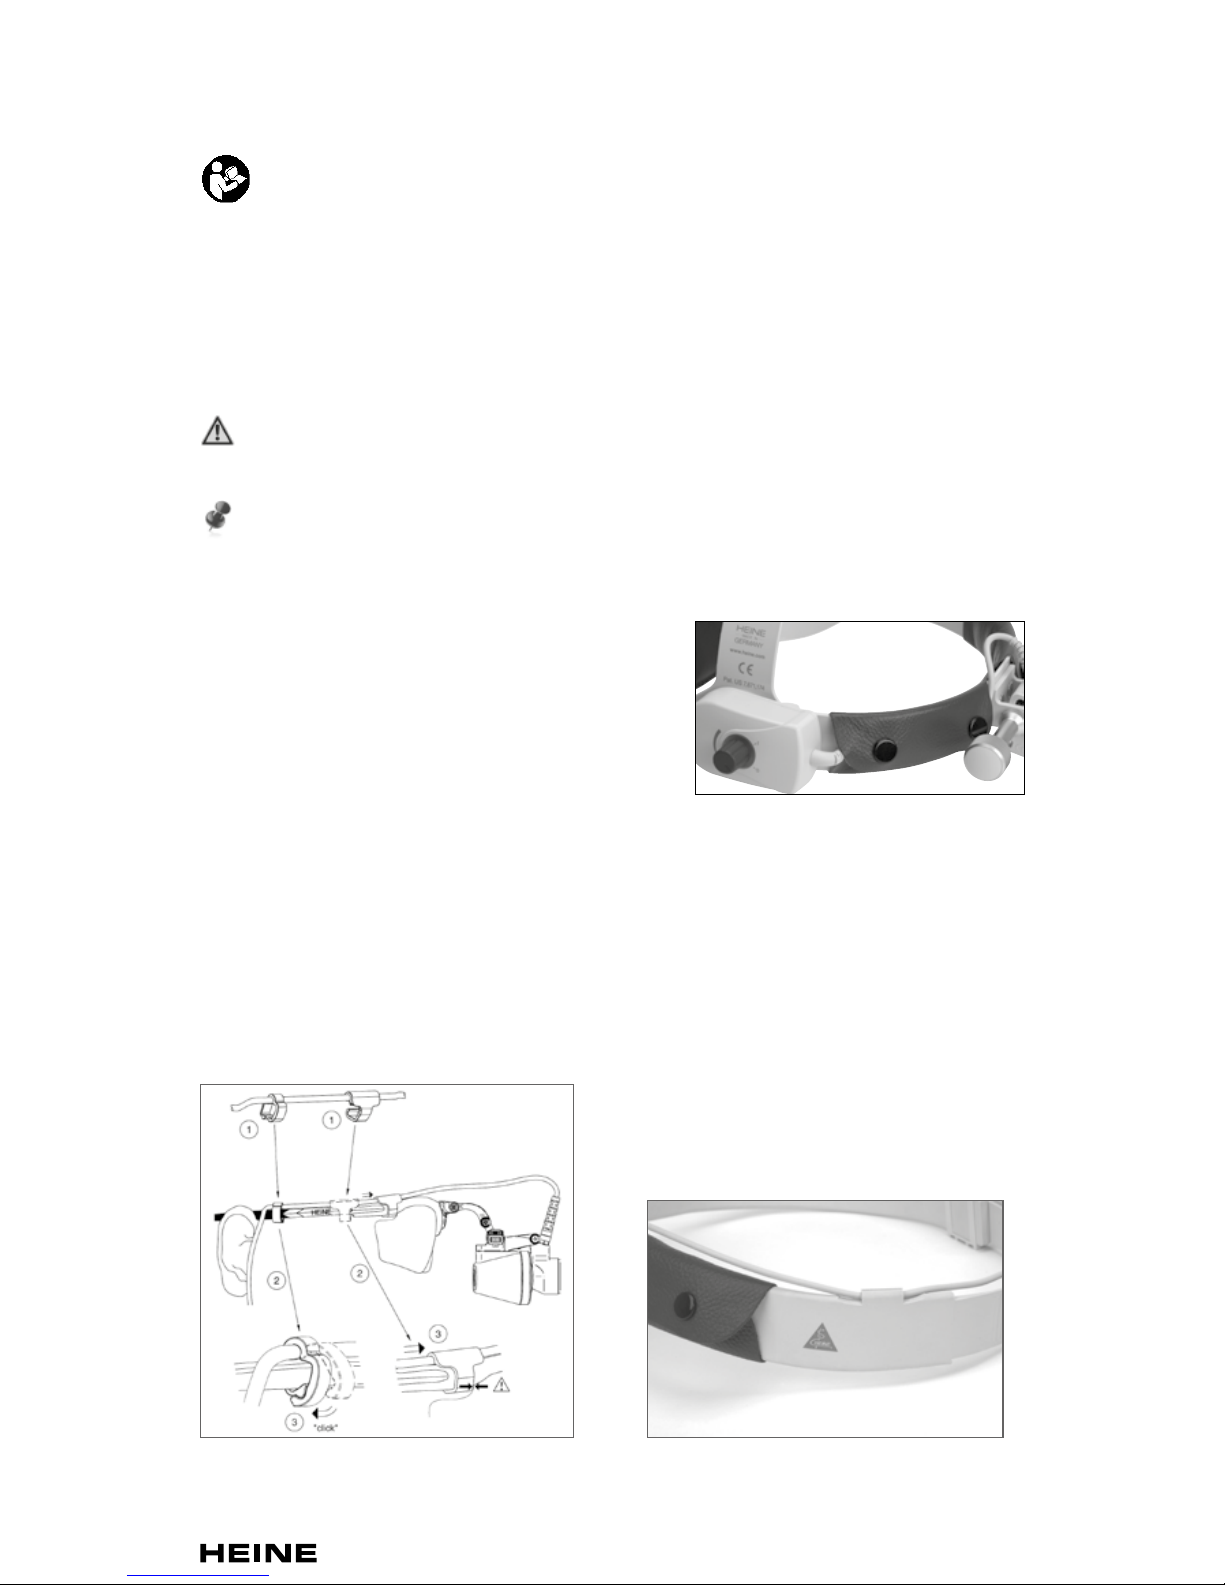
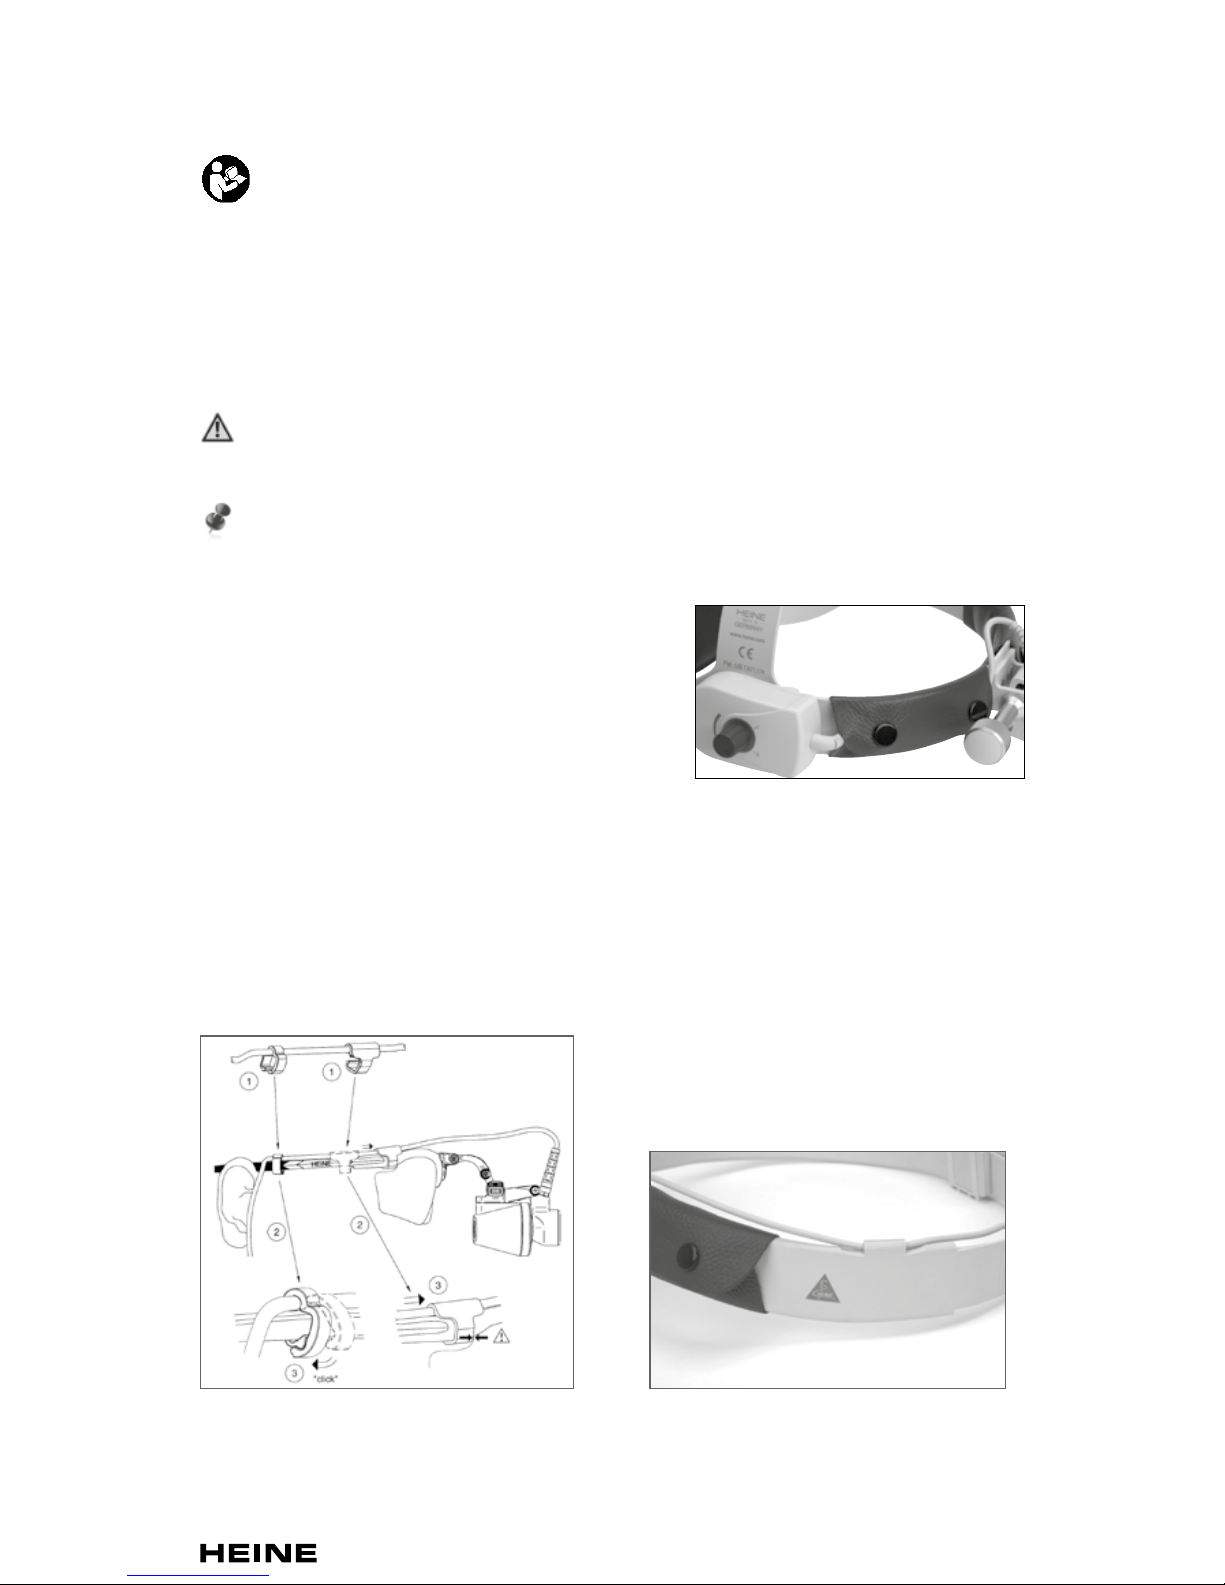
ML4 LED, Befestigen des Kopfbandreglers
Sie können den Kopfbandregler (1) auf der linken oder rechten Seite des Kopfbandes
montieren (s. Abb. 6). Mit dem Kopfbandregler (1) können Sie dann stufenlos die
Helligkeit regeln.
Bei Verwendung der ML4 LED wird empfohlen, den Regler des mPack auf „0“ zu
drehen.
3
1
4
5
2
1
2
Abb. 6 Montage des Kopfbandreglers
1
1
Montage der LED LoupeLight auf
Binokularlupenträger mit HEINE i-View
®
(s. Abb. 7):
Lösen Sie die Schraube (1) im Leuchtenhalter (2), so dass diese sich leicht auf
den Rundhaken des Lupenträgers (3)
aufschieben lässt. Der Leuchtenkopf muss
zwischen den Okularen (nicht darüber!)
sitzen.
Das Kabel der LED LoupeLight kann mit
dem Kabelclip wahlweise am rechten oder
linken Brillenbügel fixiert werden.
Abb. 7 Montage der LED LoupeLight
mit HEINE i-View
®
3
2
1

med 0714 2014 -12- 02med 0714 2014 -12- 02
5/72
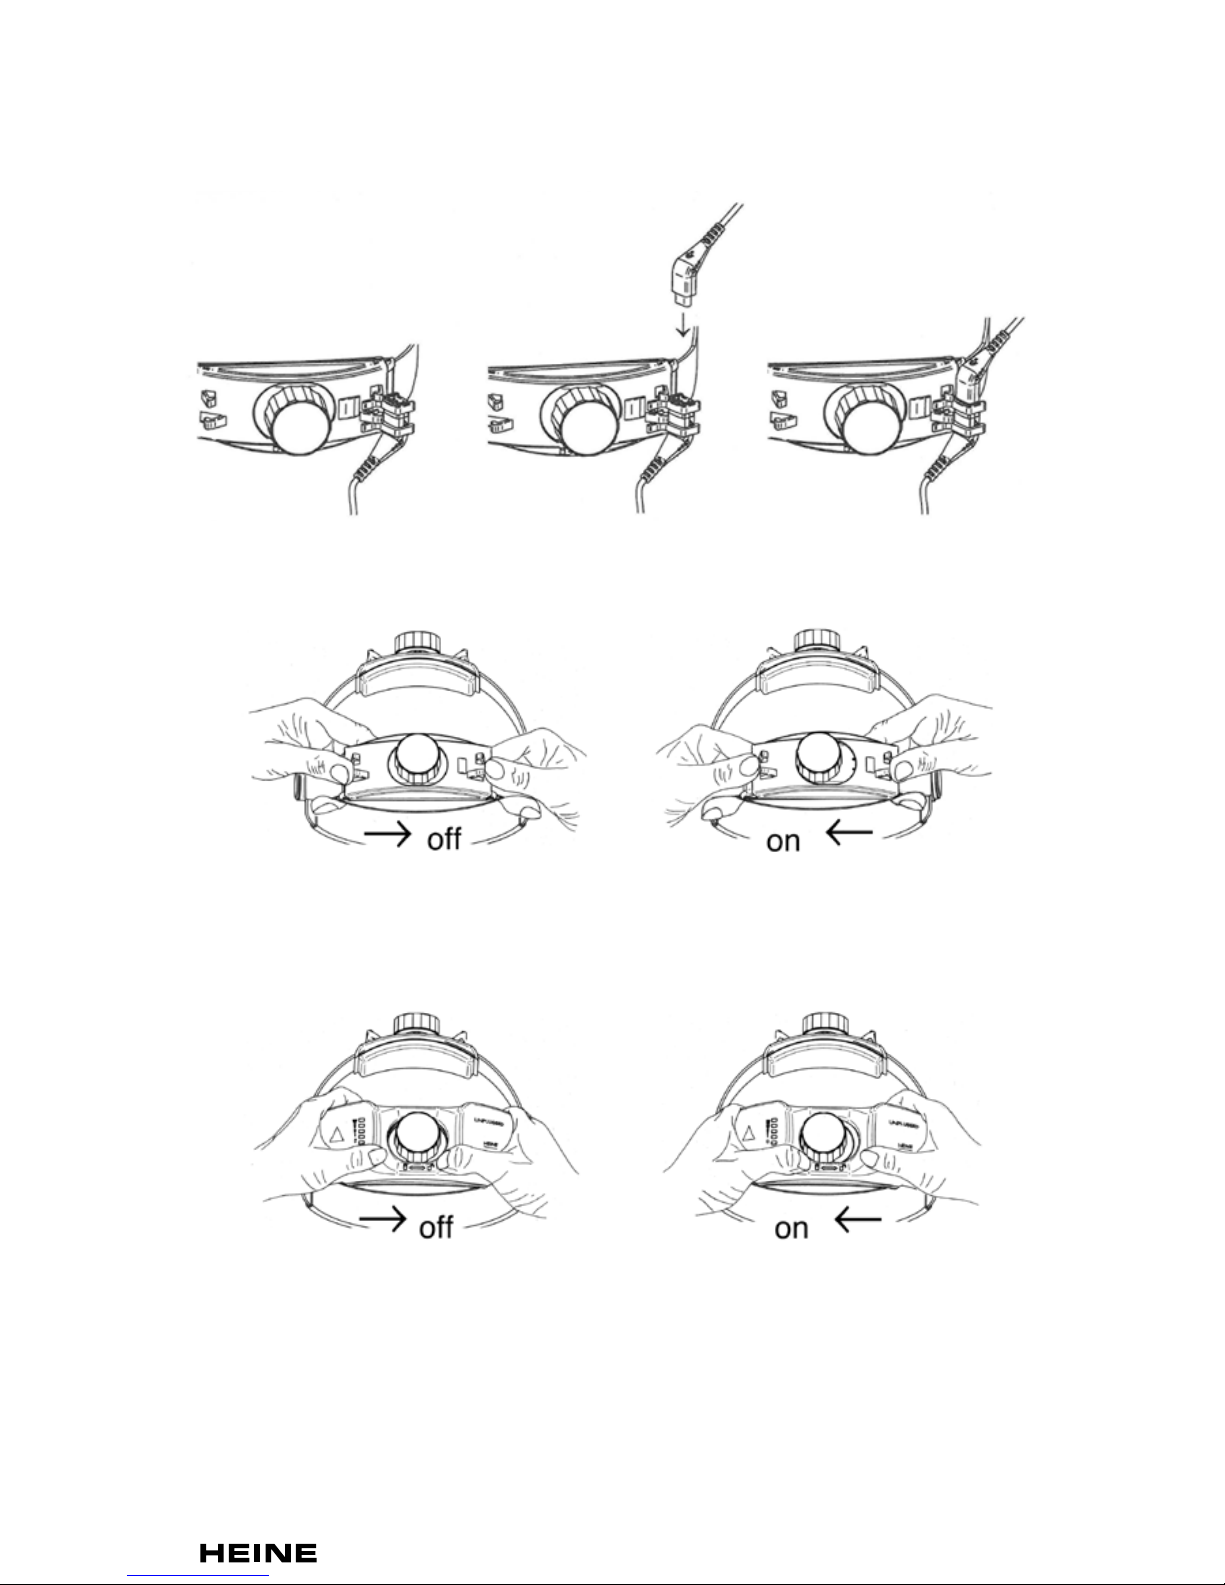
Bedienung
HEINE
®
ML4 LED
Für den Betrieb der HEINE
®
ML4 LED mit dem HEINE® mPack oder HEINE® EN50
verbinden Sie das kurze Kabel des Helligkeitsreglers mit dem Verbindungskabel
mPack UNPLUGGED/Cinch und befestigen Sie dieses an der hinteren Segmentabdeckung des Kopfbandes (s. Abb. 8). Schließen Sie das Instrument an der CinchBuchse des HEINE
®
mPack oder HEINE® EN50
an. Mit dem Regler (1) (Abb. 6) können Sie die
Helligkeit einstellen bzw. das Gerät ein- und
ausschalten.
Abb. 8
Für den Betrieb der ML4 LED mit dem mPack UNPLUGGED muss die Segmentabdeckung entfernt werden (s. Abb. 9).
Abb. 9
Anschließend befestigen Sie den mPack UNPLUGGED am hinteren Teil des Kopfbandes.
Unterstützen Sie dazu mit der linken Hand das Kopfband und schieben Sie mit dem
rechten Daumen das mPack UNPLUGGED nach links, bis es hörbar einrastet (s. Abb. 10).
Abb. 10
Einstellen der Leuchtrichtung und des Leuchtfeldes (s. Abb. 4)
Ohne HEINE
®
S-Guard
• Nach Lösen der Arretierschraube (4) lässt sich der Leuchtenkopf neigen und der Winkel
der Leuchtrichtung einstellen.
• Ziehen Sie nach beendeter Justierung die Arretierschraube (4) wieder fest an.

med 0714 2014 -12- 02
6/72
Mit HEINE® S-Guard
• Stellen Sie vor dem Aufsetzen der Lupe Ihre Pupillendistanz (PD) oder einen mittleren
Wert auf der Skala ein. Lösen Sie die Rändelschrauben und verschieben Sie beide
Okulare symmetrisch.
• Lösen Sie die Arretierschraube (4) und führen Sie den Nasensteg auf den Nasenrücken.
• Justieren Sie die Okulare so, dass Sie an den Schutzgläsern anliegen.
• Beleuchten Sie ein Objekt mit der ML4 LED in Ihrem Arbeitsabstand und justieren Sie die
Okulare so, dass Sie das Objekt mit jedem Auge in der Mitte des Übersichtsfeldes sehen
können. Ziehen Sie nach beendeter Justierung die Arretierschraube (4) wieder fest an.
Die richtige Einstellung ist erreicht, wenn Sie ein rundes, scharfbegrenztes und schattenfreies Sehfeld erhalten. Mit dem Schieber (5) lässt sich die Leuchtfeldgröße wahlweise
verkleinern oder vergrößern.
HEINE
®
LED LoupeLight und HEINE® LED MicroLight
• Verbinden Sie die LED Leuchte mit dem
HEINE
®
mPack LL.
• Schalten Sie die LED Leuchte ein und justieren
Sie den Leuchtenkopf vertikal so, dass das
Untersuchungsfeld zentral ausgeleuchtet ist.
• Durch Drehen des Drehreglers am mPack LL
lässt sich die Helligkeit stufenlos einstellen.
• Befestigen Sie mit dem mitgelieferten Stütz- Abb. 11 Kabelbefestigung mit
clip das Kabel an Ihrer Kleidung (s. Abb. 11). Stützclip
LED LoupeLight
• Justieren Sie die Binokularlupe für die vorgesehene Anwendung. Achten Sie auf eine
möglichst symmetrische Position der Okulare auf dem Lupenträger (Lupe absetzen und
überprüfen!), da das Leuchtfeld sonst seitlich versetzt erscheint.
• LED LoupeLight auf Binokularlupenträger
mit HEINE i-View
®
. Bei Bedarf kann ein
Sterihebel (s. Abb. 12) auf eines der beiden
Trägerenden (1) aufgesteckt werden, um die
Binokularlupe unabhängig von der Leuchte
in einer Drehbewegung zu schwenken (nur
HR/HRP Lupe).
Abb. 12 Benutzung des Sterihebels
LED MicroLight
• Damit die LED MicroLight in jeder stufenlos frei wählbaren Position hält, kann ein Nach-
ziehen der Schrauben mit einem Schraubenzieher notwendig werden (s. Abb. 13).
Abb. 13 Nachziehen der Schrauben
1

med 0714 2014 -12- 02med 0714 2014 -12- 02
7/72
Gebrauchsmaterial und Optionen
Für Anwendungen im Dentalbereich:
Verwenden Sie ggf. einen Gelbfilter, um eine Aushärtung von Komposit Füllmaterial zu
vermeiden, da dieser UV-Strahlung blockt.
Der aufsteckbare Polarisationsfilter P2 ermöglicht eine einfache Differenzierung und
reflexärmere Untersuchung von Gewebeoberflächen dank polarisiertem Licht. Nur in
Kombination mit ML4 LED Kopfleuchte oder LED LoupeLight und HR 2,5x Binokularlupen
funktionsfähig. Der Polarisationsfilter P2 ist kein Ersatz für einen Gelbfilter, da er Komposit
Füllmaterial aushärten kann.
Die Inbetriebnahme und Bedienung der HEINE Stromquellen sind in einer separaten
Gebrauchsanweisung beschrieben.
Hygienische Wiederaufbereitung
Anweisungen zur hygienischen Wiederaufbereitung müssen entsprechend nationaler
Normen, Gesetze und Richtlinien beachtet werden.
Einstufung gemäß KRINKO: unkritisch
Spaulding Classification USA: noncritical
Lassen Sie das Gerät vor der Aufbereitung abkühlen.
Trennen Sie das Gerät vor der Aufbereitung von der Spannungsversorgung.
Trocknen Sie die Stecker der LED LoupeLight und LED MicroLight bevor Sie die
Stromversorgung wieder anstecken.
Nehmen Sie bei Kontaminationsverdacht eine hygienische Aufbereitung vor.
Das Gerät ist nicht steril. Vermeiden Sie eine Berührung mit sterilen Händen,
Flächen oder Instrumenten.
Die beschriebenen Maßnahmen zum Reinigen und Desinfizieren ersetzen nicht die
jeweils für den Betrieb gültigen Vorschriften.
HEINE Optotechnik gibt nur die in dieser Gebrauchsanweisung genannten Mittel
und Verfahren frei.
Die Reinigung und Desinfektion ist nur von einer Person mit ausreichender
hygienischer Sachkompetenz durchzuführen.
Beachten Sie die Angaben der Hersteller der Aufbereitungsmittel.
Verwenden Sie keine Sprühdesinfektion, keine tropfend nassen oder stark
schäumenden Tücher. Bereiten Sie nicht maschinell auf.
Verwenden Sie für die Polarisationsfilter P2 keine alkoholischen Aufbereitungsmittel.
Vorgehensweise
Reinigen und desinfizieren Sie die Kopfleuchten, die Optionen und die Kopfbänder
manuell (Wischreinigung und Wischdesinfektion).
Reinigen Sie die Lederpolster der Kopfbänder mit einem Reinigungsmitteltuch.
Aufbereitungsmittelrückstände auf Optiken können mit einem keimarmen trockenen
Mikrofasertuch entfernt werden.
Empfohlene Mittel:
Reinigungsmittel: Neodisher
®
MediClean
Desinfektionsmittel: quartäre Ammoniumverbindungen (z.B. Microbac
®
Tissues)
Beachten Sie die Reinigungshinweise für den S-Frame in der gleichnamigen
Gebrauchsanweisung.
Anzahl der Aufbereitungszyklen
Die Polarisationsfilter P2 können bis zu 50 mal wiederaufbereitet werden.
Wartung und Service
Die Geräte sind wartungs- und servicefrei.
Die zu erwartende Betriebslebensdauer der HEINE Kopfleuchten beträgt 5 Jahre.
med 0714 2014 -12- 02
8/72
Allgemeine Warnhinweise
Überprüfen Sie das Gerät vor jedem Gebrauch hinsichtlich seiner einwandfreien
Funktion. Verwenden Sie das Gerät nicht, wenn Sie Beschädigungen feststellen.
Verwenden Sie das Gerät nicht in feuer- oder explosionsgefährdeter Umgebung
(z.B. durch Sauerstoff oder Anästhesiemitteln).
Modifizieren Sie das Gerät nicht.
Verwenden Sie nur original HEINE Teile, Zubehör und Stromquellen.
Lassen Sie Reparaturen nur von qualifiziertem Fachpersonal durchführen.
Gefahr durch lockere, herabfallende Teile. Überprüfen Sie vor jeder Verwendung,
dass alle Teile fest angezogen sind.
Führen Sie das Versorgungskabel so, dass niemand über das Kabel stolpern kann.
Leuchten Sie mit dem Gerät nicht in die Augen. Halten Sie auf keinen Fall Lupen
oder andere Optiken vor den Leuchtenkopf der LED-Leuchte.
Verwenden Sie den Optikschutzdeckel nur als Transportschutz. Lagern Sie den
Optikschutzdeckel in der Transportverpackung. Nicht in den OP-Räumlichkeiten
verwenden.
Beachten Sie die Akkubetriebsdauer. Halten Sie zur Sicherheit ggf. einen geladenen
Zweitakku bereit.
Ruckartige und schnelle Bewegungen können die Position des Lampengehäuses
verstellen.
Allgemeine Hinweise
Die Garantie für das gesamte Produkt erlischt bzw. gilt auch nicht, bei Verwendung
von nicht originalen HEINE Produkten, nicht originalen Ersatzteilen, und wenn Eingriffe (insbesondere Reparaturen oder Modifikationen) von Personen vorgenommen
wurden, die nicht von HEINE autorisiert sind. Nähere Informationen hierzu erhalten
Sie unter www.heine.com.
Lagern und benutzen Sie das Gerät nur in trockener und staubfreier Umgebung.
Entsorgung
Das Produkt muss einer getrennten Sammlung von Elektro- und Elektronikgeräten
zugeführt werden. Es sind die jeweils landesspezifischen Entsorgungsregeln zu
beachten.
Batterien müssen einer zentralen Sammelstelle zugeführt werden.
Elektromagnetische Verträglichkeit
Medizinische elektrische Geräte (ME-Geräte) unterliegen hinsichtlich der elektromagnetischen Verträglichkeit (EMV) besonderen Vorsichtsmaßnahmen und sind nach
den in den Begleitpapieren enthaltenen EMV-Hinweisen zu installieren und in Betrieb
zu nehmen. Tragbare und mobile HF-Kommunikationseinrichtungen können ME-Geräte
beeinflussen.
Dieses Gerät kann Funkstörungen hervorrufen oder den Betrieb von Geräten in der
näheren Umgebung stören. Es kann notwendig werden, geeignete Abhilfemaßnahmen
zu treffen wie z. B. eine neue Ausrichtung, eine neue Anordnung des ME-Geräts oder
die Abschirmung.
Die Verwendung von anderem Zubehör, anderer Wandler und Leitungen als den
angegebenen, mit Ausnahme der Wandler und Leitungen, die der Hersteller des MEGeräts oder ME-Systems als Ersatzteile für interne Komponenten verkauft, können
zu einer erhöhten Aussendung oder einer reduzierten Störfestigkeit des ME-Geräts
führen.
Das Gerät darf nicht unmittelbar neben oder mit anderen Geräten gestapelt angeordnet verwendet werden. Wenn der Betrieb nahe oder mit anderen Geräten gestapelt
erforderlich ist, sollte das ME-Gerät beobachtet werden, um seinen bestimmungsgemäßen Betrieb in dieser benutzten Anordnung zu überprüfen.
Im Anhang finden Sie die Tabellen „Leitlinien und Herstellererklärung – elektromagnetische Störfestigkeit“, technische Daten sowie eine Erläuterung der verwendeten Symbole.

med 0714 2014 -12- 02med 0714 2014 -12- 02
9/72
ENGLISH
HEINE Headlights
These instructions apply to the following products of the HEINE Headlight series:
ML4 LED, LED LoupeLight, LED MicroLight.
Please read and follow these instructions for use of and keep them for future
reference. (Background: blue, foreground: white.)
Intended Use
HEINE headlights are battery- or mains-operated devices, which are designed to provide
light during diagnosis or during a therapeutic or surgical (only Ml4 LED) intervention. They
must be used only by authorised qualified medical personnel. Do not shine the light into
eyes.
For U.S. only:
Federal law restricts this device to sale by or on the order of a Physician or
Practitioner.
Warnings and Safety Information
CAUTION! Indicates potential hazardous situations. Ignoring the corresponding
instructions may lead to dangerous situations of mild to moderate extent.
(Background color yellow; foreground color black).
NOTE! Note indicates valuable advice in terms of installation, operation,
maintenance or repair. Notes are important, but not related to hazardous situations.
Starting-up
Only operate the ML4 LED with the
HEINE
®
mPack, the mPack UNPLUGGED or
the plug transformer for the headband rheostat.
Only operate the LED LoupeLight and the
LED MicroLight with the HEINE
®
mPack LL.
Take care that the cable is fastened tightly to
the headband of the ML4 LED in the provided
buckles (see Fig. 1).
Ensure safe cable routing (see Figs. 2 and 3) for LED LoupeLight and LED MicroLight.
Avoid high mechanical loads and kinking of the electrical supply cable of the headlights.
Only use the HEINE plug transformer (Cat.No. X-095.16.330) for the HEINE
®
ML4 LED.
Fig. 2 Safe cable routing S-frame Fig. 3 Safe cable routing headband
Lightweight
Fig. 1 Safe cable routing
headband ML4 LED

med 0714 2014 -12- 02
10/72
Adjustment of the headband Professional L (see Fig. 4): To adjust for the head size,
the headband can be widened or tightened by turning the turnbuckles at the top (1)
and the back. (2).
Adjustment of the headband Lightweight (see Fig. 5): To adjust the head size, the
headband can be widened by pressing the lever (1) and tightened by pulling at the
free end (2).
Fig. 4 Headband Professional L (see tall fig.), Fig. 5 Headband Lightweight
optical protection cover (see small fig.)
ML4 LED, tting the headband rheostat
You can fit the headband rheostat (1) either on the left or the right side of the headband
(see Fig. 6). The headband rheostat (1) can then be used for stepless adjustment of the
brightness.
When using the ML4 LED, it is recommended that the mPack rheostat is set to „0“.
3
1
4
5
2
1
2
Fig. 6 Fitting the headband rheostat
1
1
How to t the LED LoupeLight to the
binocular loupe mount with HEINE i-View
®
(Fig. 7):
Unscrew the screw (1) on the light mount (2)
so that this can be attached to the round
attachment of the loupe mount (3). The
LED LoupeLight housing has to fit between
the eyepieces (not above them!).
The cable for the LED LoupeLight can be
fixed with the cable clip on the right or left
side of the frame as desired.
Fig. 7 Fitting the LED LoupeLight with
HEINE i-View
®
3
2
1
med 0714 2014 -12- 02med 0714 2014 -12- 02
11/72
Operation
HEINE
®
ML4 LED
To set up the HEINE
®
ML4 LED with HEINE® mPack or HEINE® EN50, connect the
short cord from the brightness control with the connecting cord mPack UNPLUGGED/
Cinch and fix this to the back part of the headband (Fig. 8). Connect the instrument to
the Cinch-socket of the mPack or EN 50. The rheostat (1) (Fig. 6) is used to adjust the
brightness and to turn the device on and off.
Fig. 8
To use the ML4 LED with the HEINE
®
mPack UNPLUGGED first remove the rear cover of
the headband (Fig. 9).
Fig. 9
Then attach the mPack UNPLUGGED to the rear of the headband. To do so, hold the
headband in your left hand and push the mPack UNPLUGGED to the left, until it clicks
into place (Fig.10).
Fig. 10
Selecting viewing angle and eld of view (Fig. 4)
Without HEINE
®
S-Guard
• After loosening the locking screw (4), the light head can inclined and the angle of the
light direction can be adjusted.
• After adjustment, re-tighten the screw (4).
med 0714 2014 -12- 02
12/72
With HEINE® S-Guard
• Before putting on the loupes, select your inter-pupillary distance (PD) or an average
value on the scale. Unscrew the retaining screw and slide the eyepieces to one side
symmetrically.
• Unscrew the fixing screw (4) and locate the nosepad on the bridge of the nose.
• Adjust the eyepieces so that they nearly touch the protective lenses.
• Shine the ML4 LED onto an object at your normal working distance and adjust the
eyepieces so that the object is centred in both eyepieces. After adjustment, re-tighten
the screw (4).
The loupes are correctly adjusted when you see a clearly-defined, round, shadow-free
field of view. The slider (5) allows up or down adjustment of size of the light field.
HEINE
®
LED LoupeLight and HEINE® LED MicroLight
• Connect the LED Light to HEINE
®
mPack LL.
• Switch on the LED Light and adjust vertically the
light housing such that the illumination is centred
on the area to be examined.
• Turing the swivel lever at the mPack LL allows
continuous adjustment of the brightness.
• Fasten the cable on your clothes using
the support clip provided (see Fig. 11). Fig. 11 Cable fastening with
support clip
LED LoupeLight
• Adjust the binocular loupe for the intended application. Be sure the eyepieces are
positioned as symmetrically as possible on the optics holder (take off the loupe and
check this), as otherwise the spot of light will appear shifted to the side.
• LED LoupeLight on loupe mount with
HEINE i-View
®
. If required, a steri-lever (12)
can be attached to one end (1) of the loupe
mount so that the binocular loupe can be
swivelled independently of the light
(only HR/HRP Loupes).
Fig. 12 Using the steri-lever
LED MicroLight
• In order that the LED MicroLight remains in place in every gradually and freely selectab-
le position, it may be necessary to retighten the screws using a screwdriver (see Fig. 13).
Fig. 13 Tighten the screws
1

med 0714 2014 -12- 02med 0714 2014 -12- 02
13/72
Consumable material and options
For applications in the dental area:
If necessary, use a yellow filter in order to avoid the composite filling material hardening,
as this blocks UV radiation.
The plug-on polarisation filter P2 enables a differentiation and low-reflex examination of
tissue surfaces due to polarized light. Only in combination with ML4 LED light head or
LED LoupeLight and HR 2.5x binocular loups, ready to use. The polarisation filter P2 is
not a replacement for a yellow filter as it may harden composite filling material.
The setup and operation of the HEINE power sources are described in a separate
instruction document.
Hygienic Reprocessing
Instructions on hygienic reprocessing must be adhered to, based on national standards,
laws and guidelines.
Classification according to KRINKO: noncritical
Spaulding Classification USA: noncritical
Allow the device to cool down before reprocessing.
Before cleaning, disconnect the device from the power source.
Before you plug the device back in, dry the plugs of the LED LoupeLight and the
LED MicroLight.
In the event of suspected contamination, carry out hygienic preparation of the
instrument.
The device and its accessories are not sterile. Avoid touching with sterile hands,
areas or instruments.
The described cleaning and disinfection measures do not replace the specific rules
applicable for the establishment.
HEINE Optotechnik only approves the resources and procedures named in these
instructions for use.
Cleaning and disinfection may only be carried out by personnel with sufficient
hygienic knowledge.
Observe the instructions of the manufacturer of the reprocessing media.
Do not use any spray disinfectant, or any dripping-wet or heavily-foaming cloths.
Do not prepare mechanically.
For the polarisation filter P2, do not use any alcoholic preparing agents.
Procedure
Clean and disinfect the head lights, the options and the headbands manually
(wipe-cleaning and wipe-disinfecting). Clean the leather cushion of the headbands with
a detergent cloth. Conditioning residues on optics may be removed using a low-bacterial,
dry, micro-fibre cloth.
Recommended agents:
Cleaning agent: Neodisher
®
MediClean
Disinfectant agent: quaternary ammonia compounds (e.g. Microbac
®
tissues)
Please follow the cleaning notes for the S-Frame in the identically named instructions
for use.
Number of preparation cycles
Polarisation filter P2 may be re-prepared up to 50 times.
Maintenance and Service
The instruments do not require maintenance or service.
The expected operational life of the HEINE head light is 5 years.
med 0714 2014 -12- 02
14/72
General Warnings
Check the correct operation of the device before use! Do not use the device if there
are visible signs of damage.
Do not use the device in fire- or explosive risk area (e.g. oxygen saturated or
anesthetic environments)
Do not modify the device.
Use only original HEINE parts, spare parts, accessories and power sources.
Repairs shall only be carried out by qualified persons.
Danger from loose, falling parts. Please check before every use that all the parts
are tightened safely.
Route the supply cable in such a way that nobody can trip over it.
Do not shine the light directly into the eyes. Never ever hold magnifying glasses or
any other optical system in front of the light of the LED-headlight.
Only use the lens protector as transport protection. Store the lens protector in the
transport case. Do not use in the surgical rooms.
Take note of the operating time of the rechargeable batteries. Keep a charged
back-up rechargeable battery ready if necessary.
Jerky, fast movements can alter the position of the lamp housing.
General Notes
The warranty for the entire product is invalidated if non-genuine HEINE products or
non-original parts are used and if repairs or modifications are made to the device by
persons not authorized by HEINE. For more information, please visit www.heine.com.
Store and use the device in dry and dust-free environments only!
Disposal
The product must be recycled as separated electrical and electronic devices. Please
observe the relevant state-specific disposal regulations.
Recycle batteries separately.
Electromagnetic Compatibility
Medical electric devices are subject to special precautionary measures with regard to
electromagnetic compatibility (EMC). Portable and mobile high frequency communication
equipment can affect medical electric devices.
This is a device in the domestic environment, this device may cause radio interference,
so that it may be necessary in this case, to take appropriate remedial measures, as
e.g. orientation, new arrangement or shielding of the device or restrict the connection
to the site.
The use of accessories, converters or cables other than the ones specified by
HEINE might lead to increased emission reduced electrical immunity of the medical
equipment.
The device may not be stacked directly near or used directly beside other devices.
If the device is to be operated in a stack or with other devices, the device should be
watched to ensure it operates properly in this location.
The appendix contains the tables „Guidance and Manufacturer’s declaration –
Electromagnetic immunity“, technical specification and an explanation of the used
symbols.
med 0714 2014 -12- 02med 0714 2014 -12- 02
15/72
FRANÇAIS
HEINE Lampes Frontales
Le présent mode d’emploi s’applique aux lampes frontales HEINE suivantes :
ML4 LED, LED LoupeLight, LED MicroLight
Lire et suivre attentivement le présent mode d’emploi et le conserver pour pouvoir
le consulter ultérieurement.
Utilisation prévue
Les lampes frontales HEINE sont des appareils fonctionnant sur accus ou sur secteur
destinés à fournir un éclairage lors du diagnostic ou pendant une intervention thérapeutique ou chirurgicale (ML4 LED uniquement). Leur utilisation est réservée à des
professionnels de santé autorisés et exclusivement. Ne pas diriger la lumière de l’appareil
dans les yeux.
Mises en garde et consignes de sécurité
AVERTISSEMENT ! Ce symbole indique une situation potentiellement dangereuse.
Le non-respect des consignes peut entraîner des accidents corporels mineurs à
modérés. (Fond jaune, premier plan noir.)
REMARQUE ! Ce symbole est utilisé pour donner des informations importantes
concernant l’installation, l’exploitation, la maintenance ou la réparation, mais non
liées à un danger.
Mise en service
Faire fonctionner la ML4 LED exclusivement
avec le mPack HEINE, le mPack UNPLUGGED
ou le transformateur à fiche pour rhéostat sur
bandeau.
Faire fonctionner la LED LoupeLight ou la
LED MicroLight exclusivement avec le
mPack LL HEINE
®
.
S’assurer que le câble du bandeau de la lampe
ML4 LED est solidement attaché dans les rabats
prévus à cet effet (voir Fig. 1).
Vérifier le cheminement sécurisé du câble (voir Fig. 2 et 3) sur les lampes
LED LoupeLight et LED MicroLight.
Evitez toute charge mécanique lourde et tout noeud au câble fibre optique comme au
câble électrique.
Utiliser le transformateur à fiche HEINE (réf. cat. X-095.16.330) exclusivement pour la
lampe HEINE
®
ML4 LED.
Fig. 2 Cheminement sécurisé du câble Fig. 3 Cheminement sécurisé du câble
sur la monture S-Frame sur le bandeau Lightweight
Fig. 1 Cheminement sécurisé du
câble du bandeau ML4 LED
med 0714 2014 -12- 02
16/72
Réglage du bandeau Professional L (voir Fig. 4) : Pour modifier la taille du bandeau,
tourner les molettes en haut (1) et à l’arrière (2) pour élargir ou diminuer le tour de tête.
Réglage du bandeau Lightweight (voir Fig. 5) : Pour modifier la taille du bandeau,
appuyer sur le levier (1) pour élargir le tour de tête, tirer sur l’extrémité libre (2) pour le
diminuer.
Fig. 4 Bandeau Professional L Abb. 5 Bandeau Lightweight
Couvercle de protection d’optique
(voir la vignette)
ML4 LED, Fixation du bouton de réglage
Vous pouvez monter le bouton de réglage (1) sur le côté gauche ou droit du bandeau
(voir Fig. 6). Vous pouvez ensuite régler en continue la luminosité en continu avec le
bouton (1).
En cas d’utilisation de la ML4 LED, il est recommandé de régler le rhéostat du mPack
sur « 0 ».
3
1
4
5
2
1
2
Fig. 6 Montage du rhéostat sur bandeau
1
1
Comment monter la LoupeLight LED
sur le porte-loupe binoculaire avec
HEINE i-View
®
(voir Fig. 7) :
Desserrez la vis (1) dans le support de
lampe (2), de sorte qu’elle puisse être
glissée facilement sur le crochet courbe
du porte-loupe (3). Le boîtier LoupeLight
LED doit être situé entre les deux
oculaires (pas au-dessus d’eux).
Le câble de la LoupeLight LED peut être
fixé avec le clip de câble sur le côté droit
ou gauche de la monture comme on le
souhaite.
Fig. 7 Montage de la LED LoupeLight
avec HEINE i-View
®
3
2
1
med 0714 2014 -12- 02med 0714 2014 -12- 02
17/72
Utilisation
HEINE
®
ML4 LED
Pour faire fonctionner le HEINE
®
ML4 LED avec le HEINE® mPack ou le HEINE® EN50,
connectez le câble court du bouton avec le connecteur du mPack UNPLUGGED/Cinch
et fixez le sur le cache arrière du bandeau (Fig. 8).
Raccordez l’instrument sur la prise Cinch du mPack ou du EN50. Le régulateur (1)
(Fig.6) permet de régler la luminosité ou d’allumer
et éteindre l’appareil.
Fig. 8
Le cache doit être ôté pour assurer le fonctionnement du ML4 LED avec le mPack
UNPLUGGED (Fig. 9).
Fig. 9
Fixez ensuite le mPack UNPLUGGED sur la partie inférieure à l’arrière du bandeau.
Cet effet, soutenez de la main gauche le bandeau et déplacez avec le pouce droit le
mPack UNPLUGGED vers la gauche jusqu’à ce qu’on l’entende s’encliqueter (Fig. 10).
Fig. 10
Sélection de l’angle et du champ de vision
Sans HEINE
®
S-Guard
• Desserrer la vis de fixation (4) pour pouvoir incliner la tête de lampe et régler l’angle du
faisceau lumineux.
• Après réglage, revissez l’écrou (4).
med 0714 2014 -12- 02
18/72
Avec HEINE® S-Guard
• Avant de poser la loupe, réglez la distance par rapport à la pupille ou une valeur ou
réglez une valeur moyenne sur la règle graduée. Desserrer les vis molletées et déplacez
symétriquement les deux oculaires.
• Desserrez la vis de serrage (4) et réalisez et placez le pont nasal sur l’arête du nez.
• Ajustez les oculaires de manière à ce qu’ils viennent se placer sur les verres protecteurs.
• Eclairez un objet avec le ML4 LED à une distance de travail et mettez au point les
oculaires de manière à pouvoir l’objet de chaque œil au milieu du champ de visée.
Après réglage, revissez l’écrou (4).
Le réglage est bon si vous obtenez un champ de vision rond, nettement délimité et
sans ombre. Le curseur (5) permet de réduire ou d’agrandir au choix la taille du champ
lumineux.
HEINE
®
LED LoupeLight et HEINE® LED MicroLight
• Connectez la loupe lampe frontale LED au
HEINE mPack LL
®
.
• Allumez la lampe frontale LED et réglez verticale-
ment le spot lumineux de façon que le faisceau
soit centré sur la zone à examiner.
• Le bouton de réglage du mPack LL permet de
régler progressivement la luminosité.
• Attachez le câble à votre vêtement avec le clip Fig. 11 Fixation du câble avec
fourni (voir Fig. 11). le clip
LED LoupeLight
• Ajustez la loupe binoculaire selon l’application souhaitée. Vérifiez que les oculaires
soient positionnées aussi symétriquement que possible sur le support optique (retirez
la loupe et vérifiez ce point), dans le cas contraire le spot lumineux apparaîtrait déplacé
sur le côté.
• LoupeLight LED sur le porte-loupe binocu-
laire avec HEINE i-View
®
. En cas de besoin,
un levier stérile (voir Fig. 12) peut être monté
sur l’une des deux extrémités portantes (1)
pour pouvoir pivoter la loupe binoculaire en un
mouvement rotatif,
indépendamment de la lampe (seulement
loupe HR/HRP).
Fig. 12 Utilisation du levier stérile
LED MicroLight
• La position de la LED MicroLight est réglable de façon entièrement libre et progressive;
pour qu’elle reste dans la position choisie, il peut être nécessaire de resserrer les vis
avec un tournevis (voir Fig. 13).
Fig. 13 Resserrage des vis
1

med 0714 2014 -12- 02med 0714 2014 -12- 02
19/72
Matériel et options
Pour les applications dans le domaine dentaire:
Utiliser si nécessaire un filtre jaune pour éviter un durcissement des matériaux composites, ce filtre bloquant en effet le rayonnement UV.
Le filtre polarisant amovible P2 permet une différenciation simple et un examen des
surfaces tissulaires avec moins de reflets grâce à la lumière polarisée. Fonctionne
uniquement en association avec la lampe frontale ML4 LED ou la LED LoupeLight et les
loupes binoculaires HR 2,5x. Le filtre polarisant P2 ne remplace pas un filtre jaune car il
peut faire durcir les matériaux composites.
La mise en service et l’utilisation des sources de courant HEINE sont décrites dans un
mode d’emploi distinct.
Retraitement hygiénique
Les instructions sur le retraitement hygiénique doivent être respectées, conformément
aux normes, lois et directives nationales.
Classification selon KRINKO : non critique
Spaulding Classification USA : noncritical
Laisser refroidir l’appareil avant le traitement.
Avant de procéder au traitement, débrancher l’appareil de l’alimentation électrique.
Sécher les connecteurs de la LED LoupeLight et de la LED MicroLight avant de
rebrancher l’alimentation électrique.
En cas de soupçons de contamination, procéder à un traitement hygiénique.
L’appareil et ses accessoires ne sont pas stériles. Évitez de le toucher avec des
mains, des surfaces ou des instruments stériles.
Les mesures de nettoyage et de désinfection décrites ne remplacent en aucun cas
les prescriptions à respecter lors de l’utilisation.
HEINE Optotechnik n’autorise que les produits et procédés mentionnés dans le
présent mode d’emploi.
Le nettoyage et la désinfection doivent être réalisés uniquement par une personne
possédant des compétences techniques suffisantes en matière d’hygiène.
Respecter les indications du fabricant du produit de traitement.
Ne pas utiliser la désinfection par aspersion, ni de chiffons trempés ou qui produisent
une mousse importante. Ne pas traiter en machine.
Pour le filtre polarisant, ne pas utiliser de produits de retraitement à l’alcool.
Marche à suivre
Nettoyer et désinfecter les lampes frontales, les options et les bandeaux à la main (nettoyage et désinfection par essuyage). Nettoyer la garniture en cuir du bandeau avec une
lingette nettoyante. Les résidus de produit de retraitement sur les optiques peuvent être
enlevés avec une lingette microfibres sèche et aseptique.
Produits recommandés :
Produit de nettoyage : Neodisher
®
MediClean
Produit de désinfection : d’ammonium quaternaire (p. ex. lingettes Microbac
®
) Observer
les consignes de nettoyage données pour la monture S-Frame dans le mode d’emploi
qui s’y rapporte.
Nombre de cycles de retraitement
Les filtres polarisants peuvent être retraités jusqu’à 50 fois.
Maintenance
Ces appareils ne nécessitent aucune maintenance particulière.
La durée de vie utile escomptée des lampes frontales HEINE est de 5 ans.

med 0714 2014 -12- 02
20/72
Consignes générales
Verifier avant chaque utilisation le bon fonctionnement de l’appareil. Ne pas utiliser
l’appareil s’il est endommage.
L’utilisation dans un environnement à risque d’incendie ou d’explosion, p. ex. en
présence d’oxygène ou de produits anesthésiques, n’est pas autorisée.
Ne pas modifier l’appareil.
Utiliser uniquement des pièces, accessoires et sources de courant d’origine HEINE.
Confier les réparations uniquement à des techniciens qualifiés.
Risque de chute de pièces mal fixées. Avant chaque utilisation, vérifiez la bonne
tenue de toutes les pièces.
Passer le câble d’alimentation de telle sorte que personne ne puisse trébucher dessus.
Ne pas diriger la lumière de l’appareil dans les yeux. Ne tenir en aucun cas des
loupes ou autres optiques devant la tête de la lampe LED.
Utiliser le couvercle de protection d’optique uniquement comme protection de trans-
port. Ranger le couvercle de protection d’optique dans l’emballage de transport. Ne
pas l’utiliser dans les salles d’opération.
Tenir compte de l’autonomie des accus. Par sécurité, tenir un deuxième accu chargé
à disposition si nécessaire.
Les mouvements saccadés et brusques peuvent modifier la position du boîtier de
la lampe.
Remarque générales
La garantie du produit dans son ensemble sera nulle et de nul effet en cas
d’utilisation de produits et pièces de rechange autres que les produits et pièces de
rechange d’origine HEINE ainsi qu’en cas d’interventions (en particulier des réparations ou des modifications) faites par des personnes non autorisées par HEINE.
Vous trouverez davantage d’informations à ce sujet sur le site www.heine.com.
Ranger et utiliser l’appareil exclusivement dans un environnement sec et exempt de
poussières.
Élimination des déchets
Le produit doit être mis au rebut dans le cadre du tri sélectif des appareils électriques
et électroniques. Il convient de respecter les lois en vigueur concernant l’élimination
des déchets.
Les batteries doivent être rapportées à un point de collecte central.
Compatibilité électromagnétique
Les appareils électromédicaux (appareils EM) sont soumis à des mesures de précautions
particulières concernant la compatibilité électromagnétique (CEM) et doivent être installés
et utilisés d’après les consignes relatives à la CEM contenues dans les documents
d’accompagnement. Les équipements portables et mobiles de communication HF
peuvent perturber les appareils électromédicaux.
Cet appareil est destiné à être utilisé exclusivement par des professionnels de santé.
Cet appareil peut provoquer des interférences ou peut perturber le fonctionnement
d’appareils situés dans son environnement immédiat. Il peut être nécessaire de
prendre des mesures correctives appropriées, par exemple une nouvelle orientation,
un nouvel agencement de l’appareil électromédical ou la mise en place d’un écran
protecteur.
L’utilisation d’accessoires, convertisseurs ou câbles autres que ceux indiqués, à
l’exception des convertisseurs et câbles vendus par le fabricant de l’appareil ou du
système électromédical comme pièces de rechange pour les composants internes,
peut entraîner une augmentation des émissions ou une réduction de l’immunité de
l’appareil électromédical.
Cet appareil électromédical ne doit pas être utilisé à proximité immédiate d’autres
appareils ni en empilement avec d’autres appareils. Si l’appareil doit être utilisé à
proximité d’autres appareils ou en empilement avec d’autres appareils, il convient
de vérifier qu’il fonctionne de manière conforme de manière ainsi agencée.
Vous trouverez en annexe les tableaux « Recommandations et déclaration du fabricant –
immunité électromagnétique », les caractéristiques techniques ainsi que l’explication des
symboles utilisés.
med 0714 2014 -12- 02med 0714 2014 -12- 02
21/72
ESPAÑOL
HEINE Lampas Frontales
Las presentes instrucciones de uso son válidas para los siguientes productos de la
serie de HEINE Lampas Frontales: ML4 LED, LED LoupeLight, LED MicroLight.
Leer detenidamente las presentes instrucciones de uso y conservar para futuras
referencias.
Uso previsto
Las lámparas frontales HEINE son dispositivos alimentados por batería o por el suministro eléctrico diseñados para la iluminación durante el diagnóstico e intervenciones
terapéuticas o quirúrgicas (solo con ML4 LED). Debe utilizarlas exclusivamente personal
autorizado especializado en medicina. No ilumine los ojos con el dispositivo.
Información de advertencia y seguridad
¡ADVERTENCIA! Este símbolo advierte de una posible situación peligrosa.
La no observancia de las indicaciones puede causar lesiones leves y medias.
(fondo amarillo; primer plano, negro).
¡NOTA! Este símbolo se utiliza para informar sobre la instalación, la revisión, el
mantenimiento o la reparación, que son importantes pero que no entrañan riesgos.
Puesta en servicio
Utilice la ML4 LED exclusivamente con el mPack,
el mPack UNPLUGGED o el transformador de
enchufe para regulador de cinta craneal HEINE.
Utilice la LED LoupeLight o la LED MicroLight
exclusivamente con el mPack LL HEINE
®
.
Asegúrese de que el cable de la cinta craneal
de la ML4 LED esté bien sujeto a las bridas
previstas para ello (ver Fig. 1).
Asegúrese de que la conducción del cable de la LED LoupeLight y LED MicroLight sea
segura (ver Fig. 2 y 3).
Evite esfuerzos mecánicos excesivos ni doble excesivamente el cable de alimentación
eléctrica.
Utilice el transformador de enchufe HEINE (X-095.16.330) exclusivamente para la ML4
LED HEINE.
Fig. 2 Conducción segura del cable Fig. 3 Conducción segura del cable de
para S-Frame la cinta craneal Lightweight
Fig. 1 Conducción segura del cable de
la cinta craneal para ML4 LED

med 0714 2014 -12- 02
22/72
Ajuste de la cinta craneal Professional L (ver Fig. 4): La cinta craneal puede ensancharse o estrecharse girando las ruedas giratorias situadas en la parte superior (1) y
trasera (2).
Ajuste de la cinta craneal Lightweight (ver Fig. 5): Para el ajuste al contorno craneal la
cinta se puede ensanchar mediante pulsación de la palanca (1) y estrechar estirando el
extremo libre (2).
Fig. 4 Cinta craneal Professional L Fig. 5 Cinta craneal Lightweight
Tapa de protección de la óptica
(ver Fig. pequeña)
ML4 LED, Sujeción del regulador
Vd. puede colocar el regulador de la cinta craneal (1) en el lado izquierdo o derecho de la
cinta craneal. Después podrá regular la claridad con progresión continua.
Durante la utilización de la ML4 LED se recomienda poner el regulador del mPack a “0“.
3
1
4
5
2
1
2
Fig. 6 Montaje del regulador de cinta craneal
1
1
Montaje del dispositivo luminoso LED
LoupeLight sobre el portador de lupas
con el HEINE i-View
®
(ver Fig 7):
Afloje el tornillo (1) en la sujeción de
lámpara (2) de tal modo, que la misma
se deje colocar cómodamente sobre el
gancho redondo del portador de lupas (3).
El cabezal luminoso debe asentarse
entre los oculares (¡no sobre ellos!).
El cable de la LED LoupeLight puede
ser fijado de forma alternativa a la patilla
derecha o izquierda de las gafas mediante
el clip de sujeción de cable.
Fig. 7 Montaje de la LED LoupeLight con
HEINE i-View
®
3
2
1
 Loading...