

Page 1
Camera settings for photographic documentation with the
HEINE DELTA® 20 T / HEINE DELTA® 20 PLUS / DELTA® 20 Dermatoscope
and HEINE SLR Photo adaptor
Digital high-resolution photography is the method of choice for optimum image documentation in dermatology.
of the DELTA® 20 T / DE LTA® 20 Plus / DELTA® 20 and a digital SLR camera allows for consistent high quality photographs.
This step-by-step guide will show you how to connect a DELTA® 20 T / DE LTA® 20 Plus / DELTA® 20 to a Digital SLR camera, and which
settings are optimal for your camera. For proper use please read the DELTA® 20 T / DE LTA® 20 Plus / DELTA® 20 user manual carefully.
1. The following current digital SLR cameras are recommended in connection with the DELTA® 20 T / DE LTA® 20 Plus / DELTA® 20.
Manufacturer Type
EOS 7D Mark II
EOS 60D / 80D
Canon
EOS 100D / 700D
EOS 750D / 760D / 1300D
D500 / D3200 / D3300
Nikon
D5500 / D7100 / D7200
Other currently available models from Canon and Nikon are not supported or deliver photographic material of insufcient quality.
The current Olympus camera portfolio is not compatible any more with HEINE SLR adaptors. Some of the older Canon, Nikon
or Olympus models are compatible with the SLR adaptor. If you wish to use an older camera, please contact [email protected]
to get the compatibility checked.
HEINE SLR
Photo Adaptor
K-000.34.185
K-000.34.186D3400 / D5200 / D5300
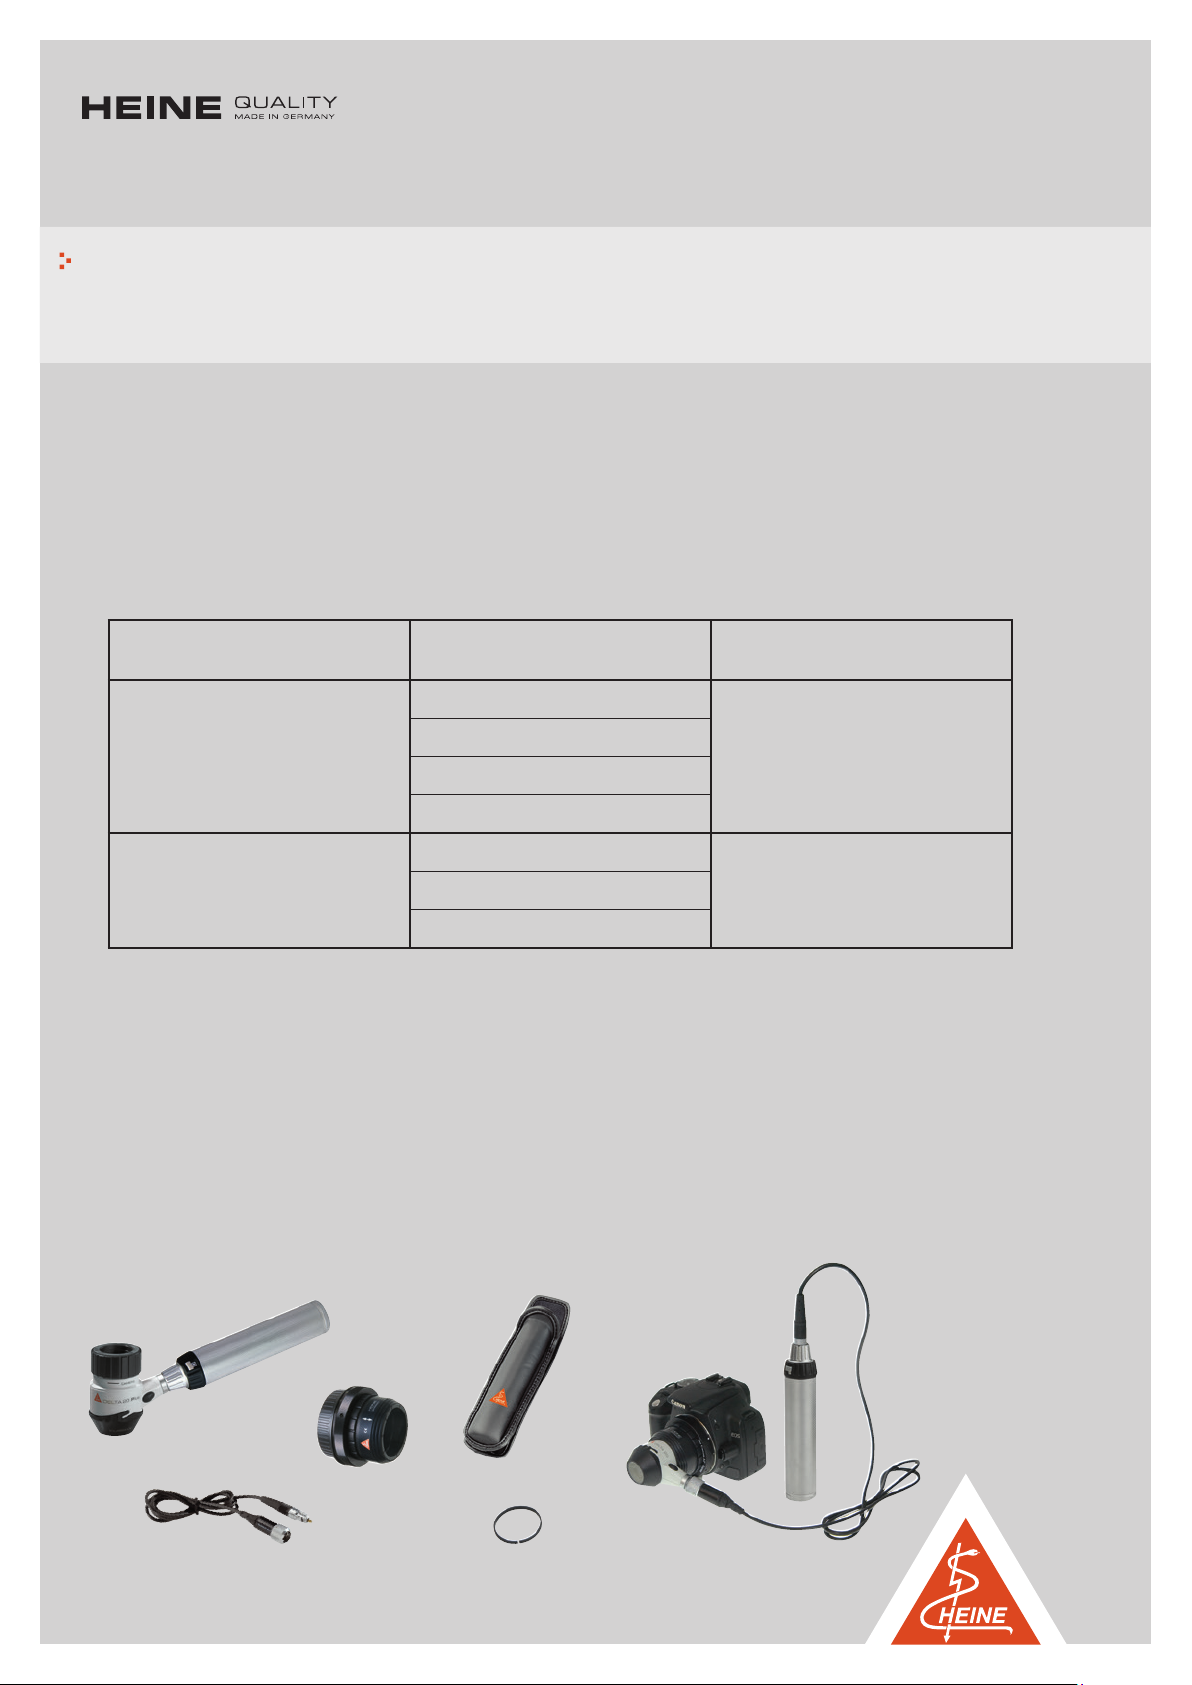
The combination
2. For best results, please assemble the following components: DELTA
contact plate and scale, BETA handle
(Canon, Nikon or Olympus) adaptor cord X-000.99.231
as power source, HEINE Photo Accessory Set consisting of HEINE SLR Photo adaptor
, and belt clip . The distance ring
®
20 T / DELTA® 20 Plus / D ELTA® 20 Dermatoscope with
is part of the adaptor set.
1
Page 2
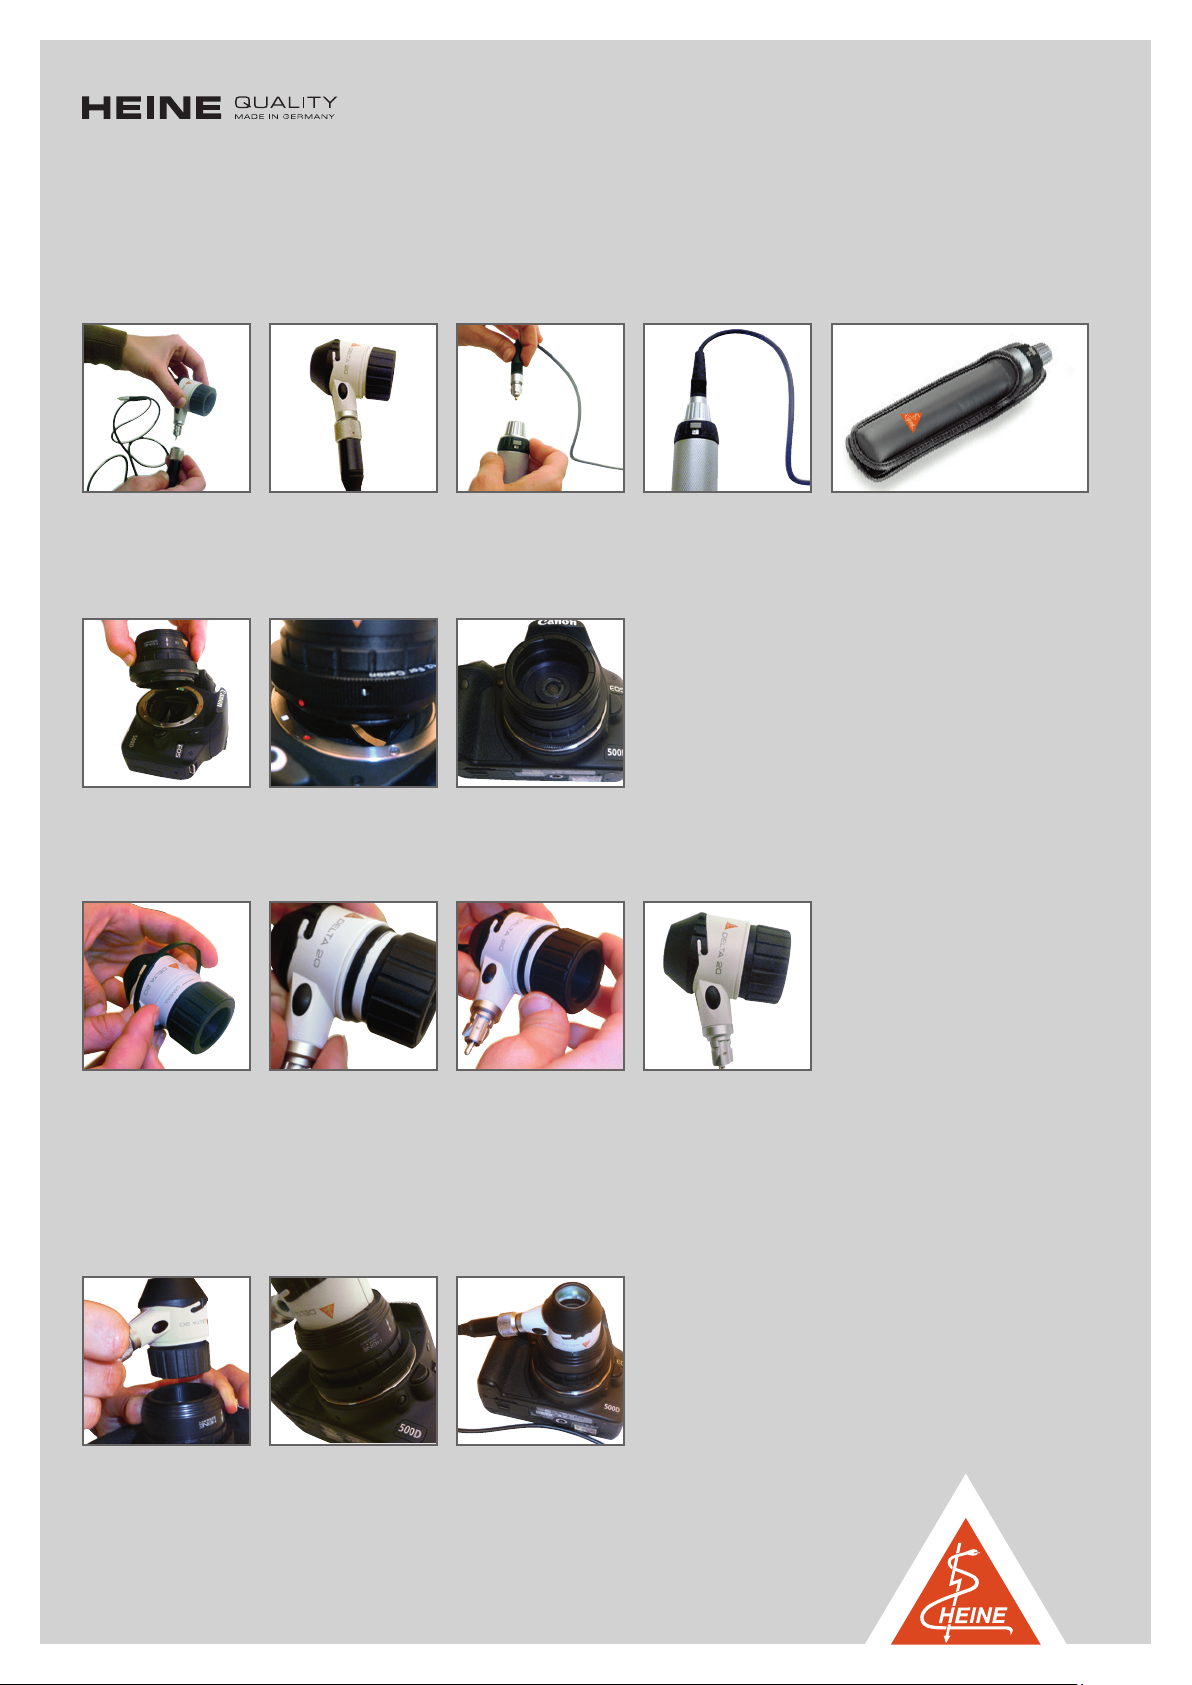
3. Connect one end of the adaptor cord to the
to the BETA hand
movement).
le by slightly turning the head of the handle. (Put the handle into your belt clip, it will give you more freedom of
4. Connect the HEINE SLR Photo adaptor to the bayonet lock of the camera by placing the red or white spots on top of each
other and twist to lock.
DELTA® 20 T /
DELTA® 20 Plus / DELTA® 20 Dermatoscope head and the other end
5. Connect the distance ring onto the line marked “Camera” on the focusing ring of the DELTA
Dermatoscope head. Once attached, tighten the focus ring down until it makes contact with the distance ring.
6. Connect the DELTA® 20 T / DE LTA® 20 Plus / DELTA® 20 to the SLR photo adaptor. Push the sliding ring of the adaptor with one
hand down towards the camera and hold it in this position. With your free hand, insert the DELTA® 20 T / DE LTA® 20 Plus /
DELTA® 20 Dermatoscope head into the adaptor until it clicks in the housing. Now release the sliding ring of the adaptor to lock
the DELTA® 20 T / DE LTA® 20 Plus / DELTA® 20 onto the SLR photo adaptor. Check whether the dermatoscope can easily rotate
on the adaptor and if it is locked in by gently pulling the head away from the camera body.
"click"
®
20 T / DE LTA® 20 Plus / DELTA® 20
7. Adjust the settings on your camera to optimize image quality.
Following are instructions on how to make the proper adjustments for Nikon
and Canon. (Please note that “auto” settings do not lead to good results.)
2
Page 3
Example: Nikon
(pictures © Nikon)
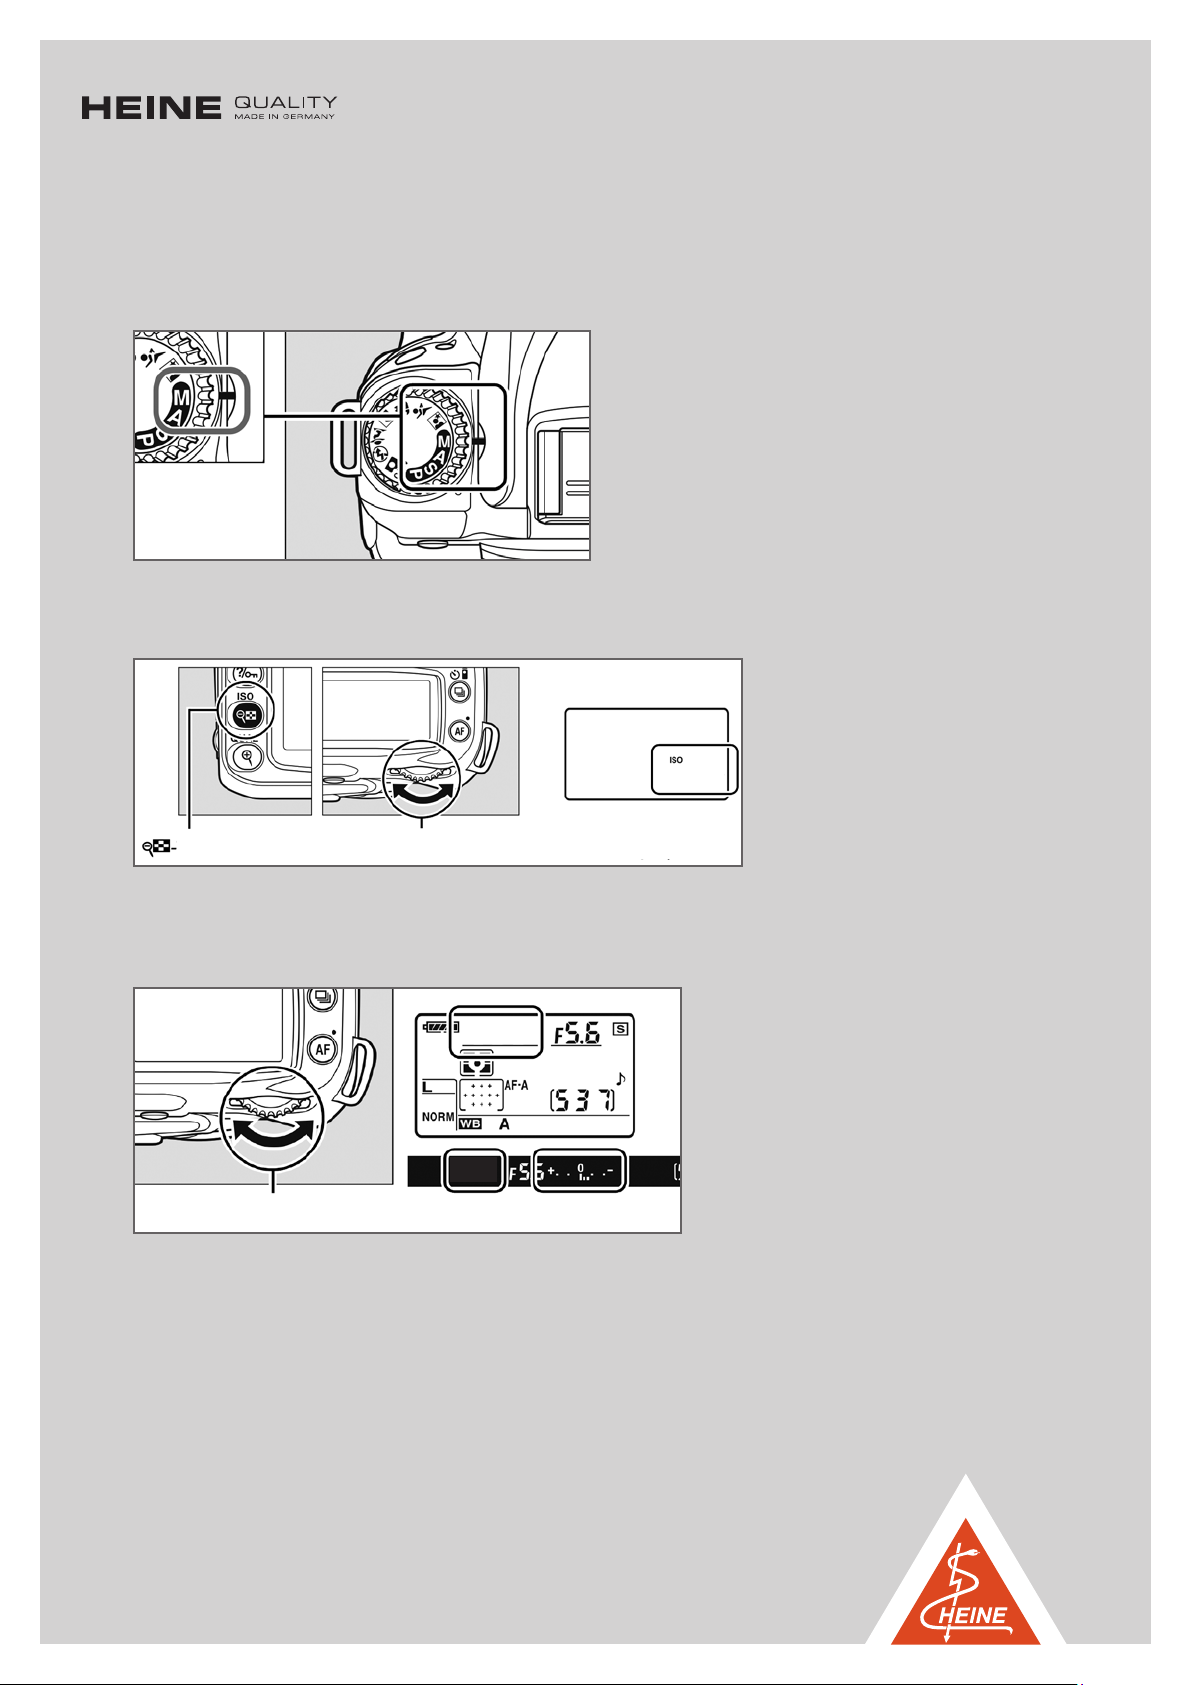
1. Please turn the mode dial to program “M”.
2. Set the ISO sensitivity to 400 by pressing the ISO - button while turning the rear main command dial until the correct value is
displayed. The correct value appears on the bottom corner of the upper control panel.
400
ISO button Main command dial Control panel
3.
Set the exposure time to 1 / 40 s. Press the shutter-release briey until the exposure time appears on the upper control panel.
Adjust the value by turning the rear main command dial.
40
40
Main command dial
3
Page 4
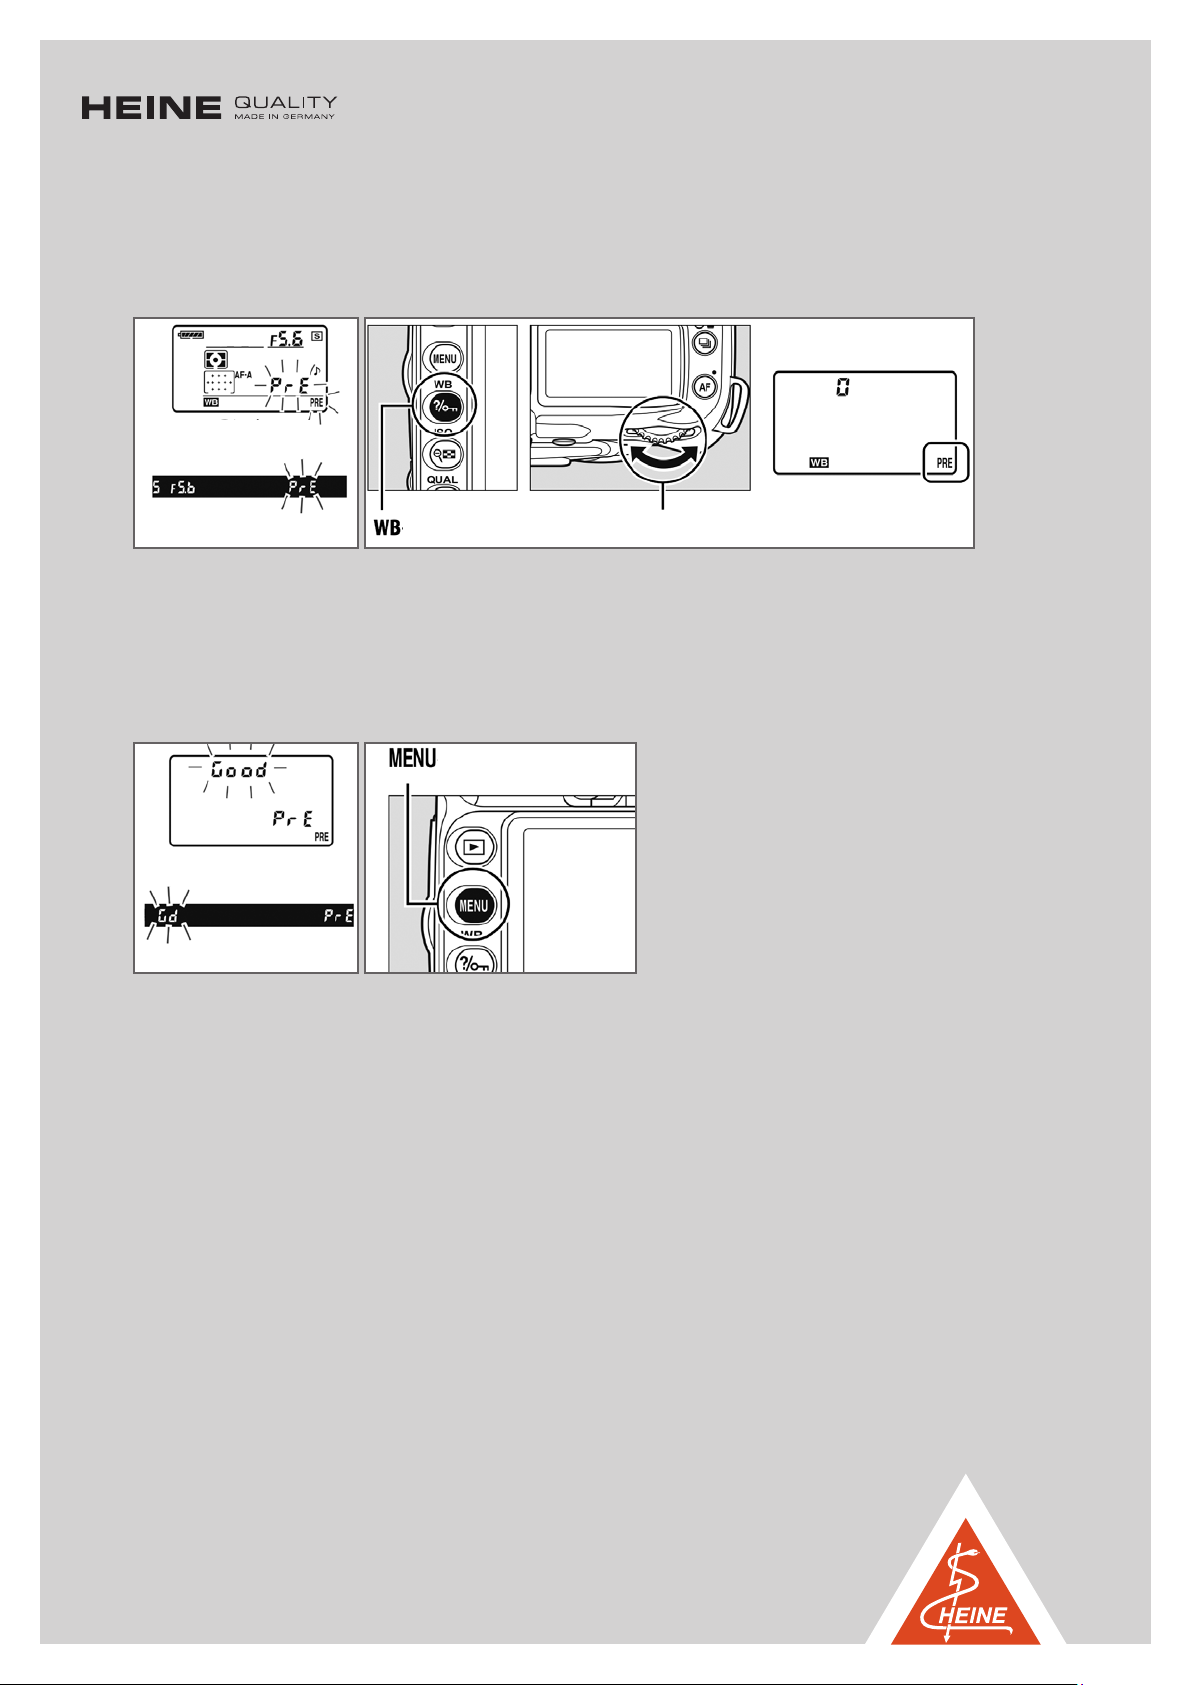
4. The white balance needs to be set once. To do this, press the WB - button and turn the rear main command dial until ”PRE“ is
displayed on the upper control panel.
40
Control panel
View nder
button Main command dial Control panel
Turn the WB button until the “PRE” symbol starts to blink.
Please point the camera with the adapted DELTA
®
20 T / DE LTA® 20 Plus / D ELTA 20 head (switched on) on a white or neutral
gray object like paper and press the shutter-release button. The display will show “good” once the measuring was accurate.
In all other cases please repeat the process.
button
Control panel
View nder
The manual white balance picture can be found in the menu. For using a previously set white balance, please also use the menu.
Please choose a white balance picture in the menu. We recommend naming the white balance picture taken with the
DELTA® 20 T / DELTA® 20 Plus / DELTA® 20 accordingly.
4
Page 5
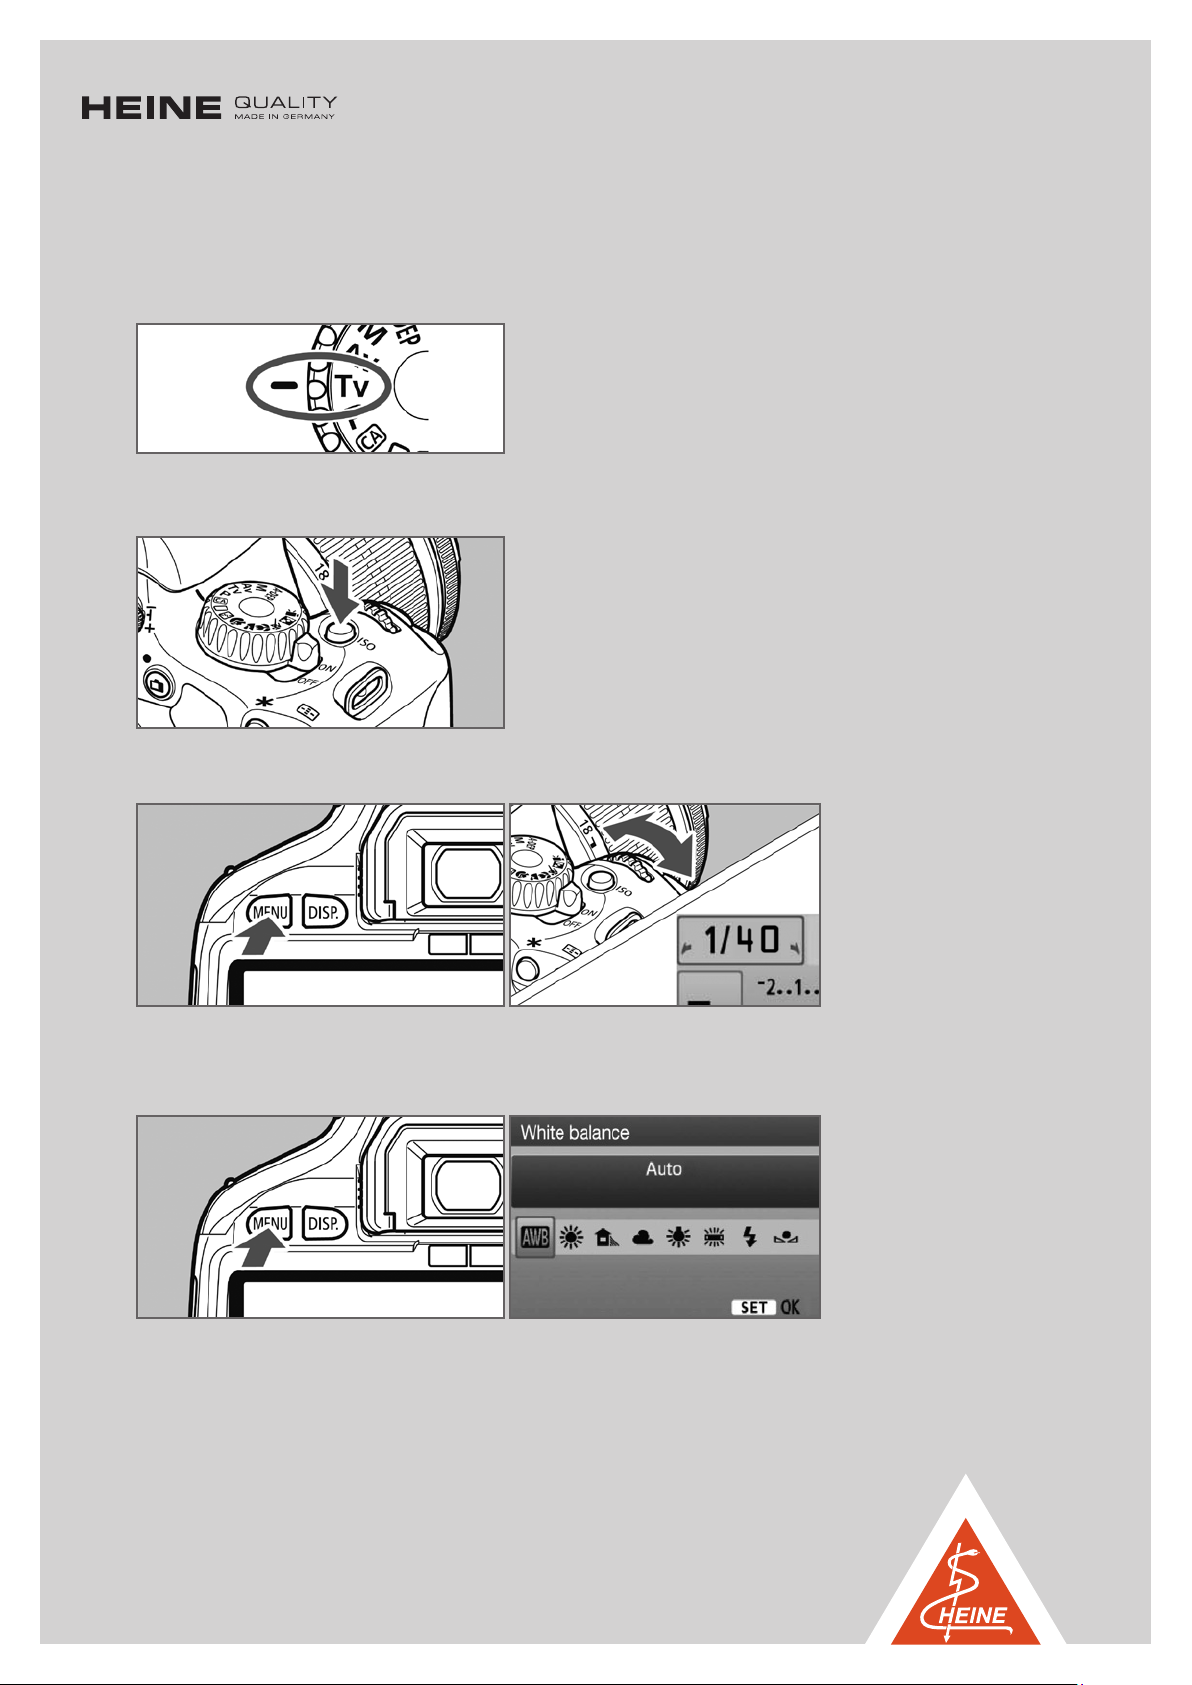
Example: EOS
(pictures © Canon)
1. Please turn the mode dial to the program Tv.
2. Set the ISO sensitivity to 400. To do so, press the ISO- button and select the value 400 on the display.
3. Adjust the exposure time to 1 / 40 s by pushing the menu button until the following menu appears:
The value can be set by turning the main dial (in the front).
4. The white balance needs to be set once. To do so, please press the menu-button until the following menu is displayed:
Press the WB button, select the customer white balance on the display and conrm with the “set” button.
5
Page 6
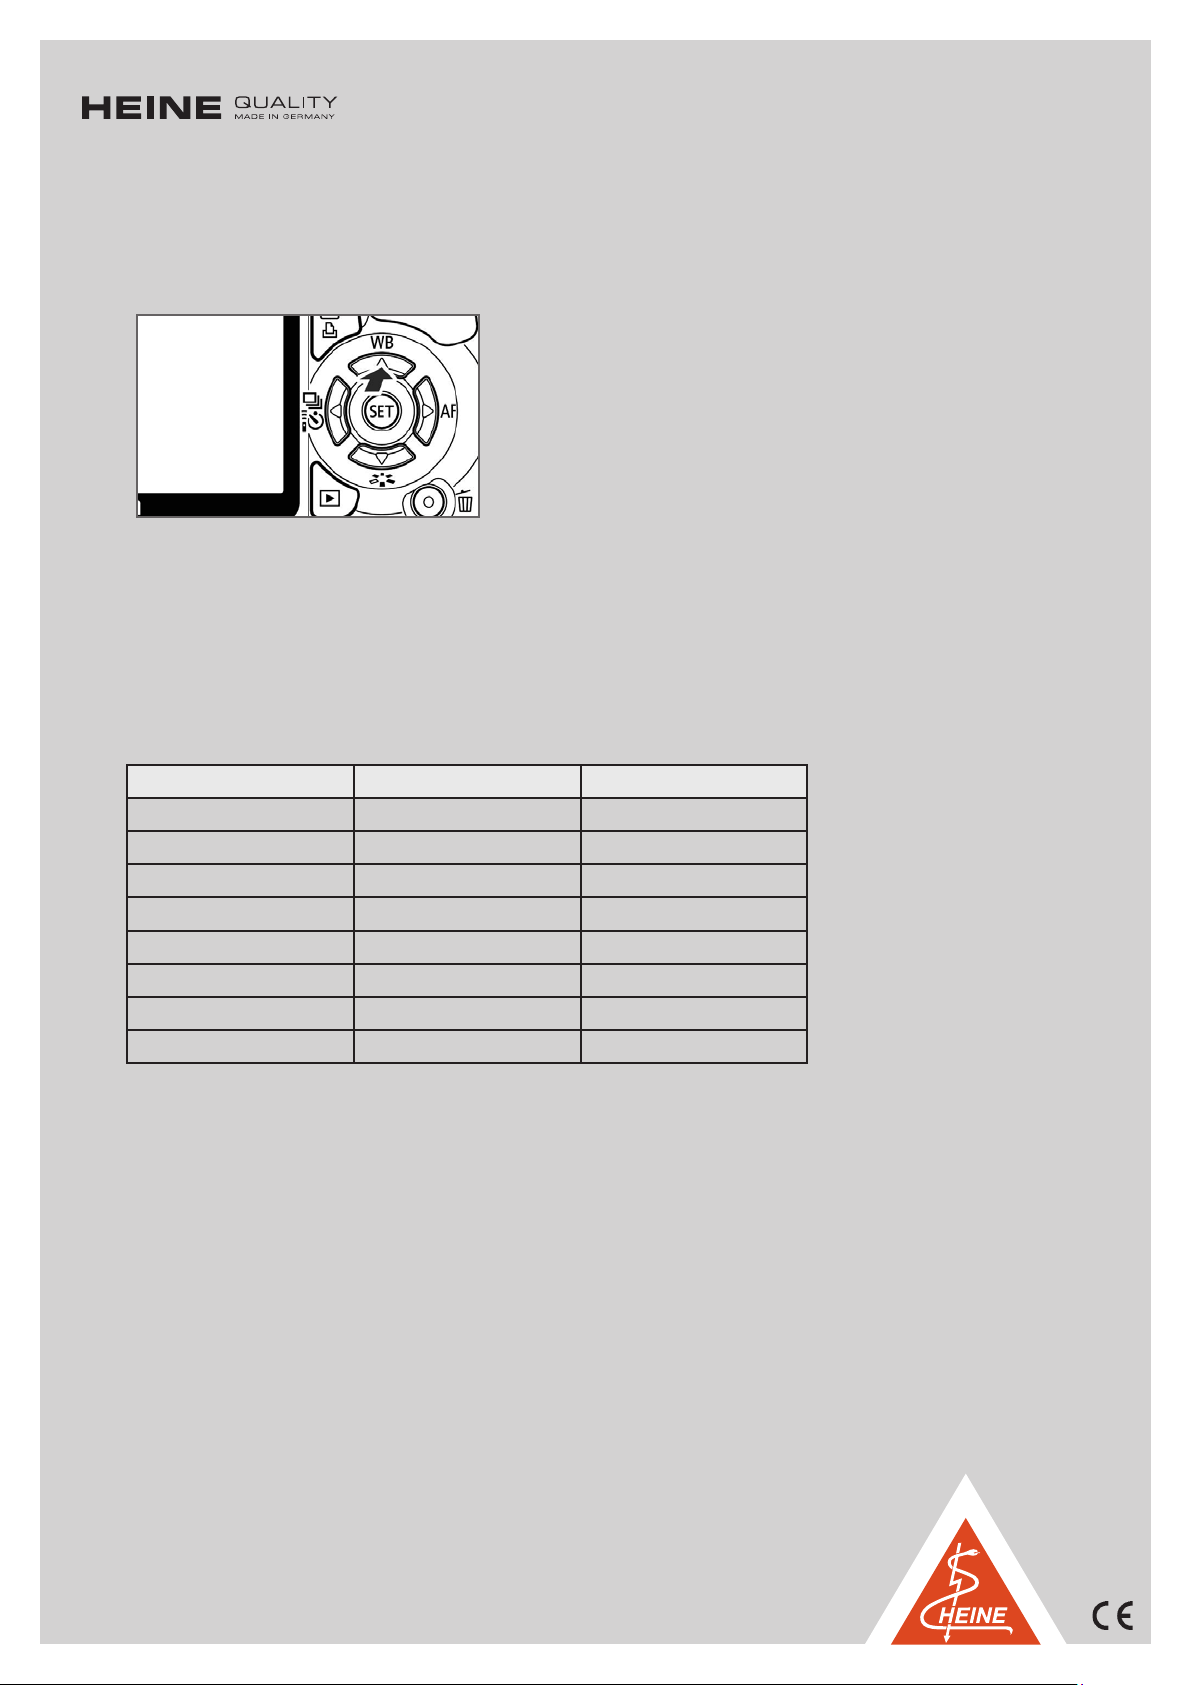
Point the camera with the adapted DELTA® 20 T / DE LTA® 20 Plus / DELTA® 20 head (switched-on) on a white or neutral grey
object like paper and
following screen is displayed.
Please select the custom WB with the set-button and conrm the chosen picture with the set-button. We recommend naming
the white balance picture taken with the DELTA® 20 T / DE LTA® 20 Plus / DELTA® 20 accordingly.
press the shutter button. To accept the white balance picture, please press the menu-button until the
Canon Camera Name Chart
Europe USA Japan
EOS 7D Mark II EOS 7D Mark II EOS 7D Mark II
EOS 60D EOS 60D EOS 60D
EOS 80D EOS 80D EOS 80D
EOS 100D Rebel SL 1 Kiss X7
EOS 700D Rebel T5i Kiss X7i
EOS 750D Rebel T6i Kiss X8i
EOS 760D Rebel T6s 8000 D
EOS 1300D Rebel T6 Kiss X80
HEINE Optotechnik GmbH & Co.KG
Kientalstr. 7 · 82211 Herrsching · Germany · Tel +49 (0) 8152 / 38 0
Fax +49 (0) 8152 / 38 - 202 · E-Ma il: [email protected] · www.heine.com
me d 011 2e 12.1 6
6
 Loading...