

Page 1
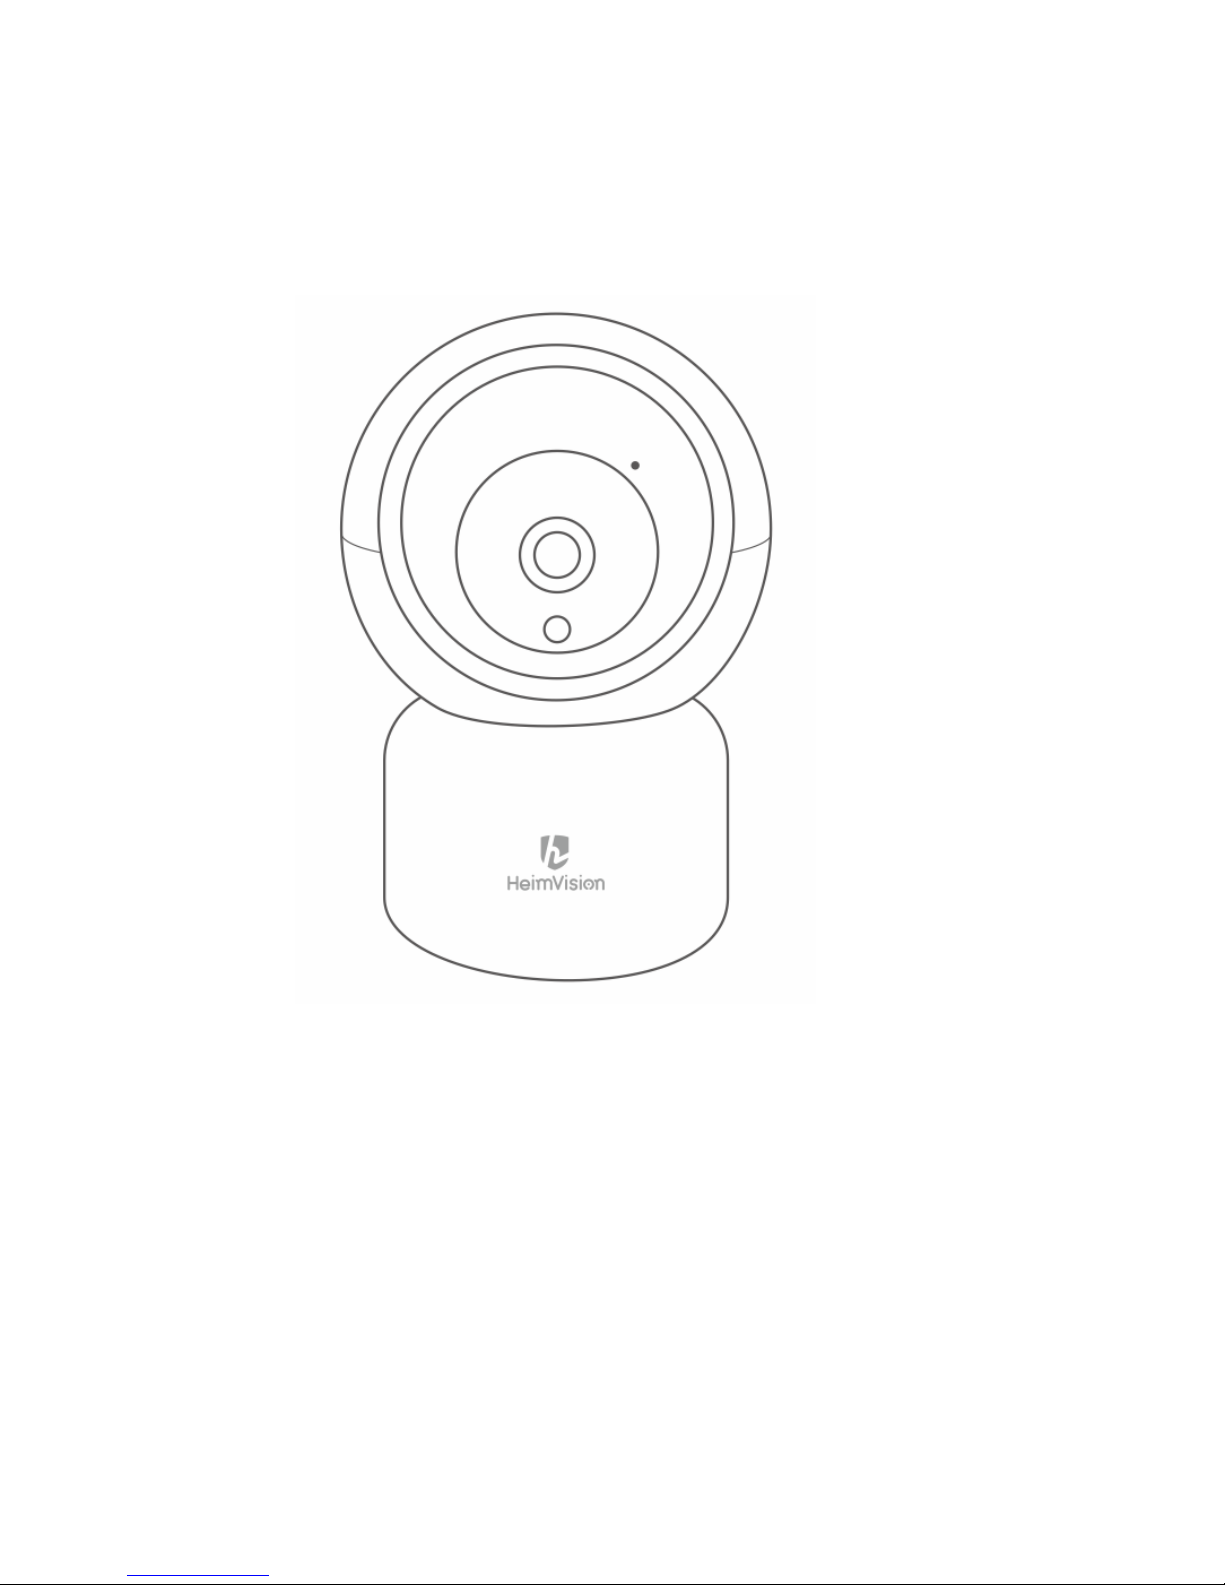
HeimVision FHD Smart WiFi Camera
Manufacture :Shenzhen VanTop Technology & Innovation Co., Ltd
Product :1080P FHD SMART Wi-Fi Camera
Model :HM203
Dear users, you are welcome to choose this product. Before using the product, please read the
instruction manual carefully and keep it for later reference
Page 2
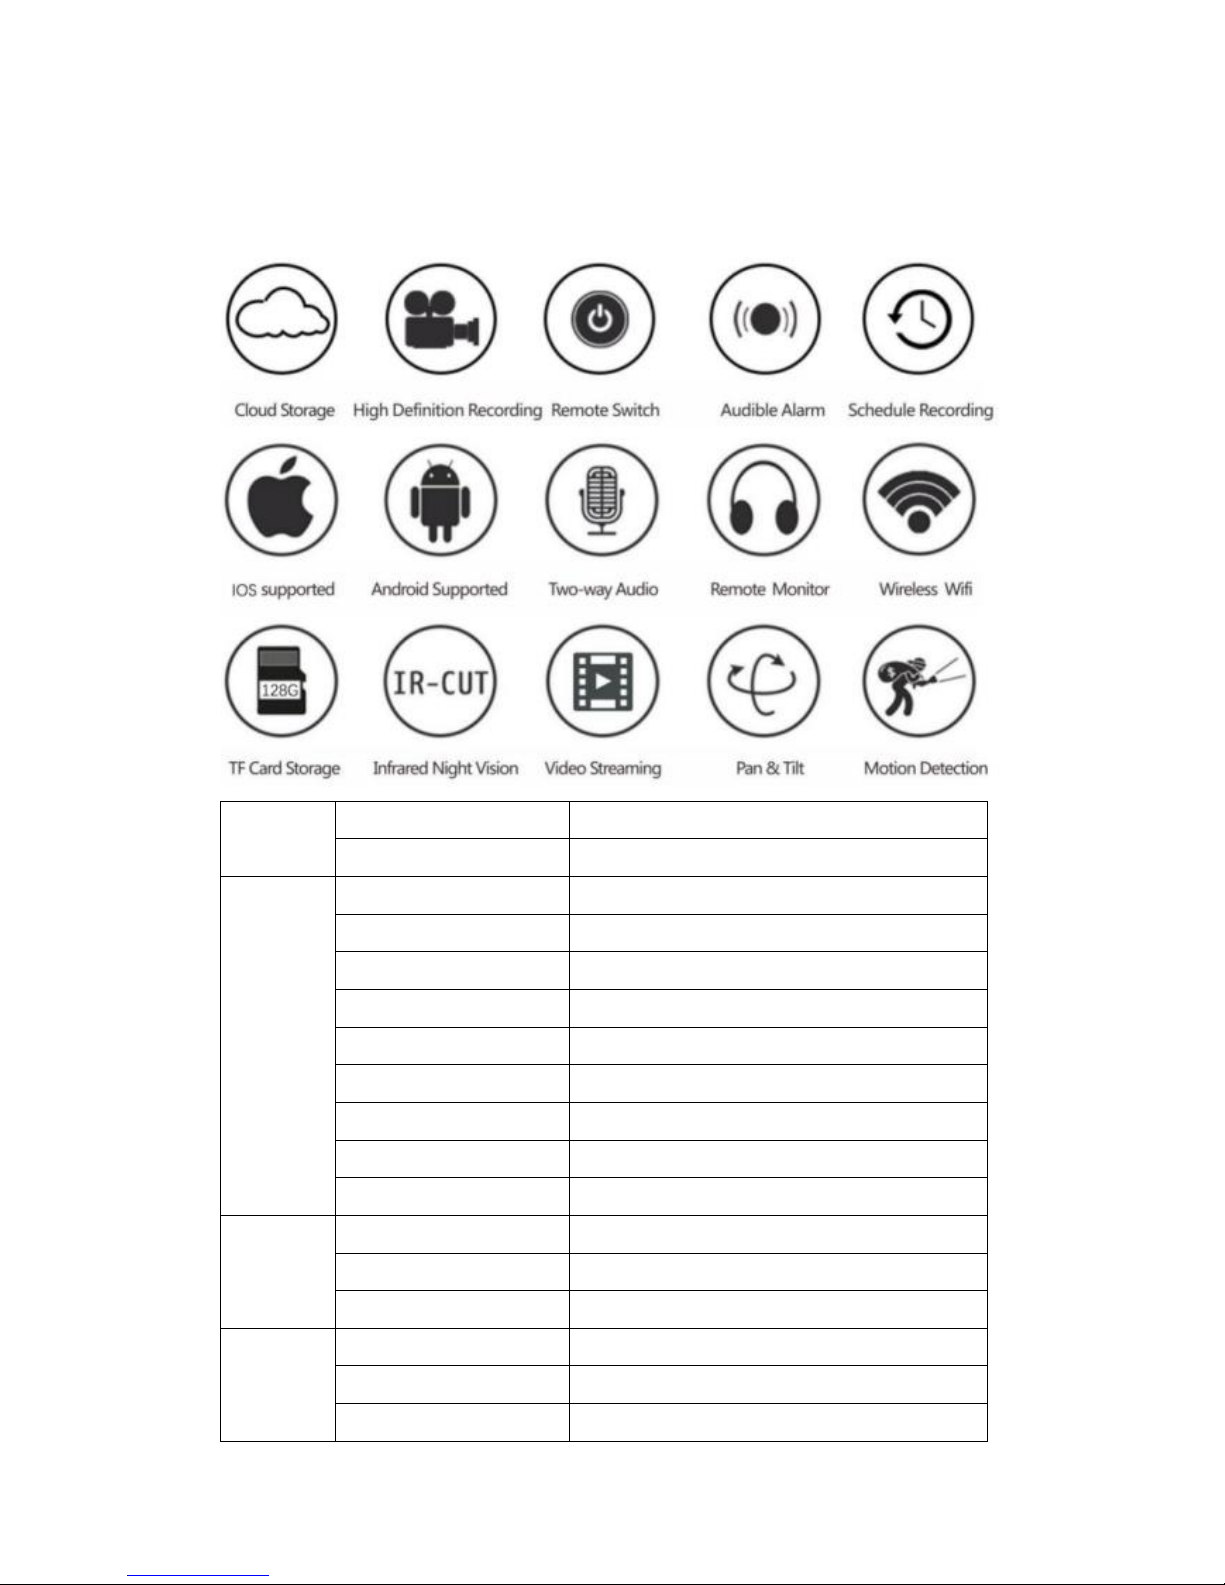
1、Main Function Description
system
Embedded Processor
GK7102
OS
LINUX
video
sensor
1/2.7" CMOS GC2033
Video coding
Smart H264+
resolution
2.0MP/1080P
frame
15fps
lens
3.6MM/F2.3
view angle
110°
digital zoom
4X
Day and night
IR_CUT filter
IR LED
6pcs 850nm
audio
audio coding
G.711
input
build-in MIC
output
build-in SPEAKER
record
method
normal、event、none
storage
SD、cloud
playback
SD、cloud
Page 3
PTZ
Horizontal
355°
Vertical
95°
auto tracking
support
preset
support
alarm
motion detection
support
sound detection
support
siren alarm
support
notification
phone、Email
network
Wi-Fi
802.11b/g/n 2.4G
protocol
TCP/IP、HTTP、DHCP、Amazon cloud、P2P
interface
TF
up to 128G
reset
support
LAN
RJ45
power
Micro USB
environment
temperature
0℃-+55℃
humidity
10%-90%
size
12.7cm*9.85cm*20.55cm
weight
175g
2、How To Download Mobile APP
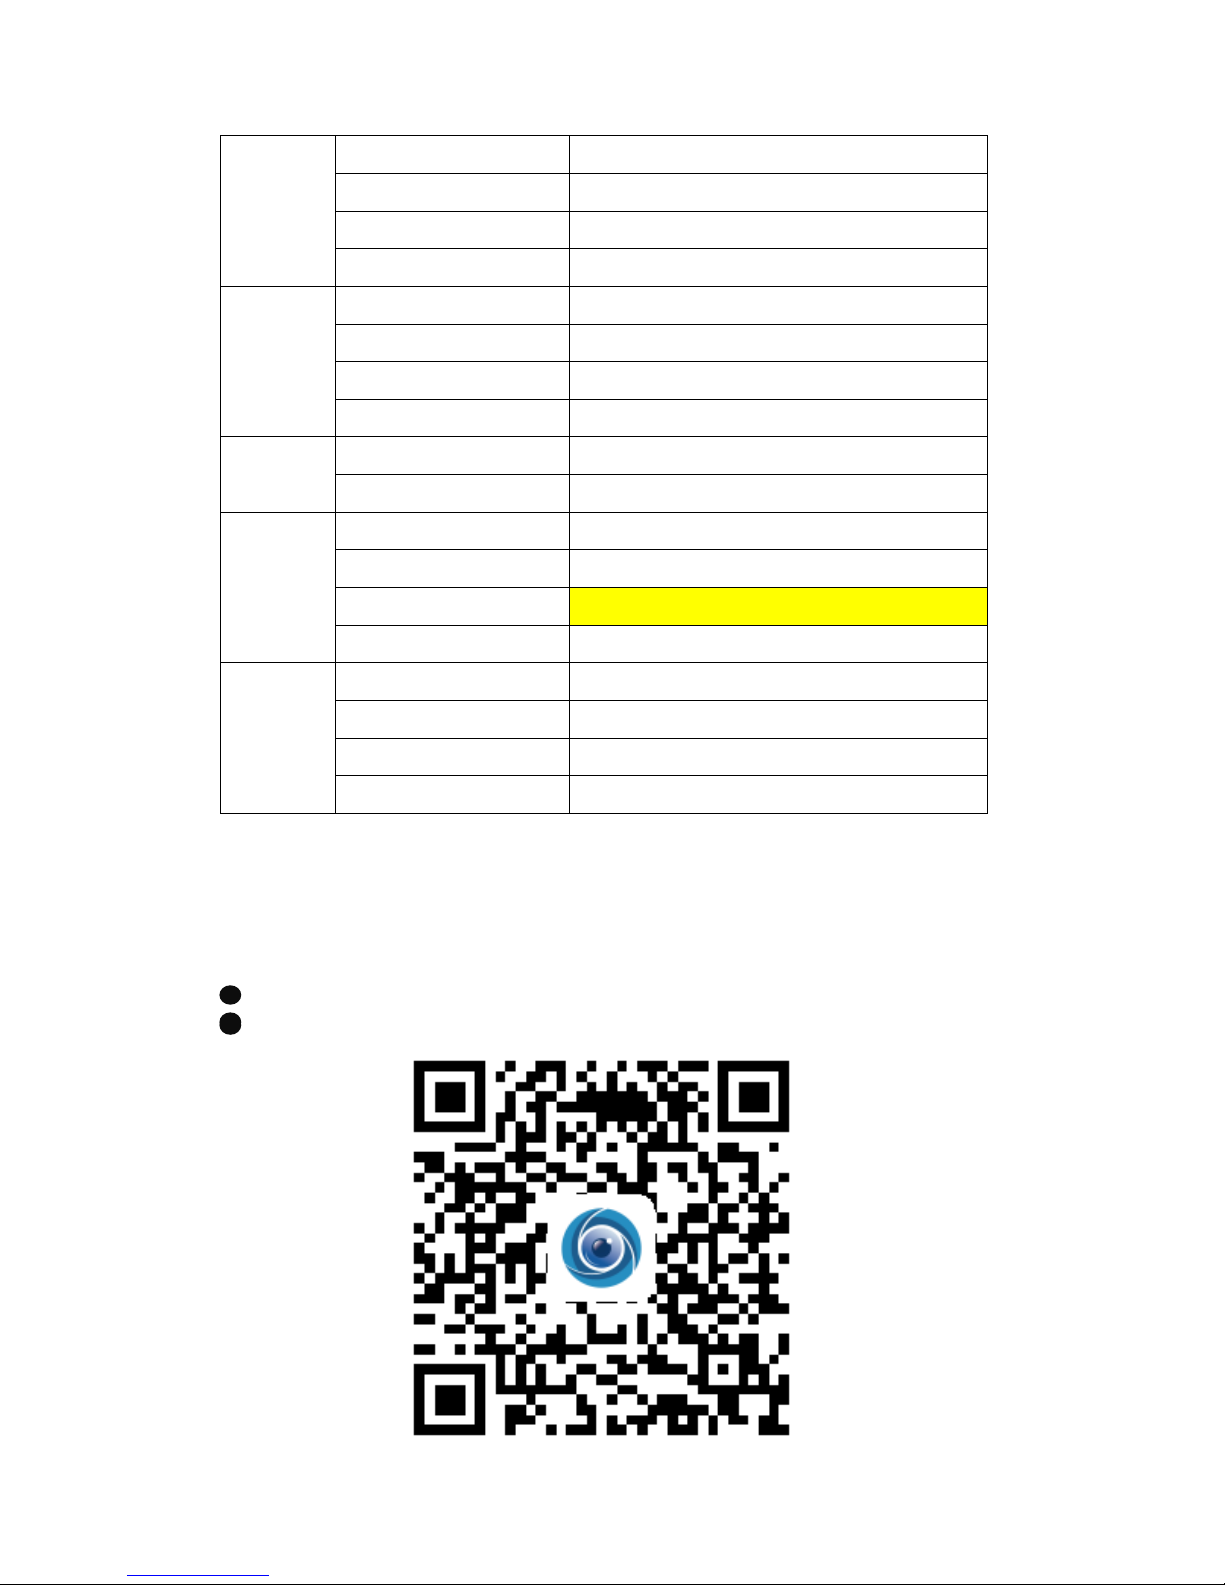
Search and download “YCC365 Plus” in Apple Store or Android app store.
Scan the QR code as below
Page 4
3、How To Operate The Mobile APP
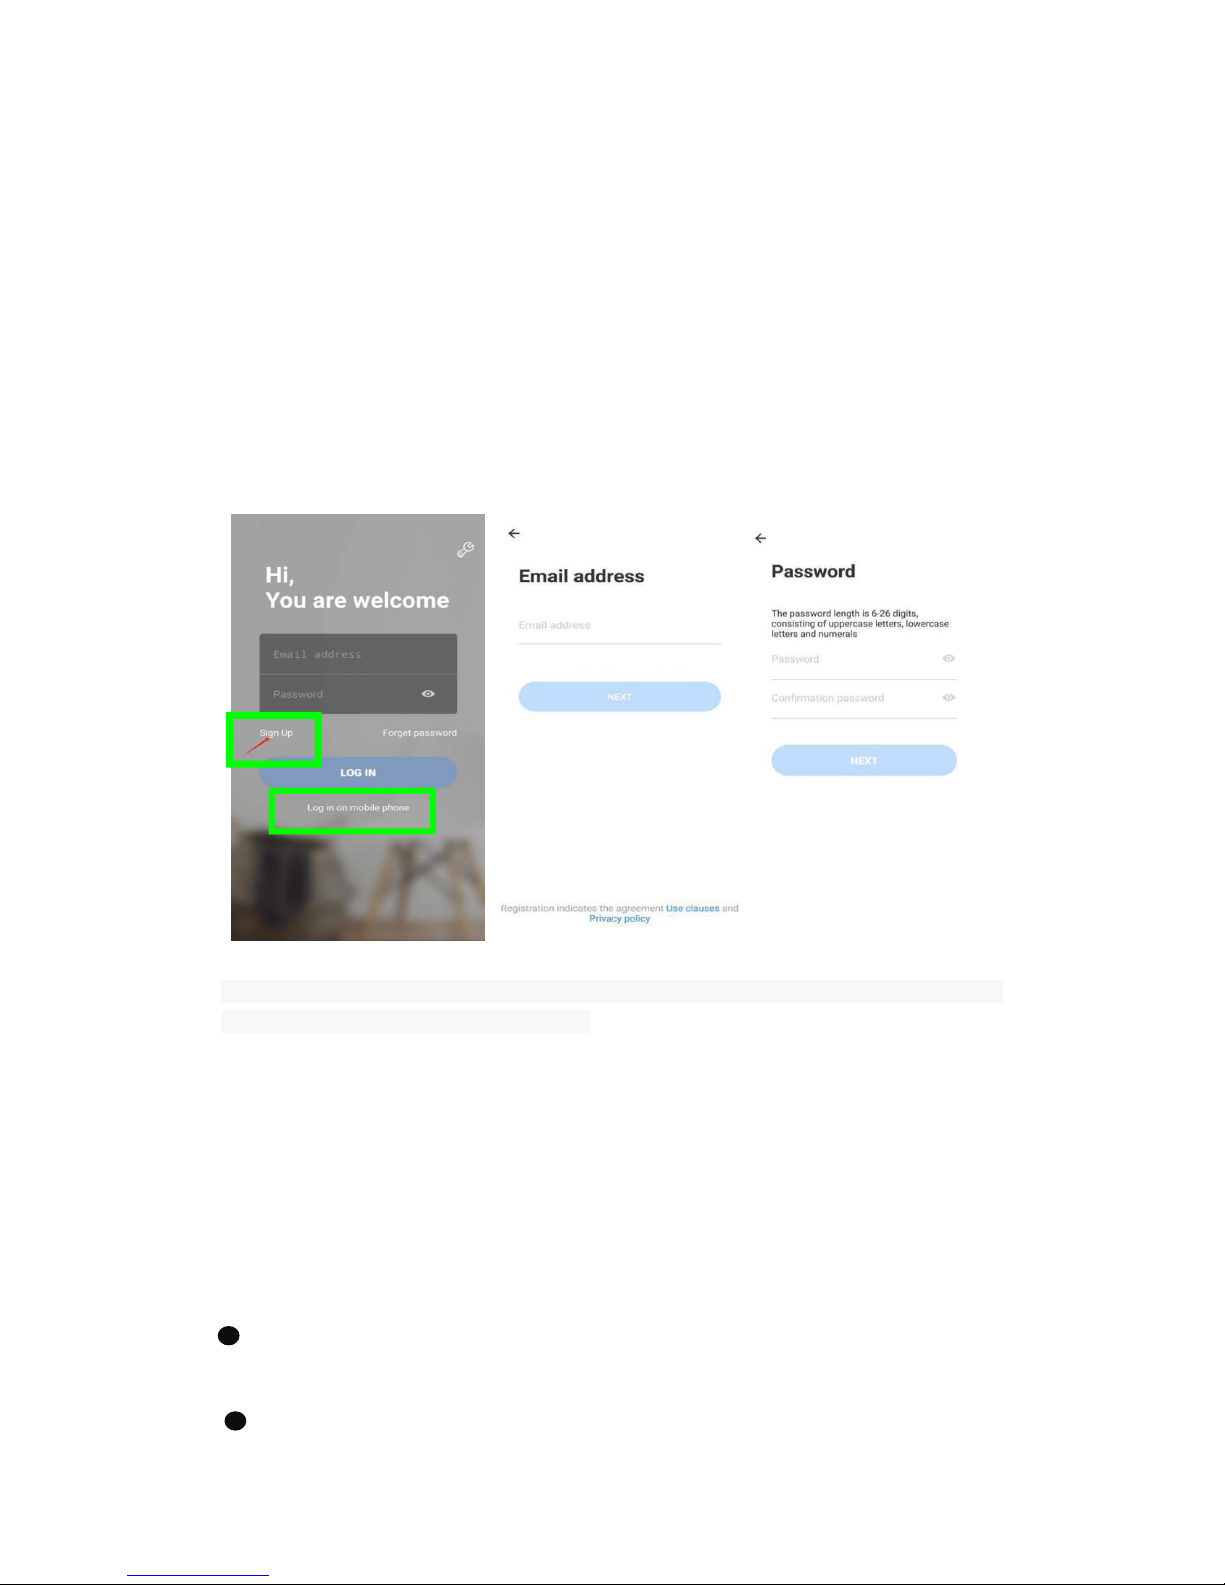
3.1 Register an account
When you use this app at the first time, you need to use your email to register an
account, click “Sign Up” and set a password according this procedure.
*If you forget your password, you can reset your password, just click "Forgot
password” on the login page.
*Password should be at least 6 characters and not longer than 30 characters. It
should be a combination of letters and numbers.
Tips: the current version only supports mobile phone number registration in Vietnam.
Please use email to register in other areas
3.2 Add camera
Note: the camera only supports 2.4G WIFI, before adding devices, make sure your router is
2.4G WIFI, and your phone is connected to 2.4G WIFI.
3.2.1、Scan QR code to add
Please make your phone connect to the Wi-Fi, and then click “Device adding by
scanning the code”, reset the camera, after hearing the voice “Please configure
camera by scanning code or AP hotspot”, please click the “Connect to the network”.
Select your own Wi-Fi and login with your password.
Page 5
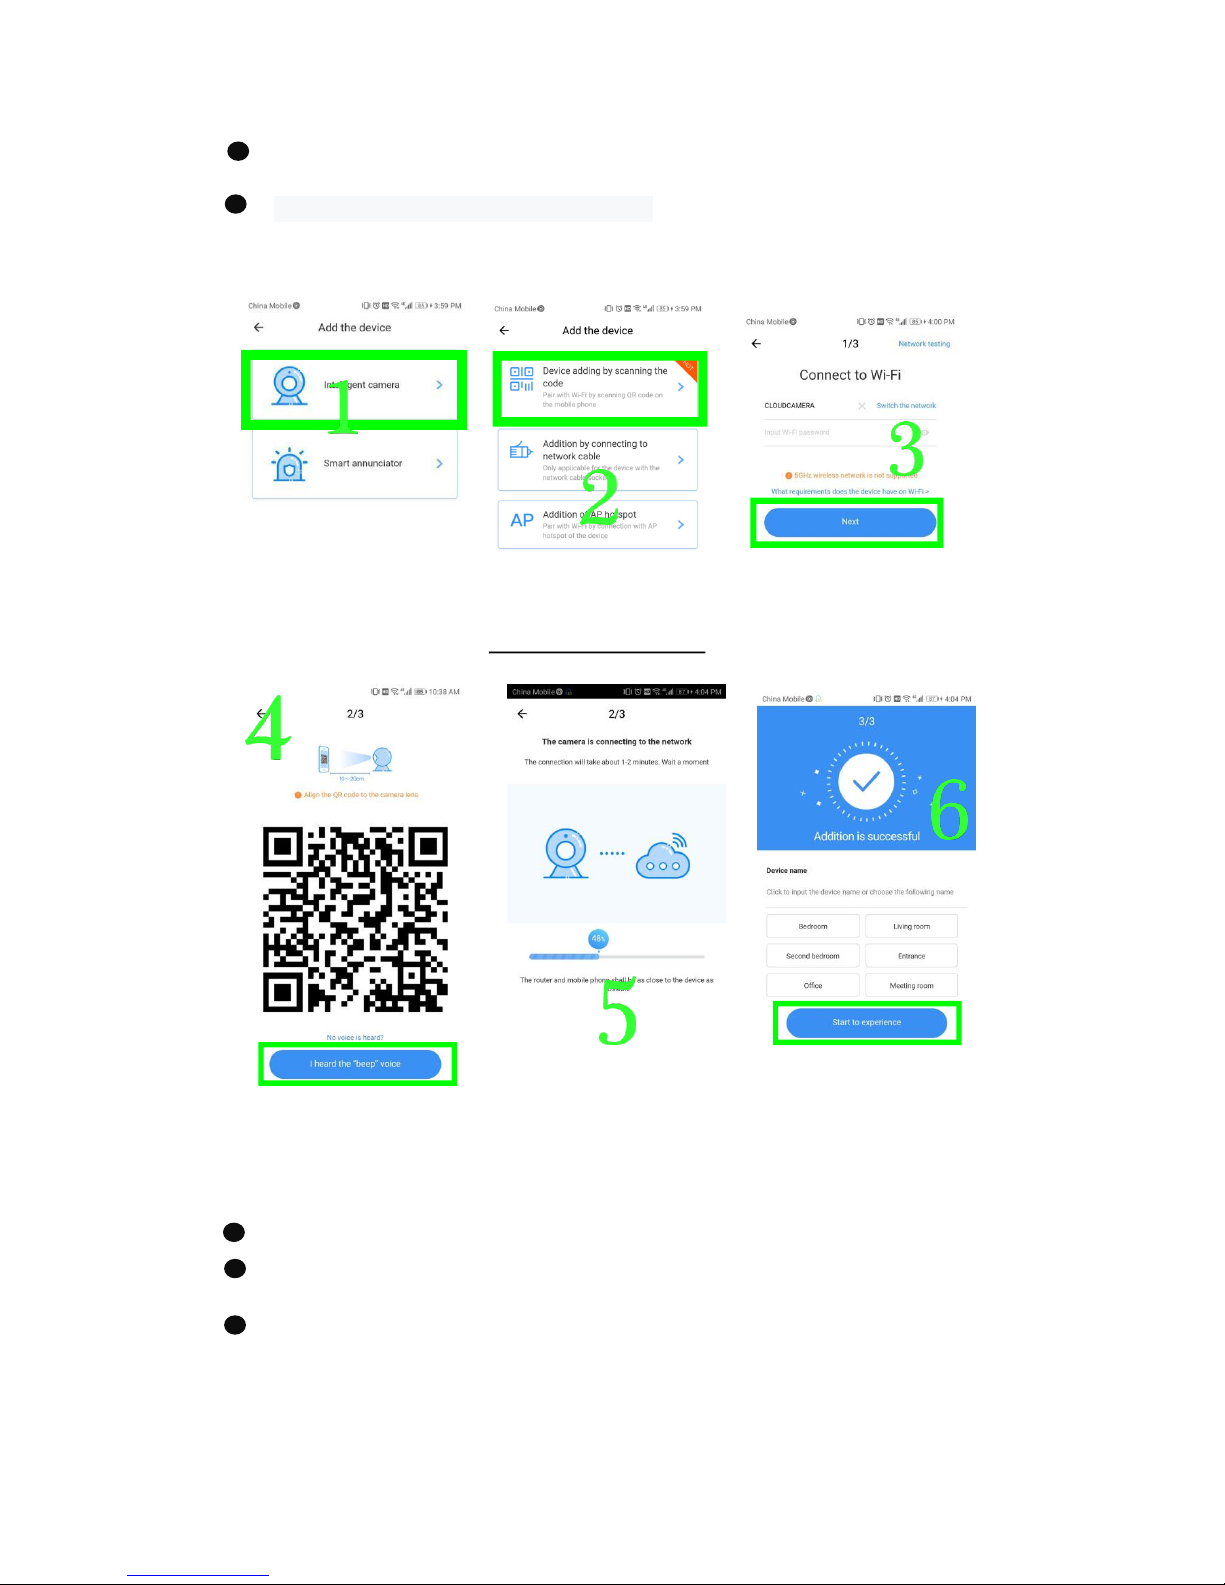
Align the two-dimensional code displayed on the phone with the camera lens,
maintain a distance of 4-8 inches and keep balance.
Click “I heard the beep voice” after hearing the beep, a few seconds later, you will
hear the voice “Internet connected welcome to use cloud camera”.
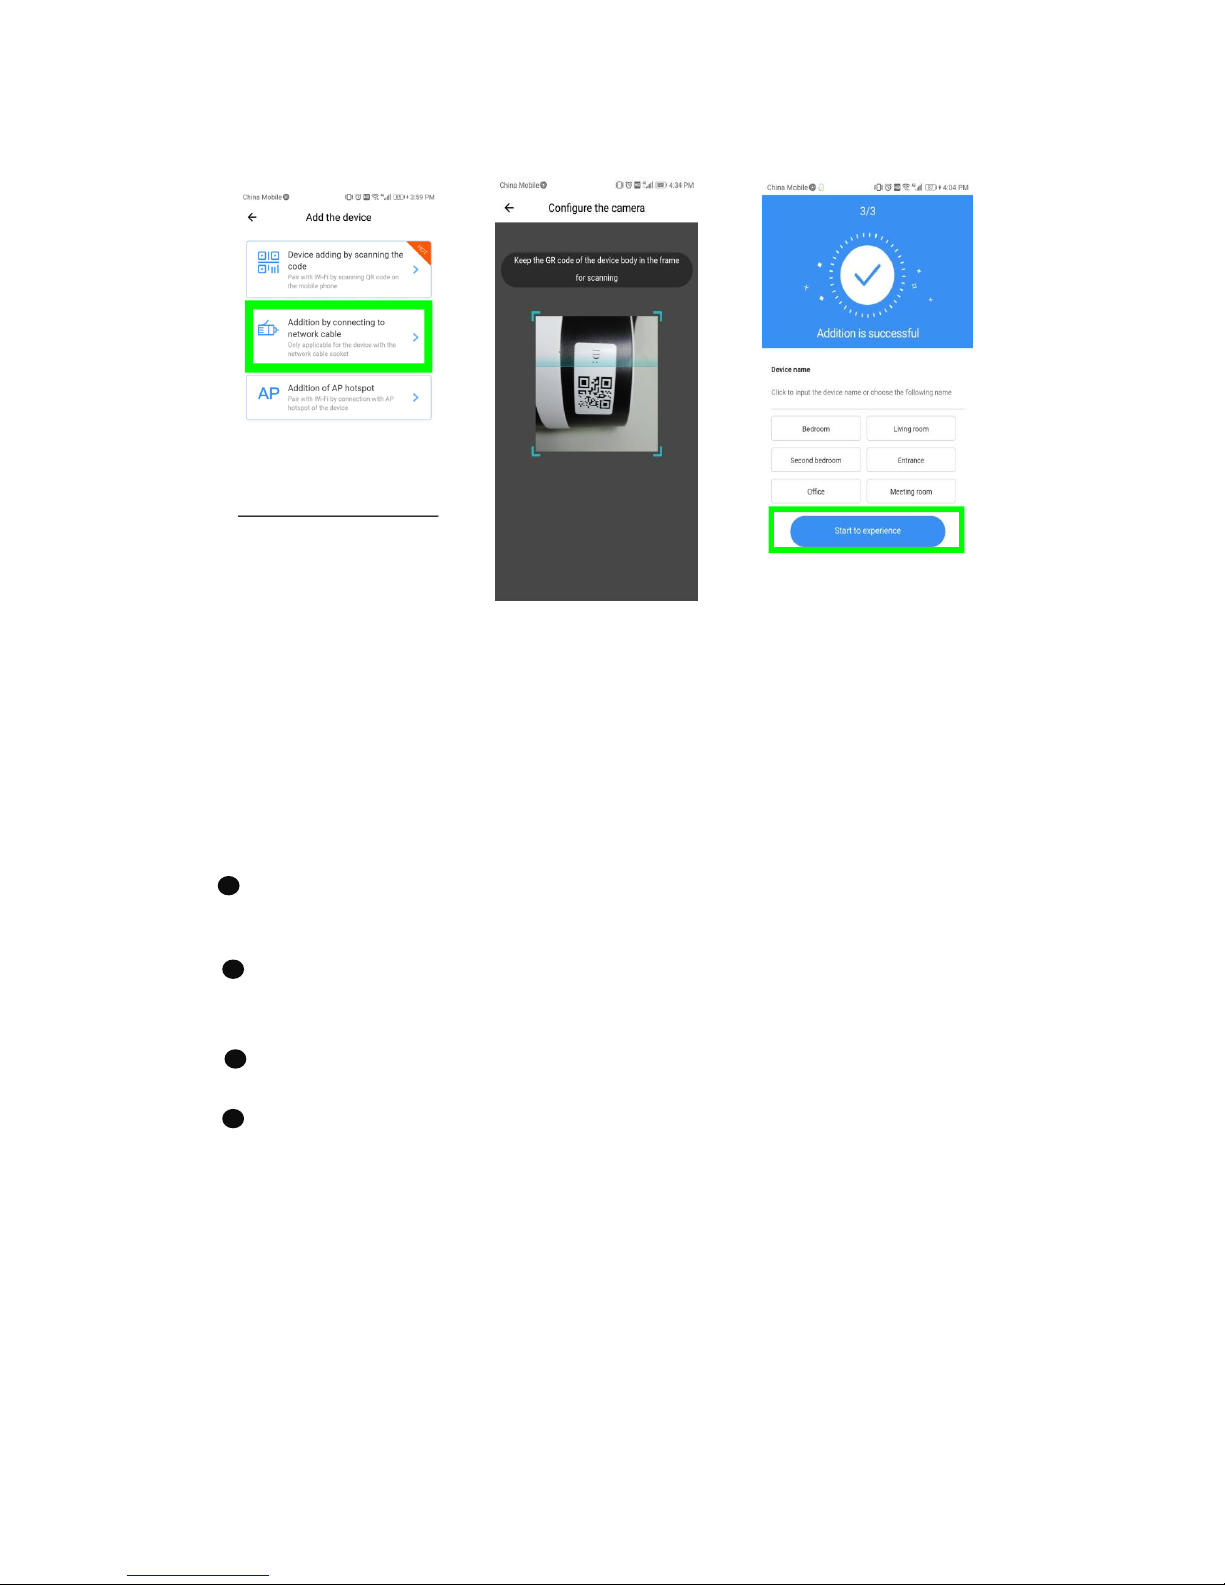
3.2.2 Addition by connecting to network cable (Only support Lan port device)
Please connect Ethernet cable between camera and Wi-Fi router.
After your phone connect to the Wi-Fi, Click “Add device” and “Addition by
connecting to network cable”
Please scan the QR code on the device and wait for the network connection to
succeed .
Page 6
3.2.3 Addition of AP hotspot
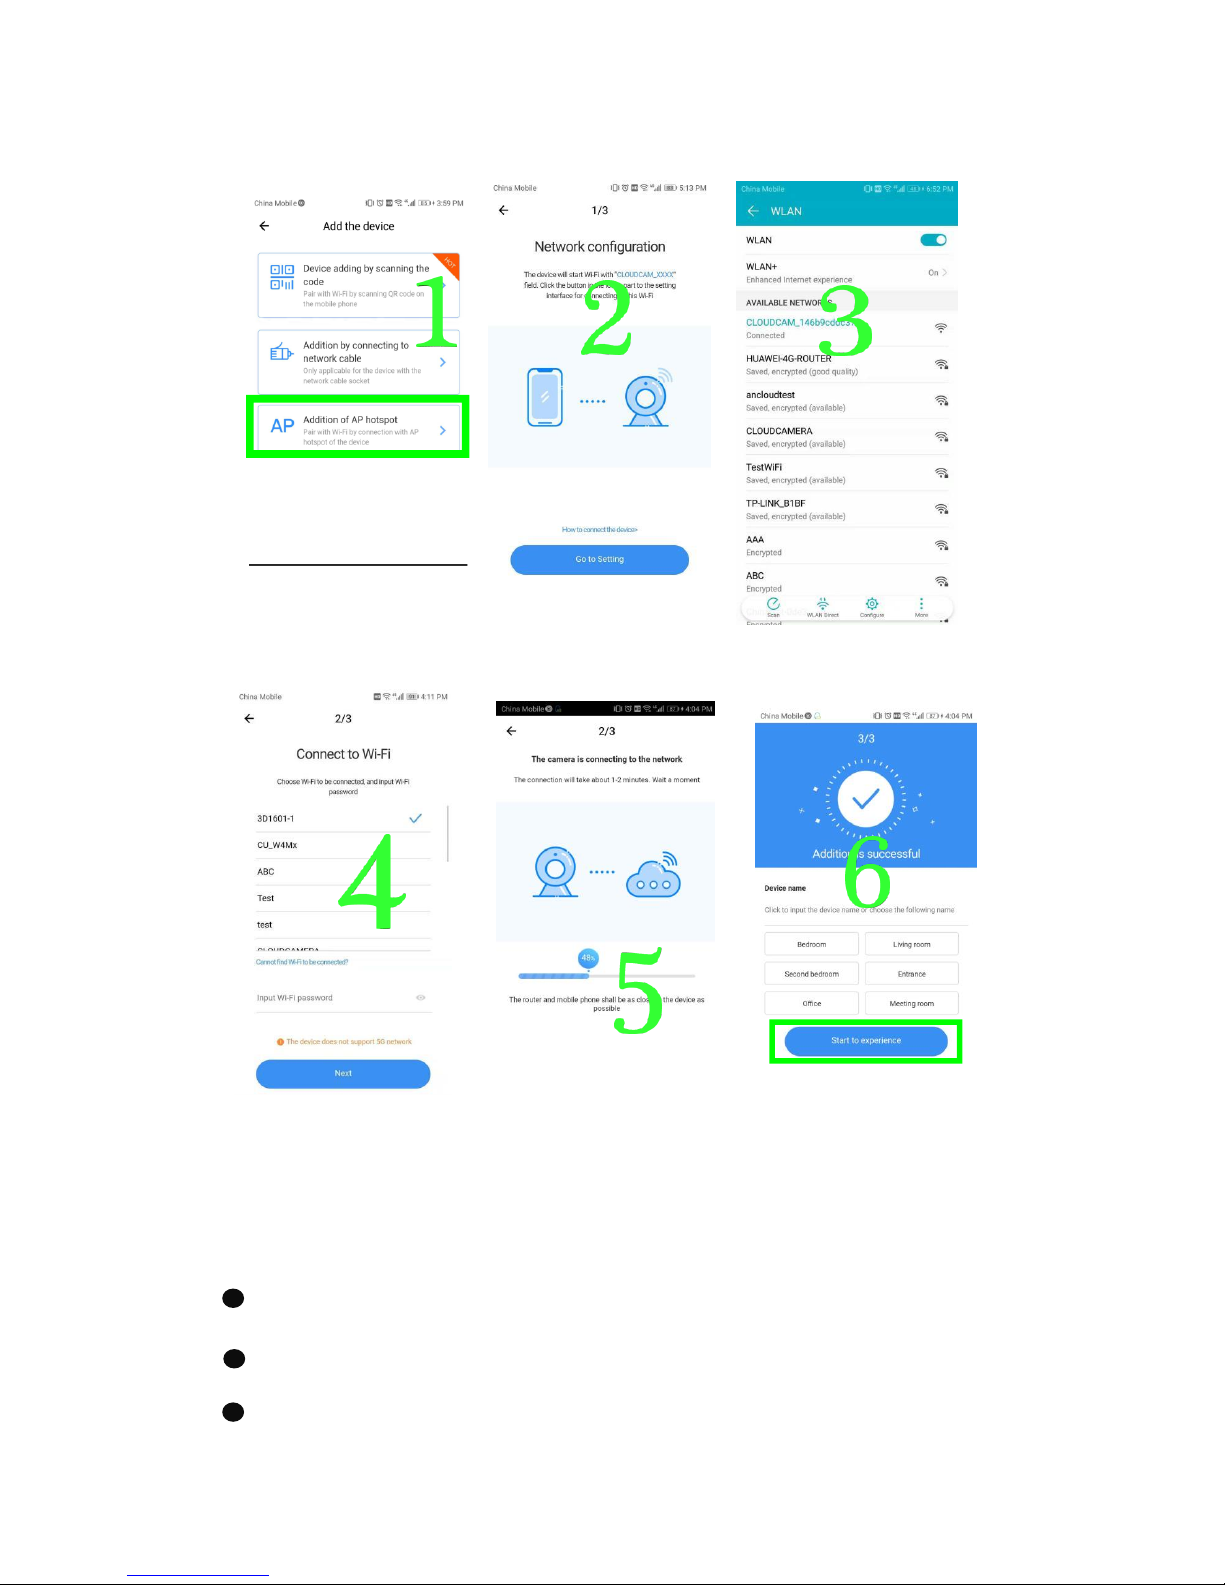
After your phone connect to a Wi-Fi , please click “Add device” and “Addition of AP
hotspot”, reset the camera, after hearing the voice “Please configure camera by
scanning code or AP hotspot”, please click the “Connect to the network”.
Follow the wizard make your phone connect to “CLOUDCAM_XXXX” network and
Return to YCC365 plus app.
Click “Next ” and Select your own Wi-Fi and login with your password.
Hear the voice “Internet connected welcome to use cloud camera” and wait for the
Wi-Fi connection to succeed.
Page 7
3.3 AP Direct mode (special)
Power up the camera and hear the voice "Please configure camera by scanning
code or AP hotspot" (if you don't hear the voice, reset the camera)
Press the reset button for two seconds and hear the voice "Enter AP access mode after
reboot" (The camera will no longer be voice broadcast after restarting).
Make your phone connect to “CLOUDCAM_XXXX” network ” .
Page 8
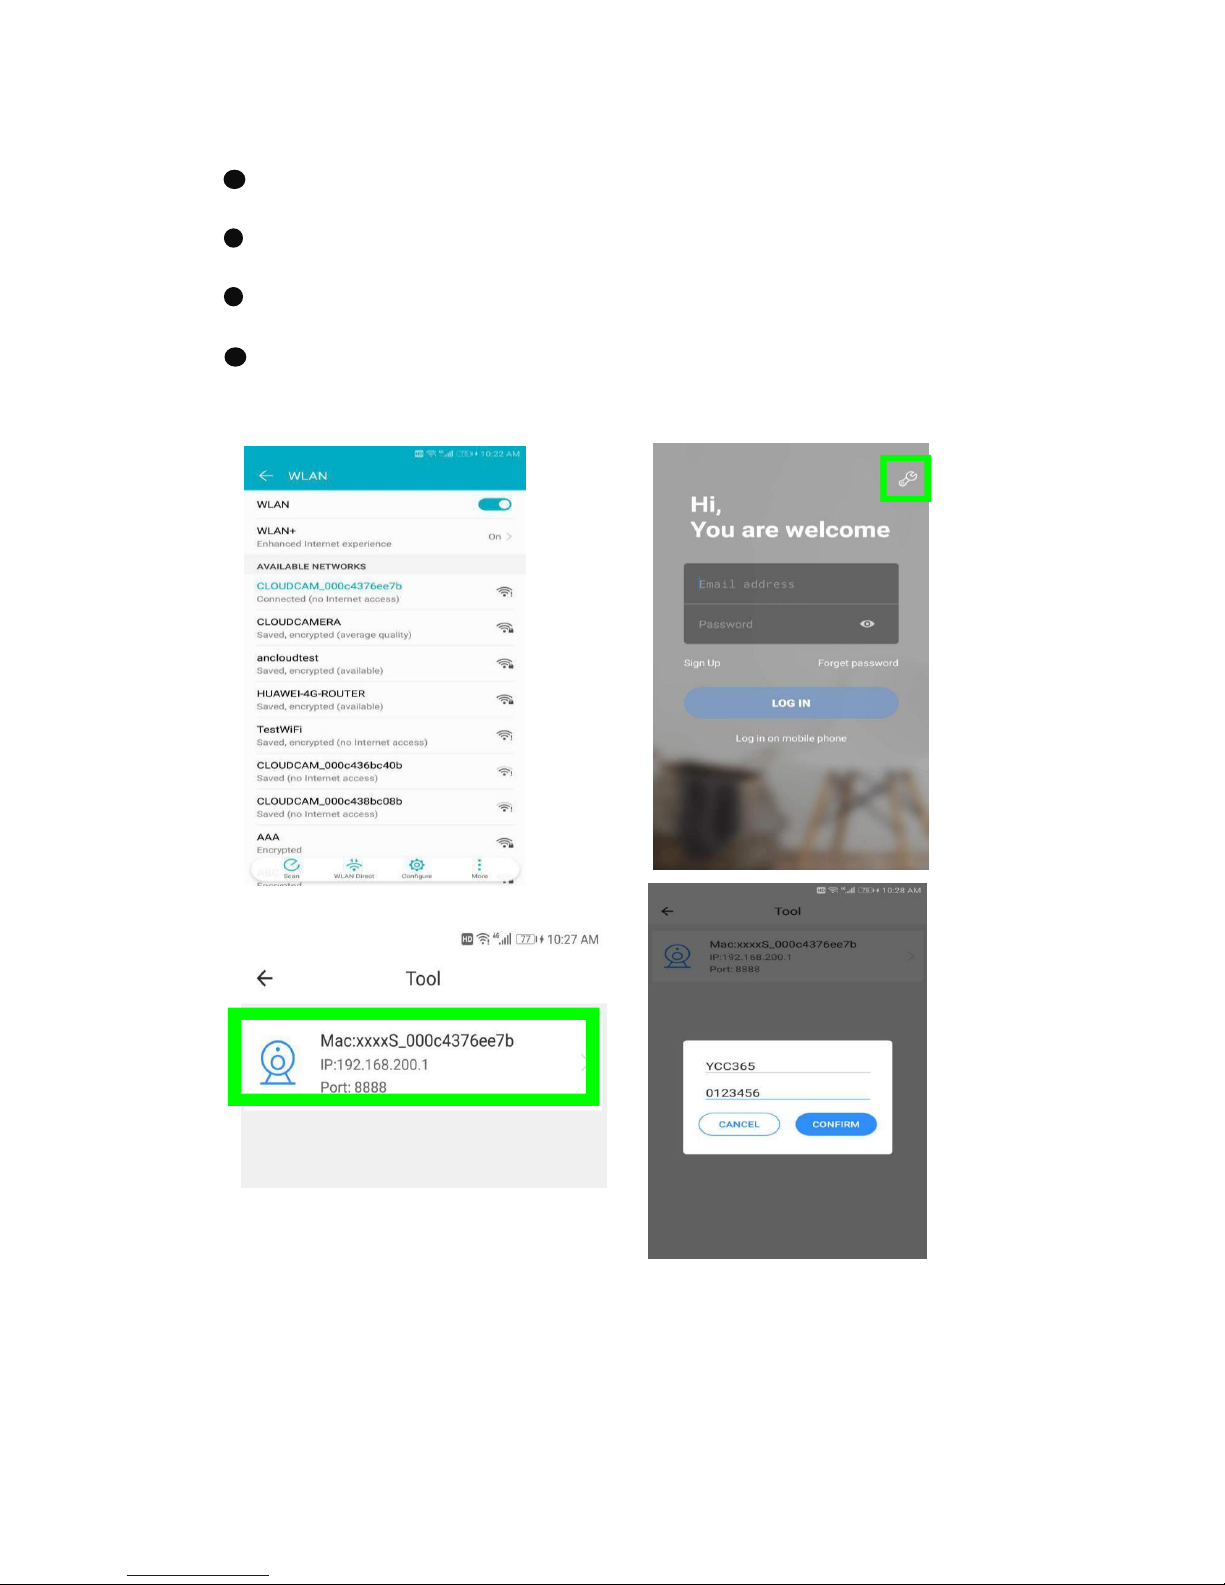
Open the YCC365 plus app to enter the login interface, click the setting icon in the upper
right corner .
Click “AP networked device preview” and Click “Next” .
Scanning the device in the Wi-Fi network , then click the device .
Enter user name: YCC365 password: 0123456, click “CONFIRM”, then you can preview
the screen.
Page 9
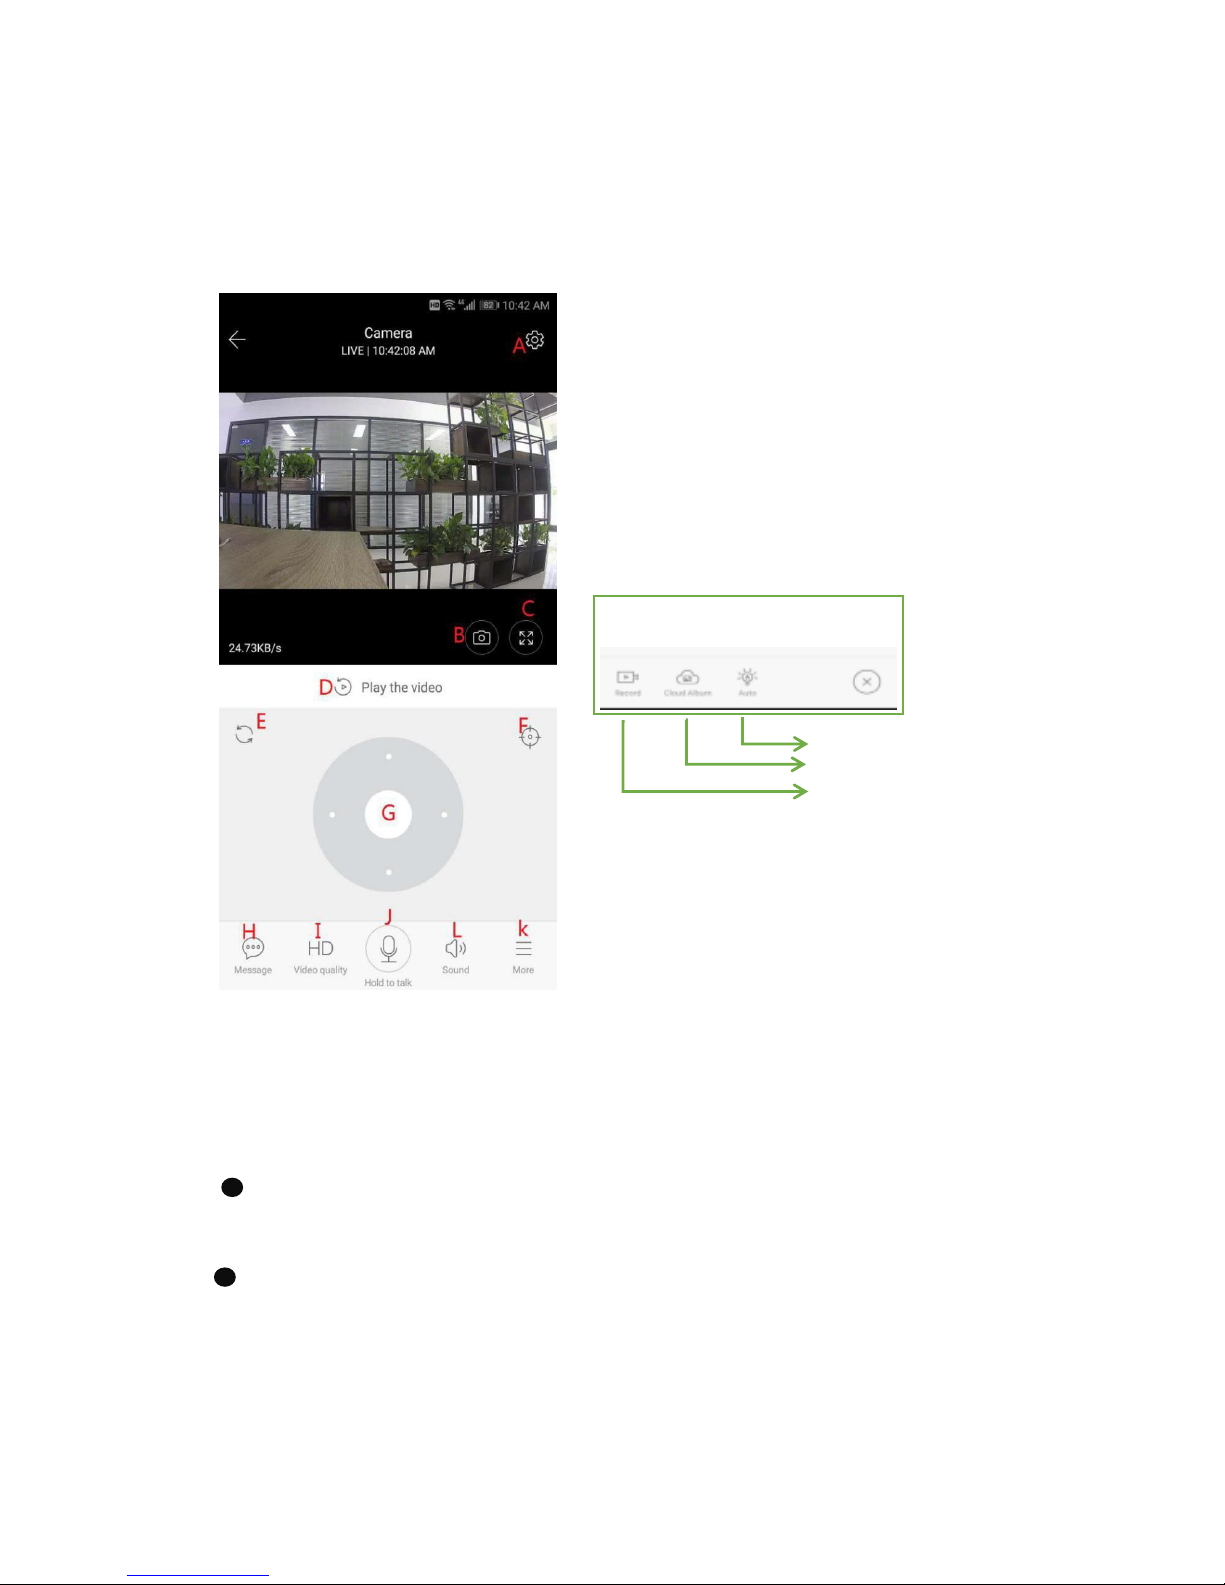
4 Function introduction
Real-time preview interface
A:Parameter Menu B:Snapshot
C:Full Screen D:Video playback
E:pan-tilt reset F:Preset
G:Pan&Tilt H:Message
I:Video quality J:Hold to talk
L:Sound
K:More
Control white light
View cloud albums
Video to the phone.
4.1 PTZ/ Preset
PTZ
By sliding steering wheel or sliding the screen on the live preview can control the camera's
rotation .
Preset
1、Click the preset icon to enter the preset management interface.
2、Add the preset: several presets can be added.
3、Delete the preset: click the edit icon to delete the preset that has been added.
Page 10
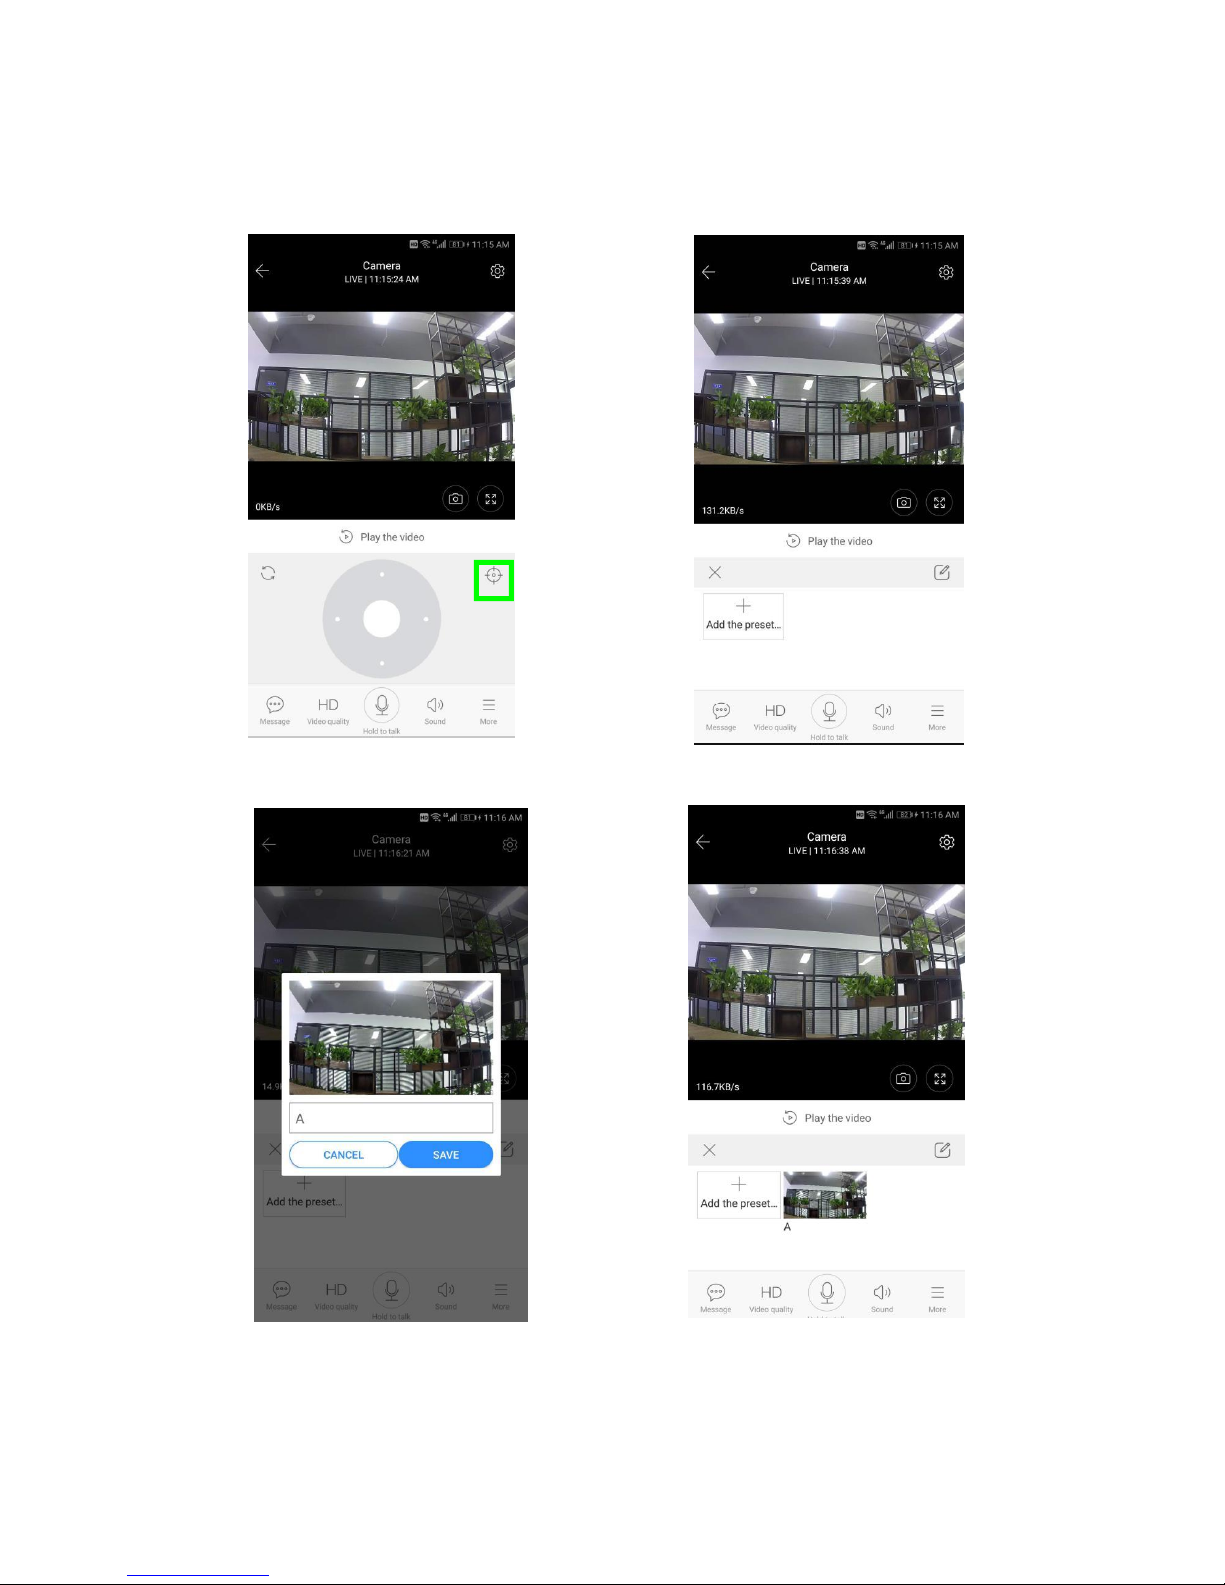
4.1.1 Add the preset
Page 11
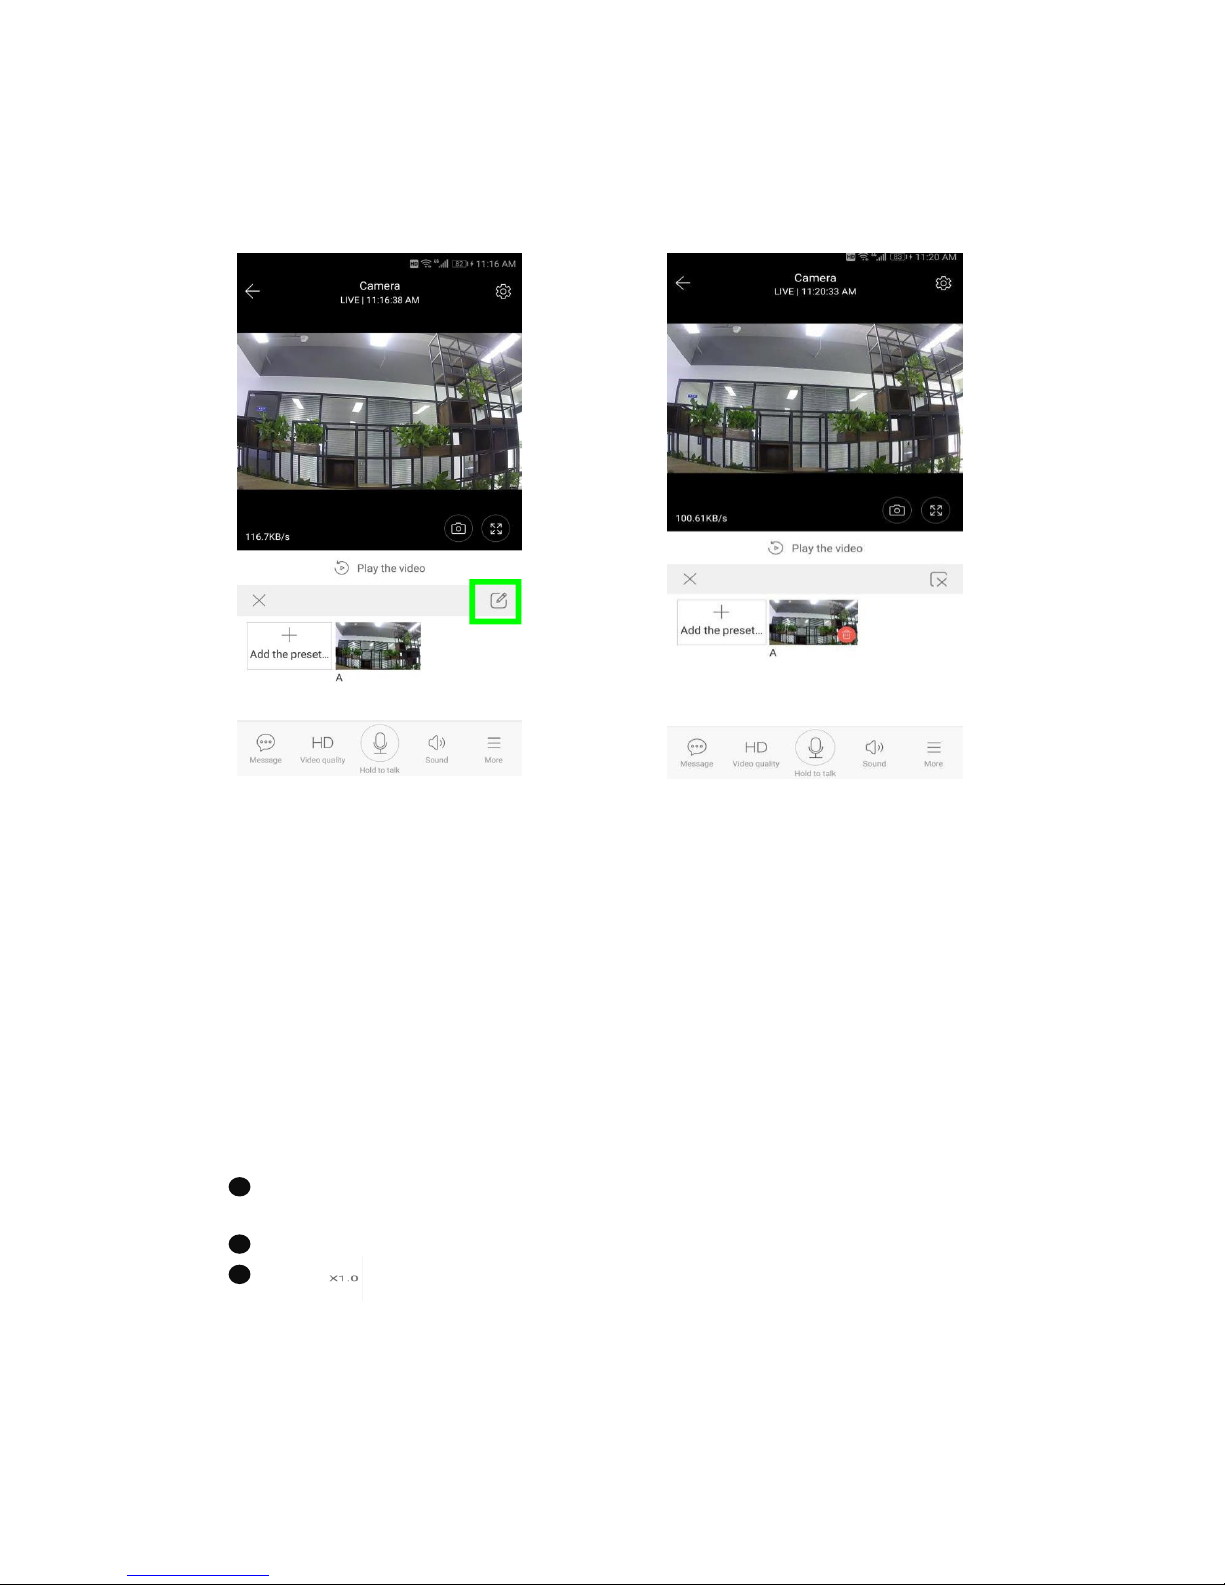
4.1.2 Delete the preset
4.2 Video playback
Gentle hint : video playback by default is cloud recording , if you want to playback the video on
the TF card , you can switch “play videos from” to “SD card”.
Cloud video has color discrimination, dark blue indicates the alarm recording and light blue
indicates non-alarm recording. TF card video color uniform light blue.
Click the date icon to playback the video of the selected date.
Click“ ”icon can adjust the cloud video playback speed, but TF card playback does not
support.
Page 12
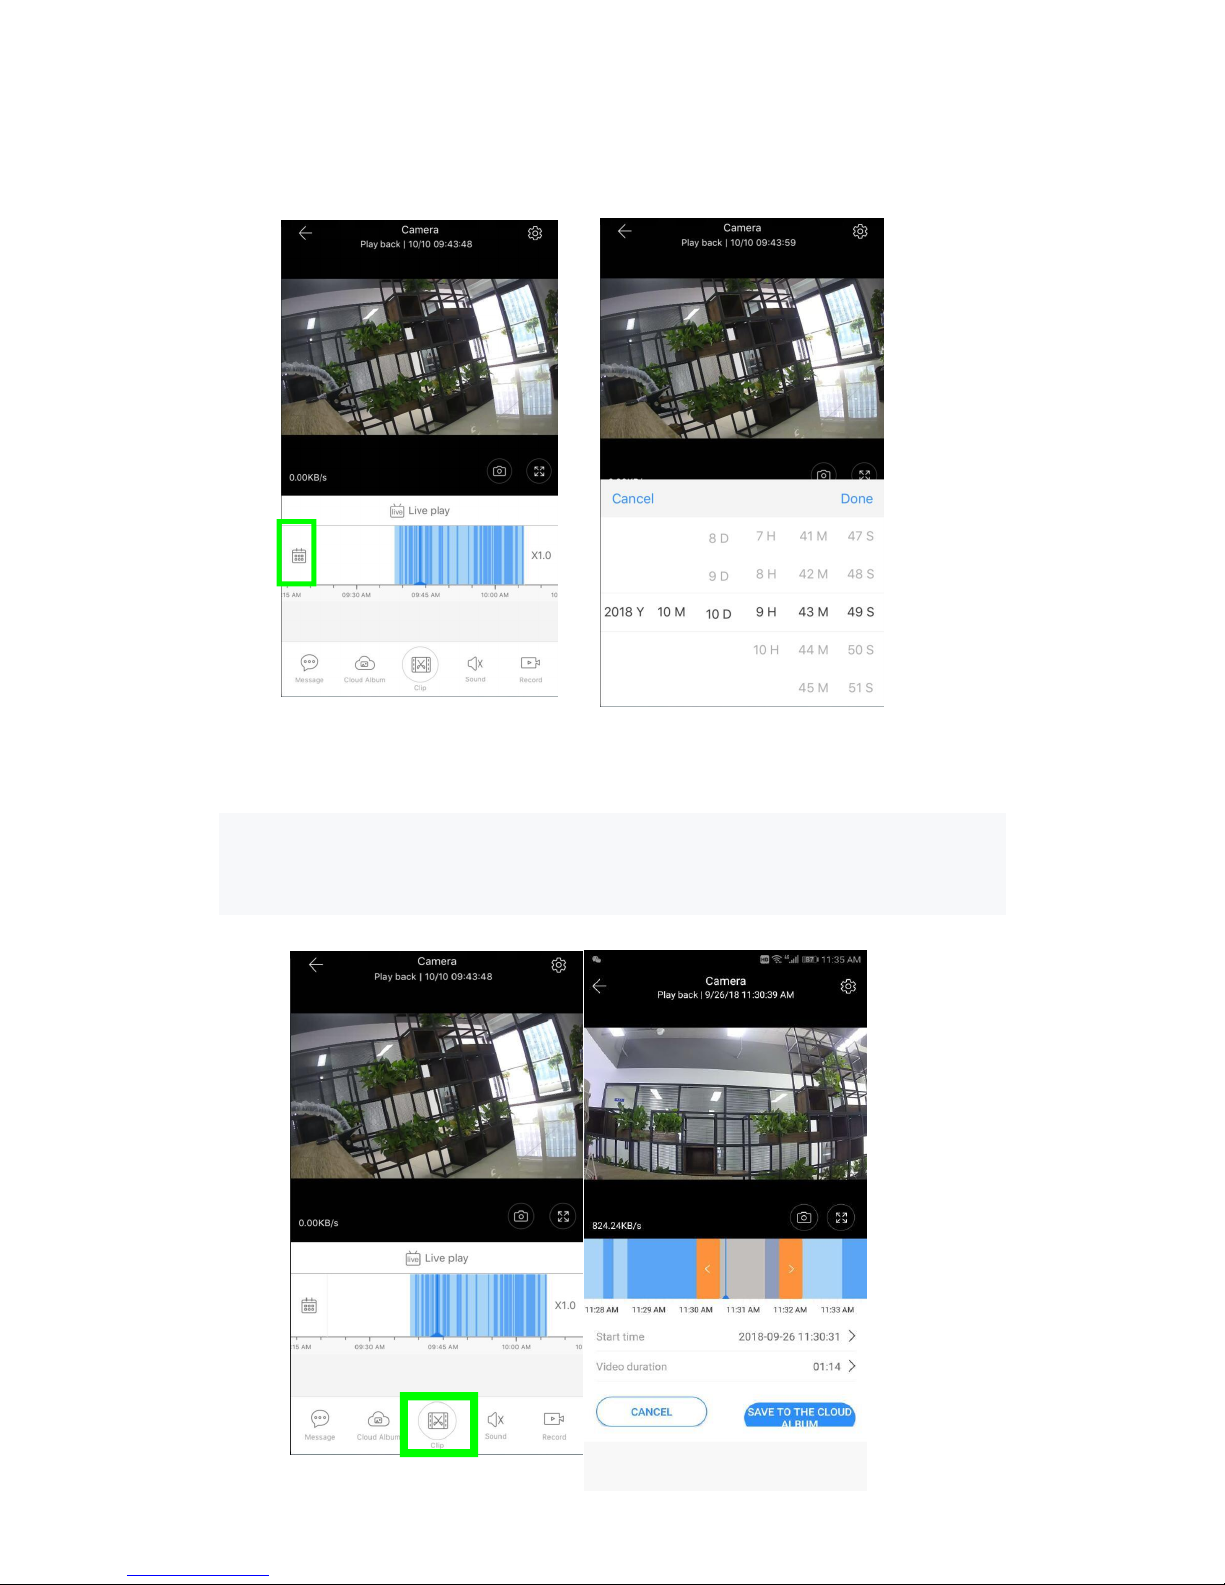
4.3 Video clip
Gentle hint: Only the cameras with cloud service package have this feature.
Drag the playback cursor and click the clip icon, select start time and click “save to the cloud
album ” , enter the video name and click “save”.
Page 13
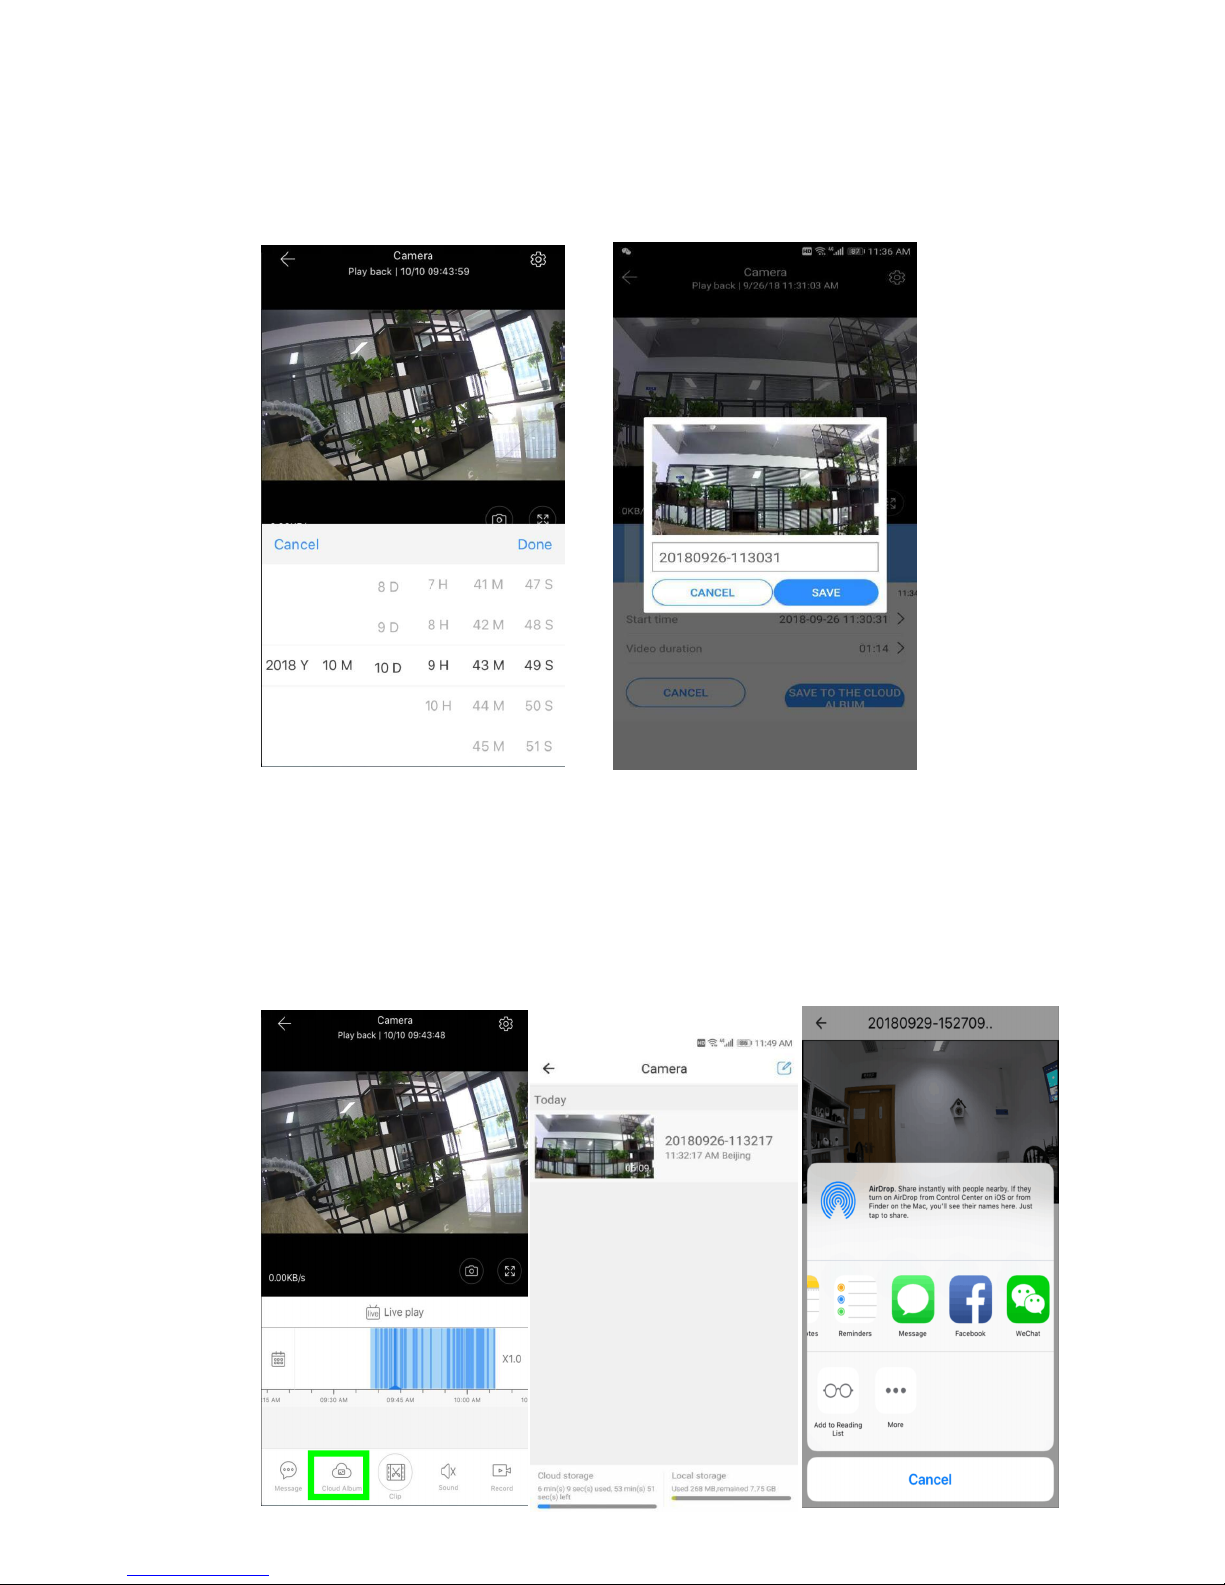
4.4 Download cloud video / share cloud video
Click the cloud album icon and click the video clip, click “Download” to save the video to your
phone or click “Share” to share your Video on Facebook and YouTube.
Page 14
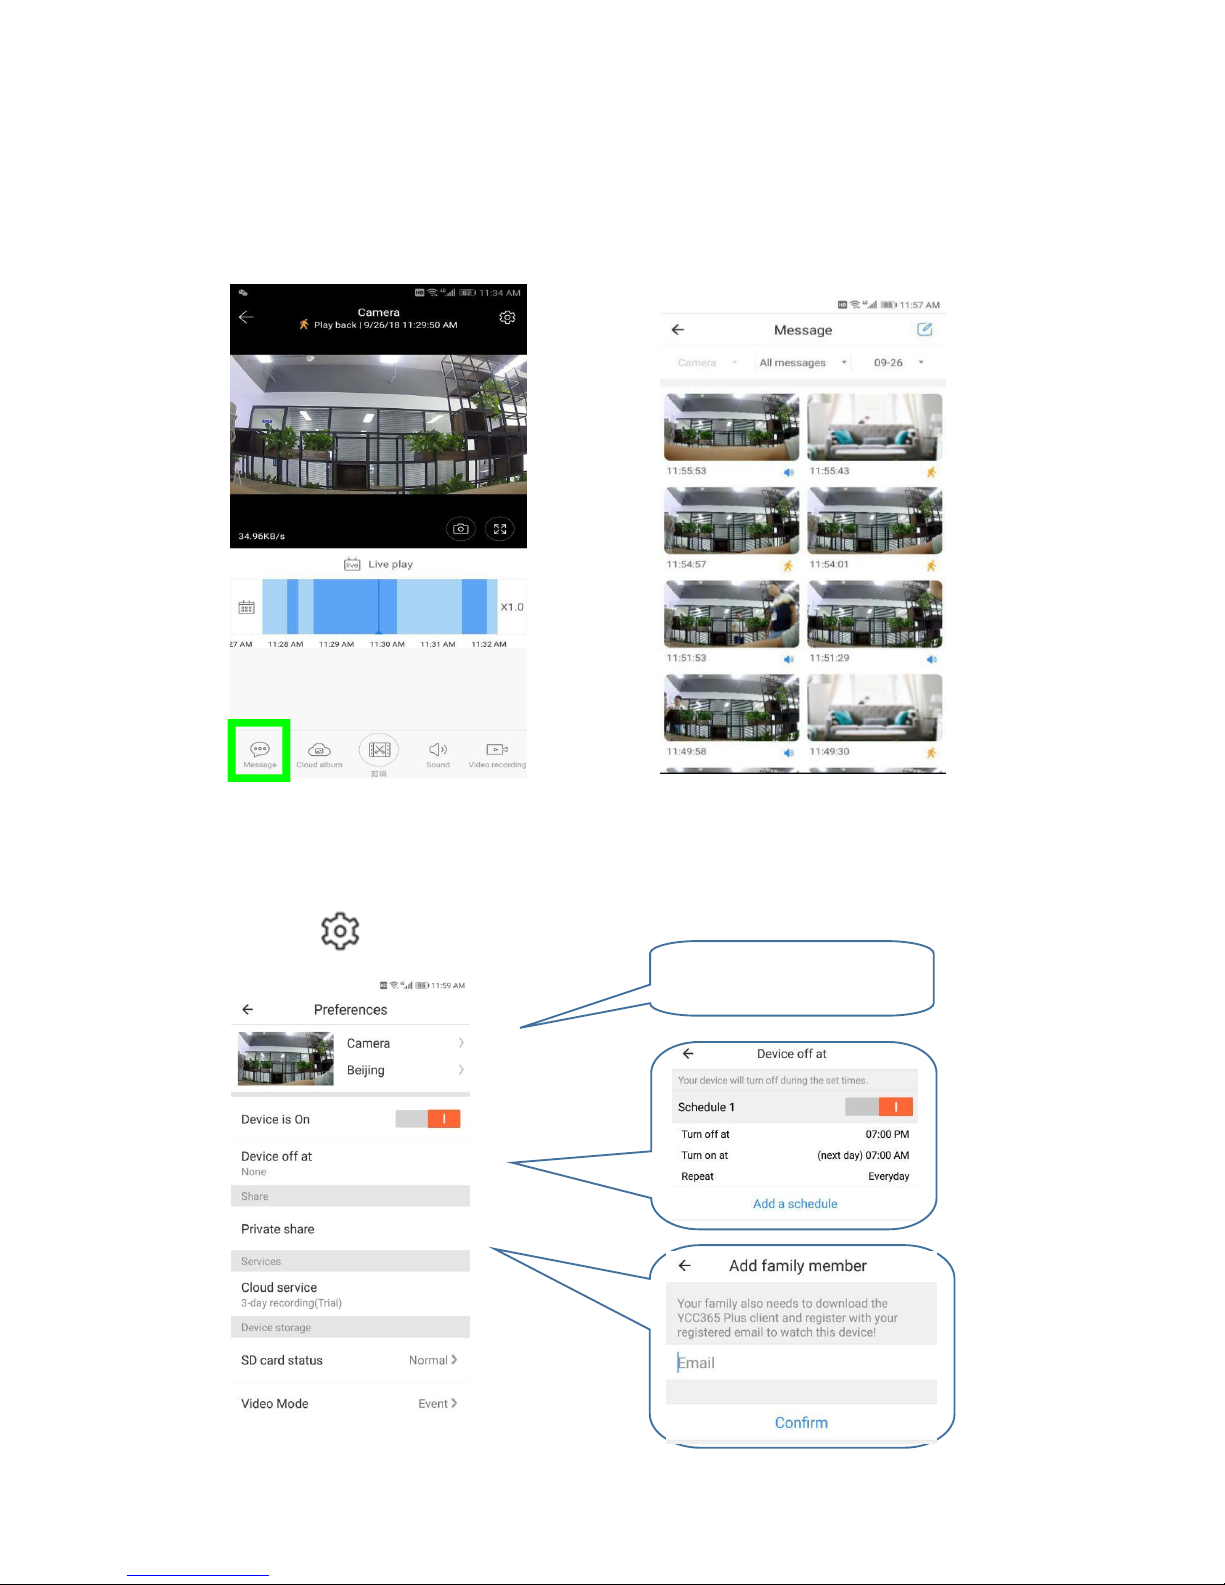
4.5 cloud video playback
Click “Message” to view the alarm video.
5 Preferences
Click “ “ in the preview screen, check the parameter menu
Add closure plan
Shared with other users
Rename the device name
Page 15
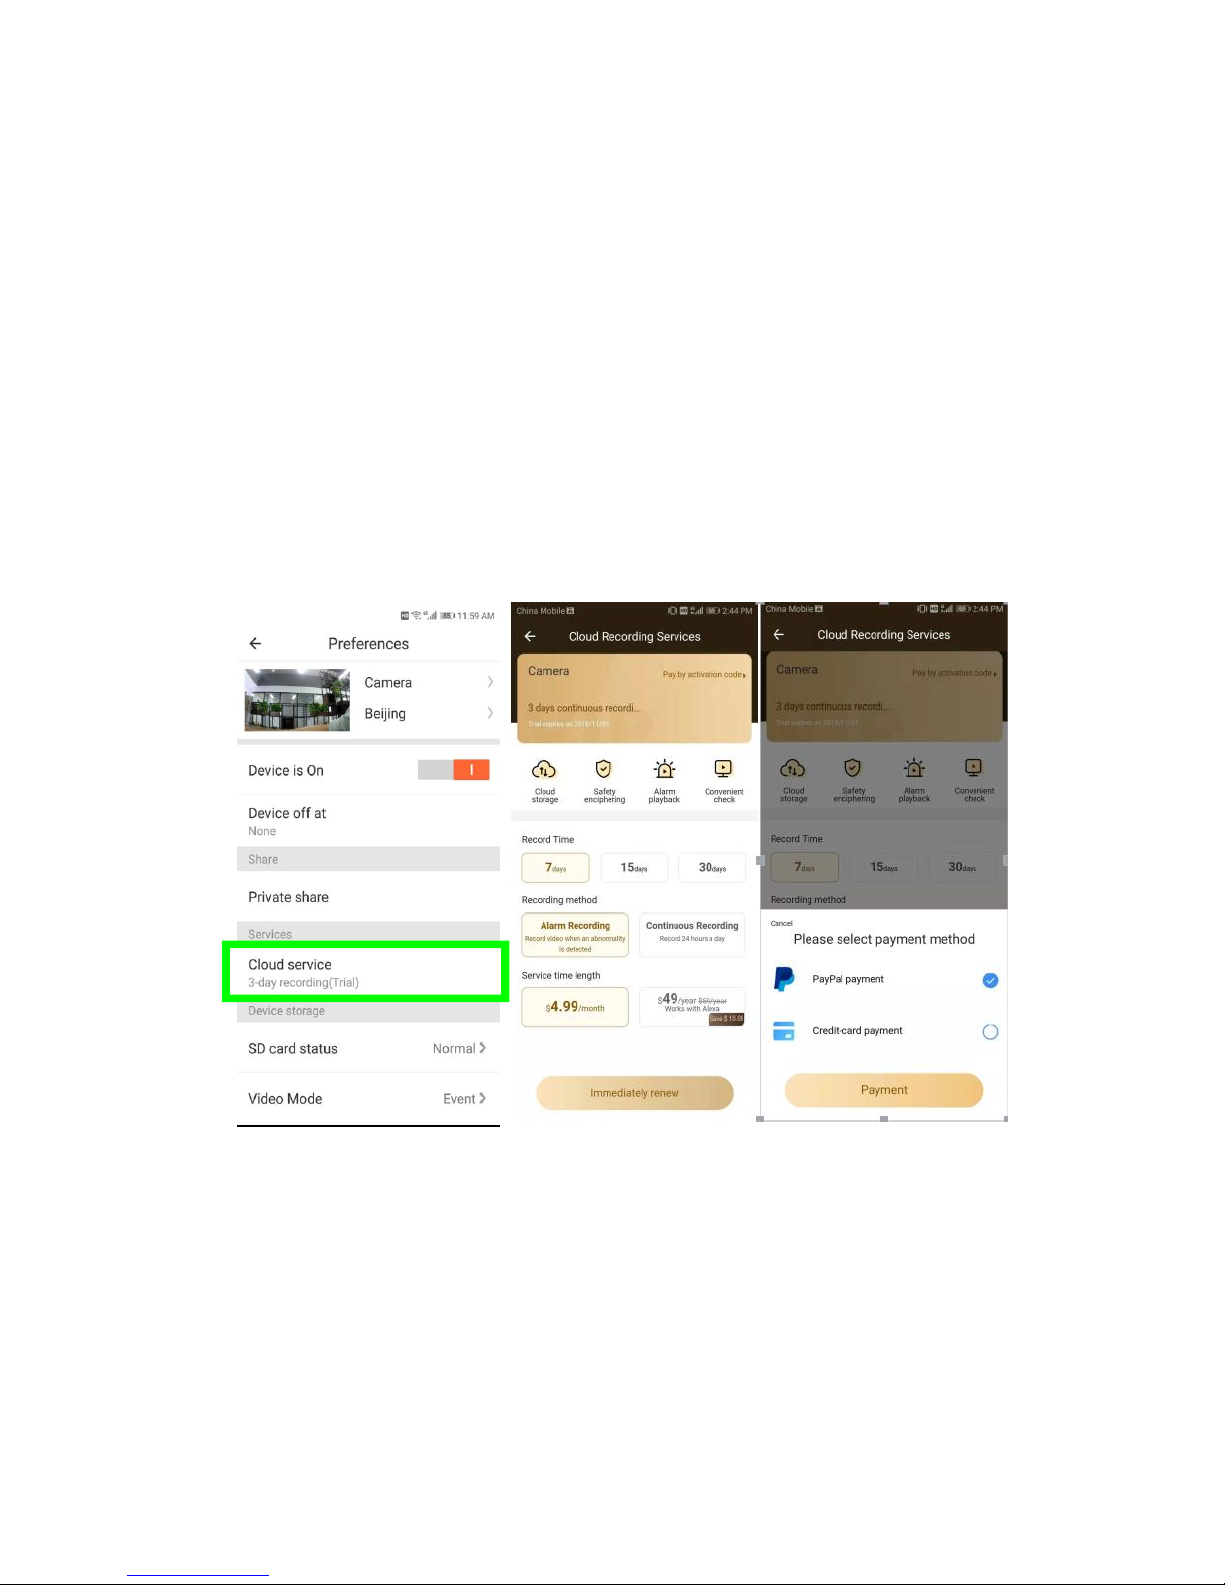
5.1 Cloud Storage service
We offer 30-day-long cloud service, everyone can enjoy the cloud storage service for
free, after that you can choose to pay for the service with a low cost.
A、Select “Cloud service” and check Subscription packages
B、There are three kinds of subscription packages for you, you can choose to pay for
this service by monthly or yearly.
C、We support PayPal payment system, click “Go to PayPal now” and then finish the
payment ( please install PayPal app in advance )
5.2 Set TF card recording Mode
Insert the TF card into the card slot and power on the camera.
TF card requirements:1、Memory space 8-128G 2、C10 TF card 3、use after formatting.
4、 Recommend Kingston/SanDisk/Samsung
Click “SD card status” to check it
Click “Video Mode” to select the video mode of TF card.
Page 16
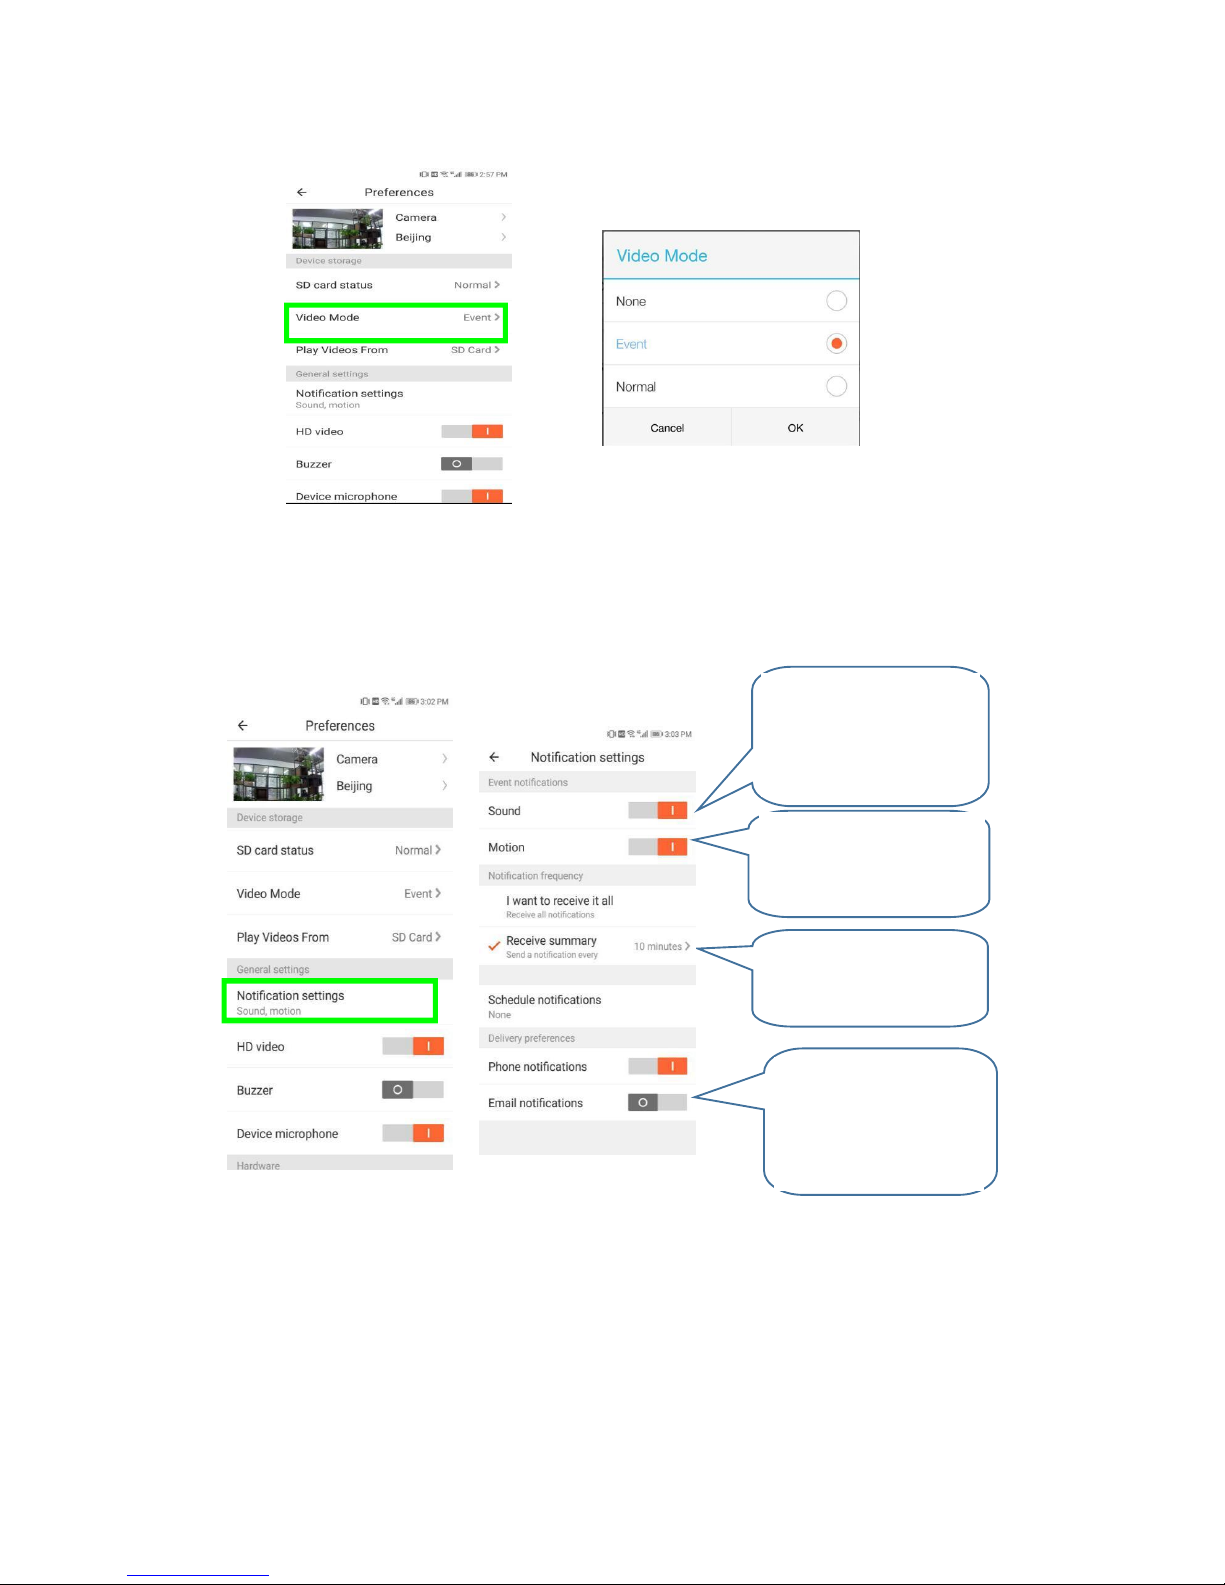
5.3 Notification settings
Gentle hint:Only the cameras with cloud service package support mail delivery.
Turn on the sound
switch,detect abnormal
sound triggering message
push
Turn on the motion
switch,detect the motion
triggering message push
Set the frequency of
message push
Turn on the email
notifications,detect
motion or sound
triggering send e-mail
Page 17
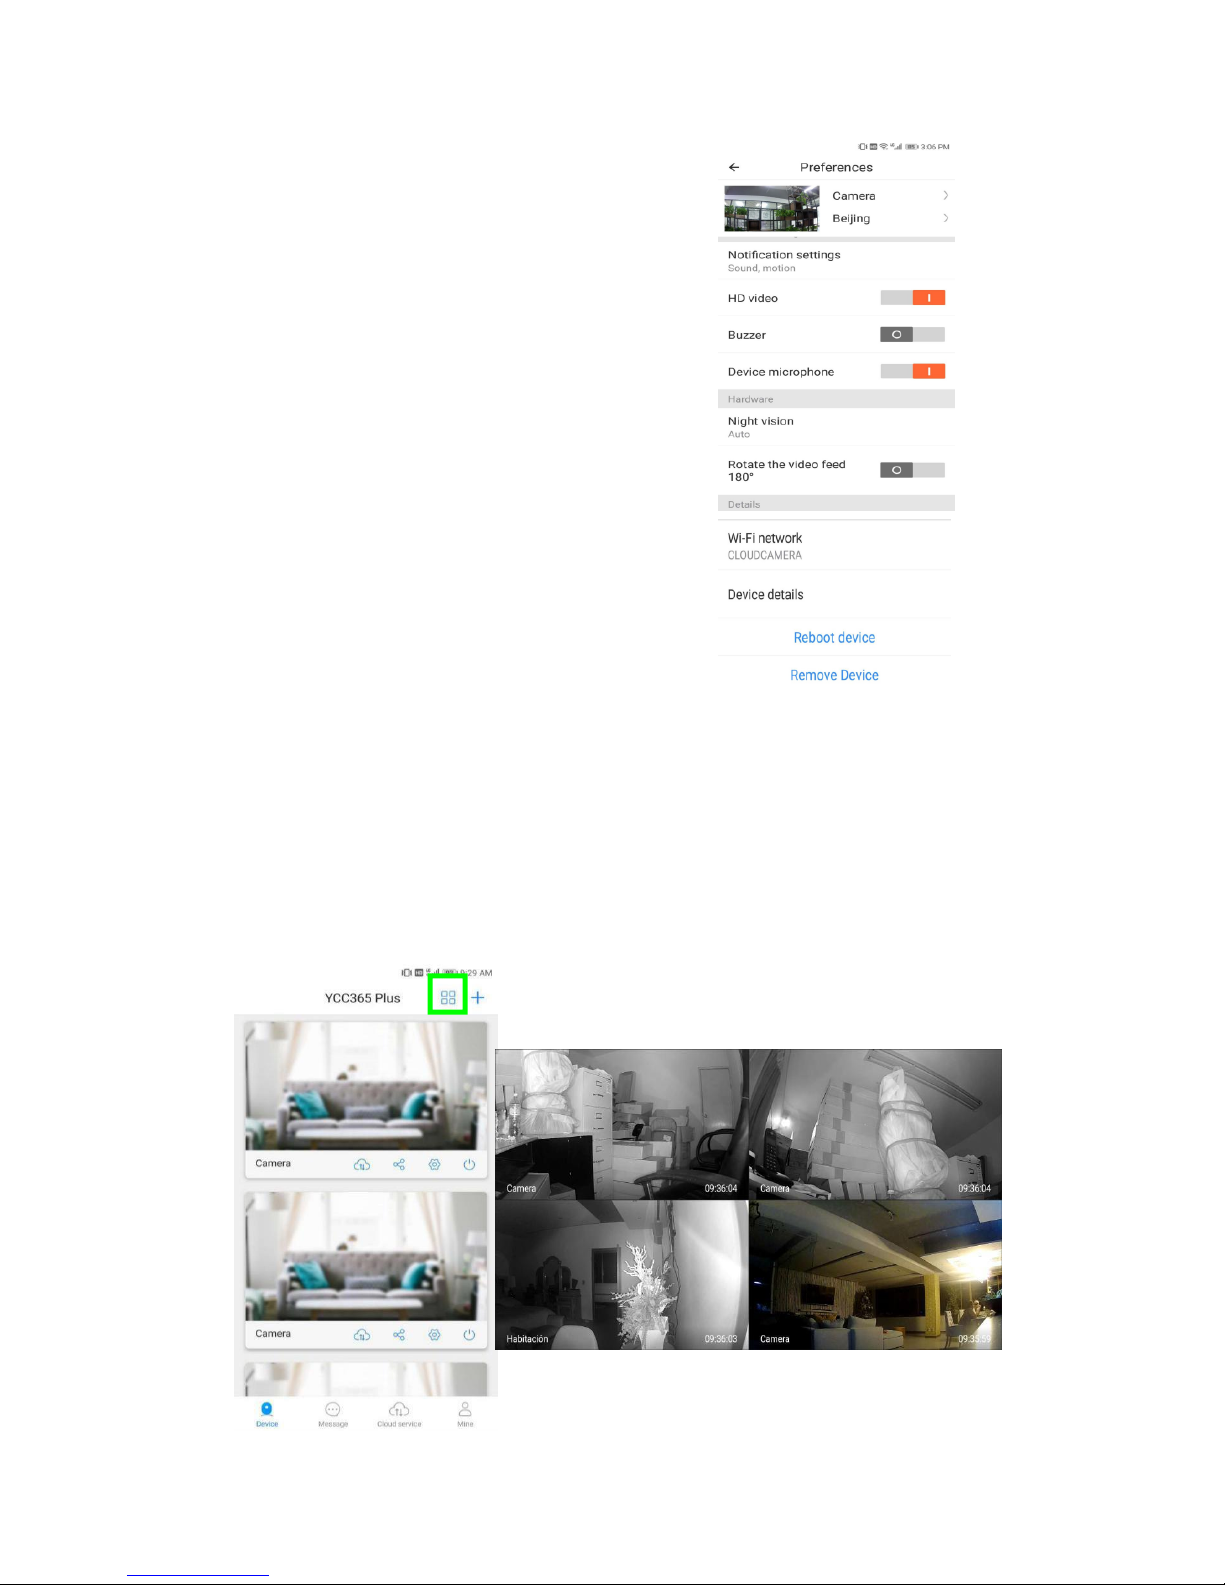
5.4 Other functions settings
HD video: switch the quality of pic, HD / SD
Device Microphone: Open / Close the microphone
Night Vision:
1、Off, close the night vision
2、On, always open night vision
3、Auto, automatic switchover
Rotate The Video Feed 180°:Flip the picture when
the camera is installed under the roof.
Wi-Fi Network: Change the Wi-Fi on the device.
Note: The Wi-Fi must be searchable, if the location
changed and the Wi-Fi is different, please reset and
connect to a new Wi-Fi again.
Device Details:Check the ID and the number
of the software\hardware of the device.
Remove Device:Please remove the camera in your account if you need to use
another account to add the camera.
6、Split screen to watch(Only for multiple equipment
under the same account)
Page 18
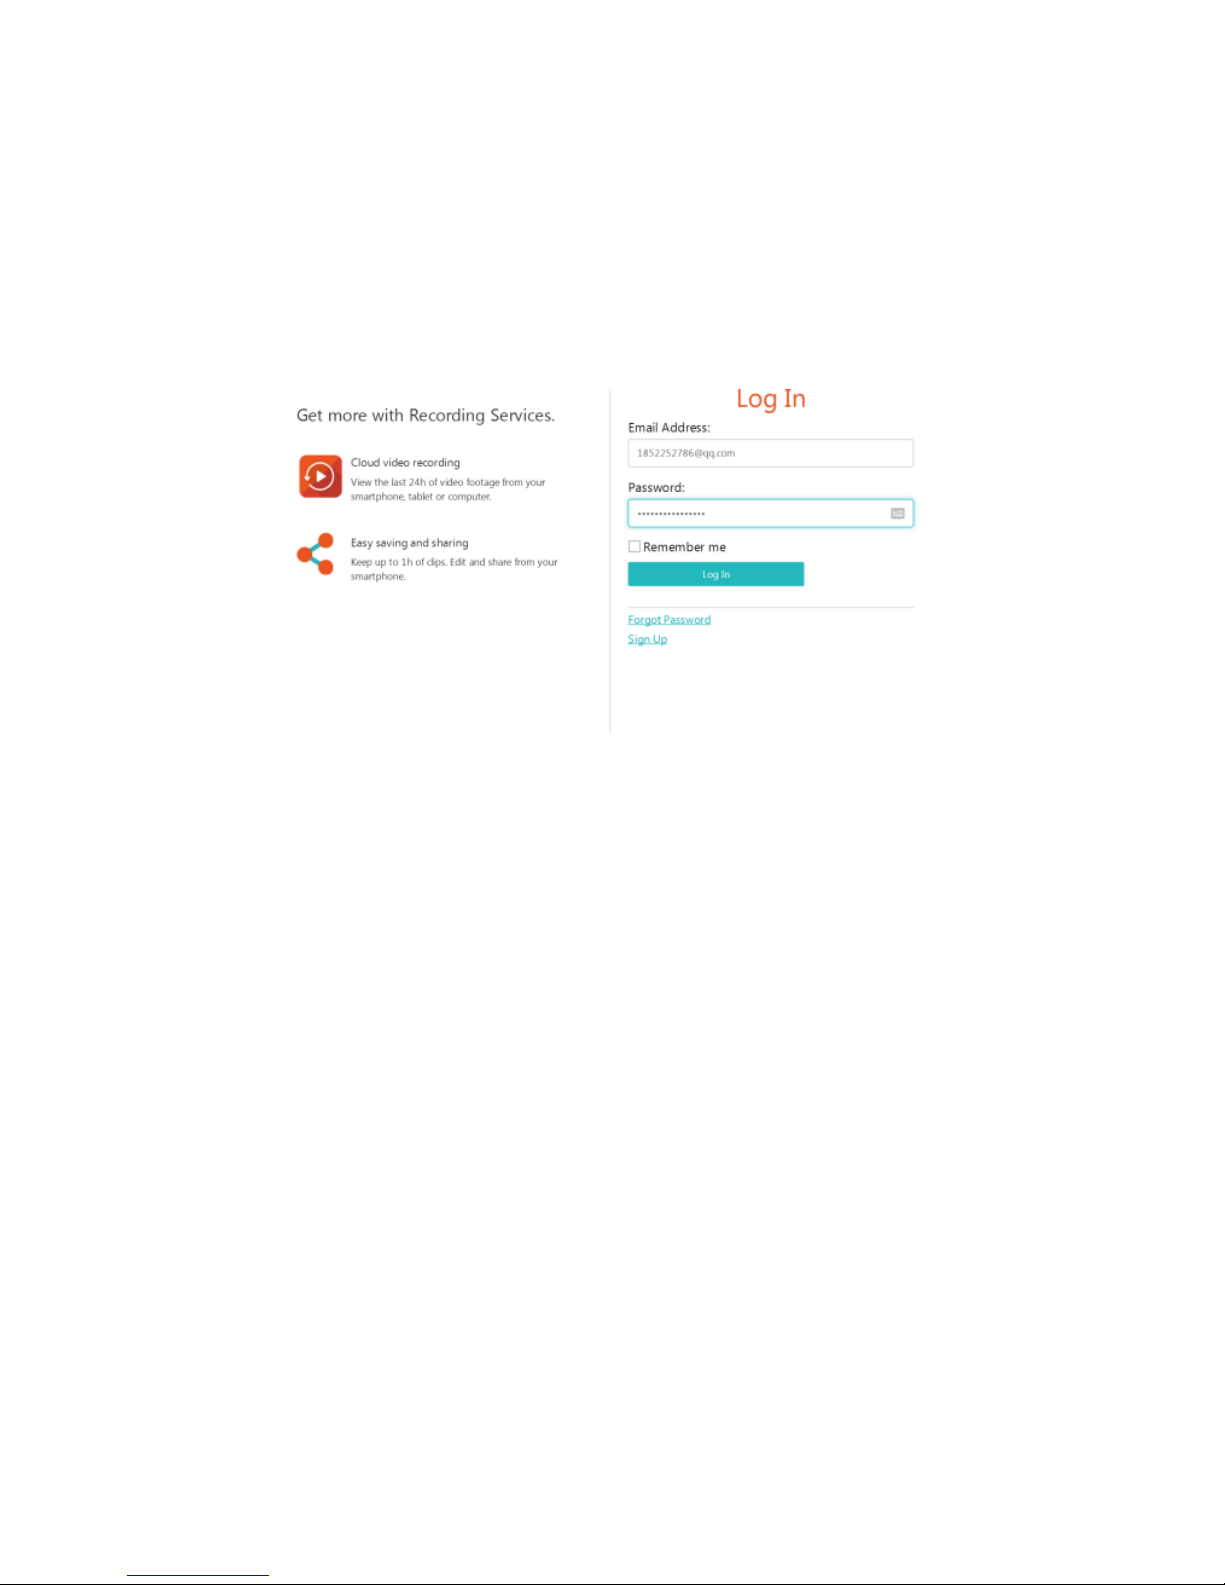
7 How to use a camera on a computer
Log In
8、 Frequently asked questions
1、Can’t add the device?
A、Please make sure the camera has been reset. Press the Reset button until hear the
prompt tone
B、Only support 2.4GHZ Wi-Fi, if your Wi-Fi router is 5GHZ, please switch to 2.4/5GHZ
dual mode.
C、Please turn on the GPS service before adding the device on the Android mobile phone .
After installation is complete, you will be asked to turn on GPS service when you use the
app at the first time, if you choose not to turn on the GPS service, please uninstall and
reinstall the app again
D、Please confirm the camera wasn’t binding by the other account.
There are four voice prompts in the progress
(1)“Please configure camera by scanning code or AP hot spot”
(2)Select your Wi-Fi and login with your password, after the device makes a noise like
“beep” you will hear this “Please wait for Wi-Fi connecting”.
(3)“Please wait for internet connecting” after getting the Internet ip address.
(4)“Internet connected welcome to use cloud camera”
Page 19

A、If you can’t go to the second step, please check your Wi-Fi channel is not hidden,
and the Wi-Fi router can’t be so far from the camera. If this way doesn’t work, please
scan the QR code to add the camera.
B、If you can’t go to the third step, please reduce the number of the Wi-Fi users, and
delete the special characters of your Wi-Fi password.
C、If you can’t go to the forth step, please try again, if it still doesn’t work, please
contact the seller.
3、Why does it have a interval while the video is recording to the TF card
The size of the video file is limited. Once the video size close to the critical value, the
video file will be created and the next video will continue to be recorded, there is a interval
but so short.
4、The TF card can’t be identified?
Please check the TF card if it meets the quality requirements, when the Wi-Fi signal is
not good, it also can’t be identified.
5、The video recording timeline is blank after the cloud service expired.
The video can’t be replayed after cloud service expired, if there is no TF card in the
camera, the video can’t be recorded.
If the TF card is always working, but the video files disappeared, please check the
Check TF card state, if it is normal in the App but no video has been recorded, please
format the TF card. If it still doesn’t work, please get a new TF card and try again.
6、Why I can’t get the notifications on my phone?
Make sure the App get the message pushing rights
Otherwise, when you are watching the real-time video in the App, there is no warning
notifications, because it’s unnecessary to send notifications when you are watching the
video online.
Advanced message push system, the warning notifications won’t be pushed to your
phone all the time but it will record all the messages and videos.
7、Camera disconnect?
Please check the power and the Internet then restart the camera. If this way doesn’t
work please remove the camera and add it again in the App.
8、Circle in the video, video runs slowly?
Circle in the video means it’s still loading, please check your network
environment.
9、How do the other people watch the video?
Share the App account with the other people.
10、How many people can use the account simultaneously.
There is no theoretical limit.
11、Why adding camera to another account would fail??
One camera one account, if the other account needs to add the camera, please
remove the camera in the current device.
12、How can I get my camera connected to the other Wi-Fi.
Two ways:
A:When you need to change to another Wi-Fi without moving the place.
Page 20

Parameter setting >> Wi-Fi Network >> select the Wi-Fi
B: When the camera is moved to another place, please start the camera, you will see the
“Device disconnected” on the main page, and then click “TROUBLESHOOT” to connect
to the Wi-Fi again.
• After sales instruction
1、The product will be updated in real time, if there is update, it will not be
noticed anymore, please visit our official website for reference.
2、Introductions of the basic function of the products are included in the
instruction, please users to read all the information carefully.
3、lf any problems occur in the usage of the video camera, please contact the
Seller
4、We have made every effort to ensure the completeness and correctness of
contents of the instruction, but there may still some deviations between part of
the data and the actual situation, if you have any question or dispute,
5、Losses caused by operating without following the instruction of the manual
book should be assumed by users.
This instruction applies to consumer product.
Kindly reminder: if the instruction is updated, it will not be noticed any more, dual video
recording memory (TF card/cloud storage) is supported by the video camera; to better safeguard
safety of video recording, users could select multiple cloud video recording mode for video
camera via service channels, choosing for monthly/yearly payment for storage.
FCC Statement
1. This device complies with Part 15 of the FCC Rules. Operation is subject to the following
two conditions:
(1) This device may not cause harmful interference.
(2) This device must accept any interference received, including interference that may cause
undesired operation.
2. Changes or modifications not expressly approved by the party responsible for compliance
could void the user's authority to operate the equipment.
NOTE:
This equipment has been tested and found to comply with the limits for a Class B digital
device, pursuant to Part 15 of the FCC Rules.
These limits are designed to provide reasonable protection against harmful interference in a
residential installation.
This equipment generates uses and can radiate radio frequency energy and, if not installed
and used in accordance with the instructions, may cause harmful interference to radio
communications. However, there is no guarantee that interference will not occur in a
particular installation. If this equipment does cause harmful interference to radio or
television reception, which can be determined by turning the equipment off and on, the user
is encouraged to try to correct the interference by one or more of the following measures:
Page 21
Reorient or relocate the receiving antenna.
Increase the separation between the equipment and receiver.
Connect the equipment into an outlet on a circuit different from that to which the receiver is
connected.
Consult the dealer or an experienced radio/TV technician for help.
FCC Radiation Exposure Statement
This equipment complies with FCC radiation exposure limits set forth for an
uncontrolled environment. This equipment should be installed and operated with
Minimum distances 20 cm between the radiator include antenna & your body.
IC WARNING
This device contains licence-exempt transmitter(s)/receiver(s) that comply with Innovation,
Science and Economic Development Canada’s licence-exempt RSS(s). Operation is subject
to the following two conditions:
(1) This device may not cause interference.
(2) This device must accept any interference, including interference that may cause
undesired operation of the device
ADVERTENCIA IC
Cet appareil contient des émetteurs / récepteurs exemptés de licence conformes aux RSS (RSS)
d'Innovation, Sciences et Développement économique Canada. Le fonctionnement est soumis aux
deux conditions suivantes :
(1) Cet appareil ne doit pas causer d'interférences.
(2) Cet appareil doit accepter toutes les interférences, y compris celles susceptibles de
provoquer un fonctionnement indésirable de l'appareil.
Operation Frequency:
2412MHz~2462MHz (802.11b/802.11g/802.11n(H20))
2422MHz~2452MHz (802.11n(H40))
Channel numbers:
11 for 802.11b/802.11g/802.11n(H20)
7 for 802.11n(H40)
Channel separation:
5MHz
Antenna Type:
Integral Antenna
Antenna gain:
3.0dBi
 Loading...