

Heiman HM-620P, HM-620PHS, HM-620PHR, HM-620PHW-AC, HM-620PHWR-AC User Manual
...
FE ATURES
● Wire Interconnection Ala rm
● Hush Button
● Malfunction Auto- Che ck
● Auto- Reset After Trigger
● Infrared Photoele ctr oni c Sensor
● Sound & Flash Alarm / LED I ndi cat ing Alarm
● SMT Manufacture Technology, Relia ble S tab ility
● Dust-proof, Moth-pro of, An ti White Light Inte rfe rence
●
● Adopts MCU Auto-Proc ess ing Tec hno log y
Anti-RF Interfere nce ( 20V /m-1GHz)
PR OD UC T INTRODUCTION
This product is a pho toe lec tronic smoke detector, hereinaft er
called d etector. Wi th a uni que structure design a nd an
intelligent MCU to pr oce ss photoe lec tro nic si gna ls, it is
pro vi ded w ith dus t- pro of, mot hp roo f a nd an ti -li gh t
interference etc. functions, ensuring the detector stability from
de si gn ba sis a nd su it able for a ll kinds of install at ion
environments. It reacts very quick to visible s mok e released
by smoldering fir e and flaming fi re, and suitable fo r fire alarm
in hous es, factories, sho ppi ng malls, ho tels, restaura nts , office
buildings, teach ing bui ldi ngs , banks, libraries, wareh ous es,
etc..
IN STALLATION
1. Avoid installati ons in places with sta gna ting smoke, heavy
dust, h eavy wat er mist, heavy oil mis t, great humidity (
and high wind speed ( >5m /s) .
2. Insert the ready battery into t he battery cabinet. Ch oose a
proper position. Normally, th e cen ter of the detection area
ceiling is recommended. Fix the de tec tor bas e in to the chosen
position and con nec t the wires if the detector is a n AC TYPE.
Then put the detector into the base and t wist t o f ast en it. Be
sure it is fastened tig htl y.
>9 5%)
User Manual for Photoelectronic Smoke Detector
TE CH NI CAL PARAMETERS
Operating voltage :
( F 22 ca rbo n battery, DC TYP E)
AC220V /110V with 9V ba cku p bat tery (AC TYPE)
Alarm indication: L ED fl ash es in Red
Alarm sound: ≥ 8 5dB /3m
Operating tempera tur e: -1 0 ℃ ~ +50 ℃
Humidity: ≤ 95 % RH
Dimension: Φ
Execution standar d: GB 471 5-2005, EN14604, UL217
Detecting area: 80 ㎡ at 6 -1 2m in stallation height;
60 ㎡ at installation he igh t <6m .
①②9V batte ry 6
Static current: <10 uA
Alarm current: <35m A
Battery life: carbo n bat ter y for about 1year
Power indication: G ree n LED c onstant ON (AC TYPE )
128*38mm
OP ER ATING PRINCIPLE
This detector a dop ts th e principle of smoke p art icles re fle cting
infrared lights . T he main circuit i ncludes a MCU pr oce ssi ng
part, an infrared emission part and an infrared reception part.
The emission and reception diode s are placed in the opt ica l
maze chamber which can shield the interference of outside
stray lights, but will not influence smoke entering into the
detector. O n smokeless conditions, the received infr are d lights
are very weak. When smoke entering, due to scattering effects ,
the received ligh t signals increase. When smoke density
accumulates up and rea ch the alar m threshold of the MCU,
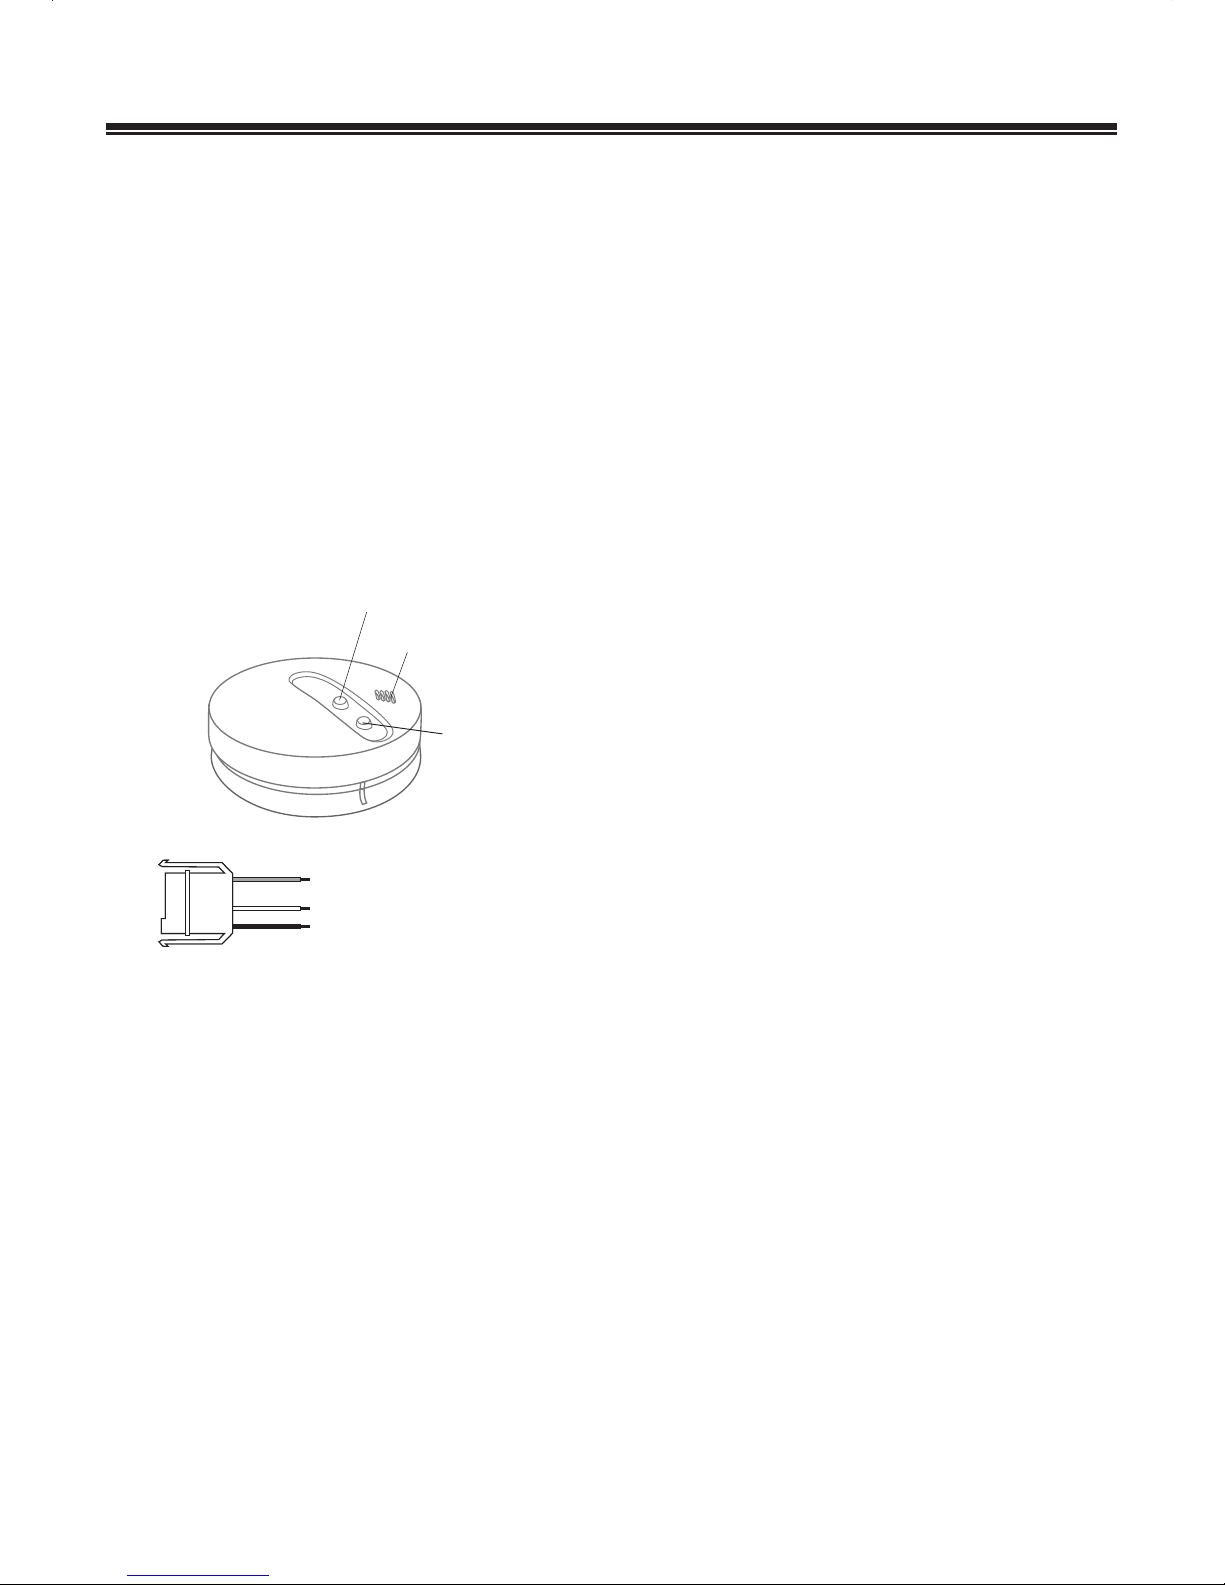
PR OD UC T PR OFILE
Note:
1) If not equi pped with t he w ire assembl y, th e de tector is a DC TY PE
and does n ot have the i ntercon nection f unction .
2) If not equipp ed with the yel low int erconne ction wire in the wi re
assemb ly, the d etector d oes not hav e the inter connect ion funct ion.
the dete cto r will b lin k its alar m indi cat or, give out strident
alarm sound and send out a larm signal to the other
interconnected de tec tor s.
1
BUZ ZER
POW ER INDI CATOR
TES T & HUS H BUTT ON
ALA RM INDI CATOR
WIR E ASSEMBLY
M2 07- 1EVe r1.0
INT ERCON NECTI ON WIRE ( YELL OW)
AC PO WER CATHO DE WIR E (BLA CK)
AC PO WER ANOD E WIRE ( WHIT E)

NO TE
1. Perform the SENSITIVI TY TEST as requested .
2. Clean the detector surface with soft bristled br ush ever y 6
months t . Remembe r to cut
off the po wer s our ce before cleaning.
3. If the de tec tor is not used for a lon g time, remove the
detector, take ou t th e battery from the cabinet and store it in a
cool and dry place.
4. The detector can reduce the happening rate of disasters. But
it can not guaran tee a h undred percent safe. For safet y
consideration, pl s use the det ect or properly and hei ghten
vi gi la nc e an d safety c on sc iousness t o ta ke p reventive
measures.
o assure the detecting sensitivity
operation.
ls contact
with the dealer in tim e. Do not attempt to remove and repair
the detector person all y to pr event incidents.
If the buz zer gives out 2 Di sounds eve ry 40 seconds along
with t he a la rm i nd ic ator f la shing t wi ce , t he i nf ra re d
photoelectronic sen sor sho uld have a malfunction. P
OP ER ATING INSTRUCTION
1. Usage
1) Ins erting the ready battery into the battery cab inet an d
keeping the battery p owe r sup ply,
2) Connecting the AC power wires (for AC TY PE) , the d ete ctor
enters into normal w orking stat us. The i ndi cator flashes o nce
per 45 seconds.
2. Sensitivity Test
The dete cto r should be tested periodically to assure normal
operation. Once per month is recommended. Press and hold
the TES T & HUSH BUTTON for more than 1s to make the
detector enter int o testin g status. If t he alarm indicator flas hes
rapidly and the buzzer gives out alarm sound , the n
3. Alarm & Hush Function
When sm oke density in surroundings reaches the al arm
threshold of the det ector, the buzzer g ive s out alarm sound
and the alarm ind icator fl ashes rapidly. At this time, pressing
the TES T & HUSH B UTTON will make the detector enter int o
mute status that las ts for 10 minutes. D uring thi s p eri od, the
indicator fl ashes once per 10s and if the density is still higher
than the t hr eshol d, t he T EST & H US H B UTTON is
nonfunctional. When the sm oke density goes below the
threshold, pressing the TES T & H USH BUT TON will ac tivate
the det ector to perform testing ope ration. A
he detector recover s aut oma tically to normal working stat us .
4. Interconnectio n Alarm
Under interconne cti on condition, if a detector only giv es out
alarm sound and its alarm indicator does n ot flash, it means
alarm occurs among th e oth er in terconnected detectors. At th is
time, press the TEST & HUSH BUT TON to hush the detect or
alarm sou nd and find th e detector in ala rm status. Meanwhile,
check the surroundings of each detector to prevent potential
losses.
the detector
works properly.
fter th e 10 minutes,
t
5. Malfunction Chec k
When the detector buzzer gi ves ou t a Di so und every 40
seconds along w ith th e alarm indic ato r flashing once, th e
battery voltage should become lower than the detector’s
normal operating voltage. At this t ime, rep lac e the battery with
a new one . Otherwise, it will influence the detector ’ norm al
User Manual for Photoelectronic Smoke Detector
2
M2 07- 1EVe r1.0
 Loading...