

Page 1
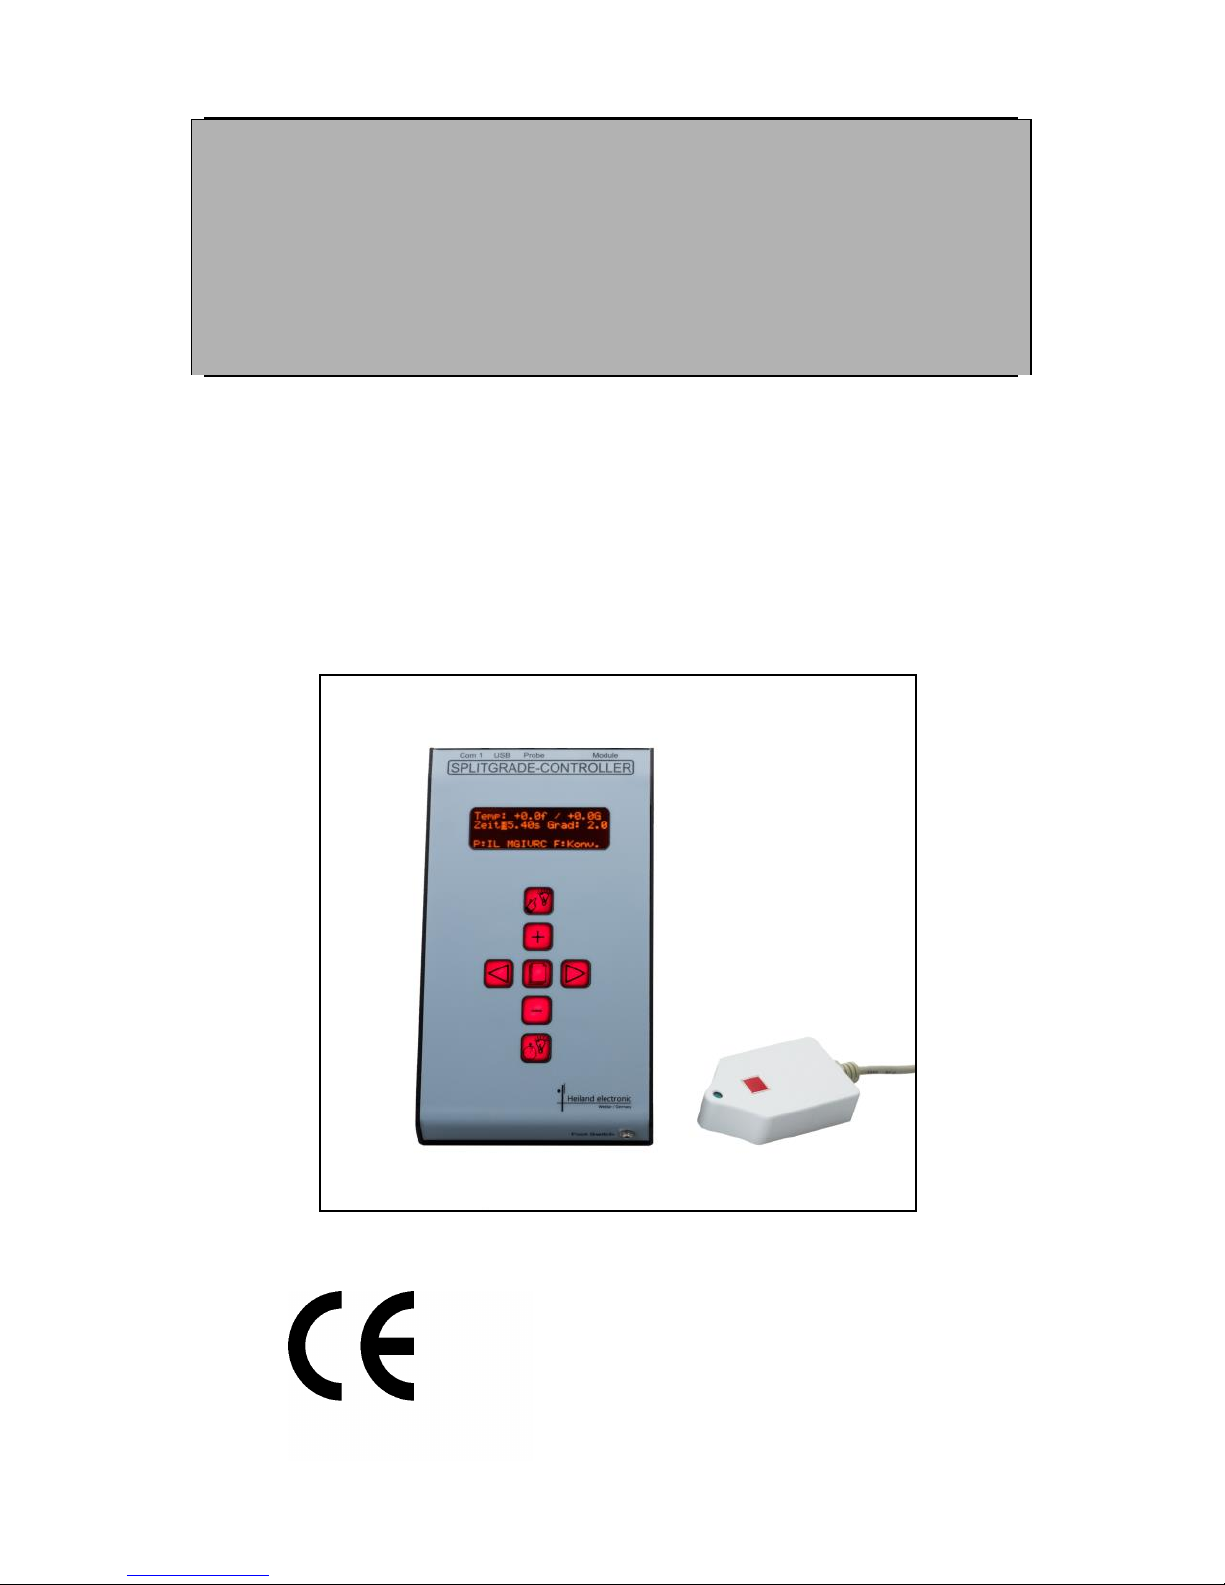
Paper Gradation Management System
User´s manual V3.4
Heiland electronic GmbH
SPLITGRADE
Page 2

2
Contents
SCHEMATIC VIEW OF THE COMPLETE SPLITGRADE SYSTEM ............. 4
THE PRODUCT .............................................................................................. 5
COPYRIGHT ................................................................................................... 5
WARRANTY ................................................................................................... 5
TECHNICAL SPECIFICATIONS OF THE CONTROL UNIT ........................................ 6
FACTORY CALIBRATED PAPER TYPES .............................................................. 7
FACTORY CALIBRATED FILM TYPES ................................................................. 8
CONTENTS OF THE DELIVERY ......................................................................... 8
FEATURES ..................................................................................................... 9
OPERATION CONDITIONS ......................................................................... 10
SAFETY ADVICE ........................................................................................... 10
INSTALLING THE FILTER MODULE AND CONTROLLER ....................... 10
CONNECTING THE SYSTEM ........................................................................... 11
USING THE CONTROLLER ........................................................................ 12
DESCRIPTION OF THE PUSH-BUTTONS ........................................................... 12
DISPLAY ...................................................................................................... 12
THE QUICK PATH TO HIGH QUALITY PRINTS ........................................ 13
PREPARATION ............................................................................................. 13
PRINTING .................................................................................................... 14
RESULT....................................................................................................... 15
MANUAL CHANGES ................................................................................... 15
CHANGING THE EXPOSURE TIME ................................................................... 15
CHANGING THE GRADE ................................................................................. 15
FAST SELECTION OF PAPER GRADE 00 OR 5 .................................................. 16
WARNINGS DURING MEASUREMENT ..................................................... 16
FURTHER MEASUREMENT MODES ......................................................... 17
MULTIPOINT MODE AND DENSITY MEASUREMENT ........................................... 17
TIME MEASUREMENT .................................................................................... 17
SUGGESTIONS FOR SETTINGS IN SPECIAL CASES ........................................... 18
Page 3

SPLITGRADE USER’S MANUAL V3.4 3
BURN-IN FUNCTIONS ................................................................................. 19
ACTIVATION AND SETTING ............................................................................ 19
EXPOSING ................................................................................................... 20
BURN-IN USING WHITE LIGHT ........................................................................ 20
USER PREFERENCES ................................................................................ 21
REFERENCE POINT ...................................................................................... 21
BEEPER ...................................................................................................... 21
TIME BASE ................................................................................................... 22
FILTER ........................................................................................................ 22
PERMANENT OFFSETS FOR EXPOSURE .......................................................... 22
TEST STRIP MODES ................................................................................... 24
CONTROLLING UP TO THREE DIFFERENT TYPES OF ENLARGER..... 26
USING THE CONTROLLER AS AN ANALYSER (SPL-M1) ..................... 27
CARE AND MAINTENANCE ....................................................................... 28
CHANGING THE FUSE ................................................................................... 28
CARE OF INSTRUMENT ................................................................................. 28
APPENDIX: DETAILS OF FILM AND PAPER PROGRAMS ...................... 29
FURTHER PRODUCTS OF HEILAND ELECTRONIC ................................ 31
Page 4
4
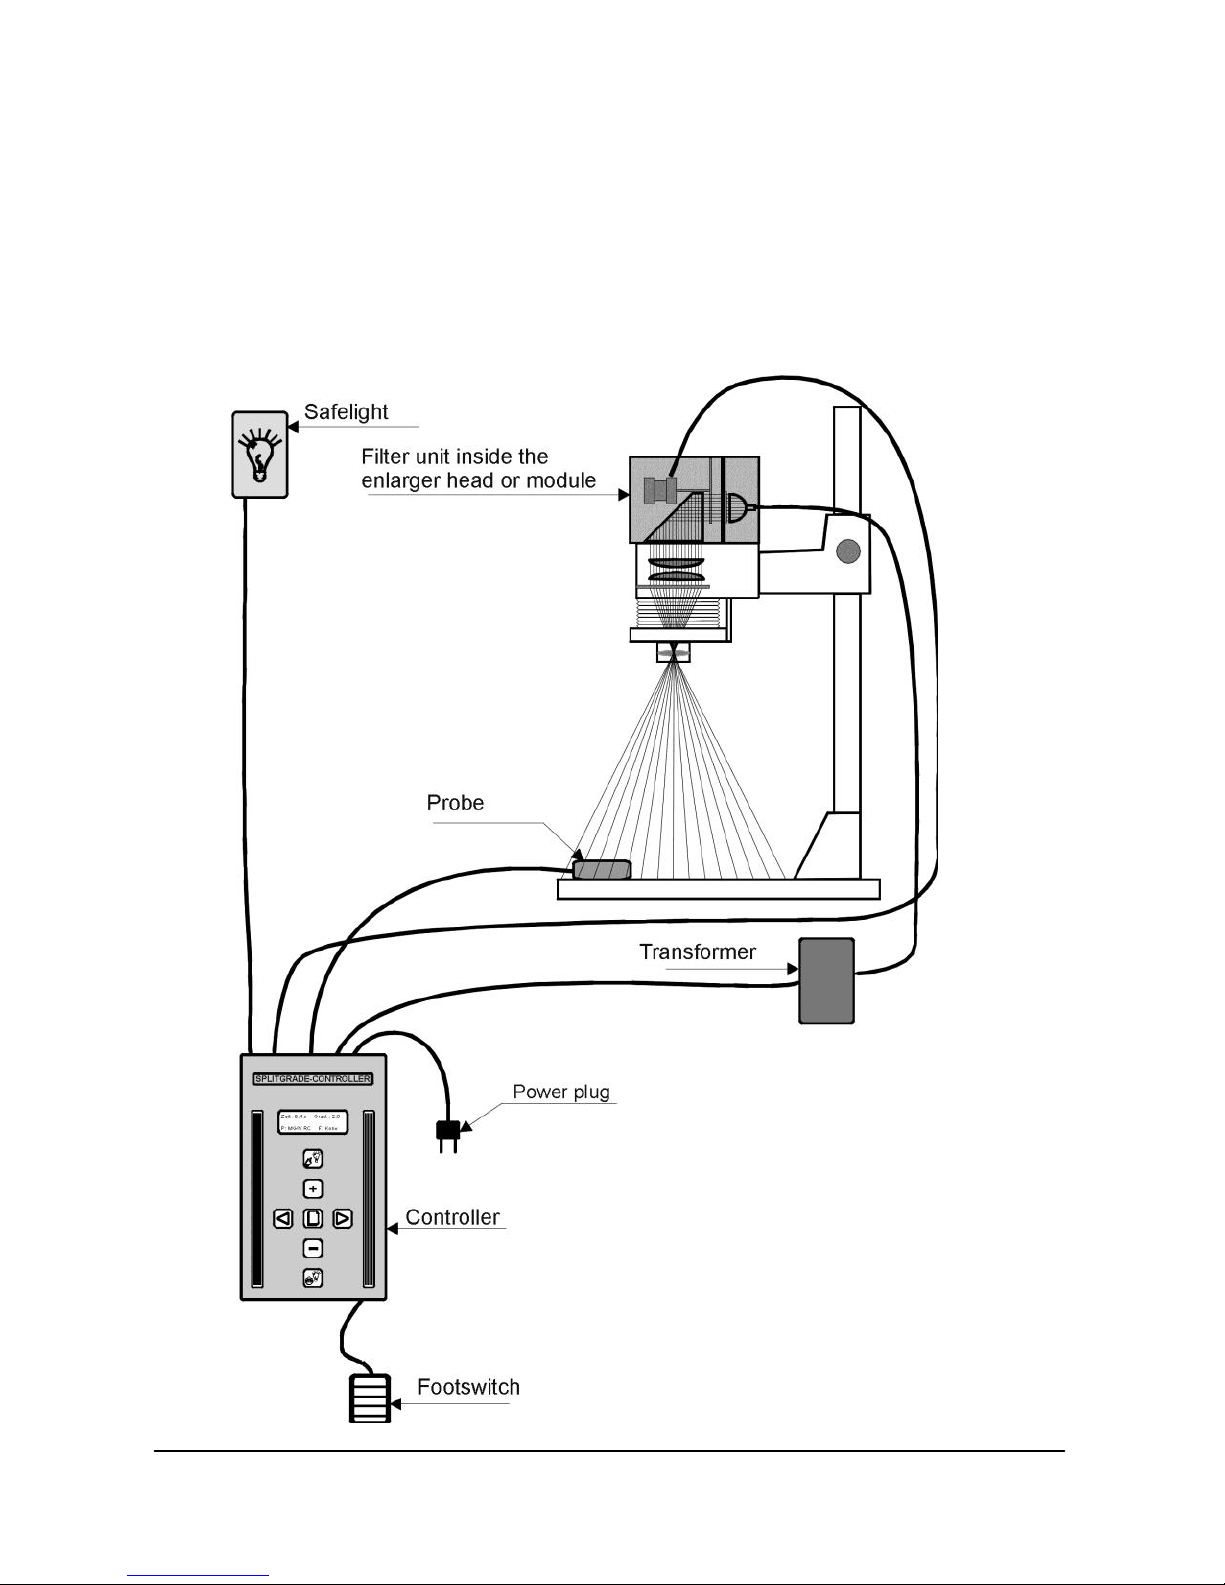
SCHEMATIC VIEW OF THE COMPLETE SPLITGRADE
SYSTEM
Page 5

SPLITGRADE USER’S MANUAL V3.4 5
THE PRODUCT
Copyright
All programs stored in the controller as well as this manual are protected by
copyright. The copyright belongs to Heiland electronic GmbH, Wetzlar,
Germany with all rights reserved.
Under the copyright laws no part of the programs and no parts of this
manual may be reproduced in any form without the prior written permission
of Heiland electronic GmbH, Wetzlar, Germany.
Warranty
This instrument carries the manufacturer's warranty for the period of two
years from the date of purchase. Proof of purchase is the invoice or receipt.
Damage caused by improper handling or unauthorised access invalidates
the guarantee. No warranty either expressed or implied is made of this
instrument regarding its quality, performance, suitability or fitness for a
particular purpose.
The manufacturer is not liable for direct, indirect, special, incidental or
consequential damages arising of the use or inability to use this instrument
or documentation even if advised of the possibility of such damages. In
particular the manufacturer assumes no liability for any material including
negatives or photographs used with this instrument including whatever costs
of repairing, replacing or recovering such materials.
This instrument has been carefully manufactured and tested using flawless
materials and state-of-the-art technology. In case of failure return the
instrument to an authorised service agent accompanied by proof of
purchase. Within the warranty period, the manufacturer assumes the cost of
replacement parts and repair. The manufacturer reserves the right to replace
the instrument in lieu of repairing at its discretion.
Valid for software rev. 3.4
May, 10th 2018, Changes without notice.
Page 6

6
Technical Specifications of the control unit
Measuring probe light sensor for intensity and contrast measurement
resulting in a suggestion for exposure time and
paper grade. Acoustic support by beeper and LED,
diameter of reading point: ø3mm
Exposure control built-in exposure timer and light shutter
Measuring range 0.01- 10 lx (10 f-stops)
Exposure time range 0.5 - 500 sec,
Resolution 0.01 sec
Time error <0.5%, repeatability error <0.1%
Gradation input automatic in 0.1 steps, after reading of the contrast
Manual grade setting in 0.1 steps with automatic density control
Manual time setting in1/10f-stops or 0.1 sec steps with constant grade
Grad table factory adjusted for up to 28 papers of main brands
and 6 films. Updates free of cost via our website.
Interfaces light sensor, foot switch, RS232, USB
Display illuminated LCD display with 4 lines
Voltage supply 100V … 240 V / 50…60 Hz
Dimensions (WxLxH) 160mm x 260mm x 80mm (Version 1...3)
120mm x 210mm x 70mm (Version 4)
Weight approx. 1kg without accessories
Delivery content controller, probe, footswitch, connecting cables,
optional filter module or LED light source
Fuse 4A time lag
Page 7

SPLITGRADE USER’S MANUAL V3.4 7
Factory calibrated paper types
Paper type Display Developer Dilution/Time
ADOX MCP 310 RC AD MCP310 MOERSCH Eco 1+9 / 75 s
ADOX Variotone FB AD VARIOT MOERSCH Eco 1+14/180 s
ADOX MCC FB AD MCC MOERSCH Eco 1+14/150 s
BERGGER Prestige Variable CB BE PRVACB MOERSCH Eco 1+14/180 s
FOMA Variant III RC FM III RC CALBE N113 1+0 / 60 s
FOMA Variant 311 RC FM V311RC MOERSCH SE4 1+9 / 60 s
FOMABROM Variant 111 FB FM B111FB CALBE N113 1+0 / 120 s
FOMATONE MG Classic 131 FB FM C131FB CALBE N113 1+0 / 120 s
ILFORD Multigrade IV RC IL MGIVRC ILFORD Multigrade 1+9 / 60 s
ILFORD Multigrade RC Warmtone IL MGRCWT ILFORD Multigrade 1+9 / 60 s
ILFORD Multigrade RC Cooltone IL MGRCCT ILFORD Multigrade 1+9 / 60 s
ILFORD Multigrade Classic IL CLASS ILFORD Multigrade 1+9/ 120 s
ILFORD Multigrade Art 300 IL ART300 MOERSCH Eco 1+14/180 s
ILFORD Multigrade FB Warmtone IL MGFBWT ILFORD Multigrade 1+9 / 120 s
ILFORD Multigrade FB Cooltone IL MGFBCT ILFORD Multigrade 1+9 / 120 s
KENTMERE VC Select KE SE RC KE VC Select Plus 1+9 / 100 s
KENTMERE Fineprint VC FB (2012) KE FP FB KE VC Select Plus 1+9 / 100 s
ROLLEI Vintage 311 RC RO VIN311 MOERSCH SE4 1+9 / 60 s
TETENAL Vario RC TT VariRC MOERSCH Eco 1+14 / 60 s
TETENAL Baryt Vario FB TT BA VA MOERSCH Eco 1+14 / 90 s
TETENAL Work * use setting AGFA MCP RC
Other papers** Others
Paper of fixed gradation*** Fixed (Exposure with white light)
Further calibration sets for papers which are no longer under production may be
installed while doing a software upgrade. This refers to brands of AGFA, AMALOCO,
BERGGER, FORTE, FOTO IMPEX, MOERSCH, ORIENTAL, TETENAL, ZONE VI.
* These papers have not been calibrated, but the mentioned settings may be
used with good results.
** Three channels may be used to adapt other papers. Factory setting is
made for low, normal and high sensitive paper. Calibration is done with
general corrections (see page 22)
*** Exposure with white light, time and grade measurement is possible.
There is no certain paper defined, the user adapts his favoured paper by
offset values to the Splitgrade setting.
Please note: All factory settings assume fresh chemistry and paper as well
as 20°C developer temperature!
Page 8

8
Factory calibrated film types
Film type Display*
Conventional Silver halide film Conv.
ILFORD „XP2“ * XP 2
ILFORD „XP2 Super“ * XP2 S
KODAK „T400CN“ * T400C
KODAK „Portra“ * Portr
KONICA „VX400“ * VX400
Silver halide film developed with Moersch Finol ** Finol
Silver halide film developed with Moersch Tanol ** Tanol
Silver halide film developed with Pyrogallol ** Pyro.
Notes:
* When a chromogenic B&W film is selected, an additional symbol will be
displayed for the film speed selected during the exposure:
+ indicates 50 - 100 ASA
N indicates 200 - 400 ASA
- indicates 800 - 1000 ASA
** If you use developers giving a stain to the film, you may add additional
offsets to compensate the stain. This is done independent of the paper offset
values. For details please refer to page 22.
Contents of the delivery
If any of the following items are missing or damaged, please contact your
supplier immediately.
The SPLITGRADE controller, used to analyse the measured values,
calculate the appropriate paper grade and exposure time and to control
various filter modules or LED cold light sources.
The light sensor (probe) to scan the projected picture.
A footswitch to start or stop the exposure.
Cable set to connect the controller, enlarger and darkroom safe light
Optional: An enlarger module with the motor-driven filter wheel or a LED
cold light source with a power supply.
Note: We recommend to keep the packaging of the instrument in case of the
need for further shipment.
Page 9

SPLITGRADE USER’S MANUAL V3.4 9
Features
SPLITGRADE is an electronic instrument intended to control the exposures
and the contrast range of variable contrast papers (VC) during enlarging.
By printing the picture in two steps using maximum filter setting for
yellow and magenta, print results are greatly improved.
The contrast range of variable contrast papers will be perfectly matched
to the given contrast range of the negative.
The characteristics of various variable contrast papers from AGFA,
AMALOCO, BERGGER, FORTE, FOMA, ILFORD, KENTMERE,
KODAK, MOERSCH,TETENAL and ORIENTAL are already stored in
the SPLITGRADE controller unit or could be added to the basic
calibration set.
The composition and evaluation of the picture takes place under white
light.
The exposure time and the grade are calculated after a scan of the pro-
jected negative. The scan is supported by acoustic and optical signals.
The darkest and the brightest spot detected determine the result.
The exposure time and paper grade are automatically adapted, also if
another paper type is selected after measurement.
At any time the user might override the calculated values or just set the
exposure time and paper grade without using the probe.
Without an automatic filter module or light source, SPLITGRADE can be
used as a high quality B&W analyser and exposure meter.
The focus light will be automatically switched OFF after 5 minutes.
The firmware is easily updated by a free download from our homepage.
To do so, you need a PC with Windows, OS X or Linux operating
system. If you own an older controller (serial no. starts with 02... or 03...
you will need an additional USB-Serial converter to connect the serial
interface of the controller to an USB port of the computer.
SPLITGRADE is the comprehension of our practical experience
acquired for more than 25 years
Conclusion
The usage of the SPLITGRADE system enables the production of high
quality prints and fine art prints, with a speed and comfort never reached
before by any other system.
As this printing system greatly improves printing efficiency, while saving
time, chemistry and paper, every photographer will have much more time for
creative printing.
Page 10

10
OPERATION CONDITIONS
Safety advice
This instruction manual should be read prior to installation and first use.
The SPLITGRADE controller and module contained in this package are
intended to operate only with the appropriate enlarger. The type of enlarger
is specified on the front label of the package.
To prevent electric shock or fire hazard, remove the power cord from the AC
supply prior to connecting or disconnecting any signal lead or prior to
replacing the fuse.
If one of the AC cables becomes damaged, refer servicing only to qualified
personnel.
Should any liquid drop into the SPLITGRADE controller or modules,
disconnect immediate the control unit from mains and have it checked by
qualified personnel before operating it again.
Unplug the SPLITGRADE controller from the voltage supply, if it is not going
to be used for several days or more. To disconnect the supply cable, pull it
by the plug. Never pull the cord itself, otherwise the cable will be damaged.
Make sure that the mains voltage and frequency are in the range indicated
on the identification label on the bottom of the instrument.
This instrument should only be connected to a properly installed voltage
supply outlet that has been properly grounded to earth.
It is not permitted to exchange the power cables for any other without
protected ground / earth wire and safety plug.
Always keep the instrument in a dry place and never immerse it in any kind
of liquid.
To prevent electric shock do not open. There are no user-serviceable parts
inside.
To avoid fire hazard, use only a fuse of the correct type, voltage and current
rating as specified in technical data (see page 6).
INSTALLING THE FILTER MODULE AND CONTROLLER
All filter modules or enlarger heads, supplied together with SPLITGRADE,
are compatible to those of the enlarger manufacturer. Please refer to the
user manual of the enlarger regarding the installation of the module or head.
Do not install the set in a hot or humid place or in a place subject to
excessive dust. Take care that there is enough working space around the
controller to operate it safely in the dark.
Page 11
SPLITGRADE USER’S MANUAL V3.4 11
Connecting the system
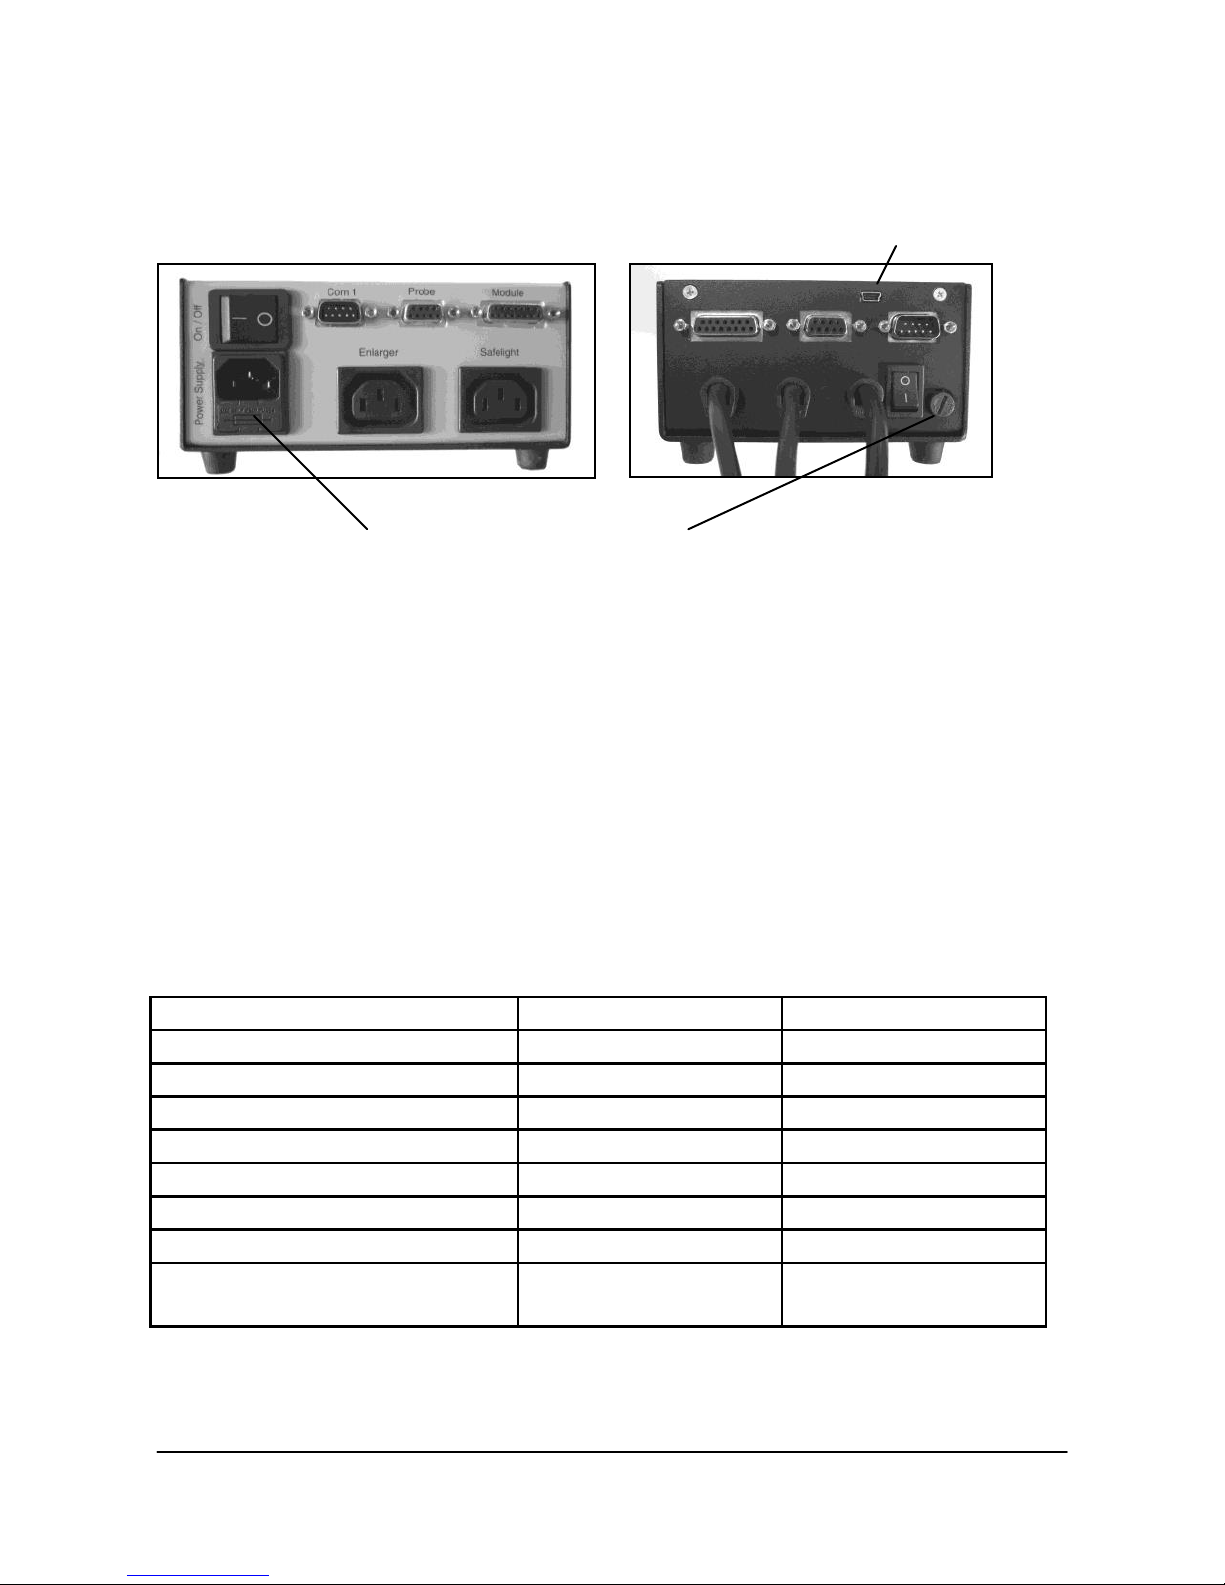
Fig. 2: Rear view of the SPLITGRADE Controller unit
Version 1...3 Version 4 USB
The controller can be used at voltages according to the id label located at
the bottom of the unit.
All connectors, the main switch and fuse are located at the rear side
connector panel (see Fig. 2).
First, connect all components to the controller like filter module or filter head,
the enlarger and the darkroom safelight. Secure the signal cables by
fastening the screws carefully. Please do not apply brute force.
Finally connect the SPLITGRADE Controller to the main voltage supply.
If a motorised filter module is connected, the filters will be moved to an initial
position after switching ON. The rotation of the motor may be audible.
Component
Cable/Plug
Label at Controller
Filter module
15-pin female
Module
Probe
9-pin female
Probe
Splitgrade Comfort
9-pin male
Com 1
Power plug of enlarger
Adapter cable
Enlarger
Darkroom safelight
Adapter cable
Safelight
Main Voltage Supply
Power cable
Power Supply
Foot switch
Jack plug 2.5mm
Foot Switch
PC (only for software update)
9-pin male (Ver 1..3)
USB (Ver. 4)
Com 1
Table 1: Connections
Fuse 4A time lag
Page 12
12
USING THE CONTROLLER
Description of the push-buttons
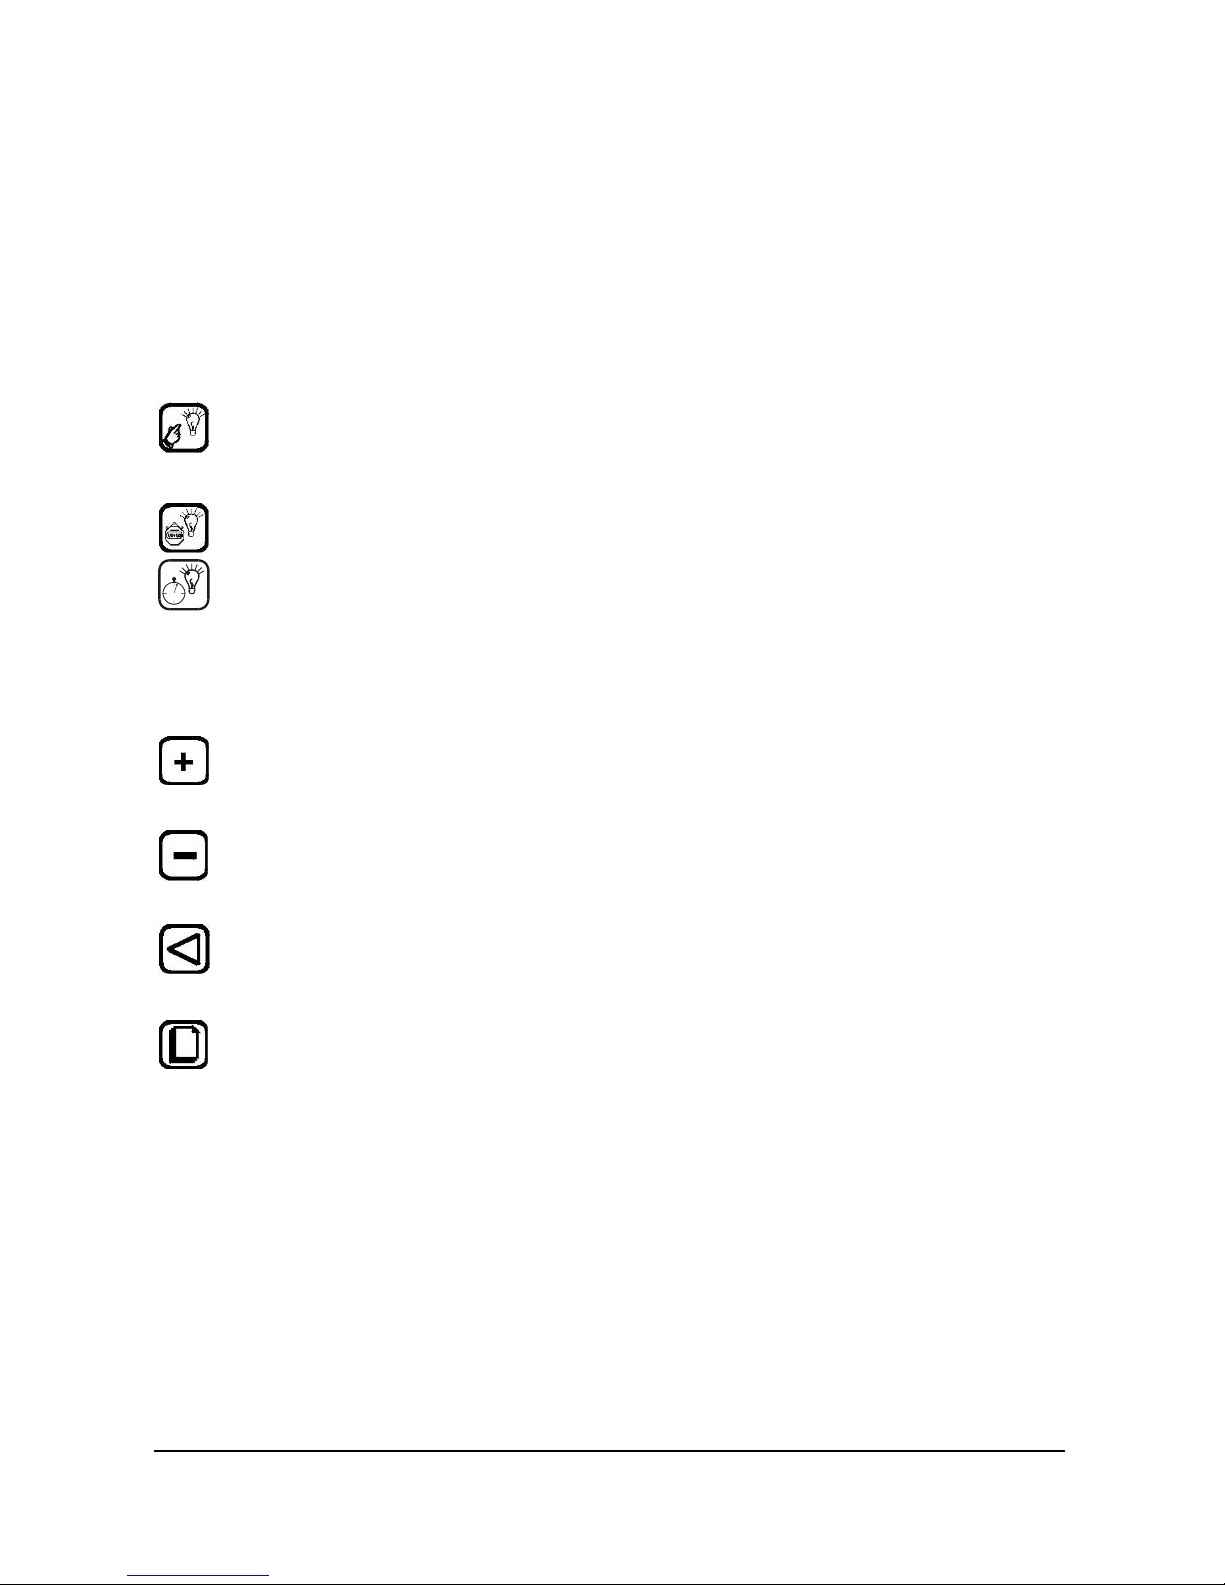
The functions are controlled by push-buttons, the buttons marked by * have
an auto repeat function.
One short press changes the value in one step, a longer press will result in a
repeated change of the value.
Focus, ON/OFF switches the enlarger light on/off,
for setting the enlarger and scanning the picture with the probe.
Start/Stop, starts (or stops) the exposure time shown in the display.
The remaining time is still stored and can be recalled by pressing the
start button again. If during exposure any button other than the start
button is pressed, the exposure will stop and the time will be
cancelled. Splitgrade controllers of the first generation are using the
upper symbol, those of the second generation the second symbol.
Plus,* increases the value marked by the cursor by one step or
alters the function.
Minus,* reduces the value marked by the cursor by one step or
changes the function.
Cursor, moves the cursor in the direction of the arrow or to the next
line.
Page, switches between the pages of the LCD display.
Foot switch, starts (or stop) the exposure.
Probe switch, starts and stops the density measurement
Display
All data important for the working of the system are shown in the 4-lines
display. The contrast is adjusted by turning a screw (potentiometer), which is
accessible through a tiny hole at the left rear side of the controller.
Page 13
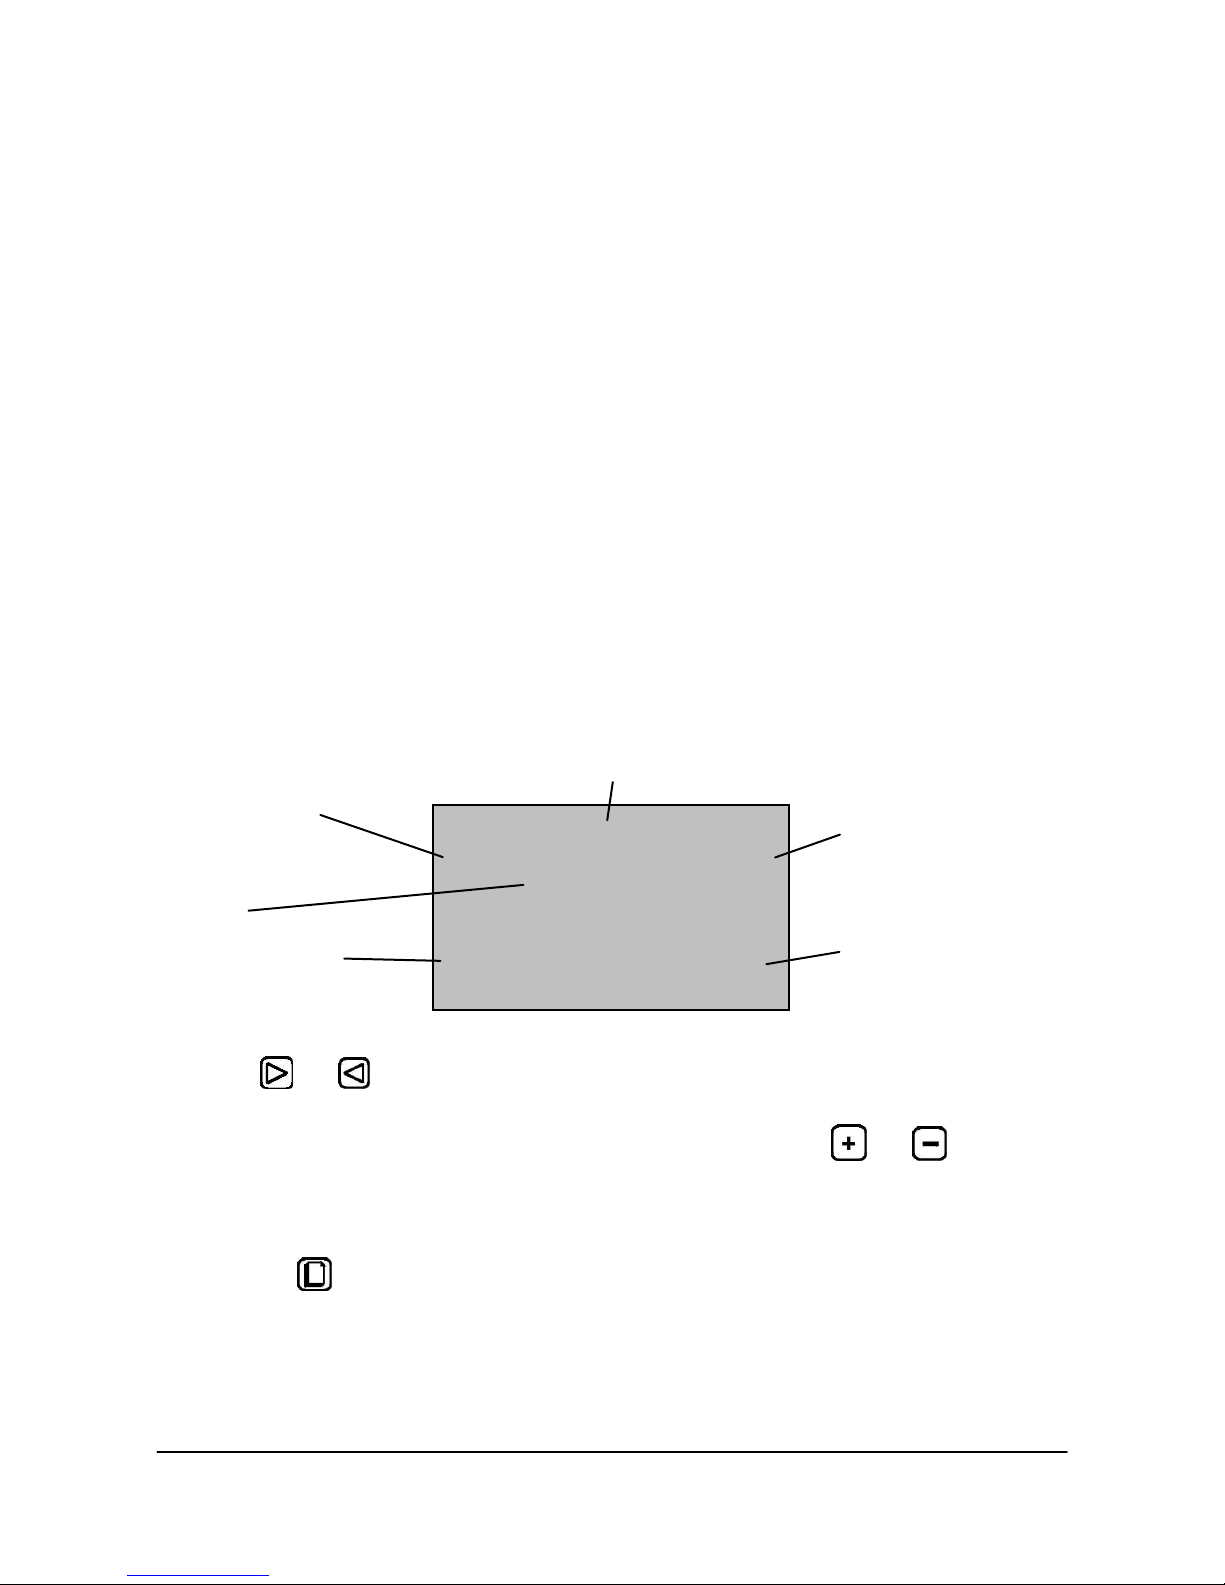
SPLITGRADE USER’S MANUAL V3.4 13
Temp.: 0.0f / 0.0G
Time: 5.40 s Grad: 2.0
P: IL MGIVRC F: Conv.
THE QUICK PATH TO HIGH QUALITY PRINTS
In order to profit from the SPLITGRADE system very quickly, please proceed
as follows:
Preparation
Connect the controller following the safety advice on page 10.
Use a paper and matching chemistry as indicated on page 7 of this
manual using only fresh paper and chemistry.
Do not use old paper or used chemistry.
Switch on the controller.
If the filter module and the probe are connected properly, the controller
displays the following information for a short while:
1. Software release
2. Type of enlarger
Next after the display will look similar like that:
After power on: Offset values KY and KM of filter module
After first key is pressed: Temporary offsets by the user
If you like to change the paper type, move the cursor to P: by pressing
the or button.
Start the selection of the paper type by pressing the or
button. Each time you press the button, another paper brand will
appear. Continue pressing or simply hold the “+” or “-“ button until your
preferred paper is displayed. Accept the selection by pressing the
button .
If necessary, move the cursor to “F”: and change the type of film the
same way.
Paper grade for the
print in the range of
00.0 to 5.0
Selected film type
e.g. Conventional
Exposure time
in seconds
Cursor
Selected paper
e.g. ILFORD
Page 14
14
Printing
Put the negative into the negative carrier.
Switch on focus light by pressing the button
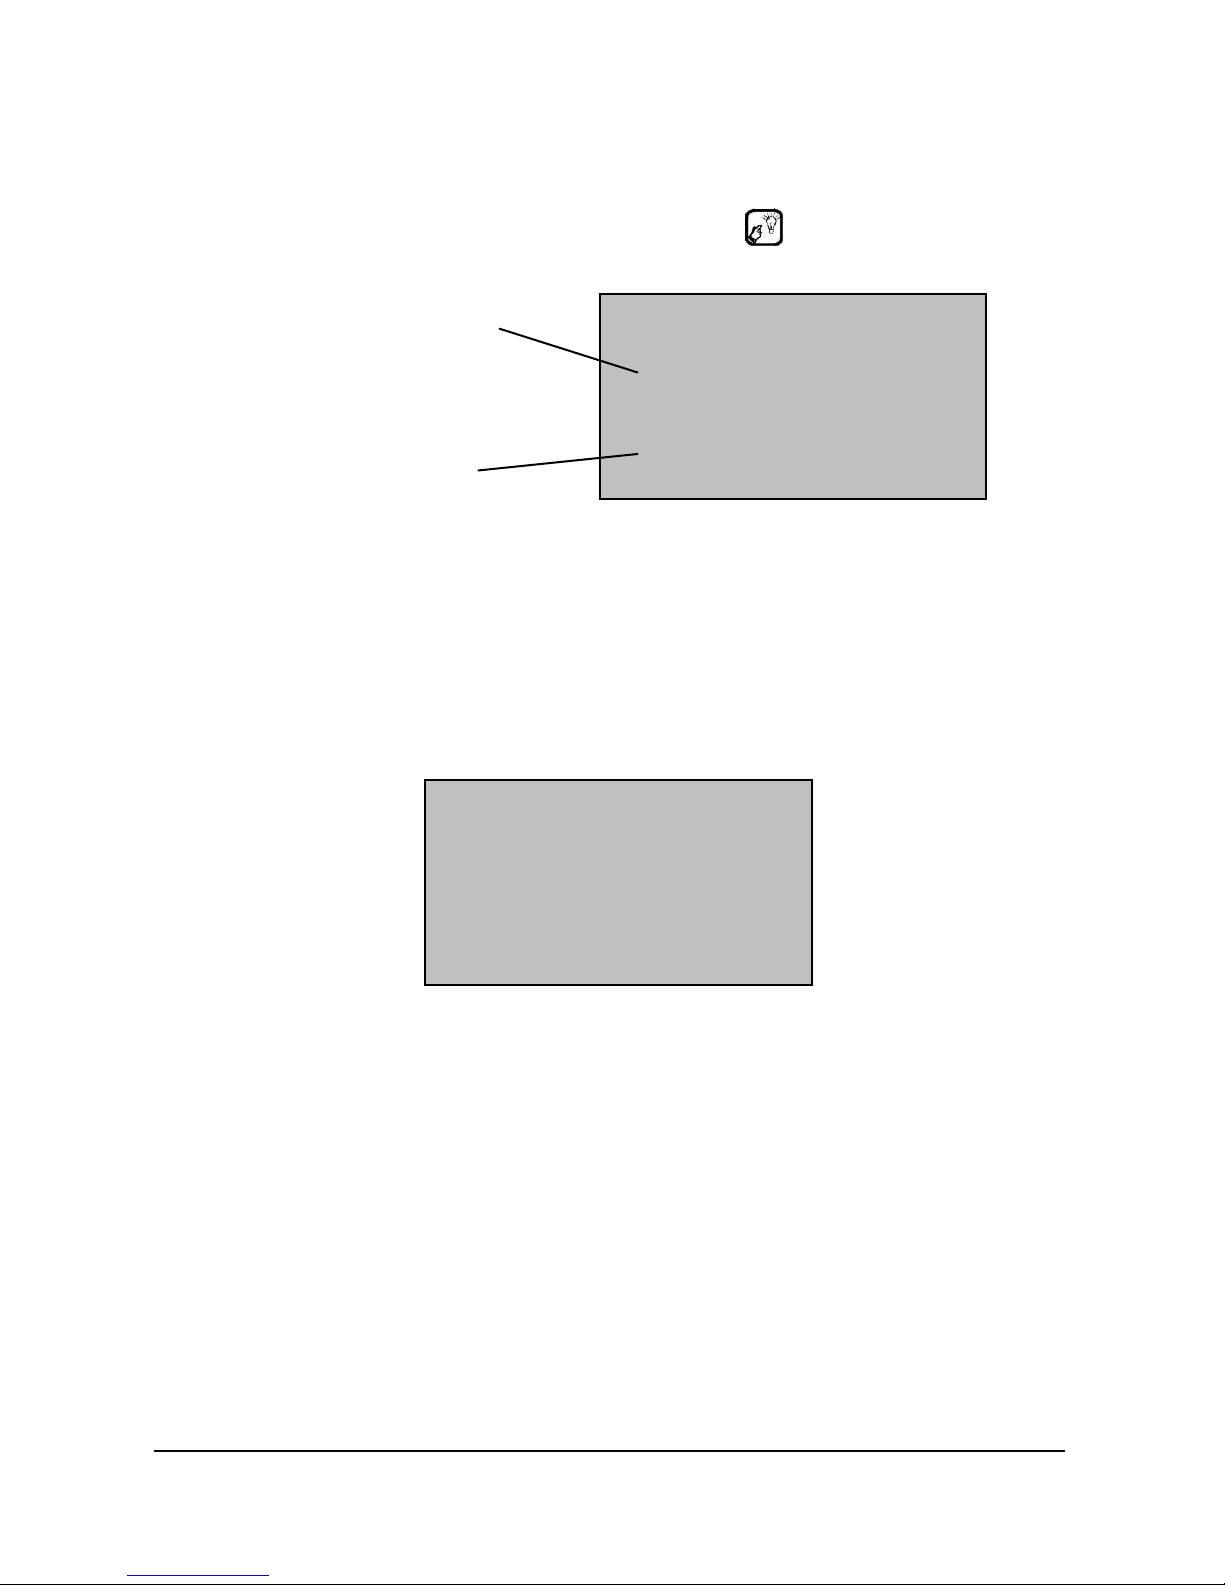
The following display appears:
Set up the magnification and focus the image. Then stop down the f-
stop of the enlarger lens.
Measurement is always done at working f-stop.
Place the probe into any part of the projected image, taking care that
the green window on top of the photo sensor is not covered.
Start the measuring procedure by briefly pressing the red button on the
probe, An intermittent signal sounds and you will have the following
display:
Move the probe over the projected image while looking for the darkest
and the brightest areas until the signal stops. Maximum probe
movement velocity is 5cm/sec, which is similar to the movement of a
computer mouse. The displayed contrast will increase.
We recommend not to measure very small spots like lamps and candle
lights, as their contribution is not important for the overall impression of
the print but can falsify the measurement resulting in a too soft grade.
No sound for a longer time indicates that the scan is complete. To stop
the measurement, press the red button on the sensor again.
Indicates the selected
measurement mode
(refer to page 17)
The contrast of the
previous measured
negative
Focus active
Mode: continuous
Start density meas.
Previous contr: 0.00
Focus active
Mode: continuous
Density meas. active
Contrast: 0.01
Page 15
SPLITGRADE USER’S MANUAL V3.4 15
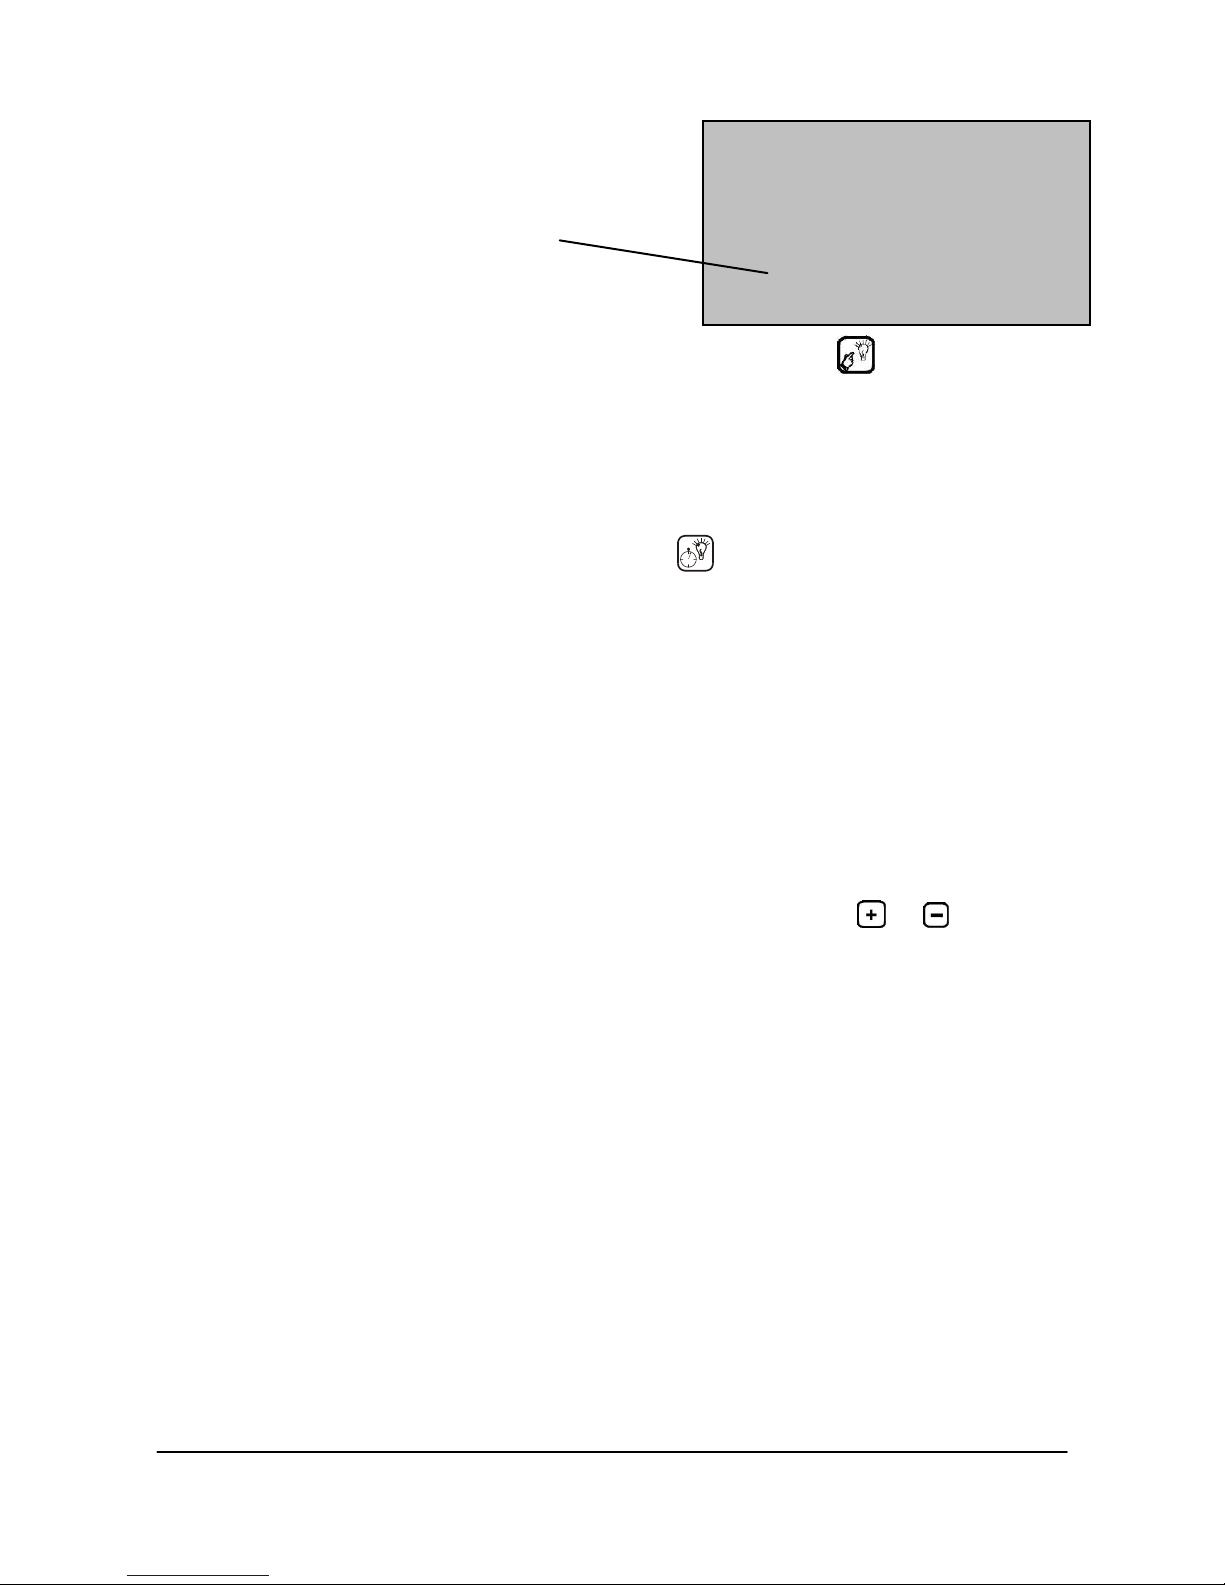
Measured contrast
(for example 1.05)
Focus active
Mode: continuous
Density meas. active
Contrast: 1.05
You will get a display similar like that:
Switch OFF the enlarger light by pressing the button .
The display shows the exposure time and the paper grade as calculated
by the controller for the selected paper and film type.
If the beeper sounds 3 times, please check the display and refer to the
detailed description in chapter "Warnings".
After a successful measurement put the paper on the enlarging easel
and start the exposure by pressing the button.
Process the paper.
Result
The lightest and darkest portions of the negative, which have been
measured, result in about 90% of the max. density and a light grey print
tone. This is what we call a technical correct print. It will satisfy your
requirements for a good start in most cases.
MANUAL CHANGES
To modify the print according to your taste in art, you may either change the
grade and or the exposure time temporary with the buttons or . The
modifications are displayed in the first line of the LCD, so you might return at
any time to the original values. A new measurement overrides the changes.
Changing the exposure time
Move the cursor to position Time: to make the print lighter or darker.
Factory setting affects changes in steps of1/10 f-stop, re calculating the
exposure time considering the reciprocity failure.
To change that default setting to a linear change in units of seconds please
refer to chapter ‘user preferences’.
Changing the grade
Move the cursor to position Grad: and modify the contrast in steps of 1/10
grade. The exposure time will be adjusted automatically to achieve constant
lights, mid grey or shadows – what ever you set in the user preferences.
Page 16
16
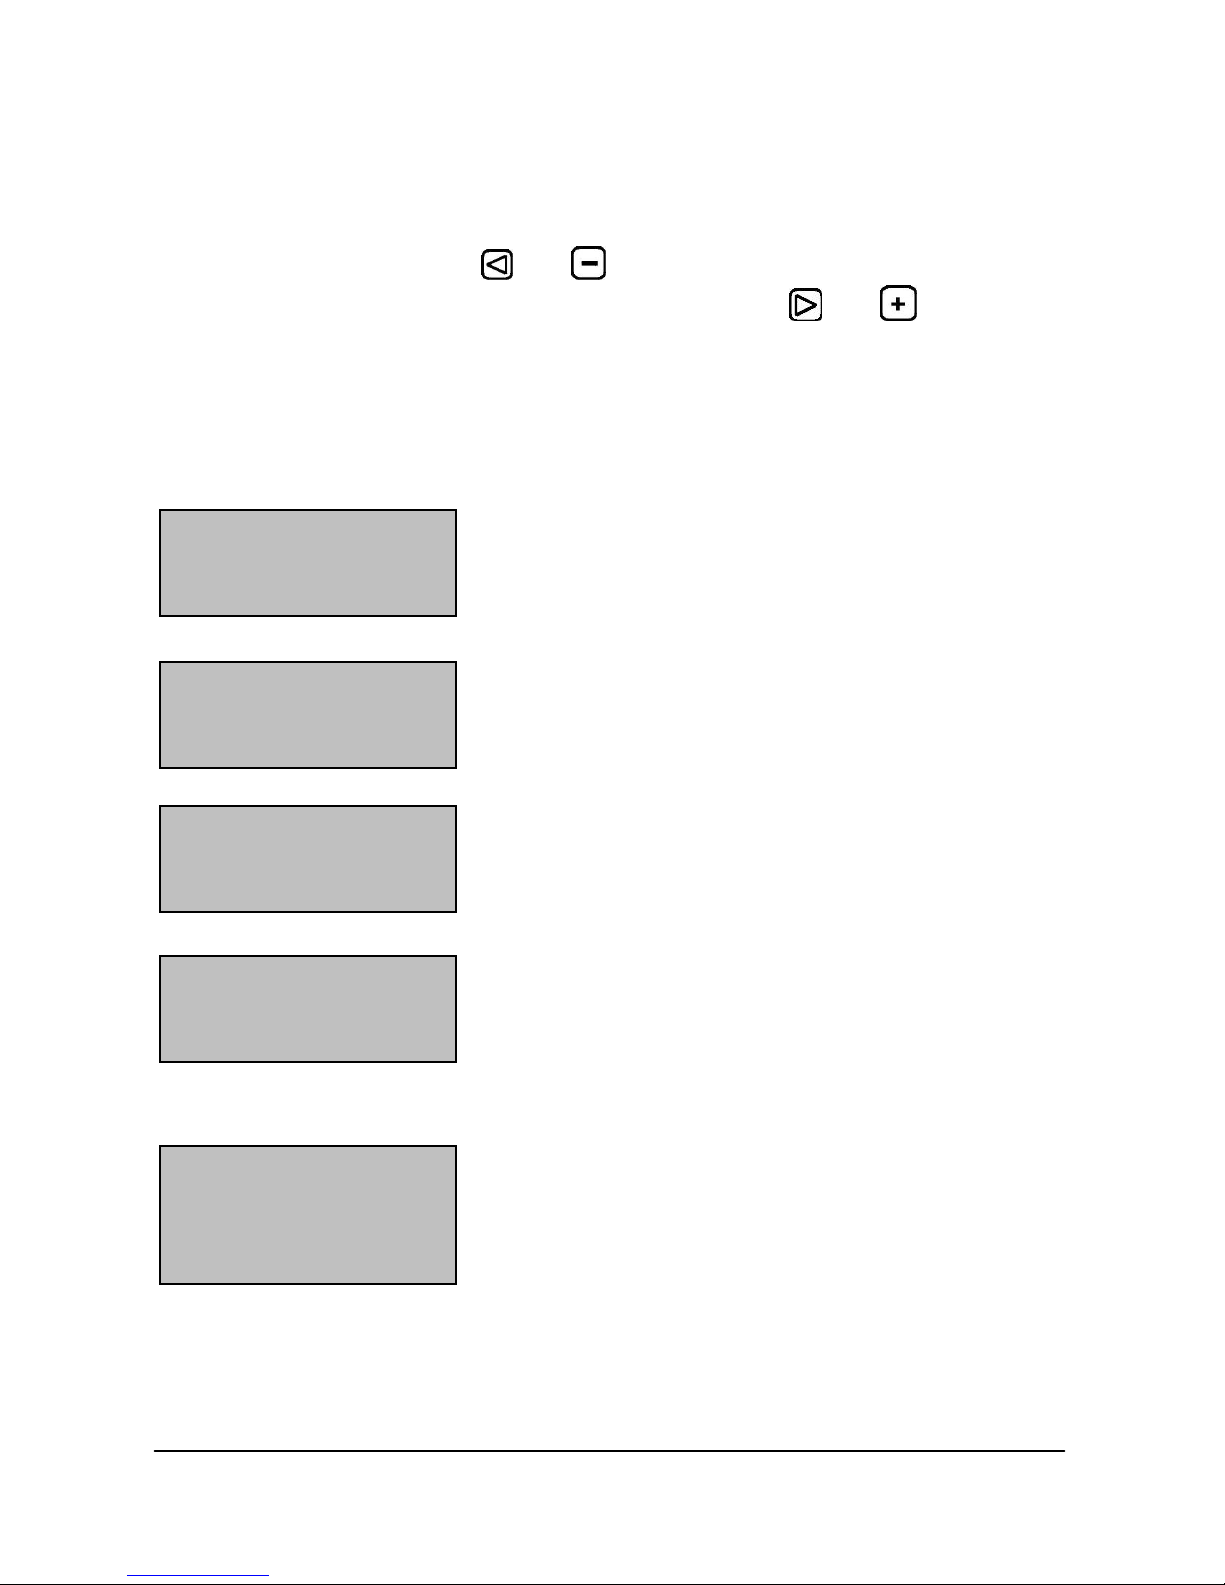
Too much light
Start meas. again
Too little light
Start meas. again
Time too long
Start meas. again
Time too short
Start meas. again
Check contrast
Fast selection of paper grade 00 or 5
For simple burn in procedures in the main menu place the cursor in Position
Grad.: Now you may fast change the paper grade to 00.0 by pressing
simultaneously the buttons and .
A value of 5.0 is selected by pressing simultaneously and .
WARNINGS DURING MEASUREMENT
Out of range failures during or after measuring will be announced by a 3
beep signal and displayed as follows:
The intensity is too bright for the light sensor.
Close f-stop and start measuring again
The intensity is too low for the sensor. Open the
f-stop and start measuring again
Calculated exposure time is too long, open the fstop and start measuring again
The exposure time is too short, close the f-stop
and start measuring again
The measured contrast is out of the ISO-R range
of the selected paper. If you proceed, the print
may loosen details, because the paper grade
could not get less 00 or more than 5.
Another reason might be, that you covered the
light sensor or you moved it outside the negative
(e.g. to the base plus fog area) while measuring. This results also in a large
contrast.
Page 17
SPLITGRADE USER’S MANUAL V3.4 17
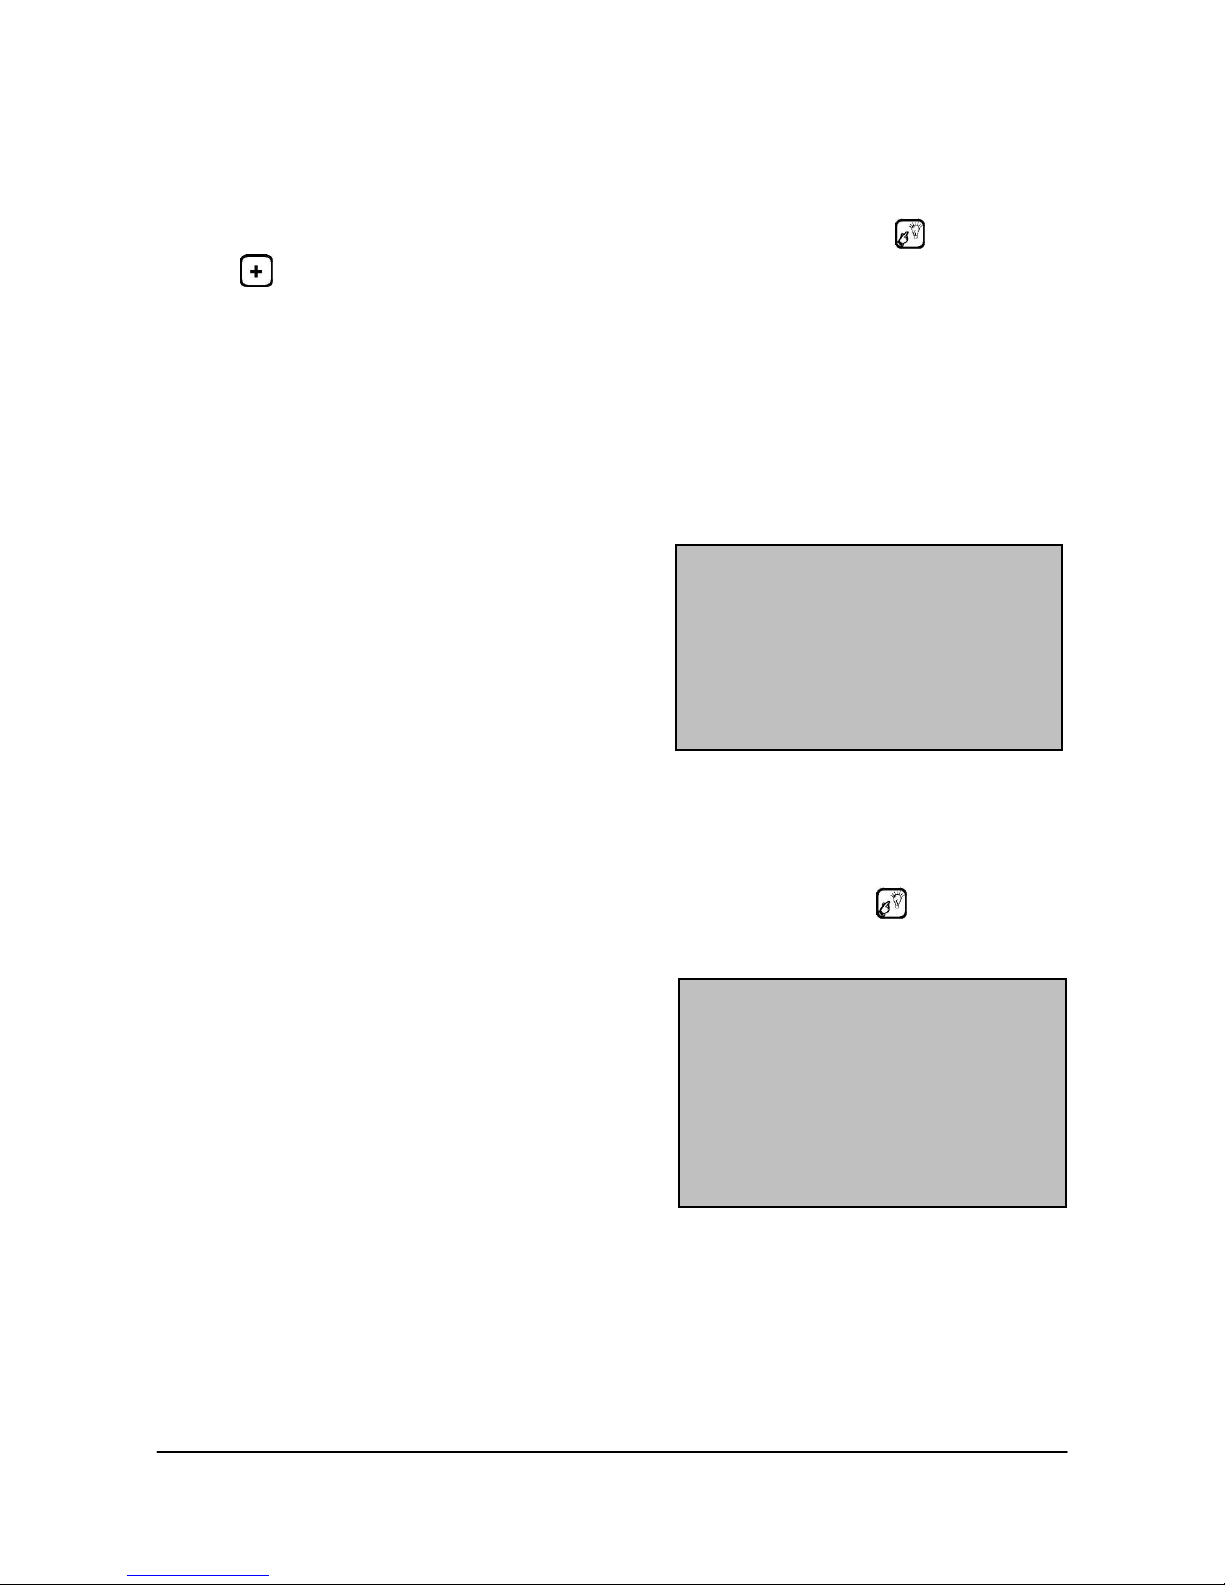
Focus active
Mode: Multipoint
Density: 0.01 logD
Contrast: 0.01 logD
Focus active
Mode: Time measurem.
Start density meas.
Value no.: 1
FURTHER MEASUREMENT MODES
To adapt the system best to your needs, there are two more modes
available. To select the proper mode switch on the Focus light , then press
button
Multipoint mode and density measurement
This mode enables a more individual scan, as the measurement is active
only when you press or hold the red button in the sensor. So you might
continue the measurement in a different area of the print.
First place the sensor at the lightest point of the negative with details, then
press the red button of the sensor for about half a second. You will get a
display like this:
The 3rd line displays the density in
reference to this first point, the last line
displays the contrast that is taken into
calculation for the paper grade. To check
the density of other areas in the negative
simply move the probe to these points
and read density in line 3. To consider the selected point for the paper grade
calculation, press the red button of the probe for a short while. You may also
measure larger areas while moving the probe and simultaneously holding
down the red button.
To calculate the exposure, release the red button and press .
Time measurement
If there is a lack of black and/or white
tones in the negative, you might select
time measurement. According to the
setting of the reference point (refer to
chapter ‘User preferences’) the system
calculates the exposure times to achieve
at the measured point(s) either
- lights with small details
- mid grey
- 90% maximum density selected
The paper grade is not modified by the measurement and might be preset
before or altered after the measurement.
Page 18

18
Suggestions for settings in special cases
Portraits
- Reference: Mid Grey
- Measurement mode: Time measurement
- Paper grade: Set manually
White egg on white plate
- Reference: Lights
- Measurement mode: Time measurement
- Paper grade: Set manually
Black dog on black coal
- Reference: Shadows
- Measurement mode: Time measurement
- Paper grade: Set manually
Same tone range for different enlargement scales
If you like to get the same tonal range for pictures of different magnification,
you should always select the same points while measuring.
If you clip a part of the negative and the darkest and the brightest points are
not situated in the area to be printed, please measure also outside the
baseboard to secure correct reference values for calculation of the paper
grade and the exposure time.
Page 19
SPLITGRADE USER’S MANUAL V3.4 19
BURN-IN FUNCTIONS
Your SPLITGRADE has a very useful burn-in function. It enables you to
store up to 7 independent burn-in times, thus building up an exposure
sequence together with the main exposure time. The main exposure is
automatically followed by the burn-in exposure.
Activation and Setting
To enter the menu with the burn in functions, press the key several times.
If the controller is in the main menu, you need to press that key only once.
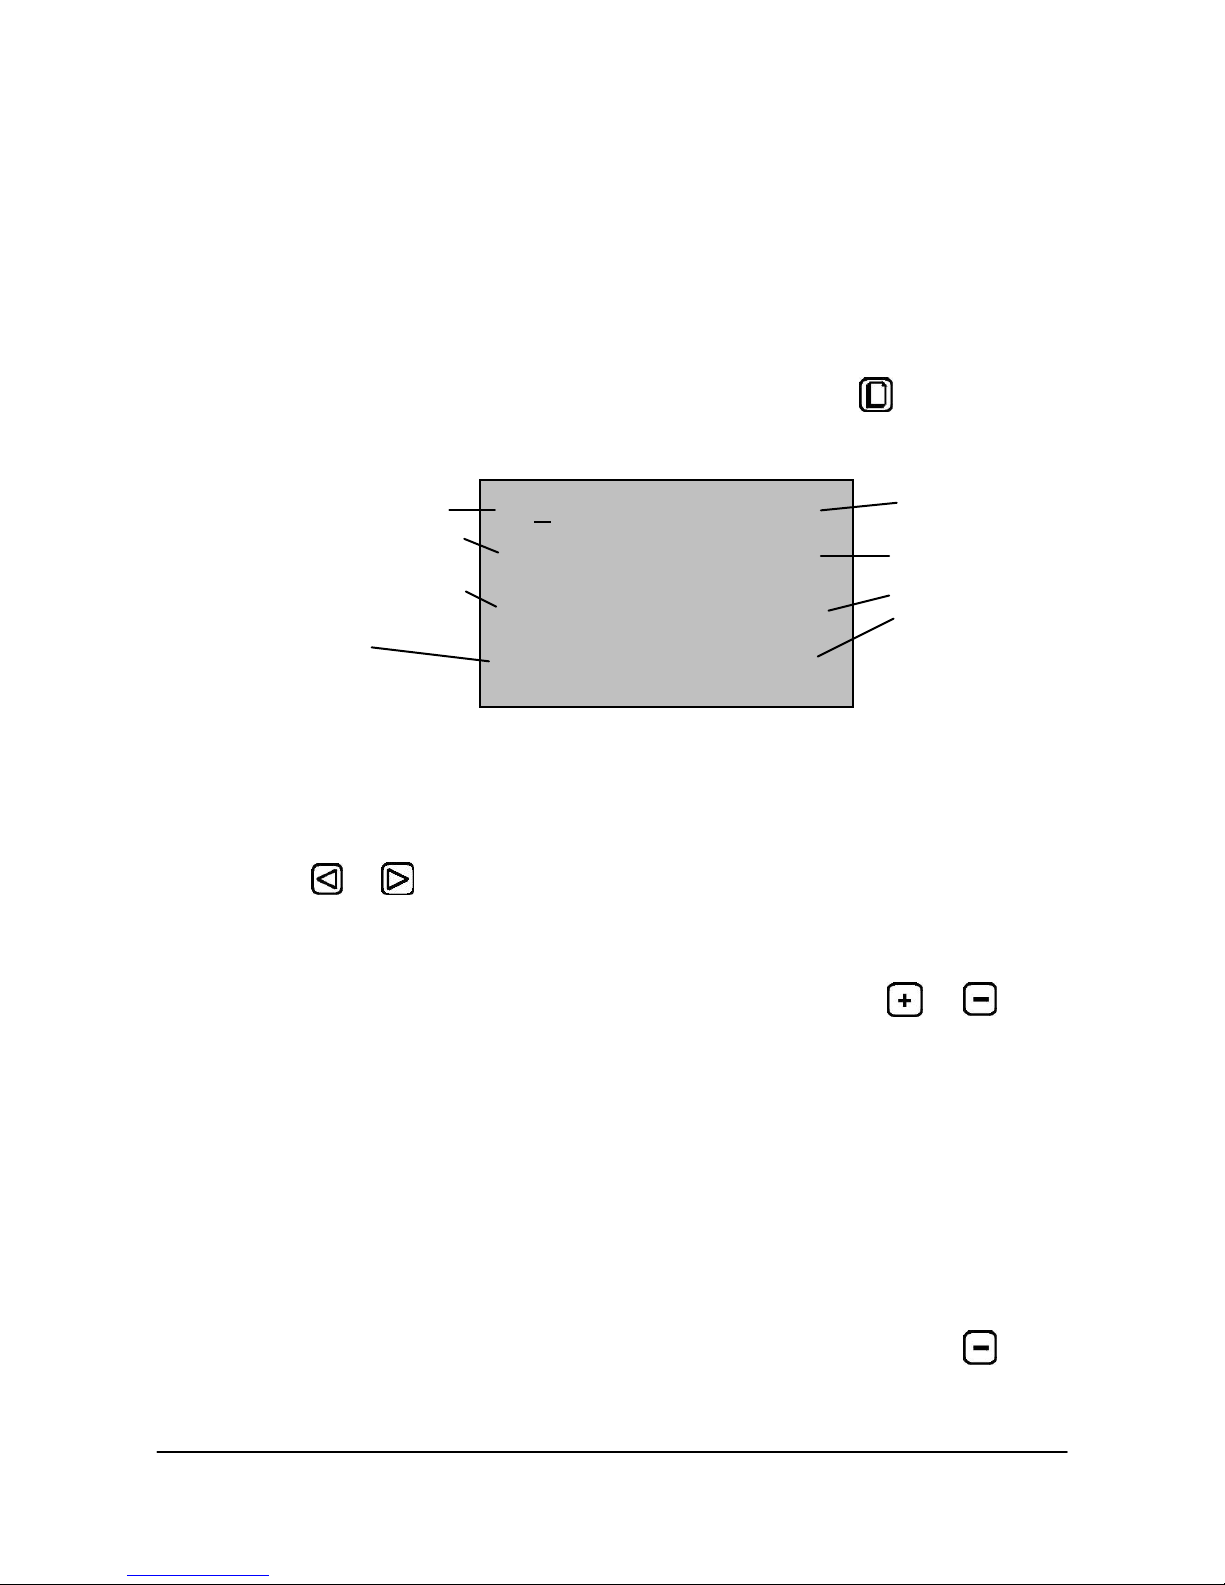
In line 1 (T0) the calculated (main) exposure time and grade are listed.
If you change these values, please pay attention to the fact that the time and
grade in menu 1 are also altered accordingly.
To select the time or grade of a burn in time move the cursor to the entry by
pressing the or button until the cursor appears in the desired position.
The display toggles automatically between Times 0 to 3 and 4 to 7 while
moving the cursor.
Altering the values of the time and grade is done by pressing or
By pressing both keys simultaneous, you alter the mode of the burn in time,
which is actually marked by the cursor. You may decide if the time should be
independent of the main exposure (in the above example T1 and T3) or
should be adapted to the main exposure in units of 1/10 f-stop (in the above
example T2). This feature could be selected for any of the burn in times. The
advantage of the adapted f-stop method is, that after a change of the
enlargement scale, you only have to measure the main exposure time again
and the whole burn in sequence is adapted to this new time.
If you have entered all the times and grades for a special sequence, set the
cursor to the first unused burn-in exposure time. Press and hold the
button in order to change this time to 0.00s or 0.0f-stop. This
signals the end of defining the exposure sequence to the controller.
T0: 5.40s G: 2.0
T1: 3.16s G: 5.0
T2: 3.37s 0.7f G: 00.0
T3: 2.05s G: ----
Grade of main exposure
e.g. grade 2.0
Grade of 1st BI e.g. 5
Grade of 2nd BI, e.g. 00
Grade of 3rd BI, e.g.
burn in with white light
Main exposure e.g. 5.4s
1st burn in (BI) e.g.3.16s
2nd BI, e.g. 0.7 f-stops of
main exposure, i.e. 0.7f of
5.4s=3.37s
3rd BI, e.g. 2.05s
Page 20
20
Exposing
Example: You like to use the main exposure and two additional burn-in times
as well. The values T0 and G0 are the main exposure, values T1 / G1 are
the first burn-in and T2 / G2 are the second burn-in time. Define these
values first. Then set T3 to 0.00s.
Go back to time T0, by using button . To start the exposure sequence
press the button. . After any exposure, the cursor moves on to the next
line and the according burn-in time can be started by pressing again.
The whole sequence is terminated after the last programmed (maximum 7)
exposure has been executed. Then the cursor moves back to time T0.
You may stop and continue an exposure by pressing the again,
or you can terminate the whole sequence at any time (also while exposing)
by pressing any other button.
Between the single steps of the sequence you may turn in the red (safe light)
filter in front of the lens and switch on the focus light in order to search for
areas that should be dodged. The focus mode will not terminate the
exposure/burn-in sequence.
All settings will be stored automatically when you leave the burn in menu.
Of course, you may also select only one of the burn in times and start this
time by pressing the button.
To quit the burn-in function, press the key until the main menu is
displayed.
Burn-in using white light
For any of the burn-in times 1-7, you may select white light for burn-in. To do
so, change the paper grade to 5.0 and press one more time or select
paper grade 00.0 and press
The display will then show “---“ to indicate the while light mode.
To cancel this setting, simply select another paper grade.
Page 21
SPLITGRADE USER’S MANUAL V3.4 21
USER PREFERENCES
You may change the settings of the controller according to your needs. The
actual setup will be stored when you leave the menu.
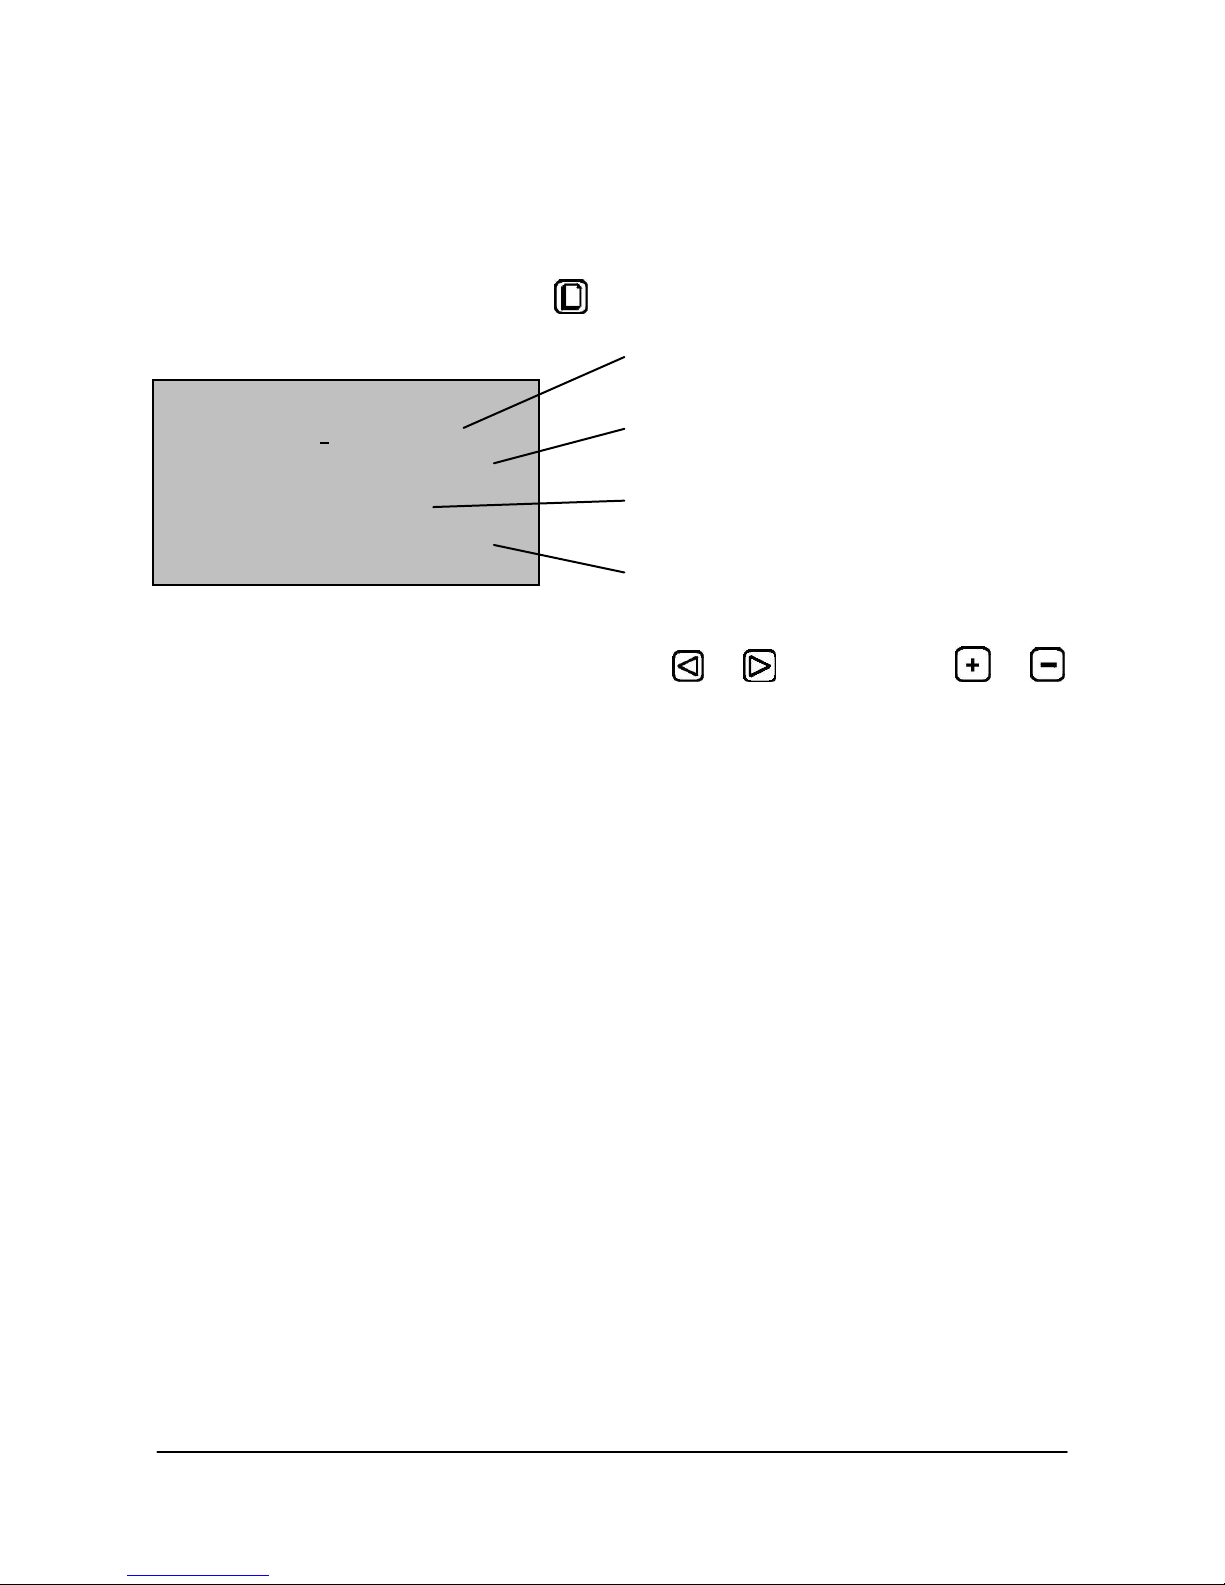
For modification press the button , until you get the following display :
To move the cursor to an entry please use or , while buttons or
change the setting
Reference point
Before changing the paper grade manually, you might determine which
tonal value should stay unchanged.
Shadows: The shadows will stay constant at about 90% Dmax (default)
Mid grey: The mid grey value (approx. zone V) will stay constant
Lights: The light portions of the print will be unchanged
Beeper
Metronome: While the exposure time is elapsing, a short signal is emitted
every second.
Filter change: 1 sec. before the filter changes a long signal is produced.
Off: No signal during the exposure time
Reference: Shadows
Beeper: Filterchange
Timebase: 1/10f
Filter: Yellow/Magenta
Selects the reference point for
manual changes of paper grade
Changes the beeper mode to Metronome, Filterchange or Off
Toggles the time base between 1/10
f-stops and units of one second
Changes the filter sequence from
Yellow/Magenta to Magenta/Yellow
Page 22
22
Offset Time: +0.0 f
Offset Grad: +0.0
Comp. Stain: +0.0 f
Comp. Stain +0.0G
Time base
Toggles the time base between 1/10 f-stop and units of a second. The
advantage of 1/10 f-stop is that changes are easier to evaluate when you are
thinking in density values. Moreover, changes are faster if the exposure time
is long. Changing the time in units of a second adapts the step size dynamic
to the exposure time and uses step sizes of 0.01 / 0.1 / 1 second, depending
on the absolute exposure time. A quick change of exposure time is possible,
by pressing and holding the + or – button. This mode is provided for
photographers, who do not like to work with 1/10 f-stops.
Filter
Alters the filter sequence. This is very helpful when you want to burn-in or
dodge the print .To change for example some areas in the picture during the
exposure with Yellow light it is advisable to choose the sequence
Magenta/Yellow. You thus can locate the area during the Magenta exposure
phase in order to manipulate this area immediately after the filter change.
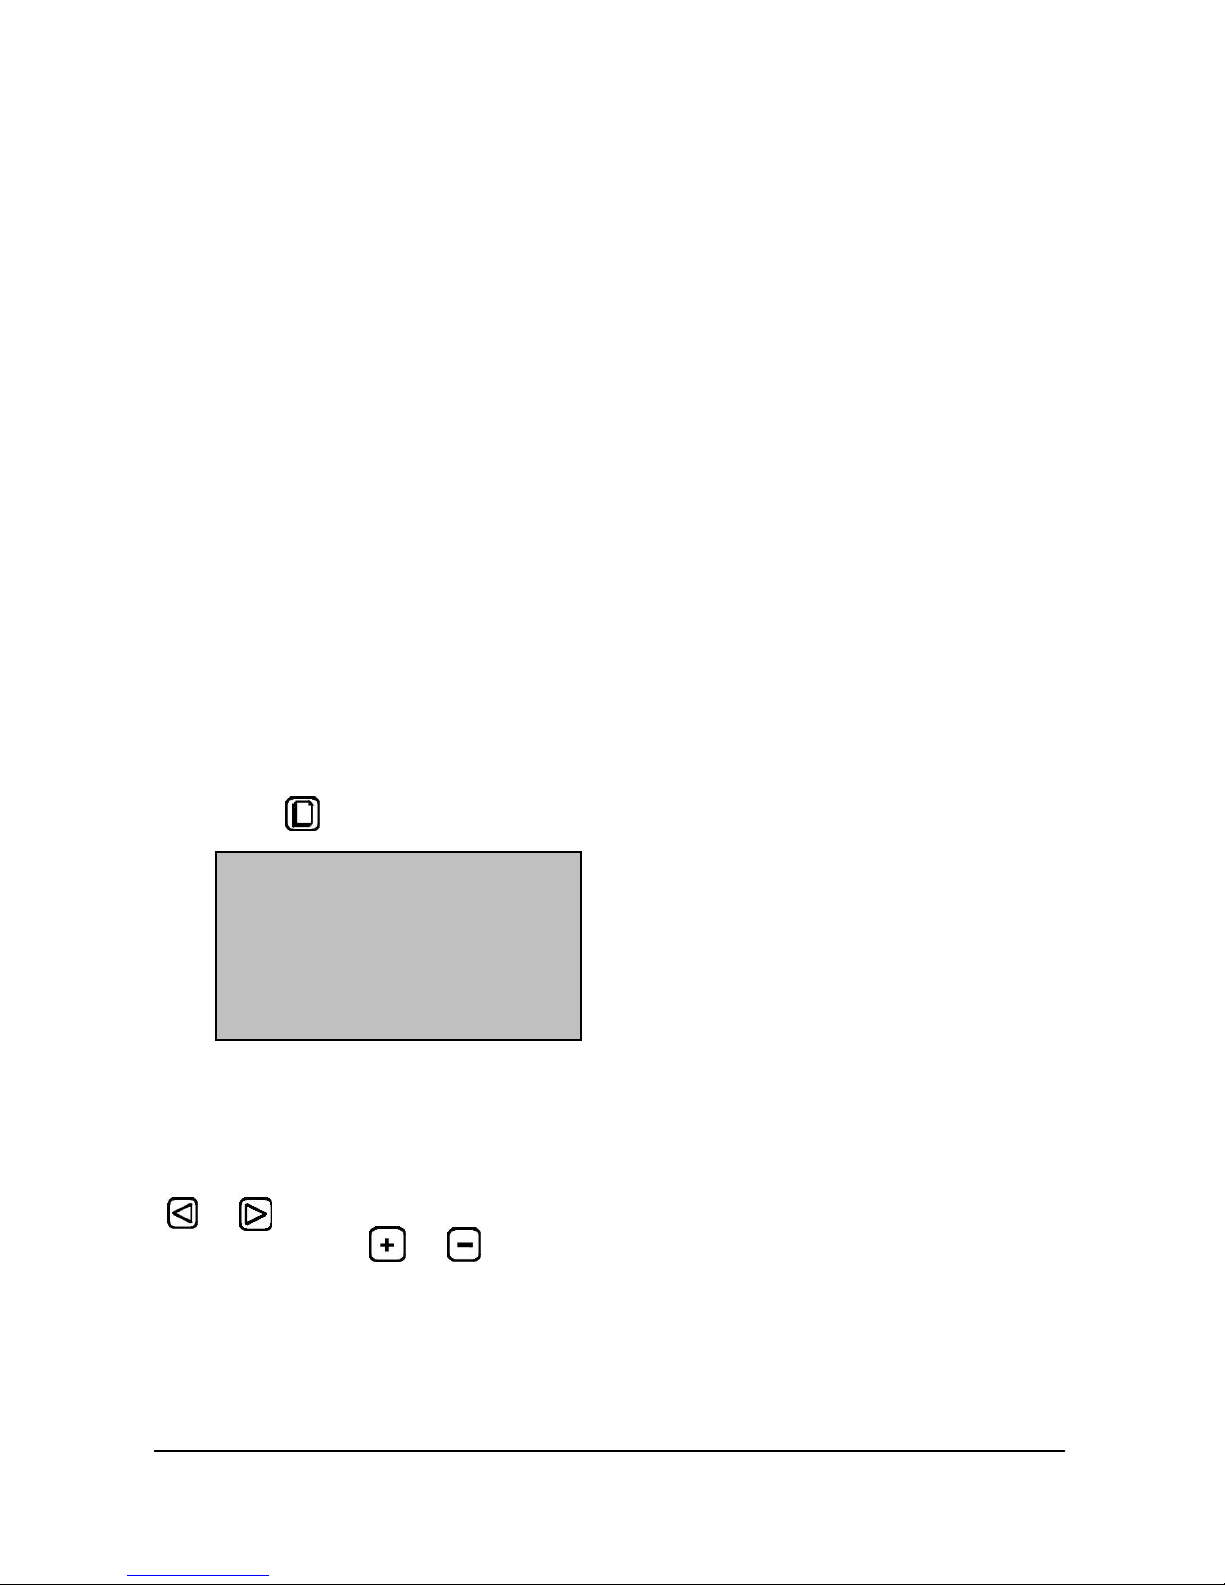
Permanent offsets for exposure
Press the button until you get the following display:
Exposure time
If, due to changes in the paper emulsion, your darkroom conditions, the kind
of images or your perception of your prints are generally looking too bright or
too dark, you may compensate this by adapting the exposure time. Press the
or
button until the cursor is at position: Offset Time.
Press the button or to change the exposure time in 1/10 f-stops. For
special applications like “Lith printing” the range of exposure time offset is +/4 f-stops. The setting for the grade is not affected by these changes.
Please note, that line 3 and
4 are displayed only when a
film developer causing stain
is selected in the main menu
Page 23
SPLITGRADE USER’S MANUAL V3.4 23
Paper grade
In case your prints are in general too hard or too soft, you may change the
grade setting.
Press the or the
button until the cursor is at position: Offset Grad.
Using the or the button you can change the setting in 0.1 grade
steps.
Films containing a stain
To compensate for the stain, you might increase the paper grade and the
exposure time. Just not to mix up these offset values with the paper specific
offsets, another two lines are displayed, when choosing 'Tanol', 'Finol' or
'Pyrogallol" developed films. The entered offset values are added to the
paper specific offset values, e.g. the total exposure time is calculated by
adding 'Offset Time' and 'Comp.Stain' to the measured exposure.
Please note:
All offsets are stored, when you leave the menu by pressing
For every paper separate offsets could be chosen. Resetting the values
to factory calibration is done by selecting 0.0.
By using these offsets, you can easily adapt Splitgrade to your personal
requirements or to modified paper processing.
Page 24

24
TEST STRIP MODES
To print a test strip, enter the menu by pressing the button several times.
SPLITGRADE offers 3 different test strip modes for various purposes. One
mode alters the paper grade and two others alter the time by using separate
exposures or additive exposure times.
You may choose between centering the exposure around the preset values
or just creating a test strip which is only lighter or only darker than the preset
value.
Within every test strip mode you have the flexibility of setting the total
number of test strips (parameter ‘Count’) as well as the step size or width.
Modes ‘Time Separate’
Each exposure is done by the complete calculated time. That mod requires
the masking of all but the exposed step or to use single strips of paper. The
paper grade is unchanged. Available modes are:
Time sep-: Test strip created from a light exposure up to the preset value
Time sep : Test strip centered to the preset value
Time sep+: Test strip starting at the preset value with increasing time
Mode ‘Time Additive’
The first exposure illuminates the whole test strip, then the user places the
mask and shifts it from left to the right for any subsequent exposure. The
paper grade is fixed to the preset value. Available modes are:
Time add-: The most right area of the strip represent the preset exposure,
all others are lighter
Time add : Test strip with the preset value in the center of the strip
Time add+: Test strip starting at the preset value with increasing time
Mode ‘Grade’
Each exposure will vary the contrast by the setting of “Step width” . This
mode requires the masking of all but the exposed step or using single strips.
The exposure adjusted according to the reference point set in user
preferences. Available modes are:
Grad- : Test strip created by paper grades softer and equal to the preset
grade
Grad : Test strip with the preset grade in the center of the strip
Grad+: Test strip starts at the preset value and increasing the grade with any
subsequent exposure.
Page 25
SPLITGRADE USER’S MANUAL V3.4 25
Time: 5.40s Grad: 2.0
Teststrip: Time Sep.
Count: 5
Step width: 0.3f
Time: 4.39s Grad: 2.0
Teststrip 2 of 5
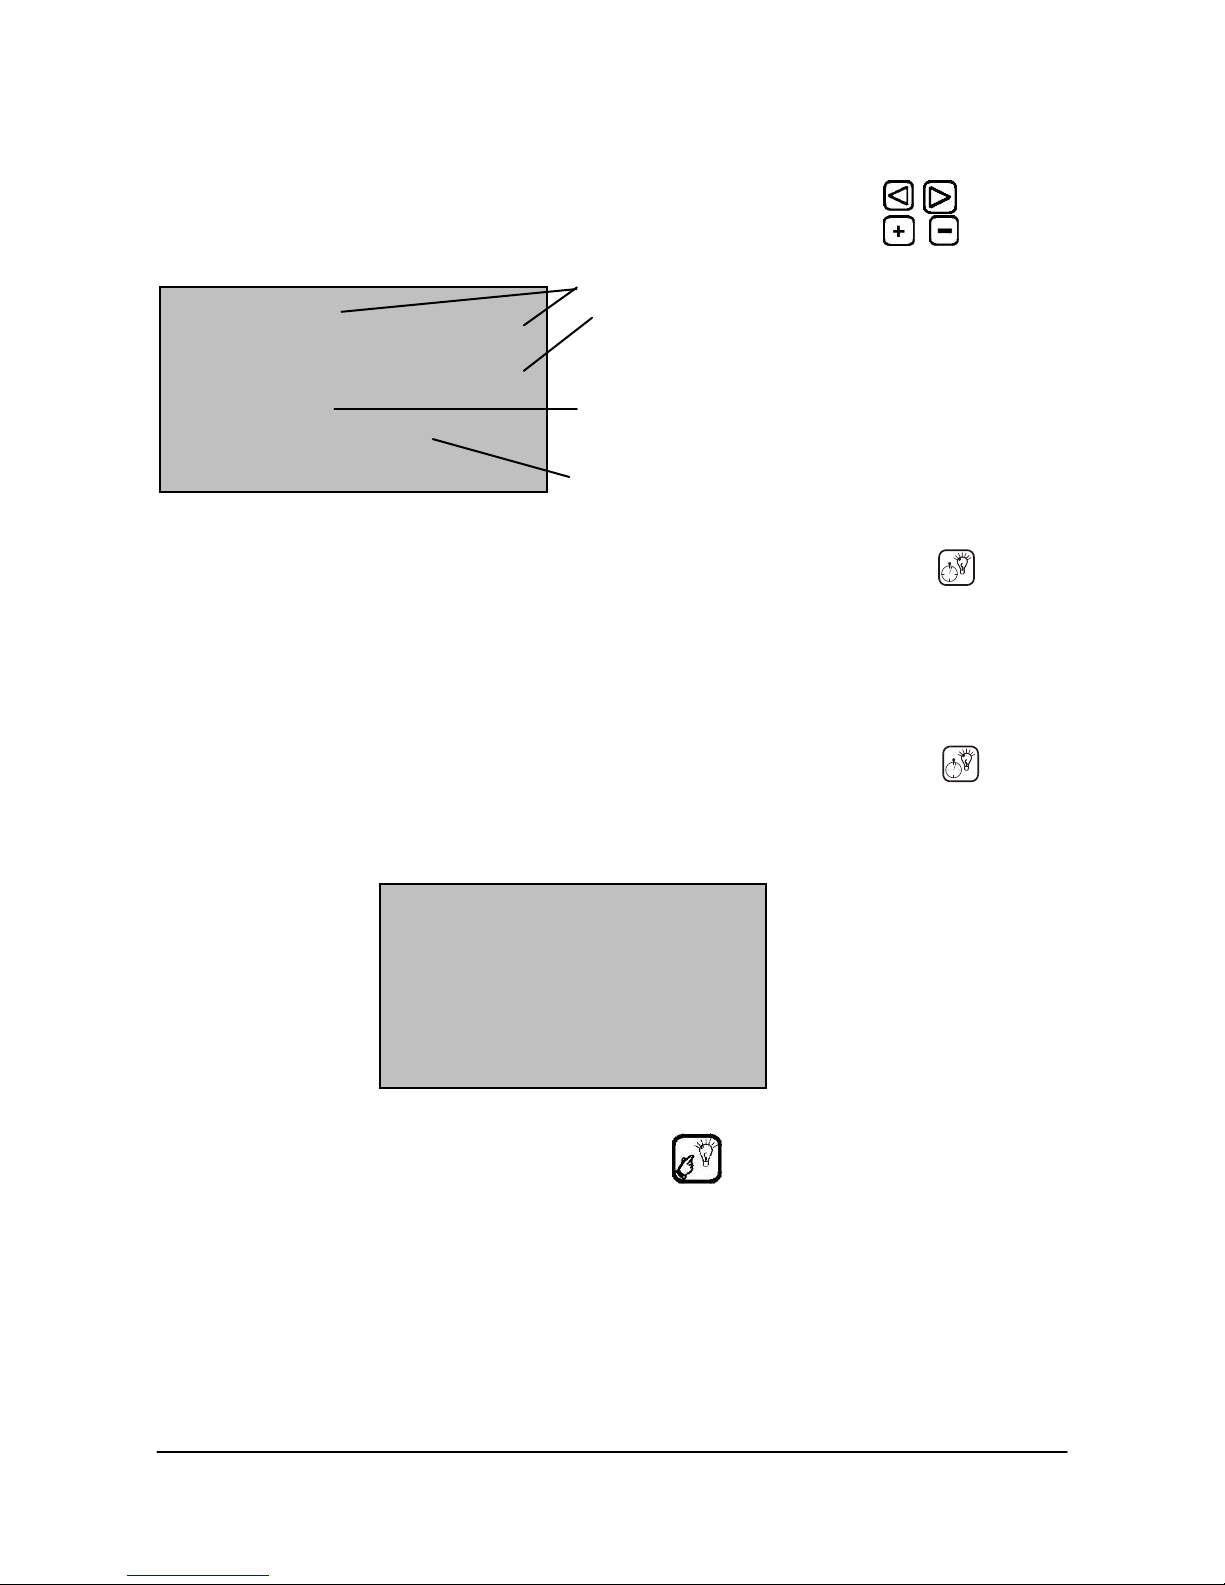
As in any other menu move the cursor by using the buttons
Alter the value that is indicated by the cursor with buttons.
Example:
Preset exposure time and grade
Test strip mode (e.g. time separate,
centered)
Total no. of exposures
Change in exposure time
from step to step
After you have defined all necessary values, and press the button to start
the first exposure.
The display will show the actual time and grade while exposing.
In the example five strips are generated with a paper grade of 2.0 and the
following times: (first exposure) 3.56s / 4.39s / 5.40s / 6.65s / 8.18s (last
exposure). Each exposure will be started after pressing the button .
While doing the various exposures, the controller display is similar to that:
Switching on the focus light with the button could be useful to check the
position of the mask, of course with the red filter moved in front of the lens.
The whole exposure sequence of the test strip is cancelled by pressing any
other button.
Page 26
26
Module(s):
1: LEITZ V35
2: None
3: None
Module-Error !
Module type
Switch off controller
CONTROLLING UP TO THREE DIFFERENT TYPES OF
ENLARGER
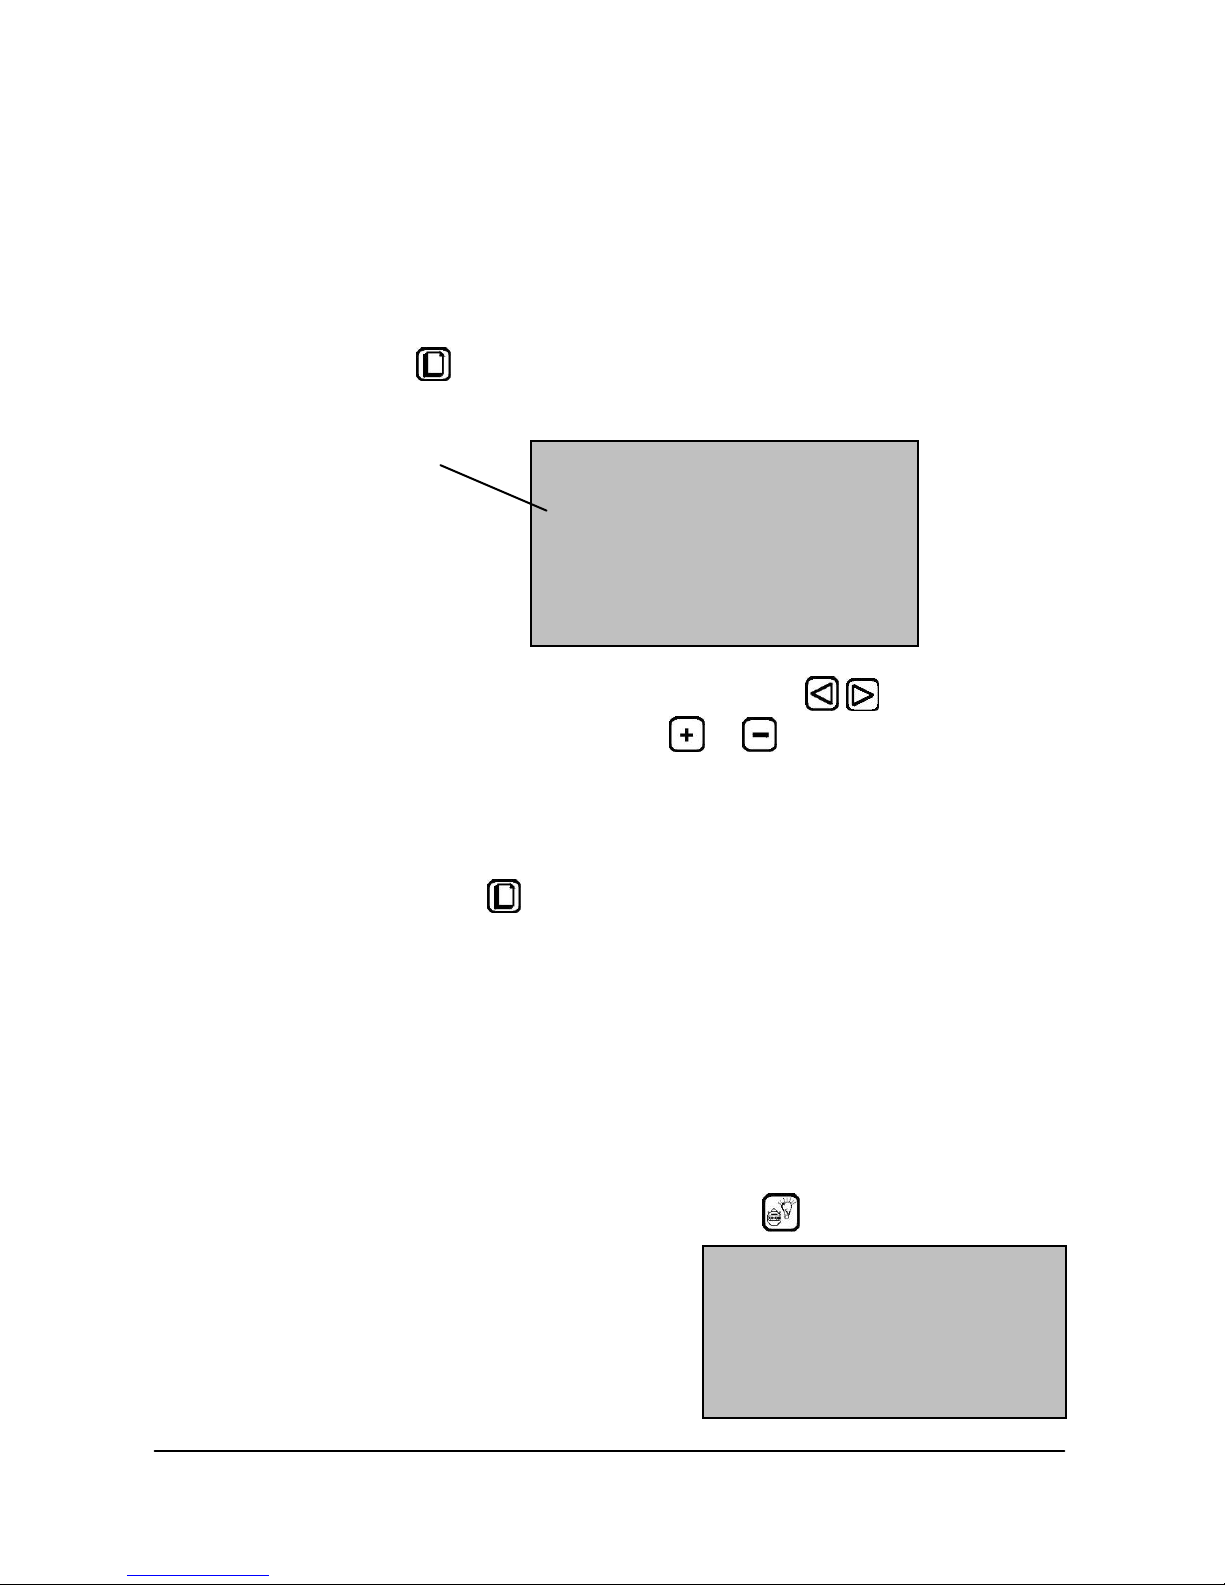
You may use different types of enlargers / modules with only one controller.
To set up and select the module type, please proceed as follows:
1) Switch off the controller and connect the new filter module.
2) Press the button while switching on. Hold it until the following display
appears.
3) Move the cursor to one of the three lines by using buttons and
select the module type with the button or .
ATTENTION: Modules for enlargers AGFA Varioscope, Leitz Ic and IIc
may use Dunco or Kienzle light sources, so please select the
appropriate one in that case.
4) By pressing the button you may toggle between the described menu
and a menu that enables to enter filter offset values for yellow (green)
and magenta (blue) filters. If you have so far used values in % or you do
not know the offset values, please contact Heiland electronic to receive
the values in units of 1/10 f-stop. Furthermore you may enter delays
from switching on the enlarger output until the shutter is opened and
vice versa. One application might be the usage of a stabilised
transformer which needs more than 0.5 sec. until the lamp switches on.
5) Finally select the required enlarger or module type by moving the cursor
in the corresponding line and press the button . If Splitgrade should
be used as a timer only, select the
module type “None”.
In case the controller displays an error
message please check if the correct
module is connected and selected and
repeat power on procedure.
In the first line the
original delivered
module is displayed,
e.g. Leitz V35.
Page 27
SPLITGRADE USER’S MANUAL V3.4 27
USING THE CONTROLLER AS AN ANALYSER (SPL-M1)
The controller of the SPLITGRADE system can used as a B&W analyser
and timer in conjunction with enlargers for which there is at present no
motorised filter module. The version with order code SPL-M1 is already set
to this manual split exposure mode.
Prior to working, the controller need to be calibrated in reference to your
enlarger. An instruction for calibration is available from the manufacturer.
Please mention the type of enlarger and light source when ordering. To use
the manual split exposure, proceed as follows:
Install and set up the controller according to the description on page 10.
If you have not purchased the SPL-M1 version, follow the instruction on
page 26 to set the enlarger type to ‘Manual’.
Select paper and film type.
If using a colour or multigrade head on the enlarger, set to white light.
Otherwise remove all filters from the light path.
Switch the enlarger light ON by pressing the button
Select the f-stop in order to achieve a exposure time of at least 5s. This
will reduce the effect of lamp start-up and after-glow on the exposure
Measure the exposure and grade as described on page 14
Terminate the measurement by pressing the button again
Press the button and select the displayed filter type. On the colour or
multigrade head dial maximum magenta or yellow; otherwise insert
grade 5 or grade 00 filter in the light path.
Start the first exposure by pressing the button
Remove the inserted filter or select filter position 0 and select the second
filter as displayed in the controller display
Start the second exposure by pressing the button again.
The image has been exposed by using two different filter settings
according to the split grade method.
Page 28

28
CARE AND MAINTENANCE
CAUTION:
To prevent electric shock do not open the instrument. There are no
user serviceable parts inside.
Note: Any unauthorised opening or servicing invalidates the guarantee.
Changing the fuse
The fuse is located in a fuse carrier on the rear side of the instrument
(please refer to Fig. 2, Page 11 . To change the fuse, remove the main
power supply connector and open the fuse carrier by using a small
screwdriver.
!!! Use only fuses with a rating of 4A time lag!!!
Care of instrument
The case should be cleaned with a lightly dampened soft cloth or chamois
only, if necessary with the addition of a mild cleaner.
Do not use solvents or abrasive materials.
The probe should be cleaned only with a soft brush or compressed air to
remove the dust. Otherwise the light sensor might be damaged permanently.
Unplug the instrument when not in use for long periods of time.
For necessary repairs send the instrument to the manufacturer or authorised
service centre.
Page 29

SPLITGRADE USER’S MANUAL V3.4 29
APPENDIX: DETAILS OF FILM AND PAPER PROGRAMS
The controller is factory-equipped with programs controlling the exposure
time and grade for a given combination of variable contrast paper and
negatives of a certain kind.
These programs may be adjusted from time to time according to the current
characteristics of commercially available papers and films.
Program adjustment for films
Classic B&W films: The setting 'Conv.´ covers all conventional silver halide
films as long as the film base does not show any peculiar colour, which
could influence the measurement of the time and the grade.
Chromogenic B&W films: These films are modified colour films, processed
in C41 chemistry mostly by professional labs.
Detailed tests show that despite the strictly standard C41 developing
process, the tint of the film might differ. As these differences can imply nonpredictable differences in exposure time and grade, the measured values
can only be a clue which should be adjusted if necessary.
Another peculiarity of chromogenic film is its reaction to different exposures.
In the same way as for silver halide films, the best results are obtained when
the exposure is done with enough light. The reduction of the ASA setting by
about a half or a quarter improves the details in the shadow areas of the
print and yields finer grain.
The contrast of the negative changes with the exposure value: with
increasing exposure the contrast becomes higher with the result that
doubling or quadrupling the ASA value yields negatives which are hard to
print.
For all these reasons the programs for chromogenic films are provided with
a compensation for the different modes in which the film was exposed. They
are collected in the groups ”N” for normally exposed film, “+” for longer
and “–“ for shorter exposures.
If you do not know the exposure mode for a given film, start with the
adjustment “N”. If the result is too light try again with the “+” setting , if they
are too dark, try it with the “–“ setting. If you are not able to get satisfactory
results, try to use the "General corrections” (see page 22).
Page 30

30
Films containing a stain
Especially fine art printers appreciate the improved details in the highlight
sections of a print caused by the stain of the film. Special developers like
Pyrogallol, Tanol and Finol may be used to get that stain.
On the other hand, the photographer needs to adjust the selected paper
grade and exposure time to get acceptable print results. In most cases it is
necessary to raise the paper grade by approx. +0.5 to +1.0 and to increase
the exposure time by about half of an f-stop.
No exact values could be recommended here, but every photographer will
know the approximate values for his process. These offsets could be
entered separate from the basic paper specific settings if the users selects
either 'Finol', Tanol' or 'Pyrogallol' as the film type. Of course we know, this is
not a film type, but the selection of these special developers fit best in the
section of film types. Please refer to page 22 for details.
Paper programs
All papers listed in the Table 1 have been tested with glossy surface and
were developed in a tray, strictly following the recommendations of the
manufacturers, including the kind of chemicals used and developing time.
The prints were dried with hot air at 60°C.
Papers with a matt surface share the same emulsion as glossy papers.
Never the less, you might add small offsets to adjust the appearance of the
print according to the reduced maximum density.
Note: The use of long stored materials, paper or developer, or varying
the instructions of the manufacturers, may change the results you can
expect.
Page 31
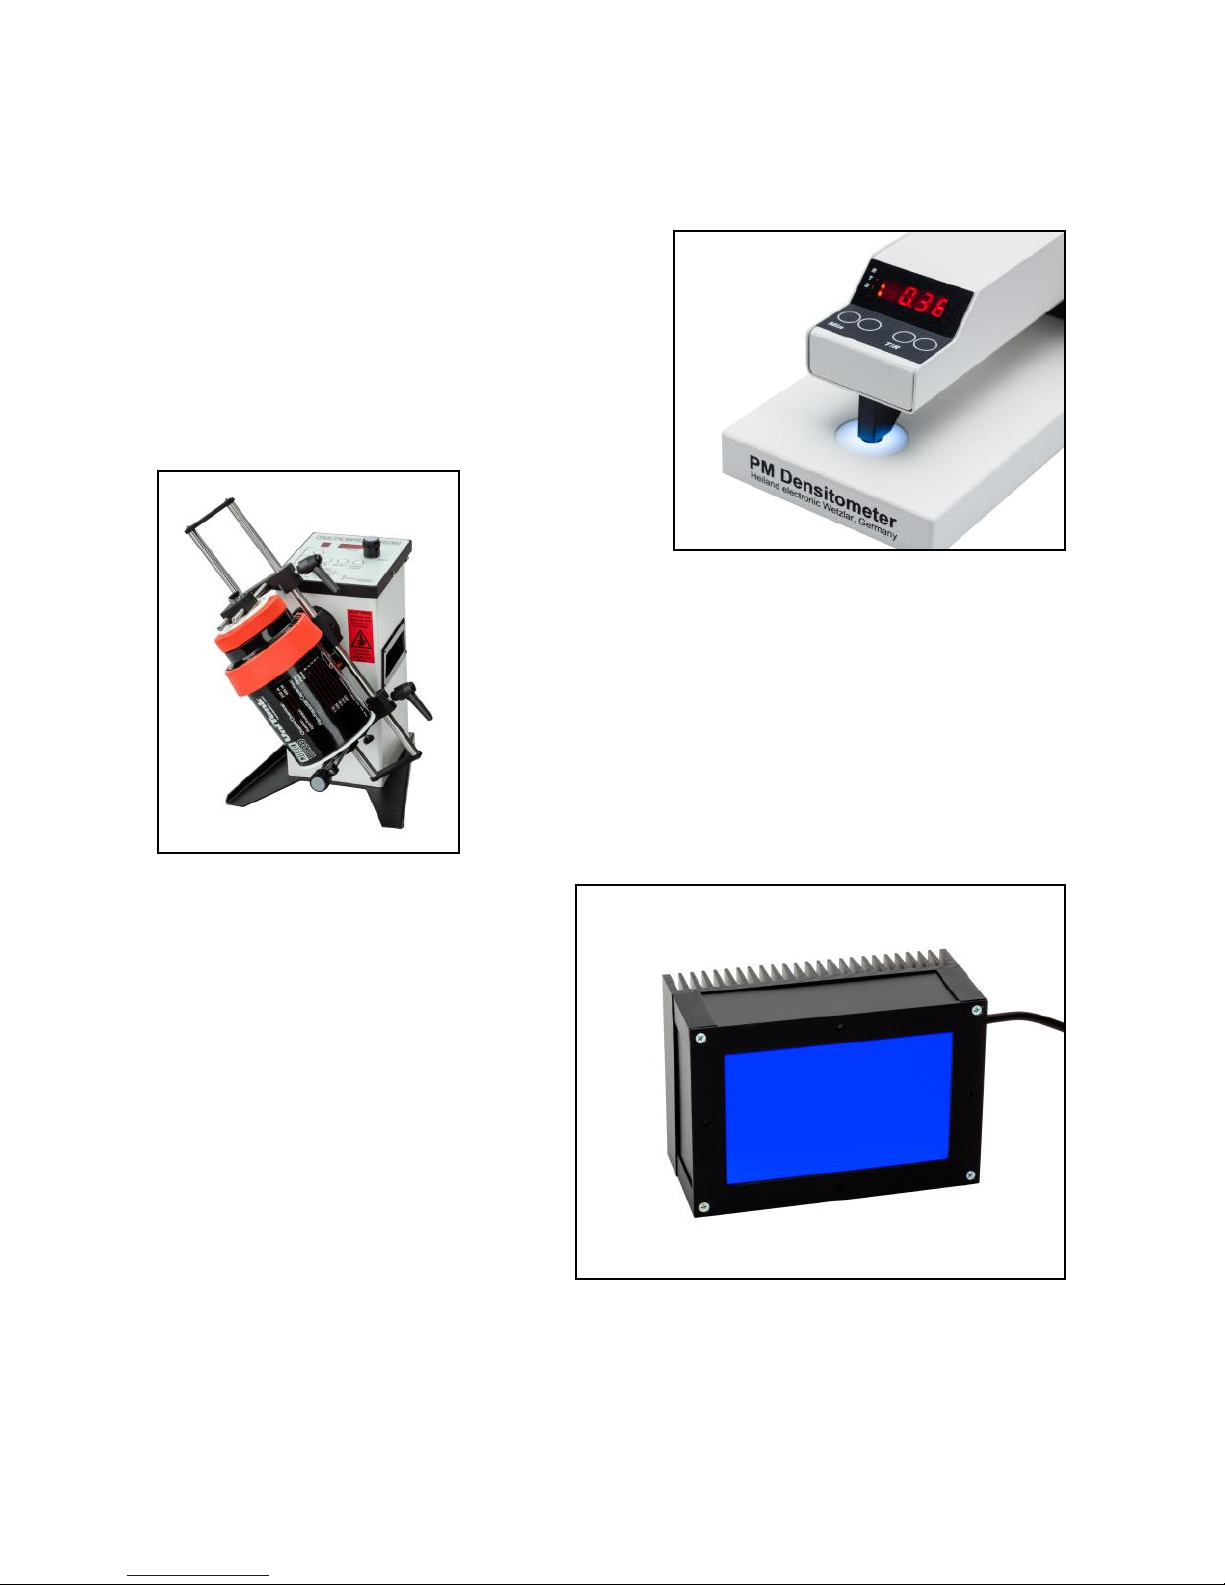
FURTHER PRODUCTS OF HEILAND ELECTRONIC
Densitometer
High precision monochrome
densitometers useful for all tasks in
general B&W photography,
Microfilm applications and repro
companies.
TAS film processor
Processes your film tank by revolving and
inverting the film tank followed by a phase of
stand still. That kind of processing is identical to
the classic film processing and ensures best
results. Setup of the parameters is very simple,
thus the TAS could be adapted to the users
preferred process.
LED cold light source
Useful for B&W and colour
processes. This modern light
source is available for almost all
enlargers and negative sizes
from 35mm up to 20x24 inch.
Various control units are
available adapting to Splitgrade
and any given Analyser or timer.
If you would like to receive further information about our products,
please refer to our address, located on the back cover.
Page 32
Heiland electronic GmbH
Schulstrasse 8
D-35579 Wetzlar
Germany
Phone: ++49 6441 26978
Fax: ++49 6441 26988
 Loading...