

Page 1

Confidential - for internal and distributor use only
Installation Guide
SPECTRALIS HRA+OCT
What is new compared to the HRA2?
© Heidelberg Engineering GmbH 2007
Printed in Germany
QM-Art. No. 97 127-003
Sage Art. No. 19978
This document refers to the Manual “Heidelberg Retina Angiograph 2, Installation and
System Configuration”, Art. No. 96 037-006.
Page 2

Table of Contents
Confidential - for internal and distributor use only
1 PC REQUIREMENTS.............................................................................................................................................3
2 SOFTWARE AND DRIVER INSTALLATION .................................................................................................4
2.1 OVERVIEW ..............................................................................................................................................................................4
2.2 HRA2 AND OCT DRIVER INSTALLATION:......................................................................................................................4
2.3 TESYCON DRIVER INSTALLATION (ADDITIONAL FIREWIRE CONTROLLER DRIVER) ............................................5
3 SET-UP INSTRUMENTATION BASE AND CAMERA ............................................................................... 10
3.1 SPECTRALIS WITH INSTRUMENTATION BASE (JOYSTICK VERSION).................................................................... 10
3.2 SPECTRALIS WITH INSTRUMENTATION BASE (XYZ-UNIT)................................................................................... 13
4 ELECTRICAL WIRING...................................................................................................................................... 14
4.1 ADDITIONAL OCT CABLES IN THE CABLE LOOM ........................................................................................................ 14
4.2 FIRE WIRE LINKS TO THE COMPUTER ............................................................................................................................14
5 INSTALLATION OF THE SAPPHIRE AND SPECTROMETER FIBERS.................................................. 16
5.1 REMOVE THE COVER OF THE POWER SUPPLY BOX....................................................................................................... 16
5.2 THROUGH FEEDING AND INSTALLATION OF FIBER CABLES................................................................................... 17
5.3 ATTACHMENT OF SPECTROMETER FIBER ..................................................................................................................... 18
5.4 INSTALLATION OF LASER COUPLER TO THE KINEFLEX.............................................................................................. 19
5.5 MEASUREMENT OF FA-LASER POWER AT OBJECTIVE................................................................................................ 20
5.6 ATTACHMENT OF THE FIBER STRAIN RELIEF UNIT ......................................................................................................21
6 SPECTROMETER ................................................................................................................................................ 22
6.1 PRINCIPAL SET-UP ...............................................................................................................................................................22
6.2 CHECK OF THE OPTICAL ALIGNMENT ............................................................................................................................23
6.3 CLOSING THE COVER......................................................................................................................................................... 28
7 FINAL CHECK AND INSTALLATION REPORT......................................................................................... 29
LINE 10 –LINE 12:............................................................................................................................................................................ 29
APPENDIX: SPECTRALIS INSTALLATION REPORT .......................................................................................31
Page 3

HRA 2 Installation and System Configuration PC Requirements
Confidential - for internal and distributor use only
1 PC Requirements
The motherboard must to be equipped with an Intel 975X chip set and two PCI Express Graphics (PEG)
slots. One PEG hosts the graphic card. The other PEG hosts a PCI Express Card with IEEE-1394b standard
interface (“FireWire800”). Additionally, a second IEEE-1394a bus with an own controller has to be
available.
To allow operation of SPECTRALIS OCT and SPECTRALIS HRA+OCT it is important that these
minimum requirements are met.
Complete PC requirements are as follows:
Motherboard:
Processor: Intel Core 2 CPU Q6700
Chip set: Intel 975X
RAM: 2 GiByte
PCI Express Graphics (PEG) slots: 2
Graphic card: Chip set Geforce 8800 GTX or comparable
Memory 512 MB; 768 MB recommended
Fire Wire Cards:
1 PCI or PCI Express Card IEEE-1394a or on-board IEEE-1394a interface (FireWire 400)
1 PCI Express Card IEEE-1394b (FireWire 800)
Internal HDD 40GB
Windows XP
3
Page 4
HRA 2 Installation and System Configuration Software and Driver Installation
Confidential - for internal and distributor use only
2 Software and Driver Installation
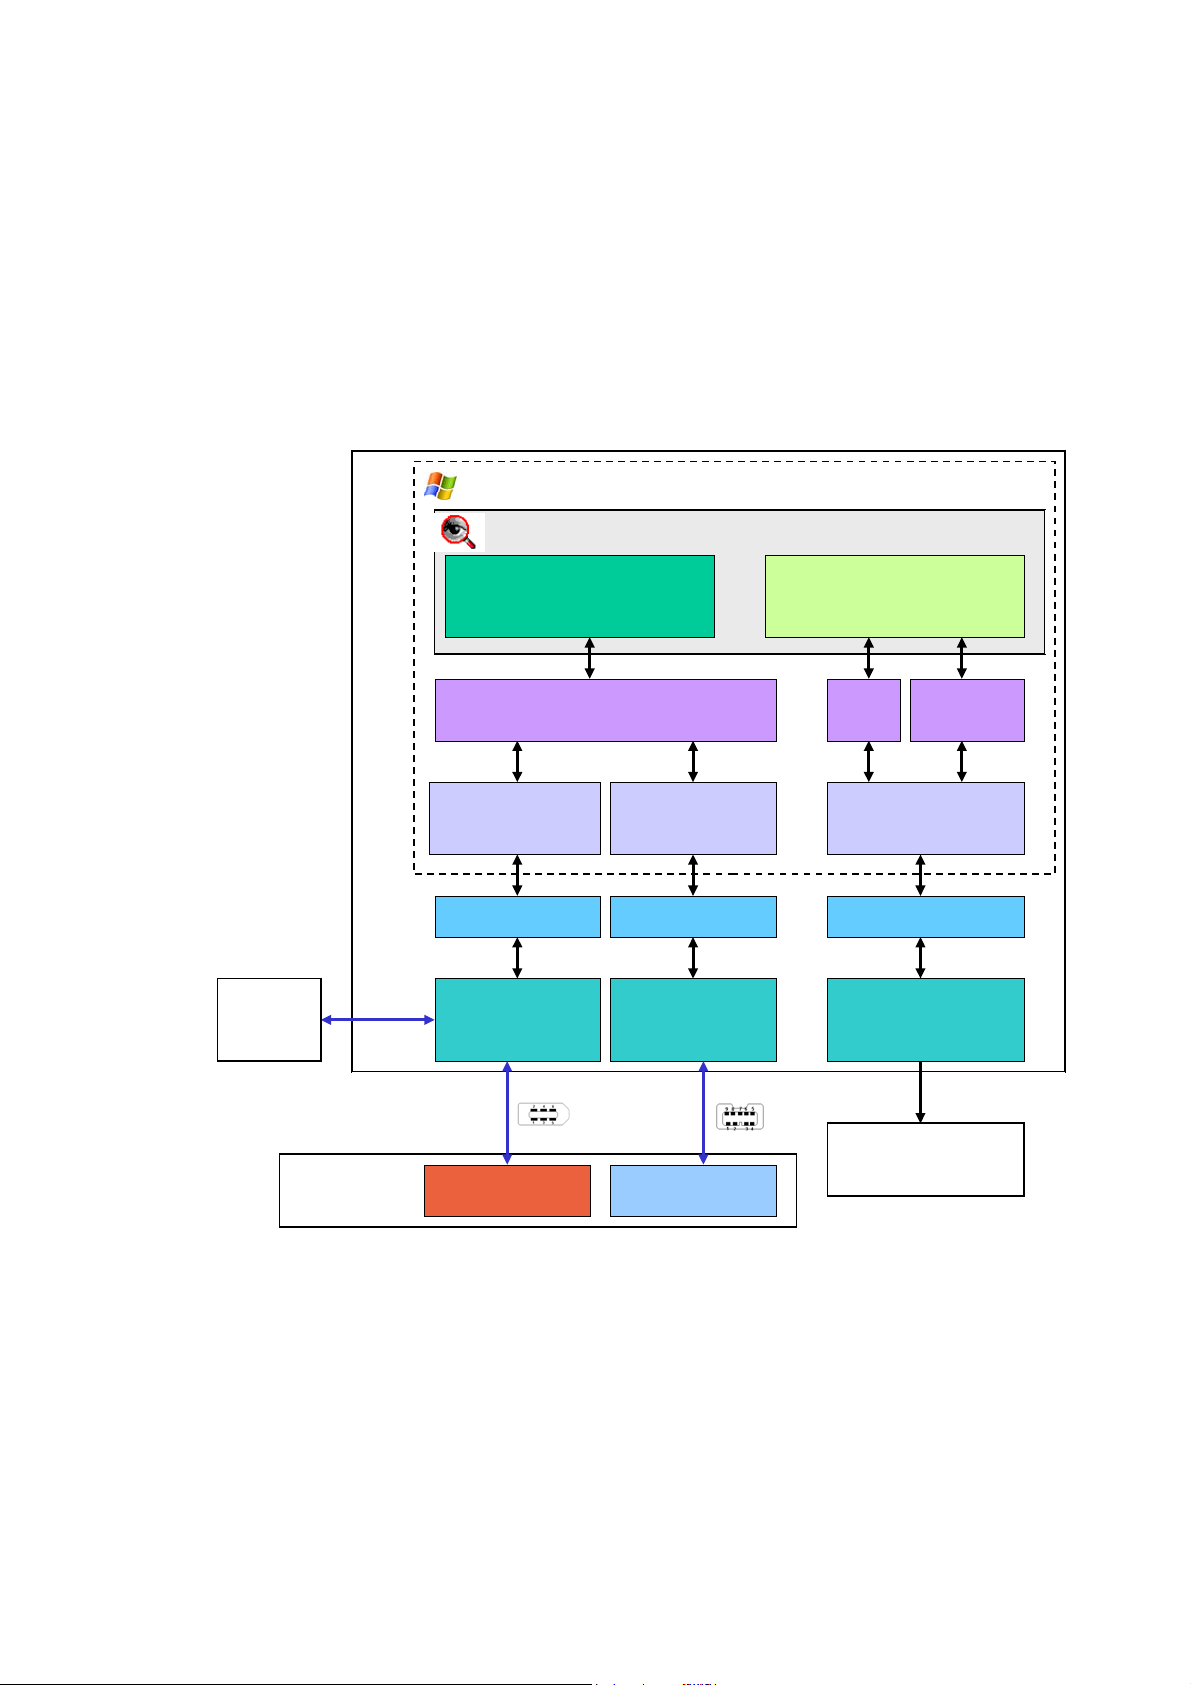
2.1 Overview
The following chart gives you an overview of the Spectralis PC software architecture.
Spectralis PC
Architecture
External
Hard
Drive(s)
PC
Windows 2000 SP4 / Windows XP SP2
Heidelberg Eye Explorer
Spectralis/ HRA2
Acquisition Module
hra2.aqm
IModule Device Driver / API
imodule.dll he_imod.sys
Microsoft
1394 Stack
PCI / PCIE
1394a (FW400)
Controller
Thesycon
1394 Stack
Northbridge NorthbridgeSouthbridge
PCI Express PCI Express x16
1394b (FW800)
Controller
Spectralis/ HRA2
Viewing Module
hraviewer.vwm
GDI OpenGL
Graphics Board
Driver
Graphics Board
512 MBytes
6-pin IEEE
1394a Cable
Spectralis
HRA Modules
2.2 HRA2 and OCT Driver Installation:
Proceed Page 38 and 39 in the HRA2 Installation Instructions. The only difference is that you have to do
this step twice. First for the HRA2 and then for the OCT Module.
9-pin IEEE
1394b Cable
Monitor
1600 x 1200 (UXGA)
OCT Modules
4
Page 5
HRA 2 Installation and System Configuration Software and Driver Installation
Confidential - for internal and distributor use only
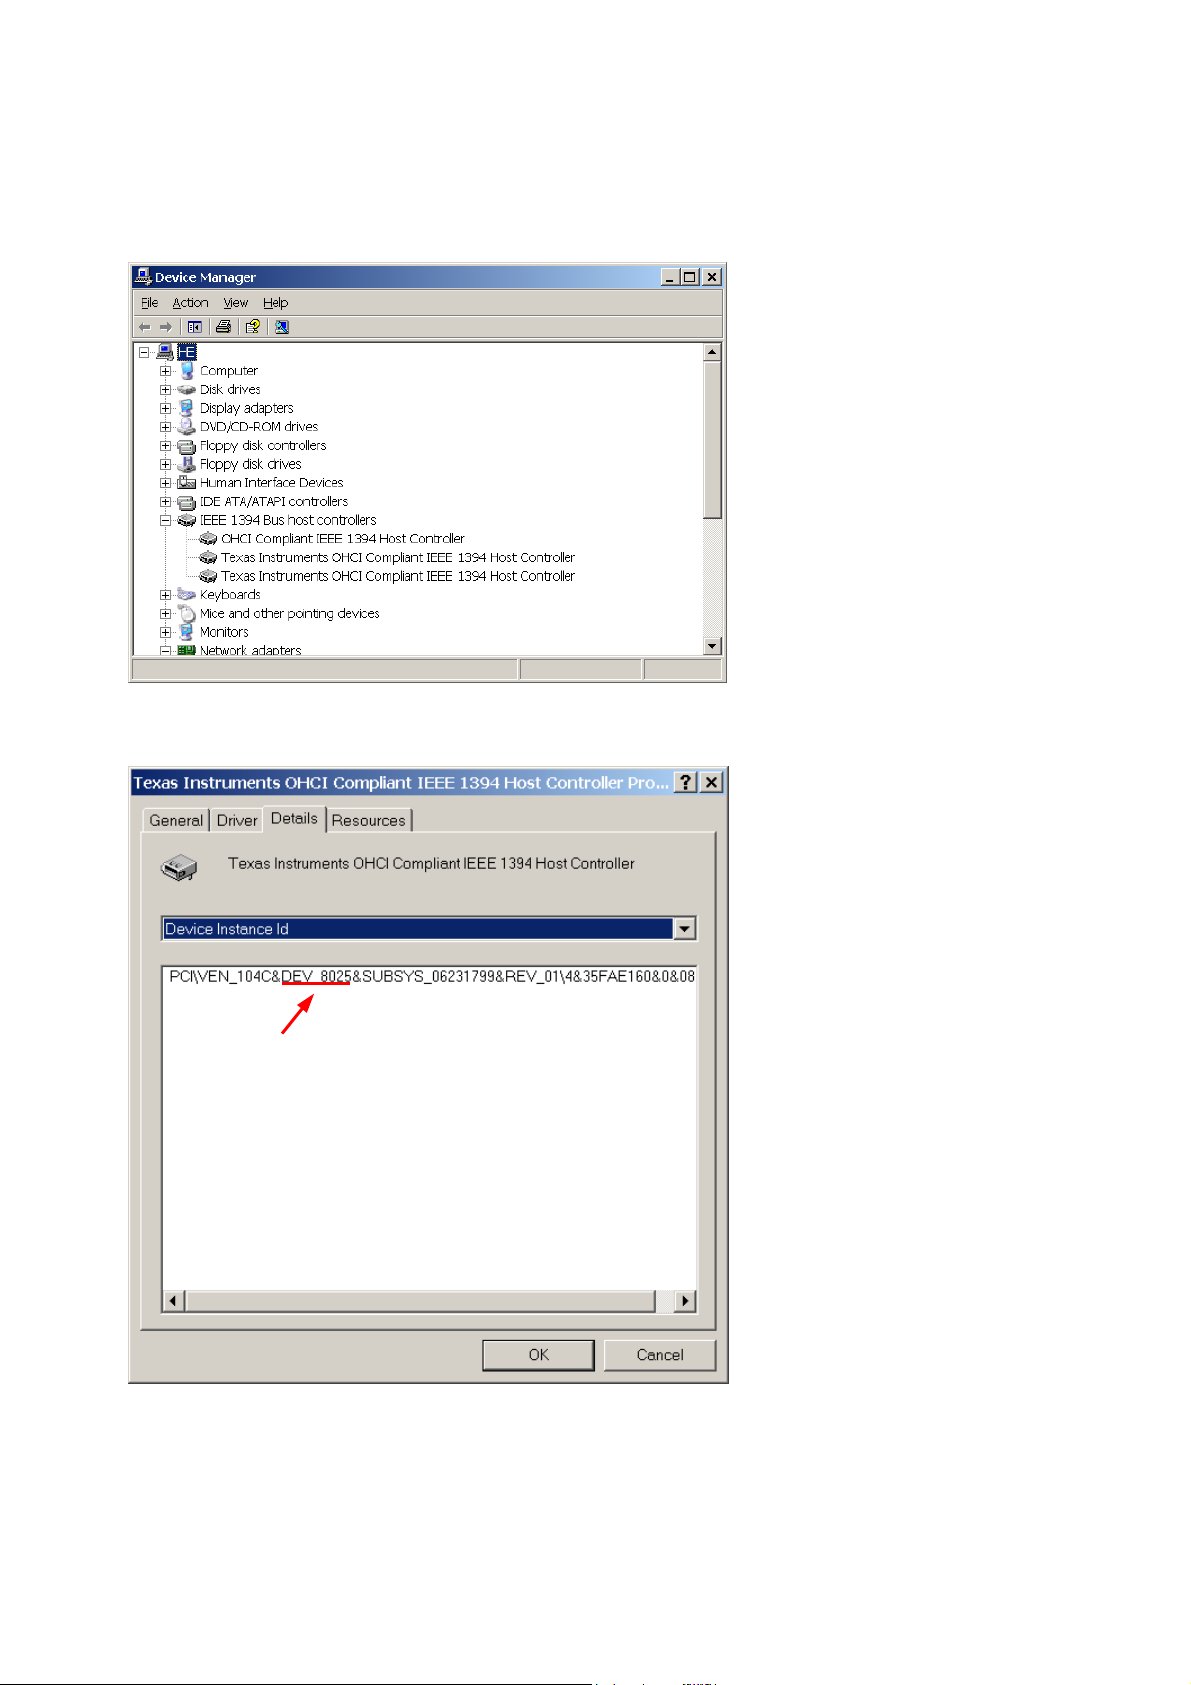
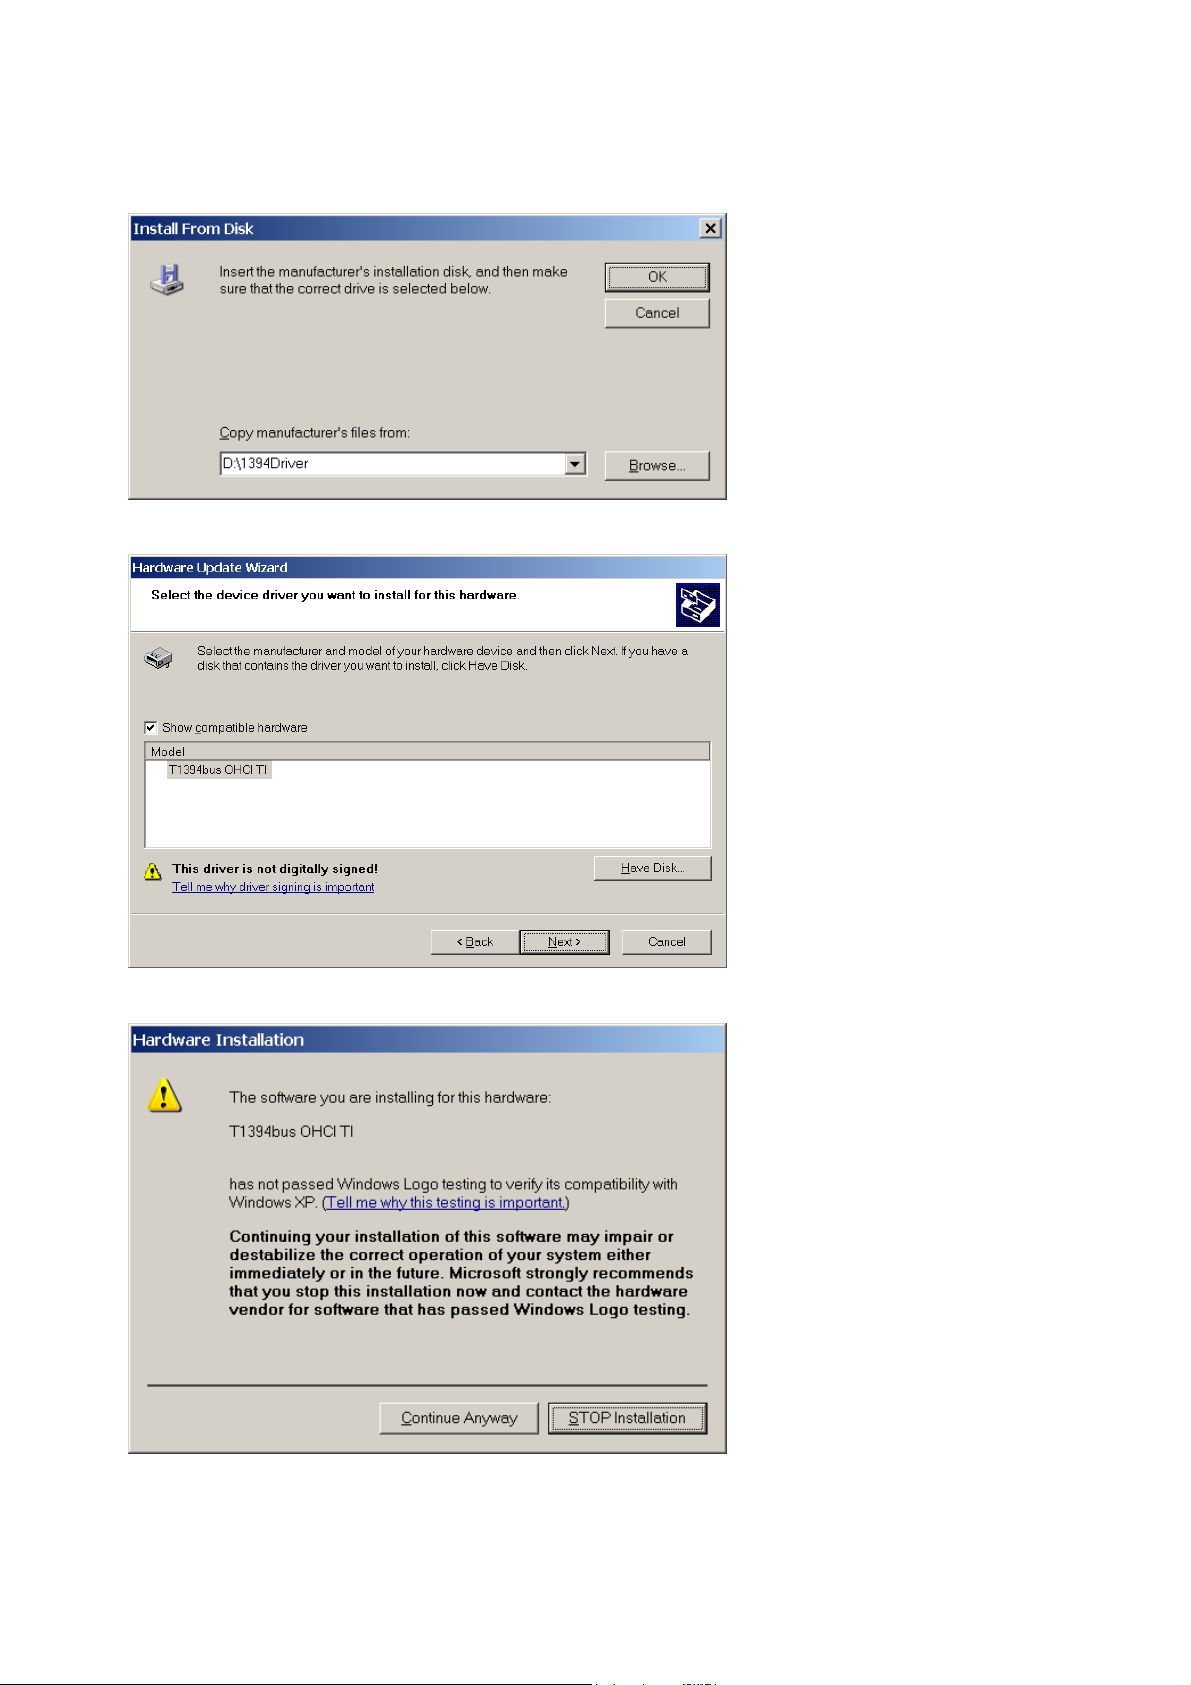
2.3 Tesycon Driver Installation (additional FireWire Controller driver)
Open the Windows device manager (e.g. from the control panel) and check open the group IEE 1394 Bus
host controllers. Here you have to identify the FireWire 1394B Controller Card (see next step).
Right click on each FireWire Controller, select Details and search for ‘DEV_8025’. This Value means that
this Card is the FireWire B Controller.
5
Page 6
HRA 2 Installation and System Configuration Software and Driver Installation
Confidential - for internal and distributor use only
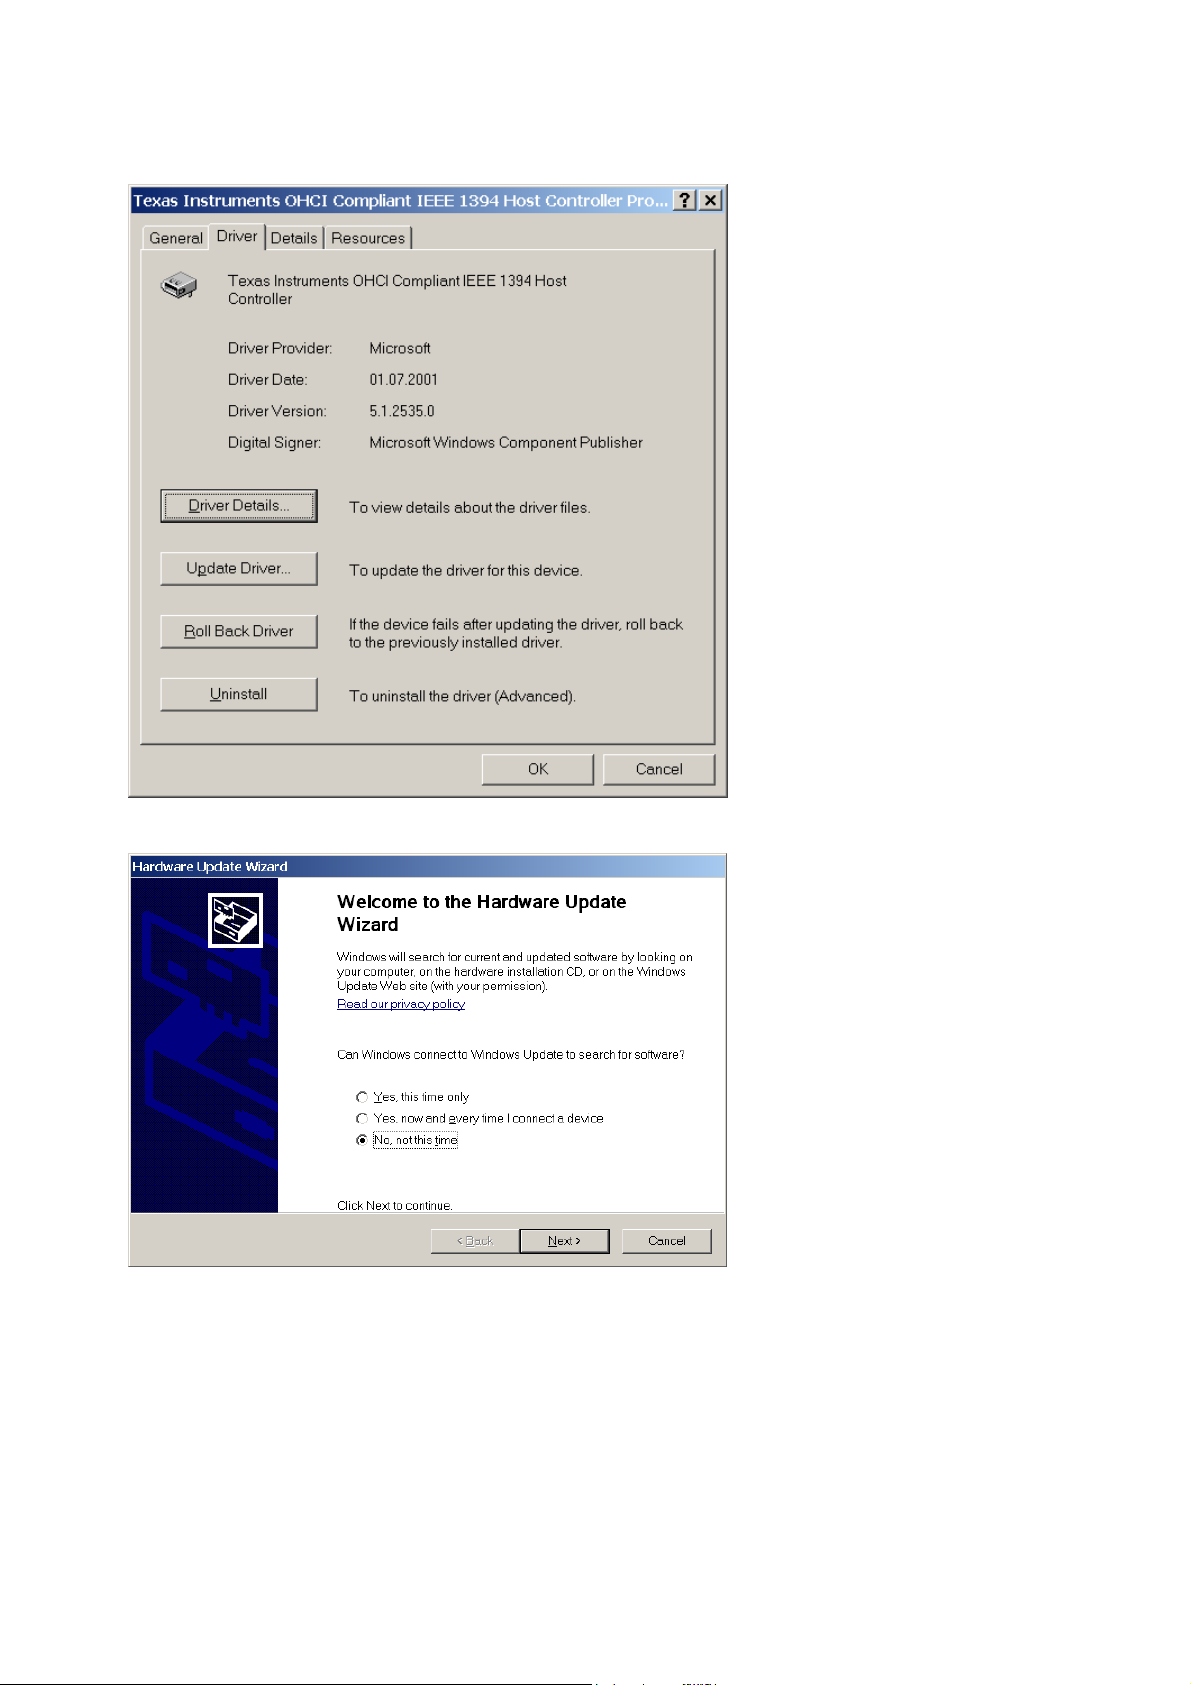
After you found the FireWire B Controller, click on ‘Driver’ and then on ‘Update Driver’
Select ‘No, not this time’ and click on ‘Next’
6
Page 7
HRA 2 Installation and System Configuration Software and Driver Installation
Confidential - for internal and distributor use only
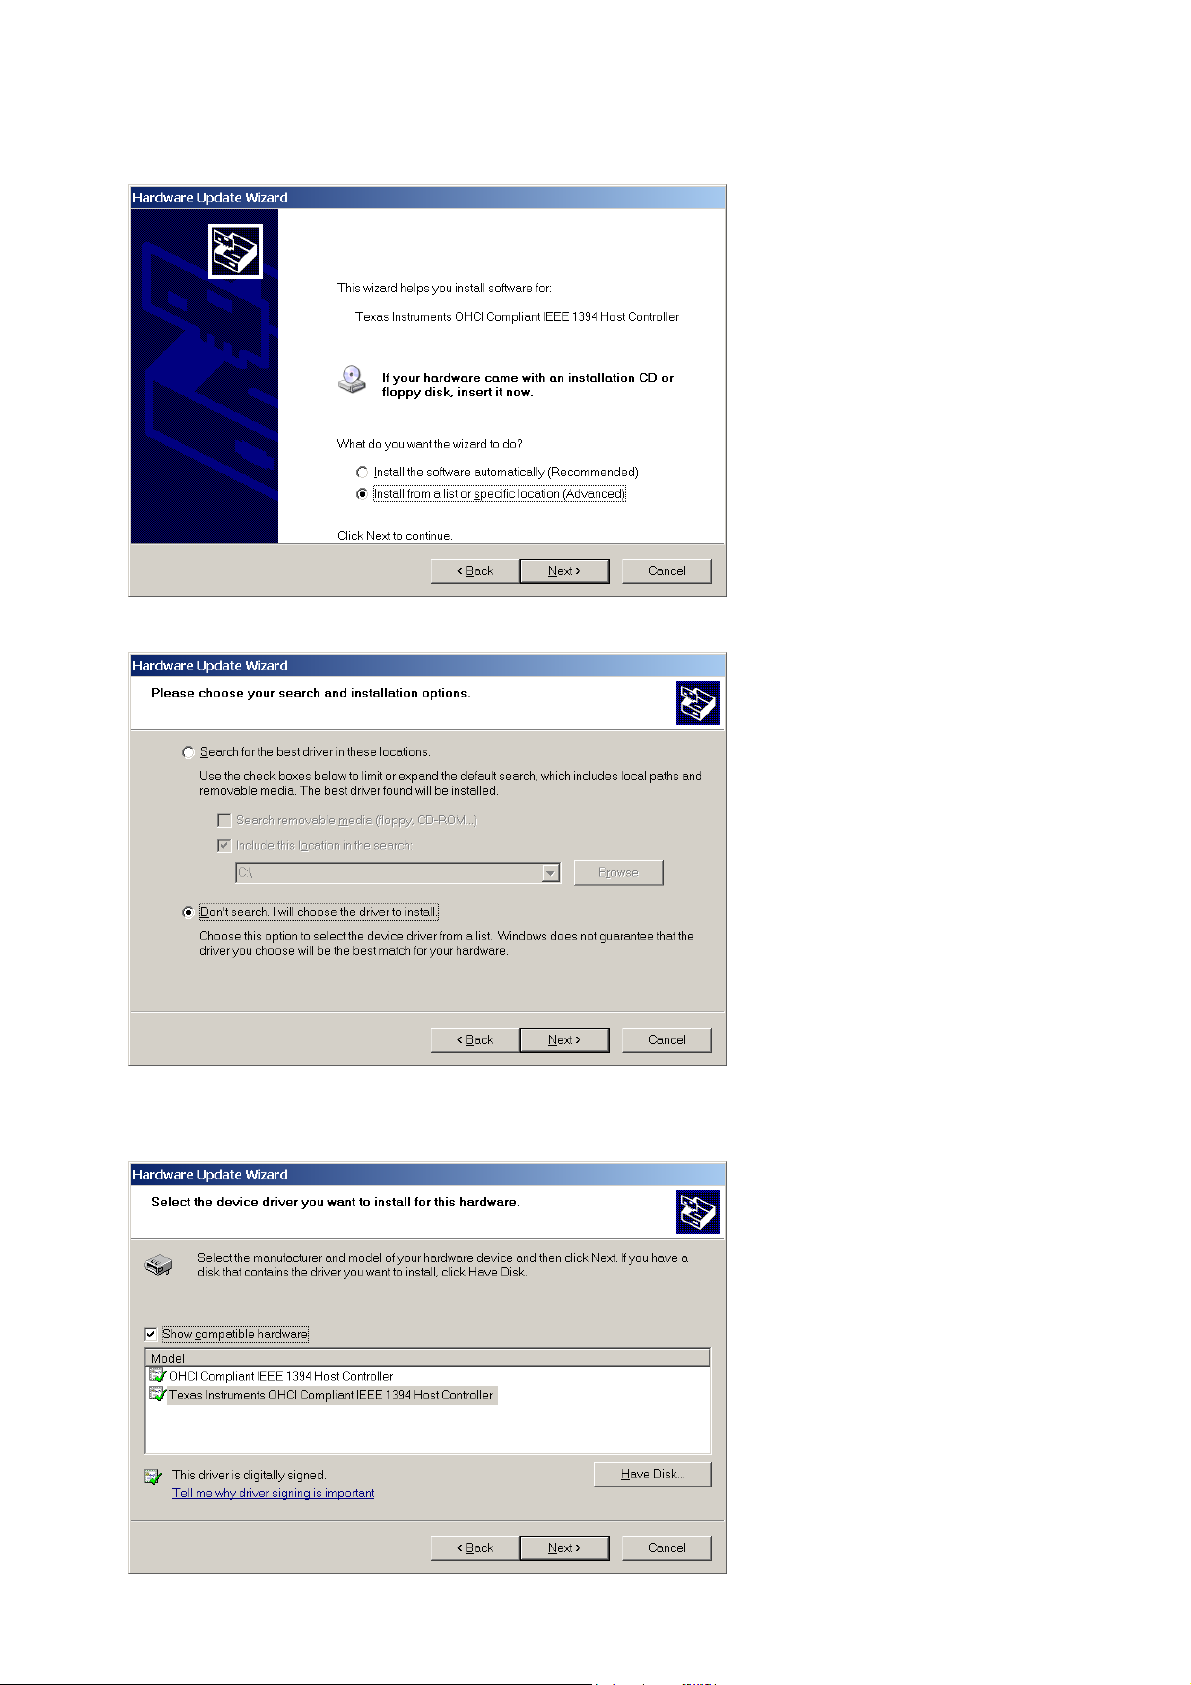
Select ‘Install from a list or specific location’ and click on ‘Next’
Select ‘Don’t search. I will choose the driver to install’ and click on ‘Next’
Click on ‘Have Disk’
7
Page 8
HRA 2 Installation and System Configuration Software and Driver Installation
Confidential - for internal and distributor use only
Insert the SPECTRALIS Installation Software CD into you CD/DVD-Drive and browse on this CD to the
Folder ‘1394Driver’.
Then the following Screen should appear. Click on ‘Next’
Click on ‘Continue Anyway’
8
Page 9
HRA 2 Installation and System Configuration Software and Driver Installation
Confidential - for internal and distributor use only
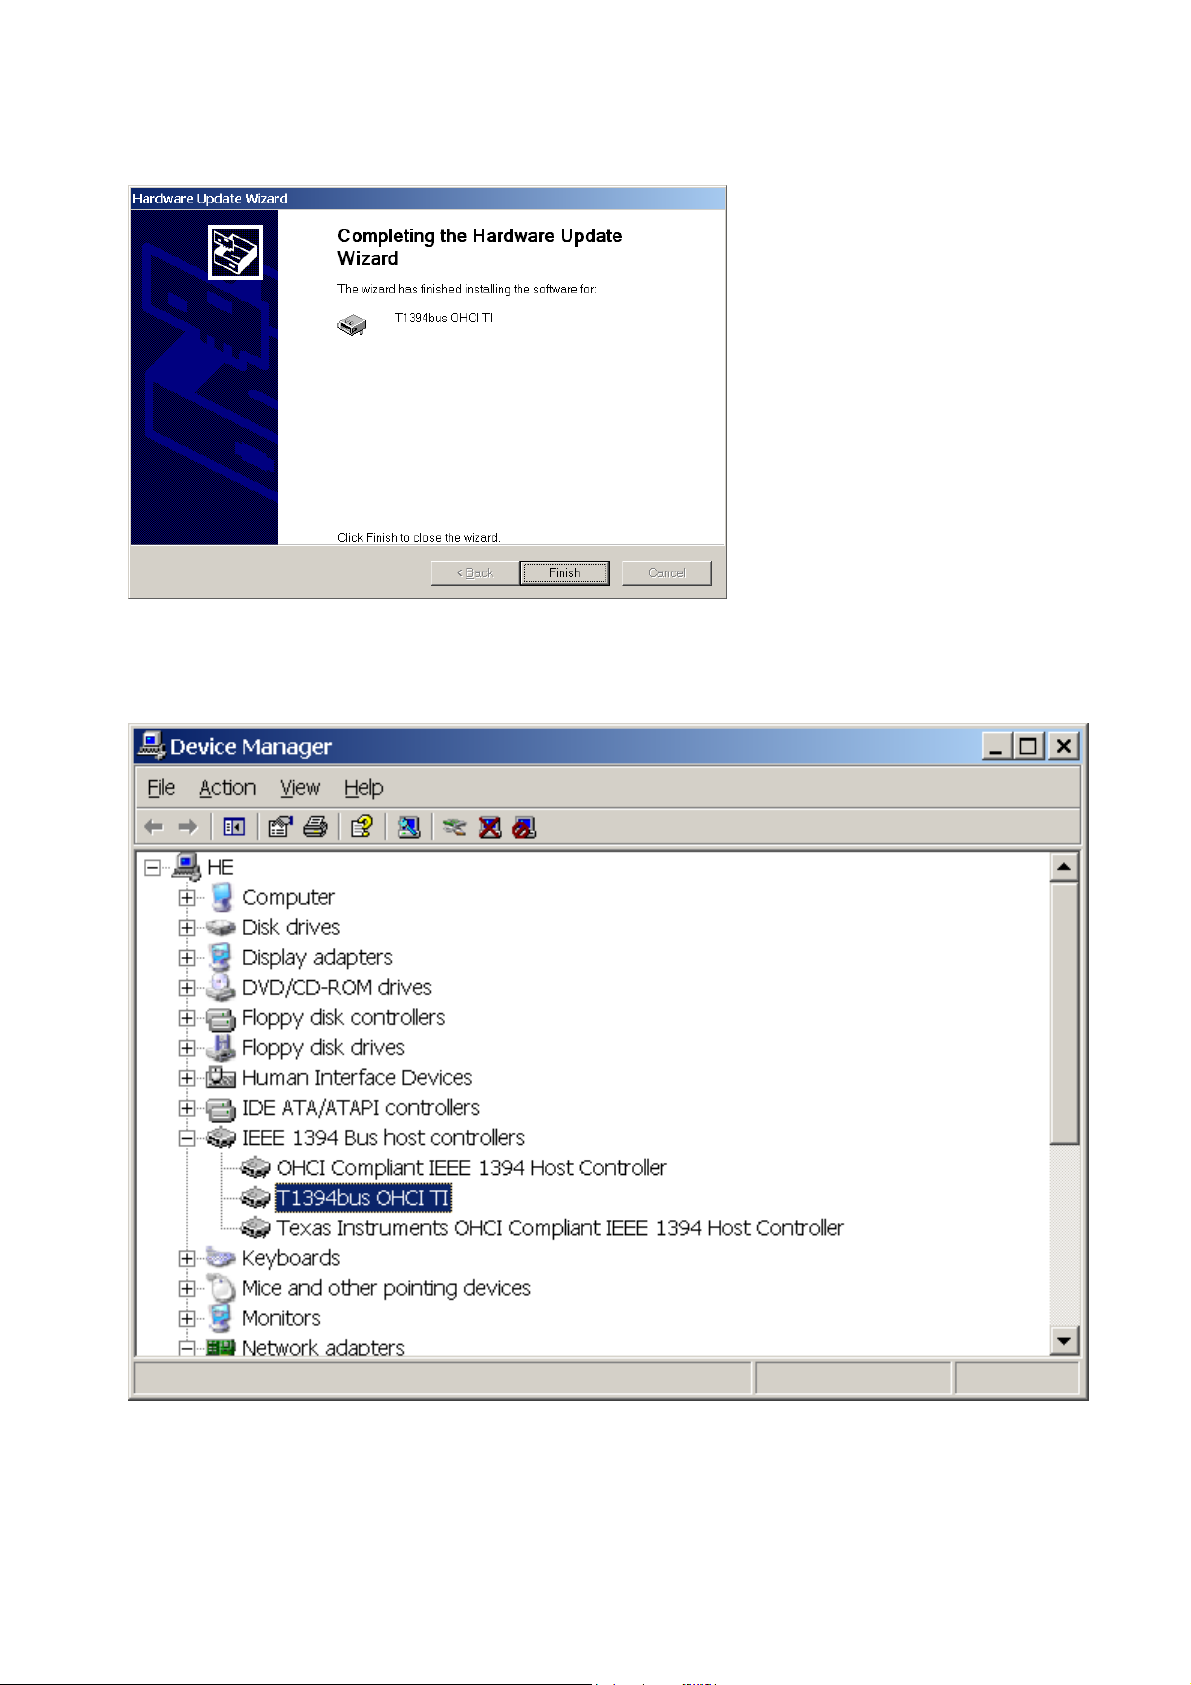
Click on ‘Finish’
To verify that the Driver is correctly installed, you now have to see that the Device name changed to
‘T1394bus OHCI TI’
After installing this Driver it could be necessary to turn off the PC completely include removing the
power cable for 1 minute.
Now Proceed with Page 40 in the HRA2 Installation Instructions.
9
Page 10
HRA 2 Installation and System Configuration Set-Up Instrumentation Base and Camera
Confidential - for internal and distributor use only
3 Set-Up Instrumentation Base and Camera
3.1 SPECTRALIS with instrumentation base (joystick version)
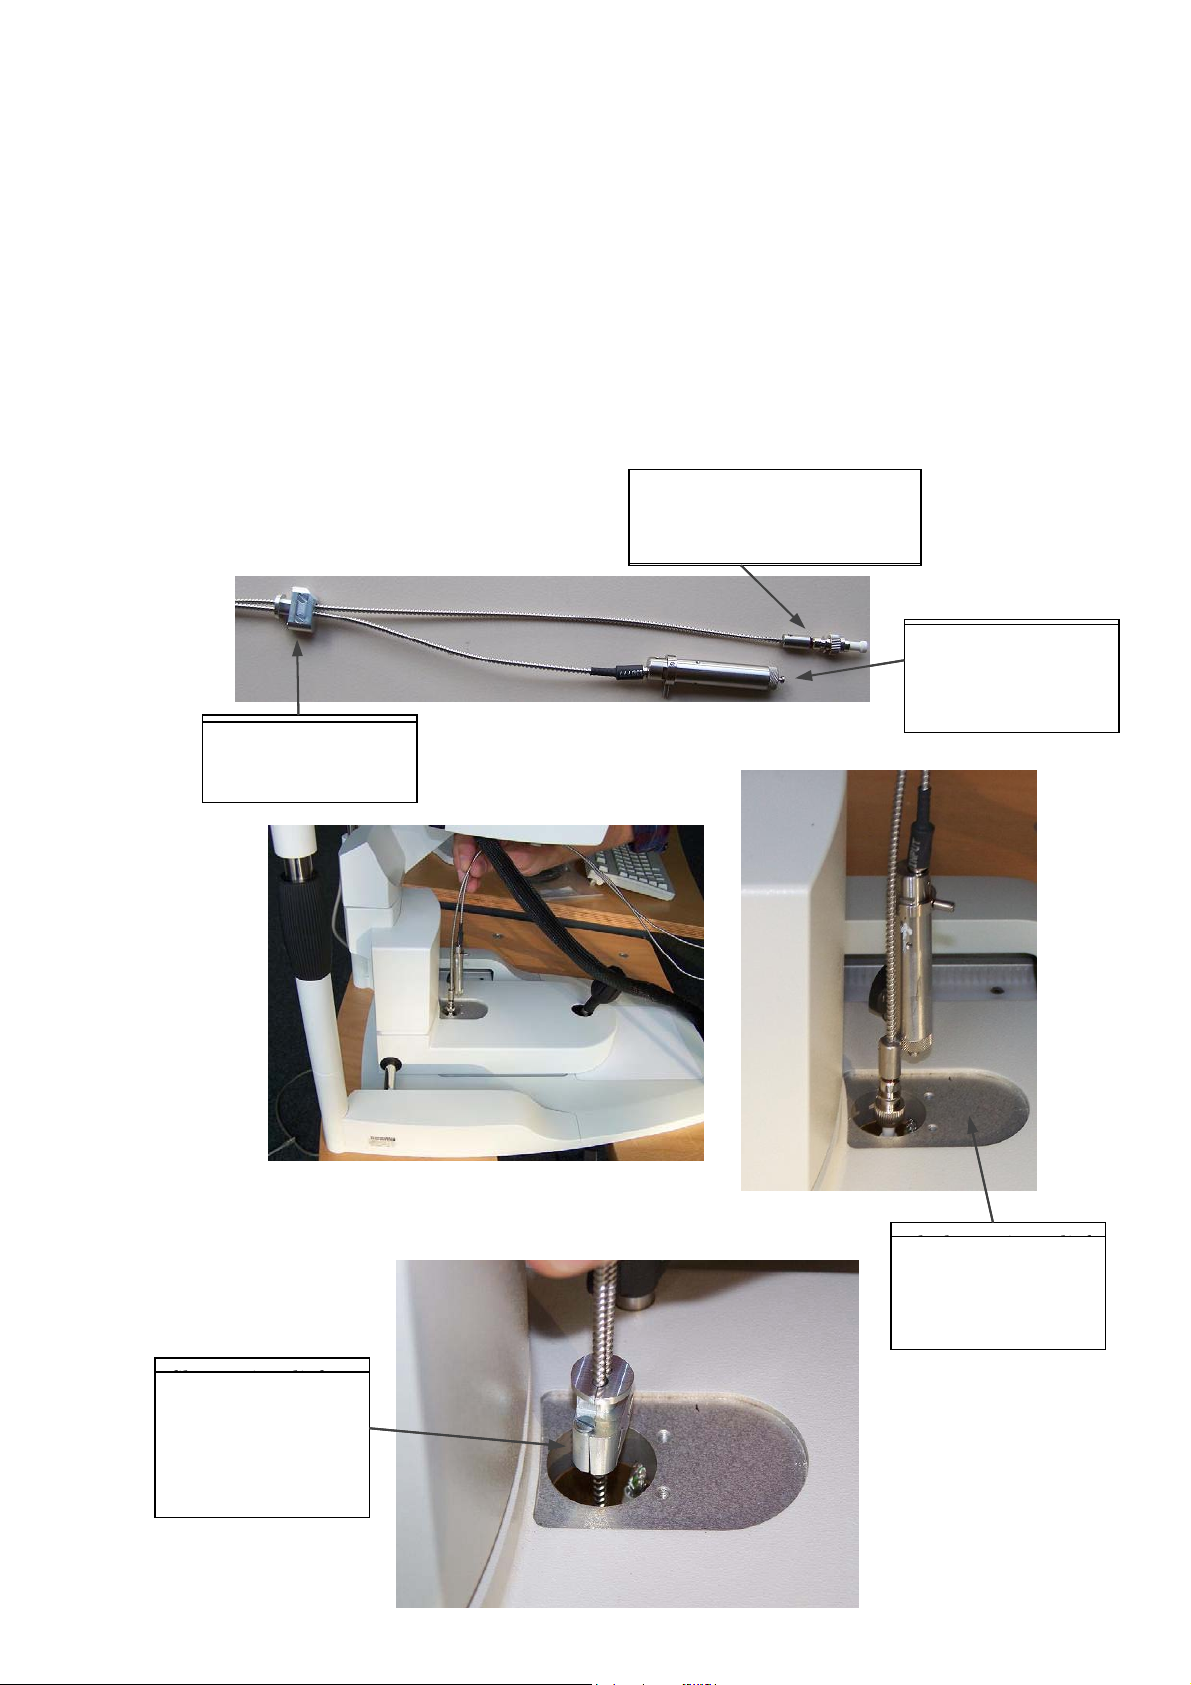
3.1.1 Launching the cable loom through the instrumentation base Launching the cable loom through the instrumentation base
After the camera head is mounted onto the instrumentation base the complete cable loom is launched
After the camera head is mounted onto the instrumentation base the complete cable loom is launched
through the cable feedthrough (brass tube channel) as shown in the following pictures. First the black
through the cable feedthrough (brass tube channel) as shown in the following pictures. First the black
strain relief assembly (for cable loom) needs to be removed. Then the optical fibers are threaded through:
strain relief assembly (for cable loom) needs to be removed. Then the optical fibers are threaded through:
FCAPC fiber connector
FCAPC fiber connector
for spectrometer
for spectrometer
fiber strain relief
fiber strain relief
fiber coupler for
fiber coupler for
Sapphire (FA) laser
Sapphire (FA) laser
fiber strain relief
fiber strain relief
fits through
fits through
the brass tube
the brass tube
Black strain relief
Black strain relief
assembly for cable
assembly for cable
loom removed
loom removed
10
Page 11

HRA 2 Installation and System Configuration Set-Up Instrumentation Base and Camera
Confidential - for internal and distributor use only
Then the three bigger HRA connectors are threaded through the cable channel. The order black, red, blue
connector is recommended.
Finally the purple and orange connectors (OCT unit) are inserted:
11
Page 12

HRA 2 Installation and System Configuration Set-Up Instrumentation Base and Camera
Confidential - for internal and distributor use only
3.1.2 Modified strain relief for SPECTRALIS cable loom
Strain-relief assembly for cable loom:
Strain relief assembly
for HRA II and
SPECTRALIS HRA
-
Strain relief assembly for
SPECTRALIS OCT and
SPECTRALIS HRA+OCT
(larger cut-out)
Mount the cable loom strain relief assembly as shown
in the HRA2 installation manual. Make sure, that the
cable loom is not twisted and that the cable loop is long
enough to allow the movement of the camera to it´s
extreme positions.
12
Page 13

HRA 2 Installation and System Configuration Set-Up Instrumentation Base and Camera
r
Confidential - for internal and distributor use only
3.2 SPECTRALIS with instrumentation base (XYZ-unit)
Similar as for the joystick version, also for the XYZ-style instrumentation base a cable bracket with a
larger cut out for the thicker cable loom (with the OCT cables) is required.
Cable bracket for HRA
II and SPECTRALIS
HRA (small cut-out)
Cable bracket fo
SPECTRALIS OCT
and SPECTRALIS
HRA+OCT (larger cutout)
13
Page 14

HRA 2 Installation and System Configuration Electrical Wiring
p
Confidential - for internal and distributor use only
4 Electrical Wiring
The electrical wiring of the SPECTRALIS system is very similar to the wiring of the HRA2 system; please
therefore follow the HRA2 installation manual for details. The only differences for the SPECTRALIS
HTA+OCT resp. SPECTRALIS OCT systems are listed below:
4.1 Additional OCT cables in the cable loom
The cable loom includes two additional cables: the OCT data cable (purple connector) and the OCT power
connector (orange connector).
Fire Wire data
links to PC
OCT data
connector
Foot switch
Instrumentation
base
Touch
anel
Power
cord
OCT power
connector
Service port
Data connector
Power connector Signal connector
4.2 Fire Wire links to the computer
In addition to the HRA2 Fire Wire cable (IEEE 1394, A-Standard, 200 MBit/s), there is now an additional
Fire Wire cable for the OCT data transfer (IEEE 1394b, B-Standard, 800 MBit/s).
Fire Wire OCT
(B-Standard)
Power Inlet
and fuse
Fire Wire HRA
(A-Standard)
OCT data port
OCT power port
14
Page 15

HRA 2 Installation and System Configuration Electrical Wiring
Confidential - for internal and distributor use only
Fire Wire cables
connected to the
power supply
Fire Wire ca
bles connected
to the computer:
B-Standard ca
ble connected
to the PCI Express Card
(IEEE-1394b)
Please note: The external hard disks are connected to additional FireWire ports of the computer. As
laptops usually do not provide electrical power at the FireWire interface, there was in the HRA2 the
possibility to connect external hard disks without intrinsic power supply to the power supply. This
option does not exist anymore for the SPECTRALIS system.
15
Page 16

HRA 2 Installation and System Configuration Installation of the Sapphire and Spectrometer Fibers
Confidential - for internal and distributor use only
5 Installation of the Sapphire and Spectrometer Fibers
5.1 Remove the cover of the power supply box
Make sure, that the power is switched off! After removal of the 8 allen screws ( 2mm allen wrench), the
power supply cover can be carefully removed as shown in the pictures below. Make sure, that the cover is
tilted to the side opposite to the cable connectors, as on this side the protective earth cable is attached.
Extreme care has to be taken for not touching and misaligning the sensor board.
Sensor board (close to the
power supply housing)
Remove protective
earth wire
16
Page 17

HRA 2 Installation and System Configuration Installation of the Sapphire and Spectrometer Fibers
Confidential - for internal and distributor use only
5.2 Through Feeding and Installation of Fiber Cables
The metallic fiber protection cap is removed from the Sapphire fiber coupler and saved in the provided
thread next to the distance bolt.
The two fiber cables are threaded behind the distance bolt into the power supply unit.
The OCT fiber is laid through the cut-out up to the spectrometer level, just next to the protective earth
wire.
Cut-out for the
protective earth
and the fiber
17
Page 18

HRA 2 Installation and System Configuration Installation of the Sapphire and Spectrometer Fibers
r
r
r
g
g
f
f
Confidential - for internal and distributor use only
5.3 Attachment of Spectrometer Fiber Attachment of Spectrometer Fiber
Fiber port
Connector key o
FCAPC connector
• Remove the plastic fibe
protection cap
• Insert the FCAPC fiber connecto
into the spectrometer fiber port.
• Make sure, that the connector key
fits into the keyway of the fibe
port.
• Carefully ti
nut while sli
hten the threaded
htly pushing the
Threaded nut o
FCAPC connector
18
Page 19

HRA 2 Installation and System Configuration Installation of the Sapphire and Spectrometer Fibers
N
p
p
Confidential - for internal and distributor use only
5.4 Installation of Laser Coupler to the Kineflex
The installation of the Sapphire coupler is described in detail in the HRA2 installation manual. Please
note the following two differences:
• The access to the alignment screws is more difficult due to the orange fiber cable and the flat
ribbon cables of the OCT spectrometer unit. It is recommended to use allen screws (2mm
allen wrench) for the alignment.
• The locking screw for the retaining pin is omitted, as the access is more difficult.
Push the spring button in order to launch in the fiber optics. Make sure, that the polarisation key fits
properly into the polarising key-way. The button can be released as soon as the fiber is properly
positioned. Once the fiber is positioned, the 4 screws can be aligned in a wide range without
readjusting the preload tension. However, usually after shipment only very slight readjustments of
A1 and B1 are required, often the specified output power values are obtained without any
readjustment.
4 x locking nuts
to secure
alignment of
A1…..B2
Push this spring button down for
inserting the fiber coupler or prealignment tool
A1
B1
B2
A2
If the fiber coupler is inserted properly,
the little set screw on the polarisation
ring should be centered within the bore
Polarisation key
marked with black
Retaining pin
omitted in new units
en
Screw for locking
retaining pin is
omitted
ut for
olarisation key
19
Page 20

HRA 2 Installation and System Configuration Installation of the Sapphire and Spectrometer Fibers
Confidential - for internal and distributor use only
5.5 Measurement of FA-Laser Power at objective
1. Start the SPECTRALIS system and the computer, open the acquisition module, and wait until the
message
Mode and select fluorescein angiography (FA) mode. Some blue light should be visible at the
camera objective.
2. Mount the Ophir-Powermeter (with the special Camera-Adapter) on the camera objective. Select
the wavelength 488 nm and the range max. 3 mW. Set the camera to 30°, HR-Mode and 0 diopters.
Measure the laser output by using the average procedure (10 seconds). The specified power range
is 260 μW – 300 μW.
warmup
on the LCD at the power supply is replaced by
no error
. Then switch to Live-
Please note: For the alignment procedure we recommend to use the Heidelberg Engineering TSEsensor equipped with an special Camera adapter fitting on the SPECTRALIS objective. The TSE
sensor significantly facilities the adjustment procedure, as the reading of the sensor is less
affected by the fluctuation due to laser modulation. However, the TSE-sensor is not calibrated and
can be used only for relative power measurements and for adjustment procedures. For the final
power check during installation a calibrated Ophir power meter is absolutely required.
If the TSE sensor is not available, the adjustment can be done with the Ophir laser power meter in
the “Tune”-Mode in order to reduce the fluctuations on the display due to the modulation of the
laser.
3. Optimise the fiber coupling by aligning the adjustment screws B1 (vertical tilt) and A1
(horizontal tilt) of the manipulator to maximum laser output at the objective in FA-mode (30°
HR-mode at 0 diopters). Compare the measured values with the data given on the datasheet
delivered with each system. If the power values are not reached, a control of the translation
adjustment in horizontal and vertical direction of the fiber coupler has to be done. Refer to the
HRA2 service manual for a detailed description of this procedure.
20
Page 21

HRA 2 Installation and System Configuration Installation of the Sapphire and Spectrometer Fibers
Confidential - for internal and distributor use only
5.6 Attachment of the fiber strain relief unit
The fiber strain relief unit is mounted to the steel band with two M2.5x8 screws as shown is the picture
below.
21
Page 22

HRA 2 Installation and System Configuration Spectrometer
Confidential - for internal and distributor use only
6 Spectrometer
6.1 Principal set-up
The OCT signal is detected by a spectrometer inside the power supply box. An optical fiber is inserted
into the spectrometer, the collimated light beam is then impinging on a diffraction grating. The
diffracted beam is imaged onto a line sensor. Due to the very small pixel size of the detector (14
microns in height) the adjustment of the grating and the adjustment of the sensor itself is crucial.
Sensor line Focussing lens
Fiber output collimating lens Diffractive grating
The line which is imaged onto the line sensor will drift vertically during operation due to thermal
effects. The piezo drive of the diffraction grating mount should compensate for this drift
automatically. The actual piezo setting is displayed on the OCT service screen.
22
Page 23

HRA 2 Installation and System Configuration Spectrometer
Confidential - for internal and distributor use only
6.2 Check of the optical alignment
• The OCT Service Screen
OCT image acquisition is started by selecting
show up by pressing
active). The service screen is showing the actual A-Scan image, i.e. one line detector output.
To check the optical alignment of the spectrometer the settings
un
checked. Now the raw spectrum should be visible.
Ctrl, Alt, Shift
and O at the same time (provided that the acquisition window is
IR + OCT
on the touch panel. The OCT service screen will
live
and
Normalize
Spectrum on
line sensor
have to be
Every time
take a few seconds depending on the grade of misalignment or drift. During this procedure the piezo
setting is changed from 0 to 1.0 to find an optimum signal intensity on the detector (A
be checked).
23
IR + OCT
is pressed on the touch screen, the auto calibration will start. This procedure can
uto piezo
must
Page 24

HRA 2 Installation and System Configuration Spectrometer
t
Confidential - for internal and distributor use only
During operation the image line will drift downward due to thermal effects which has to be
compensated by an increased value of the piezo setting. After some hours of operation the optimum
piezo setting will have been run from about 0.3 (or 0.4 depending on its initial setting) towards 1.0.
A failure of calibration is indicated by a piezo setting of 1.0: the piezo has been moved upwards from 0
to 1.0 but no spectrum signal has been detected. If
flat line with some noise shows up.
If automatic calibration fails and only a flat noisy line is visible the spectrometer has to be re-aligned.
Normalize
and
Subtract Zero
are unchecked only a
No spectrum, but noisy offse
signal
: Do
not
IMPORTANT
fiber output power delivered to the spectrometer are correct. Uncheck
If any offset signal, i.e. a flat, but noisy signal which is updating continuously, is missing then
Zero.
data transfer is interrupted! In this case, check cables, restart the power supply, and check the device
drivers. If data is transferred check the fiber output power with a powermeter (about 2μW @ 880nm).
start to re-adjust the optical setting
before
having verified that data transfer
Live, Normalize
and
and
Subtract
• Check Sensor Alignment
If a spectrum is visible in the service screen (at any piezo setting) then check, if the sensor is aligned
parallel to the incident line spectrum: Varying the piezo slider the position of the maximum and the
shape of the curve should stay constant (see figure).
24
Page 25

HRA 2 Installation and System Configuration Spectrometer
Confidential - for internal and distributor use only
Piezo: 0,460 Piezo: 0,520 Piezo: 0,560
A tilt of the line sensor is evident if the spectrum is narrowed (compared to the spectrum of your data
sheet) and its maximum moves from left to right (or the other way round) while moving the piezo
slider (see figure).
To align the sensor board
board can be turned but is held in its position. Turn the sensor board slightly to broaden the spectrum.
Possibly the micrometer screw has to be turned slightly (by only a few degrees) at the same time if the
piezo range is not sufficient to match the change in image height.
25
, loosen the screw of the black mount only to the extent that the sensor
Page 26

HRA 2 Installation and System Configuration Spectrometer
Confidential - for internal and distributor use only
Check the adjustment by moving the piezo slider and observing the spectrum as is described above.
Then fasten the screw carefully and check the alignment again.
• Check Piezo Setting
The piezo setting can be varied within a range from 0 to 1.0 corresponding to a positioning shift of 0
to 25 microns. To compensate for thermal drift the automatic piezo setting will move towards 1.0
during operation. The initial setting therefore should be in the lower range (about 0.300 to 0.350) at
system start which has to be adjusted by the micrometer screw.
Check the actual optimum piezo setting. This can be done automatically by checking
Calib.
signal.
IMPORTANT:
setting 0. Maximum intensity occurs at a different piezo setting while moving downwards!
26
or manually by pushing the slider upwards starting from 0 and identifying the maximum
Due to hysteresis of the piezo the slider has always to be moved upwards starting at
Live
or
Auto
Page 27

HRA 2 Installation and System Configuration Spectrometer
Confidential - for internal and distributor use only
If the optimum piezo setting is at its upper limit (1.0 or near), the micrometer screw has to be turned
very slightly and very slowly clockwise. This is a sensible procedure: One complete turn of the
micrometer screw corresponds to a shift of 500 microns. What is needed is a shift of about 10 microns
– so only a few degrees are required.
Then, move the slider to find the position of maximum signal intensity or use the automatic
calibration. If the system has been run for some hours the slider should be in the upper range (about
0.7), for a cold system the maximum signal should be at a slider position of about 0.3.
If the optimum signal is at a slider position which is too large to meet these requirements, turn the
micrometer screw clockwise. Correspondingly, if the optimum signal is at a slider position which is
too low, turn the micrometer screw counterclockwise.
• Check OCT Image Quality
To assess OCT image quality check
displayed below the OCT image.
Acquire an OCT image of your eye. Make sure that refraction setting and head rest positioning are
optimum to get a reliable measure. Move the Spectralis camera forward/backward until the OCT
cross section appears in the upper third of the image display. Press
the image and to read the SNR value. It should be at least 35 on a normal healthy eye.
• Check Image Quality Decay
Inherent to the OCT technique is a decay in image quality with depth. Acquire an OCT image at a
larger depth. Try to fixate the same position as before. Move the Spectralis camera forward/backward
until the OCT cross section appears at about the center of the image display.
Check, that at this position still decent images are available.
Service Display
in the Service Screen. A SNR value is now
freeze
on the touch panel to freeze
If there is a decay in image quality with depth which is evidently stronger than described above, the
focus of the spectrometer should be readjusted.
27
Page 28

HRA 2 Installation and System Configuration Spectrometer
Confidential - for internal and distributor use only
To adjust the focus
moving the brass lens mounting slightly forward/backward. If helpful, a pin or a screw can be
inserted to shift the lens.
The depth of the focus is smaller than 400 microns. Optimum focus position can be detected by a
maximum of signal intensity observed in the OCT service screen (uncheck
, loose the two screws of the spectrometer lens. Focus position is adjusted by
focus shift
Live
and
Normalize
).
IMPORTANT
possible and simultaneously move the piezo slider up and down to compensate for any changes in
height. Best focus is where maximum signal results
Tighten the screws. Signal will decrease, but can be recovered by the piezo setting or a micrometer
screw adjustment (then proceed with
: Shifting the lens affects the height of the image line! Move the lens as slightly as
after
piezo optimisation.
Check Piezo Setting
).
6.3 Closing the Cover
• First attach the protective earth wire as shown in the picture in section 5.1
• Then carefully impose the cover without touching the sensor board.
• Make sure, that no cables resp. fibers are squeezed.
• Tighten the 8 allen screws (allen wrench 2 mm)
28
Page 29

HRA 2 Installation and System Configuration Final Check and Installation Report
Confidential - for internal and distributor use only
7 Final Check and Installation Report
In order to ensure an optimum performance of the SPECTRALIS units in the clinical environment,
Heidelberg Engineering requests the own field service as well as the international partners to document
the installation process by completing an installation report form (see appendix)
This report should be filled out during / after the installation procedure at the customers site, and should
be faxed or emailed to the support department of Heidelberg Engineering. This installation report is an
important element of the device history record of each instrument.
Please follow the procedures listed below:
Line 1 – Line 4:
SPECTRALIS model name and serial numbers of camera, power supply and touch screen panel. These
lines are filled out by Heidelberg Engineering.
Line 5:
Fill in the serial number of the installed software protector dongle.
Line 6:
Check if the instrument is set-up with an instrumentation base joystick version, XYZ version or the new
Spectralis OCT (“slim”) version. Write down the corresponding serial number, if available.
Line 7:
Check, if the outer appearance of the instrument is o.k. (no transportation damage).
Line 8:
Check, if all cables are properly connected.
Line 9:
The instrument has to be connected to an appropriate isolation transformer. Check, if o.k.
Line 10 –Line 12:
Check the laser power values as follows: Set the SPECTRALIS system to 0 diopters, put the Ophir power
meter with the HE adapter onto the objective, and measure the laser power in the following modes (10
seconds average):
Line 10: ICG mode, 790 nm, high resolution mode, 30° field, laser intensity 100%
Line 11: IR-Refl. mode, 790 nm, high resolution mode, 30° field, laser intensity 100%
Line 12: FA mode, 488 nm, high resolution mode, 30° field.
These values should be within the listed specification range. On the report form, the results of
measurements during the end test procedure in Heidelberg are given as reference.
Line 13:
The primary Sapphire laser power is shown on the power supply display. The specification range is 7 mW
– 9 mW. The value should be in agreement (+/- 0.2 mW) with the data filled in by Heidelberg Engineering.
Line 14:
Sapphire power after AOM in the 1. order beam. This value needs not to be measured during normal
installation. However, it may help to locate the source of error, in case the specified range of FA power
(line 12) can not be reached.
29
Page 30

HRA 2 Installation and System Configuration Final Check and Installation Report
Confidential - for internal and distributor use only
Line 15:
In order to measure the power of the SLD (OCT light source) proceed as follows:
Switch to IR / OCT-Mode, select circular scan pattern (no laser modulation) and set the IR-Laser to laser
power 0%. (Therefore the Touch Panel has to be set to the service mode (see HRA2 service manual) , then
press 5% and 5 times the minus button). Mount the power meter (wavelength 880 nm, range 3 mW) onto
the objective. Averaging procedure is not required.
Important: For stable power reading deactivate “Live” and “automatic” buttons in Service Window.
Measure the OCT-SLD power (880 nm, circular scan, 30° field)
Line 16:
Power out of OCT fiber injected into spectrometer: This value needs not to be measured during normal
installation. However, it may help to locate the source of error, in case the curve of the SLD spectra (line
17) is lower as supposed to be. (Measuring mode as in Line 15, but power range 30 μW)
Line 17:
Screen shot of the SLD spectra
• Switch to live mode, enable the OCT feature, select OCT+IR
• Switch to 30° field, HR-mode and circular scan
• Open the OCT-Service Window (Ctrl Alt Shift O) and wait until the auto calibration procedure is
finished
• Disable “live” and “normalize” by unchecking these features, in order to display the original SLD
spectra
• Press Alt Prt in order to copy the window with the SLD spectra to the clipboard. Open an
appropriate program (e.g. Paint, Word etc.), insert the clipboard and print and/or save the debug
window with the spectra. Attach this document to the installation protocol.
• Compare the measured spectra with the delivered print-out. The shape of the curve should be
very similar, the height of the maximum should agree within +/- 10%.
Line 18 – line 19:
In order to judge the quality of the instrument performance after installation, a test examination (IRreflection and OCT image) of a normal eye should be accomplished. The following criteria allow the
evaluation of the images:
Line 18, IR-reflection image:
Check, if at laser power 50% and medium detector sensitivity a well illuminated, sharp image of the
retina of a test person is obtained.
Line 19, OCT image:
If the check box “service display” is enabled in the OCT service window, an arbitrary value for the signal
to noise ratio (SNR) is displayed on the computer screen just below the OCT image. For a healthy eye
typical values of about 35 or higher are obtained, when the OCT image is shifted to the upper range of the
OCT display window. Document the obtained values of a test examination.
30
Page 31

HRA 2 Installation and System Configuration Appendix: SPECTRALIS Installation Report
Confidential - for internal and distributor use only
Line 20 – line 22:
Document the installed versions of the Heyex, the Acquisition Module, and the Viewing module. The
installed versions are displayed in the Heyex/About menu.
Line 23:
Fill in address and institution of the customer, responsible person, phone number, and/or email address.
Line 24
Date and Signature end test by Heidelberg Engineering
:
Line 25:
Installation o.k., Date and Signature confirmed by technician / engineer, responsible for installation.
Heidelberg Engineering GmbH
fax: +49 6221 646362 Att. Technical Support
email: Support@HeidelbergEngineering.com
Appendix: SPECTRALIS Installation Report
(Art. No. 92 733)
31
Page 32

Confidential - for internal and distributor use only
32
Page 33

Confidential - for internal and distributor use only
33
 Loading...