

Page 1

SL-OCT™
Slit Lamp-OCT™
Anterior Segment Imaging
Operating Instructions
Software Version 1.0.2.0
© Heidelberg Engineering GmbH
July 2007
Part No.
97079-006 A4 Rev. 006
Page 2

The manufacturer hereby declares that this product conforms to the requirements
0482
of Directive 93/42/EEC of the Council of the European Community dated 14 June
1993 regarding medical products (MD 93/42/EEC).
Caution! Do not use the SL-OCT™ without reading this manual. Failure to
adhere the instructions of this manual may compromise data and results.
This product is manufactured under one or more of the following patents:
DE 100 35 835, DE 198 12 297, EP 0 941 692, US 6,095,648
Corporate Headquarters
Heidelberg Engineering GmbH • Tiergartenstr. 15 • 69121 Heidelberg • Germany
Phone +49 6221 6463-0 • Fax +49 6221 646362 • www.HeidelbergEngineering.de
U.S.A.
Heidelberg Engineering, Inc. • 1499 Poinsettia Avenue, Suite 160 • Vista, CA 92081
Phone 760 598-3770 • Fax 760 598-3060 • www.HeidelbergEngineering.com
Heidelberg Engineering, Inc. • 410 Harris Road • Smithfield, RI 02917
Phone 401 349-0500 • Fax 401 349-0504 • www.HeidelbergEngineering.com
2
SL-OCT Operating Instructions 1.0.2 - Part No. 97079
Page 3

TABLE OF CONTENTS
1 GENERAL INFORMATION 5
1.1 INTENDED USE 5
1.2 OPERATIONAL ENVIRONMENT 5
1.3 PRINCIPLES OF THE TECHNOLOGY 5
1.4 CAUTIONS, WARNINGS, AND CONTRAINDICATIONS 5
1.5 SYSTEM INSTALLATION 7
1.6 SYSTEM COMPONENTS 9
1.7 MAINTENANCE 9
2 SOFTWARE CONFIGURATION 10
2.1 HEIDELBERG EYE EXPLORER 10
2.2 VIEWING SOFTWARE 10
2.3 NETWORK ENVIRONMENTS 10
2.4 INTEGRA TION WITH EMR OR PRACTICE-MANAGEMENT SOFTWARE 10
3 STARTING AND POWERING DOWN THE SYSTEM 11
3.1 HARDWARE POWER ON 11
3.2 VERIFY SOFTWARE INSTALLATION 12
3.3 STARTING HEYEX 12
3.4 EXITING HEYEX 12
3.5 HARDWARE POWER OFF 13
4 DATABASE VIEWING WINDOW 14
4.1 OVERVIEW 14
4.2 DATABASE VIEWING WINDOW TOOLBAR 14
4.3 SEARCH FILTERS 15
5
PATIENT RECORDS 17
5.1 CREATING A NEW PATIENT RECORD 17
5.2 OPENING AN EXISTING PATIENT RECORD 21
5.3 EXAMINA TION TABS 21
5.4 LOADING MULTIPLE RECORDS FOR BATCH FUNCTIONS 23
6 IMAGE VIEWING WINDOW 24
6.1 OVERVIEW 24
6.2 IMAGE VIEWING WINDOW T OOL BAR 24
6.3 EDITING AND VIEWING FUNCTIONS 25
6.4 EXAMINATION TABS 26
6.5 LIGHTBOX 26
6.6 PREVIEW PANE 28
SL-OCT Operating Instructions 1.0.2 - Part No. 97079
3
Page 4

7 IMAGE ACQUISITION WINDOW 29
7.1 OVERVIEW 29
7.2 IMAGE ACQUISITION WINDOW T OOLBAR AND CONTROLS 30
7.3 ON-LINE QUALITY SCREENING 31
7.4 SAVING IMAGES 31
8 IMAGE ANALYSIS WINDOW 32
8.1 OVERVIEW 32
8.2 IMAGE ANALYSIS WINDOW TOOLBAR 33
8.3 SEGMENT ATION TAB 34
8.4 AUTO-BIOMETRY™ TAB 36
8.5 INTERACTIVE DISTANCE TAB 38
8.6 INTERACTIVE PACHYMETRY T AB 40
8.7 DIGITAL GONIOSCOPY™ TAB 43
8.8 PRINTING REPORTS 45
9 IMAGING PROCESS 46
9.1 PREPARING THE DEVICE 47
9.2 PREPARING THE PA TIENT 47
9.3 FIXATION TARGETS 47
9.4 ALIGN THE IMAGE 48
9.5 STOP/AUTO-STOP 48
9.6 VERTICAL IMAGING 49
10 EXPORT AND IMPORT OF IMAGES AND DATA 50
10.1 EXPORT 50
10.2 IMPORTING 51
SETUP /CONFIGURABLE OPTIONS 52
11
11.1 GENERAL 52
11.2 DISK SPACE 52
11.3 PLUG INS 53
12 TECHNICAL SPECIFICATIONS 54
APPENDIX A: TECHNICAL NOTES 57
APPENDIX B: DISPOSAL 58
4
SL-OCT Operating Instructions 1.0.2 - Part No. 97079
Page 5

Section 1- General Information
1 GENERAL INFORMATION
This is an introduction to the Heidelberg Slit Lamp-OCT™ (SL-OCT™) with operating software
version 1.0.2.0. These operation instructions also contain important safety information.
1.1 Intended use
The SL-OCT is a tomographic device for the viewing and axial, cross sectional imaging of anterior
ocular structures. It is used for the in vivo imaging and measurement of the anterior segment structures of the eye.
The SL-OCT is intended for use as a diagnostic device to assist in the diagnosis of the anterior segment of the eye.
1.2 Operational Environment
The intended operational environment of the device is a clinical setting, medical practise or similar location under the direction of a trained ophthalmologist or optometrist.
1.3 Principles of the technology
The SL-OCT combines slit lamp technology with optical coherence tomography (OCT). The OCT
imaging component of the SL-OCT is of a time domain OCT interferometer. The principle of time
domain OCT is well known from the literature and is described elsewhere. The SL-OCT device
uses a short coherent infrared light source. The light source is a super-luminescent light emitting
diode with a central wavelength around 1310 nm. The source beam is divided into two components, the sample beam which enters and is reflected back from the eye and the reference beam
which passes a delay line. The length of the delay line is modulated over the measurement depth
within one A-scan. The beams are recombined, and the OCT signal is calculated from the resulting
interference patterns. This OCT signal is used to produce an A-scan with precise depth information. The SL-OCT scanning beam moves across the eye providing multiple A-scans which are
combined to form a two-dimensional, cross-section scan, like an ultrasound B-scan.
1.4 Cautions, Warnings, and Contraindications WARNING Carefully read the operation manual before operating the device. Misuse of the
device may lead to incorrect diagnostic results.
WARNING Do not open the device component housings. Doing so may result in electrical
shock and laser radiation.
WARNING Do not use the device outside the scope of its “Intended use”. Doing so may lead
to malfunctions or damage of the device.
WARNING Do not use PCs, components or accessories that have not been approved by Hei-
delberg Engineering. Do not install other software as this may interfere with the
functionality of the Heidelberg Engineering software or equipment. This could include damage to the system as well as incorrect measurement results.
WARNING Do not use a network connection without network isolation in accordance with
IEC 60601-1. In the event of a failure in the network, user and patient could be at
risk of electrical shock.
SL-OCT Operating Instructions 1.0.2 - Part No. 97079
5
Page 6

Section 1- General Information
WARNING Make sure that the environmental requirements are met when the system is oper-
ated. Exceeding environmental conditions may damage the system or lead to incorrect measuring results.
WARNING Make sure the patient is correctly positioned in front of the device before starting
the examination. Wrong positioning may lead to poor images and incorrect diagnostic results.
WARNING Artifacts on the images could falsify the measured results. Do not use the meas-
ured results for further treatment if there are artefacts in the images.
WARNING Do not make a diagnostic decision on the basis of one single examination. The
device is not clinically evaluated for the diagnosis of specific pathologies. So always use alternative information; history data etc. to assist in a final diagnostic determination.
WARNING Do not use the analyse results from patients with Pathological Eyes without an
inspection of the segmentation. In case of pathological eyes the segmentation
might be incorrect, and lead to wrong calculations of the analyse results.
WARNING Prepare safeguards to ensure that only authorized personnel can access the patient
data. Data loss impedes follow-up analyses and may result in inappropriate diagnostic decisions.
WARNING Be sure to perform periodic data backup procedures. Check the success of the
backup to avoid data loss caused by backup errors.
WARNING To avoid the risk of electric shock, this equipment must only be connected to a
grounded power supply.
WARNING To avoid the risk of electric shock, do not touch conductive parts of connectors
and the patient simultaneously.
WARNING Do not operate the system directly after large temperature changes. Let the device
acclimate itself for a minimum of 2 hours to avoid device damage or incorrect
measurement results.
CAUTION Never leave the patient alone with the instrument during the examination!
CAUTION The instrument must not be used under any circumstances if mechanical, optical or
electrical faults occur. Any change or addition to the system must comply with the
relevant legal guidelines. Repairs, particularly to the electronic and optical
components, must be carried out only by Heidelberg engineering authorized,
trained personnel.
CAUTION Unusual noises and/or vibrations can indicate a fault. Should this happen, please
turn the instrument off immediately and contact the technical support center
responsible for your area. Do not attempt to repair the instrument yourself in the
event of a fault.
CAUTION This instrument contains a diode laser and emits invisible laser light through the
slit lamp. The Heidelberg SL-OCT is a Class I laser system. The laser does not
pose any safety hazard.
6
SL-OCT Operating Instructions 1.0.2 - Part No. 97079
Page 7

Section 1- General Information
CAUTION This equipment was tested in accordance to IEC 60601-1-2, Electromagnetic
Compatibility (EMC). Nevertheless, it might be affected by strong
electromagnetic fields. Portable high frequency communication devices may affect
the device.
CAUTION The operator must be sure that the device settings and adjustments are correct
before starting an examination and making any diagnostic decision. Wrong
settings and adjustments may lead to poor image quality or incorrect examination
information.
CAUTION The physician must be sure to have the correct patient data before making a
diagnostic decision. Mismatched patient data may lead to inappropriate diagnostic
decisions.
CAUTION Read subsection “Imaging Process” carefully before starting the examination.
Incorrect preparation of the patient may lead to poor image quality and incorrect
diagnoses.
CAUTION Do not start an examination without informing the patient about the examination
procedure. Inappropriate patient behavior during the examination may lead to poor
image quality and incorrect diagnoses.
CAUTION Read subsection “Service Maintenance and Cleaning” carefully. A failure to carry
out maintenance or incorrect adjustment of the device may lead to poor image
quality and incorrect diagnoses.
CAUTION Before starting the system check the regional power supply specifications to verify
that they comply with the required tolerances (100V < U < 240V; 50Hz < f <
60Hz). Wrong power supply conditions may lead to malfunctions of the system.
CAUTION A computer failure during image acquisition or analysis could lead to incorrect
results
CAUTION United States of America:
Federal law restricts this device to sale by or on the order of a Physician or Practi-
tioner
CONTRAINDICATIONS No contraindications are known.
For the United States of America only:
The laser class label “Laser Class 1” is located on the rear of the OCT
housing. The Laser safety class is approved and defined in accordance to
IEC 60825 part 1 and part 2 and in accordance to the 21 CFR Part 1040
“Performance Standard for Light emitting Products”.
1.5 System installation
Accompanying these operating instructions you will find detailed installation instructions in the
document “Installation Instructions for SL-OCT™”.
SL-OCT Operating Instructions 1.0.2 - Part No. 97079
7
Page 8

Section 1- General Information
NOTE: To ensure the overall safety of the system, the SL-OCT must be installed by certified staff
of your local Heidelberg Engineering distributor.
8
SL-OCT Operating Instructions 1.0.2 - Part No. 97079
Page 9

1.6 System components
Section 1- General Information
Mounted scanner unit
Slit lamp
(HAAG-STREIT BD 900)
Motorized lift table
SL-OCT H
ARDWARE COMPONENTS
Monitor
Keyboard / mouse
OCT unit (embedded PC)
Printer (not pictured)
The SL- OCT examination system is based on a slit lamp modified for use with an OCT device.
The slit lamp's functionality is in no way impaired by this modification. The scanner unit is
permanently attached to the slit lamp illumination and projects the OCT measurement beam over
the same path as the visible slit lamp beam.
1.7 Maintenance
The Heidelberg SL-OCT is a precision optical measuring instrument. Protect the instrument
against dust and moisture, and avoid shocks and the action of strong forces.
Please maintain the slit lamp according to the instructions in the slit lamp operations manual
(provides with this document). When necessary, the inclined mirror on the front of the slit lamp
can be carefully cleaned using a lens cloth and a small amount of isopropyl alcohol or distilled
water.
The non-optical surfaces of the instrument can be cleaned and/or disinfected with traditional
products as necessary. Any standard cleaning product appropriate for plastic surfaces which do not
contain acetone or hydrogen peroxide (e.g. ethanol and isopropyl alcohol disinfectants) may be
used for this purpose. Before doing this, please turn off the system power at the main switch.
A yearly inspection of the device by a Heidelberg Engineering Service unit is highly recommended
to ensure proper and exact operation.
SL-OCT Operating Instructions 1.0.2 - Part No. 97079
9
Page 10

Section 2- Software Configuration
2 SOFTWARE CONFIGURATION
2.1 Heidelberg Eye Explorer
The software of instruments from Heidelberg Engineering runs on the Heidelberg Eye Explorer
(HEYEX), a platform operating within the Microsoft Windows Operating System™. The HEYEX
platform provides all basic functions of the patient database and patient records.
2.2 Viewing software
In addition to the complete operating software (image acquisition and viewing) installed on the
instrument, optional HEYEX SL-OCT Viewing Software is available. This allows for analysis and
review of images on PC’s separate from the SL-OCT system. Please contact Heidelberg
Engineering or your local distributor for further information.
2.3 Network environments
For simultaneous use of the software on several computers within a network, additional
networking licenses can be purchased. For more information, please contact Heidelberg
Engineering or your local distributor.
2.4 Integration with EMR or practice-management software
The HEYEX operation system can be connected to patient data management software systems
(e.g. ICSP med, Fidus, IFA, Medistar, Duria, SEDOC, VIP Vision, WinPro, NextGen, IPRO,
Turbomed, Dr. Notes, and Medisoft). This enables quick and convenient import of patient data into
the digital patient record. Should your patient data management system currently not offer
connection to the HEYEX, Heidelberg Engineering can supply the data exchange program to your
provider for implementation. Please contact Heidelberg Engineering or your local distributor for
further information.
10
SL-OCT Operating Instructions 1.0.2 - Part No. 97079
Page 11
Section 3- Starting and Powering Down the System
3 STARTING AND POWERING DOWN THE SYSTEM
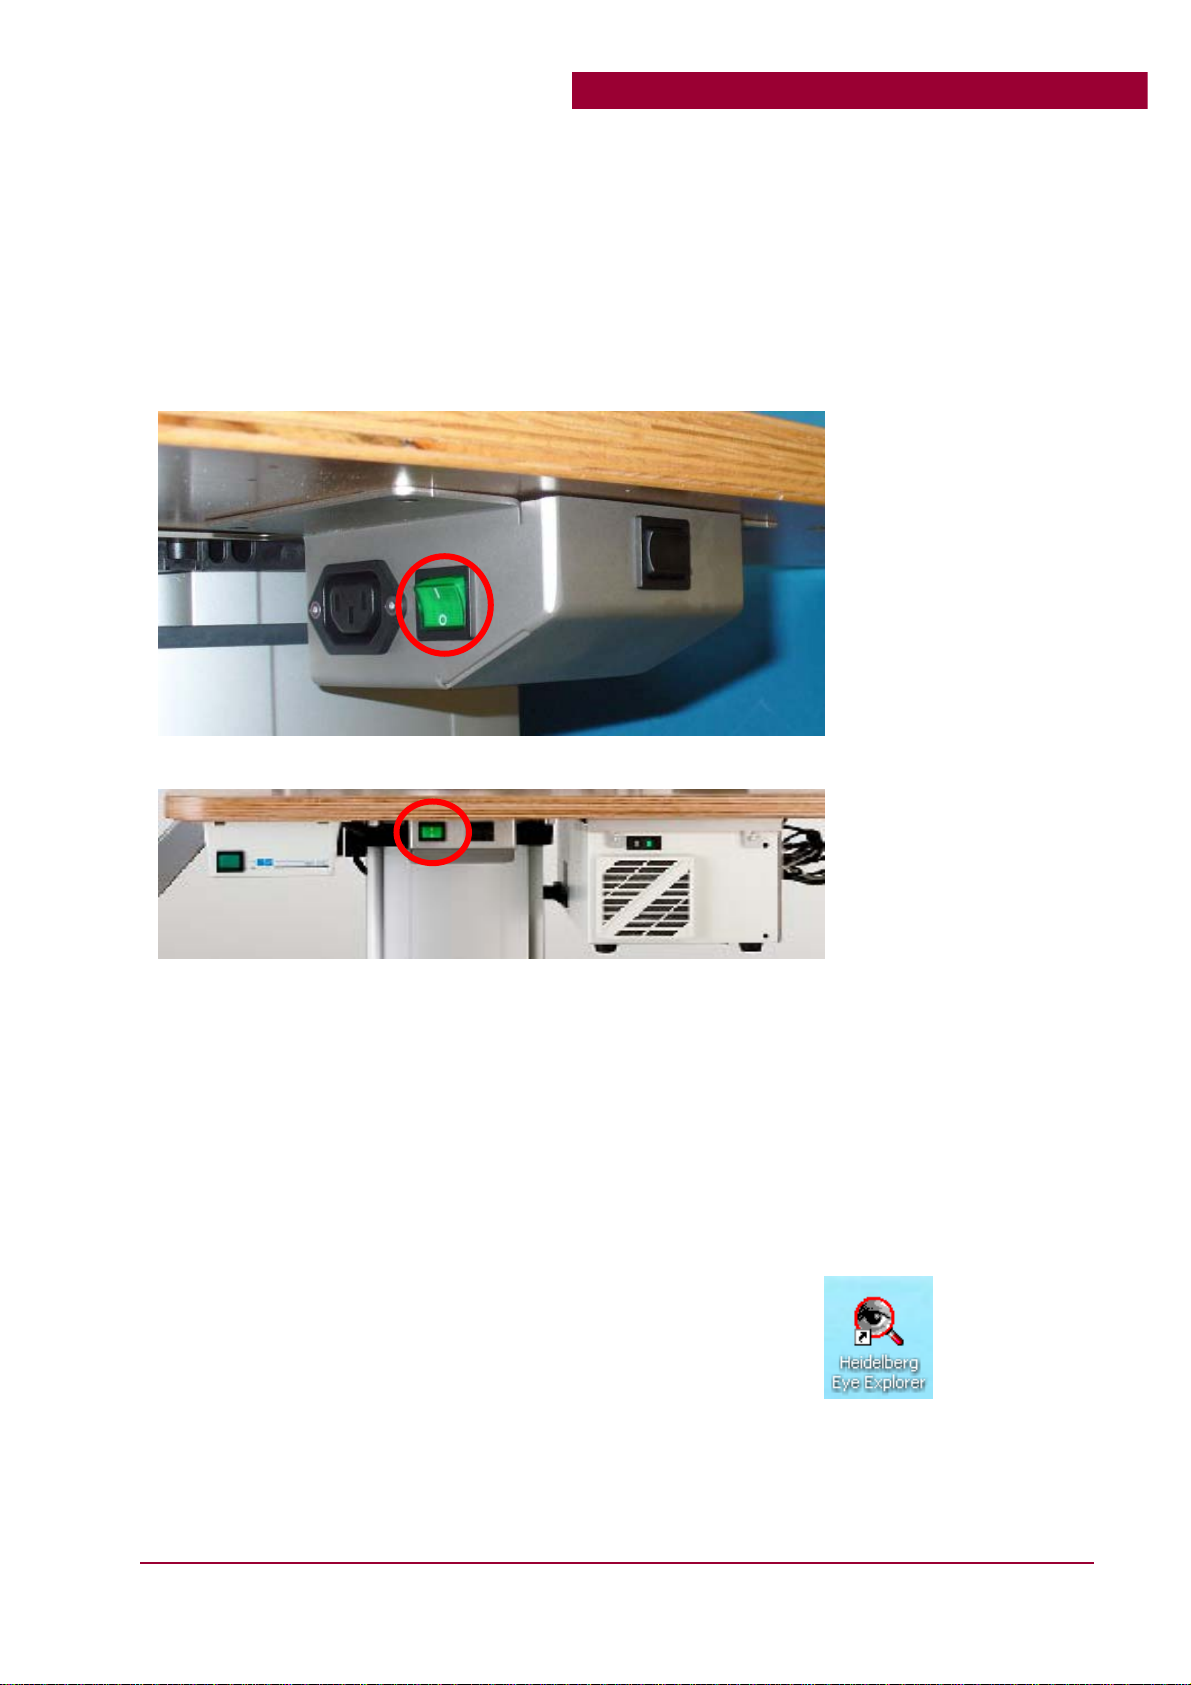
3.1 Hardware power on
To facilitate daily operation, power supplies for all SL-OCT hardware components are connected
to a single, main power switch.
The main power switch is on the control box of the motorized lift table (table) (see illustration).
OR
Original Configuration
The daily power on process is simply:
• Confirm power cables are properly connected
• Confirm Slit lamp and OCT unit are switched on
• Power on system using the main power switch
>> Green lights on the three switches will light up
>> System will power up to password protected login screen.
>> User name: SL-OCT is automatically supplied
• Enter password: “sloct” (Note: password is case sensitive and has no spaces)
>> System opens to windows desktop
• Start HEYEX operating software with the HEYEX desktop icon
Note: The main power switch located close to the lift table raise/lower control switch. When
adjusting table height, be careful not to inadvertently power off the device; if you do, unsaved
images or data entries will be lost.
SL-OCT Operating Instructions 1.0.2 - Part No. 97079
11
Page 12
Section 3- Starting and Powering Down the System
3.2 Verify software installation
In order to use the Heidelberg SL-OCT, the hardware and software must first be correctly installed.
To confirm the software is present:
• Go to the Windows desktop.
• Click on Start –– Settings – Control Panel – Add/Remove Programs.
The following items must be listed:
• Heidelberg Eye Explorer
• Heidelberg Eye Explorer License Manager
• SL-OCT
If these programs are not listed, please contact technical support.
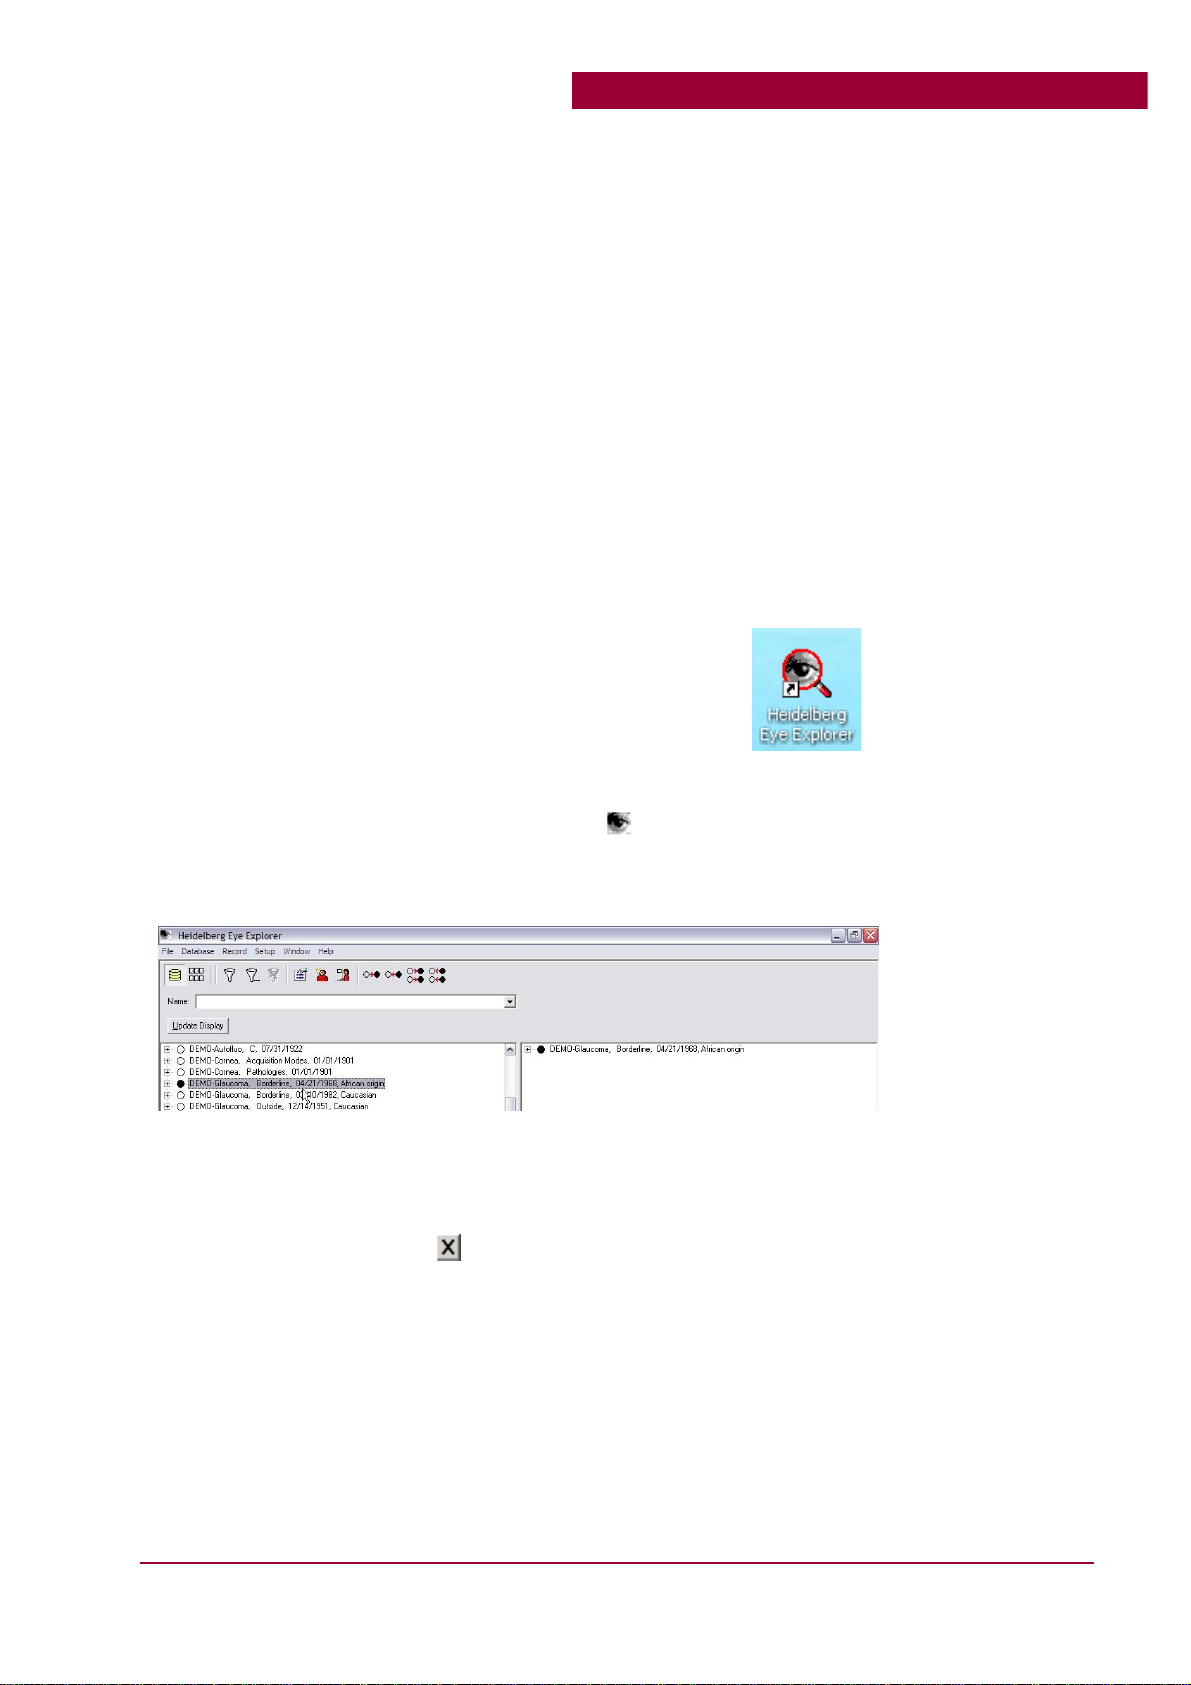
3.3 Starting HEYEX
Start HEYEX by double-clicking the Eye Explorer desktop icon:
OR
By using the windows Start Menu:
Start → Programs → Heidelberg Eye Explorer →
Heidelberg Eye Explorer
The software opens to the Database V iewing Window. (See section 4 for details.)
3.4 Exiting HEYEX
To close the program, click the
button at the upper-right corner of the screen.
OR
With the File menu: File → Exit.
12
SL-OCT Operating Instructions 1.0.2 - Part No. 97079
Page 13

Section 3- Starting and Powering Down the System
Select Yes when prompted with “Do you want to exit the program?”
HEYEX is programmed to pop-up a confirmation window before closing the program. This is a
configurable option which can be switched off. (See chapter 11, Setup / Configurable Options).
3.5 Hardware power off
Power down is a typical Windows process.
• Exit HEYEX and all open applications
• Click: Start → Shut down→ Shut down
>> Computer will power down and give a “Safe to Turn Off” message.
• Use the main power switch (section 3.1) to turn off system power
SL-OCT Operating Instructions 1.0.2 - Part No. 97079
13
Page 14
Section 4 – Database Viewing Window
-
R
e
s
Q
r
r
4 DATABASE VIEWING WINDOW
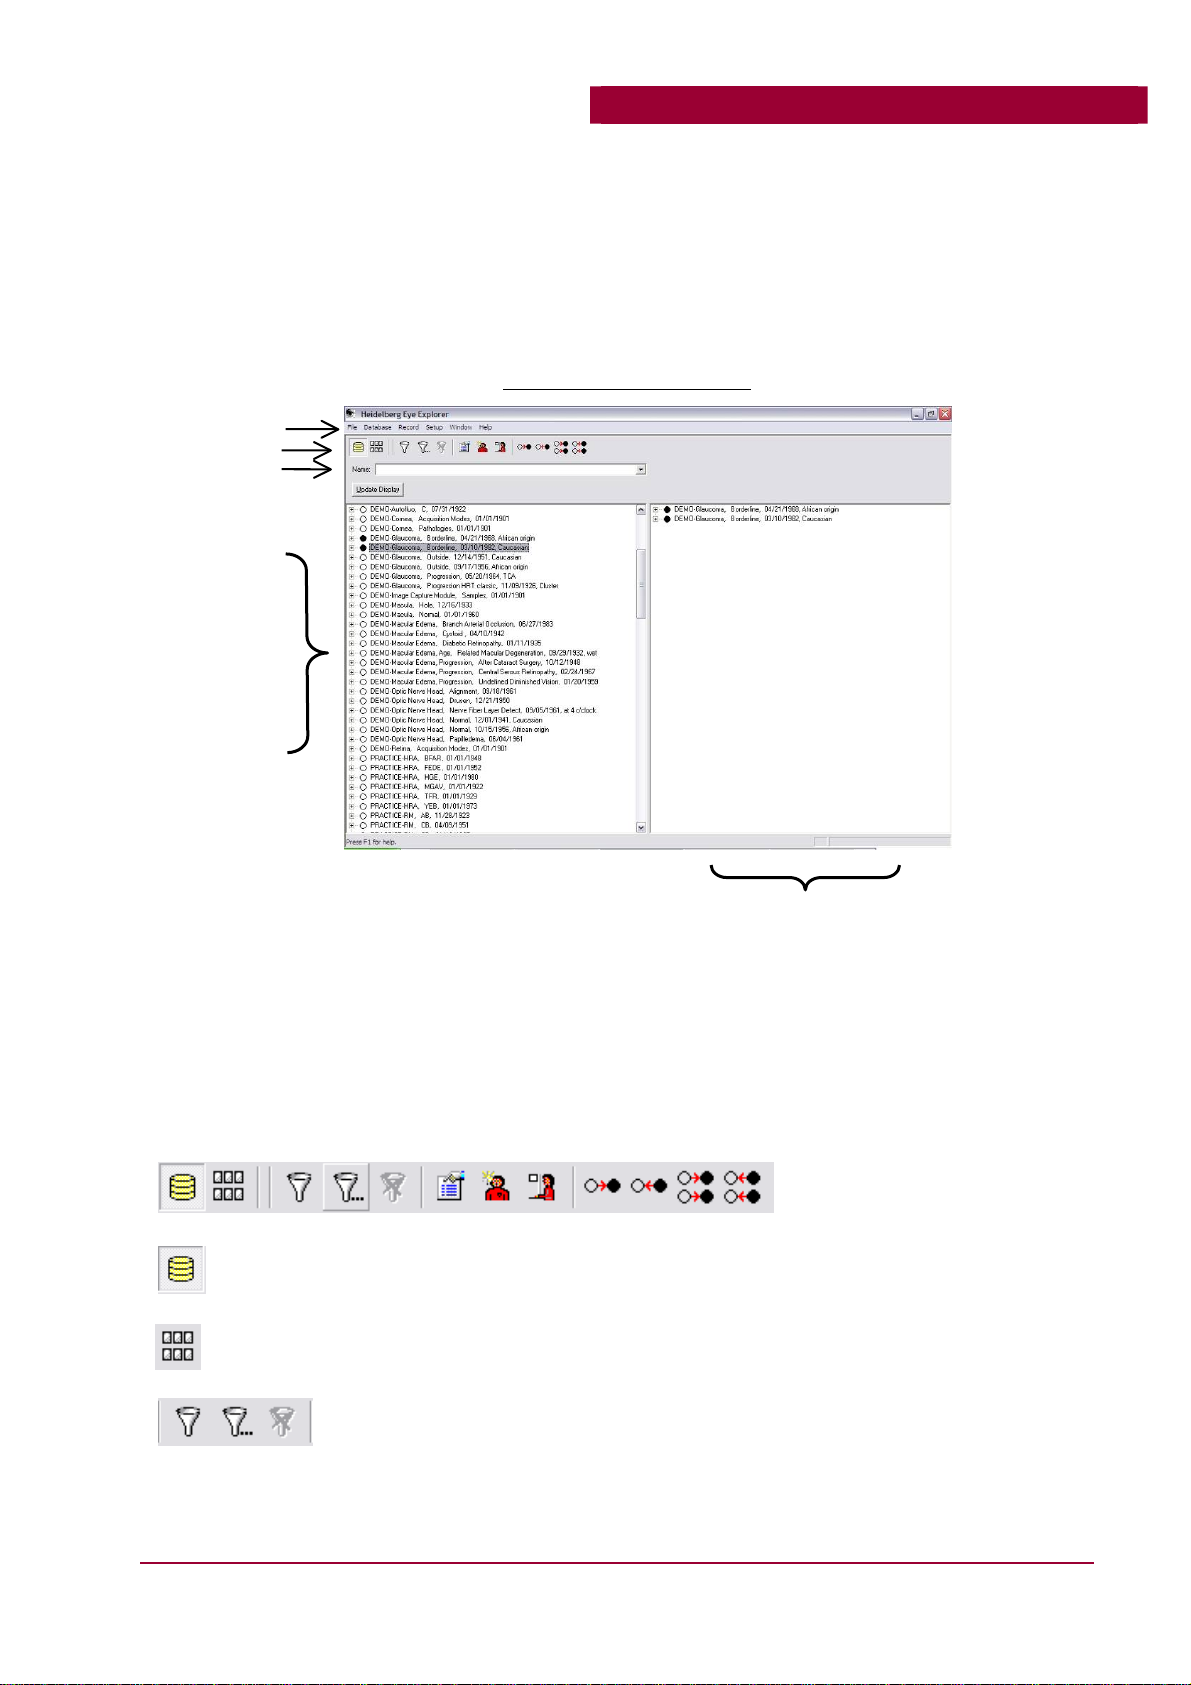
4.1 Overview
The left side of the Database V iewing window shows all patient records in the database. The right
side of the window lists “active” patient records available for new examinations, review or batch
processing.
uick
Menu ba
Icon ba
Database Viewing Win
Patient
database
/ Active Selected Patients
cord
Closing the Database Viewing window will shut down the HEYEX program. HEYEX is
programmed to pop-up a confirmation window before closing the program. This is a configurable
option which can be switched off (See chapter 11, Setup / Configurable Options).
4.2 Database Viewing Window toolbar
The Database Window icon brings you to the database viewing window.
The Image Window icon brings you to the image viewing window (section 6).
The Filter, Load Filter, and No Filter icon functions are described in section
4.3.
14
SL-OCT Operating Instructions 1.0.2 - Part No. 97079
Page 15
Section 4 – Database Viewing Window
The Properties icon opens the Patient Data window (section 5.1) for the selected patient. If
no patient record is selected, it is inactive.
The New Patient icon opens a new Patient Data window for creating a new patient record.
(See chapter 5, Patient Records for details)
The New Examination icon opens a new Examination Data window to begin a new
examination for the selected patient. (See chapter 5, Patient Records for details.)
The Load icon “loads” the selected patient or exam record(s) into the active, right-hand
side of the database window.
The Unload icon moves the selected record(s) out of the active side of the database
window.
The Load All icon moves ALL records into the active window. This is generally used only
for database export functions.
The Unload All icon removes all records from the active side of the database window
4.3 Search filters
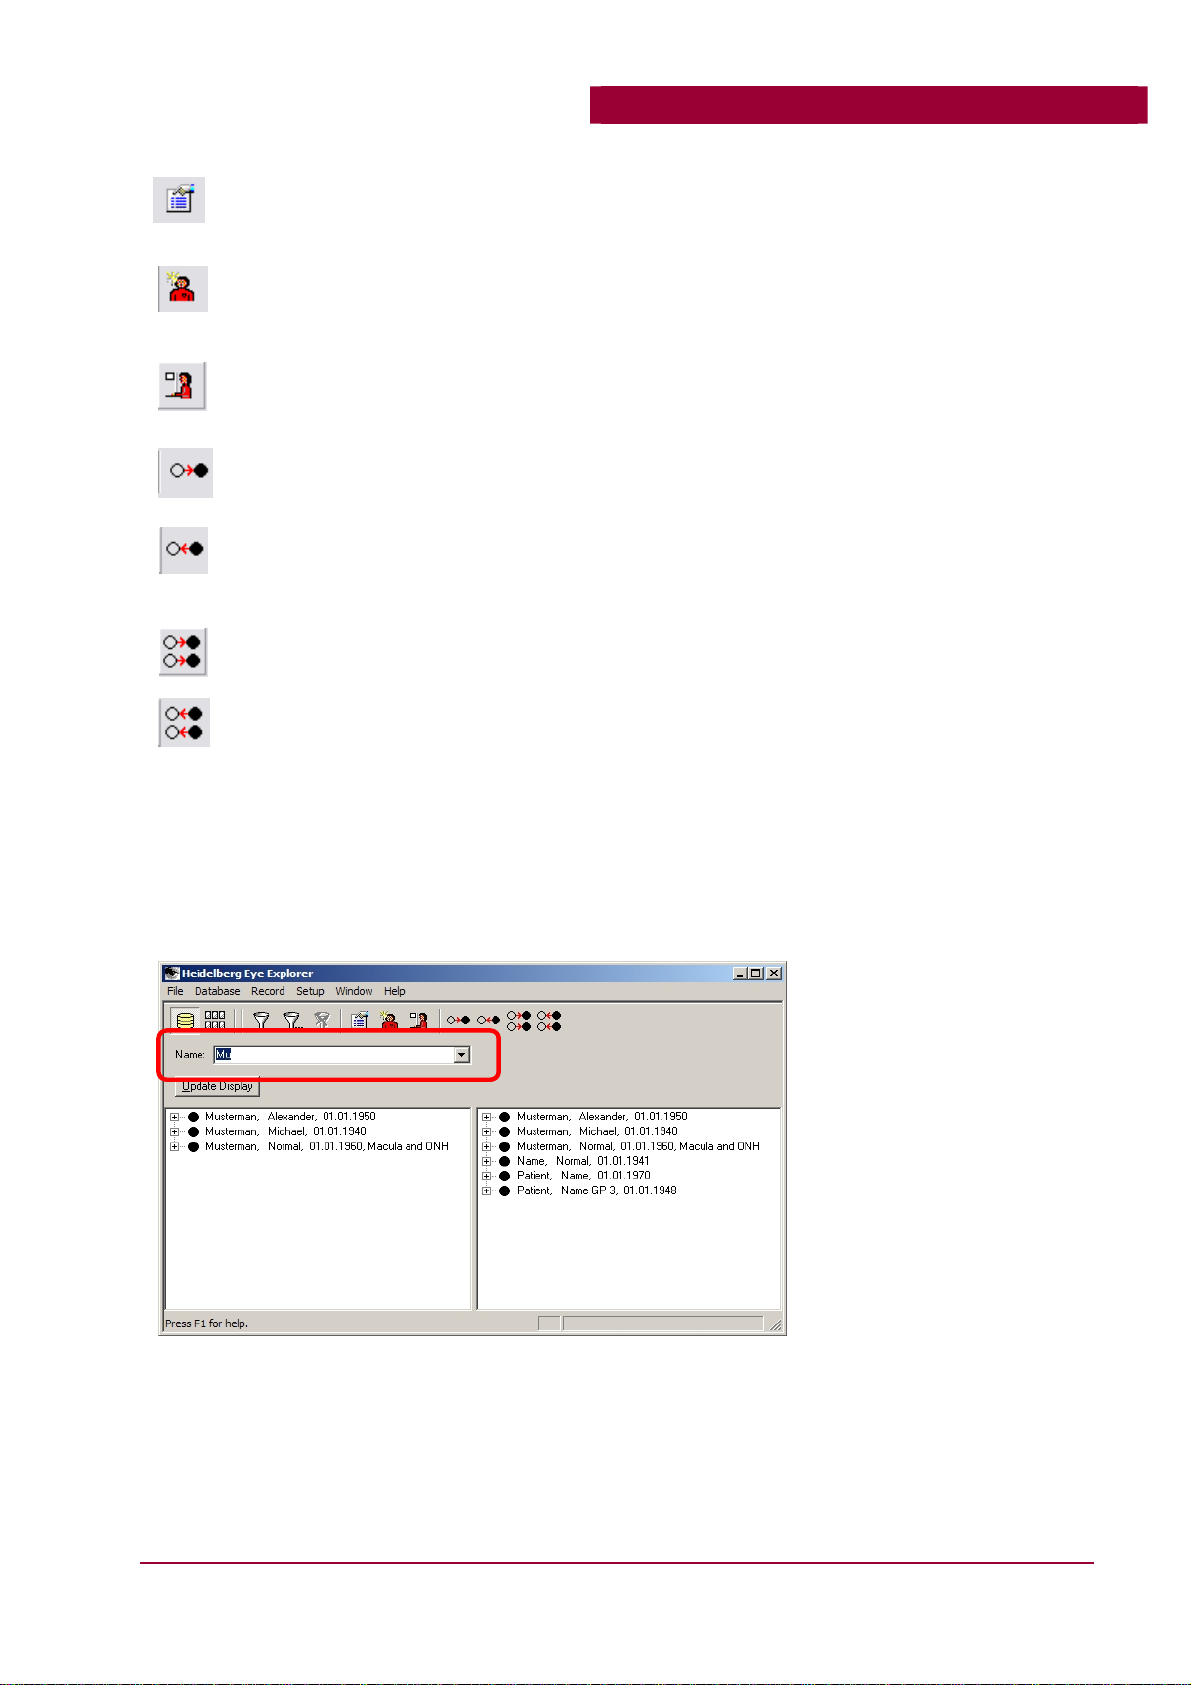
4.3.1 Quick Search
This feature allows users to quickly filter the database by patient name. For example, entering the
letters “Mu” and then pressing Enter (or clicking Update Display) will update the database
window with only those patients whose last names begin with “Mu”.
It is also possible to search by both last and first names. For example, if the entry “Mu,n” is
entered, only patients with a last name starting with “Mu” and first name starting with “N” will be
displayed.
SL-OCT Operating Instructions 1.0.2 - Part No. 97079
15
Page 16

Section 4 – Database Viewing Window
The quick search by name works only on the left side (patient database) window. It will not affect
the right side (selected patient) window.
4.3.2 Filtering
More complex filter operations are available using the Filter icons. With these tools the database
can quickly be filtered by: patient name, referring physician or clinic, time (date range), diagnosis,
participation in a study or the acquisition device. Multiple filter criteria can be used on a single
sort.
The Filter icon (section 4.2) opens the Database filter window with several filtering options. In
the example shown below, all patients that have been examined within the last 10 days, AND that
have an exam marked as part of the “Angles in darkness” study, will be displayed.
A set filter parameters (like those in the example above) can be named and saved for future use
with the [Save as] button. A list of previously saved searches can be viewed via the Load Filter
icon (section 4.2).
The No Filter icon removes all filter criteria, returning the database display to the full list.
16
SL-OCT Operating Instructions 1.0.2 - Part No. 97079
Page 17
Section 5- Patient Records
5 PATIENT RECORDS
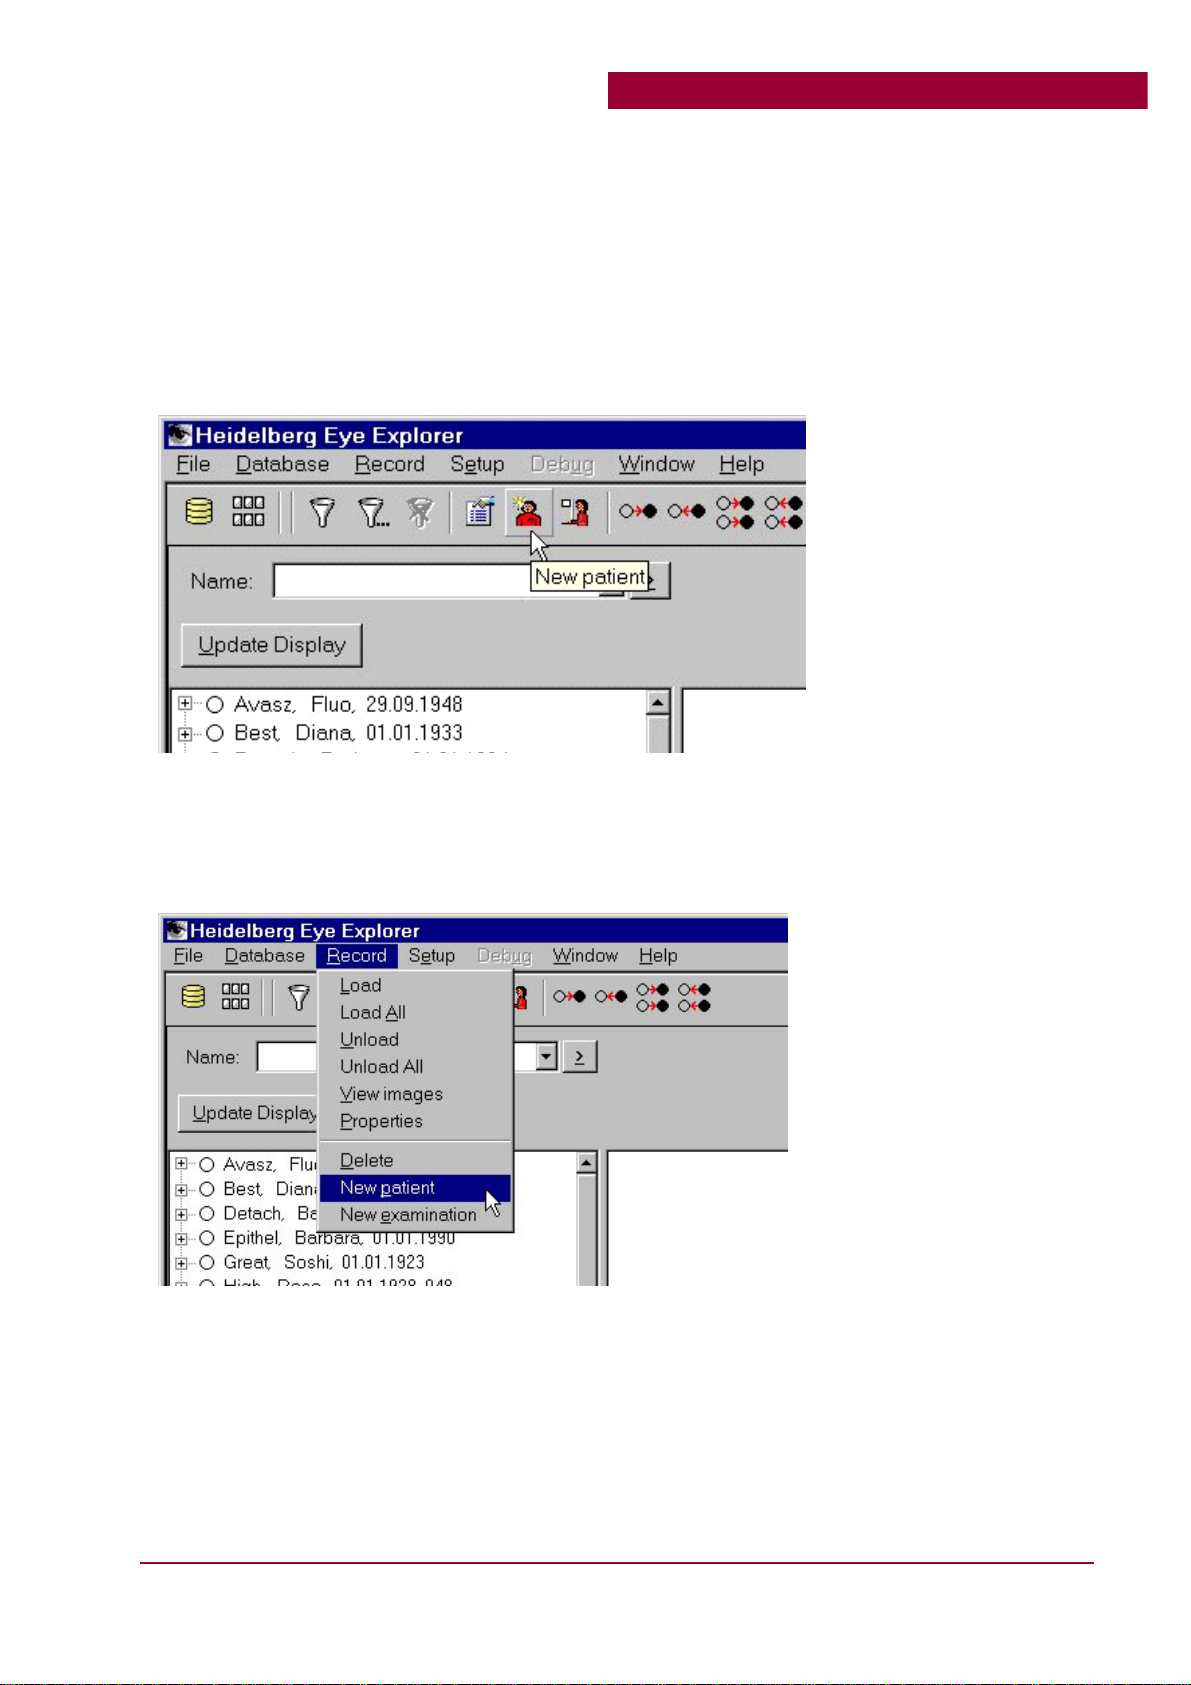
5.1 Creating a new patient record
When examining a patient for the first time, a patient record must be created. As with many other
program functions, there are several ways to open the Patient Data window.
Click the New Patient icon.
OR
Use the Record menu: Record > New Patient.
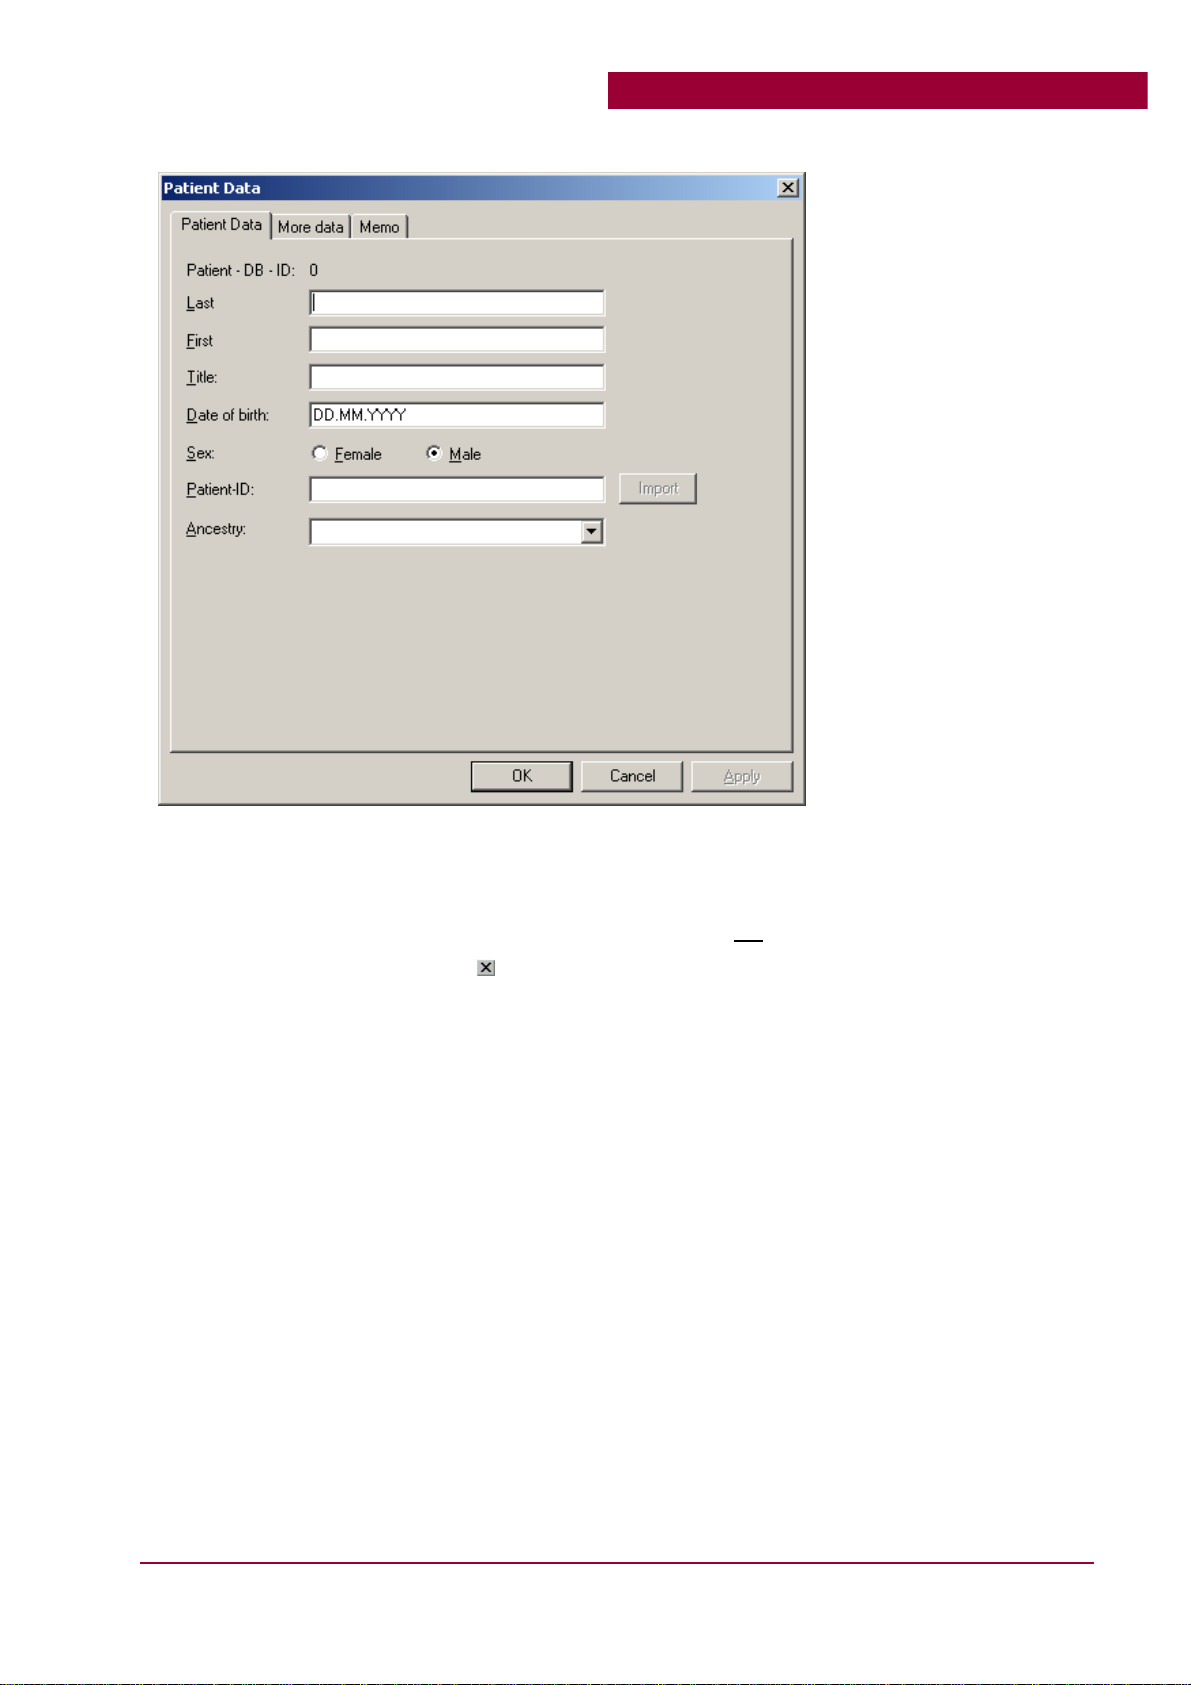
5.1.1 Patient Data Tab
Enter last name, first name, date of birth and gender (sex). All other data are optional.
Use the tab key to move to the next data entry field.
SL-OCT Operating Instructions 1.0.2 - Part No. 97079
17
Page 18
Section 5- Patient Records
Once all entries have been made, click OK to save the new patient record and begin the
examination. (See sections 7 and 9, Image Acquisition Window and Imaging Process).
The Cancel button ends the procedure and the patient record will not
Clicking the Close Window button (
) in the top right corner of the window will also cancel the
be created or saved.
procedure and no patient record will be created.
18
SL-OCT Operating Instructions 1.0.2 - Part No. 97079
Page 19

Section 5- Patient Records
5.1.2 More Data Tab
The More Date tab has a number of optional data fields including one to associate patients with
their referring physician or clinic. The Filter function can sort by this field (see “Search Filters”).
SL-OCT Operating Instructions 1.0.2 - Part No. 97079
19
Page 20

Section 5- Patient Records
5.1.3 Memo Tab
Open the Memo window by clicking on the last tab in the Patient Data window. In this section,
additional patient information and/or an anamnesis (medical history) can be entered.
This section can be used as an updatable record. Add a date and time stamp to each entry by
clicking on [Insert time].
The information in this section does not
appear on the printed examination report(s).
20
SL-OCT Operating Instructions 1.0.2 - Part No. 97079
Page 21

Section 5- Patient Records
5.2 Opening an existing patient record
As with many other program functions, there are several ways to open and existing patient record.
To open an existing patient record, select the patient record and then right-click to open the context
menu and click View Images.
OR
Use the Record menu: Record > View Images.
Patient records are opened into the Image Viewing window (section 6).
5.3 Examination tabs
Within the patient record saved images are organized on Examination tabs. The tabs are presented
chronologically by exam date and are created automatically by the software when images are
saved. (See Section 6 – Image Viewing window.)
SL-OCT Operating Instructions 1.0.2 - Part No. 97079
21
Page 22

Section 5- Patient Records
Note: If multiple SL-OCT exams are conducted on the same day, images from the additional
exams can either be added to the existing tab for that day, OR saved to a new tab(s). In the second
case, the patient record will contain multiple tabs with the same date.
5.3.1 Adding images to an existing exam tab
To add
new images to an existing exam tab, begin the additional exam(s) in the Image Viewing
window or by continuing image acquisition after saving images.
Select the desired exam tab. Click the New examination icon. The Examination Data window
will NOT open.
Saved images from this exam will be added into the existing exam tab
for that day.
Images can only be added to a tab from the CURRENT day.
5.3.2 Creating additional tabs on one day
To save images from multiple exams given on the same
day on separate exam tabs, begin the
additional exam(s) from the Database viewing window.
Select the patient’s name. Click the New examination icon. The Examination Data window
opens; allowing the operator to be verified or changed. The Study can also be changed.
Saved images from this exam will be placed on a new
tab with the same date.
22
SL-OCT Operating Instructions 1.0.2 - Part No. 97079
Page 23

Section 5- Patient Records
5.4 Loading multiple records for batch functions
Loading multiple records allow the user to quickly review several patient records without
switching between the Database and Image V iewing windows. It is also used for batch functions
(e.g. exporting).
A patient record can be activated or “loaded” in several ways:
• Click the marker circle to the left of the patient name.
• Double-click the patient name.
• Right-click the patient name, and select Load from the Context menu
• Drag and drop the patient name into the active window
• Highlight the patient name, and then click on the Load icon from the toolbar.
SL-OCT Operating Instructions 1.0.2 - Part No. 97079
23
Page 24

Section 6 – Image Viewing Window
6 IMAGE VIEWING WINDOW
6.1 Overview
Opening (double-clicking) any active patient record in the Database Viewing window opens the
Image Viewing window. The Image Viewing window is like a digital patient record; it provides
access to all the images and data saved for the selected patient.
Patient, Name, 07/13/1974
In this window, each examination is shown on a separate tab identified by exam date. Within an
individual exam tab scans are displayed in OD (right eye) and OS (left eye) windows.
6.2 Image Viewing window tool bar
The Database Window icon brings you to the Database Viewing window (Section 4).
The Image Window icon brings you to the Image Viewing window.
24
SL-OCT Operating Instructions 1.0.2 - Part No. 97079
Page 25

The Lock/Unlock Examination icon “locks” the selected examination tab. This function is
to protect data in networked systems.
The New Examination icon opens a new Examination Data window to begin a new
examination for the selected patient. (See chapter 5, Patient Records for details.)
The Large Icons, Small Icons, and List icons change the appearance of the
individual image files in the Image viewing window.
The No Split, Split Exam, and Split Exam & Lightbox icons allow you to divide
the Image Viewing window files by eye (OD/OS).
6.3 Editing and viewing functions
6.3.1 Patient Dropdown Menu
Section 6 – Image Viewing Window
All active patient records (those in the right-side of the database viewing window) can are listed in
the Patient drop-down menu. Using this list, the user can switch between patient records without
returning to the Database V iewing window.
6.3.2 Editing Patient Information
Patient information including name, date of birth, gender, and patient ID number are input before
the patient’s initial exam. This information and additional patient record details can be viewed and
edited by clicking the [Patient] button. Patient name changes will not be visible in database
viewing window until the program is restarted.
SL-OCT Operating Instructions 1.0.2 - Part No. 97079
25
Page 26

Section 6 – Image Viewing Window
6.3.3 Editing Examination Data
Examination information can be viewed and edited by clicking the [Examination] button. Some
fields, for example, examination date are not editable in these windows. Some changes to this
information will not be visible until the program is restarted.
6.3.4 View Settings
There are a number of options for displaying information in the Image Viewing window.
Individual images can be represented as Large icons, Small icons, or List entries and the window
can be split into separate OD (right eye) and OS (left eye) panels. Images in the Lightbox can also
be similarly combined or split.
The View command and the toolbar icons (shown below) can be used to select the desired view
settings.
6.4 Examination Tabs
Within the patient record saved images are organized on Examination tabs. Exam tabs are created
by the software when images are saved (see Section 5.3) and are presented chronologically by
exam date. The tab title contains three parts:
1) the device used for the image (in this case, SL-OCT)
2) exam date
3) study (This appears only if a study was flagged for that exam and can be edited via the
[Examination] button).
6.5 Lightbox
The Lightbox is located at the bottom of the Image Viewing window and can be used to mark
specific images for review at a later time.
To copy images into the Lightbox drag and drop OR right click to access the context menu,
select Add to light box.
To save a given lightbox, right-click anywhere in the Lightbox; from the context menu, select the
Save lightbox command.
To review a saved lightbox, select the name of the lightbox session from the drop-down menu.
26
SL-OCT Operating Instructions 1.0.2 - Part No. 97079
Page 27

Section 6 – Image Viewing Window
SL-OCT Operating Instructions 1.0.2 - Part No. 97079
27
Page 28

Section 6 – Image Viewing Window
6.6 Preview pane
The Preview pane allows the user to quickly preview images to determine which to analyze or save
in the Lightbox for future review.
The Preview pane Comment field allows users to add a 15 character caption to the selected image.
Once saved, the caption is visible in the Image Viewing window below the image file name. It also
appears in the title of the image viewing window and in the “additional information” stored with
the image.
28
SL-OCT Operating Instructions 1.0.2 - Part No. 97079
Page 29

Section 7 – Image Acquisition Window
7 IMAGE ACQUISITION WINDOW
7.1 Overview
Once a new patient has been created or a new examination has been started for an existing patient,
the acquisition window opens.
During acquisition, the current image is shown in the large window at upper left. If the slit lamp is
equipped with the optional camera module, the current camera image is displayed in the video
window at the upper right.
Beneath the two larger windows are 12 smaller, temporary storage windows. These show the last
twelve (12) B-scans. As image acquisition continues, the oldest B-scan is overwritten. The
current scan is identified by a green frame.
When acquisition is stopped any of the 12 temporary B-scans can be viewed in the large window
by clicking the desired scan. The green border indicates which of the 12 scans is in the large
window.
These 12 B-scans are available for saving into the patient’s record.
SL-OCT Operating Instructions 1.0.2 - Part No. 97079
29
Page 30

Section 7 – Image Acquisition Window
7.2 Image Acquisition window toolbar and controls
The
Exit
icon closes the Acquisition window and returns the program to the
Image viewing window. (This function can also be completed using the File
menu.)
The Save icon opens the Image Save dialog box. (See section 7.4, Saving images.) (This
function can also be completed using the Save menu.)
The Display Segmentation icon toggles the segmentation line on/off in the 12 temporary
image windows.
The Brightness/Contrast icon provides access to the Brightness & Contrast
control window. This tool allows users to adjust brightness and contrast at
the same time. Different brightness/contrast settings bring out greater
detail in different areas of the image. (This function can also be completed
using the Options menu.) This control works for both gray and color scale
views.
(This function can also be completed using the Options menu.)
Tip: set the brightness and contrast before examining a patient, using the
adjustment rod of the slit lamp as the measurement object.
The Color Scale icon toggles the image appearance between gray-scale and color-scale.
(This function can also be completed using the Options menu.)
The Aiming Circle icon toggles the aiming circle on/off in the large, current image window.
Note: The Aiming Circle display will update (appear/disappear) only during acquisition.
(This function can also be completed using the Options menu.)
The Start [Stop] button starts and stops the image acquisition process.
Note: If the measurement is stopped and then started again, all previously acquired B-scans will
be deleted. A pop-up confirmation window must be clicked before images are deleted and
acquisition restarts.
The Auto Stop feature will automatically stop acquisition when the user defined
(Stop after) number of good images are captured in the temporary image
windows.
Note: The feature cannot be enabled/disabled during acquisition.
30
SL-OCT Operating Instructions 1.0.2 - Part No. 97079
Page 31

Section 7 – Image Acquisition Window
7.3 On-line quality screening
During the scanning process, the system applies an on-line quality screening to each temporary
image. If an image fails the on-line screen, it is marked with a red X. If it passes, it is marked
with a green checkmark. Any temporary image may be saved for future viewing. However,
images that fail the on-line quality screen (those marked with a red X) should not be analyzed with
the measurement tools.
It is important to understand that the on-line screen is a quick check only. While all images that
fail the screen are not suitable for quantitative analysis not all images marked with the green
checkmark are suitable for quantitative analysis. The user should review each green-checked
scan and select only the best image(s) for analysis.
Goods scans will have:
• no movement artifacts, no bumps or dents in the cornea, no wave in the lens
• both chamber angles visible
• sharp cornea contour in the 10 o’clock and 2o’clock positions
• bright spot (reflex) on the corneal surfaces and lens surface connected by the bright reflex
line
7.4 Saving images
Before clicking [Save] (or the Save icon), the user must select the image(s) to be saved by double-
clicking them. Images selected for save will be marked with a save icon (
). Warning:
When the selected images are saved, the unselected images are discarded. At that point there is no
way to retrieve them.
Clicking [Save] opens the Save Data window. Select eye scanned (right/left). Click [OK] to save
selected images to the patient’s record.
Slit rotation angle. If scan direction was changed from default (horizontal), the user should
indicate the precise scan angle using the Slit rotation angle feature. The angle measurement is
taken from the scan direction indicator on the slit lamp head.
Comment. The Save Data Comment section is a 90 character text field where image-specific
notes can be stored. The first 30 characters of this field are visible in the Comment section of the
printed report. This comment can be accessed and edited later in the Image Analysis window with
the Additional Information icon (section 8).
It is recommended that for each eye examination (each eye) the three or four best scans are saved.
The selected scans are saved to an exam tab
in the patient’s record. The tab is named
with the current date. The saved scans are
now available for review and analysis. The
user can now scan the other eye, take
additional scans of the current eye, or exit
the acquisition window.
SL-OCT Operating Instructions 1.0.2 - Part No. 97079
31
Page 32

Section 8 – Image Analysis Window
8 IMAGE ANALYSIS WINDOW
8.1 Overview
Clicking [Biometric Analysis] in the preview pane opens the Image Analysis window.
If the image quality is sufficient, the elements of the anterior chamber will be automatically
segmented and a refraction correction calculated on the basis of the cornea segmentation. The Bscan will then be displayed in corrected form.
Note: the biometric analysis takes approximately 18 seconds. Once the analysis is completed for
a given image that image opens without the analysis lag.
E t
The Image Analysis window allows detailed viewing, measurement, and report printing of
individual scans. Key elements of the image analysis window are:
• The window menu and toolbar are available on all analysis window tabs. Their functions are
detailed below in section 8.2.
• The Segmentation tab. The segmentation tab shows the raw image without refractive
correction and an approximate placement of the scleral spur points. These points must be
verified by the user to activate some of the auto-analysis tools. This is explained in further
detail in section 8.3 below.
• The analysis tool tabs: Auto-biometry, Interactive Distance, Interactive Pachymetry, and
Digital Gonioscopy™. Details of these functions are provided below in sections 8.4 –8.7.
32
SL-OCT Operating Instructions 1.0.2 - Part No. 97079
Page 33

Section 8 – Image Analysis Window
8.2 Image analysis window toolbar
The image analysis window tool bar functions are visible and active on all five of the image
analysis tabs. If the scleral spur placement for the image has NOT been confirmed (see section 8.3
below), the tool bar will include as a tenth icon a red exclamation (circled below). If spur
placement has been confirmed for that image, this icon will not be visible. The tab functions are
described in sections 8.3 –8.7 below.
The Brightness and contrast icon provides access to the Brightness & Contrast control
window. This tool allows users to adjust brightness and contrast at the same time. This
control works for both gray and color scale views.
Different brightness/contrast settings bring out greater detail in different areas of the
image.
The Color mode icon toggles the image appearance between gray-scale and color-scale.
The Zoom icon opens the Zoom window. In the zoom window, select the area of interest
by clicking and dragging the red frame. Chose a zoom level (100%, 200%, 300%, 400%,
or 500%) with the [+] or [-] icons.
The Additional information icon opens an information window with exam details. In this
window the user can edit the image caption discussed in Section 6.6 and the image
comment discussed in Section 7.4.
The Display video image icon opens a window with the photo image taken simultaneously
with the OCT scan. (Note: This icon is active only if the optional video kit is installed.)
The Save image as picture file icon opens a Save As window. With this tool the image
can be saved as a BMP, JPEG, TIF, or PNG file.
The Print a report icon opens the Print Report window. Each analysis window tool tab
offers a report specific to that analysis. Note: This icon is not active on the Segmentation
tab.
The Distance measuring tool icon displays a movable measuring tool. The user can place
the ends at any two points on the image and see the distance between the points in mm.
Note: This icon is not active on the Segmentation tab.
The Segmentation icon displays software generated segmentation lines and points. The
segmentation lines also appear on the intensity profiles on the Interactive Distance and
SL-OCT Operating Instructions 1.0.2 - Part No. 97079
33
Page 34

Section 8 – Image Analysis Window
Pachymetry profile tabs.
WARNING: The user should always visually check the automated segmentation before
proceeding with quantitative analysis of the image. To do this, click the Segmentation i
and inspect the colored segmentation lines. If they are not correctly placed at the edges
con
of
the eye structures, select another image for quantitative analysis.
The Scleral spurs not confirmed icon is a visual indicator that spur placement for this
image has not been confirmed by the user. The icon will take you to the Segmentation tab.
8.3 Segmentation tab
The Segmentation tab shows the “raw” image before refractive correction. In this image the
anterior chamber appears deeper and less concave. On this tab, the user can view and evaluate
software generated placement of the scleral spur markers -- yellow dots.
Spur marker placement must be “accepted and saved” before automatic functions measured from
the scleral spurs are available; this process is described below.
In addition to confirming scleral spur placement, the user should always visually check the
automated segmentation before proceeding with quantitative analysis of the image. To do this,
click the Segmentation icon and inspect the colored segmentation lines. If they are not correctly
placed at the edges of the eye structures, select another image for quantitative analysis.
8.3.1 Scleral Spur Placement
If the automatically generated scleral spur makers are judged by the operator to be in the correct
place, the operator can “accept and save” the maker placement with no adjustments. (See section
8.3.2 below.)
To move the marker(s), pass mouse pointer over the point to be moved. Pointer will change from
standard pointer to the double arrow “move” cursor. Click and hold left mouse button to move the
point.
34
SL-OCT Operating Instructions 1.0.2 - Part No. 97079
Page 35

Section 8 – Image Analysis Window
Note: To facilitate precise placement, hide the “move” (double arrow) cursor by holding down
the right mouse button as well. At this point only the yellow dot is visible, and it moves like the
mouse pointer. Release mouse buttons to drop/place dot at desired point. For more precise
placement the zoom tool can be used. Also, activating the color-scale and varying the
brightness/contrast may help bring out additional detail in the area of interest.
8.3.2 Accept and Save
When spur markers are properly placed, left click the green check mark button at lower left of
window – see image above. This opens a Confirmation window. The operator must enter his/her
name and click [OK] to save and accept the current placement of the markers.
8.3.3 Reset all Settings
To return the scleral spur markers to the automatically generated positions click the red X button at
the lower left of the window – see image.
Before returning the points to original positions the software opens a Segmentation window which
warns that the operation cannot be undone. To proceed, click [Yes].
SL-OCT Operating Instructions 1.0.2 - Part No. 97079
35
Page 36

Section 8 – Image Analysis Window
8.4 Auto-Biometry™ tab
The Auto-Biometry tab provides one-touch measurements of: central corneal thickness, anterior
and posterior corneal radii, pupil diameter, anterior chamber depth, estimated anterior chamber
volume, spur to spur distance, angle opening distance, and trabecular iris space area. The tool
icons and functions are detailed below.
The Pachymetry Profile icon opens the interactive pachymetry profile (see below).
The Pachymetry Profile is a graph of corneal thickness across the image. The mouse pointer can
be placed at any point on the graph to see the thickness value at that point. In the B-scan image, a
white point on the corneal surface will appear and move with the pointer to show the
corresponding location on the image.
The Biometric data list icon opens a numerical summary of all measured parameters for
the image.
36
The Corneal curvature and thickness icon highlights and displays the numeric values of
the anterior and posterior cornea radii and displays the central corneal thickness
measurement.
SL-OCT Operating Instructions 1.0.2 - Part No. 97079
Page 37

Section 8 – Image Analysis Window
The Pupil diameter icon highlights and displays the numeric value of the pupil diameter.
The Anterior chamber depth icon highlights and displays the numeric value of the a
nterior
chamber depth measured from posterior surface of the cornea to anterior surface of the
lens. m e
central corne hickness are provided in the biometric data list.
Both this para eter and the total anterior chamber depth measurement which includes th
al t
The Anterior chamber volume icon highlights and displays the estimated anterior chamber
volume. To estimate volume, the software uses the measured 2-D area of the B-scan and
presumes rotational symmetry of the chamber.
The Distance between scleral spurs icon highlights and displays the numeric value of the
spur to spur distance. Note: Scleral spur placement must be verified to activate this tool.
This explained in further detail in section 8.3. Clicking this button before spur placement
is con firmed results in a reminder window. Clicking [Cancel] in the reminder window clears the
reminder. Clicking [OK] takes you to the Segmentation Tab to complete the confirmation.
The Display all values icon highlights and displays the numeric value of all of the above-
listed parameters.
1
The AOD and TISA 500
icon highlights and displays the numeric values for Angle
Opening Distance and Trabecular Iris Space Area measured at 500 microns from the
scleral spur. Note: Scleral spur placement must be verified to activate this tool. This
explained in further detail in section 8.3. (See Section 8.7, Digital Gonioscopy™ tab for
details.)
The AOD and TISA 750 icon highlights and displays the numeric values for Angle
Opening Distance and Trabecular Iris Space Area measured at 750 microns from the
scleral spur. Note: Scleral spur placement must be verified to activate this tool. This
explained in further detail in section 8.3. (See Section 8.7, Digital Gonioscopy™ tab for
details.)
1
AOD and TISA are defined by Sunita Radhakrishnan, MD; Jason Goldsmith, MD; David Huang, MD; Joseph A.
Izatt, PhD; et. al. in: Comparison of Optical Coherence Tomography and Ultrasound Biomicroscopy for Detection of
Narrow Anterior Chamber Angles, Arch Ophthalmol. Vol 123, Aug 2005.
SL-OCT Operating Instructions 1.0.2 - Part No. 97079
37
Page 38

Section 8 – Image Analysis Window
8.5 Interactive Distance tab
The Interactive Distance tab provides interactive tools for measuring virtually any vertical or
horizontal distance in the image. In addition, this window graphically shows the signal intensity
along the red axis.
The tool icons and functions available on this tab are detailed below.
8.5.1 Measuring Axis Tools
The Measuring Axis icons allow the user to activate up to four (4) movable measure axis tools.
The axes can be activated in any combination and can be moved relative to each other and the
image by clicking and dragging the line to be moved.
The white and red axes have special functions as detailed below.
The White reference axis icon toggles the white axis on/off.
This axis provides an automatically generated reference to the center of the image.
Horizontal and vertical distances between the reference axis and any other active axes are
displayed in mm. For additional measuring flexibility, the distances between the green and
blue axes are also displayed. If the reference axis is moved it can be reset using the reset
reference axis icon (see below).
The Red intensity profile axis icon toggles the red axis on/off.
The signal intensity along the red axis is displayed in the red graphs below and to the right
of the image. As the red axis lines are moved across the image the changes in the
corresponding graph show the variations in the signal intensity.
38
SL-OCT Operating Instructions 1.0.2 - Part No. 97079
Page 39

Section 8 – Image Analysis Window
The Green measuring axis icon toggles the green axis on/off. When both the green and
blue measuring axes are active, the horizontal and vertical distances between them are
displayed.
The Blue measuring axis icon toggles the blue axis on/off. When both the blue and green
measuring axes are active, the horizontal and vertical distances between them are
displayed.
The Reset reference axis icon resets the white reference axis to its default position.
To facilitate precise placement of the measuring axes, when the mouse pointer is in either the
“precision select” or “move” form it can be hidden from view by holding down the right mouse
button. This makes it easier to see and position the line being moved.
8.5.2 Intensity Profiles
The signal intensity for the portion of the image marked by the red axis is displayed in the red
intensity profile graphs below and to the right of the image. As the red axis lines are moved across
the image the changes in the corresponding profile show the variations in the signal intensity
across the image.
Peaks in the signal intensity are associated with transitions between tissue/areas with different
optical behavior like the corneal and lens surfaces. The intensity profile graphs can be adjusted
using the intensity profile controls described below.
The Average intensity profiles icon toggles the intensity profiles between graphs of each
data point separately OR graphs of averaged points calculated from the values of five (5)
neighboring A-scans.
The Normalize intensity profiles icon toggles the top of the intensity profile scales
between maximum value in the image OR maximum value in the data in the graph.
SL-OCT Operating Instructions 1.0.2 - Part No. 97079
39
Page 40

Section 8 – Image Analysis Window
8.6 Interactive Pachymetry tab
The Interactive Pachymetry tab provides interactive caliper tools for measuring perpendicular
distances in and across the cornea. In addition, this window graphically shows the A-scan which is
the signal intensity along the “active” caliper.
8.6.1 Pachymetry profile
Use the Pachymetry Profile icon to open the interactive pachymetry profile.
The Pachymetry Profile is a graph of corneal thickness across the image. The mouse pointer can
be placed at any point on the graph to see the thickness value at that point. In the B-scan image, a
white point on the corneal surface will appear and move with the pointer to show the
corresponding location on the image.
8.6.2 Interactive pachymetry tools
40
SL-OCT Operating Instructions 1.0.2 - Part No. 97079
Page 41

Section 8 – Image Analysis Window
The four colored Pachymetry tool icons each activate an interactive measuring caliper of the
corresponding color.
The tools measure perpendiculars distances in and across the cornea. For each active caliper, three
numerical measurements (mm) are displayed. These are, the distance between the “jaws” of the
caliper and the distances from each jaw to the middle line. The line of measurement is the long
line at the center of tool.
Each caliper can be moved independently in the following ways:
• Move the caliper tool across the surface of the cornea to desired location by clicking and
dragging one of the dots at the end of the long line that runs perpendicular to the cornea.
• Move the caliper jaws by clicking and dragging the dots at the end of the jaw lines.
• Move the middle distance line to the desired point between the jaws by clicking and dragging
the dot at the right-hand side of the line.
The Display reference axis icon toggles on/off the white, central reference axis (see
below). The reference axis can be moved by clicking and dragging. Reset the axis
with the Re ference axis icon (see below). position set re
When both the axis and one or more caliper tools are visible the horizontal distance (mm)
from the central reference axis to the caliper point on the anterior corneal surface is
displayed.
The Reset reference axis icon returns the reference axis to the default position.
The Automatic positioning icon moves the caliper “jaws” of the active caliper
to the
corneal surfaces. It does not move the middle line.
An individual caliper tool becomes “active” when the user moves it. The intensity profile (section
8.6.3 below) associated with that caliper will be displayed it the intensity profile window (see
above). The color of the profile corresponds with caliper color.
8.6.3 Intensity profiles
The A-scan marked by the center line of the active caliper tool is displayed in the graph to the right
of the image. As the active caliper is moved across the surface of the cornea, changes in the Ascan graph show the variations in the signal intensity across the image.
Peaks in the signal intensity are associated with transitions between tissue/areas with different
optical behavior like air to cornea. The A-scan graphs can be adjusted using the intensity profile
controls described below.
The intensity profile is helpful when using the interactive pachymetry tools to measure within the
cornea. While slowly moving a caliper across the area of interest, watch the intensity profile and
choose the point with the most clearly defined peaks. Use the automatic positioning tool (see
SL-OCT Operating Instructions 1.0.2 - Part No. 97079
41
Page 42

Section 8 – Image Analysis Window
above) to set the caliper jaws on the surfaces of the cornea. Then adjust the middle line to the
desired A-scan peak.
The zoom tool can also be used with these tools.
The Average intensity profiles icon toggles the intensify profiles between graphs of each
data point separately OR graphs of averaged points calculated from the values of three (3)
neighboring A-scans.
The Normalize intensity profiles icon toggles the top of the intensity profile scales
between maximum value in the image OR maximum value in the data in the graph.
42
SL-OCT Operating Instructions 1.0.2 - Part No. 97079
Page 43

Section 8 – Image Analysis Window
8.7 Digital Gonioscopy™ tab
The Digital Gonioscopy tab offers one-touch, automatic angle measurements and an interactive
“freehand” angle measuring tool.
Note: Scleral spur placement must be verified to activate the automatic tools; this explained in
further detail in section 8.3.
Note: For greater angle measurement precision, the operator should average the angle
measurements of at least three separate B-scans.
8.7.1 One-touch angle tools
The one-touch Digital Gonioscopy tools provide variations of the following measurements:
• Anterior Chamber Angle (measured in degrees)
• Angle Opening Distance (measured in mm)
• Trabecular Iris Space Area (measured in mm
2
)
These measurements are defined below with the illustrations of the related button. The one-touch
tools become active for a given image after the scleral spur placement is confirmed for that image
(see section 8.3). Clicking these buttons before spur placement is confirmed results in a reminder
window. Clicking [Cancel] in the reminder window simply clears the reminder. Clicking [OK]
takes you to the Segmentation Tab to complete the confirmation.
Anterior Chamber Angle
Anterior Chamber Angle (ACA) is a traditional parameter used in visual assessment of the
anterior chamber. Because three points are required to define the angle this measurement is more
SL-OCT Operating Instructions 1.0.2 - Part No. 97079
43
Page 44

Section 8 – Image Analysis Window
subjective than AOD and TISA (defined below) which are measured from anatomical landmarks –
scleral spur and surfaces of the cornea and iris.
The Digital Gonioscopy definition of ACA begins with the scleral spur and AOD (defined below).
The angle rays begin with the endpoints of the AOD500 or AOD750 line. The rays are drawn from
these points back toward the angle, and meeting at a software-determined angle-root point.
ACA500 and ACA750 be displayed using the corresponding icons shown at right. All of the
defining points can be manually moved. Points can be reset to the software generated defaults
with the Auto Position icon shown below.
The ACA500 and ACA 750 icons display the software generated angle
measurements.
Angle Opening Distance
Angle Opening Distance (AOD)
2
is an objective measurement of the open space in the area of
the trabecular meshwork.
It is defined by the perpendicular distance (mm) from the inner surface of the cornea to the iris at a
defined distance from the scleral spur measured along the inner surface of the cornea. AOD is
most commonly measured at either 500 µm or 750 µm from the scleral spur. AOD500 and
AOD750 can be displayed using the corresponding icons shown below. All of the defining points
can be manually moved. Points can be reset to the software generated defaults with the Auto
Position icon shown below. Note: AOD and TISA are displayed with the same icon.
The AOD & TISA500 and AOD & TISA750 icons display the software
generated angle measurements.
Trabecular Iris Space Area
Trabecular Iris Space Area (TISA)
trabecular meshwork. It is an area measurement (mm
2
is an objective measure if the open space in the area of the
2
). TISA is limited by the AOD (500 or 750)
the posterior corneal surface, the anterior iris surface, and a line parallel to the AOD running from
scleral spur to the surface of the iris. Like AOD, it is most commonly at either 500 µm or 750 µm
from the scleral spur. TISA500 and TISA750 can be displayed using the corresponding icon
shown above. (Note: AOD and TISA are displayed with the same icon.) All of the defining points
can be manually moved. Points can be reset to the software generated defaults with the Auto
Position icon shown below.
The Auto Position icon restores the software generated angle measurement points.
8.7.2 Freehand angle tool
2
AOD 500 and TISA500 are defined by Sunita Radhakrishnan, MD; Jason Goldsmith, MD; David Huang, MD; Jo-
seph A. Izatt, PhD; et. al. in: Comparison of Optical Coherence Tomography and Ultrasound Biomicroscopy for
Detection of Narrow Anterior Chamber Angles, Arch Ophthalmol. Vol 123, Aug 2005.
44
SL-OCT Operating Instructions 1.0.2 - Part No. 97079
Page 45

Section 8 – Image Analysis Window
The ACA Freehand icon activates the freehand measuring tool. The freehand tool i
available even if spur placement has not been confirmed. The default position of the
angle points is the ACA750 default position. When the image file is closed the
points return to default. To save a user defined angle configuration use either the Save as
picture or the Print report feature.
8.8 Printing Reports
Custom reports are available for each type of analysis.
To print a report, open the target image in the Image Analysis window. Select the tab for the
desired type of analysis (see Section 8, Image Analysis window). From the desired tab, click the
Print a report icon. The Print Report window will open. Complete fields as appropriate and click
[Print].
s
SL-OCT Operating Instructions 1.0.2 - Part No. 97079
45
Page 46

Section 9 – Imaging Process
9 IMAGING PROCESS
This section provides a detailed, step-by-step process for SL-OCT imaging. It is intended as an
aid to new users and to help users optimize image quality for accurate analysis. Once a user is
familiar with the SL-OCT system and the imaging process, the complete preparation and exam
takes only a few minutes.
For best results the manufacturer recommends new users receive training from an experienced
user and that new users are comfortable with system operation and image optimization before
imaging patients for clinical assessment.
The SL-OCT auto analysis software is designed for white-to-white scans; however, SL-OCT can
be used to scan at virtually any angle. (See sample images below.)
Horizontal (white to white)
Scan
Angled Scan of Sclera
Warning: Only white to white scans which are properly centered with the corneal and lens
reflexes situated in the center of the eye (see Section 9.4) can be accurately
analyzed. Poorly centered images produce measurement errors.
46
SL-OCT Operating Instructions 1.0.2 - Part No. 97079
Page 47

Section 9 – Imaging Process
9.1 Preparing the device
System preparation
• Turn on the main power switch (confirm slit lamp and OCT power switches are on)
• Start HEYEX
• Using either the New Patient or New Examination icon, open the patient’s record
• Enter required patient and exam data to open the Image Acquisition window
• Activate the aiming circle, and confirm desired auto-stop setting
• Place cursor over the [Start] button
Slit lamp preparation (See slit lamp operation manual for slit lamp operation details.)
• Adjust scan direction (horizontal, vertical, or other)
• Be sure chin and head rest are cleaned between each patient
• With your hand in the approximate position of the patient’s eye, adjust the slip lamp
beam to as narrow as possible
• Adjust beam intensity to lowest level easily seen by the operator
Note: Minimizing slit beam intensity will make the patient more comfortable which may
help decrease patient motion and blinking.
9.2 Preparing the patient
Before beginning, explain the process to the patient. Reassure him/her that the device will not
contact the eye. The process should be quick and comfortable. Also let the patient know that
while he/she must remain still during imaging he/she can blink during most of the imaging
process. Once the image is properly aligned (section 9.4), ask the patient not to blink for just a few
seconds. Be sure:
• Patient’s eyes are properly aligned to the device
• Patient’s chin is settled in chin rest and forehead is resting against head rest strap
• Patient is sitting in a stable position. (Note: Patient motion will adversely affect image
quality, so ensure the patient is in a comfortable position he/she can maintain throughout
the scanning process.)
• A fixation target is visible to the patient AND at the level of the patient’s line of sight
9.3 Fixation Targets
If the patient is looking up or down during imaging measurement error will occur.
A wall-mounted external
fixation target can be used. It should be easy for the patient to see and
must be adjusted to the level of the patient’s eyes when the patient is positioned at the device. The
operator must use care not to block the patient’s line of sight to the target during the imaging
process.
The slit lamp is equipped with a slit lamp mounted external
fixation target; instructions for its
use are in the accompanying slit lamp manual.
If the slit lamp is equipped with an internal
fixation target, the patient can see a green target light
when the slit lamp is grossly adjusted to his/her eye. The internal target is not visible if the slit
lamp beam is shining in the patient’s eye. There is an eight degree angle between the optical axis
and fovea, so B-scans taken with the internal fixation target will be slightly tilted. Image
alignment is corrected with the image refractive correction.
SL-OCT Operating Instructions 1.0.2 - Part No. 97079
47
Page 48

Section 9 – Imaging Process
9.4 Align the image
• Press the [Start] button – image acquisition will begin.
• Looking at the patient’s eye (NOT the imaging screen), adjust the slit lamp beam so it
is sharp and narrow over the apex of the cornea. (Experienced slit-lamp operators may
accomplish this by looking through the slit-lamp; when the iris is in focus, the gross
positioning should be correct.)
• Use the joystick adjustment to position the slit beam until it is directly over the apex of
the cornea. When the beam is properly positioned at the corneal apex, the scanning beam
reflex is visible as a bright white light shining in the patient’s pupil.
• Looking at the imaging screen, move the slit lamp to position the image shown in the
Image Capture window. For quality white-to-white images, it is important that:
o Both right and left side angles are visible. (Move device side/side to adjust.)
o Apex of cornea is visible. (Move device toward/away from patient to adjust.)
o The image is level. (If image is tilted, moving inner slit-lamp arm, the one with
the SL-OCT scanner box, slightly right or left.)
• Use the joystick to, SLOWLY adjust beam to apex of cornea. When the beam is
approaching the correct place you will see bright reflex spots appearing at the anterior
surface of the cornea. (See sample image “A” below.)
• At this point, ask the patient not to blink or move. Continue fine-tuning with the
joystick until the reflex appears on both outer and inner corneal surfaces and the sharp
reflex beam is visible through the anterior chamber. (See sample image “B” below.)
Sample Image A
Sample Image B
9.5 Stop/Auto-stop
When the desired number of good quality images is visible in the temporary image windows, click
[Stop] to stop acquisition.
If the Auto Stop feature is enabled the system will automatically stop acquisition when the user
defined (Stop after) number of good images are captured in the temporary image windows.
48
SL-OCT Operating Instructions 1.0.2 - Part No. 97079
Page 49

Section 9 – Imaging Process
Select and save the desired image(s). See Sections 7.4 Saving images and 7.3 On-line quality
screening.
Once the images are saved, the user can now scan the other eye, take additional scans of the
current eye, or exit the acquisition window.
9.6 Vertical imaging
The SL-OCT scanning beam follows the same path as the visible light beam of the slit lamp. An
adjustment in the direction of the slit lamp beam results in a corresponding adjustment in the OCT
scanning beam.
The process for vertical imaging is the same as the horizontal process described above with the
following changes:
• Adjust the slit lamp beam to the vertical direction
• To position the slit at the corneal apex, move the joystick very gently right/left
• To get a clear angle detail in the vertical, the operator may need to gently hold the patient’s
eyelids apart. It is best to correctly position the image first, and then hold the eyelids during
reflex fine tuning and final image capture.
Note: The operator should always wash his/her hands before beginning the imaging process.
He/she should explain to the patient in advance that he/she may touch the eyelids for a
moment during imaging. Before reaching toward the patient’s eye, the operator should warn
that he/she is now going to touch the eyes and remind the patient not to move.
SL-OCT Operating Instructions 1.0.2 - Part No. 97079
49
Page 50

Section 10 – Export & Import of Images & Data
10 EXPORT AND IMPORT OF IMAGES AND DATA
10.1 Export
There are several options to export data from the HEYEX Database:
10.1.1 Export Data (“E2E”) File
The complete dataset of individual images can be exported in the “E2E” file format. Individual
images or a series of images (Batch) can be exported. E2E files can be exported to a Jumpdrive
for import into another SL-OCT device or for viewing and analysis on a separate PC. Viewing on
a separate PC requires the Eye Explorer Viewer software (SL-OCT module) and a dongle. These
are available for separate purchase.
To access the E2E export function right-click an image in the Image Viewing window (for
individual image export), or any record name in the right-hand side (selected records) of the
Database Viewing window (batch export). Select, “Export E2E” (for batch export you must first
select “SL-OCT Batch >”). In the “Export Options” window select the destination and chose
whether to anonymize the data.
By default, the file name is composed of the patient’s name and an ascending number, e.g.
SMITH01J.E2E, SMITH02J.E2E, etc. The Use file name prefix option allows you to generate file
names such as EXP001.E2E, EXP002.E2E, etc.
You may enter your institution, practice, company name, or other desired identifying information
in the Location section.
WARNING If “Patient ID” is selected to make the data anonymous, and the Patient ID
field is blank, the patient’s last name will be used as the file identifier. In this
case, to preserve patient anonymity, use the “First letter only” option.
NOTE Once the data are imported into a different database, they will appear under a Patient
Record with the personal data as specified here. If the exported images are going to be
imported into a Patient Record that already exists in a different database, the exact
last name, first name, date of birth and patient ID of this existing Patient Record must
be specified in the Export Options dialog box. If the patient details in the target
database do not exactly match this information, then a duplicate patient record will be
created.
10.1.2 Export Image as Graphic File
Individual images can be exported as graphics files in BMP, JPG, TIF, or PNG, format. These files
do not require the Eye Explorer viewing software. However, some patient data, analysis
information and raw image data is not included in the export.
The Export as Graphic file function is available in the Image Analysis window via the Picture
(save this image as a picture file) icon. In the “Save As” window select the file type and
destination. The default setting for this window is NOT to include any file of patient info. Use the
Options section of the window to ad desired file information.
10.1.3 Export Data into Spreadsheet
Parameter values for image files can be exported to a tab-delimited file such as Microsoft
EXCEL
50
TM
. On images where scleral spur placement has not been confirmed, related
SL-OCT Operating Instructions 1.0.2 - Part No. 97079
Page 51

Section 10 – Export & Import of Images & Data
measurements will not be available. Some parameters may also not be available for images with
sub-optimal quality.
To export data to spreadsheet file, right-click an image in the Image V iewing window (for
individual file export) or any file name in the right-hand side (selected files) of the Database
Viewing window (batch export). Select, “Export Data” (for batch export you must first select
“SL-OCT Batch >”). In the “Save As” window select file type and destination.
10.2 Importing
To import data (E2E files) previously exported from a different SL-OCT database:
1. Insert the media containing the exported data (E2E files) into the appropriate drive.
2. From the main Database Viewing window, select the menu item Import E2E Files from the
Database menu.
3. The Import Examination Data window will open. Navigate to the drive and folder that
contains the E2E file(s) to be imported. The content of the selected folder is displayed in the
window.
4. Select the E2E files you want to import in the window and click the Open button. To select all
files displayed in the window, hold down the CTRL key and the A key simultaneously.
5. The Database Import window opens next. Here you can specify which patient data to include
in the import. Click the OK button to import the Patient Records.
6. After the import, a list of all patients that have been added to the database appears in the right
window of the Database Viewing window. The Patient Records are now available for viewing
and data analysis.
SL-OCT Operating Instructions 1.0.2 - Part No. 97079
51
Page 52

Section 11 – Setup/Configurable Options
11 SETUP /CONFIGURABLE OPTIONS
HEYEX software has a number of user-configurable options and information tabs. These can be
viewed and/or configured via the Setup option on the main menu bar. Clicking “Options…” brings
up the Options window shown below.
11.1 General
● Icons: Icon size and spacing can be modified.
● Settings: Closing the window of the HEYEX will shut down the program. The program
default provides a pop-up confirmation window to prevent inadvertent shut-down. To turn off
the confirmation window, uncheck the box.
11.2 Disk space
• Disk Space shows total, used, and available patient data disk space.
• The Clean-up now function is disabled when archiving to hard-disk.
• The Automated clean up allows you to preset points for automatic clean-up.
52
SL-OCT Operating Instructions 1.0.2 - Part No. 97079
Page 53

Section 11 – Setup/Configurable Options
11.3 Plug Ins
This tab shows details about the device-specific, installed software modules. For details on the
HEYEX software configuration see Section 2: Software Configuration.
SL-OCT Operating Instructions 1.0.2 - Part No. 97079
53
Page 54

Section 12 – Technical Specifications
12 TECHNICAL SPECIFICATIONS
12.1 Model Type and Manufacturer
Model type: SL-OCT
Manufacturer: Heidelberg Engineering GmbH
Tiergartenstr. 15
69121 Heidelberg
Germany
12.2 Environmental Specifications
Operating
Temperature: 15°C - 30°C
Relative humidity: 10% - 90%
Non operating
Temperature: -30°C - 60°C
Relative humidity: 10% - 100%
The system must not be used in potentially explosive atmospheres.
Do not operate the system directly after large temperature changes. Let the device
acclimate itself for a minimum of 2 hours to avoid device damage or incorrect
measurement results.
12.3 Electrical Safety
Electrical safety: Application Part Type B
Power Supply and Fuses
Input voltage: 100 V – 240 V
Frequency: 50 Hz – 60 Hz
Fuse 230V: 2.5 A T
Fuse 115V: 5.0 A T
Amperes: 1.2 A
Power consumption: 150 W
Caution! Use isolation transformer conforming to IEC 60601-1
12.4 Laser Source
Diode laser 1310nm, Laser Class 1
Diode laser 1550nm, Laser Class 1 (Internal only. This wavelength does not leave the base unit.
Neither patient nor User are exposed to that laser wavelength))
12.5 Scanning Specifications
Scan size: 15 mm
Scan depth: 7 mm
A-Scan frequency: 200 Hz
B-Scan frequency: 1 Hz
Lateral optical resolution capacity: <100 µm
Lateral digitalized resolution capacity: 75 µm
Axial optical resolution capacity: <25 µm
Axial digitalized resolution capacity: 10 µm
SNR (signal-to-noise ratio) >90 dB
Technical specifications are subject to change without notice.
54
SL-OCT Operating Instructions 1.0.2 - Part No. 97079
Page 55

Section 12 – Technical Specifications
12.6 Service, Maintenance and Cleaning
• Please be aware that only authorized service personnel is allowed to perform service and repair
operations of the SL-OCT, so do not open the device as otherwise you will forfeit the warranty.
If the device fails, please call your local distributor or the Heidelberg Engineering support
department.
• The SL-OCT is a precision optical measuring instrument. Protect the instrument against dust
and moisture, and avoid shocks and strong forces.
• The optical components of the slit lamp should be carefully cleaned at regular intervals. To do
so, follow the instructions provided by the slit lamp manufacturer.
• The non-optical surfaces of the instrument can be cleaned and/or disinfected as usual
whenever necessary. Before doing this, turn the instrument off and pull the power plug out.
• A yearly inspection of the device by a Heidelberg Engineering Service unit is highly
recommended to ensure proper and exact operation.
• Please observe the operation manual of the slit lamp when cleaning the optical components of
the slit lamp.
WA RN IN G :
Do not modify this equipment and do not open the housing!
12.7 Operational Environment and User training
The intended operational environment of the device is a clinical setting, medical
practise or similar location under the direction of a trained ophthalmologist or
optometrist
Only a qualified Heidelberg Engineering employee or distributor shall initially train the user.
Heidelberg Engineering periodically offers user training courses for clinicians, researchers,
physician assistants and technicians.
SL-OCT Operating Instructions 1.0.2 - Part No. 97079
55
Page 56

A
12.8 Labeling
Section 12 – Technical Specifications
pplication Part
Type B
Heidelberg Engineering GmbH
69121 Heidelberg, Germany
Model:
Serial No.:
Voltage:
Frequency:
Amperes:
Temperature:
SL-OCT Ver. B01
00010508
100-240 V
50-60 Hz
1,2 A
15°-30° C
0482
Type label on
the base unit
Serial number
of base unit
Maximum current
Operating temperature
Read Operation
Manual
Fuse label on
the base unit
scan
direction
Heidelberg Engineering GmbH
69121 Heidel berg, Germany
230 V :
2 x T 2,5A / 250V
110 V :
2 x T 5,0A / 250V
Laser Class 1
scan
direction
scan
direction
Fuses to be
used
Laser Class 1 label
on the base unit
Scan direction
indicators on the
slit lamp housing
56
SL-OCT Operating Instructions 1.0.2 - Part No. 97079
Page 57

APPENDIX A: TECHNICAL NOTES
A.1 Repeatability
The repeatability of the biometric measurements is defined as the standard deviation estimate of
large test series. It describes the variation of measurements of the same eye under the same circumstances.
APPENDIX
Measurement
Central Cornea Thickness
Anterior Chamber Depth
Anterior Chamber Volume
Cornea Anterior Radius
Cornea Posterior Radius
Pupil Diameter
Scleral Spur Distance*
Angle Opening Distance AOD 500*
Angle Opening Distance AOD 750*
* User confirmation of scleral spur placement is required.
Repeatability
(standard deviation)
± 5.6 µm ± 11 µm
± 11µm ± 21 µm
± 4.1 mm³ ± 8.0 mm³
± 0.56 mm ± 1.1 mm
± 0.36 mm ± 0.70 mm
± 0.27 mm ± 0.52 mm
± 0.14 mm ± 0.28 mm
± 59 µm ± 120 µm
± 65 µm ± 130 µm
Repeatability
(95% confidence interval)
A.2 Refractive index
Refractive index cornea =1.376
Refractive index vitreous =1.336
These refractive indices are used in the literature for the model of Gullstrand of the human eye.
These indices are for visible light. In the SL-OCT infrared light with λ=1300 nm is used.
There is one published paper concerning the refractive index of the human cornea at this
wavelength in vitro (Lin et al., Opt Lett 2004:29:83-85). Until additional information on the
refractive index at 1300 nm in vivo becomes available, the Gullstrand indices as above will be
used in the SL-OCT software.
SL-OCT Operating Instructions 1.0.2 - Part No. 97079
57
Page 58

APPENDIX B: DISPOSAL
Within the European Union:
The device must be returned to Heidelberg Engineering for disposal.
APPENDIX
58
SL-OCT Operating Instructions 1.0.2 - Part No. 97079
 Loading...