

Page 1
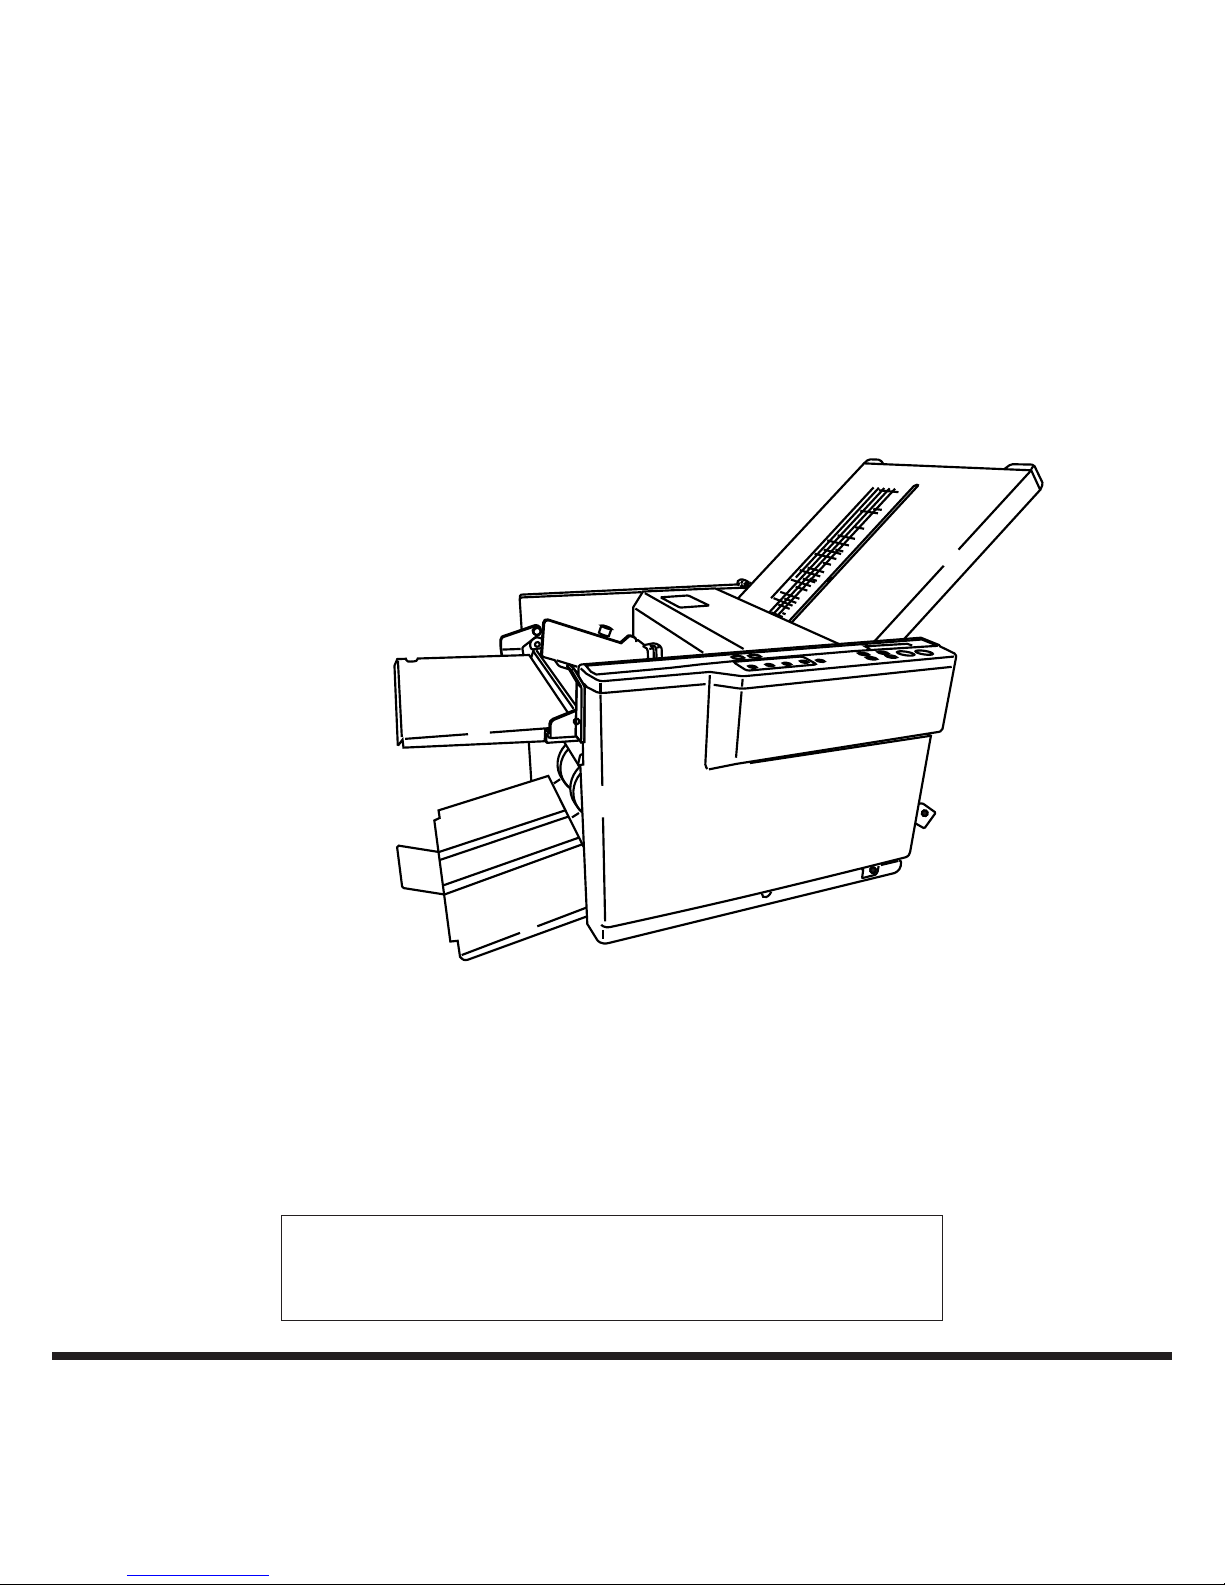
Be sure to read this manual prior to use.
Please leave this manual at the site of use for easy reference.
TF MEGA-A
FOLDER
Instruction Manual
Page 2

Introduction
Be sure to read this manual prior to using the product.
After reading, leave the manual at the site of use for easy reference whenever questions related to the
product arise in the future.
Symbols
In this manual, several symbols are used to indicate important warnings. Please make sure to read
instructions accompanied by these symbols. These symbols have the following
meanings.
Describes instructions which must be followed in use.
Be sure to read the instructions to avoid problems due to incorrect operations.
Indicates supplementary or useful information.
Describes names of related items and supplementary instructions.
Trademark
The product name and company name used in this manual are trademarks or registered trademarks of the
respective companies.
Page 3
For EU
DECLARATION OF CONFORMITY
HEFTER Systemform GmbH, Am Mühlbach 6, 83209 Prien am Chiemsee, Germany, declares that the product (or products) complies with the
provisions dened in the regulations. The reference table is mentioned below.
Name of product Model
Regulation
Low Voltage Directive
2006/95/EC
under
Electromagnetic Compatibility
Directive
2004/108/EC under
Paper Folder TF MEGA-A IEC60950-1: 2005 + EN60950-1:
2006 + A11: 2009
EN61000-6-3: 2007
EN 55014-1: 2006
EN 55014-2: 1997 + A1: 2001 + A2:
2008
EN61000-3-2: 2006
EN61000-3-3: 2008
En
KONFORMITÄTSERKLÄRUNG
HEFTER Systemform GmbH, Am Mühlbach 6, 83209 Prien am Chiemsee, Deutschland, erklärt hiermit, dass das Produkt (oder die Produkte) die in den
Vorschriften denierten Bestimmungen erfüllt. Die Bezugstabelle ist unten aufgeführt.
Bezeichnung des
Produkts
Modell
Richtlinie
Niederspannungsrichtlinie
2006/95/EG
unter
Richtlinie zur elektromagnetischen
Verträglichkeit 2004/108/EG unter
Papierfalzmaschine TF MEGA-A IEC60950-1: 2005 + EN60950-1:
2006 + A11: 2009
EN61000-6-3: 2007
EN 55014-1: 2006
EN 55014-2: 1997 + A1: 2001 + A2:
2008
EN61000-3-2: 2006
EN61000-3-3: 2008
Ge
DECLARATION DE CONFORMITE
HEFTER Systemform GmbH, Am Mühlbach 6, 83209 Prien am Chiemsee, Allemagne, déclare que le ou les produits sont conformes aux dispositions
dénies par la réglementation. Un tableau de référence est proposé ci-dessous.
Nom du produit Modèle
Réglementation
Directive Basse tension
2006/95/CE
en application de la
Directive sur la compatibilité
électromagnétique 2004/108/CE en
application de
Plieuse de papier TF MEGA-A IEC60950-1: 2005 + EN60950-1:
2006 + A11: 2009
EN61000-6-3: 2007
EN 55014-1: 2006
EN 55014-2: 1997 + A1: 2001 + A2:
2008
EN61000-3-2: 2006
EN61000-3-3: 2008
Fr
DICHIARAZIONE DI CONFORMITÁ
HEFTER Systemform GmbH, Am Mühlbach 6, 83209 Prien am Chiemsee, Germania, dichiara che il prodotto (o i prodotti) è/sono conforme/i ai requisiti
deniti dalle norme sottoelencate. La tabella di riferimento è riportata qui di seguito.
Nome del prodotto Modello
Direttiva Bassa Tensione
Direttiva 2006/95/CE relativa
alle apparecchiature a bassa
tensione
Direttiva di compatibilità
elettromagnetica 2004/108/CE in
base a
Macchina piegantesi di
carta
TF MEGA-A IEC60950-1: 2005 + EN60950-1:
2006 + A11: 2009
EN61000-6-3: 2007
EN 55014-1: 2006
EN 55014-2: 1997 + A1: 2001 + A2:
2008
EN61000-3-2: 2006
EN61000-3-3: 2008
It
DECLARACIÓN DE CONFORMIDAD
HEFTER Systemform GmbH, Am Mühlbach 6, 83209 Prien am Chiemsee, Alemania, declara que el producto (o los productos) cumple con las
disposiciones previstas en los reglamentos. Seguidamente se indica la tabla de referencia.
Nombre del producto Modelos
Reglamentación - Reglamentaciones
Directiva sobre baja tensión
2006/95/CE,
según
Directiva sobre compatibilidad
electromagnética 2004/108/CE,
según
Máquina que dobla de
papel
TF MEGA-A IEC60950-1: 2005 + EN60950-1:
2006 + A11: 2009
EN61000-6-3: 2007
EN 55014-1: 2006
EN 55014-2: 1997 + A1: 2001 + A2:
2008
EN61000-3-2: 2006
EN61000-3-3: 2008
Sp
Page 4

For North America
Note:
This equipment has been tested and found to comply with the limits for a Class B digital device, pursuant to Part 15 of the FCC Rules. These limits are
designed to provide reasonable protection against harmful interference in a residential installation. This equipment generates, uses and can radiate
radio frequency energy and, if not installed and used in accordance with the instructions, may cause harmful interference to radio communications.
However, there is no guarantee that interference will not occur in a particular installation. If this equipment does cause harmful interference to radio
or television reception, which can be determined by turning the equipment o and on, the user is encouraged to try to correct the interference by
one or more of the following measures:
– Reorient or relocate the receiving antenna.
– Increase the separation between the equipment and receiver.
– Connect the equipment into an outlet on a circuit dierent from that to which the receiver is connected.
– Consult the dealer or an experienced radio/TV technician for help.
Page 5

Disposal of Old Electrical & Electronic Equipment
is symbol (the symbol of the crossed out wheeled
bin) indicates that in European countries this product
should not be disposed of as household waste.
Please recycle where facilities exist by checking with
your local authority or supplier for recycling advice.
By ensuring this product is disposed of correctly
through proper treatment, recovery and recycling,
you will help prevent potential negative eects on the
environment and human health.
En
Entsorgung von alten elektrischen und
elektronischen Ausrüstungsteilen
Dieses Symbol (das Symbol mit dem durchgekreuzten
fahrbaren Müllbehälter) zeigt an, dass dieses Produkt
in europäischen Länden nicht als Haushaltsmüll
entsorgt werden darf. Bitte informieren Sie sich bei
Ihren örtlichen Behörden oder bei Ihrem Händler
hinsichtlich einer Empfehlung für die Entsorgung
und führen Sie die betreenden Teile dort, wo solche
Einrichtungen vorhanden sind, einem RecyclingProzess zu.
Indem sie sicherstellen, dass das betreende Produkt
durch richtige Behandlung, Rückführung und Recycling
entsorgt wird, tragen Sie dazu bei, möglichen negativen
Auswirkungen auf die Umwelt und die menschliche
Gesundheit vorzubeugen.
Ge
Elimination du matériel électronique et électrique
usagé
Ce symbole (une poubelle marquée d’une croix)
indique que dans les pays européens, ce produit ne
doit pas être éliminé comme des ordures ménagères.
Recyclez-le dans les sites adaptés qui vous seront
indiqués par les autorités locales ou renseignez-vous
auprès de votre fournisseur.
En veillant à ce que ce produit soit éliminé
correctement avec un traitement, une collecte et un
recyclage adaptés, vous contribuez à éviter son action
nocive potentielle sur l’ environnement et la santé
humaine.
Fr
Smaltimento di attrezzature elettriche ed
elettroniche consumate
Questo simbolo (il simbolo della pattumiera con rotelle
barrata) indica che nei paesi europei questo prodotto
non deve essere buttato nei rifiuti domestici.
Per favore smaltire in luogo addetto al riciclo, dove
esistente, chiedendo informazioni alle autorità locali o
a chi fornisce consulenza a proposito.
Garantendo uno smaltimento adeguato di questo
prodotto (trattamento, recupero e riciclo corretto),
aiuterete a prevenire eetti negativi sull’ambiente e
sulla salute dell’uomo.
It
Eliminación de residuos de aparatos eléctricos y
electrónicos
Este símbolo (un cubo de basura tachado) indica
que en los países europeos este producto no deberá
eliminarse como si se tratara de un residuo doméstico.
Solicite asesoramiento sobre reciclaje a las autoridades
locales o a su distribuidor, y siga la normativa en
materia de gestión medioambiental y reciclaje de este
tipo de residuos.
Si toma las medidas pertinentes para que este
producto se elimine mediante un tratamiento,
recuperación y reciclaje adecuados, contribuirá a evitar
posibles efectos negativos en el medio ambiente y la
salud humana.
Sp
For EU
Page 6
i
Safety Precautions
Safety Precautions
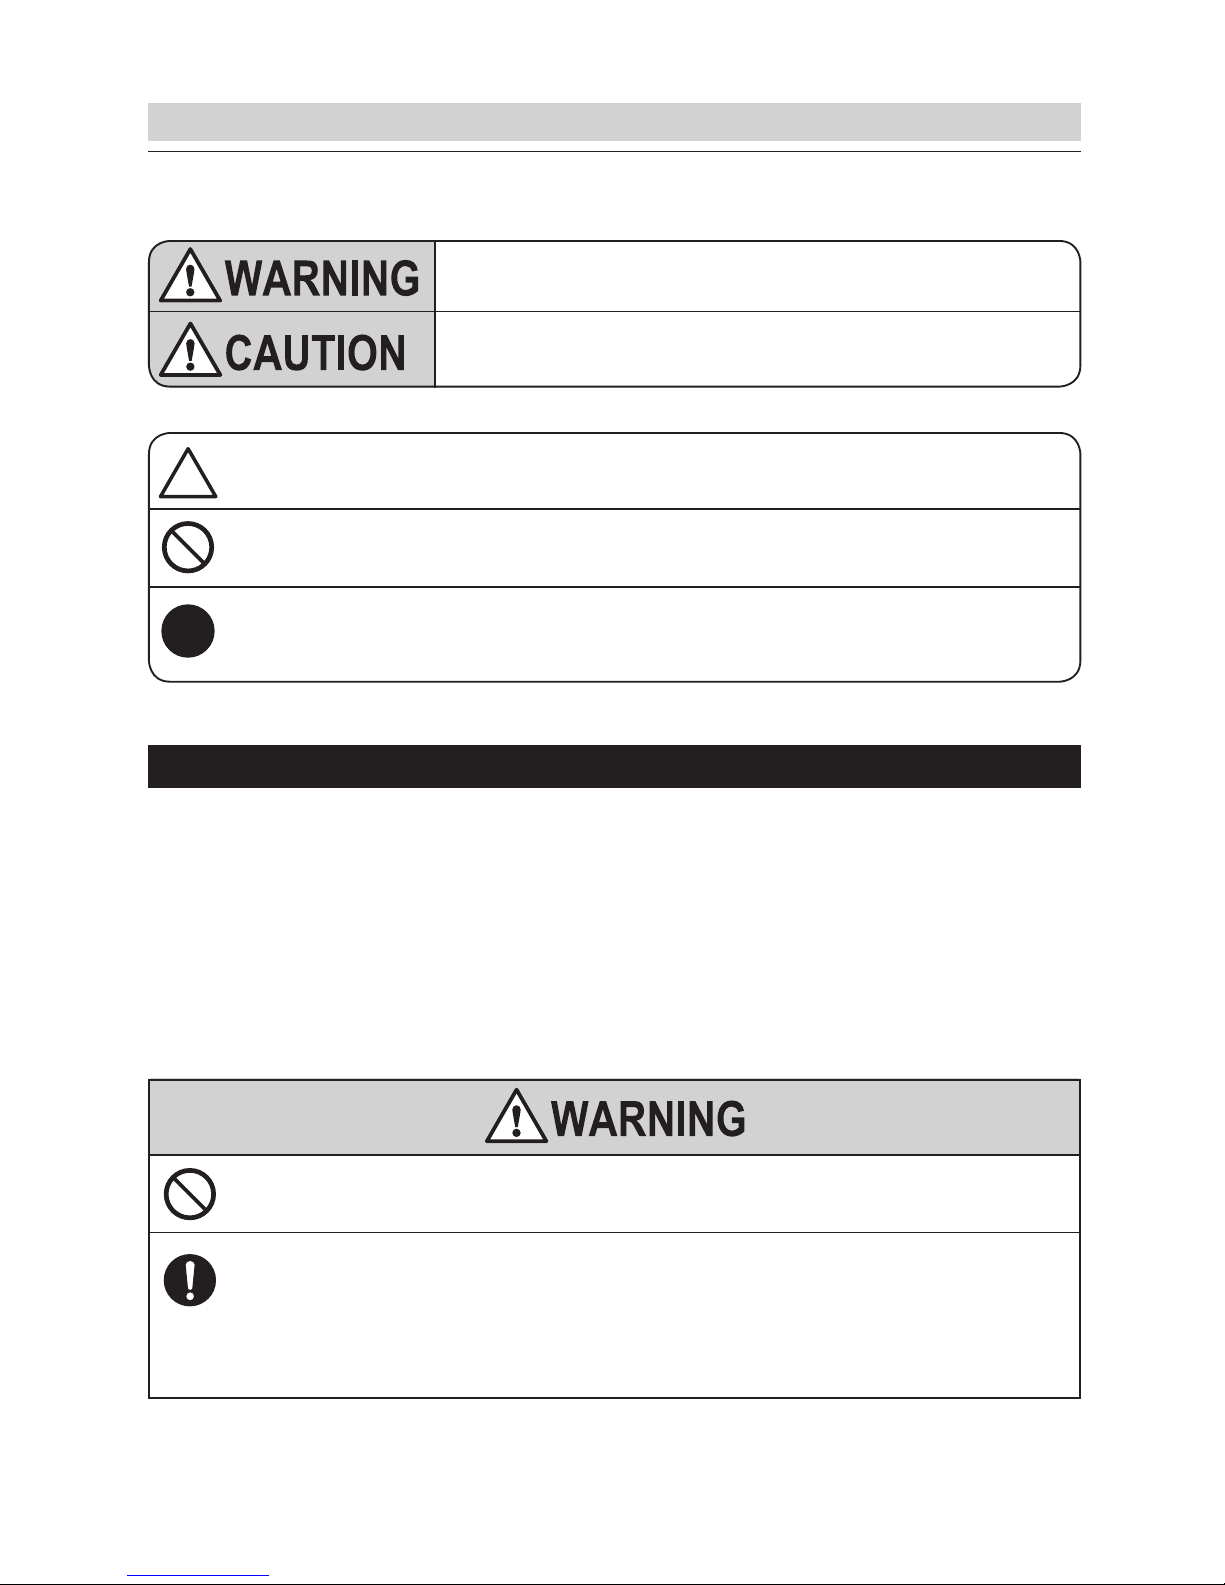
In this manual, operations and handling of the unit which are hazardous are described using the following
marks to prevent personal injury or property damage to the user and others.
Ignoring this mark could result in the possibility of
serious injury or even death.
Ignoring this mark could result in the possibility of injury
or physical damage.
This mark indicates a “Warning” or “Caution”.
A graphic may be shown inside the mark to describe the warning or caution more specically.
This mark indicates a forbidden action.
A graphic may be shown inside the mark to describe the forbidden action more specically.
This mark indicates actions that must be performed.
A graphic may be shown inside the mark to describe the action to be performed more specically.
Power Supply
• This unit shall be installed near the socket-outlet where the plug on the power supply cord is easily
accessible.
• Make sure the power supply used is always within the following range.
Power supply : 220-240 V AC, 50 Hz (EU)
120 V AC, 60 Hz (North America)
• When you power other appliances from the same AC outlet, make sure that the combined power
consumption does not exceed the power supply capacity.
Rated current (Rated power) : 0.5 A (EU), 0.85 A (North America)
Use only the power supply voltage specied on the main nameplate.
Using other voltages could result in a re or an electrical shock.
Make sure that the combined power consumption of the appliances to be
connected does not exceed the capacity rating of the power outlets or plug
receptacles.
Exceeding the capacity rating could cause the power outlets, plug receptacles, or power extension cords to
overheat and catch a re.
Page 7
ii
Safety Precautions
Operating Environment
Operate this unit in the following environment.
• where the temperature range is between 5 and 35°C/41 and 95°F (-10 to +50°C/14 to 122°F in storage)
• where the humidity range is between 20 and 80% RH (10 to 90% RH in storage, however no condensation)
• which is not subject to direct sunlight
• which is reasonably free from dust
• which is subject to little or no vibration
• which is free from air-borne salt
• where there are no harmful chemicals
• where the unit is not exposed to water
Keep this unit and the power cord away from heaters and heater vents.
Excessive heat could melt the cover or power cord covering, and result in a re or an electrical shock.
Do not place metal objects or vessels containing liquids on top of the unit.
The entry of any metal object or liquid could result in a re or an electrical shock.
Do not insert any metal or easily-combustible object inside this unit.
This could result in a re or an electrical shock.
Do not use ammable sprays inside or near the unit (e.g. when cleaning the
unit).
Such ammable gas may ignite and cause a re or combustion.
Do not install this unit in a location where there is excessive humidity or
where contact with water is possible.
Poor choice of location could result in deterioration of the insulation, a re or an electrical shock.
Install this unit on a level, stable stand or oor, with sucient space around it.
Failure to do so could result in the unit overturning and causing injury.
Disconnect the power plug from the power outlet before attempting to move
this unit.
Failure to do so could result in power cord damage, a re or an electrical shock.
Always disconnect the power plug from the power outlet when the unit is not
to be used for an extended period.
Failure to do so could result in a re due to leakage current if the insulation should deteriorate.
Page 8
iii
Safety Precautions
Maintenance / Other
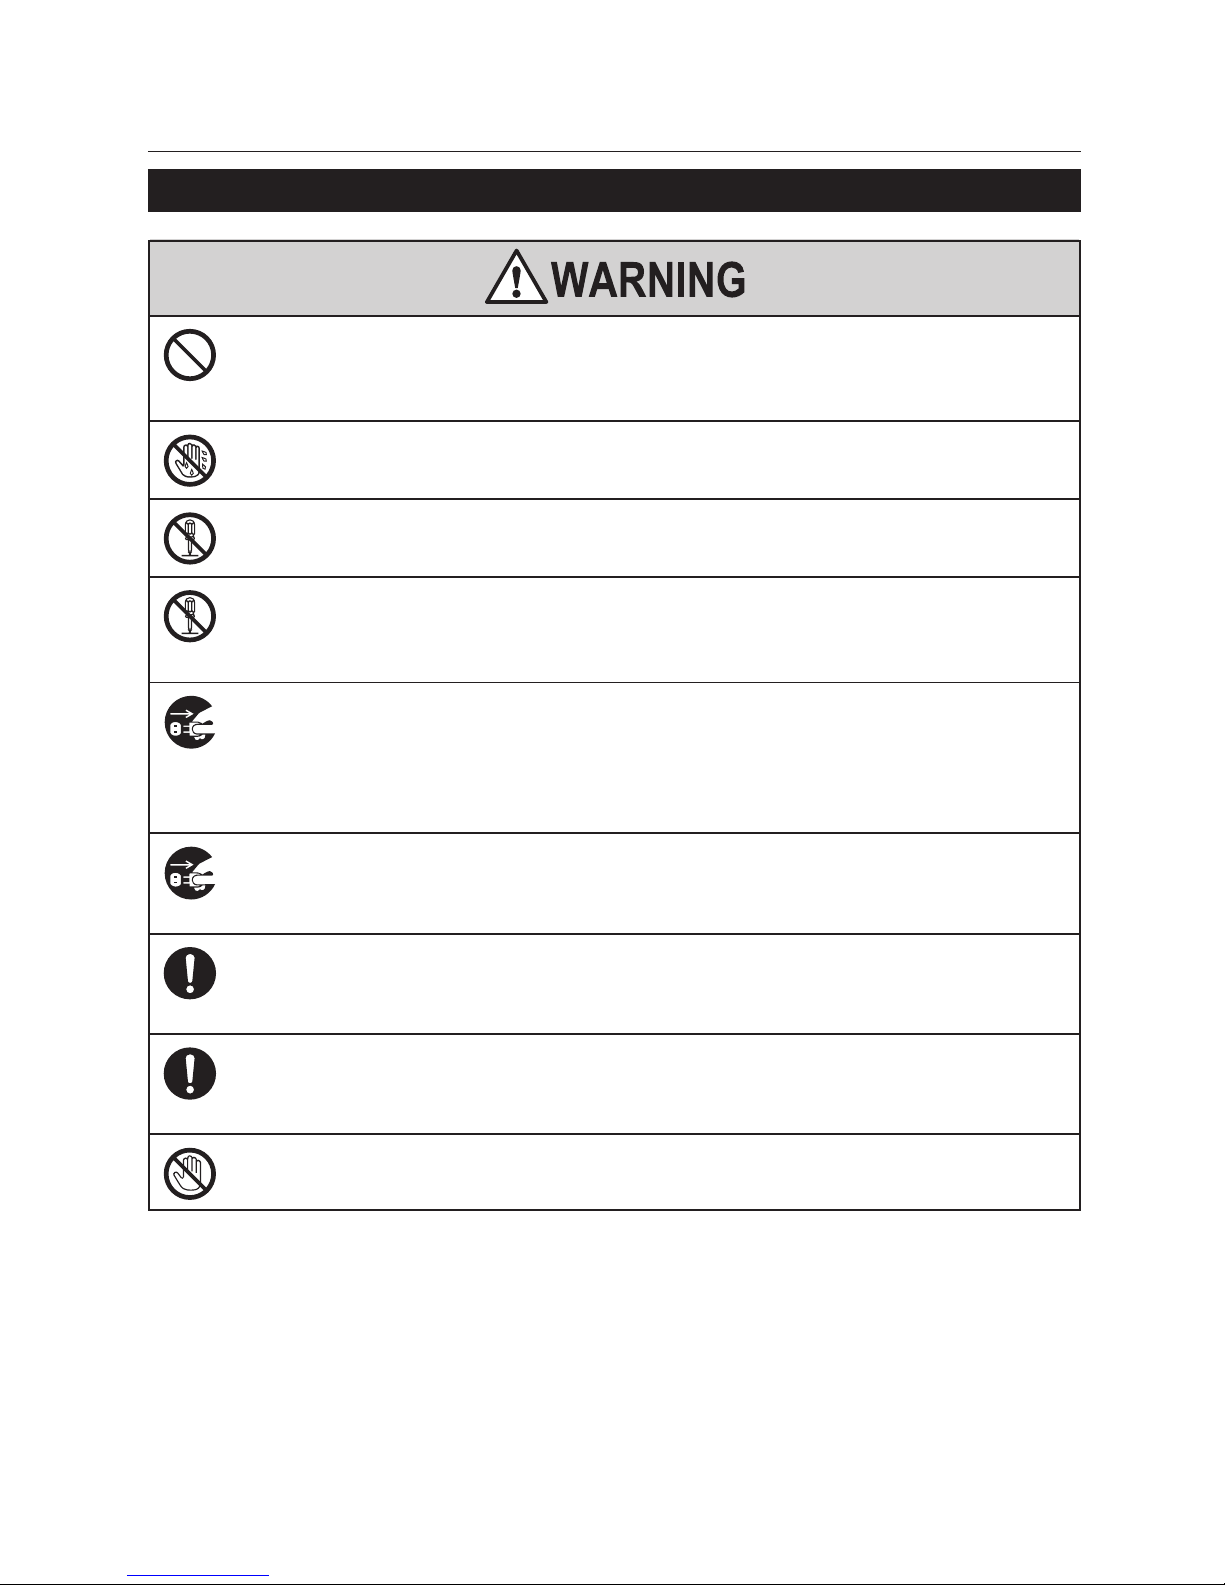
Do not damage the power cord or power plug.
Do not scratch, alter, bend, twist, pull or place heavy objects on the power cord or power plug.
This could result in damage, a re or an electrical shock.
Do not touch the power switch with wet hands.
Otherwise electric hazards may occur.
Do not remove the cover or back panel.
This unit contains high-voltage components that could cause an electrical shock.
Do not disassemble, modify or repair this unit.
There is a danger of re, electrical shock or injury.
Contact your dealer when repairs are necessary.
If any foreign object such as metal or liquid should enter this unit,
immediately turn the unit o at the power switch and disconnect the power
plug from the power outlet.
Failure to do so could result in a re or an electrical shock.
Contact your dealer immediately.
Before cleaning this unit, turn the unit o at the power switch and disconnect
the power plug from the power outlet.
Accidental operation of the unit during cleaning could result in injury.
Remove any dust that accumulates on the power plug prongs and the surface
of the plug from which the prongs extend.
Accumulated dust could result in a re.
Always grip the plug when disconnecting the power plug from the power
outlet.
Forcibly pulling on the power cord could cause damage, resulting in a re or an electrical shock.
Do not touch or insert foreign objects into any rotating part during operation.
This could result in injury.
Page 9
iv
Safety Precautions
WARNING / CAUTION Labels
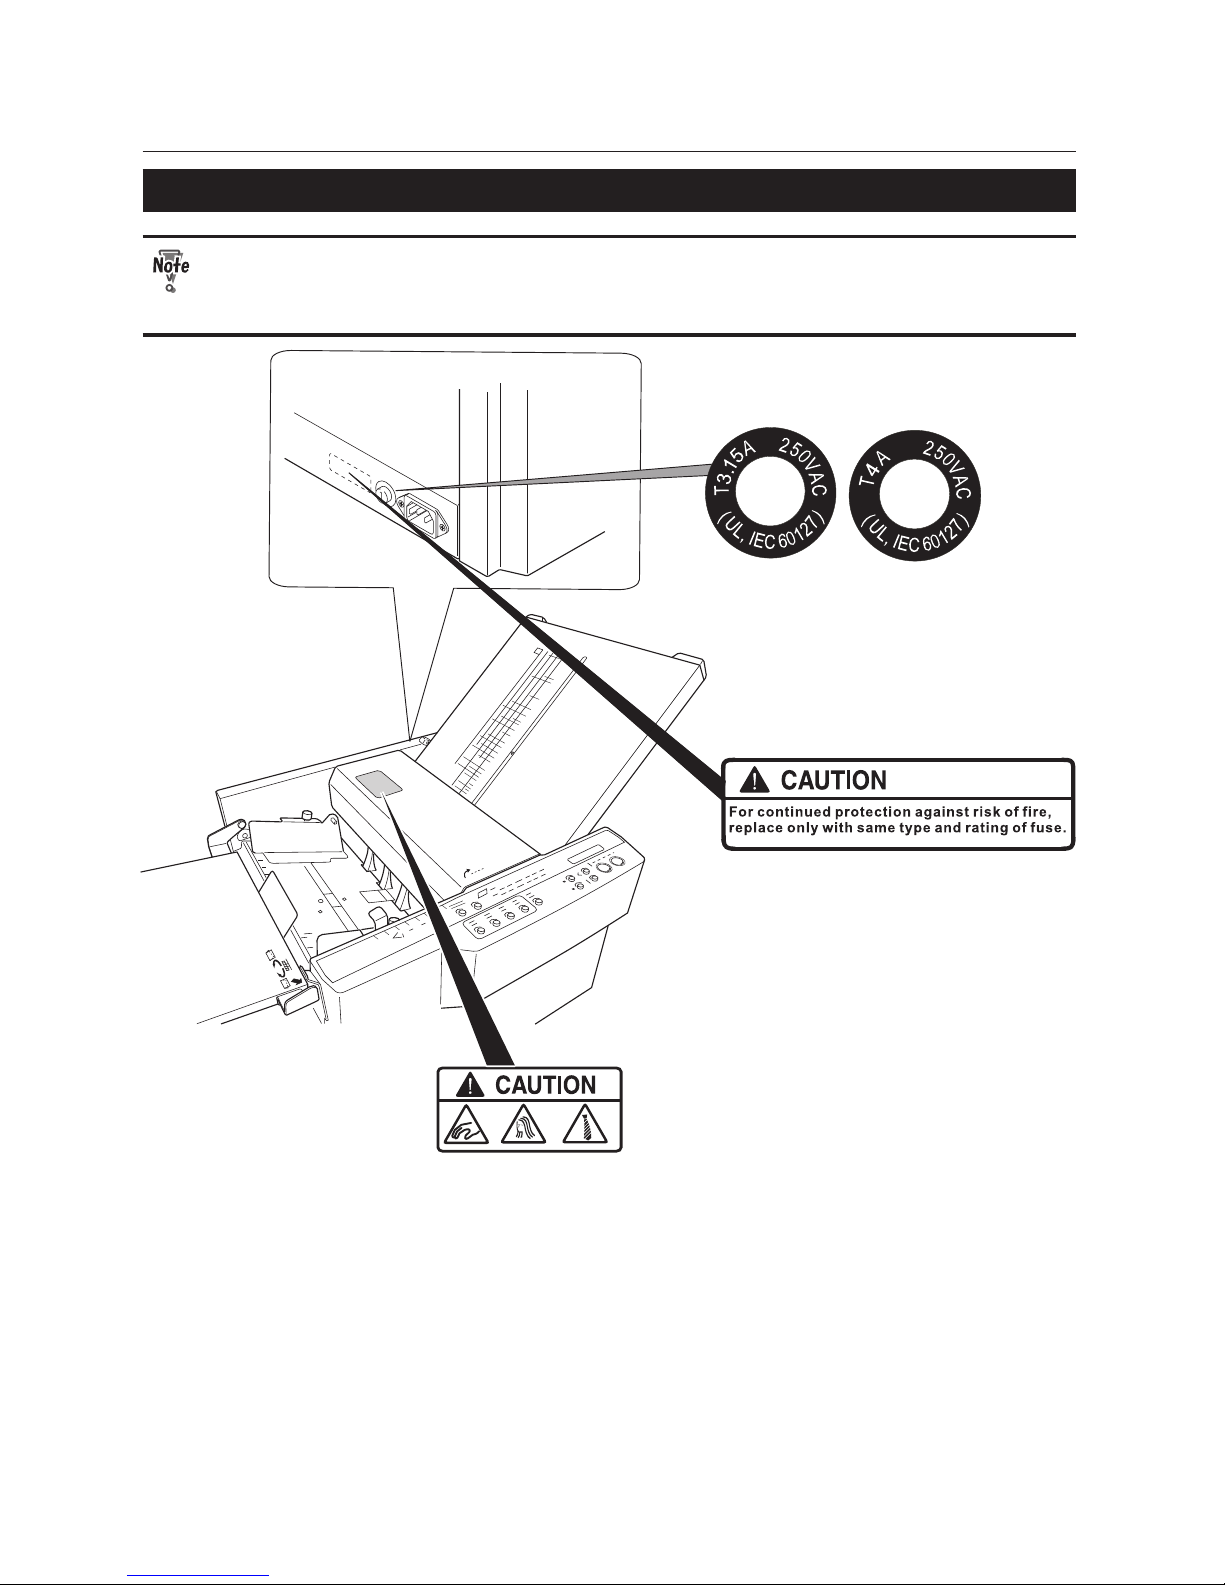
"WARNING" and "CAUTION" labels are pasted on the machine to ensure user safety.
Do not remove or change them.
When the labels become dirty or are lost, be sure to contact your dealer for a new one.
When changing a fuse, make
sure that the fuse rating is same
as that indicated on this label.
North America
EU
H
H
Page 10

v
Contents
Contents
Safety Precautions .............................................i
Power Supply .................................................................................i
Operating Environment ...........................................................ii
Maintenance / Other ............................................................... iii
WARNING / CAUTION Labels ................................................ iv
Chapter1 Before Operation
1. Features ................................................... 1-1
2. Setting Up the Machine ......................... 1-2
2-1. Components ..............................................................1-2
2-2. Removing the Press Release Lever ................... 1-3
2-3. Locking the Bearing Support Levers ............... 1-4
2-4. Attaching the Parts ................................................. 1-5
3. Names and Functions ............................. 1-8
4. Describing Control Panel ..................... 1-10
5. Screen Menus ........................................1-11
6. Handling Paper ..................................... 1-12
6-1. Paper Used ...............................................................1-12
6-2. Precautions on Stacking Paper ........................1-12
7. Emergency Stop....................................1-14
Chapter2 Basic Operation
1. Standard Folding of Standard Paper .... 2-1
1-1. Standard Paper ......................................................... 2-1
1-2. Standard Folding ..................................................... 2-2
1-3. Operation Procedures ...........................................2-2
Chapter3 Advanced Operation
1. Standard Folding of Special Paper ....... 3-1
1-1. Single Folding Thick Paper ...................................3-1
1-2. Double Folding Thick Paper ................................ 3-2
1-3.
Double Folding B6 Thin Paper (EU)/Small
Thin Paper (North America) ............................................3-4
2. Custom Folding of Standard Paper ...... 3-7
3.
Standard Folding of Non-Standard Size
Paper .............................................................. 3-11
4. Cross Folding ........................................3-13
4-1. Cross Folding Standard Size Paper .................3-14
4-2. Cross Folding Non-Standard Size Paper .......3-17
5. Using Art Paper and Coated Paper ..... 3-19
5-1. Characteristics of Art Paper and Coated
Paper ...........................................................................3-19
5-2. Operation Procedures .........................................3-19
6. Correcting Folding Misalignment .......3-20
6-1. Correcting Folding Misalignment along
Vertical Length of Paper .....................................3-20
6-2. Correcting Folding Misalignment along
Sides of Paper ..........................................................3-23
Chapter4
Troubleshooting Guide
1. Correcting Deformed Folding .......................4-1
2. Removing Jammed Paper ...................... 4-1
2-1. When Paper Has Jammed Near the Paper
Feed Ring .................................................................... 4-1
2-2. When Paper Has Slipped at the Paper
Feed Section .............................................................. 4-2
2-3. When Paper Has Coiled Around the Rubber
Roll ................................................................................. 4-3
2-4. When Paper Has Jammed at the First
Folding Plate .............................................................. 4-4
2-5. When Paper Has Jammed at the Second
Folding Plate .............................................................. 4-5
2-6. When Paper Has Jammed Near the
Stacker.......................................................................... 4-7
3. Error Messages ....................................... 4-8
4. Troubleshooting ..................................... 4-9
Chapter5 Cleaning the Unit
1. Cleaning Each Section ............................ 5-1
1-1. Cleaning the Rubber Roll ..................................... 5-1
1-2. Cleaning the Paper Feed Rings .......................... 5-2
1-3. Cleaning the Paper Separator ............................ 5-3
1-4. Cleaning the Paper Sensor .................................. 5-4
1-5. Cleaning the Ejection Gate Sensor ................... 5-4
1-6. Cleaning the Paper Ejection Belts ..................... 5-4
Chapter6 Appendix
Specication .................................................. 6-1
Page 11
1-1
Chapter1 Before Operation
Chapter1 Before Operation
1. Features
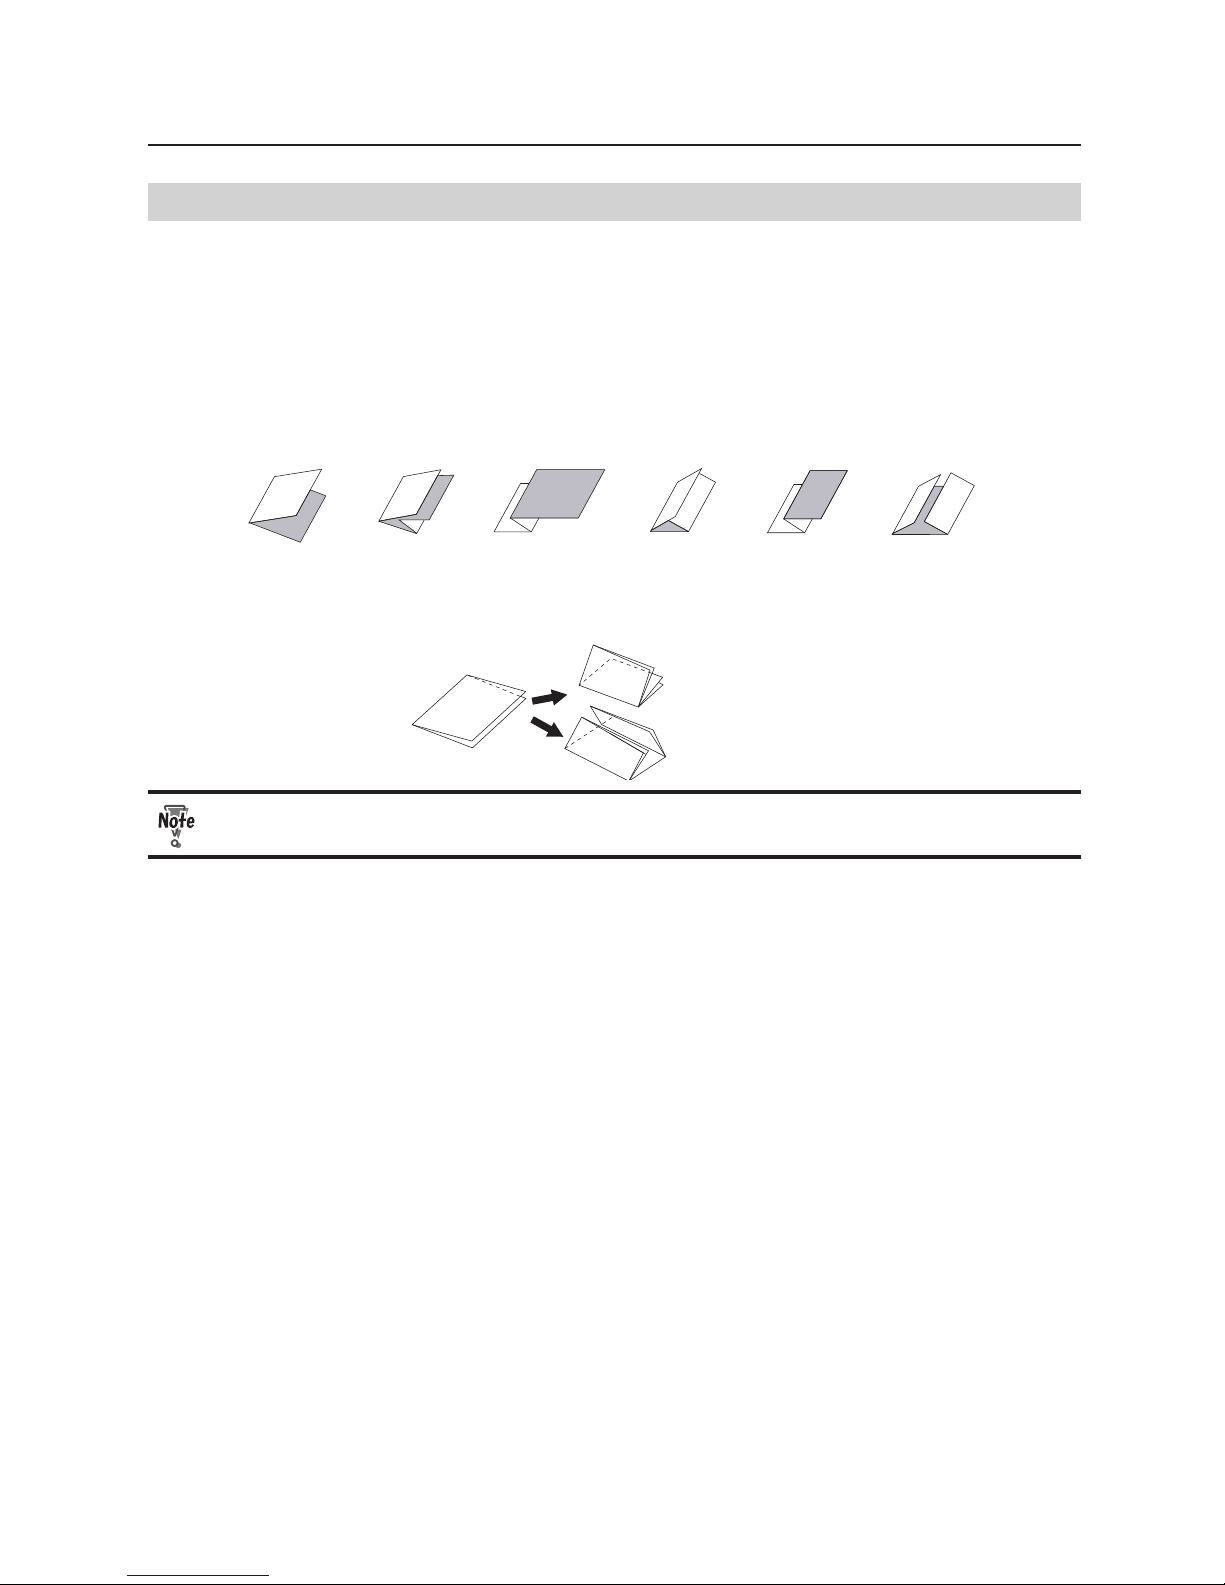
The TF MEGA-A is designed to fold paper into six popular folding modes and is capable of folding the
following number of sheets:
For EU
Approximately 125 sheets of paper per minute when single folding A4 size ne quality paper 64 g/m
2
For North America
Approximately 135 sheets of paper per minute when single folding 11 lb of ne quality LT paper
Single fold Double fold Irregular accordion fold Letter fold Accordion fold Gate fold
The TF MEGA-A is also able to create cross single fold and cross letter fold as shown in the gure.
Cross fold
Cross single fold
Cross letter fold
Note that the nish of cross folding is not as accurate as that of the six folding modes mentioned
above.
(Fold out)
(Z fold)
Page 12
1-2
Chapter1 Before Operation
2. Setting Up the Machine
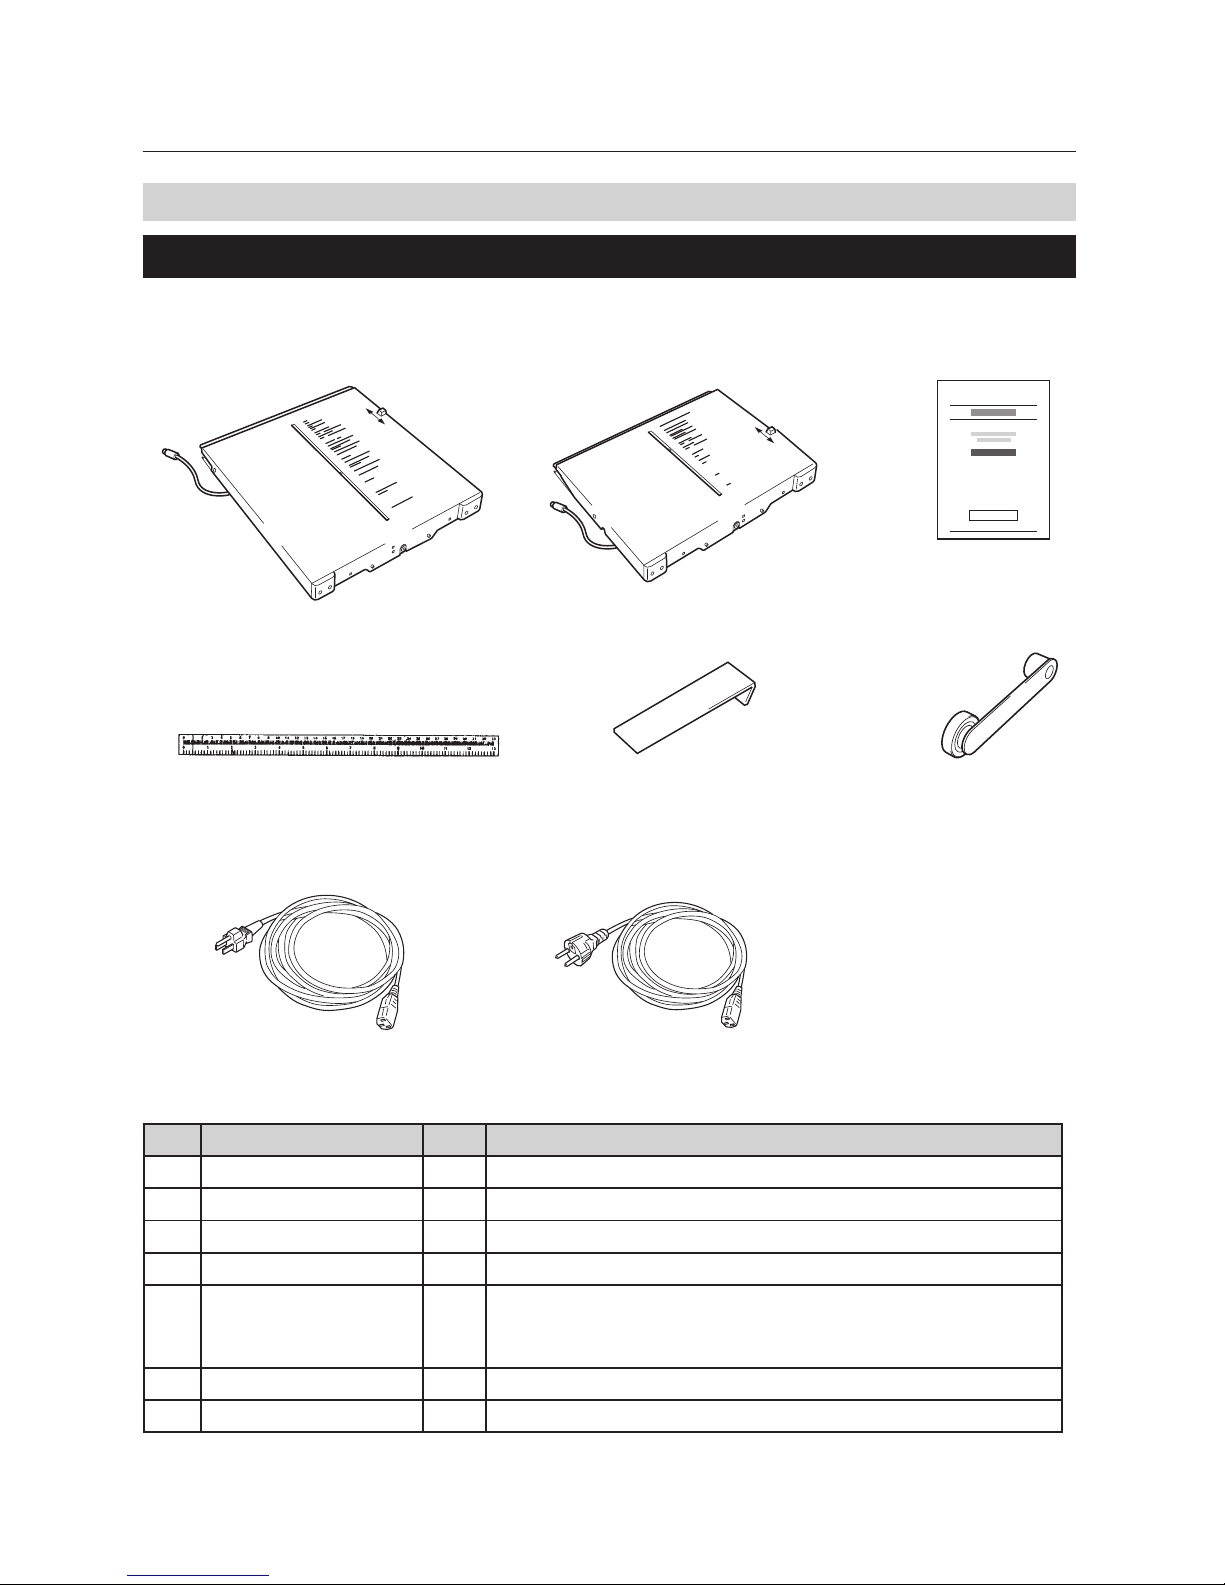
2-1. Components
[1] [2] [3]
[4] [5] [6]
[7]
220 to 240 V (For EU)120 V (For North America)
No. Name Qty. Remark
[1] First folding plate 1 Attached to the right upper section on the operator's side.
[2] Second folding plate 1 Attached to the right lower section on the operator's side.
[3] Instruction manual 1 This manual
[4] Scale label 1 Used to measure non-standard size paper. Attach the scale.
[5] Guide plate unit 1 Used when folding B6 size thin paper into four. (EU)
Used when folding small sized medium thickness paper into four.
(North America)
[6] Cross folding lever 1 Used when cross folding paper.
[7] Power cord 1
Page 13
1-3
Chapter1 Before Operation
2-2. Removing the Press Release Lever
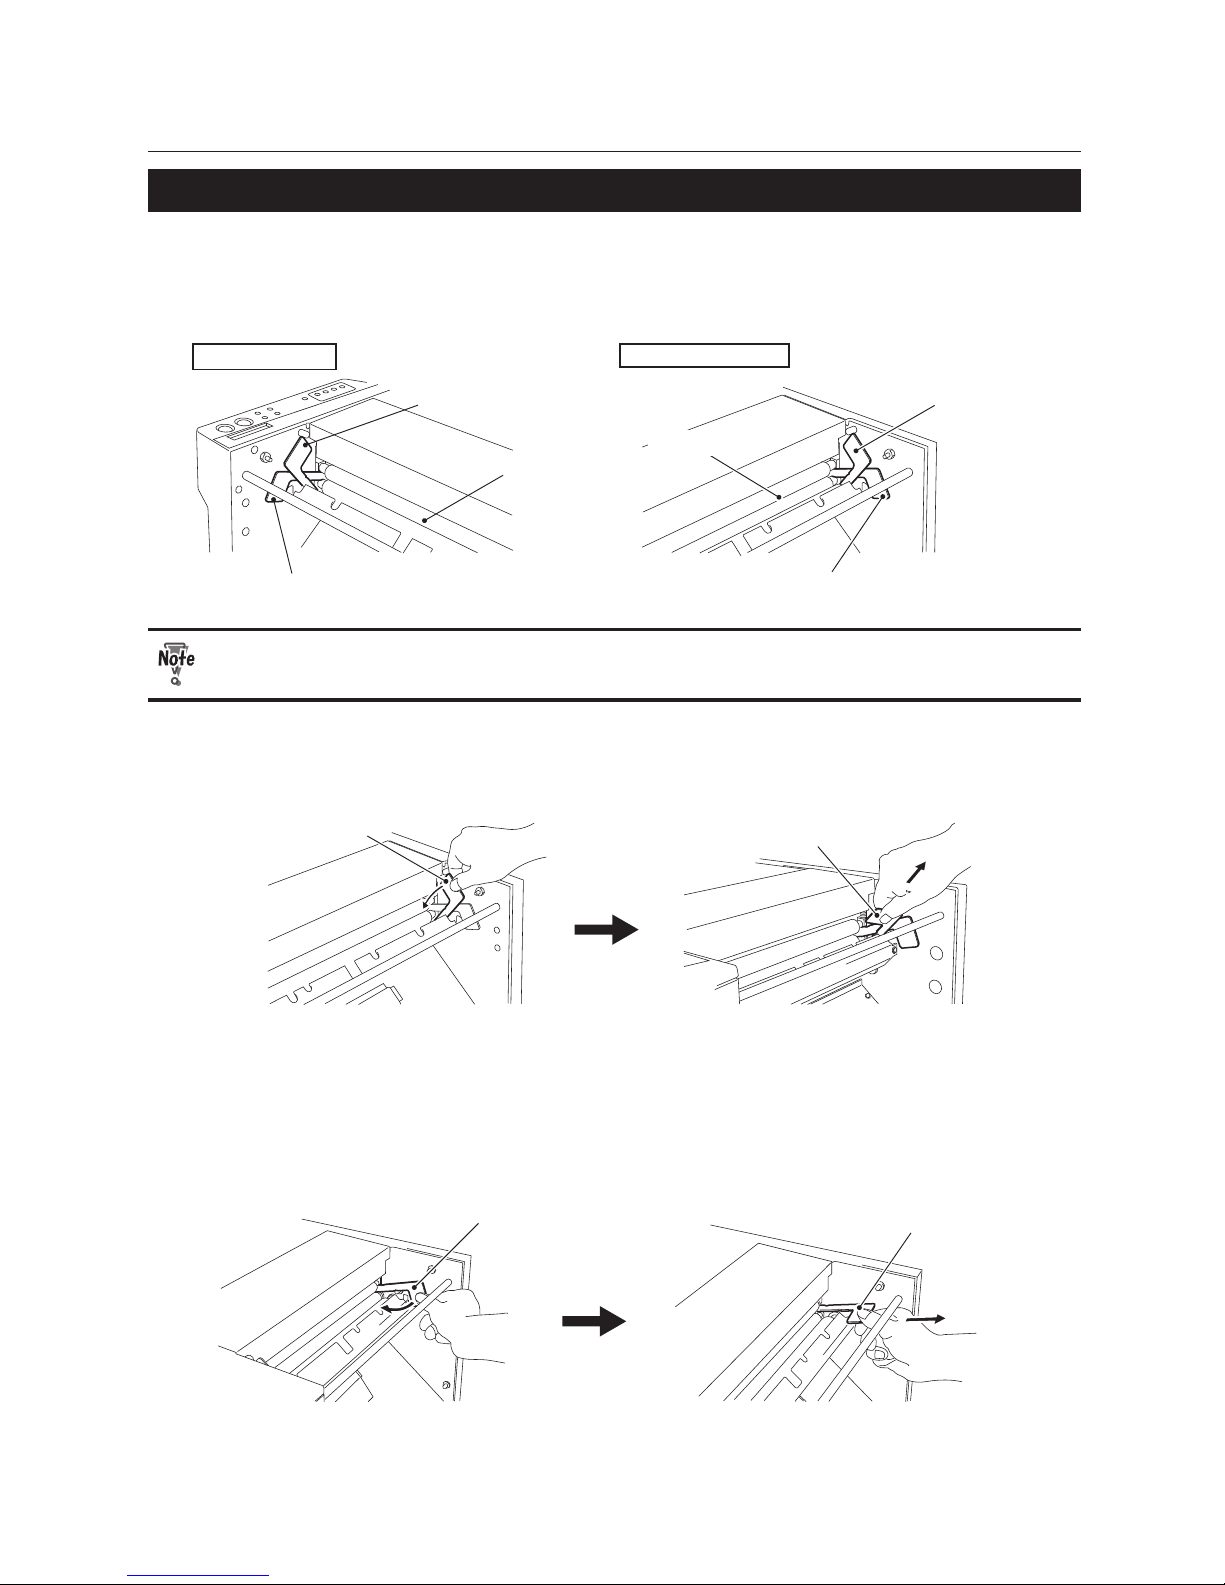
The press release levers are attached to the unit at shipment to prevent the rubber roll from becoming
distorted. Be sure to remove them when setting up the machine.
The two types of press levers are attached to either side of the rubber roll.
Press release lever (A)
Operator’s side
Rubber roll
Press release lever (B)
Press release lever (A)
Press release lever (B)
Non-operator’s side
Rubber roll
The machine will be damaged if it is used without removing the lever.
1
To remove the press release lever (A) on the non-operator’s side, push it inwards and
pull it out.
Press release lever (A)
Press release lever (A)
2
To remove the press release lever (A) on the operator’s side, push it inwards and pull it
out.
3
To remove the press release lever (B) on the non-operator’s side, push it inwards and
pull it out.
Press release lever (B)
Press release lever (B)
4
To remove the press release lever (B) on the operator’s side, push it inwards and pull it
out.
Page 14
1-4
Chapter1 Before Operation
2-3. Locking the Bearing Support Levers
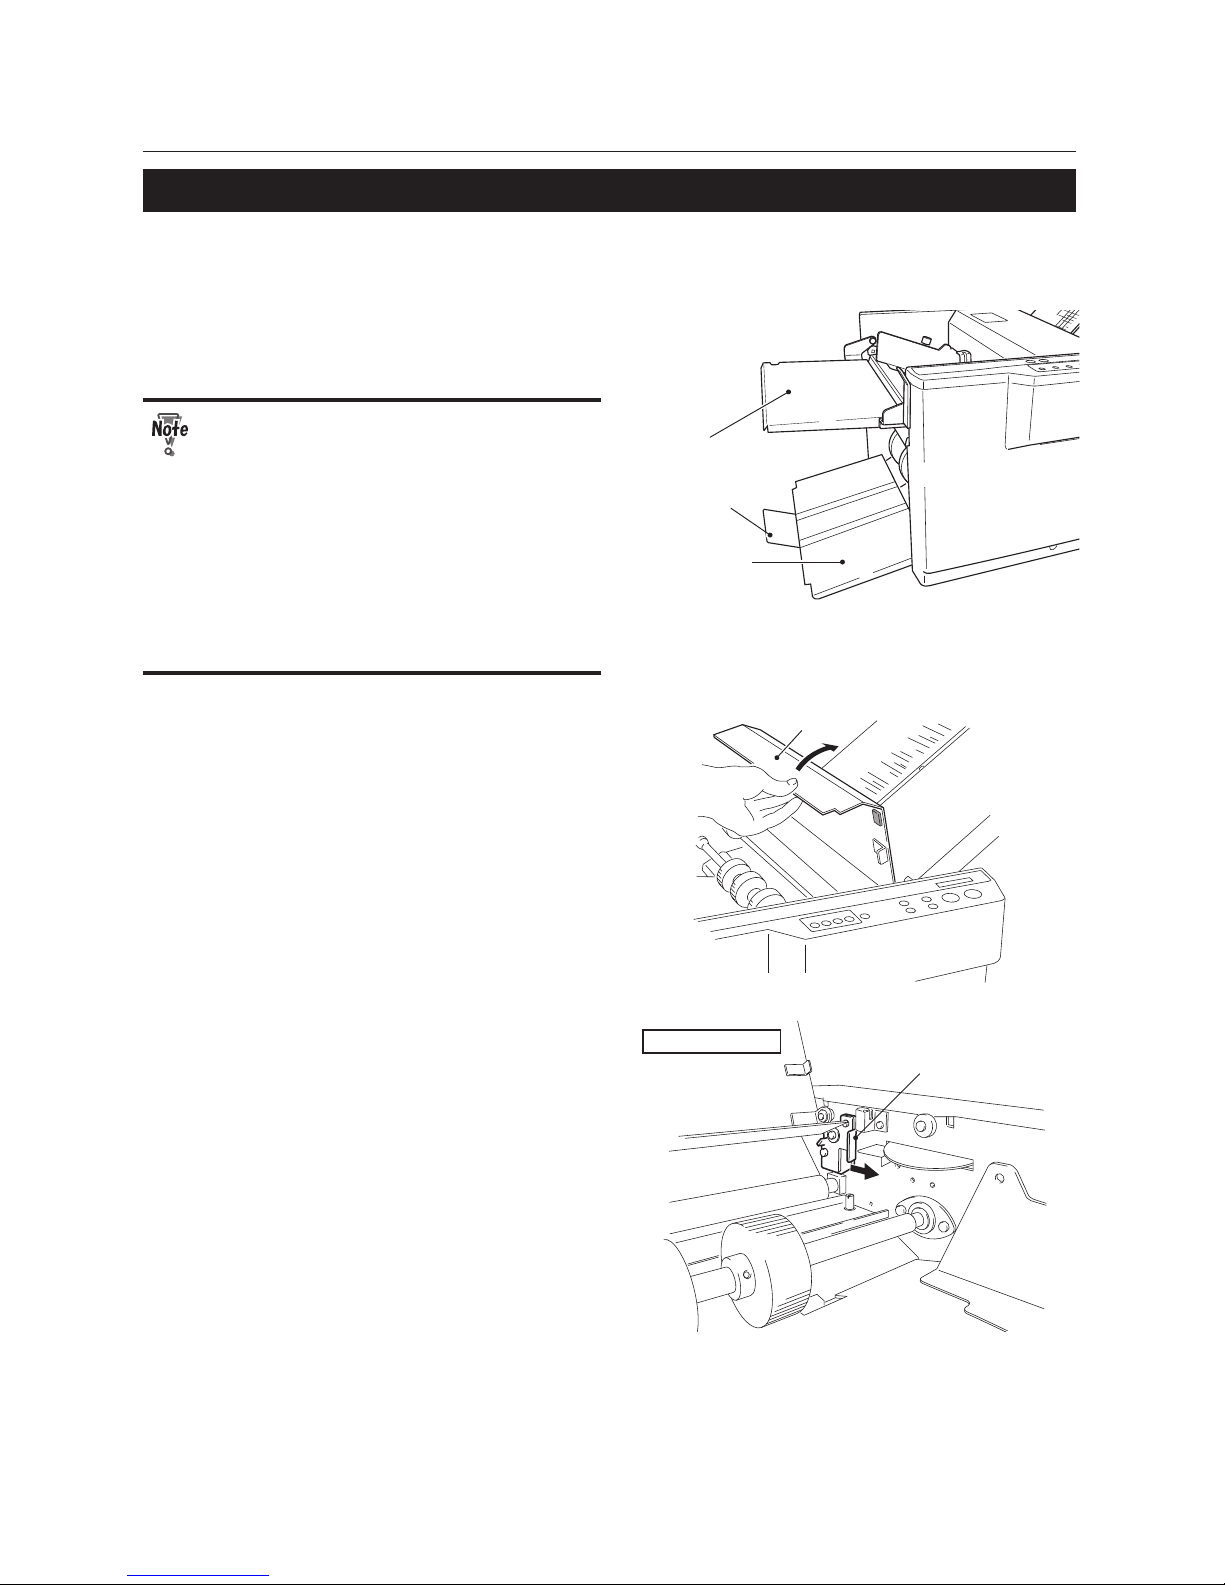
The bearing support levers are released at shipment to prevent the rubber roll from becoming distorted.
After removing the press release levers, be sure to lock the bearing.
Support paper feed plate
Paper receiving
stopper
Paper receiving
tray
1
Unfold the paper receiving tray.
2
Unfold the support paper feed plate.
• If you unfold the support paper feed
plate before unfolding the paper
receiving tray, the paper receiving
stopper may be damaged. Make sure
that you unfold the paper receiving tray
rst.
• The paper receiving tray and support
paper feed plate are foldable so that you
can easily move or store the machine.
Make sure that you unfold them before
using the machine.
Top cover
3
Open the top cover.
Bearing support lever
Operator’s side
4
Turn the bearing support lever on the
operator’s side in the direction of the
arrow.
The bearing will be locked.
Page 15
1-5
Chapter1 Before Operation
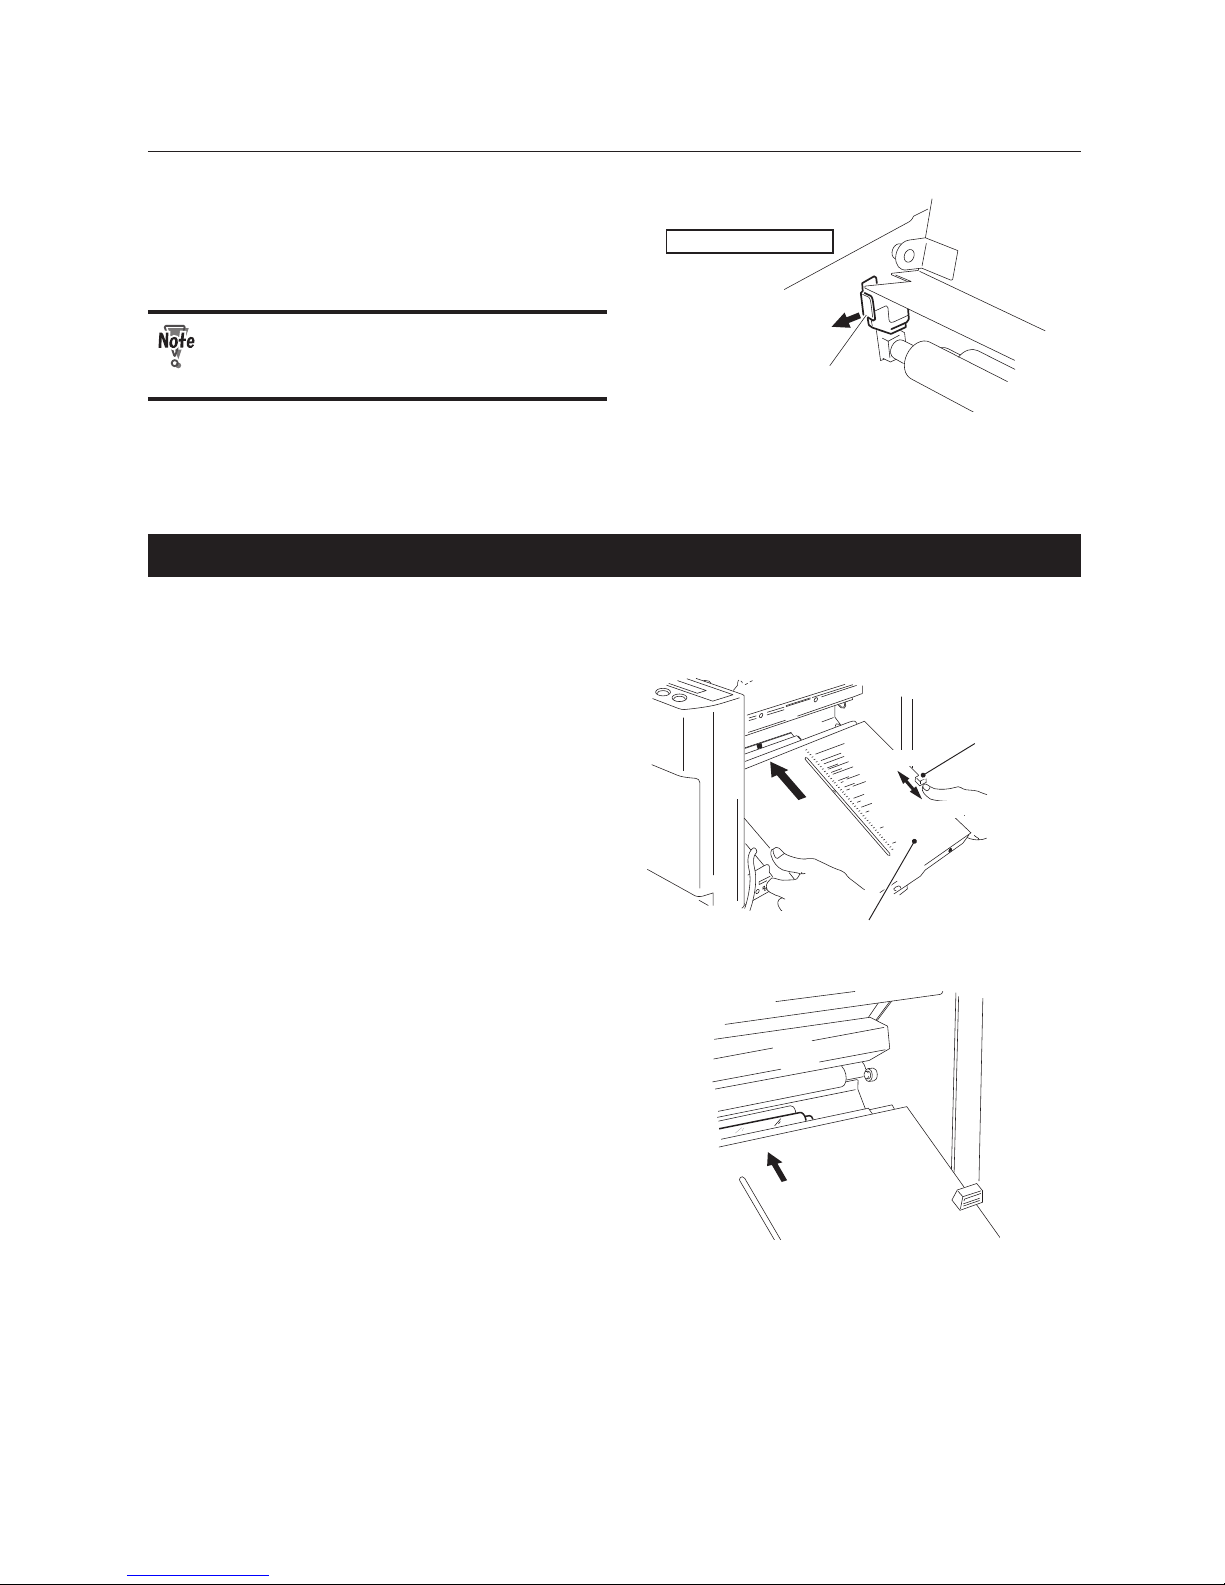
Bearing support lever
Non-operator’s side
5
Turn the bearing support lever on the
non-operator’s side in the direction of
the arrow.
The bearing will be locked.
Because the bearing support lever presses
down the rubber roll, if it is not locked,
thick paper may not be folded properly.
6
Close the top cover.
2-4. Attaching the Parts
1
Attach the second folding plate.
Second folding plate
Lock lever
UNLOCK
LOCK
1) Move the lock lever of the second folding
plate to the position of “UNLOCK.”
2) Slide the second folding plate to the
machine along the shaft on each side of the
frame, then insert the U-shaped gutter on
the edge of each side into the shaft located
on the back of the frame.
3) Move the lock lever to the position of
“LOCK.”
Page 16
1-6
Chapter1 Before Operation
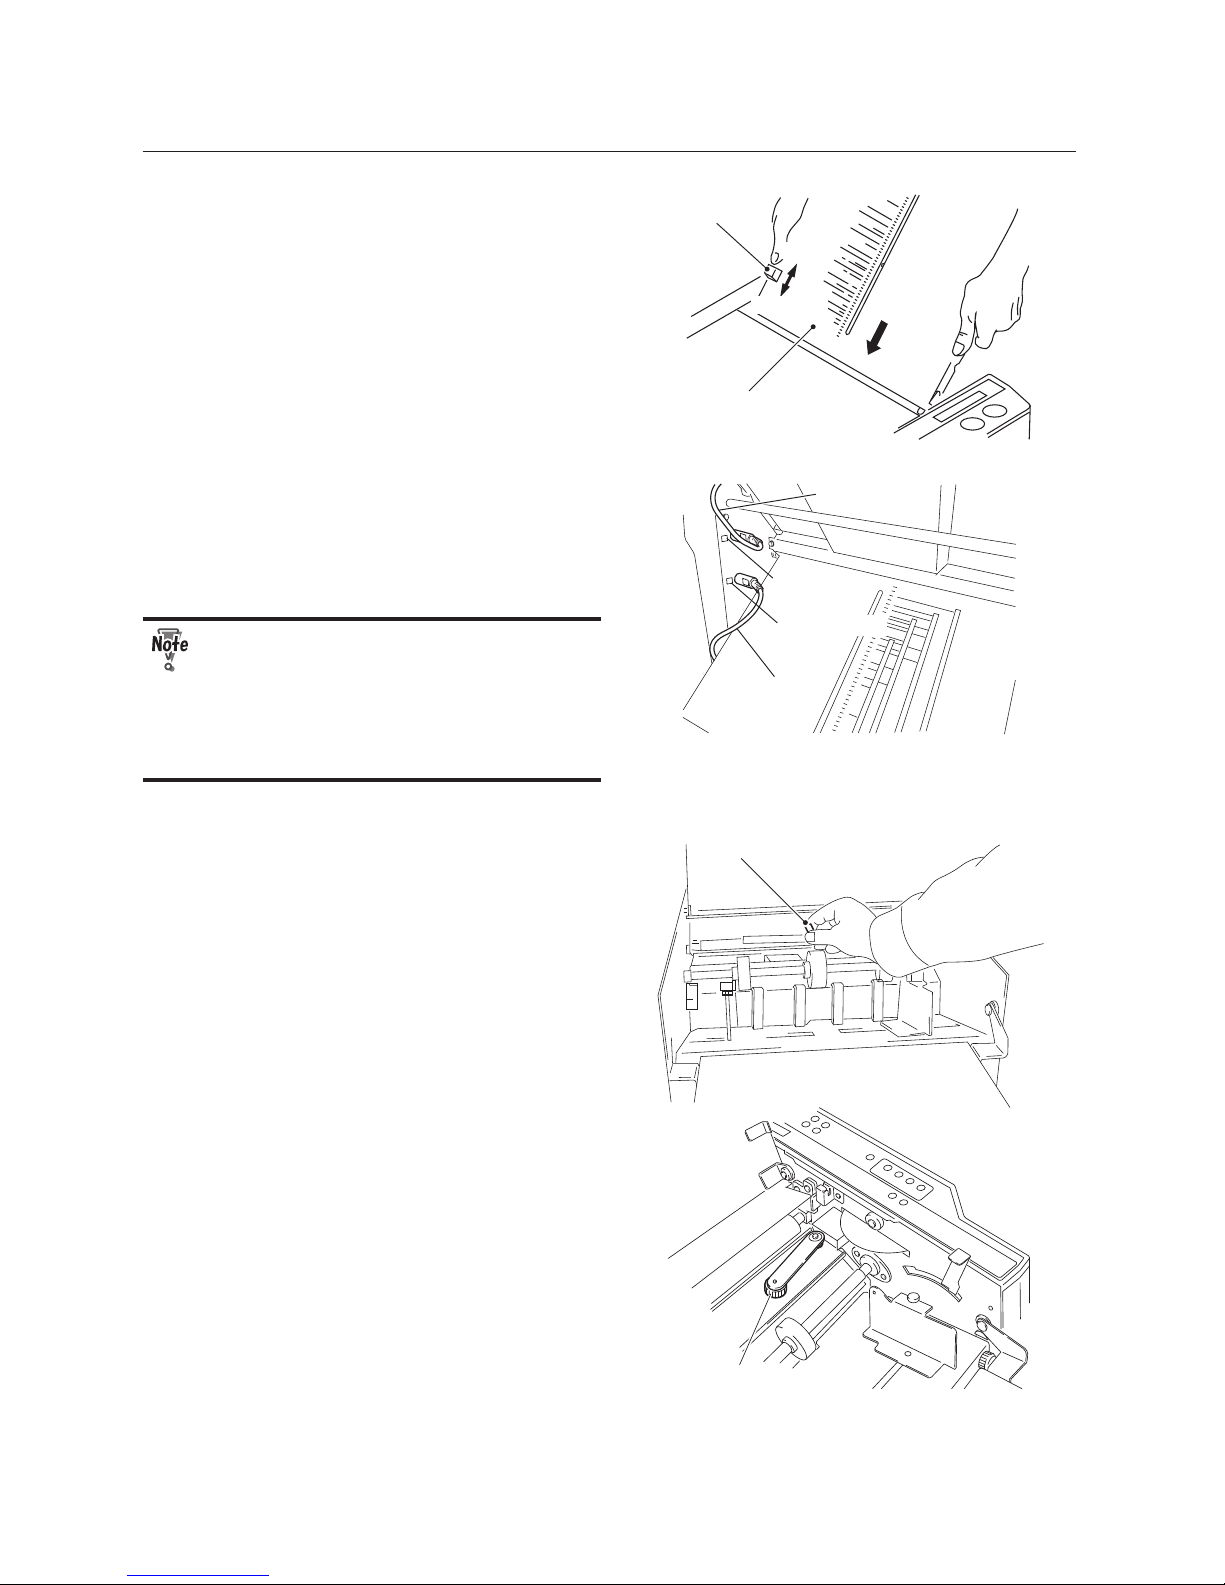
First folding plate
UNLOCK
LOCK
Lock lever
2
Attach the rst folding plate.
1) Move the lock lever of the rst folding plate
to the position of “UNLOCK.”
2) Slide the rst folding plate to the machine
along the shaft on each side of the frame,
then insert the U-shaped gutter on the
edge of each side into the shaft located on
the back of the frame.
3) Move the lock lever to the position of
“LOCK.”
Connector 1
Control cable 1
Control cable 2
1
2
2
1
Connector 2
3
After attaching the folding plates,
connect the control cable of the rst
folding plate to the connector "1" and
that of the second folding plate to the
connector "2."
• Be careful not to connect the control
cable to a wrong connector.
• Be sure to turn o the power before
connecting or disconnecting the
control cable. Otherwise the unit will
malfunction.
Guide plate unit
4
Place the guide plate unit on the
magnet under the top cover.
Cross folding lever
5
Insert the cross folding lever to the
shaft located on the operator's side
under the top cover.
Page 17

1-7
Chapter1 Before Operation
Memo
Page 18
1-8
Chapter1 Before Operation
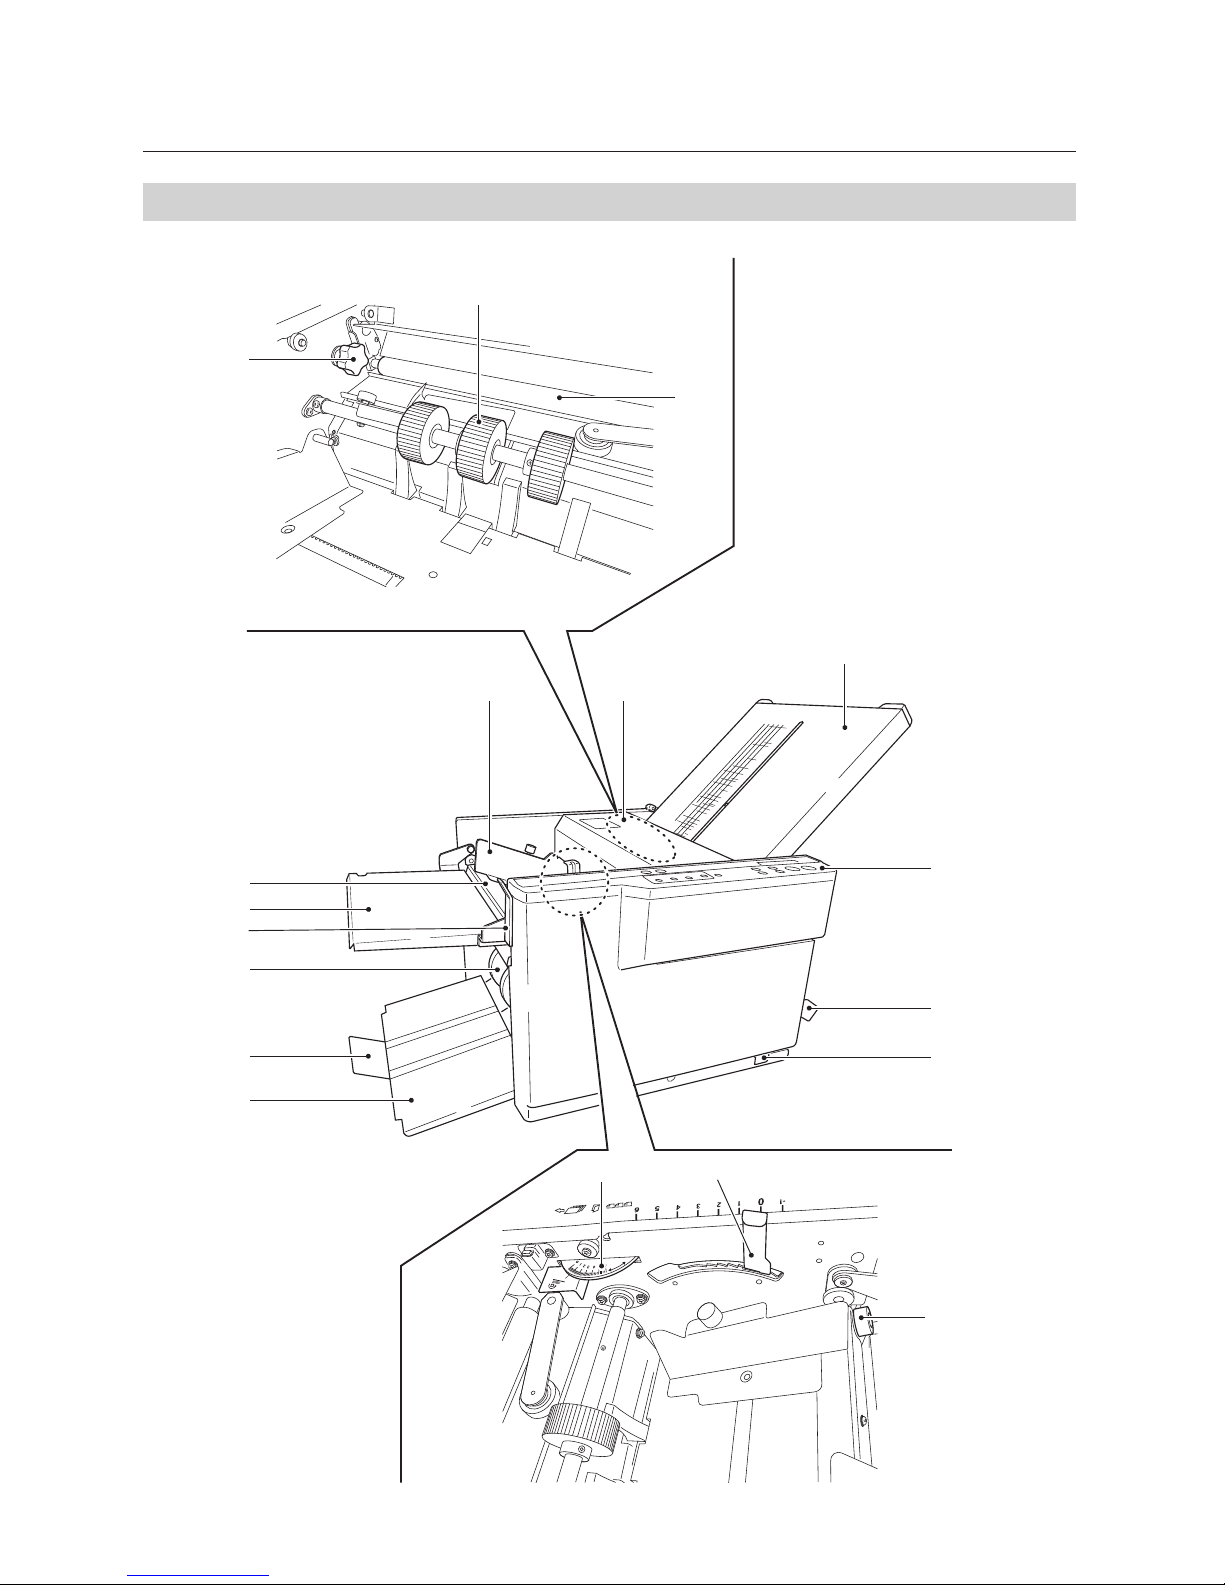
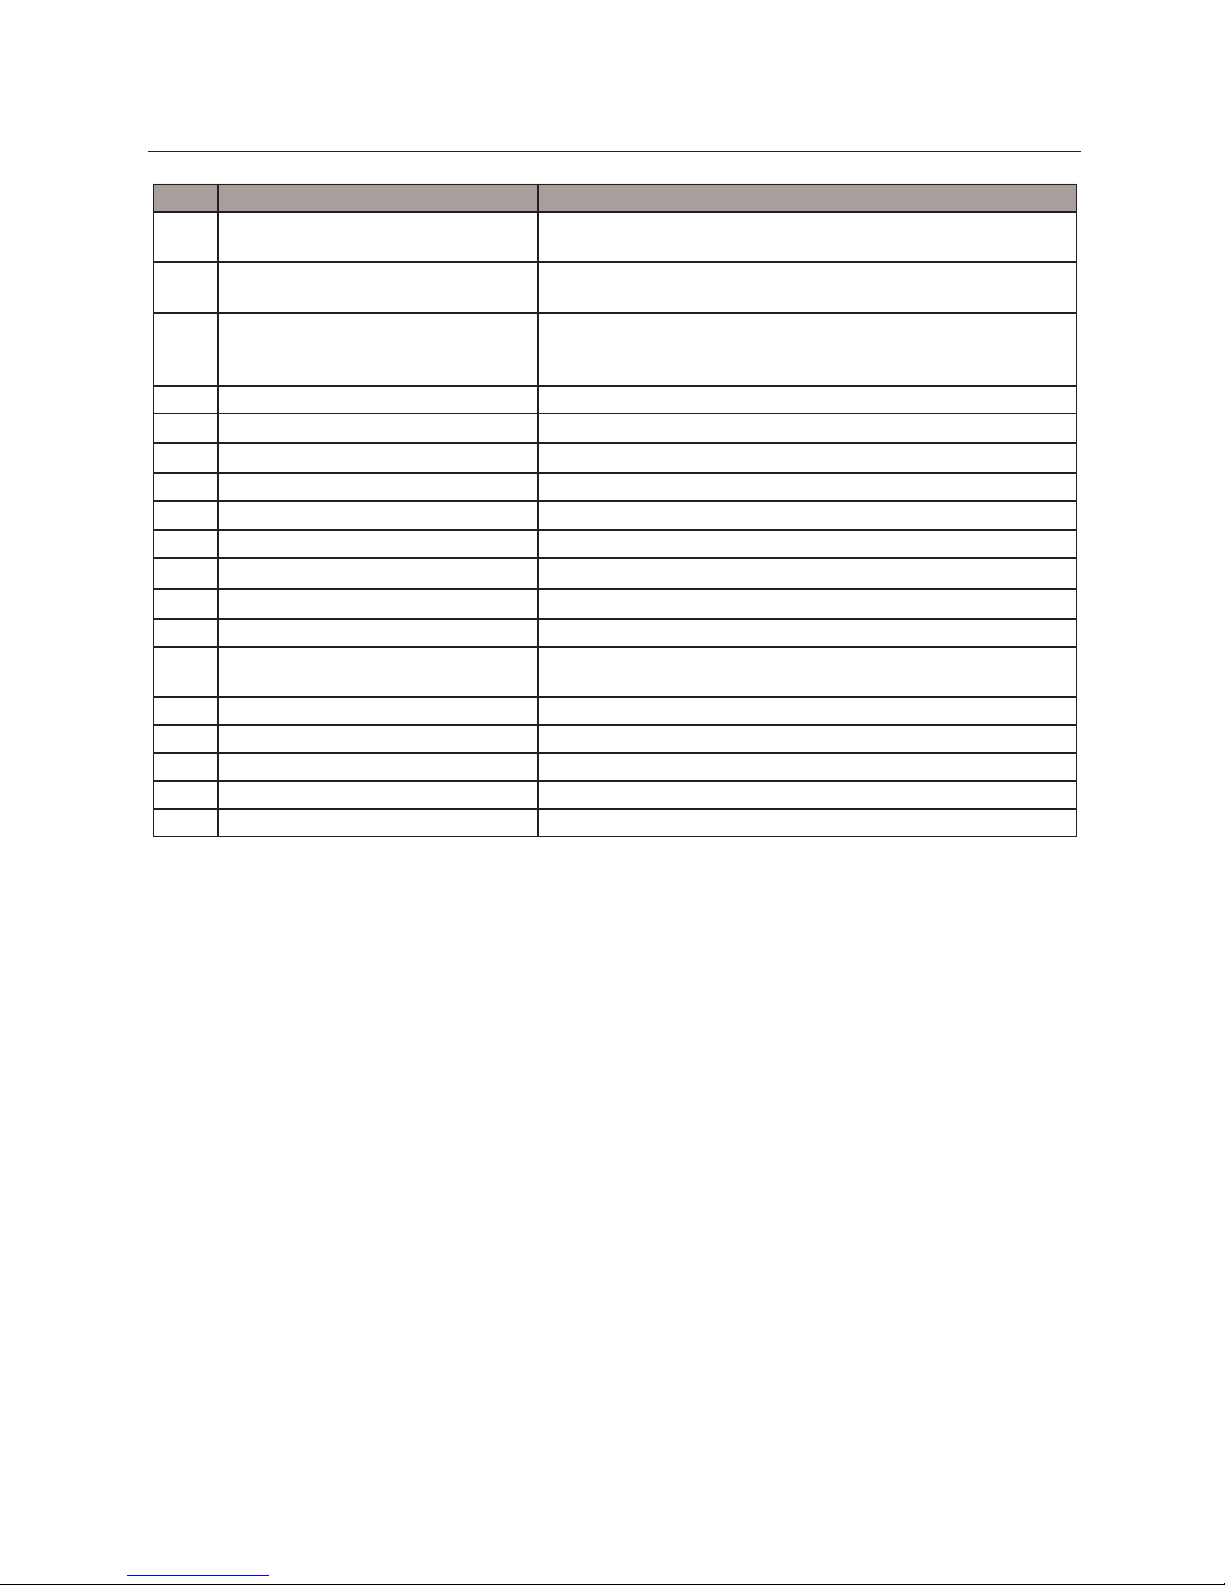
3. Names and Functions
[1]
[2]
[3]
[4]
[5]
[6]
[7]
[8]
[9]
[10]
[11]
[13]
[14]
[15]
[16] [17]
[18]
[12]
Under the main cover
Paper feed tray (operator’s side)
Page 19
1-9
Chapter1 Before Operation
No. Name Function
[1] First folding plate Guide plate for deciding a paper folding position. First folding is
made using this plate.
[2] Control panel Used when operating the machine. Error messages are also
displayed on the LCD display.
[3] Second folding plate Paper folded at the rst folding plate is sent to the second folding
plate. Second folding is made using this plate. This plate is not
used when folding paper into two.
[4] Power switch Turns on and o the power.
[5] Paper receiving tray Receives folded paper ejected out.
[6] Paper receiving stopper Stops paper ejected out from the machine.
[7] Stacker rollers Ejects folded paper from the machine.
[8] Paper set lever When lowered, the paper feed tray is raised.
[9] Support paper feed plate Supports paper stacked on the paper feed tray.
[10] Paper feed tray Used to stack paper to be folded.
[11] Side guide Holds paper stacked on the paper feed tray.
[12] Top cover Prevents the user from touching the moving parts.
[13] Jam correction knob Removes paper jammed around the rubber roll by turning the
knob.
[14] Paper feed ring Feeds paper into the machine.
[15] Rubber roll Sends paper to the rst folding plate.
[16] Separating pressure adjustment dial Adjusts the paper separating pressure.
[17] Paper feed pressure adjustment knob Adjusts paper feed pressure.
[18] Slant correction paper feed knob Corrects misalignment along sides of paper.
Page 20
1-10
Chapter1 Before Operation
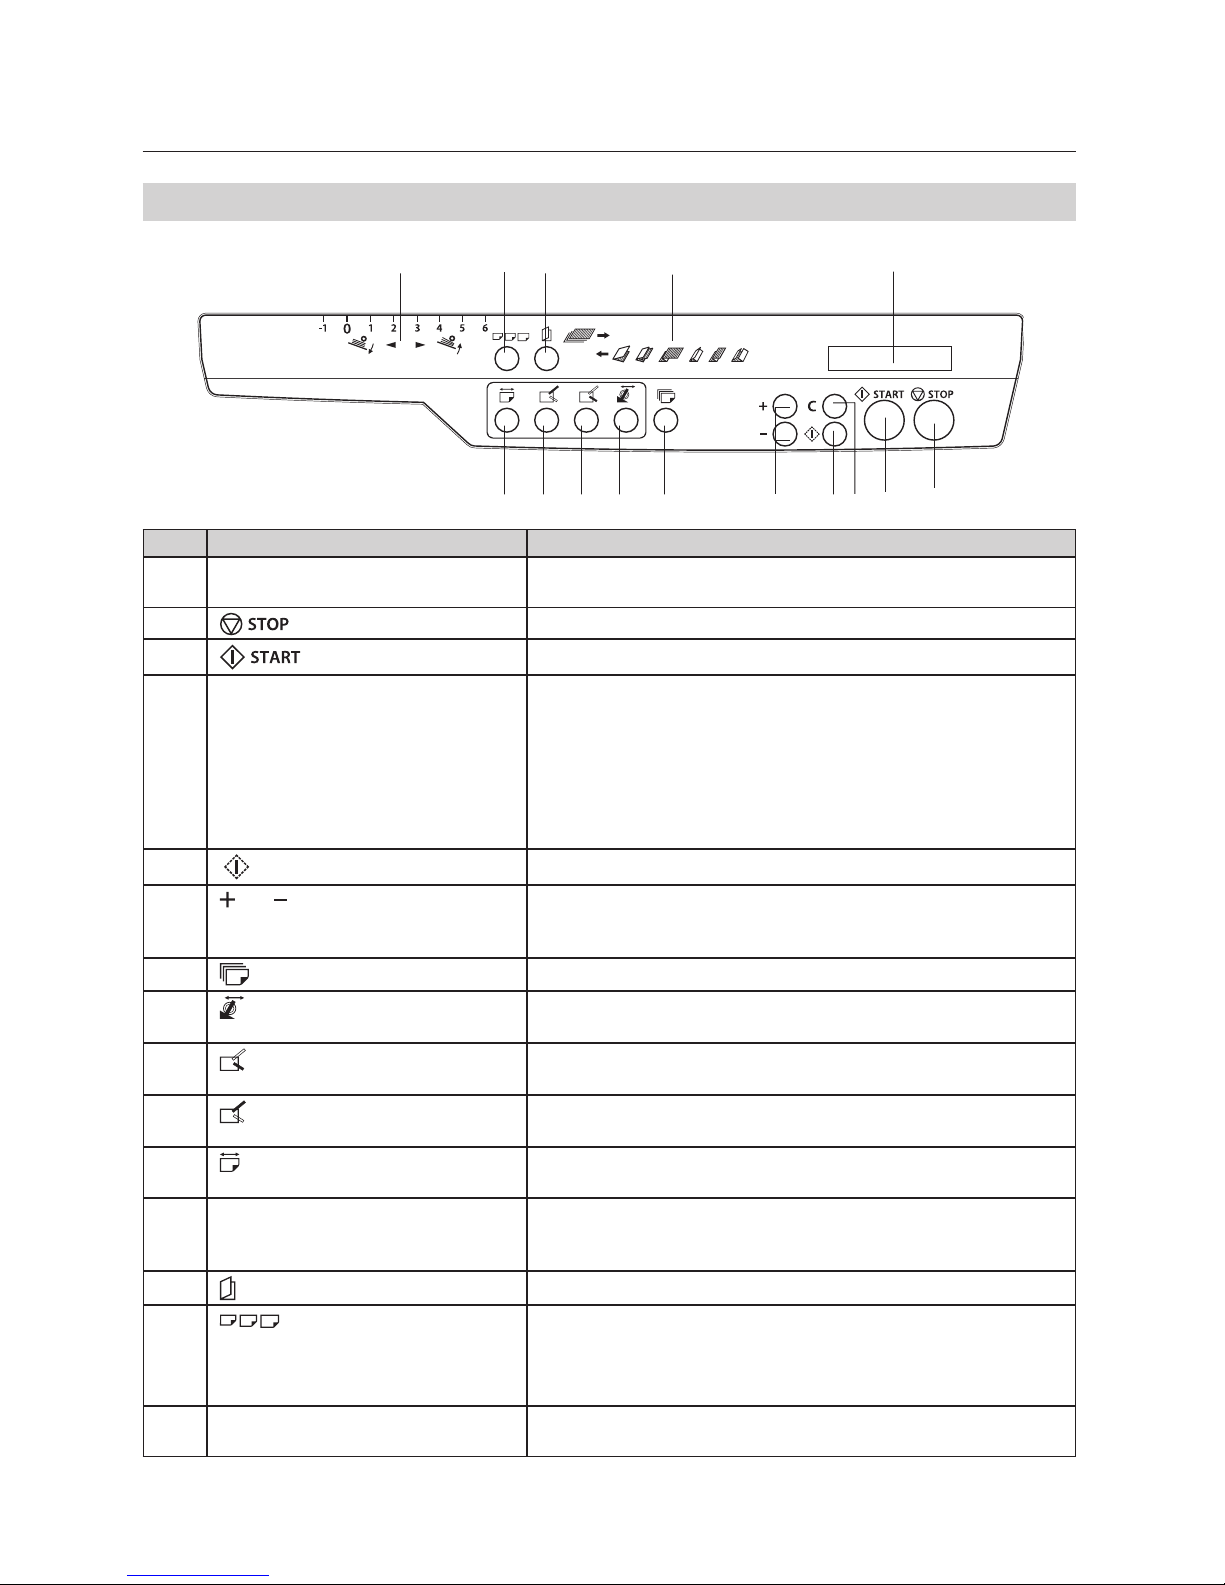
4. Describing Control Panel
[1]
[2][3][4][5][6][7][8][9][10]
[12][13][14][15]
[11]
No. Name Function
[1] Counter/LCD display A paper size, folding mode, the number of folded paper or error
messages are displayed.
[2]
key
When pressed, the machine stops.
[3]
key
When pressed, the machine starts folding operations.
[4] C (clear) key • When the machine is stopped with paper on the paper feed tray,
pressing this key for more than two seconds makes the counted
number return to "0."
• When a mis-feed has occurred, pressing this key clears the
message.
• When set to subtract count, pressing this key cancels the subtract
count mode and returns to the add count mode.
[5]
(test) key
Starts test folding.
[6] key, key Sets the details for non-standard size paper, custom folding or
folding position correction, species the number for subtract
count, or changes the stacker rollers position.
[7]
(count) key
Switches the count mode from add count to subtract count.
[8]
(stacker roller position correction)
key
Corrects the automatically set position of the stacker rollers.
[9]
(second folding stopper
adjustment) key
Adjusts the automatically set folding position or species the size
of custom folding.
[10]
(rst folding stopper adjustment)
key
Adjusts the automatically set folding position or species the size
of custom folding.
[11]
(paper length setting) key
Species the paper length when folding non-standard size paper
in a standard folding mode.
[12] Folding mode, paper feed/eject
direction lable
Shows the paper feed direction and front/back of paper and how
folded paper is discharged from the machine. Use this label when
selecting a folding mode using the folding mode key.
[13]
(folding mode) key
Selects a folding mode (six patterns).
[14] (paper size) key Selects a paper size from A3, B4, A4, B5, A5, B6, LP (non-standard
size) and CF (paper for custom folding). (EU)
Selects a paper size from LD, LG, LT, ST/IN, LP (non-standard size)
and CF (paper for custom folding). (North America)
[15] Paper feed pressure label Refer to this label when setting paper feed pressure according to
the paper quality.
Page 21
1-11
Chapter1 Before Operation
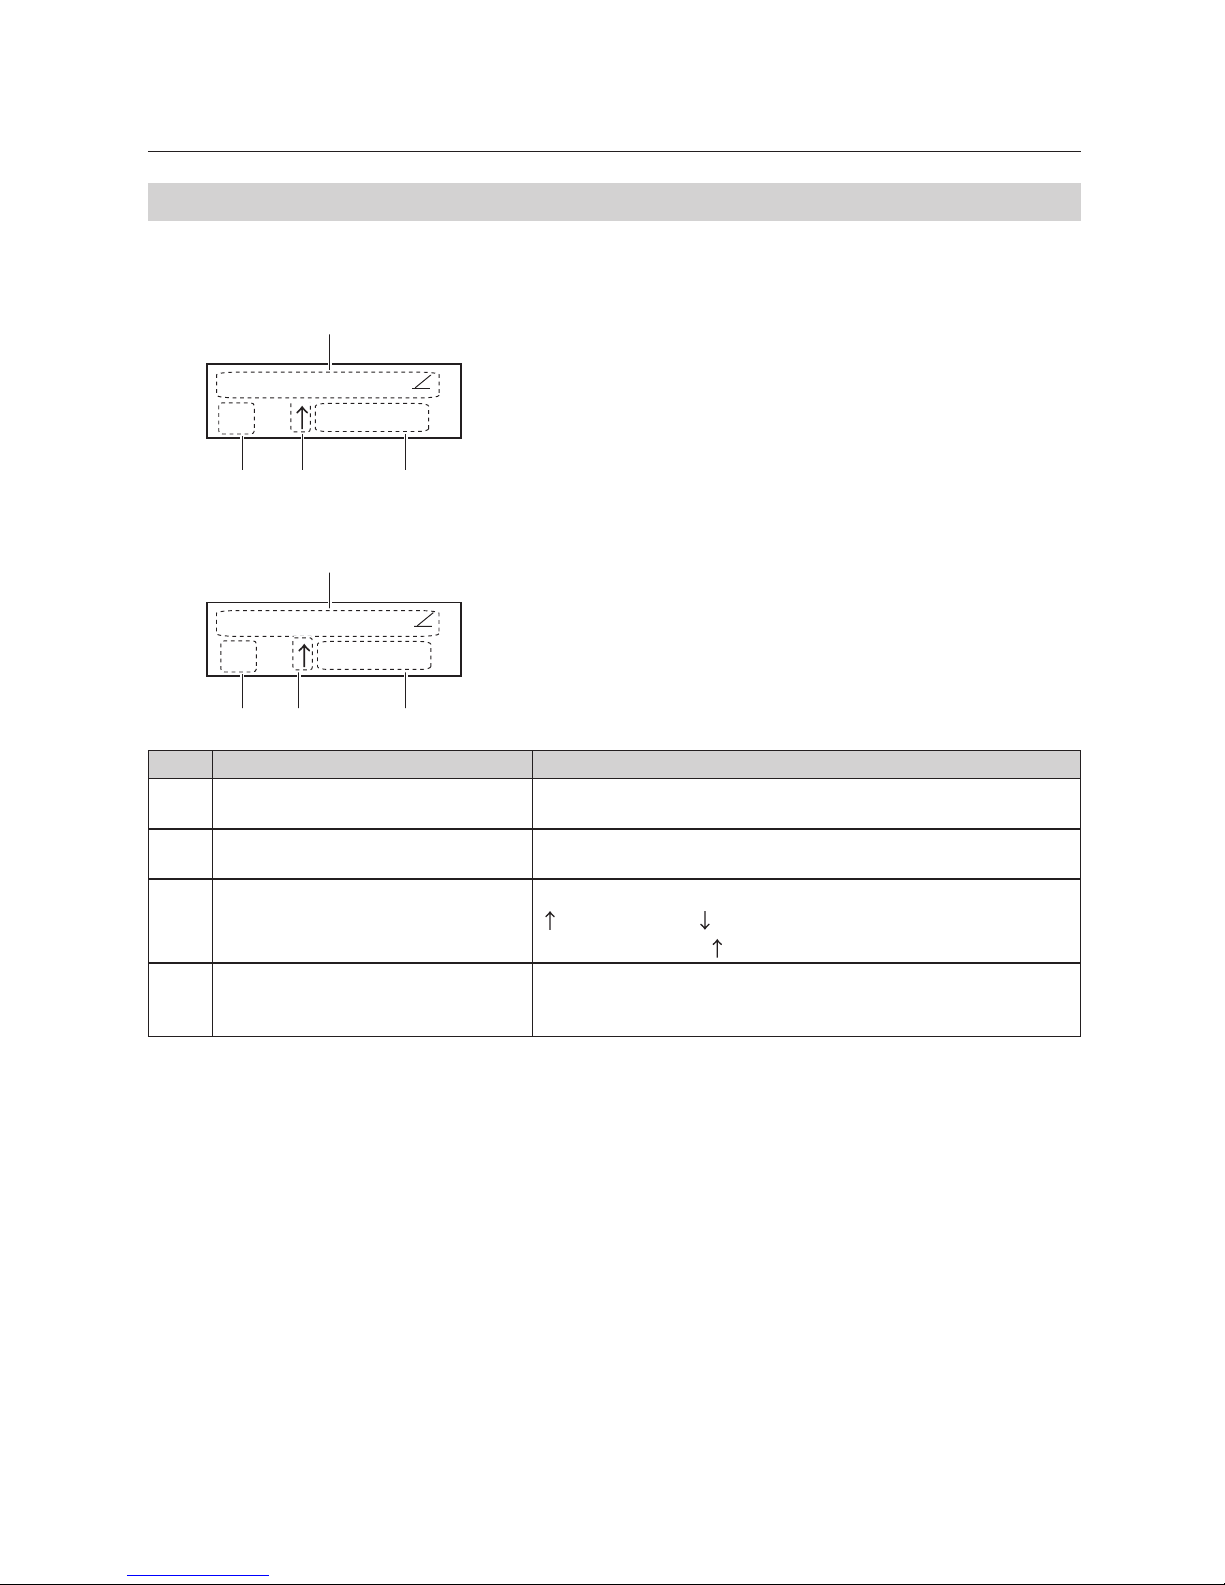
5. Screen Menus
The top screen is a screen displayed rst when you turn on the power.
For EU
A3
Single fold
[1]
Count:0
[2] [3] [4]
For North America
[1]
[2] [3] [4]
LD
Single fold
Count:0
No. Name Function
[1] Folding mode Displays a currently selected folding mode. The default setting is
[Single fold].
[2] Paper size Displays a currently selected mode. The default setting is [A3] (EU)/
[LD] (North America).
[3] Count mode Indicates a count mode.
: add count mode, : subtract count mode
The default setting is .
[4] The number of folded paper Displays the number of processed sheets in the add count mode (0
to 9999) and the number of sheets to be processed in the subtract
count mode (0 to 999).
Page 22
1-12
Chapter1 Before Operation
6. Handling Paper
6-1. Paper Used
•
Make sure that the printing ink on the paper has dried completely prior to use.
• If used without the ink completely dried, the folding roller or paper may become dirty.
• Paper printed with special ink may cause the swelling and deformation of the rubber rolls,
leading to folding misalignment.
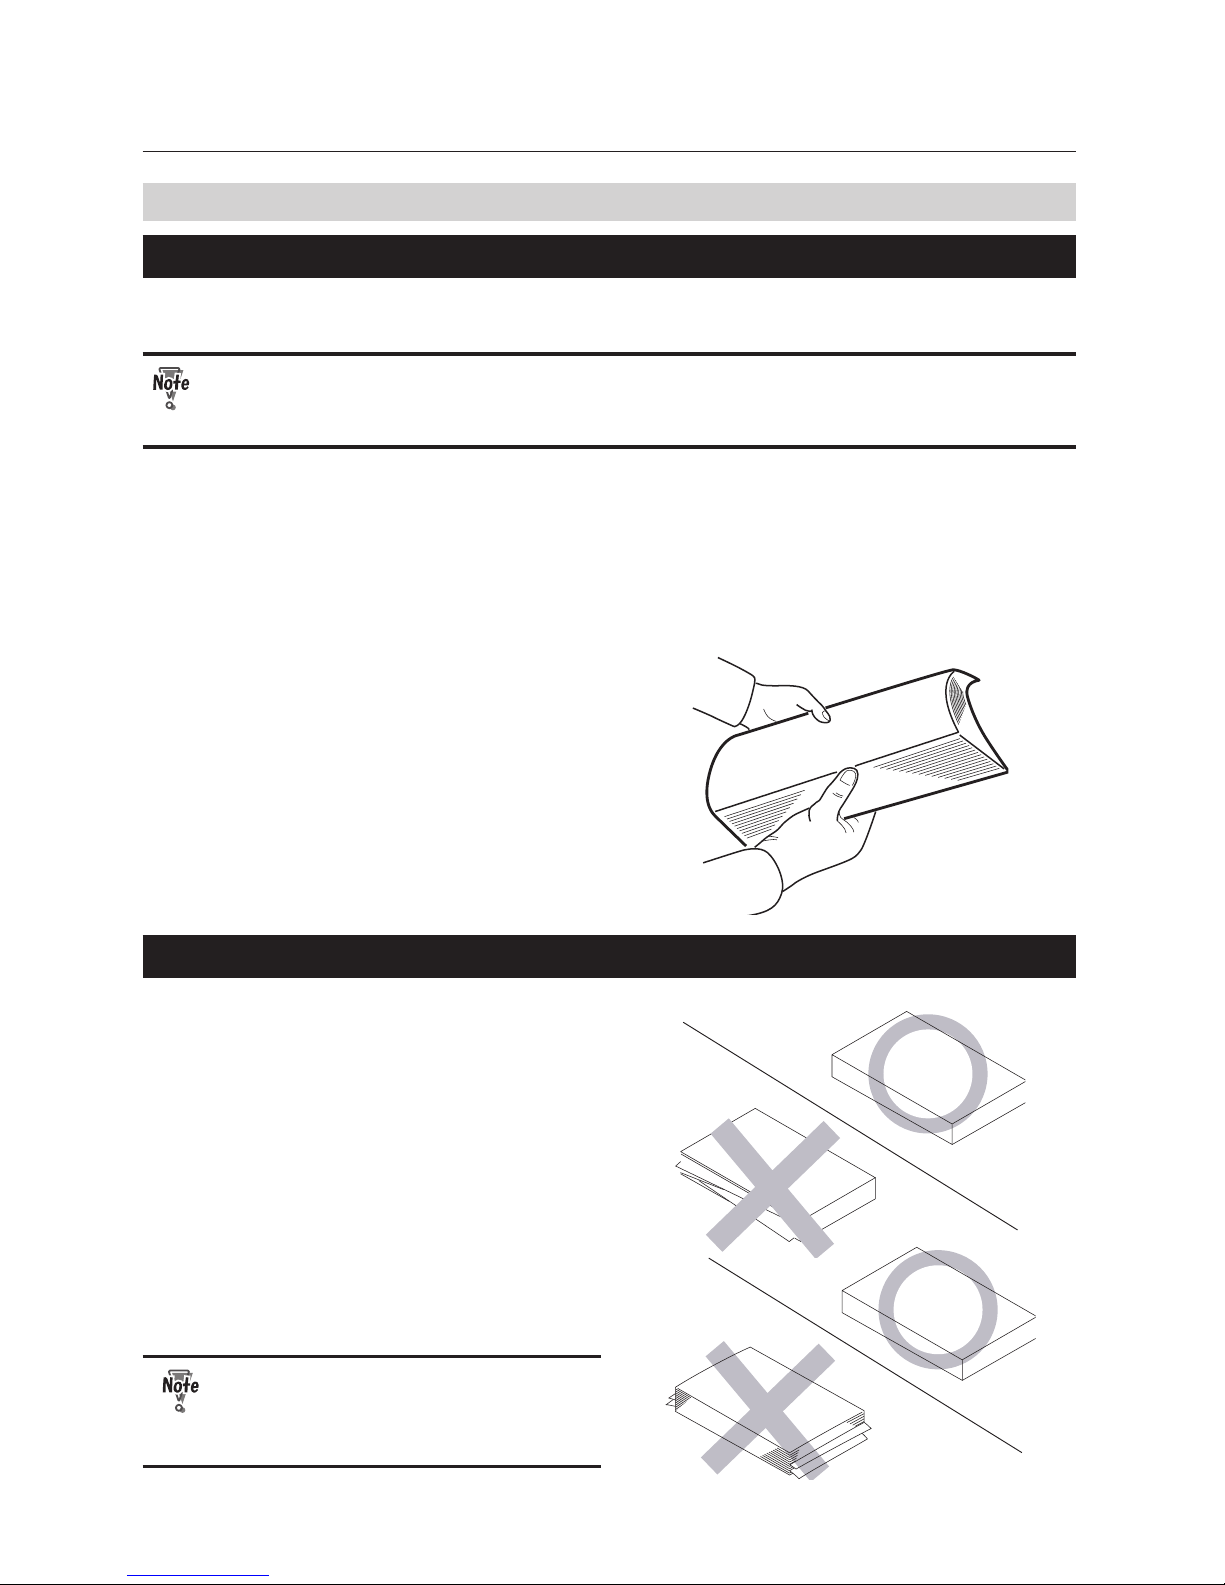
•
If curled paper is used, depending on the environmental condition (temperature,
humidity), paper quantity, paper type, and paper ber, it may not ow smoothly into
the folding plate or may not be folded properly. Flatten the paper prior to use.
•
When folding B6 size paper, if you use ne quality paper of 64 g/m2 or thicker, the paper
may not be able to be ejected. (EU)
•
Fan paper well prior to use.
6-2. Precautions on Stacking Paper
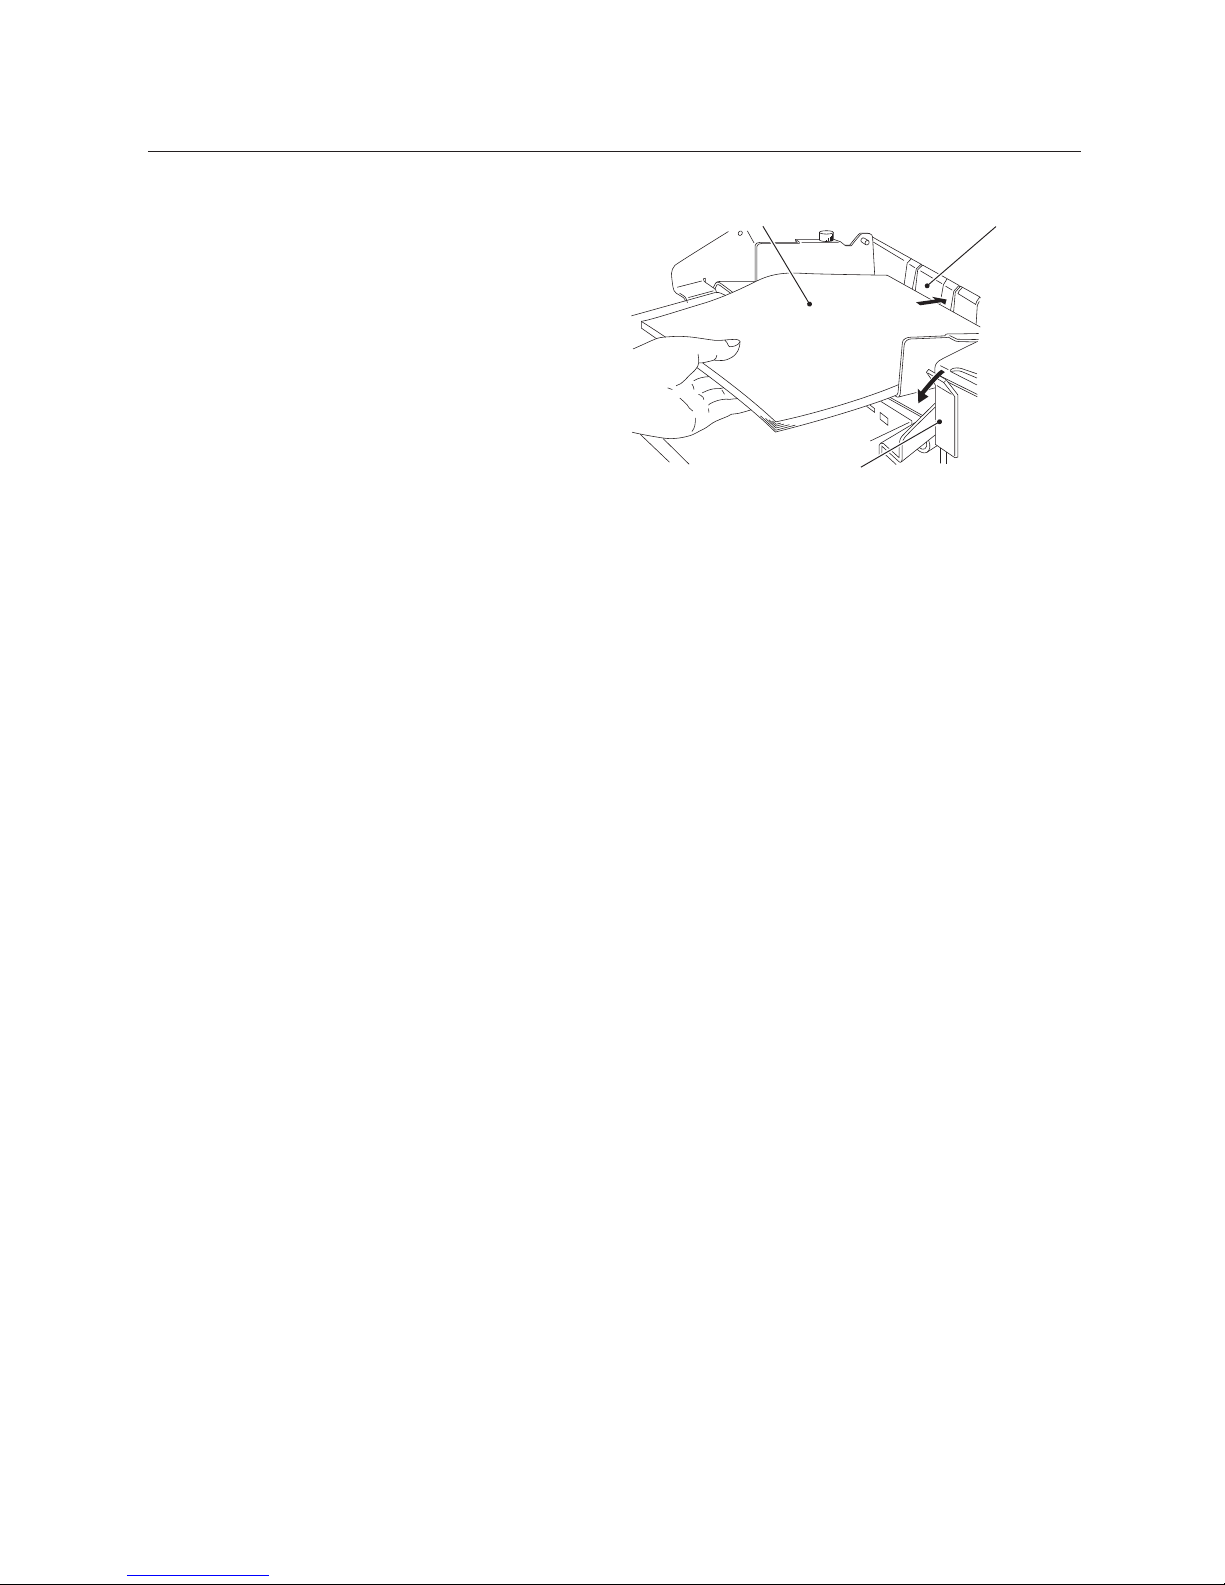
•
Do not stack paper on the paper feed
tray with the left and right sides of
the paper unaligned or some sheets
protruding out.
•
Do not stack paper on the paper
feed tray with the lead and tail edges
unaligned or some sheets protruding
out.
If the paper is protruding at the lead or
tail edge, paper will not be fed stably,
resulting in problems such as paper feed
error and folding misalignment.
Page 23
1-13
Chapter1 Before Operation
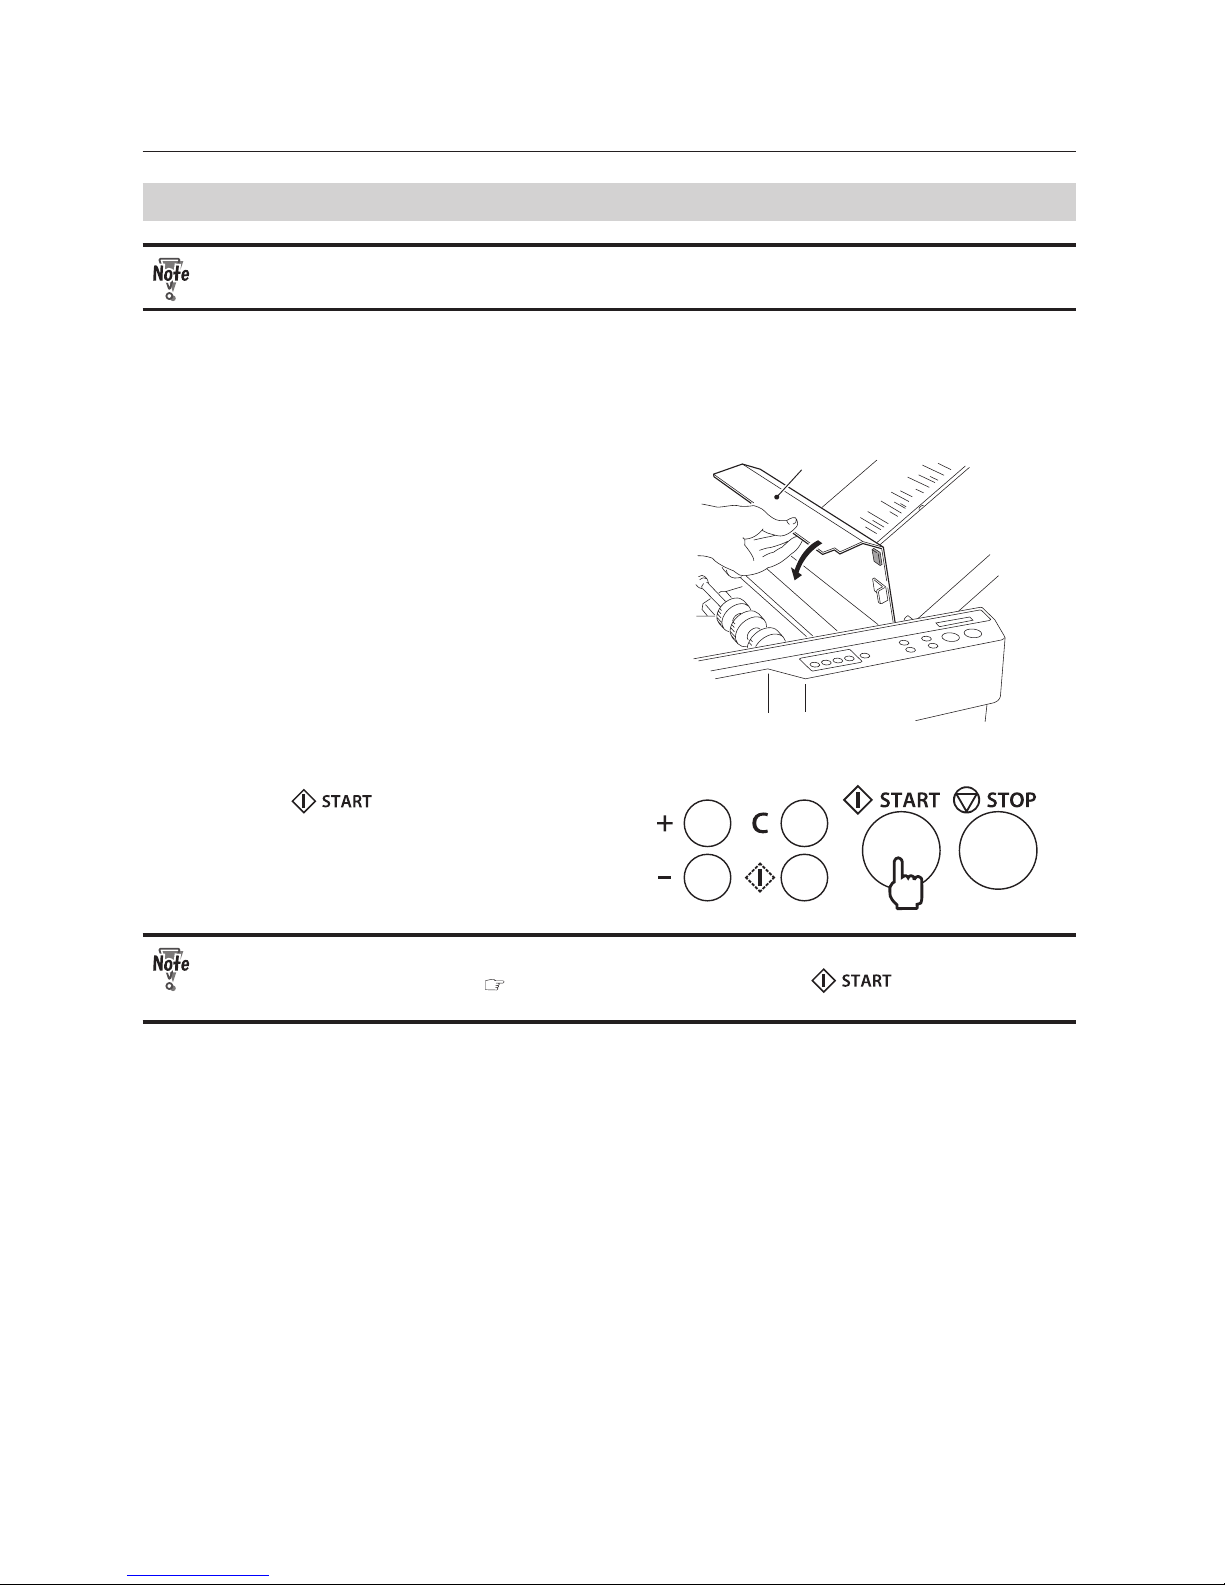
Paper
Guide plate
Paper set lever
•
When stacking just a few sheets of
paper on the paper feed tray, lower the
paper set lever while pressing the lead
edge of the paper against the guide
plate.
Page 24
1-14
Chapter1 Before Operation
7. Emergency Stop
Do not put neither hands nor ngers inside the machine during operation. You also need to be
careful not to get your hair, accessories and wear caught in the machine.
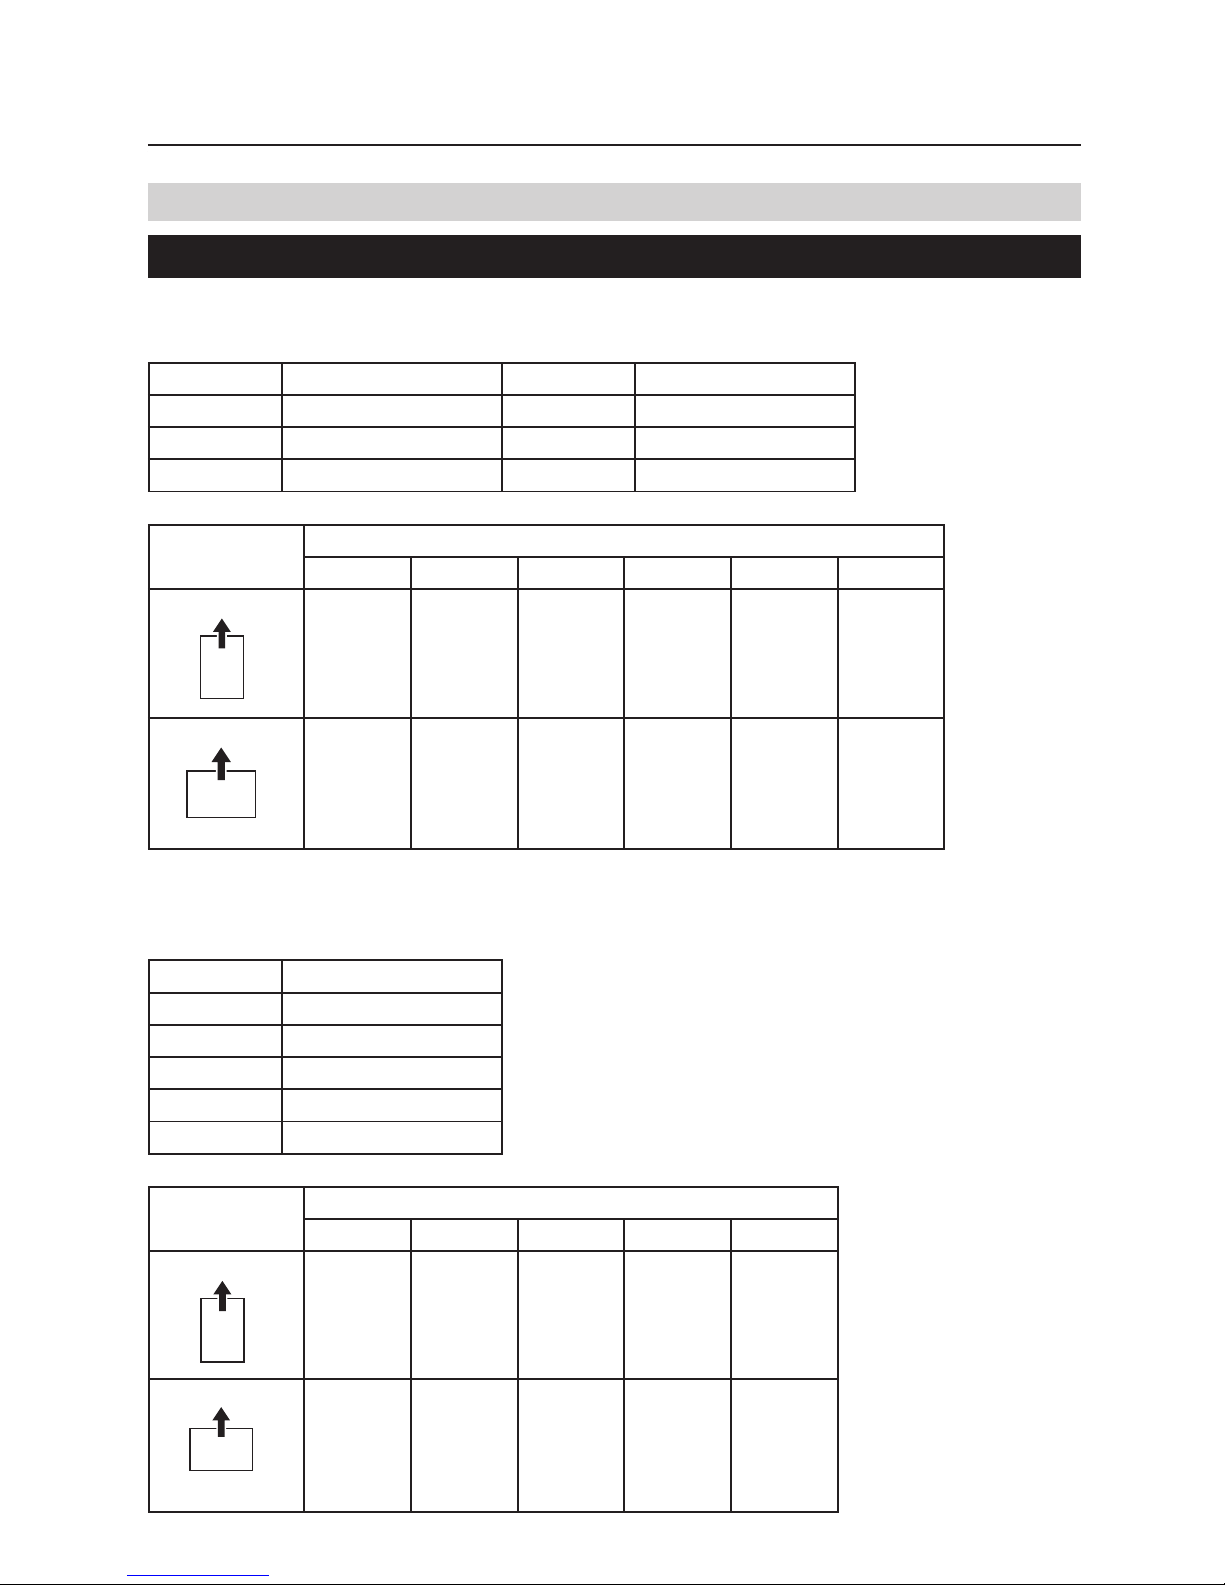
An emergency stop device to ensure safety has been installed to the top cover. Opening the cover during
operations will stop the machine.
To resume operations, follow the procedures below.
Top cover
1
Close the top cover.
2
Press the key.
Operations will start.
If an error occurs when opening the top cover, an error message will be displayed on the LCD
display after closing the cover ( p.4-8). Fix the error and press the key to resume
operations.
Page 25
2-1
Chapter2 Basic Operation
Memo
Chapter2 Basic Operation
1. Standard Folding of Standard Paper
1-1. Standard Paper
For EU
There are six types of standard paper sizes; A3, B4, A4, B5, A5, and B6.
Paper Size Long×Wide (mm) Paper Size Long×Wide (mm)
A3 420×297 B4 364×257
A4 297×210 B5 257×182
A5 210×148 B6 182×128
These sizes except A4 and B5 are detected as standard paper only when stacked with short edge feed.
Stacking
Direction
Paper Size
A3 A4 A5 B4 B5 B6
Short edge feed
O O O O O O
Long edge feed
X O X X O X
Can be used as standard paper : O Cannot be used as standard paper : X
For North America
There are ve types of standard paper sizes; LD (double letter) , LG (legal), LT (letter), ST (statement) and IN
(invoice).
Paper Size Long×WIde (inch)
LD 17 x11
LG 14 x 8.5
LT 11 x 8.5
ST 8.5 x 7
IN 8.5 x 5.5
LD and LG are detected as standard paper only when stacked with short edge feed.
Stacking
Direction
Paper Size
LD LG LT ST IN
Short edge feed
O O O O O
Long edge feed
X X O X X
Can be used as standard paper : O Cannot be used as standard paper : X
2-1
Page 26
2-2
Chapter2 Basic Operation
1-2. Standard Folding
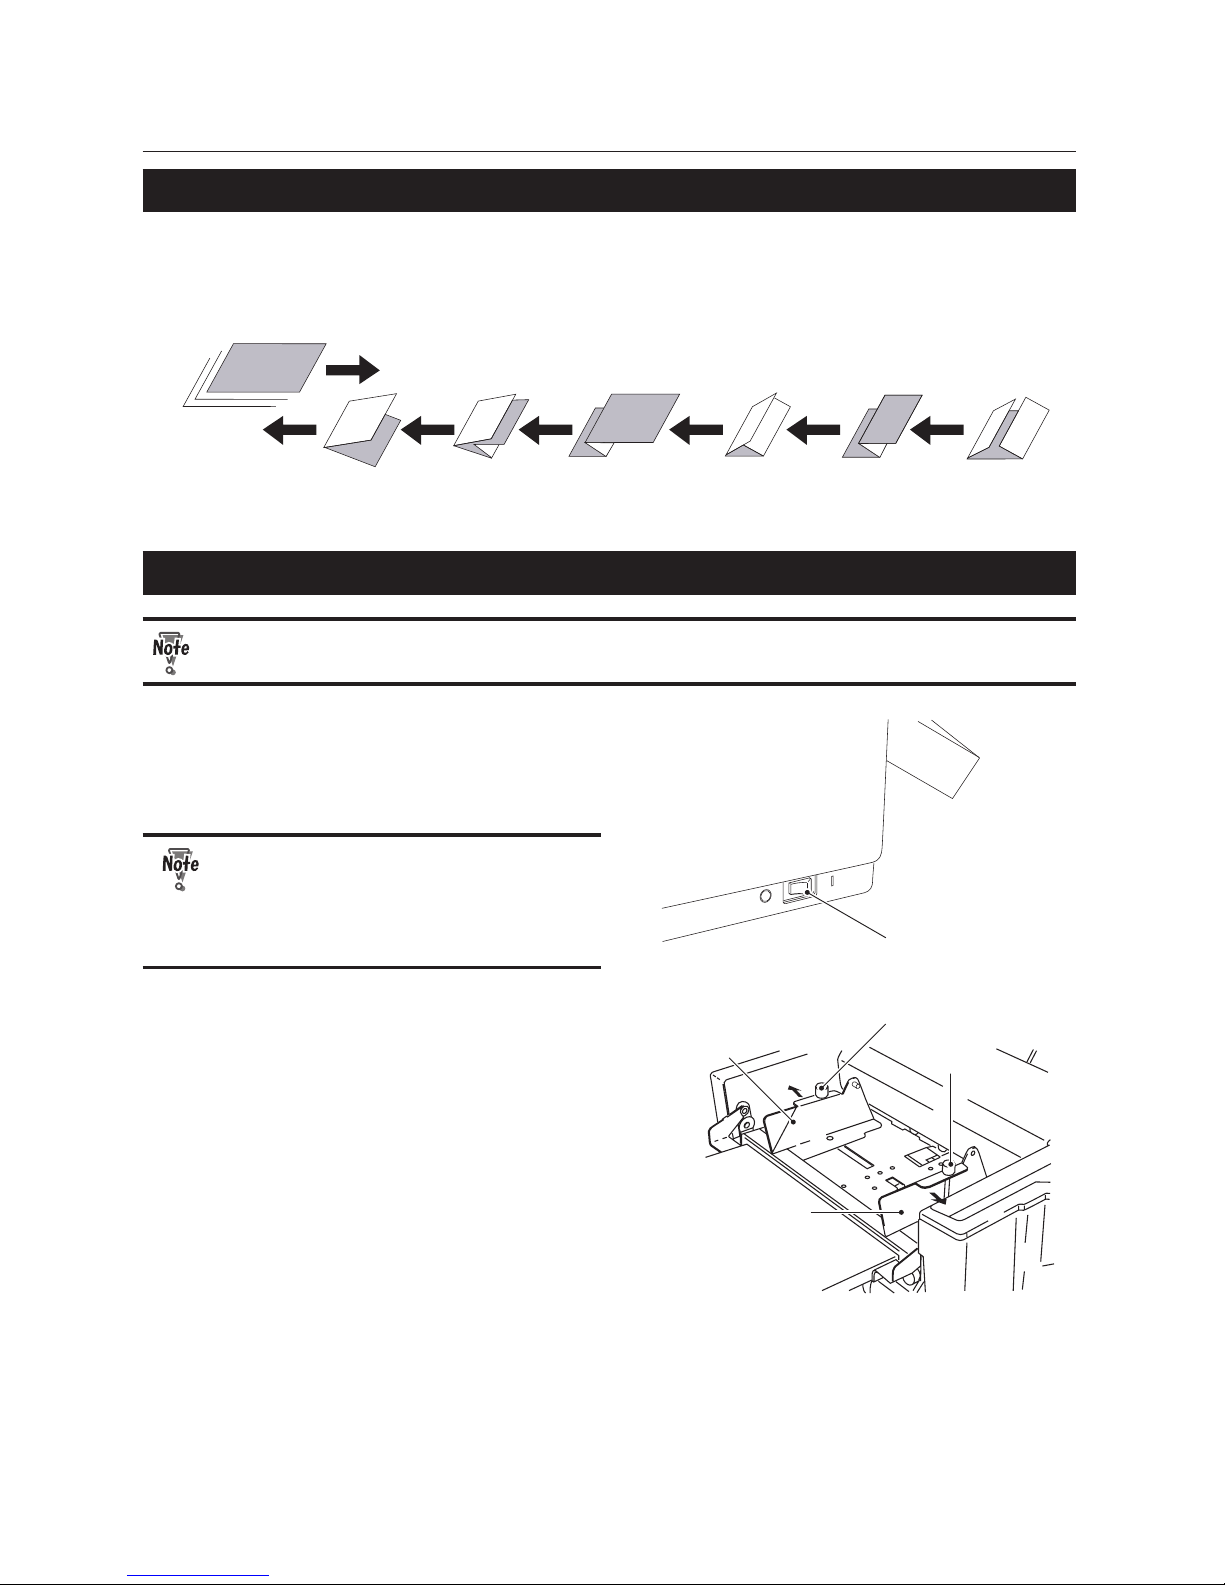
There are six types of standard folding modes: single fold, double fold, irregular accordion fold (fold out),
letter fold, accordion fold (z-fold) and gate fold. Paper is folded as shown below when the paper is placed on
the paper feed tray with its print side facing upward.
Single fold Double fold Irregular
accordion fold
Letter fold Accordion fold Gate fold
Paper feed direction
Paper ejection direction
1-3. Operation Procedures
Do not put neither hands nor ngers inside the machine during operation. You also need to be
careful not to get your hair, accessories and wear caught in the machine.
Power switch
1
Insert the power cord in the wall socket
and turn on the power.
Press “ I ” to turn on the power.
Press “O" to turn o the power.
When the power is turned on, the
folding stopper of each folding plate and
the stacker rollers move to the default
positions. Wait until the machine stops
completely.
Side guide
Fixing screw
Side guide
Fixing screw
2
Loosen the xing screws of the side
guides, and move the side guides to t
the paper width.
(Fold out)
(Z fold)
Page 27
2-3
Chapter2 Basic Operation
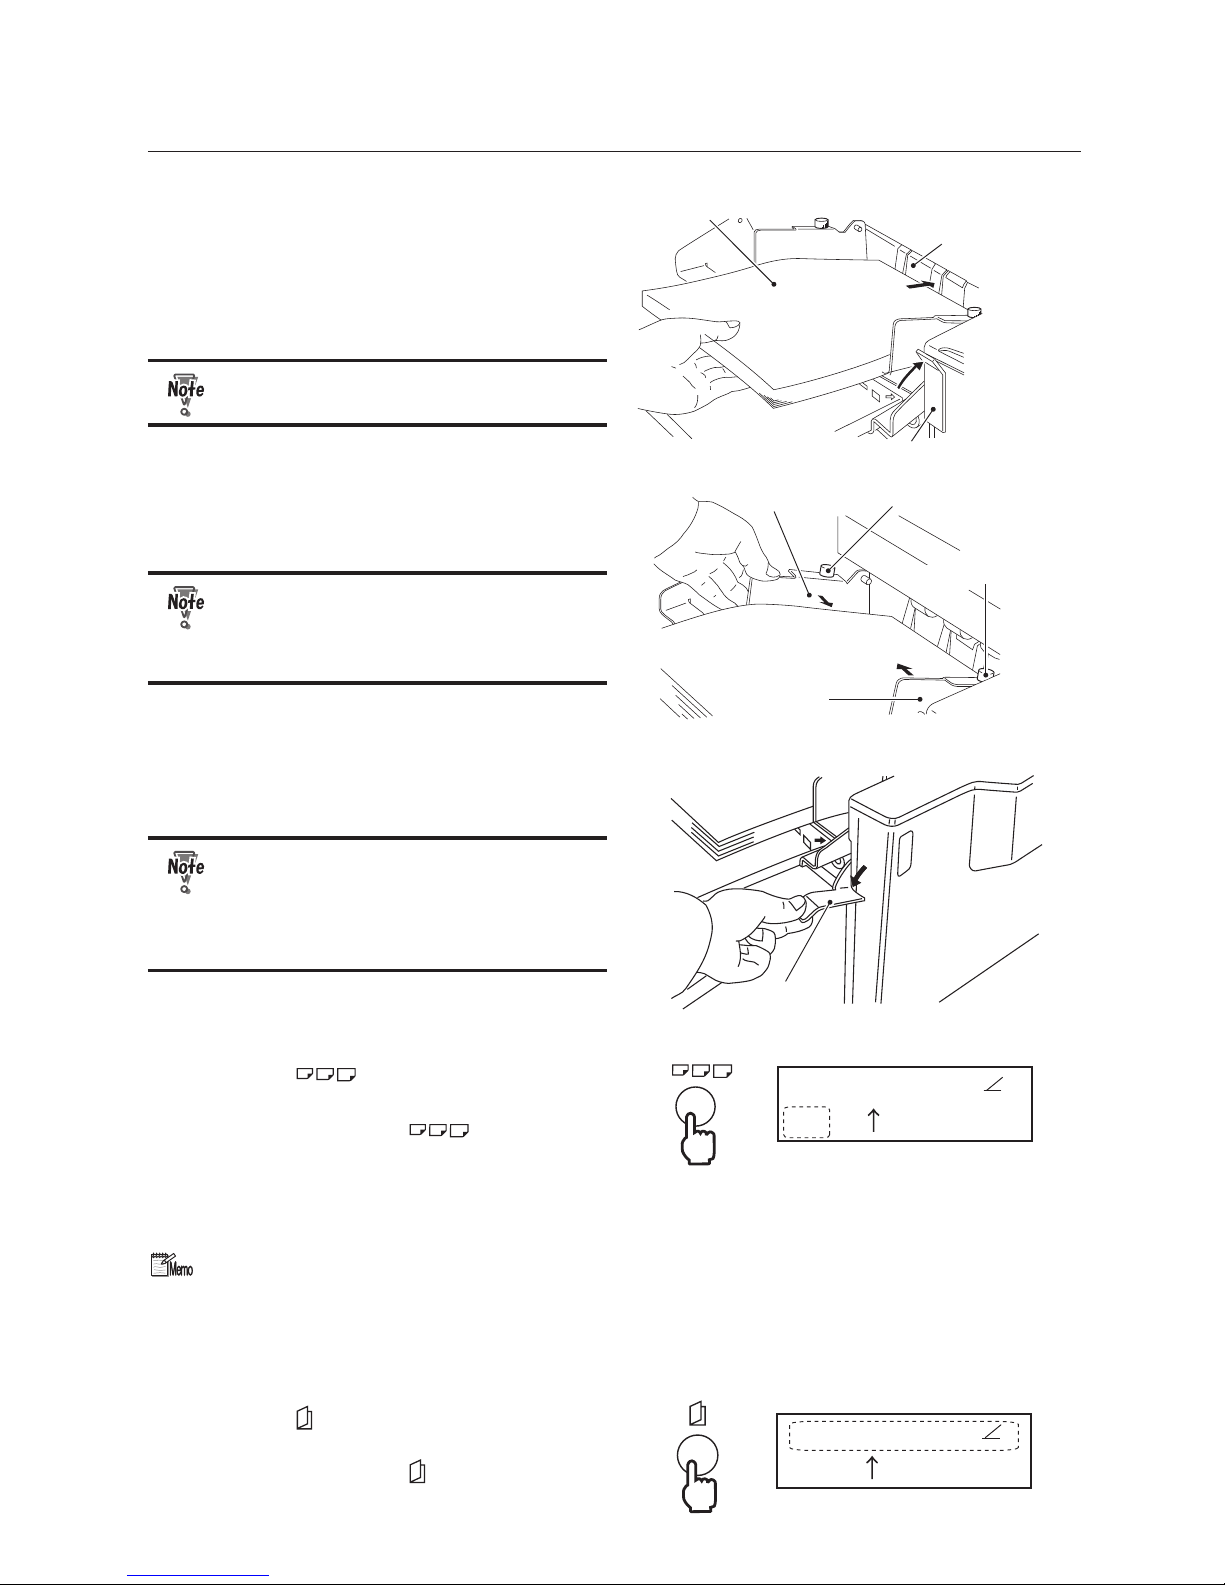
Paper
Paper set lever
Guide plate
3
Raise the paper set lever and place
some paper on the paper feed tray.
Push in the paper until its lead edge touches
the guide plate.
The message "No paper" displayed on the LCD
dispaly disappears.
Fan the paper well and stack them neatly
at the center of the paper feed tray.
Side guide
Side guide
Fixing screw
Fixing screw
4
After pressing the side guide to each
side of the paper lightly, tighten the
screws to secure the side guides.
Paper can be stacked to a height of
approximately 45 mm/1.77 inches at one
time. Do not stack too many sheets of
paper.
Paper set lever
5
Lower the paper set lever.
The paper feed tray will be raised.
Make sure that you lower the paper set
lever. If you start operations without the
paper set lever lowered, the paper feed
rings will run idle, causing the machine
to stop.
A3
Single fold
Count:0
6
Press the key to select the size of
the paper on the paper feed tray.
Each time you press the key, paper
sizes are displayed on the LCD display in the
following order with a gure:
A3, B4, A4, B5, A5, B6, LP, CF (EU)
LL, LG, LT, ST/IN, LP, CF (North America)
When stacking A4 and B5 size paper
with long edge feed, select [A5] and [B6]
respectively. (EU)
When stacking letter size paper with long
edge feed, select [ST/IN]. (North America)
A3
Single fold
Count:0
7
Press the key to select the desired
folding mode.
Each time you press the key, the folding
modes are displayed on the LCD display in the
Page 28
2-4
Chapter2 Basic Operation
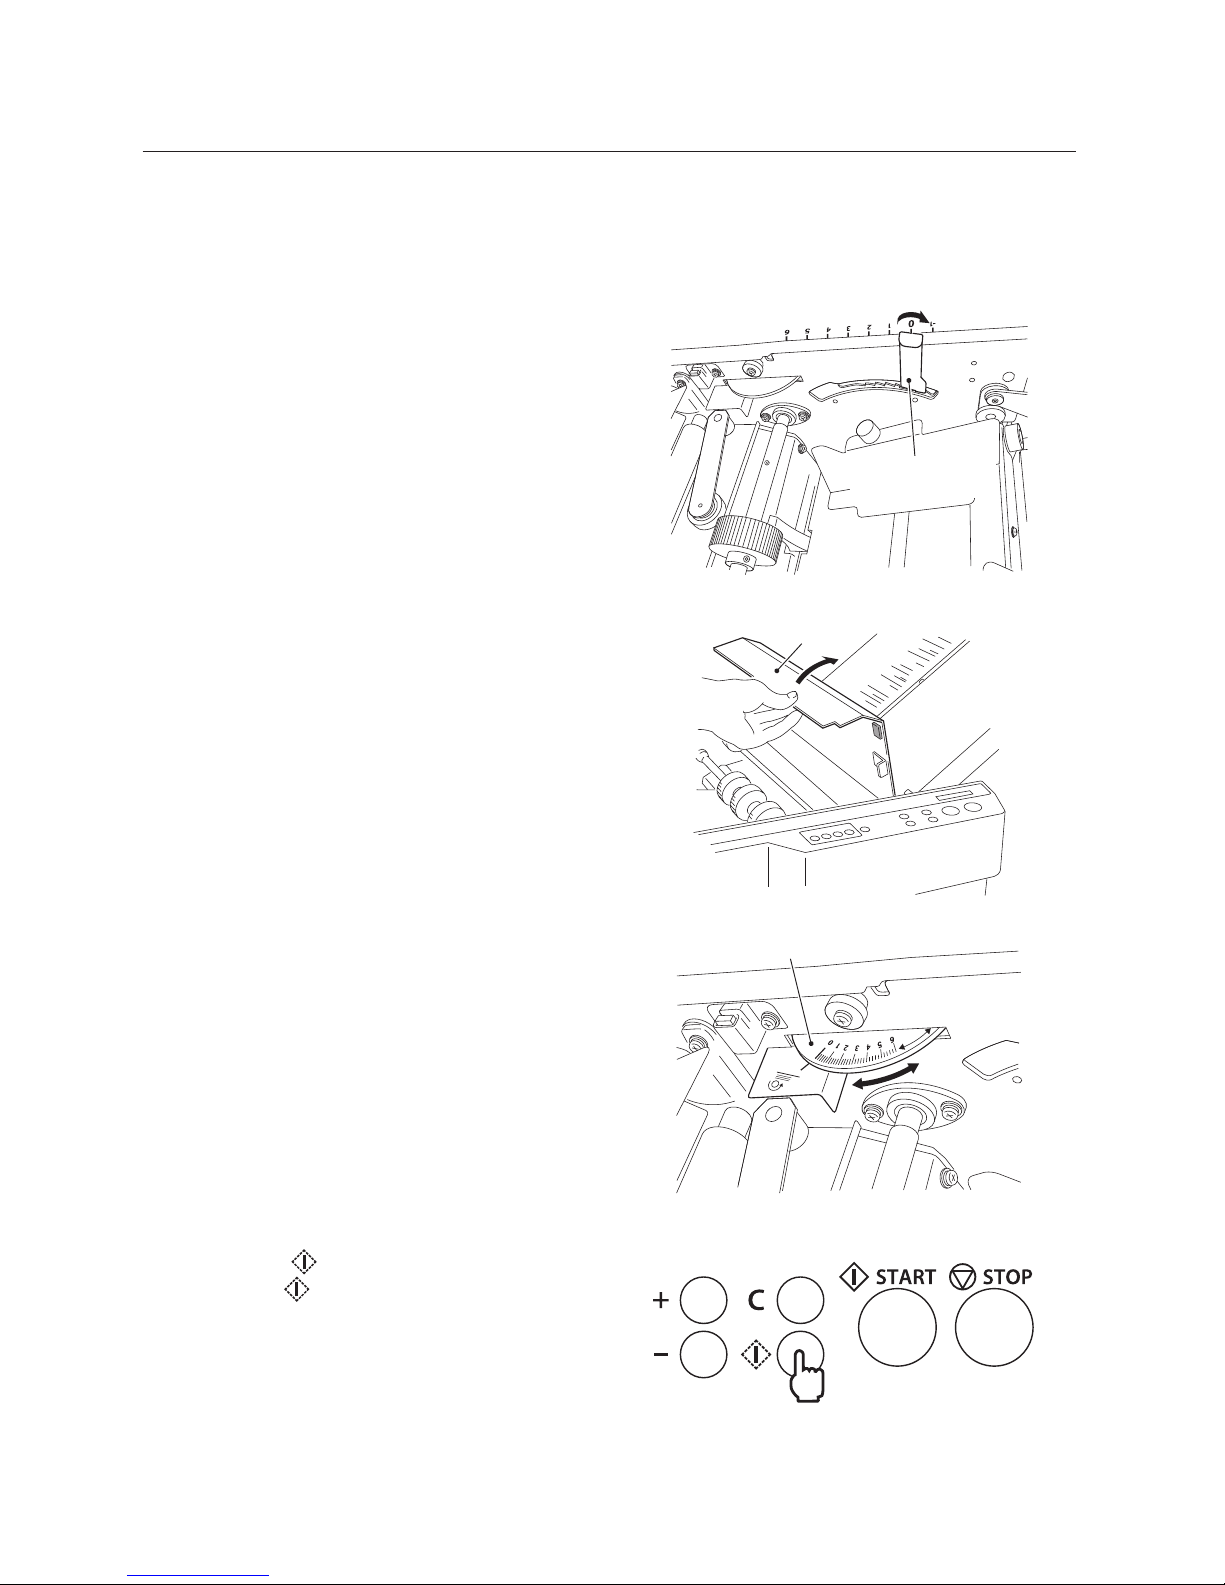
following order with a gure:
Single fold, Double fold, Fold out (irregular
accordion fold), Letter fold, Z fold (accordion
fold), Gate fold
Paper pressure
adjustment knob
8
Move the paper feed pressure
adjustment knob to "0."
Move the knob to the right or left while
pulling it upward.
If the paper slips and no paper is conveyed,
change the paper feed pressure to “1.”
If several sheets of paper are fed at the same
time (double-feed), decrease the paper feed
pressure to “–1.”
Top cover
9
Open the top cover.
Separating pressure adjustment dial
10
Set the separating pressure adjustment
dial to “0”.
If several sheets of paper are fed at the
same time (double-feed), increase the paper
separating pressure to "1" or "2."
When adjusting the separating pressure,
increase the pressure gradually in steps of 0.5.
Paper separating pressure increases as the
scale value increases.
11
Close the top cover.
12
Press the key for test folding.
When the key is pressed, the folding
stopper starts moving to the certain position
according to the set paper size and folding
mode. Two sheets of paper will be ejected.
Page 29
2-5
Chapter2 Basic Operation
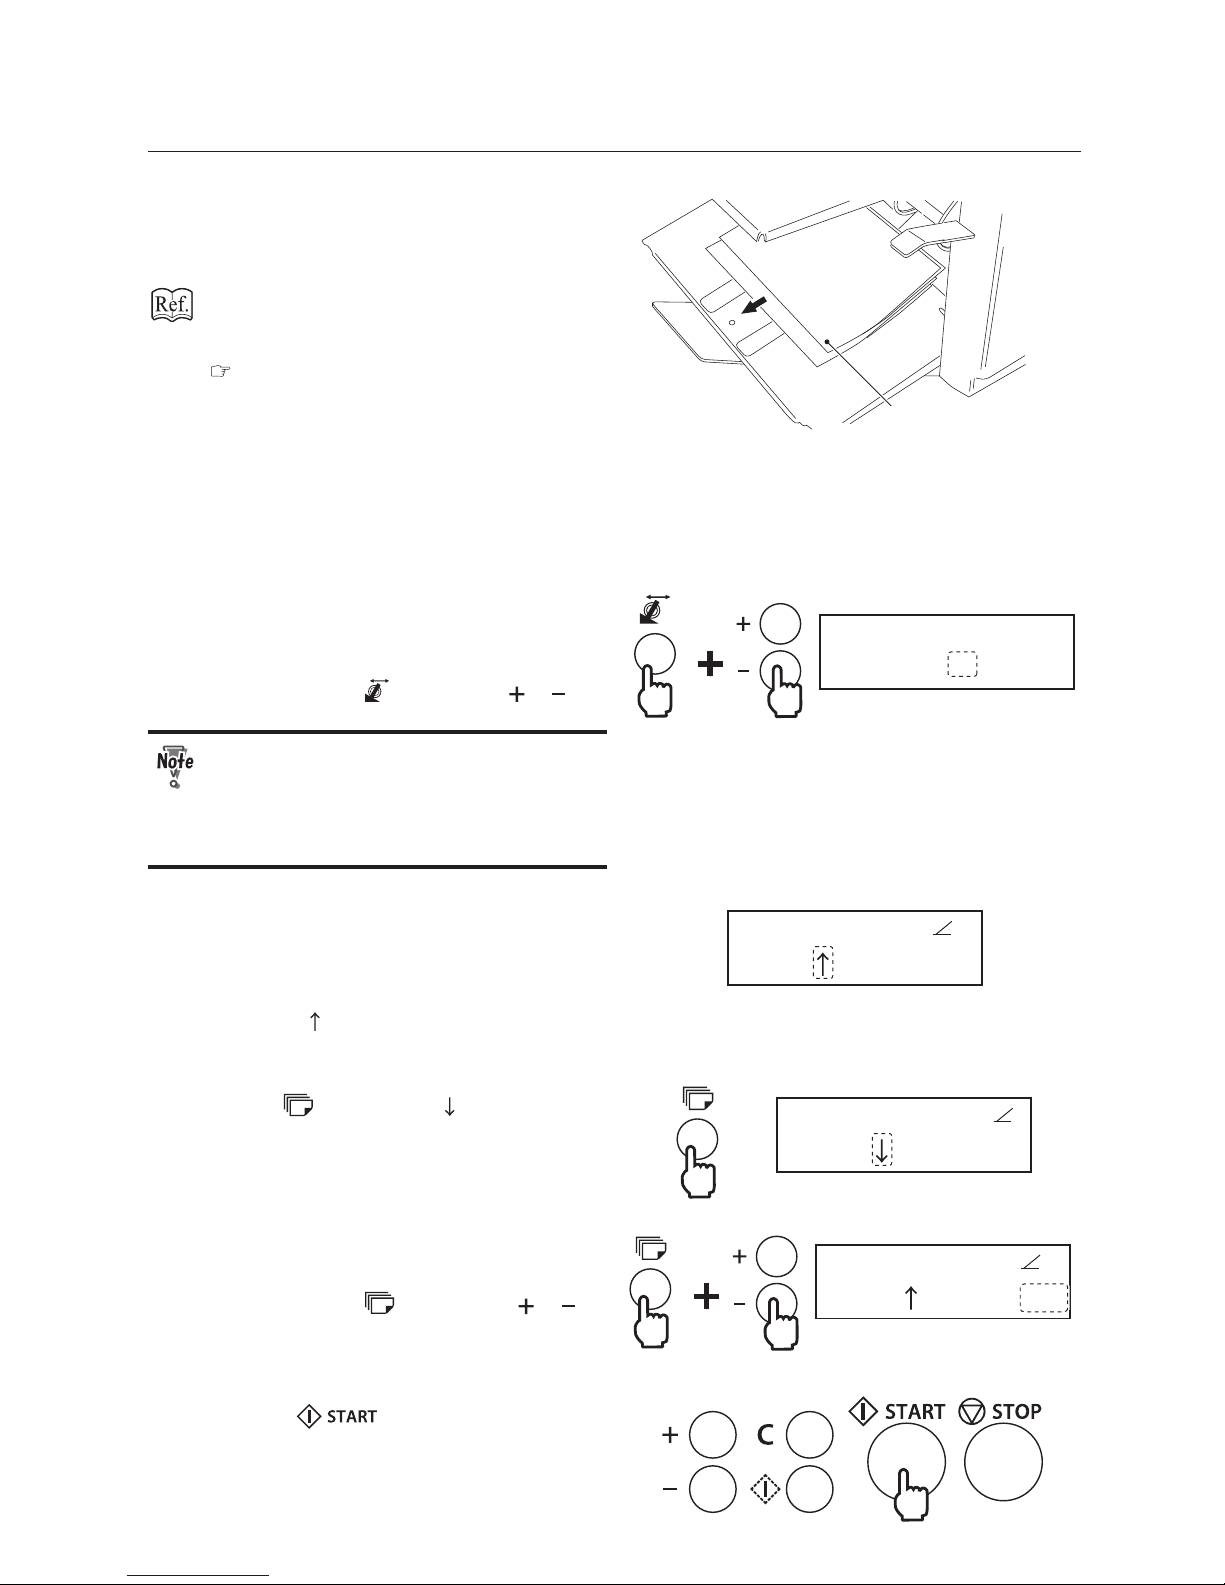
Test folded sample
13
Check the nish of test folding.
Check for folding misalignment using the
second test folded sample.
If folding misalignments occur, refer to
Chapter 3 "ADVANCED OPERATION"“5.
Correcting Folding Misalignment”
( p.3-20 ).
Depending on the count mode you choose,
the procedures to follow will change.
Use the subtract count mode to specify the
number of sheets to be processed.
Otherwise use the add count.
Subtract count mode: go to step 14.
Add count mode: go to step 16.
SR set
1
14
If the paper is not ejected smoothly,
change the position of the stacker
rollers.
While pressing the key, press the or key
to change the position.
When gate folding large size paper such
as A3 (EU)/ LD (North America) under high
temperature and high humidity, folded
paper may misalign. Change the position
of the stacker rollers to "2" from "1."
15
Change the count mode to the subtract
count mode.
A3
Single fold
Count:0
The add count mode has been selected by
default and [ Count : 0] is displayed on the
LCD display.
A3
Single fold
Count:0
To change it to the subtract count mode,
press the key to display [ Count : 0].
A3
Single fold
Count:100
16
Specify the number of sheets to be
processed.
While pressing the key, press the or
key to specify the number.
17
Press the key to start folding
operations.
Page 30
2-6
Chapter2 Basic Operation
Add count mode:
Press the key to interrupt or stop the operations. Pressing the key again will resume
operations.
When there is no paper on the paper feed tray, the machine will stop automatically and the counted
number and "No paper" will be displayed.
When paper is loaded on the paper feed tray, the counted number, paper size, and the folding mode
will be displayed.
If you press the C key for more than two seconds, the counter returns to "0." If you press the
key without pressing the C key, folding operations will resume and the accumulated number will be
displayed.
Subtract count mode:
When the process of the specied number is complete, the machine stops automatically and the
counter returns to the specied number.
Press the key to interrupt or stop the operations. Pressing the key again will resume
operations.
When there is no paper on the paper feed tray, the machine will stop automatically and the counted
number and "No paper" will be displayed.
When paper is loaded on the paper feed tray, the counted number, paper size, and the folding mode
will be displayed.
If you press the C key for more than two seconds, the counter returns to "0." If you press the
key without pressing the C key, folding operations will resume and the subtracted number will be
displayed.
Note that you cannot move onto the next procedure until you place paper on the paper feed
tray.
Page 31
3-1
Chapter3 Advanced Operation
Chapter3 Advanced Operation
1. Standard Folding of Special Paper
Do not put neither hands nor ngers inside the machine during operation. You also need to be
careful not to get your hair, accessories and wear caught in the machine.
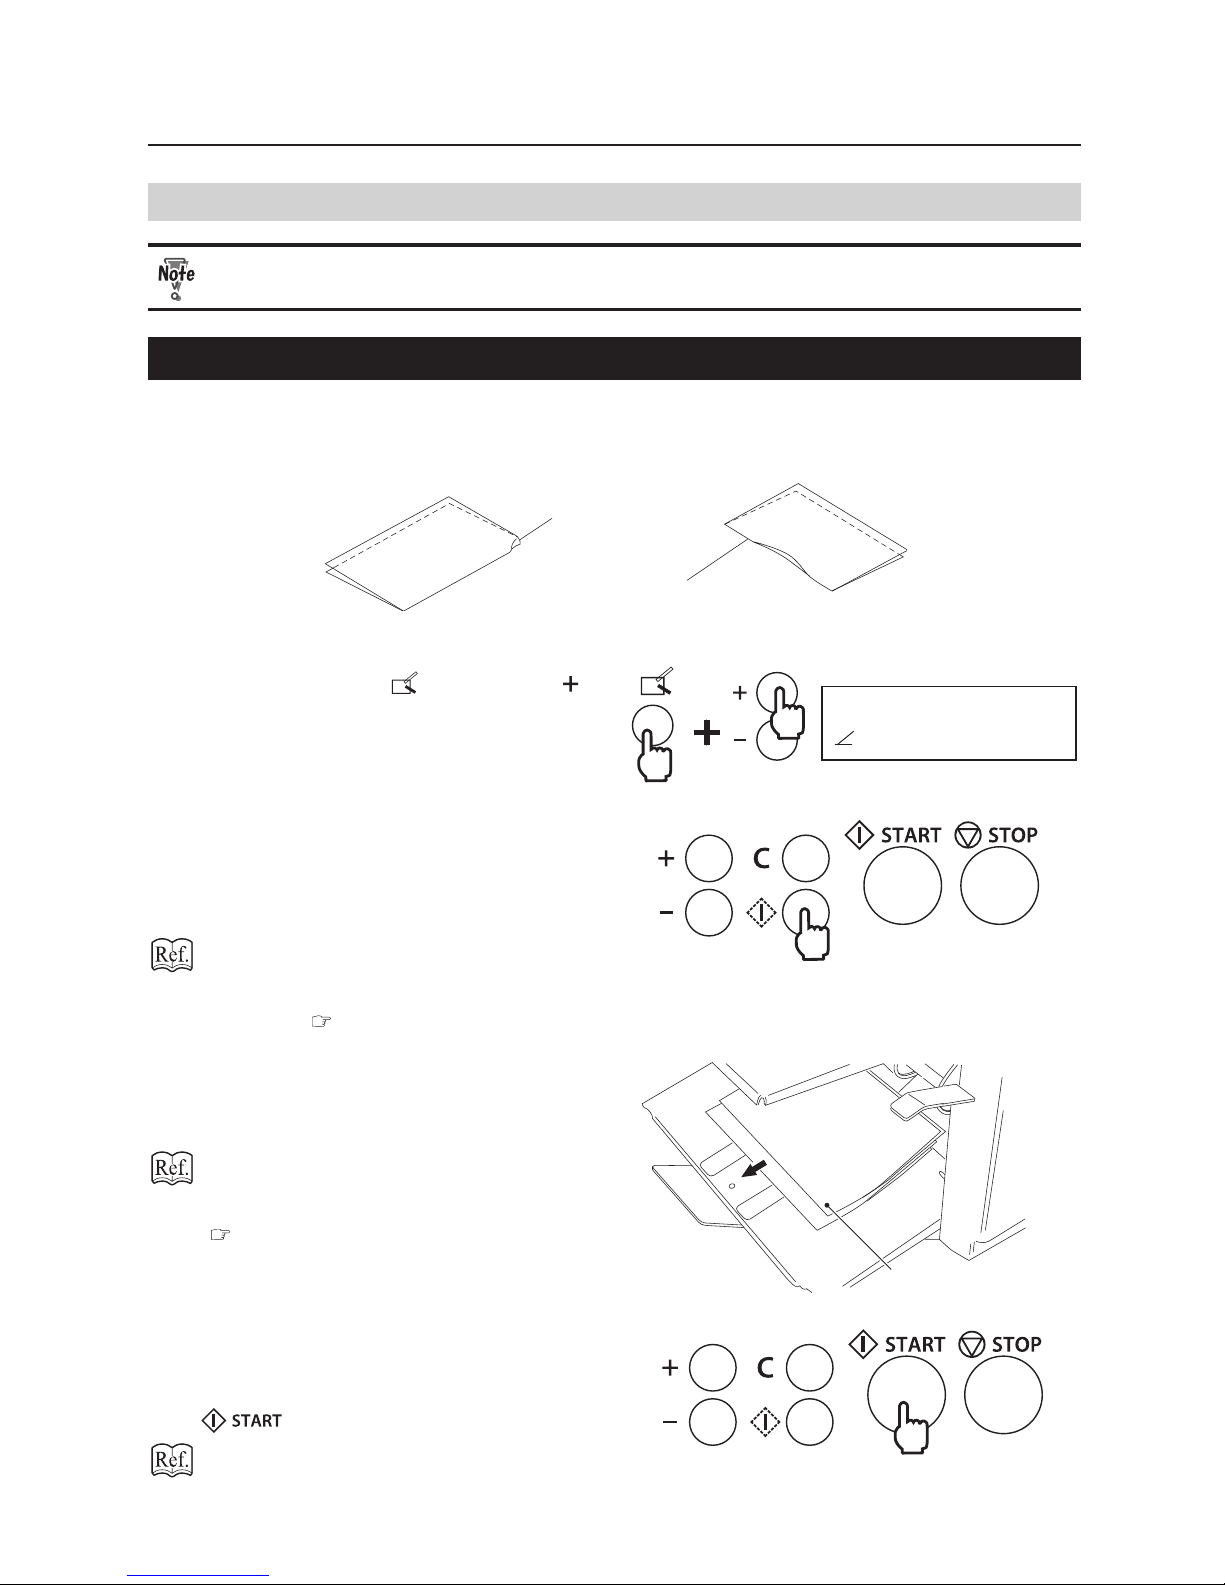
1-1. Single Folding Thick Paper
When folding ne quality thick paper 104.7 g/m2/34 lb into two, the edge of the folding line of the paper or
a part near the center may bend due to environmental conditions (temperature, humidity), paper size, paper
ber direction, etc. When this occurrs, follow the procedures below.
Bent corner
Bend near the center
A3 CF2 length
0.0mm
1
While pressing the key, press the
key to change [CF2 length] from [0.0mm]
to [0.4mm](EU)/[0.02inch](North
America).
The folding stopper of the second folding
plate moves by 0.4 mm/0.02 inch to widen the
paper conveyance path, resulting in smooth
conveyance of thick paper.
If mis-feed or double-feed occurs, refer to
Chapter2 "Basic Operation" “1.Standard
Folding of Standard Paper” "1-3. Operation
Procedures ( p.2-2).
Test folded sample
3
Check the nish of test folding.
Check for folding misalignment using the
second test folded sample.
If folding misalignments occur, refer to
Chapter 3 "ADVANCED OPERATION"“5.
Correcting Folding Misalignment”
( p.3-20 ).
4
After completing adjustments, set the
count mode either to the add count or
to the subtract count, then press the
key to start folding operations.
Refer to Chapter2 "Basic Operation"
“1.Standard Folding of Standard Paper” "1-3.
Page 32
3-2
Chapter3 Advanced Operation
Operation Procedures ( p2-2).
After completing single folding of thick
paper, turn o and on the power to
return the folding stopper to its original
position. If thin paper is single-folded
before doing this procedure, the thin
paper will not be folded neatly.
1-2. Double Folding Thick Paper
When folding ne quality thick paper 104.7 g/m2/28 lb into four, its folding section may open when ejected
to the stacker because of the paper thickness and consequently the folded paper may not be able to pass
through the stacker rollers, resulting in paper jam. To prevent this, follow the procedures below.
Do not fold ne quality thick paper 127.9 g/m2/34 lb into four because paper jam inside the
machine or paper ejection problem may occur.
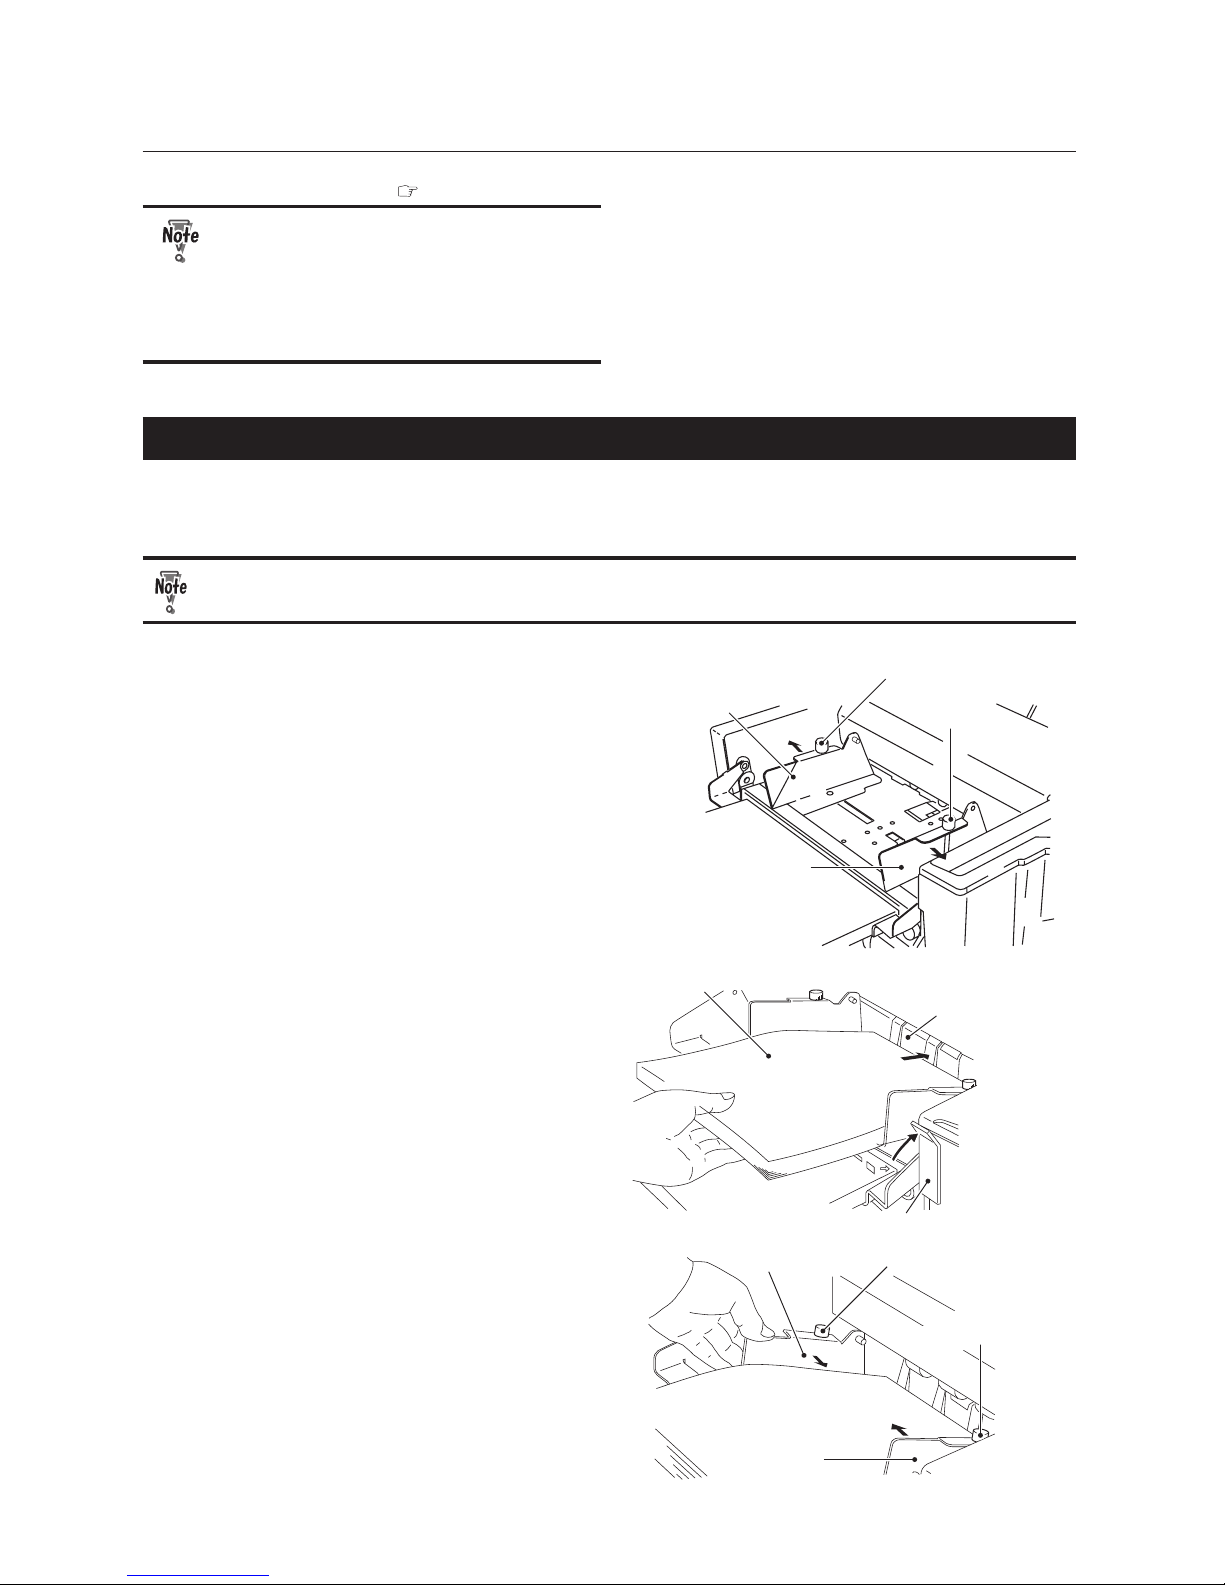
Side guide
Fixing screw
Side guide
Fixing screw
1
Loosen the xing screws of the side
guides, and move the side guides to t
the paper width.
Paper
Paper set lever
Guide plate
2
Raise the paper set lever and place
some paper on the paper feed tray.
Push in the paper until its lead edge touches
the guide plate.
Side guide
Side guide
Fixing screw
Fixing screw
3
After pressing the side guide to each
side of the paper lightly, tighten the
screws to secure the side guides.
Page 33
3-3
Chapter3 Advanced Operation
Paper set lever
4
Lower the paper set lever.
The paper feed tray will be raised.
Make sure that you lower the paper set
lever. If you start operations without the
paper set lever lowered, the paper feed
rings will run idle, causing the machine
to stop.
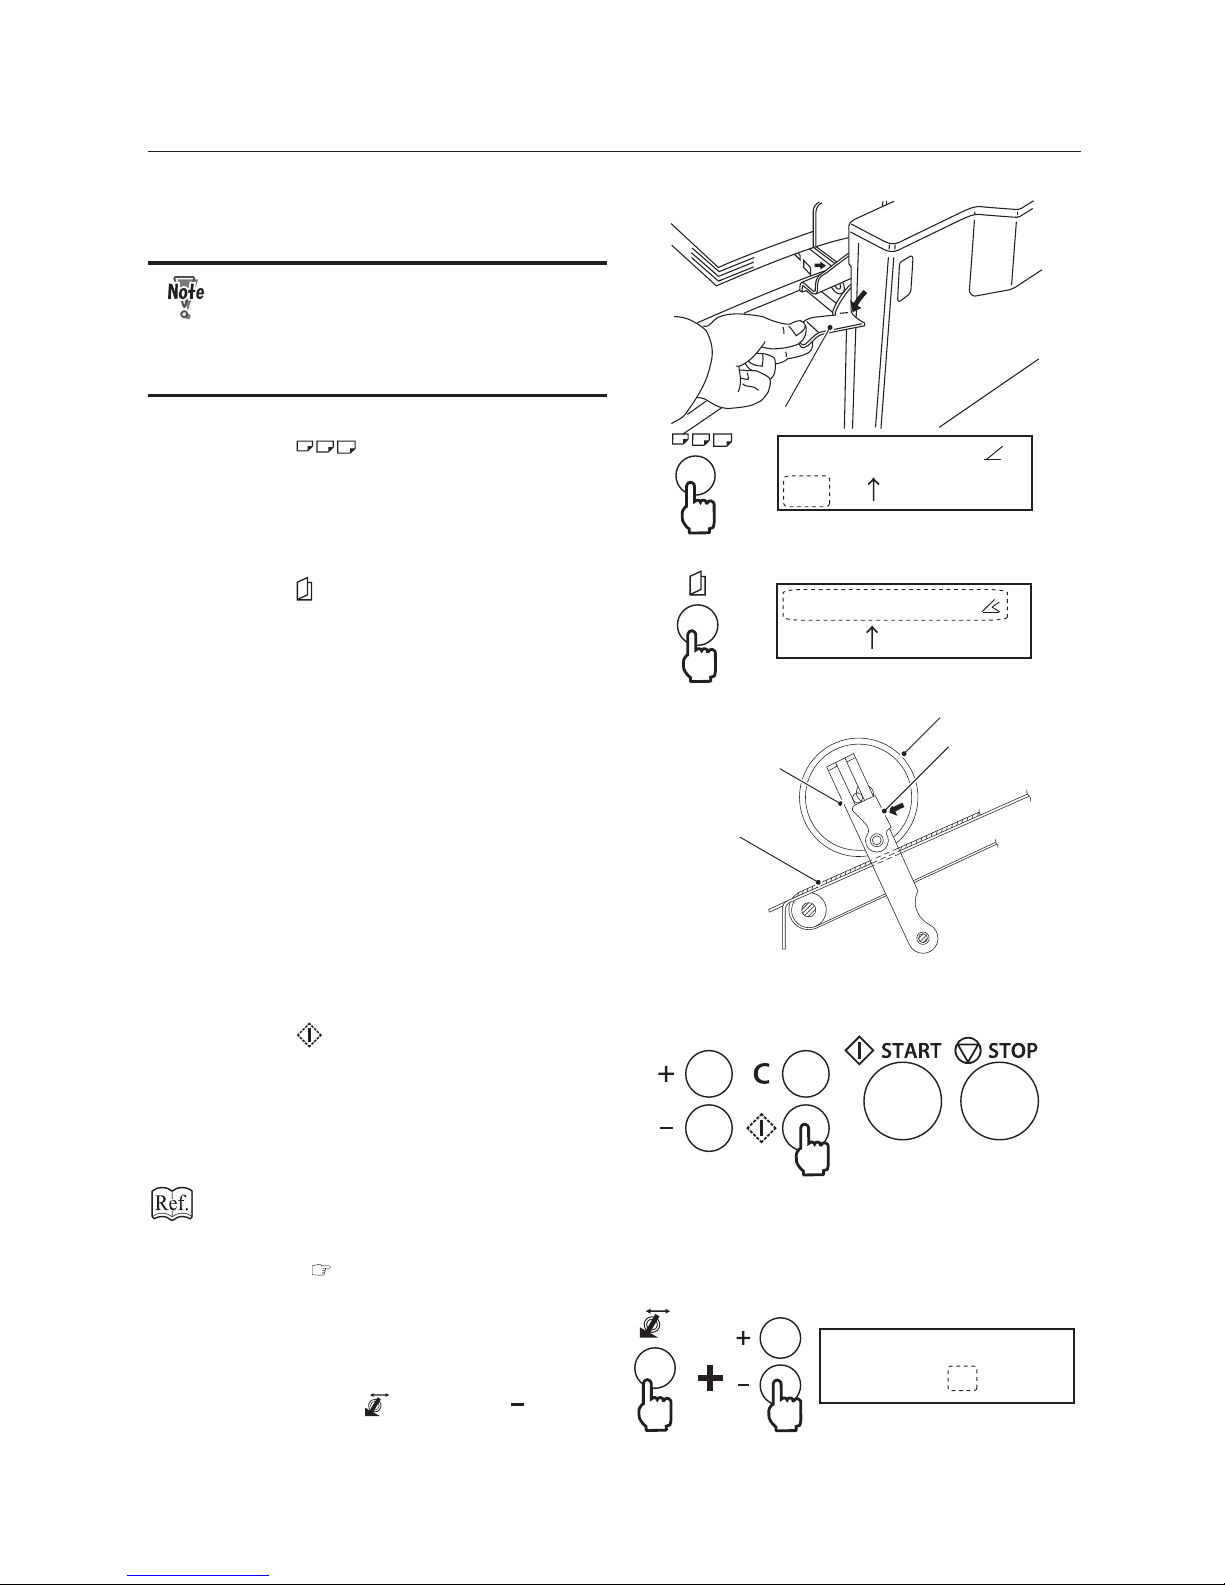
A3
Single fold
Count:0
5
Press the key to select a paper
size.
A3
Double fold
Count:0
6
Press the key to select [Double fold].
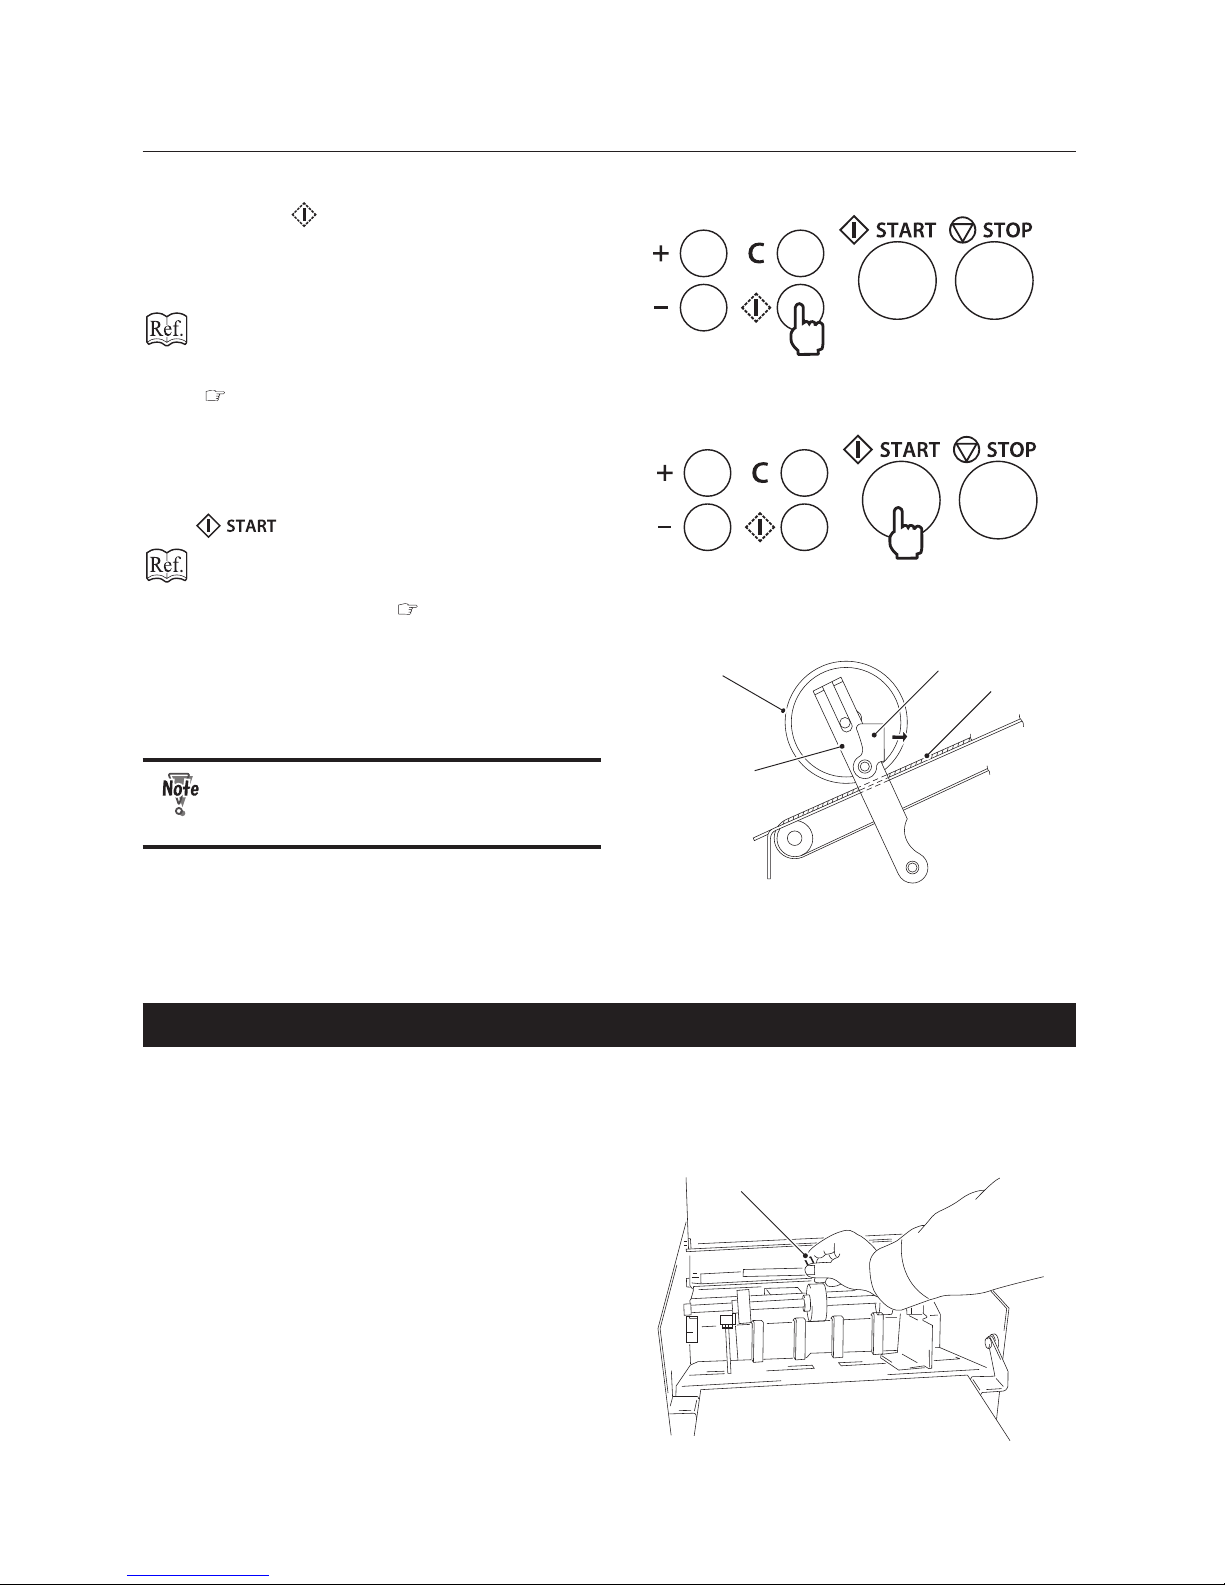
Stacker roller
Lever
Belt
Stacker lever
7
While lifting up the stacker rollers with
your hand, pull the levers (left and
right) attached to the stacker lever
in the direction of the arrow so that
contact pressure on the belts by the
stacker rollers is relieved.
8
Press the key for test folding.
The stacker rollers will move to the position of
"5."
For double letter size, the stacker rollers will
move to the position of "4." (North America)
Check if the paper is ejected smoothly.
If mis-feed or double-feed occurs, refer to
Chapter2 "Basic Operation" “1.Standard
Folding of Standard Paper” "1-3. Operation
Procedures ( p.2-2).
SR set
4
9
If the paper is not ejected smoothly,
change the position of the stacker
rollers to "4" or "3."
While pressing the key, press the key to
change [SR set] from [5] to [4] or [3].
Page 34
3-4
Chapter3 Advanced Operation
10
Press the key again for test folding
and check the nish of test folding.
Check for folding misalignment using the
second test folded sample.
If folding misalignments occur, refer to
Chapter 3 "ADVANCED OPERATION"“5.
Correcting Folding Misalignment”
( p.3-20).
11
After completing adjustments, set the
count mode either to the add count or
to the subtract count, then press the
key to start folding operations.
Refer to Chapter2 "Basic Operation"
“1.Standard Folding of Standard Paper” "1-3.
Operation Procedures ( p.2-2).
Stacker roller
Lever
Belt
Stacker lever
12
After the operations have completed,
move the left and right levers attached
to the stacker lever in the direction of
the arrow.
If the stacker rollers are left lifted up,
problems will occur when the normal
paper size is used.
Once a paper size or folding mode is changed
or the power is turned o, the stacker rollers
will return to the automatically set position.
1-3.
Double Folding B6 Thin Paper (EU)/Small Thin Paper (North America)
Paper jam may occur when folding B6 size ne quality paper of between 64 g/m2 and 81.4 g/m2 (EU)/folding
5.00 (W) x 7.00 (L) inch size ne quality paper of 22 lb or thinner (North America) into four. Using the supplied
guide plate unit will prevent paper jam.
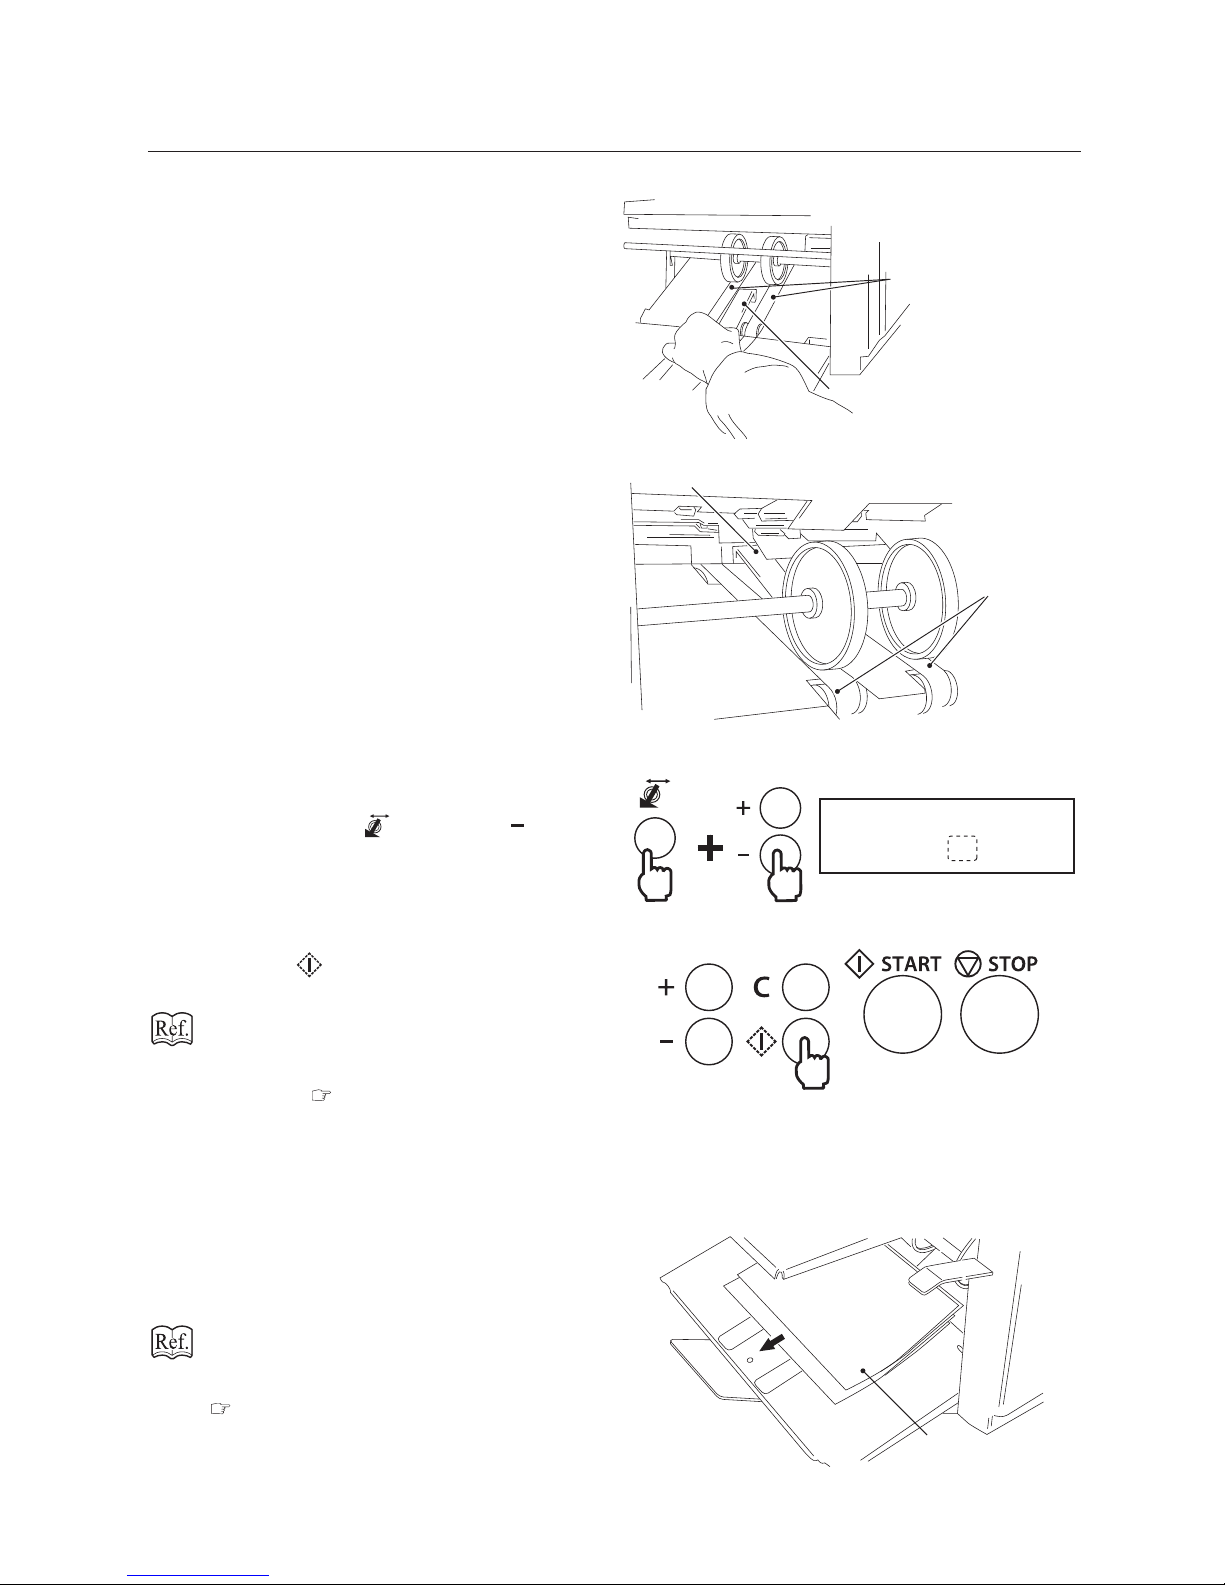
Guide plate unit
1
Remove the guide plate unit stored
inside the top cover.
Page 35
3-5
Chapter3 Advanced Operation
Paper ejection belt
Guide plate unit
2
Attach the guide plate unit to the
innermost center between the two
paper ejection belts.
Guide plate unit
Paper
ejection belt
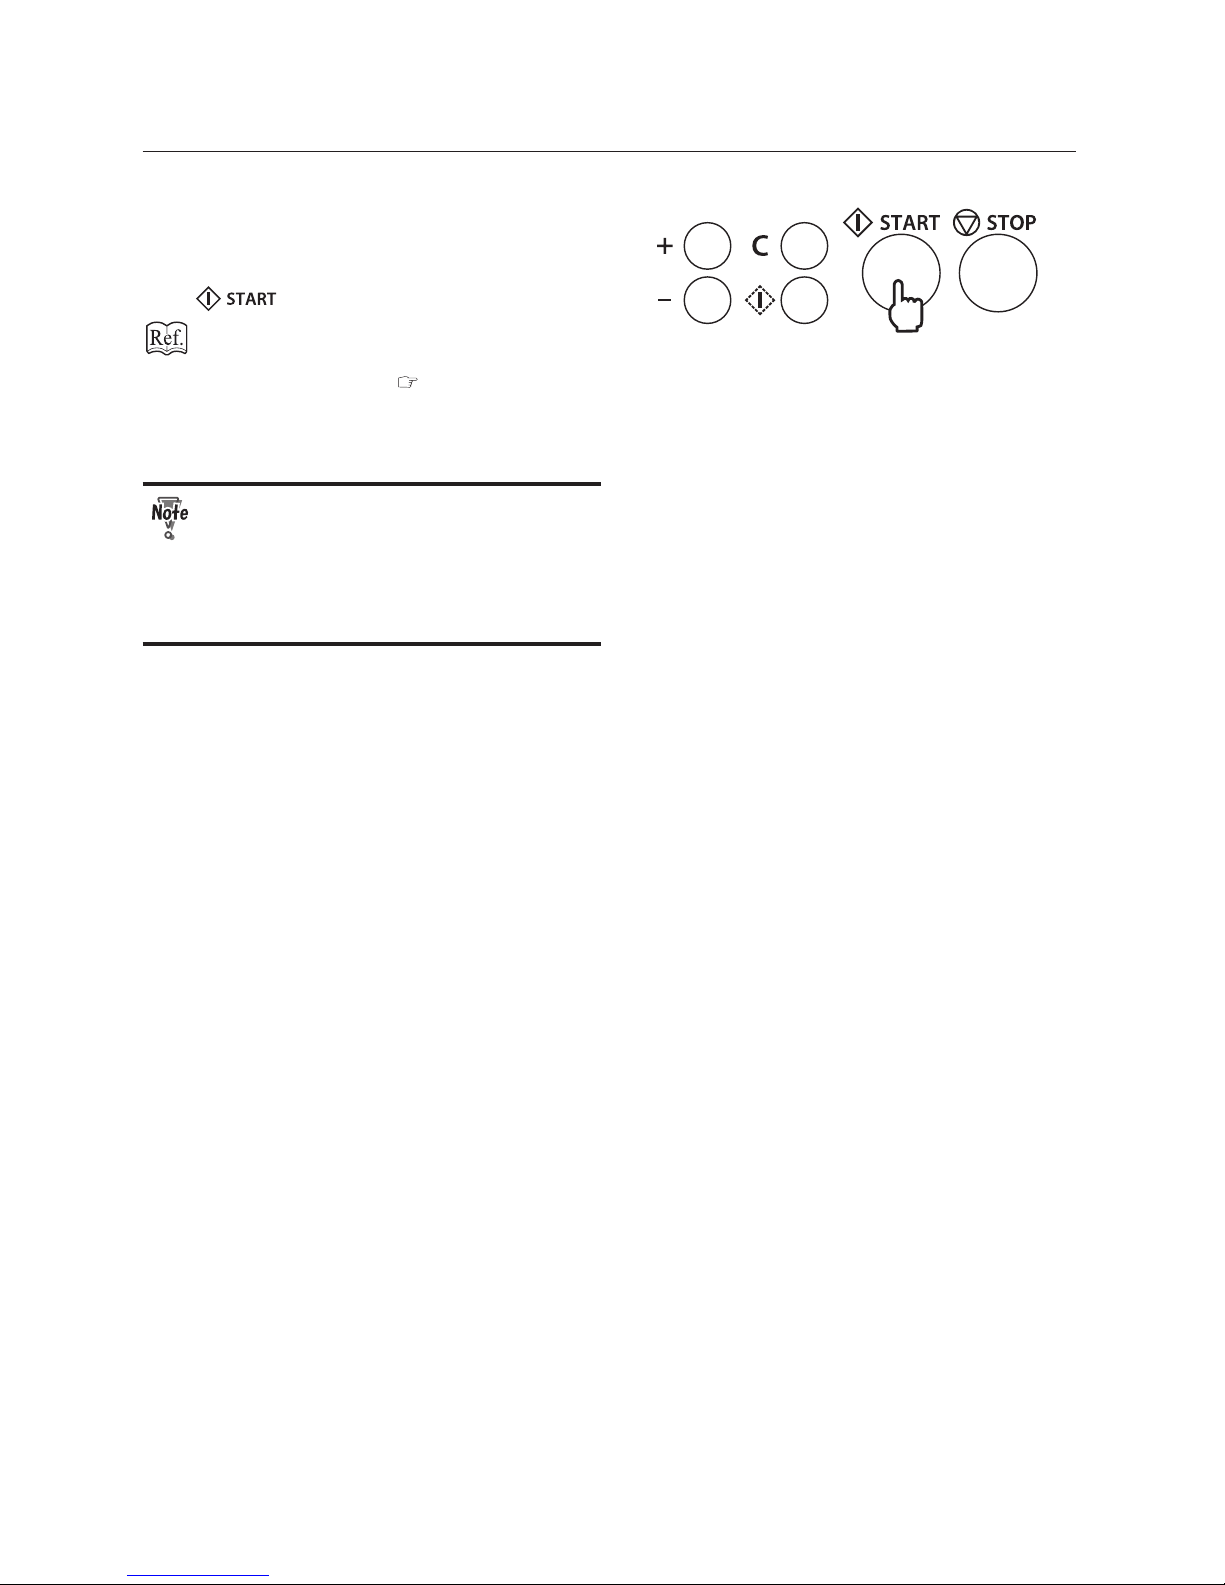
SR set
4
3
Move the stacker rollers to "4."
While pressing the key, press the key to
change [SR set] to [4] from [5].
4
Press the key for test folding and
check if the paper is ejected smoothly.
If mis-feed or double-feed occurs, refer to
Chapter2 "Basic Operation" “1.Standard
Folding of Standard Paper” "1-3. Operation
Procedures ( p.2-2).
5
If the paper is not ejected smoothly,
change the position of the stacker
rollers again.
Folded sample
6
Check the nish of test folding.
Check for folding misalignment using the
second test folded sample.
If folding misalignments occur, refer to
Chapter 3 "ADVANCED OPERATION"“5.
Correcting Folding Misalignment”
( p.3-20)
Page 36
3-6
Chapter3 Advanced Operation
7
After completing adjustments, set the
count mode either to the add count or
to the subtract count, then press the
key to start folding operations.
Refer to Chapter2 "Basic Operation"
“1.Standard Folding of Standard Paper” "1-3.
Operation Procedures ( p.2-2).
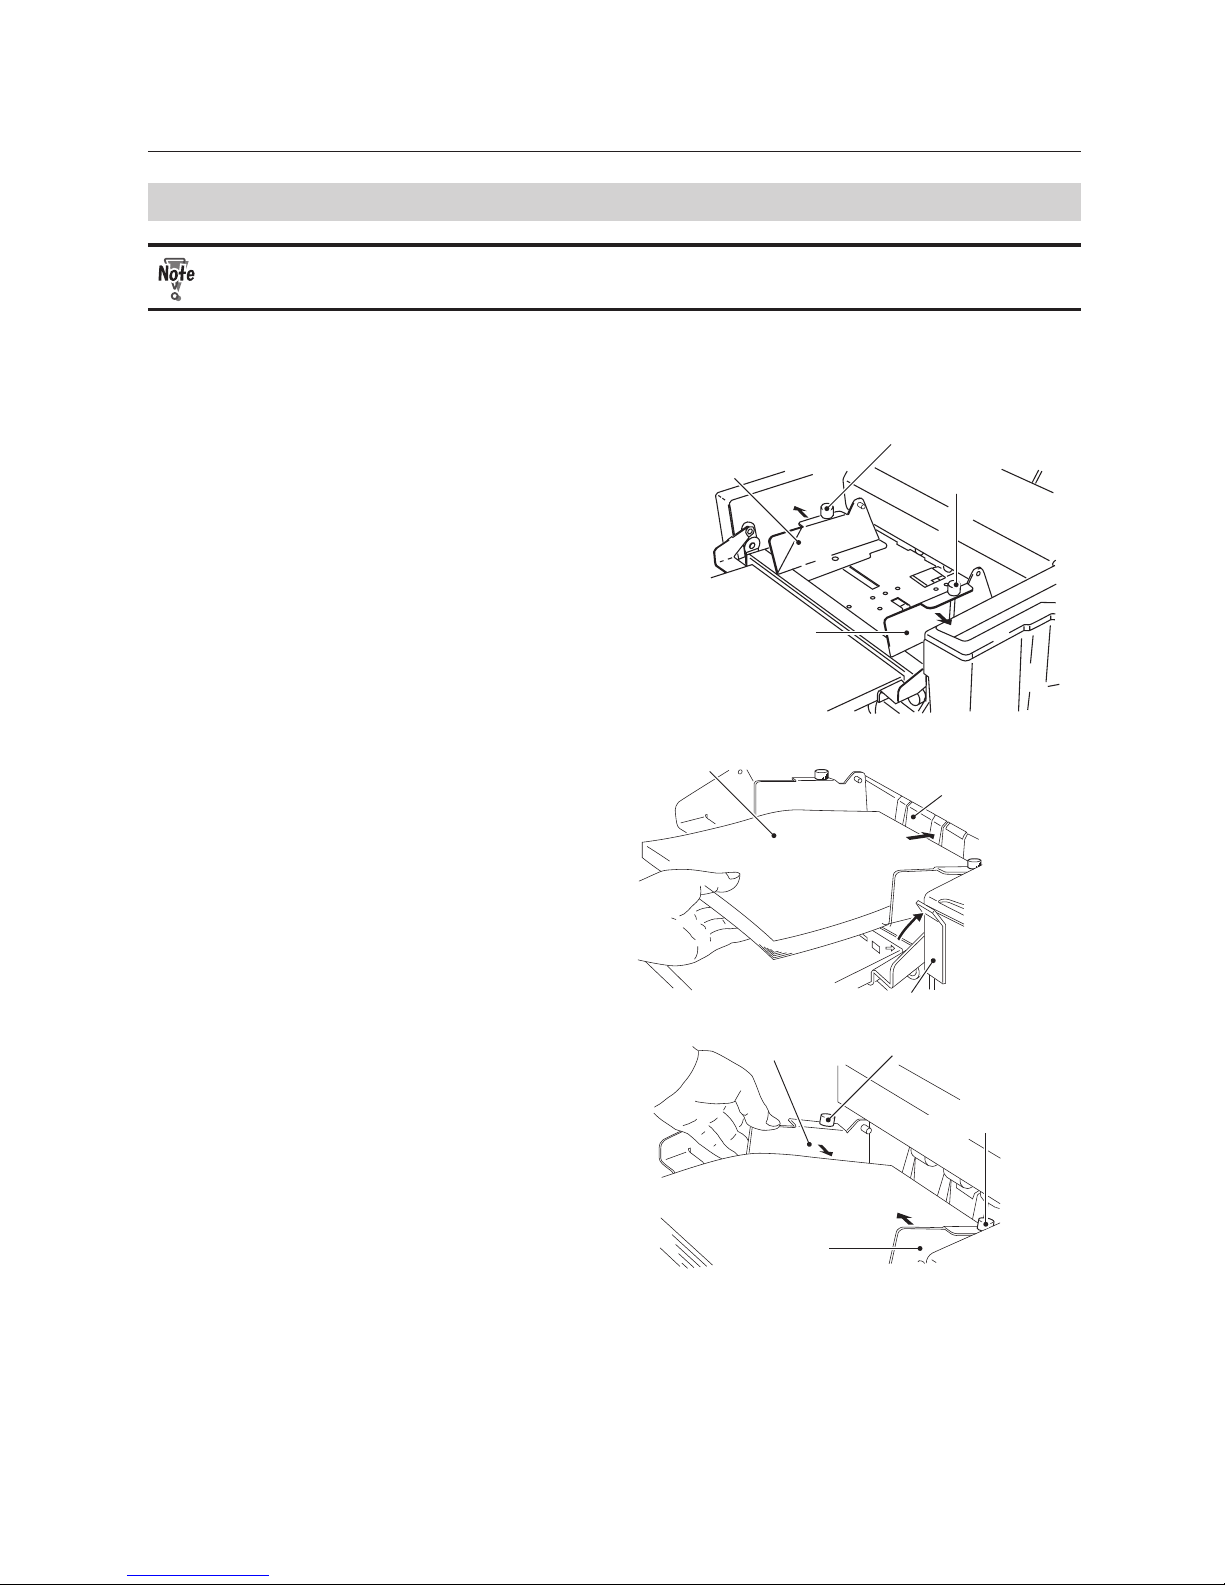
8
After completing the work, remove the
guide plate unit.
• Leaving the guide plate unit attached
may result in problems when other types
of paper are used.
• When folding ne quality paper 52.3 g/
m2 (EU)/ 14 lb (North America) into four,
do not use the guide plate unit.
9
Store the removed guide plate unit
inside the top cover.
Once a paper size or folding mode is changed
or the power is turned o, the stacker rollers
will return to the automatically set position.
Page 37
3-7
Chapter3 Advanced Operation
2. Custom Folding of Standard Paper
Do not put neither hands nor ngers inside the machine during operation. You also need to be
careful not to get your hair, accessories and wear caught in the machine.
Custom folding is the method of folding paper where you specify the folding stoppers of the rst and second
folding plates. The following describes the custom folding procedures taking accordion fold as an example.
Side guide
Fixing screw
Side guide
Fixing screw
1
Loosen the xing screws of the side
guides, and move the side guides to t
the paper width.
Paper
Paper set lever
Guide plate
2
Raise the paper set lever and place
some paper on the paper feed tray.
Push in the paper until its lead edge touches
the guide plate.
Side guide
Side guide
Fixing screw
Fixing screw
3
After pressing the side guide to each
side of the paper lightly, tighten the
screws to secure the side guides.
Page 38
3-8
Chapter3 Advanced Operation
Paper set lever
4
Lower the paper set lever.
The paper feed tray will be raised.
Make sure that you lower the paper set
lever. If you start operations without the
paper set lever lowered, the paper feed
rings will run idle, causing the machine
to stop.
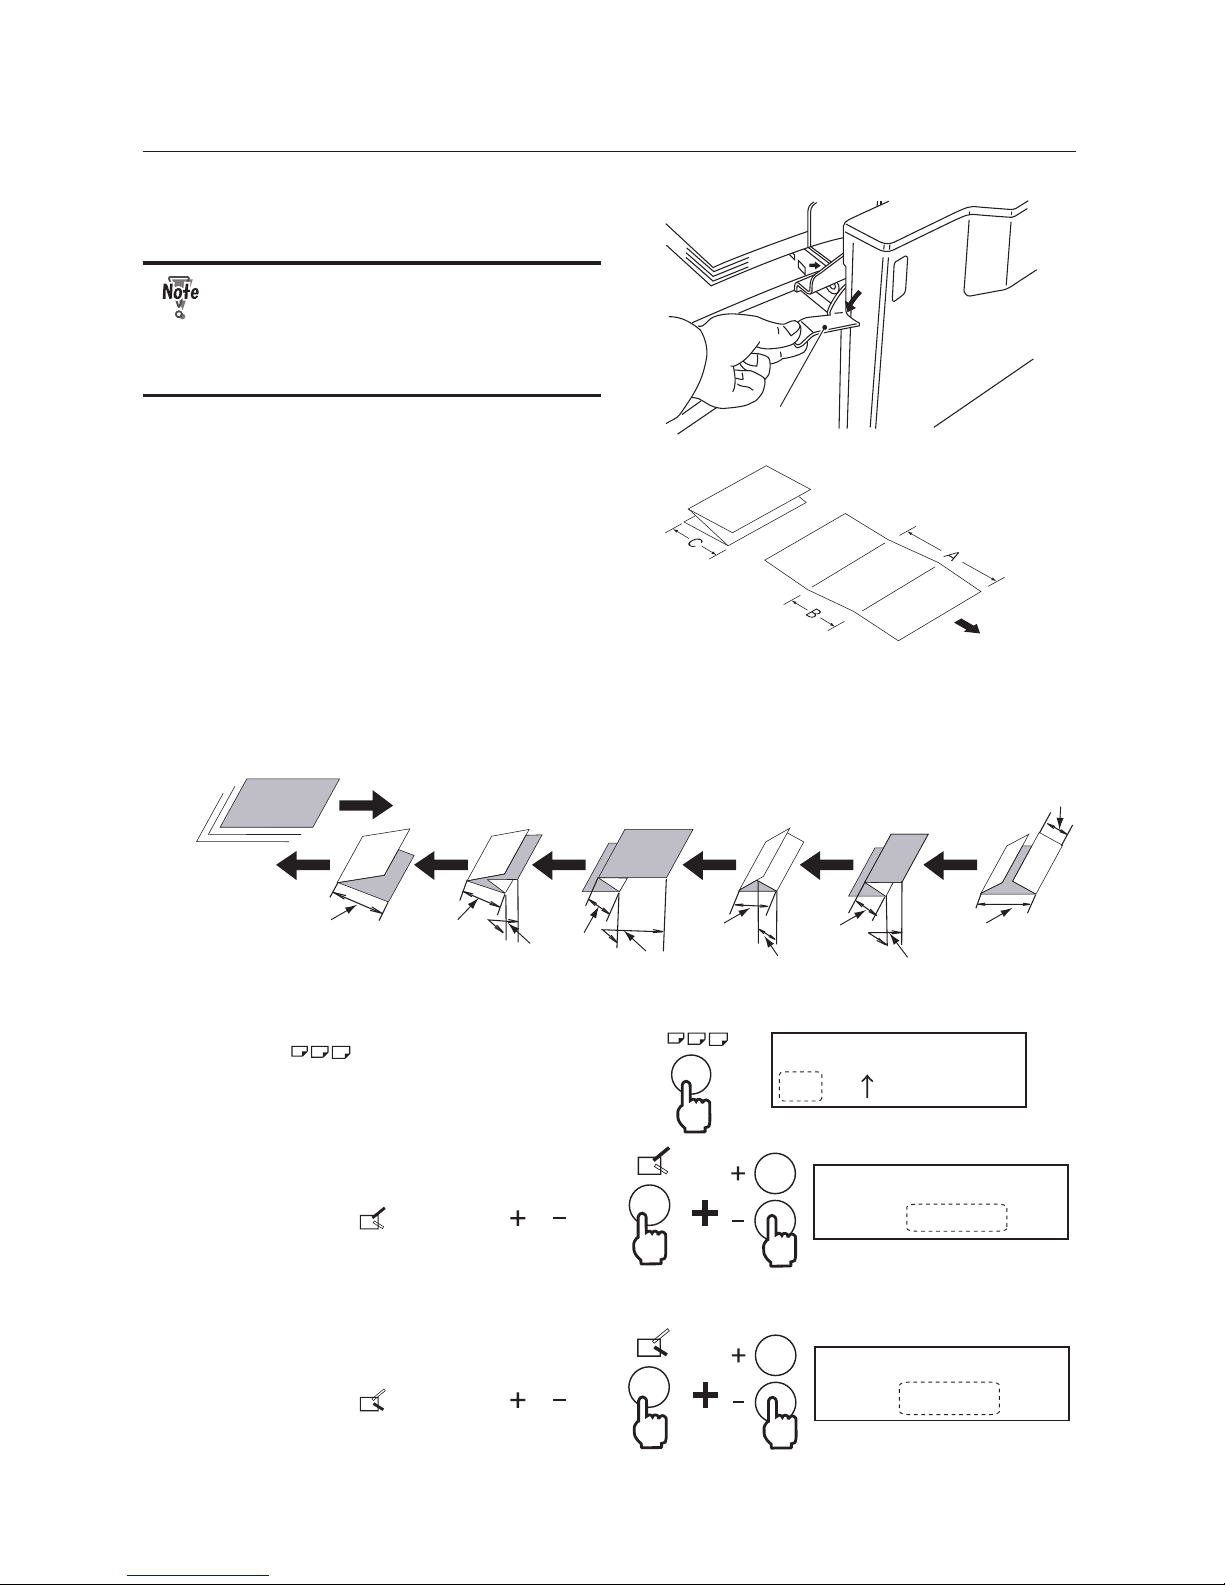
Accordion fold (example)
5
Fold a piece of paper as desired and
measure the dimensions of the A, B and
C.
The folding sizes should be within the
following ranges.
A: 40 to 325 mm/1.57 to 12.80 inches
(folded size for the rst folding plate)
B: 40 to 216 mm/1.57 to 8.50 inches
(folded size for the second folding plate)
C: 216 mm/8.50 inches or shorter
(folded paper length)
Single fold Double fold Irregular
accordion fold
Letter fold Accordion fold Gate fold
Paper feed direction
Paper ejection direction
A (B=0mm)
B
A
B
A
B
B
A
A
B
A
The position of A and B
CF
Count:0
6
Press the key to set a paper size
to [CF].
CF CF1 length
40.0mm
CF
7
Set the stopper position of the rst
folding plate to the dimension of A.
While pressing the key, press the or
key to change [CF1 length] from [40.0mm](EU)/
[1.57inch](North America) to the dimension of
A.
CF CF2 length
0.0mm
CF
8
Set the stopper position of the second
folding plate to the dimension of B.
While pressing the key, press the or
key to change [CF2 length] from [0.0mm](EU)/
[0.00inch](North America) to the dimension of
B.
(Fold out)
(Z fold)
Page 39
3-9
Chapter3 Advanced Operation
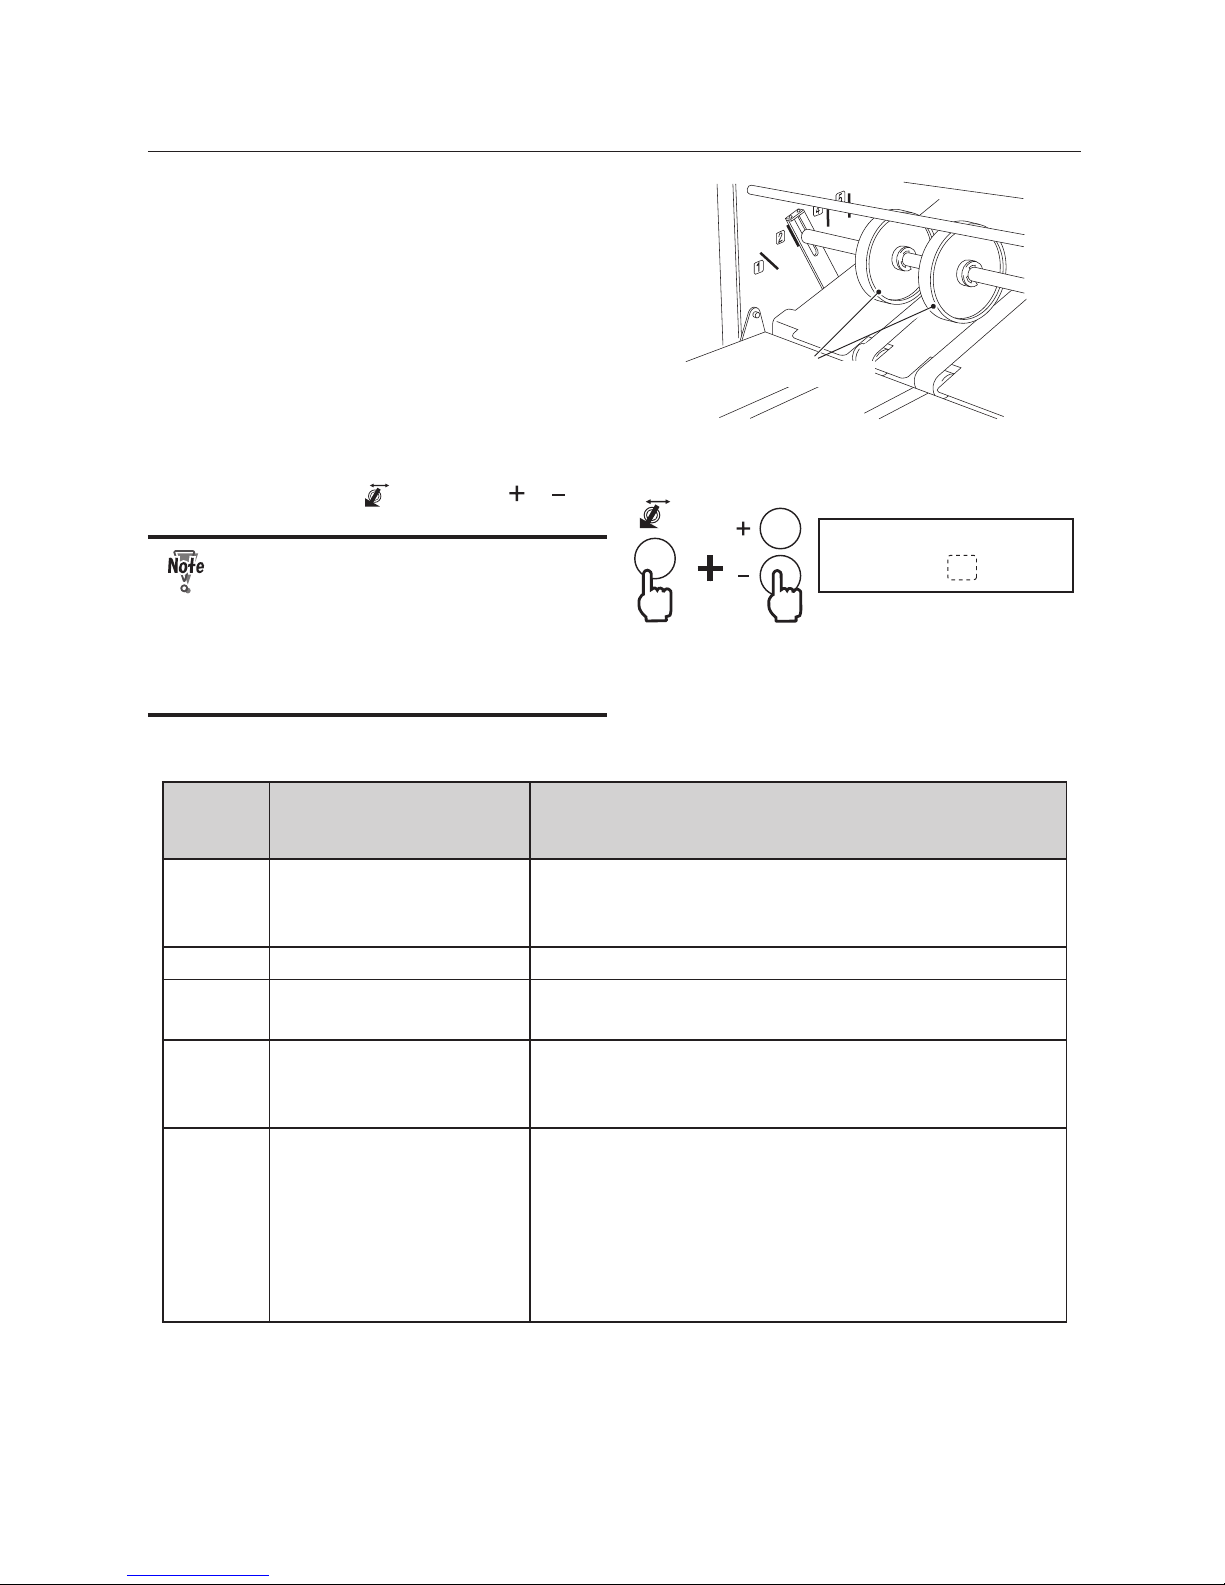
Stacker roller
9
Move the stacker rollers to the
appropriate position referring to the
following Table of Stacker Rollers
Position.
SR set
1
While pressing the key, press the or key
to set [SR set] to a disired value.
Use the table just as a reference.
You may need ne adjustments
according to various conditions such as
environmental conditions (temperature,
humidity), paper quality, paper
thickness, paper ber direction, cutting
accuracy and printing conditions.
Table of Stacker Rollers Position (EU)
Stacker
Rollers
Position
Length of Folded Paper (C) Folding Mode
1 182 to 216 mm A3: single fold, irregular accordion fold (fold out), gate fold
B4 : single fold
Single fold larger than A3 size
2 148.5 to 182 mm B4: Irregular accordion fold (fold out), gate fold
3 128.5 to 148.5 mm A4: single fold, irregular accordion fold (fold out), gate fold
A3: letter fold, accordion fold (Z fold)
4 105 to 128.5 mm A5: single fold, irregular accordion fold (fold out), gate fold
B5: single fold, irregular accordion fold (fold out), gate fold
B4: letter fold, accordion fold (Z fold)
5 40 to 105 mm B6: single fold, double fold, letter fold, accordion fold (Z fold),
irregular accordion fold (fold out), gate fold
A5: double fold, letter fold, accordion fold (Z fold)
B5: double fold, letter fold, accordion fold (Z fold)
A4: double fold, letter fold, accordion fold (Z fold)
B4: double fold
A3: double fold
Page 40
3-10
Chapter3 Advanced Operation
Table of Stacker Rollers Position (North America)
Stacker Rollers
Position
Length of Folded Paper (C) Folding Mode
1 7.0 to 8.5 inches LD: single fold, irregular accordion fold (fold out), gate fold
Single folded paper larger than LD
2 6.0 to 7.0 inches LG: Irregular accordion fold (fold out), gate fold
3 5.0 to 6.0 inches LT: single fold, irregular accordion fold (fold out) gate fold
LD: letter fold, accordion fold (Z fold)
4 4.0 to 5.0 inches LG: letter fold, accordion fold (Z fold)
LD: double fold
5 1.6 to 4.0 inches LT: double fold, letter fold, accordion fold (Z fold)
LG: double fold
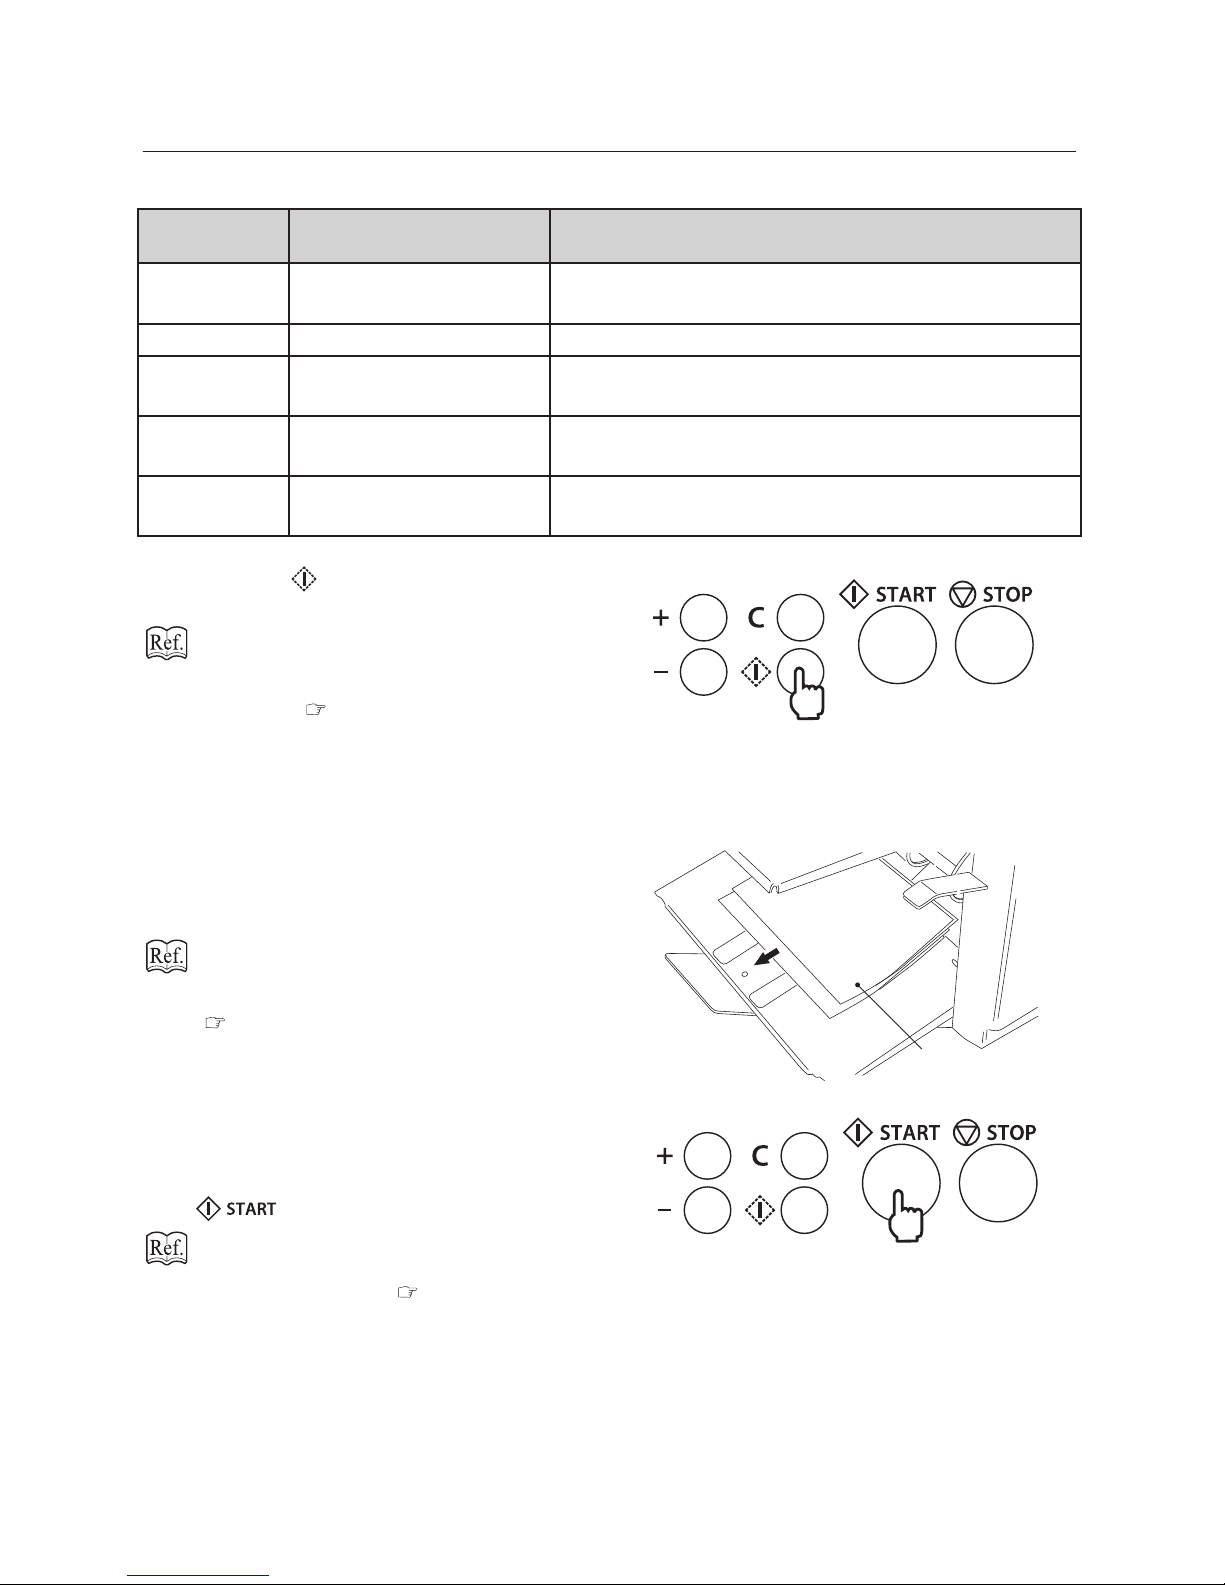
10
Press the key for test folding and
check if the paper is ejected smoothly.
If mis-feed or double-feed occurs, refer to
Chapter2 "Basic Operation" “1.Standard
Folding of Standard Paper” "1-3. Operation
Procedures ( p.2-2).
11
If the paper is not ejected smoothly,
change the position of the stacker
rollers again.
Folded sample
12
Check the nish of test folding.
Check for folding misalignment using the
second test folded sample.
If folding misalignments occur, refer to
Chapter 3 "ADVANCED OPERATION"“5.
Correcting Folding Misalignment”
( p3-20).
13
After completing adjustments, set the
count mode either to the add count or
to the subtract count, then press the
key to start folding operations.
Refer to Chapter2 "Basic Operation"
“1.Standard Folding of Standard Paper” "1-3.
Operation Procedures ( p2-2).
Page 41
3-11
Chapter3 Advanced Operation
3.
Standard Folding of Non-Standard Size Paper
Do not put neither hands nor ngers inside the machine during operation. You also need to be
careful not to get your hair, accessories and wear caught in the machine.
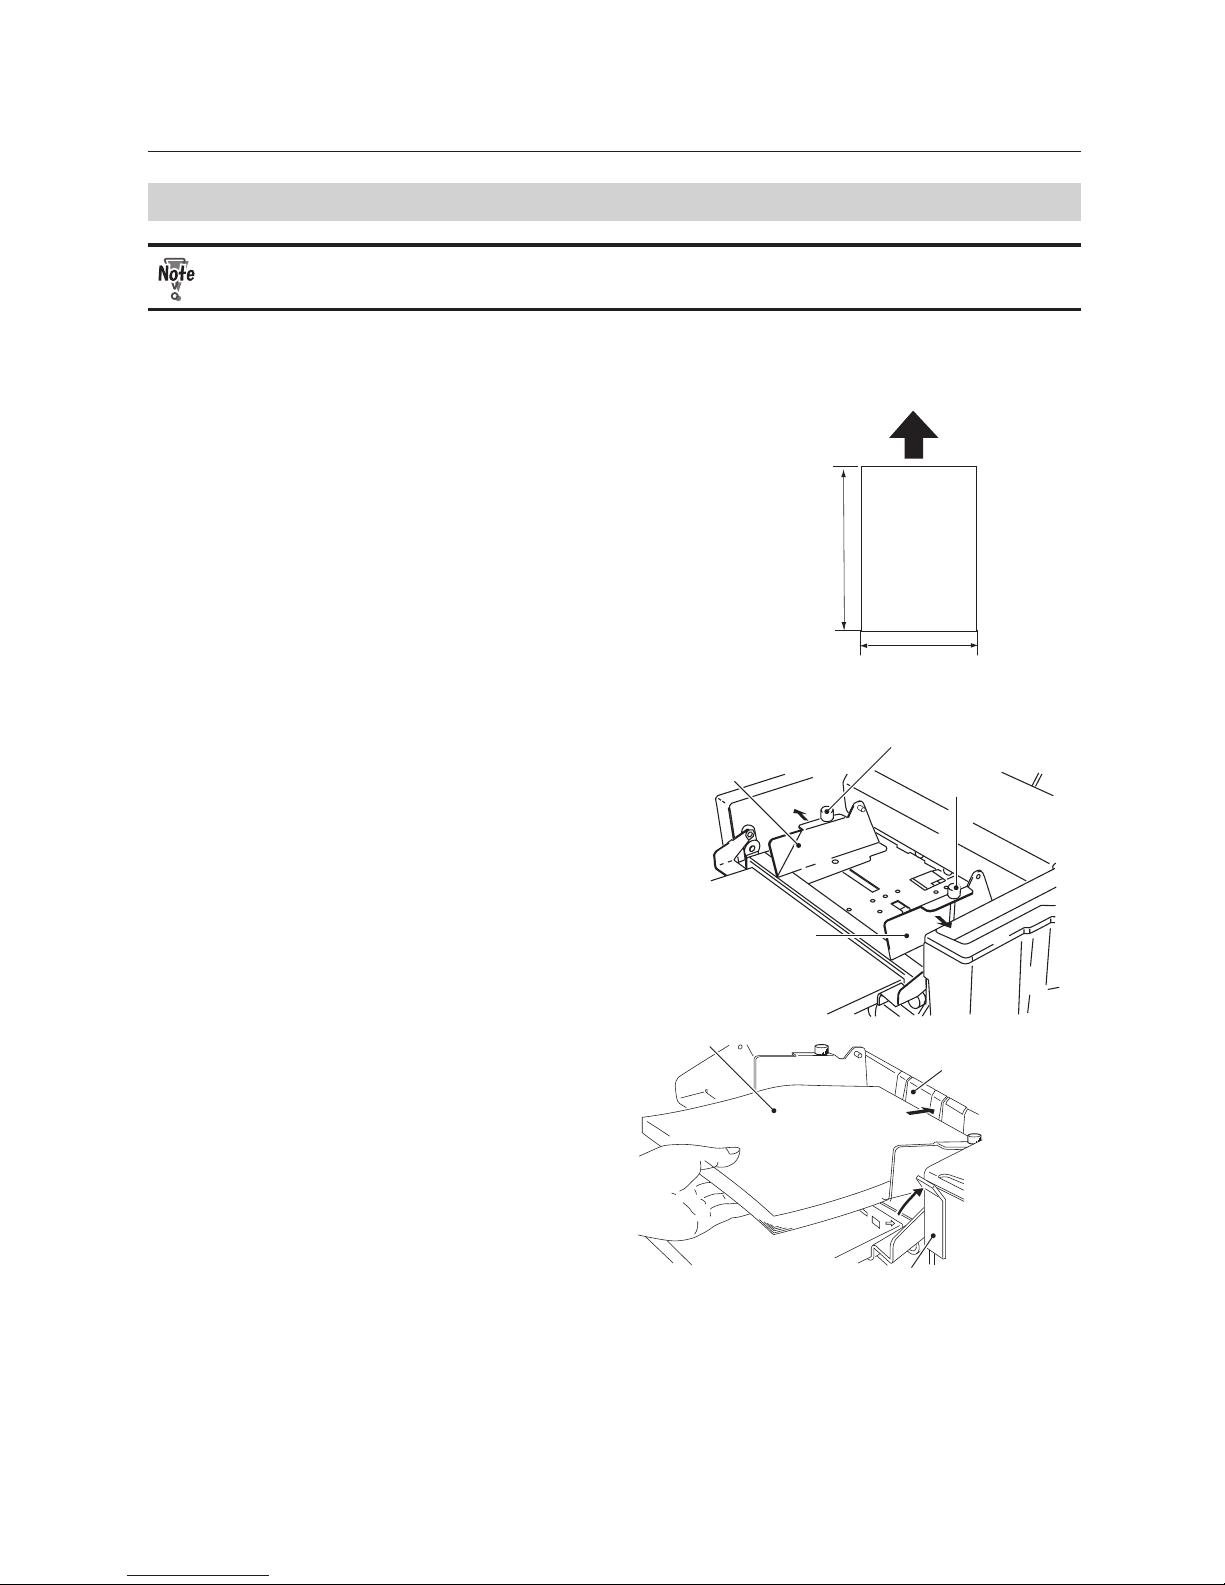
Paper other than the standard size paper are called non-standard size paper. The paper size that can be used
as non-standard size paper is as follows.
Length(L):
182 to 432 mm/
7.16 to 17.00 inches
Paper feed
direction
Width:128 to 297 mm/
5.04 to 11.69 inches
Maximum: 297 (W) x 432 (L) mm/11.69 (W) x 17.00 (L) inches
Minimum: 128 (W) x 182 (L) mm/5.04 (W) x 7.16 (L) inches
* Minimum for single fold: 90 (W) x 135 (L) mm/
3.54 (W) x 5.31 (L) inches
1
Measure the length (L).
Side guide
Fixing screw
Side guide
Fixing screw
2
Loosen the xing screws of the side
guides, and move the side guides to t
the paper width.
Paper
Paper set lever
Guide plate
3
Raise the paper set lever and place
some paper on the paper feed tray.
Push in the paper until its lead edge touches
the guide plate.
Page 42
3-12
Chapter3 Advanced Operation
Side guide
Side guide
Fixing screw
Fixing screw
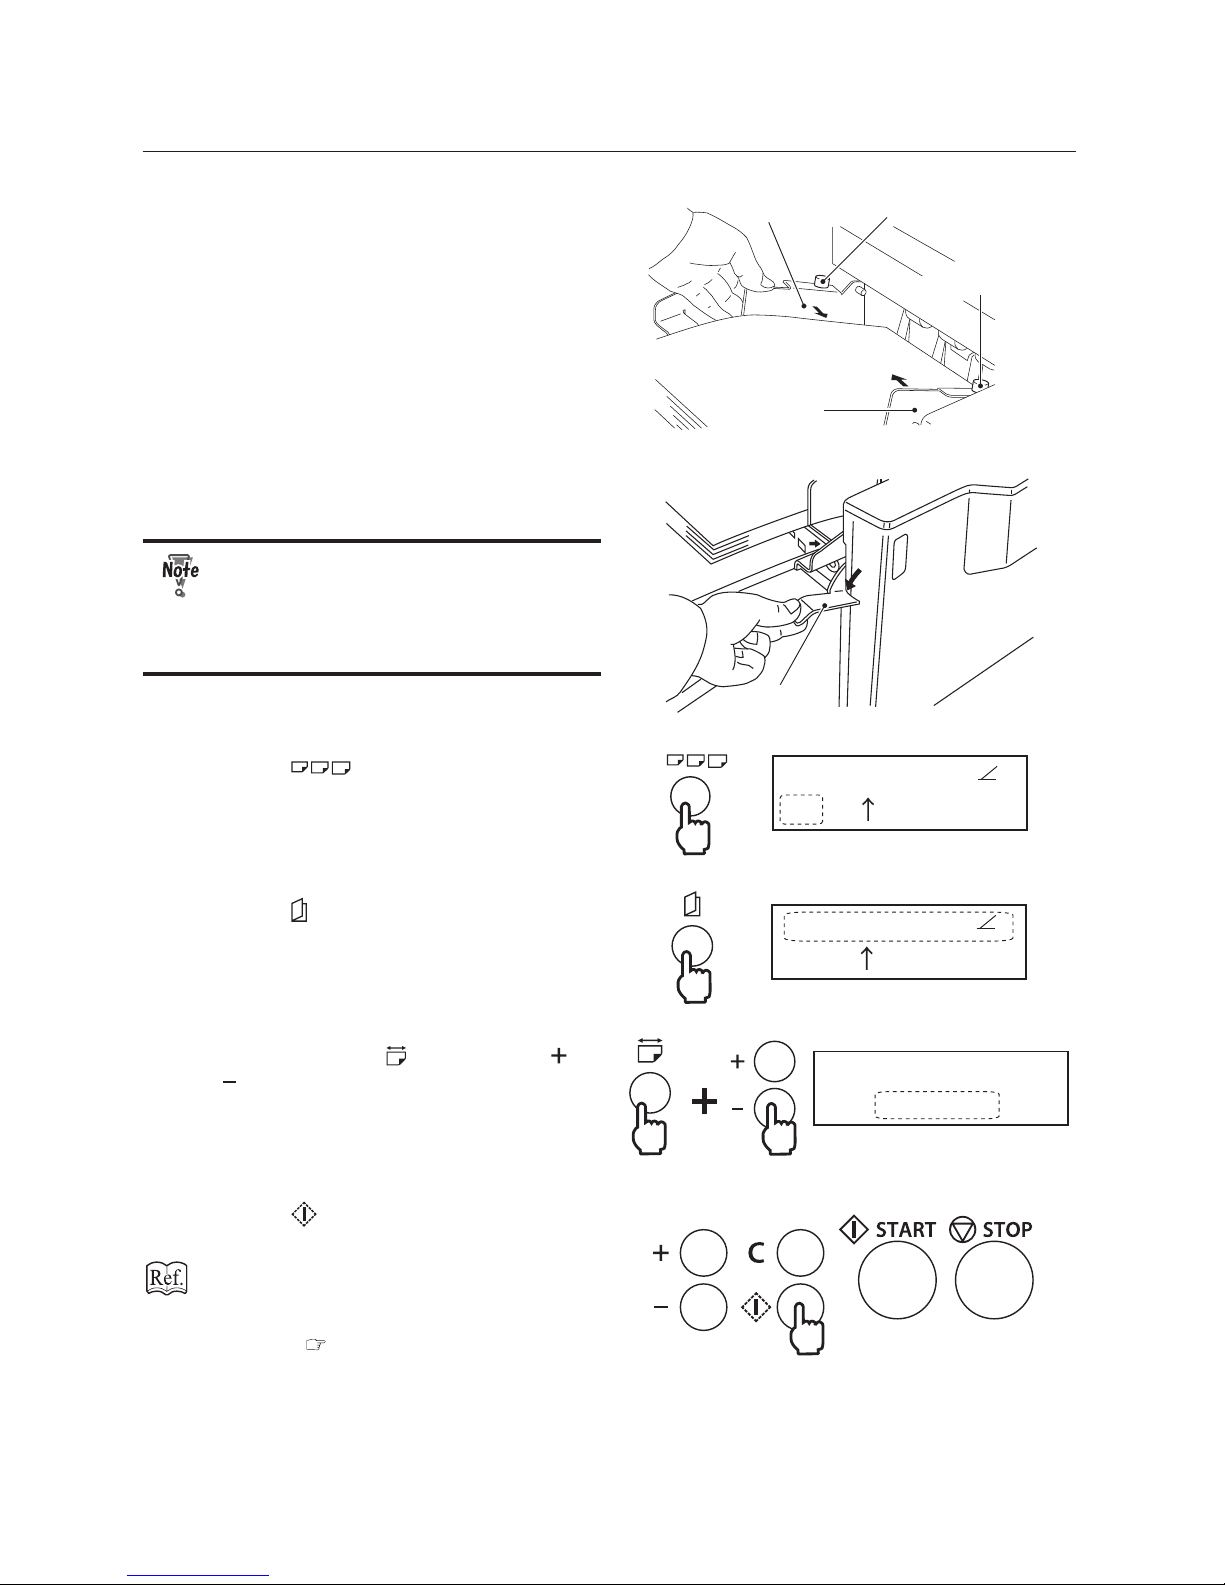
4
After pressing the side guide to each
side of the paper lightly, tighten the
screws to secure the side guides.
Paper set lever
5
Lower the paper set lever.
The paper feed tray will be raised.
Make sure that you lower the paper set
lever. If you start operations without the
paper set lever lowered, the paper feed
rings will run idle, causing the machine
to stop.
LP
Single fold
Count:0
6
Press the key to set the paper size
to [LP].
A3
Single fold
Count:0
7
Press the key to set the folding mode.
Paper length
297.0mm
8
While pressing the key, press the
or key to change [paper length] from
[297.0mm](EU)/[11.00inch] (North
America) to the length measured in step
1.
9
Press the key for test folding and
check if the paper is ejected smoothly.
If mis-feed or double-feed occurs, refer to
Chapter2 "Basic Operation" “1.Standard
Folding of Standard Paper” "1-3. Operation
Procedures ( p.2-2).
10
If the paper is not ejected smoothly,
change the position of the stacker
rollers again.
Page 43
3-13
Chapter3 Advanced Operation
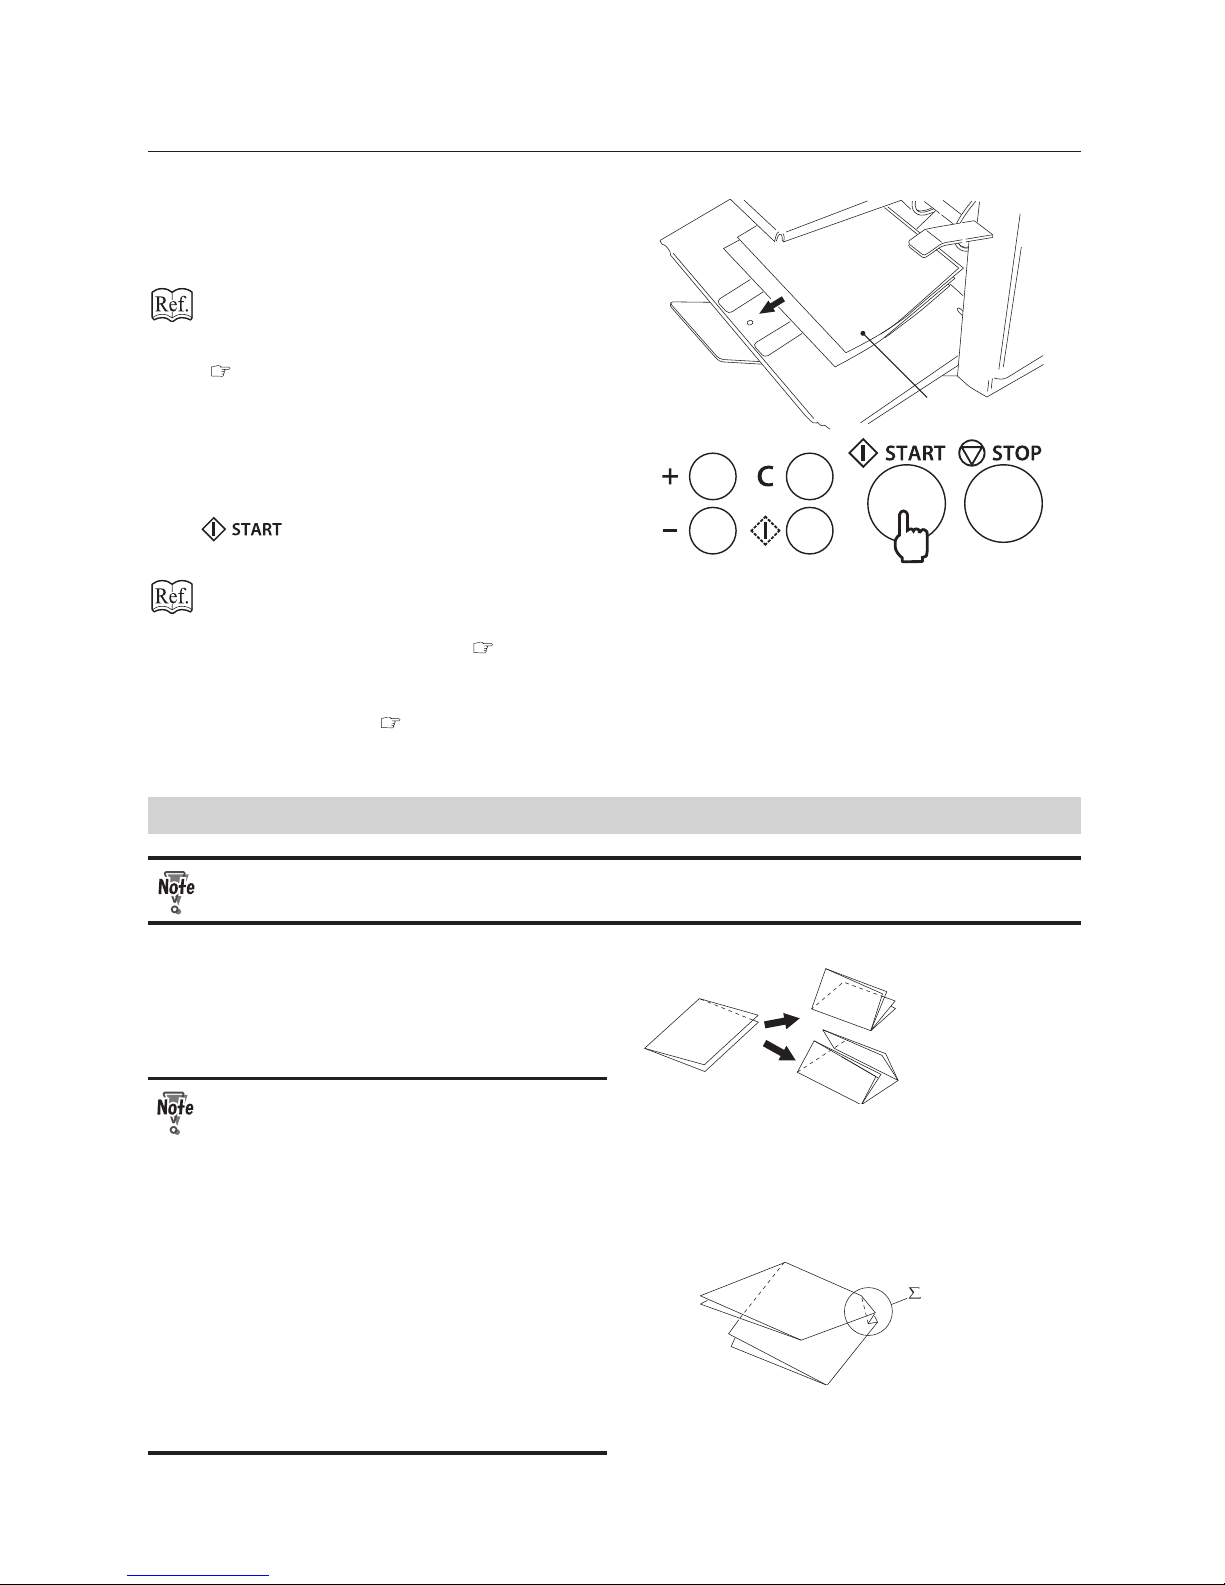
Folded sample
11
Check the nish of test folding.
Check for folding misalignment using the
second test folded sample.
If folding misalignments occur, refer to
Chapter 3 "ADVANCED OPERATION"“5.
Correcting Folding Misalignment”
( p.3-20).
12
After completing adjustments, set the
count mode either to the add count or
to the subtract count, then press the
key to start folding operations.
•
Refer to Chapter2 "Basic Operation"
“1.Standard Folding of Standard Paper”
"1-3. Operation Procedures ( p.2-2).
•
For custom folding of non-standard
size paper, refer to "2.Custom Folding of
Standard Paper" ( p.3-7).
4. Cross Folding
Do not put neither hands nor ngers inside the machine during operation. You also need to be
careful not to get your hair, accessories and wear caught in the machine.
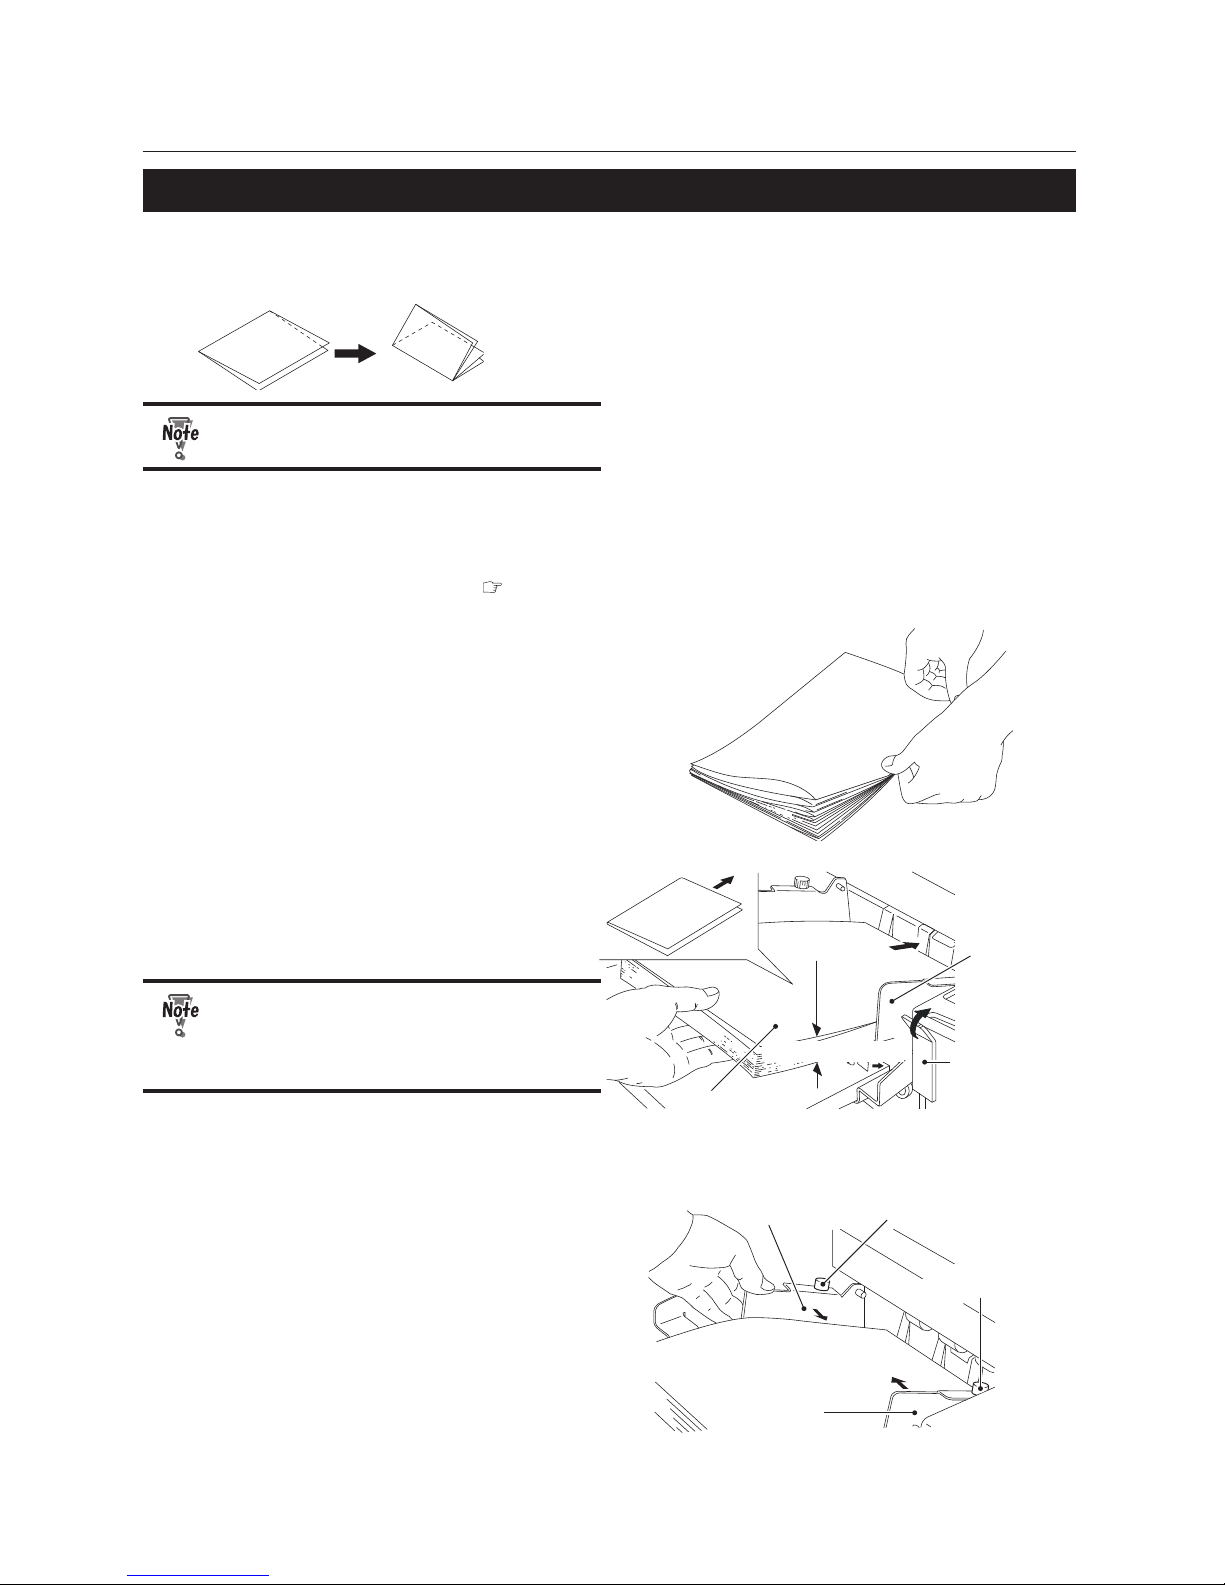
Cross fold
Cross single fold
Cross letter fold
Cross folding is to fold single-folded paper another
time into two or three.
• The maximum paper thickness is
104.7 g/m2 (EU)/28 lb (North America).
However, this thickness may dier
slightly according to various conditions
such as environmental conditions
(temperature, humidity), paper size, and
paper ber direction.
folding
• When the paper is cross folded, Σ folding
(folding slippage in the horizontal)
and folding misalignment along sides
of paper may occur due to conditions
such as environmental conditions
(temperature, humidity), paper size
and paper ber direction. This is not a
malfunction of the machine.
Page 44
3-14
Chapter3 Advanced Operation
4-1. Cross Folding Standard Size Paper
The paper size that can be cross folded is A3, B4, A4 and B5 (EU)/ LD, LG and LT (North America).
The following describes the cross single folding procedures of A3 (EU)/LG (North America) size paper.
s
Only short edge feed is available for
cross folding.
1
Fold A3 (EU)/LG (North America) size
paper into two according to Chapter
1 "BASIC OPERATION" "1.Standard
Folding of Standard Paper" ( p.2-1).
2
Press along the folded line of the singlefolded paper rmly with your ngers
to prevent the paper from slipping and
buckling in the horizontal direction
when folded.
Paper
Side guide
Paper set lever
36 mm/1-1/2 inches
3
Raise the paper set lever and stack the
single-folded paper on the paper feed
tray with the folded line facing the nonoperator's side.
The amount of paper stacked on the
paper feed tray should be approximately
2/3 (36 mm/1-1/2 inches) of the height of
the side guide.
4
Loosen the xing screws of the side
guides.
Side guide
Side guide
Fixing screw
Fixing screw
5
After pressing the side guide to each
side of the paper lightly, tighten the
screws to secure the side guides.
Page 45
3-15
Chapter3 Advanced Operation
Paper set lever
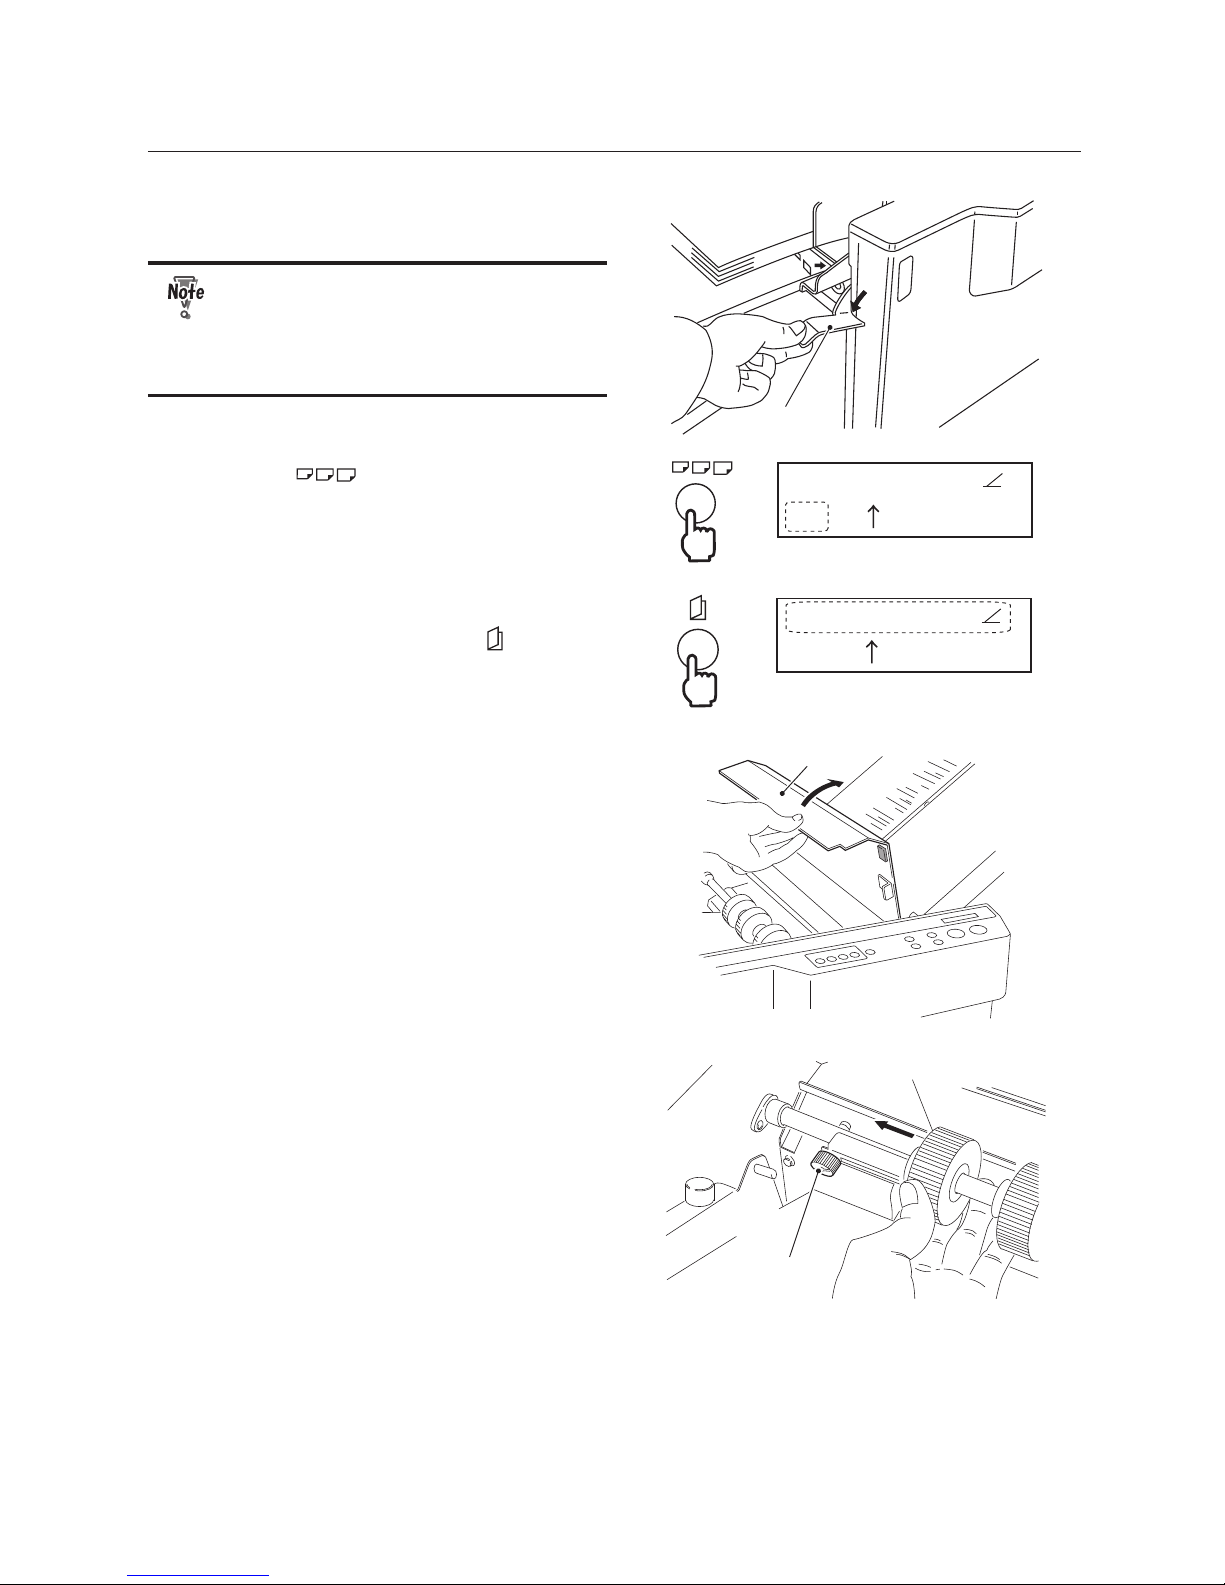
6
Lower the paper set lever.
The paper feed tray will be raised.
Make sure that you lower the paper set
lever. If you start operations without the
paper set lever lowered, the paper feed
rings will run idle, causing the machine
to stop.
A4
Single fold
Count:0
7
Press the key to change the paper
size from [A3](EU)/[LD](North America)
to [A4](EU)/[LT](North America).
A4
Single fold
Count:0
8
Check if [Single fold] is displayed on the
LCD display. If not, press the key to
select [Single fold].
Top cover
9
Open the top cover.
Set screw
Paper feed ring
10
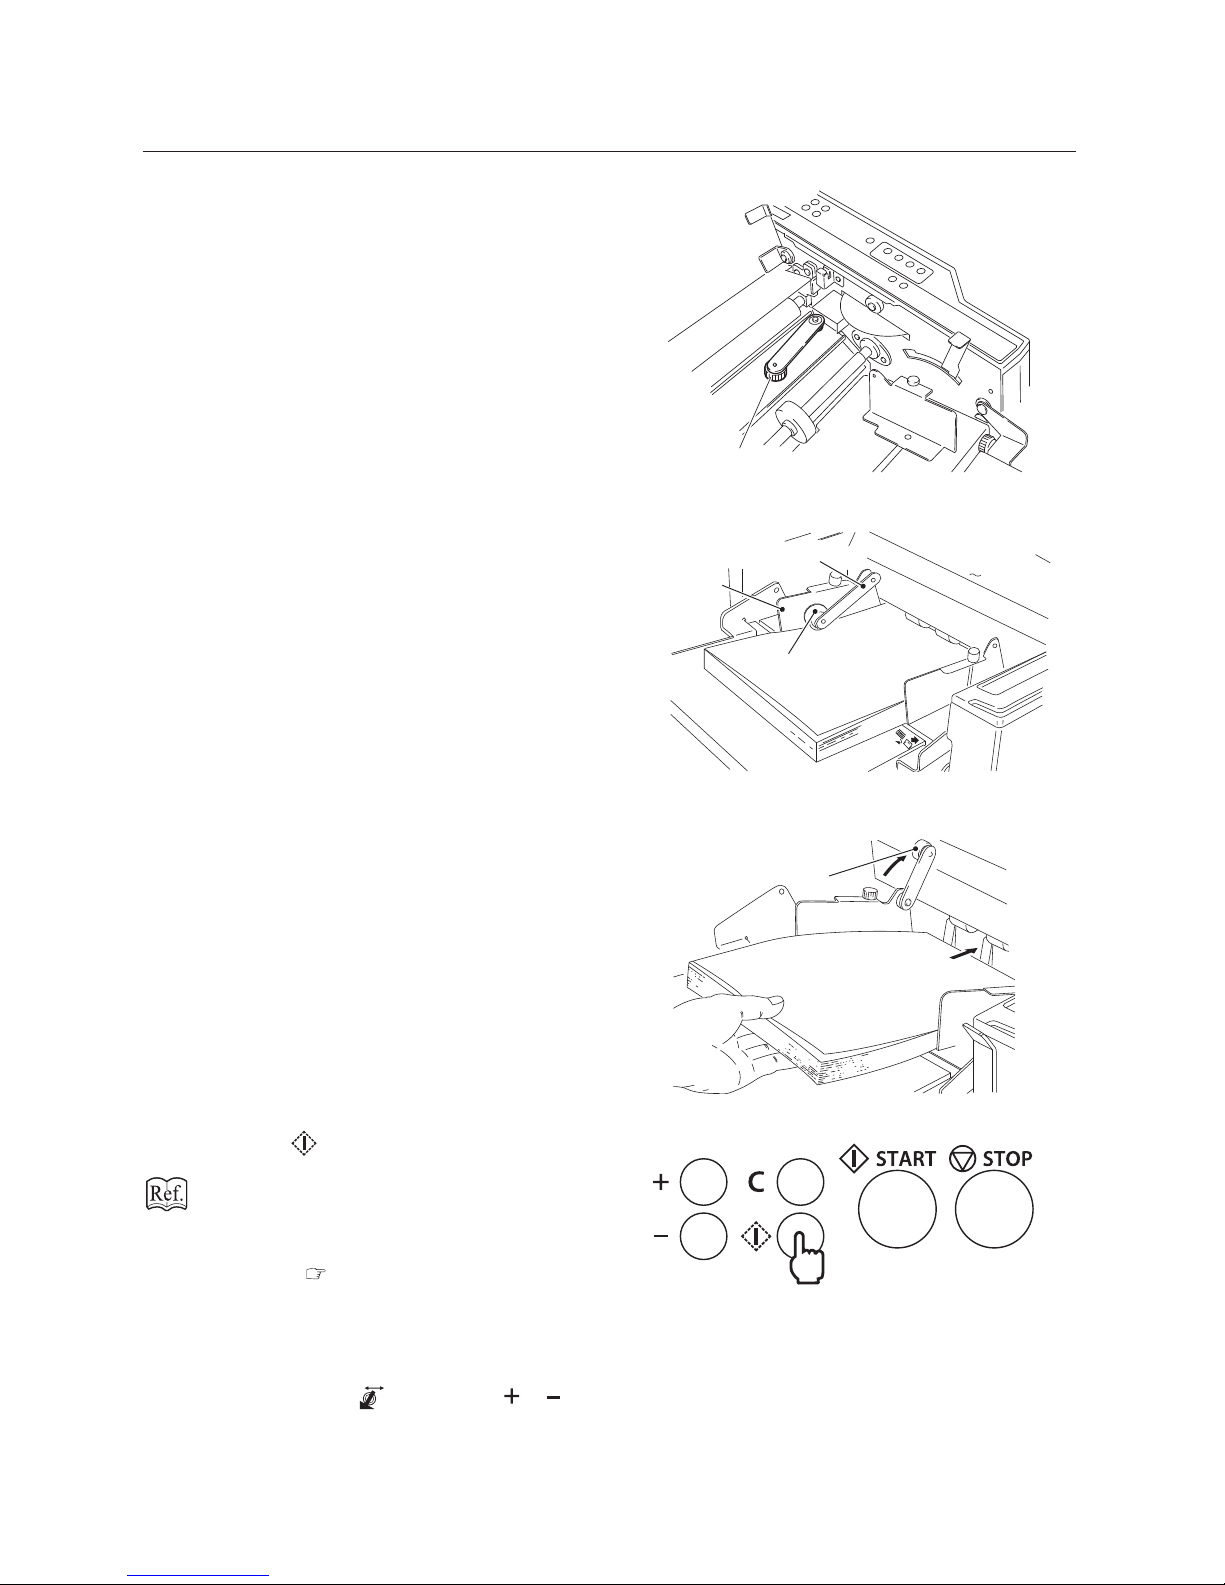
Loosen the set screw of the paper feed
ring.
11
Move the paper feed ring at the far end
to the folded line of the paper.
12
Tighten the set screw of the paper feed
ring.
Page 46
3-16
Chapter3 Advanced Operation
Cross folding lever
13
Take out the cross folding lever stored
inside the top cover.
14
Close the top cover.
Cross folding lever
Weight roller
Side guide
15
Attach the cross folding lever to the
pillar located on the side guide of the
non-operator' side.
Place the weight roller on the folding line.
Cross folding lever
To replenish paper, lift the cross folding
lever.
16
Press the key for test folding and
check if the paper is ejected smoothly.
If mis-feed or double-feed occurs, refer to
Chapter2 "Basic Operation" “1.Standard
Folding of Standard Paper” "1-3. Operation
Procedures ( p.2-2).
17
If the paper is not ejected smoothly,
change the position of the stacker
rollers.
While pressing the key, press the or
key to change the stacker rollers to a desired
position.
Page 47
3-17
Chapter3 Advanced Operation
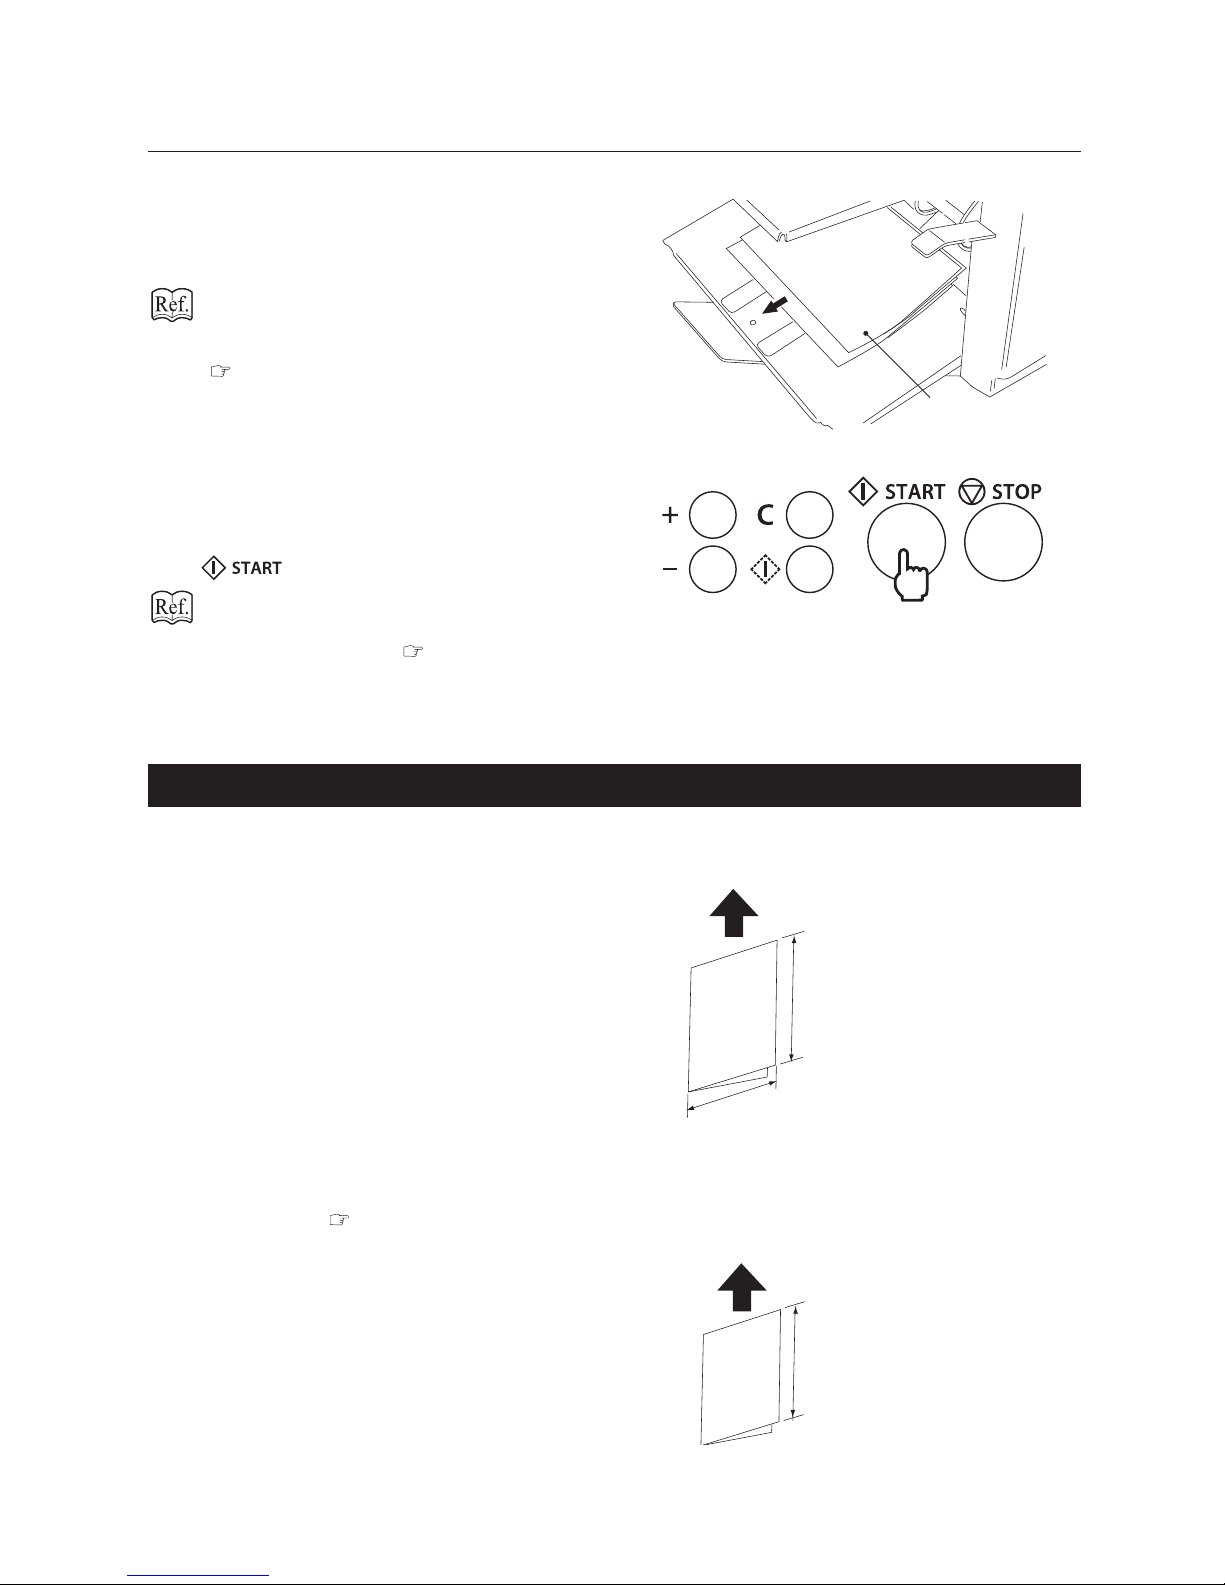
Folded sample
18
Check the nish of test folding.
Check for folding misalignment using the
second test folded sample.
If folding misalignments occur, refer to
Chapter 3 "ADVANCED OPERATION"“5.
Correcting Folding Misalignment”
( p.3-20).
19
After completing adjustments, set the
count mode either to the add count or
to the subtract count, then press the
key to start folding operations.
Refer to Chapter2 "Basic Operation"
“1.Standard Folding of Standard Paper” "1-3.
Operation Procedures ( p.2-2).
20
Store the cross folding lever.
4-2. Cross Folding Non-Standard Size Paper
Paper other than the standard size paper are called non-standard size paper. The paper size that can be cross
folded is as follows.
Length:182 to 432 mm/
7.16 to 17.00 inches
Width:128 to 297 mm/
5.04 to 11.69 inches
Paper feeding direction
Maximum: 297 (W) x 432 (L) mm/11.69 (W) x 17.00 (L) inches
Minimum: 128 (W) x 182 (L) mm/5.04 (W) x 7.16 (L) inches
* Minimum for single fold: 90 (W) x 135 (L) mm/
3.54 (W) x 5.31 (L) inches
1
Fold the paper into two according to
Chapter 3 "ADVANCED OPERATION"
"3.Standard Folding of Non-Standard
Size Paper" ( p.3-11).
L
Paper feeding direction
2
Measure the length (L) of the singlefolded paper.
Page 48
3-18
Chapter3 Advanced Operation
3
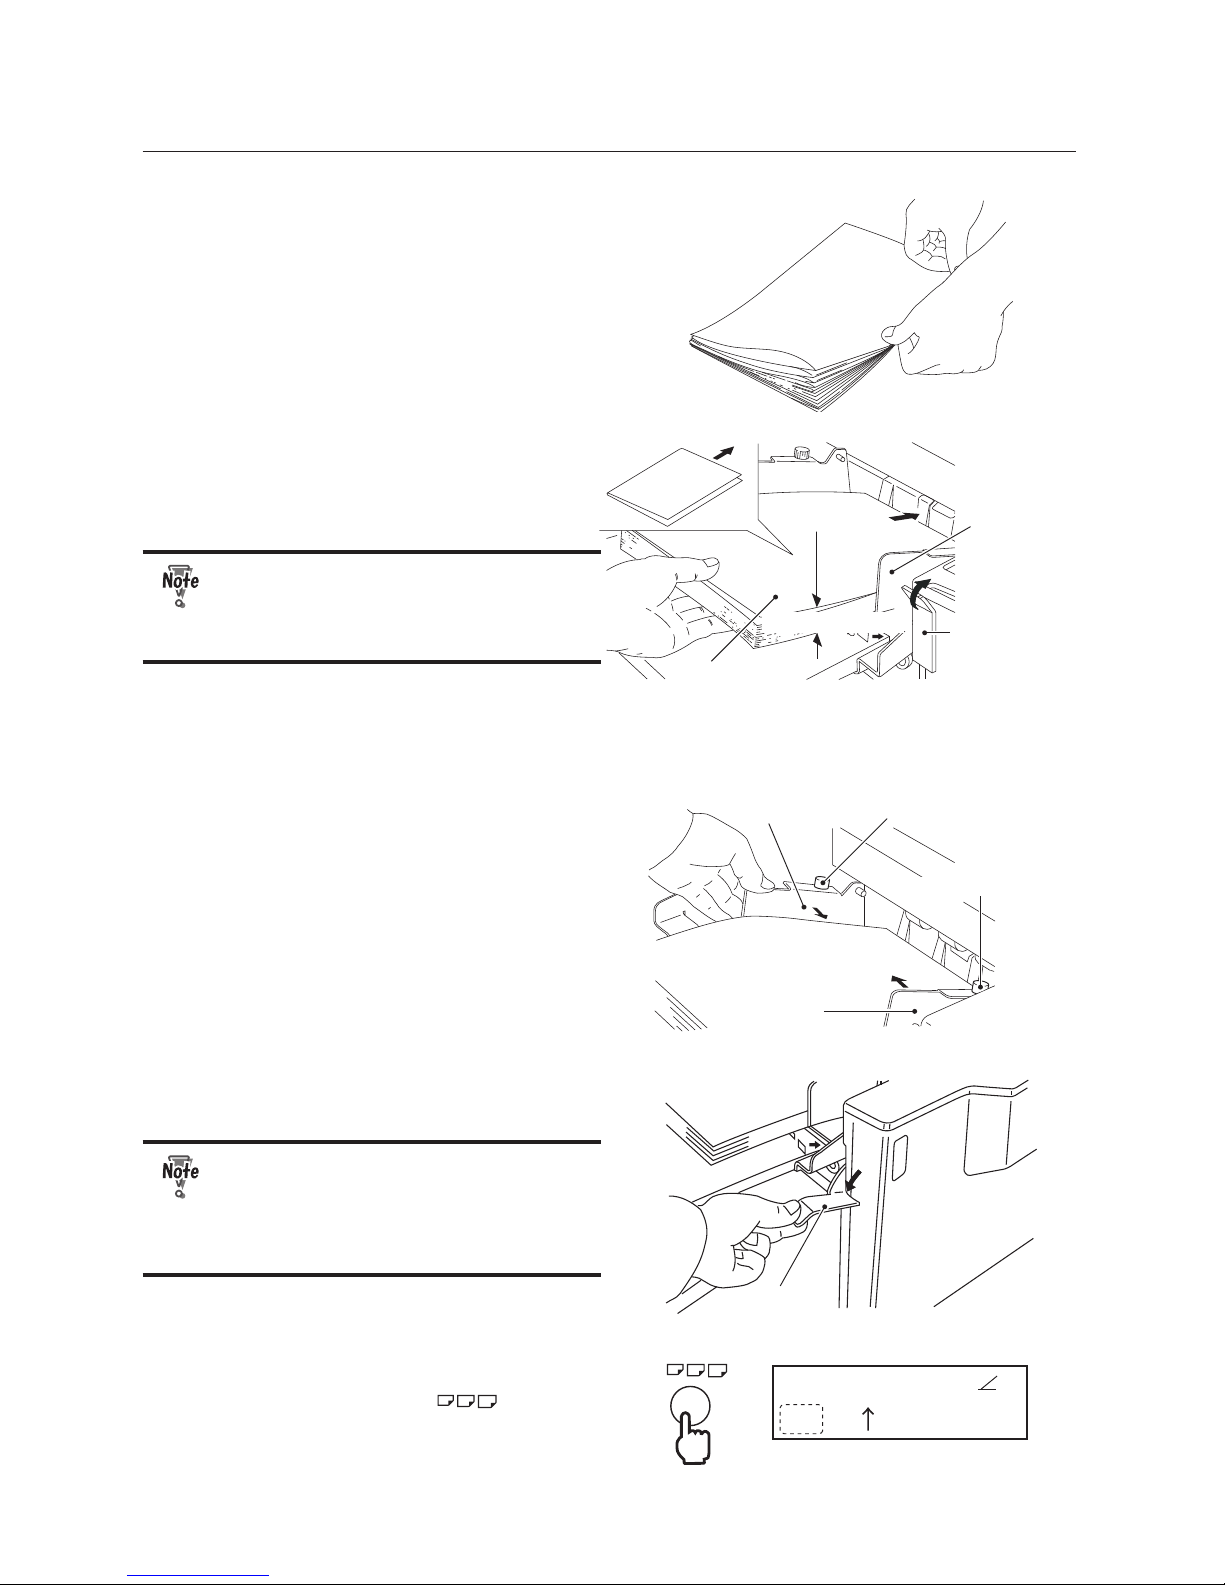
Press along the folded line of the singlefolded paper rmly with your ngers
to prevent the paper from slipping and
buckling in the horizontal direction
when folded.
Paper
Side guide
Paper set lever
36 mm/1-1/2 inches
4
Raise the paper set lever and stack the
single-folded paper on the paper feed
tray with the folded line facing the nonoperator's side.
The amount of paper stacked on the
paper feed tray should be approximately
2/3 (36 mm/1-1/2 inches) of the height of
the side guide.
5
Loosen the xing screws of the side
guides.
Side guide
Side guide
Fixing screw
Fixing screw
6
After pressing the side guide to each
side of the paper lightly, tighten the
screws to secure the side guides.
Paper set lever
7
Lower the paper set lever.
The paper feed tray will be raised.
Make sure that you lower the paper set
lever. If you start operations without the
paper set lever lowered, the paper feed
rings will run idle, causing the machine
to stop.
LP
Single fold
Count:0
8
Check if [LP] is displayed on the LCD
display. If not, press the key to
select [LP].
Page 49
3-19
Chapter3 Advanced Operation
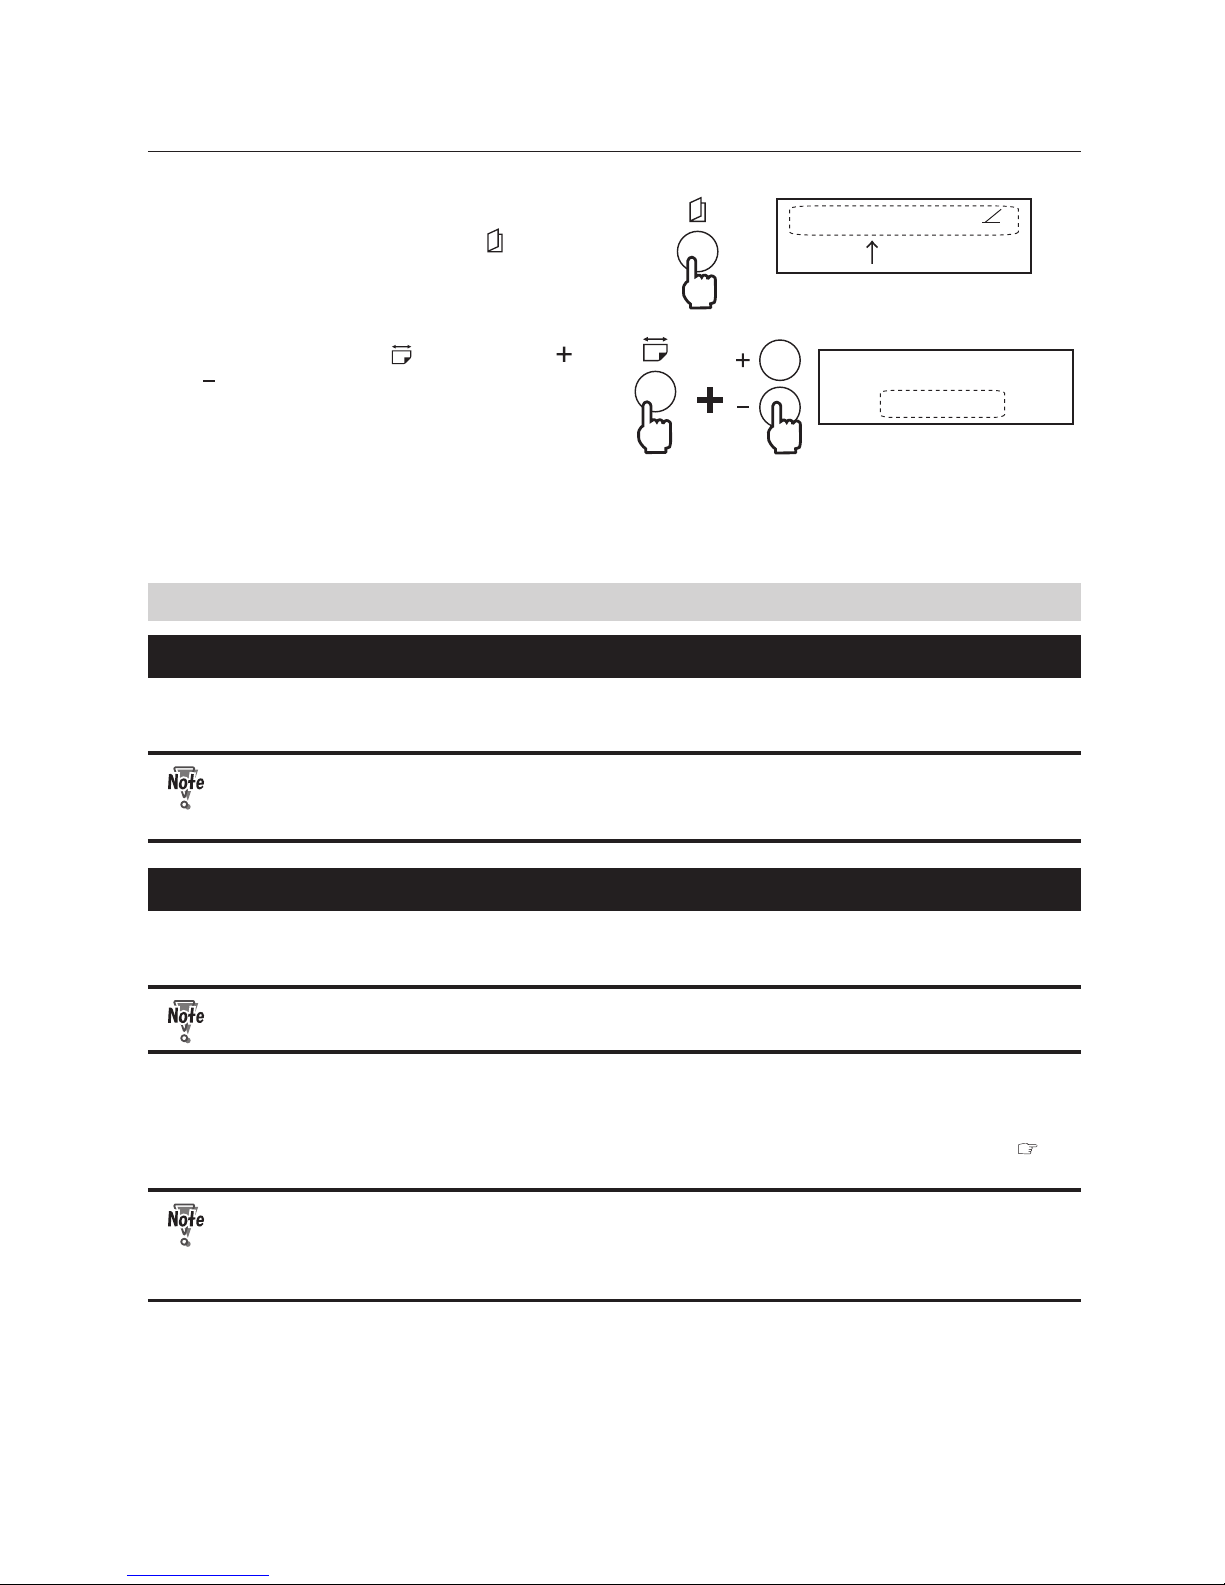
LP
Single fold
Count:0
9
Check if [Single fold] is displayed on the
LCD display. If not, press the key to
select [Single fold].
Paper length
297.0mm
10
While pressing the key, press the or
key to select the length measured in
step 2.
Refer to procedures between steps 9 to 20 in
"4-1. Cross Folding Standard Size Paper" for
rest procedures.
5. Using Art Paper and Coated Paper
5-1. Characteristics of Art Paper and Coated Paper
Art paper and coated paper often stick to each other due to the printing ink and become dicult to separate,
resulting in double-feed. When using these types of paper, follow the procedure below.
Some recycled art paper and coated paper may be imsy and inappropriate for folding. The
recommended ream weight is 104.7 to 127.9 g/m2 /28 to 34lb. Note that the environmental
conditions (temperature, humidity) may also aect folding procedures and a nish.
5-2. Operation Procedures
1
Fan paper well.
Art paper and coated paper need to be fanned well compared to ne quality paper such as
copy paper.
2
Stack paper neatly on the paper feed tray, then set the side guides.
Refer to Chapter 1 "Before Operation" "6. Handling Paper" "6-2. Precautions on Stacking Paper"( p.1-
11) for details on stacking paper.
Do not stack too many sheets of paper on the paper feed tray, the amount of which should be
about half the height of the paper feed guide (approx. 25 mm/1 inch). If too many sheets are
stacked, the paper will stick to each other from its weight and become dicult to separate,
resulting in double-feed.
3
Move the paper feed pressure adjustment knob to "3."
If paper slips and mis-feed occurs, increase the paper feed pressure to “4” or “5.” Paper feed pressure
increases as the scale value increases.
4
Open the top cover and set the separating pressure adjustment dial to "2.5."
Page 50
3-20
Chapter3 Advanced Operation
If double-feed occurs, increase the paper separating pressure by 0.5 at a time. Paper separating
pressure increases as the scale value increases.
Do not use ne quality paper such as copy paper with the paper feed pressure and paper
separating pressure settings for art paper and coated paper. Due to the high paper feed
pressure, double-feed occurs more easily. In addition, due to the high paper separating
pressure, the paper may be damaged at the lead edge. When using ne quality paper, always
return to paper feed pressure and paper separating pressure settings to levels suitable for
ne quality paper.
5
Close the top cover.
6
Press the key for test folding and check the nish.
Other steps are the same as standard folding of standard paper. Refer to Chapter2 "Basic Operation"
“1.Standard Folding of Standard Paper” ( p2-1).
6. Correcting Folding Misalignment
Folding misalignment consists of two types; “folding misalignment along the vertical length of the paper”
and “folding misalignment along the sides of the paper.”
6-1. Correcting Folding Misalignment along Vertical Length of Paper
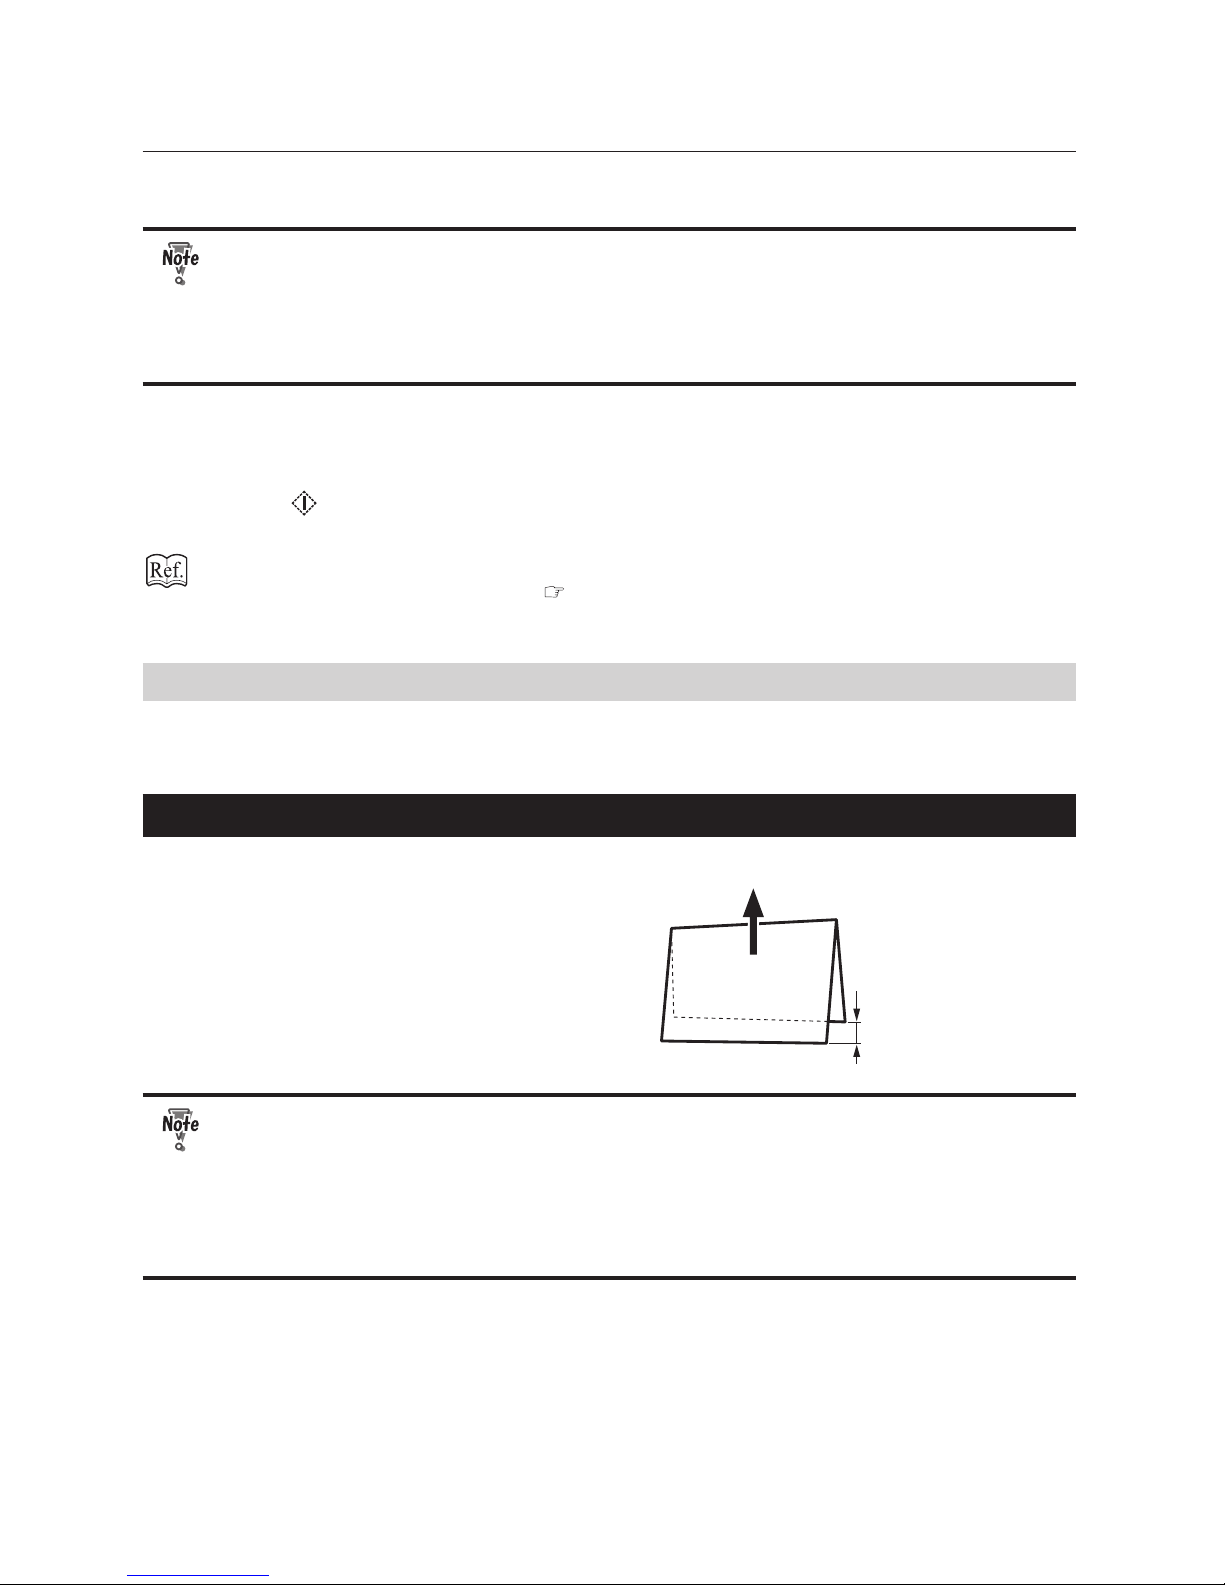
Paper feeding direction
Misalignment to
be corrected
When folded paper is misaligned along the vertical
length as shown in the gure, turn the ne adjustment
knob to correct the misalignment.
• Use the mark on the folding plate just as a reference. You may need ne adjustments
according to various conditions such as environmental conditions (temperature, humidity),
paper quality, paper thickness, paper ber direction, cutting accuracy and printing
conditions.
• The ne adjustment position of the folding stopper cannot be registered. Once a paper size
or folding mode is changed or the power is turned o, the stacker rollers will return to the
automaticallyy set position. You need to adjust the position again.
Page 51
3-21
Chapter3 Advanced Operation
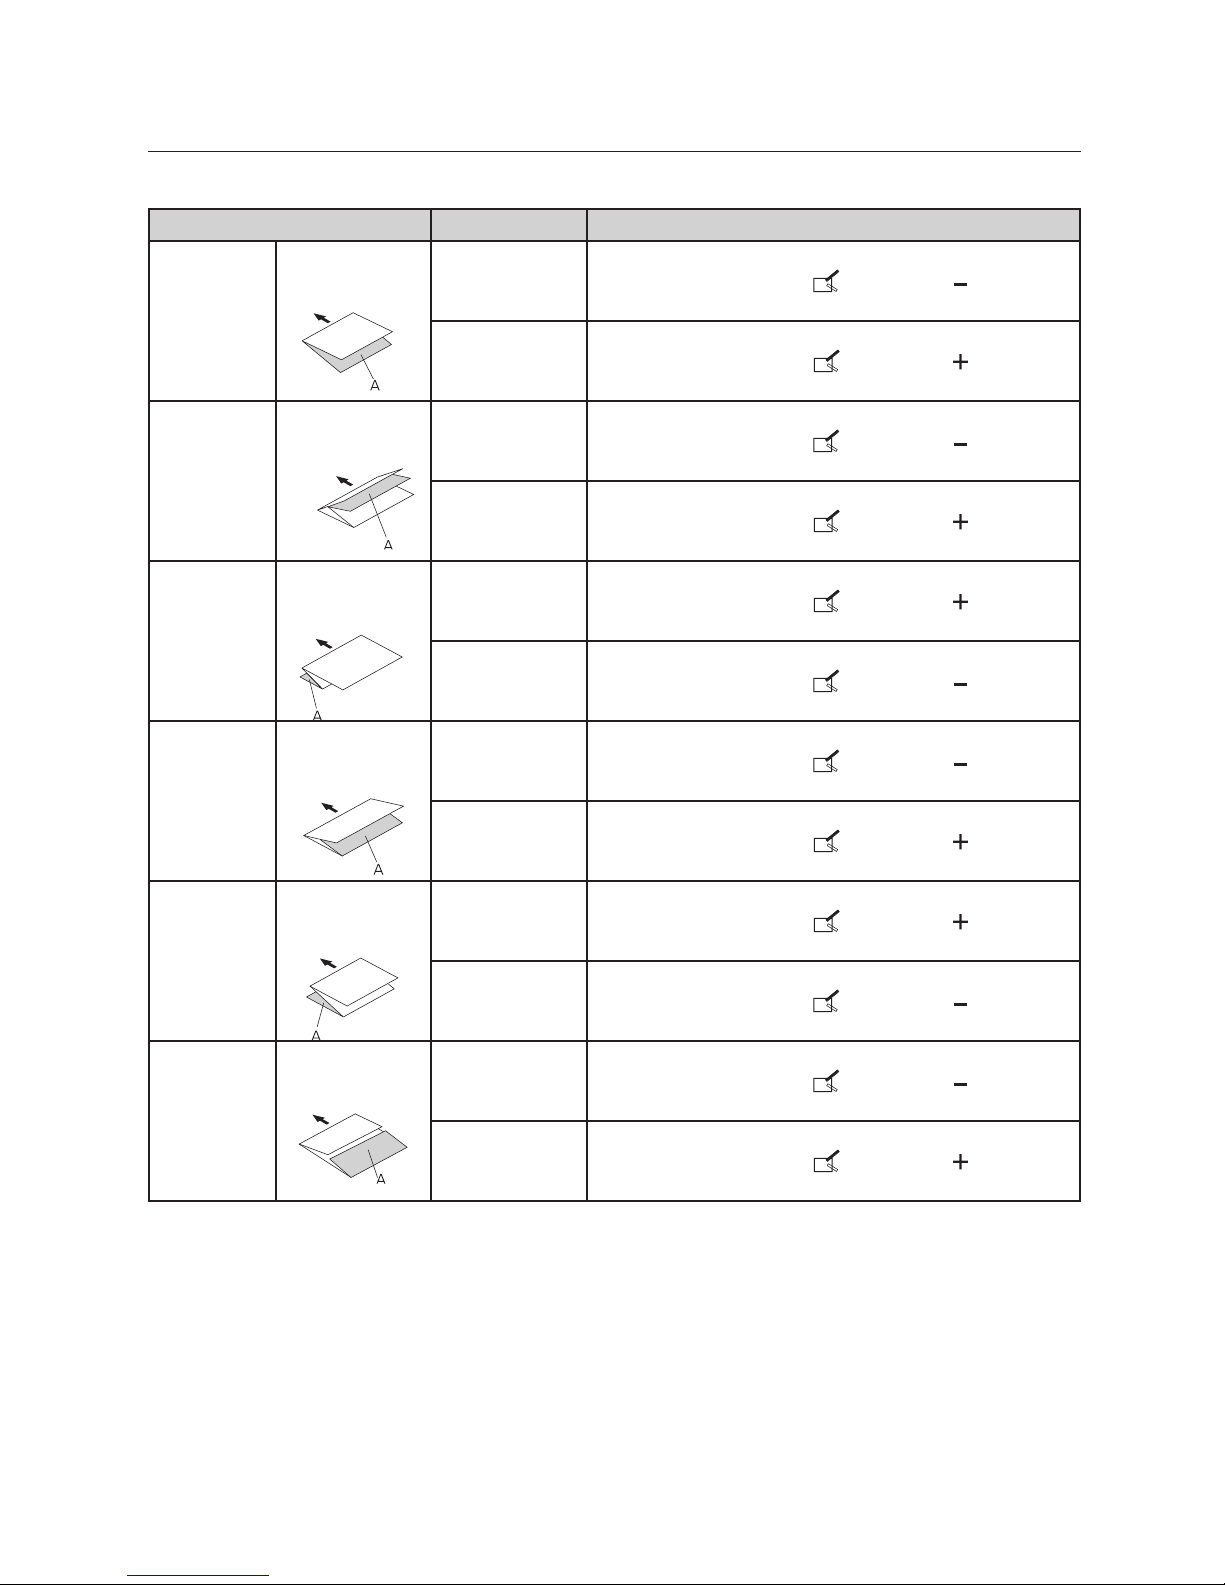
Adjusting Fine Adjustment Knob of the First Folding Plate
Folding Style Fold Surface A Adjustment
Single fold
Feeding direction
When A is
longer
While pressing the key, press the key.
When A is
shorter
While pressing the key, press the key.
Double fold
Feeding direction
When A is
longer
While pressing the key, press the key.
When A is
shorter
While pressing the key, press the key.
Irregular
accordion
fold
(Fold out)
Feeding direction
When A is
longer
While pressing the key, press the key.
When A is
shorter
While pressing the key, press the key.
Letter fold
Feeding direction
When A is
longer
While pressing the key, press the key.
When A is
shorter
While pressing the key, press the key.
Accordion
fold
(Z fold)
Feeding direction
When A is
longer
While pressing the key, press the key.
When A is
shorter
While pressing the key, press the key.
Gate fold
Feeding direction
When A is
longer
While pressing the key, press the key.
When A is
shorter
While pressing the key, press the key.
Page 52
3-22
Chapter3 Advanced Operation
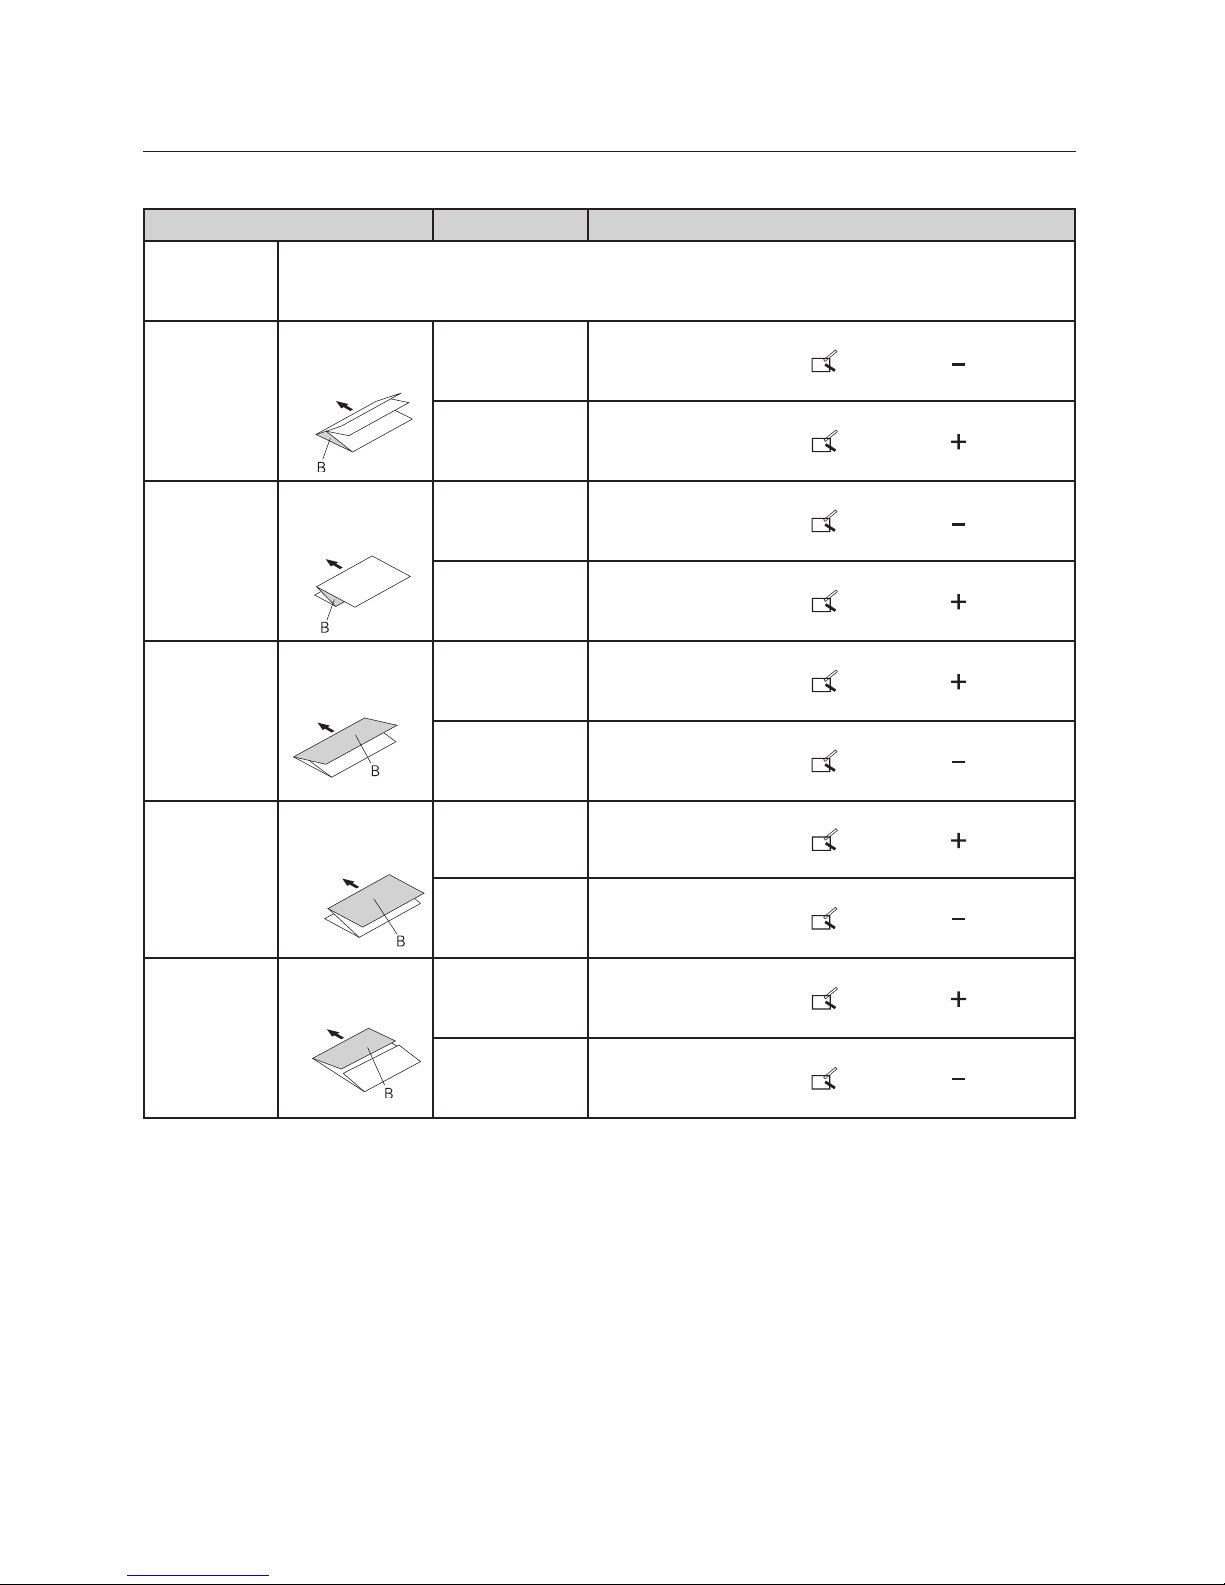
Adjusting Fine Adjustment Knob of the Second Folding Plate
Folding Style Fold Surface A Adjustment
Single fold The second folding plate is not used in single folding.
Double fold
Feeding direction
When B is
longer.
While pressing the key, press the key.
When B is
shorter.
While pressing the key, press the key.
Irregular
accordion
fold
(Fold out)
Feeding direction
When B is
longer.
While pressing the key, press the key.
When B is
shorter.
While pressing the key, press the key.
Letter fold
Feeding direction
When B is
longer.
While pressing the key, press the key.
When B is
shorter.
While pressing the key, press the key.
Accordion
fold
(Z fold)
Feeding direction
When B is
longer.
While pressing the key, press the key.
When B is
shorter.
While pressing the key, press the key.
Gate fold
Feeding direction
When B is
longer.
While pressing the key, press the key.
When B is
shorter.
While pressing the key, press the key.
Page 53
3-23
Chapter3 Advanced Operation
6-2. Correcting Folding Misalignment along Sides of Paper
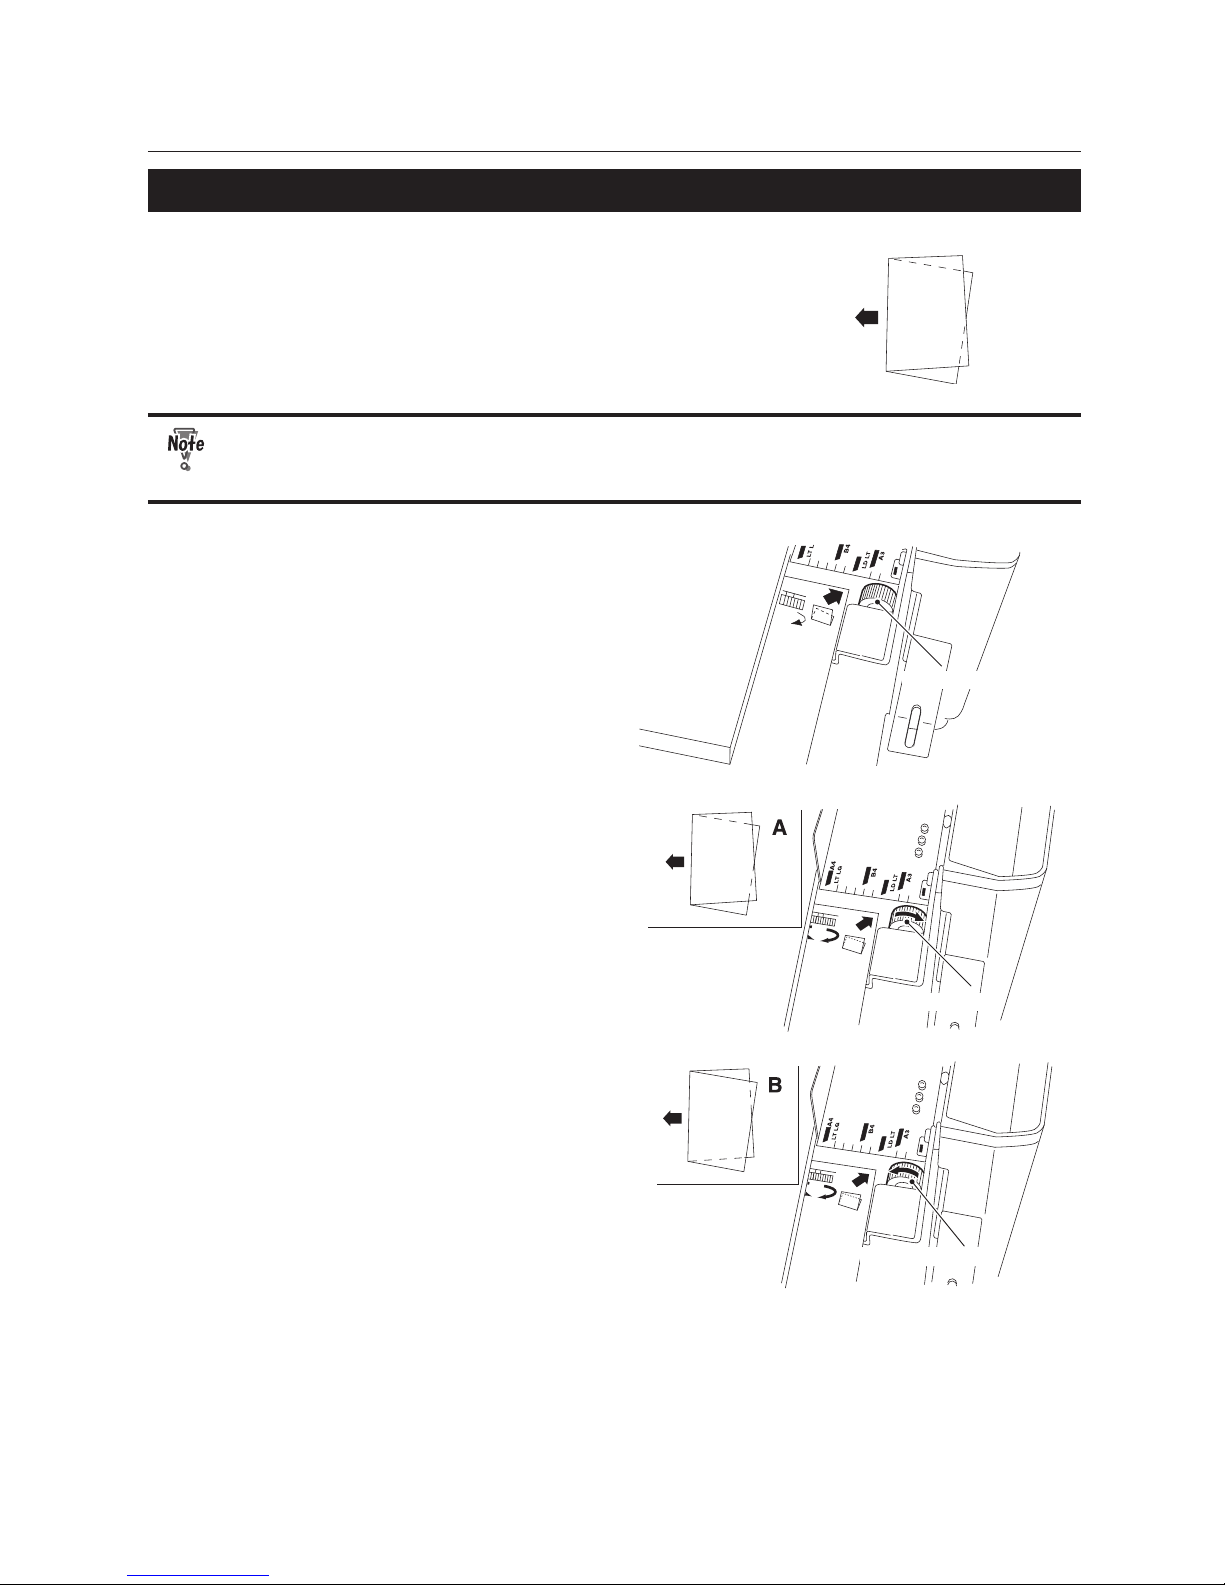
Paper feeding
direction
When folded paper is misaligned along the sides
of paper as shown in the gure, turn the slant correction
knob to correct the misalignment.
You may need ne adjustments according to various conditions such as environmental
conditions (temperature, humidity), paper quality, paper thickness, paper ber direction,
cutting accuracy and printing conditions.
Slant correction knob
1
Turn the slant correction knob to adjust
the folding slippage.
Slant correction knob
If folding slippage is as shown in Figure A, turn
the knob in the direction of the arrow.
Slant correction knob
If folding slippage is as shown in Figure B, turn
the knob in the direction of the arrow.
Page 54

3-24
Chapter3 Advanced Operation
Pin
Round hole
Slant correction knob
2
After nishing operations, be sure to
turn the slant correction knob to align
the round holes of the paper feed tray
with the pin.
The position at which the round hole meets
the pin is the standard position.
Page 55
4-1
Chapter4 Troubleshooting Guide
Chapter4 Troubleshooting Guide
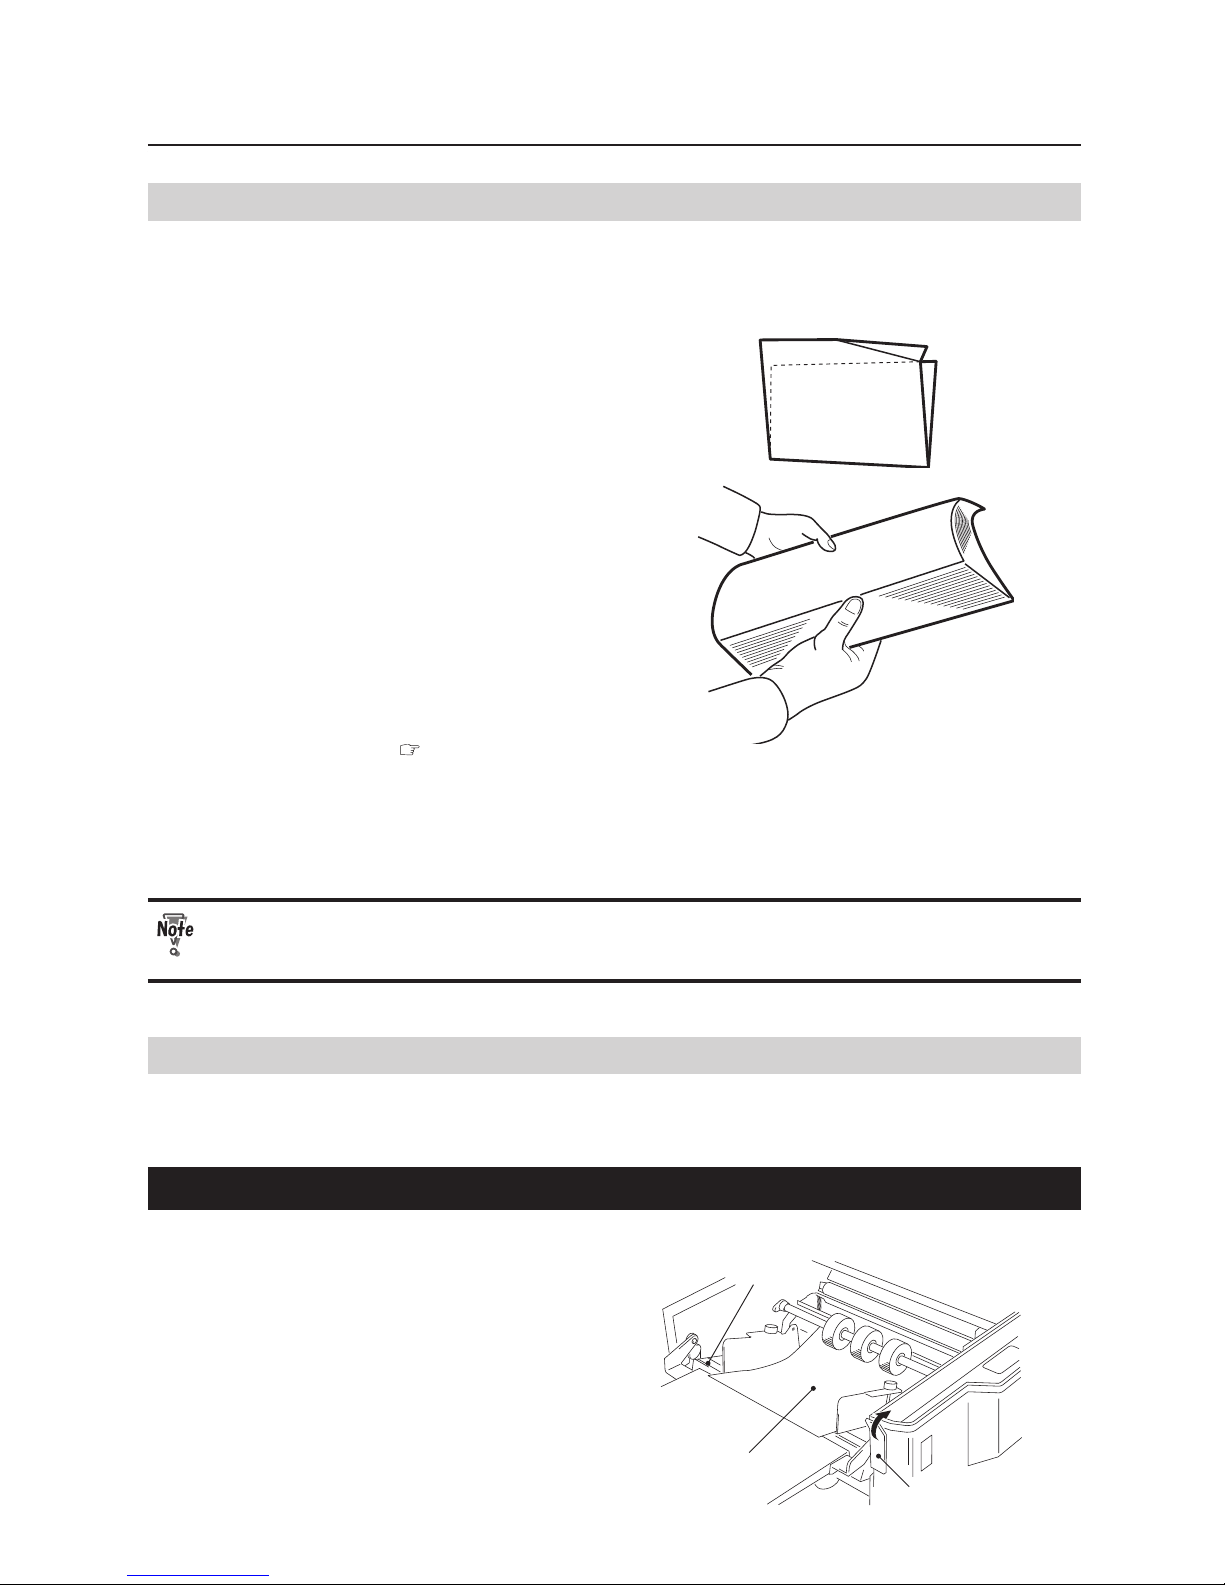
1. Correcting Deformed Folding
Check the following when deformed folding occurs.
Deformed folding
•
Fan the paper well before stacking.
•
Check if the folding plates have been
installed properly. ( p.1-5)
•
Spray a commercially-available air
duster on the rubber roll because the
static electricity may have resulted in
deformed folding.
Do not use paper other than those specied. This will cause not only deformed
folding but also malfunction of the machine.
2. Removing Jammed Paper
When paper jam has occurred, "Feed error/jam" will be displayed on the LCD display. Check the machine to
nd out where the jam has occurred and remove the jammed paper following the procedures below.
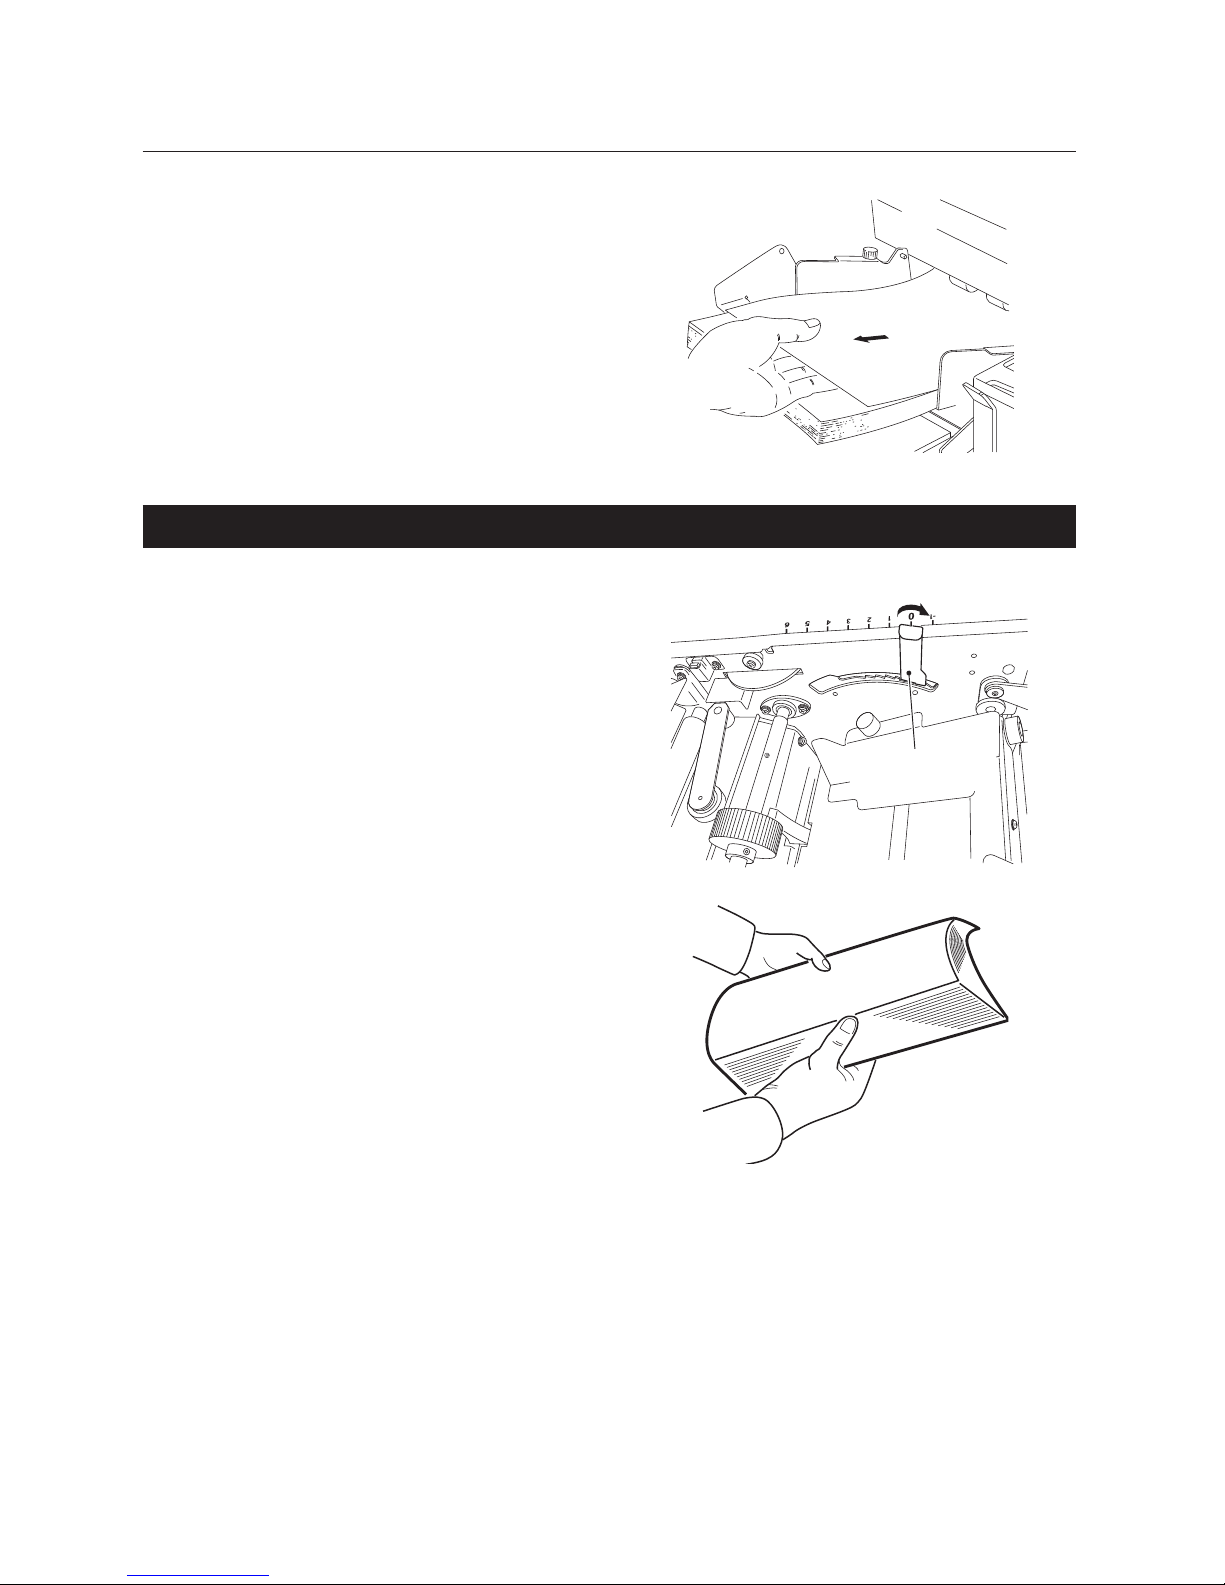
2-1. When Paper Has Jammed Near the Paper Feed Ring
Paper feed tray
Paper
Paper set lever
1
Raise the paper set lever to lower the
paper feed tray downwards.
Page 56
4-2
Chapter4 Troubleshooting Guide
2
Pull the jammed paper towards you.
2-2. When Paper Has Slipped at the Paper Feed Section
Paper pressure
adjustment knob
•
Increase the paper feed pressure.
Increase the paper separating pressure
gradually in steps of 1.
•
Fan the paper well before stacking.
•
Decrease the stacking amount of paper.
Page 57
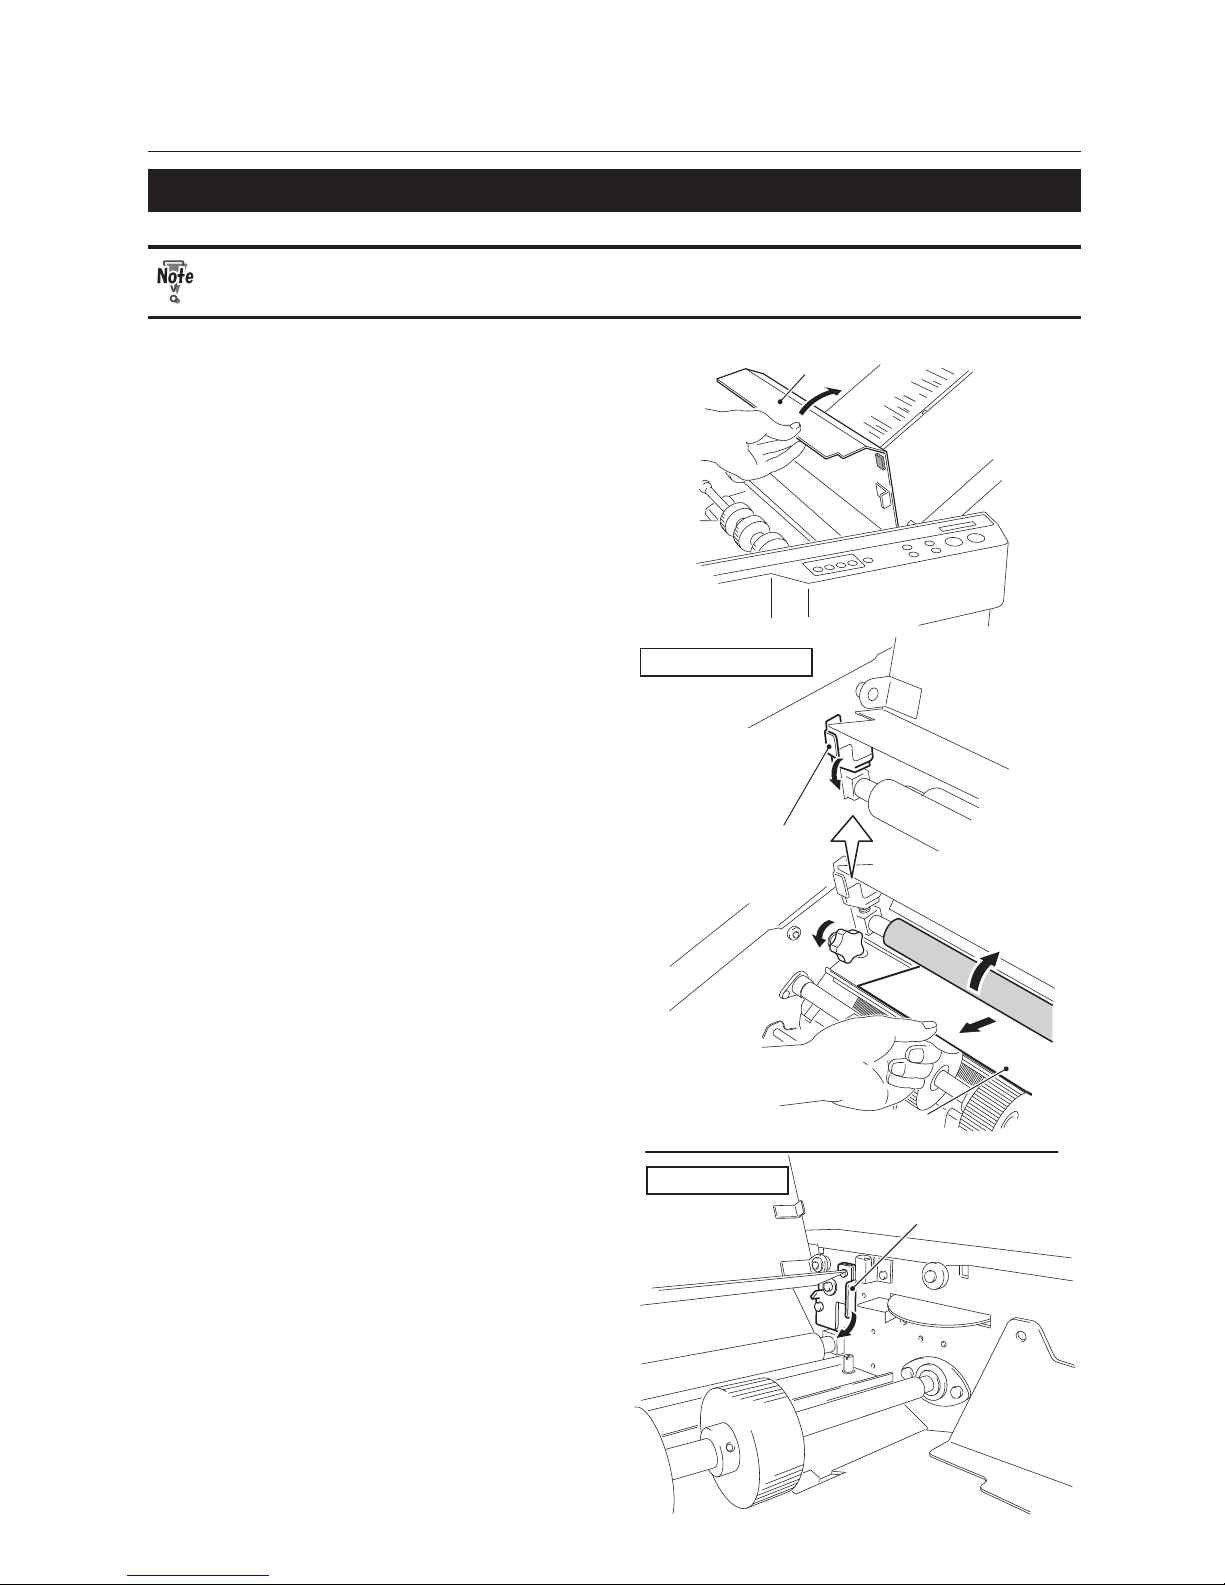
4-3
Chapter4 Troubleshooting Guide
2-3. When Paper Has Coiled Around the Rubber Roll
Turn o the machine before following the procedures below.
Top cover
1
Open the top cover.
Bearing support lever
Rubber roll
Paper
Bearing support lever
Non-operator’s side
Operator’s side
2
Turn the two bearing support levers
in the direction of the arrow to relase
them.
3
Pull the coiled paper towards you
to remove it while turning the jam
correction knob.
4
Return the bearing supprt levers.
Page 58
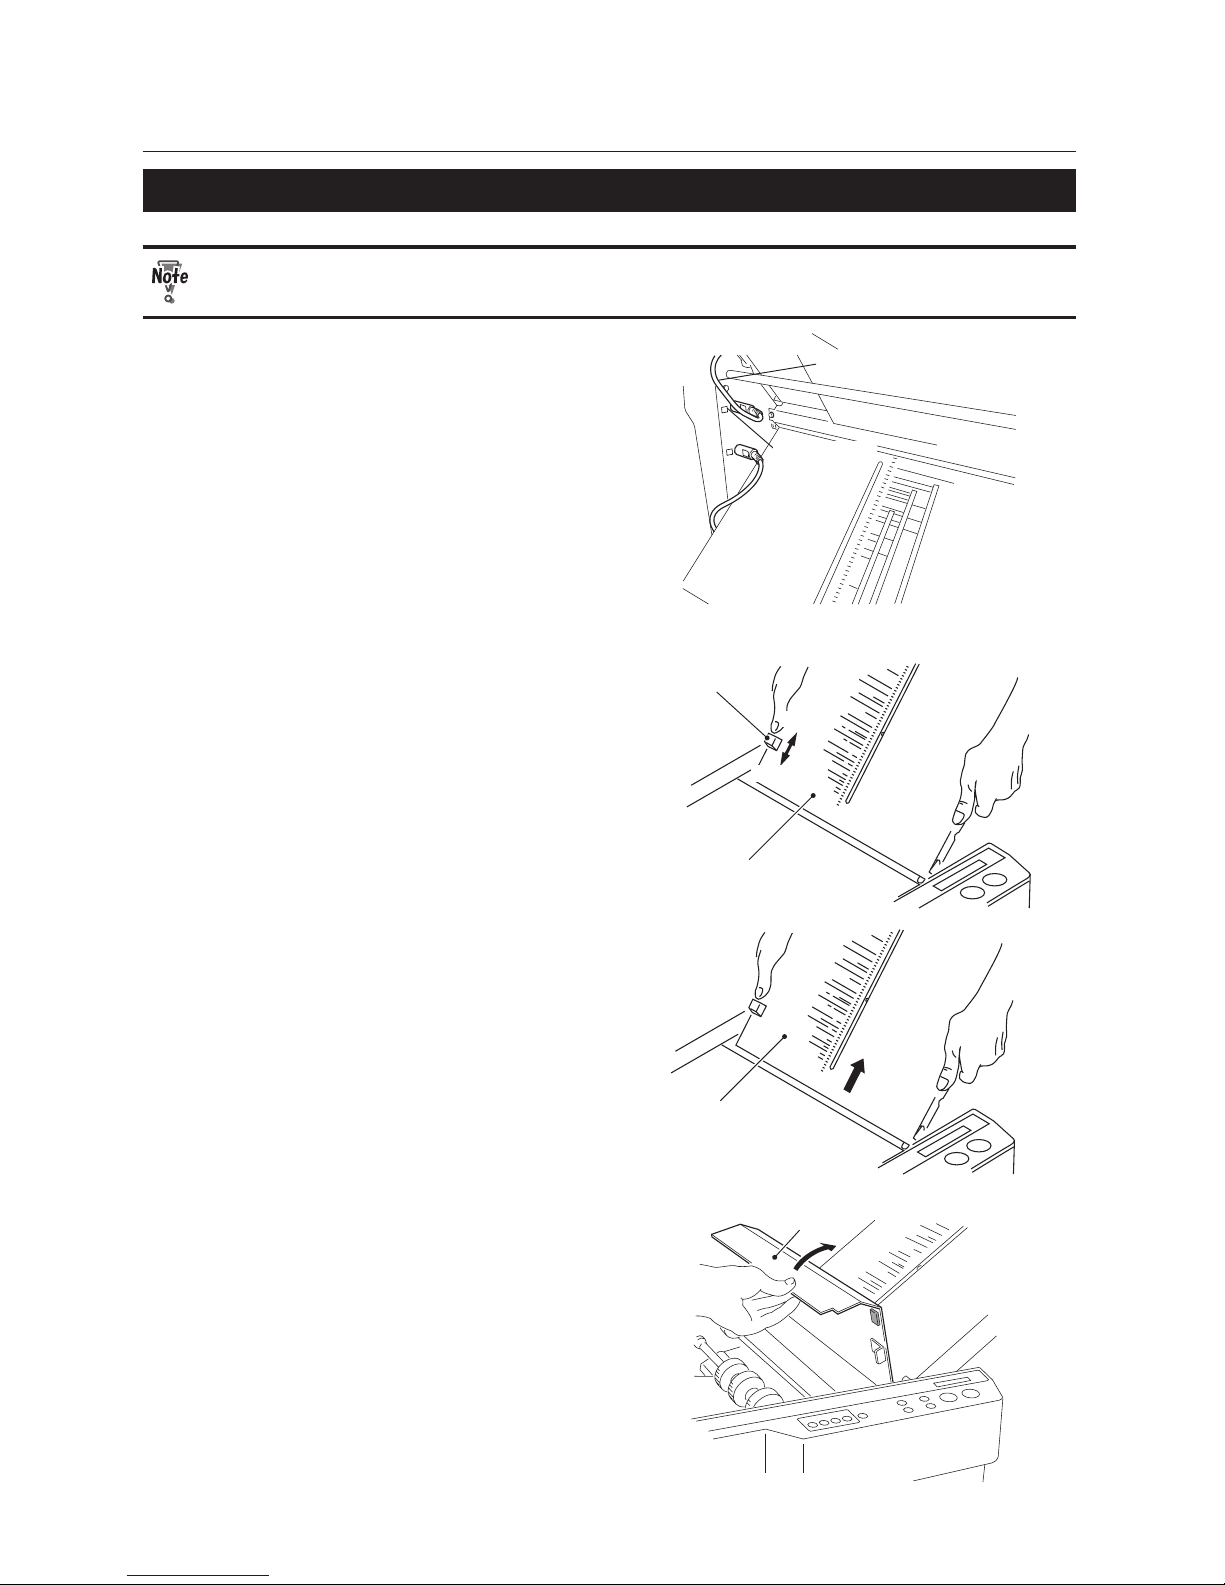
4-4
Chapter4 Troubleshooting Guide
2-4. When Paper Has Jammed at the First Folding Plate
Turn o the machine before following the procedures below.
1
2
2
1
Control cable 1
Connector 1
1
Remove the control cable 1 from the
connector 1 of the rst folding plate.
First folding plate
UNLOCK
LOCK
Lock lever
2
Move the lock lever to the position of
"UNLOCK."
First folding plate
3
Remove the rst folding plate from the
machine.
Top cover
4
Open the top cover.
Page 59
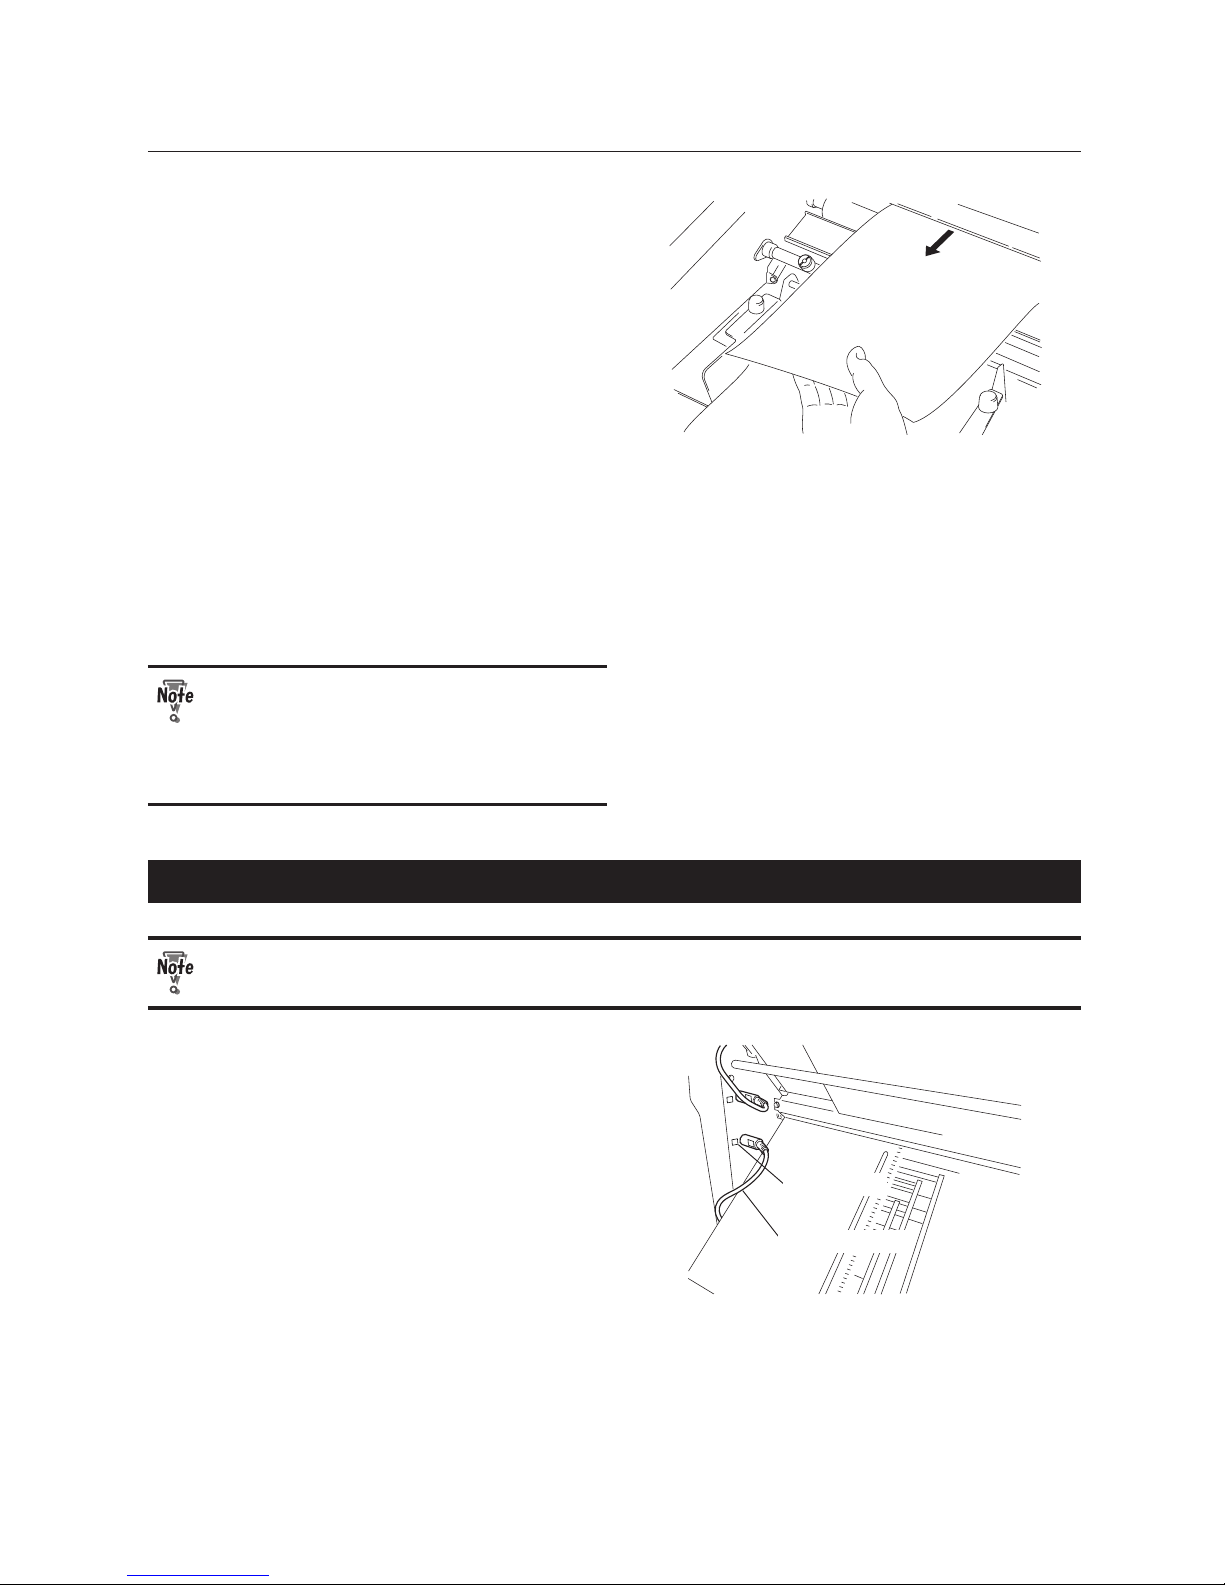
4-5
Chapter4 Troubleshooting Guide
5
Pull the jammed paper towards you.
6
Close the top cover.
7
Return the rst folding plate.
8
Move the lock lever to the position of
"LOCK."
9
Connect the control cable to the
connector.
• Check that the rst folding plate has
been installed properly.
• When you remove and return the folding
plate, make sure that you use both
hands.
2-5. When Paper Has Jammed at the Second Folding Plate
Turn o the machine before following the procedures below.
1
2
2
1
Control cable 2
Connector 2
1
Remove the control cable 2 from the
connector 2 of the second folding plate.
Page 60
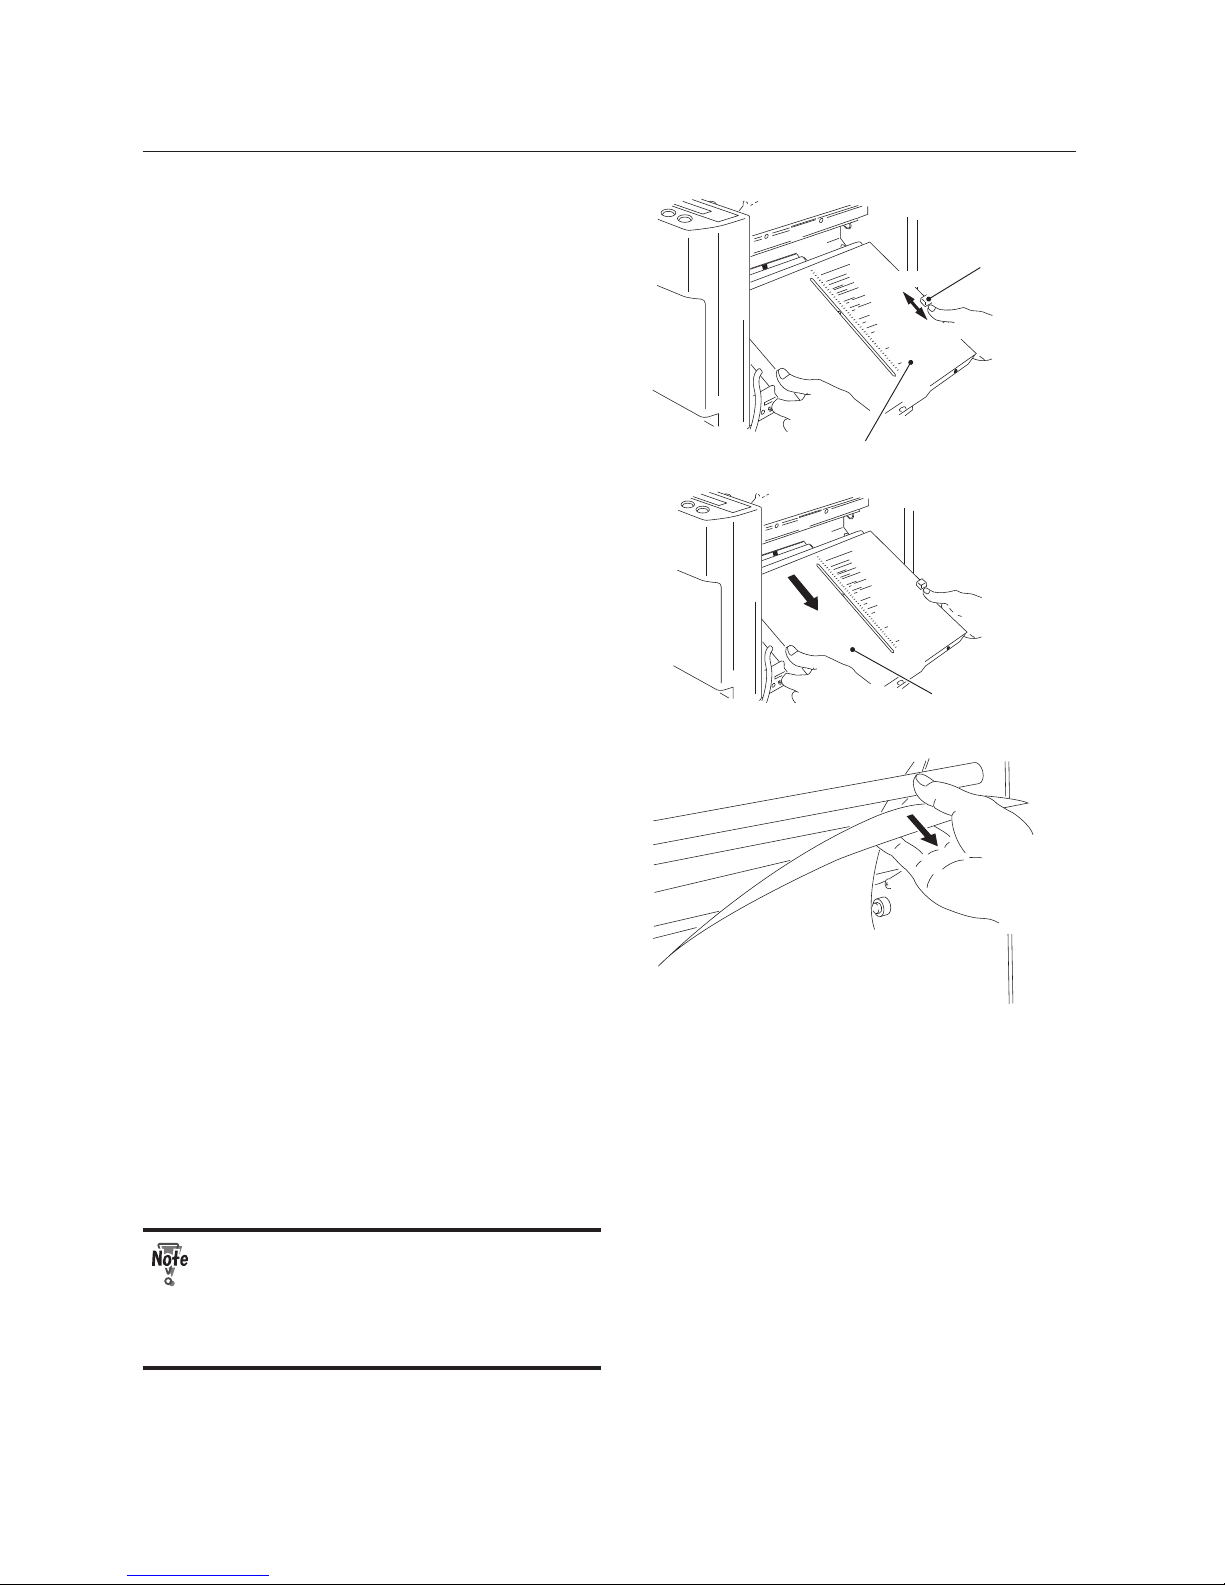
4-6
Chapter4 Troubleshooting Guide
Second folding plate
UNLOCK
LOCK
Lock lever
2
Move the lock lever to the position of
"UNLOCK."
Second folding plate
3
Remove the second folding plate from
the machine.
4
Pull the jammed paper towards you.
5
Return the second folding plate.
6
Move the lock lever to the position of
"LOCK."
7
Connect the control cable to the
connector.
• Check that the second folding plate has
been installed properly.
• When you remove and return the folding
plate, make sure that you use both
hands.
Page 61
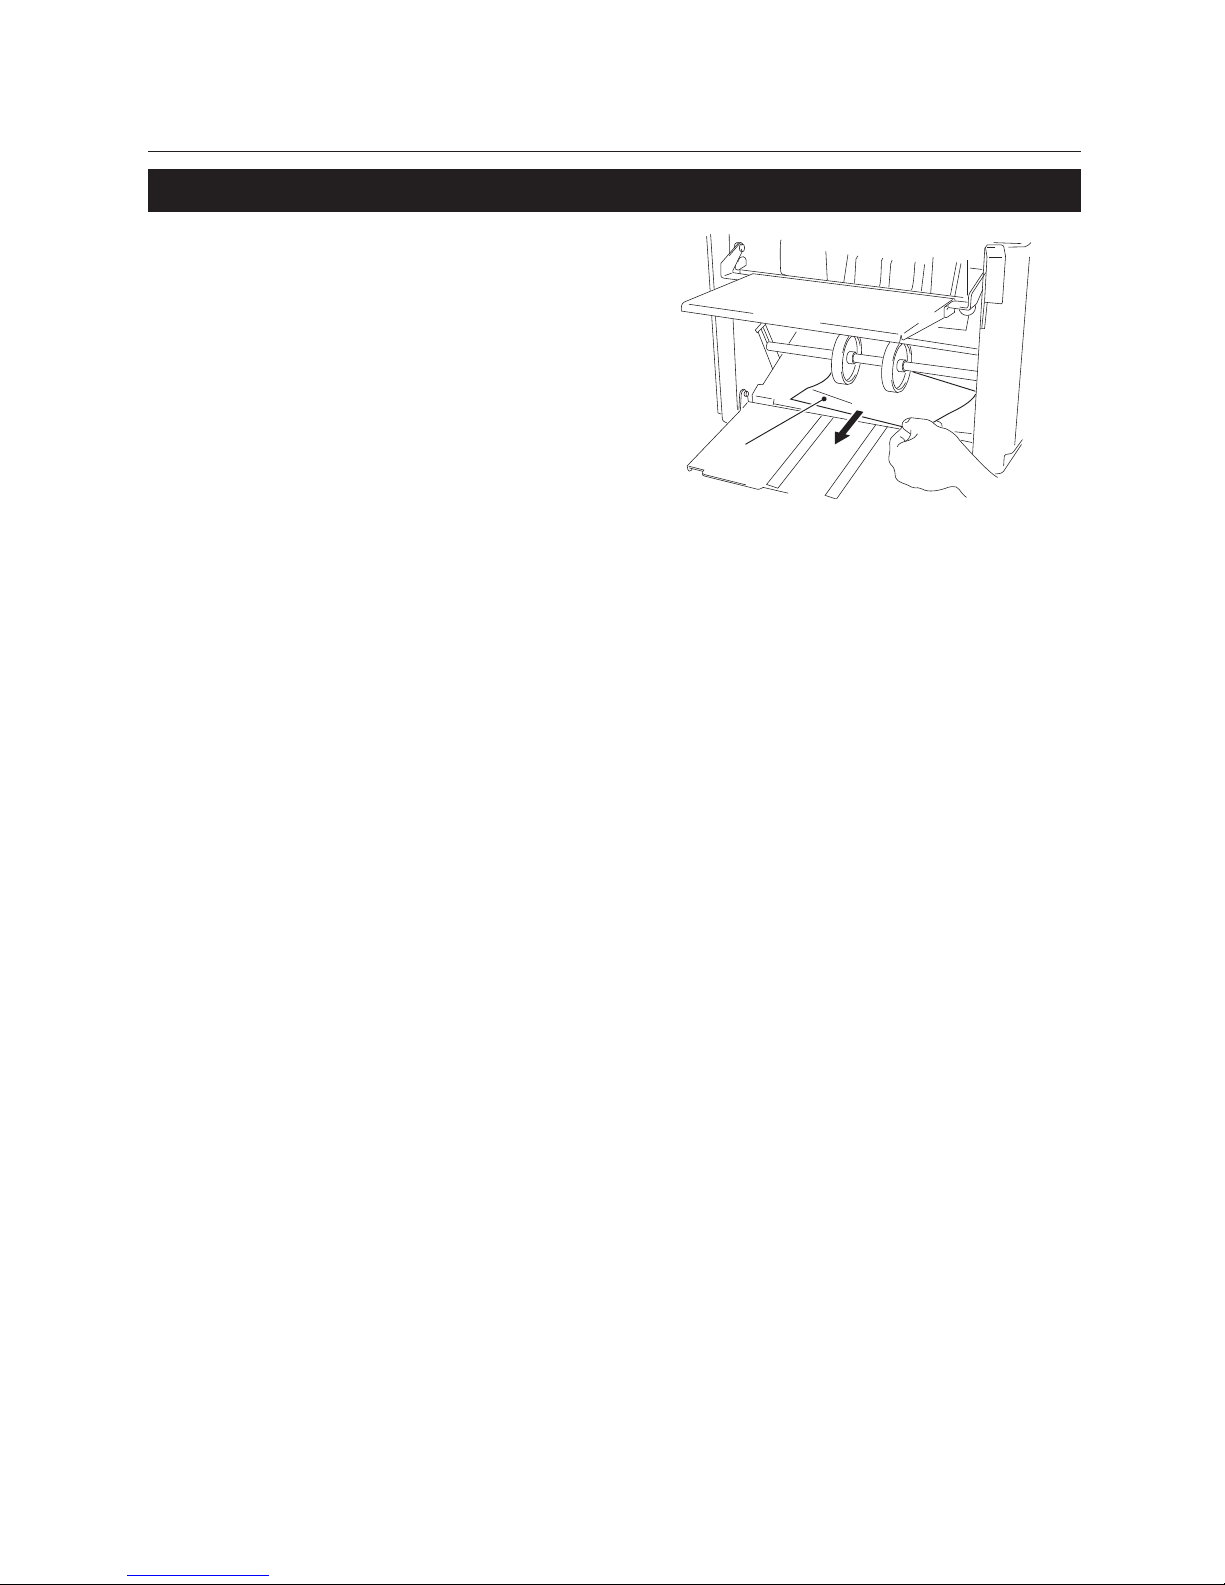
4-7
Chapter4 Troubleshooting Guide
2-6. When Paper Has Jammed Near the Stacker
Paper
Remove the paper stuck in the stacker
section towards you.
Page 62
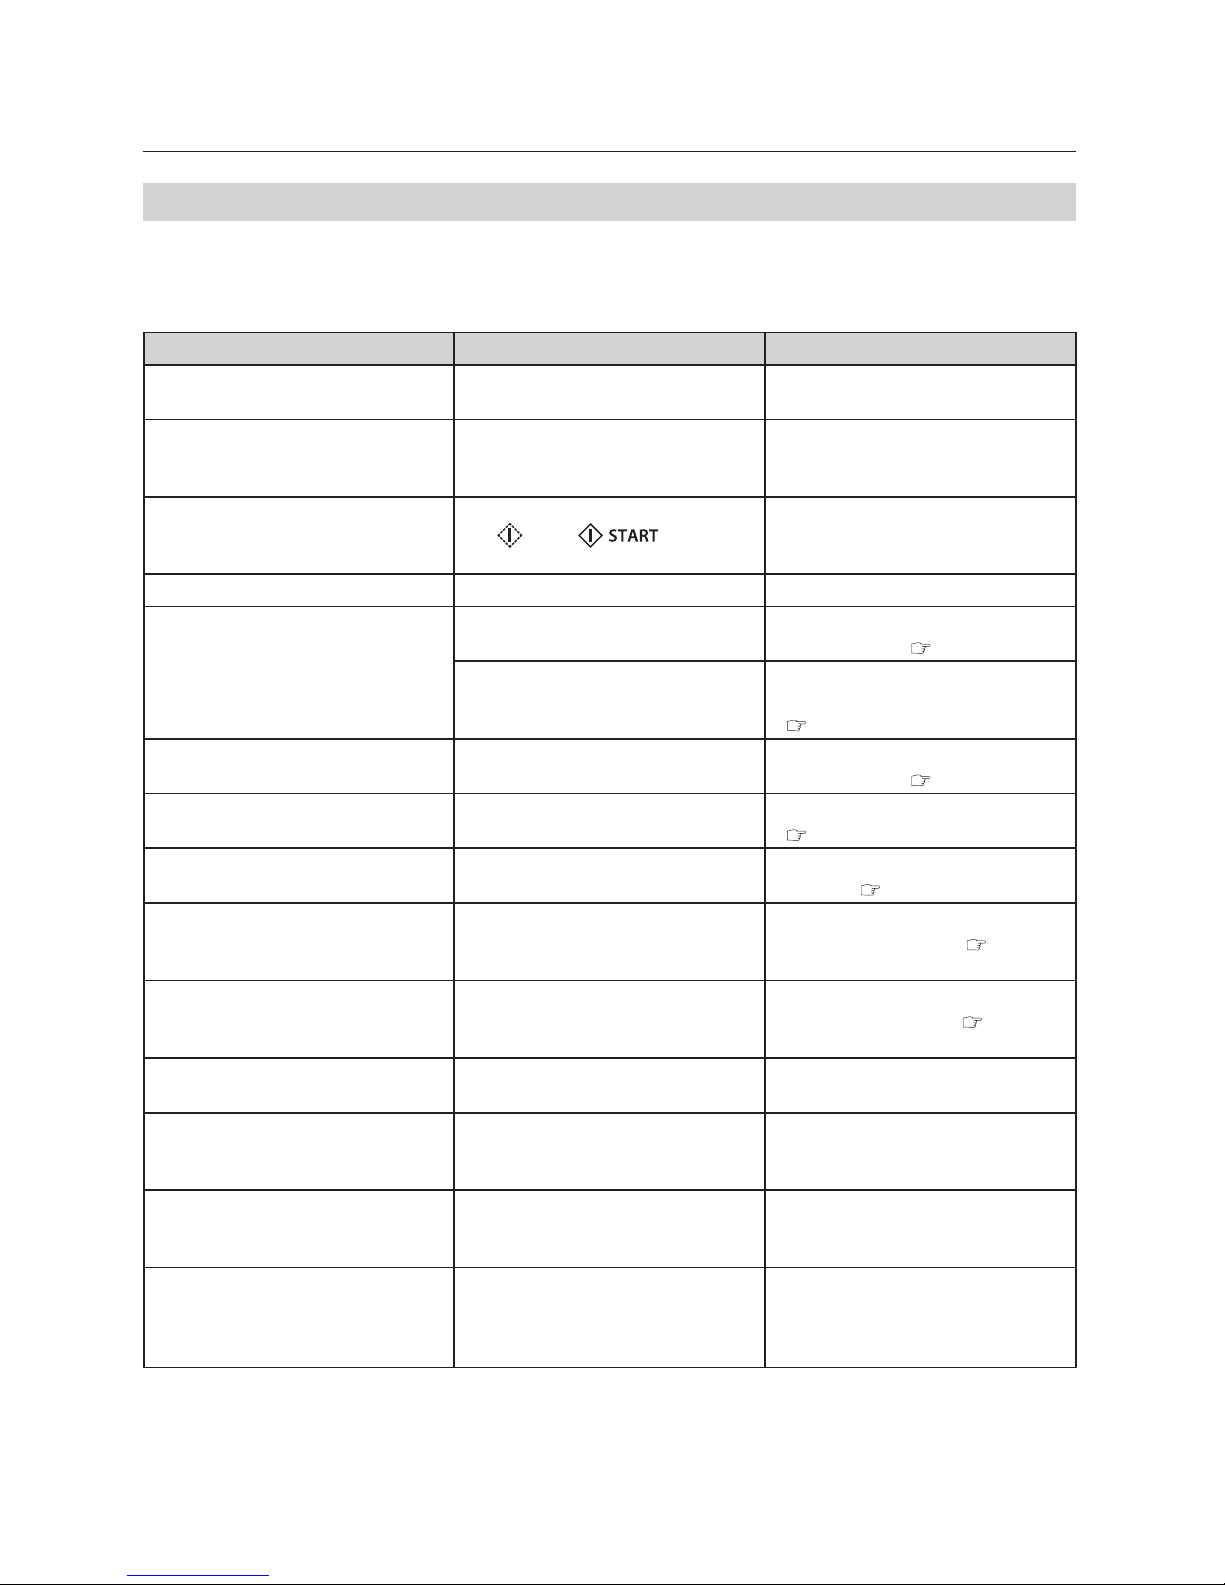
4-8
Chapter4 Troubleshooting Guide
3. Error Messages
When a paper jam has occurred or the top cover is open, an error message is displayed on the LCD display.
Follow the procedures below to x the error. If you cannot solve the trouble, contact your dealer.
Message Cause Solution
No paper When the power is turned on, there
is no paper on the paper feed tray.
Stack paper on the paper feed tray.
No paper/****(the number of folded
paper)
After paper is fed and folded, there
is no paper left on the paper feed
tray.
Stack paper on the paper feed tray.
Feed tray error When the paper feed tray is lowered,
the key or key was
pressed.
Lower the paper set lever. The paper
feed tray will go up.
Top cover open The top cover is open. Close the top cover.
Feed error A paper jam has occurred at the
paper feed section.
Remove the jammed paper and
press the C key. ( p.4-1
A mis-feed has occurred at the
paper feed section.
Stack paper properly on the paper
feed tray and press the C key.
( p.1-12, 4-2)
Jam exit A paper jam has occurred at the
paper exit section.
Remove the jammed paper and
press the C key. ( p.4-7)
Plate1 set error The rst folding plate has not been
installed properly.
Install the rst folding plate properly.
( p.1-6)
Plate2 set error The second folding plate has not
been installed properly.
Install the second folding plate
properly. ( p.1-5)
Plate1 cable err The control cable of the rst folding
plate has not been connected
properly.
Turn o the power and connect the
control cable properly. ( p.1-6)
Plate2 cable err The control cable of the second
folding plate has not been
connected properly.
Turn o the power and connect the
control cable properly.( p.1-6)
Main motor err A paper jam has caused the main
motor to become overloaded.
Remove the jammed paper and turn
o and on the power.
Stack motor err A paper jam has caused the
positioning motor of the stacker to
become overloaded.
Remove the jammed paper and turn
o and on the power.
Plate1 motor err A paper jam jam has caused the
stopper motor of the rst folding
plate to become overloaded.
Remove the jammed paper from the
leading end of the rst folding plate,
then turn o and on the power.
Plate2 motor err A paper jam has caused the stopper
motor of the second folding plate to
become overloaded.
Remove the jammed paper from the
leading end of the second folding
plate, then turn o and on the
power.
Page 63
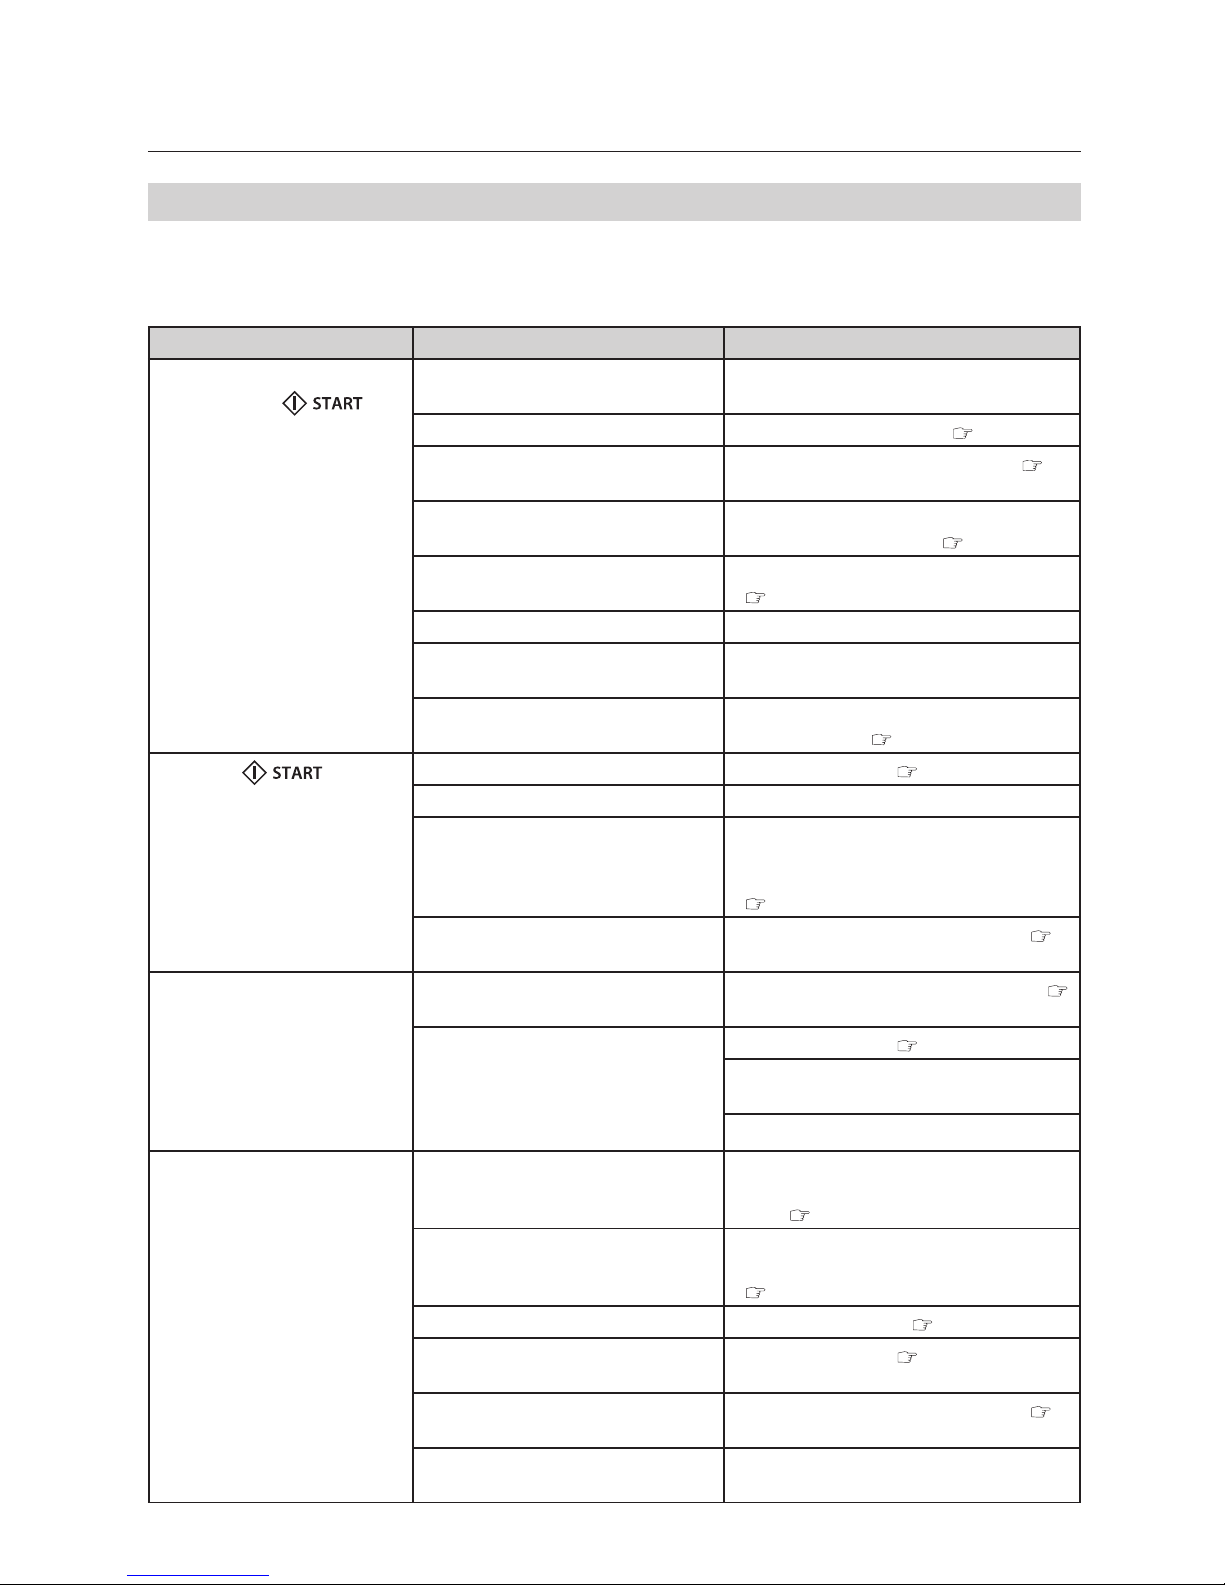
4-9
Chapter4 Troubleshooting Guide
4. Troubleshooting
When trouble has occurred, nd the symptom from the table below and solve the trouble according to the
solution. If you cannot solve the trouble, contact your dealer.
Symptom Cause Solution
The machine does not start
even when the key
is
pressed.
The power cord is not inserted to
the wall socket.
Insert the power cord to the wall socket.
The power is not on. Turn on the power switch. ( p.2-2)
There is no paper on the paper feed
tray.
Stack paper on the paper feed tray. (
p.2-2)
Paper has not reached the guide
plate of the paper feed tray.
Push in the paper until its lead edge
touches the guide plate. ( p.2-2)
A paper jam has occurred. Remove the jammed paper.
( p.4-1)
The top cover is open. Close the top cover.
A trouble has occurred inside the
machine.
Call your dealer.
The paper feed tray has been
lowered.
Lower the paper set lever to raise the
paper feed tray. ( p.2-3 )
When the key is
pressed, the paper feed rings
rotate but no paper is fed.
The paper has not been fanned well. Fan the paper well. ( p.1-12 )
The paper is curled. Straighten the paper curl.
The paper is thick. Move the paper feed pressure adjustment
knob to increase the paper feed pressure
level.
( p.2-4)
The paper is outside the
specications.
Use paper that meets specications. (
p.6-1)
The paper is not folded at the
proper folding position.
The paper folding plate is not
installed properly.
Install the paper folding plate properly. (
p.1-5)
Static electricity has occurred in the
paper.
Fan the paper well. ( p.1-12)
Spray a commercially-available air duster
on the rubber roll.
Use thicker paper.
Paper is double-fed frequently. The paper feed pressure is strong. Move the paper feed pressure adjustment
knob to decrease the paper feed pressure
level. ( p.2-4)
The separating pressure is weak. Turn the separating pressure adjustment
dial to increase the separating pressure.
( p.2-4)
The paper separator is dirty. Clean it with alcohol. ( p.5-3)
The sheets of paper are sticking to
each other and cannot be separated.
Fan the paper well. ( p.1-12)
The paper is outside the
specications.
Use paper that meets specications. (
p.6-1 )
A trouble has occurred inside the
machine.
Call your dealer.
Page 64
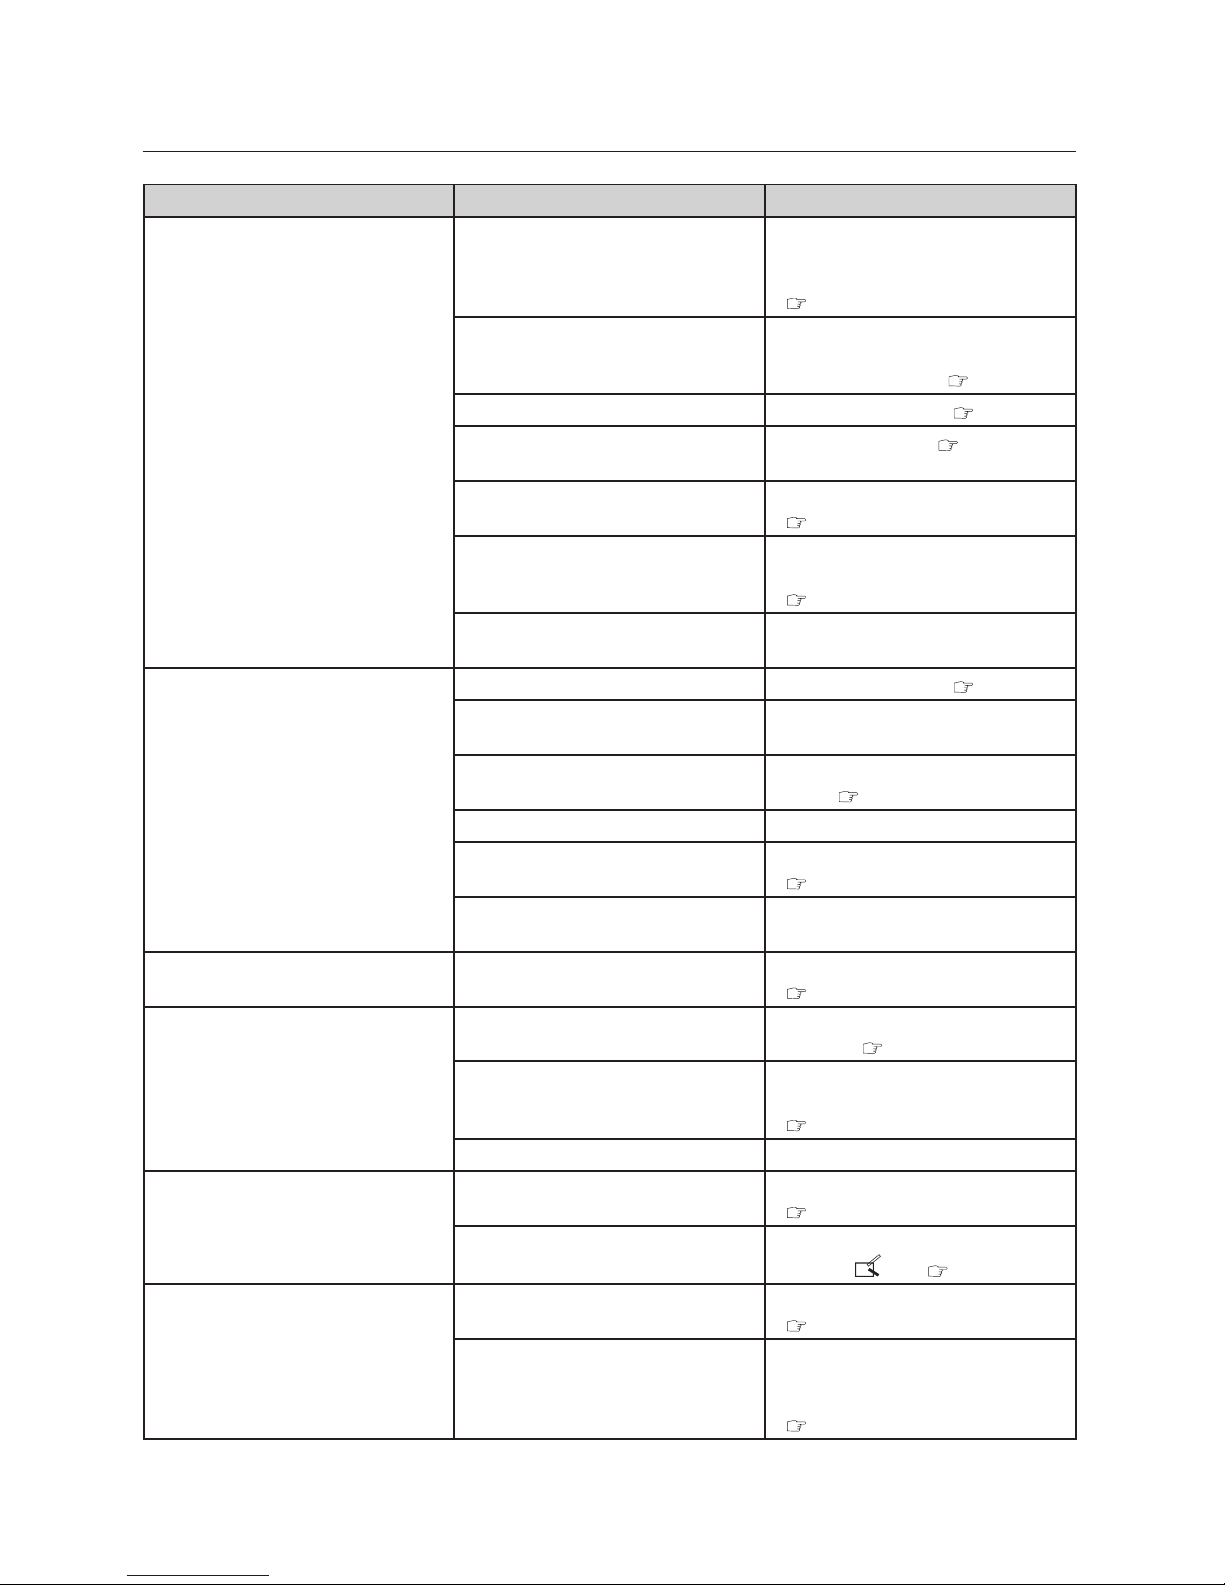
4-10
Chapter4 Troubleshooting Guide
Symptom Cause Solution
Paper slips at the paper feed section
frequently.
The paper feed pressure is weak. Move the paper feed pressure
adjustment knob to increase the
paper feed pressure level.
( p.2-4)
The separating pressure is strong. Turn the separating pressure
adjustment dial to decrease the
separating pressure. ( p.2-4)
The paper feed ring is dirty. Clean it with alcohol. ( p.5-2)
The sheets of paper are sticking to
each other and cannot be separated.
Fan the paper well. ( p.1-12)
The paper is outside the
specications.
Use paper that meets specications.
( p.6-1)
The side guides press against the
paper too tightly.
Set the side guides so that they
push against the paper lightly.
( p.2-3)
A trouble has occurred inside the
machine.
Call your dealer.
Paper jams frequently. The rubber roll is dirty. Clean it with alcohol. ( p.5-1)
Paper shreds are stuck inside the
paper conveyance passage.
Check inside the machine and
remove any paper shreds.
The stacker rollers position is not
correct.
Adjust the position of the stacker
rollers.( p.3-9)
The paper is curled. Straighten the paper curl.
The guide plate unit is left attached
to the paper ejection plate.
Remove the guide plate unit.
( p.3-6 )
Static electricity has occurred in the
paper.
Spray a commercially-available air
duster on the rubber roll.
Paper slips in the vertical direction. The folding position is not correct. Correct the folding misalignment.
( p.3-20)
Paper slips in the horizontal
direction.
The paper is stacked unevenly. Stack the paper neatly on the paper
feed tray. ( p.1-12)
There is space between the paper
and side guide.
Set the side guides so that they
push against the paper lightly.
( p.2-3)
The rubber roll is deformed. Call your dealer.
Paper jam at the rubber roll when
thick paper or cross folded thick
paper is folded into two.
The paper is outside the
specications.
Use paper that meets specications.
( p.6-1 )
The space inside the internal paper
conveyance passage is narrow.
Adjust the position of the stopper
using the key. ( p.3-1)
Small paper is fed continuously
(stream-fed).
The paper is outside the
specications.
Use paper that meets specications.
( p.6-1)
The paper feed pressure is strong. Move the paper feed pressure
adjustment knob to decrease the
paper feed pressure level.
( p.2-4)
Page 65
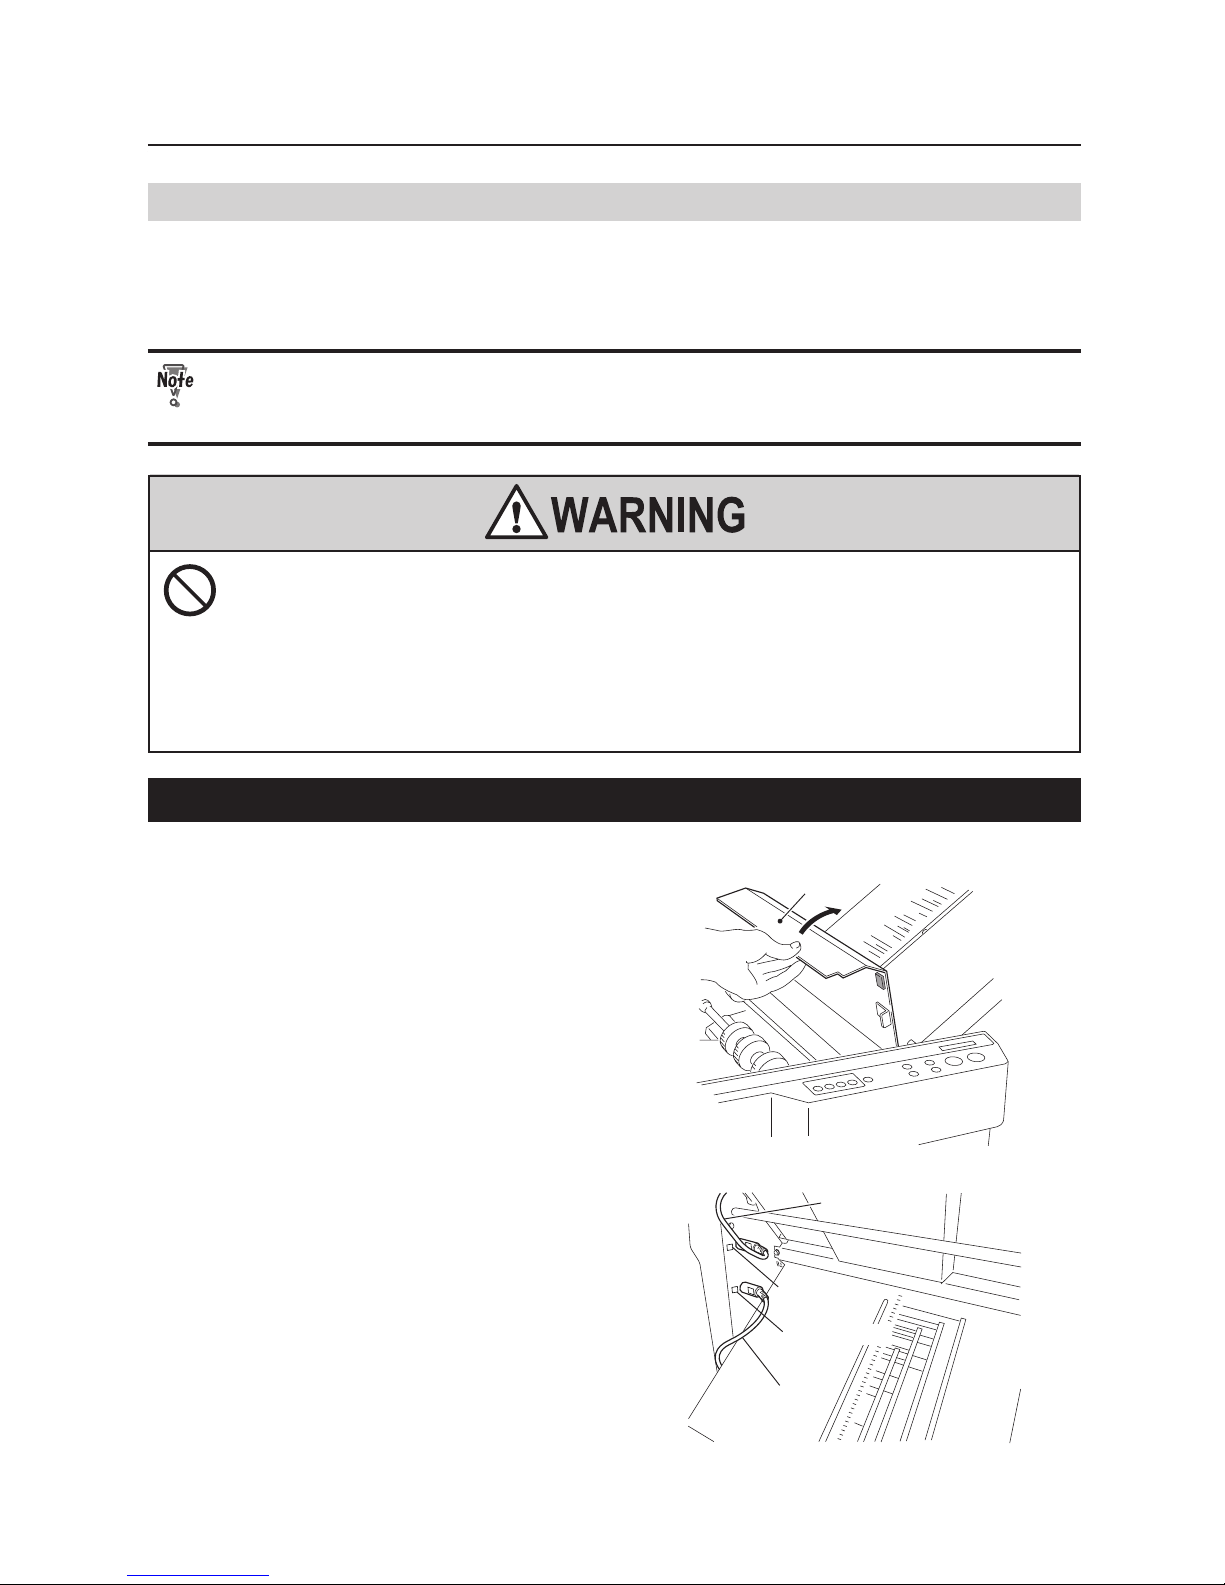
5-1
Chapter5 Cleaning the Unit
Chapter5 Cleaning the Unit
1. Cleaning Each Section
The adherence of paper dust and printing ink on the rubber rolls and paper feed rings may cause problems
such as paper feed errors and folding misalignment. Adherence of paper dust near sensors will also cause
misdetection. Clean the machine once a week. We recommend that you use a commercially-available air
duster for oce equipment to clean sensors.
• Prior to cleaning, be sure to disconnect the power cord from the outlet.
• After cleaning, make sure that the areas that were cleaned are completely dry before
resuming paper folding operations.
1-1. Cleaning the Rubber Roll
Top cover
1
Open the top cover.
Connector 1
Control cable 1
Control cable 2
1
2
2
1
Connector 2
2
Remove the control cables from the
connectors.
Do not use ammable sprays or solvent inside or near the unit (e.g.
when cleaning the unit).
Such ammable gas may ignite and cause a re or combustion.
Take precautions against re and ensure ventilation when using alcohol, and store the
alcohol in a safe place after use. Also note that use of other solvents can damage the
rubber rollers and resin inside the unit, resulting in malfunctions.
Page 66
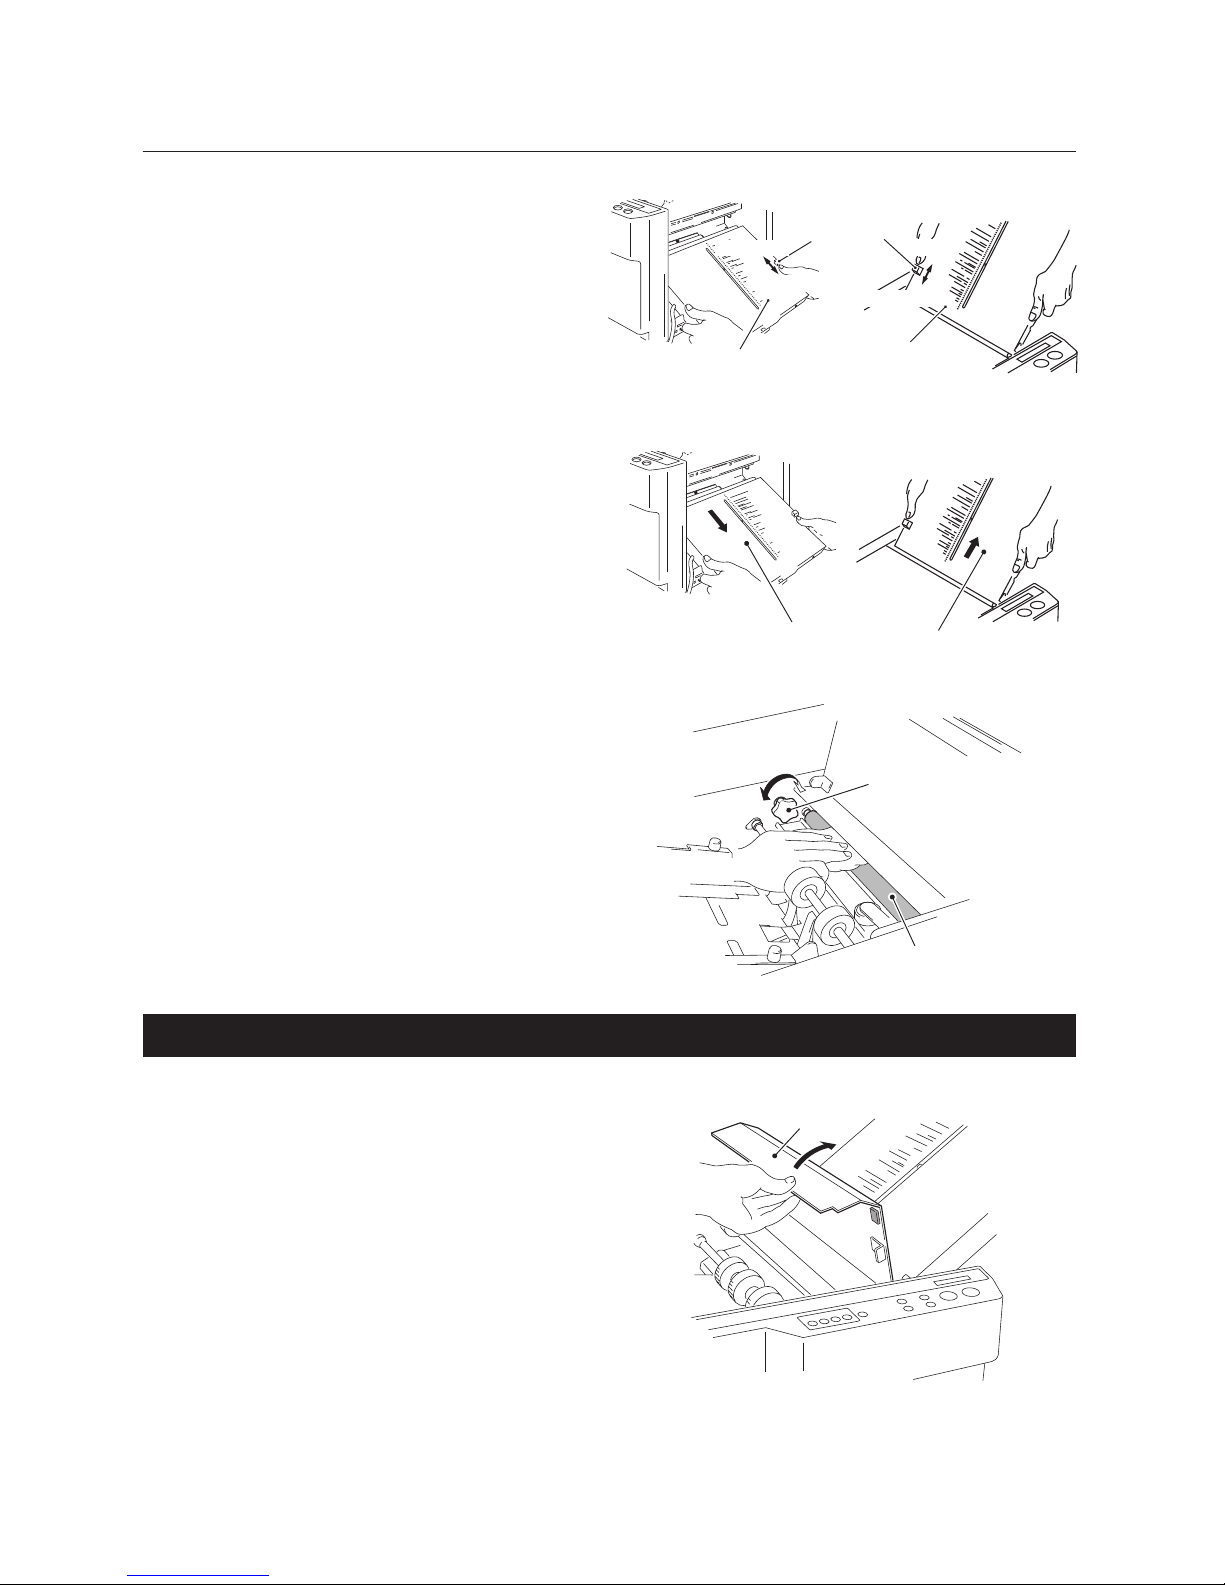
5-2
Chapter5 Cleaning the Unit
UNLOCK
LOCK
Second folding plate
UNLOCK
LOCK
Lock lever
First folding plate
3
Move the lock lever of the folding plate to
the position of “UNLOCK.”
Second folding plate
First folding plate
4
Remove the rst folding plate and
second folding plate from the machine.
Rubber roll
Jam collection knob
5
While turning the jam correction knob
to rotate the rubber roll, clean o the
dirt with a cloth moistened with alcohol.
1-2. Cleaning the Paper Feed Rings
Top cover
1
Open the top cover.
Page 67
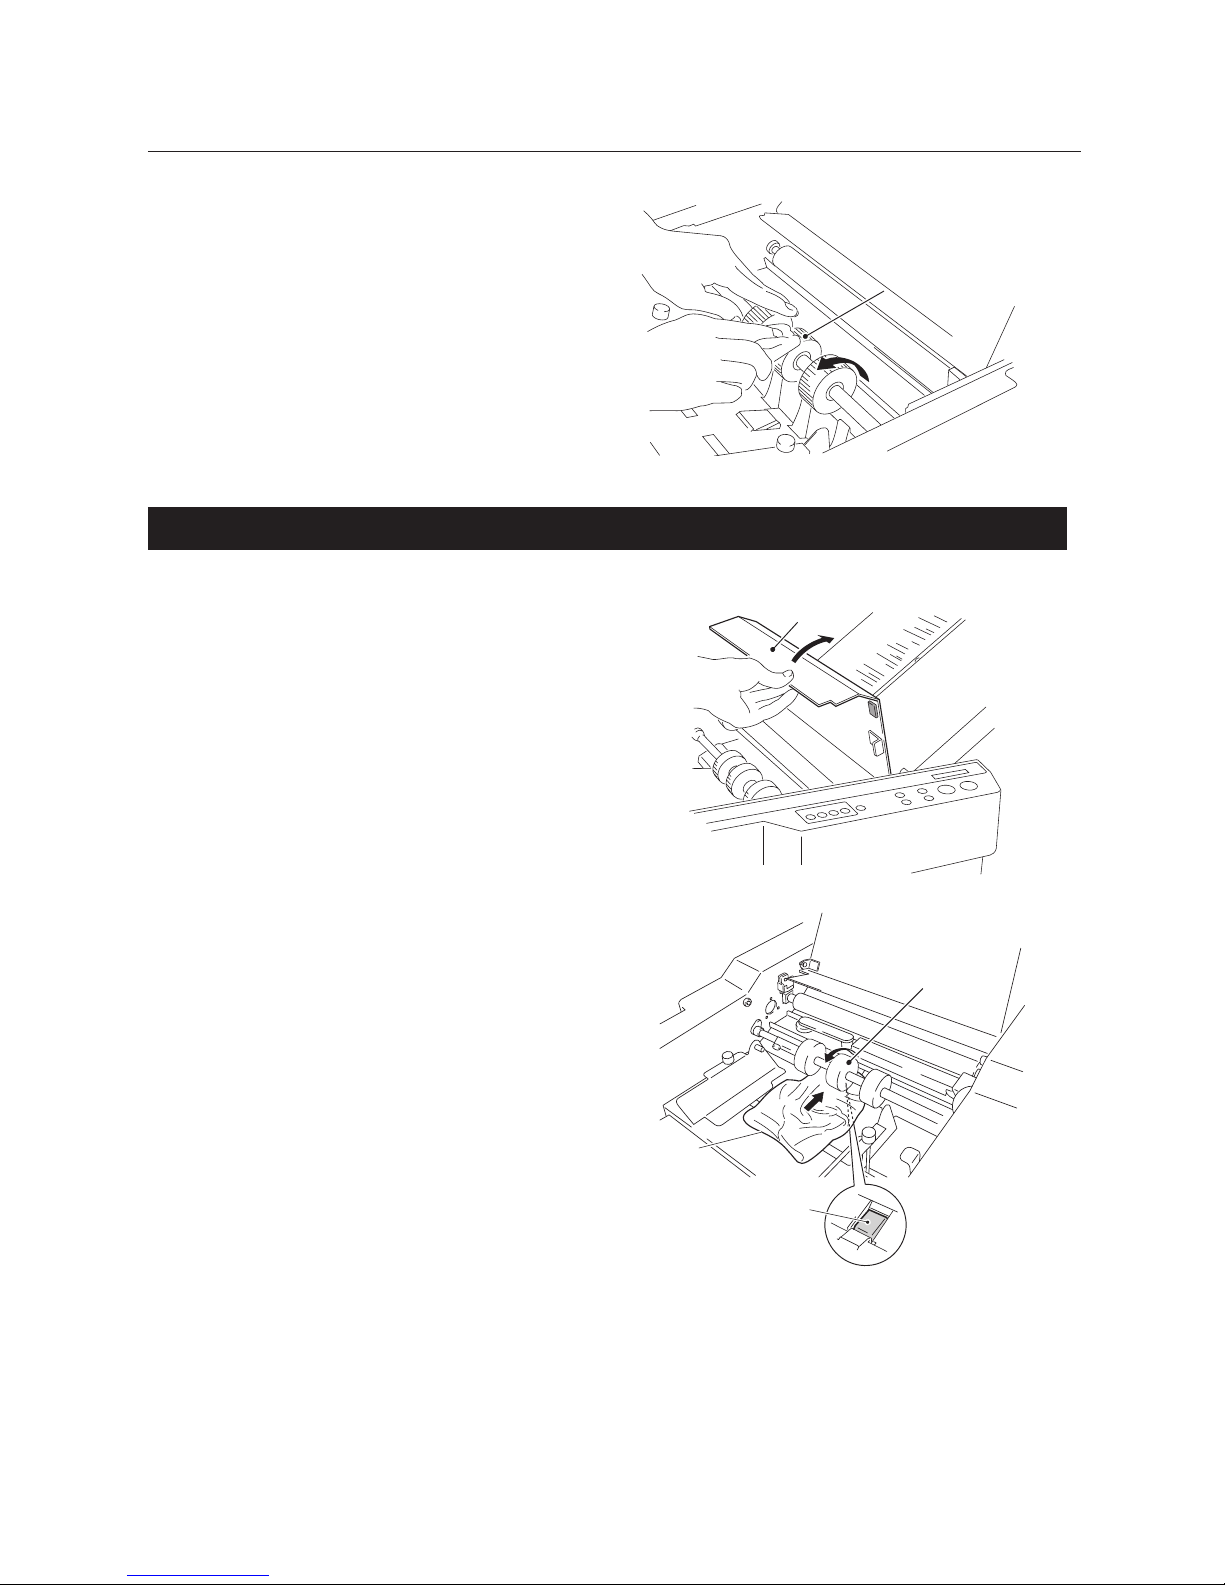
5-3
Chapter5 Cleaning the Unit
Paper feed ring
2
Rotate the rubber roll, and clean o
the dirt with a cloth moistened with
alcohol.
1-3. Cleaning the Paper Separator
Top cover
1
Open the top cover.
Paper separator
Cloth
Paper feed ring
(middle)
2
Insert a cloth moistened with alcohol
between the paper feed ring (middle)
and the paper separator.
3
Turn the paper feed rings in the
direction of the arrow.
Page 68
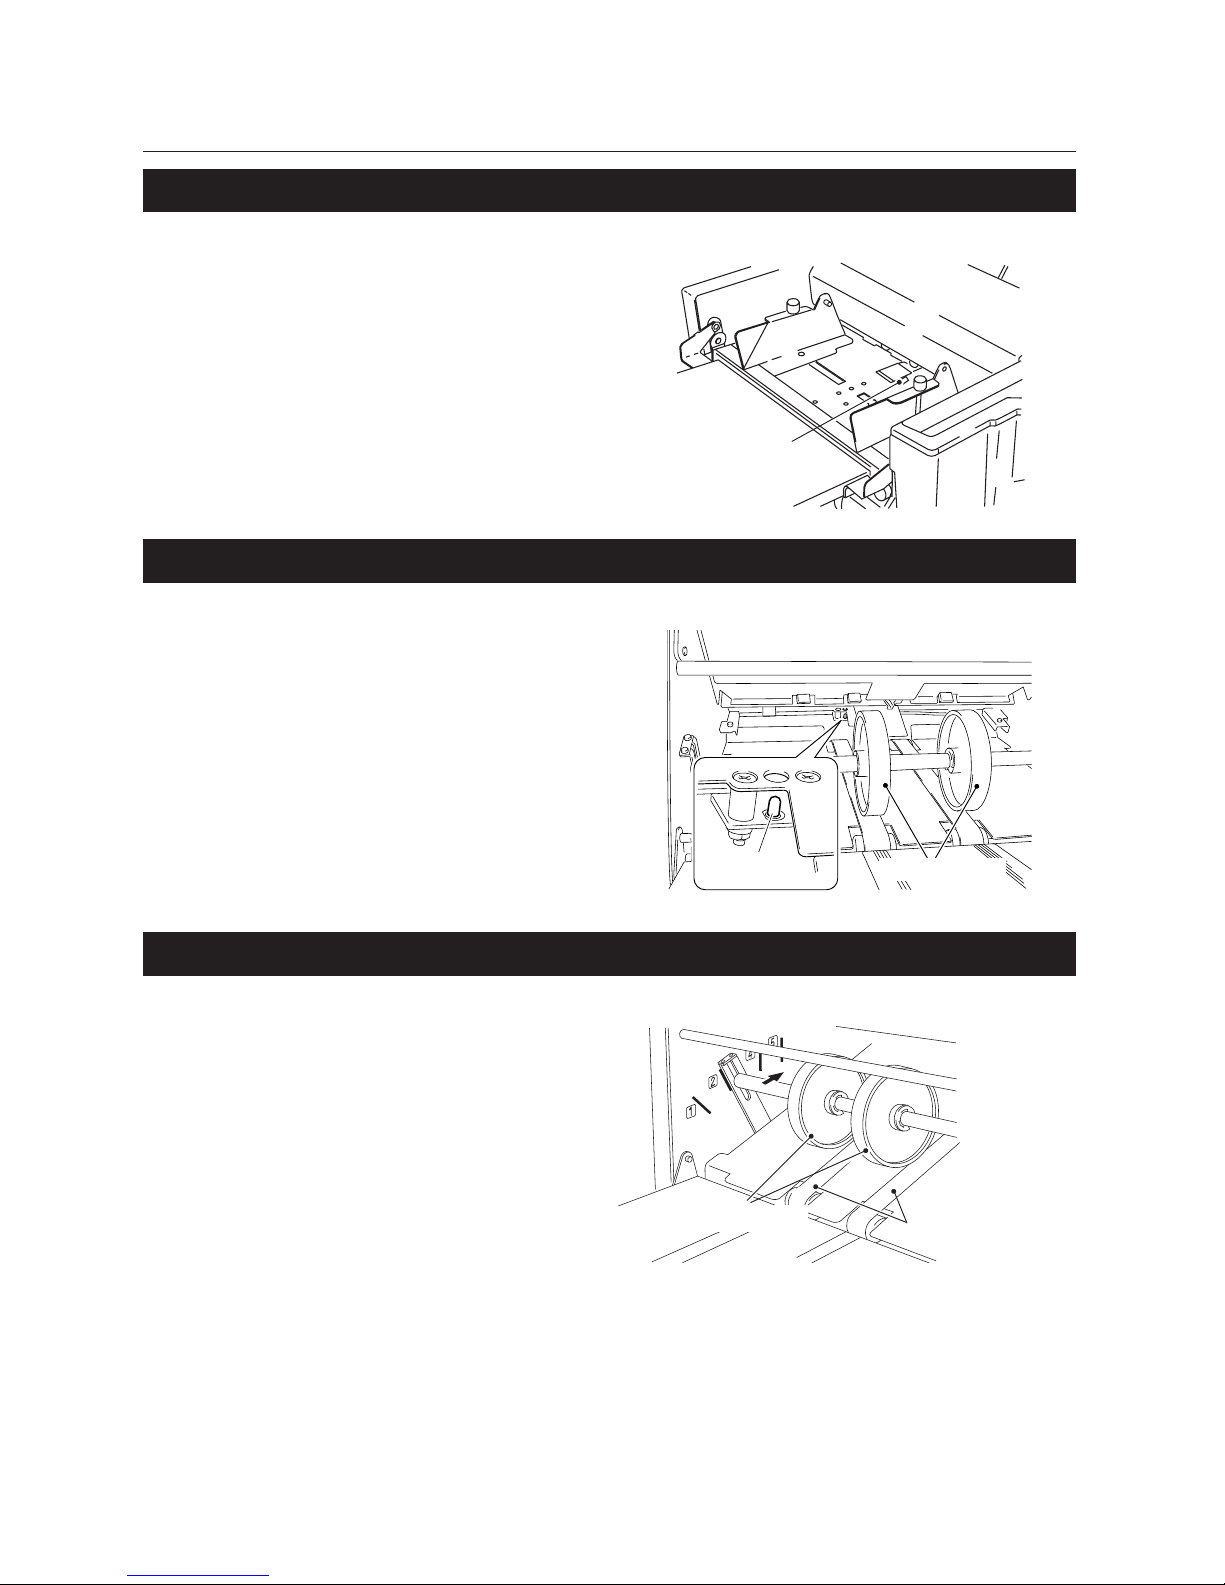
5-4
Chapter5 Cleaning the Unit
1-4. Cleaning the Paper Sensor
Paper sensor
Clean the paper sensor using an air
duster or a cotton bud.
1-5. Cleaning the Ejection Gate Sensor
Ejection gate
sensor
Stacker rollers
Clean the ejection gate sensor, located
on the back of the stacker rollers using
an air duster.
1-6. Cleaning the Paper Ejection Belts
Stacker roller
Paper ejection belt
1
Move the stacker rollers to “5” by hand.
2
Rotate the stacker roller, and clean o
the dirt with a cloth moistened with
alcohol.
Page 69
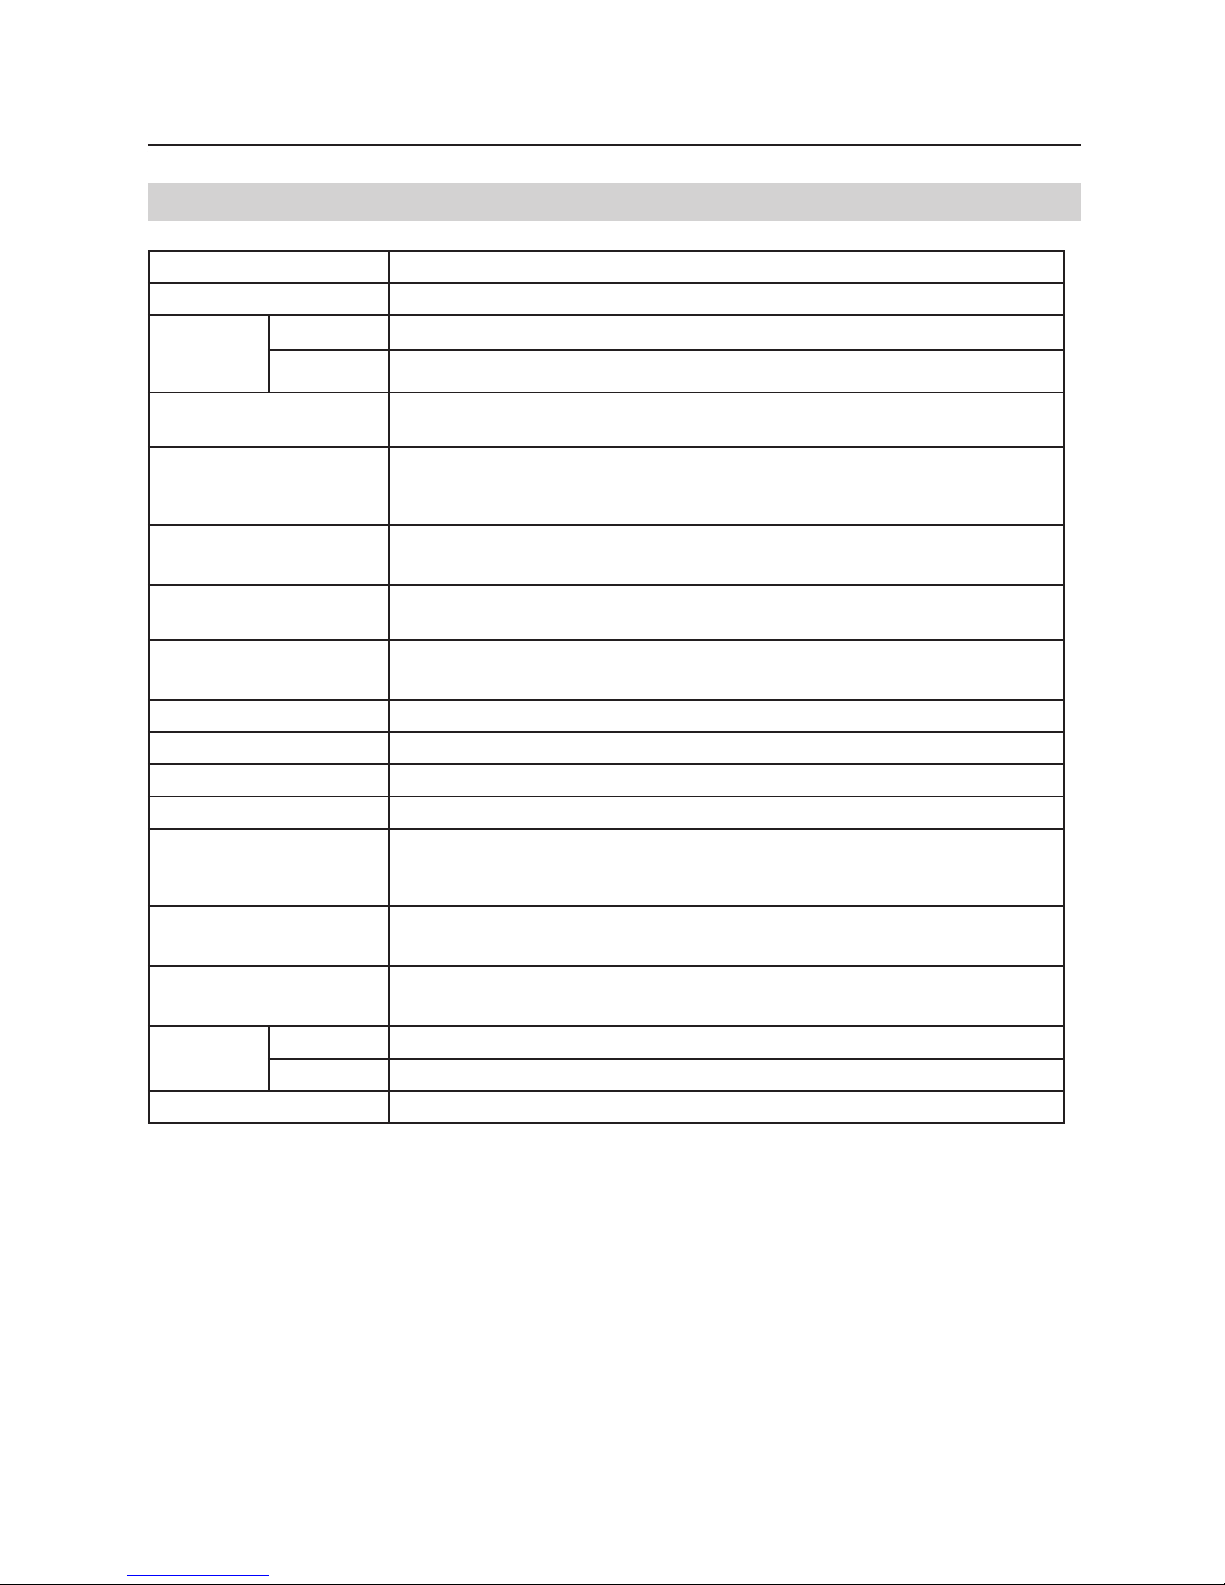
6-1
Chapter6 Appendix
Chapter6 Appendix
Specification
Model TF MEGA-A
Type Oce use, desktop
Paper size
that can
be folded
Min. 128 (W) x 182 (L) mm/5.04 (W) x 7.16 (L) inches
Max. 297 (W) x 432 (L) mm/11.69 (W) x 17.00 (L) inches
Paper quality Rough paper, ne quality paper, stencil paper, recycled paper, specied art/coated
paper (104.7 to 127.9 g/m2/28 lb to 34 lb
Folding mode Single fold, double fold, ireegular accordion fold (Fold out), letter fold, accordion
fold (Z fold), gate fold, custom fold, special cross fold (ne quality paper 52.3 to
104.7 g/m2/14 lb to 28 lb)
Paper thickness 52.3 to 127.9 g/m2 /14 lb to 34 lb
127.9 g/m2/34 lb paper cannot be folded into four.
Loading capacity of paper
feed tray
500 sheets (64 g/m2/17 lb)
Procesing speed 125 sheets/min. (For single folding A4 size ne quality paper 64 g/m2) (EU)
135 sheets/min. (For single folding 11 lb of ne quality LT paper) (North America)
Paper feed method 3 rings automatic paper separation method, slant correction device
Counter Digital display, 4-digit for add count, 3-digit for subtract count
Folding stopper Automatic setting
Stacker roller Automatic setting 5 steps
Detection function Opening/closing of top cover, no paper, mis-feed, paper jam, rst and second
folding plates improper setting, motor overload, up and down of the paper feed
tray, connecting error of the control cable of the rst and second folding plates
Power supply AC220-240 V 50 Hz (EU)
120 V 60 Hz (North America)
Power Consumption 0.5 A (EU)
0.85 A (North America)
Dimensions In use 930 (W) × 480 (D) × 535 (H) mm/36.61 (W) x 18.90 (D) x 21.06 (H) inches
In storage 620 (W) × 480 (D) × 535 (H) mm/24.41 (W) x 18.90 (D) x 21.06 (H) inches
Weight 35.5 kg/78.28 lb
Design and specications are subject to change without notice.
Page 70

6-2
Chapter6 Appendix
Memo
Page 71

6-3
Chapter6 Appendix
Memo
 Loading...