

Hedstrom m08653 Safety Manuallines

SAFETY GUIDELINES
SWING PARTS LIST
DELUXE TODDLER SWING - MO8653
FOR CHILDREN 18 - 36 MONTHS
This equipment must be assembled and checked by an adult. Two adults may be required to assemble this product.
For family domestic use only. This product has not been designed for commercial use in play centers, nurseries etc.
Adult supervision is required at all times.
Only one child per seat at any one time.
The baby seat is designed for baby with a body weight no more than 20kg.
Always fasten the harness when the child is seated.
For indoor and outdoor use.
Check all nuts, bolts and fittings for tightness and tighten if required.
Check all coverings for bolts and sharp edges and replace when required.
Check swing seats, chain, ropes and other means of attachments if relevant to your product for evidence of
deterioration. Replace when required in accordance with the manufacturers instructions if necessary.
Place the product on level surface at least 2 metres from any structure or obstruction such as a fence, garage, house,
wall, overhanging branches, laundry line or electrical wires.
DO NOT install the product over concrete, asphalt or any hard surface.
DO NOT orientate the product directly towards the sun.
Leave all fittings finger tight until assembly is complete, for ease of construction. Then tighten firmly.
Children should not wear cycle helmets whilst on this equipment.
Do not allow children to stand on any swing seats, glider seats or slide chutes relevant to your product.
Do not allow the children to jump or climb off any moving equipment.
Do not twist swing ropes or wrap them over the top bar.
Do not allow loose, hooded or baggy clothes to be worn as children can get trapped and may be unable to free
themselves.
Do not allow children to climb on parts of this equipment not intended for this purpose.
Do not allow children to wander into the play area whilst the equipment is in use.
Gliders and swings must not exceed an angle of 60 degrees from the ground.
Regularly check the item for wear and damage, removing the item from use when necessary until replacement parts
are fitted.
Failure to assemble and maintain this item as per instruction may cause injury to the user.
Please keep the instructions in a safe place for future reference.
Made in China to European Standards.
Conforms to EN71
04.07 ISSUE 2
SPANNER x 1
ALLEN KEY x 1
PLASTIC PIN x 2
PLASTIC SEAT AND ROPES x 1
1
1 1
2
2 2
6
10
3
3
5
4
4
3
4
7
8
9
IMPORTANT: Make sure you read the safety notice on the front page and always supervise
children while they are playing on the equipment. Once assembly is completed carefully check
equipment. In the unlikely event that you do find any problems, please contact us. Do not allow
children to use this product until the problem has been corrected.
M6 BOLT 47mm x 2
M6 BOLT 42mm x 2
M6 BOLT 35mm x 4
M6 BOLT 25mm x 2
F3
F4
F1
F2
FIXING KNOB x 2
TOP LEG SECTION x 4
BOTTOM LEG SECTION x 4
SIDE BAR PLAIN SECTION x 2
SIDE BAR SECTION x 2
TOP BAR x 1
10
6
STEP 2
Frame & Swing Assembly
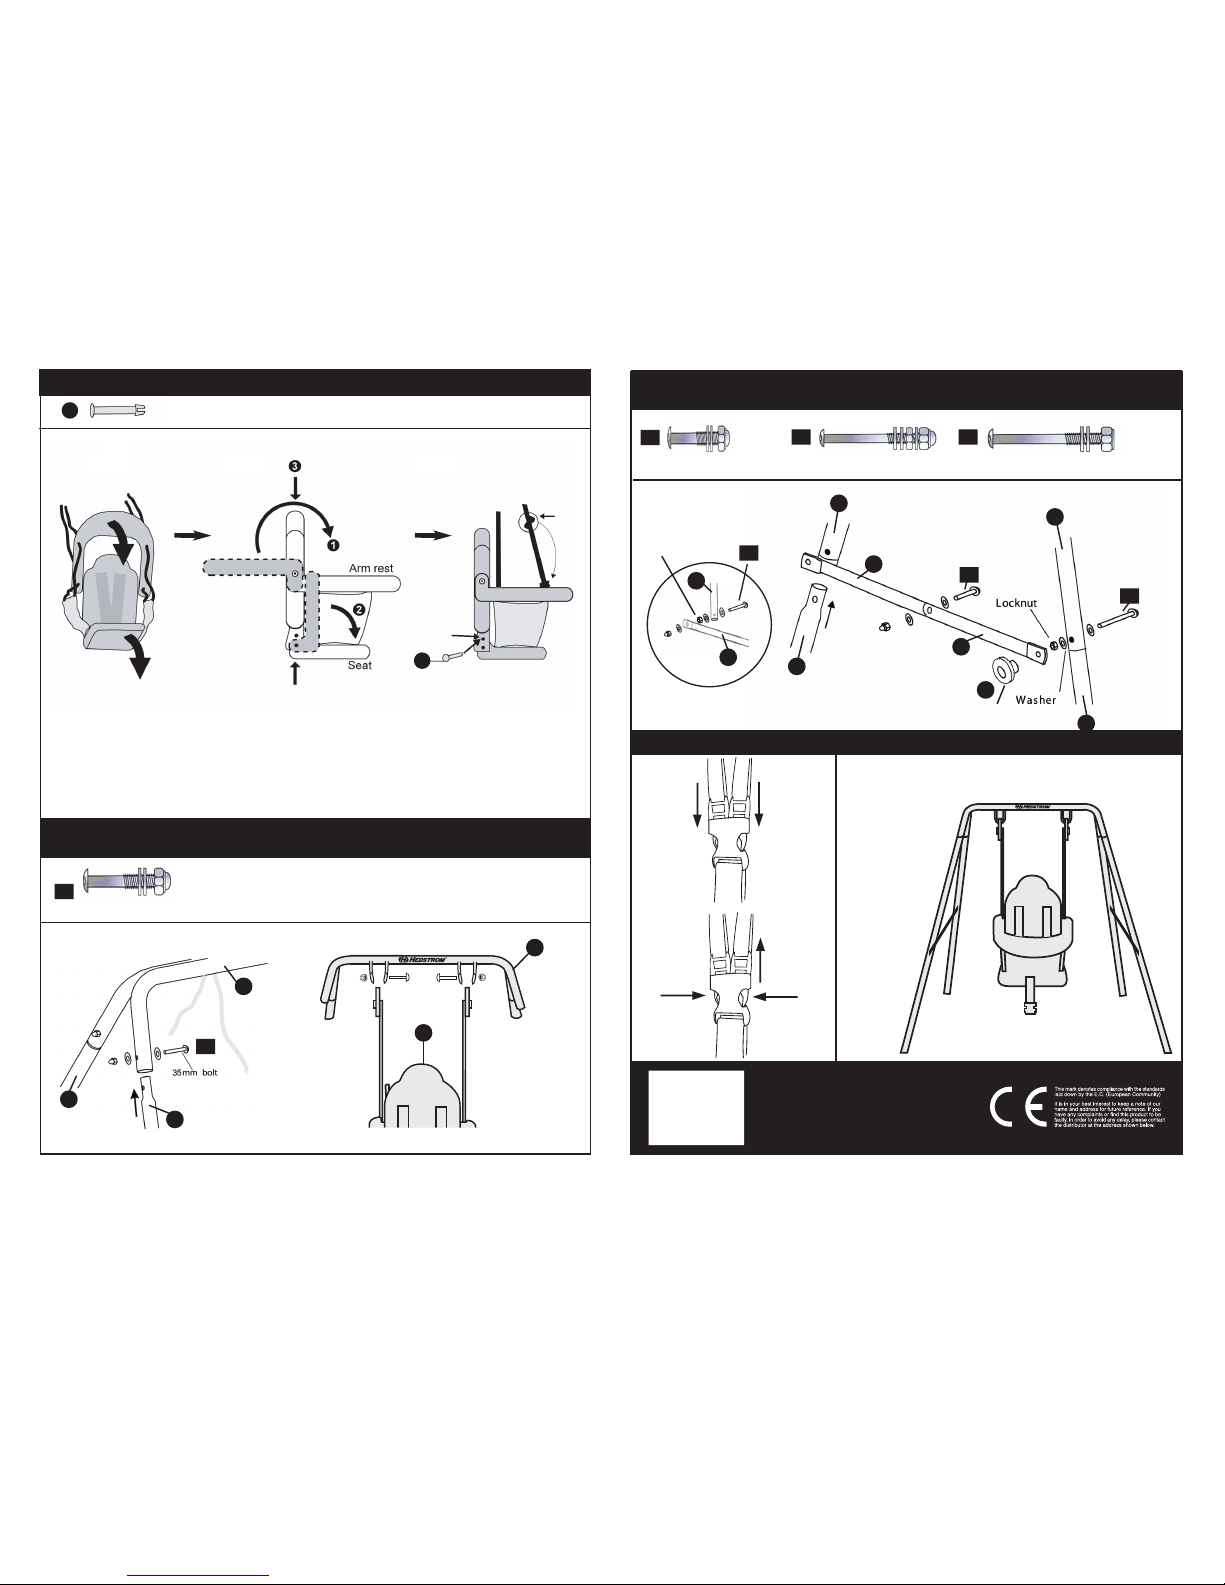
STEP 1 Seat Assembly
STEP 4 Seat Belt Assembly
CUSTOMER SERVICES
MV has taken great care to ensure that this toy has reached
you in good condition. Should you have a query, please contact:
customer.services@mvsports.com where your query will be
dealt with promptly. Alternatively, you can call on 0870 8404255.
MV Sports & Leisure Ltd.
35 Tameside Drive
Castle Bromwich
Birmingham B35 7AG
United Kingdom
email
: info@mvsports.com
www.mvsports.co
m
1
6
1
1
1
2
5
2
4
3
3
HEAD BOLT 35mm x 4
F2
F2
STEP 3
Frame Assembly
Fixing Knob
42 mm
bolt
25 mm
bolt
47 mm
bolt
Locknut
M6 BOLT 42mm x 2
F3
F3
M6 BOLT 47mm x 2
F4
F4
M6 BOLT 25mm x 2
F1
F1
9
9
9
Step C:
Once the seat has been aligned, push
the two orange pins firmly into the
sides of the seat until they fully fit into
the backrest. Please note that if the pins
are forced into the seat when it has not
been aligned, it will cause the pins to
break.
Step A:
Carefully fold over the seat
armrest followed by the base
as shown in the diagram.
Step B:
Position the back so that it is at a 90
degree angle to the base, pushing down on
it until it clicks into place.
You can
check the
seat is
aligned as
you will be
able to see
through the
holes on the
sides of the
seat.
You can
check the
seat is
aligned as
you will be
able to see
through the
holes on the
sides of the
seat.
Take Care When Seating Your Child!
The child must be secured to the seat
immediately to avoid any injury.
Push
Pull
To Open Harness
To Close Harness
Push
Push
To fasten push
both left and right
hand side clips
into the harness
until they click
into place.
1
To Attach Rope
Clamps:
Undo the screws on
each hinge and attach
both of the rope
clamps. Tighten the
screws to finish.
6
10
 Loading...