

Page 1
Heinz Electrodynamic Designs
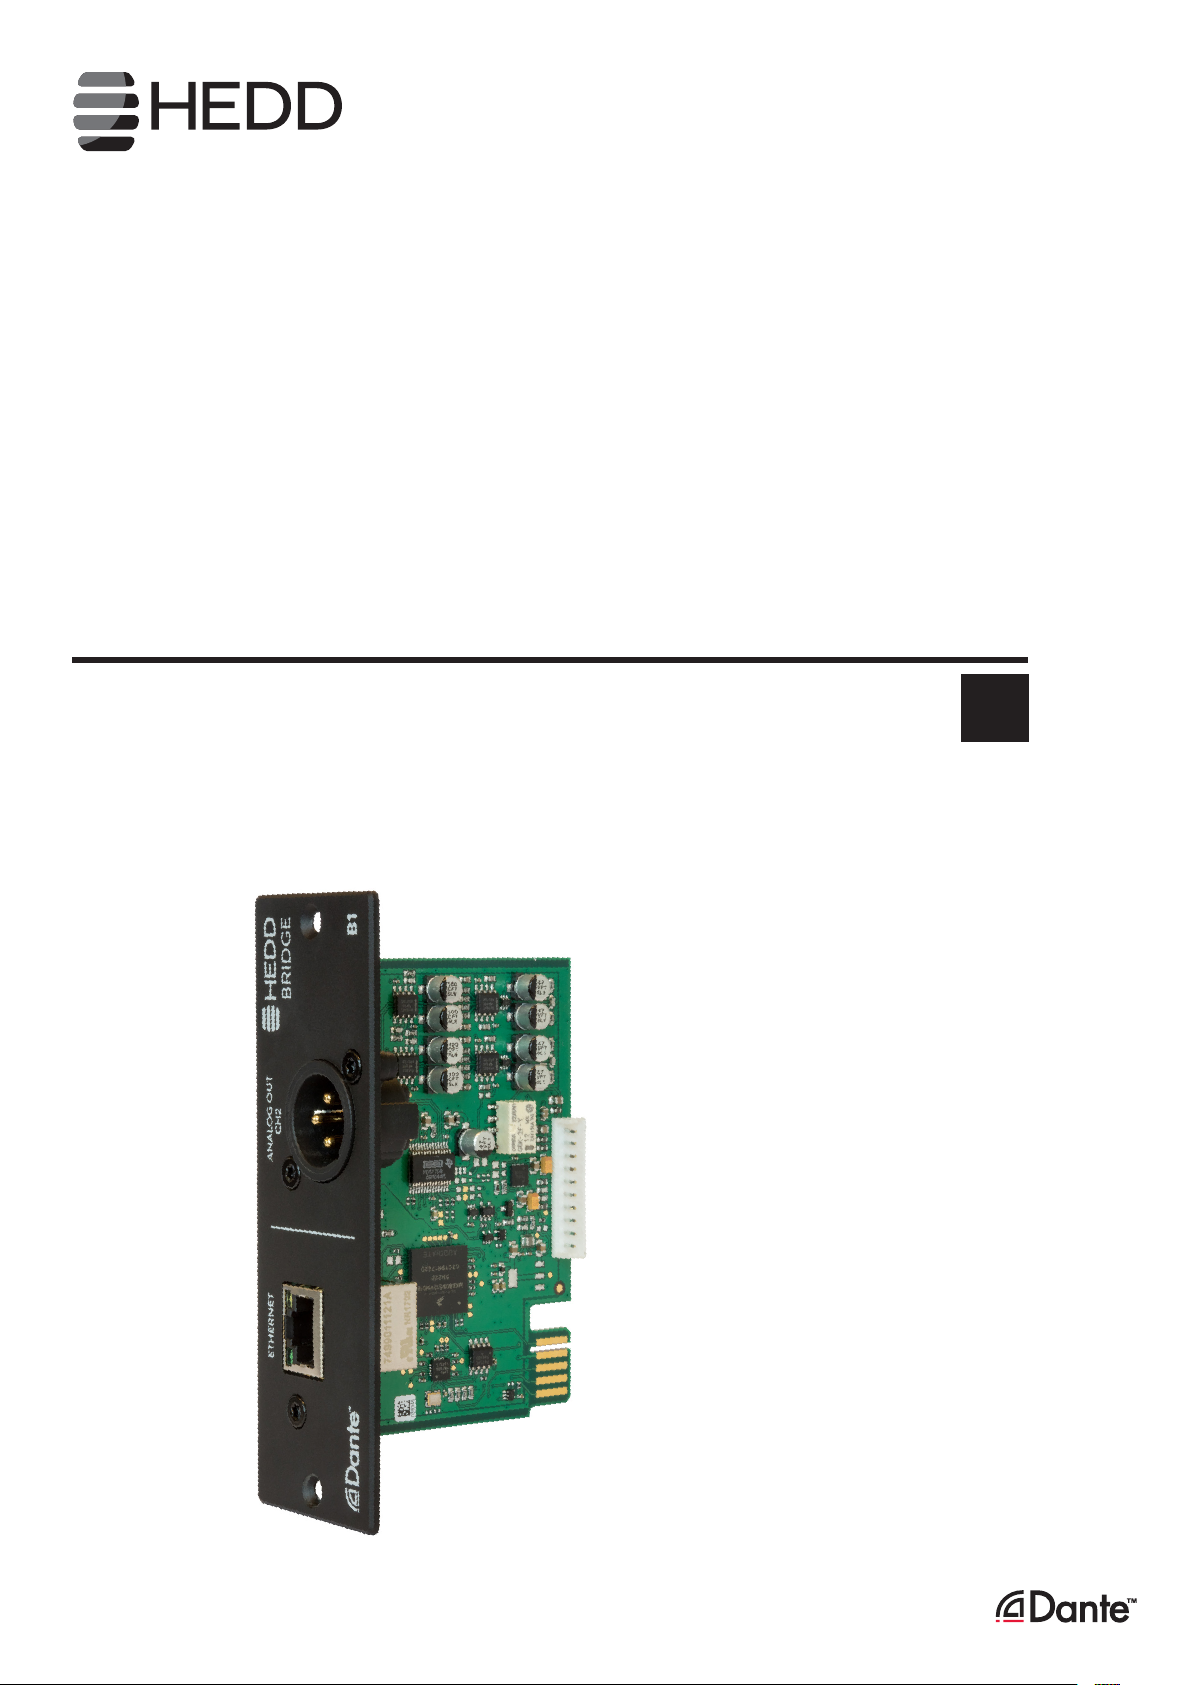
HEDD Bridge
B1 - Dante
User Manual
EN
Page 2
Introduction
HEDD Bridge // 2CH Dante Card
HEDD’s modular input card system, which we call the HEDD Bridge, brings versatile digital input connectivity
including Dante to the world of professional monitoring. It is now possible for studio monitors to integrate with
today’s most established audio network protocol.
• You can directly connect your computer to loudspeakers via a CAT.6 Ethernet cable in order to stream high
resolution audio
• In complex multi-channel setups (Dolby Atmos, Auro 3D etc.), multiple separate loudspeakers can be fed
with a single high-resolution audio stream and each one of these speaker channels can be controlled individually by software control applications
• Audio devices in dierent rooms or facilities (e.g. movie theaters, conference rooms, live concerts and
music festivals) can be controlled from one or multiple workspaces connected to the Ethernet network
• AoIP will enable broadcast engineers to simplify the in-house signal distribution in broadcast stations
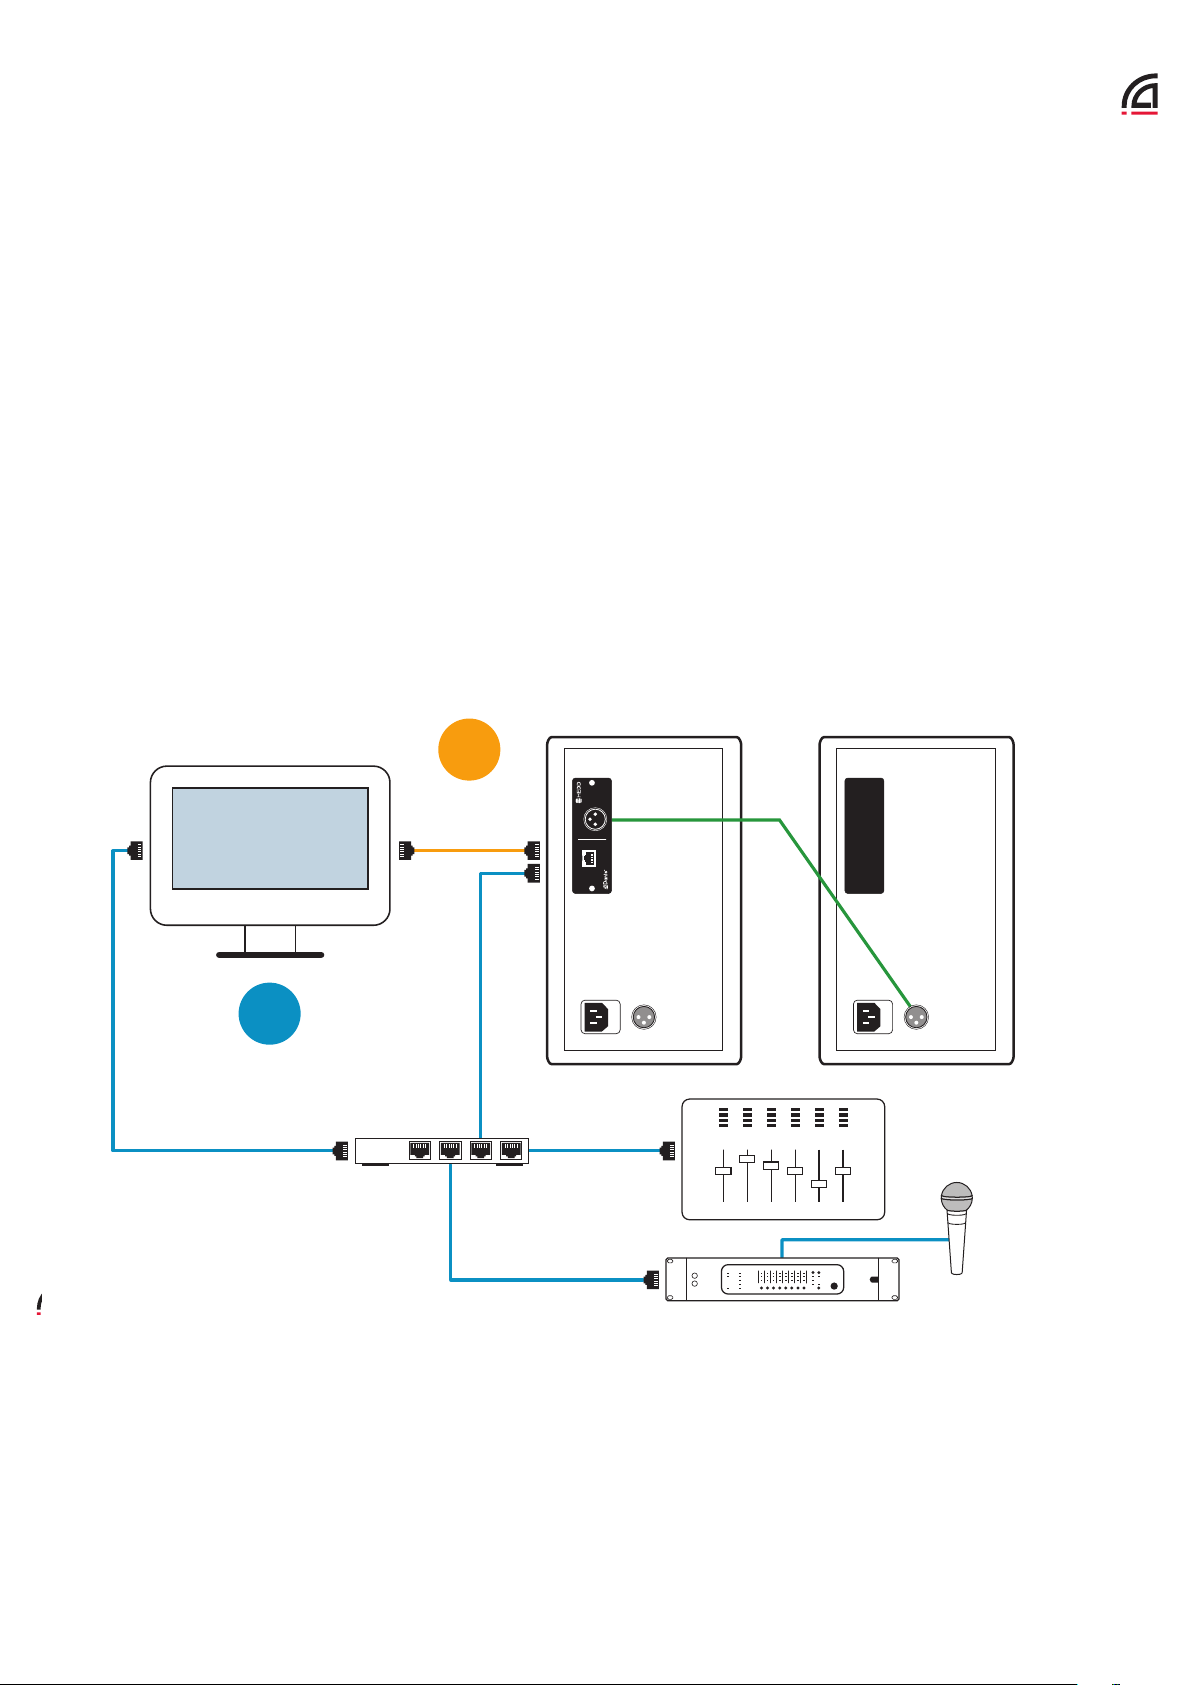
OPTION
1
Direct
Ethernet Connection
Gigabit Ethernet
OPTION
2
Gigabit Switch +
Related Audio Equipment
CH2
ANALOG OUTETHERNET
BRIDGE
B1
Analog XLR
This is how AoIP loudspeakers can be used in an Audio-over-IP setup. You can either enjoy high-resolution audio by
connecting your computer directly to one of the studio monitors (Option 1) via one Cat 6 Ethernet cable, or control
them in a more complex Gigabit-router-based setting with various other sound devices (such as Interfaces, Microphones etc.)
2
Page 3
Mounting
I this chapter, we want to show you how to mount your HEDD-BRIDGE B1-DANTE into any HEDD monitor
speaker equipped with a HEDD-Bridge compartment.
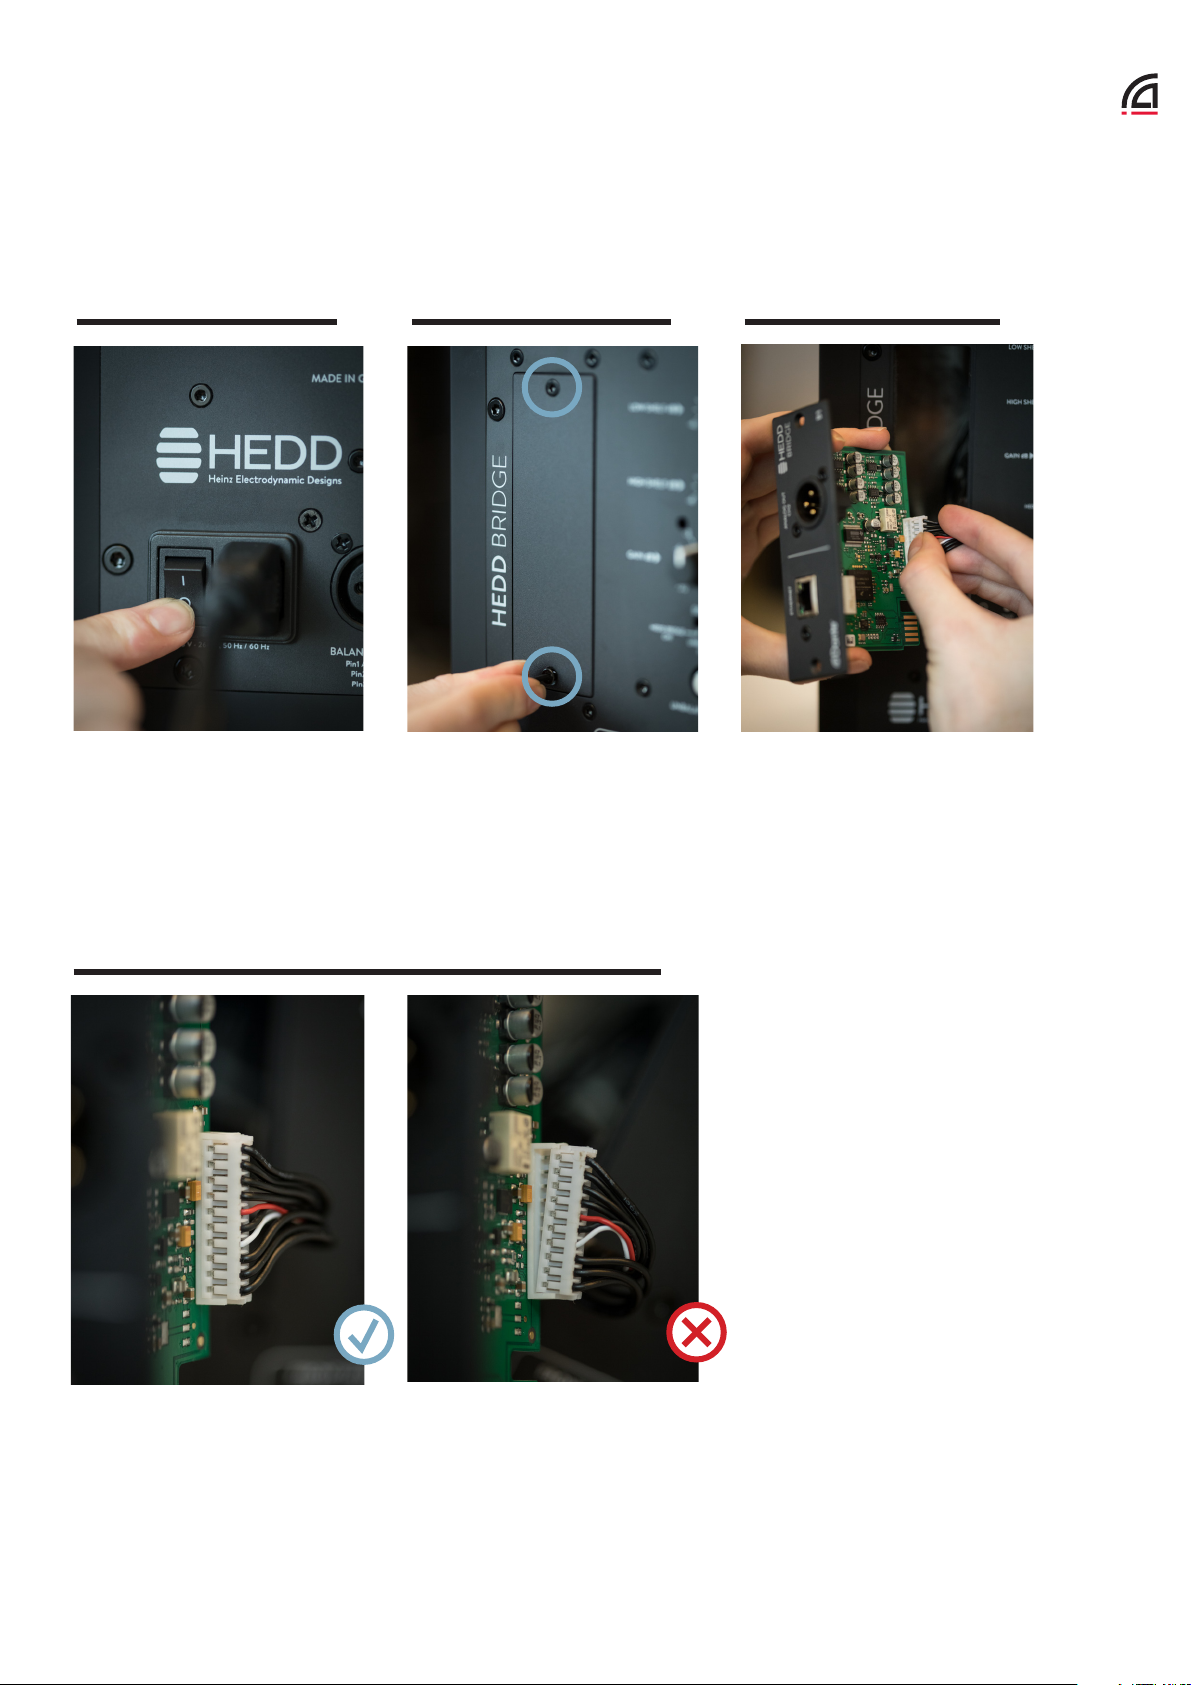
Turn o your HEDD monitor
speaker completely by switching
the Mains power switch to the
“0”-position.
1 3
Remove the rectangular dummy
faceplate of the HEDD-Bridge
compartment on the backside
of your HEDD monitor speaker
by loosening the two inner black
Torx T10 screws with the supplied
oset screwdriver.
2
Connect the white connector
from inside the monitor to the
PCB connector panel of your
Dante card. The white connector
(silver connector pins visible)
should face towards the front
plate of the card.
Apply gentle force until you hear the connector snapping. It should be
sitting straight and without any tilting.
4
Note: Make sure that you insert
the connector the right way.
It only fits in one direction. Be
careful not to bend the pins, as
this could permanently damage
your Dante card or your HEDD
monitor speaker!
3
Page 4
Mounting
5 6 7
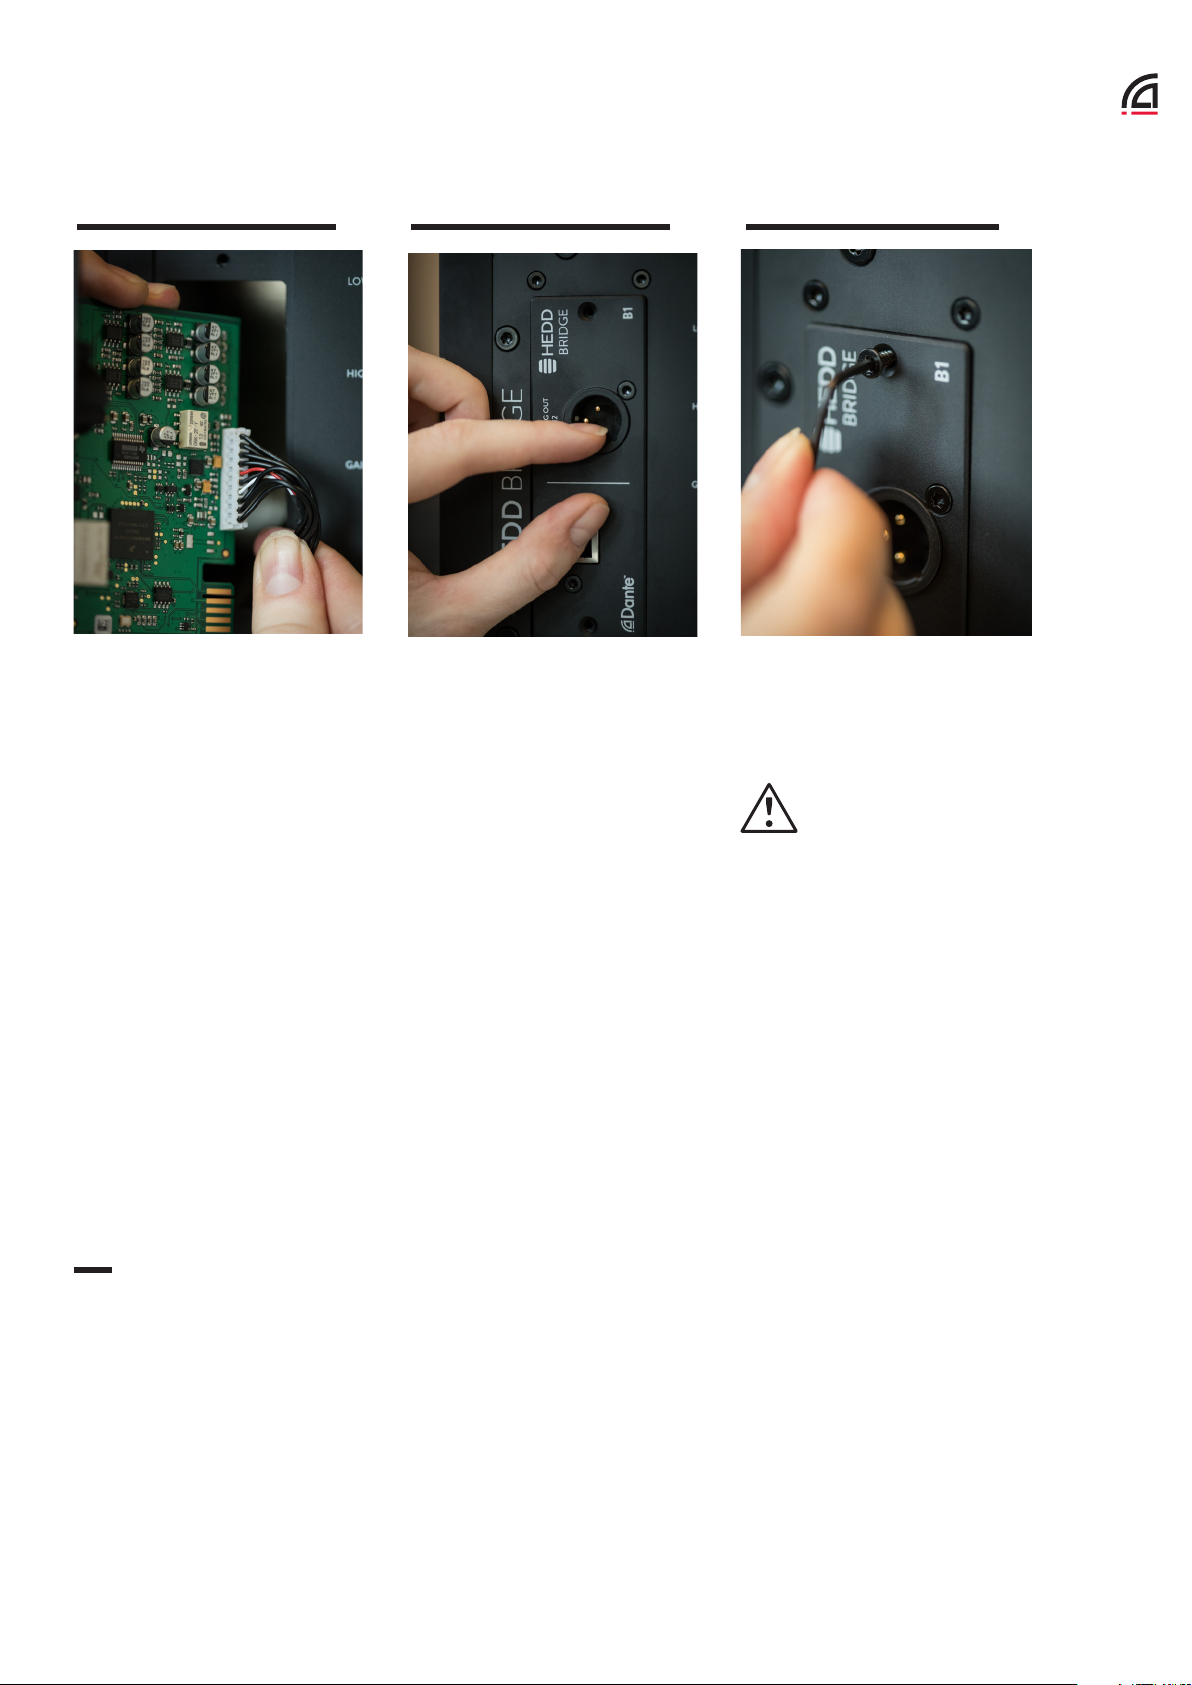
Bend the connector cable gently
and carefully slide the card into
the HEDD-Bridge compartment.
Hold the Dante card in position
so that it fits into the HEDDBridge compartment.
Attach the two black Torx T10
screws into the back panel of
your HEDD monitor speaker with
the supplied screwdriver.
Only use gentle force
while fastening the two
screws back in place,
otherwise the threads could be
damaged.
Operation
Now we want to show you how to get your HEDD Dante card up and running in a DANTE AoIP network.
Note: we assume that you have a proper DANTE AoIP network up and running and also basic knowledge and
skills in digital audio, AoIP networks, DANTE and its features and functions. If not, start by visiting
https://www.audinate.com/resources/videos/gs0-getting-started-dante-audio-networking-training
1
Connect the ETHERNET socket of your B1-DANTE to your DANTE AoIP network (e.g. via a switch or router)
using a standard RJ45 network cable (at least CAT5e rated).
Note: Your B1-DANTE is not capable of Auto-MDX, so if you want to connect it directly to an Ethernet port of
your PC or laptop, you must use an Ethernet Crossover Cable.
Note: By factory default, your B1 DANTE is set to automatically obtain an IP address via DHCP, so you must
be sure that your network has a DHCP server enabled for initial operation. You can change the IP address to a
static IP address afterwards via the DANTE Controller software application.
4
Page 5
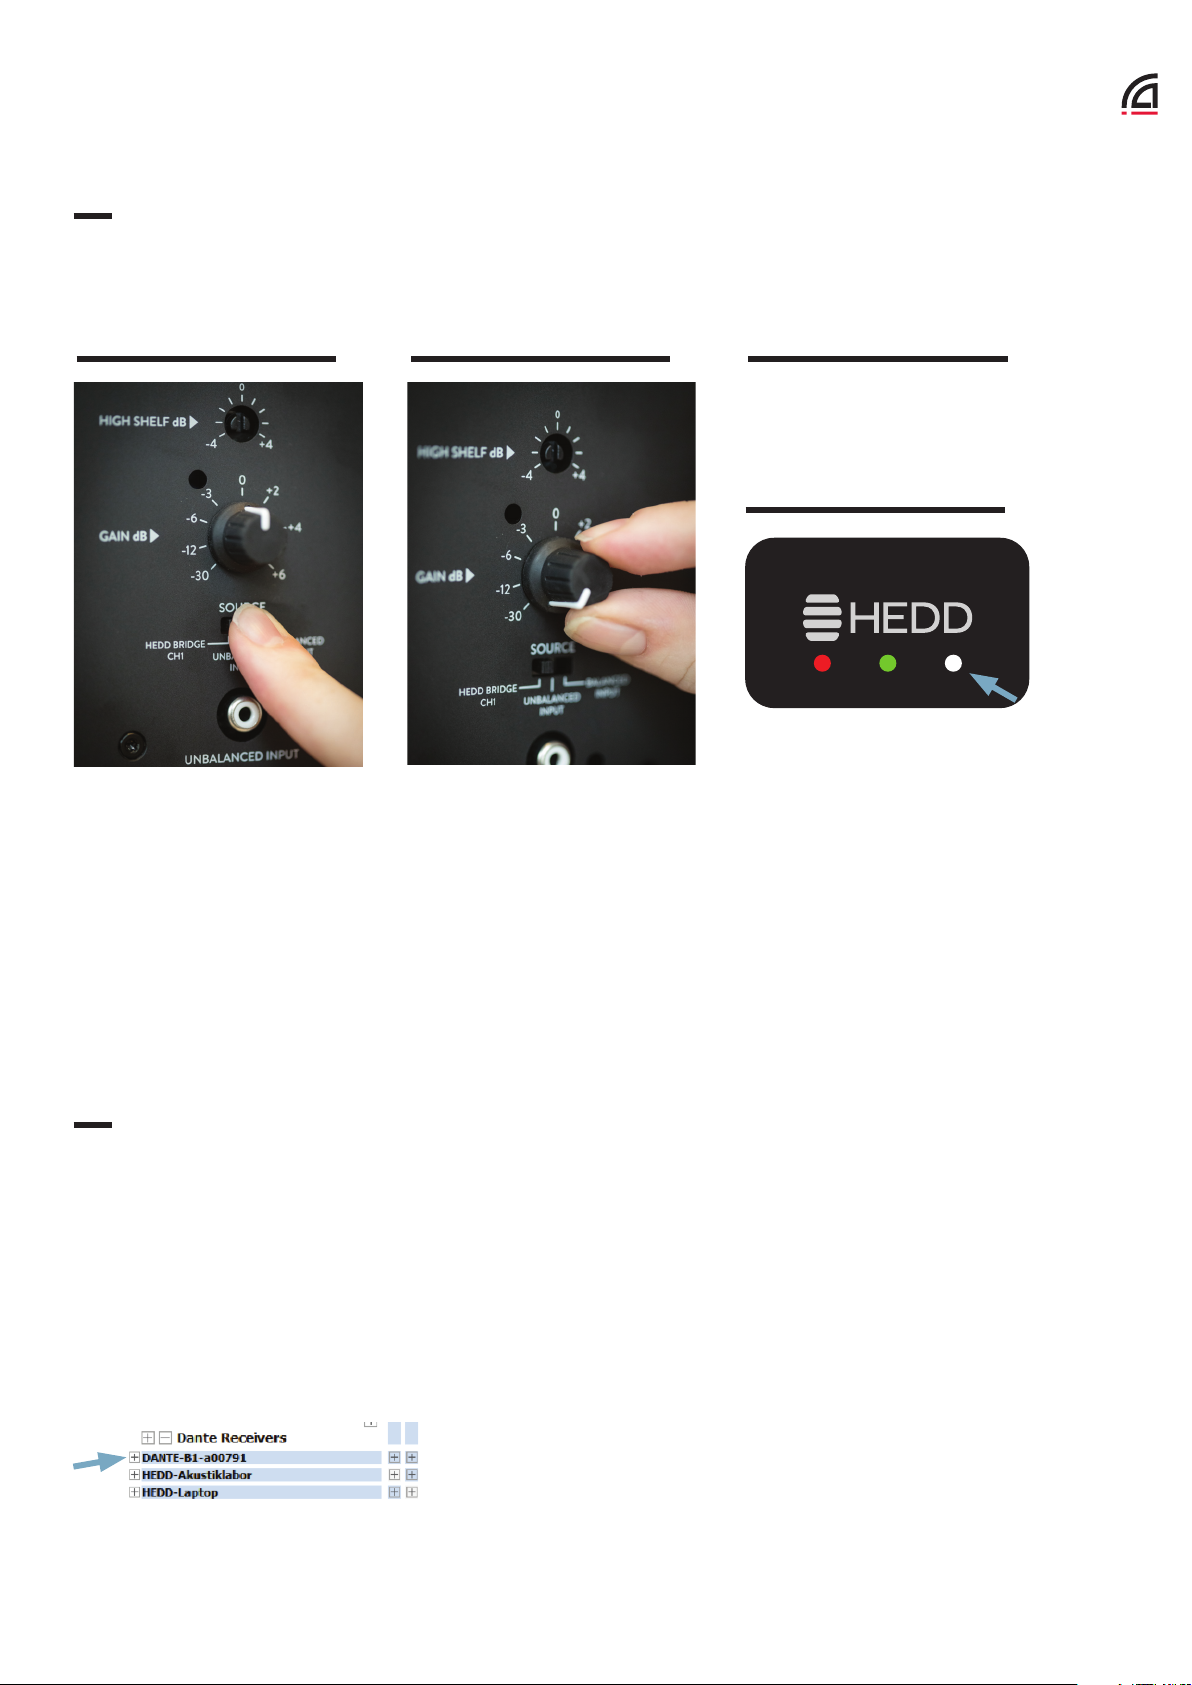
Operation
2
For 2-channel use, connect the “Balanced Input” of your second HEDD monitor speaker to “Analog Out CH2”
on your HEDD-BRIDGE B1-DANTE with a standard 3-pin XLR female-to-male audio cable.
3 4 5
Turn the Mains switch(es) of your
HEDD monitor speaker(s) to “1”
(on).
6
When the HEDD-BRIDGE B1DANTE is booted, connected and
Switch the “Source” switch of
your HEDD studio monitor (the
one housing the Dante card) to
“HEDD Bridge CH1”.
Note: if you have connected your
second HEDD monitor speaker
to “Analog Out CH2”, switch
the “Source” slide switch on this
speaker to “Balanced Input”.
Turn the GAIN of your HEDD
monitor speaker (and also your
second HEDD monitor speaker
you’ve connected to “Analog Out
CH2”) all the way down to -30 dB
(fully counterclockwise).
synced to an IP network (by means of getting a proper IP address
from DHCP), the white “Sync”
LED on the front panel of your
HEDD monitor speaker housing
the B1-DANTE will light up.
7
Now, you can use the Dante Controller software application to route audio to your HEDD monitor speaker(s) by
doing the following:
a) Start the Dante Controller software application on a PC or Mac which is connected to your DANTE AoIP
network.
Note: if you haven’t installed it yet, you can download the Dante Controller software application here:
https://www.audinate.com/products/software/dante-controller
b) On the “Routing” tab, you’ll see the B1-DANTE as a new Dante Receiver.
5
Page 6
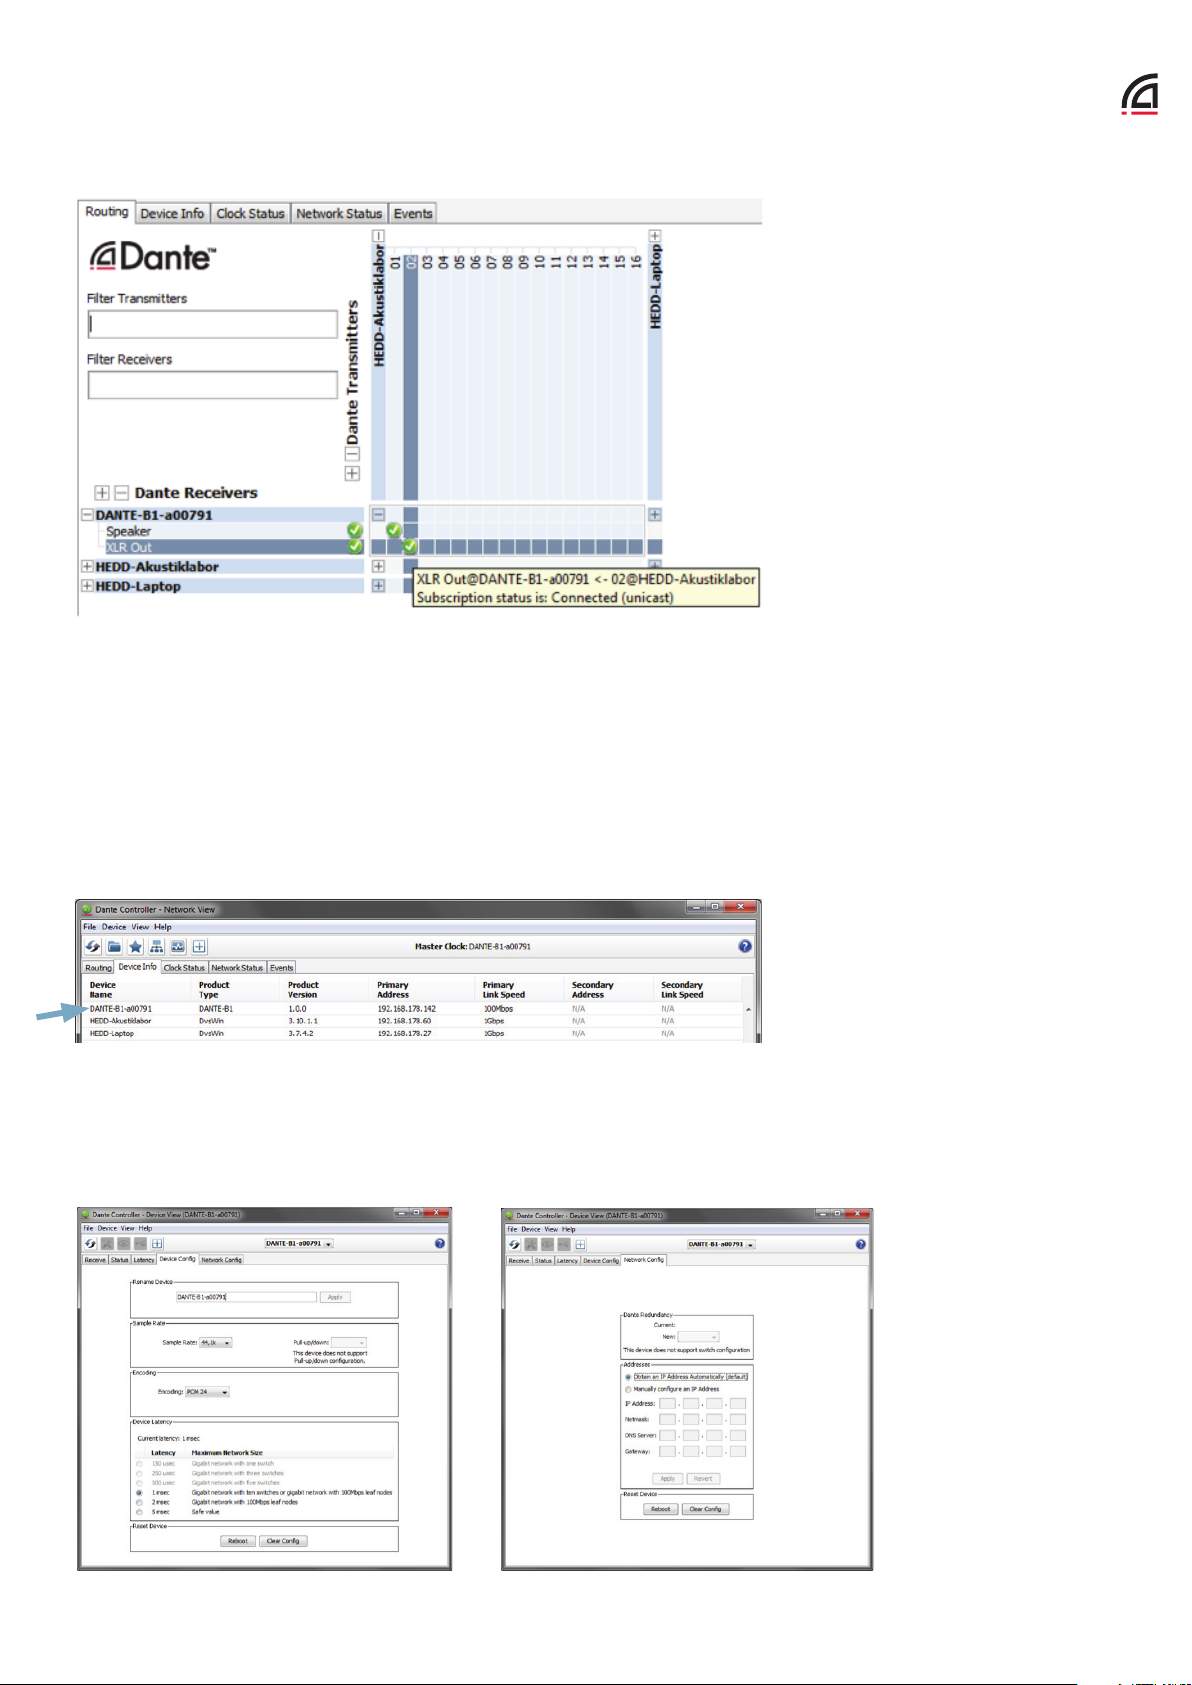
Operation
Here, you can route audio from your Dante Transmitters to your B1-DANTE by clicking and establishing a connection via the connection matrix on the right.
Note: “Speaker” routes the audio internally to the “HEDD Bridge CH1” input of your HEDD monitor speaker
that is housing the B1-DANTE. “XLR Out” routes the audio to the “Analog Out CH2” XLR output on the back
panel of your B1-DANTE, respectively to your second HEDD monitor speaker, if connected.
c) On the “Device Info” Tab, you’ll see the B1-DANTE as “Product Type: DANTE-B1”.
Double click on this row, and you’ll see the “Device View” window. Here, you can monitor the status of you
HEDD-BRIDGE B1-DANTE, re-name the B1-DANTE and its audio output channels to your liking, set the sample
rate and latency to match your DANTE environment and set a static IP address for your B1-DANTE, if required.
6
Page 7

Operation
IMPORTANT NOTE: the factory default sample rate of your B1-DANTE is set to 44.1kHz. If you cannot connect
your Dante Transmitter to your card, it is most likely that the sample rate of your Dante Transmitter and your
B1-DANTE is mismatching. If so, set the sample rate of your card to the same as your Dante Transmitter (you
can choose sample rates up to 96 kHz).
Note: It is highly recommended that you rename your B1-DANTE and its output channels to more distinct na-
mes than the factory default, e.g. Device: “Studio 1” and Output Channel 1: “Left main monitor”, Output Channel 2: “Right main monitor”. It makes it a lot easier to find and route your HEDD monitor speaker(s) correctly
when they are properly named, especially if you have other DANTE devices with a large number of channels in
your DANTE AoIP network.
8
When you’ve finished configuring and routing your B1-DANTE through your DANTE AoIP network to your
DANTE devices, you can start audio playback and adjust the GAIN of your HEDD monitor speaker(s) to suit
your needs.
Note: Be careful with high GAIN settings, as the output of the B1-DANTE has no attenuation and can lead to
surprisingly high SPL output of your HEDD monitor speakers, especially if you’re playing back hot pre-mastered
audio content that is hitting 0dBFS permanently.
Note: If you run into trouble and have set a static IP, cannot remember it and therefore don’t find your B1-
DANTE on the network anymore, you have to do the following:
a) Reset your B1-DANTE to factory default (contact us on [email protected] on how to do this)
b) Connect your B1-DANTE and a PC or laptop with the Dante Controller application a network that has a wor-
king DHCP server
c) If your PC or laptop has a static IP address, configure it so that it automatically obtains an IP address from
your DHCP
d) When your B1-DANTE is resetted to factory default, it is also set back to automatically obtain an IP address
from your DHCP, so you should see it now with its factory name (“DANTE-B1-XXXXXX”) in the Dante Controller
application
e) You have to set it up again via the Dante Controller application (naming, sample rate, IP settings and routing
within your DANTE network has to be set again)
7
Page 8
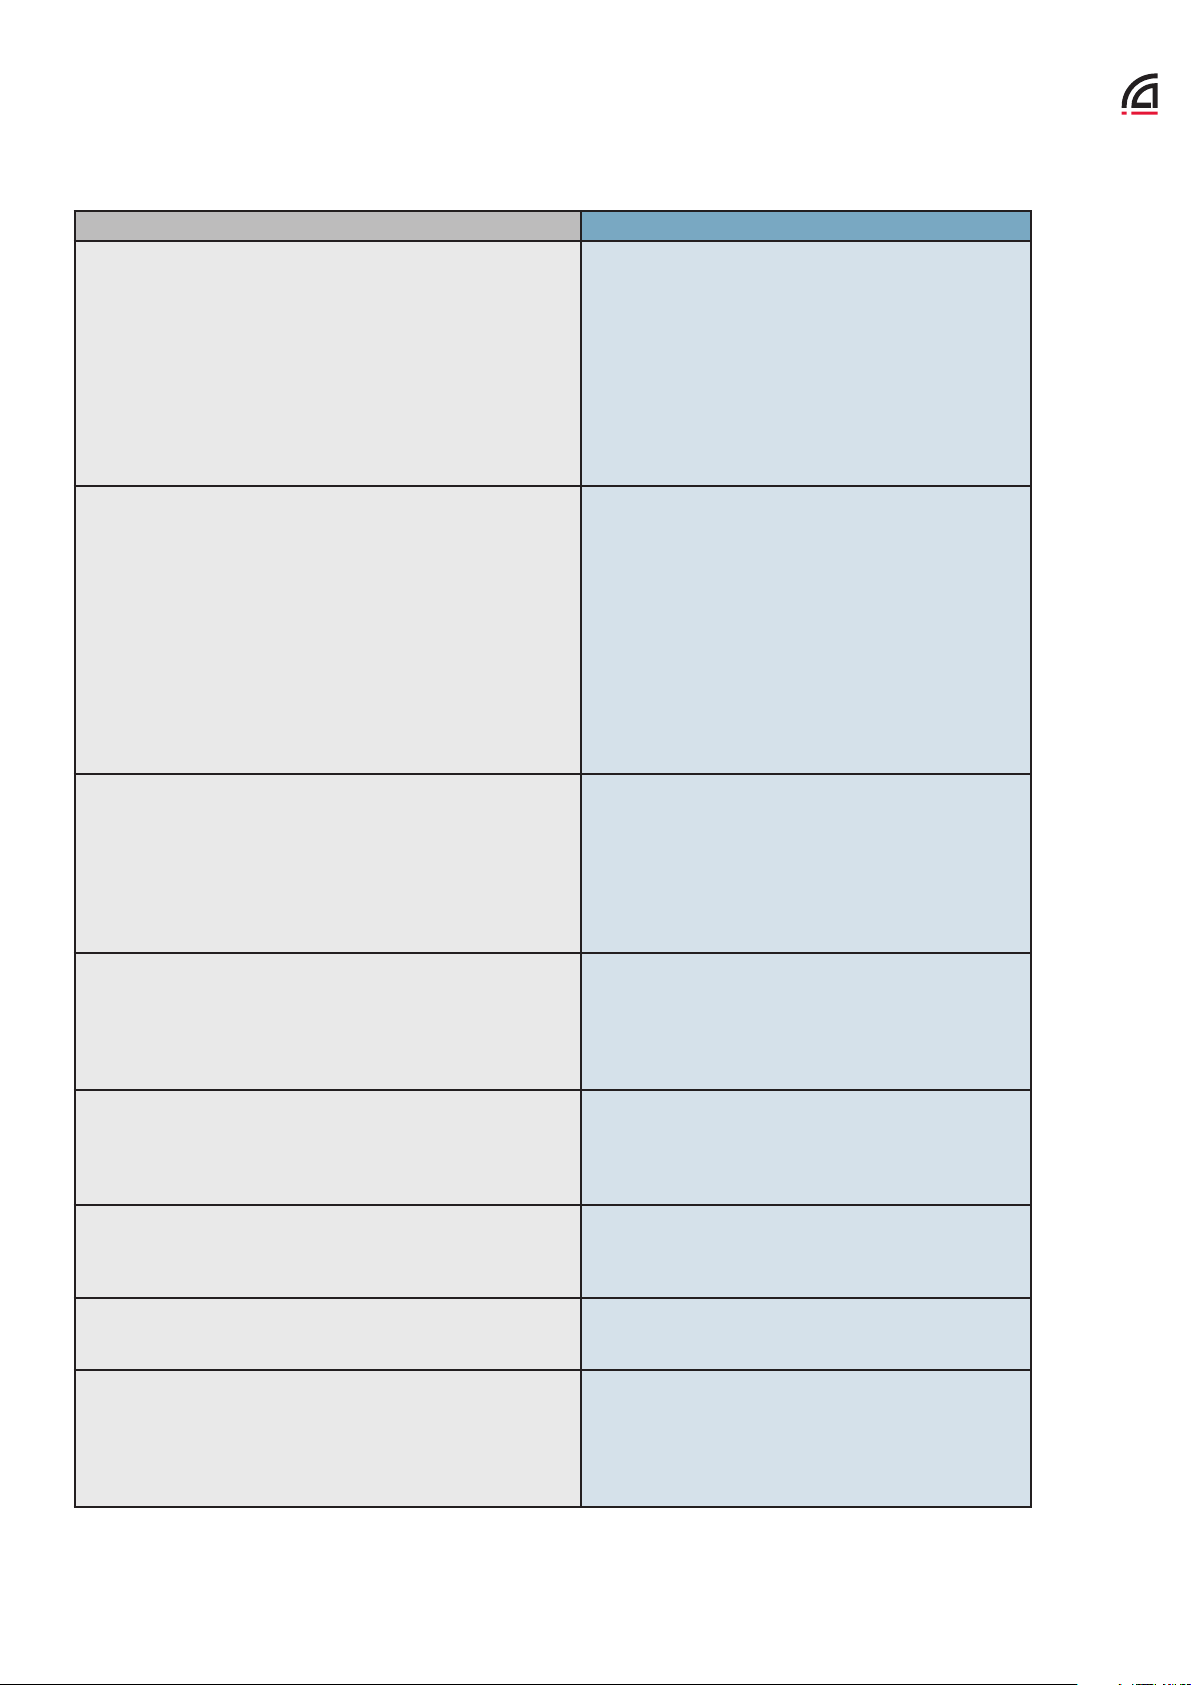
Troubleshooting
Problem Solution
On the routing-matrix in my Dante Controller, I get the errormessage: “Cannot connect. Sample rate mismatch.”
I cannot find my B1-DANTE in my DANTE network at all. Make sure the speaker that is housing the B1-DANTE is
The volume is too loud/the speakers are too sensitive when
feeding an audio signal in via DANTE.
Find out the sample rate of your DANTE Transmitter
you want to connect to by double-clicking on its device
name. Check the sample rate in the “Device Config”
tab.
Then set the sample rate of your B1-DANTE to the same
value in its “Device Config” tab. If the sample rate of
your DANTE Transmitter is greater than 96kHz, it is not
possible to directly connect it to the B1-DANTE. Set
the sample rate of your DANTE Transmitter to 96kHz
or lower.
switched on, and that the B1-DANTE card is connected
properly to your DANTE network. The white “Sync” LED
should be lit up.
Check the green and/or yellow LEDs on the back panel
of your B1-DANTE. If they aren’t flashing, then there is
no physical connection to your network.
If you have set a static IP to your B1-DANTE previously
and cannot remember it, you have to reset it to factory
default. Contact [email protected] for more information on how to do this.
Reduce the sensitivity of the speaker by turning the
GAIN knob on the back panel of your speaker counterclockwise.
If you have turned the GAIN knob all the way down and
still find the speakers to be over-sensitive, reduce the
audio level directly in your Dante Transmitter and/or
your audio source.
I have routed everything properly; get no error-messages in
the Dante Controller, but get no audio output from the speaker.
I connected a second HEDD monitor speaker for stereo playback to the “Analog Out CH2” of my B1-DANTE, but I can only
hear sound coming from one speaker.
I connected a second HEDD monitor speaker for stereo
playback to the “Analog Out CH2” of my B1-DANTE, but the
speakers are unequally loud.
I connected a second HEDD monitor speaker for stereo playback to the “Analog Out CH2” of my B1-DANTE, but left and
right channels are swapped.
I get drop-outs and crackly audio. Try to find and get rid of unused audio connections
Check if you have selected the “HEDD Bridge CH1”
input with the source switch on the back panel of your
HEDD monitor speaker that is housing the B1-DANTE.
Check, if you have routed the correct Dante Transmitter outputs to your B1-DANTE.
Check if the Source switch on both speakers is set
correctly. The speaker that is housing your B1-DANTE
should be set to “HEDD Bridge CH1”, the other speaker
that is connected via XLR should be set to “Balanced
Input”.
Be sure that both GAIN controls on the back panel of
your HEDD monitor speakers are set to the same level.
Compensate for any level dierence with the help of
the GAIN controls.
Simply flip/re-route the two output channels in the
routing matrix of your Dante Controller application.
within your DANTE network to lower the data load. It
is also possible that sync between your DANTE devices
cannot be established properly because of bad jitter
performance. In this case, upgrade to more high-grade
network peripherals.
8
Page 9
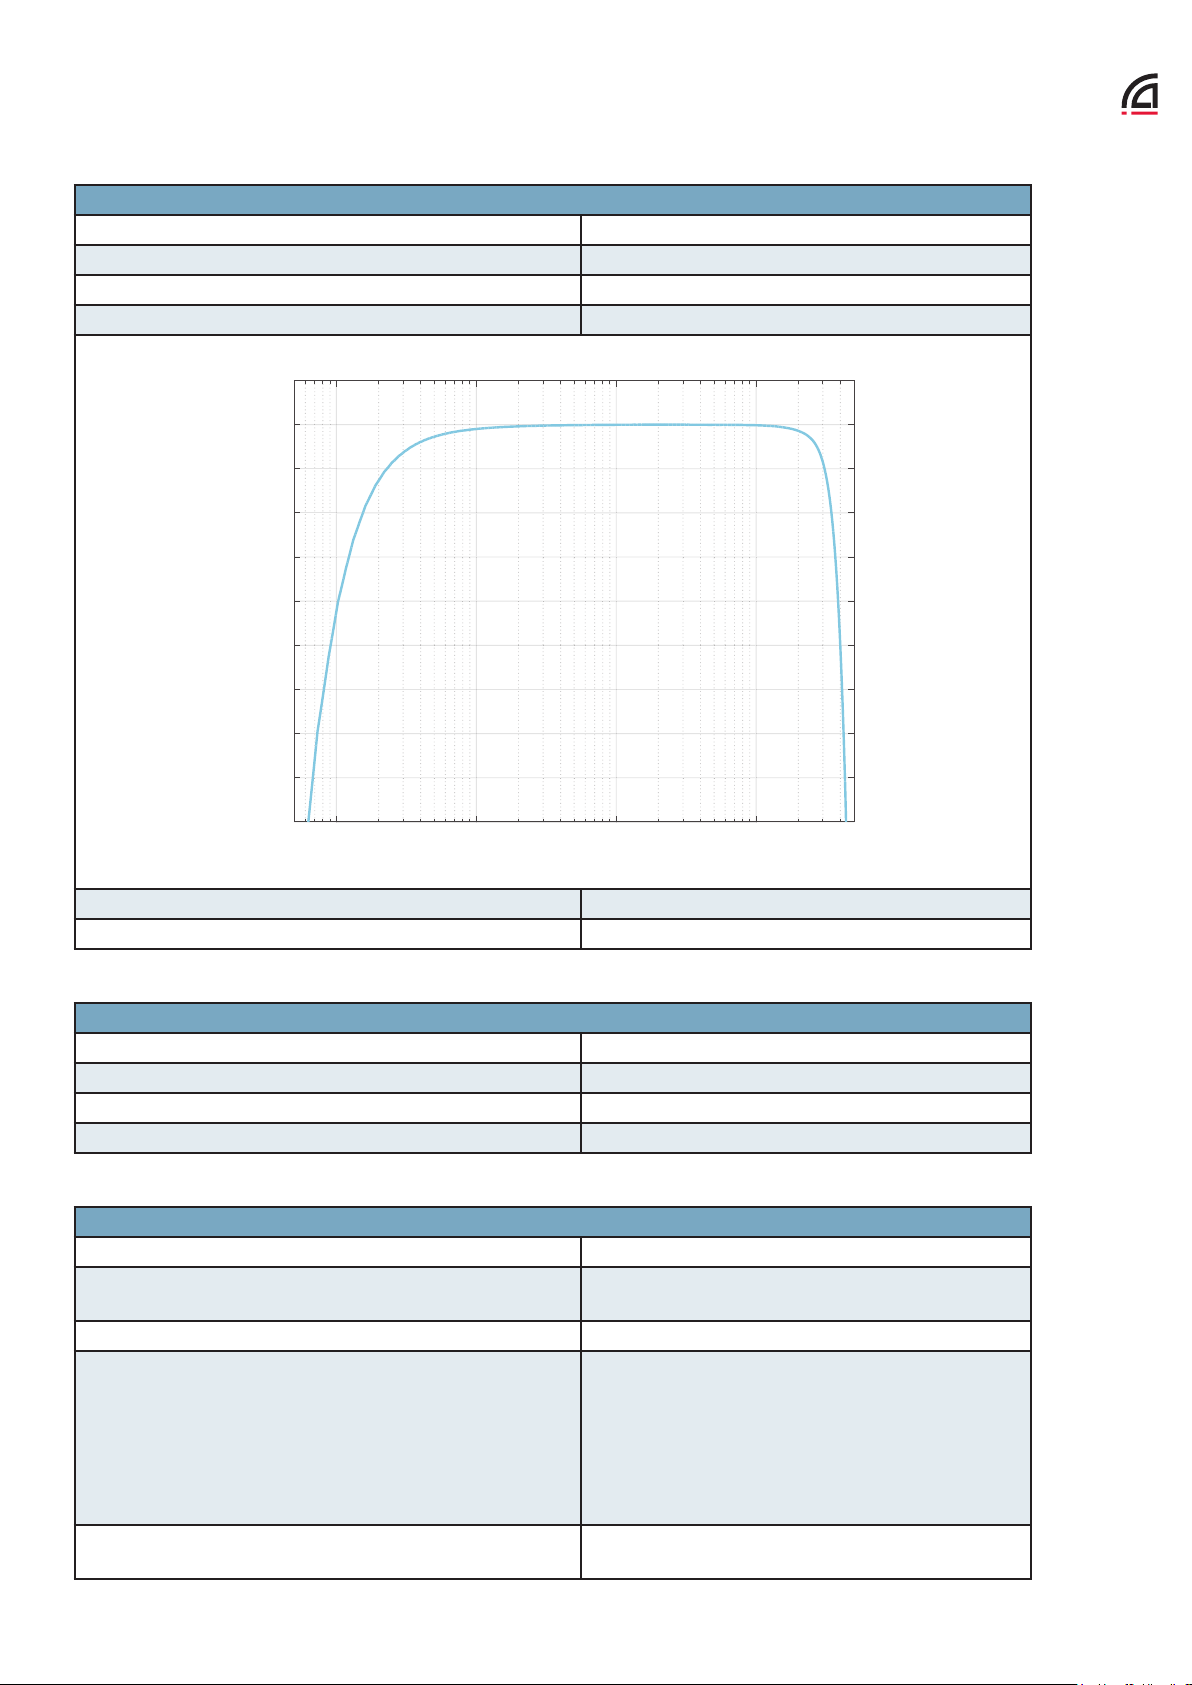
Technical Data
Audio specifi cations
DAC Texas Instruments PCM1798
Output Level +16.5 dBu (balanced) @ 0dBFS
Output Impedance 100 Ohm (balanced)
Frequency Response 15Hz … 32kHz (-1dB) @ fs = 96kHz
17
16.5
16
15.5
15
14.5
14
13.5
Balanced Output Level in dBu @ 0dBFS
13
12.5
12
10 100 1k 10k
B1-DANTE Frequency Response
Frequency in Hz
SNR 118 dB (A-weighted)
THD+N 0.002 % (-93 dB) @ +16.5 dBu
DANTE specifi cations
Number of channels 2
Sample rate 44.1kHz, 48kHz, 88.2kHz and 96kHz
Bit depth 16 Bit and 24 Bit fi xed point
Network speed 100 Mbps
General specifi cations
Product description HEDD-Bridge B1-DANTE
Connectors (rear panel)
(1) RJ-45 Ethernet
(1) 3-pin XLR male
Connectors (internal) (1) JST EHR-10 male
(1) Network speed indicator: green (100 Mb), yellow (10 Mb), Link/Act indicator: solid green (link
established), fl ashing green (data activity)
Indicators
(1) Sync indicator: white (on front panel of HEDD
monitor speaker)
Box contents
(1) HEDD-BRIDGE B1-DANTE expansion card
(1) Torx T10 o set screwdriver
9
Page 10
Heinz Electrodynamic Designs
HEDD Audio GmbH
Ringbahnstr. 32–34
12099 Berlin | GERMANY
[email protected]
www.hedd.audio
+49(0)30 720 134 70
All information subject to change without prior notice.
All trademarks are those of their respective owners.
Dante™ is a trademark of Audinate Pty Ltd.
 Loading...