

Page 1
BEATBOX
Nintendo Drum Machine
© 2011 heavyw8bit
Page 2

Introduction
_________________________________________________________________
BEATBOX will turn your original Nintendo Entertainment System into an 8-bit drum machine that you can
make beats and loops with! A TV or monitor is optional since all settings can be adjusted with key press
combinations. Features include: 2 Drum Kits: Latin & Rock, 4 programmable loops, 2 programmable fills, and a
live play mode.
Getting Started
_________________________________________________________________
This section is a quick guide to BEATBOX The following is a list of the three main modes:
1) Live Mode
When first turned on, BEATBOX is in Live Mode. In Live Mode you can play beats using Controller 1. Each
button corresponds to a different Drum Sample. To enter Live Mode press SELECT on Controller 2. Entering
live mode will also turn off both Recording and Play Modes.
2) Play Mode
Play Mode is when the Drum Loops or Fills are being played back by the NES.
● press UP on Controller 2 to play LOOP1
● press DOWN on Controller 2 to play LOOP2
● press LEFT on Controller 2 to play LOOP3
● press RIGHT on Controller 2 to play LOOP4
● press A on Controller 2 to play FILL1
● press B on Controller 2 to play FILL2
When a FILL is done playing it will automatically go back to the previous LOOP. If you change the LOOP while
a FILL is playing then that new LOOP will play once the FILL has completed.
3) Recording Mode
In Recording Mode you can record any of the 4 Loops (UP, DOWN, LEFT, RIGHT) or 2 Fills (A, B). To enter
Recording Mode, press START on Controller 2. After Pressing START then:
● press UP on Controller 2 to record LOOP1 then press UP to finish recording.
● press DOWN on Controller 2 to record LOOP2 then press DOWN to finish recording.
● press LEFT on Controller 2 to record LOOP3 then press LEFT to finish recording.
● press RIGHT on Controller 2 to record LOOP4 then press RIGHT to finish recording.
● press A on Controller 2 to record FILL1 then press A to finish recording.
● press B on Controller 2 to record FILL2 then press B to finish recording.
Page 3
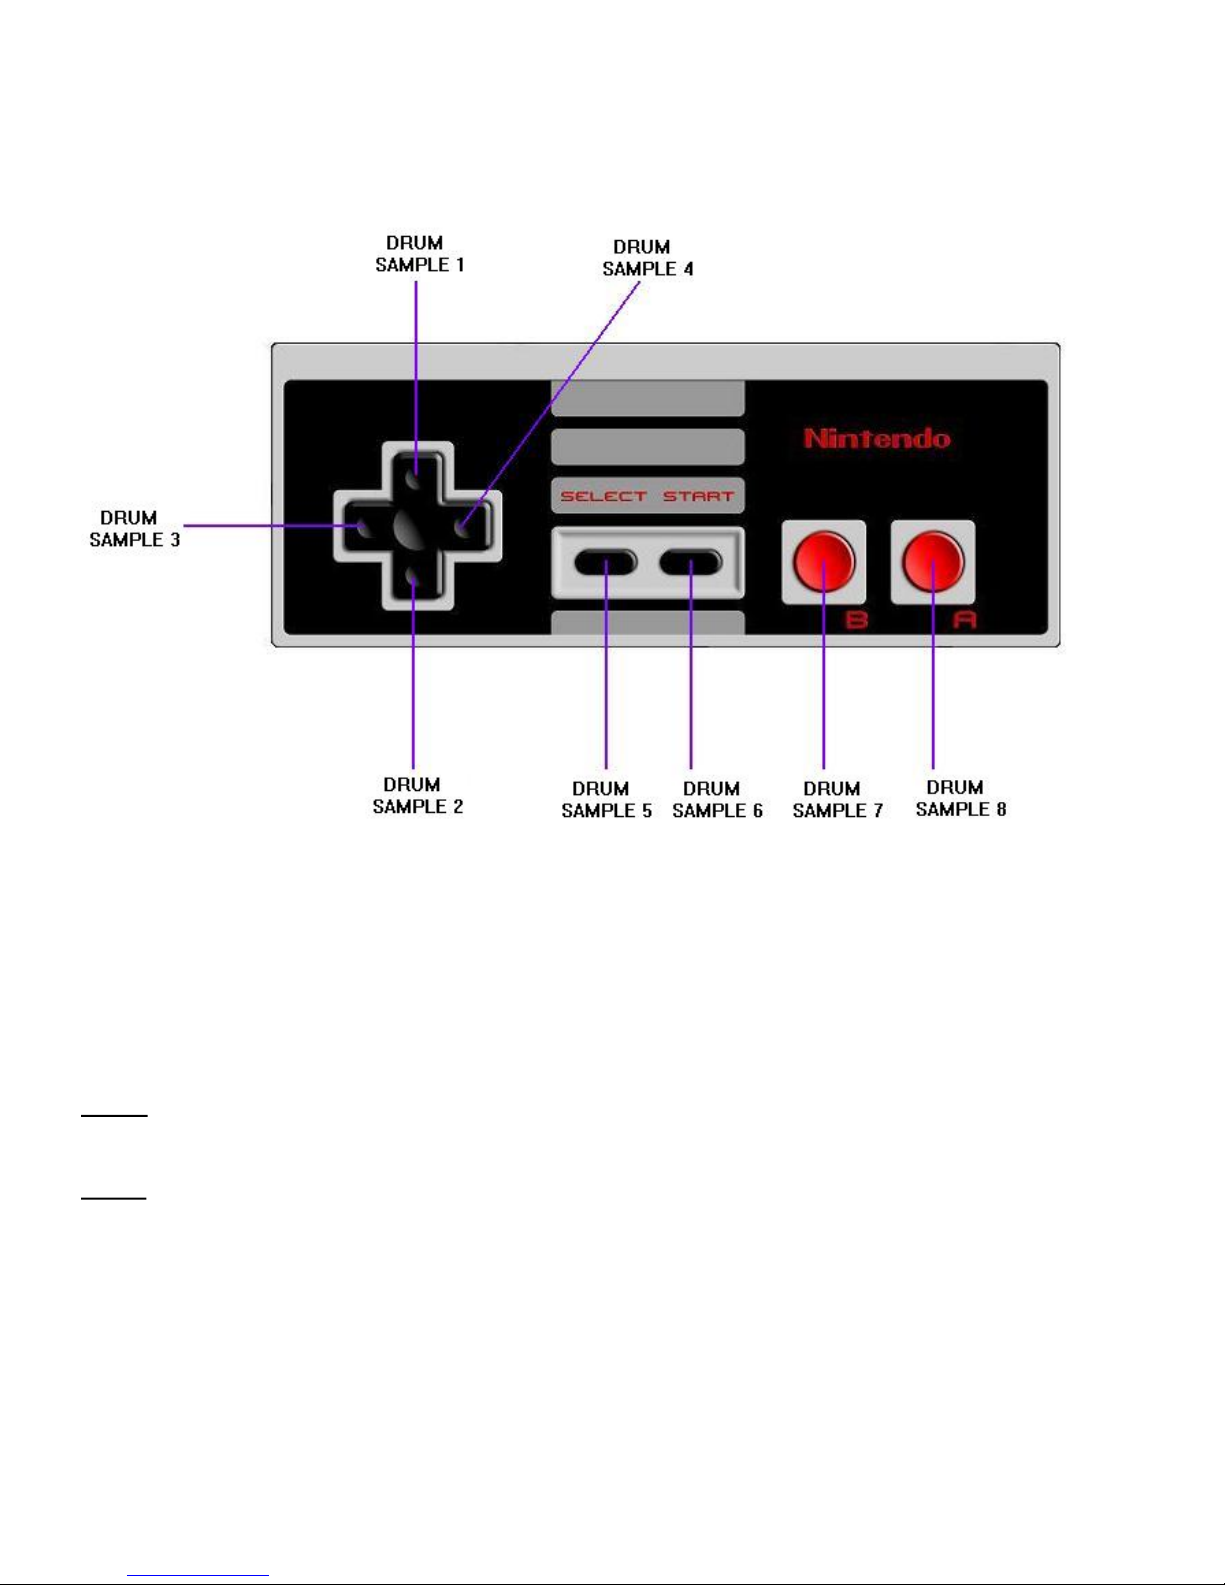
Controller 1
Each button corresponds to a different sample. There are 2 Drum Kits to choose from.
Rock: Bass Drum (UP), Hi Hat (DOWN), Clave (LEFT), Ping (RIGHT), Clap (SELECT),
Snare (START), Tom Lo (B), Tom Hi (A).
Latin: Bass Drum (UP), Conga Hi (DOWN), Conga Mid (LEFT), Cong Lo (RIGHT),
Cowbell (SELECT), Snare (START), Wood Block Hi (B), Wood Block Lo (A).
Controller 1 - Drums
Page 4
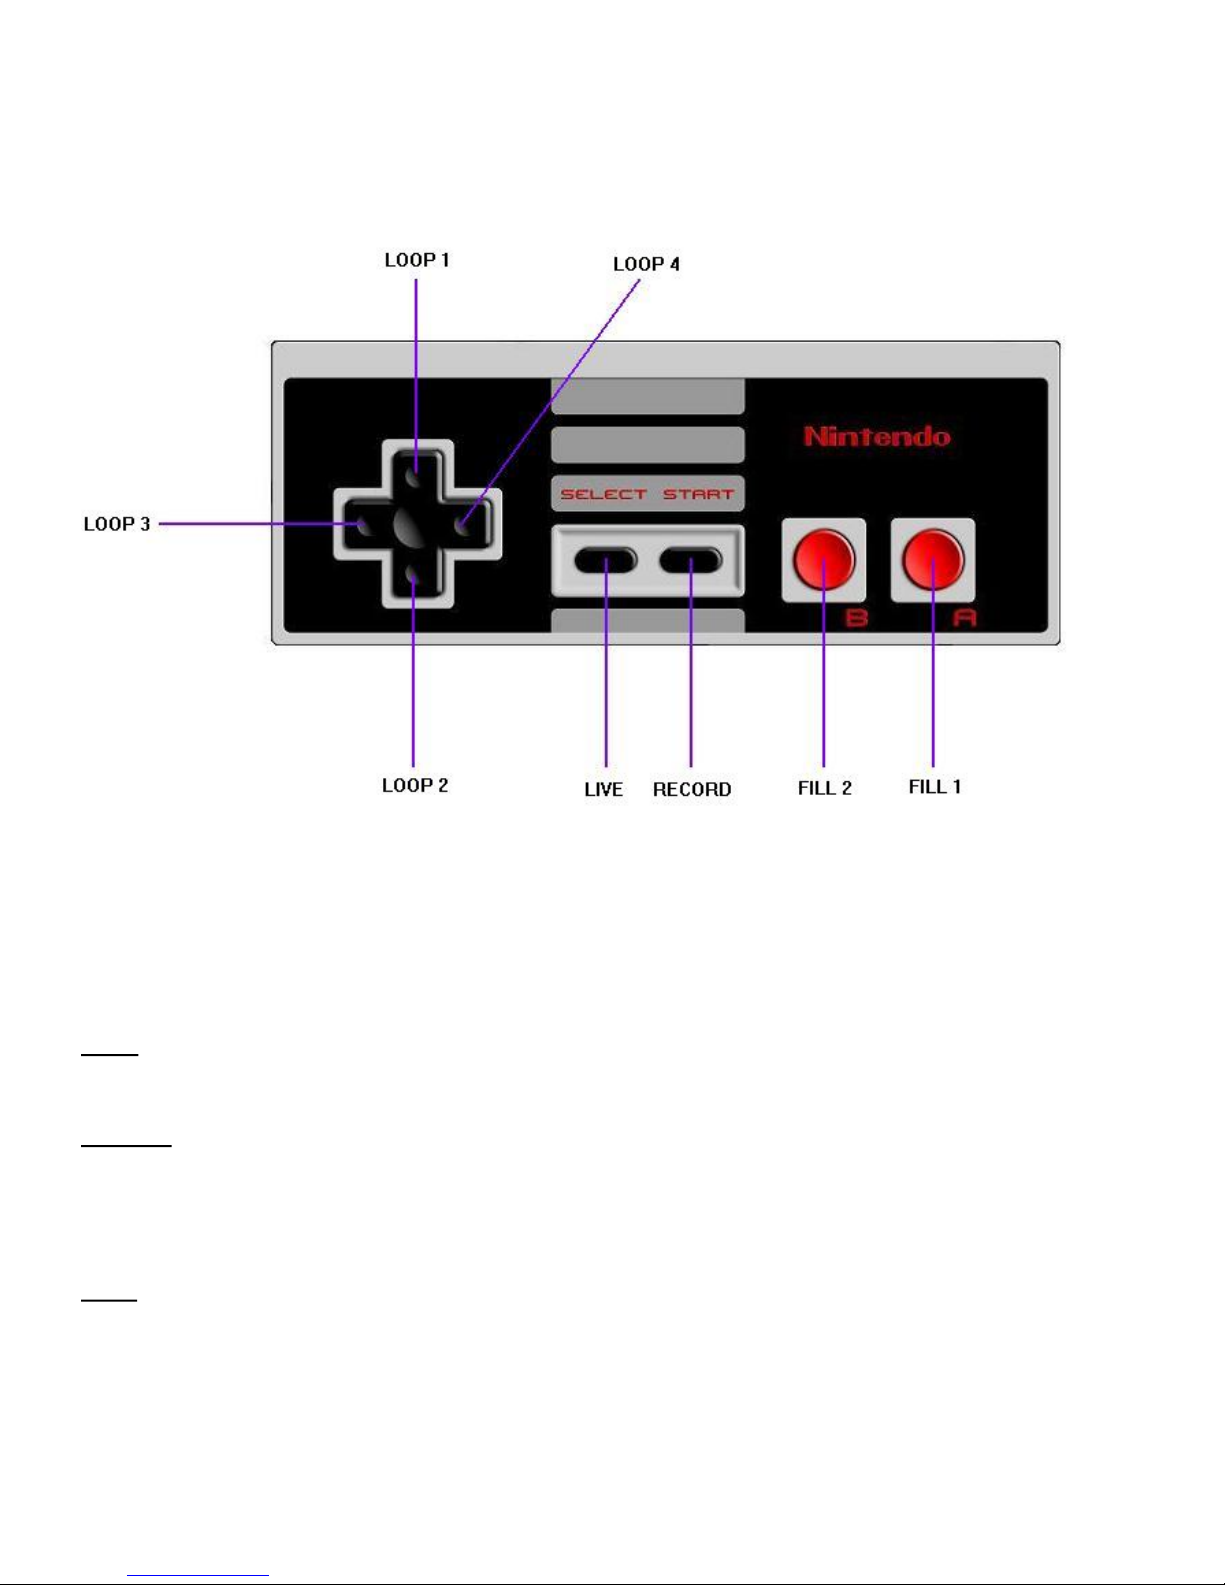
Controller 2
Play: The Directional buttons correspond to the 4 Loops and the A and B buttons correspond to the
2 Fills. Pressing these buttons in Play Mode will trigger the corresponding part to start playing.
Record: To Record a given part, press START first, then press the corresponding button. To finish
recording press the corresponding button again. For example to record LOOP 1, press START and
then UP on Controller 2. Play the beat with Controller 1 and when done press UP on Controller 2 to
finish recording LOOP 1.
Live: press SELECT to enter Live Mode and you can play beats live with Controller 1.
Controller 2 - Loop Controls
Page 5
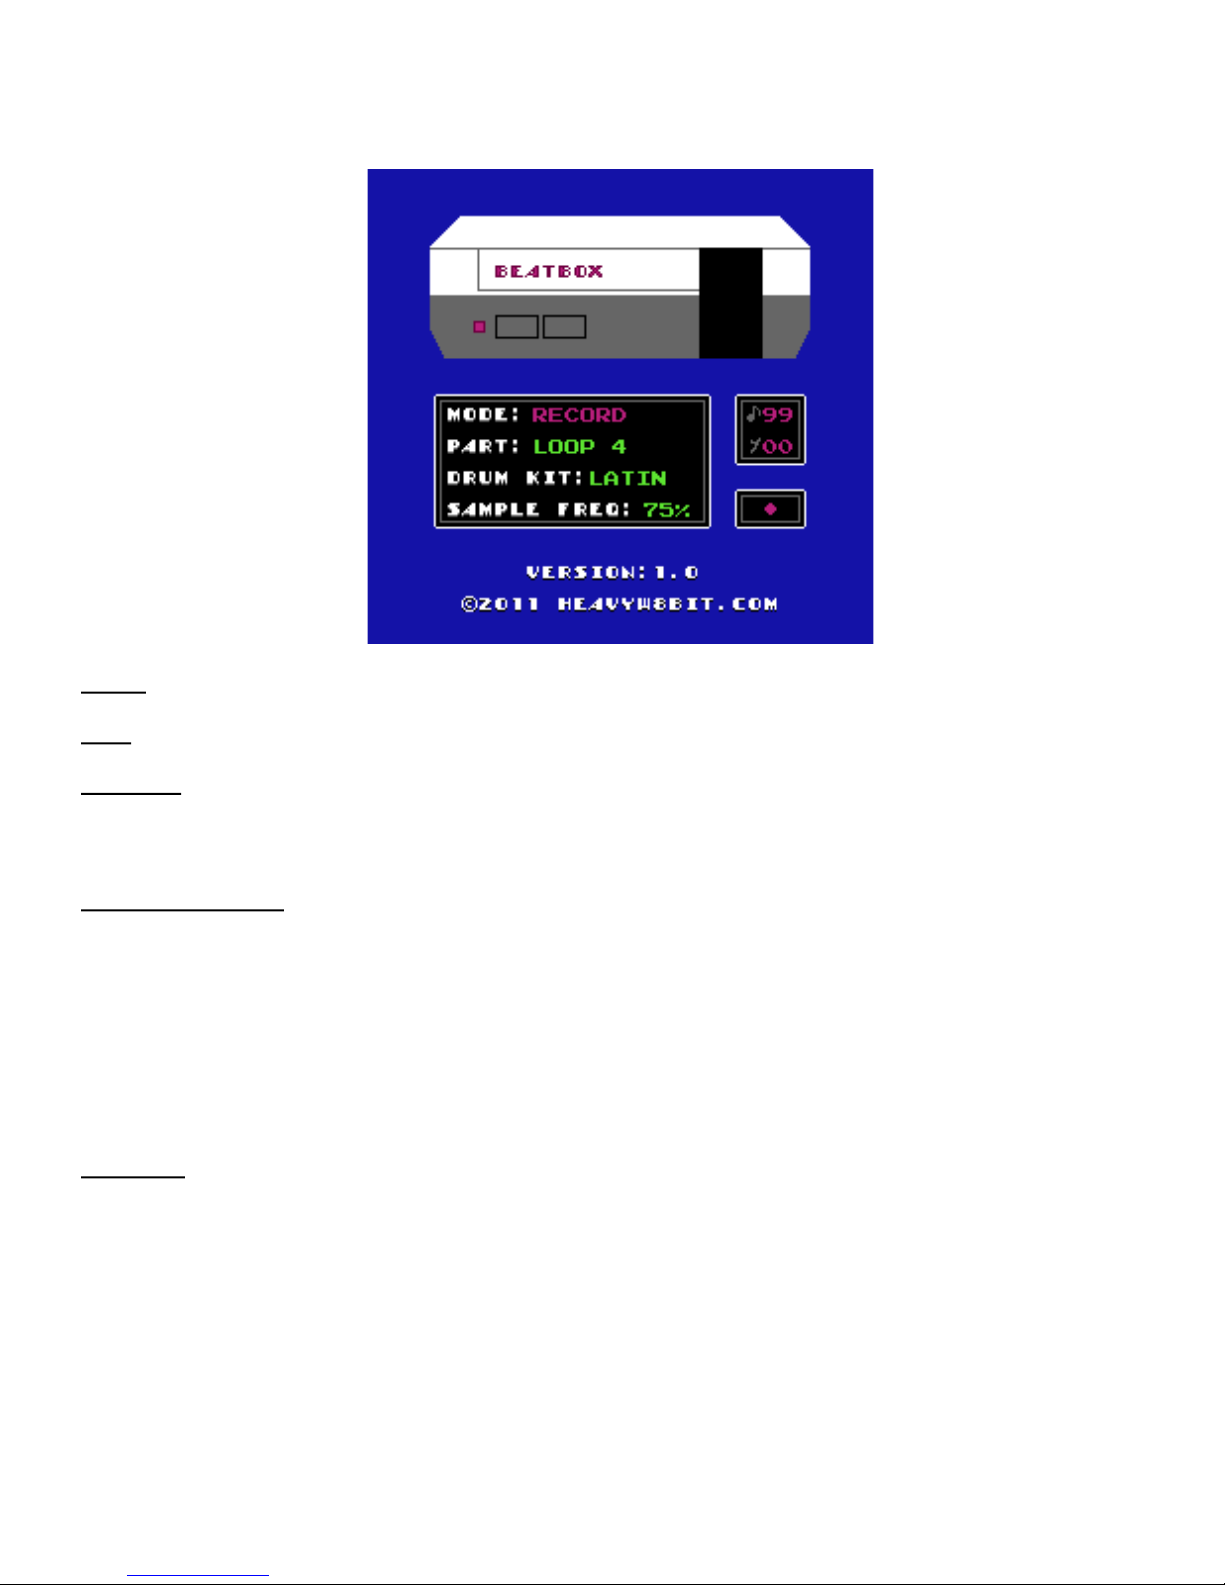
Menu
Mode: Displays current Mode. (Live, Play or Record)
Part: Displays current part that is being played or recorded.
Drum Kit: 2 Drum Kits to choose from. Rock and Latin.
■ Press SELECT and A on Controller 2 to select the Rock Kit
■ Press SELECT and B on Controller 2 to select the Latin Kit
Sample Frequency:
Adjusting the frequency affects the tuning and speed of the Drum samples
Lower Frequency = Lower Pitch and Slower Speed
There are 4 Sample Frequencies to select from. 25%, 50%, 75% and 100%
■ Press SELECT and UP on Controller 2 to set frequency to 100%
■ Press SELECT and DOWN on Controller 2 to set frequency to 75%
■ Press SELECT and LEFT on Controller 2 to set frequency to 50%
■ Press SELECT and RIGHT on Controller 2 to set frequency to 25%
Counters: There are 2 counters to watch when recording Loops and Fills. The counters will start right after
the first key press. If any of the counters gets down to zero then BEATBOX will stop recording.
1. Each Loop / Fill can save up to 99 key presses. The top counter with the Note icon counts down the
number of key presses left.
2. The maximum amount of time allowed between each key press is about 4 seconds. The bottom
counter with the Rest icon will count down from 25 to 0. The counter is reset with each key press.
 Loading...