

Page 1
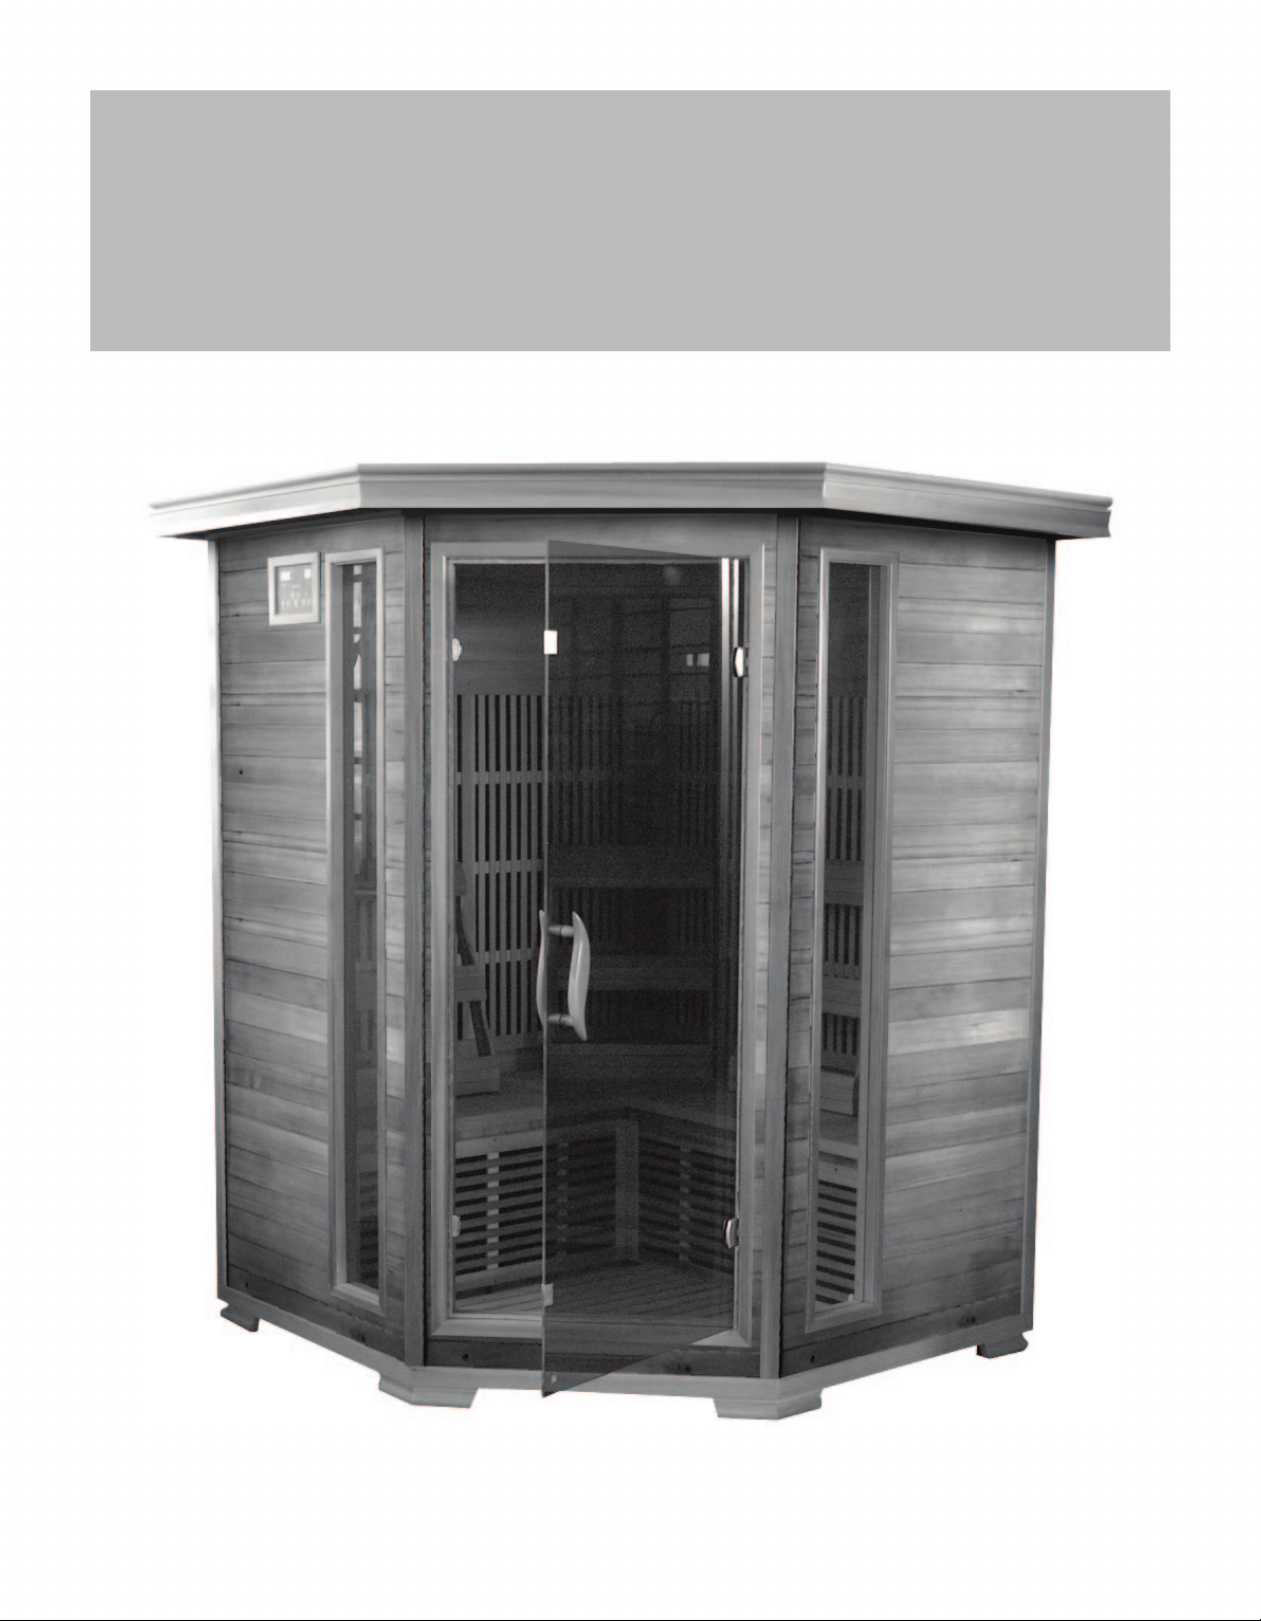
OWNER’S MANUAL
THREEPERSON & FOURPERSON
CORNER SAUNAS
SA1312/SA1320 / SA2412DX/SA2420DX
Page 2

TABLE OF CONTENTS
ASSEMBLY TIPS & WARNINGS
PARTS IDENTIFIER
ASSEMBLY INSTRUCTIONS
OPERATION INSTRUCTIONS
ENJOYING YOUR SAUNA
HEALTH & SAFETY WARNINGS
CLEANING & MAINTANENCE
TROUBLESHOOTING GUIDE
REPLACEMENT PARTS
3
4
5-10
11
12
13
14
14-15
16-19
WARRANTY INFORMATION
20
The information contained in this manual is subject to change without notice.
2
Page 3
ASSEMBLY TIPS & WARNINGS
• Before you begin, read all assembly instructions and safety warnings carefully.
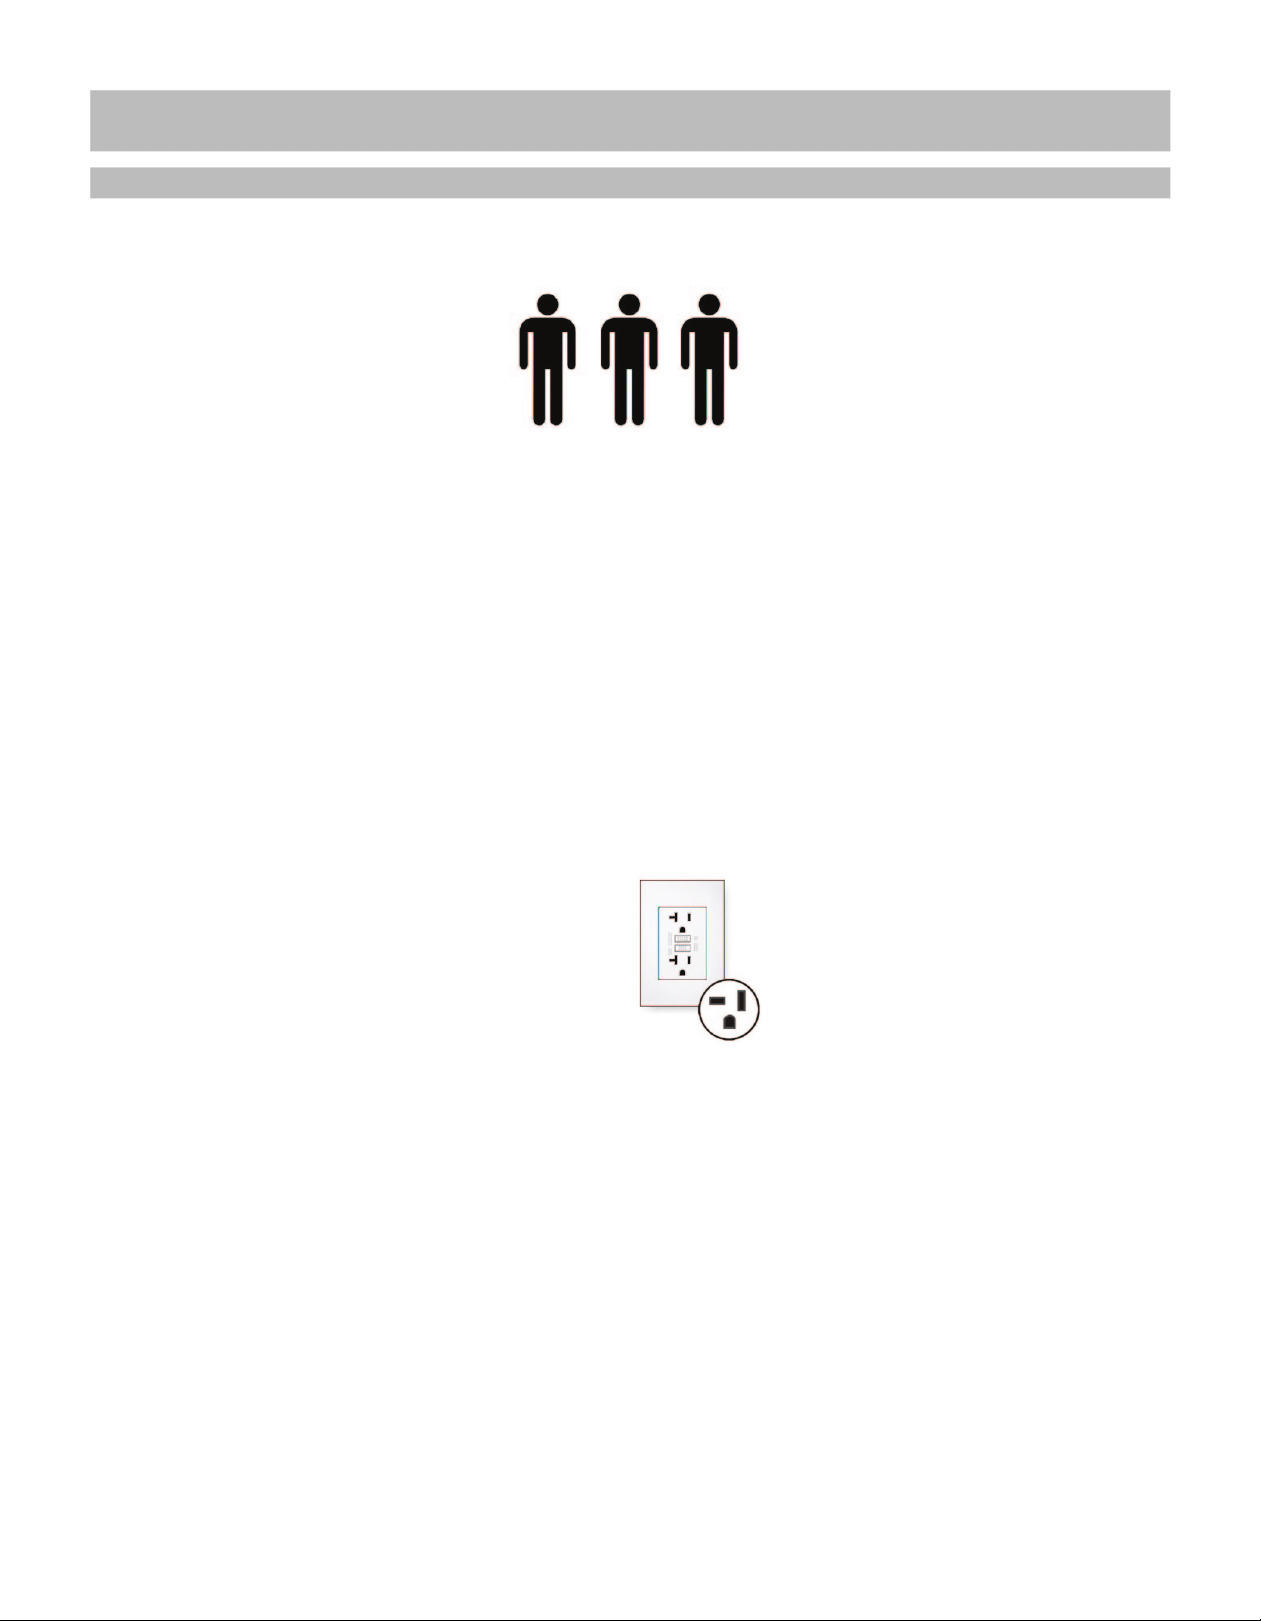
• This sauna requires at least 3 adults to complete assembly.
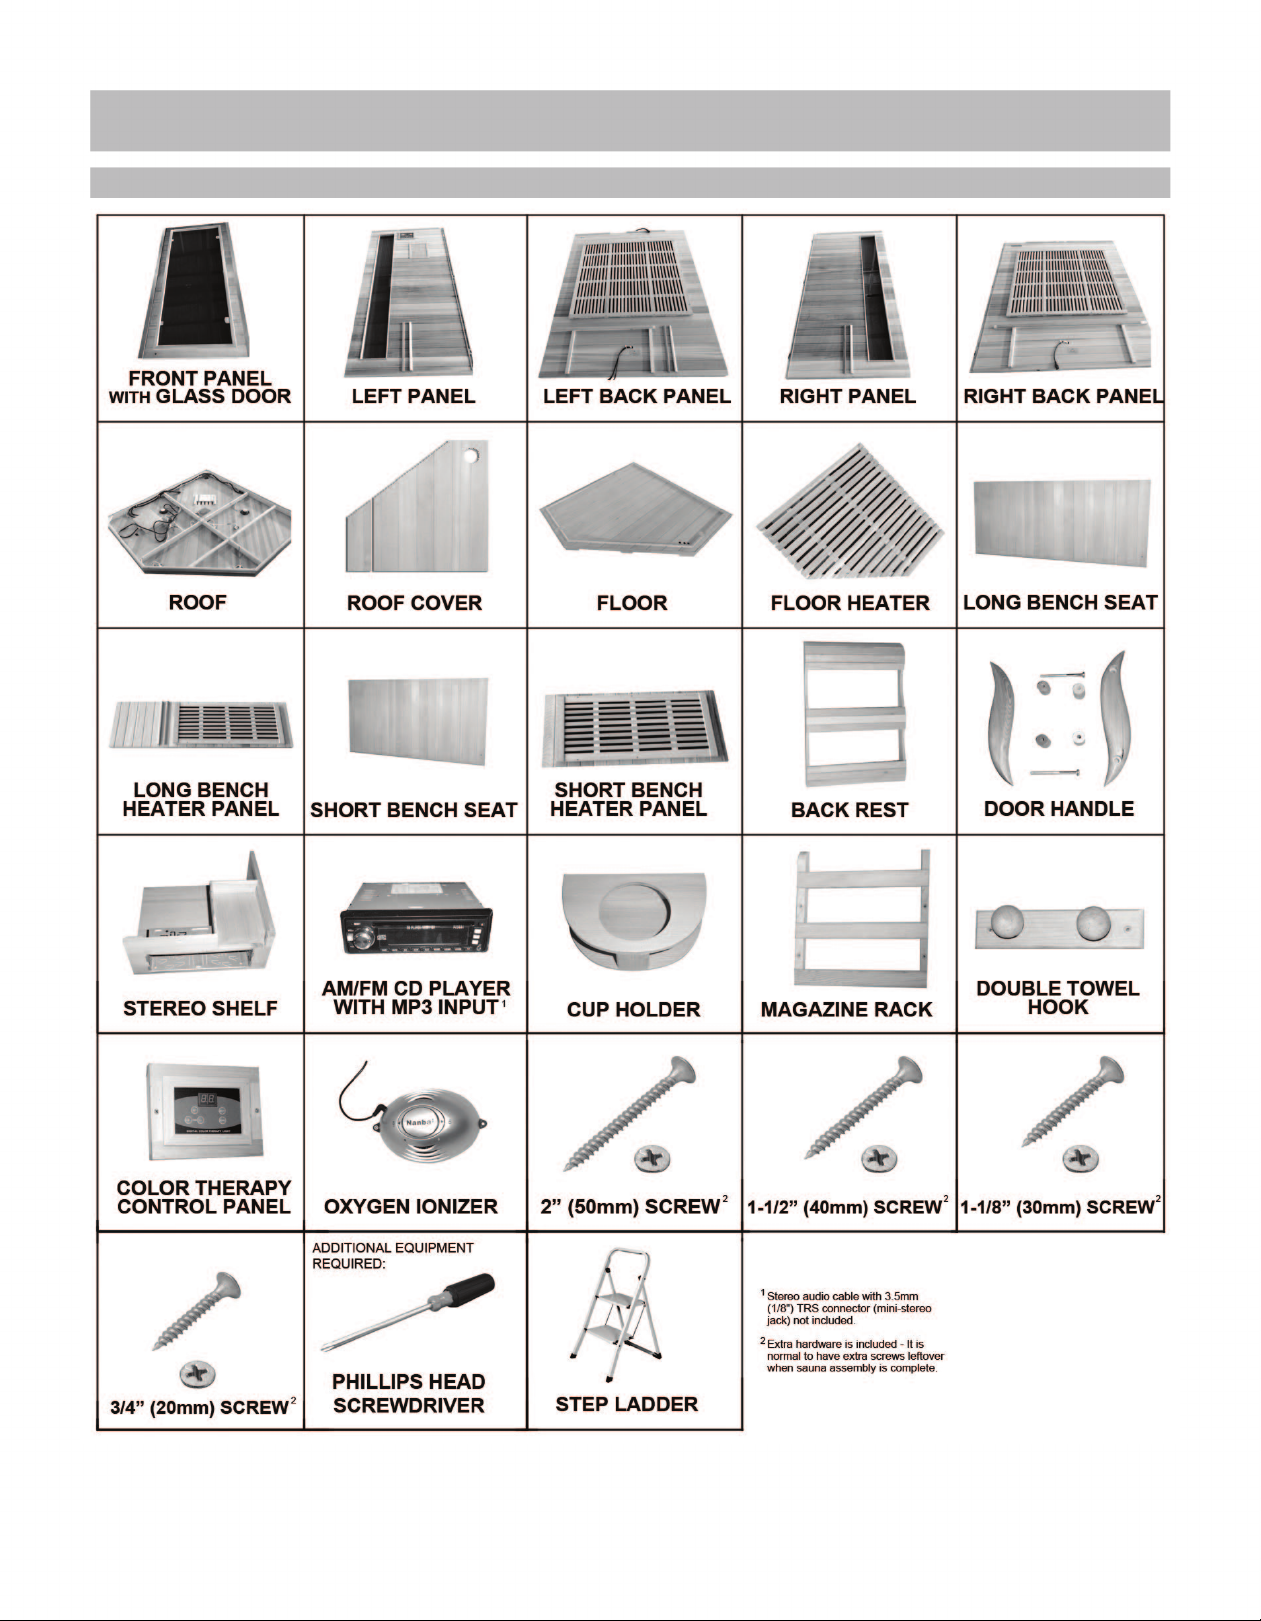
• Remove all of the contents from boxes and verify that you have all of the parts shown on the Parts
Identier before you begin assembly. Note: Some parts may be pre-installed or pre-assembled.
• This manual is used for the assembly of several sauna models; therefore, some gures or drawings
may not look exactly like your product.
• Cover the sauna oor during assembly to avoid staining the unnished wood surface.
• Retain this Owner’s Manual for future reference.
ELECTRICAL REQUIREMENTS
• We recommend consulting a licensed electrician and checking local ordinances before installing
ANY sauna.
• This sauna requires a 20 amp receptacle and a 20 amp circuit breaker. Note: Electrical modications
may be required to accommodate 20 amp power.
• Refer to the serial plate on the back of the sauna for complete electrical specications.
• This sauna requires a dedicated circuit - No other appliances should share the same outlet with the
sauna.
CHOOSING A LOCATION
• This sauna should only be placed INDOORS on a dry, level surface.
• There should be a minimum of 5 inches clearance between the sauna and any wall.
• Make sure the main power cord will reach the outlet and remains easy to access.
• The sauna should only be used in a dry location as moisture will damage the wood and electrical
components.
• Keep the sauna away from any potential hazards including water sources, ammable objects and
combustible materials.
3
Page 4
PARTS IDENTIFIER (NOT TO SCALE)
* Refer to REPLACEMENT PARTS (PAGE 16-19) to determine the correct part number when ordering replacements.
4
Page 5
ASSEMBLY INSTRUCTIONS
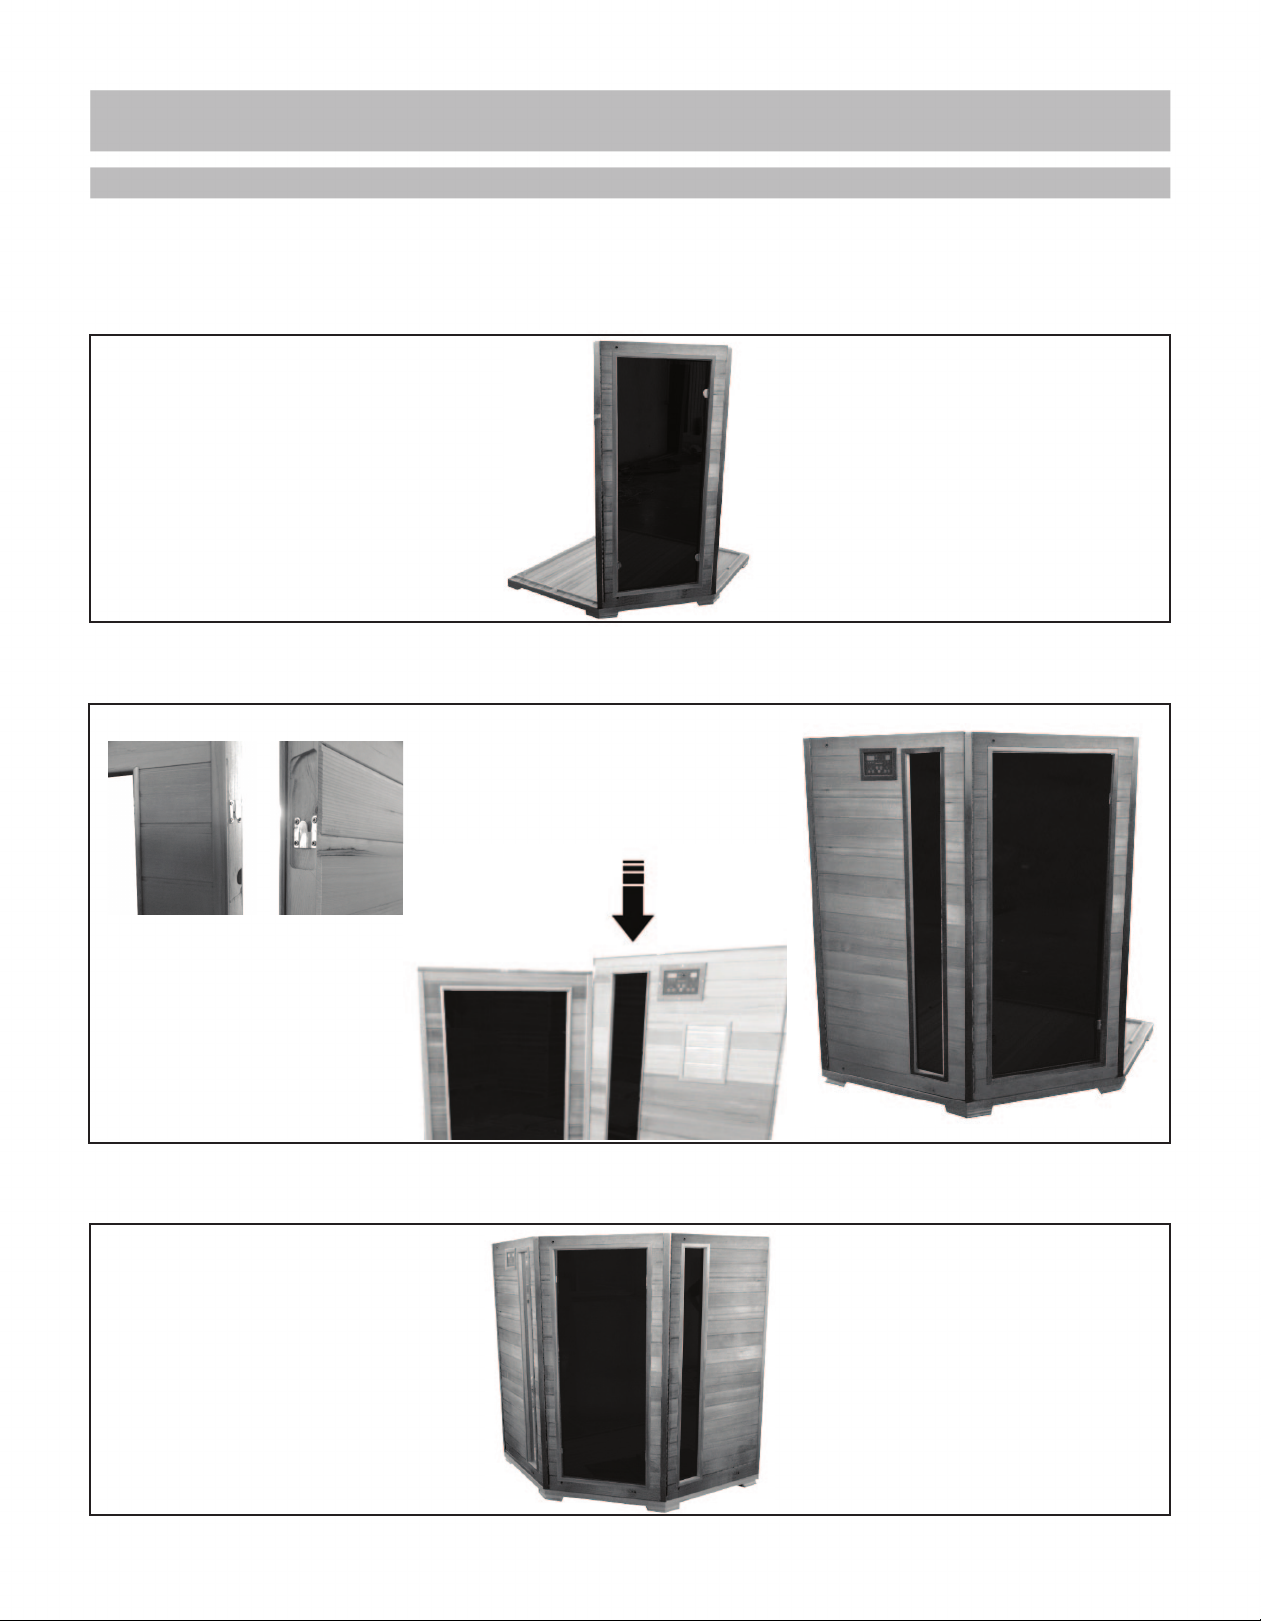
1. Begin assembly by determining an appropriate location for your sauna – see ASSEMBLY
TIPS & WARNINGS for details. Attach the FRONT PANEL to the FLOOR by lining up the FRONT
PANEL with the groove in the front of the FLOOR.
2. Attach the LEFT PANEL to the FRONT PANEL by aligning the hooks and sliding the LEFT
PANEL down, locking it into place.
3. Attach the RIGHT PANEL to the FRONT PANEL by aligning the hooks and sliding the RIGHT
PANEL down, locking it into place.
5
Page 6
ASSEMBLY INSTRUCTIONS (CONT.)
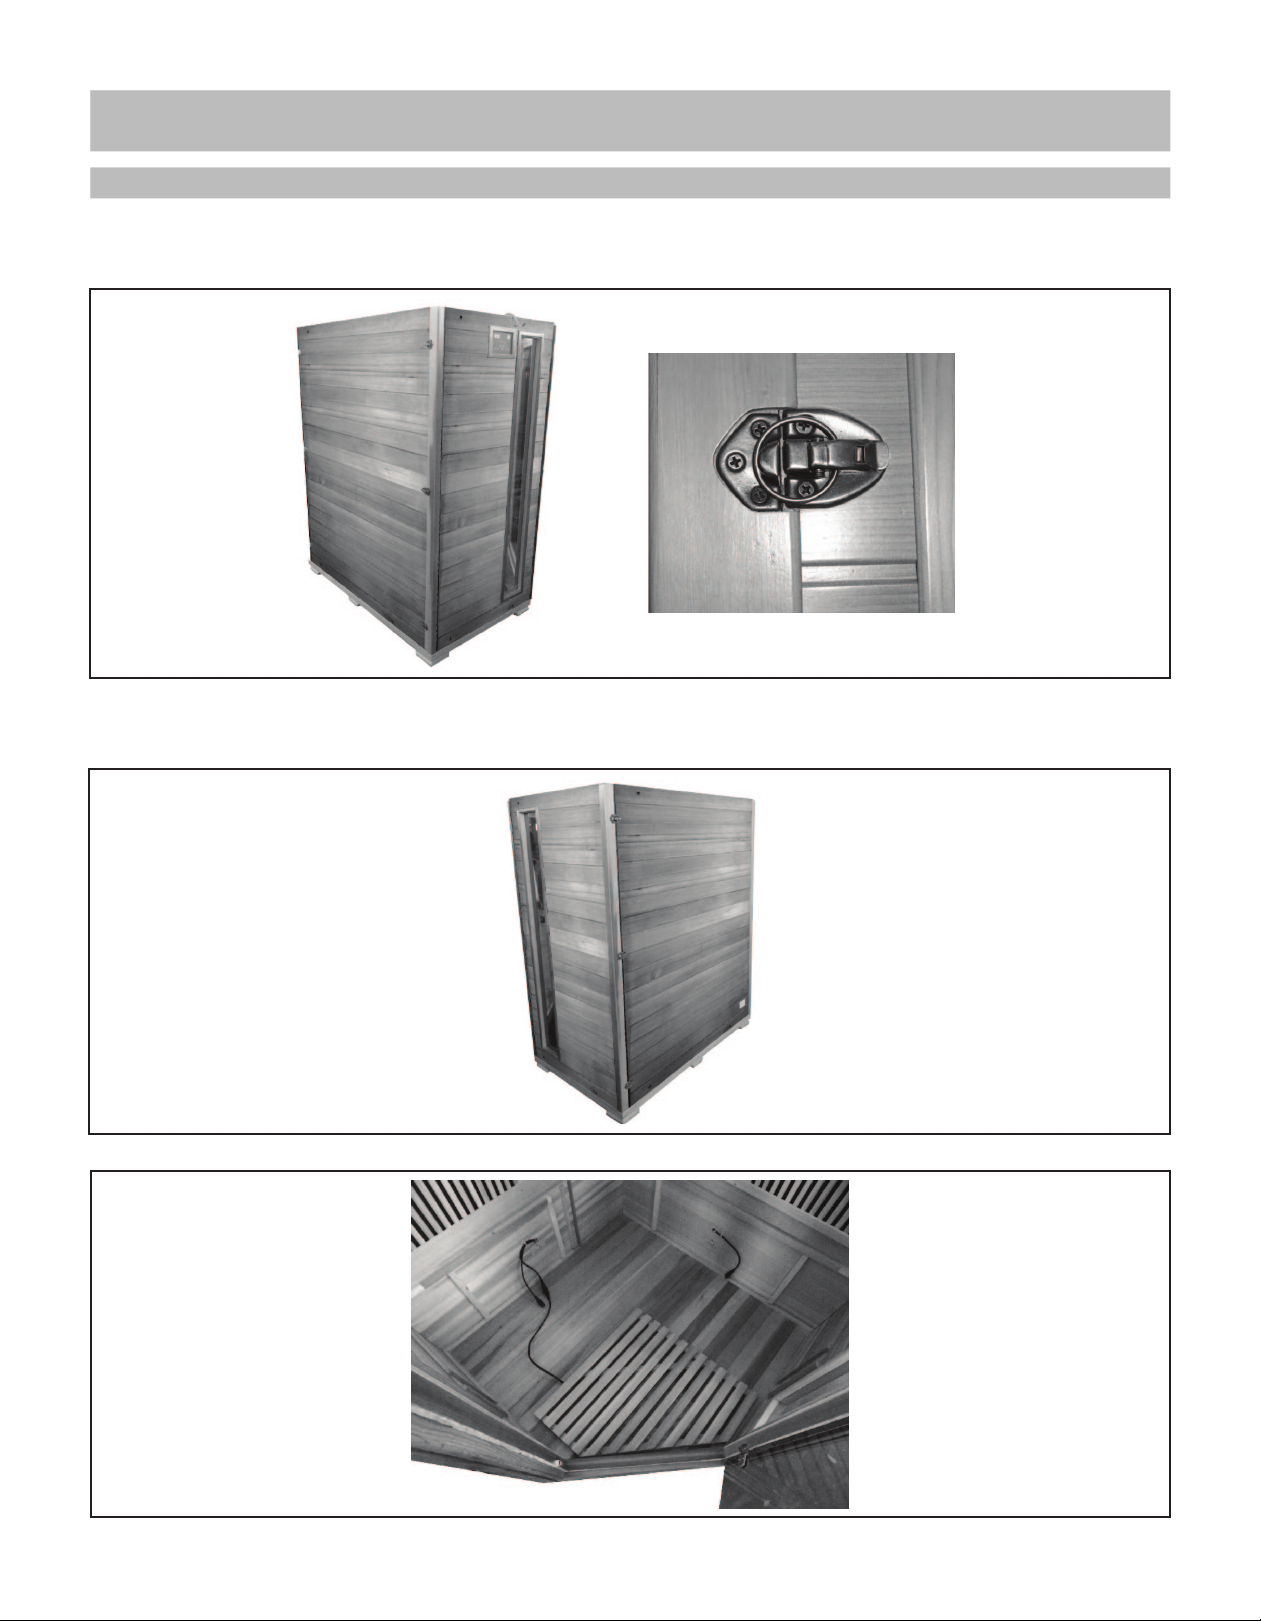
4. Attach the LEFT BACK PANEL to the FLOOR. Buckle the LEFT BACK PANEL to the LEFT PANEL.
5. Attach the RIGHT BACK PANEL to the FLOOR. Buckle the RIGHT BACK PANEL to the RIGHT
PANEL and to the LEFT BACK PANEL.
6. Attach the FLOOR HEATER to the FLOOR with 1-1/2” SCREWS. Connect the heater plug.
6
Page 7
ASSEMBLY INSTRUCTIONS (CONT.)
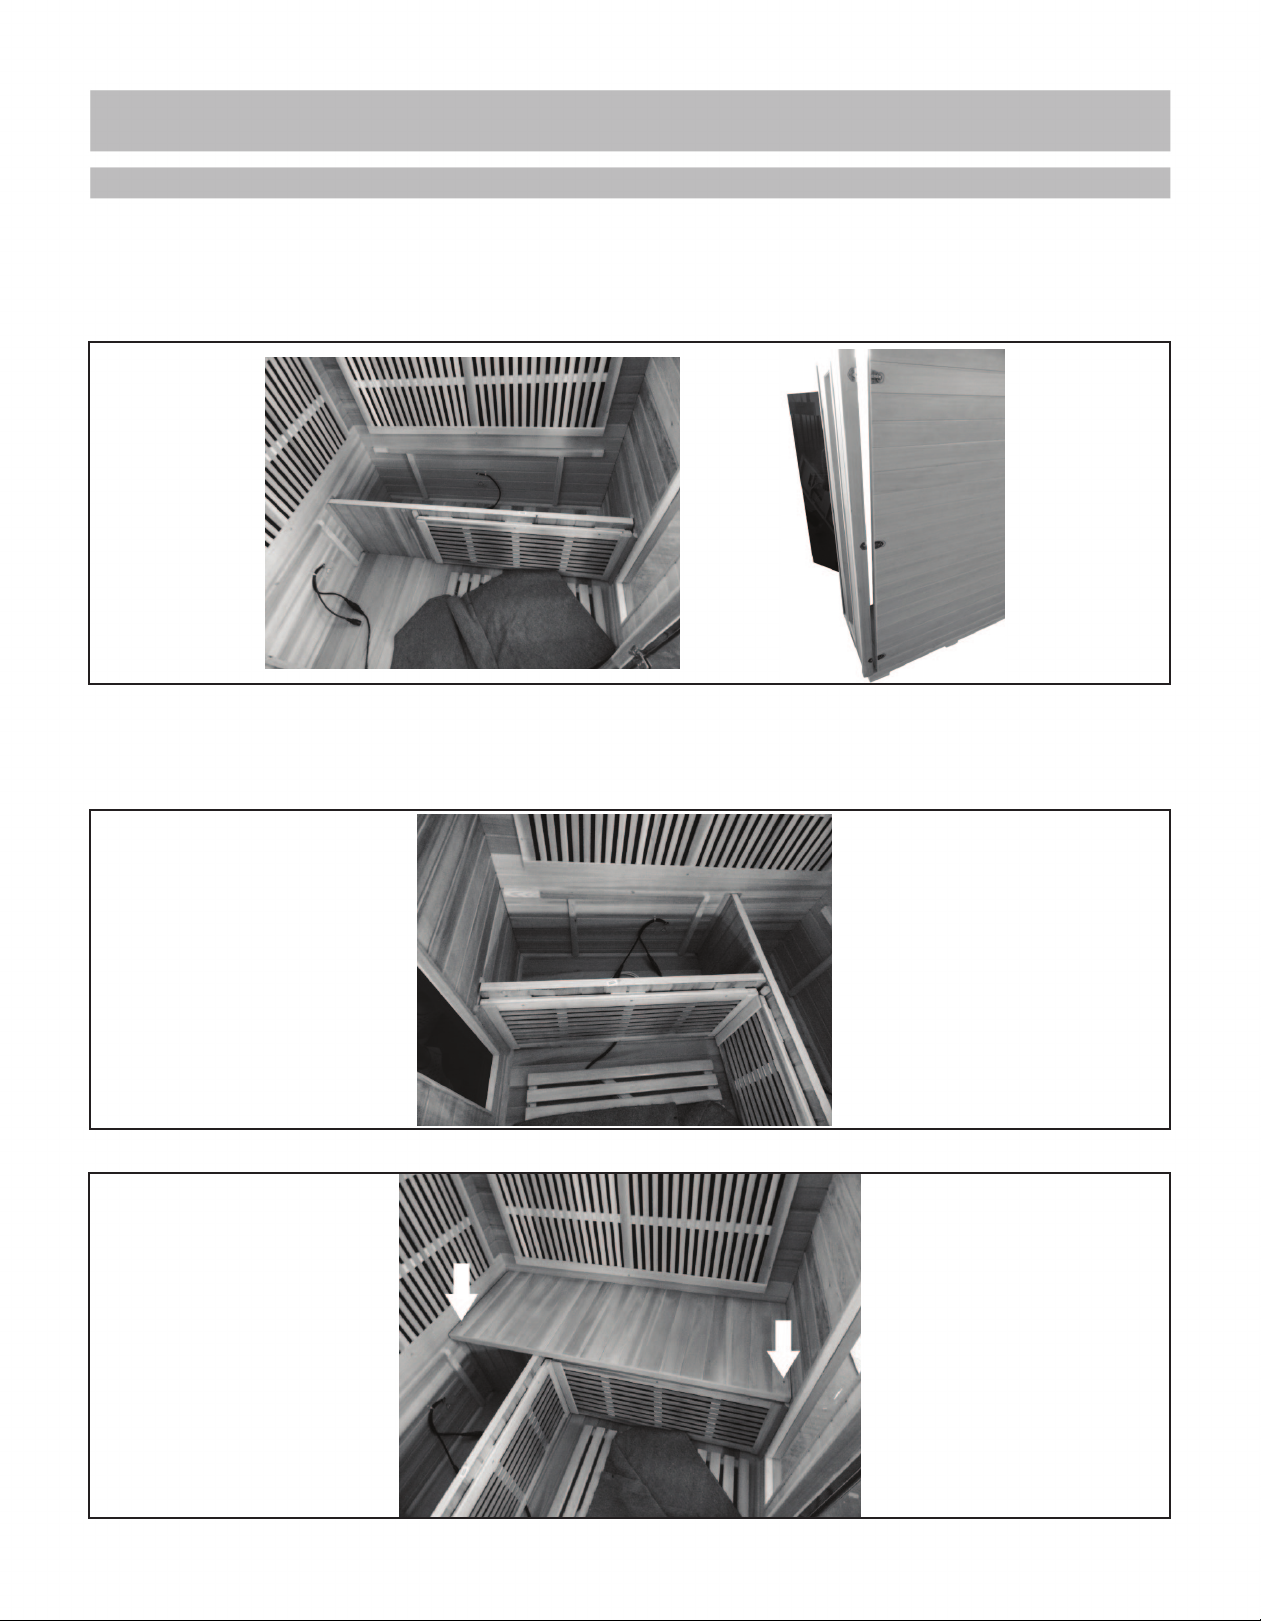
7. Slide the LONG BENCH HEATER PANEL into place between the LEFT BACK PANEL and RIGHT
PANEL. Connect the heater plug. Note: It may be necessary to unbuckle the RIGHT PANEL from
the RIGHT BACK PANEL in order to slide the LONG BENCH HEATER PANEL into place.
8. Slide the SHORT BENCH HEATER PANEL into place between the LONG BENCH HEATER
PANEL and LEFT PANEL. Connect the heater plug. Note: Make sure the FLOOR HEATER cable is
placed through the groove in the bottom of the SHORT BENCH HEATER PANEL.
9. Attach LONG BENCH SEAT with 2” SCREWS.
7
Page 8
ASSEMBLY INSTRUCTIONS (CONT.)
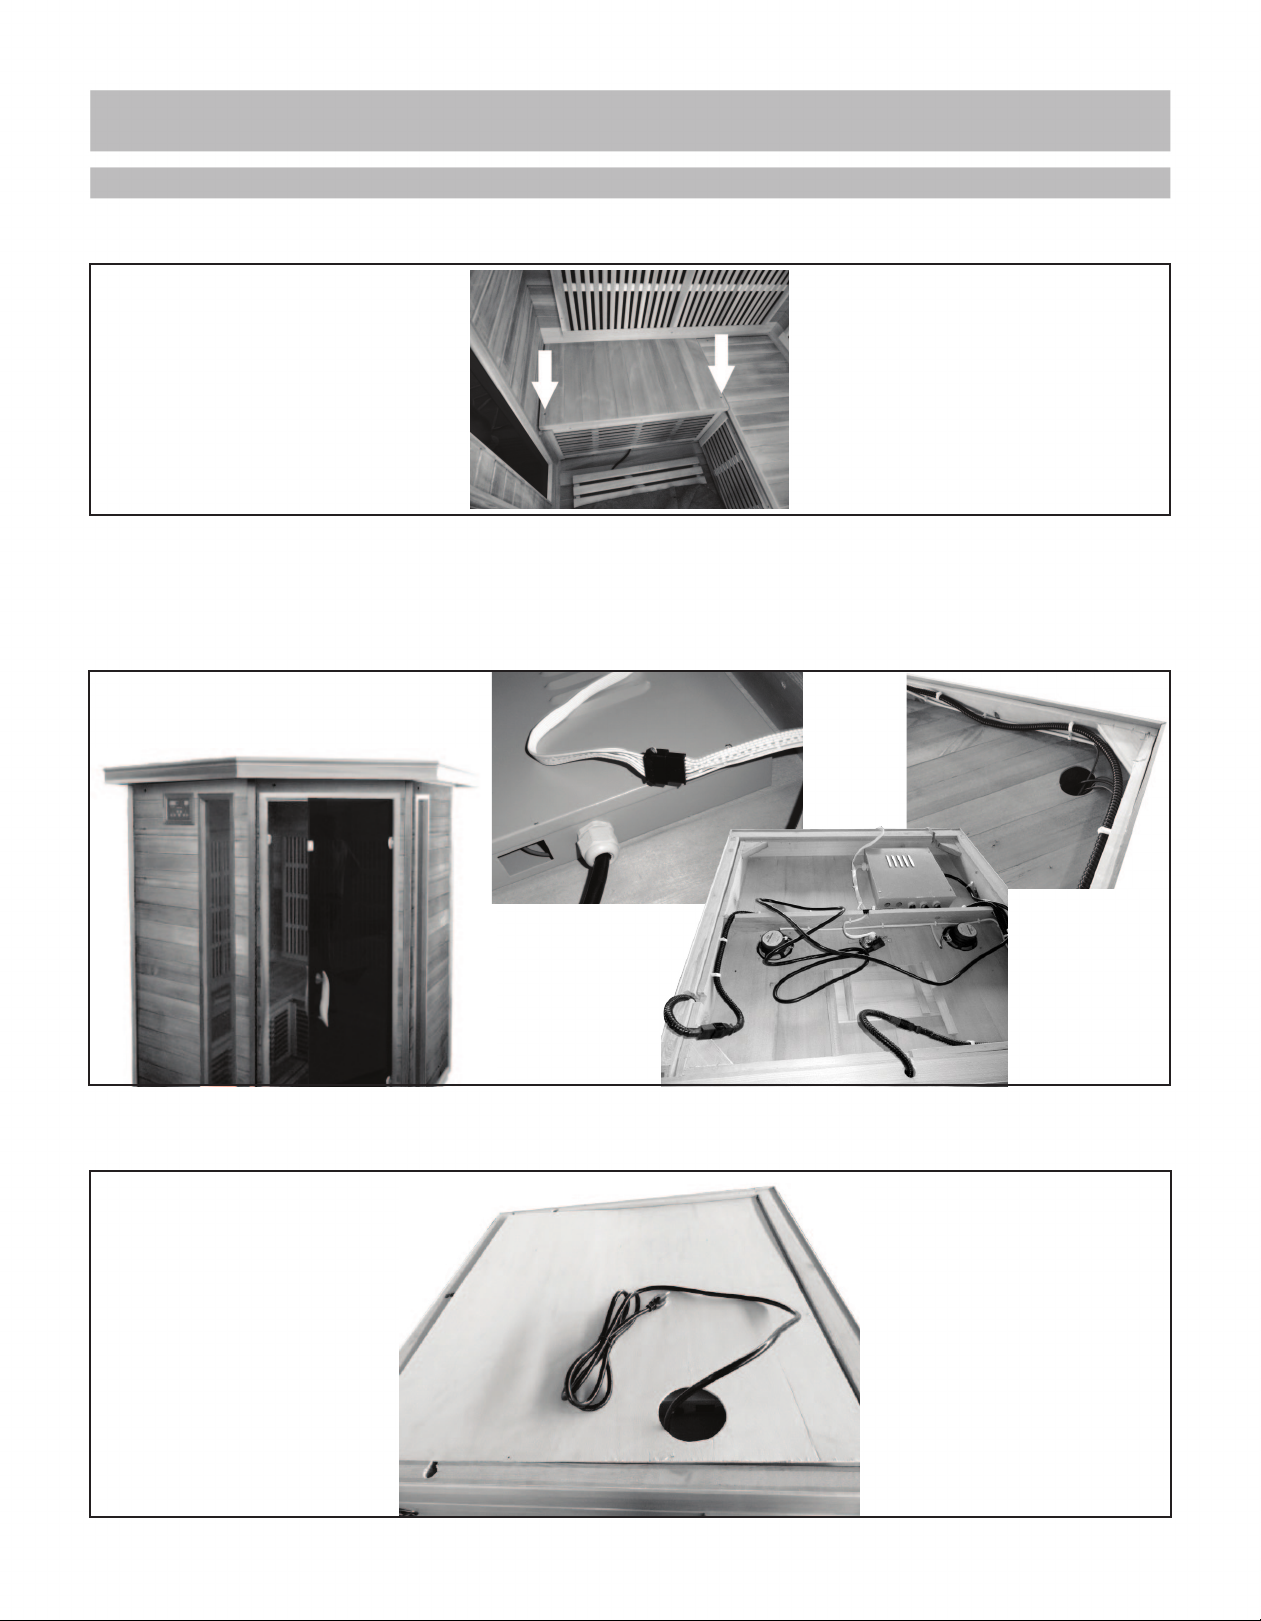
10. Attach SHORT BENCH SEAT with 2” SCREWS.
11. Lift the ROOF above the sauna, feeding the control panel and heater cables through the
corresponding holes. Feed the cables for the AM/FM CD PLAYER through the hole in the bottom of the ROOF. Secure the ROOF to the sauna with 1-1/8” SCREWS. Connect the control
panel and heater plugs.
12. Feed the main power cable through hole in ROOF COVER. Secure the ROOF COVER with
3/4” SCREWS.
8
Page 9
ASSEMBLY INSTRUCTIONS (CONT.)
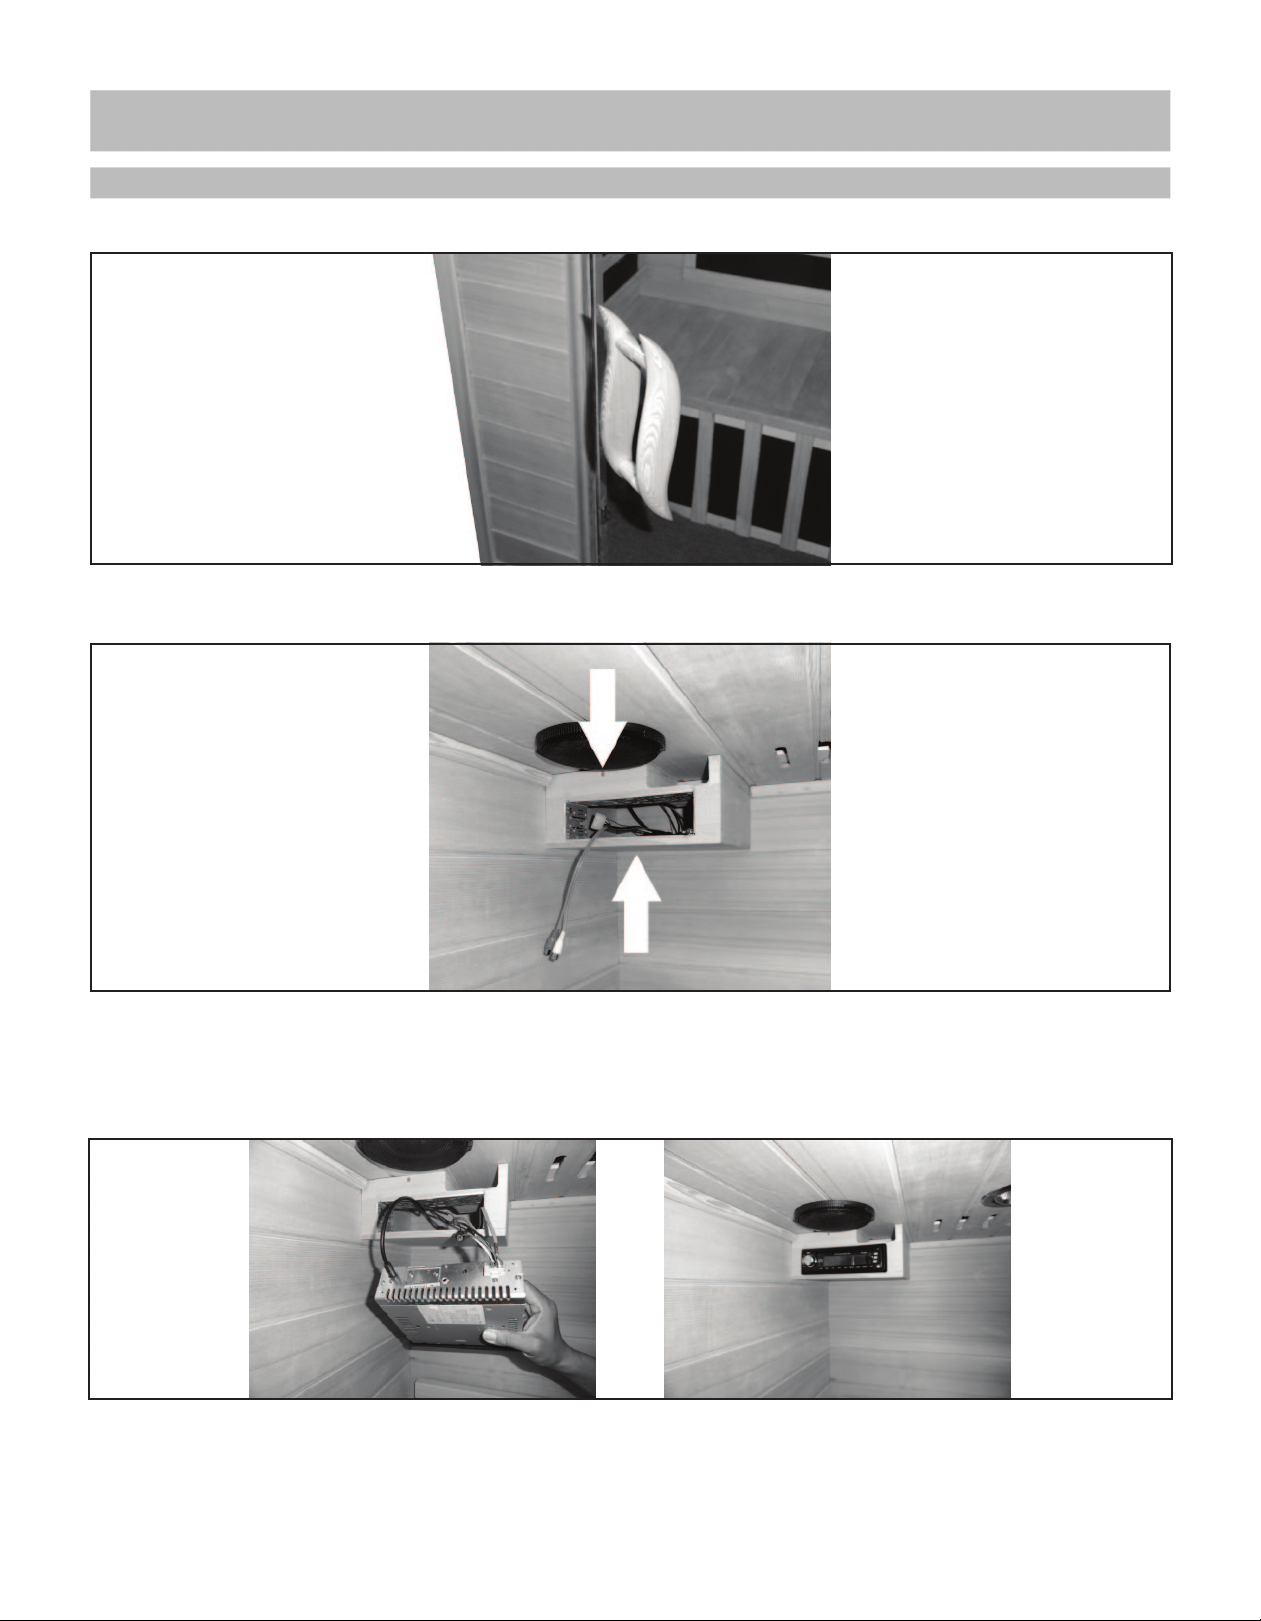
13. Attach the DOOR HANDLE to the GLASS DOOR.
14. Gently pull the cables for the AM/FM CD PLAYER through the opening in the front of the
STEREO SHELF. Attach the STEREO SHELF with 3/4” SCREWS.
15. Plug the controller and antenna into the back of the AM/FM CD PLAYER. Note: The red
and white cables are used for an optional video player and can be tucked out of the way. Slide
and lock the AM/FM CD PLAYER into the STEREO SHELF. Note: Use “keys” with to remove the CD
player for maintenance.
16. Attach the MAGAZINE RACK with 1-1/2” SCREWS. Note: A sticker indicates the optimal position for this accessory, but attaching it is optional. Consider the position carefully before driving
any screws into the sauna interior.
9
Page 10
ASSEMBLY INSTRUCTIONS (CONT.)
17. Attach the CUP HOLDER(S) with 3/4” SCREWS. Note: A sticker indicates the optimal position
for this accessory, but attaching it is optional. Consider the position carefully before driving any
screws into the sauna interior.
18. Attach the DOUBLE TOWEL HOOK with 3/4” SCREWS. Note: A sticker indicates the optimal
position for this accessory, but attaching it is optional. Consider the position carefully before driving any screws into the sauna interior.
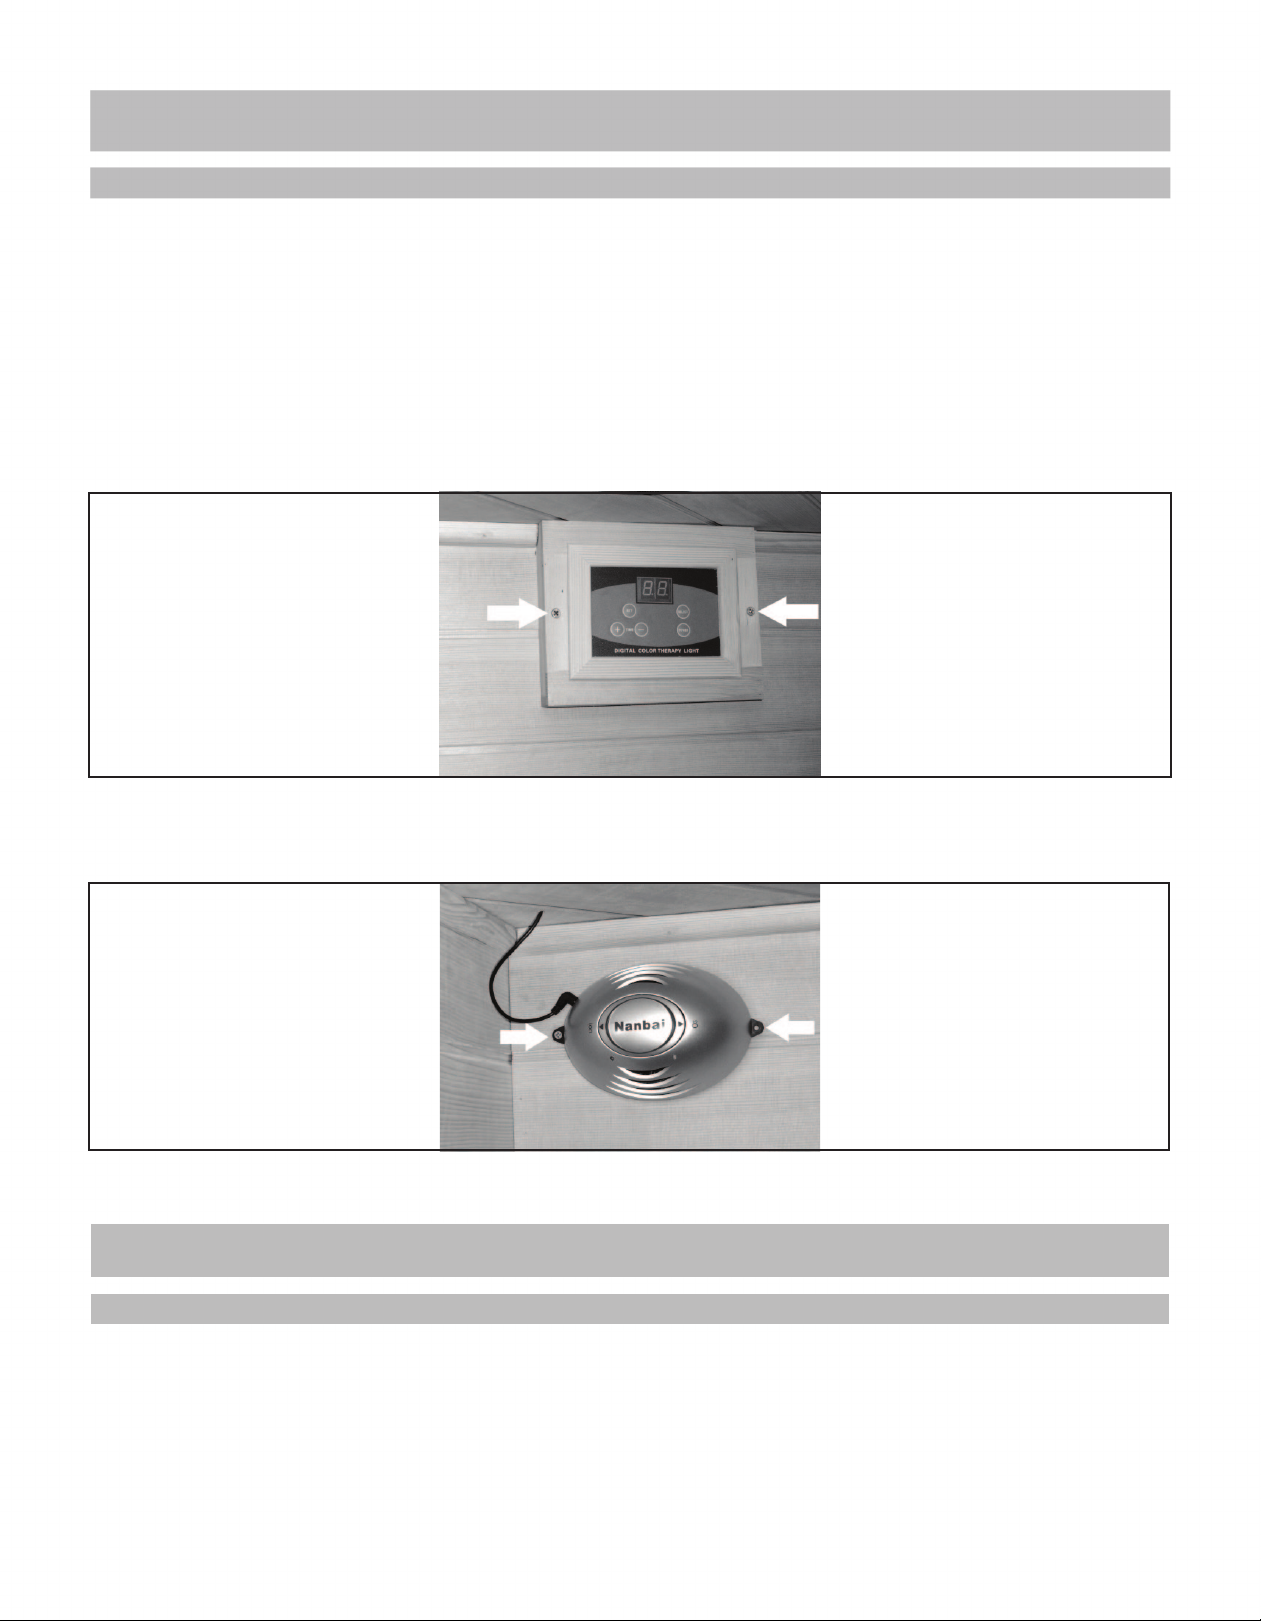
19. Attach the COLOR THERAPY CONTROL PANEL into the designated position with 2” SCREWS.
20. Remove the back cover of the OXYGEN IONIZER by turning is as indicated. Unwrap and
install the fragrance patch, then reattach the back cover. Attach the OXYGEN IONIZER in the
designated position with 3/4” SCREWS. Plug the power cable into the OXYGEN IONIZER.
21. Plug the main power cable into a dedicated outlet. Note: No other appliances should share
the same outlet with this sauna.
CONGRATULATIONS!
The assembly of your sauna is now complete.
Please review the Operation Instructions and Health & Safety warnings before using your
sauna.
To ensure years of trouble-free use, follow the Cleaning & Maintenance guidelines carefully.
10
Page 11

OPERATION INSTRUCTIONS
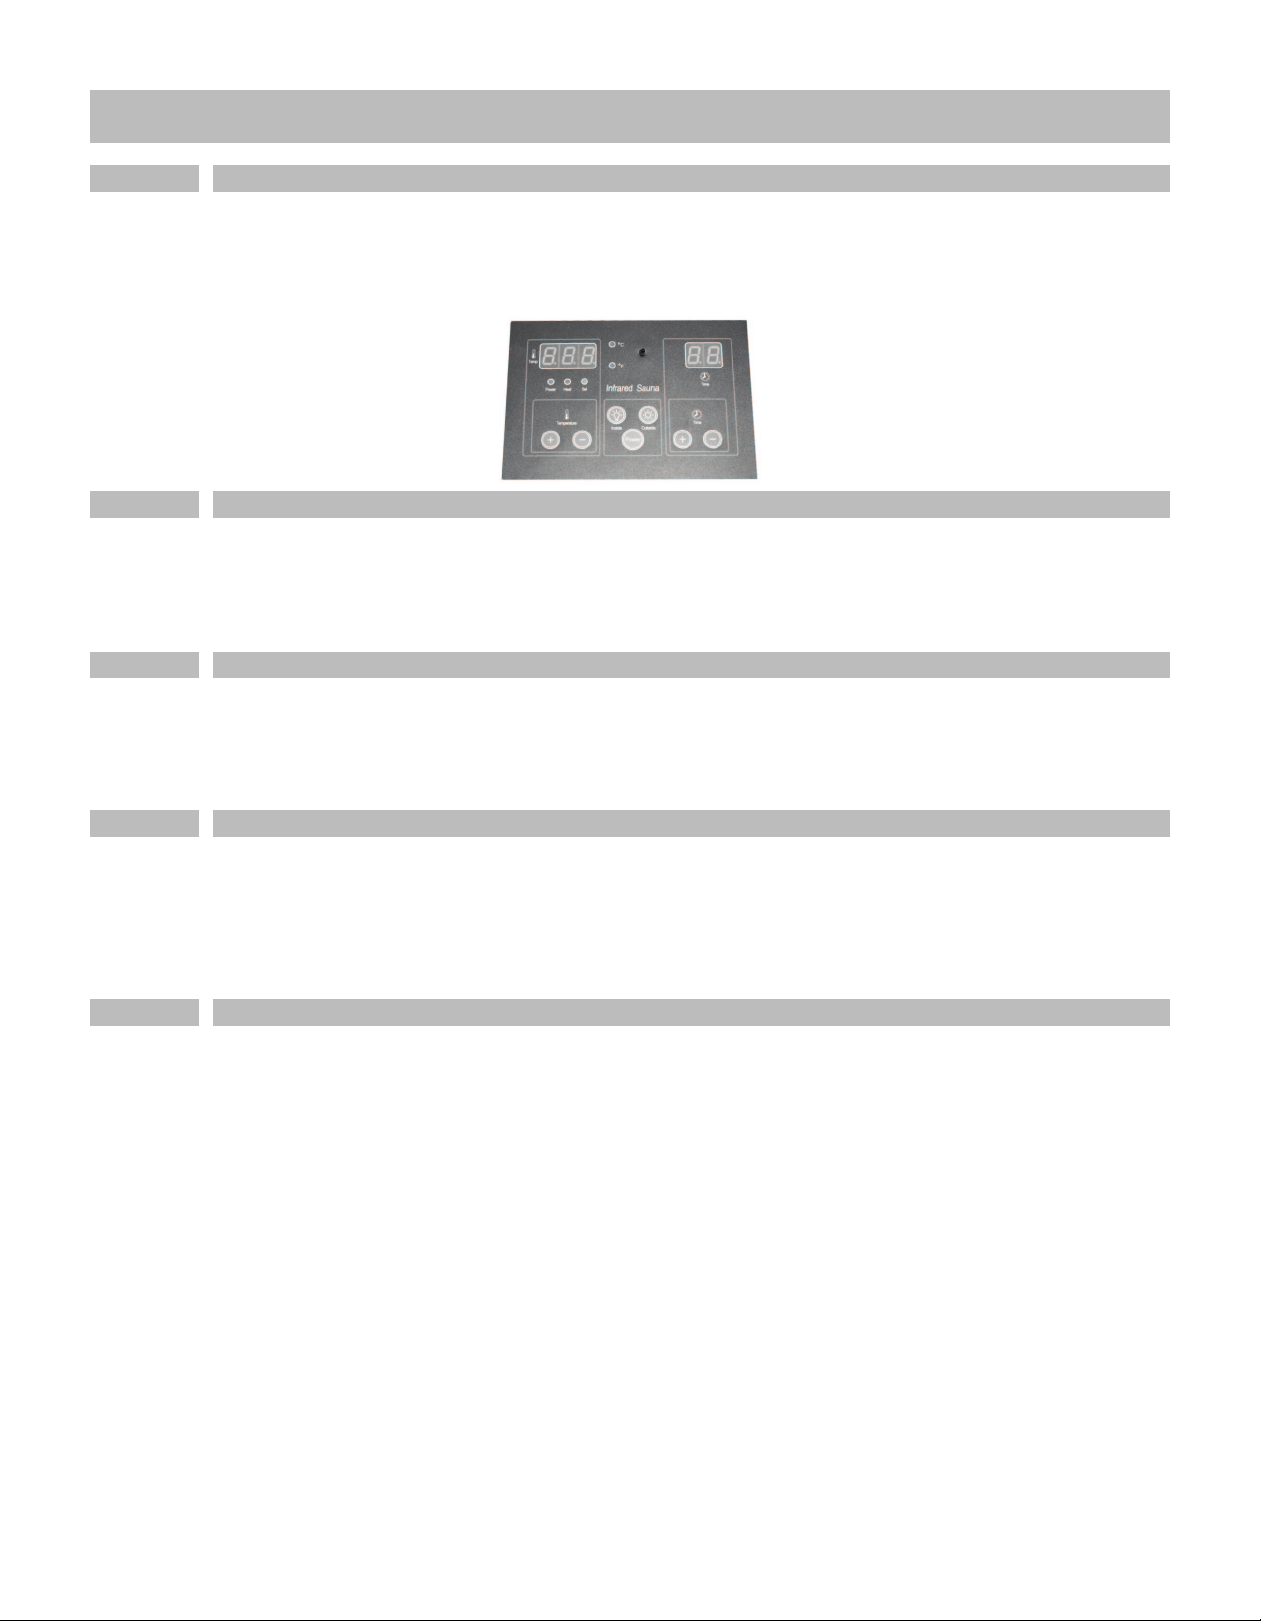
SAUNA CONTROL PANEL
Note: The sauna controls are the same for both the interior and exterior Control Panels.
1. Press POWER to turn ON the sauna.
2. Set the desired TEMPERATURE with the (+) and (-) buttons.
3. Press and hold both (+) and (-) to switch between °F (Fahrenheit) and °C (Celsius).
4. Set the desired TIME with the (+) and (-) buttons.
5. Press INSIDE or OUTSIDE to turn on or o the corresponding light.
6. When the TIME reaches 00, the heaters will turn OFF automatically.
7. After your sauna session, press POWER to turn OFF the sauna.
COLOR THERAPY CONTROL PANEL
1. Press POWER to turn ON the Color Therapy Light. The Color Therapy Light will cycle
through all the available colors.
2. Press SELECT to locate your preferred color or pattern, then press SET.
3. Set the desired TIME with the (+) and (-) buttons, then press SET.
4. Press POWER to turn OFF the Color Therapy Light.
OXYGEN IONIZER
1. Press ION to release negatively charged ions to purify the air.
2. Press O3 to disinfect the air with ozone.
11
Page 12

ENJOYING YOUR SAUNA
1. Prior to initial use, wipe down all interior surfaces of the sauna with a damp cloth.
2. Turn on the sauna and set temperature to 104° F for one hour to burn o any factory dust.
3. Always drink plenty of water before, during and after your sauna session to stay properly
hydrated.
4. A normal sauna session should last 30 minutes or less.
5. Allow approximately 10 to 15 minutes for the sauna to warm up before entering.
6. Perspiration will begin within 10 to 15 minutes after entering the sauna.
7. Limit the use of lotions or oils on your body while using your sauna. These products can
block your pores and limit perspiration, decreasing the eectiveness of your sauna session.
8. For spot treatment of a particular area, position that body part closer to the heater, allowing for deeper heating in that area.
9. During your sauna session, place towels on the bench seats and on the oor to absorb perspiration and maintain the cleanliness of your sauna.
10. Towel o excess perspiration during your sauna session to help your body perspire more
freely.
11. Open the ceiling vent or the front door to allow fresh air into your sauna.
12. Allow your body to cool down following your sauna session, then rinse the perspiration
o your body in a warm shower.
12
Page 13

HEALTH & SAFETY WARNINGS
1. Review all instructions and warnings before operating your sauna. A sauna is not a toy. Serious injury may result from negligence, intentional misuse and failure to follow safety instructions.
2. Hyperthermia Danger: Hyperthermia occurs when the body absorbs more heat than it can
dissipate. When the elevated body temperatures are suciently high, hyperthermia is a medical
emergency and requires immediate treatment to prevent disability or death. It is very important not to allow your body’s core temperature to rise above 103° F. Symptoms of hyperthermia
include dizziness, lethargy, drowsiness and fainting. The eects of hyperthermia may include
failure to perceive heat, failure to recognize the need to exit the sauna, unawareness of the impending health hazard, physical inability to exit the sauna and unconsciousness.
3. If you are feeling uncomfortable, faint or dizzy, exit the sauna immediately.
4. Do not exceed recommended time and temperature guidelines.
5. Do not touch or interfere with the temperature sensor on the control panel.
6. Do not touch or spray water on the heater elements.
7. Do not use the sauna while under the inuence of drugs or alcohol.
8. Do not sleep inside the sauna.
9. Do not use the sauna immediately following strenuous exercise. Allow your body to cool
down for 30 minutes before entering the sauna.
10. Pets should never be placed in the sauna.
11. Pregnant women, children under the age of 6, the elderly and inrm should not use the
sauna.
12. Children over the age of 6 should always be supervised by an adult.
13. People with health problems including open wounds, fever, sunburn or dehydration should
not use the sauna.
14. People suering from obesity or with a history of heart disease, low or high blood pressure,
circulatory system problems or diabetes should consult a physician before using the sauna.
15. Consult a physician before using the sauna if you take any prescription medications.
16. Keep towels and combustible materials away from the heater elements.
17. Remove all towels and materials after your sauna session.
18. Never leave your sauna unattended while in use.
19. Always unplug the sauna and allow it to cool down before performing any cleaning or maintenance.
20. Always turn o and unplug the sauna when not in use.
13
Page 14
CLEANING & MAINTENANCE
1. Always unplug the sauna and allow it to cool down before performing any cleaning or
maintenance.
2. Use furniture polish or furniture oil when cleaning the sauna exterior.
3. The sauna interior surfaces should only be wiped down with a damp cloth. Do NOT use
chemicals, abrasive cleaners or solvents on the unnished interior wood.
4. As with all natural wood products, variations in the color and the grain as well as irregularities such as knots and ne cracks may be present. These characteristics are a part of the
natural beauty of the wood and should not be considered defective.
TROUBLESHOOTING GUIDE
WARNING!
• Always unplug the sauna and allow it to cool down before performing any maintenance.
• Repairs to the electrical components of the sauna should only be performed by a qualied service technician.
• Unauthorized repairs or alterations will void the manufacturer’s warranty.
Problem
Solution
Problem
Solution
Problem
Solution
THERE IS NO POWER TO THE SAUNA
1. Check that the Main Power Cable is plugged into the wall outlet.
2. Check that the circuit breaker for the outlet has not tripped. If the breaker has tripped, check that the
amperage of the breaker is appropriate for your sauna.
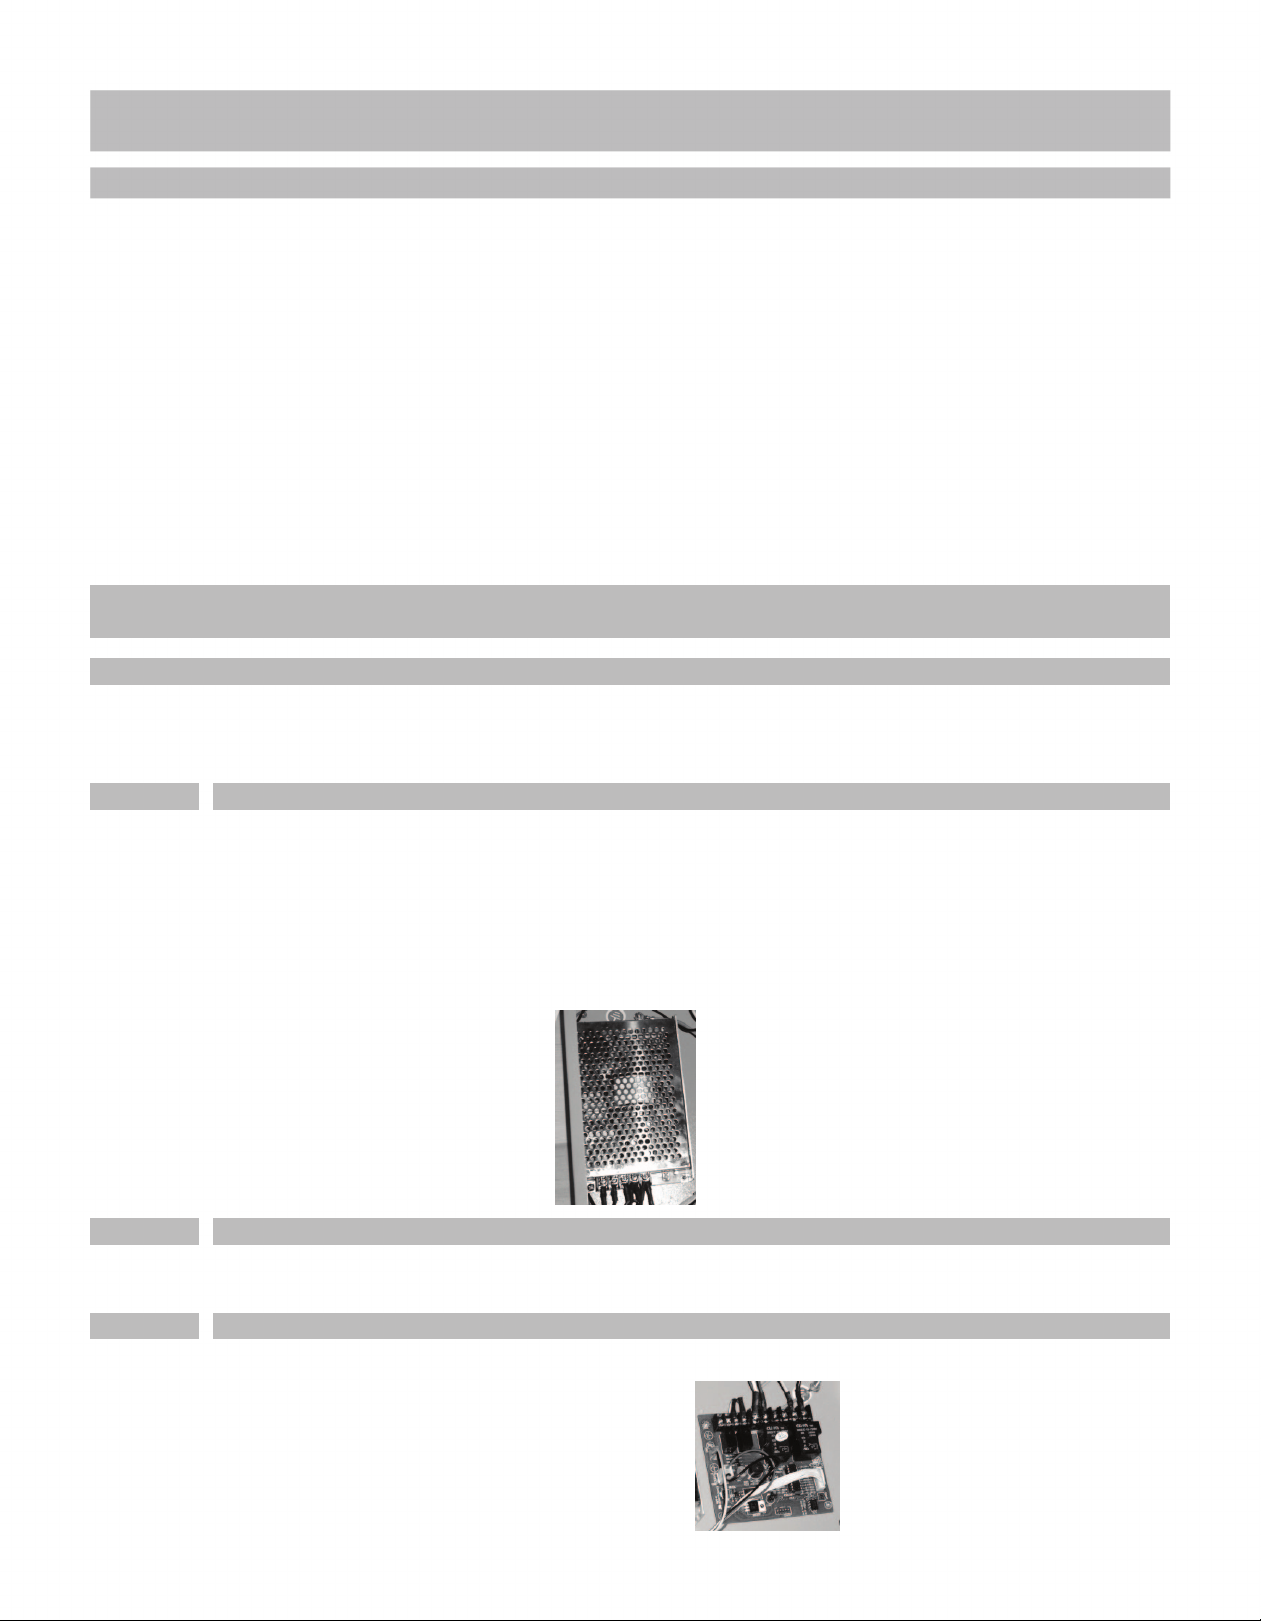
3. Check all connections to the Power Supply Box.
4. Check for damage to the Main Power Cable; replace, if necessary.
5. Replace the Power Supply Box, if necessary.
ONE HEATER DOES NOT WORK
1. Check that all the connections are tight.
2. Replace the Heater Element.
NONE OF THE HEATERS WORK
1. Check that all connections are tight.
2. Replace the Heater Circuit Board, if necessary.
14
Page 15
TROUBLESHOOTING GUIDE (CONT.)
Problem
Solution
Problem
Solution
Problem
Solution
Problem
THE CONTROL PANEL DOES NOT WORK
1. Check that all the connections are tight.
2. If the numbers are scrambled or the buttons are unresponsive, replace the Control Panel.
3. If the temperature indicator does not work or reads “--” or “EP”, replace the Control Panel with Temperature Sensor.
THE LIGHTS ARE NOT WORKING
1. Check that all the connections are tight.
2. If one light does not work, replace the bulb. Note: Do not touch the glass part of the bulb with your ngers
during installation.
3. If neither the lights nor the radio are working, replace the Power Supply Box.
THE RADIO AND/OR CD PLAYER IS NOT WORKING
1. Check that all the connections are tight.
2. Check the fuse; replace if necessary.
3. Replace the radio.
4. If neither the radio nor the lights are working, replace the Power Supply Box.
THE SPEAKERS ARE NOT WORKING
1. Check that the volume is not turned all the way down and that the fader control is set correctly.
Solution
Problem
Solution
2. If only one speaker is working, check to see that the sound balance on the stereo is not set all the way
to one side.
3. Check that all the connections are tight.
4. Replace the speaker, if necessary.
THE COLOR THERAPY LIGHTS ARE NOT WORKING
1. Check that all the connections are tight.
2. Replace the Color Therapy Light or Color Therapy Control Panel, if necessary.
15
Page 16

REPLACEMENT PARTS
In the event that you need replacement parts, locate your sauna model in the guide below to reference the
correct part numbers. It is important to use only the replacement parts specied by the manufacturer. The
use of unauthorized substitutes may damage your sauna or cause electrical hazards resulting in injury or re.
SA1312 THREE-PERSON CEDAR CORNER SAUNA
DESCRIPTION
FRONT PANEL with GLASS DOOR
LEFT PANEL
LEFT BACK PANEL
RIGHT PANEL
RIGHT BACK PANEL
ROOF
ROOF COVER
FLOOR
FLOOR HEATER
LONG BENCH SEAT
LONG BENCH HEATER PANEL
SHORT BENCH SEAT
SHORT BENCH HEATER PANEL
BACKREST
DOOR HANDLE
STEREO SHELF
AM/FM CD PLAYER with MP3 INPUT
CUP HOLDER
MAGAZINE RACK
DOUBLE TOWEL HOOK
COLOR THERAPY CONTROL PANEL
OXYGEN IONIZER
2” (50mm) SCREW
1-1/2” (40mm) SCREW
1-1/8” (30mm) SCREW
3/4” (20mm) SCREW
330W HEATER ELEMENT – LEFT BACK PANEL
330W HEATER ELEMENT – RIGHT BACK PANEL
80W HEATER ELEMENT – FLOOR HEATER
180W HEATER ELEMENT – LONG BENCH HEATER
180W HEATER ELEMENT – SHORT BENCH HEATER
CONTROL PANEL
CONTROL PANEL with TEMPERATURE SENSOR
CONTROL PANEL FRAME
MAIN POWER CABLE
POWER SUPPLY BOX
HEATER CIRCUIT BOARD
25 AMP OVERCURRENT PROTECTOR
INTERIOR LIGHT BULB
EXTERIOR LIGHT BULB
LIGHT HOUSING
COLOR THERAPY LIGHT
SPEAKER
GLASS DOOR
DOOR HINGE
BUCKLE
PART NUMBER
SAP3020
SAP3021
SAP3022
SAP3023
SAP3024
SAP3025
SAP3026
SAP3027
SAP3028
SAP3029
SAP3030
SAP3031
SAP3032
SAP3010
SAP3011
SAP3012
SAP2408
SAP3013
SAP3014
SAP3015
SAP3016
SAP2409
SAP2411
SAP2411
SAP2411
SAP2411
SAP2418
SAP2418
SAP2420
SAP2419
SAP2419
SAP3017
SAP3018
SAP3019
SAP2613
SAP2407
SAP2428
SAP2530
SAP2403
SAP2404
SAP2405
SAP2410
SAP2416
SAP2457
SAP2415
SAP2607
QTY
1
1
1
1
1
1
2
1
1
1
1
1
1
3
1 SET
1
1
2
1
1
1
1
6
10
6
34
2
2
1
1
1
1
1
1
1
1
1
1
4
2
6
1
2
1
2
9
16
Page 17

REPLACEMENT PARTS
SA1320 FOUR-PERSON CEDAR CORNER SAUNA
DESCRIPTION
FRONT PANEL with GLASS DOOR
LEFT PANEL
LEFT BACK PANEL
RIGHT PANEL
RIGHT BACK PANEL
ROOF
ROOF COVER
FLOOR
FLOOR HEATER
LONG BENCH SEAT
LONG BENCH HEATER PANEL
SHORT BENCH SEAT
SHORT BENCH HEATER PANEL
BACKREST
DOOR HANDLE
STEREO SHELF
AM/FM CD PLAYER with MP3 INPUT
CUP HOLDER
MAGAZINE RACK
DOUBLE TOWEL HOOK
COLOR THERAPY CONTROL PANEL
OXYGEN IONIZER
2” (50mm) SCREW
1-1/2” (40mm) SCREW
1-1/8” (30mm) SCREW
3/4” (20mm) SCREW
300W HEATER ELEMENT – LEFT BACK PANEL – MIDDLE
225W HEATER ELEMENT – LEFT BACK PANEL
300W HEATER ELEMENT – RIGHT BACK PANEL – MIDDLE
225W HEATER ELEMENT – RIGHT BACK PANEL
180W HEATER ELEMENT – FLOOR HEATER
80W HEATER ELEMENT – FLOOR HEATER
180W HEATER ELEMENT – LONG BENCH HEATER
180W HEATER ELEMENT – SHORT BENCH HEATER
CONTROL PANEL
CONTROL PANEL with TEMPERATURE SENSOR
CONTROL PANEL FRAME
MAIN POWER CABLE
POWER SUPPLY BOX
HEATER CIRCUIT BOARD
25 AMP OVERCURRENT PROTECTOR
INTERIOR LIGHT BULB
EXTERIOR LIGHT BULB
LIGHT HOUSING
COLOR THERAPY LIGHT
SPEAKER
GLASS DOOR
DOOR HINGE
BUCKLE
PART NUMBER
SAP3043
SAP3044
SAP3045
SAP3046
SAP3047
SAP3048
SAP3049
SAP3050
SAP3051
SAP3052
SAP3053
SAP3054
SAP3055
SAP3010
SAP3011
SAP3012
SAP2408
SAP3013
SAP3014
SAP3015
SAP3016
SAP2409
SAP2411
SAP2411
SAP2411
SAP2411
SAP2422
SAP2421
SAP2422
SAP2421
SAP2419
SAP2420
SAP2419
SAP2419
SAP3017
SAP3018
SAP3019
SAP2613
SAP2407
SAP2428
SAP2530
SAP2403
SAP2404
SAP2405
SAP2410
SAP2416
SAP2457
SAP2415
SAP2607
QTY
1
1
1
1
1
1
2
1
1
1
1
1
1
4
1 SET
1
1
2
1
1
1
1
6
10
6
35
1
2
1
2
1
1
1
1
1
1
1
1
1
1
1
4
2
6
1
2
1
2
9
17
Page 18

REPLACEMENT PARTS
SA2412DX THREE-PERSON HEMLOCK CORNER SAUNA
DESCRIPTION
FRONT PANEL with GLASS DOOR
LEFT PANEL
LEFT BACK PANEL
RIGHT PANEL
RIGHT BACK PANEL
ROOF
ROOF COVER
FLOOR
FLOOR HEATER
LONG BENCH SEAT
LONG BENCH HEATER PANEL
SHORT BENCH SEAT
SHORT BENCH HEATER PANEL
BACKREST
DOOR HANDLE
STEREO SHELF
AM/FM CD PLAYER with MP3 INPUT
CUP HOLDER
MAGAZINE RACK
DOUBLE TOWEL HOOK
COLOR THERAPY CONTROL PANEL
OXYGEN IONIZER
2” (50mm) SCREW
1-1/2” (40mm) SCREW
1-1/8” (30mm) SCREW
3/4” (20mm) SCREW
330W HEATER ELEMENT – LEFT BACK PANEL
330W HEATER ELEMENT – RIGHT BACK PANEL
80W HEATER ELEMENT – FLOOR HEATER
180W HEATER ELEMENT – LONG BENCH HEATER
180W HEATER ELEMENT – SHORT BENCH HEATER
CONTROL PANEL
CONTROL PANEL with TEMPERATURE SENSOR
CONTROL PANEL FRAME
MAIN POWER CABLE
POWER SUPPLY BOX
HEATER CIRCUIT BOARD
25 AMP OVERCURRENT PROTECTOR
INTERIOR LIGHT BULB
EXTERIOR LIGHT BULB
LIGHT HOUSING
COLOR THERAPY LIGHT
SPEAKER
GLASS DOOR
DOOR HINGE
BUCKLE
PART NUMBER
SAP3113
SAP3114
SAP3115
SAP3116
SAP3117
SAP3118
SAP3026
SAP3119
SAP3120
SAP3121
SAP3122
SAP3123
SAP3124
SAP2412
SAP2413
SAP2402
SAP2408
SAP2444
SAP2414
SAP2460
SAP3112
SAP2409
SAP2411
SAP2411
SAP2411
SAP2411
SAP2418
SAP2418
SAP2420
SAP2419
SAP2419
SAP3017
SAP3018
SAP2417
SAP2613
SAP2407
SAP2428
SAP2530
SAP2403
SAP2404
SAP2405
SAP2410
SAP2416
SAP2457
SAP2415
SAP2607
QTY
1
1
1
1
1
1
2
1
1
1
1
1
1
3
1 SET
1
1
2
1
1
1
1
6
10
6
34
2
2
1
1
1
1
1
1
1
1
1
1
4
2
6
1
2
1
2
9
18
Page 19

REPLACEMENT PARTS
SA2420DX FOUR-PERSON HEMLOCK CORNER SAUNA
DESCRIPTION
FRONT PANEL with GLASS DOOR
LEFT PANEL
LEFT BACK PANEL
RIGHT PANEL
RIGHT BACK PANEL
ROOF
ROOF COVER
FLOOR
FLOOR HEATER
LONG BENCH SEAT
LONG BENCH HEATER PANEL
SHORT BENCH SEAT
SHORT BENCH HEATER PANEL
BACKREST
DOOR HANDLE
STEREO SHELF
AM/FM CD PLAYER with MP3 INPUT
CUP HOLDER
MAGAZINE RACK
DOUBLE TOWEL HOOK
COLOR THERAPY CONTROL PANEL
OXYGEN IONIZER
2” (50mm) SCREW
1-1/2” (40mm) SCREW
1-1/8” (30mm) SCREW
3/4” (20mm) SCREW
300W HEATER ELEMENT – LEFT BACK PANEL – MIDDLE
225W HEATER ELEMENT – LEFT BACK PANEL
300W HEATER ELEMENT – RIGHT BACK PANEL – MIDDLE
225W HEATER ELEMENT – RIGHT BACK PANEL
180W HEATER ELEMENT – FLOOR HEATER
80W HEATER ELEMENT – FLOOR HEATER
180W HEATER ELEMENT – LONG BENCH HEATER
180W HEATER ELEMENT – SHORT BENCH HEATER
CONTROL PANEL
CONTROL PANEL with TEMPERATURE SENSOR
CONTROL PANEL FRAME
MAIN POWER CABLE
POWER SUPPLY BOX
HEATER CIRCUIT BOARD
25 AMP OVERCURRENT PROTECTOR
INTERIOR LIGHT BULB
EXTERIOR LIGHT BULB
LIGHT HOUSING
COLOR THERAPY LIGHT
SPEAKER
GLASS DOOR
DOOR HINGE
BUCKLE
PART NUMBER
SAP3100
SAP3101
SAP3102
SAP3103
SAP3104
SAP3105
SAP3049
SAP3106
SAP3107
SAP3108
SAP3109
SAP3110
SAP3111
SAP2412
SAP2413
SAP2402
SAP2408
SAP2444
SAP2414
SAP2460
SAP3112
SAP2409
SAP2411
SAP2411
SAP2411
SAP2411
SAP2422
SAP2421
SAP2422
SAP2421
SAP2419
SAP2420
SAP2419
SAP2419
SAP3017
SAP3018
SAP2417
SAP2613
SAP2407
SAP2428
SAP2530
SAP2403
SAP2404
SAP2405
SAP2410
SAP2416
SAP2457
SAP2415
SAP2607
QTY
1
1
1
1
1
1
1
1
1
1
1
1
1
4
1 SET
1
1
2
1
1
1
1
6
10
6
35
1
2
1
2
1
1
1
1
1
1
1
1
1
1
1
4
2
6
1
2
1
2
9
19
Page 20
SAUNA WARRANTY REGISTRATION CARD
1. This sauna has a 5-Year Warranty against defects in materials and workmanship. To receive the warranty,
the card must be lled out completely and returned. This 5-Year Warranty covers the sauna. The radio in your
sauna is covered by a limited 1-Year Warranty.
2. Please notify Blue Wave Products in advance of any sauna warranty claim prior to shipping the sauna back.
Contact our warranty claim department at [email protected].
3. If the warranty claim department determines that the item must be returned, it must be returned with a
receipt showing date of purchase, purchase price, and the dealer from which the sauna was purchased.
No warranty claim will be honored without a receipt.
4. The freight on the item when returned must be prepaid.
5. Warranty claims will only be resolved with the repair of the current product or shipment of a replacement
product. NO REFUNDS will be given.
6. Improper installation, misuse or damages resulting from acts of nature will render this warranty null and
void.
7. This warranty is in lieu of all other warranties expressed or implied and no responsibility is assumed for future damage due to misuse. This sauna is intended for INDOOR USE ONLY – outdoor installation of the sauna
WILL VOID THE WARRANTY. We are not responsible for damage to the sauna due to improper installation or
misuse. Additional actions that will void the warranty are: Use of lacquer or paints, placing sauna on nonapproved surface, and outdoor applications.
Surface cracks are not considered defects in material or workmanship, as they are normal characteristics
of all wood.
To send in this warranty card: Fill out below, detach and mail to the following address:
BLUE WAVE PRODUCTS
1745 Wallace Ave. Suite B
St. Charles, IL 60174
SAUNA WARRANTY REGISTRATION FORM
Date Purchased: _____/_____/_____
Name: ____________________________________________________________________________________
Address: __________________________________________________________________________________
City/State/Zip: _____________________________________________________________________________
Phone: ( ) ____________________________________ Email: _____________________________________
Purchased from: ____________________________________________________________________________
Item Number: ____________________________________ Purchase Price: ______________________________
Serial Number: _____________________________________________________________________________
20
 Loading...