

Heat Storm HS-1500-IRI, HS-1500-IMO, HS–1500-ILO, HS-1500-ISM, HS-1500-IPR Owner's Operating Manual
...
MODELS
HS–1500-ILO
HS-1500-ISM
HS-1500-IRI
HS-1500-ISA
HS-1500-IMO
PORTABLE
QUARTZ
INFRARED
HEATER
OWNERS OPERATING MANUAL
Thank you and congratulations on your purchase of your Heat Storm™ infrared heater.
PLEASE READ THE OPERATING INSTRUCTIONS BEFORE USING THIS APPLIANCE.
WARNING
IF THE INFORMATION IN THIS MANUAL IS NOT FOLLOWED EXACTLY, AN ELECTRIC SHOCK OR
FIRE MAY RESULT CAUSING PROPERTY DAMAGE, PERSONAL INJURY OR LOSS OF LIFE. DO NOT
STORE OR USE GASOLINE OR OTHER FLAMMABLE VAPORS AND LIQUIDS IN THE VICINITY OF
THIS OR ANY OTHER APPLIANCE.
IMPORTANT
READ ALL INSTRUCTIONS AND WARNINGS CAREFULLY BEFORE OPERATING. FAILURE TO
FOLLOW THESE INSTRUCTIONS MAY RESULT IN A POSSIBLE ELECTRIC SHOCK, FIRE HAZARD
AND/OR INJURY AND WILL VOID THE WARRANTY.

When choosing a location for your new heater, ensure that the general instructions are followed. Also, for best effect, install the
heater out of direct sunlight. Cold climate installation recommendation: when installing this unit against a non-insulated exterior
wall or chase, it is mandatory that the outer walls be insulated to conform to applicable insulation codes.
A 15 AMP, 120 Volt, 60 Hz circuit with a properly grounded outlet is required. Preferably, the heater will be on a dedicated circuit as
other appliances on the same circuit may cause the circuit breaker to trip or the fuse to blow when the heater is in operation. The
unit comes standard with 6 feet (1.8 m) three wire cord, exiting from the rear of the heater.
CAUTION: Do not exceed the current rating of the current tap. Always plug heaters directly into a wall outlet/receptacle.
NEVER use with an extension cord or relocatable power tap (outlet/ power strip).
Keep electrical cords, drapery, furniture and other combustibles at least 3 feet (0.6 m) from the front of the heater and away
from the sides.
WARNING: Make sure the power is turned off before proceeding. Any electrical repairs or rewiring of this unit should be carried
out by a licensed electrician in accordance with national and local codes.
If repairing or replacing any electrical component or wiring, the original wire routing, color coding and securing locations must
be followed.
WARNING: Electrical outlet wiring must comply with local building codes and other applicable regulations to reduce the risk
of fire, electrical shock and injury to persons.
WARNING: Do not use this heater if any part of it has been under water. Immediately call a qualified service technician to inspect
the heater and replace any part of the electrical system.
WARNING: Disconnect power before attempting any maintenance or cleaning to reduce the risk of fire, electrical shock or
personal injury.
WARNING: During any service of this appliance, the power to the unit must be turned off. First turn the main power switch to
the “OFF” position. Then remove the electrical plug from the wall outlet.
HEATER LOCATIONIMPORTANT INSTRUCTION
ELECTRICAL CONNECTION
CLEARANCE TO COMBUSTIBLES
MAINTENANCE
Read all instructions before using this heater.
This heater is hot when in use. To avoid burns, do not let bare
skin touch hot surfaces. If provided, use handles when moving
this appliance. Keep combustible materials, such as furniture,
pillows, bedding, papers, clothes and curtains at least 3 feet
(0.9 m) from the front of the heater and keep them away from
the sides and rear. WARNING: In order to avoid overheating,
do not cover the heater. It cannot be used in a wardrobe.
CAUTION: Whenever the heater is left operating and
unattended, extreme caution is necessary if children or invalids
are nearby.
The appliance is not to be used by children or persons with
reduced physical, sensory or mental capabilities, or lack of
experience and knowledge, unless they have been given
supervision or instruction.
Children being supervised not to play with the appliance.
Always unplug heater when not in use.
DO NOT operate any heater with a damaged cord or plug or
after the heater malfunctions, has been dropped or damaged
in any manner. Discard heater, or return to authorized service
facility for examination and/or repair.
If the supply cord is damaged, it must be replaced by the
manufacture, its service agent or similarly qualified persons in
order to avoid a hazard.
Any repairs to this heater should be carried out by a qualified
service person.
Under no circumstances should this heater be modified.
Parts having to be removed for servicing must be replaced
prior to operating this heater again.
DO NOT use outdoors.
This heater is not intended for use in bathrooms, laundry areas
and similar indoor locations. Never locate heater where it may
fall into a bathtub or other water container.
DO NOT run cord under carpeting. DO NOT cover cord with
throw rugs, runners or similar coverings. DO NOT route cord
under furniture or appliances. Arrange cord away from traffic
areas and where it will not be tripped over.
To disconnect heater, turn controls to the off, then remove
plug from outlet.
Connect to properly grounded outlets only.
This appliance, when installed, must be electrically grounded
in accordance with local codes or, in the absence of local
codes, with the current CSA C22.1 Canadian Electrical Code
or for U.S.A. installations, follow local codes and the National
Electrical Code, ANSI/NFPA NO.70. When using electrical
appliances, basic precautions should always be followed to
reduce the risk of fire, electrical shock, and injury to persons
including the following:
There is a thermostat limiter inside the heater. When the inner
temperature over heating or occurs abnormal heating, the
thermostat protective device would cut off power supply to
avoid the heater damaged or risk of fire.
DO NOT insert or allow foreign objects to enter any ventilation
or exhaust opening as this may cause an electric shock or fire,
or damage the heater.
To prevent a possible fire, do not block air intakes or exhaust in
any manner. DO NOT use on soft surfaces, like a bed, where
opening may become blocked.
A heater has hot and arcing or sparking parts inside. DO NOT
use it in areas where gasoline, paint or flammable liquids are
used or stored.
Use this heater only as described in the manual. Any other
use not recommended by the manufacturer may cause fire,
electric shock or injury to persons.
Always plug heaters directly into a wall outlet/receptacle.
NEVER use with an extension cord or relocatable power tap
(outlet/ power strip).
This heater is for use on 120 volts.
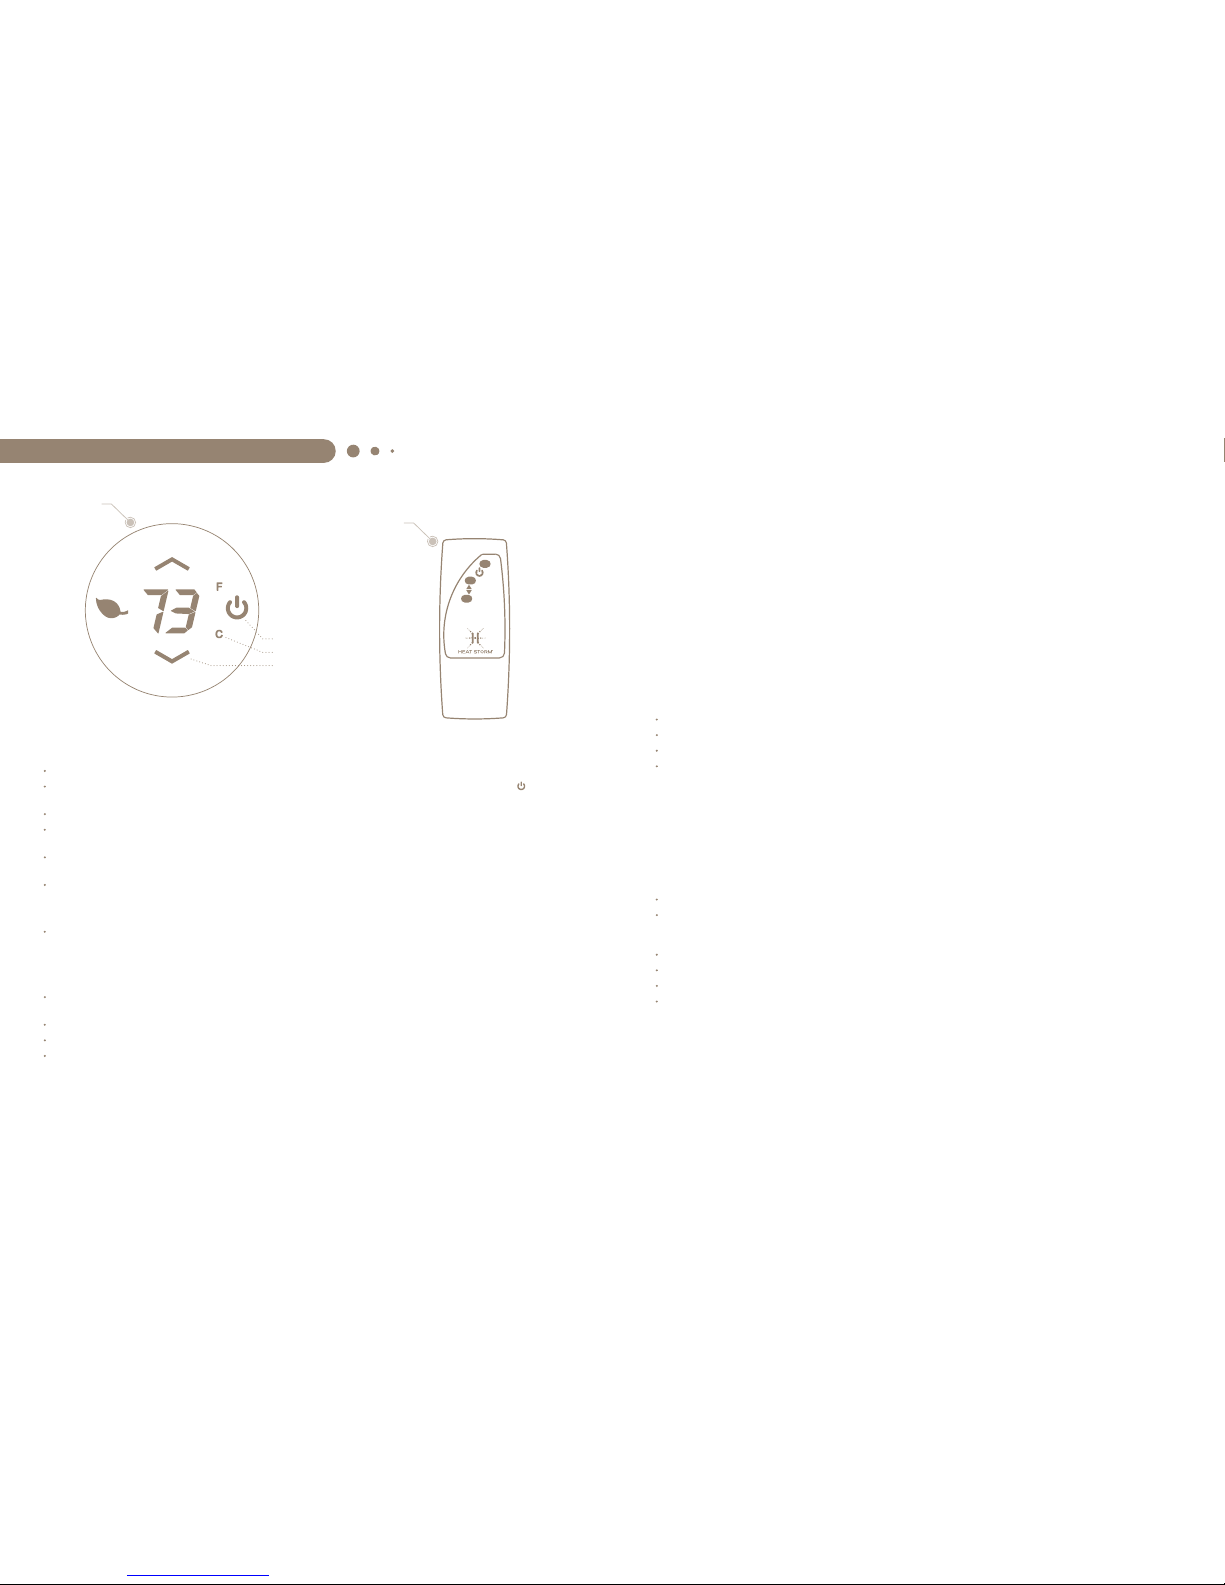
OPERATING INSTRUCTIONS & CONTROL FUNCTIONS
CONTROL
PANEL
REMOTE
CONTROL
POWER
The POWER button supplies power to all functions of the heater.
Once the heater is plugged into the outlet it will be in standby mode. The power button is the universal on/off symbol
and
will be blue indicating that the heater is plugged in, but is powered off.
The POWER button on the control panel needs to be pressed in order to turn on the heater and operate the remote control.
Press the POWER button and it will turn red indicating that the heater has been powered ON at full power. Full power is also
indicated by the red leaf.
Press the POWER button a second time it will remain red. However, the leaf will turn green indicating the unit is running at
half power.
Press the POWER button a third time and the unit will power off.
SWITCHING BETWEEN CELSIUS AND FAHRENHEIT
By pressing the “UP” and “DOWN” buttons at the same time for 3 seconds.
NOTE: You can only switch between Celsius and Fahrenheit on the heater itself as this is not available using the remote control.
SETTING TEMPERATURE
When pressing the up and down buttons the display will enter temperature setting mode. The displayed temperature will
begin to blink.
When in temperature setting mode pressing the up and down buttons will change the thermost at by 1 °F and by 1 °C.
The default set temperature of the heater is 72° F (22° C).
After 5 seconds without control input the display will exit temperature setting mode and show the current ambient temperature.
NOTE: After the heater function or power is shutoff the blower will continue to run for several minutes to cool the internal components.
1 Power Button
2 Fahrenheit & Celsius
3 Up & Down Arrows
THERMOSTAT CALIBRATION
Thermostat readings can vary based on the running environment. If desired the thermostat on the heater can be
manually calibrated.
NOTE: Thermostat calibration can only be done manually on the heater itself, not using the remote control.
To calibrate the thermostat:
1 Press the POWER button for 3 seconds to begin calibration.
2 Once the temperature begins to flash, use the up and down buttons to adjust the thermostat.
3 After 5 seconds without control input the heater will exit thermostat calibration.
NOTE: This equipment has been tested and found to comply with the limits for Class B digital device, pursuant to part 15 of the FCC Rules. These
limits are designed to provide reasonable protection against harmful interference in a residential installation. This equipment generates, uses, and
can radiate radio frequency energy and, if not installed and used in accordance with the instructions, may cause harmful interference to radio or
television reception, which can be determined by turning the equipment off and on, the user is encouraged to try to correct the interference by
one or more of the following measures:
Reorient or relocate the receiving antenna.
Increase the separation between the equipment and the receiver.
Connect the equipment into an outlet on a circuit different from that to which the receiver is connected.
Consult the dealer or an experienced radio/TV technician for help.
This device complies with Part 15 of the FCC Rules. Operation is subject to the following two conditions:
(1) This device may not cause harmful interference, and (2) this device must accept any interference received, including interference that
may cause undesired operation. Modifications not approved by the party responsible for compliance could void user’s authority to operate
the equipment. This Class B digital apparatus complies with Canadian ICES-003.
WASHABLE LIFETIME FILTER SYSTEM
Heat Storm
™
Infrared Heaters come equipped with a washable lifetime filter which is easy to clean. (The manufacturer recommends
the filter to be cleaned regularly as needed.) To do this, follow these steps:
Press both tabs to remove the filter cover and remove the filter, noting which side of the filter receives air flow into the heater.
Run warm tap water over the filter, the opposite direction of air flow, until water runs clear. The filter might excrete some filtered
residue, so be cautious not to drip on any stainable surfaces such as carpeting. You can also soak the filter in water mixed with a
small amount of mild dish soap (remember to rinse well with clean water after soaking filter).
Shake the filter over a sink until excess water is removed and allow it to drip dry completely before reinstalling.
DO NOT force or attempt to speed the filter drying process by using any alternative methods.
ENSURE that the filter is completely dry before inserting back into the air inlet and replacing covers.
Reinstall the filter and replace cover.
WARNING
ANY REQUIRED SERVICE OTHER THAN FILTER MAINTENANCE SHOULD ONLY BE PERFORMED BY AN AUTHORIZED
SERVICE REPRESENTATIVE
 Loading...