Heatstar HS4030, HS8070, HS9100, HS4040, HS9080 User Manual

...
0 (0)

Installer: Leave this manual with the appliance. Consumer: Retain this manual for future reference.

OPERATING INSTRUCTIONS AND OWNER’S MANUAL

HEATSTAR High-Intensity Infrared Heaters

MODELS

HS4040

HS9080


HS4030

HS8070


HS8050

HS9090


HS8060

HS9100S


LANGUAGES

HS9100

READ INSTRUCTIONS CAREFULLY: Read and follow all

HS9120

instructions. Place instructions in a safe place for future

HS9140

reference. Do not allow anyone who has not read these


instructions to assemble, light, adjust or operate the heater.


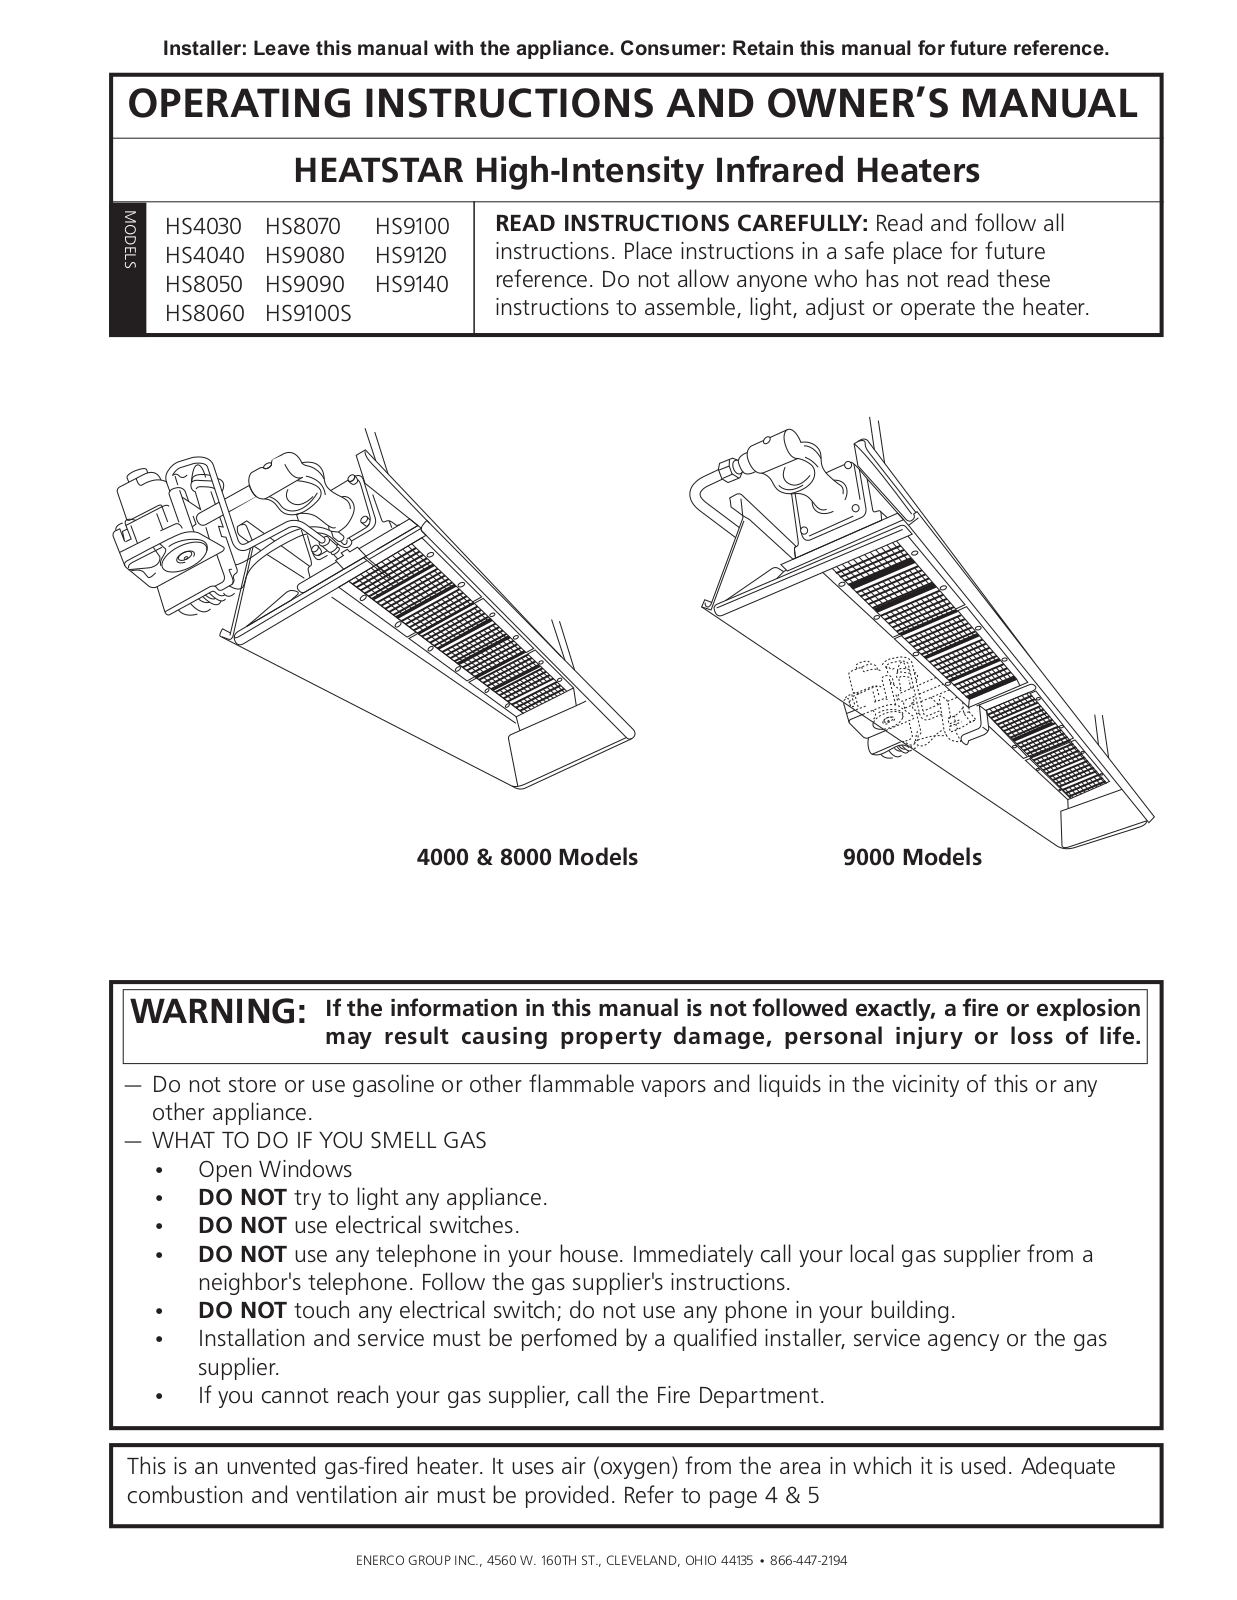
4000 & 8000 Models

9000 Models

WARNING: If the information in this manual is not followed exactly, a fire or explosion may result causing property damage, personal injury or loss of life.

­— Do not store or use gasoline or other flammable vapors and liquids in the vicinity of this or any other appliance.

WHAT TO DO IF YOU SMELL GAS

Open Windows

DO NOT try to light any appliance.

DO NOT use electrical switches.

DO NOT use any telephone in your house. Immediately call your local gas supplier from a neighbor's telephone. Follow the gas supplier's instructions.

DO NOT touch any electrical switch; do not use any phone in your building.

Installation and service must be perfomed by a qualified installer, service agency or the gas supplier.

If you cannot reach your gas supplier, call the Fire Department.

This is an unvented gas-fired heater. It uses air (oxygen) from the area in which it is used. Adequate combustion and ventilation air must be provided. Refer to page 4 & 5

ENERCO GROUP INC., 4560 W. 160TH ST., CLEVELAND, OHIO 44135 • 866-447-2194

WARNING: Improper installation, adjustment, alteration, service or maintenance can cause property damage, injury or death. Read the installation, operation, and maintenance instructions thoroughly before installing or servicing this equipment. For assistance or additional information consult a qualified installer, service agency, or gas supplier.­

WARNING: When used without fresh air, heater may give off CARBON MONOXIDE, an odorless poisonous gas. OPEN WINDOW AN INCH OR TWO FOR FRESH AIR WHEN USING HEATER.

WARNING: This heater is equipped with a PILOT LIGHT SAFETY SYSTEM. DO NOT TAMPER WITH PILOT LIGHT SAFETY SYSTEM.

WARNING: If heater shuts off, do not relight until you provide fresh air. If heater keeps shutting off, have it serviced. Keep burner and control clean. Open door for 5 minutes.

Maintain clearances as shown in Figure 1 or on heater nameplate.

DO NOT USE MATCH OR OTHER FLAME FOR LEAK TESTING.

DO NOT EXCEED 1/2 PSI INLET PRESSURE TO HEATER.

DANGER:

Carbon monoxide poisoning may lead to death.­

Carbon Monoxide Poisoning:

Early signs of carbon monoxide poisoning resemble the flu, with headaches, dizziness, or nausea. If you have these signs, the heater may not be working properly. Get fresh air at once! Have heater serviced. Some people are more affected by carbon monoxide than others. These include pregnant women, persons with heart or lung disease or anemia, those under the influence of alcohol, and those at high altitudes.

CAUTION:

Never connect gas valve or thermostat to line voltage or a transformer.

If the infra-red color of the grid becomes dull when the building furnace is operating, consult gas supplier on correct gas supply piping sizes.

This heater is for indoor installation only!

NOTE Gasket binder material used in this heater assembly will temporarily emit an odor and/or vapor. This condition will clear up in approximately 20 minutes and thereafter will not reoccur. Refer to page 4 for ventilation.

THE STATE OF CALIFORNIA REQUIRES THE FOLLOWING WARNING:

WARNING: Combustion by-products produced when using this product contain carbon monoxide, a chemical known to the State of California to cause

cancer and birth defects (or other reproductive harm).

CONTENTS


General Information..........................................................

3


Clearances.........................................................................

3


Gas Supply........................................................................

3


......................................................................Gas Pressure

4


LANGUAGES

............................................................................Electrical

5


ENGLISH

Thermostat & Location......................................................

5


Pages E1 — E16

Ventilation.........................................................................

5


SPANISH

Operations

5


Pages S1 — S16


Cleaning Information.........................................................

5


FRENCH

Thermostat

6


Pages F1 — F16


Troubleshooting.................................................................

7


Connection diagram for flame rod current


for flame rectification systems......................................

8


Replacement parts.............................................................

9


Control system replacement parts.....................................

12


Enerco Group, Inc. |Gas-Fired Infra-Red Space Heaters

E2

Operating Instructions and Owner’s Manual

1.GENERAL INFORMATION

a.Your heater comes fully assembled and is tested at the factory for proper gas and input as stated on the name plate.

b.Before proceeding with the installation, be sure to inspect for damages. The freight company that delivered the heater must be notified of any damages prior to installation. HEAT STAR will send replacement parts for damaged parts only after receiving a signed inspection report to prove the liability of the freight company.

c.Do not attempt to operate heater with any other gas than that indicated on the heater name plate.

d.Installation of the heater must conform with local building codes or, in absence of local codes, with the National Fuel Gas Code, ANSI Z223.1/NFPA54. In Canada, refer to CAN 1-B146.1.

e.Plugged 1/8” N.P.T. Test Gage Connection is located on the Heater Gas Control or a N.P.T. Connection is located on the outside of the Cast Venturi.

2.CLEARANCES Minimum clearances to combustibles.

(Refer to Figure 1)

Provide adequate clearance to combustibles, Figure 1, between control end of heater for servicing and minimum on top and sides for ventilation and combustion air supply.

A minimum clearance of 8’ above floor for public garages in accordance with ANSI/NFPA No. 88 most recent edition or Figure 1; whichever is larger. In Canada refer to CAN 1-B149.1 Installation codes for Gas burning appliances.

A minimum clearance of 10’ from the bottom of heater to top of wing, or engine enclosure, where aircraft are housed, and 8’ above floor in other areas of the hanger in accordance with ANSI/NFPA No. 409 most recent edition, or Figure 1; the larger dimension of ANSI/NFPA No. 409 or Figure 1 is to be used. In Canada refer to CCA B149-1-M91.

WARNING: MAINTAIN CLEARANCES AS SHOWN IN FIGURE 1 OR ON HEATER NAMEPLATE, IN GARAGE INSTALLATIONS WHERE PARKED VEHICLES ARE DIRECTLY BELOW THE HEATER.

3. SUSPENSION

Heater has four mounting holes, two on each end, for attaching rod or angle iron brackets and shall be safely and adequately fixed in position independent of gas and electric supply lines. Refer to Figures 4, 5, and 7 on pages 13 and 14 for recommended suspensions.

4. GAS SUPPLY

Provide adequate gas supply for rated input of each heater using American Standard Installation of gas piping and gas appliances in building ANSI/223. 1a/ NFPA54 Pamphlet, Table C-3 shows capacity of pipe

of different diameters and lengths in cubic feet per hour for Natural Gas with pressure drop of 0.3 inches specify gravity of 0.60. For liquefied Petroleum Gas (LP) capacity refer to Table C-3 and C-15 of the same pamphlet. For recommended heater gas connection refer to Figure No. 5, Page 15. In Canada refer to CAN 1-B149.1, and CSA B63.

If gas lines are to be pressure tested with compressed air, disconnect each heater to prevent control damage and cap outlets. After reconnecting all heaters, purge gas lines of air and check all connections for leaks using soap solution.

WARNING: DO NOT USE MATCH OR OTHER FLAME FOR LEAK TESTING.

5. PIPING REQUIREMENTS

All piping installed must comply with local codes and ordinances or with the National Fuel Gas Code, ANSI Z223.1 (NFPA 54), whichever takes precedence. When installing piping, the following requirements must be taken into consideration:

Use new properly reamed black pipe free from chips.

Apply a good quality pipe compound to all male threads prior to assembly. If L.P. gas is the fuel, ensure that pipe compound is resistant to L.P. gas. DO NOT USE TEFLON

™ tape.

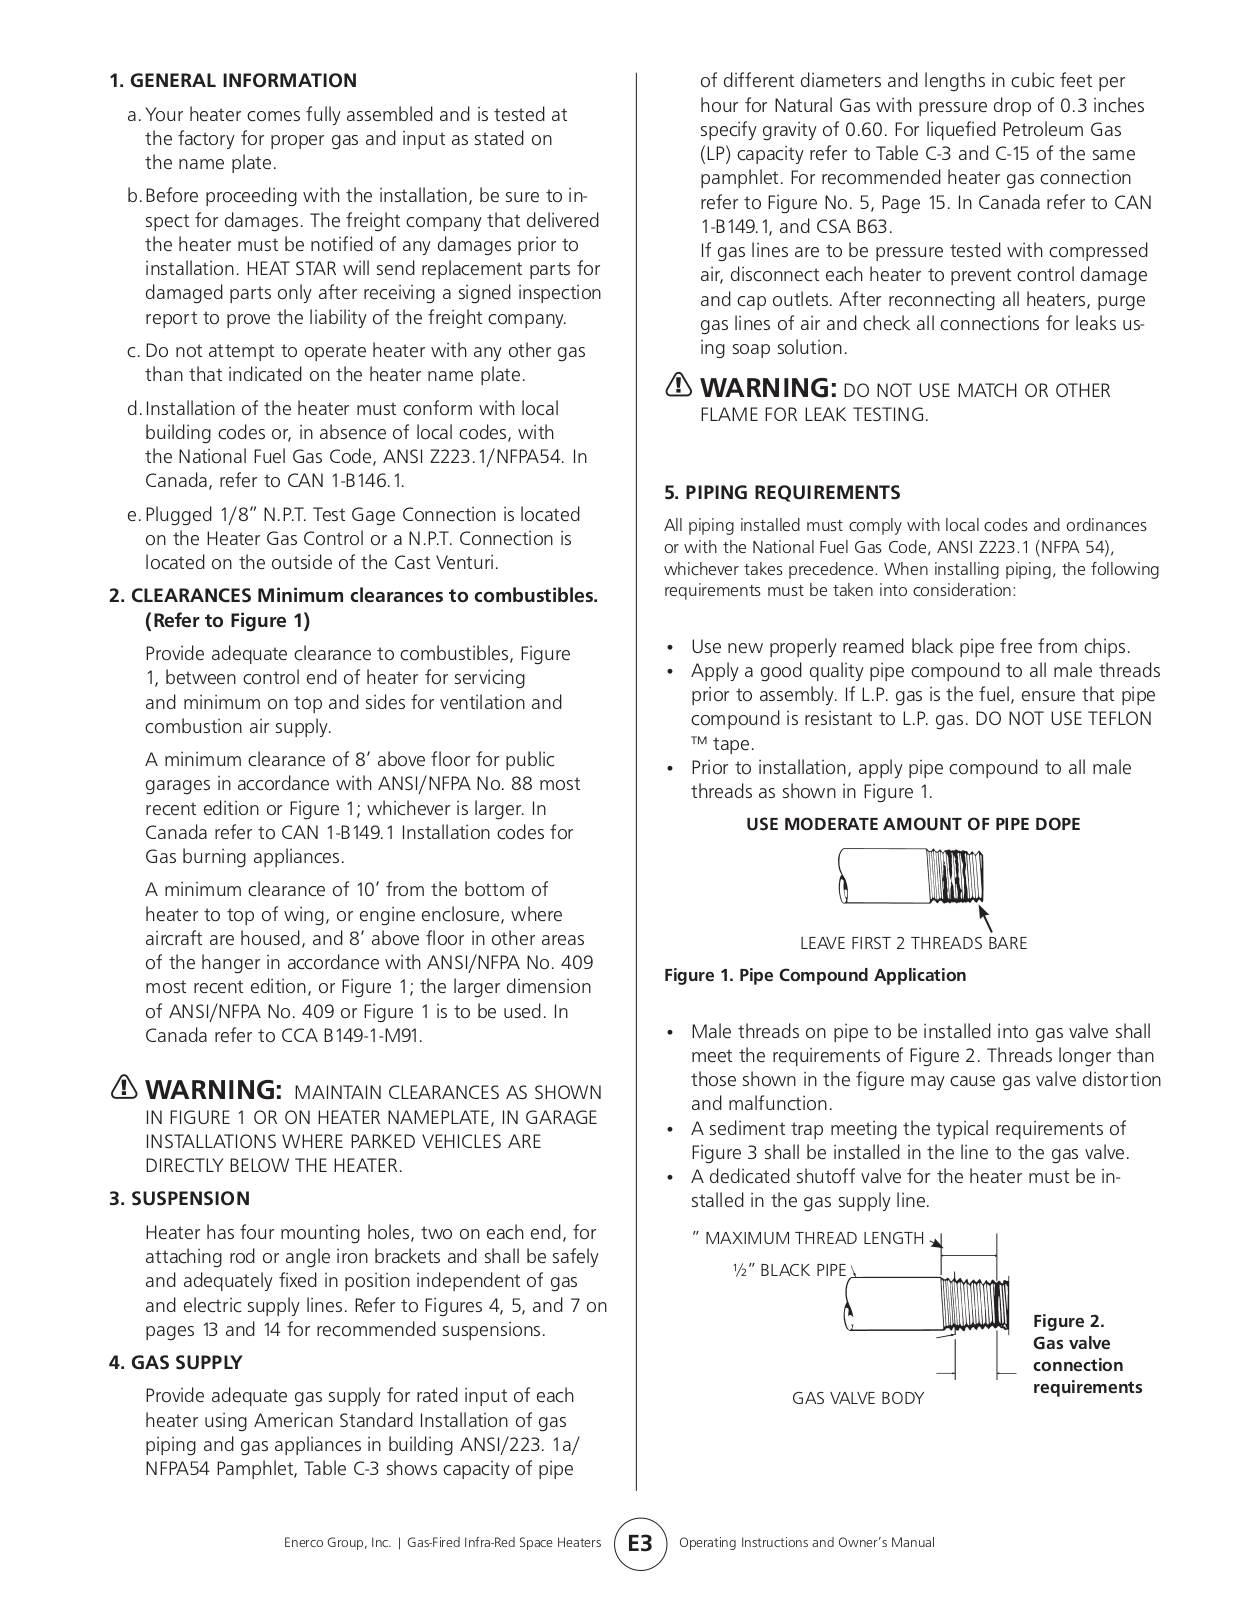
Prior to installation, apply pipe compound to all male threads as shown in Figure 1.

USE MODERATE AMOUNT OF PIPE DOPE

LEAVE FIRST 2 THREADS BARE

Figure 1. Pipe Compound Application

Male threads on pipe to be installed into gas valve shall meet the requirements of Figure 2. Threads longer than those shown in the figure may cause gas valve distortion and malfunction.

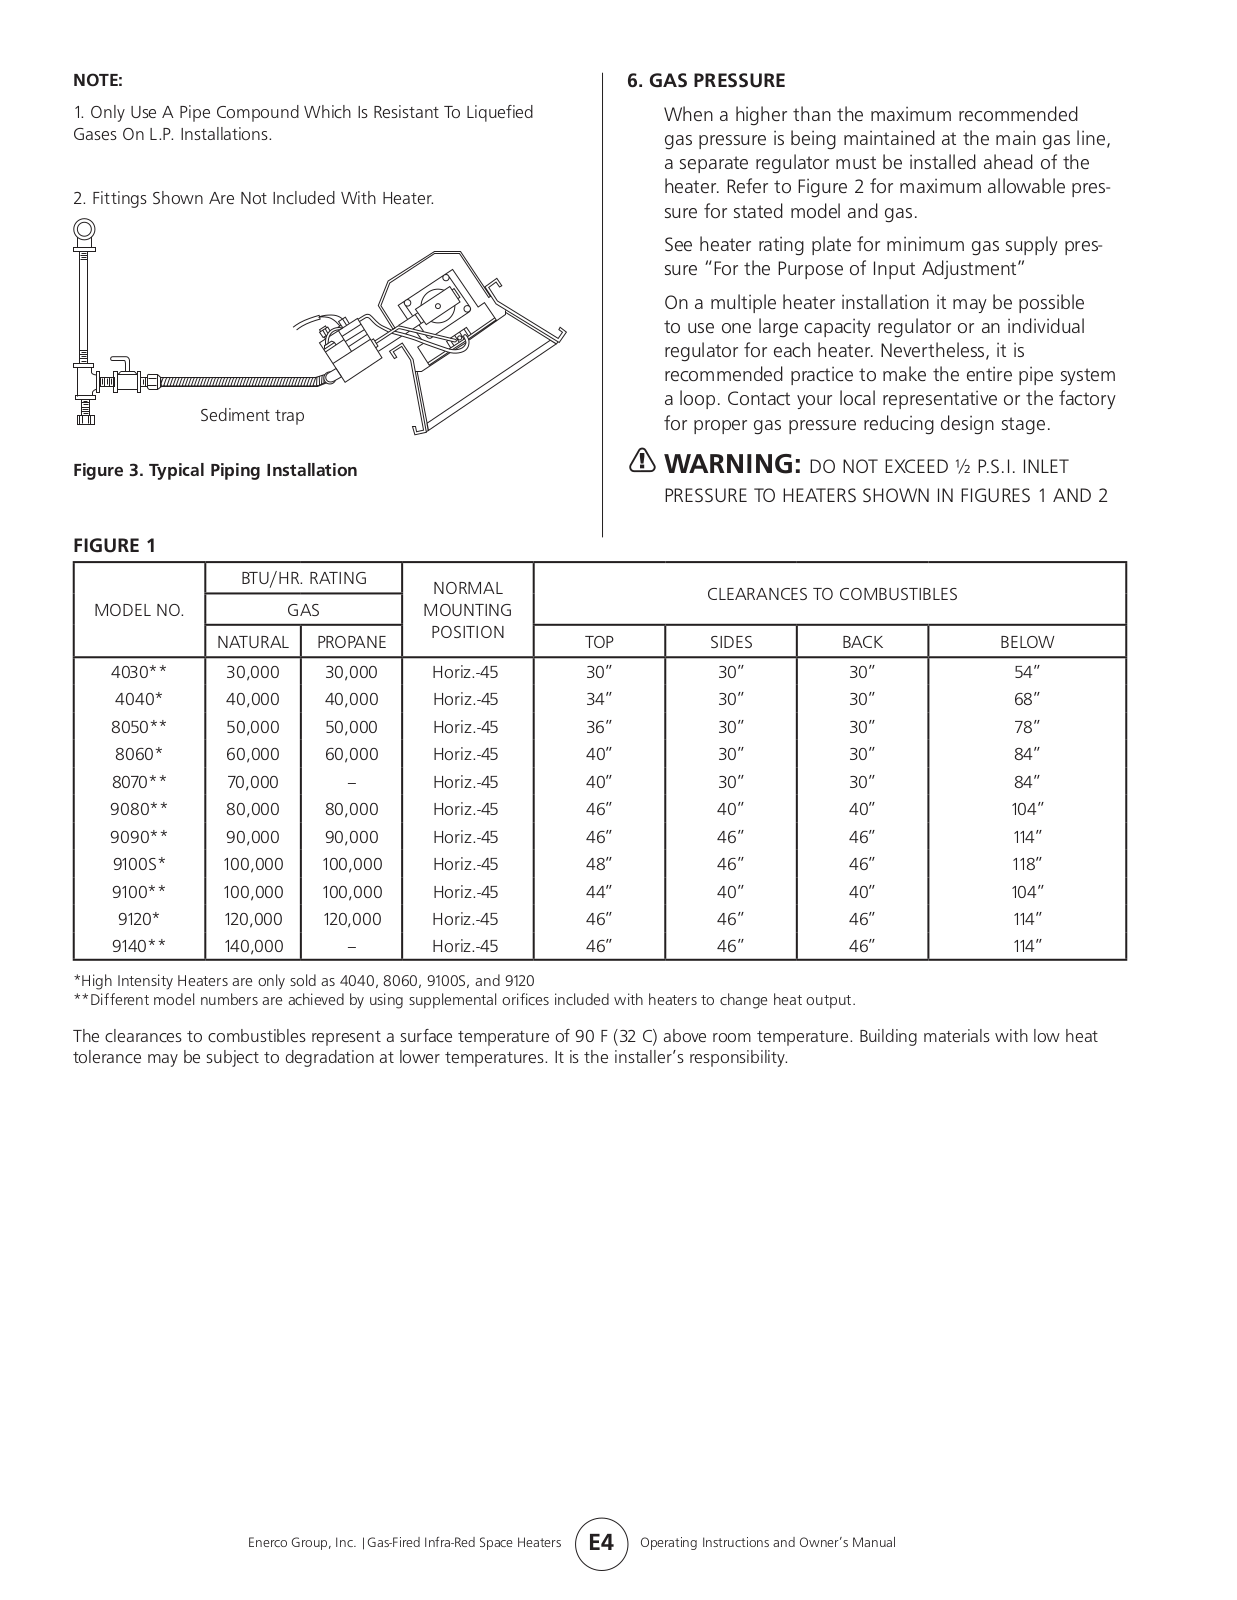
A sediment trap meeting the typical requirements of Figure 3 shall be installed in the line to the gas valve.

A dedicated shutoff valve for the heater must be installed in the gas supply line.

¾” MAXIMUM ½”


Figure 2.


Gas valve


connection

GAS VALVE BODY

requirements


Enerco Group, Inc. | Gas-Fired Infra-Red Space Heaters

E3

Operating Instructions and Owner’s Manual

NOTE:

1.Only Use A Pipe Compound Which Is Resistant To Liquefied Gases On L.P. Installations.

2.Fittings Shown Are Not Included With Heater.

Sediment trap

Figure 3. Typical Piping Installation

FIGURE 1

6. GAS PRESSURE

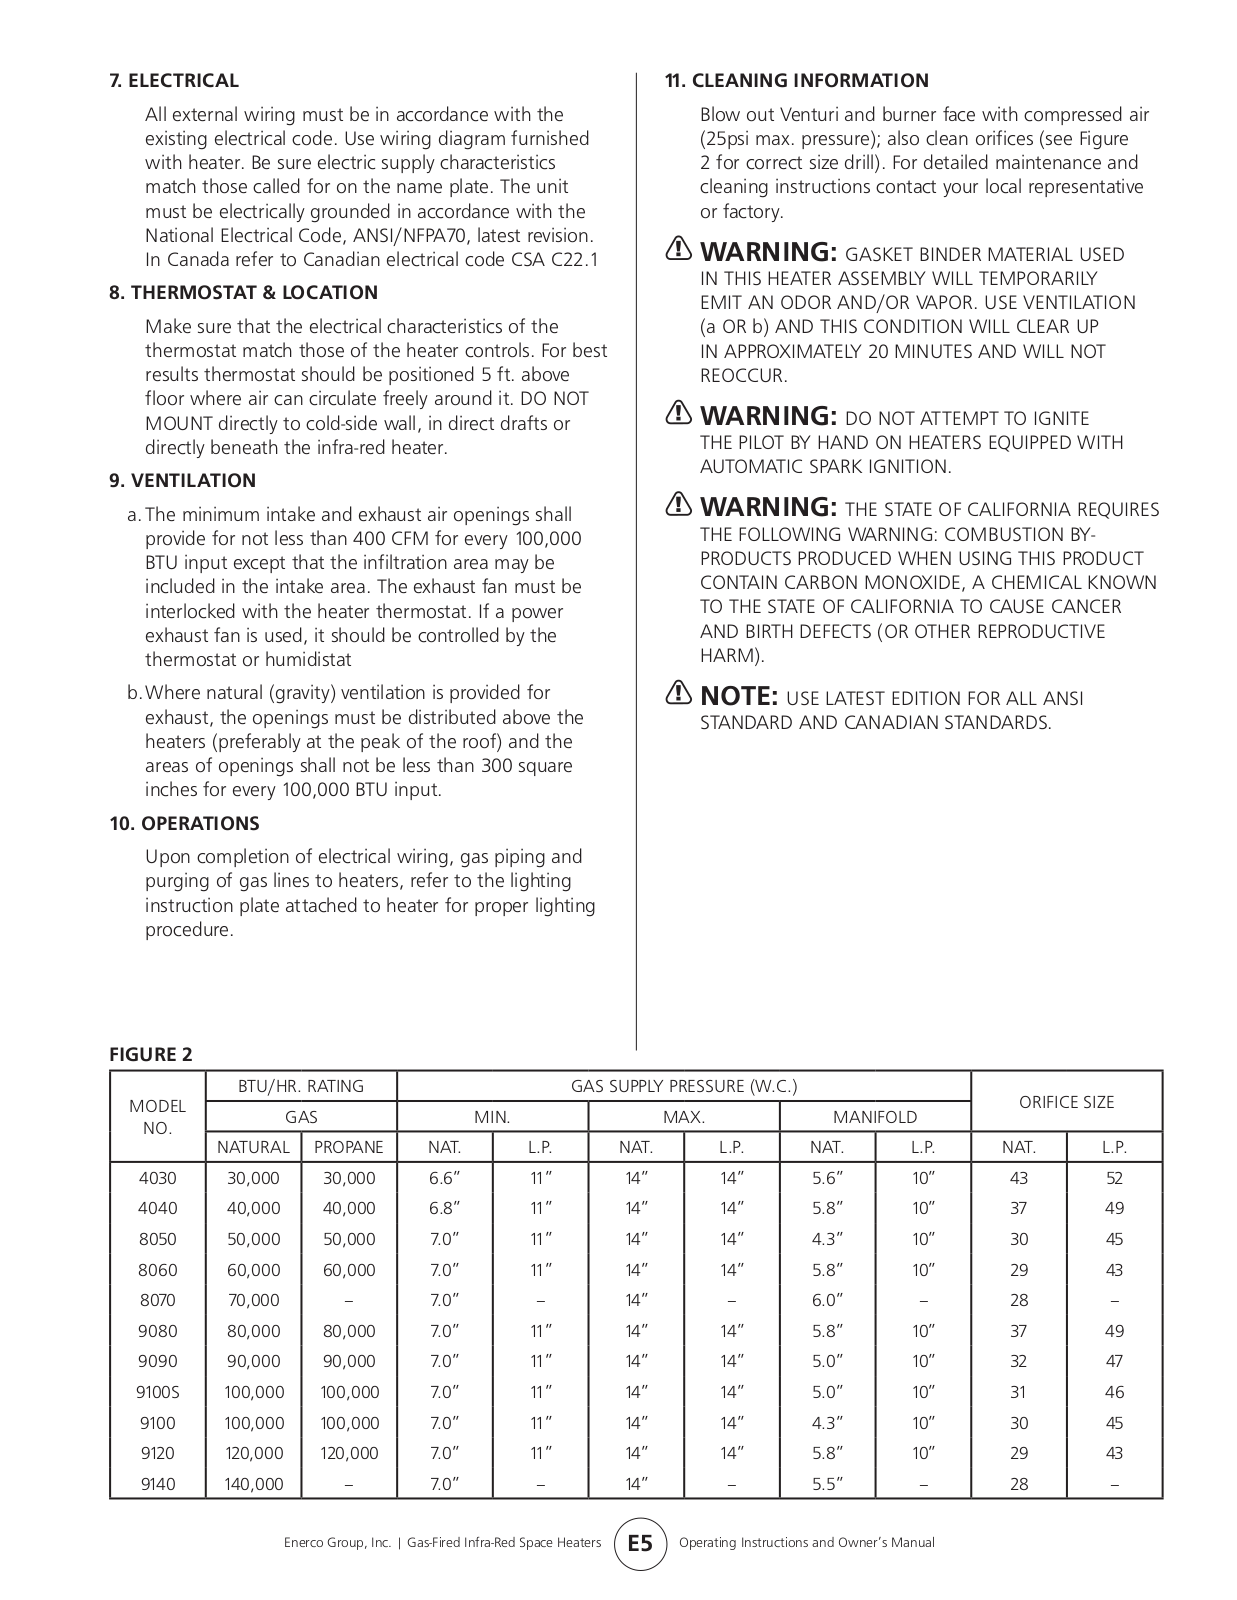
When a higher than the maximum recommended gas pressure is being maintained at the main gas line, a separate regulator must be installed ahead of the heater. Refer to Figure 2 for maximum allowable pressure for stated model and gas.

See heater rating plate for minimum gas supply pressure “For the Purpose of Input Adjustment”

On a multiple heater installation it may be possible to use one large capacity regulator or an individual regulator for each heater. Nevertheless, it is

recommended practice to make the entire pipe system a loop. Contact your local representative or the factory for proper gas pressure reducing design stage.

WARNING: DO NOT EXCEED ½ P.S.I. INLET PRESSURE TO HEATERS SHOWN IN FIGURES 1 AND 2


BTU/HR. RATING

NORMAL


CLEARANCES TO COMBUSTIBLES


MODEL NO.

GAS

MOUNTING


POSITION


NATURAL

PROPANE

TOP

SIDES

BACK


BELOW


4030**

30,000

30,000

Horiz.-45°

30”

30”

30”


54”

4040*

40,000

40,000

Horiz.-45°

34”

30”

30”


68”

8050**

50,000

50,000

Horiz.-45°

36”

30”

30”


78”

8060*

60,000

60,000

Horiz.-45°

40”

30”

30”


84”

8070**

70,000

Horiz.-45°

40”

30”

30”


84”

9080**

80,000

80,000

Horiz.-45°

46”

40”

40”


104”

9090**

90,000

90,000

Horiz.-45°

46”

46”

46”


114”

9100S*

100,000

100,000

Horiz.-45°

48”

46”

46”


118”

9100**

100,000

100,000

Horiz.-45°

44”

40”

40”


104”

9120*

120,000

120,000

Horiz.-45°

46”

46”

46”


114”

9140**

140,000

Horiz.-45°

46”

46”

46”


114”


*High Intensity Heaters are only sold as 4040, 8060, 9100S, and 9120

**Different model numbers are achieved by using supplemental orifices included with heaters to change heat output.

The clearances to combustibles represent a surface temperature of 90°F (32°C) above room temperature. Building materials with low heat tolerance may be subject to degradation at lower temperatures. It is the installer’s responsibility.

Enerco Group, Inc. |Gas-Fired Infra-Red Space Heaters

E4

Operating Instructions and Owner’s Manual

7. ELECTRICAL

All external wiring must be in accordance with the existing electrical code. Use wiring diagram furnished with heater. Be sure electric supply characteristics match those called for on the name plate. The unit must be electrically grounded in accordance with the

National Electrical Code, ANSI/NFPA70, latest revision. In Canada refer to Canadian electrical code CSA C22.1

8. THERMOSTAT & LOCATION

Make sure that the electrical characteristics of the thermostat match those of the heater controls. For best results thermostat should be positioned 5 ft. above floor where air can circulate freely around it. DO NOT MOUNT directly to cold-side wall, in direct drafts or directly beneath the infra-red heater.

9.VENTILATION

a.The minimum intake and exhaust air openings shall provide for not less than 400 CFM for every 100,000 BTU input except that the infiltration area may be included in the intake area. The exhaust fan must be interlocked with the heater thermostat. If a power exhaust fan is used, it should be controlled by the thermostat or humidistat

b.Where natural (gravity) ventilation is provided for exhaust, the openings must be distributed above the heaters (preferably at the peak of the roof) and the areas of openings shall not be less than 300 square inches for every 100,000 BTU input.

10.OPERATIONS

Upon completion of electrical wiring, gas piping and purging of gas lines to heaters, refer to the lighting instruction plate attached to heater for proper lighting procedure.

FIGURE 2

11. CLEANING INFORMATION

Blow out Venturi and burner face with compressed air (25psi max. pressure); also clean orifices (see Figure 2 for correct size drill). For detailed maintenance and cleaning instructions contact your local representative or factory.

WARNING: GASKET BINDER MATERIAL USED IN THIS HEATER ASSEMBLY WILL TEMPORARILY EMIT AN ODOR AND/OR VAPOR. USE VENTILATION (a OR b) AND THIS CONDITION WILL CLEAR UP

IN APPROXIMATELY 20 MINUTES AND WILL NOT REOCCUR.

WARNING: DO NOT ATTEMPT TO IGNITE THE PILOT BY HAND ON HEATERS EQUIPPED WITH AUTOMATIC SPARK IGNITION.

WARNING: THE STATE OF CALIFORNIA REQUIRES THE FOLLOWING WARNING: COMBUSTION BYPRODUCTS PRODUCED WHEN USING THIS PRODUCT CONTAIN CARBON MONOXIDE, A CHEMICAL KNOWN TO THE STATE OF CALIFORNIA TO CAUSE CANCER AND BIRTH DEFECTS (OR OTHER REPRODUCTIVE HARM).

NOTE: USE LATEST EDITION FOR ALL ANSI

STANDARD AND CANADIAN STANDARDS.

MODEL

BTU/HR. RATING


GAS SUPPLY PRESSURE (W.C.)


ORIFICE SIZE


GAS


MIN.


MAX.


MANIFOLD

NO.


NATURAL

PROPANE

NAT.


L.P.


NAT.


L.P.


NAT.

L.P.

NAT.

L.P.


4030

30,000

30,000

6.6”


11”


14”


14”


5.6”

10”

43

52

4040

40,000

40,000

6.8”


11”


14”


14”


5.8”

10”

37

49

8050

50,000

50,000

7.0”


11”


14”


14”


4.3”

10”

30

45

8060

60,000

60,000

7.0”


11”


14”


14”


5.8”

10”

29

43

8070

70,000

7.0”


14”


6.0”

28

9080

80,000

80,000

7.0”


11”


14”


14”


5.8”

10”

37

49

9090

90,000

90,000

7.0”


11”


14”


14”


5.0”

10”

32

47

9100S

100,000

100,000

7.0”


11”


14”


14”


5.0”

10”

31

46

9100

100,000

100,000

7.0”


11”


14”


14”


4.3”

10”

30

45

9120

120,000

120,000

7.0”


11”


14”


14”


5.8”

10”

29

43

9140

140,000

7.0”


14”


5.5”

28


Enerco Group, Inc. | Gas-Fired Infra-Red Space Heaters

E5

Operating Instructions and Owner’s Manual

THERMOSTAT

12. START-UP PROCEDURE

OPEN THE GAS SUPPLY VALVE OR VALVES.

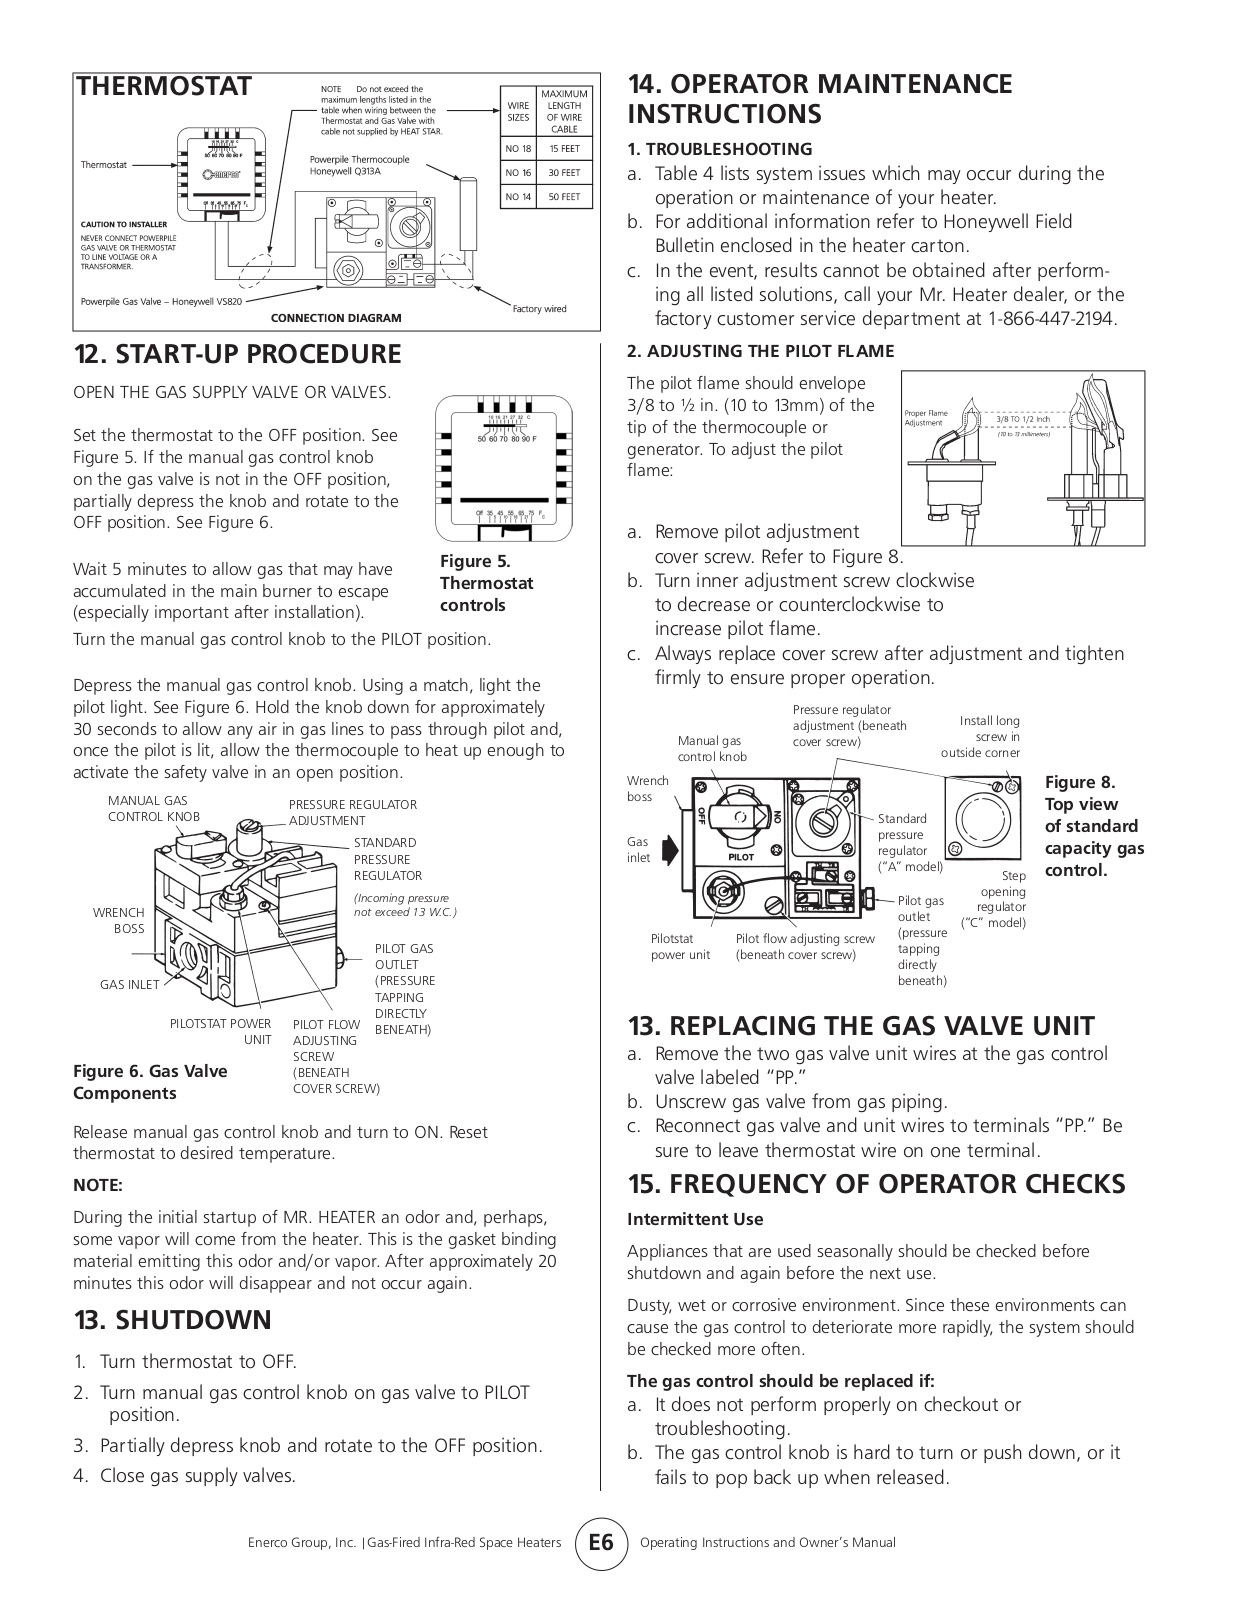
Set the thermostat to the OFF position. See Figure 5. If the manual gas control knob on the gas valve is not in the OFF position, partially depress the knob and rotate to the OFF position. See Figure 6.

Wait 5 minutes to allow gas that may have accumulated in the main burner to escape

(especially important after installation).

Figure 5. Thermostat controls

Turn the manual gas control knob to the PILOT position.

Depress the manual gas control knob. Using a match, light the pilot light. See Figure 6. Hold the knob down for approximately 30 seconds to allow any air in gas lines to pass through pilot and, once the pilot is lit, allow the thermocouple to heat up enough to activate the safety valve in an open position.

MANUAL GAS

PRESSURE REGULATOR

CONTROL KNOB

ADJUSTMENT


STANDARD


PRESSURE


REGULATOR


(Incoming pressure

WRENCH

not exceed 13” W.C.)

BOSS


PILOT GAS


OUTLET

GAS INLET


(PRESSURE


TAPPING

PILOTSTAT POWER

PILOT FLOW

DIRECTLY

BENEATH)

UNIT

ADJUSTING


Figure 6. Gas Valve

SCREW


(BENEATH


Components

COVER SCREW)

Release manual gas control knob and turn to ON. Reset thermostat to desired temperature.

NOTE:

During the initial startup of MR. HEATER an odor and, perhaps, some vapor will come from the heater. This is the gasket binding material emitting this odor and/or vapor. After approximately 20 minutes this odor will disappear and not occur again.

13. SHUTDOWN

1.Turn thermostat to OFF.

2.Turn manual gas control knob on gas valve to PILOT

position.

3.Partially depress knob and rotate to the OFF position.

4.Close gas supply valves.

14. OPERATOR MAINTENANCE

INSTRUCTIONS

1. TROUBLESHOOTING

a.Table 4 lists system issues which may occur during the operation or maintenance of your heater.

b.For additional information refer to Honeywell Field Bulletin enclosed in the heater carton.

c.In the event, results cannot be obtained after performing all listed solutions, call your Mr. Heater dealer, or the factory customer service department at 1-866-447-2194.

2. ADJUSTING THE PILOT FLAME

The pilot flame should envelope 3/8 to ½ in. (10 to 13mm) of the tip of the thermocouple or generator. To adjust the pilot flame:

a.Remove pilot adjustment cover screw. Refer to Figure 8.

b.Turn inner adjustment screw clockwise to decrease or counterclockwise to increase pilot flame.

c.Always replace cover screw after adjustment and tighten firmly to ensure proper operation.


Pressure regulator

Install long


adjustment (beneath


screw in

Manual gas

cover screw)

control knob


outside corner

Wrench boss


Standard

Gas


pressure


regulator

inlet


(“A” model)


Pilot gas


outlet

Pilotstat

Pilot flow adjusting screw

(pressure

tapping

power unit

(beneath cover screw)

directly


beneath)

Figure 8. Top view of standard

capacity gas Step control.

opening regulator

(“C” model)

13. REPLACING THE GAS VALVE UNIT

a.Remove the two gas valve unit wires at the gas control valve labeled “PP.”

b.Unscrew gas valve from gas piping.

c.Reconnect gas valve and unit wires to terminals “PP.” Be sure to leave thermostat wire on one terminal.

15. FREQUENCY OF OPERATOR CHECKS

Intermittent Use

Appliances that are used seasonally should be checked before shutdown and again before the next use.

Dusty, wet or corrosive environment. Since these environments can cause the gas control to deteriorate more rapidly, the system should be checked more often.

The gas control should be replaced if:

a. It does not perform properly on checkout or troubleshooting.

b.The gas control knob is hard to turn or push down, or it fails to pop back up when released.

Enerco Group, Inc. |Gas-Fired Infra-Red Space Heaters

E6

Operating Instructions and Owner’s Manual

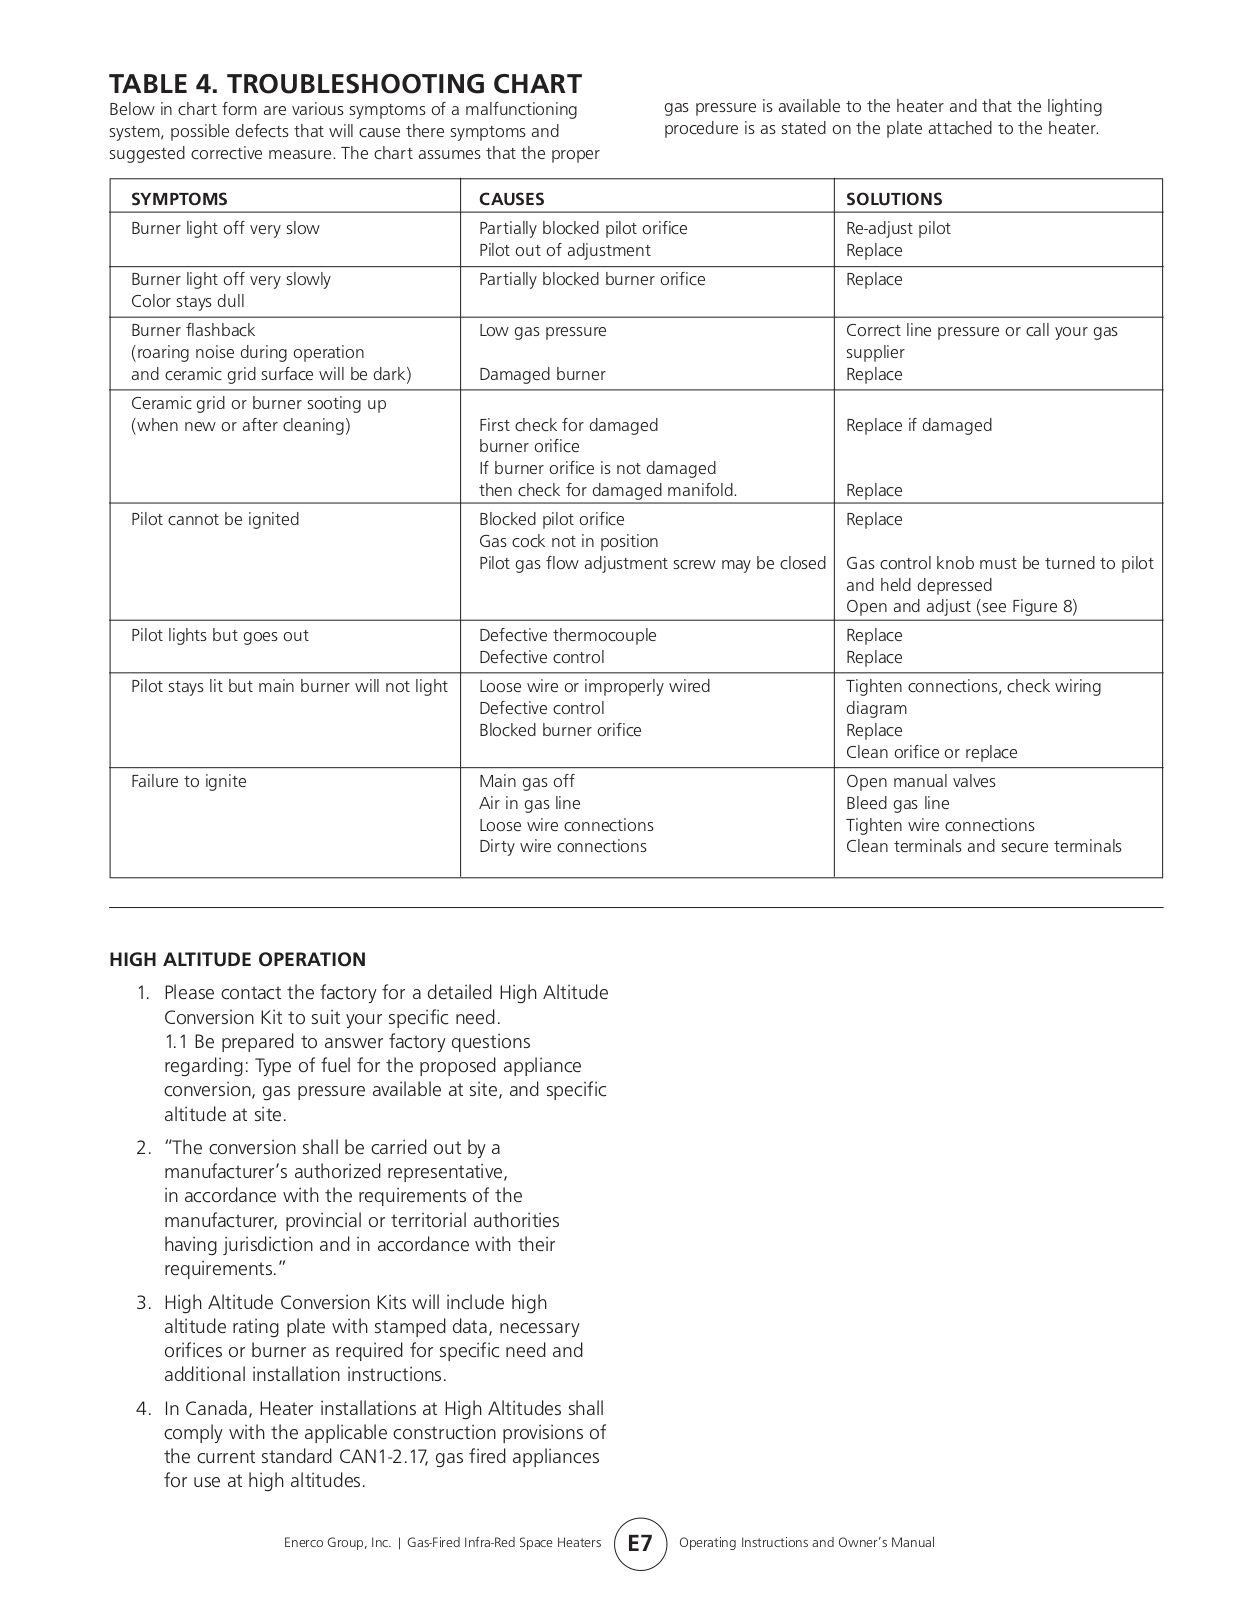
TABLE 4. TROUBLESHOOTING CHART

Below in chart form are various symptoms of a malfunctioning system, possible defects that will cause there symptoms and suggested corrective measure. The chart assumes that the proper

gas pressure is available to the heater and that the lighting procedure is as stated on the plate attached to the heater.

SYMPTOMS

CAUSES

SOLUTIONS


Burner light off very slow

Partially blocked pilot orifice

Re-adjust pilot


Pilot out of adjustment

Replace


Burner light off very slowly

Partially blocked burner orifice

Replace


Color stays dull


Burner flashback

Low gas pressure

Correct

line


pressure or call your gas

(roaring noise during operation

­


supplier

and ceramic grid surface will be dark)

Damaged burner

Replace


Ceramic grid or burner sooting up


(when new or after cleaning)

First check for damaged


Replace if damaged


burner orifice


If burner orifice is not damaged


then check for damaged manifold.

Replace

Pilot cannot be ignited

Blocked pilot orifice

Replace


Gas cock not in position


Pilot gas flow adjustment screw may be closed

Gas​

control knob must be turned to pilot


and held depressed


­

Open and adjust (see Figure 8)

Pilot lights but goes out

Defective thermocouple

Replace


Defective control

Replace

Pilot stays lit but main burner will not light

Loose wire or improperly wired

Tighten connections, check wiring


Defective control

diagram


Blocked burner orifice

Replace


Clean orifice or replace


Failure to ignite

Main gas off

Open manual valves


Air in gas line

Bleed gas line


Loose wire connections

Tighten wire connections


Dirty wire connections

Clean terminals and secure terminals

HIGH ALTITUDE OPERATION

1.Please contact the factory for a detailed High Altitude Conversion Kit to suit your specific need.

1.1 Be prepared to answer factory questions regarding: Type of fuel for the proposed appliance

conversion, gas pressure available at site, and specific altitude at site.

2.“The conversion shall be carried out by a manufacturer’s authorized representative, in accordance with the requirements of the

manufacturer, provincial or territorial authorities

having jurisdiction and in accordance with their requirements.”

3. High Altitude Conversion Kits will include high altitude rating plate with stamped data, necessary orifices or burner as required for specific need and additional installation instructions.

4.In Canada, Heater installations at High Altitudes shall comply with the applicable construction provisions of the current standard CAN1-2.17, gas fired appliances for use at high altitudes.

Enerco Group, Inc. | Gas-Fired Infra-Red Space Heaters

E7

Operating Instructions and Owner’s Manual

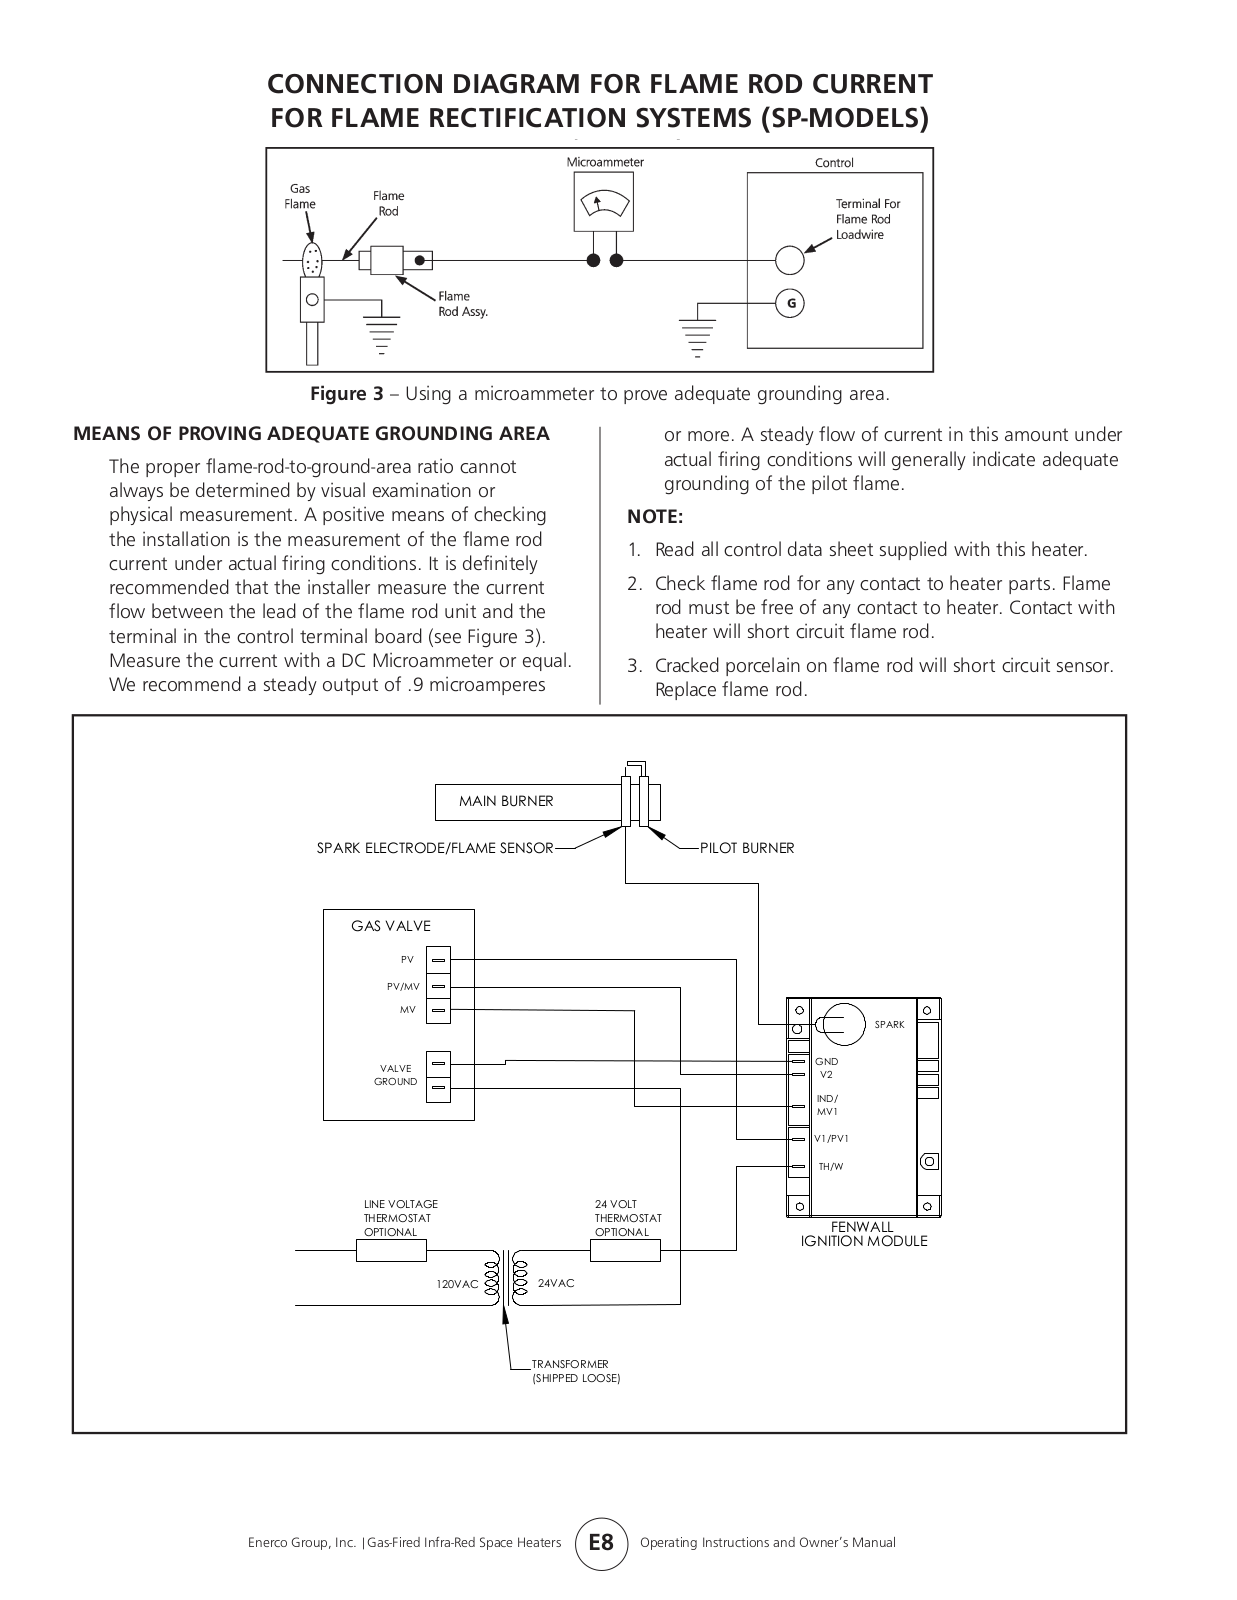
CONNECTION DIAGRAM FOR FLAME ROD CURRENT FOR FLAME RECTIFICATION SYSTEMS (SP-MODELS)

Figure 3 – Using a microammeter to prove adequate grounding area.

MEANS OF PROVING ADEQUATE GROUNDING AREA

The proper flame-rod-to-ground-area ratio cannot always be determined by visual examination or physical measurement. A positive means of checking the installation is the measurement of the flame rod current under actual firing conditions. It is definitely recommended that the installer measure the current flow between the lead of the flame rod unit and the terminal in the control terminal board (see Figure 3). Measure the current with a DC Microammeter or equal. We recommend a steady output of .9 microamperes

or more. A steady flow of current in this amount under actual firing conditions will generally indicate adequate grounding of the pilot flame.

NOTE:

1.Read all control data sheet supplied with this heater.

2.Check flame rod for any contact to heater parts. Flame rod must be free of any contact to heater. Contact with heater will short circuit flame rod.

3.Cracked porcelain on flame rod will short circuit sensor.

Replace flame rod.

MAIN BURNER

SPARK ELECTRODE/FLAME SENSORPILOT BURNER

GAS VALVE

PV

PV/MV

MV


SPARK

VALVE


GND


V2

GROUND


IND/


MV1


V1/PV1


TH/W

LINE VOLTAGE

24 VOLT


THERMOSTAT

THERMOSTAT

FENWALL

OPTIONAL

OPTIONAL


IGNITION MODULE

120VAC

24VAC


TRANSFORMER


(SHIPPED LOOSE)


Enerco Group, Inc. |Gas-Fired Infra-Red Space Heaters

E8

Operating Instructions and Owner’s Manual

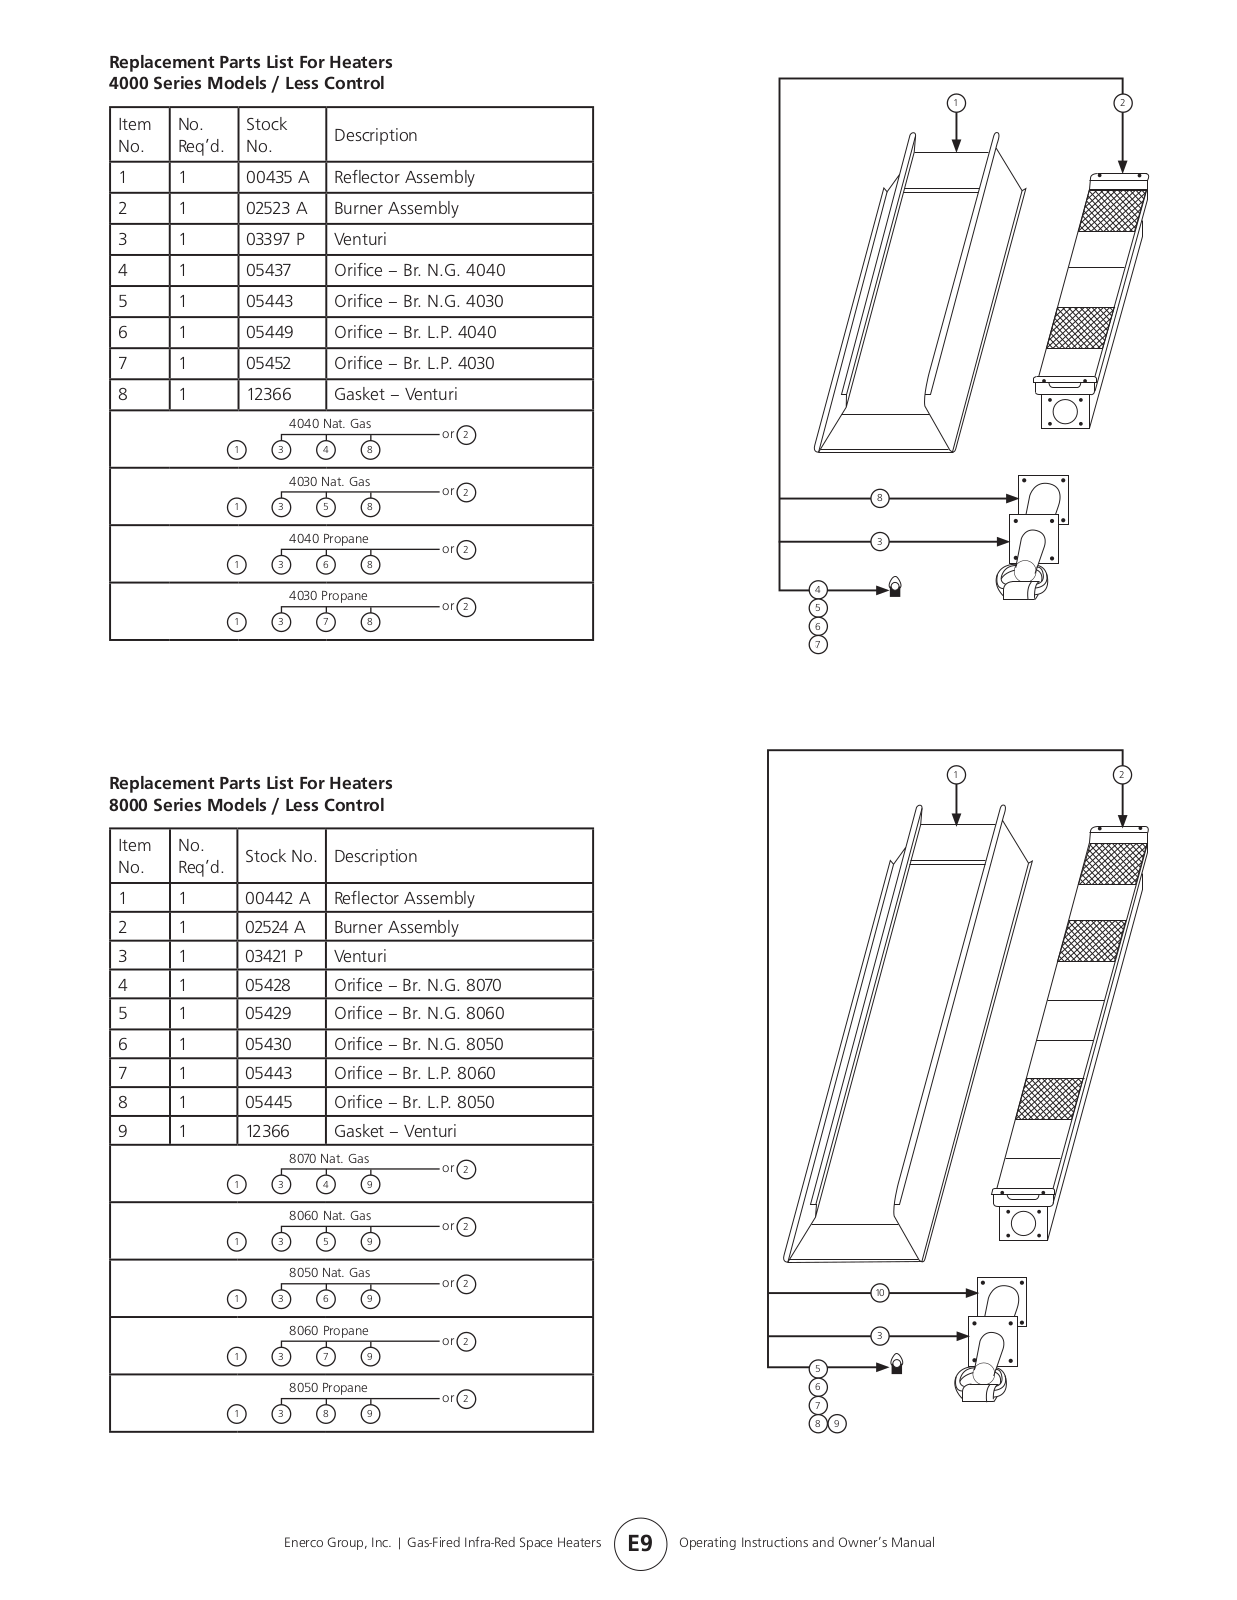
Replacement Parts List For Heaters


4000 Series Models / Less Control


1

2

Item

No.

Stock


Description


No.

Req’d.

No.


1

1

00435 A


Reflector Assembly


2

1

02523 A


Burner Assembly


3

1

03397 P


Venturi


4

1

05437


Orifice – Br. N.G. 4040


5

1

05443


Orifice – Br. N.G. 4030


6

1

05449


Orifice – Br. L.P. 4040


7

1

05452


Orifice – Br. L.P. 4030


8

1

12366


Gasket – Venturi


4040 Nat. Gas

or

2


1

3

4

8


4030 Nat. Gas

or

2


89


1

3

5

8


4040 Propane

or

2

3


1

3

6

8


4030 Propane


54


or

2

65


1

3

7

8


76


87


Replacement Parts List For Heaters


1

2


8000 Series Models / Less Control


Item

No.

Stock No.


Description


No.

Req’d.


1

1

00442 A


Reflector Assembly


2

1

02524 A


Burner Assembly


3

1

03421 P


Venturi


4

1

05428


Orifice – Br. N.G. 8070


5

1

05429


Orifice – Br. N.G. 8060


6

1

05430


Orifice – Br. N.G. 8050


7

1

05443


Orifice – Br. L.P. 8060


8

1

05445


Orifice – Br. L.P. 8050


9

1

12366


Gasket – Venturi


8070 Nat. Gas

or

2


1

3

4

9


8060 Nat. Gas

or

2


1

3

5

9


8050 Nat. Gas

or

2


10


1

3

6

9


8060 Propane

or

2


3


1

3

7

9


5


8050 Propane

or

2

6


7


1

3

8

9


8

9


Enerco Group, Inc. | Gas-Fired Infra-Red Space Heaters

E9

Operating Instructions and Owner’s Manual

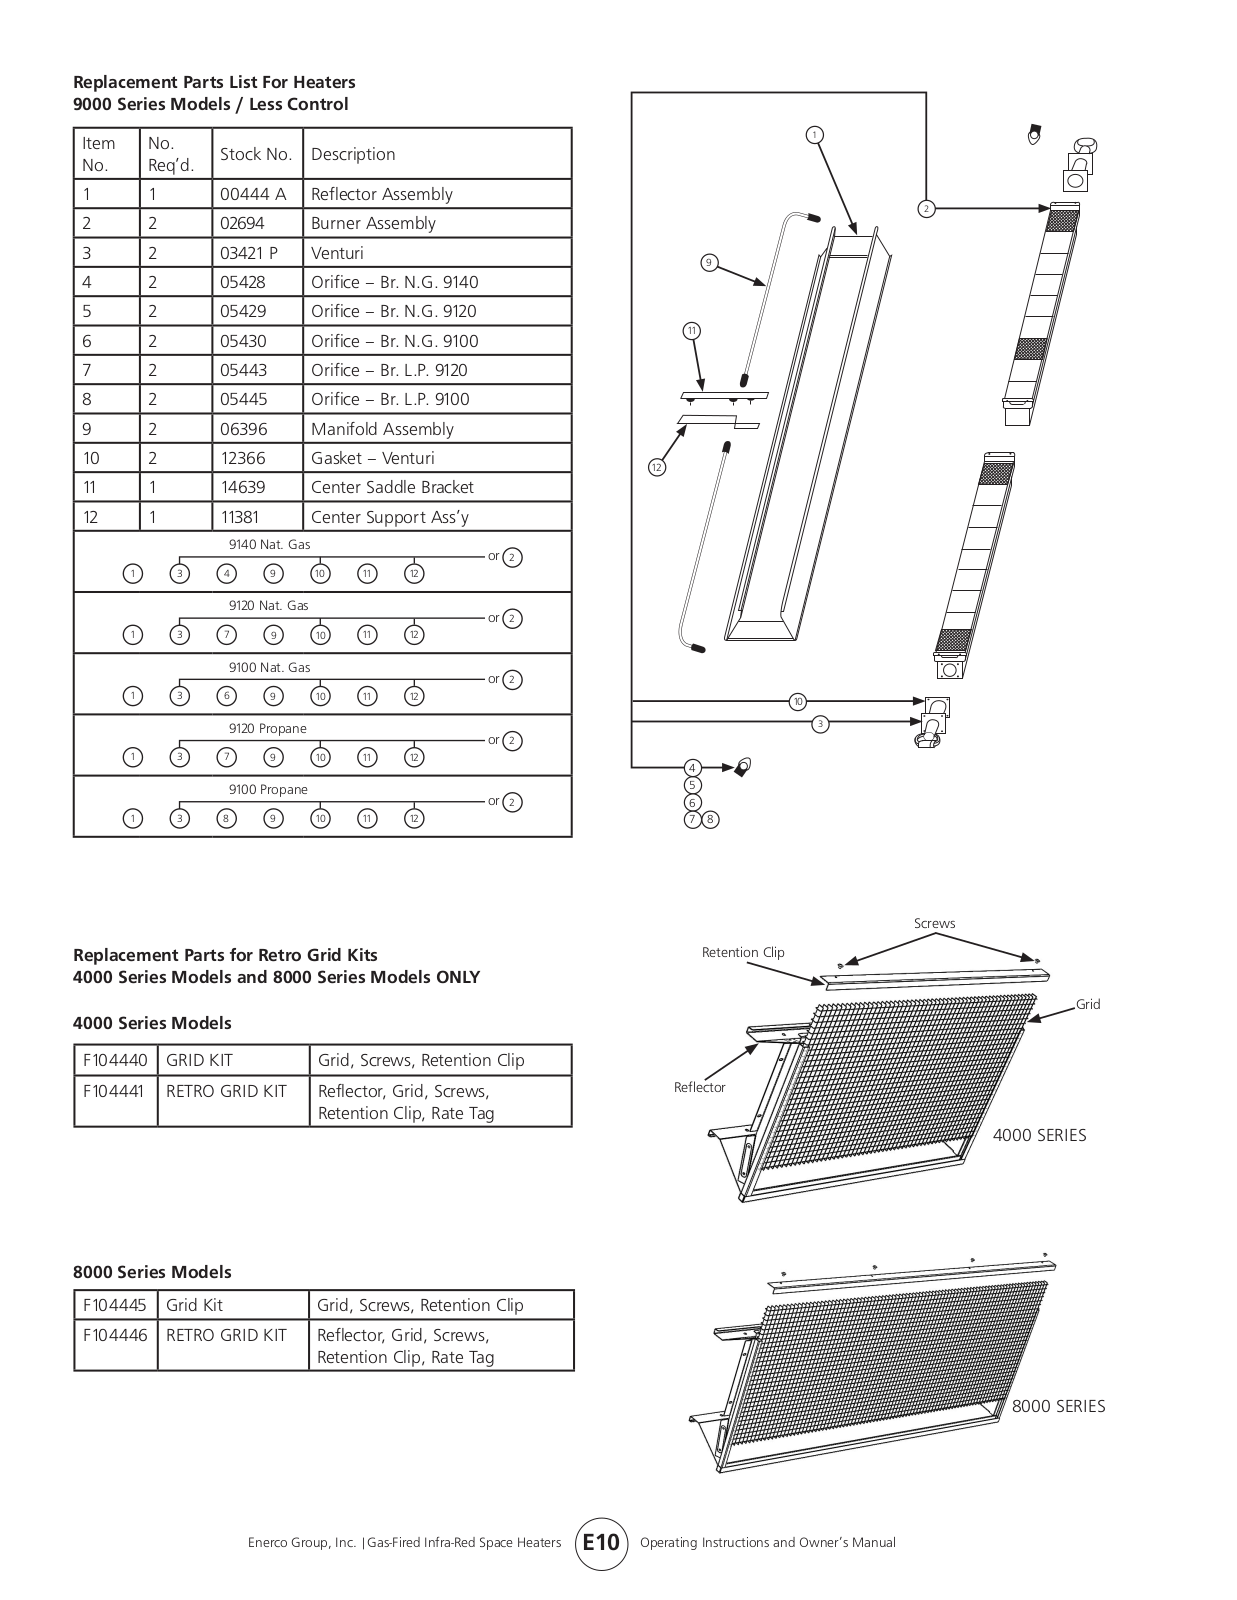
Replacement Parts List For Heaters

9000 Series Models / Less Control

Item

No.

Stock No.

Description


No.

Req’d.


1

1

00444 A

Reflector Assembly


2

2

02694


Burner Assembly


3

2

03421 P

Venturi


4

2

05428


Orifice – Br. N.G. 9140


5

2

05429


Orifice – Br. N.G. 9120


6

2

05430


Orifice – Br. N.G. 9100


7

2

05443


Orifice – Br. L.P. 9120


8

2

05445


Orifice – Br. L.P. 9100


9

2

06396


Manifold Assembly


10

2

12366


Gasket – Venturi


11

1

14639


Center Saddle Bracket


12

1

11381


Center Support Ass’y


9140 Nat. Gas


or

2


1

3

4

9

10

11

12


9120 Nat. Gas


or

2


1

3

7

9

10

11

12


9100 Nat. Gas


or

2


1

3

6

9

10

11

12


9120 Propane


or

2


1

3

7

9

10

11

12


9100 Propane


or

2


1

3

8

9

10

11

12


Replacement Parts for Retro Grid Kits

4000 Series Models and 8000 Series Models ONLY

4000 Series Models

F104440

GRID KIT

Grid, Screws, Retention Clip


F104441

RETRO GRID KIT

Reflector, Grid, Screws,


Retention Clip, Rate Tag


8000 Series Models

F104445

Grid Kit

Grid, Screws, Retention Clip


F104446

RETRO GRID KIT

Reflector, Grid, Screws,


Retention Clip, Rate Tag


1


2


119

115


124


120


3

46


57


68


79

108


Screws

Retention Clip

Grid

Reflector

4000 SERIES

8000 SERIES

Enerco Group, Inc. |Gas-Fired Infra-Red Space Heaters E10 Operating Instructions and Owner’s Manual

Replacement Parts List For Heaters

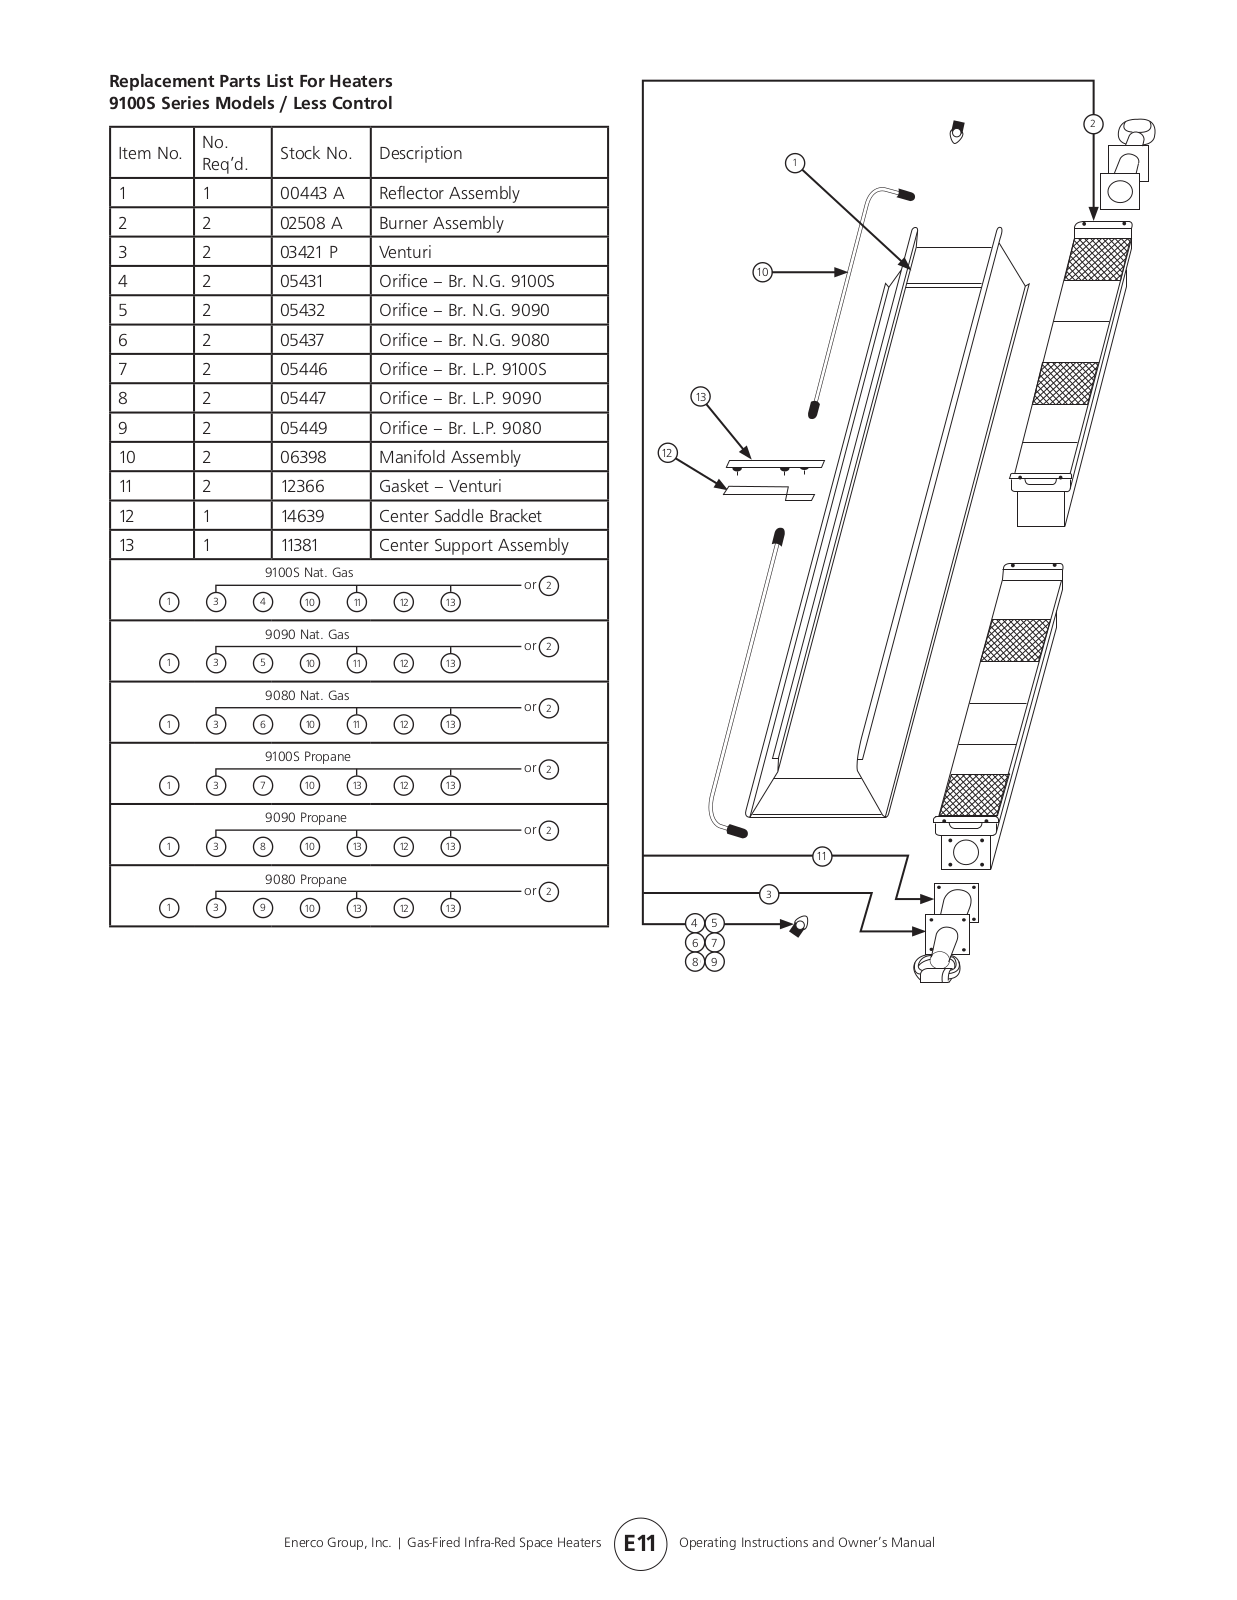
9100S Series Models / Less Control

Item No.

No.

Stock No.

Description

Req’d.


1

1

00443 A

Reflector Assembly


2

2

02508 A

Burner Assembly


3

2

03421 P

Venturi


4

2

05431

Orifice – Br. N.G. 9100S


5

2

05432

Orifice – Br. N.G. 9090


6

2

05437

Orifice – Br. N.G. 9080


7

2

05446

Orifice – Br. L.P. 9100S


8

2

05447

Orifice – Br. L.P. 9090


9

2

05449

Orifice – Br. L.P. 9080


10

2

06398

Manifold Assembly


11

2

12366

Gasket – Venturi


12

1

14639

Center Saddle Bracket


13

1

11381

Center Support Assembly


9100S Nat. Gas


or

2


1

3

4

10

11

12

13


9090 Nat. Gas


or

2


1

3

5

10

11

12

13


9080 Nat. Gas


or

2


1

3

6

10

11

12

13


9100S Propane


or

2


1

3

7

10

13

12

13


9090 Propane


or

2


1

3

8

10

13

12

13


9080 Propane


or

2


1

3

9

10

13

12

13


2


1


102

136


125


113


3

46

57

68

79

108

119

Enerco Group, Inc. | Gas-Fired Infra-Red Space Heaters E11 Operating Instructions and Owner’s Manual

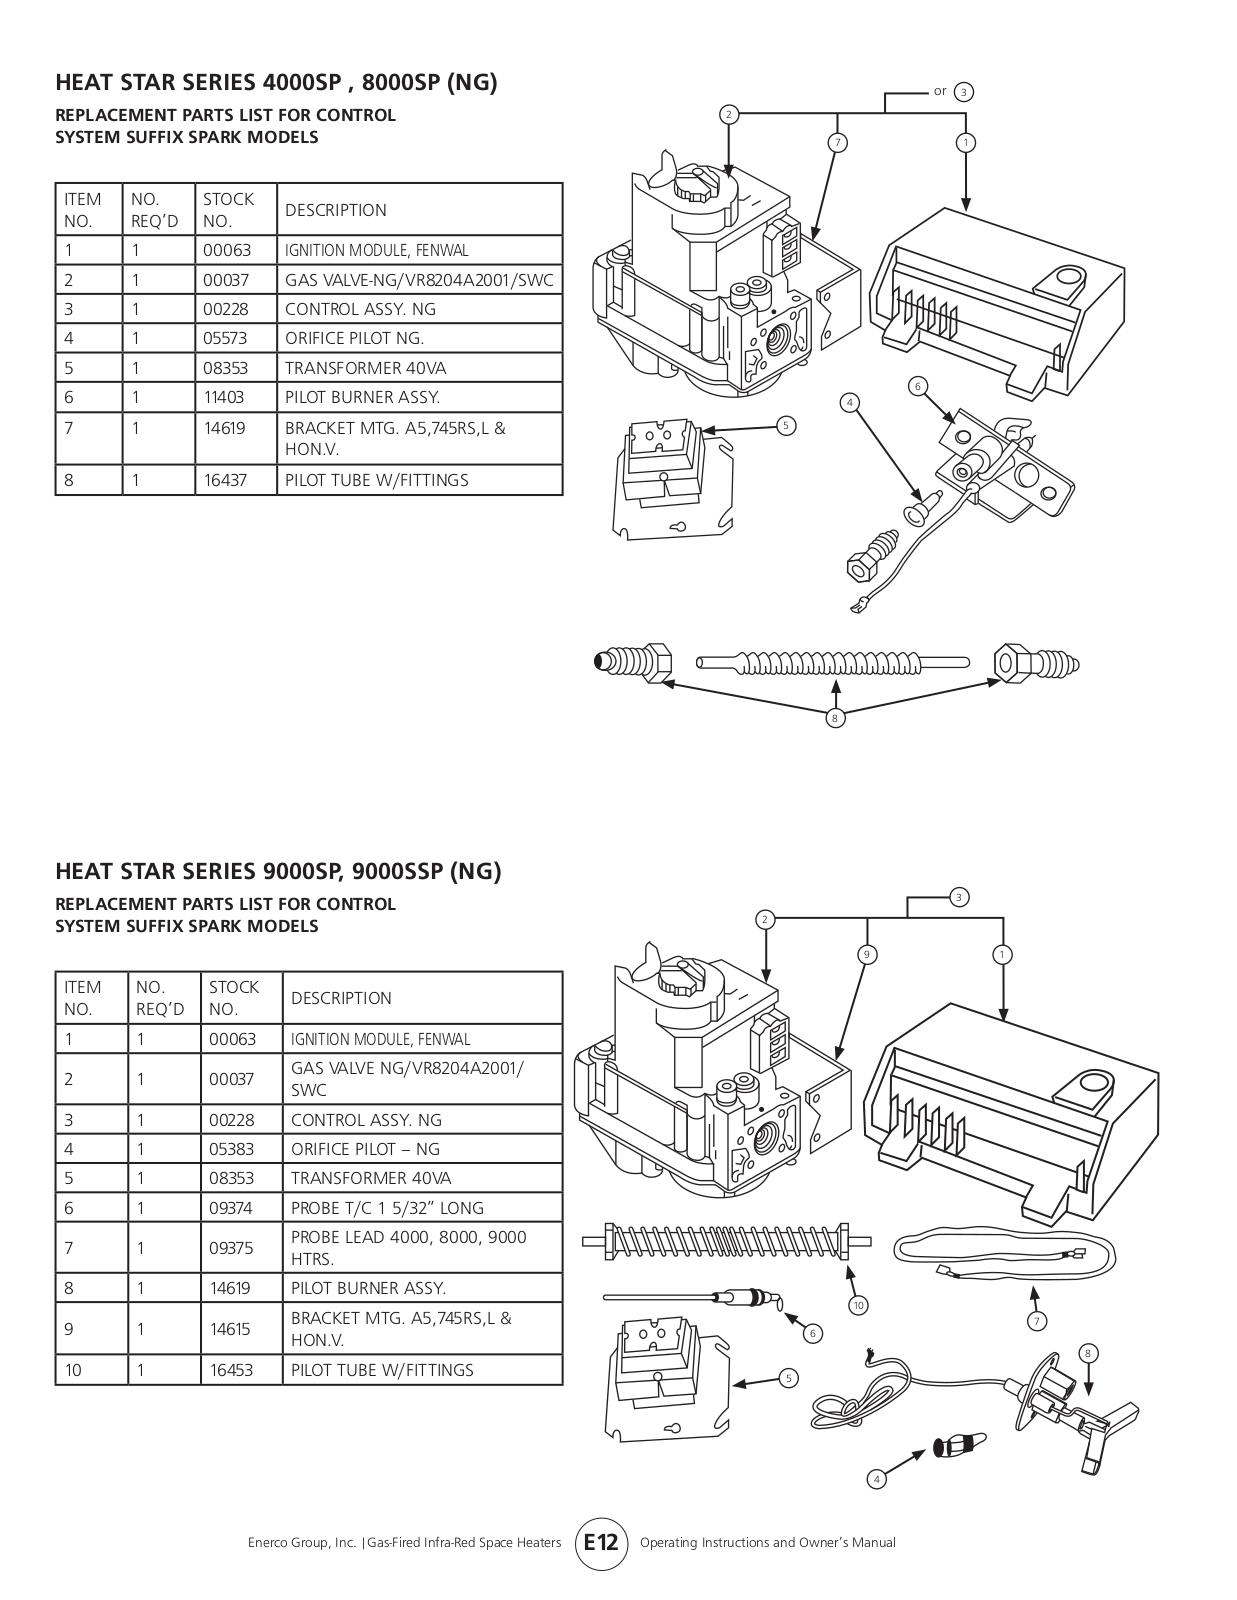
HEAT STAR SERIES 4000SP , 8000SP (NG)

REPLACEMENT PARTS LIST FOR CONTROL SYSTEM SUFFIX SPARK MODELS

ITEM

NO.

STOCK

DESCRIPTION

NO.

REQ’D

NO.


1

1

00063

IGNITION MODULE, FENWAL


2

1

00037

GAS VALVE-NG/VR8204A2001/SWC


3

1

00228

CONTROL ASSY. NG


4

1

05573

ORIFICE PILOT NG.


5

1

08353

TRANSFORMER 40VA


6

1

11403

PILOT BURNER ASSY.


7

1

14619

BRACKET MTG. A5,745RS,L &


HON.V.


8

1

16437

PILOT TUBE W/FITTINGS


or 3

2

7

1

6

4

5

8

HEAT STAR SERIES 9000SP, 9000SSP (NG)

REPLACEMENT PARTS LIST FOR CONTROL SYSTEM SUFFIX SPARK MODELS

ITEM

NO.

STOCK

DESCRIPTION

NO.

REQ’D

NO.


1

1

00063

IGNITION MODULE, FENWAL


2

1

00037

GAS VALVE NG/VR8204A2001/

SWC


3

1

00228

CONTROL ASSY. NG


4

1

05383

ORIFICE PILOT – NG


5

1

08353

TRANSFORMER 40VA


6

1

09374

PROBE T/C 1 5/32” LONG


7

1

09375

PROBE LEAD 4000, 8000, 9000

HTRS.


8

1

14619

PILOT BURNER ASSY.


9

1

14615

BRACKET MTG. A5,745RS,L &

HON.V.


10

1

16453

PILOT TUBE W/FITTINGS


3

2

91

10

7

6

8

5

4

Enerco Group, Inc. |Gas-Fired Infra-Red Space Heaters E12 Operating Instructions and Owner’s Manual

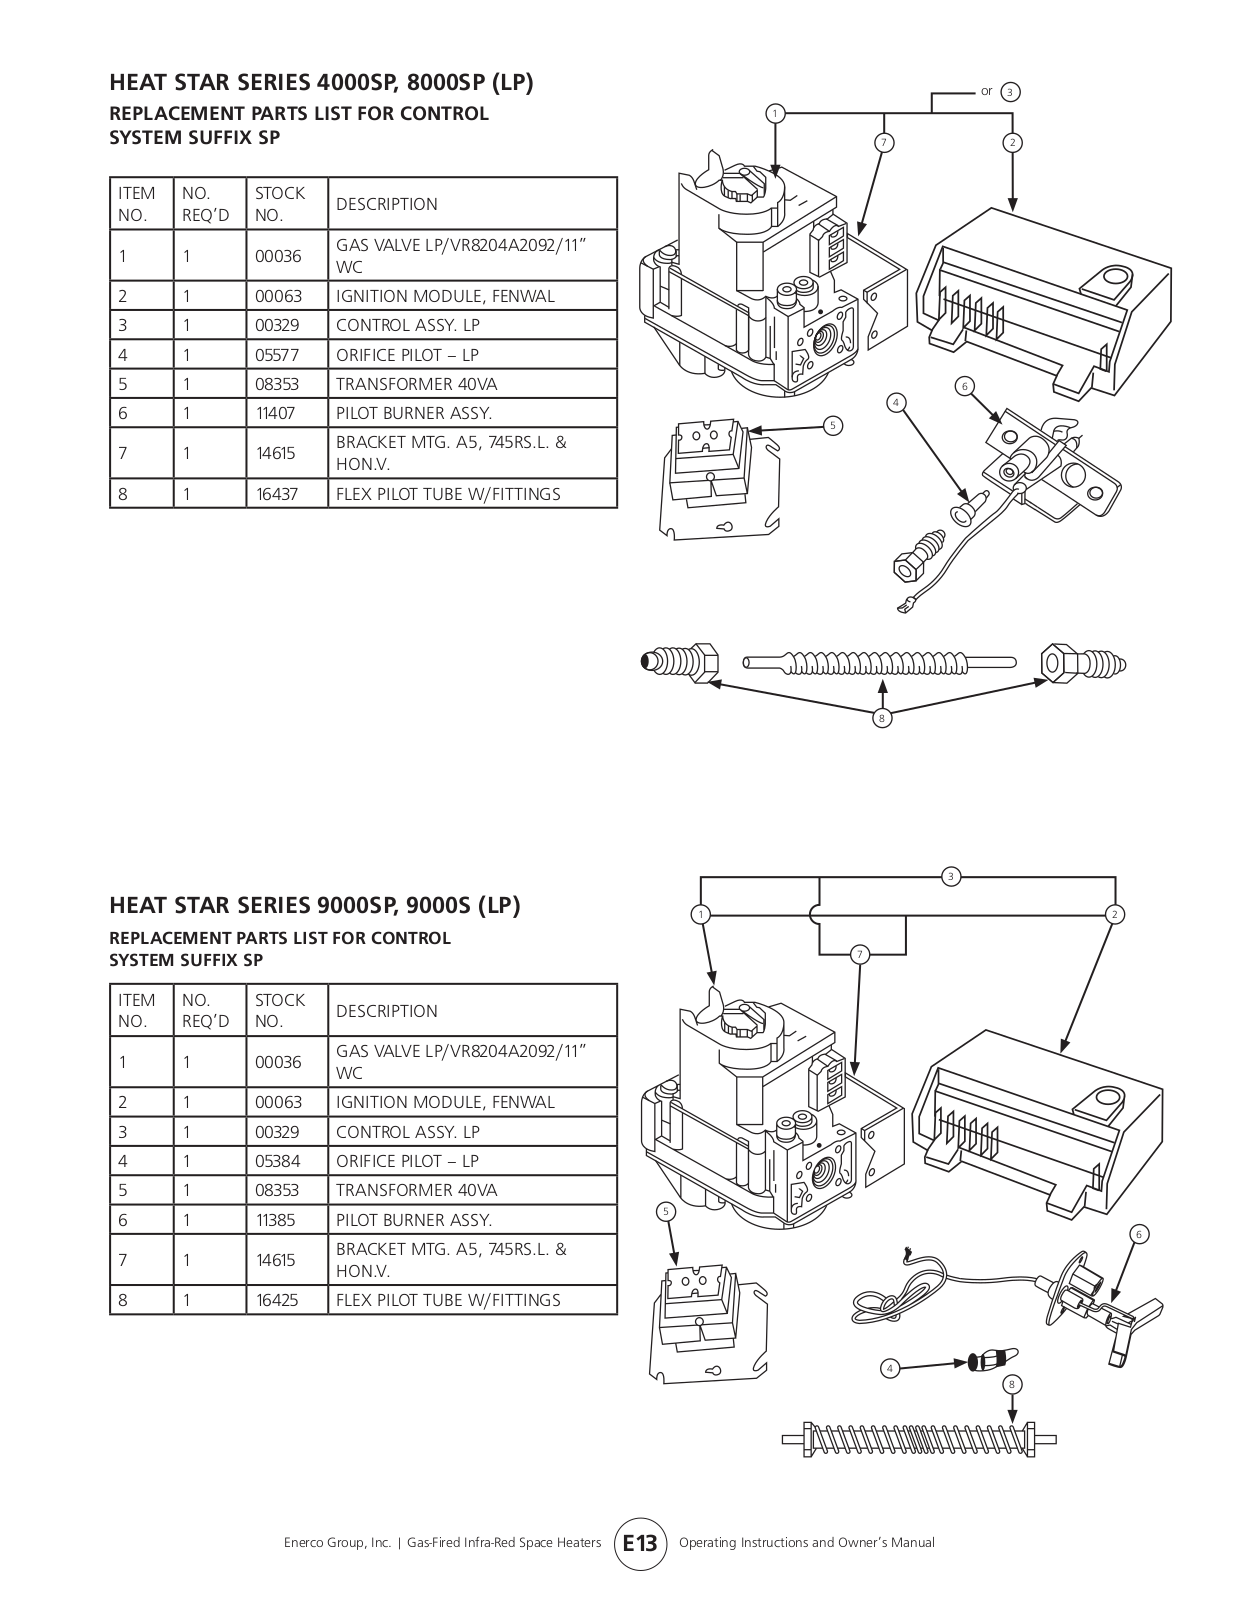
HEAT STAR SERIES 4000SP, 8000SP (LP)

REPLACEMENT PARTS LIST FOR CONTROL SYSTEM SUFFIX SP

ITEM

NO.

STOCK

DESCRIPTION

NO.

REQ’D

NO.


1

1

00036

GAS VALVE LP/VR8204A2092/11”

WC


2

1

00063

IGNITION MODULE, FENWAL


3

1

00329

CONTROL ASSY. LP


4

1

05577

ORIFICE PILOT – LP


5

1

08353

TRANSFORMER 40VA


6

1

11407

PILOT BURNER ASSY.


7

1

14615

BRACKET MTG. A5, 745RS.L. &

HON.V.


8

1

16437

FLEX PILOT TUBE W/FITTINGS


or 3

1

7

2

6

4

5

8

3

HEAT STAR SERIES 9000SP, 9000S (LP)

1

2

REPLACEMENT PARTS LIST FOR CONTROL


SYSTEM SUFFIX SP


7


ITEM

NO.

STOCK

DESCRIPTION


NO.

REQ’D

NO.


1

1

00036

GAS VALVE LP/VR8204A2092/11”


WC


2

1

00063

IGNITION MODULE, FENWAL


3

1

00329

CONTROL ASSY. LP


4

1

05384

ORIFICE PILOT – LP


5

1

08353

TRANSFORMER 40VA


6

1

11385

PILOT BURNER ASSY.

5


6


BRACKET MTG. A5, 745RS.L. &


7

1

14615


HON.V.


8

1

16425

FLEX PILOT TUBE W/FITTINGS


4


8

Enerco Group, Inc. | Gas-Fired Infra-Red Space Heaters E13 Operating Instructions and Owner’s Manual

Heatstar HS4030, HS8070, HS9100, HS4040, HS9080 User Manual

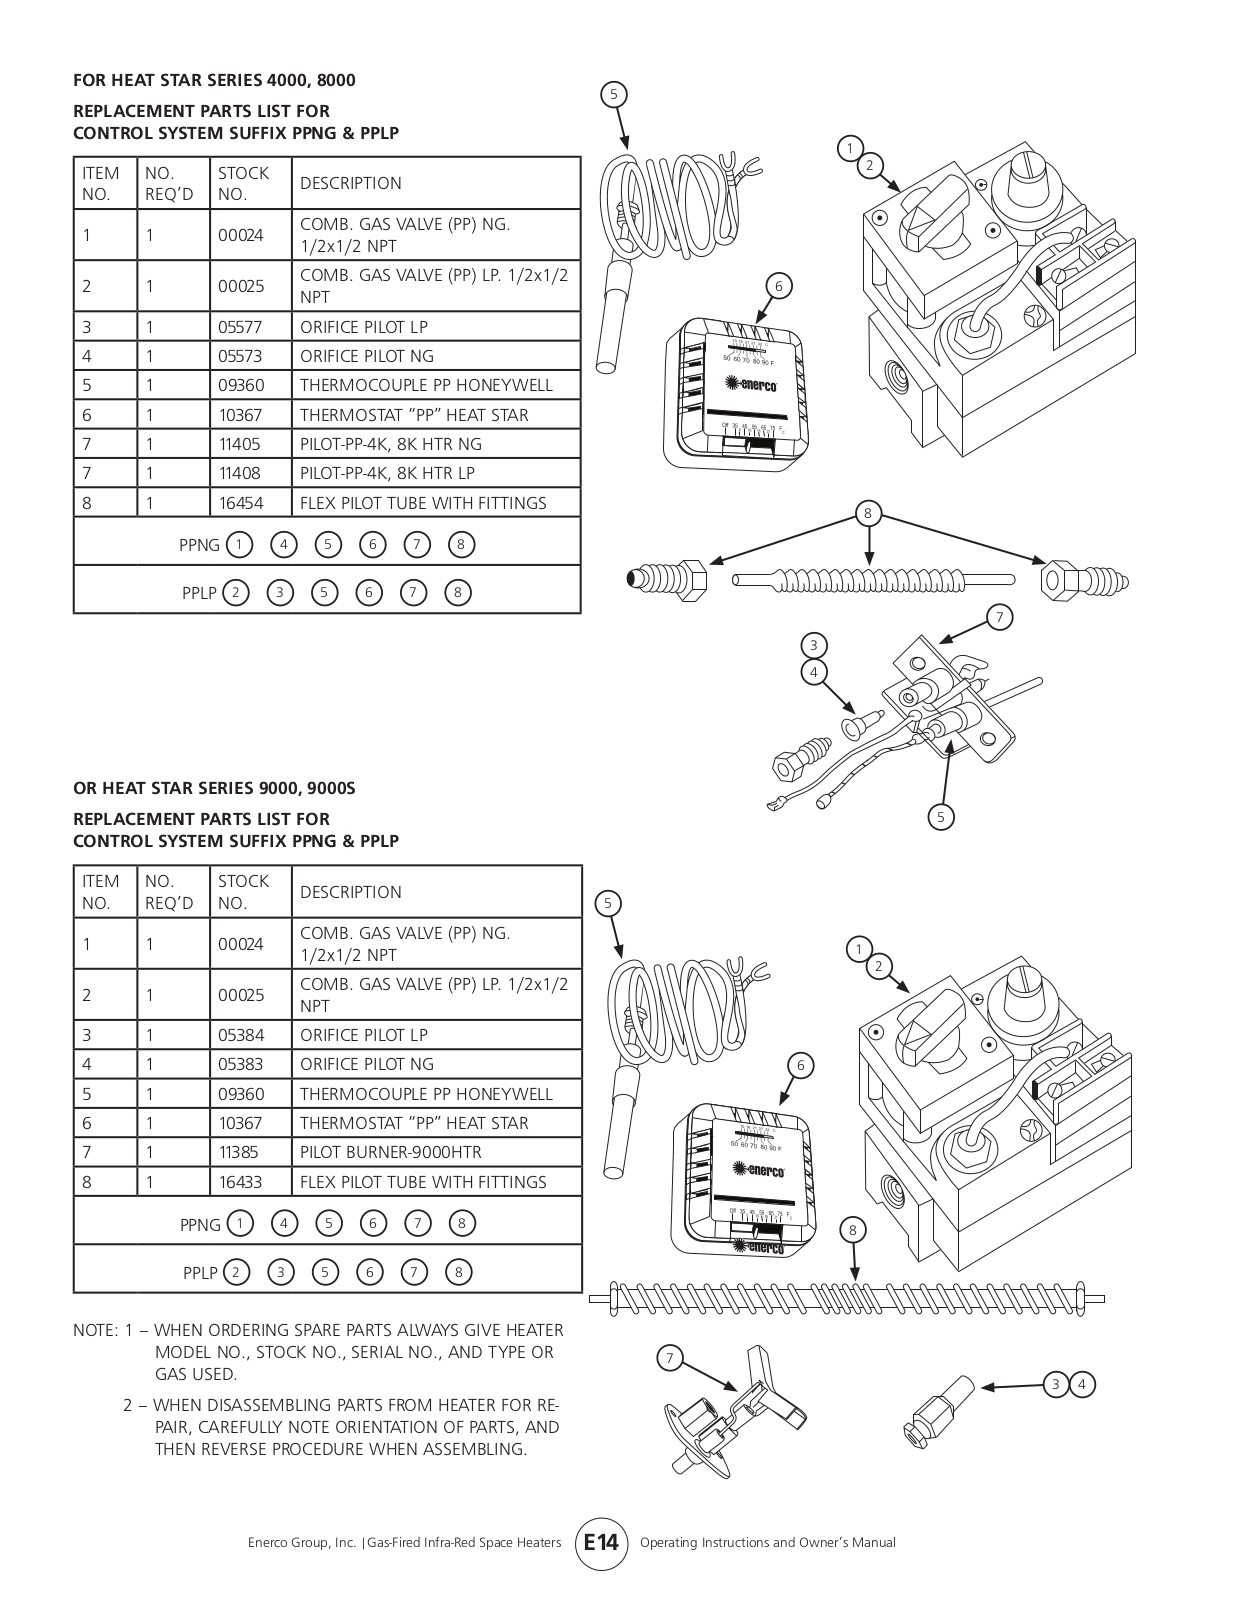
FOR HEAT STAR SERIES 4000, 8000

REPLACEMENT PARTS LIST FOR

CONTROL SYSTEM SUFFIX PPNG & PPLP

ITEM

NO.


STOCK


DESCRIPTION


NO.

REQ’D


NO.


1

1


00024


COMB. GAS VALVE (PP) NG.


1/2x1/2 NPT


2

1


00025


COMB. GAS VALVE (PP) LP. 1/2x1/2


NPT


3

1


05577


ORIFICE PILOT LP


4

1


05573


ORIFICE PILOT NG


5

1


09360


THERMOCOUPLE PP HONEYWELL


6

1


10367


THERMOSTAT “PP” HEAT STAR


7

1


11405


PILOT-PP-4K, 8K HTR NG


7

1


11408


PILOT-PP-4K, 8K HTR LP


8

1


16454


FLEX PILOT TUBE WITH FITTINGS


PPNG


1

4

5

6

7

8


PPLP


2


3


5


6


7


8


OR HEAT STAR SERIES 9000, 9000S

REPLACEMENT PARTS LIST FOR

CONTROL SYSTEM SUFFIX PPNG & PPLP

ITEM

NO.


STOCK


DESCRIPTION


NO.

REQ’D


NO.


1

1


00024


COMB. GAS VALVE (PP) NG.


1/2x1/2 NPT


2

1


00025


COMB. GAS VALVE (PP) LP. 1/2x1/2


NPT


3

1


05384


ORIFICE PILOT LP


4

1


05383


ORIFICE PILOT NG


5

1


09360


THERMOCOUPLE PP HONEYWELL


6

1


10367


THERMOSTAT “PP” HEAT STAR


7

1


11385


PILOT BURNER-9000HTR


8

1


16433


FLEX PILOT TUBE WITH FITTINGS


PPNG


1


4

5

6

7

8


PPLP


2


3


5

6


7


8


NOTE: 1 – WHEN ORDERING SPARE PARTS ALWAYS GIVE HEATER MODEL NO., STOCK NO., SERIAL NO., AND TYPE OR GAS USED.

2 – WHEN DISASSEMBLING PARTS FROM HEATER FOR REPAIR, CAREFULLY NOTE ORIENTATION OF PARTS, AND THEN REVERSE PROCEDURE WHEN ASSEMBLING.

5

1

2

6

8

7

3

4

5

5

1

2

6

8

7

3 4

Enerco Group, Inc. |Gas-Fired Infra-Red Space Heaters E14 Operating Instructions and Owner’s Manual

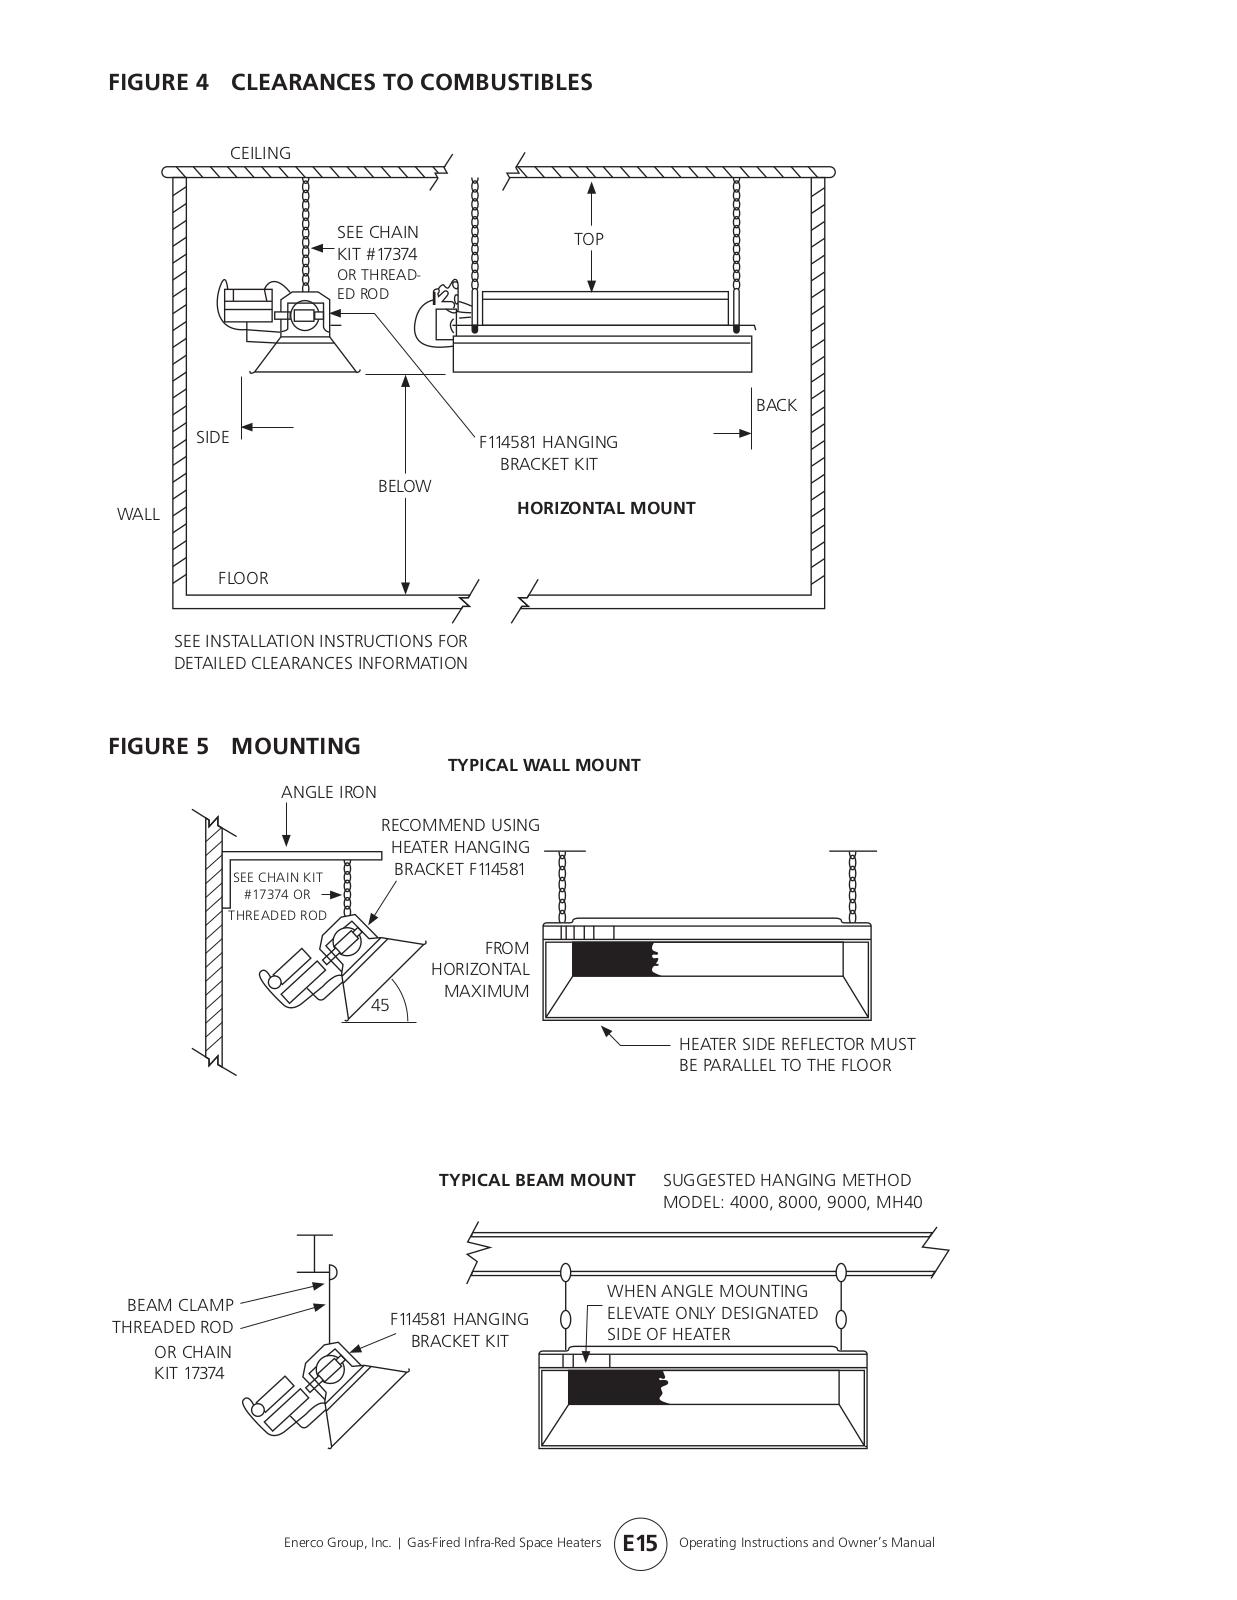
FIGURE 4 CLEARANCES TO COMBUSTIBLES

CEILING

SEE CHAIN

TOP

KIT #17374


OR THREAD-

ED ROD


BACK

SIDE

F114581 HANGING


BRACKET KIT


BELOW

WALL

HORIZONTAL MOUNT


FLOOR

SEE INSTALLATION INSTRUCTIONS FOR

DETAILED CLEARANCES INFORMATION

FIGURE 5 MOUNTING

TYPICAL WALL MOUNT

ANGLE IRON

RECOMMEND USING HEATER HANGING SEE CHAIN KIT BRACKET F114581

#17374 OR THREADED ROD

FROM

HORIZONTAL

MAXIMUM

45°

HEATER SIDE REFLECTOR MUST

BE PARALLEL TO THE FLOOR

TYPICAL BEAM MOUNT SUGGESTED HANGING METHOD


MODEL: 4000, 8000, 9000, MH40

BEAM CLAMP


WHEN ANGLE MOUNTING

F114581 HANGING

ELEVATE ONLY DESIGNATED

THREADED ROD

SIDE OF HEATER

BRACKET KIT

OR CHAIN


KIT 17374


Enerco Group, Inc. | Gas-Fired Infra-Red Space Heaters E15 Operating Instructions and Owner’s Manual

Loading...
+ 33 hidden pages