

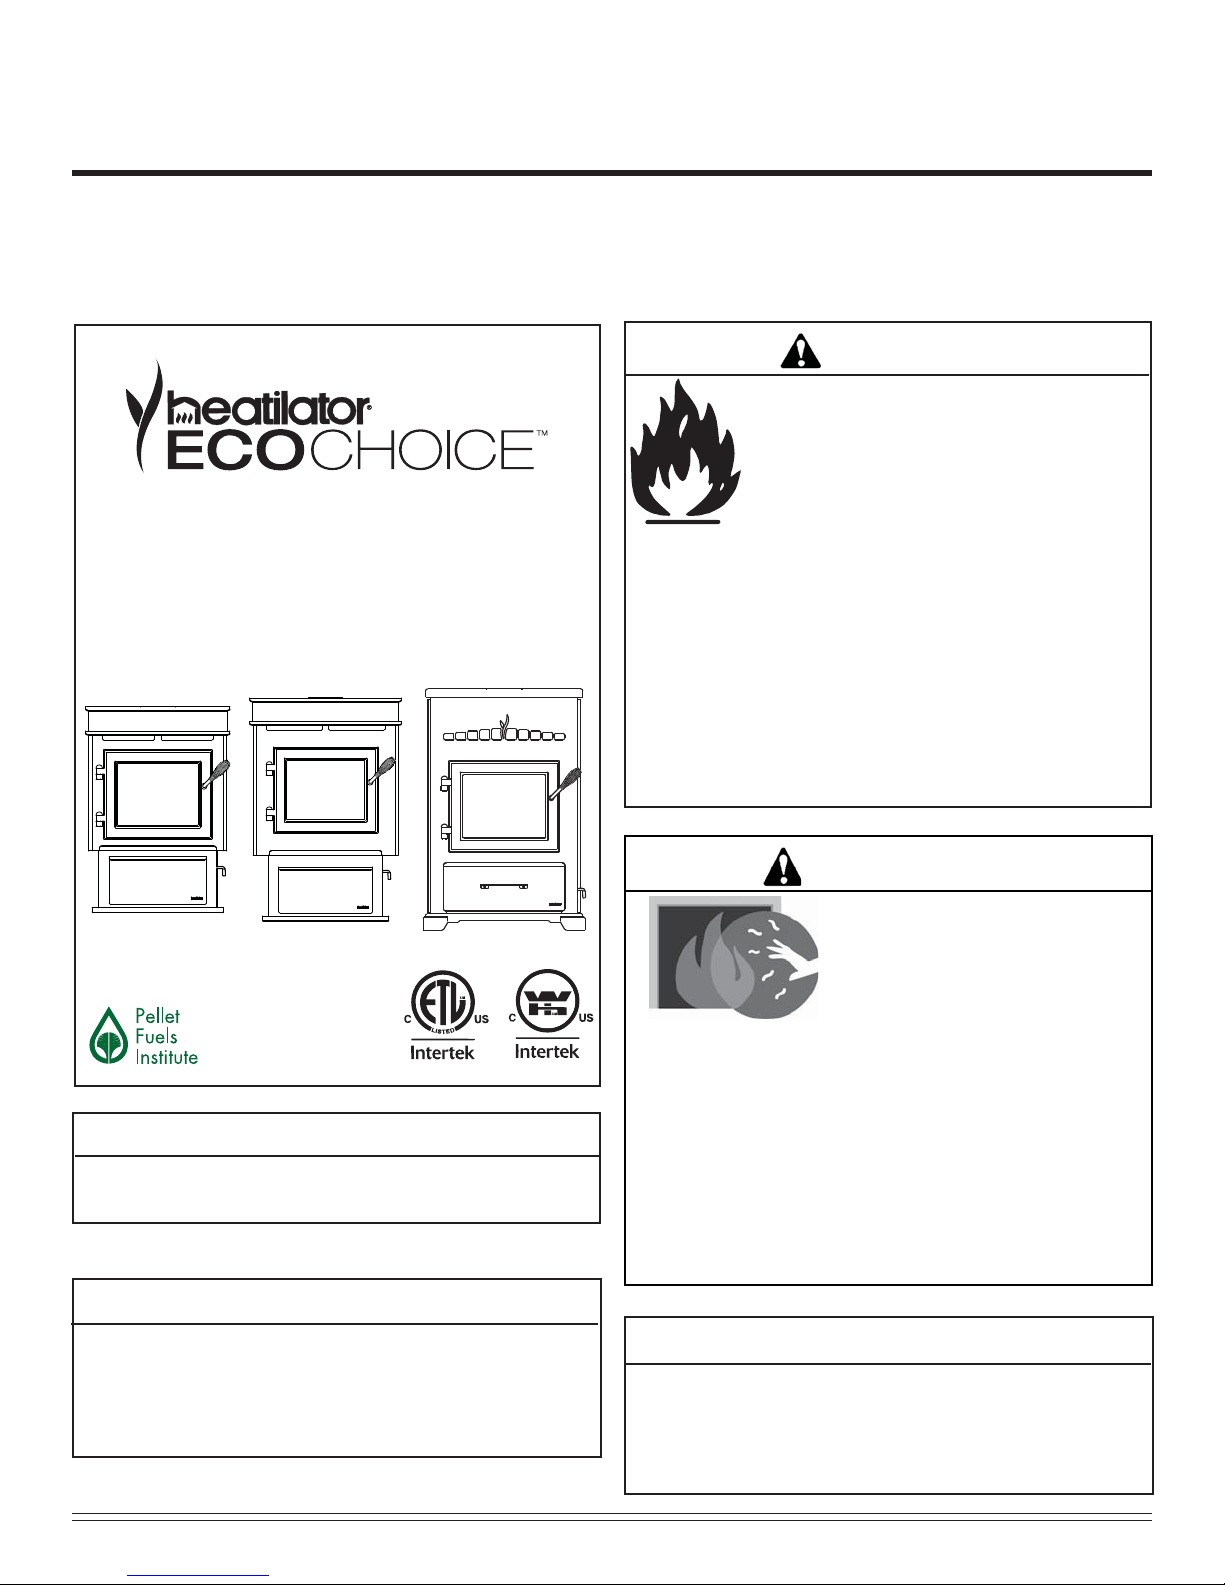
Heatilator ECO-ADV-PS35, ECO-CAB50, ECO-ADV-PS50 Owner's Manual
Owner’s Manual
Operation & Care
INSTALLER: Leave this manual with party responsible for use and operation.
OWNER: Retain this manual for future reference.
Contact your dealer with questions on installation, operation, or service.
NOTICE: DO NOT DISCARD THIS MANUAL
PELLET BURNING STOVES
Model(s):
ECO-ADV-PS35
ECO-ADV-PS50
ECO-CAB50
WARNING
If the information in these instructions is not followed exactly, a
fi re could result causing property
damage, personal injury, or death.
• Do not store or use gasoline or other fl am-
mable vapors and liquids in the vicinity of
this or any other appliance.
• Do not overfi re - If heater or chimney con-
nector glows, you are overfi ring. Overfi ring
will void your warranty.
• Comply with all minimum clearances to
combustibles as specifi ed. Failure to
comply may cause house fi re.
WARNING
HOT SURFACES!
Glass and other surfaces are hot
during operation AND cool down.
CAUTION
Tested and approved for wood pellets. Burning of any
other type of fuel voids your warranty.
CAUTION
Check building codes prior to installation.
• Installation MUST comply with local, regional, state and national codes and regulations.
• Consult local building, fi re offi cials or authorities having juris-
diction about restrictions, installation inspection, and permits.
1 7058-206C 05/06/2015
Hot glass will cause burns.
• Do not touch glass until it is cooled
• NEVER allow children to touch glass
• Keep children away
• CAREFULLY SUPERVISE children in same room as
fi replace.
• Alert children and adults to hazards of high temperatures
• High temperatures may ignite clothing or other
fl ammable materials.
• Keep clothing, furniture, draperies and other fl ammable
materials away.
NOTE
To obtain a French translation of this manual, please contact
your dealer or visit www.heatilator.com
Pour obtenir une traduction française de ce manuel, s’il vous
plaît contacter votre revendeur ou visitez www.heatilator.com
HEATILATOR ECO CHOICE
A. Congratulations
Hearth & Home Technologies welcomes you to our tradition
of excellence! In choosing a Heatilator appliance, you have
our assurance of commitment to quality, durability, and performance.
This commitment begins with our research of the market,
including ‘Voice of the Customer’ contacts, ensuring we
make products that will satisfy your needs. Our Research
and Development facility then employs the world’s most
advanced technology to achieve the optimum opera-
NOTE: Clearances may only be reduced by means
approved by the regulatory authority having jurisdiction
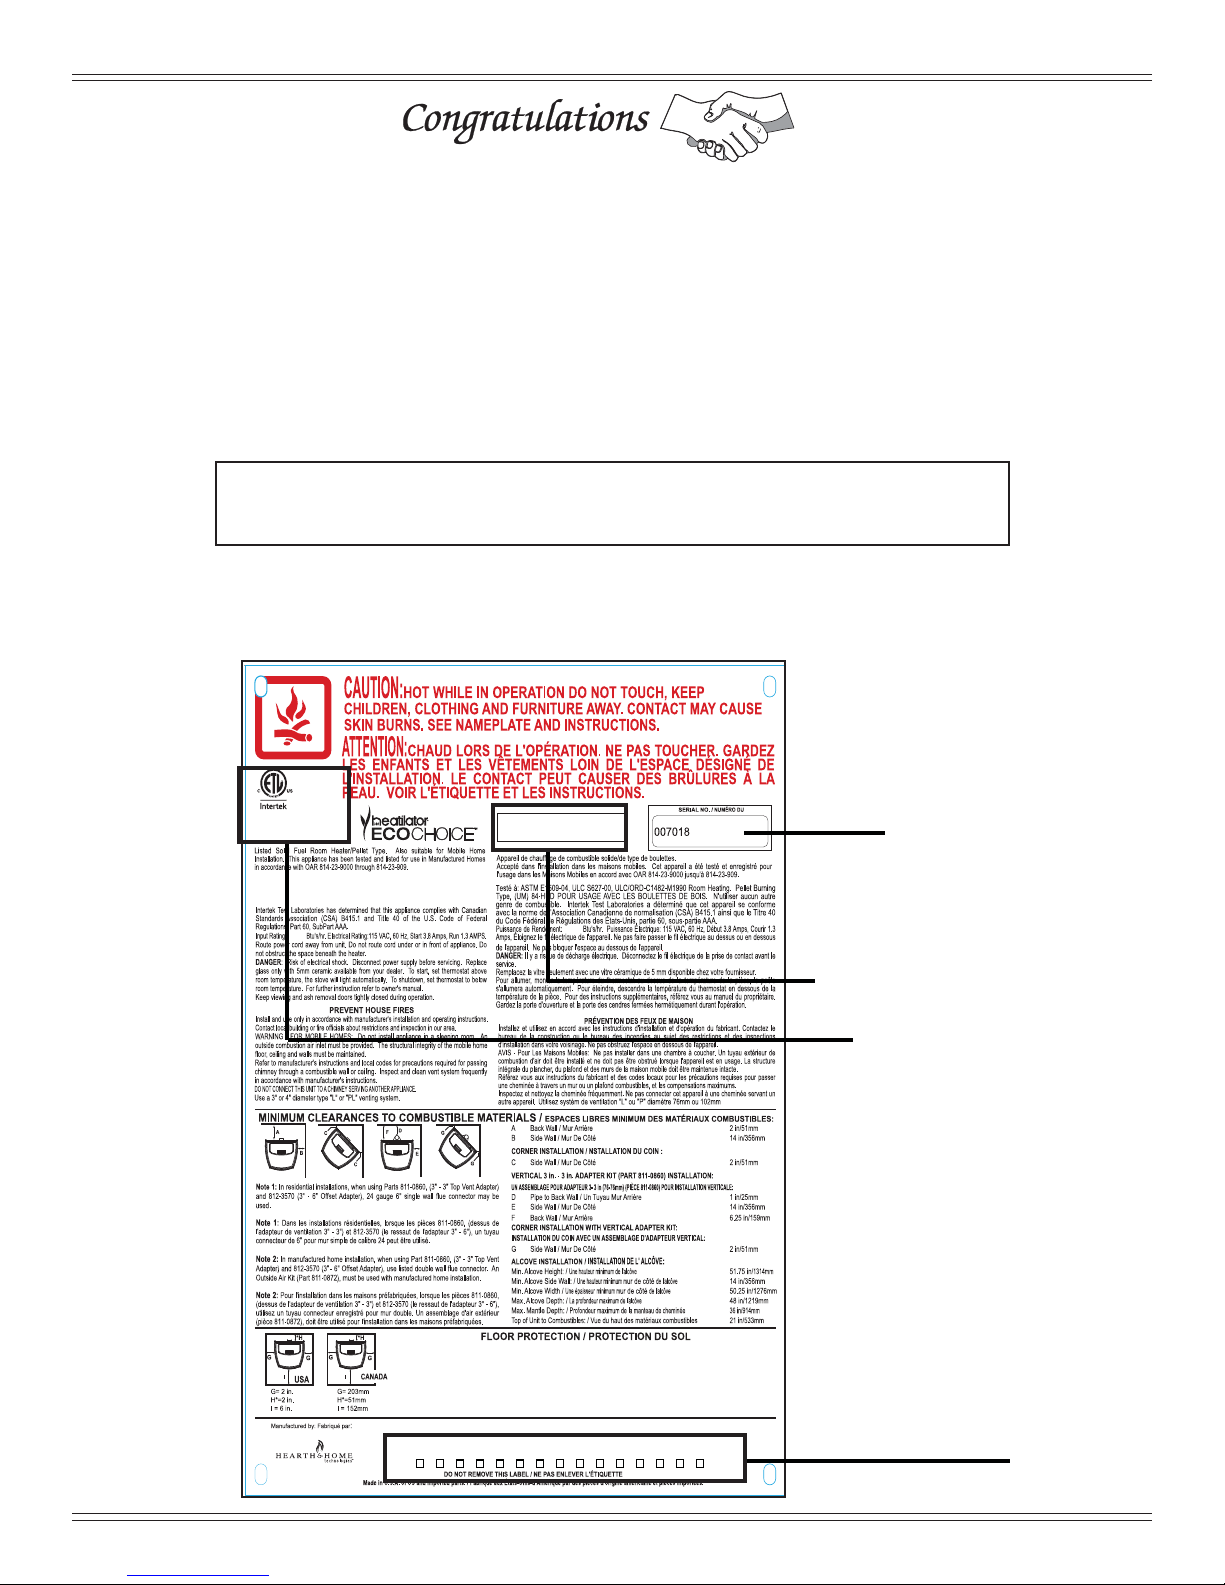
B. Sample of Serial Number / Safety Label
LOCATION: Back of Stove
tion of our stoves, inserts and fi replaces. And yet we are
old-fashioned when it comes to craftsmanship. Each unit
is meticulously fabricated and gold and nickel surfaces are
hand-fi nished for lasting beauty and enjoyment. Our pledge
to quality is completed as each model undergoes a quality
control inspection.
We wish you and your family many years of enjoyment in the
warmth and comfort of your hearth appliance. Thank you for
choosing Heatilator.
4001508
Conforms to ASTM STD E1509, Certified to ULC STD S627, ULC/ORD-C1482-M1990 Room
Heating Pellet Burning Type, (UM) 84-HUD FOR USE ONLY WITH PELLETIZED WOOD
FUEL. Do not use any other type of fuel.
34,400
ECO-ADV-PS35
SAMPLE
Floor protector must be non-combustible material, extending
beneath heater and to the front/sides/rear as indicated.
Measure front distance (I) from the surface of the glass door.
*
Non-combustible floor protection must extend 2 inches
(51mm) beneath the flue pipe when installed with horizontal
venting or under the Top Vent Adapter with vertical installation.
1445 North Highway
Colville, WA 99114
www.heatilator.com
RECOMMENDED IN USA; REQUIRED IN CANADA.
Certified to comply with 2015 particulate emission standards at 2.1 g/hr EPA method 28 and 5G. Not approved for sale after May 15, 2020.
This wood heater needs periodic inspection and repair for proper operation. Consult the owner’s manual for further information. It is against federal
regulations to operate this wood heater in a manner inconsistent with the operating instructions in the owner’s manual.
2015
2016
U.S. ENVIRONMENTAL PROTECTION AGENCY
2017 JAN FEB MAR APR MAY JUN
34,400
Le poêle doit être placé sur une assise non combustible s’étendant tout
autour de lui, comme les schémas l’indiquent.
devant (I) de la surface de la porte vitrée.
*Un protecteur incombustible de plancher doit s'étendre 2 inches (51mm)
sous le conduit de cheminée pour une installation de ventilation horizontale
ou sous un adapteur de ventilation de dessus pour une installation verticale.
ÉTATS-UNIS - RECOMMANDÉ; CANADA - REQUIRENT.
JUL AUG SEP OCT NOV DEC
Mesurez la distance du
7058-143F
Serial No.
Model
Name
Test Lab &
Report No.
Mfg. Date
2 7058-206C 05/06/2015

HEATILATOR ECO CHOICE
Safety Alert Key:
• DANGER! Indicates a hazardous situation which, if not avoided will result in death or serious injury.
• WARNING! Indicates a hazardous situation which, if not avoided could result in death or serious injury.
• CAUTION! Indicates a hazardous situation which, if not avoided, could result in minor or moderate injury.
• NOTICE: Indicates practices which may cause damage to the appliance or to property.
TABLE OF CONTENTS
A. Congratulations..................................................................2
B. Sample of Serial Number / Safety Label............................2
C. Warranty Policy .................................................................4
1 Listing and Code Approvals ............. 6
A. Appliance Certifi cation ...................................................... 6
B. BTU & Effi ciency Specifi cations........................................6
C. Glass Specifi cations .........................................................6
D. Electrical Rating (on high) ................................................6
E. Mobile Home Approved .................................................... 6
2 Operating Instructions ......................7
A. Fire Safety .........................................................................7
B. Non-Combustible Materials ...............................................7
C. Combustible Materials .......................................................7
D. Fuel Material and Fuel Storage ........................................7
E. General Operating Information .........................................8
F. Before Your First Fire ........................................................8
G. Hopper Lid Latch and Hopper Switch...............................9
H. Starting Your First Fire .....................................................9
I. Fire Characteristics ............................................................10
J. Feed Rate Adjustment Instructions ...................................10
K. Ignition Cycles ..................................................................10
L. Clear Space ......................................................................10
M. Quick Start Guide ..............................................................11
N. Frequently Asked Questions.............................................12
3 Maintenance and Service ................ 13
A. Proper Shutdown Procedure ............................................13
B. Quick Reference Maintenance Chart................................13
C. General Maintenance .......................................................13
D. High Ash Fuel Content Maintenance .................................17
E. Soot or Creosote Fire .......................................................17
4 Troubleshooting Guide .................... 18
5 Service Parts Replacement ............. 21
A. Convection Blower Replacement......................................21
B. Exhaust Blower Replacement...........................................22
C. Snap Disc Replacements .................................................22
D. Igniter Replacement .........................................................23
E. Baffl e Removal & Replace ................................................23
F. Glass Replacement ...........................................................24
6 Reference Materials ......................... 25
A. Component Functions .......................................................25
B. Component Locations ........................................................27
C. Exploded Drawings & Service Parts - PS35 ......................28
D. Exploded Drawings & Service Parts - PS50 ......................32
E. Exploded Drawings & Service Parts - CAB50 ...................36
Heatilator is a registered trademark of Hearth & Home Technologies.
NOTE: Hearth & Home Technologies, manufacturer of this appliance, reserves the right to alter its products,
their specifi cations and/or price without notice.
05/06/2015 7058-206C 3

HEATILATOR ECO CHOICE
C. Warranty Policy
Hearth & Home Technologies Inc.
HEATILATOR ECO-CHOICE WARRANTY
Hearth & Home Technologies Inc., on behalf of its hearth brands (“HHT”), extends the following warranty for ECOCHOICE by heatilator wood and pellet hearth appliances that are purchased from an HHT authorized dealer.
WARRANTY COVERAGE:
HHT warrantes to the original owner of the HHT appliance at the site of installation, and to any transferree taking ownership of the appliance at the site of installation within two years following the date of original purchase, that the HHT
appliance will be free from defects in materials and workmanship at the time of manufacture. After installation, if covered components manufactured by HHT are found to be defective in materials or workmanship during the applicable
warranty period, HHT will, at its option, repair or replace the covered components. HHT, at its own discretion, may fully
GLVFKDUJHDOORILWVREOLJDWLRQVXQGHUVXFKZDUUDQWLHVE\UHSODFLQJWKHSURGXFWLWVHOIRUUHIXQGLQJWKHYHUL¿HGSXUFKDVH
price of the product itself. The maximum amount recoverable under this warranty is limited to the purchaser price of
the product. This warranty is subject to conditions, exclusions and limitations as described below.
WARRANTY PERIOD:
Warranty coverage begins on the date of original purchase. In the case of new home construction, warranty coverage
EHJLQVRQWKHGDWHRI¿UVWRFFXSDQF\RIWKHGZHOOLQJRUVL[PRQWKVDIWHUWKHVDOHRIWKHSURGXFWE\DQLQGHSHQGHQW
authorized HHT dealer/distributor, whichever occurs earlier. The warranty shall commence no later than 24 months
following the date of product shipment from HHT, regardless of the installation or occupancy date. The warranty period
for parts and labor for covered components is produced in the following table.
Warranty Period Heatilator ECO-CHOICE
Appliances
Parts Labor Pellet EPA Wood
1 year X X
3 years X Firepots and burnpots
3 years 1 year X X Castings
5 years 3 years X Manifold tubes
5 years 3 years X X Firebox and heat exchanger
90 days X X
All parts and material except as covered by
Conditions, Exclusions, and Limitations listed
All replacement parts beyond warranty period
Components Covered
See conditions, exclusions,and limitations on next page
4 7058-206C 05/06/2015

HEATILATOR ECO CHOICE
WARRANTY COVERAGE:
7KLVZDUUDQW\RQO\FRYHUV++7DSSOLDQFHVWKDWDUHSXUFKDVHGWKURXJKDQ++7DXWKRUL]HGGHDOHURUGLVWULEXWRU$OLVWRI
HHT authorized dealers is available on th HHT branded websites.
7KLVZDUUDQW\LVRQO\YDOLGZKLOHWKH++7DSSOLDQFHUHPDLQVDWWKHVLWHRIRULJLQDOLQVWDOODWLRQ
&RQWDFW\RXULQVWDOOLQJGHDOHUIRUZDUUDQW\VHUYLFH,IWKHLQVWDOOLQJGHDOHULVXQDEOHWRSURYLGHQHFHVVDU\SDUWVFRQWDFW
the nearest HHT authorized dealer or supplier. Additional service fees may apply if you are seeking warranty service
from a dealer other than the dealer from whom you originally purchased the product.
&KHFNZLWK\RXUGHDOHULQDGYDQFHIRUDQ\FRVWVWR\RXZKHQDUUDQJLQJDZDUUDQW\FDOO7UDYHODQGVKLSSLQJFKDUJHV
for parts are not covered by this warranty.
WARRANTY EXCLUSIONS:
This warranty does not cover the following:
&KDQJHVLQVXUIDFH¿QLVKHVDVDUHVXOWRIQRUPDOXVH$VDKHDWLQJDSSOLDQFHVRPHFKDQJHVLQFRORURILQWHULRUDQG
H[WHULRUVXUIDFH¿QLVKHVPD\RFFXU7KLVLVQRWDÀDZDQGLVQRWFRYHUHGXQGHUZDUUDQW\
'DPDJHWRSULQWHGSODWHGRUHQDPHOHGVXUIDFHVFDXVHGE\¿QJHUSULQWVDFFLGHQWVPLVXVHVFUDWFKHVPHOWHGLWHPV
or other external sources and residues left on the plated surfaces from the use of abrasive cleaners or polishes.
5HSDLURUUHSODFPHQWRISDUWVWKDWDUHVXEMHFWWRQRUPDOZHDUDQGWHDUGXULQJWKHZDUUDQW\SHULRG7KHVHSDUWVLQFOXGH
SDLQWZRRGSHOOHWDQGFRDOJDVNHWV¿UHEULFNVJUDWHVÀDPHJXLGHVOLJKWEXOEVEDWWHULHVDQGWKHGLVFRORUDWLRQRI
glass.
0LQRUH[SDQVLRQFRQWUDFWLRQRUPRYHPHQWRIFHUWDLQSDUWVFDXVLQJQRLVH7KHVHFRQGLWLRQVDUHQRUPDODQGFRP-
plaints related to this noise are not covered by this warranty.
'DPDJHVUHVXOWLQJIURPIDLOXUHWRLQVWDOORSHUDWHRUPDLQWDLQWKHDSSOLDQFHLQDFFRUGDQFHZLWKWKHLQVWDOODWLRQ
LQVWUXFWLRQVRSHUDWLQJLQVWUXFWLRQVDQGOLVWLQJDJHQWLGHQWL¿FDWLRQODEHOIXUQLVKHGZLWKWKHDSSOLDQFHIDLOXUHWR
install the appliance in accordance with local building codes; (3) shipping or improper handling; (4) improper operation,
abuse, misuse, continued operation with damaged, corroded or failed components, accident, or improperly/incorrectly
performed repairs; (5) environmental conditions, inadequate ventilation, negative pressure, or drafting caused by tightly
VHDOHGFRQVWUXFWLRQVLQVXI¿FLHQWPDNHXSDLUVXSSO\RUKDQGOLQJGHYLFHVVXFKDVH[KDXVWIDQVRUIRUFHGDLUIXUQDFHV
RURWKHUVXFKFDXVHVXVHRIIXHOVRWKHUWKDQWKRVHVSHFL¿HGLQWKHRSHUDWLQJLQVWUXFWLRQVLQVWDOODWLRQRUXVHRI
components not supplied with the appliance or any other components not expressly authorized and approved by HHT;
PRGL¿FDWLRQRIWKHDSSOLDQFHQRWH[SUHVVO\DXWKRUL]HGDQGDSSURYHGE\++7LQZULWLQJDQGRULQWHUUXSWLRQVRU
ÀXFWXDWLRQVRIHOHFWULFDOSRZHUVXSSO\WRWKHDSSOLDQFH
1RQ++7YHQWLQJFRPSRQHQWVKHDUWKFRPSRQHQWVRURWKHUDFFHVVRULHVXVHGLQFRQMXQFWLRQZLWKWKHDSSOLDQFH
$Q\SDUWRIDSUHH[LVWLQJ¿UHSODFHV\VWHPLQZKLFKDQLQVHUWRUDGHFRUDWLYHJDVDSSOLDQFHLVLQVWDOOHG
++7¶VREOLJDWLRQXQGHUWKLVZDUUDQW\GRHVQRWH[WHQGWRWKHDSSOLDQFHV¶FDSDELOLW\WRKHDWWKHGHVLUHGVSDFH,QIRUPD-
tion is provided to assist the consumer and the dealer in selecting the proper appliance for the application. Consider-
DWLRQPXVWEHJLYHQWRDSSOLDQFHORFDWLRQDQGFRQ¿JXUDWLRQHQYLURQPHQWDOFRQGLWLRQVLQVXODWLRQDQGDLUWLJKWQHVVRI
the structure.
This warranty is void if:
7KHDSSOLDQFHKDVEHHQRYHU¿UHGRURSHUDWHGLQDWPRVSKHUHVFRQWDPLQDWHGE\FKORULQHÀXRULQHRURWKHUGDPDJLQJ
FKHPLFDOV2YHU¿ULQJFDQEHLGHQWL¿HGE\EXWQRWOLPLWHGWRZDUSHGSODWHVRUWXEHVUXVWFRORUHGFDVWLURQEXEEOLQJ
FUDFNLQJDQGGLVFRORUDWLRQRIVWHHORUHQDPHO¿QLVKHV
7KHDSSOLDQFHLVVXEMHFWHGWRSURORQJHGSHULRGVRIGDPSQHVVRUFRQGHQVDWLRQ
7KHUHLVDQ\GDPDJHWRWKHDSSOLDQFHRURWKHUFRPSRQHQWVGXHWRZDWHURUZHDWKHUGDPDJHZKLFKLVWKHUHVXOWRIEXW
not limited to improper chimney or venting installation.
WARRANTY EXCLUSIONS:
7KHRZQHU¶VH[FOXVLYHUHPHG\DQG++7¶VVROHREOLJDWLRQXQGHUWKLVZDUUDQW\XQGHUDQ\RWKHUZDUUDQW\H[SUHVVRU
LPSOLHGRULQFRQWUDFWWRUWRURWKHUZLVHVKDOOEHOLPLWHGWRUHSODFHPHQWUHSDLURUUHIXQGDVVSHFL¿HGDERYH,QQR
event will HHT be liable for any incidiental or consequential damages caused by defects in the appliance. Some states
do not allow exclusions or limitation of incidental or consequential damages, so these limitations may not apply to you.
7KLVZDUUDQW\JLYHV\RXVSHFL¿FHULJKWV\RXPD\DOVRKDYHRWKHUULJKWVZKLFKYDU\IURPVWDWHWRVWDWH(;&(3772
7+((;7(173529,'('%</$:++70$.(612(;35(66:$55$17,(627+(57+$17+(:$55$17<
63(&,),('+(5(,17+('85$7,212)$1<,03/,(':$55$17<,6/,0,7('72'85$7,212)7+((;-
35(66(':$55$17<63(&,),('$%29(
05/06/2015 7058-206C 5
HEATILATOR ECO CHOICE
1 Listing and Code Approvals
A. Appliance Certifi cation
Model ECO-ADV-PS35, ECO-ADV-PS50
and ECO-CAB50
Laboratory Intertek
Report No. 3198406
Type Solid Fuel Room Heater/Pellet Fuel
Burning Type
Standard ASTM E1509-04 and ULC S627-00,
ULC/ORD-C1482-M1990 Room Heater
Pellet Fuel Burning type and (UM) 84HUD, Mobile Home Approved.
FCC Complies with Part 15 of FCC Rules.
Operation is subject to the following
two conditions: (1) this device may not
cause harmful interference, and (2) this
device must accept any interference
received, including interference that may
cause undesired operation.
NOTICE: This installation must conform with local codes. In
the absence of local codes you must comply with the ASTM
E1509-04, ULC S627-00, (UM) 84-HUD and ULC/ORDC-1482.
The Heatilator ECO Choice Pellet Heater meets the U.S. Environmental Protection Agency’s emission limits for pellet heaters sold
after May 15, 2015.
This pellet heater needs periodic inspection and repair for proper
operation. It is against federal regulations to operate this pellet heater
in a manner inconsistent with operating instructions in this manual.
B. BTU & Effi ciency Specifi cations
PS35 PS50
EPA Certifi cation #: 937-14 938-14
EPA Certifi ed Emissions: 2.1 1.7 grams/hour
*LHV Tested Effi ciency: N/A N/A %
**HHV Tested Effi ciency: N/A N/A %
***EPA BTU Output: 9,300 to
24,400
****BTU Input: 12,900 to
34,400
Vent Size: 3 or 4 inches, “L” or “PL”
Hopper Capacity: 45 83/120 lbs.
Fuel Wood Pellets
* Weighted average LHV effi ciency using data collected during
EPA emissions test.
**Weighted average HHV effi ciency using data collected during
EPA emissions test.
***A range of BTU outputs based on EPA Default Effi ciency and
the burn rates from the low and high EPA tests.
****Based on the maximum feed rate per hour multiplied by
approximately 8600 BTU’s which is the average BTU’s from a
pound of pellets.
CAB50
11,900 to
31,400
16,300 to
43,000
per hr.
per hr.
C. Glass Specifi cations
This stove is equipped with 5mm ceramic glass. Replace
glass only with 5mm ceramic glass. Please contact your
dealer for replacement glass.
D. Electrical Rating (on high)
Model PS35: 115 VAC, 60 Hz, Start 3.8 Amps, Run 1.3 Amps
Model PS50: 115 VAC, 60 Hz, Start 5.1 Amps, Run 3.0 Amps
Model CAB50: 115 VAC, 60 Hz, Start 5.1 Amps, Run 3.0 Amps
E. Mobile Home Approved
• This appliance is approved for mobile home installations when not installed in a sleeping room and when
an outside combustion air inlet is provided.
• The structural integrity of the mobile home fl oor, ceil-
ing, and walls must be maintained.
• The appliance must be properly grounded to the frame
of the mobile home and use only Listed pellet vent
Class “L” or “PL” connector pipe.
• Outside Air Kit, part OAK-ACC must be installed in a
mobile home installation.
• Unit must be secured to mobile home structure.
Note: The appliance is also approved for installation
into a shop
WARNING
Fire Risk.
Hearth & Home Technologies disclaims any
responsibility for, and the warranty will be voided by,
the following actions:
• Installation and use of any damaged appliance.
• Modifi cation of the appliance.
• Installation other than as instructed by Hearth & Home
Technologies.
• Installation and/or use of any component part not approved by
Hearth & Home Technologies.
• Operating appliance without fully assembling all components.
• Operating appliance without legs attached (if supplied with unit).
• Do NOT Overfi re - If appliance or chimney connector glows,
you are overfi ring.
Any such action that may cause a fi re hazard.
Improper installation, adjustment, alteration, service or
maintenance can cause injury or property damage.
For assistance or additional information, consult a qualifi ed
installer, service agency or your dealer.
6 7058-206C 05/06/2015
User Guide
2 Operating Instructions
WARNING
Fire Risk.
• Do not operate appliance before reading and
understanding operating instructions.
• Failure to operate appliance properly may
cause a house fi re.
A. Fire Safety
To provide reasonable fi re safety, the following should be
given serious consideration:
• Install at least one smoke detector and CO monitor on each
fl oor of your home.
• Locate detectors away from the heating appliance and close
to the sleeping areas.
• Follow the detector’s manufacturer’s placement and
installation instructions and maintain regularly.
• Conveniently locate a Class A fi re extinguisher to contend
with small fi res.
• In the event of a hopper fi re:
• Evacuate the house immediately.
• Notify fi re department.
B. Non-Combustible Materials
Material which will not ignite and burn, composed of any
combination of the following:
- Steel - Plaster - Glass - Tile
- Brick - Iron - Slate - Concrete
Materials reported as passing ASTM E 136, Standard
Test Method for Behavior of Metals, in a Vertical Tube
Furnace of 750° C.
C. Combustible Materials
Material made of/or surfaced with any of the following
materials:
- Compressed Paper - Wood - Plywood/OSB
- Sheet Rock (drywall) - Plastic - Plant Fibers
Any material that can ignite and burn: fl ame proofed or not,
plastered or un-plastered.
D. Fuel Material and Fuel Storage
Pellet fuel quality can greatly fl uctuate. This appliance has
been designed to burn a wide variety of fuels, giving you the
choice to use the fuel that is most economical in your region.
Hearth & Home T echnologies strongly recommends only using
Pellet Fuel Institute (PFI) certifi ed fuel.
HEATILATOR ECO CHOICE
Fuel Material
• Made from sawdust or wood by-products
• Depending on the source material it may have a high or
low ash content.
Higher Ash Content Material
• Hardwoods with a high mineral content
• Fuel that contains bark
• Standard grade pellets, high ash pellets,
Lower Ash Content Material
• Softwoods
• Fuels with low mineral content
• Premium grade pellets
Clinkers
Minerals and other non-combustible materials such as sand
will turn into a hard, glass-like substance called a clinker when
heated in the fi repot.
Trees from different areas will vary in mineral content. That
is why some fuels produce more clinkers than others.
Moisture
Always burn dry fuel. Burning fuel with high moisture content
takes heat from the fuel and tends to cool the appliance,
robbing heat from your home. Damp pellet fuel can clog the
feed system.
Size
•
Pellets are either 1/4 inch or 5/16 inch (6-8mm) in diameter
• Length should be no more that 1-1/2 inches (38mm)
• Pellet lengths can vary from lot to lot from the same
manufacturer
• Due to length variations, the fl ame height (feed rate) may
need adjusting occasionally . See page 10 for instructions.
Performance
• Higher ash content requires the ash drawer to be emptied
more frequently
• Hardwoods require more air to burn properly
• Set wall control to “Utility Pellet” if the fi repot and ash pan
are fi lling quickly. This will cause the auto-clean system
to empty the fi repot more often.
• Premium wood pellets produce the highest heat output.
• Burning pellets longer than 1-1/2 inches (38mm) can cause
an inconsistent fuel feed rate and/or missed ignitions.
We recommend that you buy fuel in multi-ton lots whenever
possible. However, we do recommend trying various brands
before purchasing multi-ton lots to ensure your satisfaction.
05/06/2015 7058-206C 7
HEATILATOR ECO CHOICE
Changing to Different Fuel Type
• Empty the hopper of the previous fuel
Thoroughly vacuum hopper before fi lling with the new fuel
•
• Select the appropriate setting on the FUEL SELECTION
screen on the thermostat wall control
The burn rate, BTU content and heat output will all vary
depending on the fuel selected.
Storage
• Wood pellets should be left in their original sealed bag until
using to prevent moisture absorption.
• This will also prevent rodents from becoming a problem
• Do not store any pellet fuel within the clearance requirements
or in an area that would hinder routine cleaning and
maintenance.
.
CAUTION
Tested and approved for wood pellets. Burning of any
other type of fuel voids your warranty.
E. General Operating Information
1. Thermostat Calls For Heat
The appliance is like most modern furnaces; when the
thermostat calls for heat, your appliance will automatically
light and deliver heat.
When the room is up to temperature and the thermostat is
satisfi ed, the red call light will go off and the appliance will
shut down.
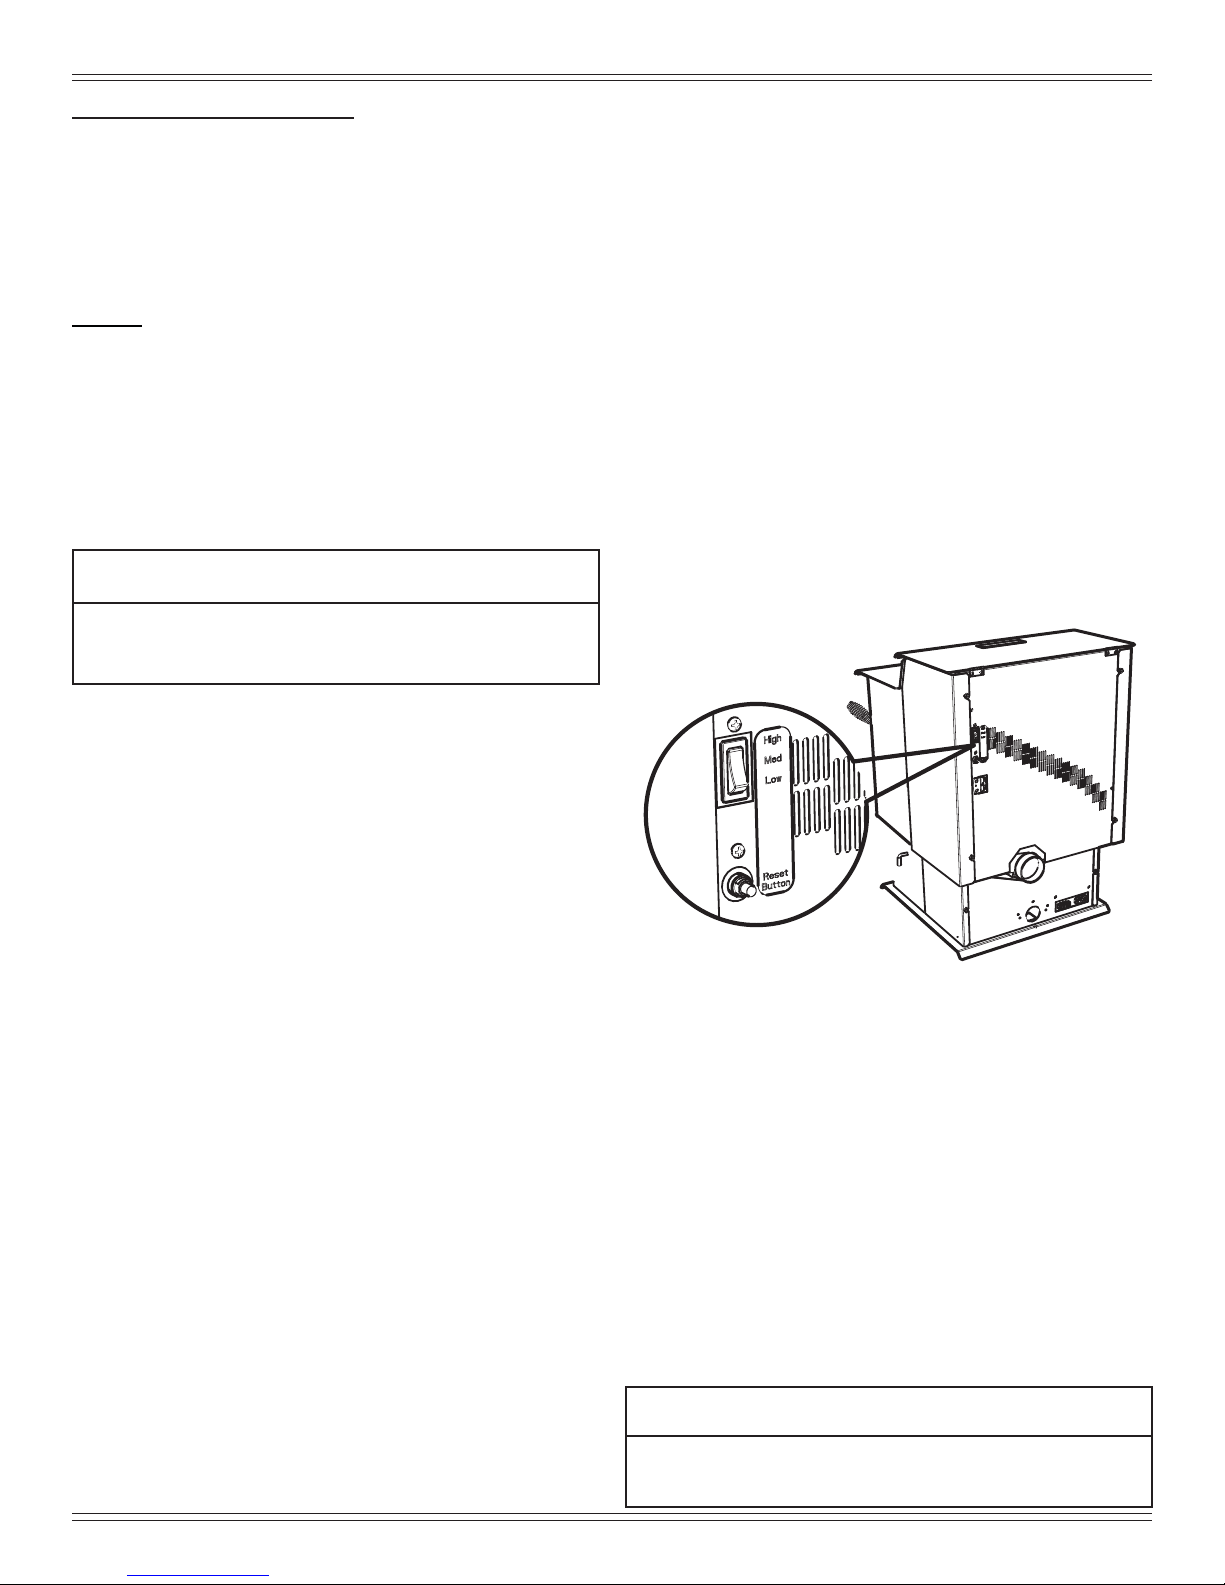
2. Heat Output Controls
This appliance is equipped with a heat output control switch
that has three settings or burn rates; low, medium and high.
Figure 8.1.
The appliance will turn on and off as the thermostat demands.
When the thermostat calls for heat, the appliance will start
up at the burn rate for which it is set. If the appliance is set
at one of the lower settings, it will run quieter but take longer
to heat up an area than if it were set at a higher burn rate.
Regardless of the burn rate, when the area is warm enough
to satisfy the thermostat, the appliance will shut off.
8 7058-206C 05/06/2015
Figure 8.1
F. Before Your First Fire
1. First, make sure your appliance has been properly
installed and that all safety requirements have been met.
Pay particular attention to the fi re protection, venting and
thermostat installation instructions.
2. Double check that the ash drawer and fi rebox are empty!
3. Check that cleaning rod is in the fully closed
position.
4. Close and latch the door.
NOTICE: The tip of the thermocouple must be in contact
with the inside end of the thermocouple cover or missed
ignitions can occur.
CAUTION
HOT WHILE IN OPERATION. KEEP CHILDREN, CLOTHING
AND FURNITURE AWAY. CONTACT MAY CAUSE SKIN
BURNS.
HEATILATOR ECO CHOICE
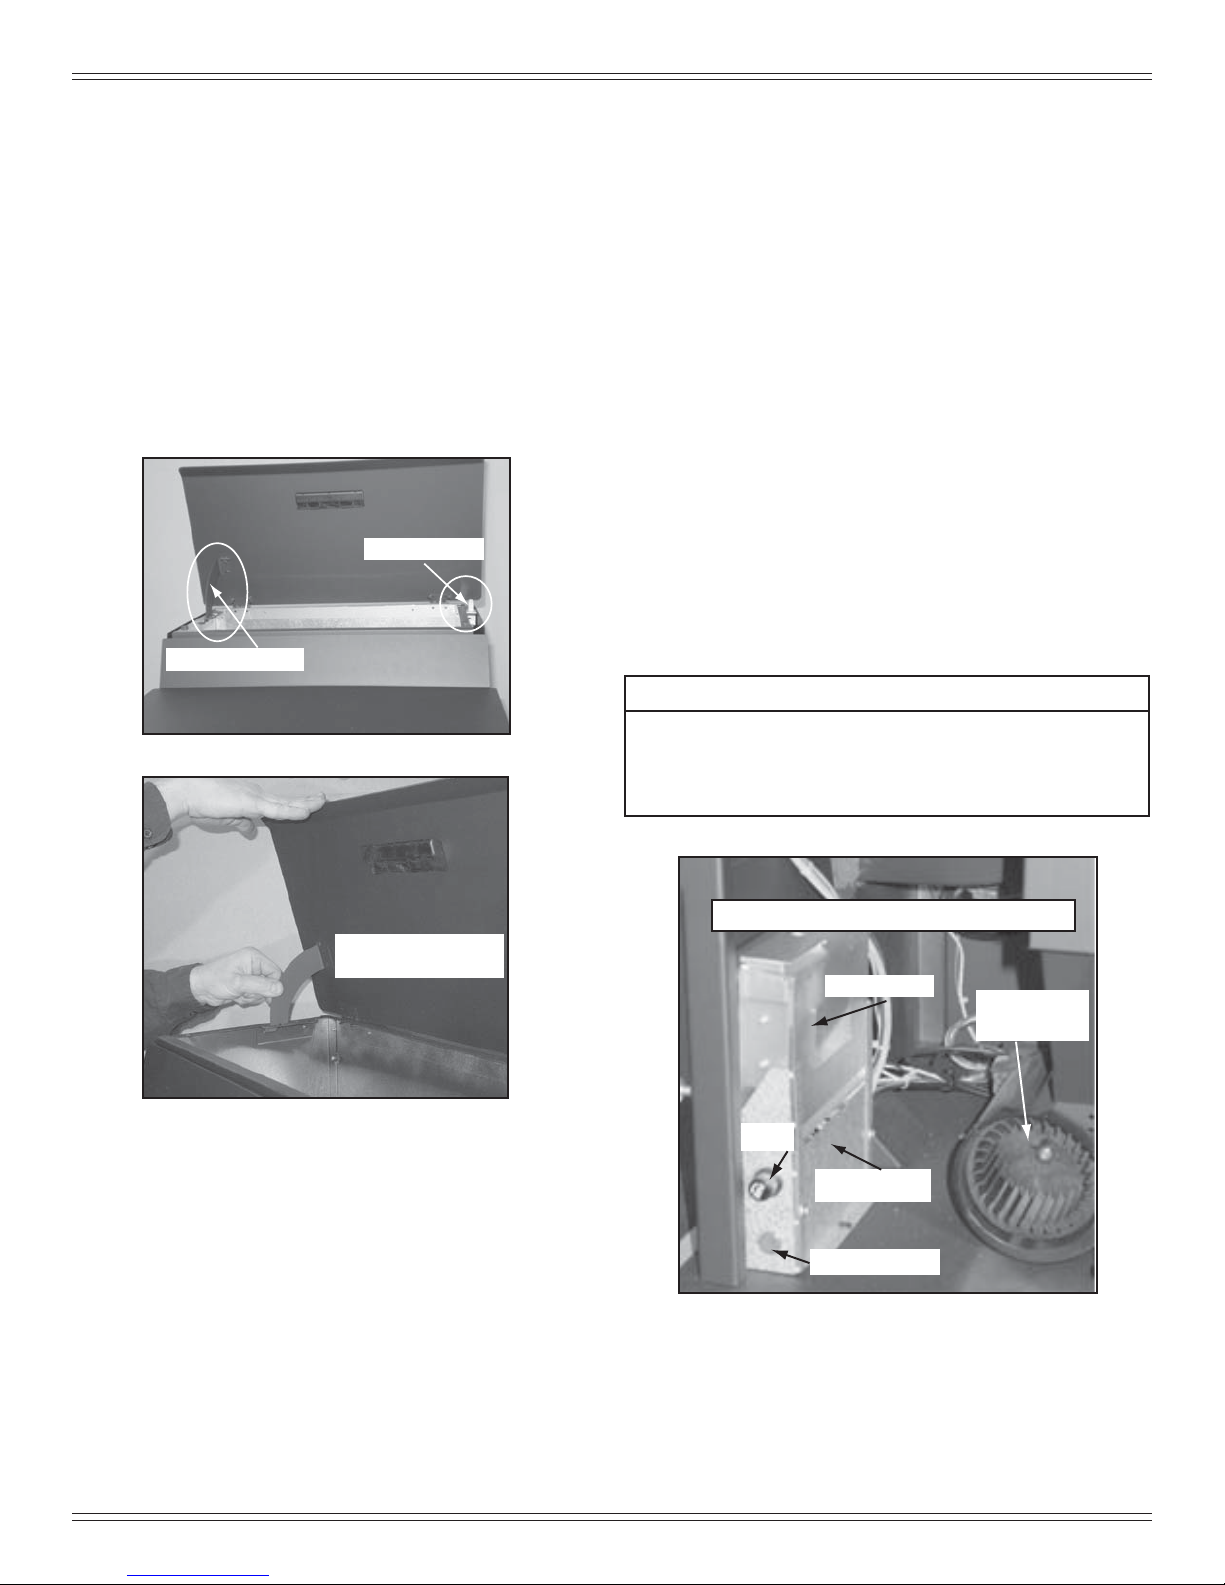
G. Hopper Lid Latch and Hopper Switch
1. Lift up the hopper lid and lock into open position. Now
you can fi ll the hopper with fuel.
2. The hopper switch is designed to shut down the feed
motor when the hopper lid is open. Leaving the lid open
too long can cause the fi re to go out. Figure 9.1.
3. To close the hopper lid, while holding lid open with one
hand, push the bottom of the latch inwards to release
from locked position and then slowly close the hopper
lid. Figure 9.2.
Note: The CAB50 has no hopper lid latch. The hopper switch
is located in a similar location and is activated by a magnet
attached to the Hopper Lid.
Hopper Switch
Hopper Lid Latch
Turn it to the “high” setting by pushing the top of the
control switch in and then adjust the thermostat to its
highest setting.
4. Look through the hole in the left lower side panel and you
will see the red call light on the control box will be on.
Figure 9.3. This indicates the thermostat is calling for
heat. On the CAB50 the light can be viewed from behind
through the hole near the bottom left side of the rear panel.
5.
The fuel feed system and the igniter should
now
be on.
6. For your fi rst fi re it will be necessary to press the reset
button once approximately 2 minutes after start up and
again in 5 minutes. Reset as needed or every 60 seconds
until pellets begin to drop into fi repot. This will fi ll the feed
system and allow the appliance to begin dropping pellets.
Or you can put a handful of pellets in the fi repot to speed
up the process. The appliance will continue to run as long
as the thermostat is calling for heat.
7. Once the appliance has ignited, let it burn for approximately
15 minutes, then set the thermostat to the desired room
temperature. Adjust the heat output control switch to the
desired setting.
Figure 9.1
Push Bottom of Latch
Inward to Release
Figure 9.2
H. Starting Your First Fire
1. A thermostat is required for proper operation of this
appliance. If you have to adjust the feed rate after you
have started the fi re, most of the pellets in the hopper will
need to be removed so start out with fi lling the hopper
approximately 1/4 full at this time. Set the thermostat to
its lowest setting and plug the power cord into nearby
outlet.
2. The exhaust blower will stay on for approximately 18
minutes even though the thermostat is not calling for heat.
This is normal.
3. L
ocate the heat output control switch mounted on the back
of the appliance in the upper left corner. Figure 8.1 on
page 8.
CAUTION
Odors and vapors released during initial operation.
• Curing of high temperature paint.
• Open windows for air circulation.
Odors may be irritating to sensitive individuals.
LOCATED BEHIND LEFT SIDE PANELS
Control Box
Fuse
Junction Box
Red Call Light
Figure 9.3
Convection
Blower
05/06/2015 7058-206C 9
HEATILATOR ECO CHOICE
I. Fire Characteristics
A properly adjusted fi re with the heat output control switch
set on “high” has a short active fl ame pattern that extends out
of the fi repot approximately 4 to 8 inches (102 to 203mm).
If the fi re has tall fl ames with black tails and seems somewhat
lazy, the feed rate will need to be reduced. This is done by
sliding the fuel adjustment control rod down, which will reduce
the feed. Figure 10.2.
If the fi re is not 4 to 8 inches (102 to 203mm) tall, slide the
fuel adjustment control rod up to increase the feed. A medium
and low setting will give a shorter fl ame. The fl ame will rise
and fall somewhat. This is normal.
J. Feed Rate Adjustment Instructions
1. Loosen the thumb screw.
2. Pull the feed adjustment control rod up to increase the
feed rate and fl ame height or push down to decrease the
feed rate and fl ame height.
3. Re-tighten the thumb screw. A new stove has a break in
period. The fi re characteristics should be checked again after
5 bags of pellets and adjustments made if necessary.
K. Ignition Cycles
1. At the beginning of each ignition cycle, it is normal to see
some smoke in the fi rebox. The smoke will stop once
the fi re starts.
2. The convection blower will automatically turn on after your
appliance has been burning for approximately 10 minutes.
This blower transfers heat from your appliance into the
room, and will continue to run after the thermostat has
stopped calling for heat until the appliance has cooled
down.
3. Occasionally the appliance may run out of fuel and shut
itself down. When this happens, the red call light will be
on. See Figure 9.3, page 9.
To restart it, fi ll the hopper and press the reset button.
When you press the reset button the red call light will go
out. Release the button and the light will come back on.
Continue pushing the button once a minute until pellets
begin to fall into the fi repot.
You should see a fi re shortly. If not, follow the instructions
on page 9, for “Starting Your First Fire”.
L. Clear Space
Mantel:
objects on mantel or hearth. Heat may damage these
Avoid placing candles and other heat-sensitive
objects.
Feed Adjustment Rod located
inside Hopper at Front
Figure 10.1
Bottom of Hopper
Push Down to
Decrease
Figure 10.2
Pull Up to
Increase
Loosen Thumb Screw
NOTICE: Clearances may only be reduced by means approved by the regulatory authority having jurisdiction.
WARNING
Fire Risk.
Do NOT place combustible objects in front of the
appliance. High temperatures may ignite clothing,
furniture or draperies. Maintain a minimum clear-
ance of 3 feet (914mm) in front of appliance.
WARNING
Fire Risk.
Keep combustible materials, gasoline and other
fl ammable vapors and liquids clear of appliance.
• Do NOT store fl ammable materials in the appliance’s
vicinity.
• DO NOT USE GASOLINE, LANTERN FUEL, KEROSENE,
CHARCOAL LIGHTER FLUID OR SIMILAR LIQUIDS TO
START OR “FRESHEN UP” A FIRE IN THIS HEATER.
• DO NOT BURN GARBAGE OR FLAMMABLE FLUIDS
SUCH AS GASOLINE, NAPHTHA OR ENGINE OIL.
• DO NOT USE CHEMICALS OR FLUIDS TO START THE
FIRE.
• Keep all such liquids well away from the heater while it is in
use.
• Combustible materials may ignite.
10 7058-206C 05/06/2015

M. Quick Start Guide
Remove hang tags from the door glass. Clean the glass. Remove the hardware pack and
HEATILATOR ECO CHOICE
ECO CHOICE QUICK START GUIDE
*Before you plug in this appliance, follow these instructions*
dessicant bag from the fi rebox area before your fi rst fi re.
Turn the thermostat to off.
1
If the feed tube is empty or this
is the fi rst fi re, add a handful of
pellets to the fi repot.
*Do not add extra fuel to the
fi repot if the feed tube has already
been primed. Overfi lling the fi re-
pot will cause smoky start-ups.
4
Add pellets to the hopper and
close the lid.
2
Close the fi rebox door and plug
the power cord into the wall
receptacle.
5
Open the fi rebox door and make
sure the baffl es are in place.
3
Turn the thermostat on.
6
The stove will feed pellets for
a minute and stop. Once a fi re
starts, the feed cycle will resume.
Note: Allow 5 minutes for
ignition to take place.
7
After 30 minutes have passed, turn the thermostat off and allow the unit to cool completely. Open the door and
clean the fi repot according to the cleaning instructions found inside the hopper lid or owners manual. Close the
door and set the thermostat to a desired temperature. Unit is now ready to resume normal operation.
10
05/06/2015 7058-206C 11
If the fi re dies out after a few
minutes of operation it will be necessary to push the reset button to
add more fuel.
8
Once a fi re has been established
in the unit, leave the unit burning
on the “high” setting for 30 minutes to allow the paint to cure.
Note: Odors and vapors will be
released during this process.
*Open windows in the room for
ventilation*
9

HEATILATOR ECO CHOICE
N. Frequently Asked Questions
CONT ACT YOUR DEALER for additional information
regarding operation and troubleshooting.
Visit www.heatilator.com to fi nd a dealer.
What causes my glass to become dirty?
If the glass has white ash build up it is normal and the
glass should be cleaned. If it is a black soot build up airfl ow
thru the unit may be restricted. The most often cause is
overdue maintenance and cleaning. See “Maintaining and
Servicing Appliance” in the owner’s manual.
How can I get more heat out of the appliance?
The most often cause of diminished heat output is overdue
maintenance and cleaning . See “Maintaining and Servicing Appliance” in the owner’s manual. If this still does not
help, verify the correct settings for maximum heat output.
See “Feed Rate Adjustment” under “Operating Instructions”
in the owner’s manual.
What should I do if I smell smoke or there is ash/soot
coming from the appliance?
While there will always be some smoke smell from wood
burning appliances (including pellet) you should investigate
all venting to make sure it is sealed properly. Most venting requires silicone to seal the seams. In addition most
homes are built very tight today and with exhaust systems
can create negative pressure in the home. See “Negative
Pressure” under “Getting Started” in the owner’s manual if
you have checked the venting but still have smoke coming
from the appliance. For ash or soot check the above and
the exhaust blower housing and seals.
Why would my appliance run fi ne last winter but not
start this fall?
It is possible that the stove was not properly prepared for
the Non-burn season. See “Trouble shooting” in the owner’s manual.
Why would the metal on the inside of the appliance
begin to fl ake?
There are some pellet mills that get their raw materials
from lumber mills that purchase logs that are transported
in sea water. These pellets can have a higher salt content
and cause the metals in the unit to corrode prematurely
and deteriorate. If you are seeing any components inside
the fi rebox deteriorate it is recommended to change pellet
brands immediately.
Why does only the exhaust blower run when I unplug
and plug back in my appliance?
This is a Safety feature to prevent the unit from operating in
an unsafe condition. Allow the unit to run and it will return to
normal operation.
Is there a place to lubricate the blowers to quiet them
down?
The most often cause of noisy blowers is from the impellers
becoming dirty over time. See “General Maintenance &
Cleaning” under “Maintaining & Servicing Appliance” in the
owner’s manual. No form of lubrication should ever need
applied to the blowers.
Why are different components cycling on and off in my
appliance at random?
The selector switch on control box may be on the wrong
setting. Refer to the Reference Materials section of our
owner’s manual for details.
What is the metal object with the bend in it for that
came inside the plastic bag?
It is a clean-out tool used to help clean the fi repot and
remove any jams in the rare event they occur in the feed
tube.
Why is there a black residue building up on the outside
of my home?
Wind can cause this to happen. If the appliance is operating correctly very little soot should ever exit the termination
cap. Also check to be sure the venting is installed per the
owner’s manual and local codes.
Do I need an outside air kit?
Outside air is required for mobile home installs and in
some jurisdictions. Refer to “Listing & Code Approvals”,“
Mobile Home Installation” and “ Appliance Set-up” owner’s
manual. Also refer to local building codes.
I am seeing sparks coming out of my pipe (termination
cap) outside is this safe?
This is normal. As long as clearances to combustibles
were followed this is safe.
My unit sounds like a freight train at times what can be
done to eliminate this?
This is referred to as Rumbling. Maintenance may be
needed see “Maintaining and Servicing appliance” in the
owner’s manual. Decrease fuel fl ow see “Feed rate adjust-
ment” under Operating Instructions”.
Why does my unit run fi ne on high, but shuts down on
low and medium?
Maintenance may be needed see “Maintaining and Servicing Appliance” See also “Trouble Shooting”.
Can I use another brand of wall thermostat or remote
system?
Yes, any remote/wall thermostat system that does not
require power from the appliance should work.
I have no power to anything. Does this unit have a
circuit breaker or fuse or a reset button?
This unit has one serviceable fuse in the junction box and
a reset button for the thermostat circuit.
Can I burn corn in my unit?
Corn is not an approved fuel for the ECO units.
I’m thinking about going green (solar power) and need
to know what the power consumption is on my Unit.
PS50 115 VAC, 60 Hz, Start 5.1 Amps, Run 3.0 Amps.
PS35 115 VAC, 60 Hz, Start 3.8 Amps, Run 1.3 Amps.
CAB50 115 VAC, 60 Hz, Start 5.1 Amps, Run 3.0 Amps
Where is the serial # of my unit is located?
The serial # is located on the back of the stove.
12 7058-206C 05/06/2015
 Loading...