

Page 1
Model HD-5677
70 Watt High Pressure
Sodium Floodlight
Installation Instructions
READ ALL INSTRUCTIONS CAREFULLY BEFORE BEGINNING INSTALLATION.
NOTE: All wiring must be run in accordance with the National Electrical Code (Canadian Electrical Code in Canada) through
conduit or another acceptable means. Contact a qualified electrician if there is any question as to the suitability of
the system.
Lamp in Fixture Contains Mercury. Dispose According to Local, State, or Federal Laws.
WARNING: Turn off the circuit breaker or remove
the fuse protecting the lighting circuit.
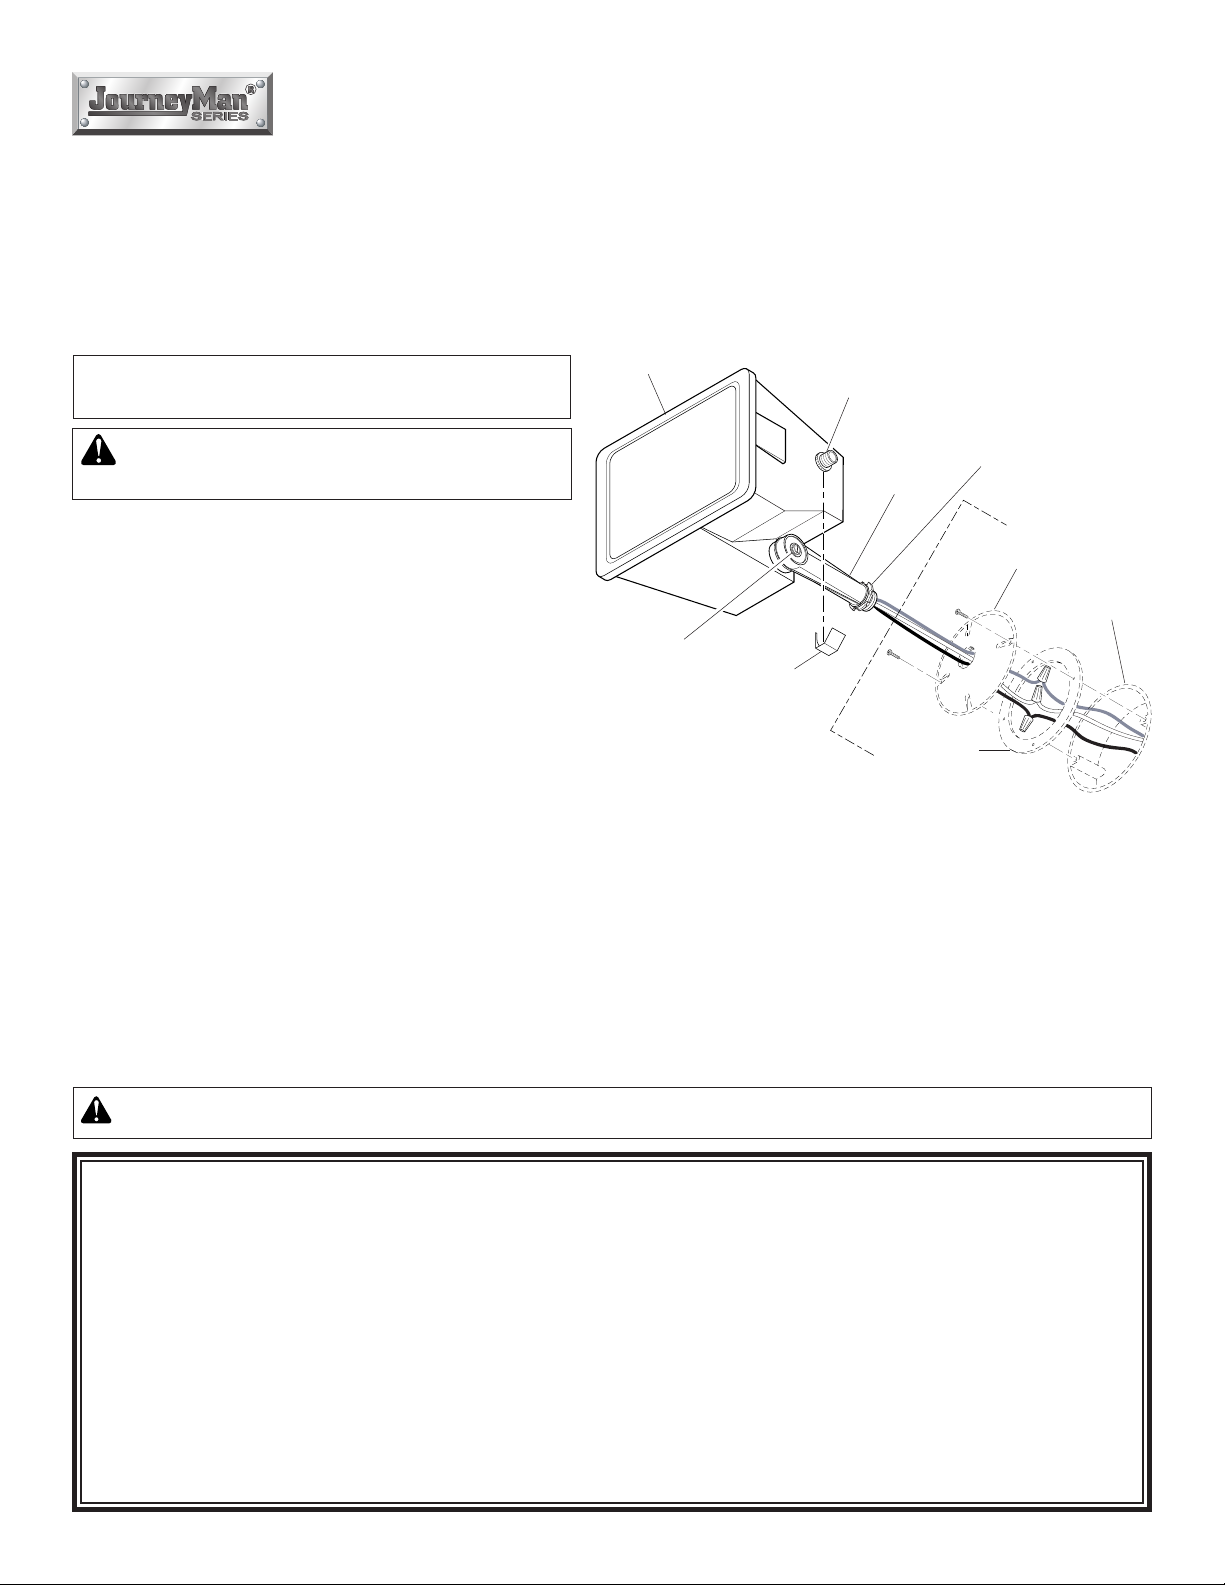
Fixture
Photocontrol (Location of photocontrol
may vary from that shown)
Mounting
Arm
Lock Nut
1. Install light fixture to an approved outdoor weatherproof
junction box cover plate (not included).
2. Connect the fixture wires to the junction box wires
(black to black, white to white, and the fixture ground
wire to the junction box ground wire). Secure with the
wire connectors provided.
3. Secure the cover plate to the outdoor weatherproof junction box (not included) with two screws (not included).
Locking
Screw
Metal Reflector
Cover Plate
Junction
Box
4. Apply weatherproof silicone caulking around cover
plate to provide a watertight seal.
5. Adjust the fixture to aim in the general direction desired.
If possible, turn the light fixture so the photocontrol
Gasket
does not point at another light or reflective surface near
the fixture.
6. When you have the floodlight aimed where you want it, tighten the lock nut on the mounting arm and the locking screw
at the fixture joint.
7. Release the clasp that holds the lens closed. Install ONLY a 70 watt high pressure sodium type S62 lamp (provided).
8. Close the lens and lock it shut with the clasp.
To test operation during daylight, cover the photocontrol with black tape. Turn on the power. The light will take up to ten minutes to reach full brightness. Remove the tape from the photocontrol and your unit will operate automatically—on at dusk, off
at dawn.
In Case of Difficulty
If your floodlight does not turn on automatically or cycles on and off, it could be affected by other nearby lights or is seeing its
own light. In either case, loosen the plastic nut that secures the photocontrol. Slide the metal reflector under the nut so that
the reflector causes the photocontrol to look away from nearby lights or reflective surfaces and retighten the plastic nut.
WARNING - Risk of fire. Do not aim the bulbs at a combustible surface within 3 ft. (1 m).
JourneyMan® Lifetime Warranty
This is a “Limited Warranty” which gives you specific legal rights. You may also have other rights which vary from state to state or province to province.
For as long as you (the original purchaser) own this JourneyMan® product, any malfunction caused by factory defective parts or workmanship will be
corrected at no charge to you.
Not Covered - Repair service, adjustment and calibration due to misuse, abuse or negligence, light bulbs, batteries, and other expendable items are
not covered by this warranty. Unauthorized service or modification of the product or of any furnished component will void this warranty in its entirety. This
warranty does not include reimbursement for inconvenience, installation, setup time, loss of use, unauthorized service, or return shipping charges.
This warranty covers only JourneyMan® products and is not extended to other equipment and components that a customer uses in conjunction with
our products.
THIS WARRANTY IS EXPRESSLY IN LIEU OF ALL OTHER WARRANTIES, EXPRESS OR IMPLIED, INCLUDING ANY WARRANTY, REPRESENTATION OR CONDITION OF MERCHANT ABILITY OR THAT THE PRODUCTS ARE FIT FOR ANY PARTICULAR PURPOSE OR USE, AND SPECIFICALLY IN LIEU OF ALL SPECIAL, INDIRECT, INCIDENTAL, OR CONSEQUENTIAL DAMAGES.
REPAIR OR REPLACEMENT SHALL BE THE SOLE REMEDY OF THE CUSTOMER AND THERE SHALL BE NO LIABILITY ON THE PART OF
HeathCo LLC FOR ANY SPECIAL, INDIRECT, INCIDENTAL, OR CONSEQUENTIAL DAMAGES, INCLUDING BUT NOT LIMITED TO ANY LOSS
OF BUSINESS OR PROFITS, WHETHER OR NOT FORESEEABLE. Some states or provinces do not allow the exclusion or limitation of incidental
or consequential damages, so the above limitation or exclusion may not apply to you. Please keep your dated sales receipt, it is required for all warranty requests.
© 2008 HeathCo LLC 598-1247-03
Page 2

Modelo HD-5677 Faro de vapor de sodio a
alta presión de 70 vatios
Instrucciones para la Instalación
ANTES DE EMPEZAR LA INSTALACIÓN LEA CUIDADOSAMENTE TODAS LAS INSTRUCCIONES
NOTA: Todo el cableado debe realizarse de acuerdo con el Código Eléctrico Nacional (Código Eléctrico Canadiense en
Canadá) usando tubería u otro medio aceptable. Contáctese con un electricista calificado si tiene alguna pregunta
respecto a si el sistema(eléctrico) es apropiado.
La lámpara en el dispositivo contiene mercurio.
Artefacto
Deseche de acuerdo con las leyes locales, estatales
o federales.
ADVERTENCIA: El artefacto está diseñado para
ser MONTADO SÓLO EN PARED (vea la ilustración
de abajo).
1. Instale el aparato de luz a la tapa de la caja de empalme
aprobada, exterior y contra intemperie (no incluida).
2. Conecte los conductores del artefacto con los de la caja
de empalme (negro con negro, blanco con blanco,
y el conductor de puesta a tierra del artefacto con el
Tornillo de Fijación
conductor de puesta a tierra de la caja de empalme).
Asegúrelos con los conectores de cable provistos.
Reflector Metálico
3. Asegure la tapa a la caja de empalme exterior contra intemperie (no incluida) usando dos tornillos (no incluidos).
4. Aplique un calafateo de silicona contra la intemperie
alrededor de la tapa para formar un sello hermético
contra el agua.
5. Regule el aparato para que apunte en la dirección general deseada. De ser posible gire el aparato de luz de modo que
el fotocontrol no apunte a otra luz o superficie reflectora cerca del aparato.
6. Una vez que el reflector esté en la dirección deseada, ajuste la contratuerca del brazo de montaje y el tornillo de sujeción
de la articulación del artefacto.
7. Suelte el broche que mantiene cerrada a la placa traslúcida. Instale SOLAMENTE una lámpara de sodio de alta presión
de 70 vatios tipo S62 (provista).
8. Cierre la placa traslúcida y asegúrela con el sujetador.
Para probar el funcionamiento durante la luz diurna, cubra el fotocontrol con cinta negra. Encienda la energía. A la luz le
tomará hasta diez minutos en alcanzar su brillo total. Retire la cinta del fotocontrol y su lámpara trabajará automáticamente
encendiéndose en el crepúsculo y apagándose al amanecer.
En Caso de Dificultad
Si su reflector no se enciende automáticamente o no cumple el ciclo encendido/apagado, pueda que le esté afectando las
luces de lámparas cercanas o su propia luz. En cualquier caso, afloje la tuerca plástica que asegura al fotocontrol. Deslice
el reflector metálico por debajo de la tuerca para que el fotocontrol enfoque fuera de luces o de superficies reflectoras cercanas. Vuelva a ajustar la tuerca plástica.
Fotocontrol (La ubicación del fotocontrol
puede ser diferente de la que se muestra)
Brazo de
Montaje
Empaque
Contratuerca
Tapa
Caja de
Empalme
ADVERTENCIA: Riesgo de incendio. No apunte las lámparas a superficies combustibles dentro de un 3 pies (1 m).
Garantía JourneyMan® Permanente
Esta es una “garantía limitada” que le da derechos legales específicos. Ud. puede también tener otros derechos que varían de estado a estado o de
provincia a provincia.
Por todo el tiempo que Ud. (el comprador original) posea este Producto Journey Man®, cualquier funcionamiento anómalo ocasionado por partes o
mano de obra defectuosas de fábrica será corregido sin costo para Ud.
No Cubierto - Servicio de reparación, ajuste y calibración debido al mal uso, abuso o negligencia, bombillas, baterías, u otras partes fungibles no
están cubiertas por esta garantía. un servicio o modificación no autorizados del producto o de cualquier componente que se provea, invalidarán
esta garantía en su totalidad. Esta garantía no incluye reembolso por inconveniencia, instalación, tiempo de instalación, perdida de uso, servicio no
autorizado, o costos de transporte de retorno.
Esta garantìa cubre sólo a productos JourneyMan® y no se extiende a otros equipos y componentes que el cliente los usa junto con nuestros productos.
ESTA GARANTÍA ESTÁ EXPRESAMENTE EN LUGAR DE CUALQUIER OTRA GARANTÍA, EXPRESADA O IMPLÍCITA, INCLUYENDO CUALQUIER GARANTÍA, REPRESENTACIÓN O CONDICIÓN DE COMERCIABILIDAD O QUE EL PRODUCTO SEA ADAPTADO PARA CUALQUIER PROPÓSITO O USO
PARTICULAR, Y ESPECÍFICAMENTE EN LUGAR DE TODOS LOS DAÑOS ESPECIALES, INDIRECTOS, INCIDENTALES O CONSECUENTES.
LA REPARACIÓN O EL REEMPLAZO SERÁN LAS ÚNICAS ALTERNATIVAS DEL CLIENTE Y NO HABRÁ RESPONSABILIDAD POR PARTE DE
HeathCo LLC POR NINGÚN DAÑO ESPECIAL, INDIRECTO, INCIDENTAL O CONSECUENTE, INCLUIDOS PERO NO LIMITADOS A PÊRDIDA DEL
NEGOCIO O DE LOS BENEFICIOS, SEAN O NO PREVISIBLES. Algunos estados o provincias no permiten la exclusión o limitación de daños incidentales
o consecuentes, de modo que la limitación o exclusión arriba indicada pueda que no se aplique a Ud. Por favor guarde su recibo de venta fechado; se
lo requiere para cualquier solicitud de garantía.
© 2008 HeathCo LLC 598-1247-03 S
Page 3

NOTE :
Modèle HD-5677
Projecteur à vapeur de sodium
à haute pression de 70 W
Mode d’installation
LIRE SOIGNEUSEMENT LES DIRECTIVES AVANT D’ENTREPRENDRE L’INSTALLATION.
Le câblage doit être conforme aux exigences du Code canadien de l’électricité et être installé dans des canalisations ou autres
dispositifs acceptables. Si vous avez des doutes concernant la convenance du système, consultez un électricien reconnu.
La lampe du luminaire contient du mercure. Mettez-la
aux rebuts conformément aux lois locales, provinciales ou fédérales.
AVERTISSEMENT: Ce luminaire est conçu pour
Projecteur
Cellule photoélectrique (L’emplacement
de l’interrupteur photo-électrique peut
varier par rapport à celui représenté)
Bras de
montage
Écrou de blocage
être INSTALLÉ AU MUR SEULEMENT (voir l’illustration plus loin).
1. Installez le luminaire sur une plaque de finition de boîte de
connexion extérieure étanche approuvée (non fournie).
2. Raccordez les fils du luminaire aux fils de la boîte
de jonction (noir à noir, blanc à blanc). Fixez les
Vis de blocage
Plaque de finition
Boîte de jonction
connexions avec les serre-fils inclus.
3. Fixez la plaque de finition à la boîte de connexion
extérieure étanche (non fournie) au moyen de deux
Réflecteur métallique
vis (non fournies).
4. Appliquez un scellant à base de silicone autour de la
Garniture
plaque pour assurer l’étanchéité.
5. Orientez le projecteur dans la direction désirée. Dans
la mesure du possible, placez le luminaire de façon que la cellule photo-électrique ne soit pas orientée vers une autre
source lumineuse ou réfléchissante située près du luminaire.
6. Lorsque le projecteur est pointé à votre goût, serrez l’écrou de blocage sur le bras et la vis de blocage à l’articulation du
projecteur.
7. Enlevez le fermoir qui maintient la lentille fermée. Installez SEULEMENT une ampoule 70 W de type S62 au sodium
haute pression (fournie).
8. Refermez la lentille et verrouillez-la avec la pince.
Pour vérifier le fonctionnement du luminaire le jour, recouvrez la cellule photoélectrique de ruban noir. Mettez le courant.
L’ampoule pourra prendre jusqu’à 10 minutes pour atteindre sa pleine intensité. Enlevez le ruban et le luminaire fonctionnera
automatiquement - s’allumera au crépuscule et s’éteindra à l’aurore.
En cas de difficulté
Si votre projecteur ne s’allume pas automatiquement ou s’il s’éteint et se rallume, il pourrait être affecté par une source lumineuse proche ou sa propre lumière. Dans un cas comme dans l’autre, desserrez l’écrou de plastique qui immobilise la cellule
photoélectrique. Faites glisser le réflecteur métallique sous l’écrou de manière que le réflecteur force la cellule à «regarder»
ailleurs qu’en direction de ces sources lumineuses ou surfaces réfléchissantes, puis resserrez l’écrou de plastique.
AVERTISSEMENT: Risque d'incendie ! Ne pas pointer les lampes vers une surface combustible située à moins
de 1 mètre.
Il s’agit d’une « Garantie limitée » qui vous confère des droits juridiques spécifiques. Vous pouvez également jouir d’autres droits, variables d’une
Garantie à vie JourneyMan
province à l’autre.
Tant et aussi longtemps que vous (l’acheteur initial) possédez ce produit JourneyMan®, toute anomalie de fonctionnement imputable à un vice de
matériau ou de main-d’oeuvre sera corrigée gratuitement.
Exclusions de la garantie - Réparations, réglage et calibrage dus à une mauvaise utilisation, un mauvais traitement ou à la négligence. Les ampoules, les piles et des autres articles non durables ne sont pas couverts par cette garantie. Le service non autorisé ou la modification du produit ou d’un
ou l’autre de ses composants fournis invalidera totalement la présente garantie. Cette garantie n’inclut pas le remboursement pour le dérangement,
l’installation, le réglage, la perte d’utilisation, le service non autorisé ou les frais d’expédition pour le renvoi de la marchandise.
La garantie ne couvre que les produits JourneyMan® et ne s’étend pas aux autres équipements et composants que le client pourrait utiliser conjointement avec nos produits.
CETTE GARANTIE TIENT EXPRESSÉMENT LIEU DE TOUTES AUTRES GARANTIES, EXPLICITES OU IMPLICITES, Y COMPRIS DE TOUTE GARANTIE
DE REPRÉSENTATION OU DE CONDITION DE CONVENANCE À LA COMMERCIALISATION OU À L’EFFET QUE LES PRODUITS CONVIENNENT À UN
BUT OU À UNE UTILISATION PARTICULIÈRE, ET SPÉCIFIQUEMENT DE TOUS DOMMAGES SPÉCIAUX, DIRECTS, INDIRECTS OU SECONDAIRES.
LE REMPLACEMENT OU LA RÉPARATION CONSTITUENT LE SEUL RECOURS DU CLIENT ET HeathCo LLC NE POURRA ÊTRE TENUE
RESPONSABLE DE TOUS DOMMAGES SPÉCIAUX, DIRECTS, INDIRECTS OU SECONDAIRES, Y COMPRIS, SANS S’Y LIMITER, LES PERTES
COMMERCIALES ET PERTES DE PROFIT, QU’ELLES SOIENT PRÉVISIBLES OU NON. Certaines provinces n’autorisent pas l’exclusion ou la
limitation des dommages indirects ou secondaires, et la limitation ou l’exclusion ci-dessus pourrait ne pas s’appliquer à vous. Veuillez conserver le
reçu portant la date d'achat; vous en aurez besoin pour toutes vos demandes liées à la garantie.
®
© 2008 HeathCo LLC 598-1247-03 F
Page 4

TECHNICAL SERVICE
Please call 1-800-858-8501 (English speaking only) for assistance before returning product to
store.
If you experience a problem, follow this guide. You may also want to visit our Web site at: www.hzsupport.com. If the prob-
lem persists, call* for assistance at 1-800-858-8501 (English speaking only), 7:30 AM to 4:30 PM CST (M-F). You may also
write* to:
HeathCo LLC
P.O. Box 90045, Bowling Green, KY 42102-9045
ATTN: Technical Service
* If contacting Technical Service, please have the following information available: Model Number, Date of Purchase, and
Place of Purchase.
No Service Parts Available for this Product
SERVICIO TÉCNICO
Favor de llamar al 1-800-858-8501 (sólo para hablar en inglés) para pedir ayuda antes de devol-
ver el producto a la tienda.
Si tiene algún problema, siga esta guía. Usted puede también visitar nuestro sitio Web: www.hzsupport.com. Si el proble-
ma continúa, llame al 1-800-858-8501 (sólo para hablar en inglés), de 7:30 AM a 4:30 PM CST (L-V). Usted puede también
escribir a:
HeathCo LLC
P.O. Box 90045, Bowling Green, KY 42102-9045
ATTN: Technical Service (Servicio Técnico)
* Si se llama al Servicio Técnico, por favor tener lista la siguiente información: Número de Modelo, Fecha de compra y Lugar
de compra.
No hay piezas de servicio disponibles para este producto.
SERVICE TECHNIQUE
Veuillez faire le 1 800 858-8501 (service en anglais seulement) pour obtenir de l’aide avant de
retourner l’article au magasin.
En cas de problème, suivez ce guide. Vous pouvez aussi visiter notre site Web à
siste, composez* le 1 800 858-8501 (service en anglais seulement), entre 7 h 30 et 16 h 30, HNC, du lundi au vendredi. Vous
pouvez aussi écrire au :
HeathCo LLC
P.O. Box 90045, Bowling Green, KY 42102-9045
ATTN: Technical Service (Service technique)
* Lors d’un appel au service technique, veuillez avoir les renseignements suivants à portée de main : numéro du modèle,
date d’achat et endroit de l’achat.
Aucune pièce de rechange n’est disponible pour ce produit.
www.hzsupport.com.
Si le problème per-
 Loading...