

1
Instruction Manual
..................................... x
Manuel d’instructions
................................. x
Manual de Instrucciones ........................... x
Bedienungsanleitung ................................. x
All rights reserved. Printed in China.
Tous droits réservés. Imprimé en Chine.
Todos los derechos reservados. Impreso en Chine.
Alle Rechte vorbehalten. Gedruckt in China.
Instruction Manual
#26-015-10050/51-483
©Heathrow Scientific® LLC
High-Speed
Mini-Centrifuge
www. .com
information@itm.com1.800.561.8187

32
Your mini-centrifuge is designed for laboratories in the bioscience,
medical, and chemistry fields. It may be involved with biohazardous
and/or hazardous materials. This instruction manual cannot address all
safety hazards. It is the responsibility of the user to consult and observe
all health and safety precautions and to assess the instrument’s
suitability to the task.
1. Never use this product in any manner inconsistent with these
instructions.
2. This product is intended to be used indoors only.
3. This product is intended for separating aqueous solutions in
approved test tubes compatible to the RCF of this unit.
4. The product is not intended to centrifuge very dense materials. Do
not use materials with a density greater than 1.2g/cm.
5. Observe general laboratory safety precautions and regulations when
using this product.
6. Do not attempt to operate with the cover removed or open.
7. The rotor and lid must always be securely fastened when in
operation.
8. Always seat the rotor completely onto the shaft, then tighten the rotor
nut.
9. Do not use damaged rotors.
10. Do not put hands onto the rotor unless the rotor is completely
stopped.
11. Do not move unit while the rotor is spinning.
12. Do not immerse the product in water. Injury due to shock or fire may
result.
13. The rotor must be loaded symmetrically. Operating this unit with an
unbalanced rotor will cause severe vibration and damage, which is
not covered by warranty.
14. Do not fill tubes while inserted in rotor. Spilled liquid may harm unit.
15. Close tube lids before starting centrifuge. Open lids can be torn off
during centrifugation and damage the unit. Open lids can cause fluid
to be dispersed inside the centrifuge.
16. Do not insert non-standard tubes or other foreign articles into the
rotor.
Safety Precautions
Caution!
Before starting the mini-centrifuge for the first time, please read
this instruction manual carefully. This manual contains
important information, safeguards, and operating instructions.
17. Follow all precautions from the Material Safety Data Sheet (MSDS) for
any reagent you use with this instrument.
18. Do not use solvent or flammable liquids near this or other electrical
equipment.
19. Do not centrifuge flammable, explosive, or corrosive materials.
20. Do not operate in a hazardous or flammable environment.
21. Do not use any solvent on the unit that may attack plastic or cause
cracks in the rotor.
22. Ensure the rotor is protected from corrosion and mechanical damage.
The rotor must be cleaned with a pH-neutral cleaning liquid.
23. Always work in a manner which endangers neither the user nor any
other person.
24. Should the instrument fail to work to specification, immediately stop
centrifuging. Clean and troubleshoot the instrument according to the
instructions under “Trouble Shooting” before any further use of the
instrument. Contact an authorized dealer or the manufacturer if trouble persists.
25. Do not attempt to stop rotor while unit is running. Doing so may
cause the unit to fail and will void the warranty.
26. Only use original manufacturer’s rotors, AC adapters, tube adapters
and any other spare parts.
27. Repairs are to be performed by trained and authorized service personnel only. Contact Heathrow Scientific
®
LLC.
28. Opening the instrument housing or improper use of the instrument
voids the warranty. If there is a failure during the warranty period,
contact Heathrow Scientific® LLC for warranty service.
29. Do not attempt to use units that have not been correctly installed or
repaired.
30. Do not attempt to disassemble or modify this product.
31. Store at room temperature in a dry area. Do not expose to sunlight,
moisture, or extreme temperatures for prolonged periods of time.
Warning!
If the unit is not used as recommended by the manufacturer, the
overall safety will be impared.
Warning!
Check MSDS, wear required Personal Protective Equipment, and
observe all applicable local and national regulations before
dispensing and disposing of hasardous sample.
www. .com
information@itm.com1.800.561.8187

54
Disposal Responsibilities:
The equipment you purchased may contain hazardous substances that
could impact the environment. Per regulations on electronic devices in
the European Community, you must use the appropriate disposal
systems to avoid exposure of these substances to the environment.
The disposal systems will reuse or recycle hazardous materials from
your equipment responsibly.
The crossed-out wheeled bin symbol invites you
to use those systems.
If you need more information on the collection, reuse and recycling
systems, please contact your local or regional waste administration.
You can also contact us for more information on the environmental
performance of our products.
Changes or modifications to the product not expressly approved by the manufacturer could void the user’s authority to operate the equipment.
This product has been tested and found to comply with the limits of
a Class A digital device pursuant to Part 15 of the FCC rules. These limits
are designed to provide reasonable protection against harmful interference
when the product is operating in a commercial
environment. The product generates, uses, and can radiate radio frequency
energy and if not installed and used in accordance with the user’s manual
may cause harmful interference to radio communications. Operation of the
product in a residential area is likely to caused interference in which case
the user will be required to correct the interference.
Supplied Equipment:
• 1 ea. Centrifuge
• 1 ea. Universal AC power adapter with 4 mains cables
• 1 ea. Standard Tube rotor (1.5mL & 2.0mL tubes) (12,500 rpm)
• 1 ea. Strip tube rotor (8 place 0.2ml Strip Tubes or 32 individual 0.2ml
tubes) (12,500 rpm)
• 12 ea. 0.2mL tube adapters (for use in the standard rotor only)
• 12 ea. 0.5mL tube adapters (for use in the standard rotor only)
Operating Conditions:
Maximum speed: 500rpm - 12,500 rpm
Maximum RCF: 9,800 RCF
Electrical: 100 – 240VAC, 50/60Hz
Ambient temperature: 2°C to 40°C
Relative humidity: ≤80% noncondensing
Power Requirements:
12VDC 8.33A
Storage Conditions:
Storage temperature: 20°C - 55°C
Relative humidity: ≤90% noncondensing
Technical Data
EC Declaration of Conformity
Manufacturer: Heathrow Scientic
®
Address: 620 Lakeview Parkway • Vernon Hills, IL 60061 USA
European Contact: Emergo Europe
Molenstraat 15, 2513 BH, The Hague, The Netherlands
This unit has been constructed and conforms to the following:
Safety Standards:
EN61010-1:2010
EN61010-2-020:2006
IEC61010-1
IEC61010-2-020
UL Std. 61010A-1, 61010A-02-20
CAN/CSA C22.2 No. 61010-1-04 (R2009)
CAN/CSA C22.2 No. 61010-2-020-09
2006/95/EC (Low Voltage Directive)
EMC Standards:
EN61326-1:2006
2002/96/EC (WEEE)
2002/95/EC (RoHS)
Signed:
Jamie Devin, Managing Director
Note:
—
Note:
—
Positive Polarity
This mark is the confirmation that the unit conforms to
the EU guidelines and has been tested according to the
following EU Declaration of Conformity.
Conforms to UL Std. 61010-1.
Certified to CAN/CSA C22.2 No. 1010.2.020-94.
www. .com
information@itm.com1.800.561.8187

76
Operation
General Operation:
1. Turn power switch in the back of the unit ON. The unit will initialize.
2. To open lid, press the OPEN button. The lid should pop up slightly.
Lift the front of the lid gently up and backward until approximately
90 degrees vertical.
3. On benchtop, prepare samples tubes in a rack so that tubes are
filled to equal levels. Close tube lids.
4. Install tubes in the rotor in a balanced manner (see section Balancing the Rotor).
5. Set the appropriate time by pressing the time up/down button.
6. Set the appropriate RPM by pressing the speed up/down button.
7. Place the standard rotor cover on the rotor to limit noise and
aspiration of liquids that may escape from tubes.
8. Close Lid and press down until locked (Display status should read
“READY”).
9. Press Start/Stop (rotor should spin up to the user set speed).
10. At a determined time the rotor will spin down and stop at the preset
time.
11. The unit will then emit a beep when the cycle is complete.
12. To open lid, press the OPEN button.
• Remove the contents from the package examining them carefully for
breakage, defects or missing parts.
• Place the product on a sturdy, level surface away from the edge of
the counter and other moving equipment. Make sure the AC power
adapter and cords are clear of hot surfaces and other hazards.
• Make sure the product has ventilation and is not encased in any
material that will limit airflow. An overheating situation could occur.
• Verify that the power switch in the back of the unit is in the OFF
position. Plug the DC cord into the rear of the unit and the AC cord
an approved outlet.
Display
Display Status
LID OPEN
- Lid is open
READY
- Unit ready to centrifuge
SPIN UP
- Cycle is starting and is increasing speed
SPINNING
- Running in Standard mode
SPIN DOWN
- Cycle is slowing down
STOPPED
- Cycle has stopped
COMPLETED
- Centrifuge cycle is nished
QUICK SPIN (ashes)
- Running in Quick Spin mode
ERROR
- An error has occurred (See error section)
STATUS READY
12300 RPM 12:12 MIN
Speed
RPM/RCF
Time Min:Sec
Status
of Unit
Stop
Start
Front Panel
Rear Panel
Quick
Spin
Open
Speed
Up/Down
Time
Up/Down
On/Off
Switch
DC Jack
Prior to using:
- Turn power switch in the rear ON. The unit will initialize.
- Press the OPEN button. The lid should pop up slightly. Lift the front
of the lid gently up and backward until approximately 90 degrees
vertical.
- Remove any remaining packaging materials.
- Verify that the rotor is installed correctly. (see section Rotor
Installation and Removal) Do not run without the rotor installed.
- Close the lid.
- Press the Start/Stop button (rotor should spin up to the preset
speed). If there is a smooth whirring sound and the unit accelerates
with little or no vibration, the mini-centrifuge is ready to use. If there
are loud or unusual sounds, or excessive vibration, DO NOT
OPERATE. Contact Heathrow Scientific® LLC Technical Support.
- At the set time, the rotor will spin down, stop and the unit will
emit a beep when the cycle is complete.
www. .com
information@itm.com1.800.561.8187

98
Trouble Shooting
Trouble Resolution
No power
present
— Verify that the AC adapter is fully plugged into
the wall and rear of unit
— Verify that the power switch is turned on
Unit or display
is not operating
normally
— Turn off the unit, wait 2 minutes, and turn power
on
Excessive
vibration
Excessive noise
— Inspect the tubes for equal ll or improper
placement
— Inspect the rotor for improper installation
— Remove the tubes and determine if the noise
persists with an empty rotor
Lid will not
close
— Verify that nothing is blocking the lid from fully
closing
— Verify that nothing has fallen into the lock
mechanism opening
Lid will not
open
— If for any reason you need to manually open the
lid to access tubes due to an error or power loss,
please perform the below
— Turn off the unit, remove power cord
— Make sure the rotor has stopped completely
— Use a thin rod and insert it into the opening
on the bottom
— Press gently but rmly. You will feel a
— mechanical movement within the unit and
the lid will release.
— Remove the rod, set the unit on the feet
— Remove your tubes and reclose the lid
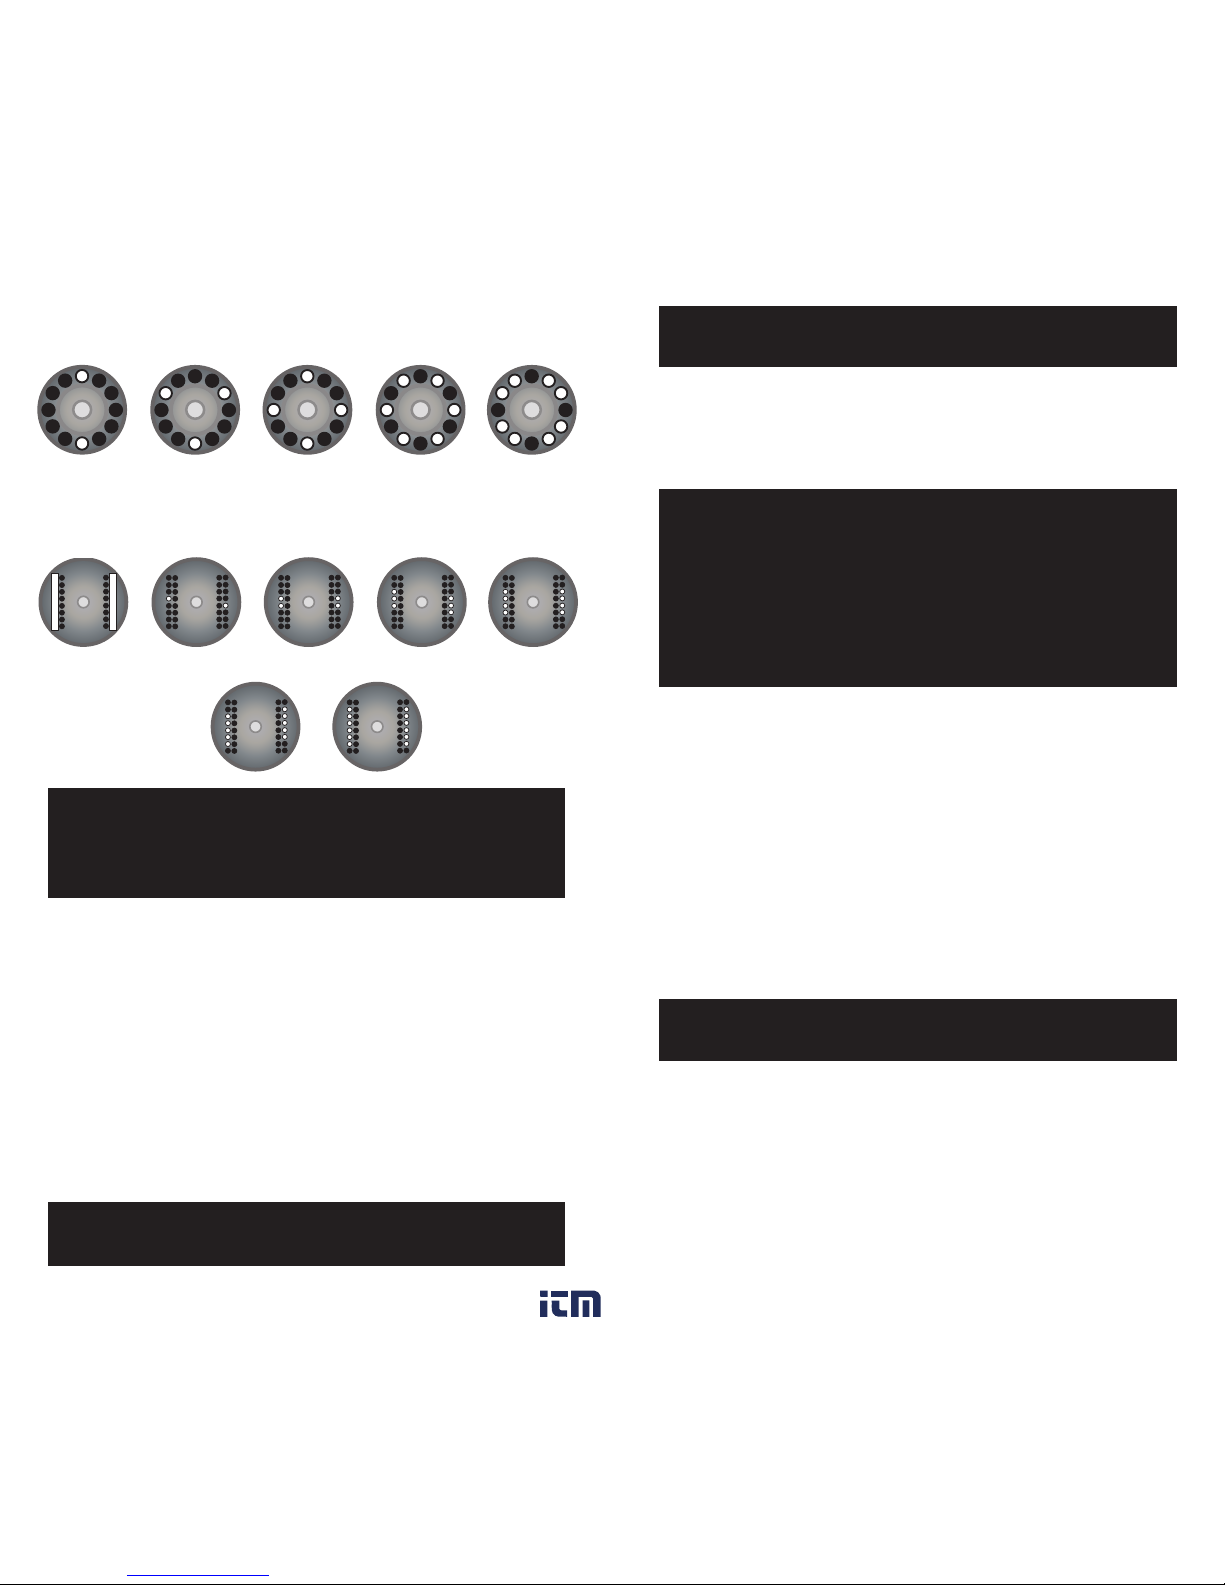
Balancing the Rotor
Tubes of equal weight and size should be placed opposite each other.
Use additional sample or water in other tubes to provide a balanced
rotor. Examples of proper sample balancing are illustrated next.
Warning!
Spin balanced loads only!
Do not place the tubes asymmetrically nor load unequal volume
tubes. Improper placement of tubes will lead to insufficient
centrifugation and may cause serious injury or an accident.
Quick Spin Operation:
1. Prepare the unit for centrifugation as in the General Operation
(section above Steps 1-8).
2. Press Quick Spin button (rotor should spin up to the set speed).
3. The timer will begin counting.
4. Once enough time has elapsed for your needs, release the Quick
Spin button. The rotor will spin down, stop and the unit will emit a
beep when the cycle is complete.
5. To open lid, press the OPEN button.
Other:
Change Between RPM and RCF
- Prior to a spin cycle, press both the Speed Up & Down buttons
simultaneously.
- The speed setting will then convert to the other.
Quick Stop
- If for any reason you need to stop the cycle quickly, press and hold
the Start/Stop button. The cycle will stop more rapidly than normal.
Caution: The tube contents may be disturbed during the quick
stop process.
• If an error happens, the unit will beep and the display will indicate
the error.
• Press Start/Stop to clear the error from the display.
Error:
Error Status Resolution
Motor
Overload
— Something is interfering with the rotor. Clear the rotor and
reset.
User Stop
— The operator has held down the Start/Stop and
implemented a quick stop.
Balance
— Inspect the tubes for equal tube ll or improper placement.
Once corrected, rerun.
— If the balance error continues to happen, remove the tubes
and determine if the balance error still persists with an
empty rotor.
— Inspect the rotor for improper installation.
Temperature
— The unit has exceeded the normal operating temperature.
— Turn off the unit and allow to cool.
Excessive Tilt
— The unit has experienced a non-normal tilt event.
— Make sure the unit is placed on a level surface.
Once corrected, rerun
Lid Fail
— The lid has opened during the cycle. Check for proper
operation of the lid lock mechanism. The lid should stay
locked during the entire cycle.
Rotor Lock
— The unit has experienced a problem with the rotor.
— Correct the rotor interference. Once corrected, rerun.
STATUS ERROR
Rotor Lock
Status of Unit
Error Type
www. .com
information@itm.com1.800.561.8187
1110
Notes
—Ensure all parts are throughly dry prior to operation.
Maintenance
Warning!
Do not use any solvent on the unit that may attack plastic
or cause cracks in the rotor. Ensure the rotor is protected
from corrosion and mechanical damage. The rotor must be
cleaned with a neutral cleaning liquid.
If hasardous sample is spilled on the unit and or leaked
into the unit, do not run the centrifuge unless it is safe to
do so.
Your mini-centrifuge is normally maintenance-free. Clean unit
only when it is not plugged into an electrical outlet. When
necessary, the housing and rotor can be wiped using a damp
cloth and a mild, non-corrosive detergent.
1. Remove rotor from unit
2. Remove screws from the bottom of the rotor
3. Clean as needed
4. Reasssemble rotor, making sure that the alignment tab is
engaged into the slot.
5. Test run reassembled EMPTY rotor to ensure it is still
balanced
1.5mL / 2.0 mL Circular Rotor
0.2mL Tube Rotor
10 Tubes 12 Tubes
Warning!
Do not attempt to open lid until rotor has completely stopped!
Avoid severe personal injury or property damage from moving parts.
Only use rotor compatible with the centrifuge.
Warning!
Do not use damaged or cracked rotors!
Rotor installation and removal
To remove rotor:
— With one hand, grasp the rotor. With the other hand, unscrew
center knob counter clockwise until it disengages from the motor
shaft.
—
Pull up on the center knob firmly. The rotor should easily lift off of
the motor drive.
To install the rotor:
— Check to make sure the bands on the rotor are in the slots.
— Set rotor onto the motor drive and push down until seated.
— With one hand, grasp the rotor. With the other hand, screw the
center knob clockwise until it engages the motor shaft.
Keep turning the knob until it tightens.
—
Do not over tighten the knob.
Mini-centrifuge with AC adapter, 2 rotors,
rotor cover, and tube adapters ........................................HS10050
Standard Rotor................................................................HS100503
Strip Tube Rotor..............................................................HS100504
Rotor Knob......................................................................HS100505
Standard Rotor Cover.....................................................HS100506
Ordering Information
Tubes
2 Strip
Dissassembly of Rotors for Cleaning
www. .com
information@itm.com1.800.561.8187

1312
Limited Warranty
Heathrow Scientific® LLC warrants that your mini-centrifuge will
be free from defects in workmanship and material for two years
from the date of purchase.
If you believe that there is a defect in the product, you must,
during the warranty period, notify Heathrow Scientific
®
LLC,
provide proof of purchase, and return the product to Heathrow
Scientific
®
LLC with a Return Authorization form. To obtain a
Return Authorization form, please call 1-847-816-5070.
If Heathrow Scientific® LLC is properly notified and, after
inspection, confirms that there is a defect and the warranty
period has not expired, Heathrow Scientific
®
LLC will repair,
modify, or replace the product, at its sole option, at no charge.
OTHER THAN THIS LIMITED WARRANTY, HEATHROW
SCIENTIFIC
®
LLC MAKES NO WARRANTIES, EXPRESS OR
IMPLIED, WITH RESPECT TO THE QUALITY OR
PERFORMANCE OF THE PRODUCT, INCLUDING BUT NOT
LIMITED TO THE IMPLIED WARRANTIES OF
MERCHANTABILITY AND FITNESS FOR PARTICULAR
PURPOSE WHICH ARE HEREBY DISCLAIMED AND
EXCLUDED. HEATHROW SCIENTIFIC
®
LLC WILL IN NO
Warranty
IN NO EVENT WILL HEATHROW SCIENTIFIC® LLC’S
OBLIGATION UNDER THIS WARRANTY EXCEED THE PRICE
OF THE PRODUCT.
Heathrow Scientific® LLC will not accept any product return that is
not appropriately cleaned and decontaminated. In the unlikely
event of repair, or when damage to the unit necessitates return,
contact Heathrow Scientific
®
LLC and obtain return authorization
before sending your product for service.
Return for Repair
Important:
Transporting hazardous materials without a permit is a
violation of federal law.
EVENT BE LIABLE FOR ANY LOSS OF USE, LOSS OF
PROFITS, CONSEQUENTIAL, SPECIAL, EXEMPLARY OR
PUNITIVE DAMAGES.
THIS WARRANTY DOES NOT COVER:
• ANY DEFECT OR DAMAGE CAUSED BY IMPROPER OR
UNREASONABLE USE OF THE PRODUCT. (THE MINICENTRIFUGE IS DESIGNED FOR USE ONLY BY TRAINED
LABORATORY TECHNICIANS. USE BY ANYONE ELSE WILL
VOID THIS WARRANTY.)
• ANY PRODUCT THAT HAS BEEN, IN HEATHROW
SCIENTIFIC® LLC’S SOLE JUDGEMENT, TAMPERED WITH,
ALTERED, OR REPAIRED BY ANYONE OTHER THAN
HEATHROW SCIENTIFIC
®
LLC.
• ANY PRODUCT THAT IS INOPERATIVE BECAUSE OF: (a)
WEAR OCCASIONED BY USE, (b) NEGLIGENCE, (c)
ACCIDENT, (d) INCORRECT MAINTENANCE, OR (e) USE
UNDER ABNORMAL CONDITIONS OF TEMPERATURE, DIRT
OR CORROSION, OR USE WITH ABRASIVE OR CORROSIVE
MATERIALS.
• ACCESSORY PARTS, SUCH AS RUBBER AND PLASTIC
PARTS THAT ARE DAMAGED BY LIQUIDS OR MISUSE.
www. .com
information@itm.com1.800.561.8187
 Loading...