

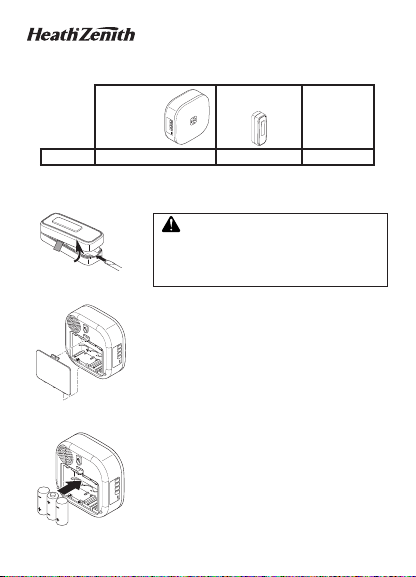
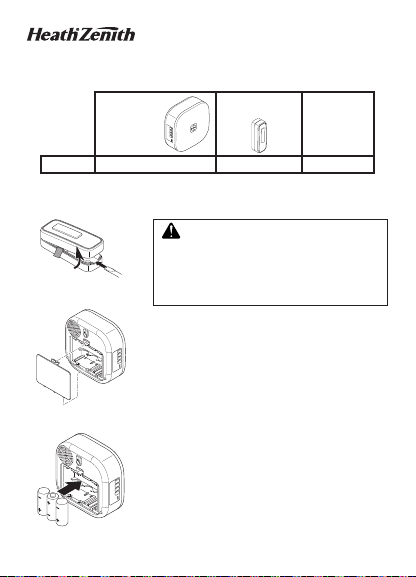
Wireless MP3 Chime
This package includes (Style of push button and chime may vary from illustration):
Wireless
chime
Music
Model
7310
This chime requires 3 “C” alkaline batteries (not included). In typical use, alkaline
batteries will last up to one year.
✔ ✔ ✔
INJURY or DEATH:
• NEVER allow small children near batteries.
• If battery is swallowed, immediately notify
Figure 1
1. Remove orange battery tab from push button.
Remove back of case by pushing in tab on bottom
with a small screwdriver (see Figure 1). Remove
orange battery tab.
VOL
+
VOL
2. Install 3 alkaline “C” batteries. Press in latch on
–
LightSync
Music
rear of chime and lift off battery cover (see Figure 2).
Install 3 alkaline “C” batteries (not included) into
chime. Make sure batteries are installed according
to the diagram inside the chime (see Figure 3).
Figure 2
Replace battery access door onto back of chime.
3. Test range. Temporarily position chime and push
button where you want them mounted. Press push
button to verify chime and push button work properly. If chime does not sound, see Troubleshooting.
VOL
+
VOL
–
LightSync
Music
Figure 3
© 2019 HeathCo LLC 209938-01A
Wireless push
VOL
+
VOL
–
Light
Sync
button
Hardware
pack
WARNING: To prevent possible SERIOUS
doctor.
2
Figure 4
Keyhole Slot
4. Mount push button. Use either screws or double
sided tape to mount push button.
•
Screw Mounting: To mount with screws, remove
back of case by pushing in tab on bottom with a
small screwdriver (see Figure 1). Note: Remove
material in screw holes (if needed) before mounting
with screws. Attach back of case to door jamb or
wall (see Figure 4). Snap front of push button on.
• Tape Mounting: When attaching push button
using double sided tape, make sure the surface
of the door jamb or wall is clean.
5. Mount chime. Determine mounting location.
• Drill one 7/32 in. (5.5 mm) pilot hole and insert a
wall anchor.
• Mount keyhole screw to wall leaving about 1/8"
(3 mm) of the screw threads exposed.
• Using keyhole on back of chime base, hang base
on screw (see Figure 5).
Operation
Chime Mute
VOL
+
VOL
–
The chime can be muted for a select period of time:
LightSync
Music
full-time, 3 hours, 6 hours, 9 hours, or 12 hours. Press
and release the mute icon to select the amount of time
the chime should be muted (see Figure 6). The mute
Keyhole Screw
Wall Anchor
Figure 5
Figure 6
Helpful Videos – www.hzsupport.com Helpful Answers – 1-800-858-8501
icon will turn green each time it is pressed to show the
amount of time selected.
OFF Full-Time 3Hr 6Hr 9Hr 12Hr
Note: The chime will flash the selected color each
time the push button is pressed whether the chime is
muted or unmuted.
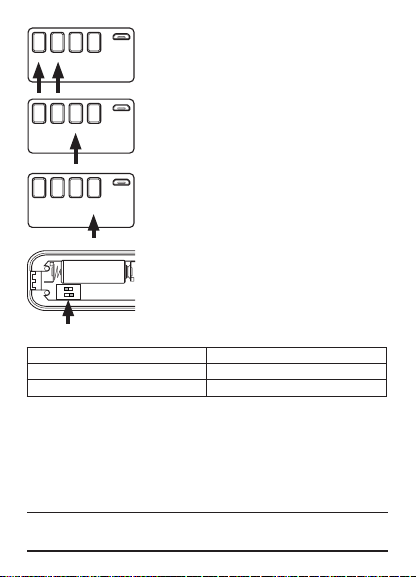
Volume Control
VOL +VOL –Light Sync
VOL +VOL –Light Sync
VOL +VOL –Light Sync
1 2
ON
Music
Music
Music
The chime has adjustable volume levels. Press and
release the “VOL +” or “VOL –” buttons to increase or
decrease the chime volume.
Light Color Selection
The chime will blink whenever the push button is
pressed. The color of the light is selectable. Press and
hold the “Light” button until the chime glows. While the
chime is glowing, press and release the “Light” button
to select the desired color. Press the push button to
lock in the desired color.
Tune Selection
The chime has ten pre-loaded selectable “front door”
tunes. Press and release the “Sync/Music” button until
the desired tune is heard. While the desired tune is playing, press the push button to lock in the selected tune.
Note: Each push button can be assigned its own
unique tune.
Note: To listen to the selected tune, press and release
the “Sync/Music” button.
Note: All chime models are designed to work with up
to 5 push buttons (sold separately).
Tune Setting Table
Push Button Tune
Switch 2 - ON (Back Door) Ding
Switch 2 - OFF (Front Door) Selected Musical Tune
Front Door
Any MP3 File (16MB Available Space)
Ding-Dong Birthday Celebration
Traditional Westminster Auld Lang Syne
Traditional Whittington Beethoven’s 5th
Bell Whittington We wish you a merry Christmas
Short Westminster Star Spangled Banner
Back Door
Ding
Helpful Videos – www.hzsupport.com Helpful Answers – 1-800-858-8501
Tune Selection Guide
3
4
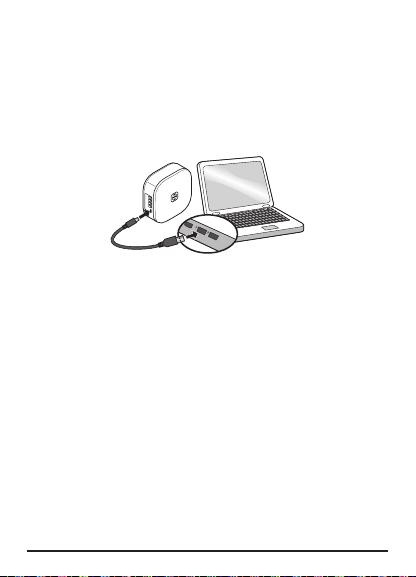
Adding MP3 Tunes to the Chime
The suggested tune length is 2-15 seconds. The maximum tune length is 20 seconds.
If the tune is longer than 20 seconds, only the first 20 seconds will play.
• Connect the USB cable to the chime and the computer.
• Locate and open the external drive folder.
• Drag the desired MP3 file to the chime drive.
• Disconnect (eject per computer operating system) the chime from computer.
• Remove the USB cable.
Note: The chime will not play while connected to the computer.
VOL
+
VOL
–
Light
Music
Sync
1. PROBLEM: Chime does not play the added sound file.
Troubleshooting
POSSIBLE CAUSE: Chime can only play MP3 formatted sound files.
CORRECTIVE ACTION: Find a MP3 version of the desired tune or convert
the existing file to the MP3 format.
2. PROBLEM: Chime does not sound.
A. POSSIBLE CAUSE: Push button and chime are not synced.
A. CORRECTIVE ACTION: Sync the push button and chime.
• Press and hold the “Sync/Music” button on the chime until the chime sounds
a “Beep-Beep”.
• Press the push button within 30 seconds. The chime will sound a “BeepBeep” tone to indicate the push button is synced.
• Press the push button to ensure operation.
B. POSSIBLE CAUSE: Batteries not installed correctly.
B. CORRECTIVE ACTION: Make sure batteries are installed according to the
diagram inside the push button and chime.
C. POSSIBLE CAUSE: Batteries are dead.
C. CORRECTIVE ACTION: Check charge of push button and chime batteries
and replace if necessary.
Helpful Videos – www.hzsupport.com Helpful Answers – 1-800-858-8501

D. POSSIBLE CAUSE: Chime is muted.
D. CORRECTIVE ACTION: Press and release the mute button until the green
light is turned off.
E. POSSIBLE CAUSE: Dip switch #1 in the push button has been moved to the
“ON” position.
E. CORRECTIVE ACTION: Ensure dip switch #1 is in the “OFF” position in the
push button and follow the steps above to re-sync the push button and chime.
3. PROBLEM: Batteries seem okay, but the chime does not work after installation.
A. POSSIBLE CAUSE: Chime or push button is mounted on metal or near metal
studs. Note: Metal reduces transmission range.
A. CORRECTIVE ACTION: Use 1/4 in. to 1/2 in. (6 to 13 mm) wood shims to
move chime or push button away from metal surface.
B. POSSIBLE CAUSE: Chime is mounted near concrete floor or wall. Note:
Concrete may reduce range.
B. CORRECTIVE ACTION: Move chime away from concrete surface.
C. POSSIBLE CAUSE: Chime and push button are installed too far apart.
C. CORRECTIVE ACTION: Locate chime closer to push button.
4. PROBLEM: Chime sounds when not intended (false triggers).
POSSIBLE CAUSE: Chime is receiving interference from another wireless
device.
CORRECTIVE ACTION: Reset chime and push button.
• Remove push button battery. Wait 30 seconds.
• Press and hold the push button for 10 to 15 seconds within 60 seconds
after installing battery into the push button.
• Press and hold the “Sync/Music” button on the chime until the chime sounds
a “Beep-Beep-Beep-Beep”.
• To re-sync the push button and chime, press and hold the “Sync/Music”
button on the chime until the chime sounds a “Beep-Beep”.
• Press the push button within 30 seconds. The chime will sound a “BeepBeep” tone to indicate the push button is synced.
• Press the push button to ensure operation.
5. PROBLEM: The new push button and chime do not work with existing push
buttons and chimes.
POSSIBLE CAUSE: The new push button and chime are not using the same
codes as existing push buttons and chimes.
CORRECTIVE ACTION: The new push button and chime need to be set
to work with existing push buttons and chimes. Please call 1-800-858-8501
for assistance in changing the codes to work with existing push buttons and
chimes.
Note: The push button and chime come synced from the factory. The range of the
wireless chime can vary with location, temperature, and battery condition.
Helpful Videos – www.hzsupport.com Helpful Answers – 1-800-858-8501
5

6
Technical Service
Please contact us for assistance
before returning product to the
store or to HeathCo LLC.
If you experience a problem, follow this
guide. You may also contact us between
8:00 AM to 5:00 PM CST (M-F).
When contacting Technical Service,
please include the following information: Name, Street Address, Daytime
Phone Number, Email Address, Model
Number, Date of Purchase, Place of
Purchase, Product Issue, and DATED
SALES RECEIPT FOR WARRANTY
REQUESTS.
Helpful Videos – www.hzsupport.com Helpful Answers – 1-800-858-8501
No Service Parts Available for this
HeathCo LLC
P.O. Box 90045
2445 Nashville Road
Bowling Green, KY 42101, USA
ATTN: Technical Service
Internet: www.hzsupport.com
Phone: 1-800-858-8501 (English Only)
Fax: 1-270-846-8500
Product

ONE YEAR LIMITED WARRANTY
This is a “Limited Warranty” which gives you specific legal rights. You may
also have other rights which vary from state to state or province to province.
For a period of one year from the date of purchase, any malfunction caused by
factory defective parts or workmanship will be corrected at no charge to you.
Not Covered - Repair service, adjustment and calibration due to misuse,
abuse or negligence, light bulbs, batteries, and other expendable items are
not covered by this warranty. Any damage to the light fixture resulting from the
use of chemicals or a pressure washer machine are not covered by this warranty. Unauthorized service or modification of the product or of any furnished
component will void this warranty in its entirety. This warranty does not include
reimbursement for inconvenience, installation, setup time, loss of use, unauthorized service, or return shipping charges.
This warranty covers only HeathCo LLC assembled products and is not extended
to other equipment and components that a customer uses in conjunction with
our products.
THIS WARRANTY IS EXPRESSLY IN LIEU OF ALL OTHER WARRANTIES,
EXPRESS OR IMPLIED, INCLUDING ANY WARRANTY, REPRESENTATION
OR CONDITION OF MERCHANT ABILITY OR THAT THE PRODUCTS ARE FIT
FOR ANY PARTICULAR PURPOSE OR USE, AND SPECIFICALLY IN LIEU OF
ALL SPECIAL, INDIRECT, INCIDENTAL, OR CONSEQUENTIAL DAMAGES.
REPAIR OR REPLACEMENT SHALL BE THE SOLE REMEDY OF THE CUSTOMER AND THERE SHALL BE NO LIABILITY ON THE PART OF HEATHCO
LLC FOR ANY SPECIAL, INDIRECT, INCIDENTAL, OR CONSEQUENTIAL
DAMAGES, INCLUDING BUT NOT LIMITED TO ANY LOSS OF BUSINESS
OR PROFITS, WHETHER OR NOT FORESEEABLE. Some states or provinces
do not allow the exclusion or limitation of incidental or consequential damages,
so the above limitation or exclusion may not apply to you.
Please keep your dated sales receipt, it is required for all warranty requests.
HeathCo LLC reserves the right to discontinue and to change specifications at any
time without notice without incurring any obligation to incorporate new features in
previously sold products.
Helpful Videos – www.hzsupport.com Helpful Answers – 1-800-858-8501
7
Campana MP3 inalámbrica
Este paquete tiene (El estilo del pulsador y de la campana puede variar de la
ilustración):
Wireless
chime
Music
Model
7310
Esta campana requiere 3 pilas alcalinas tipo “C” (no incluidas). Con un uso
normal, las pilas alcalinas durarán hasta 1 año.
Figura 1
Figura 2
Figura 3
© 2019 HeathCo LLC 209938-01 S
✔ ✔ ✔
LESIÓN SERIA o LA MUERTE:
• NUNCA deje que los niños estén cerca de las
• Si se traga una batería, notifique inmediata-
1. Retire la pestaña naranja de la batería del botón
pulsador. Extraer la parte posterior de la caja pre-
sionando la aleta en el botón con un destornillador
VOL
+
VOL
–
LightSync
pequeño (vea la Figura 1). Quite la aleta anaranjada
Music
de la batería.
2.
Coloque las 3 pilas alkalinas “C”.
seguro en la parte de atrás de la campana y levante
la tapa de la pila (vea la Figura 2). Instale 3 baterías
alcalinas “C” (no se incluyen) en la campanilla.
Asegúrese de que las baterías estén instaladas
según el diagrama del interior de la campanilla (vea
la Figura 3). Volver a colocar la puer ta de acceso de
la batería sobre la parte posterior de la campanilla.
3. Pruebe el alcance. Ponga provisionalmente la
VOL
+
VOL
–
LightSync
campana y el pulsador en la posición donde los
Music
quiera instalar. Presione el pulsador para verificar
que la campana y el pulsador funcionen apropiadamente. Si la campana no suena, vea Análisis de
Averías.
Wireless push
VOL
+
VOL
–
Light
Sync
button
Hardware
pack
ADVERTENCIA: Para prevenir una posible
baterías.
mente al doctor.
Presione el

4. Instale el pulsador. Use ya sean tornillos o cinta
adhesiva por ambas caras para instalar el pulsador.
• Montaje con tornillos: Para montar con tornillos,
quite la parte de atrás de la caja empujando
hacia adentro la lengüeta de abajo con un
destornillador pequeño y girando la cuchilla
(vea la Figura 1). Nota: Quite la suciedad de los
orificios para tornillos (si es necesario) antes de
poner los tornillos. Coloque la parte de atrás de la
caja contra la jamba o la pared (vea la Figura 4).
Encaje a presión la parte frontal del pulsador.
• Montaje con cinta adhesiva: Cuando fije el
pulsador usando cinta adhesiva por ambas caras,
Figura 4
Agujero de alineación
VOL
+
VOL
–
LightSync
Music
Tornillo para el
agujero de alineación
Anclaje de pared
Figura 5
Figura 6
Vídeos prácticos – www.hzsupport.com Respuestas prácticas – 1-800-858-8501
asegúrese que la superficie de la pared o la del
batiente de la puerta estén limpias.
5.
Monte la campana. Determine el sitio para el montaje.
• Taladre un orificio piloto de 5,5 mm (7/32 de
pulgada) e inserte un anclaje de pared.
• Coloque el tornillo del orificio de alineación en la
pared dejando 3 mm (1/8 de pulgada) de la rosca
del tornillo sin apretar.
• Usando este orificio de alineación de la parte
posterior de la base de la campana, cuelgue la
base en el tornillo (vea la Figura 5).
Operación
Silenciador del timbre
La campana puede ser puesta en silencio por un
período de tiempo seleccionado: tiempo completo, 3
horas, 6 horas, 9 horas o 12 horas. Presione y suelte
el icono de silencio para seleccionar la cantidad de
tiempo que la campana debe estar puesta en silencio
(vea la Figura 6). El icono de silencio se volverá color
verde cada vez que se lo presiona para mostrar la
cantidad de tiempo seleccionada.
OFF Full-Time 3Hr 6Hr 9Hr 12Hr
Nota: La campana parpadeará el color seleccionado
cada vez que se presione el pulsador sea que la
campana esté o no puesta en silencio.
9

10
VOL +VOL –Light Sync
VOL +VOL –Light Sync
VOL +VOL –Light Sync
1 2
Music
Music
Music
ON
Control del volumen
La campana tiene niveles de volumen regulables
Presione y suelte los botones “VOL +” o “VOL –” para
aumentar o disminuir el volumen de la campana.
Selección del color de la luz
La campana parpadeará cada vez que se presione el
pulsador. El color de la luz es seleccionable. Presione
y mantenga presionado el botón “Light” [“luz”] hasta
que la campana se ilumine. Mientras la campana
está iluminada presione y suelte el botón “Light” para
seleccionar el color deseado. Presione el pulsador para
fijar el color deseado.
Selección de tono
La campana tiene diez melodías para la “puerta
principal” seleccionables precargadas. Presione y
suelte el botón “Sync/Music” hasta escuchar la melodía
deseada. Mientras se reproduce la melodía deseada,
presione el pulsador para fijar la melodía seleccionada.
Nota: A cada pulsador se le puede asignar su propia
y única melodía.
Nota: Para escuchar la melodía seleccionada, presione
y suelte el botón “Sync/Music” [“Sincronizar / Música”].
Nota: Todos los modelos de campanillas están diseñados para trabajar hasta con 5 botones pulsadores
(se venden por separado).
Tabla de programación de melodías
Botón pulsador Ajustes
Interruptor 2 - ENCENDIDO (Puerta posterior) Ding
Interruptor 2 - APAGADO (Puerta principal) Melodía musical seleccionada
Puerta del frente
Cualquier archivo MP3 (16MB de espacio disponible)
Ding-Dong Birthday Celebration
Traditional Westminster Auld Lang Syne
Traditional Whittington Beethoven’s 5th
Bell Whittington We wish you a merry Christmas
Short Westminster Star Spangled Banner
Puerta de atrás
Ding
Vídeos prácticos – www.hzsupport.com Respuestas prácticas – 1-800-858-8501
Guía de Selección de Tonos

Adición de melodías MP3 a la campana
La duración sugerida de la melodía es de 2-15 segundos. La duración máxima de
la melodía es de 20 segundos. Si la melodía dura más de 20 segundos, solamente
se reproducirán los primeros 20 segundos.
• Conecte el cable USB a la campana y a la computadora.
• Localice y abra la carpeta de la unidad externa.
• Arrastre el archivo MP3 deseado a la unidad de la campana.
• Desconecte (expulse según el sistema operativo de la computadora) la campana
de la computadora.
• Retire el cable USB.
Nota: La campana no se reproducirá mientras esté conectada a la computadora.
VOL
+
VOL
–
Light
Music
Sync
11
1. PROBLEMA: La campana no reproduce el archivo de sonido añadido.
CAUSA POSIBLE: La campana puede solo reproducir archivos de sonido
en formato MP3.
ACCIÓN CORRECTIVA: Encuentre una versión MP3 de la melodía deseada
o convierta el archivo existente al formato MP3.
2. PROBLEMA: La campanilla no suena.
A. CAUSA POSIBLE: El botón pulsador y la campanilla no están sincronizados.
A. ACCIÓN CORRECTIVA: Sincronice el botón pulsador y la campanilla.
• Presione y mantenga presionado el botón “Sync/Music” en la campana
hasta que la campana emita un pitido “bip-bip”.
• Presione el botón pulsador durante 30 segundos. Cuando el botón pulsador
esté sincronizado, la campanilla hará un “bip-bip”.
• Presione el botón pulsador para asegurar el funcionamiento.
B. CAUSA POSIBLE: Las baterías no están bien instaladas.
B. ACCIÓN CORRECTIVA: Asegúrese de que las baterías estén instaladas de
acuerdo con el diagrama ubicado dentro del botón pulsador y de la campanilla.
C. CAUSA POSIBLE: Las baterías se acabaron.
C. ACCIÓN CORRECTIVA: Revise la carga de las baterías del botón pulsador
y de la campanilla y reemplácelas si es necesario.
Vídeos prácticos – www.hzsupport.com Respuestas prácticas – 1-800-858-8501
Análisis de Averías
Continúa

12
D. CAUSA POSIBLE: La campana está puesta en silencio.
D. ACCIÓN CORRECTIVA: Presione y suelte el botón de silencio hasta que se
apague la luz verde.
E. CAUSA POSIBLE: El interruptor DIP n° 1 en el pulsador ha sido movido a
la posición “ON”.
E. ACCIÓN CORRECTIVA: Asegúrese de que el interruptor DIP n° 1 esté en
la posición “OFF” [Apagado] en el pulsador y siga los pasos anteriores para
volver a sincronizar el botón y la campana.
3. PROBLEMA: Las baterías parecen estar bien pero la campanilla no funciona
después de la instalación.
A. CAUSA POSIBLE: La campanilla o el botón pulsador están montados sobre
metal o cerca de montantes de metal. Nota: El metal reduce el alcance de
transmisión.
A. ACCIÓN CORRECTIVA: Use calzas de madera de 6 a 13 mm (1/4 a 1/2
pulg.) para sacar la campanilla o el botón pulsador de la superficie de metal.
B. CAUSA POSIBLE: La campanilla está montada cerca de un piso o pared de
concreto. Nota: El concreto puede reducir el alcance.
B. ACCIÓN CORRECTIVA: Aleje la campanilla de la superficie de concreto.
C. CAUSA POSIBLE: La campanilla y el botón pulsador están instalados
demasiado alejados.
C. ACCIÓN CORRECTIVA: Ubique la campanilla más cerca del botón pulsador.
4. PROBLEMA: La campanilla suena cuando no debe hacerlo (activadores falsos).
CAUSA POSIBLE: La campanilla está recibiendo interferencia de otro
dispositivo inalámbrico.
ACCIÓN CORRECTIVA: Reinicialice la campanilla y el botón pulsador.
• Retire la batería del botón pulsador. Espere 30 segundos.
• Mantenga presionado el botón pulsador entre 10 y 15 segundos por un
periodo de 60 segundos luego de instalar la batería en el botón pulsador.
• Presione y mantenga presionado el botón “Sync/Music” en la campana
hasta que la campana emita un pitido “bip-bip-bip-bip”.
• Para volver a sincronizar el pulsador y la campana, presione y mantenga
presionado el botón “Sync/Music” en la campana hasta que la campana
emita un pitido “bip-bip”
• Presione el botón pulsador durante 30 segundos. Cuando el botón pulsador
esté sincronizado, la campanilla hará un “bip-bip”.
• Presione el botón pulsador para asegurar el funcionamiento.
Vídeos prácticos – www.hzsupport.com Respuestas prácticas – 1-800-858-8501

5. PROBLEMA: El botón pulsador y la campana nuevos no funcionan con los
pulsadores y las campanas existentes.
CAUSA POSIBLE: El pulsador y la campana nuevos no están usando los
mismos códigos que los pulsadores y las campanas existentes.
ACCIÓN CORRECTIVA: El pulsador y la campana nuevos deben configurarse
para que funcionen con los pulsadores y las campanas existentes. Por favor
llame al 1-844-760-3644 para obtener ayuda sobre cómo cambiar los códigos
para que funcionen con los pulsadores y campanas existentes.
Nota: El botón pulsador y la campanilla están sincronizados desde la fábrica. El
alcance de la campanilla inalámbrica puede variar con la ubicación, temperatura
y condición de la batería.
13
Por favor comuníquese con nosotros
antes de devolver el producto a la
tienda o a HeathCo LLC.
En caso de cualquier problema, siga esta
guía. Puede también comunicarse con
nosotros entre las 8:00 AM y las 5:00
PM (de lunes a viernes).
Cuando se comunique con el Servicio
Técnico, por favor dé la siguiente
información: nombre, dirección, número
de teléfono durante el día, dirección de
su email, número de modelo, fecha de
compra, lugar de compra, problema
del producto, y RECIBO FECHADO
DE COMPRA PARA PETICIONES DE
GARANTÍA.
Vídeos prácticos – www.hzsupport.com Respuestas prácticas – 1-800-858-8501
No hay piezas de servicio disponi-
bles para este producto.
HeathCo LLC
P.O. Box 90045
2445 Nashville Road
Bowling Green, KY 42101, USA
ATTN: Technical Ser vice (Servicio
Técnic)
Internet: www.hzsupport.com
Teléfono: 1-800-858-8501 (solo inglés)
Fax: 1-270-846-8500
Servicio Técnico

14
GARANTÍA LIMITADA A 1 AÑO
Esta es una “Garantía Limitada” que le da a Ud. derechos legales específicos.
Usted puede también tener otros derechos que varían de estado a estado o
de provincia a provincia.
Por un período de 1 año desde la fecha de compra, cualquier mal funcionamiento ocasionado por partes defectuosas de fábrica o mano de obra será
corregido sin cargo para Ud.
No cubierto - Servicio de reparación, ajuste y calibración debido al mal
uso, abuso o negligencia, bombillas, baterías, u otras partes fungibles no
están cubiertas por esta garantía. Cualquier daño en el aparato de luz como
resultado de usar productos químicos o lavadora a presión no están cubiertos
por esta garantía. Los Servicios no autorizados o modificaciones del producto
o de cualquier componente que se provee invalidarán esta garantía en su
totalidad. Esta garantía no incluye reembolso por inconveniencia, instalación,
tiempo de instalación, perdida de uso, servicio no autorizado, o costos de
transporte de retorno.
Esta garantía cubre solamente los productos ensamblados por HeathCo LLC
y no se extiende a otros equipos o componentes que el consumidor usa junto
con nuestros productos.
ESTA GARANTÍA ESTÁ EXPRESAMENTE EN LUGAR DE OTRAS GARANTÍAS, EXPRESADAS O SOBREENTENDIDAS, INCLUYENDO CUALQUIER
GARANTÍA, REPRESENTACIÓN O CONDICIÓN DE COMERCIABILIDAD O
QUE LOS PRODUCTOS SE ADAPTEN PARA CUALQUIER PROPÓSITO O
USO EN PARTICULAR, Y ESPECIFICAMENTE EN LUGAR DE TODOS LOS
DAÑOS ESPECIALES, INDIRECTOS, INCIDENTALES Y CONSECUENTES.
LA REPARACIÓN O EL REEMPLAZO DEBERÍA SER LA ÚNICA SOLUCIÓN
DEL CLIENTE Y NO HABRÁ RESPONSABILIDAD POR PARTE DE HEATHCO LLC POR CUALQUIER DAÑO ESPECIAL, INDIRECTO, INCIDENTAL O
CONSECUENTE, INCLUIDOS PERO NO LIMITADOS A CUALQUIER PÉRDIDA
DE NEGOCIO O GANACIAS SEAN O NO PREVISIBLES. Algunos estados
o provincias no permiten la exclusión o limitación de daños incidentales o
consecuentes, de modo que la limitación o exclusión arriba indicada puede
que no se aplique a Ud.
Por favor guarde su recibo de venta fechado; se lo requiere para cualquier
solicitud de garantía.
HeathCo LLC se reserva el derecho de descontinuar y de cambiar las especificaciones a cualquier momento, sin previo aviso, sin incurrir en ninguna obligación de
tener que incorporar nuevas características en los productos vendidos anteriormente.
Vídeos prácticos – www.hzsupport.com Respuestas prácticas – 1-800-858-8501

Carillon MP3 sans fil
Cet emballage contient (Le style de l’unité de bouton-poussoir et du carillon peut
varier par rapport à l’illustration):
Wireless
chime
Music
Model
7310
Ce carillon nécessite 3 piles alcalines « C » (non comprises). En utilisation
typique, les piles alcalines durent une an.
Figure 1
Figure 2
Figure 3
© 2019 HeathCo LLC 209938-01 F
✔ ✔ ✔
de BLESSURES GRAVES, voire de DÉCÈS :
• Ne laissez JAMAIS un enfant seul près des
• En cas d’ingestion d’une pile, avisez
1. Retirez la languette orange de la pile du boutonpoussoir. Ôtez la partie arrière du boîtier en enfon-
çant la patte du bas au moyen d’un petit tournevis
VOL
+
VOL
–
(voir la Figure 1). Retirez la languette orange.
LightSync
Music
2. Installez 3 piles alcalines « C ». Appuyez sur
le loquet à l’arrière du carillon, puis soulevez le
couvercle
« C » (non incluses) dans le carillon. Assurez-vous
que les piles sont insérées conformément au diagramme situé à l’intérieur du carillon
3)
des piles en place à l’arrière du carillon.
3. Plage d’essai. Positionnez temporairement le carillon et l’unité de bouton-poussoir à l’endroit où vous
VOL
+
VOL
voulez les monter. Enfoncez le bouton-poussoir pour
–
LightSync
Music
vous assurer que celui-ci et le carillon fonctionnent
correctement. Si le carillon ne retentit pas, consultez
la section «Dépannage».
4. Montez l’unité de bouton-poussoir. Utilisez soit
des vis, soit du ruban adhésif double face pour
Wireless push
VOL
+
VOL
–
Light
Sync
button
Hardware
pack
MISE EN GARDE : Pour éviter les risques
piles.
immédiatement un médecin.
(voir la Figure 2)
. Remettez le couvercle d’accès du compartiment
. Insérez 3 piles alcalines
(voir la Figure

16
Figure 4
Orifice en forme de poire
Vis de fixtation
Ancrage au mur
Figure 5
Figure 6
Vidéos pratiques – www.hzsupport.com Réponses pratiques – 1-800-858-8501
monter l’unité de bouton-poussoir.
• Au moyen de vis : Pour faire l’installation avec
les vis, enlevez le dos du boîtier en poussant sur
les agrafes de la base avec un tournevis (voir la
Figure 1). Remarque : Enlevez les débris des
trous de vis (au besoin) avant d’installer les vis.
Fixez le dos du boîtier au chambranle ou au mur
(voir la Figure 4). Enclenchez la partie avant de
l’unité de bouton-poussoir en place.
• Au moyen de ruban adhésif : Lorsque vous
montez l’unité de bouton-poussoir en utilisant du
ruban adhésif double face, assurez-vous que la
surface du montant de porte ou du mur est propre.
5.
Montez l’unité le carillon.
ment de l’installation.
• Percez un avant-trou de 5,5 mm (7/32 po) et
insérez un dispositif d’ancrage au mur.
• Vissez la vis de fixation au mur en laissant
dépasser environ 3 mm (1/8 po) de la vis.
• Au moyen du trou en forme de poire à l’arrière
VOL
+
VOL
–
LightSync
Music
du socle, suspendez ce dernier sur la vis (voir la
Figure 5).
Silence du carillon
Le son du carillon peut être désactivé pendant une
période donnée : en permanence, 3 heures, 6 heures,
9 heures ou 12 heures. Appuyez sur et relâchez le
bouton de désactivation du son pour sélectionner la
durée pendant laquelle le son du carillon devrait être
désactivé (voir la Figure 6). L’icône de désactivation du
son devient verte à chaque fois que l’on appui dessus
pour afficher la durée sélectionnée.
OFF Full-Time 3Hr 6Hr 9Hr 12Hr
Remarque : Le carillon clignotera la couleur sélectionnée à chaque fois que vous appuierez sur le boutonpoussoir, que le son du carillon soit activé ou non.
Déterminez l’emplace-
Utilisation

Réglage du volume
Le volume du carillon est réglable. Appuyez sur et
VOL +VOL –Light Sync
Music
VOL +VOL –Light Sync
Music
VOL +VOL –Light Sync
Music
1 2
ON
Bouton-poussoir Sonnerie
Interrupteur 2 - ON (marche) (porte arrière) Ding
Interrupteur 2 - OFF (arrêt) (porte avant) Sonnerie musicale choisie
Entrée principale
N’importe quel fichier MP3 (16 Mo d’espace disponible)
Ding-Dong Birthday Celebration
Traditional Westminster Auld Lang Syne
Traditional Whittington Beethoven’s 5th
Bell Whittington We wish you a merry Christmas
Short Westminster Star Spangled Banner
Entrée secondaire
Ding
Vidéos pratiques – www.hzsupport.com Réponses pratiques – 1-800-858-8501
relâchez les boutons « VOL + » ou « VOL – » pour
augmenter ou diminuer le volume du carillon.
Sélectionner la couleur de la lumière du carillon
Le carillon clignote à chaque fois que vous appuyez sur
le bouton-poussoir. Vous pouvez choisir la couleur de la
lumière. Appuyez sur et maintenez enfoncé le bouton
« Light » (Lumière) jusqu’à ce que le carillon s’illumine
et ensuite appuyez sur et relâchez le bouton « Light »
pour sélectionner la couleur souhaitée. Appuyez sur
le bouton-poussoir pour verrouiller la couleur désirée.
Sélection de tonalité
Le carillon a dix mélodies pré-chargées sélectionnables
pour la « porte d’entrée ». Appuyez sur et relâchez le
bouton « Sync/Music » (Synchroniser/Musique) jusqu’à
ce que la mélodie désirée soit entendue. Pendant la
lecture de la mélodie souhaitée, appuyez sur le boutonpoussoir pour la verrouiller.
Remarque : Chaque bouton-poussoir peut se voir
assigné sa propre mélodie.
Remarque : Pour écouter la mélodie sélectionnée,
appuyez sur et relâchez le bouton « Sync/Music »
(Synchroniser/Musique).
Remarque : Tous les modèles de carillons sont conçus
pour fonctionner avec un maximum de 5 boutonspoussoirs (vendus séparément).
Tableau du réglage des mélodies
Guide de Sélection des Airs
17

18
Ajouter des morceaux MP3 au carillon
La durée suggérée pour la mélodie est de 2 à 15 secondes. La durée maximale
pour toute mélodie est de 20 secondes. Si la mélodie dure plus de 20 secondes,
seules les 20 premières secondes seront jouées.
• Connectez le câble USB au carillon et à l’ordinateur.
• Recherchez et ouvrez le dossier du lecteur externe.
• Faites glisser le fichier MP3 souhaité sur le lecteur du carillon.
• Débranchez (conformément au système d’exploitation de l’ordinateur) le carillon
de l’ordinateur.
• Retirez le câble USB.
Remarque : Le carillon ne jouera rien tant qu’il est connecté à l’ordinateur.
VOL
+
VOL
–
Light
Music
Sync
1. PROBLÈME : Le carillon ne diffuse pas le fichier sonore ajouté.
Dépannage
CAUSE POSSIBLE : Le carillon peut uniquement diffuser les fichiers sonores
de type MP3.
MESURE CORRECTIVE : Trouvez une version MP3 de la mélodie souhaitée
ou convertissez le fichier actuel au format MP3.
2. PROBLÈME : Le carillon n’émet pas de son.
A. CAUSE POSSIBLE : Le bouton-poussoir et le carillon ne sont pas synchro-
nisés.
A. MESURE CORRECTIVE : Synchronisez le bouton-poussoir et le carillon.
• Appuyez sur et maintenez enfoncé le bouton « Sync/Music » (Synchroniser/
Musique) du carillon jusqu’à ce que vous entendiez un « bip-bip ».
• Appuyez sur le bouton-poussoir dans les 30 secondes suivantes. Le carillon
émettra un « Bip-Bip » pour indiquer que le bouton-poussoir est synchronisé.
• Appuyez sur le bouton-poussoir afin de vous assurer qu’il fonctionne bien.
B. CAUSE POSSIBLE : Les piles ne sont pas insérées correctement.
B. MESURE CORRECTIVE : Assurez-vous que les piles sont insérées confor-
mément au diagramme situé à l’intérieur du bouton-poussoir et du carillon.
C. CAUSE POSSIBLE : Les piles sont à plat.
C. MESURE CORRECTIVE : Vérifiez la charge des piles du bouton-poussoir
et du carillon et remplacez-les au besoin.
Vidéos pratiques – www.hzsupport.com Réponses pratiques – 1-800-858-8501

D. CAUSE POSSIBLE : Le son du carillon est désactivé.
D. MESURE CORRECTIVE : Appuyez sur et relâchez le bouton de désactivation
du son jusqu’à ce que le voyant vert s’éteigne.
E. CAUSE POSSIBLE : Le commutateur DIP n° 1 du bouton-poussoir a été mis
sur la position « ON ».
E. MESURE CORRECTIVE : Veillez à ce que le commutateur DIP n° 1 du
bouton-poussoir soit sur la position « OFF » et suivez les étapes ci-dessus
pour resynchroniser le bouton-poussoir et le carillon.
3. PROBLÈME : Les piles ne semblent pas poser problème, mais le carillon ne
fonctionne pas une fois son installation terminée.
A. CAUSE POSSIBLE : Le carillon ou le bouton-poussoir est installé sur du
métal ou à proximité de montants en métal. Remarque : Le métal réduit la
portée de transmission.
A. MESURE CORRECTIVE : Posez des cales en bois de 6 mm à 13 mm (1/4
po à 1/2 po) pour éloigner le carillon ou le bouton-poussoir de la surface en
métal.
B. CAUSE POSSIBLE : Le carillon est installé à proximité d’un plancher ou d’un
mur en béton. Remarque : Le béton peut réduire la portée de transmission.
B. MESURE CORRECTIVE : Éloignez le carillon de toute surface en béton.
C. CAUSE POSSIBLE : Le carillon et le bouton-poussoir sont trop éloignés l’un
de l’autre.
C. MESURE CORRECTIVE : Rapprochez le carillon et le bouton-poussoir.
4. PROBLÈME : Le carillon sonne à des moments inopportuns (déclenchements
intempestifs).
CAUSE POSSIBLE : Le carillon subit des interférences provenant d’un autre
appareil sans fil.
MESURE CORRECTIVE : Réinitialisez le carillon et appuyez sur le bouton.
• Retirez le pile du bouton-poussoir. Attendez 30 secondes.
• Dans la minute après avoir inséré les piles dans le bouton-poussoir, appuyez
sur le bouton-poussoir en le gardant enfoncé pendant 10 à 15 secondes.
• Appuyez sur et maintenez enfoncé le bouton « Sync/Music » (Synchroniser/
Musique) du carillon jusqu’à ce que vous entendiez un « bip-bip-bip-bip ».
• Pour resynchroniser le bouton-poussoir et le carillon, appuyez sur et
maintenez enfoncé le bouton « Sync/Music » (Synchroniser/Musique) situé
sur le carillon jusqu’à ce que celui-ci émette un « bip-bip ».
• Appuyez sur le bouton-poussoir dans les 30 secondes suivantes. Le carillon
émettra un « Bip-Bip » pour indiquer que le bouton-poussoir est synchronisé.
• Appuyez sur le bouton-poussoir afin de vous assurer qu’il fonctionne bien.
Suite
Vidéos pratiques – www.hzsupport.com Réponses pratiques – 1-800-858-8501
19

20
5. PROBLÈME : Le nouveau bouton-poussoir et le nouveau carillon ne fonctionnent
pas avec les boutons-poussoirs et les carillons existants.
CAUSE POSSIBLE : Le nouveau bouton-poussoir et le nouveau carillon
n’utilisent pas les mêmes codes que les boutons-poussoirs et les carillons
existants.
MESURE CORRECTIVE : Le nouveau bouton-poussoir et le nouveau carillon
doivent être configurés de manière à ce qu’ils fonctionnent avec les boutonspoussoirs et les carillons existants. Veuillez appeler le +1 (800) 858-8501 si
vous souhaitez obtenir de l’aide pour modifier les codes pour que ces derniers
fonctionnent avec les boutons-poussoirs et carillons existants.
Remarque : Le bouton-poussoir et le carillon sont synchronisés au départ de
l’usine. La portée de transmission du carillon sans fil peut varier en fonction de son
emplacement, de la température et de la charge des piles.
Service Technique
Veuillez communiquer avec nous
pour obtenir de l’aide avant de
retourner le produit au magasin ou
à HeathCo LLC.
En cas de problème, consultez ce
guide. Vous pouvez communiquer avec
nous du lundi au vendredi, entre 8 h et
17 h (HNC).
Veuillez fournir les renseignements
suivants lorsque vous communiquez
avec le service technique : nom,
adresse, n° de téléphone pendant la
journée, adresse de courriel, numéro
de modèle, date d’achat, endroit de
l’achat, problème affectant le produit et
REÇU DE CAISSE DATÉ, POUR LES
DEMANDES SOUS GARANTIE.
Vidéos pratiques – www.hzsupport.com Réponses pratiques – 1-800-858-8501
Aucune pièce de rechange n’est
disponible pour ce produit.
HeathCo LLC
P.O. Box 90045
2445 Nashville Road
Bowling Green, KY 42101, USA
ATTN: Technical Ser vice (Service
technique)
Internet : www.hzsupport.com
Téléphone : 1-800-858-8501 (anglais
seulement)
Télécopieur : 1-270-846-8500

21
Il s’agit d’une « Garantie limitée » qui vous confère des droits juridiques
spécifiques. Vous pouvez également jouir d’autres droits, variables d’une
province à l’autre.
Pendant une période de 1 an à compter de la date d’achat, toute anomalie
de fonctionnement imputable à un vice de matériau ou de main-d’oeuvre sera
corrigée gratuitement.
Exclusions de la garantie - Réparations, réglage et calibrage dus à une mauvaise utilisation, un mauvais traitement ou à la négligence. Les ampoules, les
piles et des autres articles non durables ne sont pas couverts par cette garantie.
Les dommages causés au luminaire qui seraient attribuables à l’utilisation de
produits chimiques ou d’une machine à laver à pression ne sont pas couverts
par la garantie. Le service non autorisé ou la modification du produit ou d’un
ou l’autre de ses composants fournis invalidera totalement la présente garantie.
Cette garantie n’inclut pas le remboursement pour le dérangement, l’installation,
le réglage, la perte d’utilisation, le service non autorisé ou les frais d’expédition
pour le renvoi de la marchandise.
La garantie ne couvre que les produits assemblés HeathCo LLC et ne s’étend
pas aux autres équipements et composants que le client pourrait utiliser
conjointement avec nos produits.
CETTE GARANTIE TIENT EXPRESSÉMENT LIEU DE TOUTES AUTRES GARANTIES, EXPLICITES OU IMPLICITES, Y COMPRIS DE TOUTE GARANTIE
DE REPRÉSENTATION OU DE CONDITION DE CONVENANCE À LA COMMERCIALISATION OU À L’EFFET QUE LES PRODUITS CONVIENNENT À
UN BUT OU À UNE UTILISATION PARTICULIÈRE, ET SPÉCIFIQUEMENT DE
TOUS DOMMAGES SPÉCIAUX, DIRECTS, INDIRECTS OU SECONDAIRES.
LE REMPLACEMENT OU LA RÉPARATION CONSTITUENT LE SEUL
RECOURS DU CLIENT ET HEATHCO LLC NE POURRA ÊTRE TENUE
RESPONSABLE DE TOUS DOMMAGES SPÉCIAUX, DIRECTS, INDIRECTS
OU SECONDAIRES, Y COMPRIS, SANS S’Y LIMITER, LES PERTES COMMERCIALES ET PERTES DE PROFIT, QU’ELLES SOIENT PRÉVISIBLES
OU NON. Certaines provinces n’autorisent pas l’exclusion ou la limitation des
dommages indirects ou secondaires, et la limitation ou l’exclusion ci-dessus
pourrait ne pas s’appliquer à vous.
Veuillez conserver le reçu portant la date d’achat; vous en aurez besoin
pour toutes vos demandes liées à la garantie.
HeathCo LLC se réserve le droit de mettre fin à la production de ses produits ou
d’en modifier les spécifications à tout moment, et elle n’est pas tenue d’incorporer
les nouvelles caractéristiques de ses produits aux produits vendus antérieurement.
Vidéos pratiques – www.hzsupport.com Réponses pratiques – 1-800-858-8501
GARANTIE LIMITÉE DE 1 AN

22
This device complies with Part 15 of the FCC Rules. Operation is subject to the following two conditions:
(1) this device may not cause harmful interference, and (2) this device must accept any interference
received, including interference that may cause undesired operation.
Warning: Changes or modifications to this unit not expressly approved by the party responsible for
compliance could void the user’s authority to operate the equipment.
Note: This equipment has been tested and found to comply with the limits for a Class B digital device,
pursuant to part 15 of the FCC Rules. These limits are designed to provide reasonable protection
against harmful interference in a residential installation. This equipment generates, uses and can
radiate radio frequency energy and, if not installed and used in accordance with the instructions, may
cause harmful interference to radio communications. However, there is no guarantee that interference
will not occur in a particular installation. If this equipment does cause harmful interference to radio or
television reception, which can be determined by turning the equipment off and on, the user is encouraged
to try to correct the interference by one or more of the following measures:
- Reorient or relocate the receiving antenna.
- Increase the separation between the equipment and receiver.
- Connect the equipment into an outlet on a circuit different from that to which the receiver is connected.
- Consult the dealer or an experienced radio/TV technician for help.
This device contains licence-exempt transmitter(s)/receiver(s) that comply with Innovation, Science
and Economic Development Canada’s licence-exempt RSS(s). Operation is subject to the following
two conditions:
This device may not cause interference.
This device must accept any interference, including interference that may cause undesired operation
of the device.
Este aparato cumple con la Parte 15 de las Reglas de la FCC. La operación está sujeta a las dos
siguientes condiciones: (1) este aparato no puede causar interferencias perjudiciales y (2) este
aparato debe aceptar cualquier interferencia recibida, incluyendo una interferencia que pueda causar
un funcionamiento indeseado.
Advertencia: los cambios o modificaciones en esta unidad que no estén expresamente aprobados por
la parte responsable del cumplimiento pueden anular la autoridad del usuario para operar el equipo.
Nota: Este equipo ha sido probado y se lo encontró que cumple con los límites para un dispositivo digital
de Clase B, de acuerdo con la parte 15 de las Normas de la FCC. Estos límites están diseñados para
proporcionar una protección razonable contra interferencias dañinas en una instalación residencial. Este
equipo genera, usa y puede irradiar energía de radiofrecuencia y, si no se lo instala y usa de acuerdo
con las instrucciones, puede causar interferencia dañina a las comunicaciones de radio. Sin embargo,
no hay garantía de que la interferencia no ocurra en una instalación en particular. Si este equipo
causa interferencia dañina a la recepción de radio o televisión, lo que se puede determinar apagando
y encendiendo el equipo, se recomienda que el usuario intente corregir la interferencia mediante una
o más de las siguientes medidas:
- Reoriente o reubique la antena receptora.
- Aumente la separación entre el equipo y el receptor.
- Conecte el equipo a un tomacorriente en un circuito diferente al que está conectado el receptor.
- Para recibir ayuda consulte con el distribuidor o con un técnico experto en radio / TV.
This device contains licence-exempt transmitter(s)/receiver(s) that comply with Innovation, Science
and Economic Development Canada’s licence-exempt RSS(s). Operation is subject to the following
two conditions:
This device may not cause interference.
This device must accept any interference, including interference that may cause undesired operation
of the device.
Helpful Videos – www.hzsupport.com Helpful Answers – 1-800-858-8501

Cet appareil est conforme aux exigences de la Partie 15 des Règles du FCC. Son utilisation est assujettie
aux deux conditions suivantes : (1) cet appareil ne doit pas causer d’interférence nocive; (2) cet appareil
doit accepter les interférences, y compris celles qui peuvent causer un fonctionnement non désiré.
Avertissement: Les changements ou modifications apportés à cette unité qui ne sont pas expressément approuvés par la partie responsable de la conformité peuvent annuler l’autorité de l’utilisateur
à utiliser l’équipement.
Remarque : Cet appareil a été testé et déclaré conforme aux limites pour appareils numériques de classe
B, selon la section 15 des règlements de la FCC. Ces limites sont destinées à assurer une protection
raisonnable contre les interférences nuisibles dans une installation résidentielle. Cet appareil produit,
utilise et peut émettre de l’énergie radio électrique et, s’il n’est pas installé et utilisé conformément aux
présentes instructions, peut causer des interférences nuisibles aux communications radio. Il n’existe
toutefois aucune garantie que de telles interférences ne se produiront pas dans une installation particulière.
Si cet appareil cause des interférences nuisibles à la réception des signaux de radio ou de télévision,
ce qui peut être déterminé en allumant et en éteignant l’appareil, on encourage l’utilisateur d’essayer
de corriger ces interférences par l’un des moyens suivants :
- Réorienter ou repositionner l’antenne de réception.
- Augmenter la distance séparant l’appareil du récepteur.
- Brancher l’appareil sur un circuit électrique différent de celui où le récepteur est branché.
- Consulter le détaillant ou un technicien spécialisé en radio/télévision.
L’émetteur/récepteur exempt de licence contenu dans le présent appareil est conforme aux CNR d’Inno-
vation, Sciences et Développement économique Canada applicables aux appareils radio exempts de
licence. L’exploitation est autorisée aux deux conditions suivantes :
L’appareil ne doit pas produire de brouillage;
L’appareil doit accepter tout brouillage radioélectrique subi, même si le brouillage est susceptible d’en
compromettre le fonctionnement.
Helpful Videos – www.hzsupport.com Helpful Answers – 1-800-858-8501
23

24
Chime Purchase Information
Información de la compra de la campana
Renseignements d’achat du carillon
Model #: _________________________________________
Nº de modelo / N° de modèle
Date of Purchase: _________________________________
Fecha de compra / Date d’achat
Staple Purchase Receipt Here
Engrape aquí el recibo de compra
Agrafez le reçu d’achat ici
PLEASE KEEP YOUR DATED SALES RECEIPT,
IT IS REQUIRED FOR ALL WARRANTY REQUESTS.
POR FAVOR GUARDE SU RECIBO DE VENTA
FECHADO; SE LO REQUIERE PARA CUALQUIER
DATE D'ACHAT; VOUS EN AUREZ BESOIN POUR
TOUTES VOS DEMANDES LIÉES À LA GARANTIE.
Helpful Videos – www.hzsupport.com Helpful Answers – 1-800-858-8501
SOLICITUD DE GARANTÍA.
VEUILLEZ CONSERVER LE REÇU PORTANT LA
 Loading...