

Page 1
USE AND CARE GUIDE
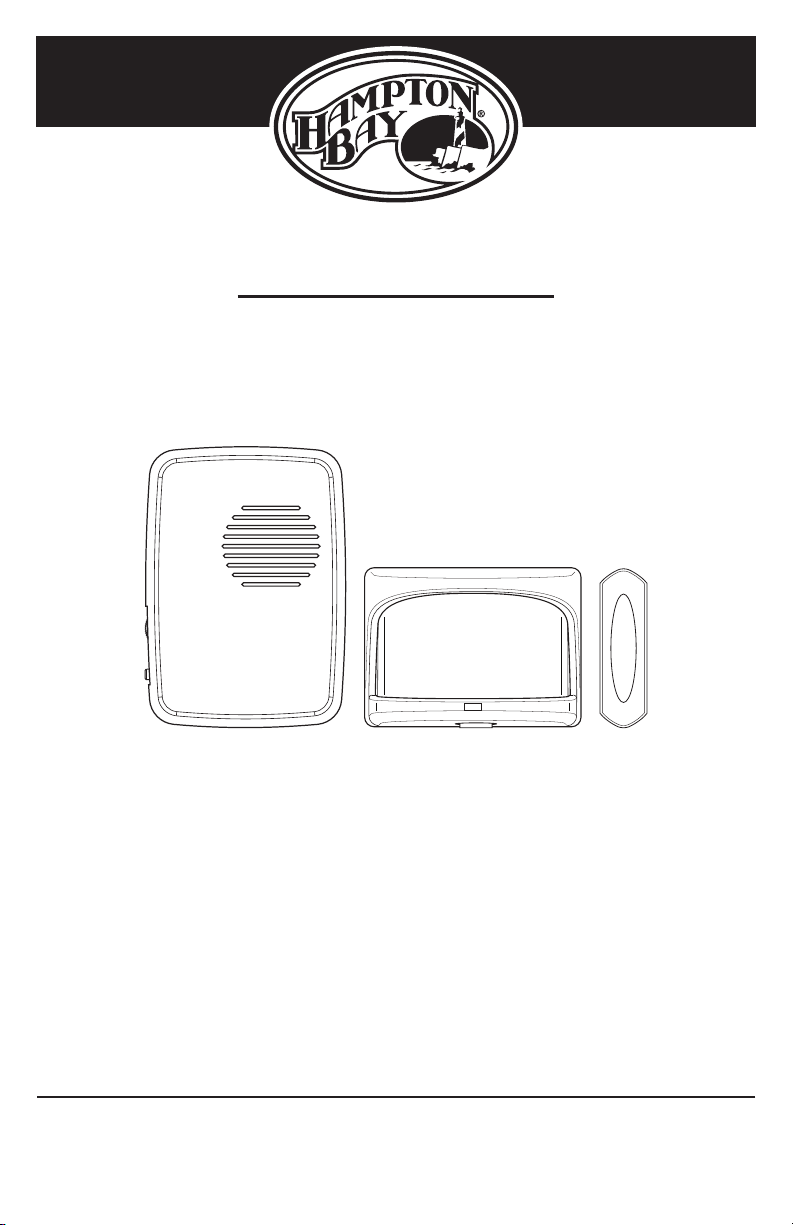
WIRELESS MOTION ALERT
DOORBELL KIT
Item #0000000000
Model #HB-7903-02
Questions, problems, missing parts?
Before returning to the store, call Hampton Bay Customer Service
8 a.m. - 5 p.m., CST, Monday - Friday
1-844-760-3644
DRAFT COPY
We appreciate the trust and condence you have placed in Hampton Bay through the purchase of this wireless motion
alert doorbell kit. We strive to continually create quality products designed to enhance your home. Visit us online to see
our full line of products available for your home improvement needs. Thank you for choosing Hampton Bay!
HAMPTONBAY.COM
Illustrations may vary from actual unit.
THANK YOU
Page 2
Table of Contents
Table of Contents .......................................2
Safety Information .....................................2
Warranty ....................................................2
3-Year Limited Warranty ........................2
Pre-Installation ..........................................3
Planning Installation ..............................3
Specications ........................................3
Safety Information
PRECAUTIONS
□ Please read and understand this entire manual
before attempting to assemble, install, or operate
this doorbell.
□ All electrical work must be in accordance with
national and local electrical codes. If in doubt,
consult a qualied electrician.
WARNING: To prevent possible SERIOUS INJURY or
DEATH never allow small children near batteries. If a
battery is swallowed, immediately notify doctor.
WARNING: Risk of re. Do not plug the doorbell into a
power inverter.
Warranty
Tools Required .......................................3
Hardware Included .................................3
Package Contents ..................................4
Installation .................................................4
Operation ...................................................6
Care and Cleaning .....................................8
Troubleshooting .........................................8
NOTE: The motion sensor, push button, and doorbell
come synced from the factory. The range of the wireless
doorbell can vary with location, temperature, and battery
condition.
This device complies with Part 15 of the FCC Rules and
RSS-210 of Industry Canada. Operation is subject to the
following two conditions: (1) this device may not cause
harmful interference, and (2) this device must accept any
interference received, including interference that may
cause undesired operation.
The user is cautioned that changes or modications
not expressly approved by the party responsible for
regulatory compliance could void the user’s authority to
operate the equipment.
3-YEAR LIMITED WARRANTY
WHAT IS COVERED
This product is guaranteed to be free of factory defective parts and workmanship for a period of 3 years from date
of purchase. Purchase receipt is required for all warranty claims.
WHAT IS NOT COVERED
This warranty does not include expendable items (such as light bulbs, batteries, etc.), repair service, adjustment
and calibration due to misuse, abuse or negligence. Unauthorized service or modication of the product or of any
furnished component will void this warranty in its entirety. This warranty does not include reimbursement for
inconvenience, installation, setup time, loss of use, unauthorized service, or return shipping charges. This warranty
is not extended to other equipment and components that a customer uses in conjunction with this product.
Contact the Customer Service Team at 1-844-760-3644 or visit www.hamptonbay.com.
2
Page 3
Pre-Installation
PLANNING INSTALLATION
Before installing the wireless motion alert doorbell kit, ensure that all parts are present. Compare the parts with the
Hardware Included and Package Contents sections. If any part is missing or damaged, do not attempt to assemble,
install, or operate this wireless motion alert doorbell kit.
Estimated installation time: 30 minutes
SPECIFICATIONS
Doorbell Push button Motion sensor
Power requirements
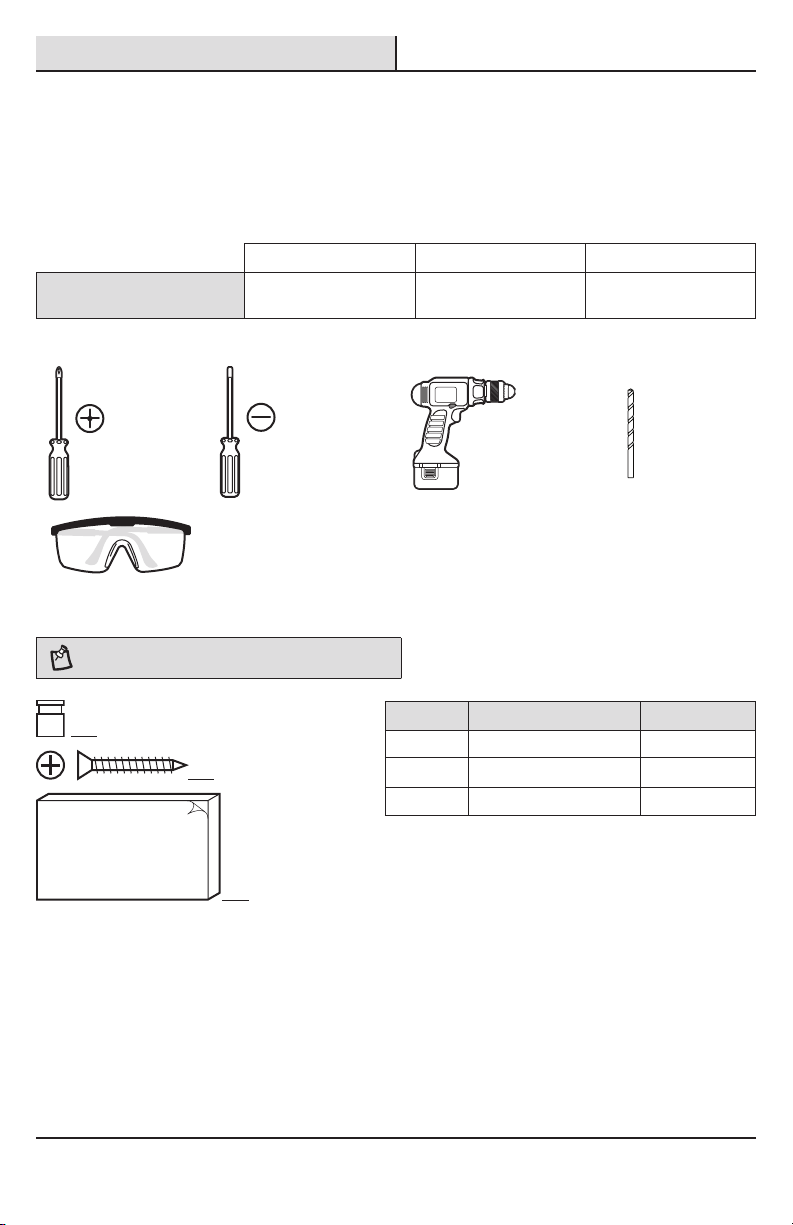
TOOLS REQUIRED
120V, 60 Hz Type A23 12V battery
(included)
2x - Type “AAA” 1.5V
battery (not included)
Phillips
screwdriver
HARDWARE INCLUDED
NOTE: Hardware shown to actual size.
AA
BB
Safety goggles
CC
Small athead
screwdriver
Drill
Part Description Quantity
AA Jumper 1
BB Screw 4
CC Double-sided tape 1
1/16 in.
(1.5 mm)
Drill bit
3 HAMPTONBAY.com
Please contact 1-844-760-3644 for further assistance.
Page 4

Pre-Installation (continued)
PACKAGE CONTENTS
A
Part Description Quantity
A Doorbell 1
B Motion sensor 1
C Push button 1
Installation
B
C
Installing the doorbell
1
□ Plug in the doorbell (A) at the desired location.
Installing the batteries into the
2
motion sensor
□ Remove the screw and cover on the back of
the motion sensor (B) using a small Phillips
screwdriver (not included).
□ Install two “AAA” batteries. Ensure the
batteries are oriented correctly.
□ Replace the cover on the back of the motion
sensor (B) and tighten the screw.
4
A
B
Page 5

Installation (continued)
ON-TIME
TEST 1 5
(MINS)
MIN
Removing the battery tab
3
□ Remove the backs of the push button (C) by
pushing in the tab on the bottom with a small
athead screwdriver (not included).
□ Remove the orange battery tab from the push
button (C).
Testing the push button and
4
doorbell
□ Temporarily position the push button (C) where
it will be mounted.
□ Press the push button (C) to verify the
doorbell(A) and push button (C) work properly.
□ If the doorbell (A) does not sound, move the
doorbell (A) closer to the push button (C) and
test again.
NOTE: Do not permanently mount the sensor or push
button until the sensor, push button, and doorbell are all
working properly.
Testing the sensor and doorbell
5
In most cases, testing of the motion sensor requires two
people; one person to activate the sensor (B) and the
other to listen for the doorbell (A) to sound.
□ On the bottom of the motion sensor (B), slide the
ON-TIME switch to the “TEST” position.
□ Temporarily position the sensor (B) near the
desired mounting location.
□ While someone is listening for the doorbell (A)
to sound, walk in front of the sensor (B). The
red LED on the sensor (B) should ash and the
doorbell (A) will sound “Beep-Beep”. In the
“TEST” position, all motion must stop for 10
seconds before the sensor (B) will activate the
doorbell (A) again.
□ If the doorbell (A) does not sound, move the
doorbell (A) closer to the sensor (B) and test
again.
NOTE: Do not permanently mount the sensor or push
button until the sensor, push button, and doorbell are all
working properly.
C
C
A
RANGE
MAX
MIN
TEST 1 5
(MINS)
SYNC
ON-TIME
B
A
B
5 HAMPTONBAY.com
Please contact 1-844-760-3644 for further assistance.
Page 6

Installation (continued)
Mounting the push button
6
Use either screws (BB) or double-sided tape (CC) to
mount the push button (C).
□ To mount with screws (BB), remove the back
of the push button (C) by pushing in the tab on
the bottom with a small athead screwdriver.
Place the back of the push button (C) on the
door jamb and mark the two screw holes.
Attach with screws (BB) and snap on the front
of the push button (C).
□ When attaching the push button (C) with
double-sided tape (CC), remove the paper from
both sides of the double-sided tape (CC) and
apply to a clean surface.
BB
Mounting the sensor
7
Attach the sensor (B) mounting bracket to a sturdy
surface using the screws (BB). Make sure the sensor
(B) has an unobstructed view.
□ Place the sensor (B) mounting bracket
in the desired location and mark the two
screw holes. Attach the sensor (B) with the
screws(BB).
□ If the sensor (B) was removed from the
mounting bracket, use a Phillips screwdriver
(not included) to loosen the clamp screw on
the mounting bracket. Insert the swivel ball on
the sensor (B) into the mounting bracket until it
snaps into place. Aim the sensor (B) toward the
area to be monitored and tighten clamp screw.
Operation
Adjusting the doorbell volume
1
The doorbell (A) has an adjustable volume control
located on the side. Rotate the thumbwheel up or
down to adjust the volume.
NOTE: Attach mounting bracket vertically when attaching
to a curved surface.
IMPORTANT: The sensor must be rotated so the controls are facing
down.
BB
B
A
6
Page 7

Operation (continued)
Setting the sensor’s day detect
2
The sensor (B) can be programmed to operate during
the daytime only (DAY ONLY) or both day and night
(DAY/NIGHT).
□ Remove the batteries from the sensor (B).
□ Slide the “DAY DETECT” switch to the desired
mode. Replace the batteries and cover.
Setting the sensor’s range
3
The “RANGE” control increases and decreases the
sensitivity of the sensor (B). It also increases and
decreases the distance the sensor (B) will detect
movement.
NOTE: False triggering may happen if the RANGE is set
too high.
□ Adjust the “RANGE” control to increase (MAX)
or decrease (MIN) the sensitivity.
SYNC
MAX
RANGE
DAY DETECT
DAYDAY/
ONLY NIGHT
MIN
TEST 1 5
(MINS)
ON-TIME
B
B
Setting the sensor’s on-time
4
The “ON-TIME” control determines the amount of time
that all motion must be stopped before the sensor (B)
will activate the doorbell (A) again.
□ Select the “ON-TIME” setting desired:
□ “TEST” - Motion must be stopped for 10
seconds before reactivation.
□ “1 MIN” - Motion must be stopped for 1
minute before reactivation.
□ “5 MIN” - Motion must be stopped for 5
minutes before reactivation.
RANGE
MAX
MIN
SYNC
TEST 1 5
(MINS)
ON-TIME
B
Setting the wireless push
5
button
The wireless push button (C) has two options for tune
selection: Play the selected “FRONT” door musical
tune or play the “REAR” door designated tune (Ding).
□ Remove the single jumper (AA) inside the push
button (C) to play the selected musical tune.
□ Add the single jumper (AA) inside the push
button(C) to play only the Ding tune.
7 HAMPTONBAY.com
Please contact 1-844-760-3644 for further assistance.
Remove jumper to Add jumper to set
set as the “FRONT” door as the “REAR” door
C
AA
Page 8

Operation (continued)
Selecting a push button tune
6
The doorbell (A) has different selectable tunes for
different push buttons (sold separately). The push
button (C) set as the “REAR” push button will only play
“Ding” (one note tune). The push button set as the
“FRONT” push button will play either “Ding-Dong” (two
note tune) or Westminster (eight note tune).
□ Press and release the “TUNE” button on the
doorbell (A) until the desired tune is heard.
NOTE: All doorbell models are designed to work with up
to 10 wireless push buttons (sold separately).
Doorbell tune
Motion sensor
alert
Beep-Beep Ding-Dong or Westminster Ding
Front door push button
(sold separately)
Care and Cleaning
□ Use a dry cloth to clean the doorbell, sensor, and push button.
□ Do not use cleaners or polishes.
□ Do not use any uids on the doorbell, sensor, and push button.
Troubleshooting
NOTE: All doorbells are designed to play only two
different tunes no matter how many push buttons are used.
A
Rear door push button
(sold separately)
Problem Possible Cause Solution
The doorbell does
not sound.
8
□ The batteries are not
installed correctly.
□ The batteries are dead. □ Check the charge of the sensor and push button batter-
□ The doorbell is not
receiving power.
□ The doorbell and the
sensor or push button
are not synced.
□ Make sure the batteries are installed according to the
□ Make sure the plug-in doorbell has power.
□ Sync the doorbell to the sensor or push button. Only one
diagram inside the sensor and push button.
ies and replace them if necessary.
sensor or push button may be synced at a time. Repeat
these steps for each sensor or push button.
□ Press and hold the button on the doorbell until the
doorbell sounds a “Beep-Beep”.
□ Press the button on the bottom of the sensor or the
push button within 30 seconds. The doorbell will
sound a “Beep-Beep” tone to indicate the sensor or
the push button is synced.
□ Test the sensor as shown in step 5 under Installa-
tion or press the push button to ensure operation.
Page 9

Troubleshooting (continued)
Problem Possible Cause Solution
The doorbell
sounds at night.
The doorbell does
not sound during
the day.
The batteries
seem okay, but
the doorbell does
not work after
installation.
The doorbell
sounds when not
intended (false
triggers).
□ The day detect switch
is in the “DAY/NIGHT”
position.
□ The day detect switch is
in the “DAY ONLY” position and the sensor is
located in a dark area.
□ The doorbell, sensor, or
push button is mounted
on metal or near metal
studs.
□ The doorbell is mounted
near concrete oor or
wall.
□ The doorbell and sensor
or push button are
installed too far apart.
□ The doorbell is receiv-
ing interference from
another wireless device.
□ The sensor is functioning correctly. If a doorbell alert is
not desired at night, slide the day detect switch to the
“DAY ONLY” position.
□ Slide the day detect switch to the “DAY/NIGHT” position
or move the sensor to an area that receives more light.
□ Metal reduces transmission range. Use 1/4 in. to 1/2 in.
(6 to 13 mm) wood shims to move the doorbell, sensor,
or push button away from the metal surface.
□ Concrete may reduce range. Move the doorbell away
from the concrete surface.
□ Locate the doorbell closer to the sensor or push button.
□ Reset the doorbell, sensor, and push button.
□ Re-sync the doorbell to the sensor and push button.
Only one sensor or push button may be synced at a time.
Repeat these steps for each sensor or push button.
□ Remove the sensor and push button batteries. Wait
30 seconds.
□ Press and hold the button on the bottom of the sen-
sor and the push button for 10 to 15 seconds within
60 seconds after installing batteries into the sensor
and push button.
□ Press and hold the button on the doorbell until the
doorbell sounds a “Beep-Beep-Beep-Beep”.
□ Press and hold the button on the doorbell until the
doorbell sounds a “Beep-Beep”.
□ Press the button on the bottom of the sensor or the
push button within 30 seconds. The doorbell will
sound a “Beep-Beep” tone to indicate the sensor or
the push button is synced.
□ Test the sensor as shown in step 5 under Installa-
tion or press the push button to ensure operation.
9 HAMPTONBAY.com
Please contact 1-844-760-3644 for further assistance.
Page 10

Questions, problems, missing parts?
Before returning to the store, call Hampton Bay Customer Service
8 a.m. - 5 p.m., CST, Monday - Friday
1-844-760-3644
HAMPTONBAY.COM
Retain this manual for future use.
208191-01A
 Loading...