

Page 1
Glass Enclosure Kits: GD415ATPB and GD485ATPB
for Models: EM-415 and EM-485
- Installation and Operation Instructions -
W ARNING
HOT! DO NOT TOUCH.
SEVERE BURNS MA Y RESUL T .
CLOTHING IGNITION MA Y RESUL T .
Glass and other surfaces are hot during operation and
cool down.
• Keep children away.
• CAREFULL Y SUPER VISE children in same room as appliance.
• Alert children and adults to hazards of high temperatures.
• To avoid burns or clothing ignition, the doors must remain closed if children will be present during the operation and cool down of the fireplace.
• Do NOT operate with protective barriers open or removed.
• Keep clothing, furniture, draperies and other combustibles away.
IMPORT ANT : Read all instructions carefully before starting installation. Failure to follow these installation instructions as detailed may result in a possible fire hazard and will void the warranty.
INSTALLATION PRECAUTIONS
The Heat-N-Glo Glass Enclosure Kits GD415ATPB and
GD485A TPB are tested and safe when installed in accordance with this installation manual. It is your responsibility
to read all instructions before starting installation and to
follow these instructions carefully during installation to assure maximum benefit from and safe operation of the glass
enclosure.
CHECK CONTENTS OF SHIPPING CARTON
Compare contents in the following list with actual parts received. If any parts are missing, or damaged, contact your
dealer before starting installation. Do not install a damaged
glass enclosure kit.
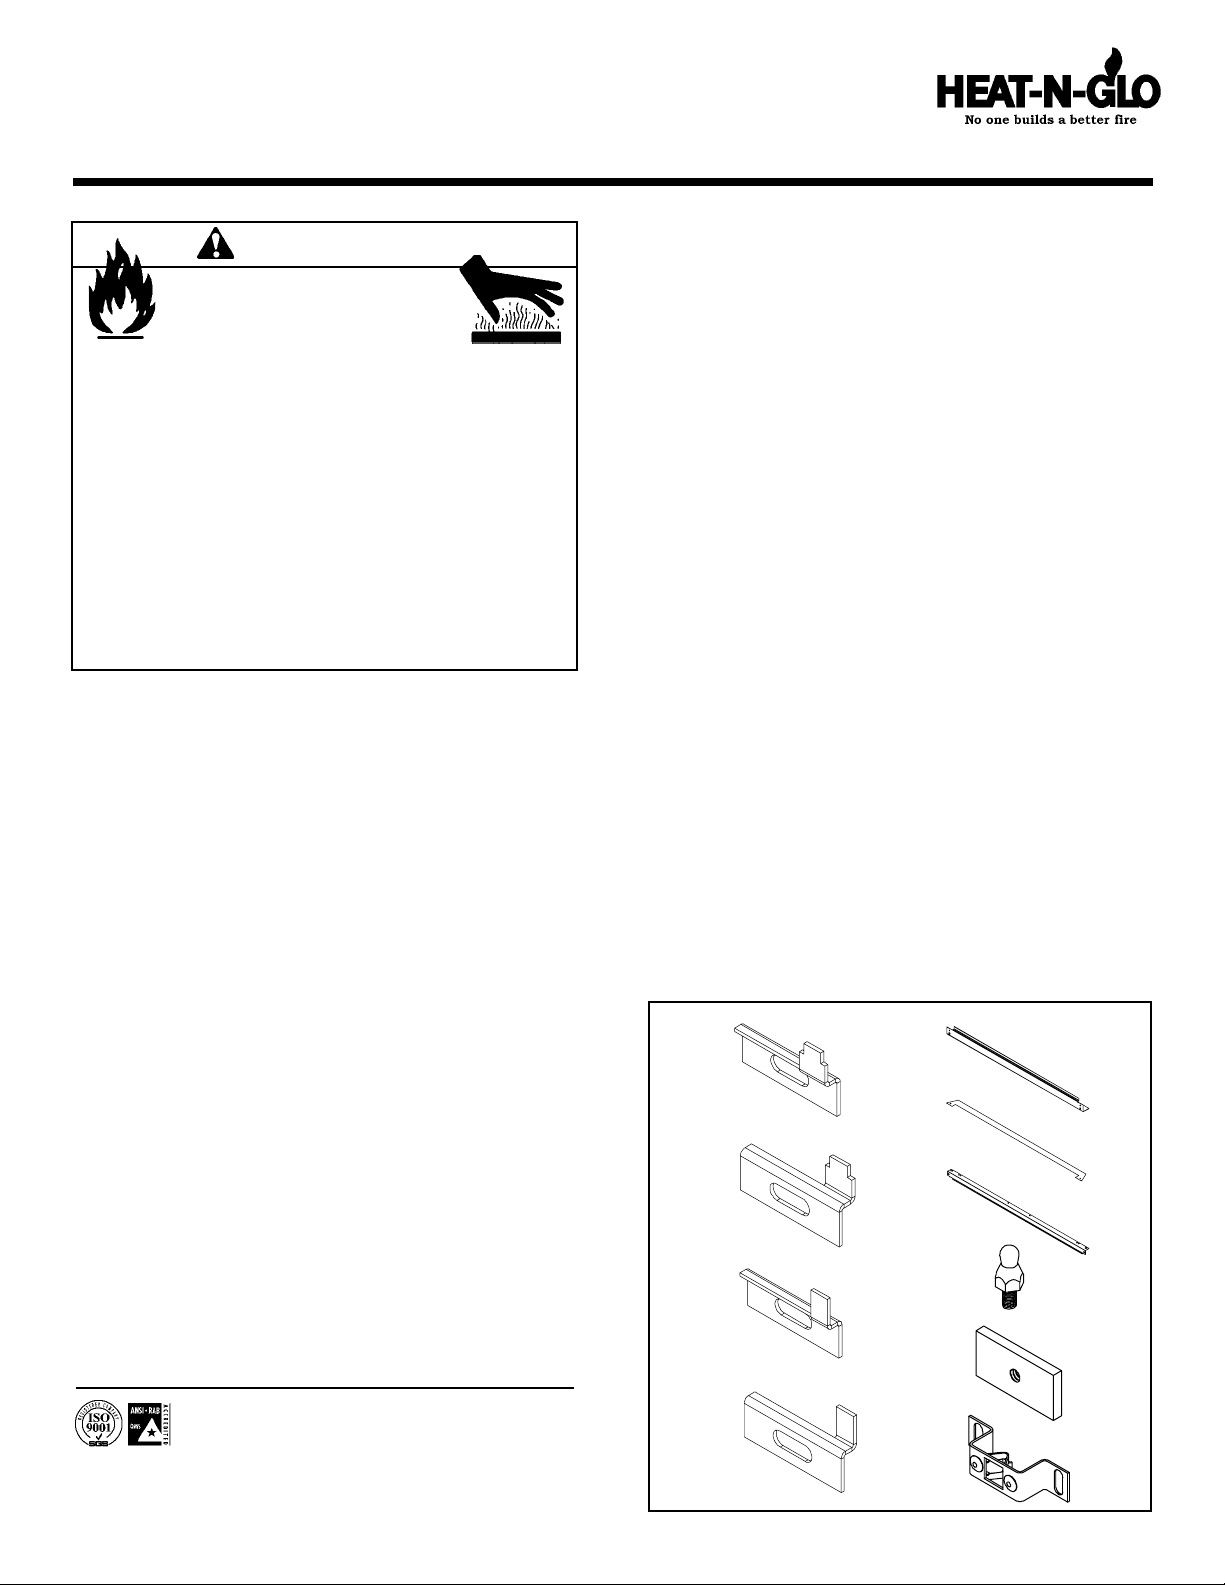
Contents of shipping carton:
(See Figure 1 for sheetmetal parts)
Qty. Part Item
1 Hinge: Bottom left..................................................1
1 Hinge: Bottom right ...............................................2
1 Hinge: T op right .....................................................3
1 Hinge: T op left .......................................................4
2 Side Filler ............................................................5
1 Front Filler...........................................................6
2 T op/Bottom T racks ..............................................7
2 Ball S tud..............................................................8
2 Ball S tud Plate ....................................................9
2 Ball S tud Receiver Bracket ................................ 10
2 Doors
2 Handles
4 3/4" Screws for Handles
4 Slotted Hinge screws
2 Nylon Washers
1 4 1/2" Sheetmetal screws
4 1/4" Screws for Ball S tud Receiver Bracket
4 S teel W ashers
These glass enclosures are fully engineered and must be
installed on Models EM-415 and EM-485 fireplaces. If you
modify it or any of its components, you may cause a fire
hazard and will void the warranty . In addition, such action
may void the coverage provided by the owner's home insurance.
The glass enclosure must be installed WITHIN the fireplace
opening as detailed in these instructions . It must NOT be
separated from the firebox with fireplace facing or finishing
materials.
It is highly recommended the outside air kit AK22 is used.
It is good practice to protect your hands and eyes during
installation by wearing work gloves and safety glasses.
HEAT -N-GLO QUALITY SYSTEMS
REGISTERED BY SGS ICS
Printed in U.S.A. Copyright 2004,
Heat-N-Glo, a brand of Hearth & Home Technologies Inc.
20802 Kensington Boulevard, Lakeville, MN 55044, USA
1
Figure 1
1
2
3
4
5
6
7
8
9
10
690-950D 7/04
Page 2
CLEAN NEW MASONRY
Mortar and masonry cleaning agents will corrode metal unless they are neutralized. Therefore, if your fireplace surround has been faced with any type of masonry, wash it
with ammonia water or a baking soda solution so the metal
trim pieces of your kit will not be corroded.
NOTE: THE MET AL ON THE GLASS DOORS SHOULD
BE CLEANED WITH A MILD SOAP AND W A TER ONL Y.
INSTALLATION INSTRUCTIONS
1. Unscrew, remove and discard top door track.
2. Remove mesh rod and mesh.
3. Unscrew , remove and discard hearth filler (part covering
the front of the hearthstone) by lifting and twisting one
end at a time out from behind the columns.
4. Lift up front of the hearthstone. While pulling stone forward, hold it up and slip FRONT FILLER under the stone
making sure the ears fit in behind the sides of the unit.
Push and sit the stone back into the unit (See Figure 2).
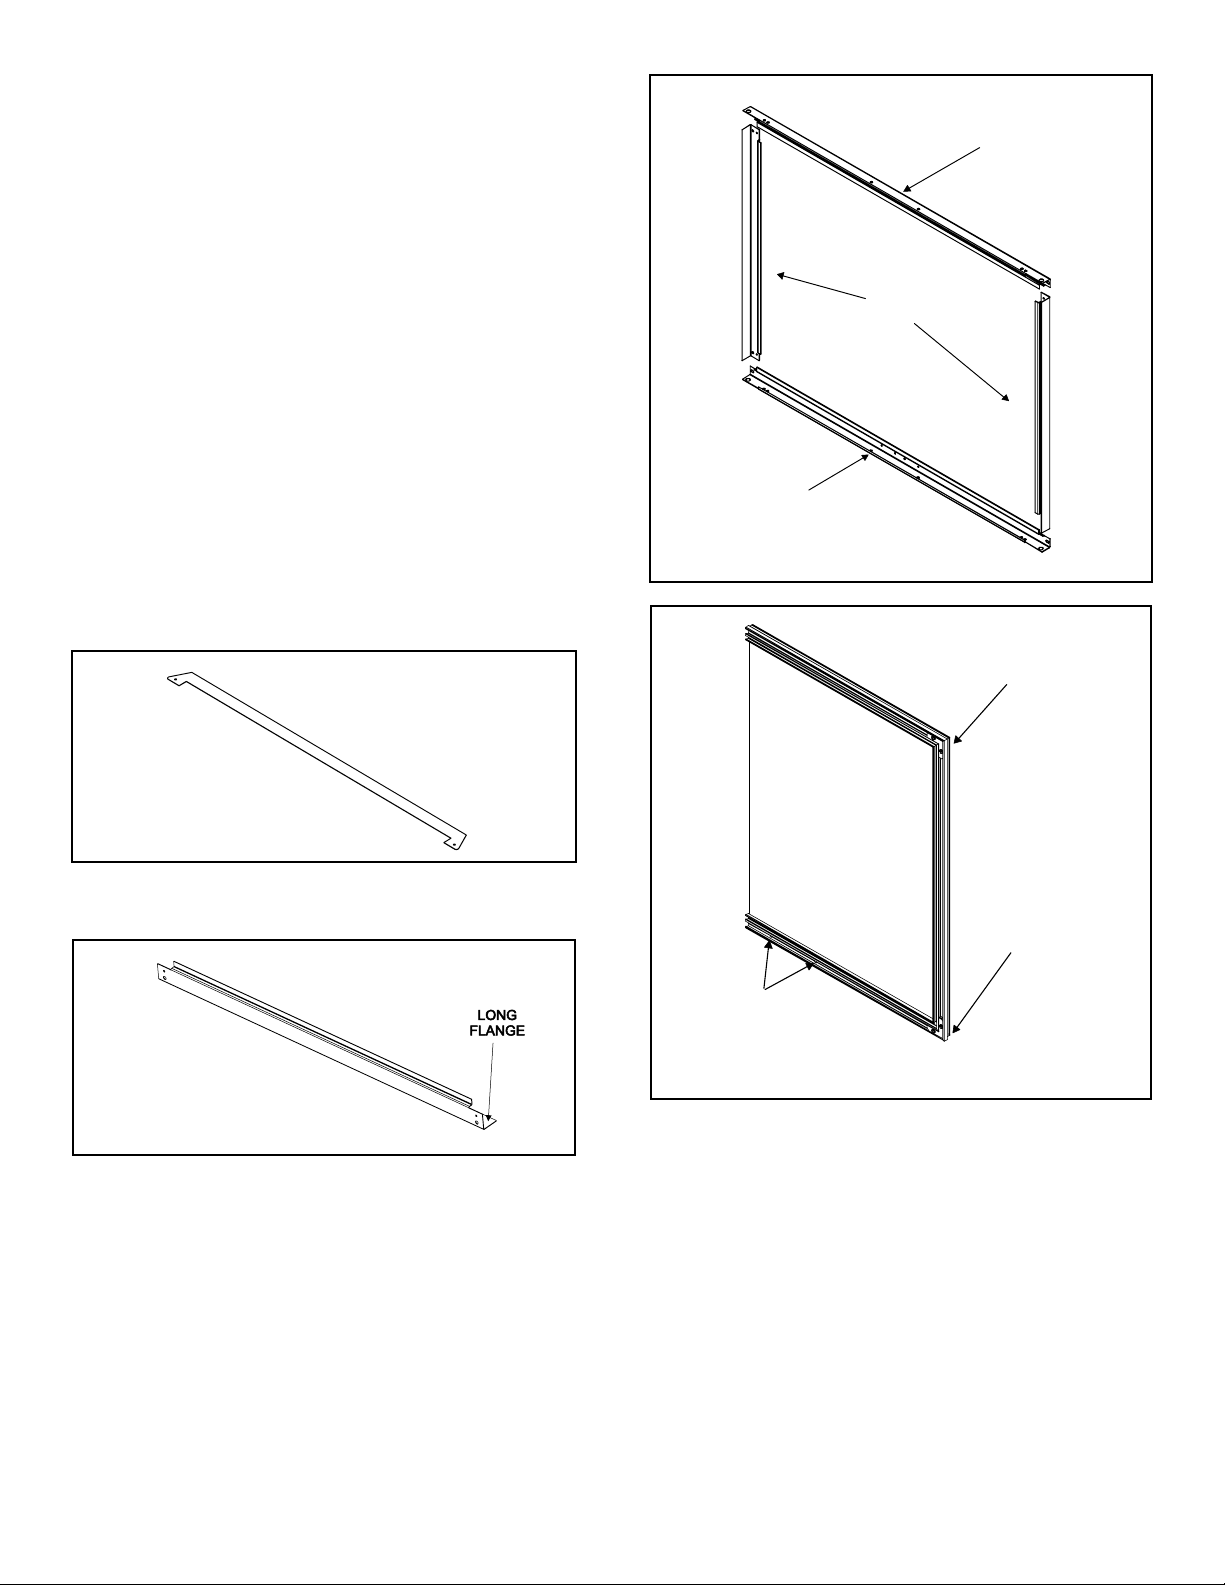
Figure 4
BOTTOM
TRACK
SIDE
FILLER
TOP
TRACK
TOP CORNER
BRACKET
Figure 2
5. Slip side fillers in on both sides so long flange is behind
columns (see Figure 3).
Figure 3
6. Screw top and bottom track to unit.
7. Push side fillers up tight against door tracks and secure
with screws through holes in back of top and bottom
tracks (see Figure 4 for part orientation).
8. Remove shipping tape from doors.
9. Turn doors face down (gasket side up).
10. Remove one set screw from top of top corner bracket
and one from bottom of bottom corner bracket (see
Figure 5). Discard the removed set scews.
BOTTOM CORNER
BRACKET
HOLES FOR
DOOR HANDLE
Figure 5
11. Using a metal washer and slotted hinge screw, att ach
bottom pivot bracket onto the bottom of each door where
the set screw was removed. (Bottom of door is defined
by holes in part for door handle.)
12. Screw handle onto each door.
13. Place nylon washer over hole in the bottom face of fire-
place.
14. Pick door up and insert bottom pivot bracket in the hole
making sure you engage the nylon washer. HOLD ONT O
THE DOOR UNTIL NEXT STEP IS COMPLETE.
2
Page 3

15. Insert the leg of the top pivot bracket up into the hole in
the door track. Line up the top pivot bracket with hole in
the corner brace on top of the door and attach with the
slotted hinge screw and steel washer (both doors).
16. Align doors by readjusting the pivot brackets and steel
washers and sliding the doors in or out.
17. Insert the ball stud into the hole in the ball stud plate.
Slide into the door as shown in Figure 6.
BALL STUD
PLATE
BALL STUD
Figure 6
OPERATING PRECAUTIONS AND
INSTRUCTIONS
The glass doors and the fireplace flue damper must both be
in the fully open position before starting your fire.
Follow the procedure for building and starting a fire as detailed in your fireplace homeowners manual. Y ou may close
the doors AFTER the fire is well st arted. THE FIRST FEW
FIRES MUST BE SMALL TO ALLOW THE PROPER TEMPERING OF THE GLASS AND TO PREVENT GLASS
BREAKAGE.
Do not, however, close the doors on an excessively hot fire.
The glass must be allowed to warm slowly. Keep the fire
well back from the doors and never let flames contact the
glass.
If the fire gets too large at any time, open both sets of glass
doors. This will quickly reduce the heat in the firebox. Push
the logs or other fuel to the center of the firebox and rearrange into single layer. Let the fire burn to a smaller size
before closing the glass doors again.
18. Attach the ball stud receiver brackets to the bottom door
track. Use the 4 1/4" screws as shown in Figure 7.
BALL STUD
RECEIVER BRACKETS
Figure 7
19. Line up the ball studs and receiver brackets by sliding
the receiver brackets up and down, and the ball studs
left and right. Once these parts are aligned, tighten the
screws on the receiver brackets and turn the ball stud
1/4 turn past hand tight. DO NOT OVER TIGHTEN THE
BALL STUD.
20. If the ball studs and receiver brackets are not holding
the doors closed, you may need to compress the gasket material on the back of the door by pressing it down
with your fingers.
NOTE: The ball stud may need to be adjusted after the first
couple of fires. Periodically check the alignment of the ball
stud with the ball stud receiver bracket and adjust if necessary.
WARNING: FIREPLACES EQUIPPED WITH DOORS
SHOULD BE OPERATED ONLY WITH DOORS FULLY
OPEN OR DOORS FULL Y CLOSED. IF DOORS ARE LEFT
P ARTL Y OPEN, GAS AND FLAME MA Y BE DRAWN OUT
OF THE FIREPLACE OPENING, CREATING RISKS OF
BOTH FIRE AND SMOKE. MAKE SURE THE FIREPLACE
SCREEN IS CLOSED WHEN THE DOORS ARE OPEN.
The following check list summarizes the key steps discussed
under OPERA TING INSTRUCTIONS:
1. Open doors and fireplace damper.
2. Build fire as described in fireplace manual.
3. Close doors after the fire is started IF fire is normal
size.
4. If fire gets too large, open doors and reduce size of fire.
5. Keep damper open until fire is completely out and all
smoking has stopped.
For maximum benefit and efficient usage, refer to operating
instructions in owner's manual.
REPLACEMENT PARTS
REPLACEMENT PARTS
Side F ille r
Front Filler
Top/Bottom Tracks
Left Door
Right Door
Hard ware Kit Includes:
Hinge: Bottom Left & Right
Hinge: Top Left & Right
Ball Stude & Plate
Ball Stud Receiver Bracket
Handles & 3/4 " Screws fo r Ha ndles
Slotted Hinge Screws
Washers
1/2" Sheetmetal Screws
1/4" Screws for Ball Stud
Receiver Bracket
GD415ATBPB GD485ATPB
690-105 690-105
690-106 691-106
690-108 691-108
690-390A 691-390A
690-391A 691-391A
690-100A 690-100A
KITS
3
 Loading...