

Page 1
PLUG-IN ROOM TEMPERATURE CONTROLLER HEATERMATE
NO.
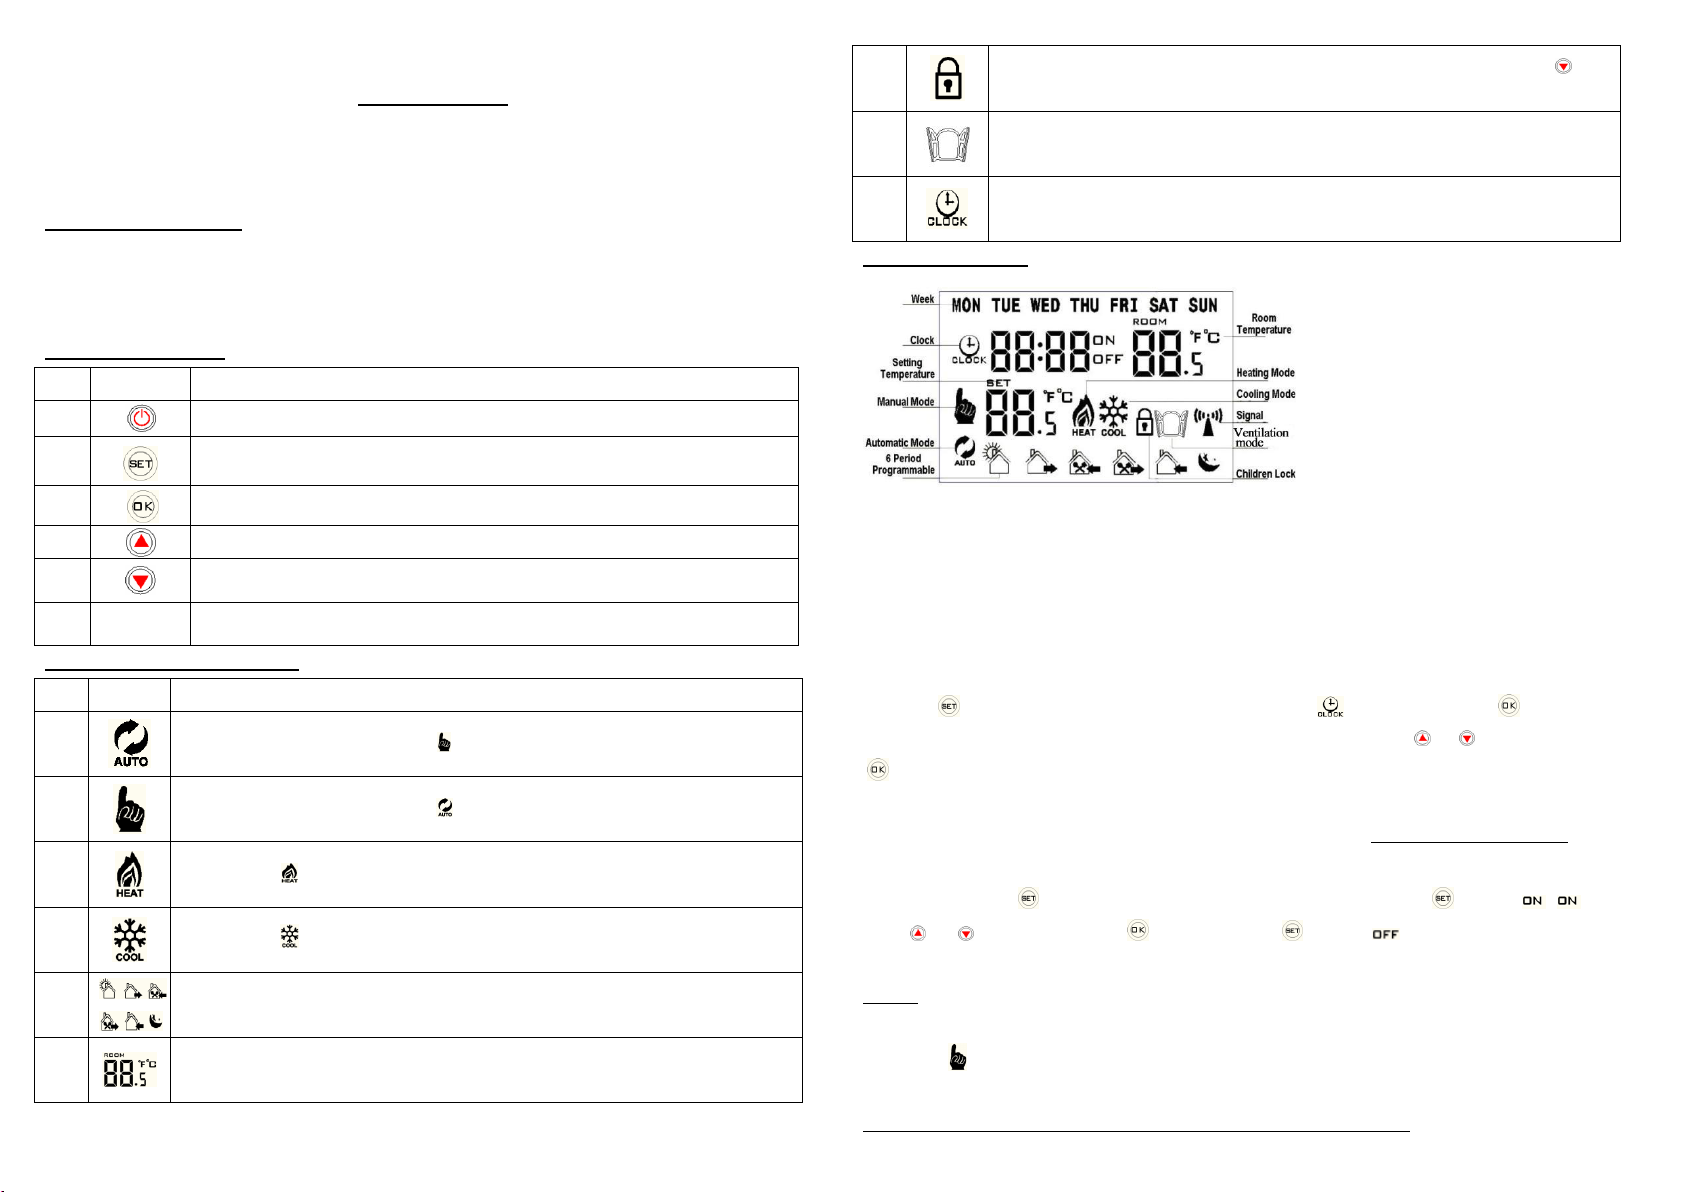
Symbols
Explanation
1
Power ON/OFF
2
Short press to switch between Manual and Automatic Modes
3
Press to Enter/Confirm
4
Increase (Up) Button
5
Decrease (Down) Button
6
Indicator
Light is ON -- power to heater is ON; light is OFF -- power to heater is OFF.
NO.
symbols
Explanation
1
Automatic control mode (manual control “ ” is not showing)
2
Manual control mode (automatic control “ ” is not showing)
3
Heating mode; “ ” is displayed when power to heater is ON
4
Cooling mode; “ ” is displayed when power to air conditioner or fan is ON
5
6 periods programmable icon
8
Room temperature
9
Child lock: activated automatically after 10 minutes of inactivity. Press/hold Down button “ ”for 3
seconds then release to unlock. Repeat the same procedure to lock.
10
Ventilation mode – turns heater off for a specified period of time during room ventilation (opening
windows) when room temperature drops below a specified temperature.
11
Clock setting icon
Model HY02TP
TM
Thank you for choosing HEATERMATE. This programmable electronic temperature controller will provide
you with comfortable home environment and will help you to save energy.
QUICK START-UP GUIDE:
Plug HEATERMATE into power point – a display showing current ROOM temperature and SET temperature
will come up. By pressing Up or Down buttons select your desired SET temperature. Plug your heater into
Heatermate. If child lock is activated press/hold Down button for 3 seconds then release to unlock.
BUTTONS EXPLAINED:
DISPLAY SYMBLES EXPLAINED:
DISPLAY OVERVIEW:
1) Operation - Heating
Heatermate will turn your heater ON when ROOM temperature drops 1 degree below SET temperature and will turn your
heater OFF when ROOM temperature rises 1 degree above SET temperature. This 2 degrees temperature differential (which
comes as default) can be increased or reduced based on your preference – please refer to Section 6. Smaller differential will
lead to smaller room temperature fluctuations, but the heater will come ON/OFF more frequently and vice versa.
2) Clock Setting
Press/hold “ ” for 3 seconds then release to enter into setting screen. “ ” icon is flashing. Press “ ” to enter into clock
setting mode which displays minute, hour and day of the week. Minute is flashing. Press “ ” or “ ” to set minutes then press
“ ” to save and move to hours. Set hours and day of the week in similar manner.
3) Timer Function
The Timer function is designed to enable customer to switch Heatermate ON for one fixed time period every day defined by
ON and OFF times. Outside of this time period Heatermate will be in OFF state (nothing will be showing on its display).
To set Timer press/hold “ ” for 3 seconds then release to enter into setting screen. Press“ ”to select “ ”( will flash)
Press “ ” or “ ” to set ON time. Press“ ” to save then press“ ”to select “ ” and set OFF time. To disable Timer
function set both ON and OFF times to 00.00 (comes as default).
Example: Set Timer for heater to come ON at 10pm every night, maintain 21.0 degrees temperature and turn OFF at 7am.
(i) Set ON time to 22:00 and OFF time to 08:00 by following above steps; (ii) Make sure the device is in Manual mode i.e. that
hand symbol is showing next to SET temperature. If not, press SET button once to switch to Manual mode; (iii) Set the
SET temperature to 21.0 degrees C by pressing UP/Down buttons. You can now leave your Heatermate and it will do the job.
NB: The Timer ON/OFF times, once set, will apply to both Manual and Automatic Modes
Page 2
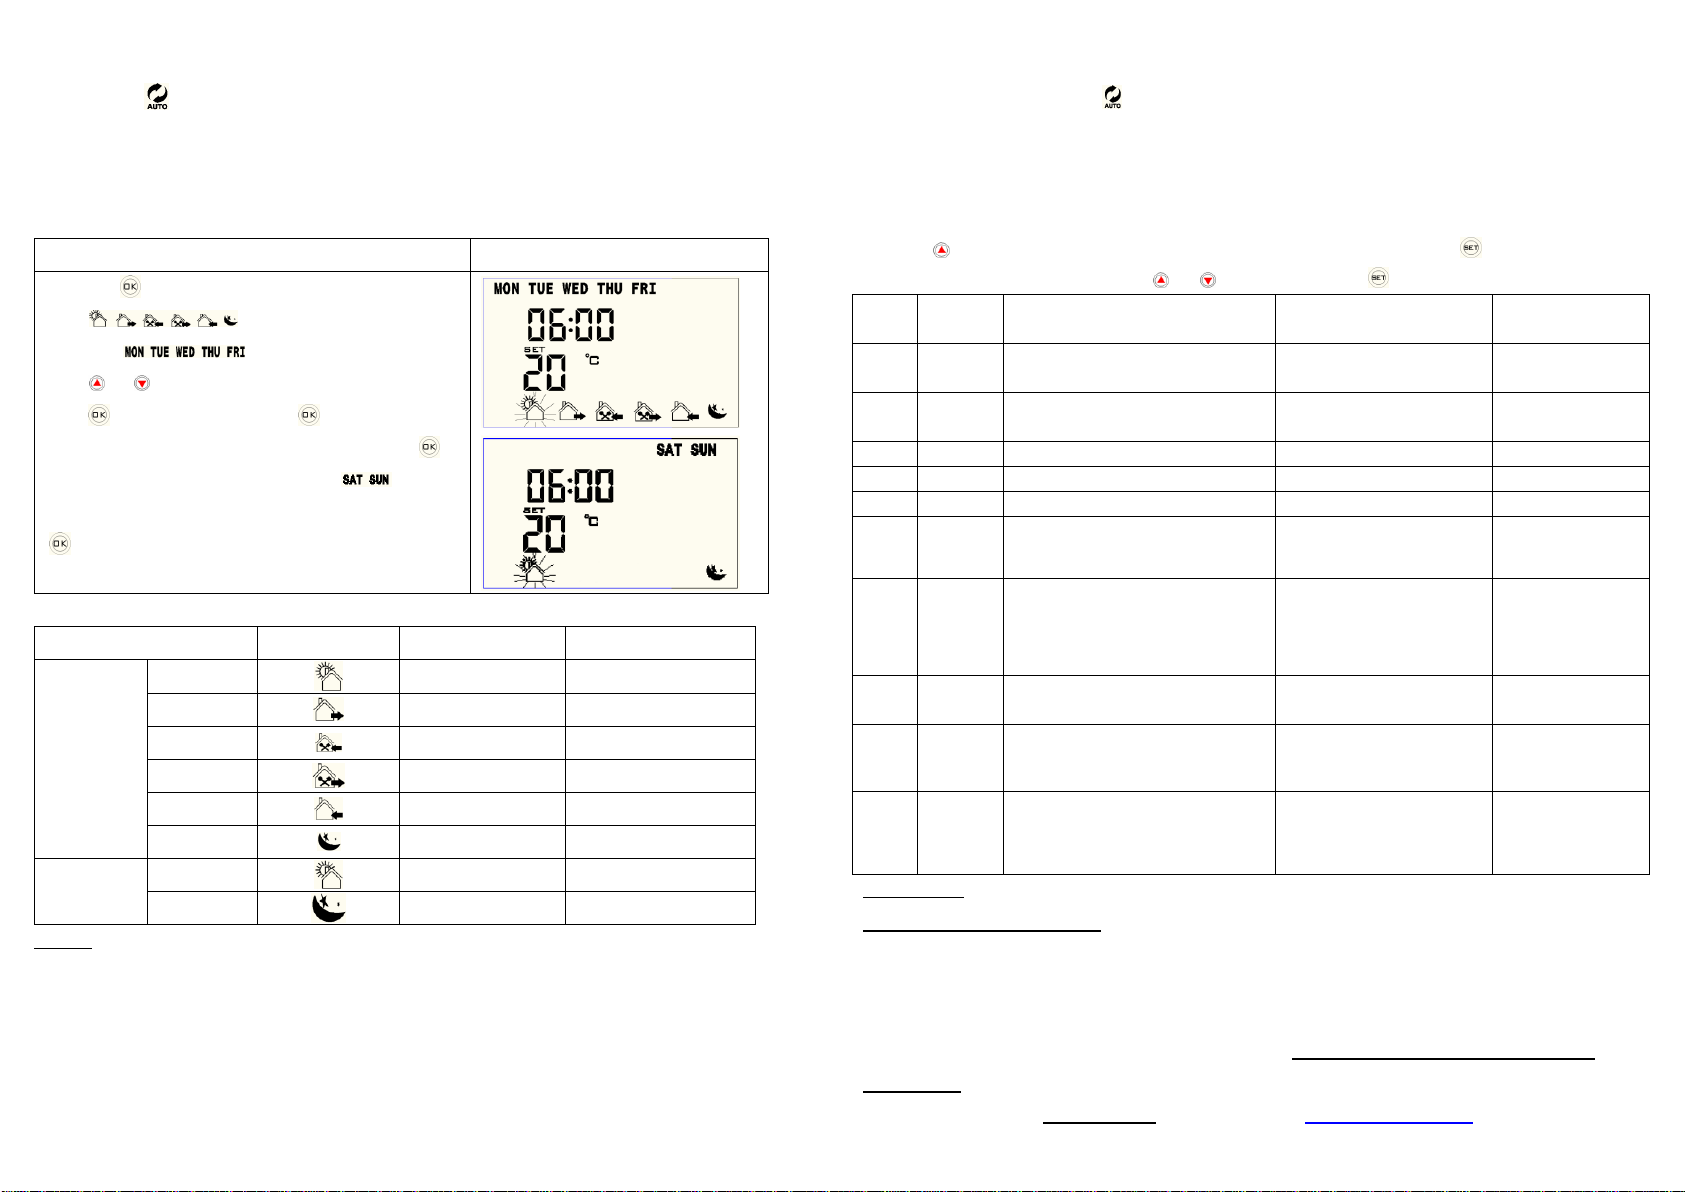
4) Automatic Mode - Weekly Programming
Explanation
Screen
Press/hold “ ” for 3 seconds then release - screen will
display (6 periods for every week day) and
week days: “ ”. First period will be flashing -
press “ ” or “ ”to adjust temperature setting temperature then
press “ ” to adjust time setting. Press “ ”to go to the next
period and so on for all 6 periods for week days. Now press “ ” to
go to weekend programming with 2 periods for “ ” and set
temperatures and times in the same way as for week days. . Press
“ ” when finished. Please refer to the table below for default
values for different periods.
Period
Icon
Default Time
Default Temperature
Working Day
1 06:00
20ºC
2 08:00
15ºC
3 11:30
15ºC
4 12:30
15ºC
5 17:30
20ºC
6 22:00
15ºC
Weekend
1 08:00
20ºC
2 23:00
15ºC
No.
Display
Setting Option
Data Setting Function
Factory Default
Setting
1
A1
Room Ventilation Function
(Heater is off when window is open)
5-25ºC; 5-60min
Disabled (- - ºC)
2
A2
Temperature Differential to Activate
Heater
1-9ºC
2ºC
3
A3
Temperature Setting - Highest Limit
20-70ºC
35ºC 4 A4
Temperature Setting - Lowest Limit
1-10ºC
5ºC 5 A5
Temperature Sensor Calibration
±5ºC
Factory Calibration
6
A6
Anti-freezing Function – turns heater
ON when temperature is below 5ºC
00:Anti-freezing function OFF
01:Anti-freezing function ON
00:Anti-freezing
function OFF
7
A7
Resume operation after power
disconnection
1:Resume operation after
power disconnection
0:Stay turned OFF after
power disconnection
1:Resume operation
after power
disconnection
8
A8
Operational Mode
00:Cooling Mode
01:Heating Mode
01:Heating Mode
9
A9
Programmable or Non-programmable
(Automatic Mode is disabled)
00:Programmable
01:Non-programmable
00:Programmable
10
AA
Return to Factory Settings
88:Do not return to Factory
Settings
00:Return to Factory Settings
N/A
Operating Voltage: 240V , 50HZ
Max Load: 10A, 2400W (resistive)
Temperature Measurement Precision:±1ºC
Temperature Setting Range:1ºC - 70ºC
Self-consumption Power:<0.3W
Temperature Sensor: NTC
Automatic Mode ( symbol is showing next to SET temperature) allows customer to program up to 6 periods with different
SET temperatures for every weekday and up to 2 periods for the weekend. The table below shows the factory pre-set periods
and their temperatures. If less than 6 periods per day are required, then the adjacent periods can be merged into one period as
illustrated in the Example below. When device is in Automatic Mode, the display will always be ON, showing the current period
icon and its SET temperature.
5) Factory Programmed Periods and Settings
and its start time to 19.00; (vii) Make sure the Timer function is disabled – 00.00 is set for both ON and OFF times (viii) Make
sure Heatermate is in Automatic mode - symbol is showing next to SET temperature. If not, press SET button once to switch
to Automatic mode. You can now leave your Heatermate and it will do the job.
6) Factory Settings
This section shows how to change factory settings: change from Heating to Cooling mode, adjust the temperature
sensor reading, change the temperature differential to activate your heater (see Section 1 - Operation) etc.
Press/hold “ ” for 3 seconds then release to enter into factory settings mode, then press“ ”to choose the required
option (A1-A9, AA) as per table below. Press“ ” or “ ”to adjust value. Press“ ” to save and move to the next option.
Example: Set the heater to come ON at 7pm, maintain room temperature at 20 degrees until 7am, then turn OFF until 1pm,
then at 1 pm to come ON and maintain 22 degrees temperature until 2.30pm, then turn OFF and come ON at 7pm (as above)
and so on, during weekdays:
(i) Set up Period 1 temperature to well below the typical room temperature e.g. to 10 degrees and Period 1 start time to 07:00;
(ii) Move to period 2 and set its temperature also to 10 degrees and leave its start time as default at 08:00 (iii) Repeat the same
for period 3 (iv) Move on to period 4 and set its temperature to 22 degrees and its start time to 13.00; (v) Move on to Period 5
and set its temperature to 10 degrees and its start time as 14.30 (vi) Move on to Period 6 and set its temperature to 20 degrees
Troubleshooting: If you lost your Heatermate functionality - please return it to its factory settings (#10 in the above table).
TECHNICAL SPECIFICATIONS:
NB: Suitable for use with heaters and air conditioners which can automatically restart after power reconnection
WARRANTY: This product comes with 2 years manufacturer warranty – please contact your place of purchase for
warranty replacement. For technical support please contact us via [email protected] or call us 1800 229 325.
 Loading...