

Page 1
Wall Mounted
Mini-Split System
Single-Zone
Air Conditioning/Heat Pump
Service Manual(General)
VMC09SB-1/VMH09SB-1
VMC12SB-1/VMH12SB-1
VMC18SB-1/VMH18SB-1
VMC24SB-1/VMH24SB-1
VMC30SB-1/VMH30SB-1
Before servicing the unit, read the
“safety precautions” in this manual.
Only for authorized service personnel.
HEAT CONTROLLER, INC.
Page 2

CONTENTS
Part 1 General Information
1. Safety Precautions........................................................................................................4
Part 2 Functions & Controls
1. List of Functions & Controls........................................................................................8
2. Basic Mode Controls ...................................................................................................9
3. Special Mode Controls ...............................................................................................11
4. Utility Functions .........................................................................................................12
5. Protection Functions & Controls...............................................................................15
Air Conditioner Service Manual
Part 3 Test Run
1. Check before Test Run ...............................................................................................31
2. Test Run Flow chart ....................................................................................................32
3. Test Run Detail ............................................................................................................33
Part 4 Trouble Shooting Guide
1. 2-Way, 3-Way Valve ....................................................................................................35
2. Pumping Down ...........................................................................................................36
3. Evacuation...................................................................................................................37
4. Gas Charging (After Evacuation) ..............................................................................38
5. Cycle Troubleshooting Guide ....................................................................................39
6. Electric Parts Troubleshooting Guide.......................................................................40
7. Self-diagnosis Function .............................................................................................45
Only for training and service purposes
- 2 -
Page 3

Part 1 General Information
1. Safety Precautions ............................................................................................................4
Only for training and service purposes
- 3 -
Page 4
Part 1 General Information
1. Safety Precautions
To prevent injury to the user other people and property damage, the following instructions must be followed.
■ Incorrect operation due to ignoring instruction will cause harm or damage. The seriousness is classified by the following indications.
This symbol indicates the possibility of death or serious injury.
This symbol indicates the possibility of injury or damage to property only.
■ Meanings of symbols used in this manual are as shown below.
Be sure not to do.
Be sure to follow the instruction.
Dangerous Voltage
1.1 Cautions in Repair
Be sure to disconnect the power cable plug from the plug socket before disassembling the equipment for a repair.Internal components and circuit boards are at
main potential when the equipment is connected to the power cables. This high
voltage is extremely dangerous and may cause death or severe injury if come in
contact with it.
Do not touch the discharging refrigerant gas during the repair work.
The discharging refrigerant gas can cause frostbite.
Release the refrigerant gas completely in a well-ventilated place first.
Otherwise, when the pipe is disconnected, refrigerant gas or refrigerating
machine oil discharges and it can cause injury.
When the refrigerant gas leaks during work, ventilate the area. If the refrigerant
gas comes in contact with fire, a poisonous gas poisonous gas generates.
Leakage of the refrigerant closed room full of gas is dangerous because a shortage of oxygen occurs. Be sure to ventilate the area.
When removing the front panel or cabinet, execute short-circuit and discharge
between high voltage capacitor terminals. If discharge is not executed, an electric
shock is caused by high voltage resulting in a death or injury.
Do not turn the air-conditioner ON or OFF by plugging or unplugging the power
plug. There is risk of fire or electrical shock.
Only for training and service purposes
- 4 -
Page 5
Part 1 General Information
Do not use a defective or underrated circuit breaker. Use the correctly rated
breaker and fuse. Otherwise there is a risk of fire or electric shock.
Install the panel and the cover of control box securely. Otherwise there is risk of
fire or electric shock due to dust, water etc.
Indoor/outdoor wiring connections must be secured tightly and the cable should
be routed properly so that there is no force pulling the cable from the connection
terminals. Improper or loose connections can cause heat generation or fire.
Do not touch, operate, or repaire the product with wet hands. Otherwise there is
risk of electric shock or fire.
Do not turn on the breaker when the front panel and cabinet are removed.
Be sure to ground the air conditioner with an ground/earth conductor connected
to the ground/earth terminal.
Conduct repair work after checking that the refrigerating cycle section has
cooled down sufficiently. Otherwise, hot refrigerant in cycle can cause burns.
Do not tilt the unit while removing panels. Otherwise, the water inside the unit
can spill and wet floor.
Weld in a well-ventilated place. Welding in an enclosed room can cause oxygen
deficiency.
Be sure to turn off power switch before connecting or disconnecting connector,
or parts damage may be occur.
Only for training and service purposes
- 5 -
Page 6
Part 1 General Information
1.2 Inspections after Repair
Check to see if the power cable plug is not dirty or loose. If the plug is dusty or
loose it can cause an electrical shock or fire.
Do not use a joined power cable or extension cable, or share the same power
outlet with other electrical appliances. Otherwise, it can cause an electrical
shock, excessive heat generation or fire.
Do not insert hands or other objects through the air inlet or outlet while the product is operating. There are sharp and moving parts that could cause personal
injury.
Do not block the inlet or outlet of air flow. It may cause product failure
Check to see if the parts are mounted correctly and wires are connected.
Improper installation and connections can cause an electric shock or an injury.
Check whether the installation platform or frame has corroded. Corroded installation platform or frame can cause the unit to fall, resulting in injury.
Be sure to check whether the ground/earth wire is correctly connected.
After the work has finished, be sure to do an insulation test to check whether the
resistance is 2[Mohm] or more between the charge section and the non-charge
metal section (ground/earth position). If the resistance value is low, a disaster
such as a leak or electric shock is caused at user’s side.
Check the drainage of the indoor unit after the repair. If drainage is faulty the
water may enter the room and wet floor.
Only for training and service purposes
- 6 -
Page 7

Part 2 Functions & Controls
1. List of Controls & Functions ..........................................................................................8
2. Basic Mode Controls........................................................................................................9
3. Special Mode Controls...................................................................................................11
4. Utility Functions .............................................................................................................12
5. Protection Functions & Controls .................................................................................15
Only for training and service purposes
- 7 -
Page 8
Part 2 Functions & Controls
1. List of Functions & Controls
Category Function Description Remark
Basic mode
controls
Special Mode
controls
Utility Functions
Protection
Controls &
Functions
Cooling Mode
Heating Mode
Healthy Dehumidification
Auto Changeover
Jet Cool
Jet Heat
Energy saving
Forced operation
Auto Clean
Air volume control
Natural Air control
Chaos Swing
Sleep mode Auto control
Auto Restart Function
Five Second Delay (Fan)
Two Minutes Stand-by
(Comp.)
Hot Start
Freeze prevention
Compressor Pre Heating
Sump Heater Control
Automatic Defrost
Power Relay Control
Inverter (with inverter
power control)
Overheating Protection
(Power Module)
Total Current Control
(Over Current Protection)
DC Peak Control
Discharge Pipe Temp Control
Low Ambient Function
Oil Return Control
Oil Equalizing Control
Cooling operation
Heating operation
Dry operation
Cooling mode is automatically changed to heating mode and
vice versa
Powerful cooling mode
Powerful heating mode
Air volume & set temp. are automatically selected for saving
energy in cooling mode
Operation without remote controller
After cooling operation, this function makes the evaporator
dry
Indoor Fan speed Control
Air volume control Program
Vertical Airflow Direction control
Air volume & set temp. are automatically changed for com-
fortable sleep
When power returns after a power failure, Unit restarts in the
previous operating mode
For noise prevention
For overload prevention
To prevent cold cold air from blowing on heating mode start
up until the evaporator coil has warmed up.
Evaporator frost prevention
To protect compressor
To protect fan from accumulated ice at base panel
Condenser frost prevention
Over current prevention
Modulation of voltage & frequency to allow the compressor to
run at various speeds.
To protect power module
To protect power device
To protect power module
For overheating protection
For operation at low temp.
To protect compressor
To protect compressor
Cooling Mode Only
9,12k Model Only
Only for training and service purposes
- 8 -
Page 9
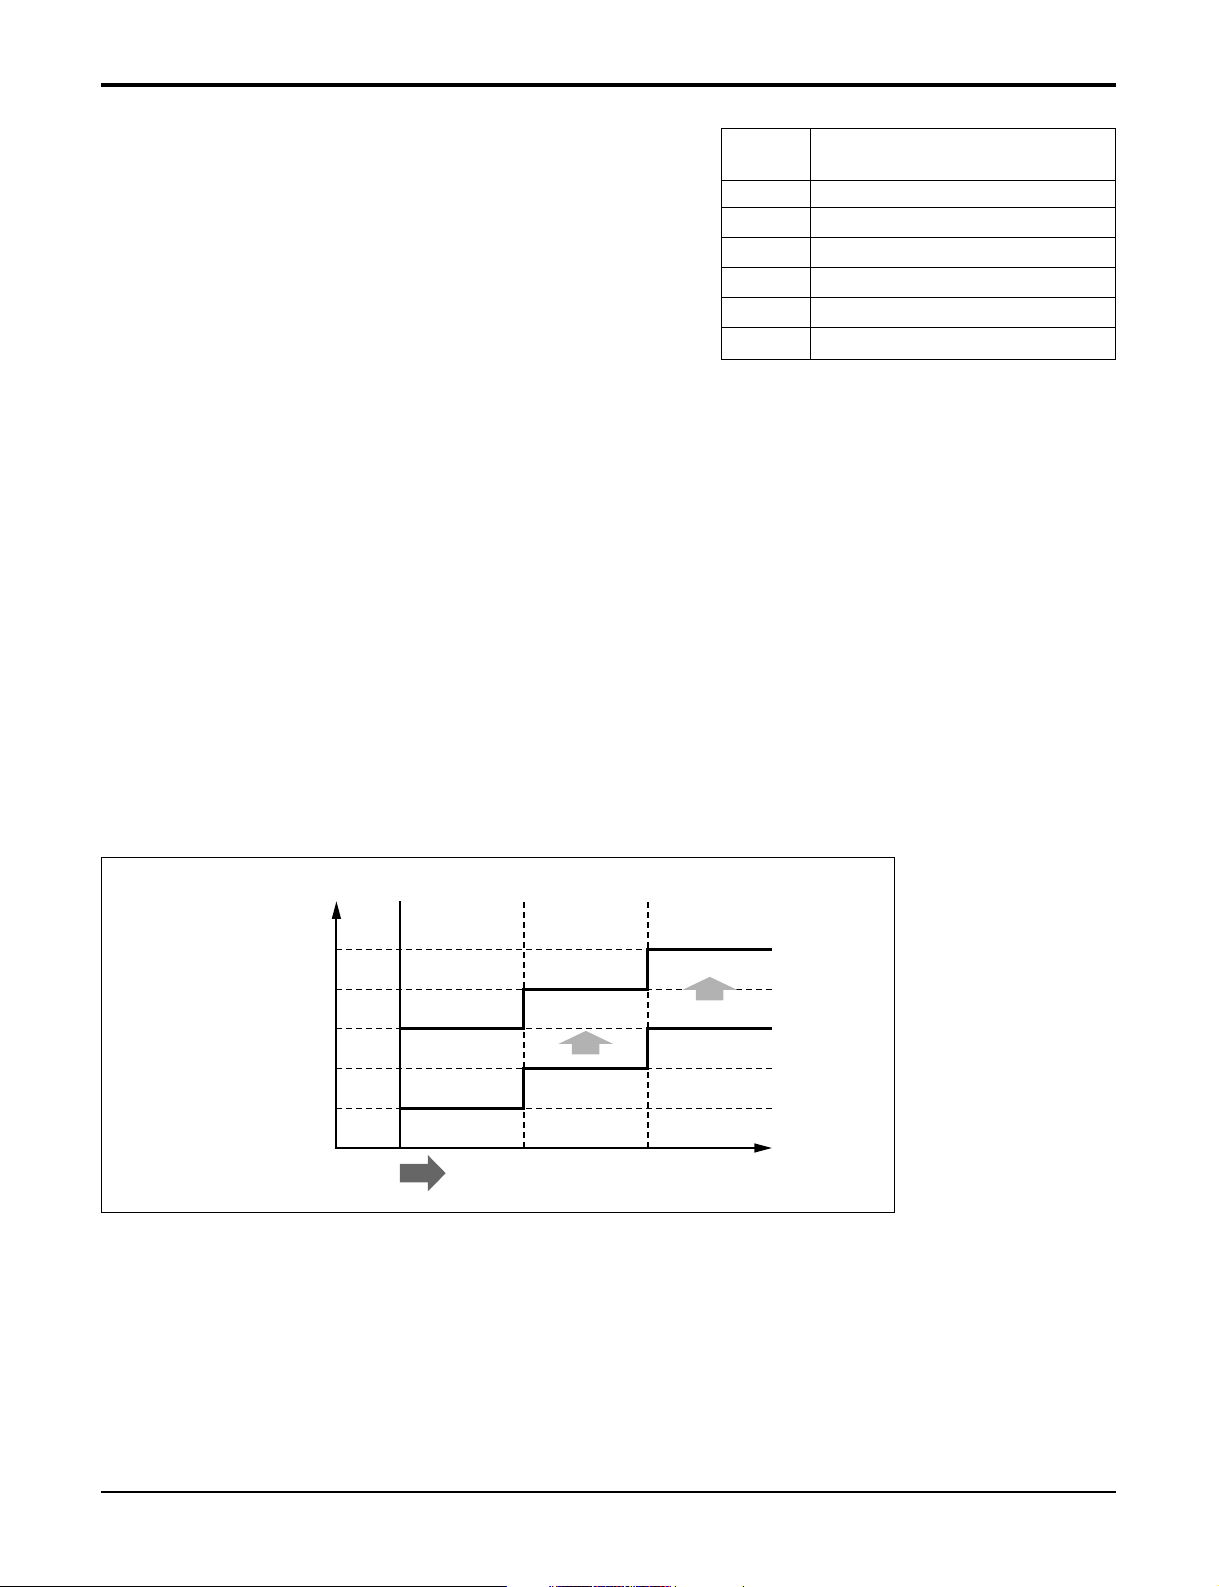
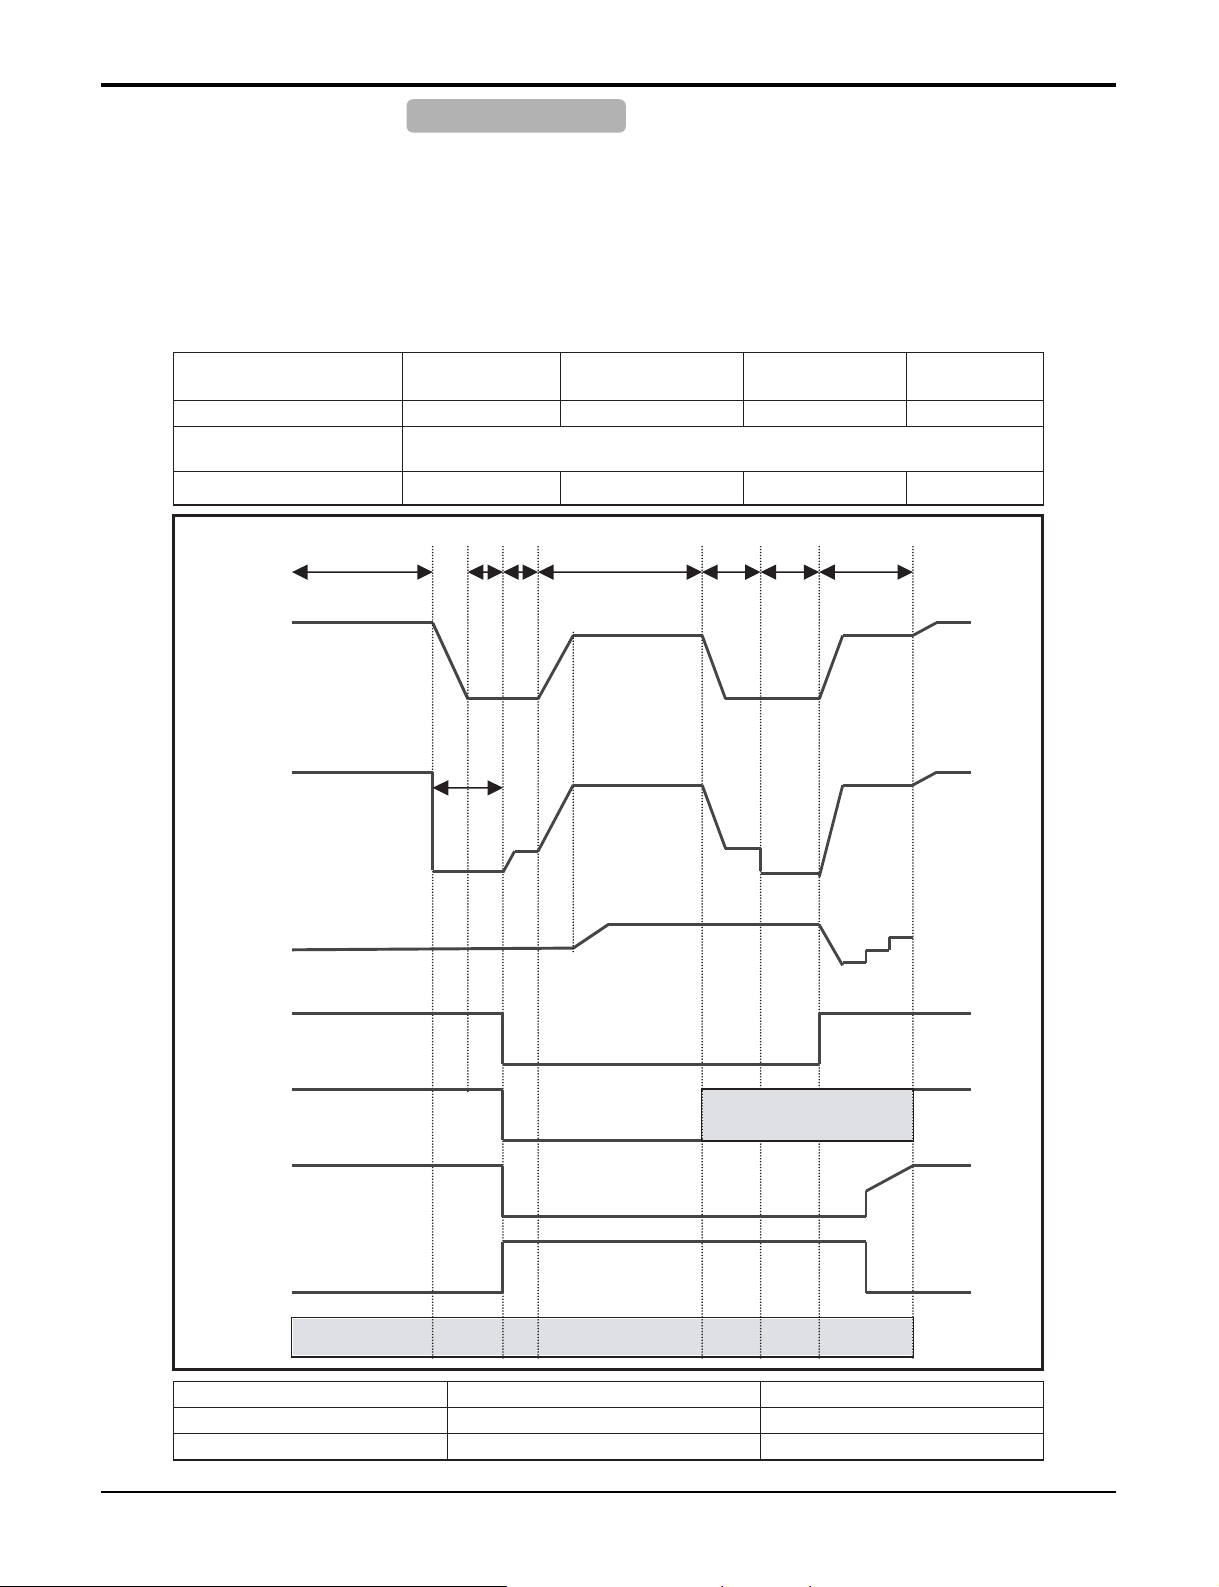
2. Basic Mode Controls
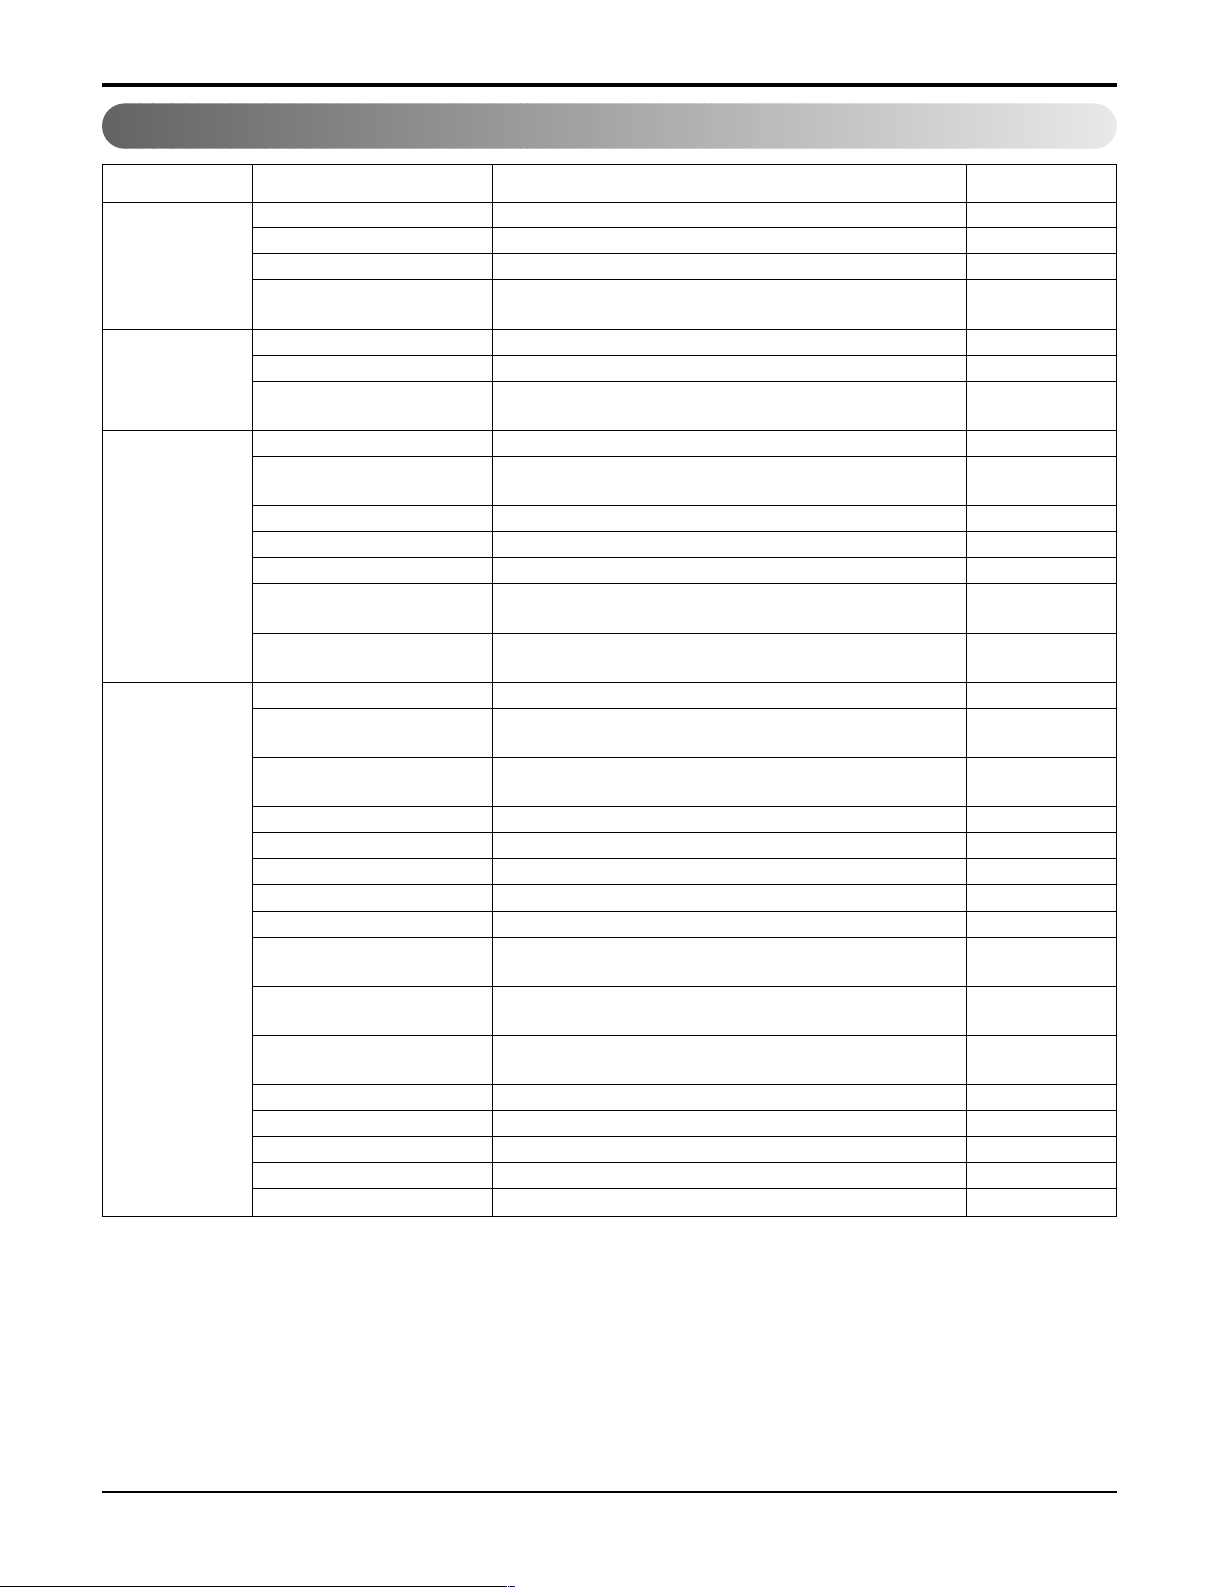
2.1 Cooling Mode
Part 2 Functions & Controls
+0.5°C(1°F)
Setting
Temp.
-0.5°C(-1°F)
INV. Comp.
Frequency
High LowHigh
Low
Comp. OFF
Thermo ON
Thermo OFF
• Operating frequency of compressor depends on the load condition, like the difference between the room temp. and
the set temp., frequency restrictions.
• If the compressor operates at some frequency, the operating frequency of compressor cannot be changed within 30
seconds. ( not emergency conditions)
• Compressor turned off when
- intake air temperature is in between ±0.5°C(±1°F) of the setting temp. limit for three minutes continuously.
- intake air temperature reaches below 1.0°C(2°F) of the temperature of setting temp..
• Compressors two minutes time delay.
- After compressor off, the compressor can restart minimum 2 minutes later.
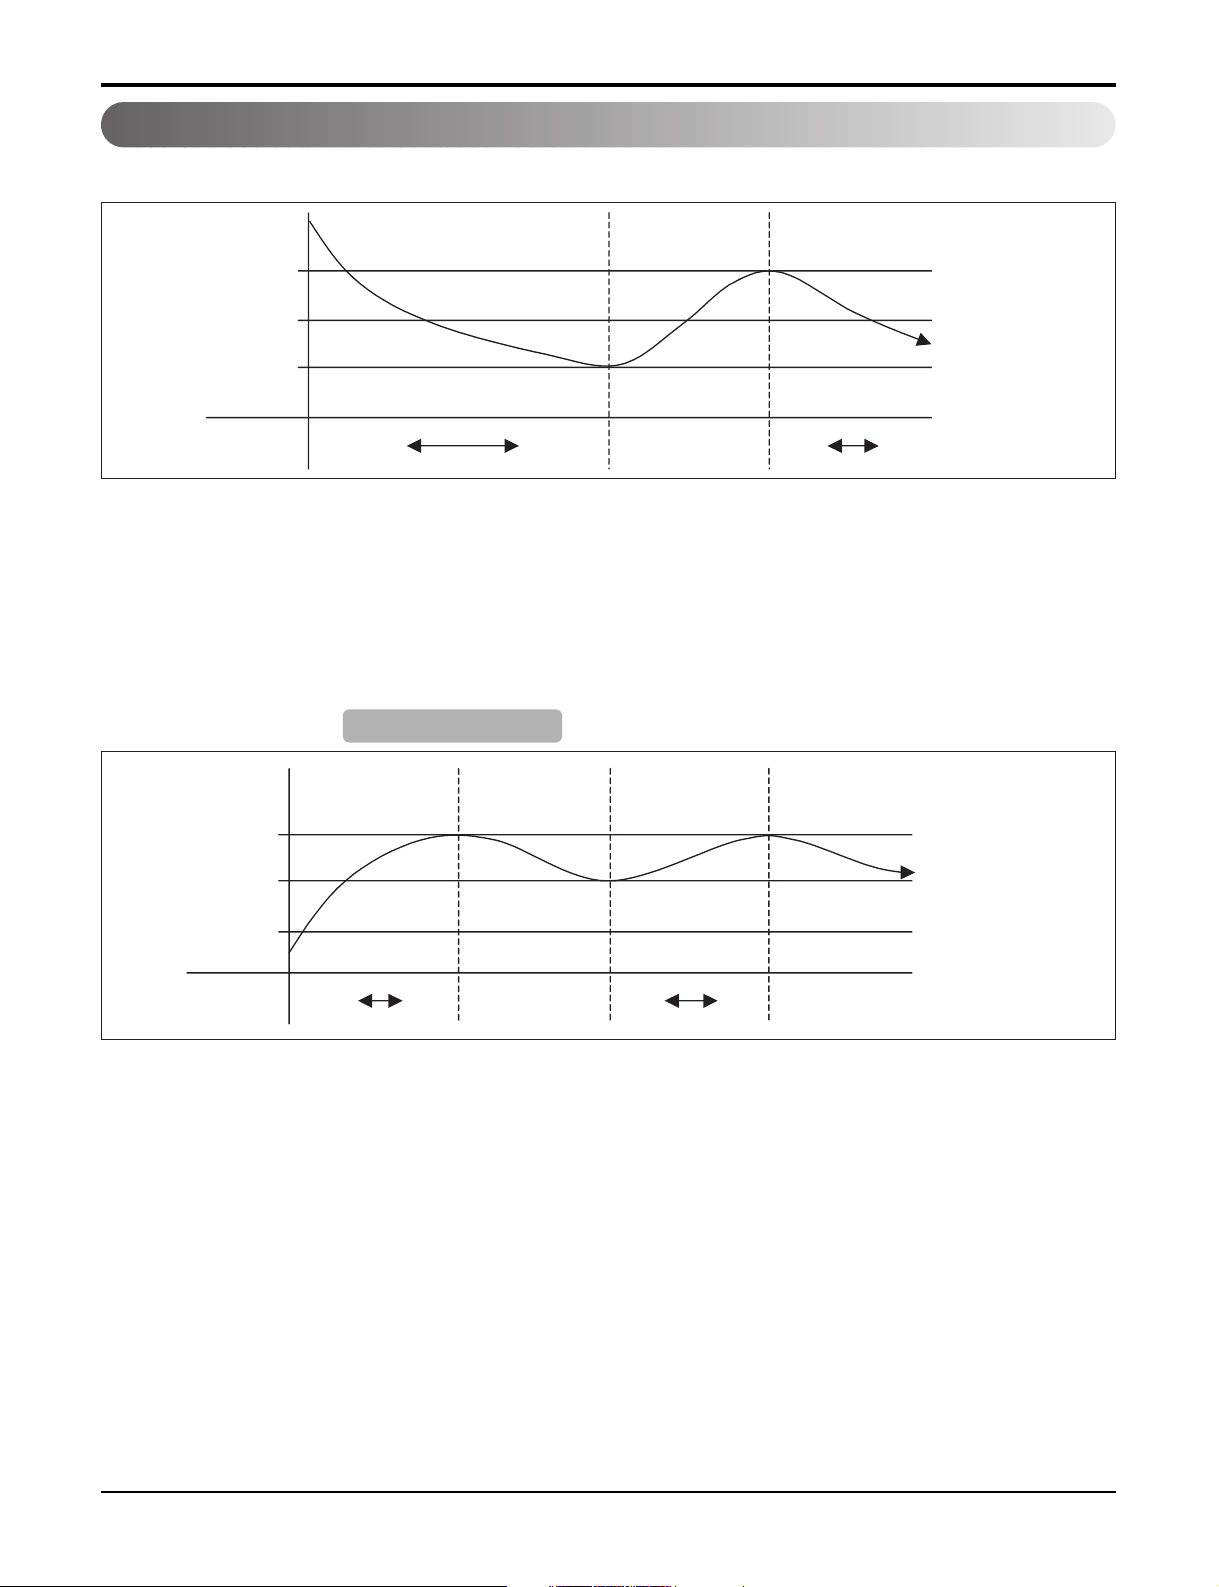
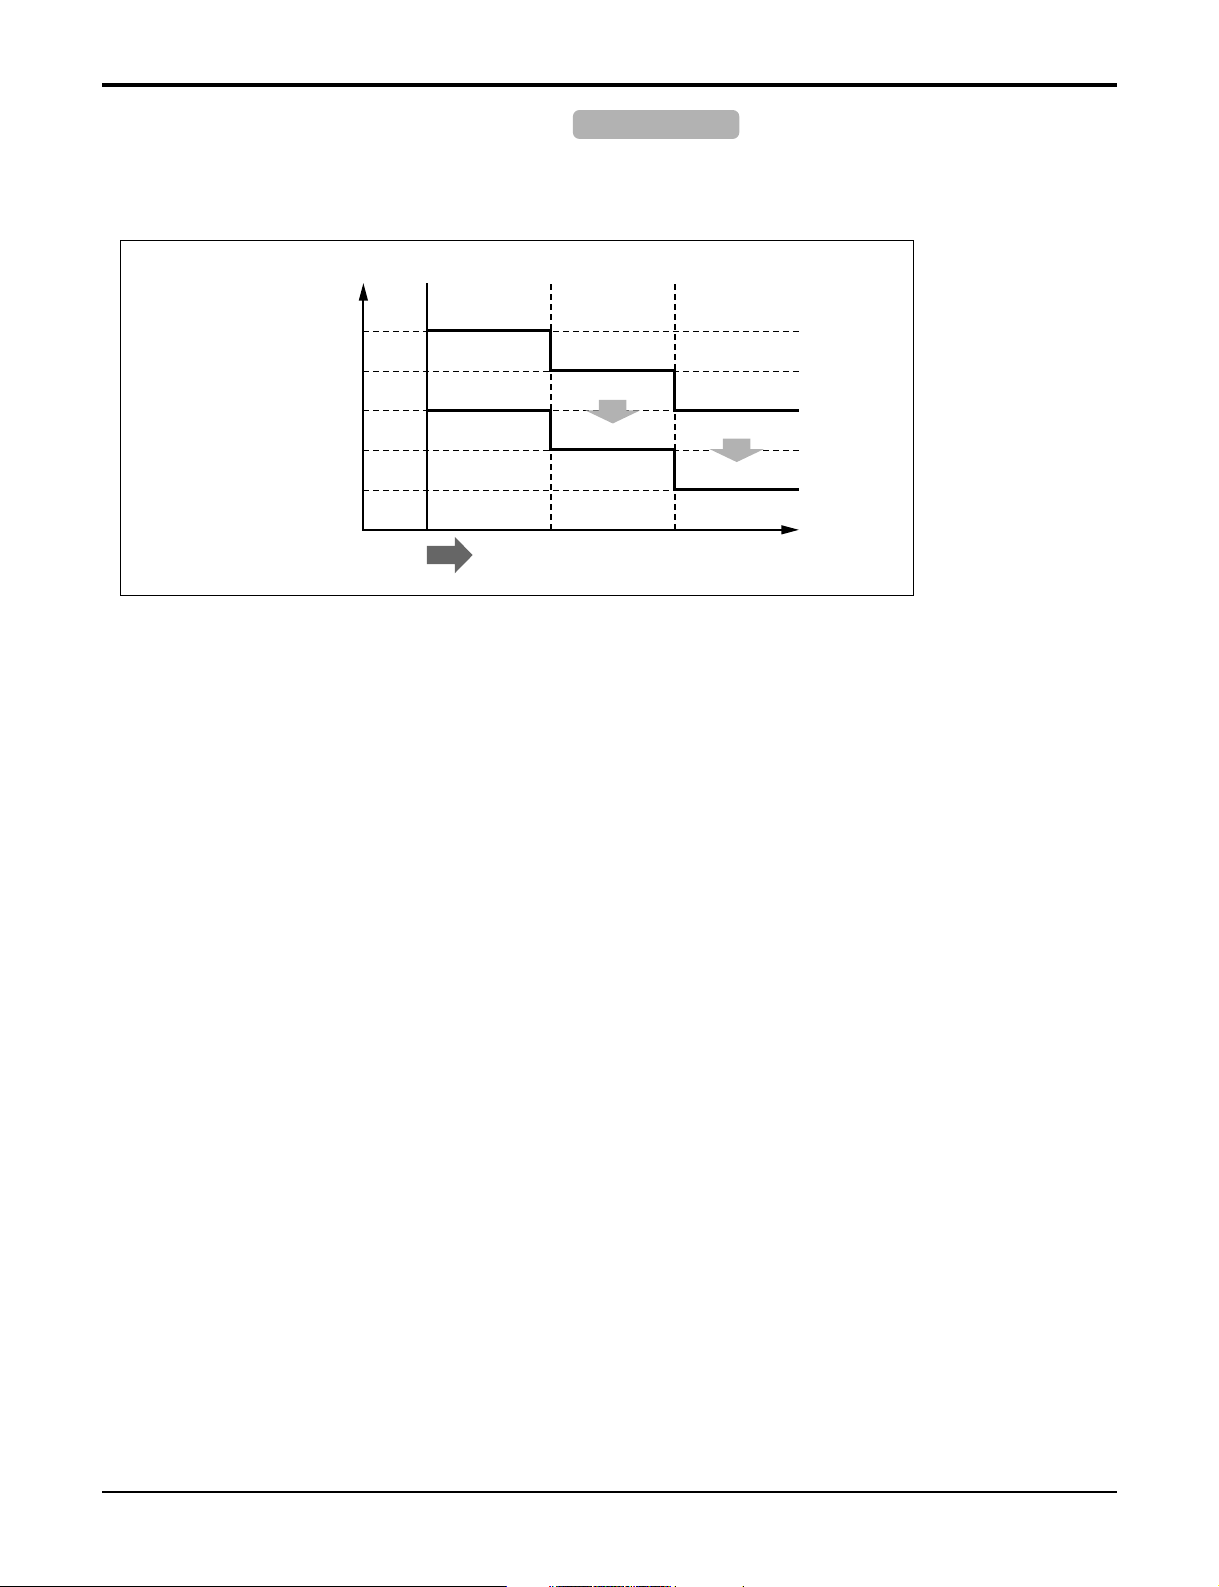
2.2 Heating Mode Heatpump Only
5˚C(9˚F)
Thermo OFF
2˚C(3.6˚F)
Setting
Temp.
INV. Comp.
Frequency
High LowHigh Comp. OFF
Low
Comp. OFF
Thermo ON
• Operating frequency of compressor depend on the load condition, The difference between the room temp. and set
temp., frequency restrictions.
• If compressor operates at some frequency, the operating frequency of compressor cannot be changed within 30 sec-
onds.
• Condition of compressor turned off
- When intake air temperature reaches +5°C(9°F) above the setting temperature.
• Condition of compressor turned on
- When intake air temperature reaches +2°C(3.6°F) above the setting temperature.
* Condition of indoor fan turned off
- While in compressor on : indoor pipe temp. < 20°C(68°F)
- While in compressor off : indoor pipe temp. < 30°C(86°F)
• While in defrost control, the indoor and outdoor fans are turned off.
• Compressor 2minutes delay
- After compressor off, the compressor can restart minimum 2 minutes later.
Only for training and service purposes
- 9 -
Page 10
Part 2 Functions & Controls
2.3 Healthy Dehumidification operation
• When the dehumidification operation is set by the remote controller, the intake air temperature is detected and the set-
ting temp. is automatically set according to the intake air temperature.
Intake air Temp. Setting Temp.
26°C(78.8
24°C(75.2
22°C(71.6
°F)
°F)
18°C(64.4°F) ≤ intake air temp. < 22°C(71.6
intake air temp. < 18°C(64.4
•
When intake air temp. is 1°C(2°F) above the setting temp., condition of compressor is same as in cooling mode operation.
°F)
≤ intake air temp. 25°C(77
≤ intake air temp.< 26°C(78.8
≤ intake air temp. < 24°C(75.2
°F)
°F)
°F)
°F)
°F)
intake air temp. -1°C(-2
intake air temp. -0.5°C(-1
intake air temp.
18°C(64.4
°F)
°F)
°F)
• When intake air temperature reaches 1°C(2°F) below the setting temp., compressor operates in lower frequency and
the indoor fan speed again operates at low speed or comes to a stop.
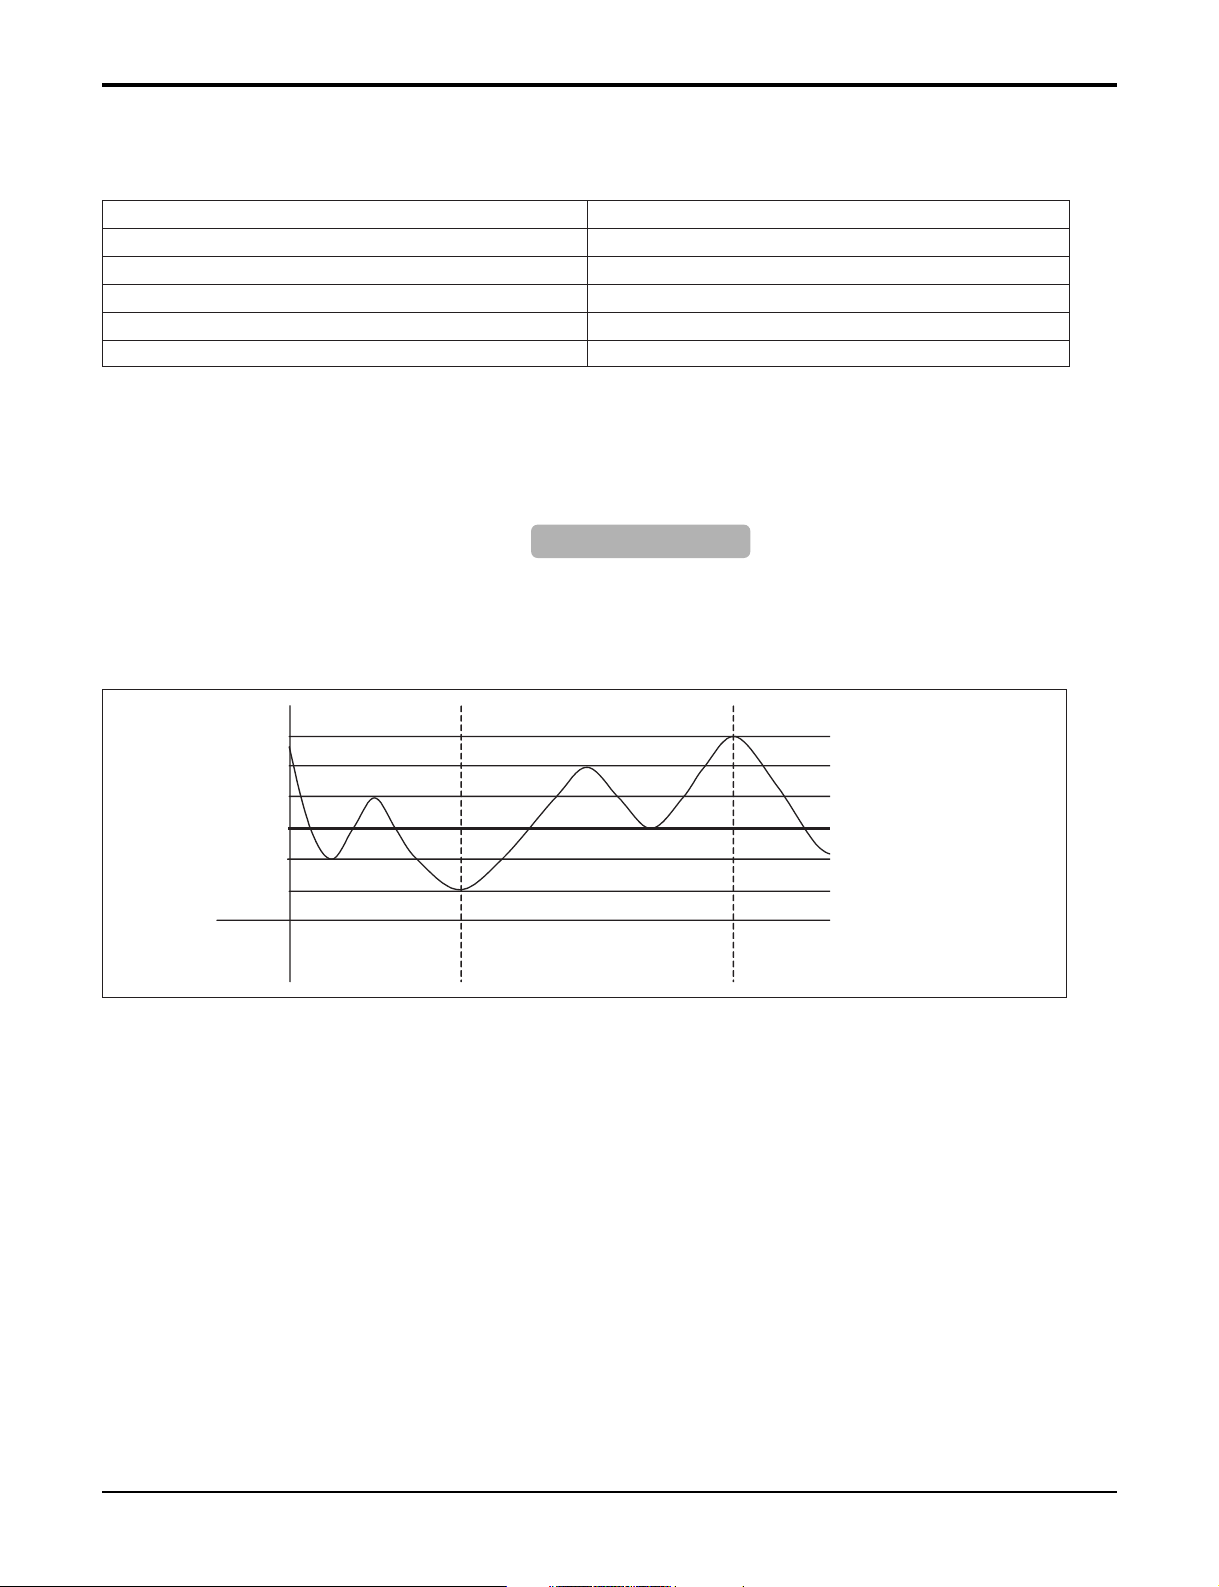
2.4 Auto changeover operation Heatpump Only
• The air conditioner changes the operation mode automatically to keep indoor temperature steady.
• When room temperature vary over ±2°C(±4°F) with respect to setting temperature, air conditioner keeps the room tem-
perature in ±2°C(±4°F) with respect to setting temperature by changing the mode from cooling to heating and vice
versa.
+4°C(+8°F)
+2°C(+4°F)
+0.5°C(+1°F)
Setting
Temp.
-0.5°C(-1°F)
-2°C(-4°F)
Mode
Switching point
Heating thermo off
Cooling thermo off
Switching point
Cooling
operation
Heating operation
Cooling
operation
Only for training and service purposes
- 10 -
Page 11

Part 2 Functions & Controls
3. Special Mode Controls
3.1 Jet Cool operation
• In the heating mode or Fuzzy operation, the Jet cool function does not work.
When it is input while in other mode of operation (cooling, dehumidification, ventilation), the Jet cool operation takes
place.
• In the Jet cool mode, the indoor fan is operated at super-high speed for 30 min. at cooling mode operation.
• In the Jet cool mode, the room temperature is maintained at a setting temperature of 18°C(64.4°F).
• When the sleep timer mode is input during the Jet cool operation, the Jet cool mode has the priority.
• When the Jet cool button is pressed, the horizontal vane of the unit is reset to the initial cooling vane position and then
operates so that the air outflow can reach further.
3.2 Jet Heat operation Heatpump Only
• While in cooling mode or Fuzzy operation, the Jet Heat function does not work.
When it is input while in the Heating mode operation (dehumidification), the Jet Heat mode operation takes place
• In the Jet Heat mode, the indoor fan operated at super-high speed for 60 min. at Heating mode operation.
• In the Jet Heat mode, the room temperature is maintained at a temperature of 30°C(86°F).
• When the sleep timer mode is input during the Jet Heat mode operation, the Jet Heat mode has the priority.
• When the Jet Heat button is pressed, the horizontal vane of the unit is reset to the initial Jet heating vane position and
then operates so that the air outflow can reach further.
3.3 Energy saving operation in cooling mode
• During cooling and dehumidification mode of operation, the Energy saving button can be input.
• In this operation, the set temperature and air volume is set automatically to save energy.
Only for training and service purposes
- 11 -
Page 12
Part 2 Functions & Controls
4. Utility Functions
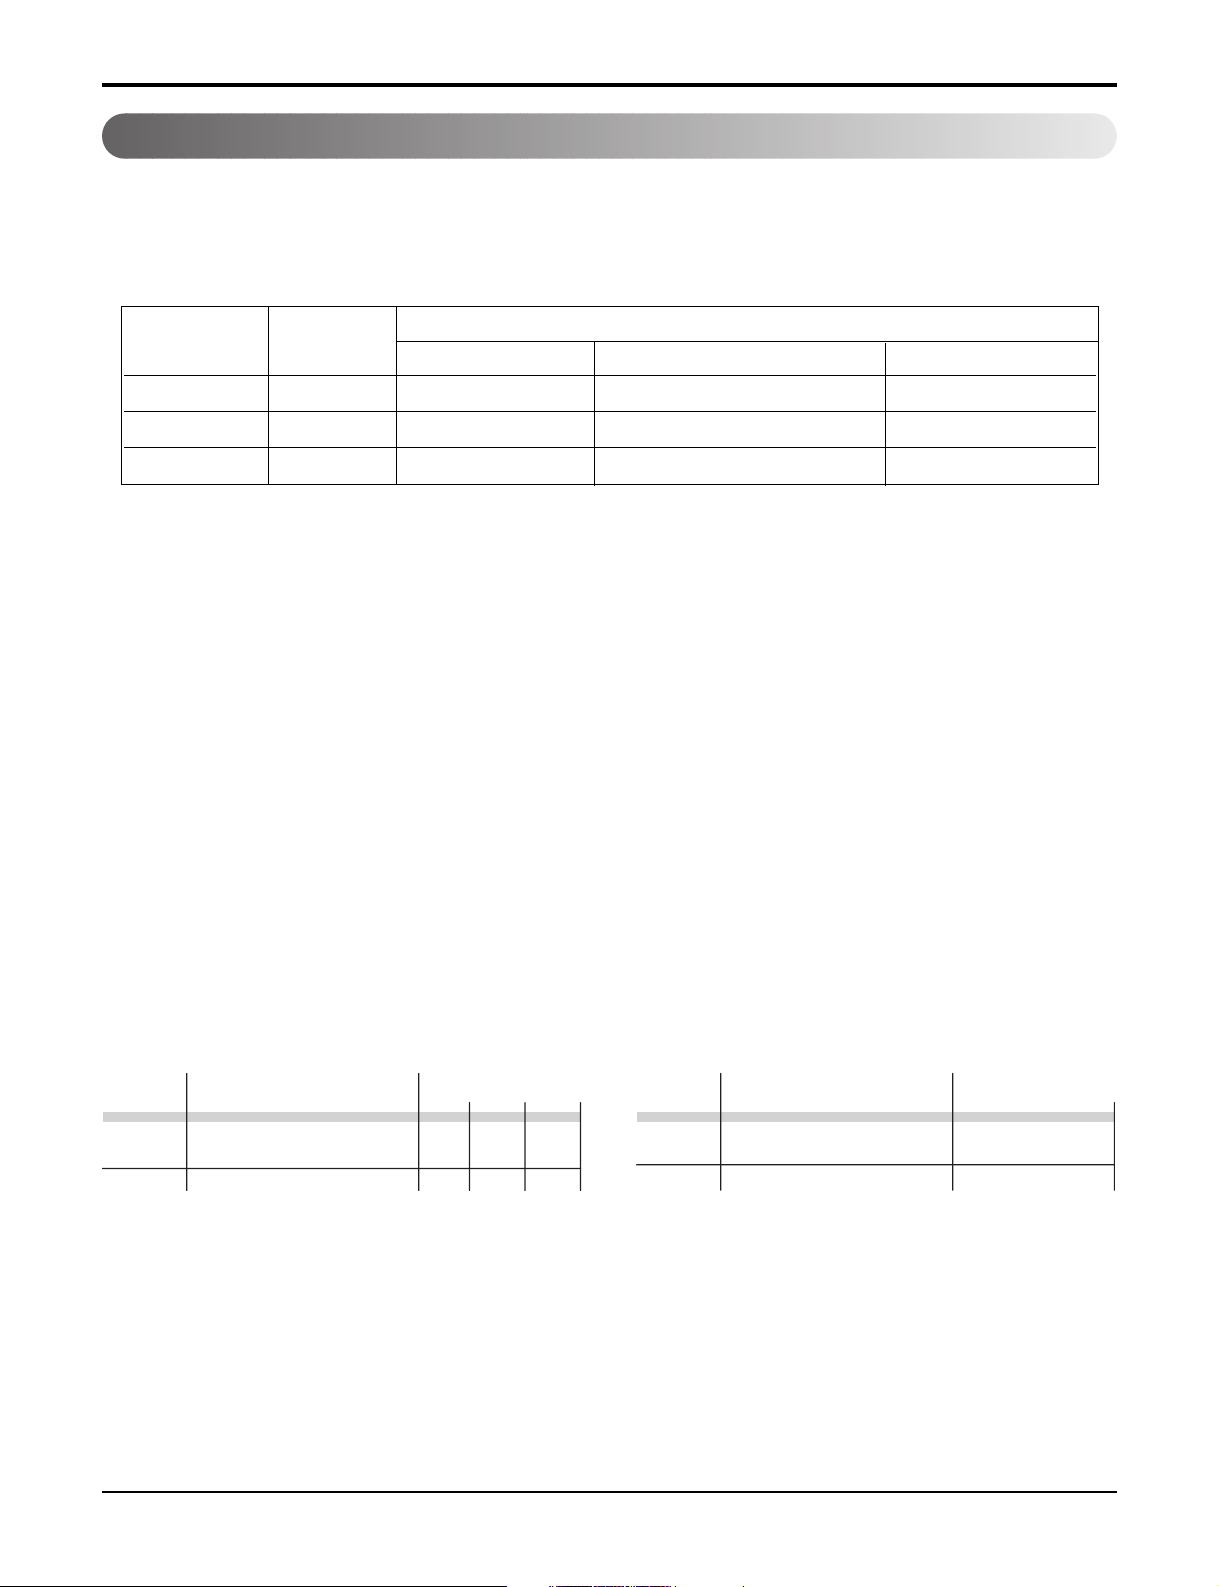
4.1 Forced operation
• To operate the appliance manually if the remote control is lost. The forced operation selection switch is on the main
unit of the appliance and will operate the appliance in the standard conditions.
• The operating condition is set according to the outdoor temp. and intake air temperature as follows.
Heat pump Model
Cooling Model
Operating mode Cooling Cooling Healthy Dehumidification Heating
Indoor FAN Speed High High High High
Setting Temperature 22°C(71.6°F) 22°C(71.6°F) 23°C(73.4°F) 24°C(75.2°F)
• The unit will automatically select the last operation mode it last operated in within the past 3 hours based off of infor-
mation stored in the unit's memory.
• Operating procedures when the remote control can't be used is as follows :
- The operation will be started if the ON/OFF button is pressed.
- If you want to stop operation, re-press the button.
- The ON/OFF switch is on the display PCB or side of indoor unit
Room Temp. ≥ 24°C(75.2°F) 21°C(69.8°F) ≤ Room Temp. < 24°C(75.2°F) Room Temp. < 21°C(69.8°F)
4.2 Auto cleaning operation
• Function used to perform Self Cleaning to prevent the Unit from Fungus and bad odor.
• Use after the cooling operation, before turning the unit off. This operation cleans and dries the evaporator based on
the cycle below, until the unit is operated again.
• The function is easy to operate as it is accessed through the Remote controller.
1) Heat/pump Model
ON
Cooling CYCLE
Comp.
Indoor Fan Setting Step LL LL LL
ON
OFF
13 Min
HeatingFan
60 Sec 120 Sec
ONOFF OFF
Fan
2) Cooling/only Model
ON
Cooling CYCLE
Comp.
Indoor Fan
Setting Step Low
ON
OFF
Fan
30 Min
OFF
Only for training and service purposes
- 12 -
Page 13
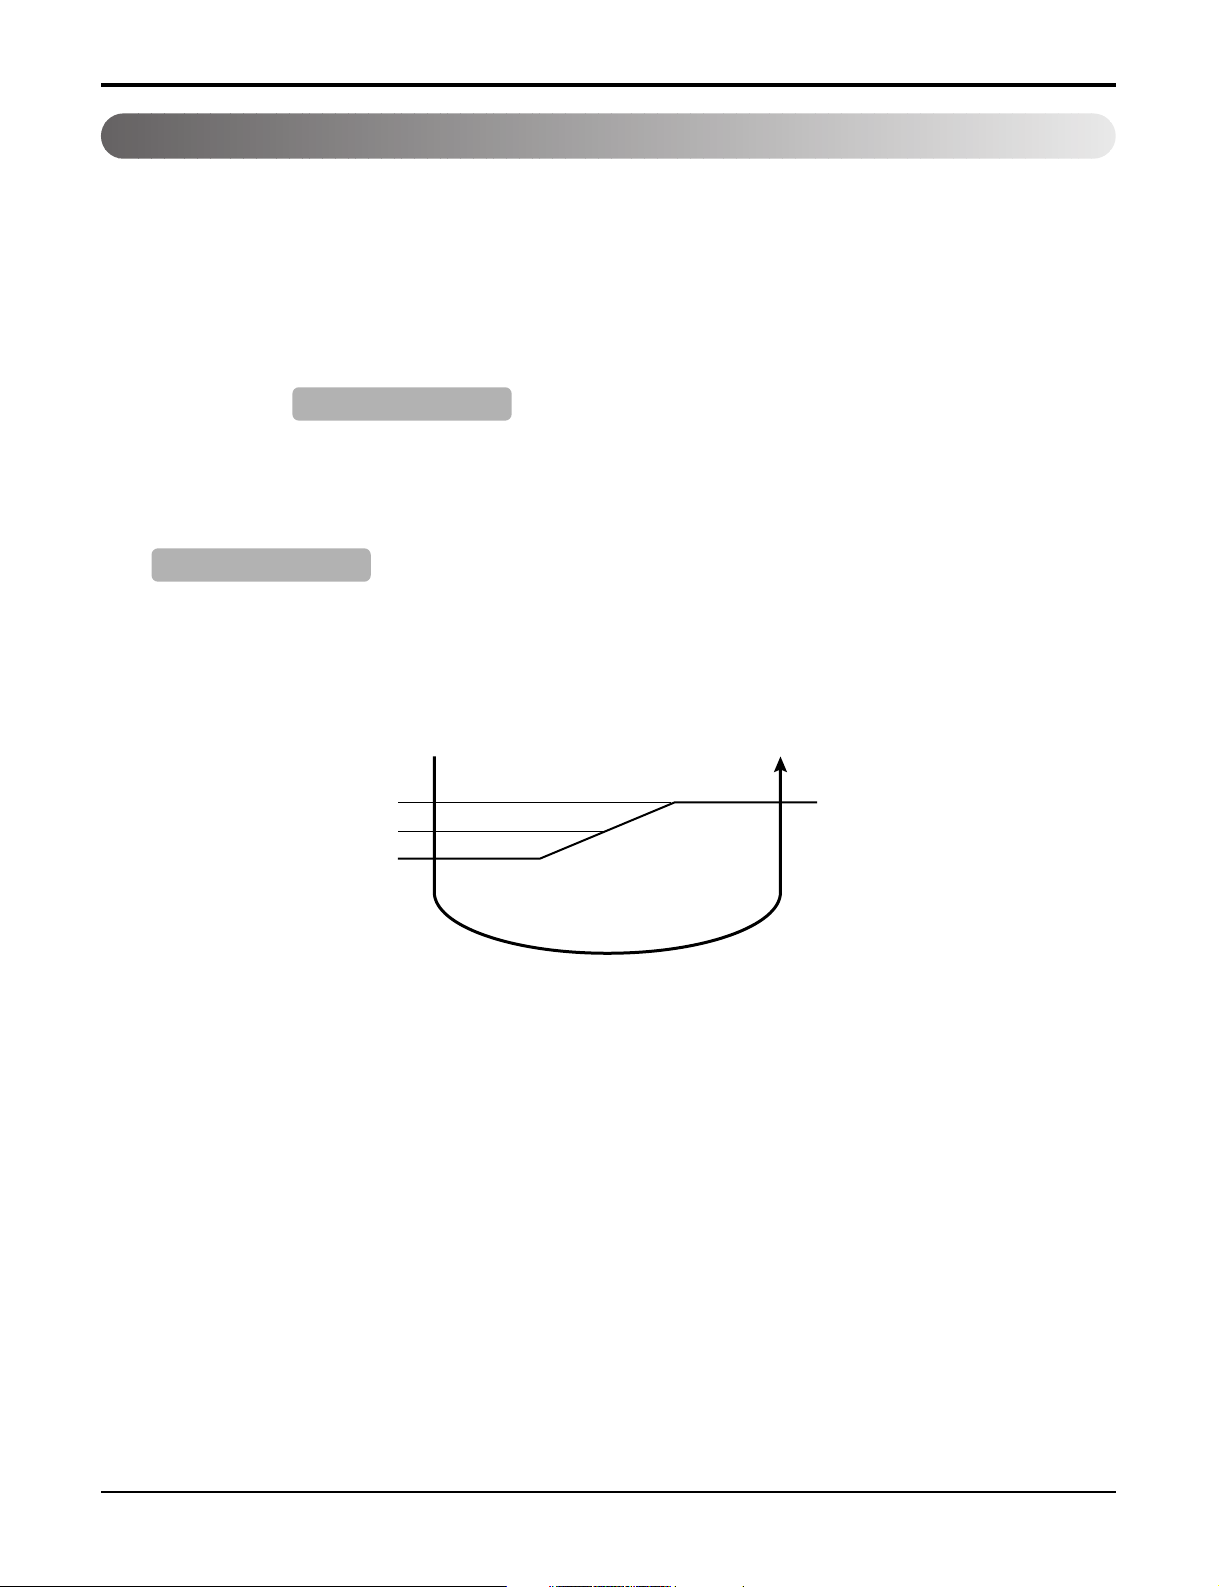
Setting temp. (˚C)
1.0˚C(2˚F) up
1.0˚C(2˚F) up
Cooling ON temp.
(Setting temp. +0.5˚C(+1˚F))
Cooling OFF temp.
(Setting temp. -0.5˚C(-1˚F))
0.5 1 Sleep time (hour
)
Part 2 Functions & Controls
4.3 Air volume control
• Indoor fan motor control have 6 steps.
• Air volume is controlled "SH", "H", "Med", "Low" by the remote con-
troller.
• "LL" step is selected automatically in Hot start operation.
4.4 Natural Air Control(Auto Wind)
• When the Auto Step is selected, the high, medium, or low speed of
the airflow mode is operated for 2~15 sec. randomly by the Chaos
Simulation.
Step Description
LL Very low, In heating mode
L Low
M Med
H High
SH Super high
Auto Natural wind
4.5 Chaos Swing
• By selecting Chaos swing, the horizontal vane automatically operates with a swinging motion or it is fixed to the
desired direction.
4.6 Sleep mode Auto control
• Using the remote control, the sleep mode timer can be set for a time period of 1,2,3,4,5,6 or 7 hours. During this time
period the unit will operate as described in sections 4.6.1 or 4.6.2, until the set time period has expired. Once the set
time period has been reached, the unit will automatically turn off.
• When the appliance is on pause, the sleep timer mode cannot be input.
4.6.1 Sleep timer operation for cooling cycle
• While in cooling mode , 30 min. after the start of the sleep timer, the setting temperature increases by 1°C(2°F).
After another 30minutes lapse, it increases again by 1°C(2°F).
NOTE: Some Models are different by swing width and swing pattern.
Only for training and service purposes
- 13 -
Page 14
Part 2 Functions & Controls
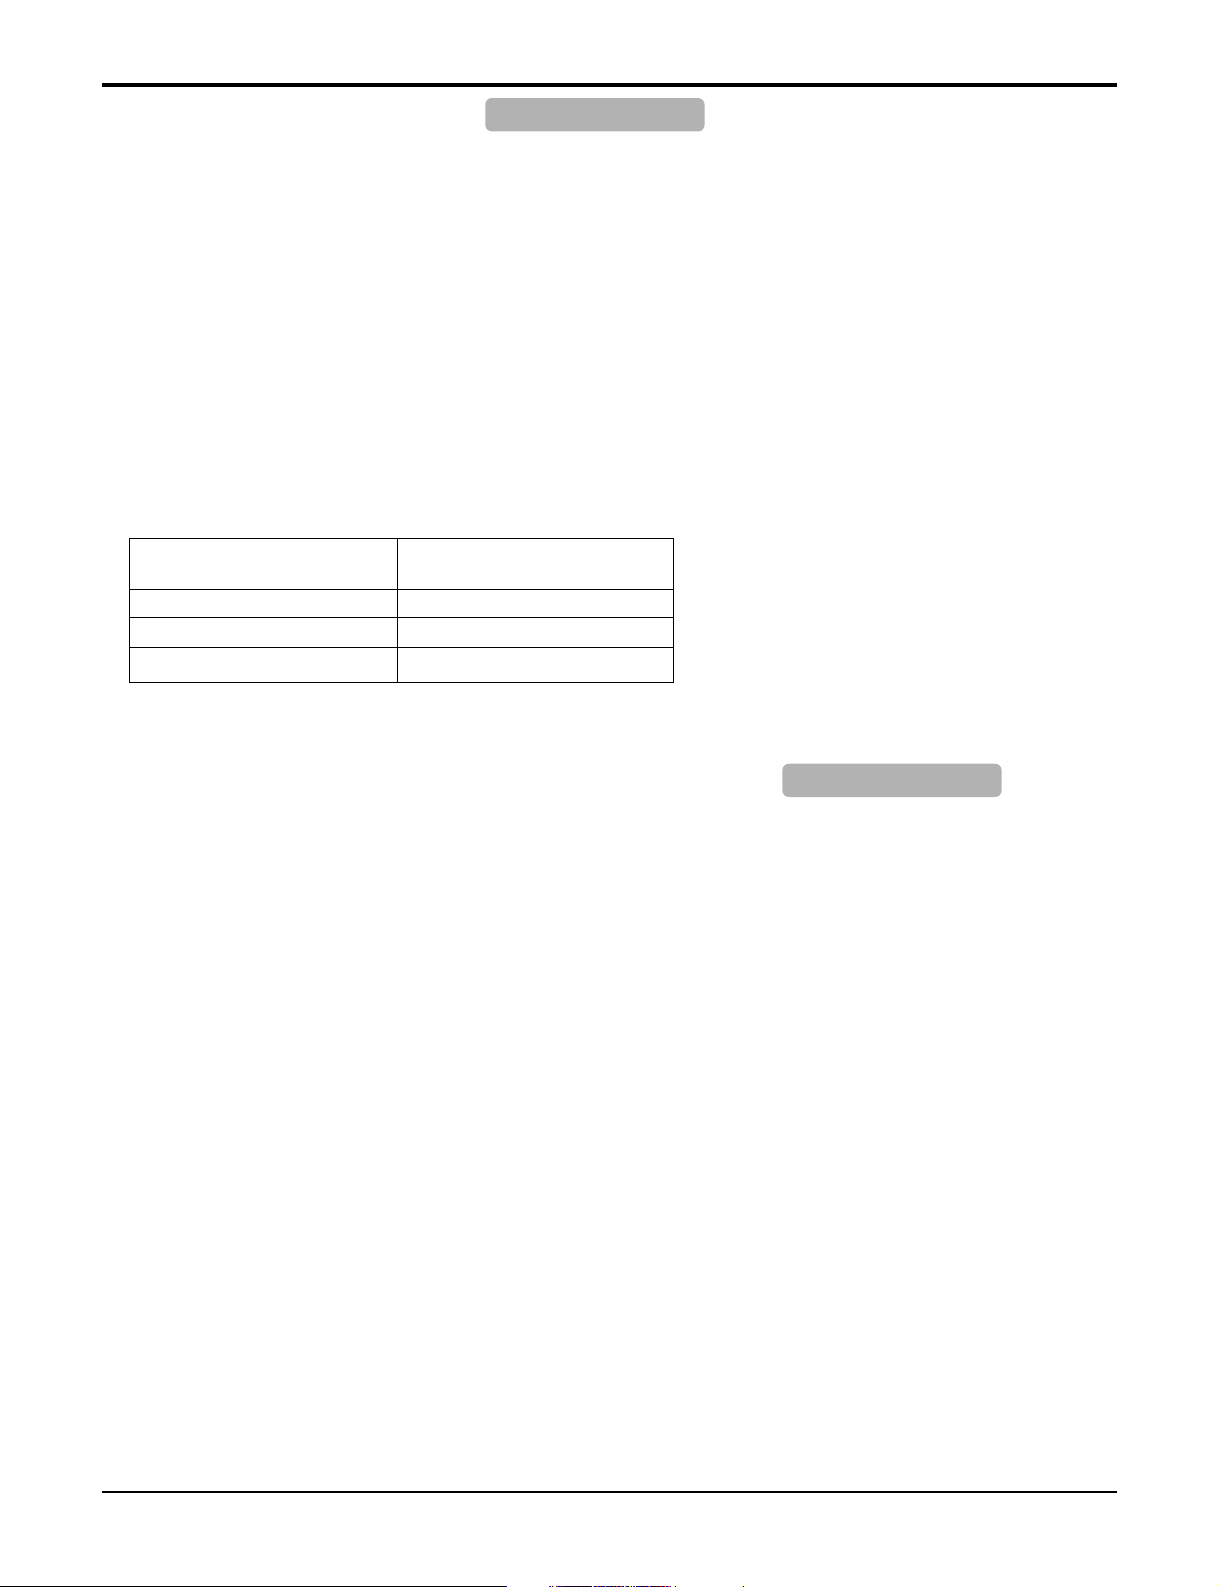
Setting temp. (°C)
Heating ON temp.
(Setting temp)
Heating OFF temp.
(Setting temp. +4.0°C(+8°F))
1 2 Sleep time (hr
)
1.0°C(2°F) down
1.0°C(2°F) down
4.6.2 Sleep timer operation for heating cycle Heatpump Only
• While in heating mode, 60 min. after the start of the sleep timer, the setting temperature decreases by 1°C(2°F).
After another 60minutes lapse, it decreases again by 1°C(2°F).
4.7 Auto restart
• When the power comes back after a sudden power failure during operation, the mode before the power failure is kept
in the memory of the appliance appliance. Upon restoring power, The unit will return back to it's last operation mode
automatically based on the information saved in the appliance's memory, as shown below.
• Operation mode that is kept on the memory
- State of operation ON/OFF
- Operation mode/setting temp./selected airflow speed
- Sleep timer mode/remaining time of sleep timer
- Chaos Swing
Only for training and service purposes
- 14 -
Page 15
Part 2 Functions & Controls
Comp. free
Comp. Step 4
Comp. Step 2
Comp. off
T1
3˚C(37.4˚F)
6˚C(42.8˚F)
7˚C(44.6˚F)
Indoor pipe
temp.
5. Protection Functions & Controls
5.1 Five Seconds Stand-by (fan)
• The indoor unit fan will begin to rotate after 5 seconds of the unit being turned on.
5.2 Two Minutes Stand-by (comp.)
• After the compressor cycles off, it will not restart for a minimum of 2 minutes.
5.3 Hot start Heatpump Only
• To prevent cold air from blowing in the room upon starting up the unit in heating mode, the indoor fan will not rotate
until the heat exchanger temperature reaches 30˚C(86˚F).
5.4 Freeze prevention (Protection of the evaporator pipe from frosting)
Heatpump Only
• If the indoor pipe temperature is below 0˚C(32˚F) within 7 minutes after the compressor operates continuously in cooling mode, the compressor and outdoor fan will turn off.
• When the indoor pipe temperature is 7˚C (44.6˚F) or higher after a 2 minute pause/cycle off of the compressor, the
compressor and outdoor fan will turn on according to the condition of the indoor air temperature.
NOTE: Some Models are different by T1.
Only for training and service purposes
T1: 0 ~ 2°C(32~35.6°F)
- 15 -
Page 16
Part 2 Functions & Controls
5.5 Compressor Preheating Heatpump Only
5.5.1 9,12kBtu/h Model
With low outdoor temperature, preheating the compressor compressor is neccessary to maintain the oil viscosity before the unit starts.
The preheating Mode preheats the compressor motor coil/windings by electric current without compressor running.
Mode-in conditions : Outdoor temp. < 0˚C (32˚F) and Discharge pipe temp < 15˚C (59˚F)
Mode-out conditions : Outdoor temp. > 5˚C (41˚F) or Discharge pipe temp < 25˚C (77˚F) or Compressor on
5.5.2 18, 24, 30kBtu/h Model
When the unit starts with low outdoor temperature, preheating the compressor is neccessary to maintain the oil
viscosity.
upper case Under the following conditions, the compressor runs at 15Hz for a specific time
Conditions : heat sink temperature < 0˚C (32˚F) and Discharge pipe temp < 0˚C (32˚F)
Outdoor Temperature Running Time [sec]
-5˚C (23˚F) ~ -0˚C(32˚F) 90
-10˚C (14˚F) ~ -5˚C (23˚F) 180
Under -10˚C (14˚F) 300
5.6 Sump Heater Control (9, 12kBtu/h Model Only) Heatpump Only
With low outdoor temperature, the sump heater located on base panel prevents icing that may cause drain
blockage and fan damage.
Heater-on conditions : Outdoor temp. ≤ 0˚C (32˚F) and heating mode
Heater-out conditions : Outdoor temp. > 1˚C (34˚F)
Only for training and service purposes
- 16 -
Page 17
Part 2 Functions & Controls
5.5 Automatic defrost Heatpump Only
5.5.1 9,12kBtu/h Model
• While in heating mode operation, in order to protect the evaporator pipe of the outdoor unit from freezing,
the unit is reversed to the cooling cycle to defrost the evaporator pipe of the outdoor unit.
• Defrost control is available 40 minutes after the heating cycle started and the difference of the pipe
tem-perature of outdoor unit reaches above option 1.
• The defrost control is available without reference to heating operation time only if the pipe temperature of
outdoor unit reaches below option 2.
The mean outdoor
temperature
The minimum Time of
Heating(sec)
Minimum Time
Of Heating
Operating
Setting Freq.
Freq. Of
Comp
(Comp off
Inapplicable.)
Operating
Setting Freq.
Freq. Of
Comp
(Comp off
Applicable.)
The Degree
of Superheat
EEV
Control
Open step
4-Way
Indoor
ON
Setting
Speed
FAN
Setting
Indoor
Speed
FAN
-10˚C(14˚F) less than
>4Option 1
And Heating operating time 40 minutes
5sec
5sec
Step 5
Min
15 sec
off
Step 5
Min
-5~0˚C(23~32˚F) between
Expected heating operating time
Main Deice time
30 sec
10 sec
300
OFF
Min
off
Min
off
Starting Step
Hi Speed
Hot
OFF
Start
1min
Step 3
Step 3
ON
0˚C(32˚F) more than-10~-5˚C(14~23˚F) between
>5>5>5
-25-25-30-30Option 2
Setting
Freq.
Setting
Speed
Super low speed
° low speed
Pre-Heat
LED
OFF
Deice STEP 0123456
Model (kBtu/h) Compressor Frequency EEV
9 65Hz(Step 5) 300
12 80Hz(Step 5) 300
Only for training and service purposes
- 17 -
ON
OFF
Page 18
Part 2 Functions & Controls
5.5.2 18,24,30kBtu/h Model
• Starting the defrosting operation
1) Defrost operation will start when the conditions below are met:
a) Accumulation time of operation and the period after completion of defrost = 35 min.
b) After 10 minutes from re-starting the compressor and over 35 minutes of accumulated operating time,
defrosting operation starts after 10 minutes.
c) Piping temperature of the outdoor heat exchanger is maintained below the defrost starting temperature for 4
minutes after 35 minutes continuous operation.
d) Exceeding 10 minutes after oil recovery operation
2) Outdoor piping temperature is below –6°C (21.2°F, Option) for starting defrosting operation.
Defrosting
Comp. Freqency
Model (kBtu/h) Defrosting Comp. Frequency EEV
18 90Hz 350
24 77Hz 350
30 90Hz 350
Only for training and service purposes
- 18 -
Page 19

Part 2 Functions & Controls
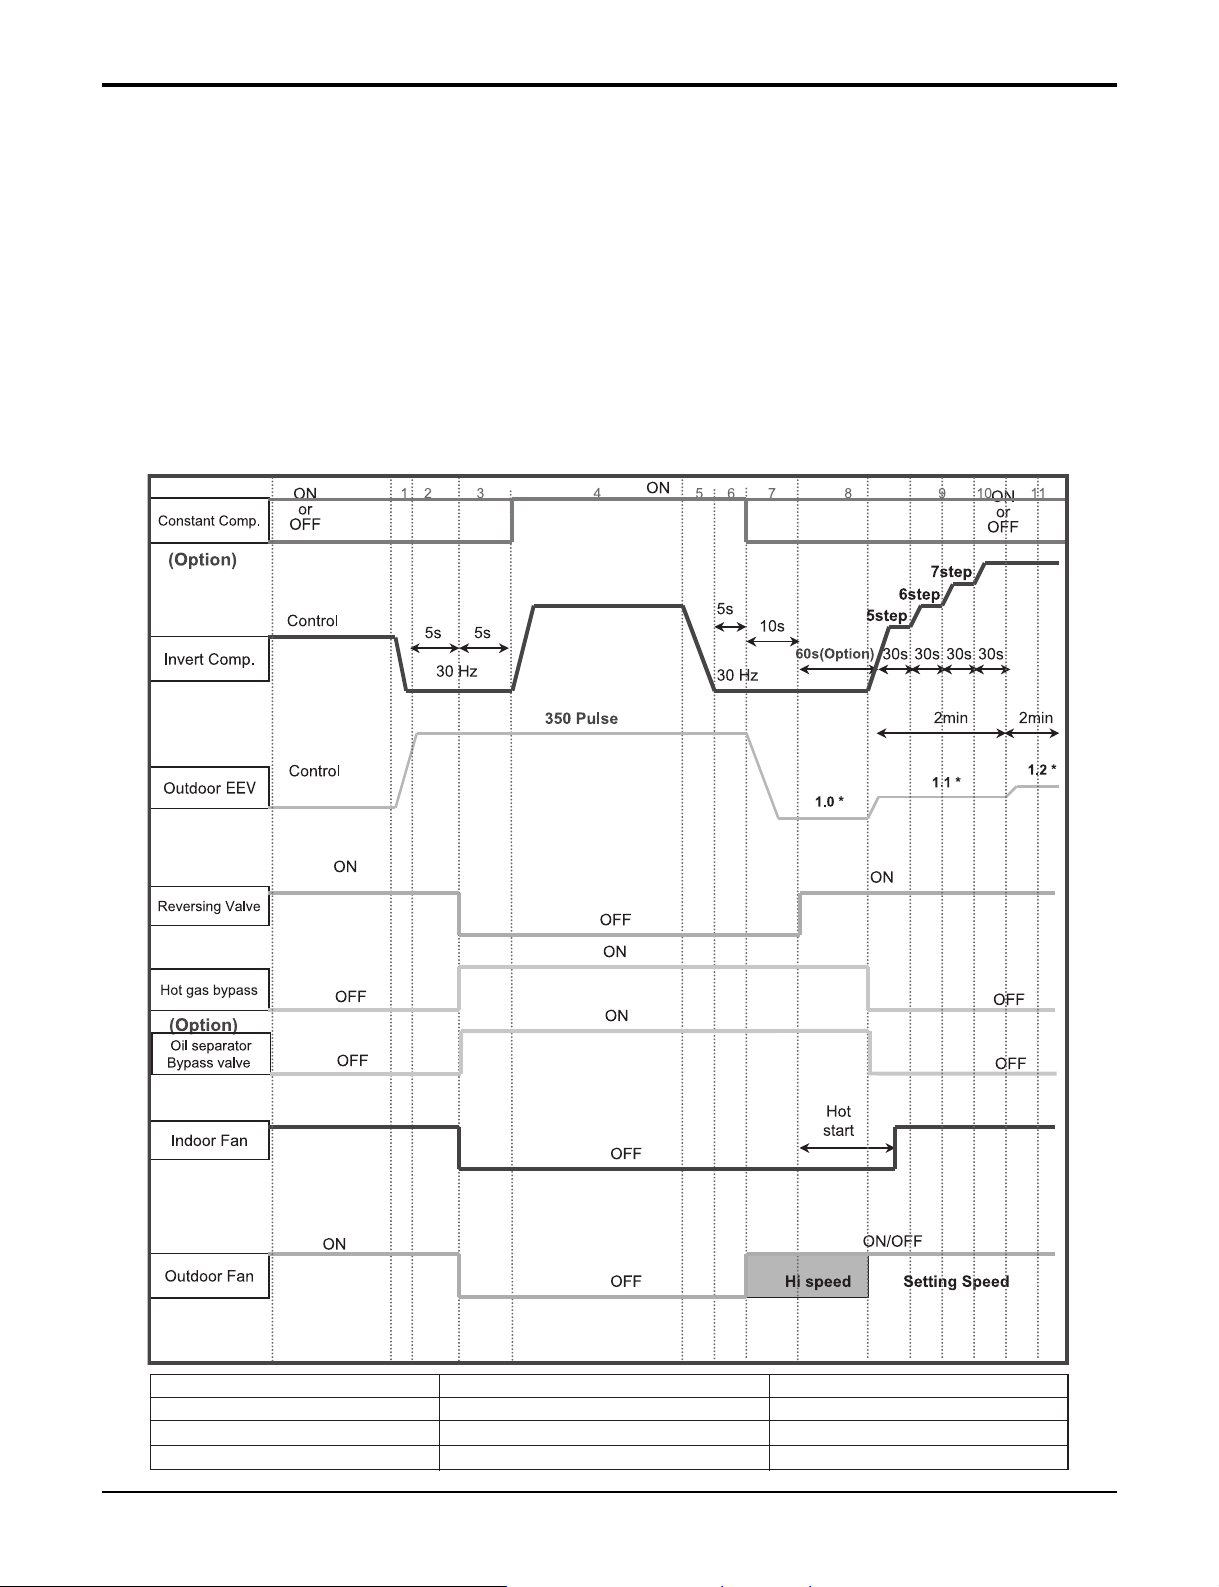
• Defrosting Control Algorithm
1) Lowering the compressor frequency starts the defrosting operation.
Constant speed compressor is ON 10 seconds.
2) The EEV has an opening 350 pulse (Option) when starting the defrosting operation.
3) Reversing valve is OFF after 5 seconds from the compressor reaching an operating frequency of 30 Hz.
Then the indoor fan turns OFF (including when the indoor unit is OFF, except if the remote controller is OFF).
4) After 5 seconds from the compressor reaching 30Hz, the outdoor unit fan turns off and the Hot gas Bypass/Oil
Separator valve turns OFF.
NOTE: Comp.frequency and EEV pulse is different for each models.
• Control algorithm of defrost completion
1) Frequency of compressor lowers to 30 Hz and maintains constant speed operation at 30 Hz for 75 seconds and
then starts operating. If the constant speed compressor is OFF, it will receive an off receive OFF signal after 5
seconds from the compressor reaching 30 Hz.
2) The EEV will open with the standard previous pulse after 5 seconds from the time the compressor reaches 30
Hz.
3) Reversing valve is ON after 15 seconds from the time the compressor reaches 30 Hz.
4) The indoor unit fan is ON with high speed for 5 seconds from the time the compressor reaches 30Hz.
5) Hot Gas bypass valve/Oil separator bypass valve is OFF after 75 seconds from the time the compressor reach-
es 30Hz.
NOTE: Comp.frequency and EEV pulse is different for each models.
Only for training and service purposes
- 19 -
Page 20
Part 2 Functions & Controls
3Ø
Comp.
Motor
U
UV W
V
W
+
5.6 Power Relay Control
• Power relay turns on 1 second later after the power is supplied to the outdoor unit.
• Control sequence : power on → PTC operating → power relay on
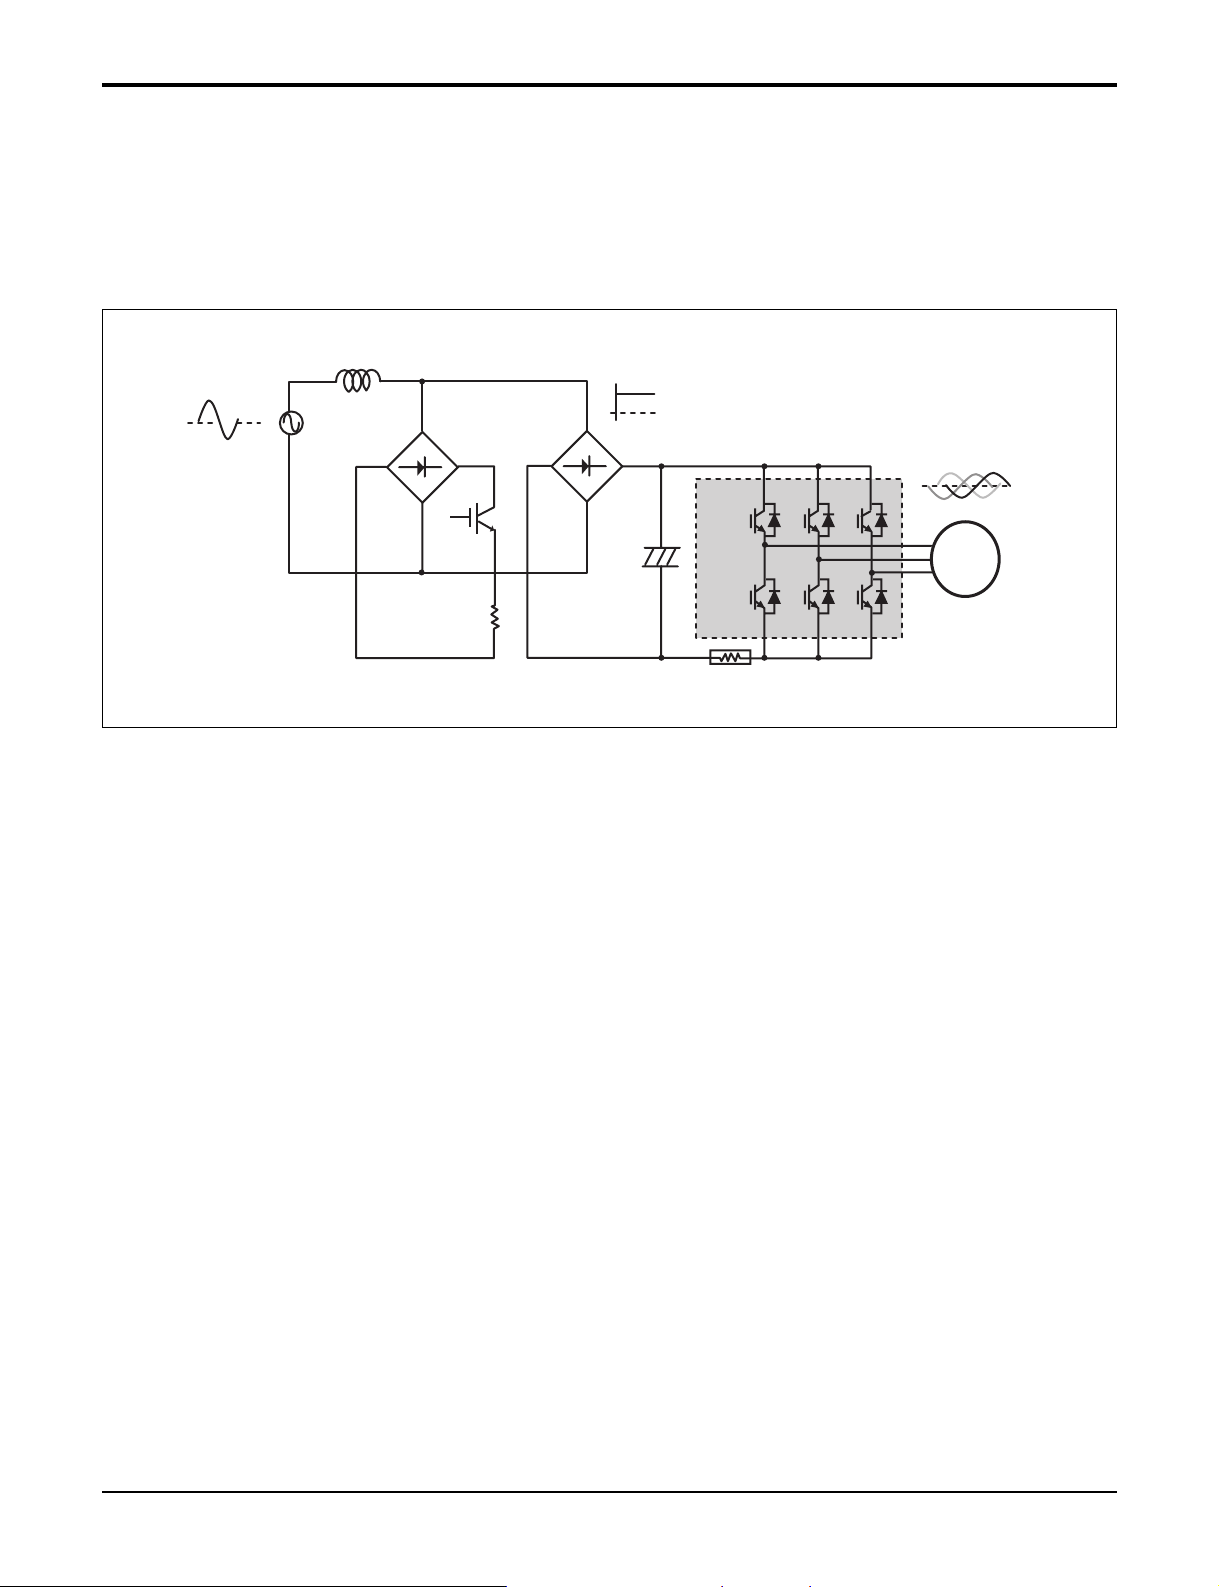
5.7 Inverter
1. The single phase power AC is converted into DC.
2. The single phase power DC is converted into a three phase chopped DC voltage with a variable frequency.
3. When the frequency changes, the rotation speed of the compressor changes resulting in a changed refrigerant circulation. This leads to changeable amount of the heat exchange per unit.
Only for training and service purposes
- 20 -
Page 21

Part 2 Functions & Controls
5.8 Overheating Protection (Power Module)
5.8.1 9,12kBtu/h Model
• If the temperature of the heat sink thermistor reaches over Toff, the Compressor stop instantly.
• The compressor operating frequency is limited according to the heat sink thermistor. (refer to below FIG.)
• The LED on PCB board will blink 4 times, when the thermistor is open or short, also when the temperature is over T
off.
∆T = (T off - T on)/3
T1 = T on + ∆T
T off °C
T2 °C
T1 °C
T on °C
COMP
Freq.
T2 = T on + 2 * ∆T
Free OFF FreeFc-1 Fc-1Fc-2 Fc-2
T on : 85°C(185°F) (Model by Model)
T off : 95°C(203°F) (Model by Model)
Heat Sink Temp.
Only for training and service purposes
- 21 -
Page 22

Part 2 Functions & Controls
COMP
Hz
Toff=85°C(185°F)
T2=75°C(167°F)
OFF
Set
frequency
Set
frequency
Set
frequency
Heat Sink temp
5 Hz
Down
5 Hz
Down
T1=70°C(158°F)
5.8.2 18,24,30kBtu/h Model
• Function
: Power module failure is protected by checking the temperature of heat sink via a temperature sensor.
• Heat sink sensor failure error
Short Check : if temperature ≥130°C(266
Open Check : if temperature < - 30°C(-22
System will go in self diagnosis (Error code 65) is displayed and product stops.
°F)
°F)
• Heat sink temperature control
a) Heat sink temperature < T2 : No limitation on compressor frequency
b) T2 ≤ heat sink temperature < Toff : Compressor frequency down by 5 Hz
c) Heat sink temperature ≥ Toff : Compressor will be off.
The system will stop if this situation occurs 5 times within 1 hour an which error Code4 will be generated and
self diagnosis will start.
If high temperature situation occurs 5 times in 1 hr system counts 1 error and after that 4 times if this situation
occurs system stops and give error code.
If the temperature reaches Toff condition, the system will count the occurrence 5 times, then the system will
stop with error code 4.
Only for training and service purposes
- 22 -
Page 23

Part 2 Functions & Controls
5.9 Total Current Control (Over Current Protection)
5.9.1 9,12kBtu/h Model
1) CT1 control
• If the operating current reaches CT1, the operating frequency of the compressor decreases.
• After decreasing the operating frequency by 4Hz, if operating current is below I1 for 60 seconds continuously, the
operating frequency of compressor increases to setting frequency.
2) CT2 control
• If the operating current of the appliance reaches CT2, the compressor stops instantly and two minutes later the compressor restarts again.
• If CT2 occurs 5 times within one hour, the appliance turns off and displays ERROR CODE 7.
Model CT 1 CT 1
(kBtu/h) (Cooling) (Heating)
9 7.5A 9A 10A
12 7.5A 9A 10A
CT 2
Only for training and service purposes
- 23 -
Page 24

Part 2 Functions & Controls
5.9.2 18,24,30kBtu/h Model
1) Detection : check the output DC voltage of Current Transformer(CT).
2) Current Transformer Sensing Error
a) In initial power input, if the CT output is over 4.0V (25A) it shows.
Error Code 40 (defect in CT sensing)
3) CT 1 detection :
a) If total current exceeds the value of CT1, then the operating frequency will be reduced by 1 step.
- Step down 10Hz from current step.
- If new Hz is below the minimum frequency 15Hz, then turn off the compressor.
b) After step down,if the total current exceeds CT1 for more than 5 sec. then the compressor will step down 1
more step.
c) If the current continue below „1 for more than 1 min.,return the Hz to setting Hz.
4) CT 2 detection :
a) If total current exceeds CT2, the compressor will turn off.
after 3 min the compressor and check the current again.
b) If the CT2 condition occurs 5 times within 1 hour, then the unit will stop operating and Error Code 22 will be
displayed.
Model CT 1 CT 1
(kBtu/h) (Cooling) (Heating)
18 11A 12A 14A
24 14A 12A 15.5A
30 11A 12A 14A
CT 2
Only for training and service purposes
- 24 -
Page 25

Part 2 Functions & Controls
5.10 DC Peak control
5.10.1 DC Peak Current Error by a fault signal of IPM
• If the operating current of IPM reaches 35A ±3A, the compressor stops instantly.
• If DC PEAK occurs 5 times within 1 hour, the appliance turns off and displays Error Code 6(9,12kBtu/h Model) / Error
Code 21(18,24,30kBtu/h Model).
5.10.2 DC Peak Current Error by the compressor lock
• If the DC LINK voltage is below DC 140V and this occurs 5 times within 1 hour while the compressor is operating, the
appliance turns off and display Error Code 6(9k,12k Model) / Error Code 23(18k,24k,30k Model).
5.10.3 DC Peak Current Error by the Outdoor Fan Lock
• If this problem occurs 5 times within 1 hour in case of the temperature of outdoor pipe thermistor is over 65°C(149°F)
while the compressor is operating, the appliance turns off and displays Error Code 6(9,12kBtu/h Model) / Error Code
61(18,24,30kBtu/h Model).
5.11 Discharge Pipe Temp Control
5.11.1 9,12kBtu/h Model
• If the temperature of the discharge pipe of compressor reaches over 130°C(266°F) or below -30°C(-22°F) the compressor stops instantly.
• The compressor's operating frequency is limited according to the compressor dome thermistor. (Refer to below Fig.)
• Temperature range of COMP SPEC varies by 10°C(50°F).
Discharge pipe temp.
T off °C
T3 °C
T2 °C
T1 °C
-13 °C(8.6°CF)
COMP Freq. Free Free
Fh min
∆T = (T off - T2)/2
T1 = T2 - 2 * ∆T
T3 = T2 + ∆T
OFFFc-1 Fc-1Fc-2 Fc-2
T off : 110°C(230°F)
T2 : 100°C(212°F)
Only for training and service purposes
- 25 -
Page 26

Part 2 Functions & Controls
Expansion
valve
10
Pulse Up
10
Pulse Up
COMP
Hz
Toff(105)°C(221°F)
T1(90)°C(194)°F
T2(95)°C(203)°F
5 Hz
Down
5 Hz
Down
OFF
Set
Set
Discharge pipe temp.
Stop control
Set
Set
Set
5.11.2 Inverter Compressor (18,24,30kBtu/h Model)
1) There can be two situations
(a) Temperature sensor is failed (Error Code 41)
(b) Abnormal high temperature discharge temperature (error code for high discharge will be generated)
Both cases unit will stop.
2) Compressor working
(a) If discharge pipe temperature < T1 No limitation on compressor frequency
(b) T2 ≤ discharge pipe temperature < T off, (Hysteresis control) Compressor frequency down by 5Hz and
expansion valve up by 10 pulse in every 1 min.
(c) Discharge pipe temperature ≥ Toff, Compressor will be off
System will stop if this situation occurs 5 times in 1 hour and error code will be generated.
Only for training and service purposes
- 26 -
Page 27

Part 2 Functions & Controls
COMP
Step
ON
Discharge pipe temp.
OFF
ON
Expansion
valve
10
Pulse
Up
On time
control
On-time
control
Stop
Toff(105)°C(221)°F
T1(90)°C(194)°F
T2(95)°C(203)°F
5.11.3 Constant Compressor (only 30kBtu/h Model)
1) There can be two situations
(a) Temperature sensor is failed (Error Code 41)
(b) Abnormal high temperature discharge temperature (error code for high discharge will be generated)
Both cases unit will stop.
2) Compressor working
(a) If discharge pipe temperature < T1 Compressor ON, EEV on-time control
(b) T2 ≤ discharge pipe temperature < Toff (Hysteresis control) Expansion valve up by 10 pulses every 1 min.
If EEV is in the starting control it will follow it as it is.
(c) Discharge pipe temperature ≥ Toff Compressor will be OFF
System will stop if this situation occurs 5 times in 1 hour and error code will be generated (Error Code 33).
Only for training and service purposes
- 27 -
Page 28

Part 2 Functions & Controls
(T1 = 0)°C
(T2 = 0)°C
Outdoor pipe temp
O/D fan
Set speed
Off
Off
Set speed Set speed
5.12 Low Ambient control
5.12.1 9,12kBtu/h Model
• If outdoor temperature drops below a certain temperature, liquid return is prevented by On/Off control of outdoor fan.
• It can prevent frosting of evaporator and keep cooling operation
Model
Mode-in by outdoor
pipe temp.
Mode-in by indoor
pipe temp.
Outdoor fan-on time ≥ 3 min.
(And) Outdoor pipe temp. ≤ 4˚C (39˚F)
(And) Outdoor temp. < 10˚C (50˚F)
Comp-on time ≥ 5 min.
(And) Indoor pipe temp. ≤ 4˚C (39˚F)
(And) Outdoor temp. < 10˚C (50˚F)
Mode-in Condition
Mode-out Condition
Outdoor fan-off time ≥ 5 min.
(Or) Outdoor pipe temp. ≤ 20˚C(68˚F)
(And) Outdoor temp. ≥ 10˚C (50˚F)
Outdoor fan-off time ≥ 5 min.
(Or) Indoor pipe temp.≤ 4˚C (39˚F)
(And) Outdoor temp. ≥ 10˚C (50˚F)
5.12.2 18, 24, 30kBtu/h Model
Low ambient cooling case : In this situation outdoor fan works in ON/OFF control.
: If the pipe temperature 0°C(32°F) and it is falling rapidly, the compressor will run for 5 min & then it will go into
low ambient control. (❈ Temp. value can be different for each model.)
❈ After the system is stopped by CT cut or heat sink cut-off then the cycle returns to the normal conditioned con-
trol.
Model T1 [˚C(˚F)] T2 [˚C(˚F)]
18kBtu/h 18(64) 18
24kBtu/h 16(61) 16
30kBtu/h 0(32) 0
Only for training and service purposes
- 28 -
Page 29

Part 2 Functions & Controls
5.13 Oil return control(30kBtu/h Model) Heatpump Only
5.13.1 Operating Contion
1) When the continuous running time is over 3hr.(option), oil returning operation is run for 3min.
In case of the initial operation, oil returning operation is run, after completing initial operation.
2) After defrost and oil returning operation, the continuous running time is reset.
5.13.2 Operation Process
1) EEV-Full open, Hot gas bypass valve-On
2) Compressor Step-70Hz + Constant Comp. On(Option)
3) Reversing valve-Off(Process of Off/On, follows defrost operating.)
4) Outdoor Fan-Low step
5.14 Oil equalizing control(30kBtu/h Model)
Operating condition :
1) When the continuous inverter compressor running time at under 40 Hz(option) is over 2 hours(option) in 2 com-
pressor system, oil restoring operation begins.
2) If compressor operating Hz is below 40 Hz by the safety control, the accumulated time will be cleared and oil
restoration does not begin.
3) During this operation,if operating Hz can not be changed by safety control, the oil equalization operation will
cease.
Operating process : Raise the operating HZ up to 70,and after 20 sec.(option) recover to the last value.
Only for training and service purposes
- 29 -
Page 30

Part 3 Test Run
Part 3 Test Run
1. Check before Test Run...................................................................................................31
2. Test Run Flow chart .......................................................................................................32
3. Test Run Detail................................................................................................................33
Only for training and service purposes
- 30 -
Page 31

1. Check before Test Run
Part 3 Test Run
1
Check to see whether there is any refrigerant leakage, and check whether the power or transmission
cable is connected properly.
Check whether the liquid pipe and gas pipe valves are fully opened.
2
NOTE: Be sure to tighten caps.
Confirm that 500 V meter shows 2.0 MΩ or more between power supply terminal block and ground.
Do not operate when there is of 2.0 MΩ or less.
NOTE: Never carry out mega ohm check over terminal control board.
Otherwise the control board may break.
3
Immediately after mounting the unit or after leaving it turned off for an extended length of
time, the resistance of the insulation between the power supply terminal board and the
ground may decrease to approx. 2.0 MΩ as a result of refrigerant accumulation in the internal
compressor.
If the insulation resistance is less than 2.0 MΩ, turn on the main power supply.
Only for training and service purposes
- 31 -
Page 32

Part 3 Test Run
2. Test Run Flow chart
START
Test operation for indoor unit
Operate the unit in cooling mode.
Does Test operation start?
Yes
Is cold air discharged for
more than 3 minutes ?
Yes
Is there any temperature
difference between intake and
discharged air?
Yes
Is the operating current
normal ?
Yes
Operation mode change
to Heating mode
No
No
No
No
Refer to part4, Section 7: Electronic
Troubleshooting Guide
Refer to part4, Section 5: Cycle
Troubleshooting Guide
* Check the load (In/Out Temp.)
* Check pipe length and amount of
refrigerant
* Check for abnormal sound in
outdoor unit (comp.,Fan, others )
Is hot air discharged ?
After Hot Start
Yes
Normal
NOTE: When outdoor temperature is low, the unit is operated in heating
mode during the test run procedure.
Only for training and service purposes
No
Refer to Troubleshooting
Guide
- 32 -
Page 33

Bolt
Tubing connection
Discharge
temperature
Discharge air
Intake temperature
3. Test Run Detail
Part 3 Test Run
1. Check that all tubing and wiring have been properly con-
nected.
2. Check that the gas and liquid side service valves are fully
open.
Settlement of outdoor unit
• Anchor the outdoor unit with a bolt and nut Ø0.39 inch
tightly and horizontally on a concrete or rigid mount.
• When installing on the wall, roof or rooftop, anchor the
mounting base securely with a nail or wire assuming the
influence of wind and earthquake possibilities.
• When vibration of the unit is conveyed through the hose,
secure the unit with an anti-vibration bushing.
Evaluation of the performance
Operate unit for 15~20 minutes, then check the system
refrigerant charge:
1. Measure the pressure of the gas side service valve.
2. Measure the temperature of the intake and discharge air.
3. Ensure the difference between the intake temperature and
the discharge is more than 8˚C(46˚F) (Cooling or
Heating).
NOTE: If the actual pressure is higher than shown, the
system is most likely over-charged, and charge
should be removed.
If the actual pressures are lower than shown, the
system is most likely undercharged, and charge
should be added.
The air conditioner is now ready for use.
PUMP DOWN
This is performed when the unit is to be relocated or
the refrigerant circuit is serviced.
Pump Down means collecting all refrigerant in the outdoor
unit without loss in refrigerant gas.
CAUTION:
Be sure to perform Pump Down procedure with the unit in
cooling mode.
Pump Down Procedure
1. Connect a low-pressure gauge manifold hose to the
charge port on the gas side service valve.
2. Open the gas side service valve halfway and purge the air
from the manifold hose using the refrigerant gas.
3. Close the liquid side service valve(all the way in).
4. Turn on the unit's operating switch and start the cooling
operation.
5. When the low-pressure gauge reading becomes 1 to
0.5kg/cm2G(14.2 to 7.1 P.S.I.G.), fully close the gas side
valve stem and then quickly turn off the unit. At that time,
Pump Down has been completed and all refrigerant gas
will have been collected in the outdoor unit.
5. Check operating current.
6. Change from cooling mode to heating mode (if heat
pump model) and check all operations.
4. For reference; the gas side pressure of optimum condition
is as below.(Cooling)
Refrigerant
Outside ambient
TEMP.
The pressure of the gas side
service valve.
R22 35°C (95°F) 4~5kg/cm2G(56.8~71.0 P.S.I.G.)
R410A 35°C (95°F) 8.5~9.5kg/cm2G(120~135 P.S.I.G.)
Only for training and service purposes
- 33 -
Page 34

Part 4 Trouble Shooting
1. 2-Way, 3-Way Valve ........................................................................................................35
2. Pumping Down ..............................................................................................................36
3. Evacuation ......................................................................................................................37
4. Gas Charging (After Evacuation) .................................................................................38
5. Cycle Troubleshooting Guide........................................................................................39
6. Electronic Parts Troubleshooting Guide ......................................................................40
7. Self-diagnosis Function.................................................................................................45
Only for training and service purposes
- 34 -
Page 35

Valve cap
Open position
Closed position
Pin
Service
port
Service
port cap
To outdoor unit
Flare nut
To
piping
connection
To outdoor unit
Hexagonal wrench (4mm)
Open position
Closed position
To
piping
connection
Flare nut
1. 2-Way, 3-Way Valve
2-way Valve (Liquid Side) 3-way Valve (Gas Side)
Part 4 Trouble Shooting
Only for training and service purposes
operating device
Standard position
Air purging
1.
(Installation)
Operation
Pumping down
2.
(Transfering)
Evacuation
3.
(Servicing)
Gas charging
4.
(Servicing)
Pressure check
5.
(Servicing)
Gas releasing
6.
(Servicing)
Shaft position Shaft position Service port
Closed Closed Closed
(with valve cap) (with valve cap) (with cap)
Open Closed Open
(counter-clockwise) (clockwise) (push-pin or with
vacumm pump)
Open Open Closed
(with valve cap) (with valve cap) (with cap)
Closed Open Open
(clockwise) (counter-clockwise) (connected manifold
gauge)
Open Open Open
(with charging
cylinder)
Open Open Open
(with charging
cylinder)
Open
(with charging cylinder)
Open
(with charging cylinder)
Open Open
Open Open
- 35 -
Page 36

Part 4 Trouble Shooting
Lo
Closed
Purge the air
Outdoor unit
Indoor unit
Liquid side
Gas side
CLOSE
Open
2-Way
valve
3-Way
valve
CLOSE
2. Pumping Down
• Procedure
(1) Confirm that both the 2-way and 3-way valves
are set to the open position.
– Remove the valve stem caps and confirm that
the valve stems are in the raised position.
– Be sure to use a hexagonal wrench to operate
the valve stems.
(2) Operate the unit for 10 to 15 minutes.
(3) Stop operation and wait for 3 minutes, then
(4) Air purging of the charge hose.
(5) Set the 2-way valve to the closed position.
connect the charge set to the service port of
the 3-way valve.
– Connect the charge hose with the push pin to
the service port.
– Open the low-pressure valve on the charge set
slightly to allow air purge from the charge hose.
(6) Operate the air conditioner at the cooling
cycle and stop it when the gauge indicates
1kg/cm2·g (14 PSI).
(7) Immediately set the 3-way valve to the closed
position.
– Do this quickly so that the gauge ends up indi-
cating 3 to 5kg/cm2·g (42 to 71PSI).
(8) Disconnect the charge set, and mount the 2-
way and 3-way valve’s stem nuts and the service port nut.
– Use torque wrench to tighten the service port
– Be sure to check for gas leakage.
nut to a torque of 1.8 kg·m (13 lbf·ft)
Only for training and service purposes
- 36 -
Page 37

Lo
Open
Open
Vacuum pump
3-Way
valve
Outdoor unit
Liquid side
Indoor unit
Gas side
3-Way
valve
OPEN
Vacuum
Gage
OPEN
3. Evacuation
Part 4 Trouble Shooting
• Procedure
(1) Connect the vacuum pump to the center hose
of charge set center hose
(2) Evacuation for approximately one hour.
– Confirm that the gauge needle has moved
toward 0.8 Torr (2PSF).
(3) Close the valve (Lo side) on the charge set,
turn off the vacuum pump, and confirm that
the gauge needle does not move (approximately 5 minutes after turning off the vacuum
pump).
(4) Disconnect the charge hose from the vacuum
pump.
– Vacuum pump oil.
If the vacuum pump oil becomes dirty or
depleted, replenish as needed.
Only for training and service purposes
- 37 -
Page 38

Part 4 Trouble Shooting
Lo
Charging
cylinder
Outdoor unit
Indoor unit
Liquid side
Gas side
Open
3-Way
valve
3-Way
valve
OPEN
Open
Check valve
(1)
CLOSE
Vacuum
Gage
4. Gas Charging (After Evacuation)
• Procedure
(1) Connect the charge hose to the charging
cylinder.
– Connect the charge hose which you dis-con-
nected from the vacuum pump to the valve at
the bottom of the cylinder.
– If you are using a gas cylinder, also use a
scale and reverse the cylinder so that the system can be charged with liquid.
(2) Purge the air from the charge hose.
– Open the valve at the bottom of the cylinder
(3) Open the valve (Lo side on the charge set and
charge the system with liquid refrigerant.
– If the system can not be charged with the spec-
and press the check valve on the charge set to
purge the air. The procedure is the same if
using a gas cylinder.
ified amount of refrigerant, it can be charged
with a little at a time (approximately 150g
(5.3oz) each time) while operating the air conditioner in the cooling cycle; however, one time
is not sufficient, wait approximately 1 minute
and then repeat the procedure (pumping pin).
This is different from previous procedures.
Because you are charging with liquid refrigerant
from the gas side, absolutely do not attempt to
charge with larger amounts of liquid refrigerant
while operating the air conditioner.
(4) Immediately disconnect the charge hose from
the 3-way valve’s service port.
– Stopping partway will allow the gas to be dis-
charged.
– If the system has been charged with liquid
refrigerant while operating the air conditioner
(5) Mount the valve stem nuts and the service
port nut.
– Use torque wrench to tighten the service port
– Be sure to check for gas leakage.
turn off the air conditioner before disconnecting
the hose.
nut to a torque of 1.8 kg·m (13 lbf·ft)
Only for training and service purposes
- 38 -
Page 39

Part 4 Trouble Shooting
5. Cycle Troubleshooting Guide
Trouble analysis
1. Check temperature difference between intake and discharge air, and operating current.
Temp. Difference
Operating Current
Temp. difference : approx. 0°C(1°F)
Current : less than 80% of
rated current
Temp. difference : approx. 8°C(16°F)
Current : less than 80% of
rated current
Temp. difference : less than 8°C
Current : near the rated
current
Temp. difference : over 8°C(16°F)
(16°F)
All amount of refrigerant leaked out.
Check refrigeration cycle.
Refrigerant leakage
Clog of refrigeration cycle
Defective compressor
Excessive amount of refrigerant
Normal
NOTICE
Temperature difference between intake and discharge air depends on room air humidity. When the room air
humidity is relatively higher, temperature difference is smaller. When the room air humidity is relatively lower
temperature difference is larger.
Only for training and service purposes
- 39 -
Page 40

Part 4 Trouble Shooting
6. Electronic Parts Troubleshooting Guide
Trouble 1
Check the voltage of power(AC 208~230V, 60Hz).
• The voltage of main power.
• The voltage applied to the unit.
• The connecting method of Indoor/Outdoor connecting cable (each color)
• The PCB Ass'y
(Fuse,Noise Filter, Power Module(SMPS), IC01D,IC04D)
The Product doesn’t operate at all. (9~30kBtu/h Model)
Turn off the main power and wait until LED on outdoor PCB is off.
Turn on the main power again.
"Beeping" sound is from the indoor unit?
Flashing LED mounted on the outdoor PCB?
NO
YES
• Primarily, the operating condition of Micom is O.K.
• Check CN-DISP1
The operation check of the P.C.B. Ass'y
Procedure
1) The input voltage of Power
Module(SMPS)
2) The output voltage of Power
Module (SMPS)
3) IC01D(LD1085), IC04D(7805)
Specification
: DC 220V~390V
: 15V ±10%
: DC 5V
Remedy
Replace the P.C.B.
Only for training and service purposes
- 40 -
Page 41

Part 4 Trouble Shooting
Trouble 2
(When operated in the Sleeping Mode, the air speed is set to the low speed as force).)
Caused by the remote controller.
Product doesn't operate with the remote controller. (9~30kBtu/h Model)
Turn on main power.
Wait 2 minutes for the compressor to turn on.
When the compressor is stopped stopped, the Indoor Fan is driven by a low speed.
At this point the air speed is not controlled by the remote controller.
Caused by other parts except
the remote controller
When the mark ( ) is displayed in LCD
screen, replace battery.
Check the contact of CN-DISP 1, 2 connector
Check DISP P.C.B Ass'y
-Voltage between CN-DISP1 ③ - ⑧ : DC +5V
Check point
• Check the connecting circuit between
MICOM PIN and CN-DISP1 PIN ⑦
• Check receiver ass'y
Only for training and service purposes
- 41 -
Page 42

Part 4 Trouble Shooting
Trouble 3
Using the remote controller, set the indoor set point to at least 15˚C(5˚F) less than the
indoor air temperature.
Check that the sensor for Indoor temperature sensor is attatched and as close to the heat
exchanger (EVA.) as possible.
When displaying Error code, refer to the trouble shooting guide.
The Compressor/Outdoor Fan does not operate (9, 12kBtu/h Model)
Turn on the main power.
When in air circulation mode, compressor/outdoor fan is stopped.
Check the main power source.(AC 208V~230V)
Check the trouble shooting guide error code 6,9
Turn off main power.
Check the electrical wiring diagram of Outdoor side.
Check the open or short of connecting wires between Indoor and Outdoor.
Only for training and service purposes
- 42 -
Page 43

Part 4 Trouble Shooting
Trouble 4
Using the remote controller, set the indoor set point to at least 15˚C(5˚F) less than the
indoor air temperature.
Check the sensor for Indoor temperature is attatched as close as to be effected by the
themperature of Heat Exchange (EVA.)
When displaying Error code, refer to the trouble shooting guide.
The Compressor/Outdoor Fan does not operate (18, 24, 30kBtu/h Model)
Turn on the main power.
When in air circulation mode, compressor/outdoor fan is stopped.
Check the main power source.(AC 208V~230V)
Check the trouble shooting guide error code 21,26.
Check that CN_FAN(A,B) supplied voltage to outdoor PCB is about AC 208V~230V.
Turn off main power.
Check the electrical wiring diagram of Outdoor side.
Check the open or short of connecting wires between Indoor and Outdoor.
Only for training and service purposes
- 43 -
Page 44

Part 4 Trouble Shooting
Trouble 5
When indoor Fan does not operate.(9~30kBtu/h Model)
Turn off main power.
Check the connection of CN-FAN.
Check the Fan Motor.
Check the Fuse(AC250V, T2A).
Check the related circuit of indoor Fan Motor.
• The pin No.
• Check the related pattern.
• Check the SSR.
- SSR Open: Indoor Fan Motor never operate.
- SSR short: Indoor Fan Motor always operates in case of ON or OFF.
38
of micom and the Q01M that drives the SSR.
Turn on the main power
Check the SSR high speed operation by remote control.
(the Indoor Fan Motor is connected)
The voltage of Pin No 1(orange) and 3(black) of CN-FAN.
About AC 160V over About AC 50V over
SSR is not damaged Check SSR
Only for training and service purposes
- 44 -
Page 45

Part 4 Trouble Shooting
1 time
1
time
3
sec
2
times
2 times
3
sec
4 times
4
times
3 sec
5times
5times
3 sec
6
times
6
times
3
sec
7
times
7
times
3
sec
3
sec
3
sec
2
times
3
sec
2
times
3
sec
1
time
3
sec
1
time
3
sec
1
time
3 sec
1
2
4
5
6
7
Error Indicator
Error
Code
Cause of Error
Display
Indoor Outdoor
Indoor
Operation
O
O
O
O
O
O
O
O
O
O
O
O
O
O
O
O
• Indoor Temp. sensor error
- Sensor open or short
• Heat Sink sensor error
- Sensor open or short
- Heat Sink temp is over 95˚C
(203˚F)
• Communication error
• Outdoor Temp. sensor error
- Sensor open or short
• DC Peak error
• Over current error (CT2)
ON
ON
ON
OFF
SHUT
DOWN
SHUT
DOWN
9times
9
times
3
sec
10 times
10
times
3 sec
10
ON
• Outdoor fan lock error
• Discharge pipe thermistor is
short or open.
(BLDC fan model only)
OFF
8times 8 times
3
sec
8
• Indoor fan lock error
(BLDC fan model only)
OFF
9
(4 LED Model)
7. Self-diagnosis Function
■ Error Indicator
• The error indicator assists with self-diagnoisis of the air conditioner and identifies if there is any trouble.
• The error indicator location is near the ON/OFF button by the LED on the evaporator and will signal as shown in
the table below.
• If more than two errors occur simultaneously, primarily the highest severity error code is displayed.
• After error an occurrence, the error is cleared, the error LED is also cleared, simultaneously.
• To operate again on the occurrence of error code, be sure to turn off the power and then turn on.
• The error codes are different for various models
■ 9, 12kBtu/h Model
Only for training and service purposes
- 45 -
Page 46

Part 4 Trouble Shooting
1 Time 1 Time 1 Time
2 Times2 Times2 Times
1 Sec.
2 Sec. 2 Sec.
1 Sec. 1 Sec.
LED01G
(RED)
LED02G
(GREEN)
Case of error
LED02G
(Green)
LED01G
(Red)
Contents
Error
code
Compressor malfunction,IPM Fault
Current is 14A or above.
DC Link volt. Is 140V or below.
Low / High press switch OPEN
Abnormal AC volt. Input.
Off
Off
Off
IPM Fault (Compressor Over current)
CT 2(Max. Current)
DC Link Low Volt.
Low / High press
AC Low / AC High Volt.
DC Compressor Position
PSC Fault
DC Link High Volt
Discharge Pipe Temp. High (INV)
Discharge Pipe Temp. High (Cons.)
21
22
23
24
25
26
27
28
32
33
Off
Off
Off
Off
Off
Off
Off
Off
Off
Off
Outdoor
Status
2 times
2 times
2 times
2 times
2 times
2 times
2 times
2 times
3 times
3 times
1 time
2 times
3 times
4 times
5 times
6 times
7 times
8 times
2 times
3 times
■ 18,24,30kBtu/h Model
Indoor Error
Error code Descrition INV TPS
LED1 LED2 Indoor
(Red) (Green) Status
00 No Error ● ON
01 Indoor Room themistor error ● 1time ◑ OFF
02 Indoor in-piping sensor error ● 2times ◑ OFF
05
Communcation error between indoor and outdoor units
● 5times ◑ OFF
06 Indoor Out-Piping sensor error ● 6times ◑ OFF
Outdoor Error
Ex) Error Code 21 (IPM Fault)
Only for training and service purposes
- 46 -
Page 47

Part 4 Trouble Shooting
Case of error
LED02G
(Green)
LED01G
(Red)
Contents
Error
code
CT Circuit malfunction
Open / Short
Open / Short
Open / Short
Open / Short
Open / Short
Communication Poorly
Check sum mismatching
Cond. Temp. high
Heat sink temp. high
Open / Short
CT Circuit (open/ short)
Sensor INV. (open/ short)
Air sensor (open/ short)
Cond. Pipe sensor (open/ short)
Suction pipe sensor (open/ short)
Sensor Cons. (open/ short)
Communication (Indoor to Outdoor)
EEPROM check sum
Cond. Pipe sensor temp. high
Heat sink sensor temp. high
Heat sink sensor (open/ short)
40
41
44
45
46
47
53
60
61
62
65
Off
Off
Off
Off
Off
Off
Off
Off
Off
Off
Off
Outdoor
Status
4 times
4 times
4 times
4 times
4 times
4 times
5 times
6 times
6 times
6 times
6 times
1 time
4 times
5 times
6 times
7 times
3 times
1 time
2 times
5 times
Only for training and service purposes
- 47 -
Page 48

Part 4 Trouble Shooting
■ Troubleshooting Guide(9,12kBtu/h Model)
Error code
Description Cause of error
Indoor thermistor is short
1
or open
Check flow
Indoor thermistor is connected
to Indoor pcb
- Connect to CN-TH1 in
indoor pcb
assembly ?
No
assembly
• Indoor thermistor (sensor) is short or open
•
Indoor thermistor (sensor) is not connected to the indoor pcb assembly
• Damage or defect on the sensing circuit of indoor pcb assembly.
(R01H, R02H, R03H, R04H, C01H, C02H)
YES
Indoor thermistor is right ?
No
Check Indoor thermistor
-
Measure resistance of thermistor
(air : about 10kΩ at 25°C(77°F),
pipe : about 5kΩ at 25°C(77°F)
YES
Sensing circuit of indoor
is right ?
pcb
No
- Check soldering state of
R01H ~ R04H, C01H, C02H
Error code
Description
Outdoor thermistor is
2
short or open
Check flow
Outdoor thermistor is connected
to outdoor pcb assembly ?
No
- Connect to CN-TH1 in
outdoor pcb assembly
• Outdoor thermistor (sensor) is short or open
•
Outdoor thermistor (sensor) is not connected to the outdoor pcb assembly
• Damage or defect on the sensing circuit of outdoor pcb assembly.
(R03H~R06H, C02H, C03H)
YES
Outdoor thermistor is right ?
No
Check outdoor thermistor
-
Measure resistance of thermistor
(air : about 10kΩ at 25°C(77°F),
pipe : about 5kΩ at 25°C(77°F)
Cause of error
YES
Sensing circuit of outdoor
pcb
is right ?
- Check soldering state of
R03H ~ R06H, C02H, C03H
No
Only for training and service purposes
- 48 -
Page 49

Part 4 Trouble Shooting
4
• Heat-sink thermistor is damaged(short or open).
• Heat-sink Temp. is over 95°C(203°F)
• Damage or defect on the sensing circuit of outdoor pcb assembly.
(R01H, R02H, C01H)
Heat-sink Temp. is over
95°C(203°F)
Heat-sink thermistor
is open or short
Heat-sink thermistor in INV-IC is
Right ?
Sensing circuit of outdoor
pcb is right ?
YES
No
Check heat-sink thermistor
-
Measure resistance of thermistor
(about 10kΩ at 25°C(77°F))
Heat-sink thermistor is connected
to outdoor PCB assembly?
YES
No
- Connect to CN-TH2 in
outdoor PCB assembly
No
- Check soldering state of
R01H, R02H, C01H
Check flow
9k,12kBtu/h Model Heat-sink Thermistor resistance check
Description Cause of error
Error code
120
R-T Graph
Temperature
Resistance[kΩ]
100
80
60
40
20
0
20 30 40 50 60 70 80 90 100 110 120 130 [˚C]
[˚F]
68 86 104 122 140 158 176 194 212 230 248
266
Ω
Only for training and service purposes
- 49 -
Page 50

Part 4 Trouble Shooting
Error code
5
Communication Error
Check flow
Wiring connection
Is right ?
No
Indoor
1(BR) 1(BR)
2(BL) 2(BL)
3(GN/YL) 3(GN/YL)
4(RD) 4(RD)
Outdoor
Description Cause of error
• Wrong or missing wiring between indoor and outdoor unit cable
• Defect of communication components in indoor pcb assembly
• Defect of communication components in outdoor pcb assembly
• Defect of power supply components in outdoor pcb assembly
• No ground connection in air conditioner unit
(affected by noise in power source)
YES
Is the voltage of T/Block
, in outdoor about
AC 208~230V ?
No
Check if the power connector
is not connected to the
Terminal Block of the indoor
unit.
YES
Is the voltage of GND & DC5V in
Outdoor pcb about DC 5V ?
No
Check FUSE, NF01/02J, PTC,
Power Module, BD-01S in
Outdoor pcb
assembly
YES
Communication circuit of indoor
& outdoor pcb Is right ?
No
Check IC01K, IC02K,D01K~D03K,
ZD01K~ZD03K, R01K~R10K,
C01K~C04K
YES
Ground connection is installed ?
(power outlet or outdoor chassis)
No
Install ground connection from outdoor
unit. (In case power outlet has no earth
port)
Earth port
Only for training and service purposes
- 50 -
Page 51

Part 4 Trouble Shooting
Error code
6
Description Cause of error
DC Peak Error
Check flow
Supplied voltage to
Outdoor pcb is about
AC 208~230V ?
No
Check power source
YES
• Supplied power is not normal
Comp Connector (CN-U,V,W) is disconnected or inserted into the
•
wrong
position
• Compressor is damaged (coil short) ➔ replace compressor
• Too much Refrigerant
• Defect in outdoor pcb assembly ➔ replace pcb assembly
YES
Is connector (CN-U,V,W)
connected to compressor and
inserted into the pcb in right position ?
No
Check CN-U,V,W connector
(U : RD, V : BL, W : YL)
YES
Cause of error
YES
Refrigerant pressure is right ?
No
Check refrigerant pressure
and adjust.
Is the compressor right ?
No
Check resistance
Between U-V, V-W, U-W port.
→ Short / Open circuit
(Comp.motor coil error)
→ normal : 1 ~2
Between U,V,W and Body
→ normal : over 10M
Ω
Ω
U
V
W
Ω
Inverter components in outdoor pcb assembly are
right ?
No
* 9 K/12K Model
Check
Short of SPM3 pins (GND - P, U, V, W pin)
Direction of D01Z~D03Z, C08Z,10Z,12Z,16Z
Assembling state of R01P ~ R21P & IC01P
Assembling state of screw between INV-IC &
Heat-sink
DC 15V output of Power module.
Only for training and service purposes
- 51 -
Page 52

Part 4 Trouble Shooting
Error code
Over current Error
7
Check flow
Supplied voltage to
Outdoor pcb is about
AC 208~230V ?
No
Check power source
YES
Description Cause of error
• Supplied power is not normal
• Indoor/outdoor fan is locked
(CT2)
YES
Does indoor / outdoor fan work
normally ?
Check indoor / outdoor fan and
adjust.
• Too much refrigerant
• Defect in current sensing circuit in outdoor pcb assembly
YES
Refrigerant pressure is right ?
No
Check refrigerant pressure
and adjust.
No
Current sensing circuit is right ?
No
Check current sensing circuit.
- check CT is damaged in outdoor pcb
(output wire is disconnected to pin or not)
- BD01N is inserted in right position
(refer to marking on pcb and component)
- Spec of R01N (1kΩ), R02N (1.65kΩ) is correct
- Direction of diode (D01N, D02N) is right
Only for training and service purposes
- 52 -
Page 53

Part 4 Trouble Shooting
Error code
8
Description Cause of error
Indoor fan is locked
(BLDC fan model only)
• Indoor fan is locked or separated
• Fan connector is not connected to indoor pcb assembly
• Defective DC-fan driving circuit
Check flow
YES
Indoor fan is rotating ? (1) Indoor fan is rotating ? (2)
No
Check indoor unit
- remove obstacles in
indoor unit
fan assembled correctly.
-
Check soldering state of
CN-Motor1 & assembling
state of DC Fan connector
No
YES
DC–fan driving circuit is right ?
No
Check DC Fan Driving circuit
(Soldering state & Direction)
- R01F~R09F, C01F~C03F,
IC01F~IC03F, Q01F~Q02F, ZD01F
Error code
9
Description Cause of error
Outdoor fan is locked
(BLDC fan model only)
• Outdoor fan is locked by an obstacle (ex : branch of tree, bar…etc)
• Fan connector is not connected to outdoor pcb assembly
• Defective in DC-fan driving circuit
Check flow
YES
Outdoor fan is rotating ? (1) Outdoor fan is rotating ? (2)
No
Check outdoor unit
- remove obstacles in
outdoor unit
Check connector is not
connected to outdoor pcb
assembly (CN-FAN2)
No
YES
DC–fan driving circuit is right ?
No
Check DC Fan driving circuit
(Soldering state & Direction)
- R01F~R05F, C01F~C03F,
Q01F~Q04F, ZD01F
Only for training and service purposes
- 53 -
Page 54

Part 4 Trouble Shooting
Error code
Description Cause of error
Discharge pipe temp. is
10
short or open
Check flow
Discharge pipe temp. is connected
to Outdoor pcb assembly ?
No
Connect to CN-D_PIPE
in outdoor pcb assembly
• Discharge pipe temp. is short or open
• Discharge pipe temp. is not connected to the outdoor pcb assembly
• Damage or defect on the sensing circuit of outdoor pcb assembly
YES
Discharge pipe temp. is right ?
No
Check Discharge pipe temp.
-
Measure resistance of thermistor
(about 200kΩ at 25°C(77°F)).
YES
Sensing circuit of outdoor
pcb is right ?
No
- Check soldering state of
R07H, R08H, C04H
Only for training and service purposes
- 54 -
Page 55

Ω
10kΩ
Check the resistance Check the voltage
V
2.5VDC
■ Troubleshooting Guide(18,24,30kBtu/h Model)
1) Troubleshooting CH01, CH02, CH06
Part 4 Trouble Shooting
Error
code
01
02
06
Title Cause of error Check point & Normal condition
Indoor air sensor
Indoor inlet pipe sensor
Indoor outlet pipe sensor
• Open / Short
• Soldered poorly
• Internal circuit error
• Open / Short
• Soldered poorly
• Internal circuit error
• Open / Short
• Soldered poorly
• Internal circuit error
Normal resistor : 10kΩ/ at 25°C(77°F) (Unplugged)
Normal voltage : 2.5VDC / at 25°C(77°F) (plugged)
Normal resistor : 5kΩ/ at 25°C(77°F) (Unplugged)
Normal voltage : 2.5VDC / at 25°C(77°F) (plugged)
Normal resistor : 5kΩ/ at 25°C(77°F) (Unplugged)
Normal voltage : 2.5VDC / at 25°C(77°F) (plugged)
Check Point
1. Unplug the sensor on Indoor unit PCB.
2. Estimate the resistance of each sensor.
3. If the resistance of the sensor is 10kΩ/ 5kΩ at 25°C(77°F), then sensor is normal.
4. If the resistance of the sensor is 0 kΩ or ∞, then sensor is abnormal. → Change the sensor.
5. Plug the sensor onto the Indoor unit PCB and Power ON.
6. Estimate the voltage of each sensor.
7. If the voltage of the sensor is 2.5VDC at 25°C(77°F), then sensor is normal.
8. If the resistance of the sensor is 0 or 5VDC, then sensor is abnormal. → Repair or Change the PCB.
Only for training and service purposes
- 55 -
Page 56

Part 4 Trouble Shooting
2) Troubleshooting CH05, CH53
Error
code
05
/
53
Title Cause of error Check point & Normal condition
Communication
(Indoor → Outdoor)
• Communication poorly
Check Point
1.
Check the input power AC 208~230V. (Outdoor, Indoor unit)
2. Check that the communication wires are correctly
connected.
→ Adjust the connection of wire
→ Confirm the wire is either “Live”, “Neutral”
3. Check the resistance between communication line and
GND. (Normal : Over 2MΩ)
4. Check that the communication cable is correctly
connected.
5. Check the connection of GND1, GND2, and main GND.
6. Check to see if one of the indoor units in operating properly
and the outdoor PCB is operating correctly.
→ Check any other indoor units
• Power input AC 208~230V. (Outdoor, Indoor)
• The connector for transmission is disconnected.
• The connecting wires are misconnected.
• The GND1,2 is not connected at main GND.
• The communication line is shorted at GND.
• Transmission circuit of outdoor PCB is abnormal.
• Transmission circuit of indoor PCB is abnormal.
* CH05 is displayed at indoor unit, CH53 is displayed at out-
door unit.
Only for training and service purposes
- 56 -
Page 57

3) Troubleshooting CH21
Ω
Comp
Copper
pipe
Resistance(Ω) at 20°C(68°F)
Resistance(Ω) at 20°C(68°F)
0.64
0.64
0.64
Inverter
comp.
V-W
W-U
U-V
Terminal
0.8
0.8
0.8
Constant
comp.
2MΩ
2MΩ
2MΩ
Inverter
comp.
V-GND
W-GND
U-GND
Terminal
2MΩ
2MΩ
2MΩ
Constant
comp.
V
U
W
Ω
Comp
Part 4 Trouble Shooting
Error
code
21
Title Cause of error Check point & Normal condition
• An instant over current in the U,V,W phase
- Comp lock
DC Peak
• Instant over current
• Over Rated current
• Poor insulation of IPM
- The abnormal connection of U,V,W
• Over load condition
- Overcharging of refrigerant
- Pipe length.
• Poor insulation of compressor
Check Point
1. Check the wire connection. (U,V,W)
2. Check the load condition. (Refrigerant, Pipe length, …) → Adjust the load condition
3. Check the electricity leakage of the compressor. → Normal : Over 2MΩ.
4. Check the resistance of compressor. → Normal : 0.65Ω(INV), 0.8Ω(Cons.) → No difference at each terminal.
5. Check the insulation from water at IPM part. → Check the trace of water.
6. Check the IPM circuit.
Only for training and service purposes
- 57 -
Page 58

Part 4 Trouble Shooting
V
4) Troubleshooting CH21, CH22
Error
code
21
22
Title Cause of error Check point & Normal condition
check if the compressor is locked or operating.
Check the compressor insulation and motor wire
resistance.
Check if the outdoor fan is locked or operating.
Check the IPM short.
Check AC input voltage.
Check if the outdoor fan is locked or operating.
Check input current.
Check the C01N DC voltage.
(From where the electricity is entering and Before
the product operates, Normality Vdc value is
2.5V±0.2V)
DC_Peak
C/T
Internal circuit
Compressor output
current over.(30A↑)
Initial current error
Check Point
1. Check the power source.
2. Check that the indoor fan is operating correctly.
3. Check the current.
4. Check the install conditions.
5. Check the internal circuit.
Only for training and service purposes
- 58 -
Page 59

5) Troubleshooting CH23, CH28
V
Part 4 Trouble Shooting
Error
code
23
28
Title Cause of error Check point & Normal condition
DC Link
Low voltage.
DC Link
High voltage
• DC link volt. is
140VDC or lower.
• DC link volt. is
140VDC or higher.
• Check the power source.
• Check the DC Link Voltage.
• Check the power source.
• Check the DC Link Voltage.
Check Point
1. Check the power source.
2. Check the DC Link Voltage.
Only for training and service purposes
- 59 -
Page 60

Part 4 Trouble Shooting
CN TRNAS1
CN PRESS
TRANS1
60Hz, DC12V
6) Troubleshooting CH24, CH25
Error
code
24
25
Title Cause of error Check point & Normal condition
Press S/W Open
Input voltage
• Low / High press
S/W open.
•
Abnormal Input voltage
(140VAC or lower 300VAC
or higher).
• Check the connection of “CN_Press”.
• Check the components.
• Check the power source.
• Check the components.
Check Point
• CH 24
1. Check the connection of “CN_PRESS”
2. Check the installation conditions for over loads.
3. Check that the SVC Valve is open.
4. Check for the leakage of refrigerant.
• CH 25
1. Check the power source.
2. Check the components
(Trans1, B/Diode, Diode, Resistance)
Only for training and service purposes
- 60 -
Page 61

7) Troubleshooting CH26, CH27
‘B’
‘A’
Part 4 Trouble Shooting
Error
code
26
27
Title Cause of error Check point & Normal condition
DC Compressor
Position
PSC Fault
• Compressor
position detect error
• Over current at “IGBT”
• Check the connection of comp wire “U,V,W”
• Malfunction of compressor
• Check the component of “IPM”, detection parts.
Check the Reactor spec.
(18k,30k:10A/26.8mH, 24k:13A/13mH * 2)
Check AC input voltage.
Check if the outdoor fan is locked or operating.
Check input current.
Check Point
• CH 26
Check the connection of "U, V, W"
Check for shorts at check point "A".
Check for with the error code "21"
• CH 27
Check the "IGBT" short point "B"
Only for training and service purposes
- 61 -
Page 62

Part 4 Trouble Shooting
LEV Openness
(Pulse)
COMP Frequency
(Hz)
Toff(105) °C
T1(90) °C
T2(95) °C
OFFNormal
OFF ControlNormal
Normal
Normal
Discharge pipe temp.
(221) °F
(194) °C
(203) °C
8) Troubleshooting CH32, CH33, CH40
Error
code
32
33
40
Title Cause of error Check point & Normal condition
Discharge pipe (Inverter)
temp. high
(105°C(221°F)↑)
Discharge pipe(Constant)
temp. high
(105°C(221°F)↑)
CT Sensor
• Discharge sensor
(Inverter) temp. high
• Discharge sensor
(Cons.) temp. high
• Open/Short
• Soldered poorly
• Internal circuit error
• Check the discharge pipe sensor for INV.
• Check the installation conditions for over loads.
• Check for leakage of refrigerant.
• Check if the SVC V/V is open.
Note: If SVC V/V stands for service valves, please
use service valves in place of SVCV/V.
• Check the discharge pipe sensor for Cons.
• Check the installation conditions for over loads.
• Check for leakage of refrigerant.
• Check if the SVC valve is open.
• Normal resistor : about 0
Ω
Check Point
• CH 32
1. Check the installation conditions for over loads.
2. Check if the SVC valve is open.
3. Check for leakage of refrigerant.
• CH 40
1. If the resistance of the sensor is only ∞ , the check Is
possible.
2 If the error occurs again after the reset , change the
PCB.
Only for training and service purposes
• CH 33
1. Check the installation conditions for over loads.
2. Check if the SVC valve is open.
3. Check for leakage of refrigerant.
4. Check the constant compressor. (same with CH21)
- 62 -
Page 63

9) Troubleshooting CH41, CH44, CH45, CH46, CH47, CH65
Ω
Part 4 Trouble Shooting
Display
code
41
44
45
46
47
65
Title Cause of error Check point & Normal condition
Discharge pipe sensor
(Inverter)
Air sensor
Condenser Pipe sensor
Suction Pipe sensor
Discharge pipe sensor
(Constant)
Heat sink sensor
• Open / Short
• Soldered poorly
• Internal circuit error
• Open / Short
• Soldered poorly
• Internal circuit error
• Open / Short
• Soldered poorly
• Internal circuit error
• Open / Short
• Soldered poorly
• Internal circuit error
• Open / Short
• Soldered poorly
• Internal circuit error
• Open / Short
• Soldered poorly
• Internal circuit error
• Normal resistor : 200kΩ / at 25°C(77°F) (Unplugged)
• Normal voltage : 4.5VDC / at 25°C(77°F) (plugged)
• Normal resistor : 10kΩ / at 25°C(77°F) (Unplugged)
• Normal voltage : 2.5VDC / at 25°C(77°F) (plugged)
• Normal resistor : 5kΩ / at 25°C(77°F) (Unplugged)
• Normal voltage : 2.5VDC / at 25°C(77°F) (plugged)
• Normal resistor : 5kΩ / at 25°C(77°F) (Unplugged)
• Normal voltage : 2.5VDC / at 25°C(77°F) (plugged)
• Normal resistor : 200kΩ / at 25°C(77°F) (Unplugged)
• Normal voltage : 4.5VDC / at 25°C(77°F) (plugged)
• Normal resistor : 10kΩ / at 25°C(77°F) (Unplugged)
• Normal voltage : 2.5VDC / at 25°C(77°F) (plugged)
Check Point
1. Estimate the resistance of each sensor.(Unplugged)
2. Estimate the voltage of each sensor.(Plugged)
3. If the resistance of the sensor is 0 kΩ or ∞, then sensor is abnormal.
If the voltage of the sensor is 0 V or 5VDC, then sensor is abnormal.
Only for training and service purposes
- 63 -
Page 64

Part 4 Trouble Shooting
Inverter/Constant
Discharge pipe R-T Table
Temperature(˚C/˚F) Resistance(kΩ)
20/68 244
30/86 164.8
40/104 114
50/122 80.6
60/140 58.3
70/158 42.9
80/176 32.1
90/194 24.4
100/212 18.9
110/230 14.8
120/248 11.7
Condenser/Suction Pipe
Pipe R-T Table
Temperature(˚C/˚F) Resistance(kΩ)
20/68 6.3
30/86 4
40/104 2.6
50/122 1.8
60/140 1.2
70/158 0.9
80/176 0.6
90/194 0.4
100/212 0.3
Air R-T Table
Temperature(˚C/˚F) Resistance(kΩ)
20/68 12.5
30/86 8
40/104 5.3
50/122 3.6
60/140 2.5
70/158 1.7
80/176 1.2
90/194 0.9
100/212 0.7
Heatsink R-T Table
Temperature(˚C/˚F) Resistance(kΩ)
20/68 12.5
30/86 8
40/104 5.3
50/122 3.5
60/140 2.5
70/158 1.7
80/176 1.2
90/194 0.9
100/212 0.7
110/230 0.5
120/248 0.4
10) Troubleshooting CH51, CH60
Display
code
60
Title Cause of error Check point & Normal condition
EEPROM
Check sum
• Check sum error
Check Point
• CH 60
1. Check the condition of EEPROM.
2. Check for poor soldering
Only for training and service purposes
• Check the PCB ASM P/No.
• Check for poor soldering.
- 64 -
Page 65

11) Troubleshooting CH61, CH62
COMP Frequency
(Hz)
Toff °C
T1 °C
T2 °C
OFFNormal Normal
Normal
Heat Sink temp.
Part 4 Trouble Shooting
Display
code
61
62
Title Cause of error Check point & Normal condition
Condenser
pipe sensor
temp. high
Heat sink sensor
temp. high
• Condenser pipe sensor
detected high
temp.(65°C(149°F))
• Heat sink sensor
detected high
temp.(85°C(185°F))
• Check the load condition.
• Check the sensor of Condenser pipe sensor.
• Check the fan is locked.
• Check the sensor of heat sink.
Check Point
• CH 61
1. Check the the installation conditions for over loads.
(Refrigerant, Pipe length, Blocked, …)
• CH 62
1. Check if the fan is locked.
2. Check if the Outdoor temp. is very high.
Only for training and service purposes
- 65 -
Page 66

P/NO : MFL41161604
20/02/2008
Specifications and performance data subject to change without notice.
HEAT CONTROLLER, INC.
1900 WELLWORTH AVENUE • JACKSON, MICHIGAN 49203
THE QUALITY LEADER IN CONDITIONING AIR
 Loading...