


Ensure that the installed Heater Assembly of your handpiece is defective by referring to the TP-65 Heater
Assembly Checkout Procedures in either of the PACE TP-65 Handpiece Manuals (P/N 5050-0295 or 5050-0335).
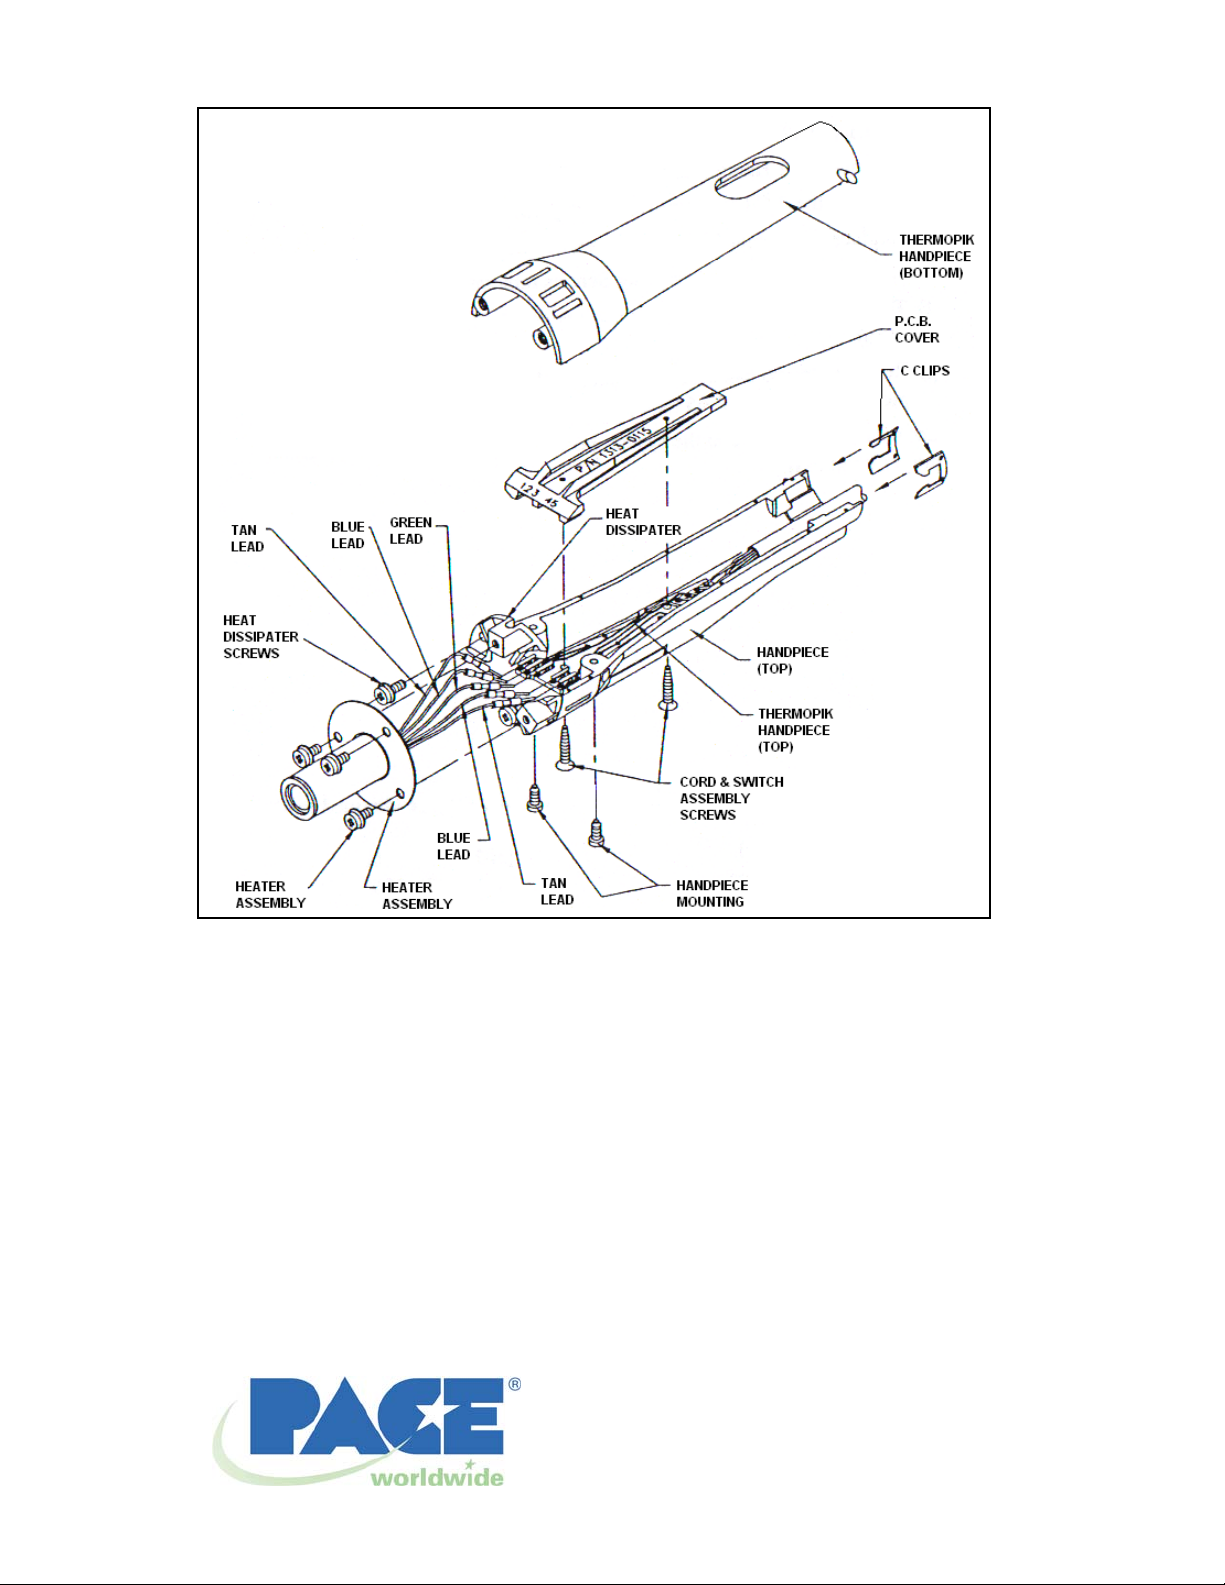
To replace the TP-65 Heater Assembly, follow the procedure listed below using the illustration as guide to ensure
optimum results:
1. Remove any attached tip and the vacuum cup from the heater end of the handpiece.
2. Disconnect the TP-65 handpiece from the power receptacle of the power source.
3. Remove the end cap, vacuum pick assembly and the metal vacuum chamber.
4. Remove the two (2) C Clips located at the rear of the handpiece.
5. Remove the two (2) Handpiece Mounting Screws which secure the top and bottom halves of the
handpiece together.
6. Remove the three (3) Heater Assembly Screws. Allow the assembly to hang loose. DO NOT pull the
heater from the handpiece at this time.
7. Remove the two (2) Heat Dissipator Screws which attach the Heat Dissipator to the Handpiece
(Bottom). Refer to the illustration. DO NOT remove the third screw attaching the Heat Dissipator to the
Handpiece (Top).
8. Remove the Handpiece (Bottom).
9. Remove the two (2) Cord & Switch Assembly Screws. Set the PCB Cover aside.
10. Using needle nose pliers, disconnect the five (5) Heater Assembly leads plugged into the Cord and Switch
Assembly. Remove the defective heater from the handpiece.
11. Install the new heater leads through the Heat Dissipator. Using needle nose pliers, careful l y plug the five
(5) color coded leads of the replacement heater into the receptacles of the Cord & Switch Assembly. Plug
the Tan leads into the receptacles along either edge of the PCB (#1 and #5; see PCB Cover markings on
illustration). Plug the Green Lead into the center receptacle (#3). Plug the two (2) Blue leads into the two
(2) remaining receptacles (#2 and #4).
12. Place the PCB Cover back over the Cord & Switch Assembly. Attach to the handpiece using the two
(2) screws removed in step #9.
13. Reassemble the handpiece in the following order:
a) Replace the Handpiece (Bottom) removed in step #8.
b) Replace the two (2) Heat Dissipator Screws removed in step #7.
c) Replace the three (3) Heater Assembly Screws removed in step # 6.
d) Replace the two (2) Handpiece Mounting Screws removed in step #5.
e) Replace the two (2) C Clips removed in step #4.
f) Replace the metal vacuum chamber, vacuum pick assembly and the end cap assemblies removed in
step #3. Replace the tip and vacuum cup.
14. Connect the handpiece to the system power source. NOTE-A small amount of smoke will be emitted for a
short period of time when the heater is initially powered up.
TP-65 HEATER ASSEMBLY
PACE P/N 6010-0081-P1
INSTALLATION INSTRUCTIONS
-
Insure that the pcb receptacles face up against the PCB Cover and the
cable assembly wires are not pinched during the Cord & Switch Assembly
Screw installation.
©2005 PACE Incorporated, Annapolis Junction, MD All Rights Reserved. Printed in the USA
CAUTION
www.paceworldwide.com
A
A
t
t
r
PACE Incorporated retains the right to make changes to specifications contained herein at any time, withou
notice. Contact your local authorized PACE Distributor or PACE Incorporated to obtain the lates
specifications.
The following are trademarks and/or service marks of PACE, Incorporated, MD, USA:
INSTACAL
POWERPORT
TEKLINK™.
The following are registered trademarks and/or service marks of PACE Incorporated, Annapolis Junction
Maryland U.S.A.
ARM-EVAC
SODRTEK
VISIFILTER
PACE products meet or exceed all applicable military and civilian EOS/ESD, temperature stability and othe
specifications including MIL STD 2000, ANSI/JSTD 001, IPC7711, and IPC A-610.
©2005 PACE Incorporated, Annapolis Junction, MD All Rights Reserved. Printed in the USA
™
, FUMEFLO™, HEATWISE™, PACEWORLDWIDE™, PERMAGROUND™,
™
, POWERMODULE™, TEMPWISE™, TIP-BRITE™, AUTO-OFF™, and
®
, FLO-D-SODR®, MINIWAVE®, PACE®, SENSATEMP®, SNAP-VAC®,
®
, SODR-X-TRACTOR®, ST 325®, THERMOJET®, THERMOTWEEZ®,
®
, THERMO-DRIVE®, and TOOLNET®.
dditional copies of this manual or other PACE literature may be obtained from:
PACE Incorporated
9030 Junction Drive
nnapolis Junction,
MD 20701
Tel: (301) 490-9860
Fax: (301) 498-3252
www.paceworldwide.com
PACE Europe Limited
13 Tanners Drive
Blakelands
Milton Keynes
Tel: (44) 1908-277666
Fax: (44) 1908-277777
 Loading...