

Heartland Appliances 3015, 3065, 3165, 3115 Installation And Operating Instructions Manual
1050 Fountain Street North Cambridge, Ontario, Canada N3H 4R7
CSA
VERIFIED
VÉRIFIE
Energy
Performance
Rendement
Énergétique
®
HEARTLAND
®
APPLIANCES
Bus. (519) 650-5501 Fax (519) 650-3773 Toll Free Phone 1-800-361-1517 Toll Free Fax 1-800-327-5609
Installation and Operating Instructions
Heartland Bottom Mount Fridges
Models:
3015
30” Classic Bottom Mount Fridge
3065
30” Legend Bottom Mount Fridge
3115
36” Classic Bottom Mount Fridge
3165
36” Legend Bottom Mount Fridge
Save these instructions
for future use
Keep sales receipt and/or cancelled check as proof of purchase. If service is required, have complete model and serial
number identication of your refrigerator. This is located on a data plate inside the refrigerator compartment, on the
upper left side. Record these numbers below for easy access :
Model Number ________________________________ Serial Number_________________________________
Date of Purchase______________________________
In our continuing effort to improve the quality and performance
of our appliances, it may be necessary to make changes to the
appliance without revising this guide.
Note: Please read these instructions thoroughly before attempting to install this unit.
#37309.091708
ATTENTION INSTALLER: Leave this manual with appliance
Model #3165 shown

Contents
Important Safety Instructions .................................................................. 3
What You Need to Know About Safety Instructions ................................................. 3
Recognize Safety Symbols, Words, Labels .............................................................. 3
Power Cord ..................................................................................................................3
Installation ................................................................................................. 5
Measuring the Opening 30” Classic and ................................................................... 5
Measuring the Opening 36” Classic and ................................................................... 5
Measuring the Opening 30” Legend .......................................................................... 6
Measuring the Opening 36” Legend ......................................................................... 6
Leveling (all models) ................................................................................ 7
Transporting Your Refrigerator ............................................................... 8
Fridge Dimensions ................................................................................... 9
Connecting the Water Supply ............................................................... 13
Materials Needed ....................................................................................................... 13
Touch Temperature Controls ................................................................. 14
Fresh Food Features .............................................................................. 15
Shelves ....................................................................................................................... 15
Dairy Center ............................................................................................................... 15
Door Buckets ............................................................................................................. 15
Full-width Door Shelf ................................................................................................15
Crisper Drawer ........................................................................................................... 16
Temperature-Controlled Drawer ...............................................................................16
Beverage Organizer™ ............................................................................................... 17
Freezer Features ..................................................................................... 17
Lower Wire Basket.....................................................................................................17
Upper Wire Basket .....................................................................................................17
Ice Cube Tray ............................................................................................................ 17
Ice and Water ............................................................................................................. 18
Automatic Ice Maker ..................................................................................................18
Water Dispenser ....................................................................................................... 19
Water Filter ................................................................................................................ 19
State of California Water Certicate ..................................................... 22
Food Storage Tips .................................................................................. 23
Fresh Food Storage ...................................................................................................23
Frozen Food Storage .................................................................................................23
Food Storage Chart ................................................................................................... 24
Care and Cleaning .................................................................................. 26
Cleaning the Outside .................................................................................................27
Legend Molded Polymer Panel (Models 3065/3165) ...............................................27
Classic Painted / Nickel plated surfaces (Models 3015/3115) .............................. 27
Removing Odors From Refrigerator ........................................................................ 27
Energy Saving Tips ................................................................................................... 28
Replacing Light Bulbs ...............................................................................................28
Preparing for Vacation .............................................................................................. 29
Operating Sounds .................................................................................. 31
Troubleshooting ..................................................................................... 32
Ice Maker .................................................................................................................... 34
Warranty ................................................................................. 35
If You Need Service ...................................................................................................36
Important Safety Instructions
Use & Care Guide
What You Need to Know
About Safety Instructions
Warning and Important Safety Instructions appearing in this guide are not meant to cover all
possible conditions and situations that may occur.
Common sense, caution and care must be exercised when installing, maintaining or operating
appliance.
Always contact the manufacturer about problems
or conditions you do not understand.
Recognize Safety Symbols,
Words, Labels
DANGER
DANGER – Immediate hazards which WILL
result in severe personal injury or death.
WARNING
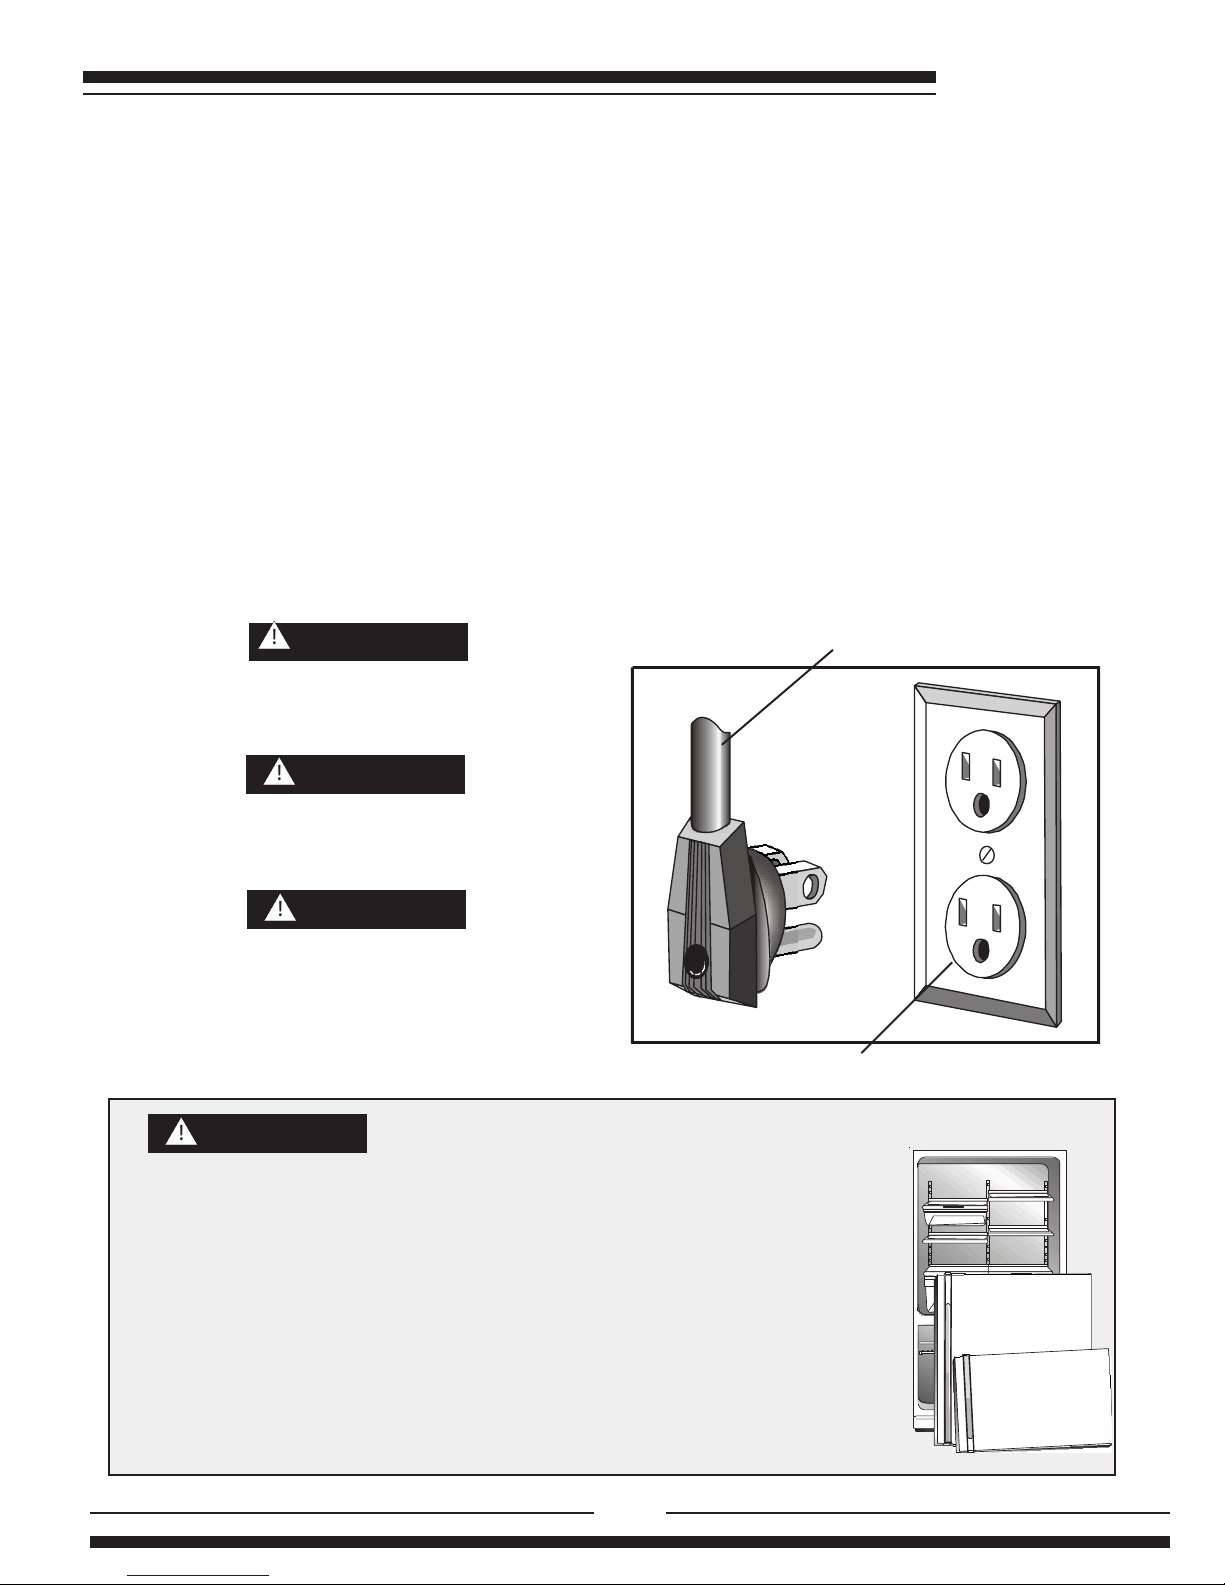
Power Cord
This appliance is equipped with a 5 ft. (1.5 m)
power cord with three-prong grounding plug for
your protection against possible electrical shock
hazards.
It must be plugged into a 115 Volts 60Hz 10 amp
grounding receptacle.
Where a standard two-prong wall receptacle is
encountered, it is the personal responsibility and
obligation of the customer to have it replaced with
a properly grounded three-prong wall receptacle.
Do not under any circumstances, cut or remove
the third (ground) prong from the power cord.
Do not use an adapter plug.
Power supply cord with three prong grounding plug
WARNING – Hazards or unsafe practices which
COULD result in severe personal injury or death.
CAUTION
CAUTION – Hazards or unsafe practices which
COULD result in minor personal injury or property
damage.
Grounding type wall receptacle
DANGER
To reduce risk of injury or death, follow basic precautions, including the
following:
IMPORTANT: Child entrapment and suffocation are not problems of the past.
Junked or abandoned refrigerators are still dangerous – even if they sit out for
“just a few days”.
If you are getting rid of your old refrigerator, please follow the instructions be-
low to help prevent accidents.
Before you throw away your old refrigerator or freezer:
• Take off the doors.
• Leave the shelves in place so children may not easily climb inside.
3

Use & Care Guide
Important Safety Instructions
To reduce risk of re, electric shock, serious injury or death when using your refrigerator, follow these
WARNING
basic precautions, including the following:
1) Read all instructions before using the
refrigerator.
2) Observe all local codes and ordinances.
3) Be sure to follow grounding instructions.
4) Check with a qualied electrician if you are not
sure this appliance is properly grounded.
5) Do not ground to a gas line.
6) Do not ground to a cold-water pipe.
7) Refrigerator is designed to operate on a separate
115 volt, 15 amp, 60 cycle line.
8) Do not modify plug on power cord. If plug does
not t electrical outlet, have proper outlet installed
by a qualied electrician.
9) Do not use a two-prong adapter, extension cord
or power strip.
10) Do not remove warning tag from power cord.
11) Do not tamper with refrigerator controls.
12) Do not service or replace any part of refrigerator
unless specically recommended in Use & Care
Guide or published user-repair instructions.
Do not attempt service if instructions are not
understood or if they are beyond personal skill
level.
13) Always disconnect refrigerator from electrical
supply before attempting any service. Disconnect
power cord by grasping the plug, not the cord.
14) Install refrigerator according to Installation
Instructions. All connections for water, electrical
power and grounding must comply with local
codes and be made by licensed personnel when
required.
15) Keep your refrigerator in good condition. Bumping
or dropping refrigerator can damage refrigerator
or cause refrigerator to malfunction or leak. If
damage occurs, have refrigerator checked by
qualied service technician.
16) Replace worn power cords and/or loose plugs.
17) Always read and follow manufacturer’s storage
and ideal environment instructions for items being
stored in refrigerator.
18) Your refrigerator should not be operated in the
presence of explosive fumes.
19) Children should not climb, hang or stand on any
part of the refrigerator.
20) Clean up spills or water leakage associated with
water installation.
21) Ensure that the anti-tip bracket is installed as
per installation instructions.
SAVE THESE INSTRUCTIONS
4

Installation
Your refrigerator has been packed carefully for
shipment. Remove and discard shelf packaging
and tape. Do not remove the serial plate.
The following pages contain “Measuring and
Opening” instructions particular to each of the
models and sizes. Ensure you choose the correct
instructions for your model.
•
If refrigerator is installed beside a cooking appli-
ance, (not recommended) it is important that there
be at least 5” (13 cm) between the refrigerator and
range for proper air circulation.
•
Do not install refrigerator near a radiator or other
heat source. If not possible, shield refrigerator with
cabinet material.
•
Do not install where temperature falls below 55° F
(13° C) or rises above 110° F (43° C). Malfunction
may occur at this temperature.
•
Refrigerator is designed for indoor household
application only.
Use & Care Guide
to prevent the refrigerator from tipping forward
should downward pressure be applied with both
doors open. To fasten bracket to the wall, distance
from oor to underside of bracket will be 66-1/4”
(169 cm) max. Mark wall where studs are located.
Fasten anti-tip bracket to the wall.
Subooring or oor coverings (i.e. carpet, tile, wood
oors, rugs) may make your opening smaller than
anticipated.
Some clearance may be gained by using the leveling
procedure under Leveling.
IMPORTANT:
low door to open 90 degrees, corner installations
must allow 4” (10 cm) space between wall and
refrigerator on hinge side. Filler wood strip recommended for aesthetics.
Corner Installations Classic: To al-
Measuring the Opening
Measuring the Opening
30” Classic
(see page 9 #3015 diagram)
If refrigerator is to be installed into a recess, verify
and use the following dimensions
1.) Cut out height for refrigerator:
Option 1) Without optional cowl, and
of the refrigerator is completely covered:
67 1/4” (171 cm) - space provides the necessary
gap above the refrigerator for tool access to fasten
anti-tip bracket (see details below)
Option 2) With 6” high optional cowl:
73 1/4 (186 cm) - provides enough space for op-
tional 6” cowl assembly
2.) Cut out width for refrigerator’s main body: 30”
(77 cm)
3.) Max. cut-out depth: 27 1/2” (70 cm)
4.) When installing your refrigerator, measure care-
fully. Allow ½” space at top and ½” space behind the
machine compartment cover (located in the rear) for
proper air circulation.
Anti-Tip Bracket: Every refrigerator includes an
anti-tip bracket which must be properly installed
where the top
36” Classic
(see page 10 #3115 diagram)
If refrigerator is to be installed into a recess verify
and use the following dimensions
1.) Cut out height for refrigerator:
Option 1) without optional cowl, and where the
top of the refrigerator is completely covered:
70” (177.8 cm) - space provides the necessary
gap above the refrigerator for tool access to fasten anti-tip bracket (see details below)
Option 2) with 6” high optional cowl:
76 (193.1 cm) - provides enough space for op-
tional 6” cowl assembly
2.) Cut out width for refrigerator’s main body: 36-
1/2” (93 cm).
3.) Max. cut-out depth: 24 1/2” (62 cm)
4.) When installing your refrigerator, measure care-
fully. Allow ½” space at top and ½” space behind the
machine compartment cover (located in the rear) for
proper air circulation.
Anti-Tip Bracket: Every refrigerator includes an
anti-tip bracket which must be properly installed
to prevent the refrigerator from tipping forward
should downward pressure be applied with both
doors open. To fasten bracket to the wall, distance
5

Use & Care Guide
from oor to underside of bracket will be 68-3/4
(174.6 cm) min to 69-1/4 (176 cm) max. Mark wall
where studs are located. Fasten anti-tip bracket
to the wall.
Subooring or oor coverings (i.e. carpet, tile, wood
oors, rugs) may make your opening smaller than
anticipated.
Some clearance may be gained by using the level-
ing procedure under Leveling.
IMPORTANT:
low door to open 90 degrees, corner installations
must allow 4” (10 cm) space between wall and
refrigerator on hinge side. Filler wood strip recom-
mended for aesthetics.
Corner Installations Classic: To al-
Measuring the Opening
30” Legend
(see page 11 #3065 diagram)
If refrigerator is to be installed into a recess verify
and use the following dimensions
1.) Cut out height for refrigerator, where the top
of the refrigerator is completely covered: 67” (171
cm) - space provides the necessary gap above
the refrigerator for tool access to fasten anti-tip
bracket (see details below)
2.) Cut out width for refrigerator’s main body: 30”
(77 cm)
3). Max. cut-out depth: 27 1/2” (70 cm)
When installing your refrigerator, measure carefully.
Allow ½” space at top and ½” space behind the
machine compartment cover (located in the rear) for
proper air circulation.
Some clearance may be gained by using the leveling
procedure under Leveling.
IMPORTANT:
low door to open 90 degrees, corner installations
must allow 3” (7.6 cm) space between wall and
refrigerator on hinge side. Filler wood strip recommended for aesthetics.
Corner Installations Legend: To al-
Measuring the Opening
36” Legend
(see page 12 #3165 diagram)
If refrigerator is to be installed into a recess verify
and use the following dimensions
1.) Cut out height for refrigerator, where the top of
the refrigerator is completely covered: 70” (177.8
cm) - space provides the necessary gap above
the refrigerator for tool access to fasten anti-tip
bracket (see details below)
2.) Cut out width for refrigerator’s main body: 36
(93 cm)
3.) Max. cut-out depth: 24 1/2” (62 cm)
When installing your refrigerator, measure carefully. Allow ½” space at top and ½” space behind the
machine compartment cover (located in the rear) for
proper air circulation.
AntiTip Bracket: Every refrigerator includes an
anti-tip bracket which must be properly installed
to prevent the refrigerator from tipping forward
should downward pressure be applied with both
doors open. To fasten bracket to the wall, distance
from oor to underside of bracket will be 68-3/4
(174.6 cm) min to 69-1/4 (176 cm) max. Mark wall
where studs are located. Fasten anti-tip bracket
to the wall
½”
Anti-Tip Bracket: Every refrigerator includes an
antitip bracket which must be properly installed
to prevent the refrigerator from tipping forward
should downward pressure be applied with
both doors open. To fasten bracket to the wall,
distance from oor to underside of bracket will be
66-1/4” (169 cm) max. Mark wall where studs are
located. Fasten anti-tip bracket to the wall.
Subooring or oor coverings (i.e. carpet, tile, wood
oors, rugs) may make your opening smaller than
anticipated.
Subooring or oor coverings (i.e. carpet, tile, wood
oors, rugs) may make your opening smaller than
anticipated.
Some clearance may be gained by using the leveling
procedure under Leveling.
IMPORTANT :
low door to open 90 degrees, corner installations
must allow 4” (10 cm) space between wall and
refrigerator on hinge side. Filler wood strip recommended for aesthetics.
Corner Installations Legend: To al-
6
Leveling 36” Model
A. Leveling screw
A
Notch
Location
B
A A
B
CAUTION
To protect property and refrigerator from damage,
observe the following:
• Protect vinyl or other ooring with cardboard,
rugs, or other protective material.
• Do not use power tools when performing levelling
procedure.
To enhance the appearance and maintain performance, the refrigerator should be level.
Materials Needed
• 3/8” hex head driver.
• Carpenter’s level.
Use & Care Guide
3. Open the door again to make sure that
it closes as easily as you like. If not, tilt the
refrigerator slightly more to the rear by turning
both leveling screws clockwise. It may take
several more turns, and you should turn both
screws the same amount.
4. Replace the base grille.
If your refrigerator seems unsteady or
you want the door to close more easily, use
the instructions below.
1. Remove the base grille. Grasp the
grille rmly and pull it toward you.
2. Raise or lower the cabinet.
Leveling screw
Using a ¼” hex driver, turn the leveling
screw on each side to raise or lower that side
of the refrigerator.
NOTE: Having someone push against
the top of the refrigerator takes some weight
off the leveling screws. This makes it easier
to turn the screws. It may take several turns
of the leveling screw to adjust the tilt of the
refrigerator.
■ To raise, turn the leveling screw clock-
wise.
■ To lower, turn the leveling screw coun-
terclockwise.
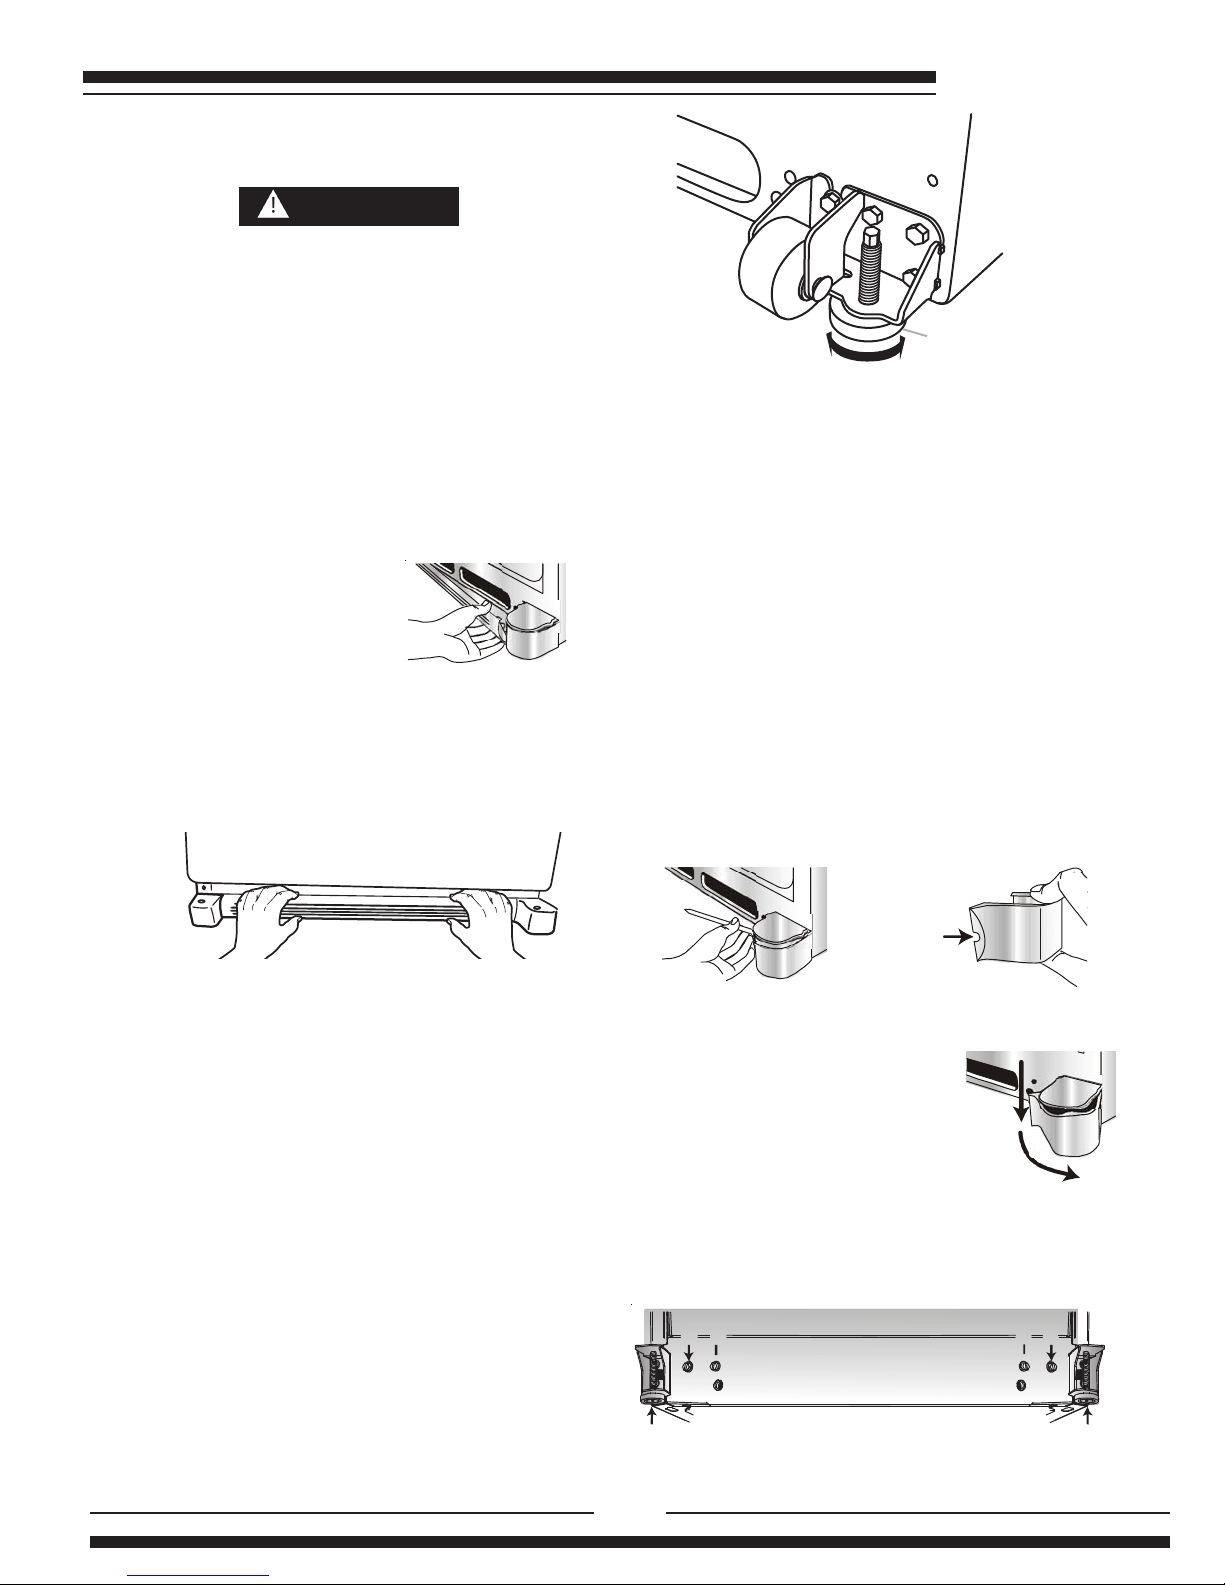
Leveling 30” Model
Once unit is in place, adjust both front
stabilizing legs (A) securely against oor.
1. Remove toe grille:
• Grasp rmly and pull outward to unclip.
2. Remove bottom bracket
cover(s).
• Place the eraser end
of a pencil or similar blunt
tool in the cover notch.
• Use slight pressure to
pry the cover loose.
• Continue to maintain
downward pressure to the notched side of the
cover while swinging it off.
7

Use & Care Guide
3. Using hex head driver, turn the front
adjustment screws (A) on each side clockwise
to raise or counter-clockwise to lower the front
of the refrigerator. (ensure the back of the unit
is rmly under the anti-tip bracket.)
4. Using the carpenter’s level,
make sure front of refrigerator is 1/4” (6 mm)
or 1/2 bubble higher than back of refrigerator
and that the refrigerator is level from side to
side.
5. Turn stabilizing legs (B) clock-
wise until rmly against oor.
6. Turn adjustment screws (A)
counter clock wise to allow the full weight of
the refrigerator to rest on the stabilizing legs.
7. Replace bracket cover(s):
• Position cover into the outer
edge of the hinge.
• Swing the cover toward the cabinet and snap it into place.
8. Replace the toe grill.
between the refrigerator and dolly.
• Secure refrigerator to dolly rmly with straps or
bungee cords. Thread straps through handles
when possible. Do not overtighten. Overtightening
restraints may dent or damage outside nish.
Note:
• For proper reinstallation, ensure the “top”
marking on the interior of the toe grill is oriented
correctly.
• Align the toe grill mounting clips with the lower
cabinet slots.
• Push the toe grill rmly until it snaps into
place.
Transporting Your
Refrigerator
• NEVER transport refrigerator on its side. If an upright
position is not possible, lay refrigerator on its back.
Allow refrigerator to sit upright for approximately 30
minutes before plugging it in to assure oil returns
to the compressor. Plugging the refrigerator in
immediately may cause damage to internal parts.
• Use an appliance dolly when moving refrigerator.
ALWAYS truck refrigerator from its side or back–
NEVER from its front.
• Protect outside nish of refrigerator during transport
by wrapping cabinet in blankets or inserting padding
8
Use & Care Guide
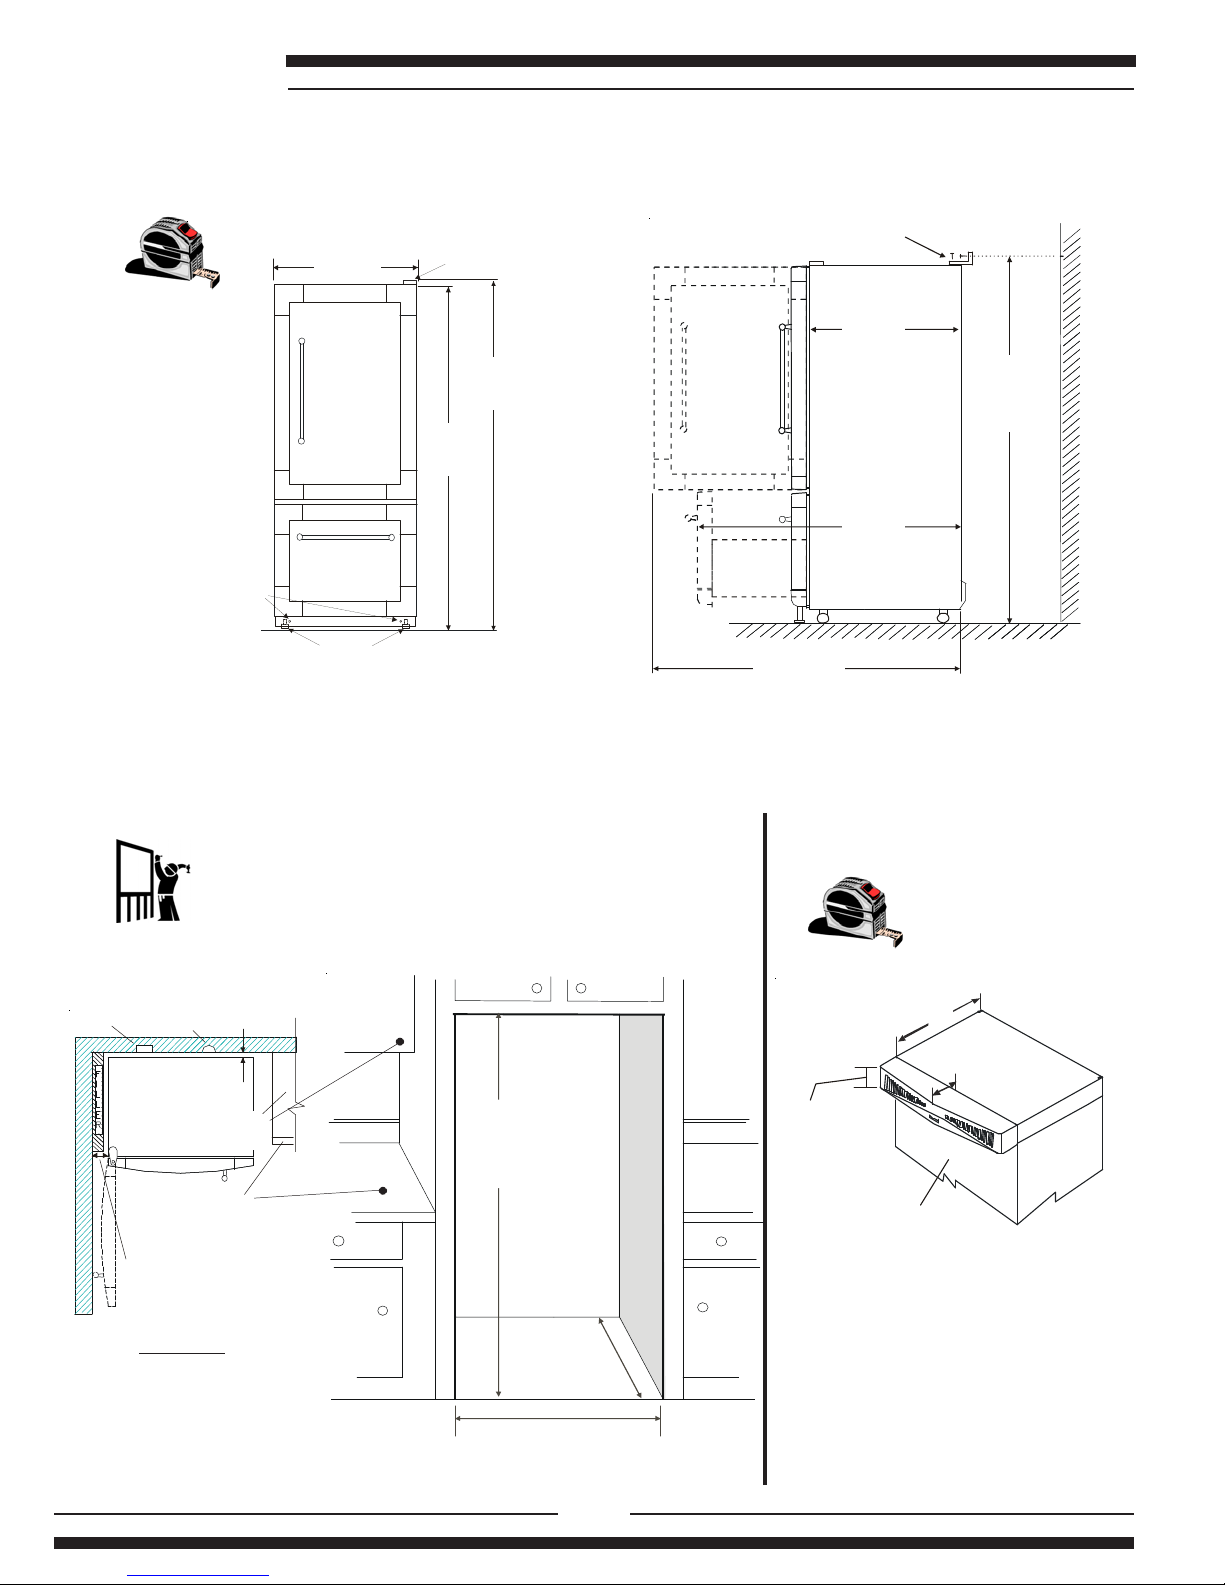
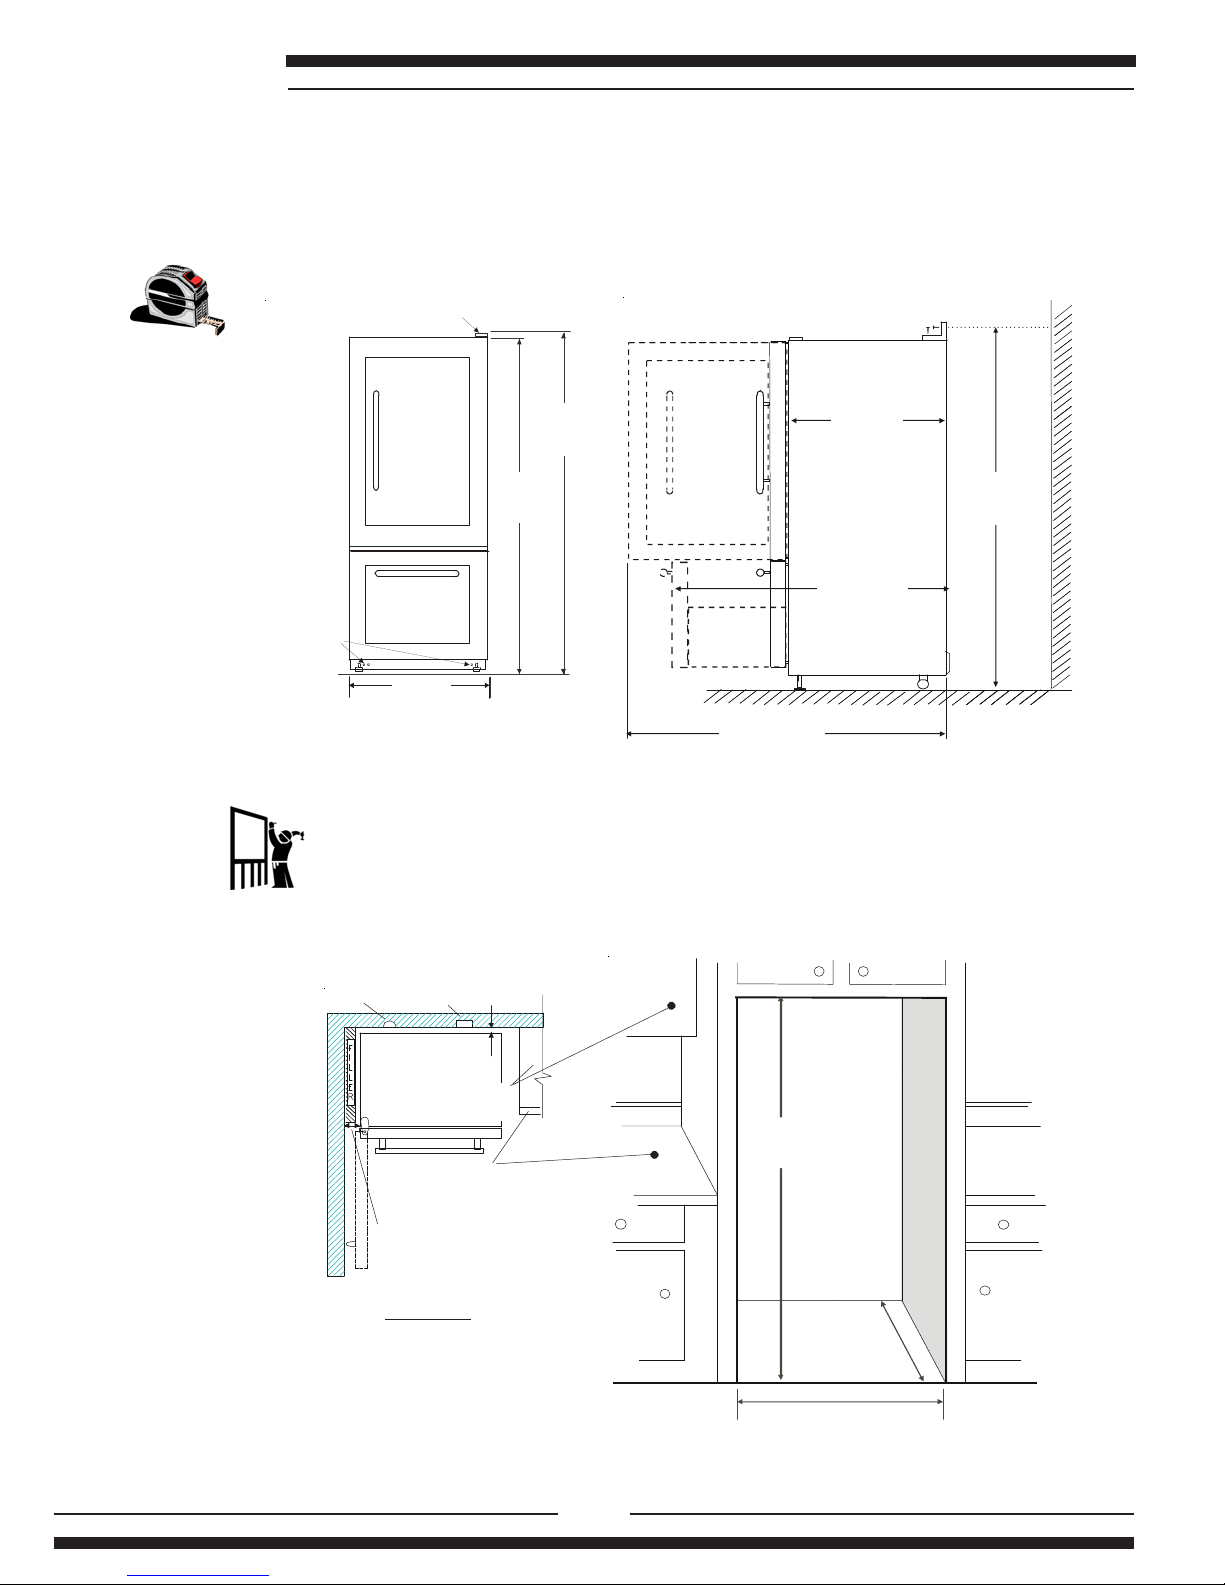
Dimensions
A
nti-Tip Bracket
66 1/4”
(169 cm)
58 3/4”
(
150 cm
)
with fridge door open
27.1/2”
(71 cm)
51 3/8” (131 cm)
w/ freezer
door open
67”
(170 cm)
65 5/8”
(167 cm)
Body Width
29 5/8”
(76 cm)
Hinge
3/8”
front leg
adjusters
front
stabilizers
Rough In
Measurements
30”
(77 cm)
27-1/2”
(70 cm)
67-1/4” (171 cm)
with-out cowl
73 1/4” (186 cm)
with 6” cowl
OPTIONAL COWL
C
L
6” (152 mm)
27.5”
(70 cm)
6”
(16 cm)
Refrigerator
• Optional 6” (15 cm) high cowl - part
39022-color
• Cut-out height of opening will dependant on installation of cowl option. See adjacent Figure.
Dimensions
Electrical
Water
½” (1.3 cm)
air gap
4” (10 cm) gap
required for proper
door swing
25” (63.5 cm)
counter depth
24” (61 cm)
cabinet depth
Top View
Model 3015 30” Classic
9

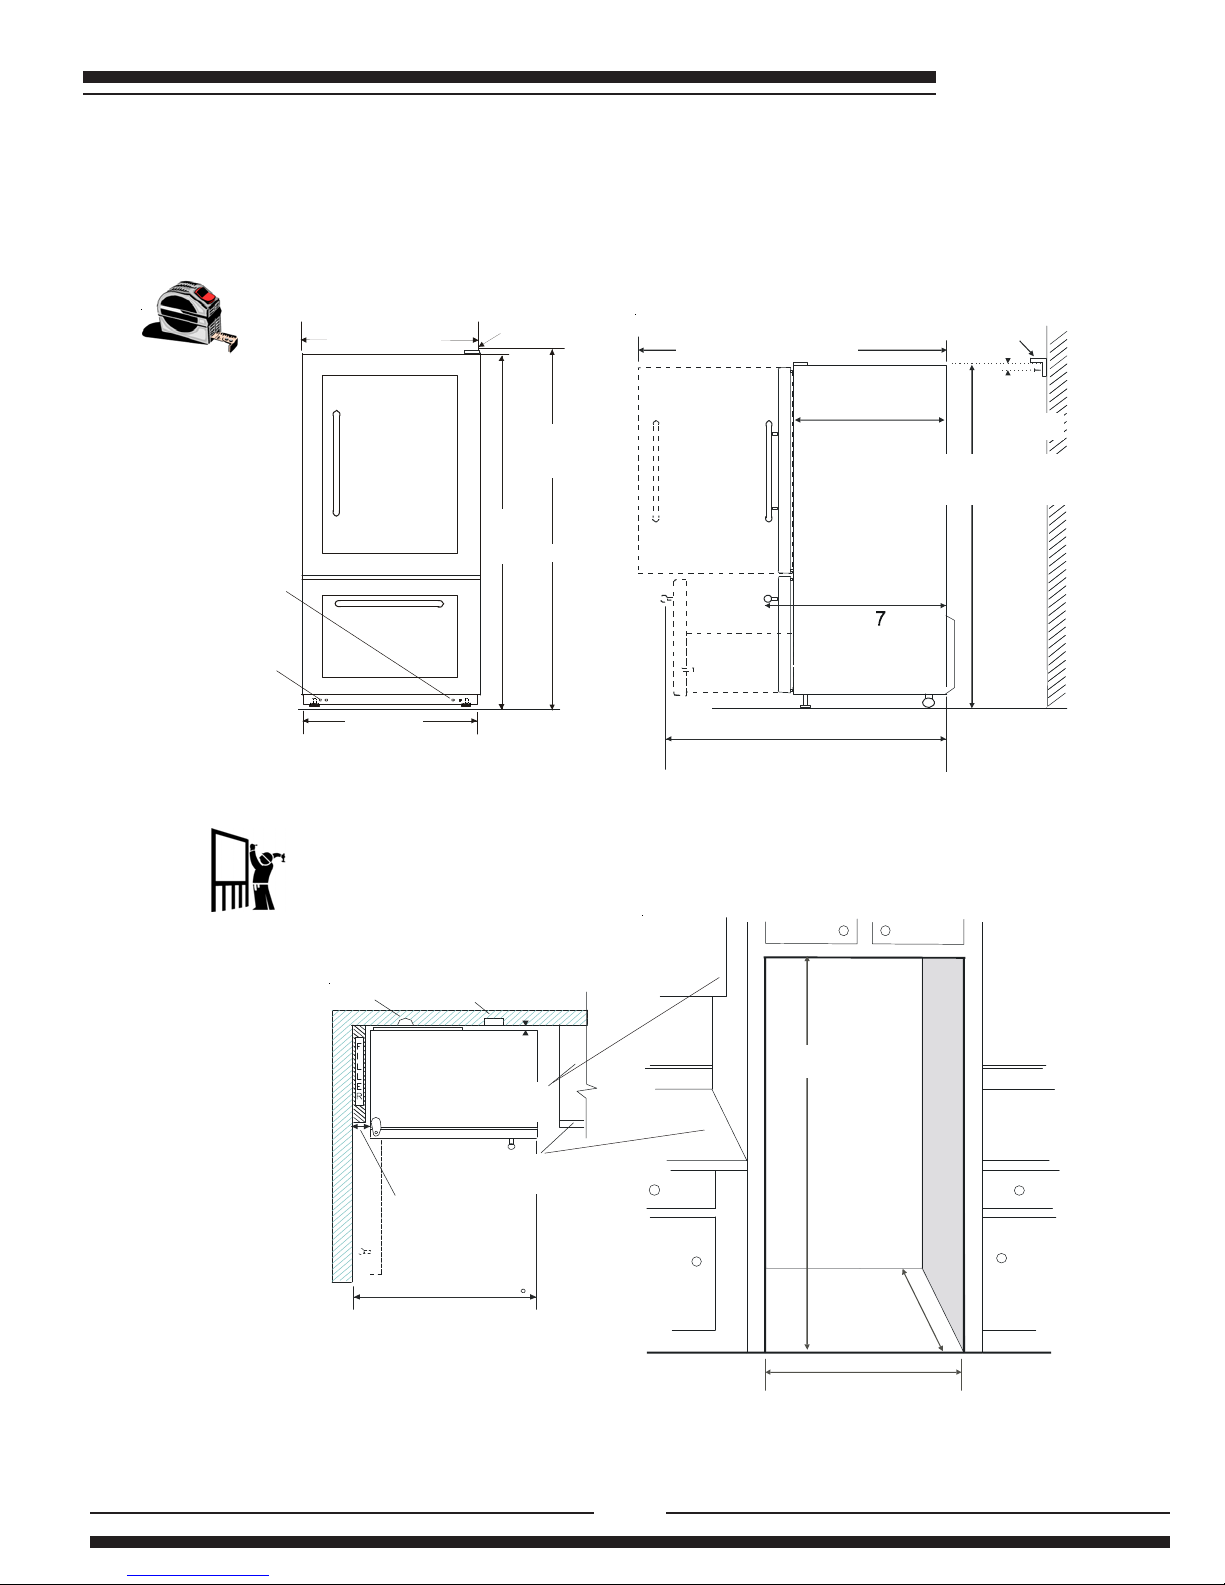
Model 3115 36” Classic
Dimensions
A
nti-Tip Bracket
69-1/4 (176 cm) max
68-3/4” (174.6 cm) min
23-1/2” (60 cm)
cabinet depth
31” (79 cm)
depth w/ door
61” (155 cm)
depth w/ open door
47-1/4” (120 cm)
depth w/ open door
3/4”
(19 mm)
69-1/2”
(176.5cm)
35-5/8”
(90.5 cm) cabinet
Hinge
3/8” front
leg adjusters
(typical of two)
3/8” back
leg adjusters
(typical of two)
68-3/4”
(174.6 cm)
36” (91.4 cm)
door width
Rough In
Measurements
OPTIONAL COWL
Dimensions
• Optional 6” (15 cm) high cowl - part
39016-color
Note: color specified at time of order.
• Cut-out height of opening will dependant on installation of cowl option. See adjacent Figure.
Electrical
Water
1” (2.5 cm)
air gap
24” (61 cm)
cabinet depth
41-1./4”
(105 cm)
w/ door open 90
4” (10.2 cm)
gap
for door swing
25” (63.5 cm)
counter depth
36-1/2”
(92.7 cm)
24-1/2”
(62.3cm)
70” (177.8 cm)
no cowl
76” (193.1 cm)
6” cowl
C
L
6” (15.3 cm)
cowl option
24”
(61 cm)
5-9/16”
(13 cm)
Refrigerator
Use & Care Guide
10
Use & Care Guide
Dimensions
29 5/8”
(76 cm)
Hinge
3/8”
front leg
adjusters
67”
(170 cm)
65 5/8”
(167 cm)
Body Width
27 ½”
(71 cm)
49” (125 cm)
w/ freezer
door open
58-5/8”
(149 cm)
with fridge door open
66 1/4”
(169 cm)
Rough In
Measurements
Top View
30”
(77 cm)
27-1/2”
(70 cm)
67 1/4” (171 cm)
Electrical
Water
½” (1.3 cm)
air gap
3” (7.6 cm) gap
required for proper
door swing
25” (63.5 cm)
counter depth
24” (61 cm)
cabinet depth
Model 3065 30” Legend
11
Model 3165 36” Legend
Dimensions
69-1/2”
(176.5cm)
35-5/8”
(90.5 cm) cabinet
Hinge
3/8” front
leg adjusters
(typical of two)
3/8” back
leg adjusters
(typical of two)
68-3/4”
(174.6 cm)
36” (91.4 cm)
door width
A
nti-Tip Bracket
69-1/4 (176 cm) max
68-3/4” (174.6 cm) min
23-1/2” (60 cm)
cabinet depth
29-1/2” (
5 cm)
depth w/ door
61” (155 cm)
depth w/ open door
44-3/4” (113.7 cm)
depth w/ open door
3/4”
(20 mm)
Rough In
Measurements
Electrical
Water
1” (2.5 cm)
air gap
24” (61 cm)
cabinet depth
35-5/8”
(90.5 cm)
w/ door open 90
4” (10.2 cm)
gap
for door swing
25” (63.5 cm)
counter depth
36-1/2”
(92.7 cm)
24-1/2”
(63 cm)
70” (177.8 cm)
Use & Care Guide
12
 Loading...