

Page 1
We value every NuWave customer. You’ve purchased the Precision Induction Cooktop
because you want to save time, money and energy while enjoying great tasting meals.
Our mission is to exceed our customers’ expectations by providing innovative new
products using the most advanced technology available today.
To show our gratitude and lifetime commitment to you, we
have created the nuwavecookingclub.com exclusively for
our customers. This site will be hosted by our executive
chef and will feature recipes, step-by-step instructional
cooking videos, live chat and more.
You can also visit www.hearthware.com to see more innovative
products developed by the makers of the NuWave
NuWave Oven Pro and NuWave Mini Oven, plus the NuWave Twister
NuWave Party Mixer, i-ROAST
®
Coffee Bean Roaster and Supermo®Coffee Mill.
®
Oven,
®
Blender and
FOR HOUSEHOLD USE ONLY
Model X ~ X: 120V, 60Hz, 1300 Watts
US Patents: and Other US Patents Pending.
Manufactured and Distributed by:
IIBC-HEARTHWARE, Inc
1755 Butterfield Road, Libertyville, IL 60048, U.S.A.
1-847-775-8123 or 1-888-NUWAVE1 (689-2831)
© 2011 Hearthware Home Products. All Rights Reserved IDC-CB1
COMPLETE
COOKBOOK
OWNERS’ MANUAL
RECIPES AND TIPS
Page 2
WELCOME TO PRECISION INDUCTION COOKING
Congratulations on your purchase of the NuWave
®
Precision Induction Cooktop. This book contains
detailed instructions and images to help you
get started using your NuWave Precision
Induction Cooktop. It is also filled with great
recipes and time-saving tips to help you
prepare delicious gourmet meals in a fraction
of the time it would take when using a regular
stovetop.
Cooking is fast and easy with the NuWave Precision
Induction Cooktop from IBC-Hearthware, Inc. This versatile countertop
appliance uses induction to save time, energy and money.
The NuWave Precision Induction Cooktop is efficient, safe, fast and easy to
clean. And because you can program your times and temperatures from
warming to searing you make almost any food to perfection.
WHAT IS INDUCTION COOKING?
An induction cooktop holds a series of burners called induction coils
(based on magnetic principles). These coils generate magnetic fields
that induct a warming reaction in steel and iron-based pots and pans.
This way, the cookware itself heats the food, not the cooktop surface.
Induction cooking is the most eco-friendly and energy-efficient way to cook.
Induction cooktops use 90% of the energy produced, which is much more
energy-efficient than gas or electric cooktops. Induction heats only the diameter
of the pot so very little energy is wasted. Induction emits no flame, so less
residual heat is produced in your kitchen.
There are no open flames and the Induction Cooktop remains cool to the touch
where the magnetic surface is not activated.
Since heating and adjustments are immediate, you can save up to 50% of
cooking time when compared to gas and electric stove tops.
Hot spots and rings are avoided because the bottom of your cookware heats
uniformly.
The surface is flat and smooth; spills and over flows do not stick to the cooktop,
so they can easily be wiped away.
The NuWave Precision Induction Cooktop Products and Accessories:
NuWave Precision Induction Cooktop:
(30101) NuWave Precision Induction Cooktop
(32001) Induction Cooktop Compatible Pot
(32002) Induction Cooktop Pot Lid
(32041) Precision Induction Cooktop Magnet
(32051) NuWave Precision Induction Cooktop Owner’s Manual / Cookbook
(32053) NuWave Precision Induction Cooktop Registration Card
NuWave Precision Induction Cookware - Ultimate Cookware Set:
(32003) Induction Cooktop Compatible Pot
(32004) Induction Cooktop Pot Lid
(32005) Induction Cooktop Steamer
(32006) Induction Cooktop Yogurt Jars*
(32007) Induction Cooktop Fondue Insert
(32008) Induction Cooktop Fondue Fork
(32055) Ultimate Cookware set Manual
NuWave Precision Cast Iron Cookware - Grill Pan:
(32021) Induction Cooktop Grill Pan
(32022) Induction Cooktop Oil Drip Tray
(32056) Induction Cooktop Grill Pan Manual
To order parts and accessories, call our customer service at:
1-888-689-2831 or order online at: www.nuwaveoven.net.
Please provide the item name and number to ensure that
your purchase is processed accurately.
1 • THE NUWAVE PRECISION COMPLETE COOKBOOK
NuWave Precision Induction Cookware - Fry Pan:
(32009) Induction Cooktop Eco-Green Frying Pan
(32056) Induction Cooktop Grill Pan Manual
NuWave Precision Induction Supplement - Jump Start Yogurt Starter:
(32052) *Jump Start Yogurt Starter Supplement Packets (12 packets/box)*
PARTS AND ACCESSORIES • 2
Page 3

TABLE OF CONTENTS
Introduction ....................................1
Products & Accessories ................2
Owner’s Manual ........................ 3-11
General Tips ................................. 12
Breakfast .................................. 13-15
Scrambled Eggs .................... 14
Fried Eggs ............................. 14
Omelette ............................... 14
Homemade Pancakes ........... 15
Breakfast Potatoes ................ 15
Homemade Yogurt .............. 15
Appetizers & Fondues .............16-21
Chicken Satay .........................17
Saucy Spicy Shrimp ...............17
Doubly Hot Cheese Dip ......... 18
Shrimp & Citrus Cocktail ........18
Brie & Sun-dried Tomato
Fondue ..........................................19
Cheddar Cheese Fondue ...... 19
Cheddar Chipolte Fondue ........19
Beef Fondue .......................... 20
Chicken Fondue .....................20
Shabu-Shabu Fondue ............21
Chocolate Fondue ..................21
S’Mores Fondue .....................21
Vegetables ................................22-25
Vegetable Cooking Chart .......24
Artichokes with Butter Sauce .24
Broccoli & Carrot Stir-Fry .......24
Green Beans Almandine ........25
Green Beans Almandine ........25
Grilled Japanese Eggplant with
Sundried Tomatoes & Feta .... 25
Beef ...........................................26-28
Grilled Sirloin with Mushrooms
& Red Peppers....................... 27
Spiced Beef with Dumplings ..27
Hometown Chili ......................28
Bistro Beef & Mushrooms ..... 28
Poultry & Pork ......................... 29-32
Chicken & Mushrooms ......... 30
Chicken Provencal ................30
Fried Chicken ....................... 31
Pan-fried Pork Chops ........... 31
Pork Marsala .......................... 32
Sweet & Sour Pork &
Pineapple ..............................32
Stocks, Soups & Sauces ........ 33-40
Beef Stock ............................ 34
Chicken Stock ...................... 34
Vegetable Stock ....................35
Creamy Cheddar Soup ............35
White Bean Tomato Soup ....... 36
French Onion Soup ................. 36
Hot & Sour Soup with Shrimp. 37
Vegetable Beef Soup .............. 37
Roux ......................................... 38
Basic White Sauce .................. 38
Quick Brown Sauce ................ 38
Mustard Marinade ................ 38
Mushroom Duxcelle ................ 39
Cheese Sauce ......................... 39
Marinara Sauce ....................... 40
Hollandaise Sauce .................. 40
Seafood .................................... 41-44
Battered Fried Shrimp .......... 42
Ginger Shrimp ...................... 42
Jumbo Louisiana Shrimp with
Andouille & Grits ...................43
Seafood Paella ....................... 43
Steamed Mussels in Tomato
and Wine .............................. 44
Fried Catfish ......................... 44
Pasta, Grains & Rice .............. 45-50
Basic Pasta Dough ................46
Fettuccine Alfredo .................. 46
Mushroom Stroganoff .............. 47
Roasted Red Pepper Sauce
over Tortellini ........................... 47
Stir-Fried Tofu & Vegetables ..48
Beans with Pesto Bulgar ........48
Vegetable Fried Rice ............. 49
Popcorn Rice with Pecans .....49
Rice Pilaf ................................49
Spanish Rice ..........................50
Black Eyes Peas with
Andouille ................................ 50
Desserts ................................... 51-54
Simple Fudge ........................ 51
Classic Cherries Jubilee ........ 52
Old Fashion Hard Candy ....... 52
Pears in White Wine Caramel
Sauce ................................... 53
Candy Suckers ..................... 53
Chocolate Caramel Turtles.... 53
Easy Peanut Brittle ................ 54
Panna Cotta with Amber
Crystals ..................................54
Bananas Foster ..................... 54
CONTENIDO
Manual Del Usario ....................56-65
Introducción .................................. 57
Recetas .....................................67-72
Huevos Revueltos .................... 67
Papas Para el Desayuno ......... 67
Caldo de Res ........................... 68
Caldo de Pollo ......................... 68
Chili Tradicional ........................69
Cerdo Agridulce con Piña .......... 69
Camarones Cepeados ............. 70
Paella de Mariscos .................. 70
Masa Básica Para Pasta ..........71
Fetuchini Alfredo ...................... 71
Arroz Frito con Verduras .......... 72
Arroz Español ...........................72
+ THE NUWAVE PRECISION COMPLETE COOKBOOK
TABLE OF CONTENTS +
Page 4

IMPORTANT SAFEGUARDS
When using electrical products, especially when children are present, basic
safety precautions should always be followed.
READ ALL INSTRUCTIONS BEFORE USING
DANGER – To reduce the risk of electrocution:
1. Read all instructions, safeguards, and warnings before using the
appliance.
2. Do not place appliance where it can fall or be pulled into water or other
liquids.
3. Do not reach for an appliance that has fallen into water. Unplug
immediately!
4. Do not immerse cord, plug, or unit in water or other liquids.
WARNING – To reduce the risk of burns, electrocution, fire, or injury:
• Never touch the induction cooktop and the power plug with wet hands.
• Be sure to operate the unit on a flat, level, non-metallic surface.
• Do not connect the induction cooktop to the same outlet with other
household appliances such as microwaves, etc. as it could overload the
outlet and trip a circuit breaker.
• If using an extension cord to connect the cooktop, please note that a
damaged extension cord can cause the unit to malfunction. Always check
your extension cord for damage and be sure it is compliant with the required
voltage. Be sure not to place cord where people can trip over it.
• Never attempt to unplug the induction cooktop by pulling on the power
cable.
• Do not move the induction cooktop during cooking or with hot cookware on
top of it.
• Do not place any empty cookware on the induction cooktop while it is
functioning. An empty piece of cookware will heat up very rapidly and can
cause material damage or personal injury.
• Do not place any metal objects on the induction cooktop (other than the
cookware you intend to cook in).
• Check the power cable for damage from time to time. Never operate the
induction cooktop when the cable is damaged. If the power cable shows any
signs of defect, contact IBC-Hearthware, Inc. customer service.
• Do not heat up any unopened cans of food on the induction cooktop. A
heated can of food could explode. Only cook or heat food in induction
compatible cookware.
• Although the surface of the induction cooktop remains cool to the touch
because heat is transferred directly to the pot, please note that the residual
heat from the cookware will eventually warm up the cooking surface,
especially the area directly underneath the pot. Be careful when handling
the cooktop after use and let it cool down before storing or cleaning.
• Scientific tests have proven that induction cooktops do not pose a risk to
health. However, persons with a pacemaker should keep a minimum
distance of two feet from the induction cooktop while it is operating.
• In order to avoid overheating, do not place any aluminum foil or metal
plates on the cooking surface. Foil may bond to the Cooktop surface.
• Do not place any magnetized objects like credit cards, cell phones etc.
on the glass surface while the induction cooktop is in operation. The
magnetic properties of the unit can damage these items.
• Do not insert any objects like wires or tools into the ventilation slots.
Attention: this may cause electric shock.
• Never use the induction cooktop when it is not functioning properly,
shows signs of damage or if it has been dropped.
• Do not leave the induction cooktop unsupervised during operation.
Keep children away from the induction cooktop.
• Do not submerge the induction cooktop in water or other liquids and do
not wash it in the dishwasher.
• Do not operate the induction cooktop on any metal table or surface.
• Only qualified experts may perform repair and maintenance work on
the induction cooktop using authentic Hearthware replacement and
accessory parts. Never attempt to dissemble and repair the induction
cooktop yourself!
• This product is not intended for commercial use; it is for household use
only.
• Be sure to always use proper judgment and caution while using this
cooktop in outdoor situations and public areas. Always make sure the
unit is not set up in a place where there are unattended children or
people who are unaware of its presence. Make sure to set up on a flat,
stable surface in an area where there is no nearby water source that
could pose an imminent danger like pools, spas, sprinklers, hoses, etc.
SAVE THESE INSTRUCTIONS
ELECTRICAL INFORMATION:
The cord length of this appliance was selected to reduce safety hazards that
may occur with a long cord. Extension cords are available and may be used if
care is exercised in their use. If an extension cord is used: (1) the marked
electrical rating of the extension cord should be at least as great as the
electrical rating of the appliance, and (2) the longer cord should be arranged so
that it does not drape over the counter or table top where it could be
accidentally pulled off the counter or table or tripped over.
Certain models of the appliance may have a polarized plug (one blade is wider
than the other). This plug is intended to fit into a polarized outlet only one way. If
the plug does not fit fully into the outlet, reverse the plug. If it still does not fit
properly, contact a qualified electrician. Do not attempt to modify the plug in any
way.
W A R N I N G
Electric shock hazard. Use with adequate electrical system.
Do not use if cord or plug is damaged.
WARNING: All items on the cooktop can get very hot during
cooking. Please be careful when removing these items from the
cooktop. Always wear oven mitts or use pot holders. Allow
everything to cool completely before cleaning.
3 • THE NUWAVE PRECISION COMPLETE COOKBOOK
OWNER’S MANUAL • 4
Page 5
C
O
O
K
I
N
G
S
U
R
F
A
C
E
C
A
N
R
E
M
A
I
N
H
O
T
E
V
E
N
A
F
T
E
R
C
O
O
K
I
N
G
C
O
O
K
I
N
G
S
U
R
F
A
C
E
C
A
N
R
E
M
A
I
N
H
O
T
E
V
E
N
A
F
T
E
R
C
O
O
K
I
N
G
M
a
x
M
a
x
Max
P
R
E
C
I
S
I
O
N
I
N
D
U
C
T
I
O
N
C
O
O
K
T
O
P
T
M
D
I
G
I
T
A
L
A
C
C
U
R
A
C
Y
•
T
M
INDUCTIO N C OOKTO PINDUCTION COOKTOP
byNuWave
®
PRECISIPRECISI NN
M
a
x
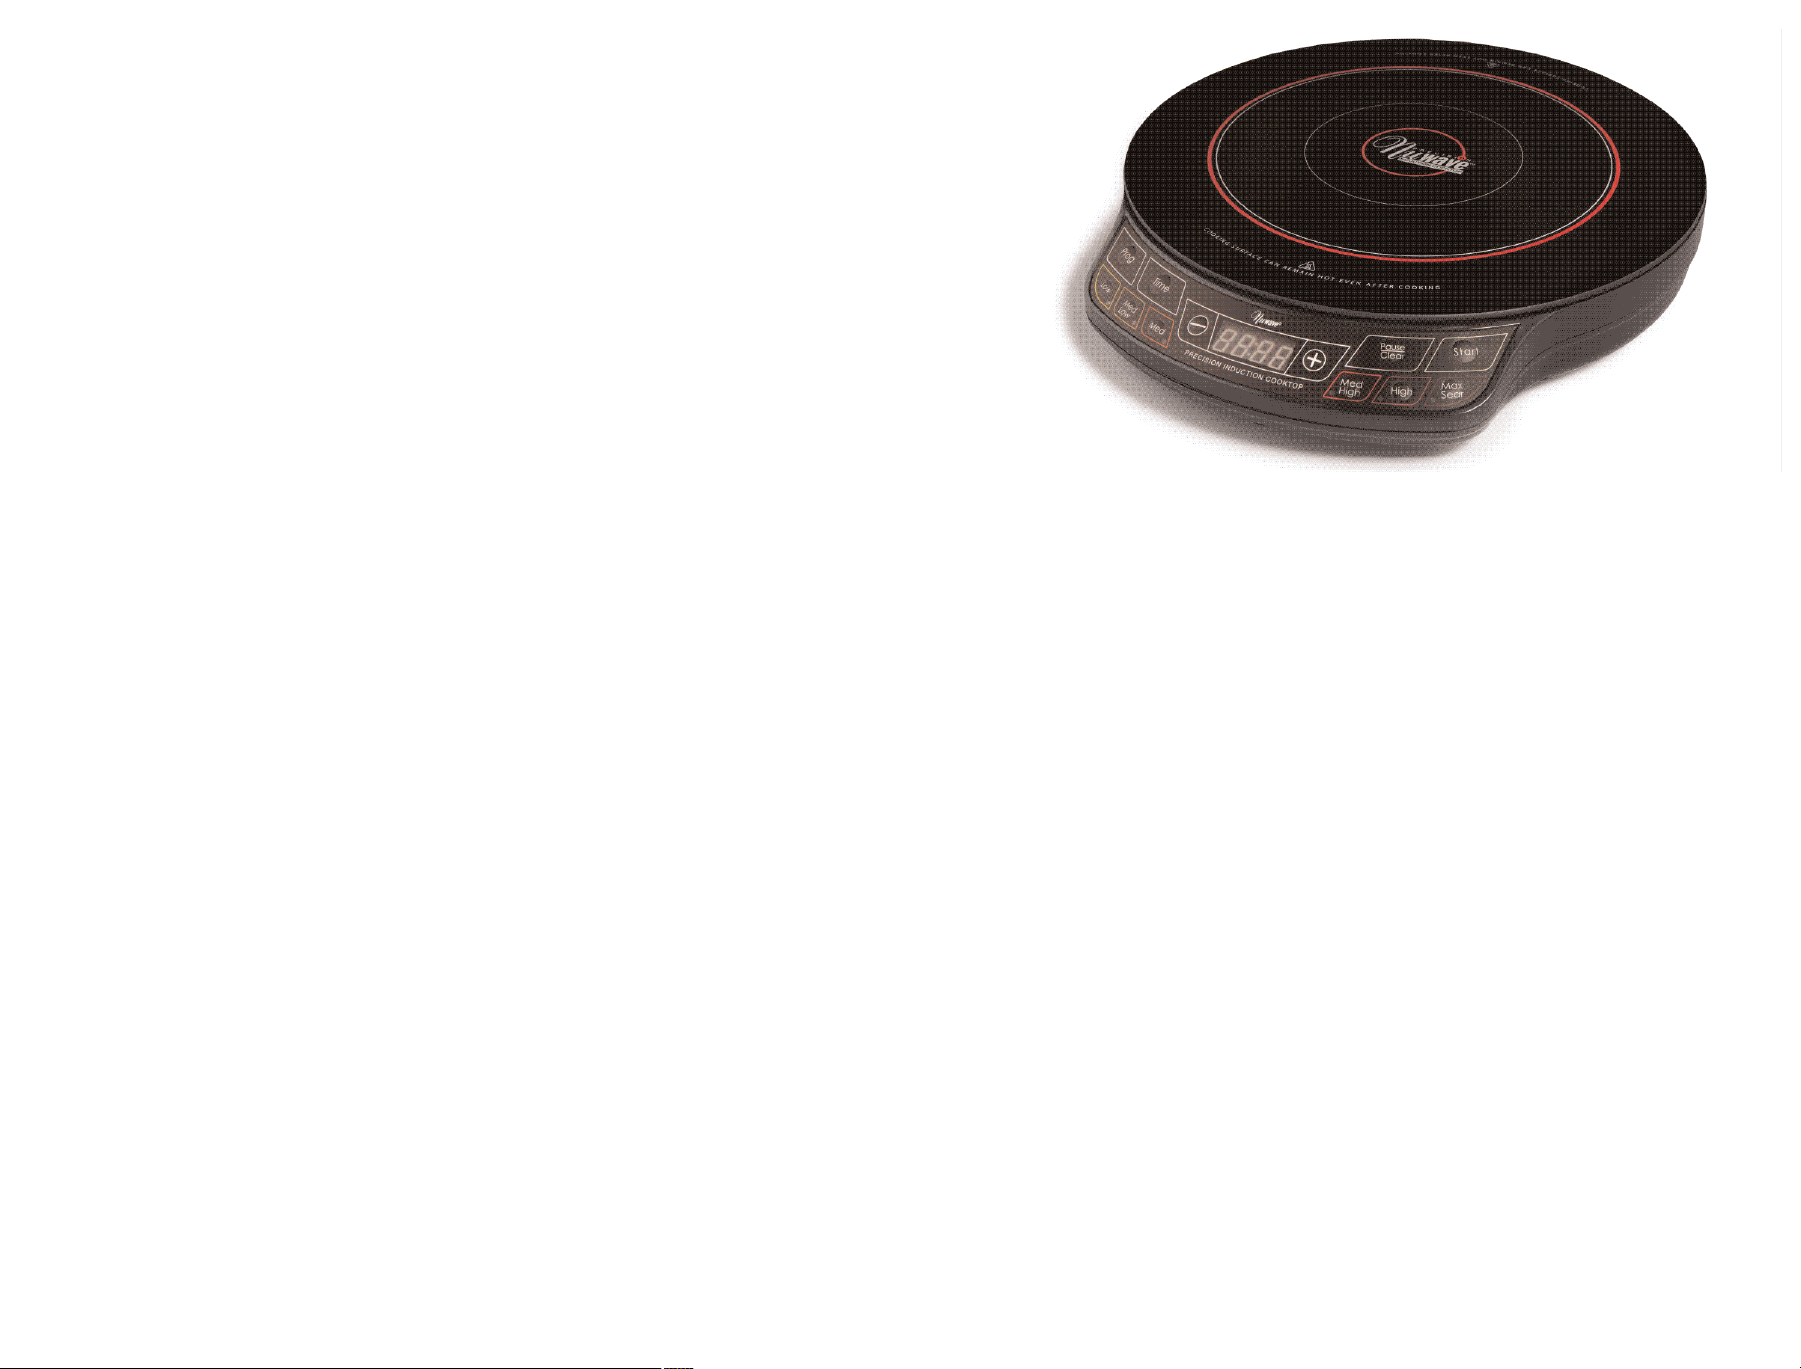
THE NUWAVE PRECISION INDUCTION COOKTOP
1
2
3
4
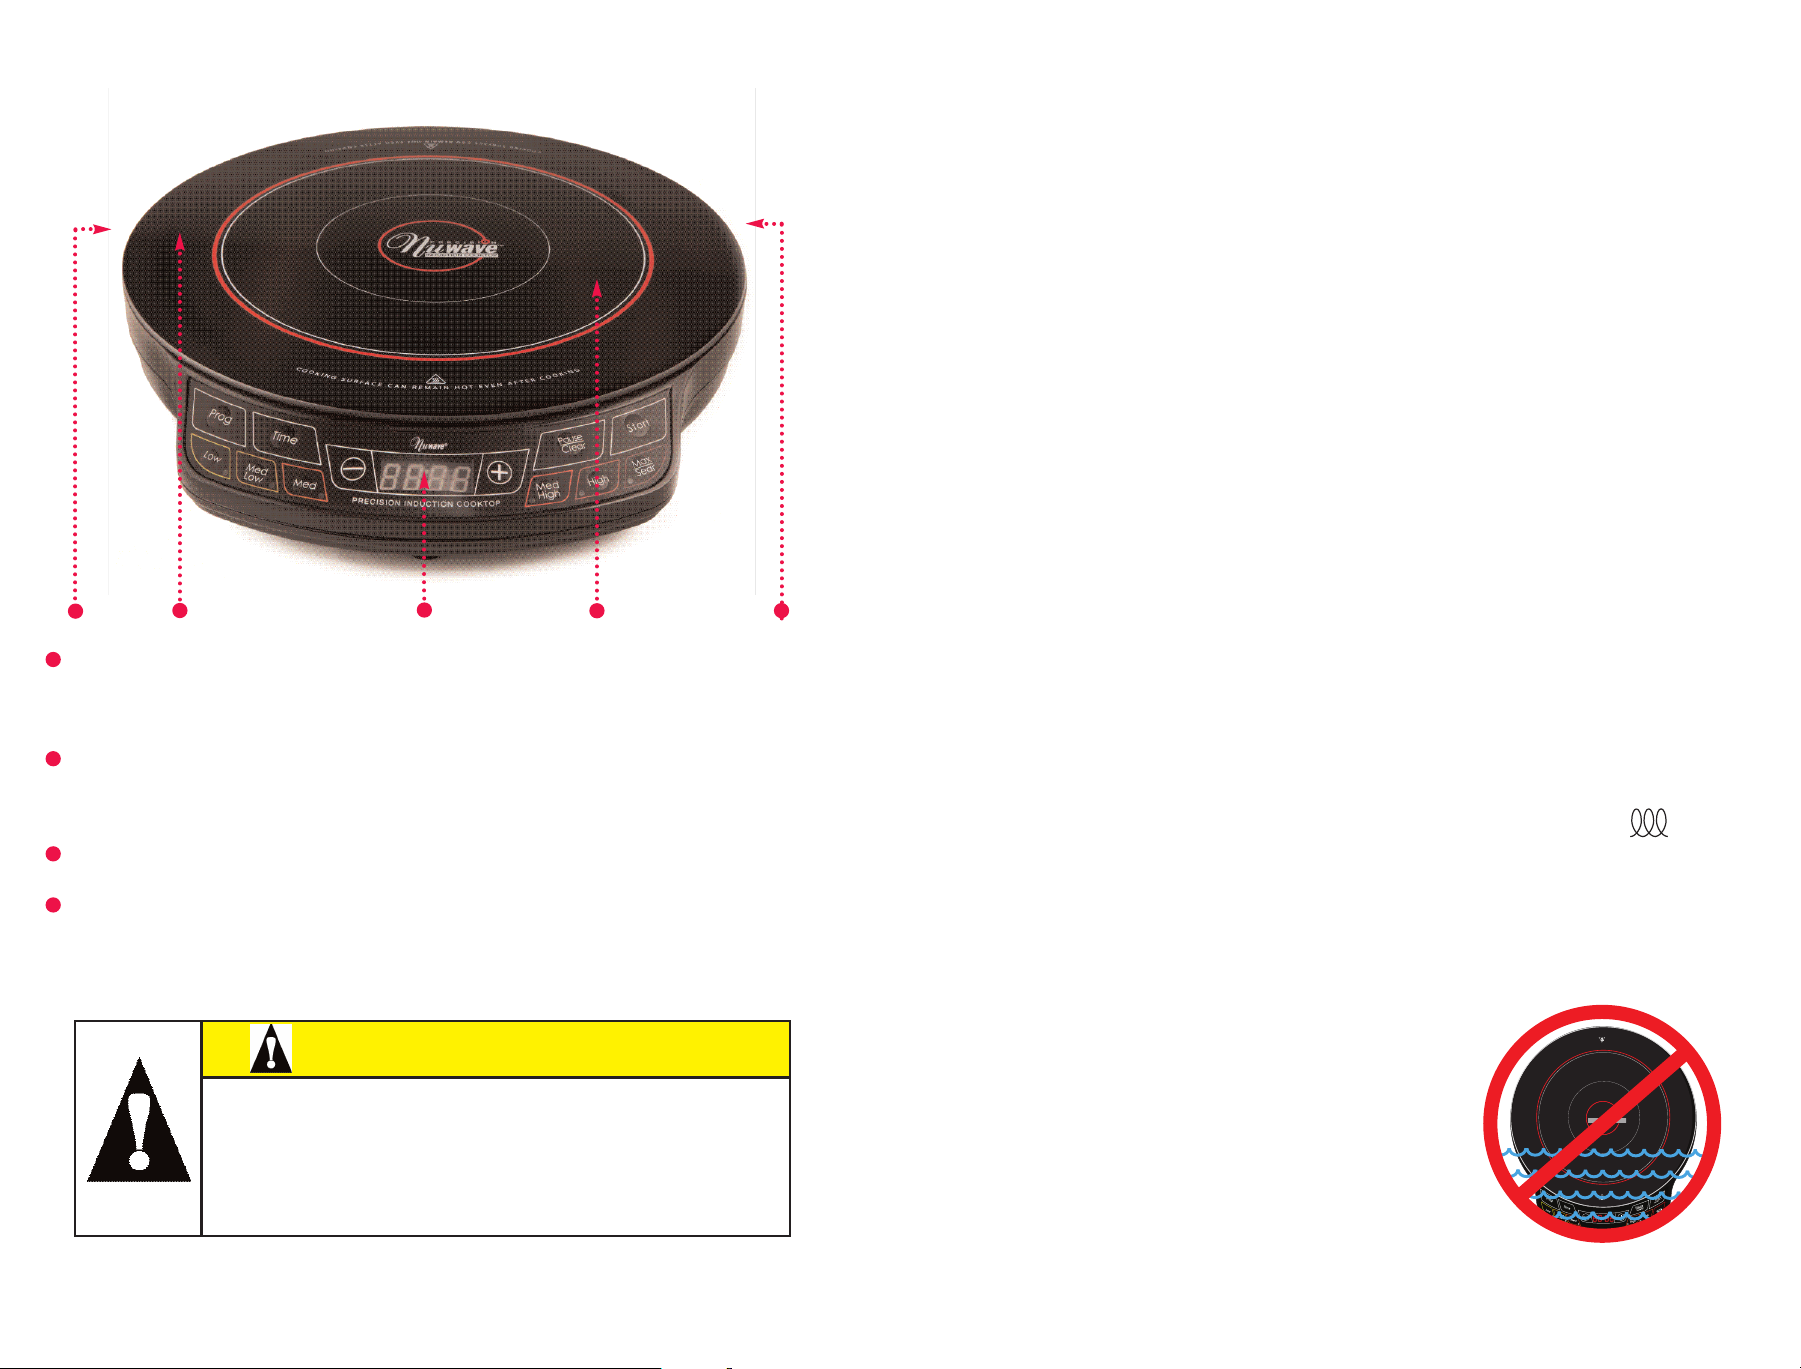
TYPES OF PANS TO USE ON AN INDUCTION COOKTOP:
Since Induction is based on magnetic principles, the cookware used on it must
have a ferrous (iron-based, magnetic) bottom. Some types of cookware are
made of naturally magnetic metals (such as pure iron), while others are made
to be magnetic by “sandwiching” a thin layer of a ferrous metal in the base. This
layer in the base is what will be affected by the magnetic field of the induction
cooktop and distribute the heat. Tri-ply, high-quality stainless steel and cast iron
cookware will work on induction cooktops. Copper, glass and aluminum
cookware will not work unless they have a sandwiched magnetic base. The
easiest way to check whether your cookware is compatible with an induction
cooktop or not, is to take a magnet and try to stick it to the bottom of your pot. If
it sticks, your pot will work on induction. The magnet has to stick only to the
bottom of the pot, not necessarily the sides. If the sides are not magnetic but
the bottom is, your pot will still work on the induction cooktop. The pots that
work best on induction cooktops are medium to heavy gauge.
ATTENTION:
The cookware used on your NuWave Precision Induction Cooktop should not
exceed 9 inches in diameter. On the heating surface, the 9 inches in diameter is
indicated within the larger red ring.
Examples of compatible cookware:
1
• All NuWave Precision cookware • Enameled iron and steel
• Stainless Steel with a magnetic base • Cast iron
1
Ventilation: Air vents are located on the back of the product to allow any heat
generated by the heating element to escape. This allows it not to be transferred
to the cooking surface and keeps the induction cooker performing efficiently.
2
Top Surface
The heat resistant glass surface is easy to clean. Surface over the
magnetic heating surface stays cool to the touch.
3
Control Panel with LCD Display: Light up, easy to read display.
4
Heating Source: An electro-magnetic coil located below the glass transfers
heating power directly to your induction compatible pot, so any exposed surface
remains cool to the touch.
C A U T I O N
Do not touch the surface of the cooking area during
operation. The surface can become very hot and may
cause burns.
Do not remove pots and or pans while it is still operating.
Push the “Pause / Clear” first to turn off the power
before removal.
Examples of Non-induction compatible cookware:
• Copper • Glass • Aluminum • Pottery type vessels
How to check your cookware for Induction Compatibility?
There are three simple ways to check if your existing cookware or future
cookware purchases can be used on the PrecisionTMInduction
Cooktop:
1) An induction symbol will be printed on the bottom of the cookware.
2) Place water in an inductive pot or pan and water will boil quickly, when
placed on an induction appliance.
3) A magnet is typically a great indicator. It must stick to the bottom of the
cookware which usually means it is induction ready, sometimes the magnetic
property in the cookware will not be strong enough for the pot to work efficiently.
CLEANING & CARE FOR YOUR INDUCTION COOKTOP:
BEFORE USING:
Wipe down surface with a cloth soaked in warm
soapy water.
IMPORTANT - Do not wash or immerse unit in
water or in dishwasher. The outer surface can
be cleaned by wiping carefully with a damp
dishcloth or sponge. Make sure the unit is
cooled down completely before cleaning.
5 • THE NUWAVE PRECISION COMPLETE COOKBOOK
OWNER’S MANUAL • 6
Page 6
GENERAL CLEANING INSTRUCTIONS:
• Unplug the unit before cleaning.
• Clean after each use.
• Always make sure the unit is completely cooled before cleaning.
• The top surface can be cleaned by wiping it with a damp cloth.
• Remove the power plug prior to cleaning the induction cooktop. Do not
use any caustic cleaning agents and make sure that water does not
penetrate inside the induction cooktop.
• Never immerse the induction cooktop, its cables or the plug into water
or other liquids.
• Wipe off the glass cooktop with a damp cloth or use a mild, non-abrasive
soap solution. Make sure the unit is cooled completely before cleaning.
• Wipe off the casing and the operating panel with a soft cloth or a mild
detergent.
• Do not use any oil based cleansing products as this can damage the
plastic parts or the casing/operating panel.
• Do not use any flammable, acidic or alkaline materials or substances near
the induction cooktop, as this may reduce the service life of the induction
cooktop and pose a fire risk when the induction cooktop is turned on.
• In order to keep your cooktop looking new, make sure that the bottom of your
cookware does not scrape the glass surface, although a scratched surface
will not impair the use of the induction cooktop.
• Make sure to properly clean the unit before storing it in a cool, dry place.
IMPORTANT TIPS:
1. Check the power outlet for proper operation. Do not operate the unit with
other major appliances in the same power outlet. Check power level if the
unit cooks too slowly.
2. Check to see if electrical plug is properly plugged into the outlet.
3. Always turn off and unplug the unit before wiping down.
GENERAL OPERATING INSTRUCTIONS:
• Place the cooktop on a stable, level and non-metallic surface.
• Never place the cooktop on a flammable surface (e.g. table cloth, carpet, etc.).
• Do not block the ventilation slots of the induction cooktop. This may overheat
the cooktop. Keep a minimum distance of 3-5 inches from walls and other
objects, appliances, etc.
• Do not place the induction cooktop next to devices or objects that react
sensitively to magnetic fields (e.g. radios, TVs, video recorders, etc.).
• Do not place the induction cooktop next to open fires, heaters or other
sources of heat.
• Make sure that the power cable is not damaged or compressed beneath the
induction cooktop.
• Make sure that the power cable does not come into contact with sharp edges
and/or hot surfaces.
• Prior to connecting the induction cooktop, check whether the voltage indicated
in this manual corresponds to the voltage supply in your home. A wrong
connection may lead to damage to the induction cooktop and possible injury to
persons.
• The cooktop’s surface is made of temperature-resistant glass. In the event
that damage to the unit is observed, even if it is only a small crack on the glass
surface, disconnect the induction cooktop from the power supply immediately.
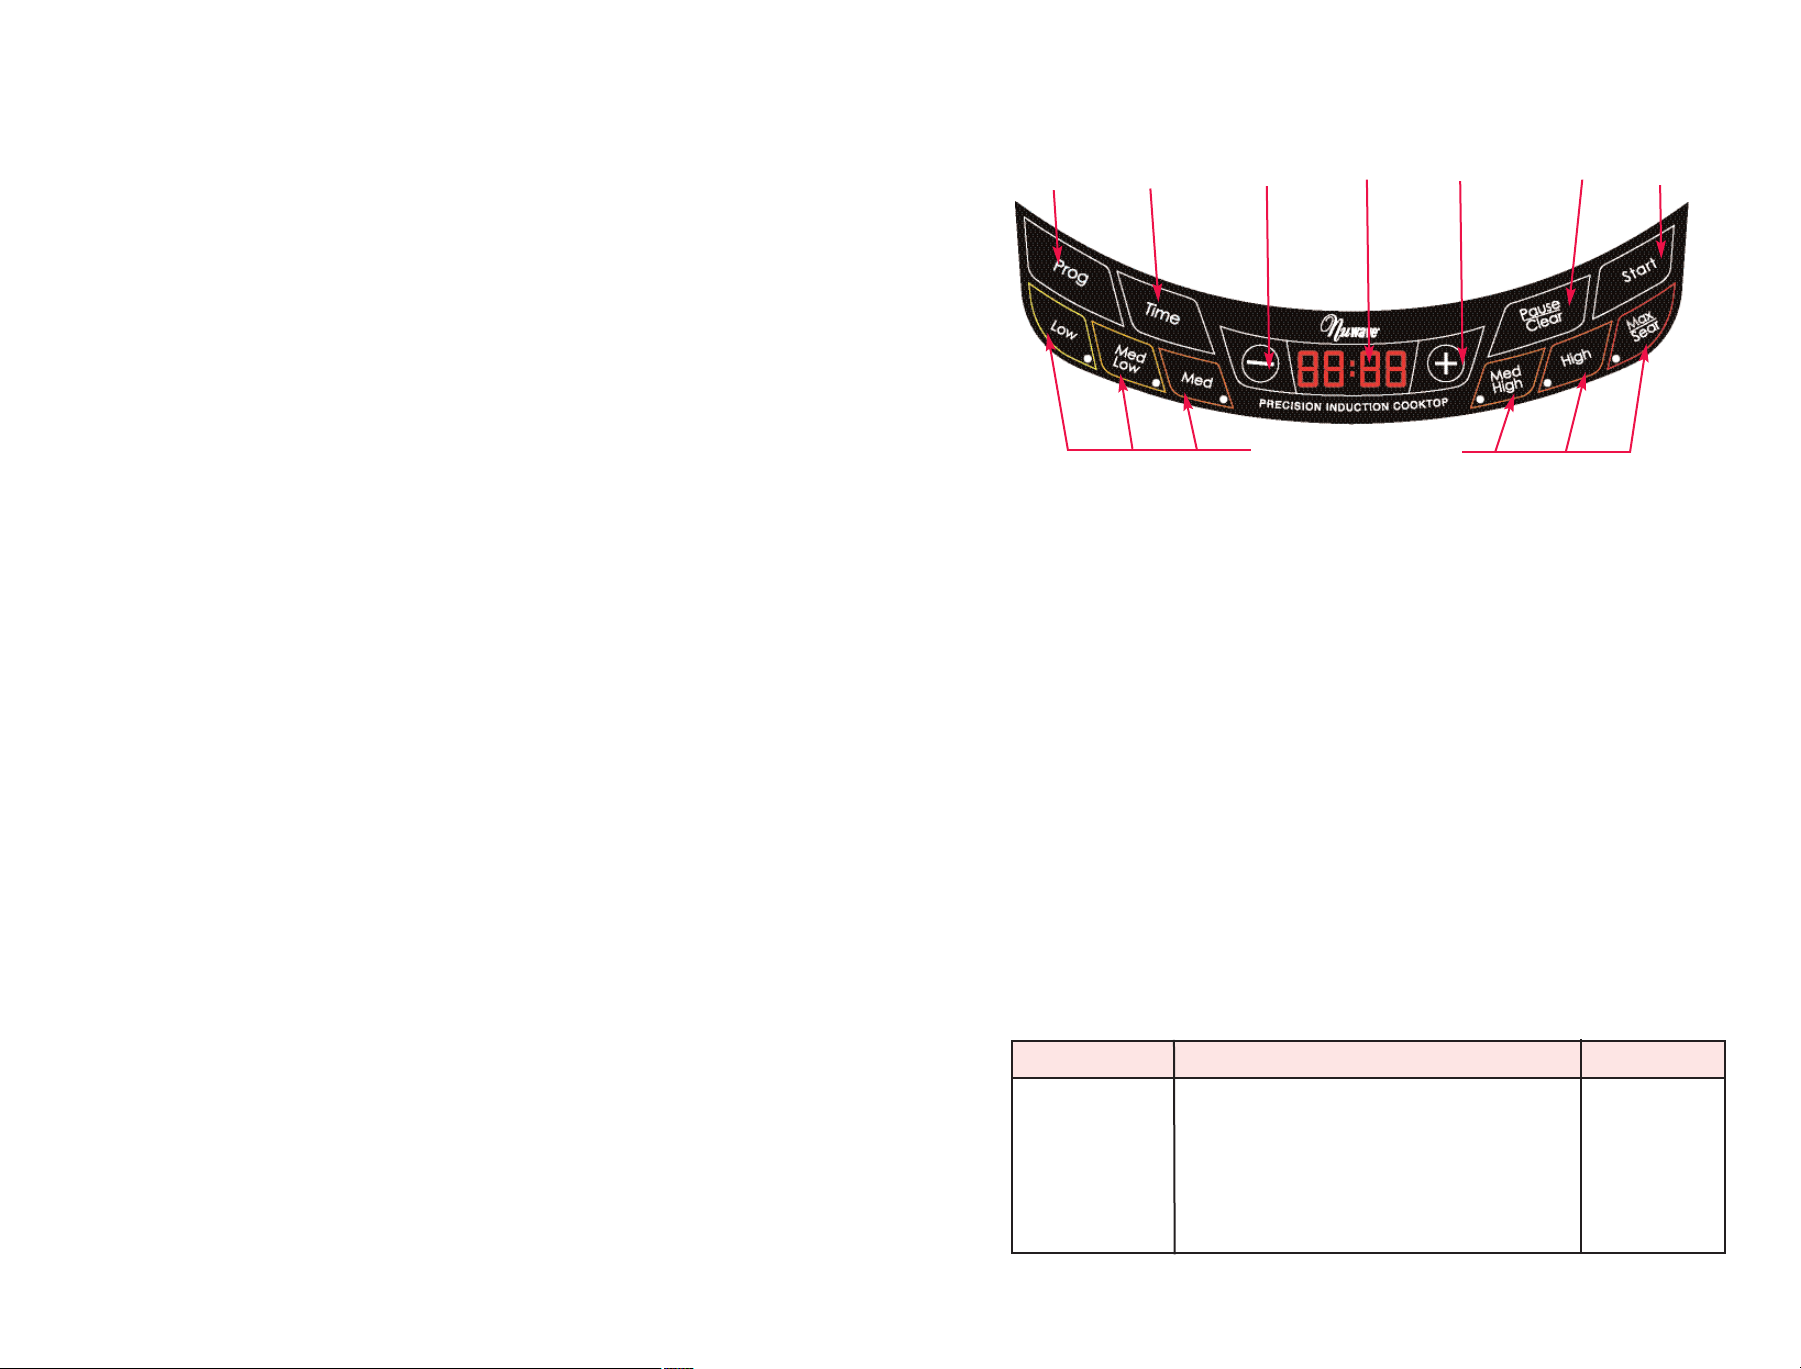
DIRECTIONS FOR THE DISPLAY PANEL
LCD
Prog
Time Start
Decrease
EASY START:
Precision is preset to cook at High (425 degrees F) for 45 minutes.
To start cooking, press “Start” button, make sure the pot is on the surface.
If cooking at any other power level other than “High”, you would need to press
“Low” to “Max/Sear” or press the “-” or “+” to increase or decrease temperature
in 10 F degree increments. See the Panel Display Chart on the bottom of this
page.
CONTROL PANEL ON DISPLAY PANEL:
“0” should appear when the program is clear or power is on.
WHEN YOU START COOKING:
Set your temperature and time, then press “Start” to begin cooking. The oven
will automatically stop cooking when the time has expired and will beep to alert
you that it has stopped. The display will always show the temperature during
the cooking cycle. If you wish to see the time count down, press “Time” and the
time will show until the cycle or stage is complete.
SETTING TEMPERATURE:
This appliance is preset to cook at High (425 degrees F). To set the
temperature, press temperature key “Low” - “Max/Sear”, then press “Start”.
The temperature range will show on the display panel. To raise or lower the
temperature, press the “+” button or “-” until desired temperature is shown in
display panel. Refer to chart below for preset temperatures.
The minimum temperature is 100°F and the maximum temperature is 450°F.
The “+” and “-” will increase or decrease the temperature in 10°F increments.
Press Button Range Temperature / Panel Display Examples
Low 100°F (37°C) / 100F Warm
Med Low 175°F (79°C) / 175F Simmer
Med 275°F (135°C) / 275F Steam
Med High 375°F (191°C) / 375F Stir/Deep Fry
High 425°F (218°C) / 425F Boil/Saute
Max/Sear 450°F (232°C) / SEAr Sear
Display
Increase
Low - Max / Sear
Pause / Clear
7 • THE NUWAVE PRECISION COMPLETE COOKBOOK
OWNER’S MANUAL • 8
Page 7

SETTING TIME:
Press the “Time” button. The “0” will flash in the far right corner of the display
panel. Press the “+” button until you reach the desired amount of time. For
example; for 5 minutes press “Time” once, then press “+” until you see 00:05
on the display. Next press “Start”. For 20 minutes, you press “Time” twice then
press the “+” until you see 00:20, then press “Start”. For 2 hours and 30
minutes, press “Time” twice, press “+” until you reach 3, then press “Time”,
press “+” until you reach 2 the display will show 02:30 then press “Start”.
• Remember the 0 that is blinking would be the digit you can adjust. The
maximum time is 99 hours and 59 minutes.
• Our display shows hours and minutes, not seconds.
PAUSE / CLEAR FUNCTION:
To PAUSE the cooking time, press the “Pause / Clear” button one time. This will
pause at the particular stage it is in. The temperature will stay in the display
panel but the “F” will not be blinking. To resume press “Start”.
To CLEAR the cooking mode or display during cooking, press the “Pause /
Clear” button twice. The screen will be fully cleared, a “0” will appear and the
unit will shut off.
PROGRAMMING FUNCTION (Stage Cooking):
• Press the”Prog“ button.
• “Pro” will be in the display panel.
1. Press the desired set temperatures ranging from “Low” to “Max / Sear”. If you
need to increase or decrease the temperature press the “-” or “+” buttons.
2. Press the “Time” button 00:00 will be on the display and press the “-” or “+”
buttons until you reach the desired time. See above on “SETTING TIME” for
detailed information on how to enter minutes and hours.
•To add additional stages, repeat steps 1 and 2 and then press “Start” to start your
program. You can program up to 10 stages.
•If you need to change any part of the program press “Pause / Clear” button and
start over.
For example, if you want to boil for 5 minutes then reduce to simmer for 20
minutes; Press “Prog”, next press the “Max / Sear” button, press “Time” button
once, press “+” until you reach 5. Press “Low” next press “Time” twice then “+”
until you reach 20 then press “Start”.
NOTE: Maximum allowed cook time is 99 hours and 59 minutes.
DELAY FUNCTION:
The purpose of this function is for you to be able to have the program you set
above start at a later time.
To use this function, press “Prog”, then press the ”Time“ button. The “0” will
flash in the lower right corner of the display panel. Press the “+” button until you
reach the desired amount of time you wish to delay the oven to start. (For more
information, review SETTING TIME on the top of this page). Then press “Prog”
again to set cooking program. The amount of time you set for Delay is included
in the stages you program. To continue to the next stage, press “Low” to “Max /
Sear” indicating which temperature you want to have to start cooking. Continue
with #2 on “SETTING THE PROGRAM”. Once you are ready for the countdown
to begin press “Start”.
When delay countdown reaches “0”, the oven will beep to signal the end. After
this the cooking time will start and the temperature will be displayed.
TROUBLE SHOOTING:
Display Problem Solution
E1 Pot is not secure Make sure cooktop is on a
flat surface and pot/pan is
Magnetic.
E2 IGBT connection Malfunction inside unit.
Contact customer service.
E3 Too low of voltage Minimum is 85 volts.
E4 Too high of voltage Maximum is 144 volts.
E5 NTC Short circut Malfunction inside unit.
Contact customer service.
E6 NTC Open circut Malfunction inside unit.
Contact customer service.
E7 IGBT overheating If IGBT temperature
exceeds 230 Fº, any
operation will be stopped
and beeping will occur.
Press “Pause / Clear” and
wait for the unit to cool.
• When any of the above displays show on the LCD display the unit
will beep at least once.
• Fan will run for an additional 60 seconds after you press “Pause /
Clear” button once. Continue cooking by pressing the “Start” button
within 45 minutes.
• The unit will shut off after 45 minutes if no buttons (such as “Start”)
are pressed. When the unit shuts off, it will clear all previous cooking
history.
• When pressing the “Pause / Clear” button twice, the fan will run for an
additional 60 seconds. Unit will then turn off.
• When E1 occurs, it will beep every 2 seconds, until it detects a pot.
If the unit has not detected a pot after 1 minute, the unit will shut off
automatically.
• To fully correct errors E2, E5, E6, E7, you will need to reconnect
the power to have the error sign disappear.
9 • THE NUWAVE PRECISION COMPLETE COOKBOOK
OWNER’S MANUAL • 10
Page 8
THE MANUFACTURER WARRANTS: The induction cooktop and all electrical
components to be free from defects and workmanship under normal household
use, when operated in accordance with the Manufacturer’s written instructions
provided with each unit for one (1) year from date of purchase. The Manufacturer
will provide the necessary parts and labor to repair any part of the infrared cooking
system at Hearthware Home Products Service Department. After the expiration of
the warranty, the cost of the labor and parts will be the responsibility of the owner.
THE WARRANTY DOES NOT COVER: Any coating (if applicable) on any part of
the cooking system. The Limited Warranty is voided if repairs are made by an
unauthorized dealer or the serial number data plate is removed or defaced.
Normal deterioration of finish due to use or exposure is not covered by this
Warranty. This Limited Warranty does not cover failure, damages or inadequate
performance due to accident, acts of God (such as lightning), fluctuations in
electric power, alterations, abuse, misuse, misapplications, corrosive type
atmospheres, improper installation, failure to operate in accordance with the
Manufacturer’s written instructions, abnormal use or commercial use.
TO OBTAIN SERVICE: The owner shall have the obligation and responsibility to:
pay for all services and parts not covered by the warranty; prepay the freight to
and from Service Department for any part or system returned under this warranty;
carefully package the product using adequate padding material to prevent
damage in transit. The original container is ideal for this purpose. Include in the
package owner’s name, address, daytime telephone number, a detailed
description of the problem, and your RETURN GOODS AUTHORIZATION
NUMBER (RGA number): Call 1-888-NUWAVE1(689-2831) or e-mail
[email protected] to obtain the RGA number. Provide the
cooking system model & serial number and proof of date of purchase
(a copy of the receipt) when making claims under this warranty.
MANUFACTURER’S OBLIGATION:
The Manufacturer’s obligation under this Limited Warranty is limited to repairing
or replacing any part of the induction cooktop expressly covered by this Limited
Warranty which upon examination is found to be defective under normal use. The
Limited Warranty is applicable only within the continental United States and only
to the original purchaser of manufacturer’s authorized channels of distribution.
The Limited Warranty may not be altered, varied or extended except by written
instrument executed by the manufacturer. The remedy of repair or replacement
as provided under this limited warranty is exclusive. In no event shall the
manufacturer be liable for any consequential or incidental damages to any person,
whether or not occassioned by negligence of the manufacturer, including without
limitation, damages for loss of use, costs of substitution, property damage, or
other money loss.
Some states do not allow the exclusion or limitation of incidental or consequential
damages, so the above limitation exclusions may not apply. This Limited Warranty
gives specific legal rights, and there may also be other rights which vary from
state to state. Except as otherwise expressly provided above, the manufacturer
makes no warranties expressed or implied arising by law or otherwise, including
without limitation, the implied warranties of merchantability and fitness for a
particular purpose to any other person.
READ YOUR OWNER’S MANUAL: If you still have any questions about operation
or warranty of the product, please contact Hearthware Home Products at
GENERAL TIPS
This recipe book contains valuable
information to help you get started
incorporating the NuWave®Precision
Induction Cooktop into your daily life.
We’ve provided easy-to-prepare recipes
along with helpful tips at the beginning
of each section for perfect results every
time. Here are a couple general tips to
get you started.
Have a garbage bowl next to your
cutting board.
Flexible cutting boards are great, you
chop and lift. No mess, no spills.
Glass measuring cups are for liquids
and measuring cups are for dried
ingredients.
After you juiced the lemons, put them
in the garbage disposer to refresh.
Pay close attention to the butter as
you're melting it, because butter melts
when its internal temperature reaches
82.4°F to 96.8°F. This means it will
melt fast, so be prepared to remove it
from the stove quickly.
Some of these recipes suggest prepping
and/or cooking items in the NuWave Oven.
Contact customer service for more details.
Delicious is in the details
1 square of bakers chocolate = 1 ounce
4 pecks = 1 bushel
8 tablespoons =1/
2 cup
1 pound of chopped nuts = 2 cups
1
/
2 cup of butter = 1 stick
2 cups granulated sugar = 1 pound
2 cups butter = 1 pound
16 fluid ounce = 1 pint
1 cup =1/
2 pint
11 • THE NUWAVE PRECISION COMPLETE COOKBOOK
OWNER’S MANUAL • 12
 Loading...