

Page 1
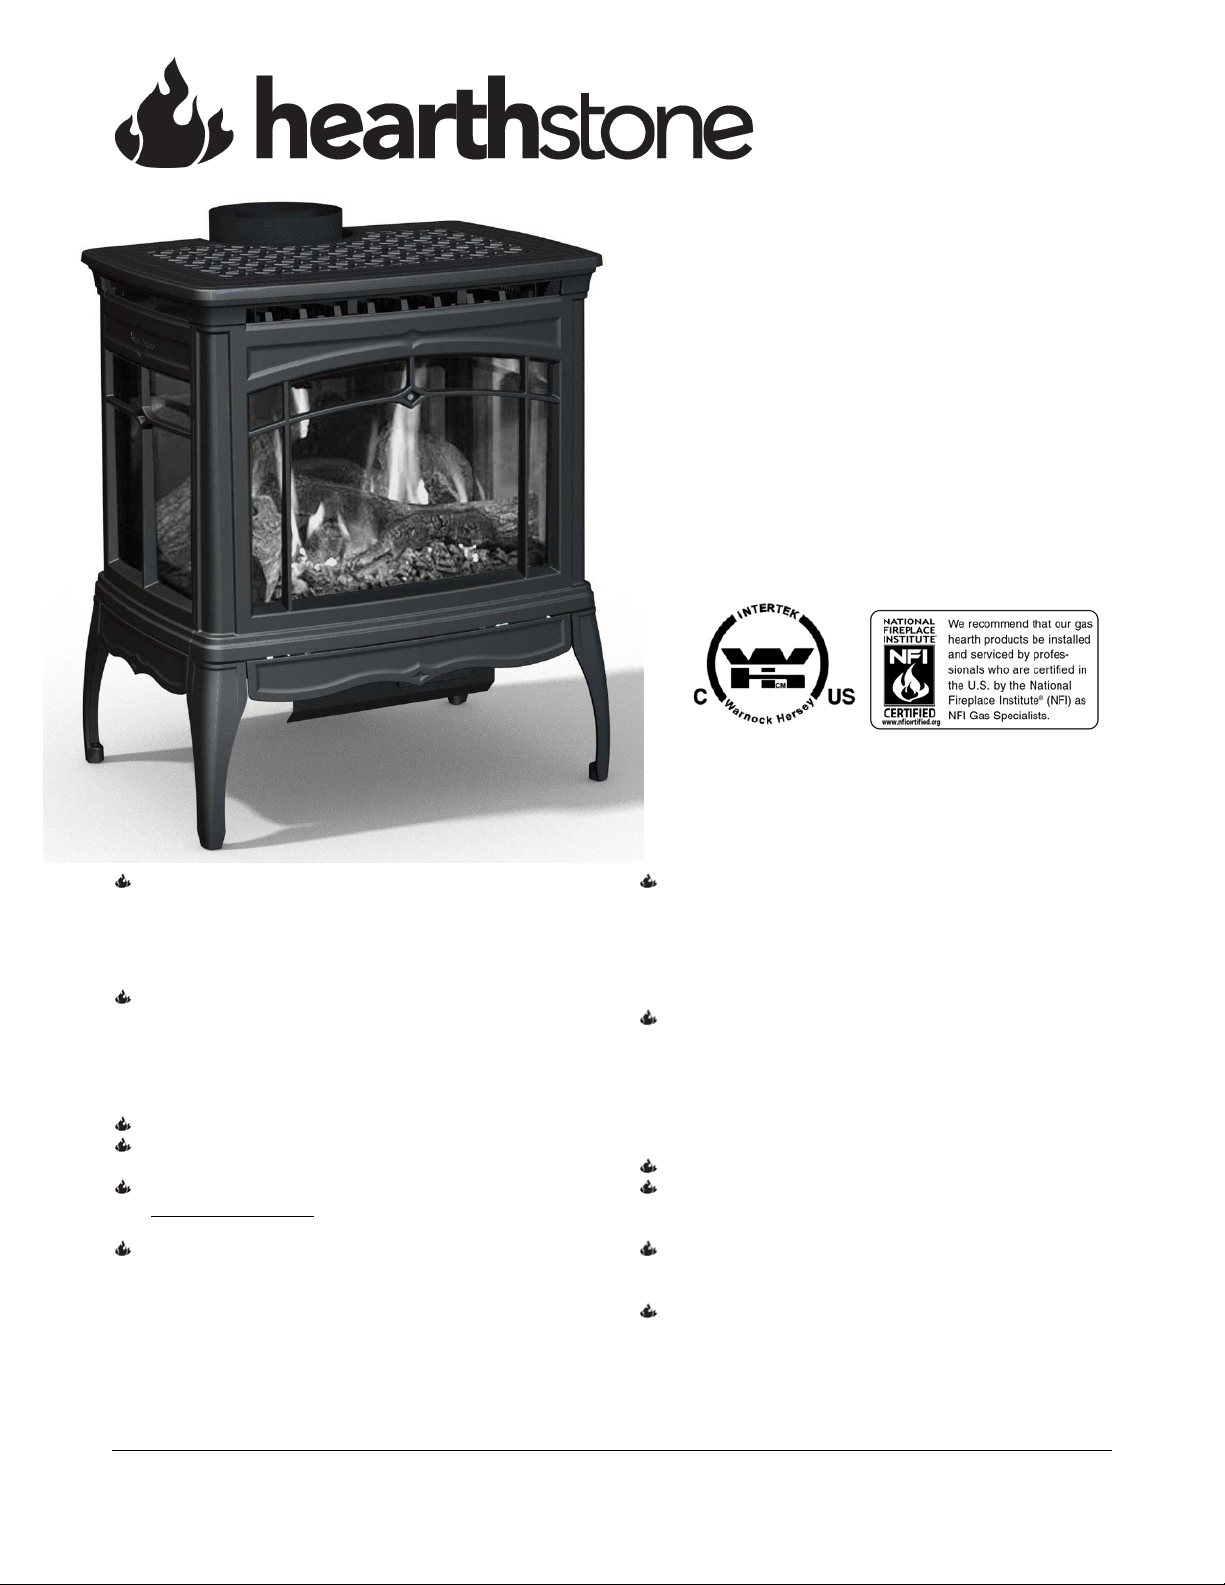
Bristol DX
(Model 8762)
GAS-FIRED DIRECT-VENT HEATER
Owner's Manual
Installation & Operating
Instructions
Read This Manual in Its Entirety
Operate And Maintain This Gas Heater
According To This Instruction Manual.
SAVE THESE INSTRUCTIONS!
WARNING: FOLLOW THE INFORMATION IN
THESE INSTRUCTIONS EXACTLY, IF NOT, A FIRE
OR EXPLOSION MAY RESULT CAUSING
PROPERTY DAMAGE, PERSONAL INJURY OR
LOSS OF LIFE.
WARNING: DO NOT STORE OR USE GASOLINE
OR ANY OTHER FLAMMABLE VAPORS AND
LIQUIDS NEAR THIS OR ANY OTHER GAS
APPLIANCE.
WHAT TO DO IF YOU SMELL GAS:
Do not try to light any appliance.
Do not touch electrical switches; do not use the phone
in your building.
Immediately call your gas supplier from a phone
outside the structure. Follow your gas supplier’s
instructions.
If you cannot reach your gas supplier, call the fire
department or 911.
A qualified installer, service agency, or gas supplier must
perform installation and service of this appliance. In the
Commonwealth of Massachusetts, all installation of gas
lines and gas fittings must be performed by a licensed gas
fitter or licensed plumber.
AVERTISSEMENT: ASSUREZ-VOUS DE BIEN
SUIVRE LES INSTRUCTIONS DONNÉ DANS
CETTE NOTICE POUR RÉDUIRE AU MINIMUM LE
RISQUE D’INCENDIE OU POUR ÉVITER TOUT
DOMMAGE MATÉERIEL, TOUTE BLESSURE OU
LA MORT.
AVERTISSEMENT: NE PAS ENTRESPOSER NI
UTILISER D’ESSENCE NI D’AUTRE VAPERURS
OU LIQUIDES INFLAMMABLES DANS LE
VOISINAGE DE CET APPRAREIL OU DE TOUT
AUTRE AP PAREIL.
QUE FAIRE SI VOUS SENTEZ UNE ODEUR DE GAZ:
Ne pas tenter d’allumer d’appareil.
Ne touchez à aucun interrupteur. Ne pas vous servir
des téléphones se trouvant dans le batiment où vous
vous trouvez.
Appelez immédiatement votre fournisseur de gaz
depuis un voisin. Suivez les instructions du
fournisseur.
Si vous ne pouvez rejoindre le fournisseur de gaz,
appelez le service dos incendies.
L’installation et service doit être exécuté par un qualifié
installer, agence de service ou le fournisseur de gaz.
Hearthstone Quality Home Heating Products, Inc. ®
Bristol DX Model 8762
Manual: 6400-40466
R: 1/4/2012
Page 2

Intentionally Blank
Page 3
Hearthstone Quality Home Heating Products, Inc. Bristol DX Model 8762
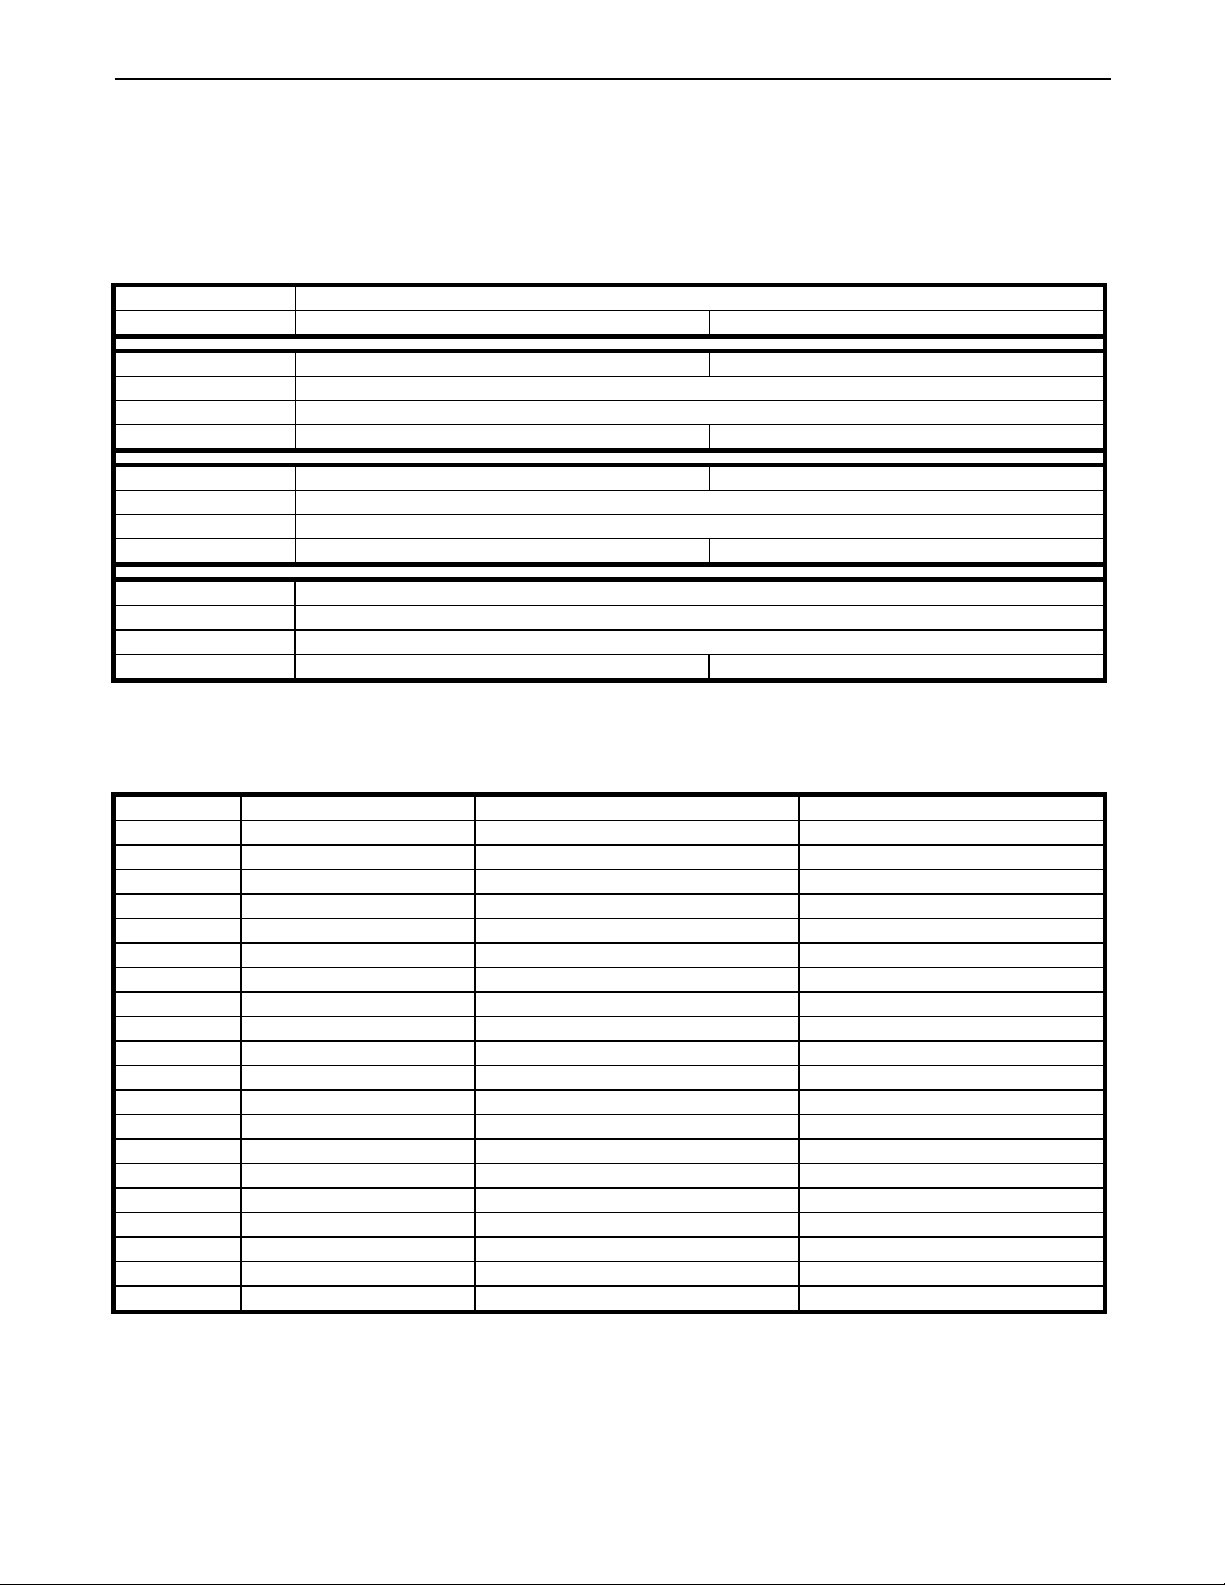
Information Sheet
Use this page to record all relevant information concerning the purchase, installation, and maintenance of your
Bristol DX Model 8762 Direct -Vent heater. This information will facilitate servicing, purchase of replacement
parts, and warranty claims (if necessary). Keep your original receipt in a safe place as proof of purchase.
Serial Number:
Fuel type:
Sold by: Date of Purchase:
Address:
Phone:
E-mail Website:
Installed by: Date of Installation:
Address:
Phone:
E-mail Website:
Gas Supplier:
Address:
Phone:
E-mail Website:
Read this Owner’s Manual before installing, or operating your BRISTOL DX. Retain this manual for future
reference.
Natural Gas Liquid Propane
SERVICE RECORD
Date Who Performed Work Work Performed Notes:
WHAT WHEN
Firebox Cleaning............. annually
Glass Cleaning................ as needed
Door Gasket.................... Replacement as needed
3
Page 4

Hearthstone Quality Home Heating Products, Inc. Bristol DX Model 8762
Table of Contents
INTRODUCTION ........................................................................................................................................................... 5
SAFETY INFORMATION ................................................................................................................................................ 6
PROFLAME CONTROL SYSTEM & FEATURES ................................................................................................................ 8
Bristol DX 8762 Model Overview ................................................................................................................................ 8
Control Functions ..................................................................................................................................................... 10
SPECIFICATIONS ....................................................................................................................................................... 12
INSTALLATION PREPARATION .................................................................................................................................... 13
Codes ....................................................................................................................................................................... 13
Items Required for Installation .................................................................................................................................. 13
Packing List .............................................................................................................................................................. 13
Unpacking and Inspection ........................................................................................................................................ 13
CLEARANCES TO COMBUSTIBLES .............................................................................................................................. 16
Clearance to Combustibles....................................................................................................................................... 16
Hearth Requirement/Floor Protection ....................................................................................................................... 16
VENTING INFORMATION ............................................................................................................................................. 18
Venting Components ................................................................................................................................................ 18
Minimum Venting Installation Instructions ................................................................................................................ 22
ELECTRICAL SYSTEM INFORMATION .......................................................................................................................... 25
GAS SUPPLY & CONNECTIONS .................................................................................................................................. 26
Gas Connections ...................................................................................................................................................... 27
LOG SET, & SCREEN PLACEMENT ............................................................................................................................. 28
Installation of the Log Set ......................................................................................................................................... 28
Installation of the Optional Screens .......................................................................................................................... 29
Removal of Log Set .................................................................................................................................................. 29
Completing the Installation ....................................................................................................................................... 29
LIGHTING & OPERATION ........................................................................................................................................... 30
Lighting Instructions .................................................................................................................................................. 30
Initial Adjustments .................................................................................................................................................... 30
Daily Operation ......................................................................................................................................................... 32
ROUTINE MAINTENANCE & CARE .............................................................................................................................. 34
Cleaning ................................................................................................................................................................... 34
Monthly (or as needed): ............................................................................................................................................ 34
Annually: ................................................................................................................................................................... 34
As Needed: ............................................................................................................................................................... 35
PARTS LIST .............................................................................................................................................................. 37
TROUBLESHOOTING .................................................................................................................................................. 38
RATING LABEL ......................................................................................................................................................... 40
4
Page 5

Hearthstone Quality Home Heating Products, Inc. Bristol DX Model 8762
Introduction
Congratulations on your purchase of the Bristol DX
Model 8762, Gas-Fired Direct-Vent heater. The
Bristol, by Hearthstone, incorporates the latest in
direct vent gas technology, which will provide you
with ease of use, clean, and efficient heat for years
to come. The Bristol’s copious three sides of glass,
sleek styling, and enameled or painted cast iron
gives the Bristol ambiance and a pleasing look that
is maintained with minimum care.
However, as with any gas appliance, the unit must
be properly and safely installed and maintained by
qualified service personnel to ensure safe and
trouble-free operation.
Bristol DX Model 8762 features:
1. Proflame GTMFS Control System
2. 5-piece log set
3. Platinum Bright Embers
4. The option to toggle back and forth between an
Intermittent (IPI) or Continuous (CPI) pilot mode.
a. The IPI mode allows the most efficient
use of gas, burning the pilot only when
the thermostat calls for the burner to
ignite.
b. The CPI mode runs the pilot
continuously keeping the firebox warmer
thus promoting better draft in colder
climates.
5. Battery backup for functionality during power
outages.
6. Blower Assembly
7. Optional Screen Kit
The Proflame GTMFS System Features:
1. Thermostatic Remote Control
a. Six (6) flame levels, adjustable via the
remote
b. Split Burner control via remote
2. “Child-safe” lock-out on remote control.
3. “Low Battery” indicator for Transmitter on remote
8762-0010 Matte Black
8762-0020 Brown Enamel
8762-0083 Basil Enamel
Operate and maintain this gas heater according to
the instructions in this manual. For your safety, and
years of trouble free operation, read this manual in
its entirety.
Verify the gas connections and that venting systems
supply adequate combustion and ventilation air to
meet the requirements of local, regional or national
installation codes.. Qualified service personnel must
inspect the gas heater before use, and at least
annually.
Manufactured & warranted by:
Hearthstone Quality Home heating Products, Inc.
317 Stafford Ave.
Morrisville, VT 05661
www.hearthstonestoves.com
c. Six (6) blower speeds, adjustable via the
remote
d. Thermostatic mode to turn on/off based
upon room temperature.
e. “Smart” thermostatic mode to modulate
flame levels automatically as the unit
approaches the set point temperature.
f. Additional AC receptacle controlled
(on/off) by the remote.
control
Part # Description
Read this Owner’s Manual
Heater Must Be Installed and Maintained By
Qualified Service Personnel
5
Page 6

Hearthstone Quality Home Heating Products, Inc. Bristol DX Model 8762
Safety Information
Your Bristol is an attractive and extremely efficient
and easy to use heater, utilizing today’s best
technologies. By following a few simple safety
precautions and by performing minimal
maintenance, the unit will remain appealing while
providing years of quality performance.
The installation must conform to local codes or, in
the absences of local codes, the current National
Fuel Gas Code, ANSI Z223.1 (NFPA 54) or
CAN/CGA B149 Installation Code. (Installer
l’appareil selon les codes ou réglements locaux, ou,
en l’absence de tells réglements, selon les Codes
d’installation CAN/CGA B149.)
CAUTION: DO NOT USE THIS APPLIANCE IF ANY
PART WAS UNDER WATER. IMMEDIATELY CALL
A QUALIFIED SERVICE TECHNICIAN TO INSPECT
THE HEATER AND TO REPLACE ANY PART OF
THE CONTROL SYSTEM AND GAS CONTROL
THAT HAS BEEN UNDER WATER. (NE PAS SE
SERVIR DE CET APPAREIL S’IL A ÉTÉ PLONGÉ
DANS L’EAU, COMPLÉTEMENT OU EN PARTIE.
APPELER UN TECHNICIEN QUALIFIÉ POUR
INSPECTOR L’APPAREIL ET REMPLACER TOUTE
PARTIE DU SYSTÉME DE CONTRÔLE ET TOUTE
COMMANDE QUI ONT ÉTÉ PLUNGES DANS
L’LAU.)
During the first few hours of operation the appliance
may produce smoke and/or odor. This is normal
during the first several burns and also after long
periods when the stove is not burned. During these
initial burns, open a window(s) to assist in the
removal of the smoke/odor.
The appliance and its individual shutoff valve must
be disconnected from the gas supply piping system
during any pressure testing of that system at test
pressures in excess of ½ psig. (3.5k Pa). The
appliance must be isolated from the gas supply
piping system by closing its individual manual
shutoff valve during any pressure testing of the gas
supply piping system at test pressures equal to or
less than ½ psig (3.5k Pa).
Fire Hazard
Do not store or use gasoline, other flammable
vapors or liquids in the vicinity of this appliance.
Locate the Bristol out of traffic areas and away from
furniture, draperies, clothing, and flammable
material.
Vent Only to the Outside
Never vent the gas heater to other rooms or
buildings.
Service Caution
If you believe your Bristol is not in any way
performing properly, immediately discontinue
operation until the unit is inspected and approved by
qualified service personnel. Prior to servicing the
unit, turn the gas to the valve off, and disconnect
any electrical source. Ensure the unit is cool prior to
servicing and cleaning. Replace any safety screen,
guard, or component removed during servicing
prior to operation. Use of any components not
supplied by Hearthstone on the stove voids all
warranties. Do not substitute components.
Proper Fuel
This gas heater is designed to burn natural gas (NG)
or with conversion, liquid propane (LP). Never burn
any fuel gas not intended for use with this unit.
Never burn paper, wood, or other materials in this
appliance.
This heater is factory equipped to burn natural gas
(NG). To burn propane (LP), you must purchase an
LP conversion kit 97-56621.
This appliance is only for use with the type(s) of gas
indicated on the rating plate. This appliance is not
convertible for use with other gases, unless a
certified kit is used. Cet appareil doit être atilisé
uniquement avec les types de gas indiqués sur la
plaque signalétique. Ne pas l’utiliser avec d’autres
gas sauf si un kited conversion certifié est installé. )
WARNING: THIS GAS APPLIANCE MUST NOT BE
CONNECTED TO A CHIMNEY FLUE SERVING A
SEPARATE GAS OR SOLID-FUEL BURNING
APPLIANCE
WARNING: DO NOT OPERATE THE APPLIANCE
WITH THE FRONT GLASS REMOVED, CRACKED,
OR BROKEN. REPLACEMENT OF GLASS
SHOULD BE DONE BY A LICENSED OR
QUALIFIED SERVICE PERSON. ONLY OPEN
FRONT FOR ROUTINE SERVICE. DO NOT SLAM
FRONT OR STRIKE GLASS.
WARNING: HEARTHSTONE RECOMMENDS THAT
ONLY AN NFI CERTIFIED SERVICE TECHNICIAN
INSTALLS, AND REPAIRS THIS APPLIANCE. A
QUALIFIED SERVICE TECHNICIAN MUST
INSPECT THE APPLIANCE BEFORE USE, AND AT
LEAST ANNUALLY. MORE FREQUENT CLEANING
MAY BE REQUIRED DUE TO EXCESSIVE LINT
FROM CARPETING, BEDDING MATERIAL, PETS,
ETC. IT IS IMPERATIVE THAT THE CONTROL
COMPARTMENTS, BURNERS, AND CIRCULATING
AIR PASSAGES OF THE APPLIANCE ARE KEPT
CLEAN AND FREE OF OBSTRUCTIONS.
6
Page 7
Hearthstone Quality Home Heating Products, Inc. Bristol DX Model 8762
(S’ASSURER QUE LE BRÛLEUR ET LE
COMPARTIMENT DES COMMANDES SONT
PROPRES. VOIR LES INSTRUCTIONS
D’INSTALLATION ET D’UTILISATION QUI
ACCOMPAGNENT L’APPAREIL.)
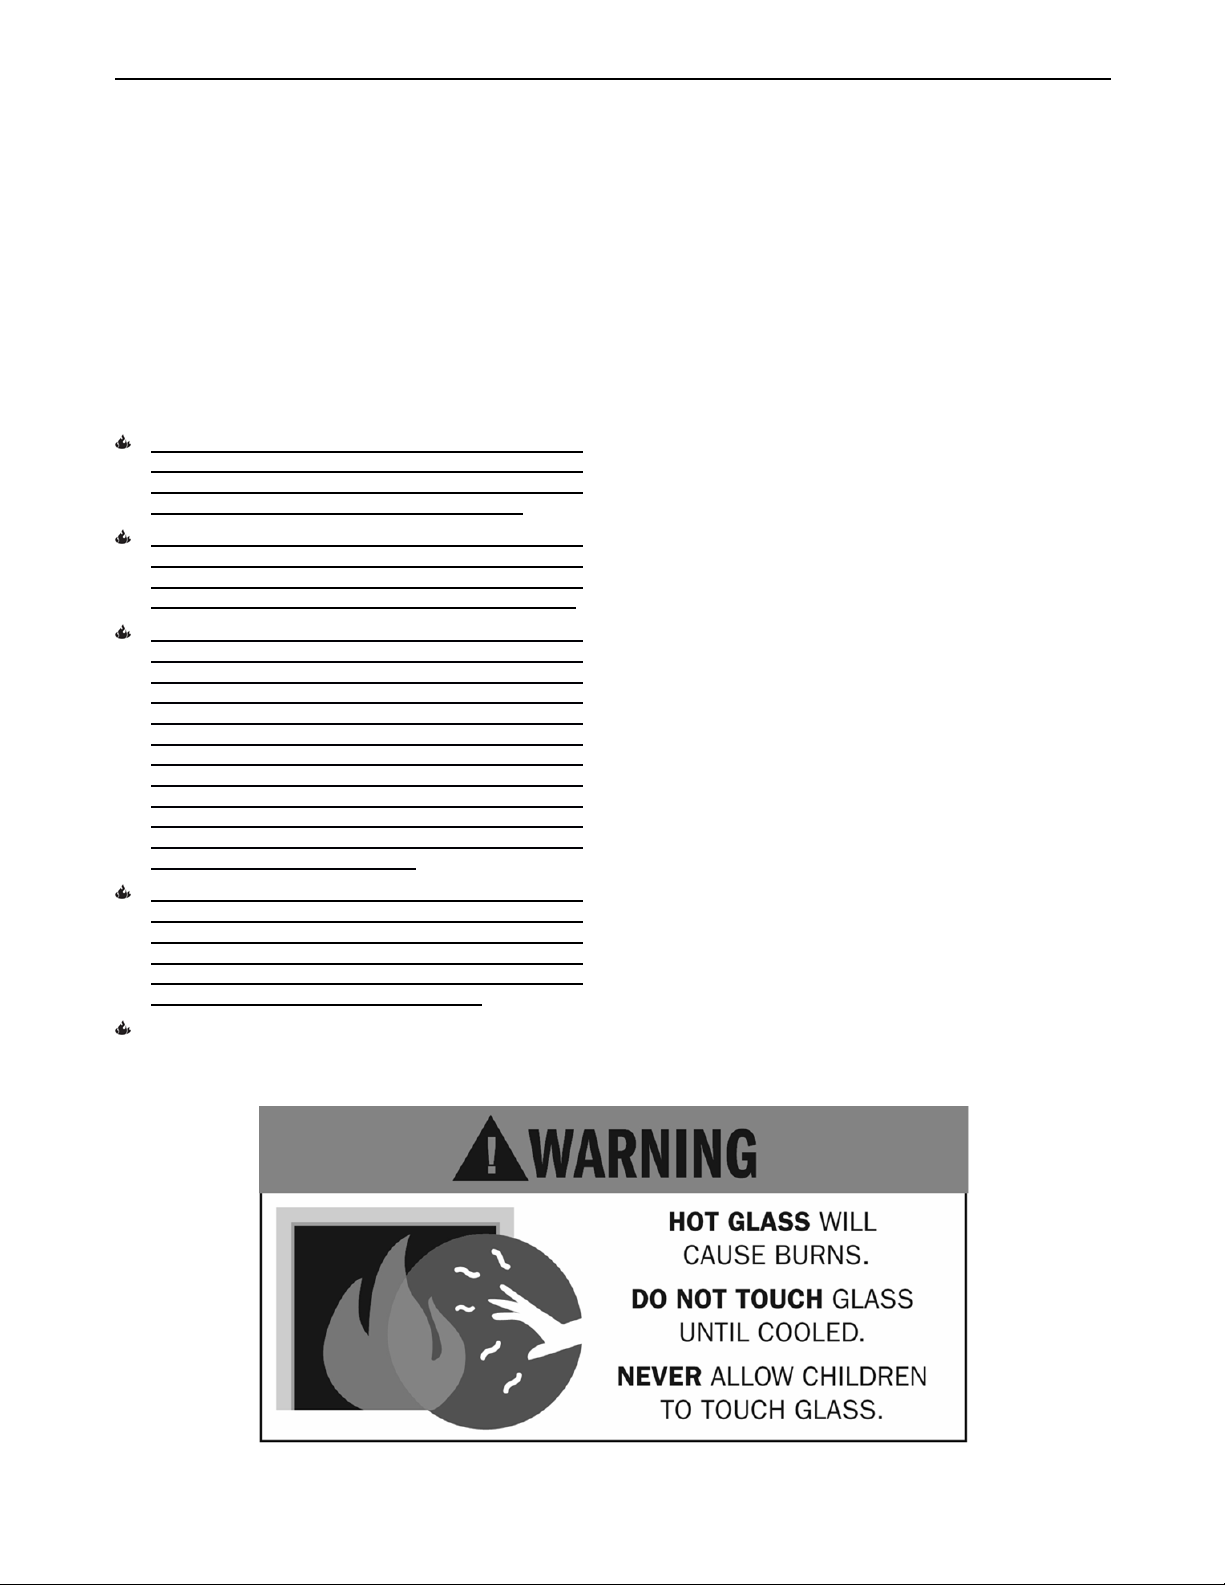
Hot Surfaces
Certain exposed surfaces of the Bristol will reach
high temperatures during normal operation.
Clearances to combus tibles must be maintained, as
specified in the “Clearances To Combustibles”
section of this manual.
DUE TO HIGH TEMPERATURES THE APPLIANCE
SHOULD BE LOCATED OUT OF TRAFFIC AND
AWAY FROM FURNITURE, DRAPERIES,
CLOTHING AND FLAMMABLE MATERIALS.
CHILDREN AND ADULTS SHOULD BE ALERTED
TO THE HAZARDS OF HIGH SURFACE
TEMPERATURES AND SHOULD STAY AWAY TO
AVOID BURNS TO SKIN OR CLOTHING IGNITION.
CAREFULLY SUPERVISE YOUNG CHILDREN
WHEN THEY ARE IN THE SAME ROOM AS THE
APPLIANCE. TODDLERS, YOUNG CHILDREN,
AND OTHERS MAY BE SUSCEPTIBLE TO
ACCIDENTAL CONTACT BURNS. A PHYSICAL
BARRIER IS RECOMMENDED IF THERE ARE AT
RISK INDIVIDUALS IN THE HOUSE. TO RESTRICT
ACCESS TO A FIREPLACE OR STOVE, INSTALL
AN ADJUSTABLE SAFETY GATE TO KEEP
TODDLERS, YOUNG CHILDREN, AND OTHER AT
RISK INDIVIDUALS OUT OF THE ROOM AND
AWAY FROM HOT SURFACES.
CLOTHING OR OTHER FLAMMABLE MATERIAL
SHOULD NOT BE PLACED ON OR NEAR THE
APPLIANCE. (SURVEILLE LES ENFANTS.
GARDER LES VÊTEMENTS, LES MEUBLES,
L’ESSENCE OU AUTRES LIQUIDES À VAPEUR
INFLAMMABLES LIN DE L’APPAREIL.)
CLEAN THE AREA AROUND, UNDER, AND
BEHIND THE UNIT ON A REGULAR BASIS TO
PREVENT THE ACCUMULATION OF DUST AND
LINT.
Ceramic Logs, & Burner
If the decorative ceramic log, or burner material
supplied with the Bristol is damaged or parts are
missing, they must be replaced with the same, or
approved Hearthstone replacement parts. These
components affect the combustion quality and safety
of the heater. Do not replace ceramic logs, or the
burner with unapproved ceramic components or any
other material.
We recommend you always wear gloves and safety
goggles while handling the ceramic log set, and
burner materials.
Electrical Hazard
If present, any three-prong grounded plug must be
plugged directly into a properly grounded threeprong receptacle. Do not cut or remove the
grounding prong from any plug or otherwise attempt
to circumvent the grounding protection provided with
the unit. The Bristol must be electrically grounded in
accordance with local codes, or in the absence of
local codes, with the National Electrical Code,
ANSI.NFPA 70 in the U.S. or CSA C22.1 Canadian
Electrical Code in Canada.
Do Not Light Pilot or Burner by Hand
The pilot light on this gas heater is lit using an
electronic ignition module as described elsewhere in
this manual. Never attempt to light the pilot or main
burner by hand with a match or lighter.
Mobile Home Installations
This appliance may be installed in an aftermarket
permanently located, manufactured (mobile) home,
where not prohibited by local codes. (Cet appareil
peut être installé dans un maison préfabriquée
(mobile) déjá installée á demeure si les réglements
locaux le permettent.
7
Page 8

Hearthstone Quality Home Heating Products, Inc. Bristol DX Model 8762
Proflame Control System & Features
NOTE: OPEN DOOR UNDER THE ASH LIP AND DROP DOWN THE MODESTY PANEL FOR ACCESS TO
ELECTRICAL AND GAS CONNECTIONS.
Bristol DX 8762 Model Overview
Proflame GTMFS System
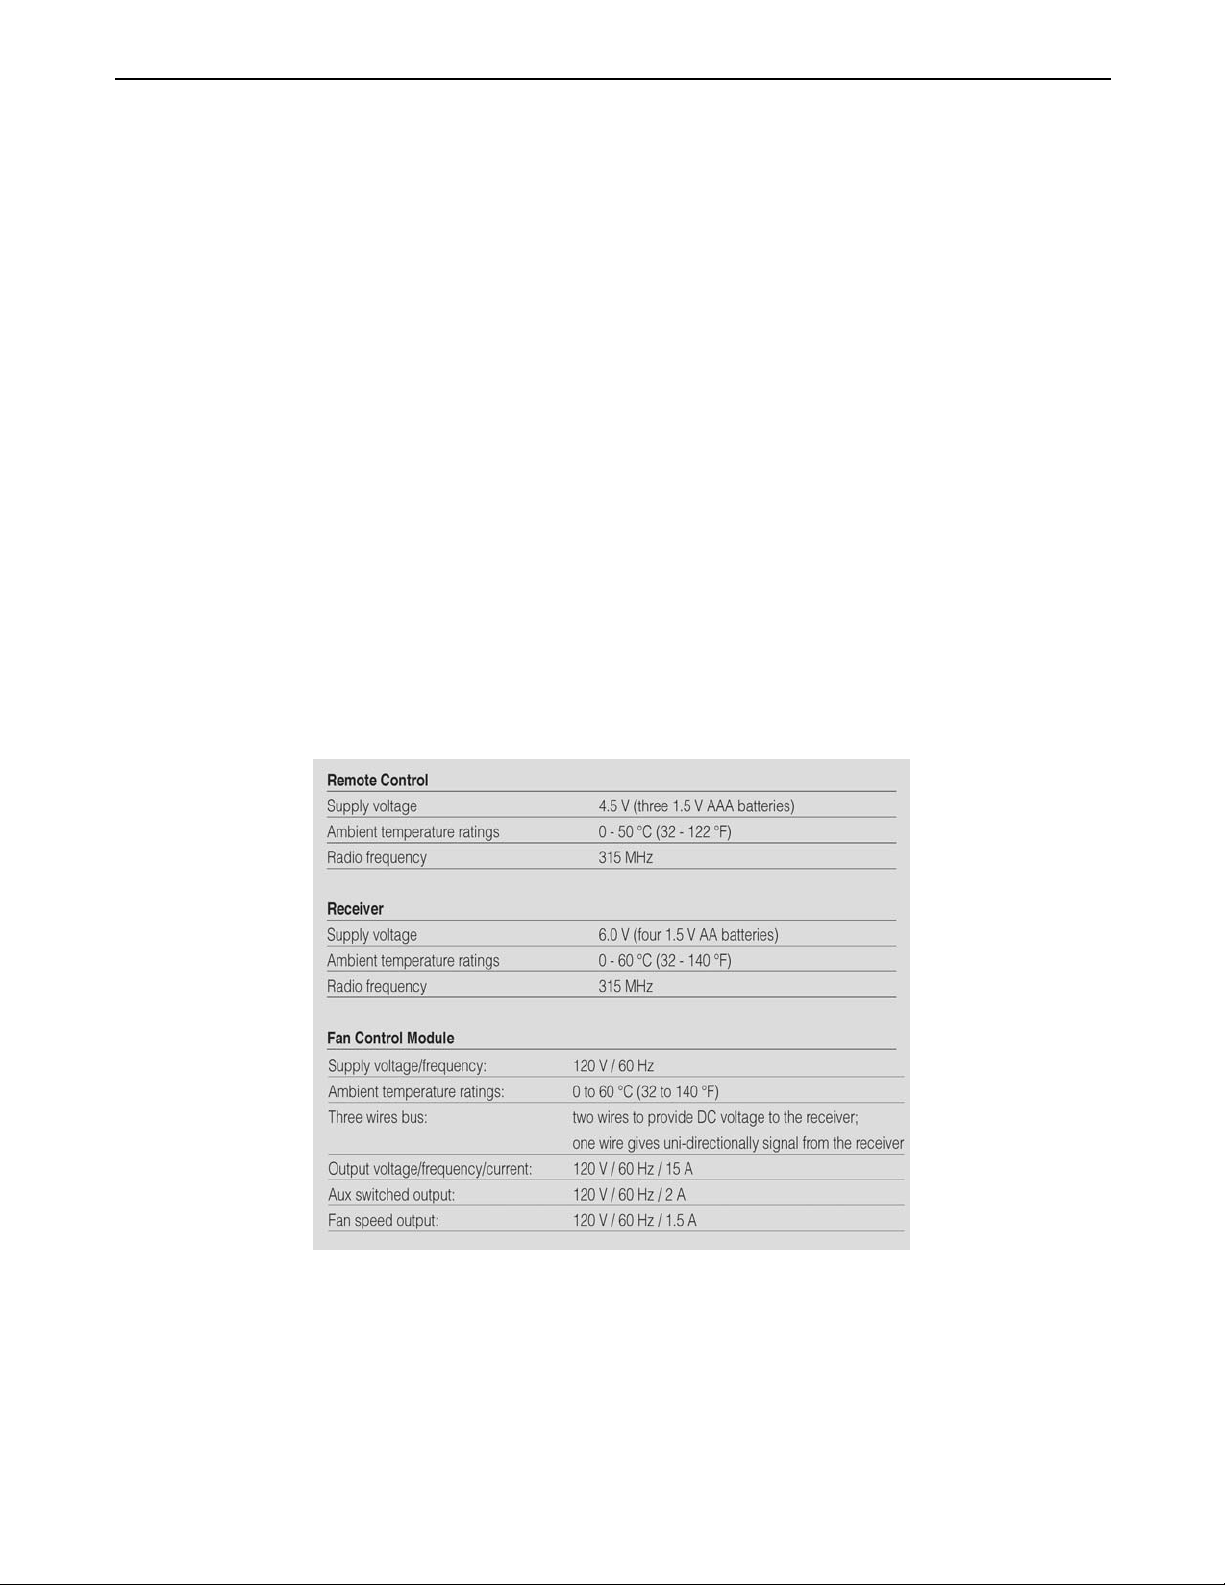
The Proflame GTMFS is a modular remote control
system that directs the functions of the Bristol. The
Proflame GTMFS System is configured to control the
on/off, main/split burner operation, its flame levels,
and provides Manual and Smart thermostatic control
of the hearth appliance. The system controls two
remotely actuated 120V/60Hz power outlets. The Fan
outlet controls the fan speed through six levels, and
the Auxiliary outlet either on or off. There is also an
additional constantly powered 120V/60Hz outlet. The
system has battery backup power for burner
operation and control during power outages (see
page 9 for specifications).
Receiver
The Receiver accepts commands via radio frequency
from the Remote to operate the appliance. The
Receiver is powered (6V DC) by the Fan Control
Module and uses four 1.5 volt AA type batteries for
backup during power outages. The Receiver’s slider
switch is set to one of three positions: ON (Manual
Override), REMOTE (Remote Control) or OFF. The
ON selection turns the valve on (to high), and
activates the split flow setting last used if the Remote
becomes inoperative.
Figure 2 – Proflame Receiver
Figure 1 - Proflame Remote Transmitter
Remote Transmitter
The Bristol comes equipped with a thermostatic
remote control transmitter. The easy to read LCD
display shows all functional abilities as well as a
childproof lockout and low battery indicator. It
displays room temperature readout, set temperature
readout and function status. The remote transmitter is
powered by three 1.5 volt AAA batteries. A Mode Key
is provided to index between the features and a
Thermostat Key is used to turn on/off or index
through thermostat functions.
Figure 3 – Proflame Fan Control Module
Fan Control Module
The Fan Control Module (FCM) is the main power
supply for the entire system when 120v AC is
available. The FCM provides two 120V remotely
controlled outlets, and one constantly powered outlet.
The FCM allows the remote to control the fan unit
through 6 speeds and turns the auxiliary outlet on
and off. This module also powers the Receiver and
Ignition Module with 6v DC, making the batteries in
the Receiver a backup power. When 120V power is
8
Page 9
Hearthstone Quality Home Heating Products, Inc. Bristol DX Model 8762
not available, neither the FCM nor the blower will
operate.
The FCM is equipped with a three-prong (grounding)
plug for protection against shock hazard and should
be plugged directly into a properly grounded threeprong receptacle. Do not cut or remove the grounding
prong from the plug.
Proflame DFC Ignition Module
This is the command center for the appliance. The
DFC Module allows the pilot to run in the Intermittent
(IPI) mode or the Constant (CPI) mode. It signals the
burner to light or shut down and provides the ignitor
with the electricity needed for sparking. The DFC
Module is powered by the FCM when 120V power is
available or by the batteries in the Receiver during a
power outage.
SIT Modulating Gas Valve
The remote transmitter can modulate the valve and
the flame to 6 different settings between high and
low. You can modulate the flame via the remote
yourself or by setting the remote control to the Smart
Thermostat modulation mode. Smart mode means
that as the room temperature approaches the limit set
for shut down the valve will automatically gradually
step down the flame height. The reverse happens
when the room cools - the valve will automatically
gradually increase the flame height.
SIT Split Burner Solenoid
The remote transmitter can toggle between dual
burner, and single burner mode (35,000 Btu/hr or
12,000 Btu/hr).
Pilot Assembly
The pilot assembly consists of a pilot hood, sensor
rod, and ignitor. The ignitor sends a spark to the pilot
hood which ignites the gas and lights the pilot. With
the pilot lit the sensor rod is engulfed by the flame,
flame rectification occurs and the appliance remains
lit. If the sensor does not stay engulfed by the flame
the main burner will not light and the pilot will shut
down.
Figure 4 - Proflame GTMFS Component Specifications
9
Page 10
Hearthstone Quality Home Heating Products, Inc. Bristol DX Model 8762
Control Functions
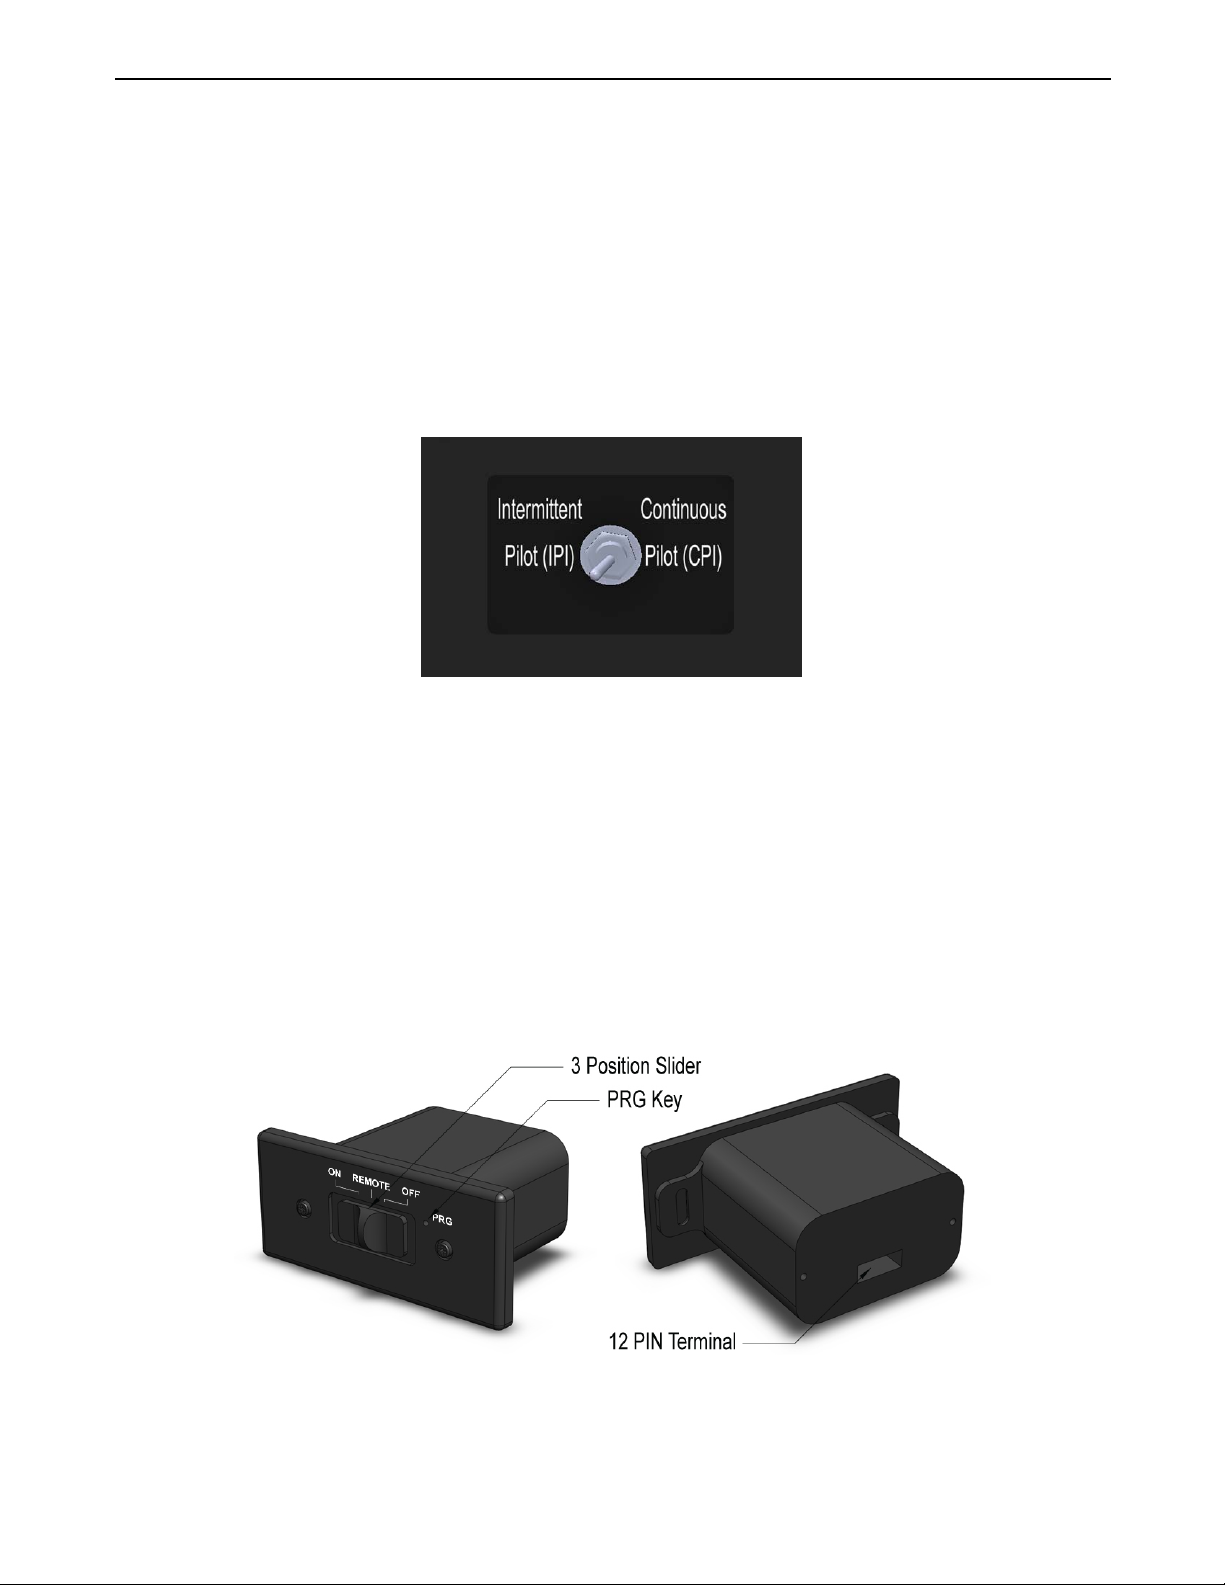
Pilot Mode
Continuous Pilot (CPI): Running the Bristol 8762 in CPI mode will keep your pilot on even when the thermostat
does not call for heat and when the burner is not lit. This is an advantage in cold climates or under windy
conditions. The “standing pilot” helps to keep the venting warm and generate some draft within the system. The
standing pilot also keeps the firebox warm – greatly minimizing, or eliminating condensation formation on the
glass during startup. The ignitor will automatically spark whenever the pilot mode is switched to CPI, regardless
of the position of the receiver switch.
Intermittent Pilot (IPI): Using the IPI mode is a more efficient use of fuel as the pilot only ignites when the
thermostat calls for heat.
Figure 5 - Pilot Mode Switch
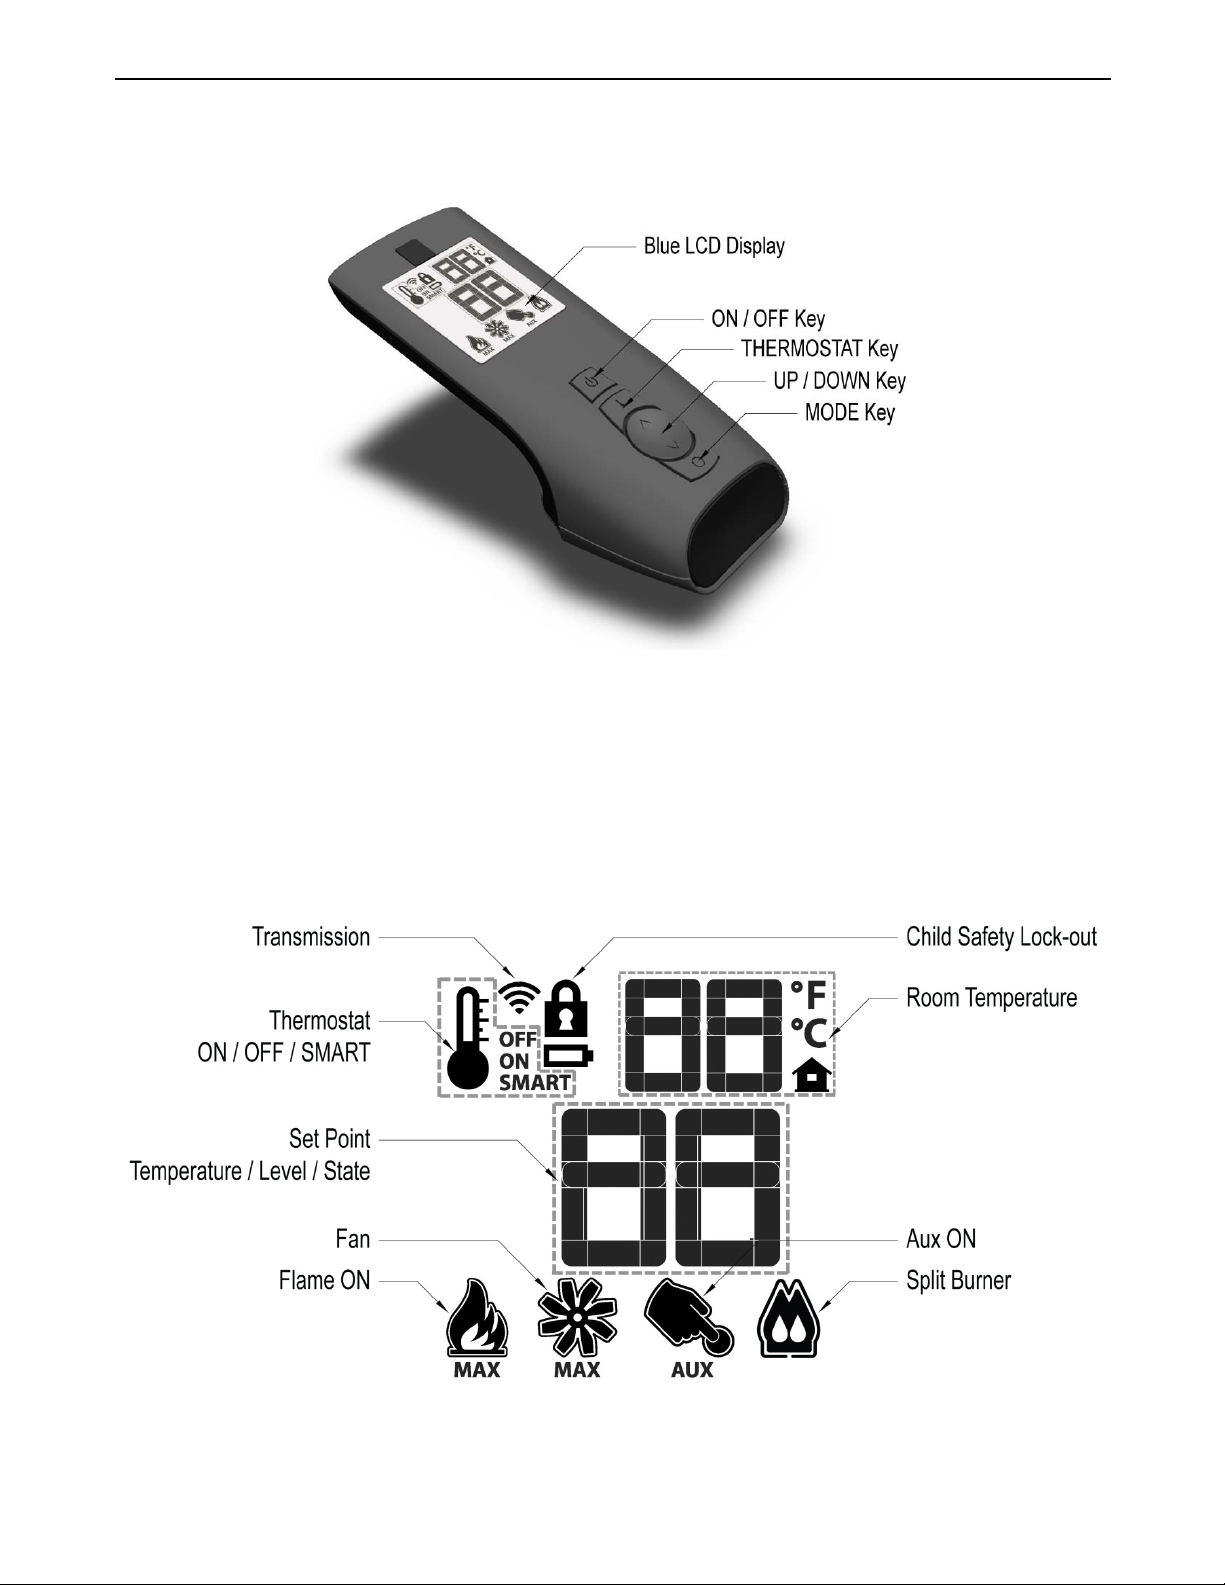
Remote Receiver
The Receiver is normally powered by the Fan Control Module or by four 1.5V AA batteries during a power
outage. The Receiver switch can be set to three different positions:
On: Manual override allowing the valve to function and ignite the burner without the remote transmitter. The
ignitor will spark automatically.
Remote: Remote Transmitter controls all functions of components.
Off: Turns off the stove. If CPI mode is selected, pilot will remain lit.
PRG Key: Used to synchronize the Transmitter and Receiver initially, and after each battery change (see page
35).
Figure 6 - Receiver Detail
10
Page 11
Hearthstone Quality Home Heating Products, Inc. Bristol DX Model 8762
Remote Transmitter
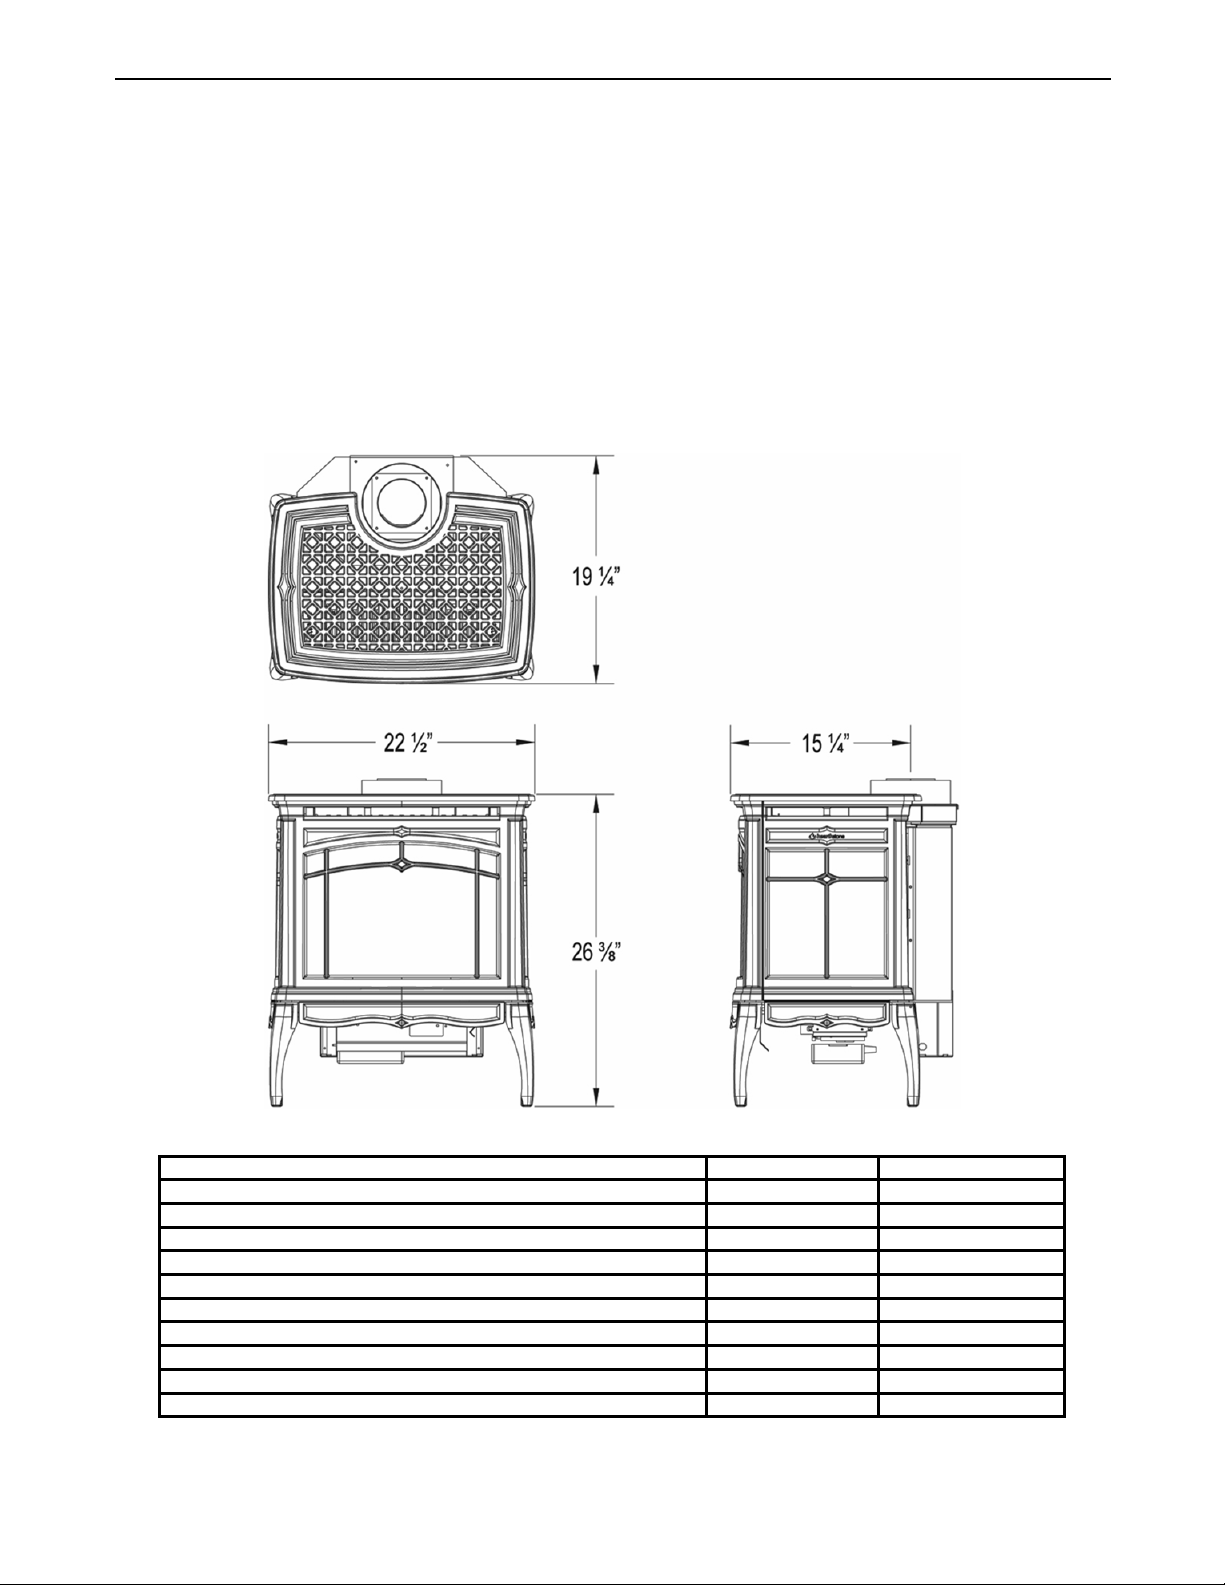
Figure 7 - Remote Transmitter Function Keys (remote color may differ from shown)
ON/OFF Key: Controls the main burner, blower, and
the modulation of both.
Thermostat Key: This is the function that sets either
the Manual or Smart thermostatic control.
UP/Down Arrow Key: Adjusts the thermostat
temperature range, flame settings, split flow, and fan
speed.
Mode Key: Toggles through the component to be
controlled (split flow burner, blower or auxiliary
outlet)
The transmitter features a user-friendly layout with a
Blue LCD Screen for easier viewing.
See the instructions provided with the remote for
more operation details.
Figure 8 - Remote Transmitter Display Data
11
Page 12
Hearthstone Quality Home Heating Products, Inc. Bristol DX Model 8762
Specifications
L
ISTED:
Gas-Fired Direct-Vent Fireplace Heater
Model: Bristol Direct-Vent Gas Fireplace
Heater (8762)
Testing Agency: Intertek Testing Services
NA, Inc. (ITS)
Tested to: ANSI Z21.88-09, CSA 2.33-09,
CAN/CGA2.17-M91
Certified for Canada, CSA P.4.1-02
Approved for Mobile Home Installation (see
page 7)
Certified for use by:
Board of State Examiners of Plumbers & Gasfitters
100 Cambridge Street, Room 1511
Boston, MA 02202
www.mass.gov
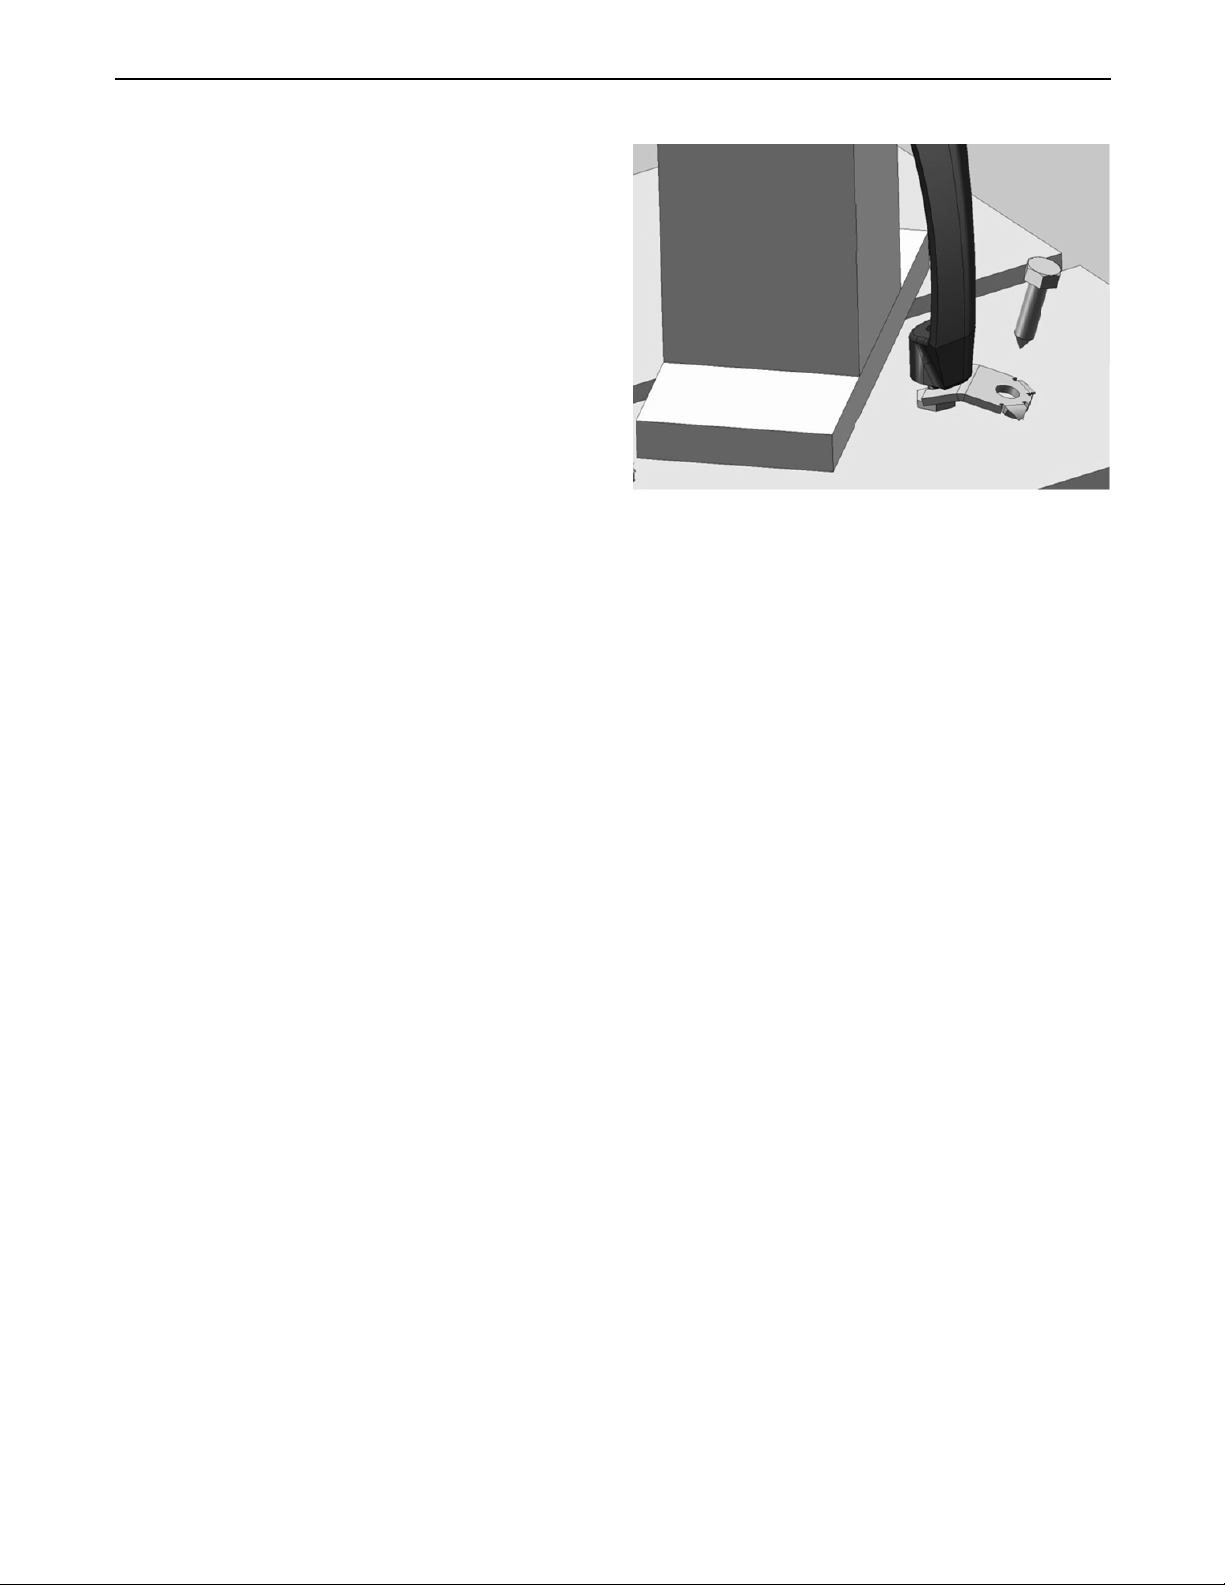
Figure 9 - Model 8762 Dimensions (
Specification NG LP
INPUT RATING (Btu/hr) 0-2000 ft (0-610 m) 36,000 33,000
INPUT RATING (Btu/hr) 2000-4500 ft (610-1370 m) 35,000 30,000
MAXIMUM OUTPUT (Btu/hr) 0-2000 ft (0-610 m) 28,200 26,200
MINIMUM INPUT (btu/hr) 0-2000 ft (0-610 m) 16,000 10,000
ORIFICE SIZE (DMS) 0-2000 ft (0-610 m (front/rear)) 43/46 54/57
ORIFICE SIZE (DMS) 2000-4500 ft (610-1370 m (front/rear)) 43/47 55/59
MANIFOLD PRESSURE - (in. W.c./kpa) 3.5/0.87 10.0/2.48
MANIFOLD PRESSURE - Low setting (in. W.c./kpa) 1.1/.027 6.4/1.59
INLET PRESSURE - MINIMUM (in.w.c./kpa) 5.0/1.25 12.0/2.99
INLET PRESSURE – MAXIMUM (in. w.c./kpa) 7.0/1.74 13/3.22
12
Inches
)
Page 13

Hearthstone Quality Home Heating Products, Inc. Bristol DX Model 8762
Installation Preparation
Codes
Adhere to all local codes or, in their absence, the
latest edition of THE NATIONAL FUEL GAS CODE
ANSI Z223.1 (NFPA 54) or CAN/CGA B149 (Installer
l’appareil selon les codes ou règlements locaux, ou,
en l’absence de tels règlements, selon les Codes
d’installation CAN/CGA-B149.)
Installation Codes can be obtained from:
AMERICAN NATIONAL STANDARDS
INSTITUTE, INC.
1430 BROADWAY
NEW YORK, NY 10018
www.ansi.org
NATIONAL FIRE PROTECTION ASSOCIATION,
INC.
BATTERY MARCH PARK
QUINCY, MA 02269
www.nfpa.org
The appliance when installed must be electrically
connected and grounded in accordance with local
codes or, in the absence of local codes, with the
current NFPA 70-National Electrical Code or CSA
C22.1-Canadian Electric Code.
A manufactured home (mobile) OEM installation must
conform to the Manufactured Home Construction and
Safety Standard, Title 24 CFR, Part 3280 (U.S.) or
Standard for Manufactured Home Installation,
ANSI/NCBCS A225.1 or Standard for Gas Equipped
Recreational Vehicles and mobile Housing, CSA
Z240.4.CAN/SCA Z240 MH (Canada). (Installer
l’appareil selon les codes ou règlements locaux, ou,
en l’absence de tels règlements, selon les Codes
d’installation CAN/CGA-B149.)
This appliance is equipped for use at 0 to 2000 feet
(0-610 meters) altitude. (Cet appareil est equipè pour
des altitudes compries entre 0 et 2000 pieds (0-610
m) seulement.)
WARNING: DO NOT INSTALL OR USE THIS
APPLIANCE IF ANY PART WAS SUBMERGED
UNDER WATER. IMMEDIATELY CALL A
QUALIFIED SERVICE TECHNICIAN TO INSPECT
THE HEATER AND TO REPLACE ANY PART OF
THE CONTROL SYSTEM AND GAS CONTROL
THAT WAS UNDER WATER. (NE PAS SE SERVIR
DE CET APPAREIL S’IL A ÉTÉ PLONGÉ DANS
L’EAU, COMPLÈTEMENT OU EN PARTIE.
APPELER UN TECHNICIEN QUALIFIÉ POUR
INSPECTOR L’APPAREIL ET REMPLACER TOUTE
PARTIE DU SYSTÈME DE CONTRÔLE ET TOUTE
COMMANDE QUI ONT ÉTÉ PLONGÉS DANS
L’LAU)
Items Required for Installation
Approved venting
External regulator (for propane (LP) only)
LP conversion kit (not included, for propane
only))
Piping which complies with local codes
Pipe sealant approved for use with
propane (LP) (resistant to sulfur compounds).
Manual shutoff valve
Sediment trap (see page 26)
120 volt electrical service
Pipe wrench
Phillips head screwdriver
7/16-inch wrench
3/16” hex wrench
Other parts as required by local code
Safety Glasses
Gloves
Packing List
1- Bristol DX 8762 Gas-Fired Heater
1- Owner’s Packet Envelope (manual, warranty card)
5- Decorative Ceramic Logs (in box on pallet)
1- Blower Assembly (on Stove)
4- ¼ x 20 x 1” Leg leveling screws
1- Accessory Box (on pallet) containing:
1- Remote Control w/batteries
1- Package of four AA Batteries
1- Bag of Platinum Bright Embers
1- Enamel Touch-up Paint (if applicable)
Note: Vent kits and components are supplied
separately. Failure to use the venting
components approved by Hearthstone for this
appliance will void your warranty.
Unpacking and Inspection
Hearthstone packages your Bristol to withstand
normal shipment without damage. However, damage
can still occur during transit. Take care to inspect for
damage when unpacking and installing the unit.
DO NOT INSTALL, OR PUT INTO SERVICE, A
DAMAGED OR INCOMPLETE HEATER.
Remove the shrink-wrap and other packaging
materials taking care not to damage the stove’s
finish. Inspect the Bristol for visible or concealed
damage. The unit should be square and true. Any
sheet metal parts should be smooth and free of
bends and dents. Any enameled cast iron should be
free of chips or cracks. If visible or concealed
13
Page 14
Hearthstone Quality Home Heating Products, Inc. Bristol DX Model 8762
damage is found or suspected, contact your dealer
for instructions.
Always use gloves and eye protection when handling
the decorative ceramic fire logs, and burner. Use
care when handling these parts as they are fragile
and subject to damage and breakage if handled
roughly.
See the firebox access instructions on page 15 and
remove the log set. Unpack and inspect the logs for
damage. Inspect the ceramic burner. Open the other
boxes and inspect the components. If log, burner, or
any other component damage is encountered,
contact your dealer for a replacement. Otherwise, set
the logs and other components aside until called for
during the installation.
Dismounting from Pallet
With the accessory boxes removed and set aside,
remove the 4 lag bolts and clips that fasten the unit to
the pallet (see figure 10). Take care not to mar or
chip the stove’s finish.
Have someone help lift the stove up and off the
shipping stands and pallet, taking care to avoid
damaging components mounted under the stove.
Shipping Stand
Lag
Bolt
Clip
Carriage Bolt
Figure 10
– Shipping Clip Detail
Leg Leveler Screws
If your hearth surface in uneven, or is not level, you
can use the four provided leveling screws.
1. Completely remove the four carriage bolts
used for shipping the stove.
2. Replace them with the ¼ x 20 x 1” oval tip
set screws provided in the packing kit.
3. Install the leveling screws down through the
flanges on the feet (hex end up).
4. Adjust the screws only enough to keep the
stove from rocking or wobbling*.
*
On thinner hearths, or hearth pads, adjusting the screws so the
entire stove’s weight is solely supported on them can cause
damage to your hearth.
14
Page 15
Hearthstone Quality Home Heating Products, Inc. Bristol DX Model 8762
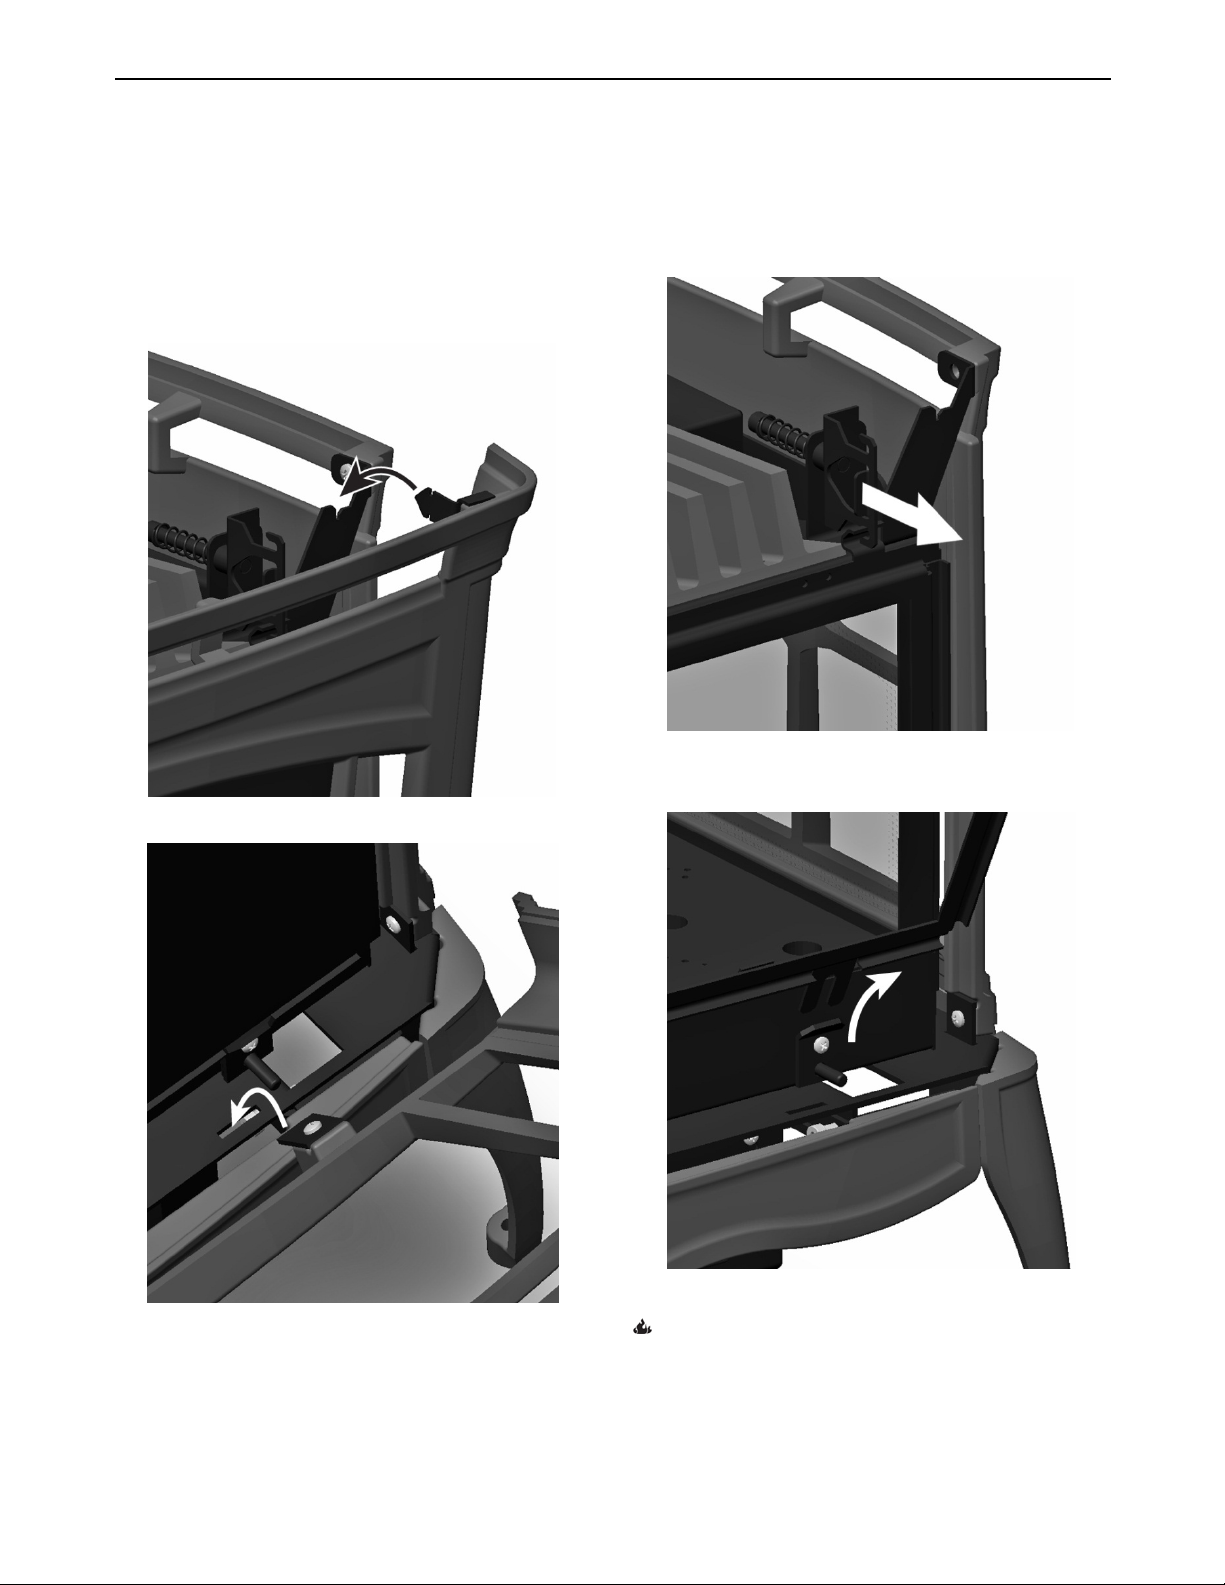
Firebox Access
1. First, remove the top of the stove (lift off). Set
carefully aside on a soft surface.
2. Lift the front panel slightly to disengage the tangs
at its top – tilt the front toward you slightly and lift
it up out of the bottom slots and set aside on a
soft surface.
4. Pull forward and disengage the spring clips
securing the top of the glass frame. See Figure
14. Tilt the top of the glass frame outward and lift
it off the studs on the bottom – set carefully
aside.
Figure 13 – Glass Spring Clip Detail
Figure 11 – Front Panel Mounting Tang Detail
Figure 12 – Front Panel Retaining Slots
3. If installed, remove the front screen by lifting it off
the glass frame.
5. Lift glass frame off the lower mounting pins.
Figure 14 - Lower Mounting Stud/Spring Detail
See page 28 for log set installation. Reinstall
components by reversing the previous steps.
Ensure you slide the lower glass frame tangs
behind the spring keepers.
not reinstall the optional screens.
If desired, you need
15
Page 16
Hearthstone Quality Home Heating Products, Inc. Bristol DX Model 8762
Clearances to Combustibles
Note: Ensure clearances are in accordance
with local installation codes and the
requirements of the gas supplier.
Clearance to Combustibles
Due to high surface temperatures, locate the unit out
of traffic areas and away from furniture and
draperies. Do not place clothing and other
flammable material on or near the heater. When
positioning the unit always maintain adequate
clearances around air openings into the combustion
chamber and allow for adequate ventilation.
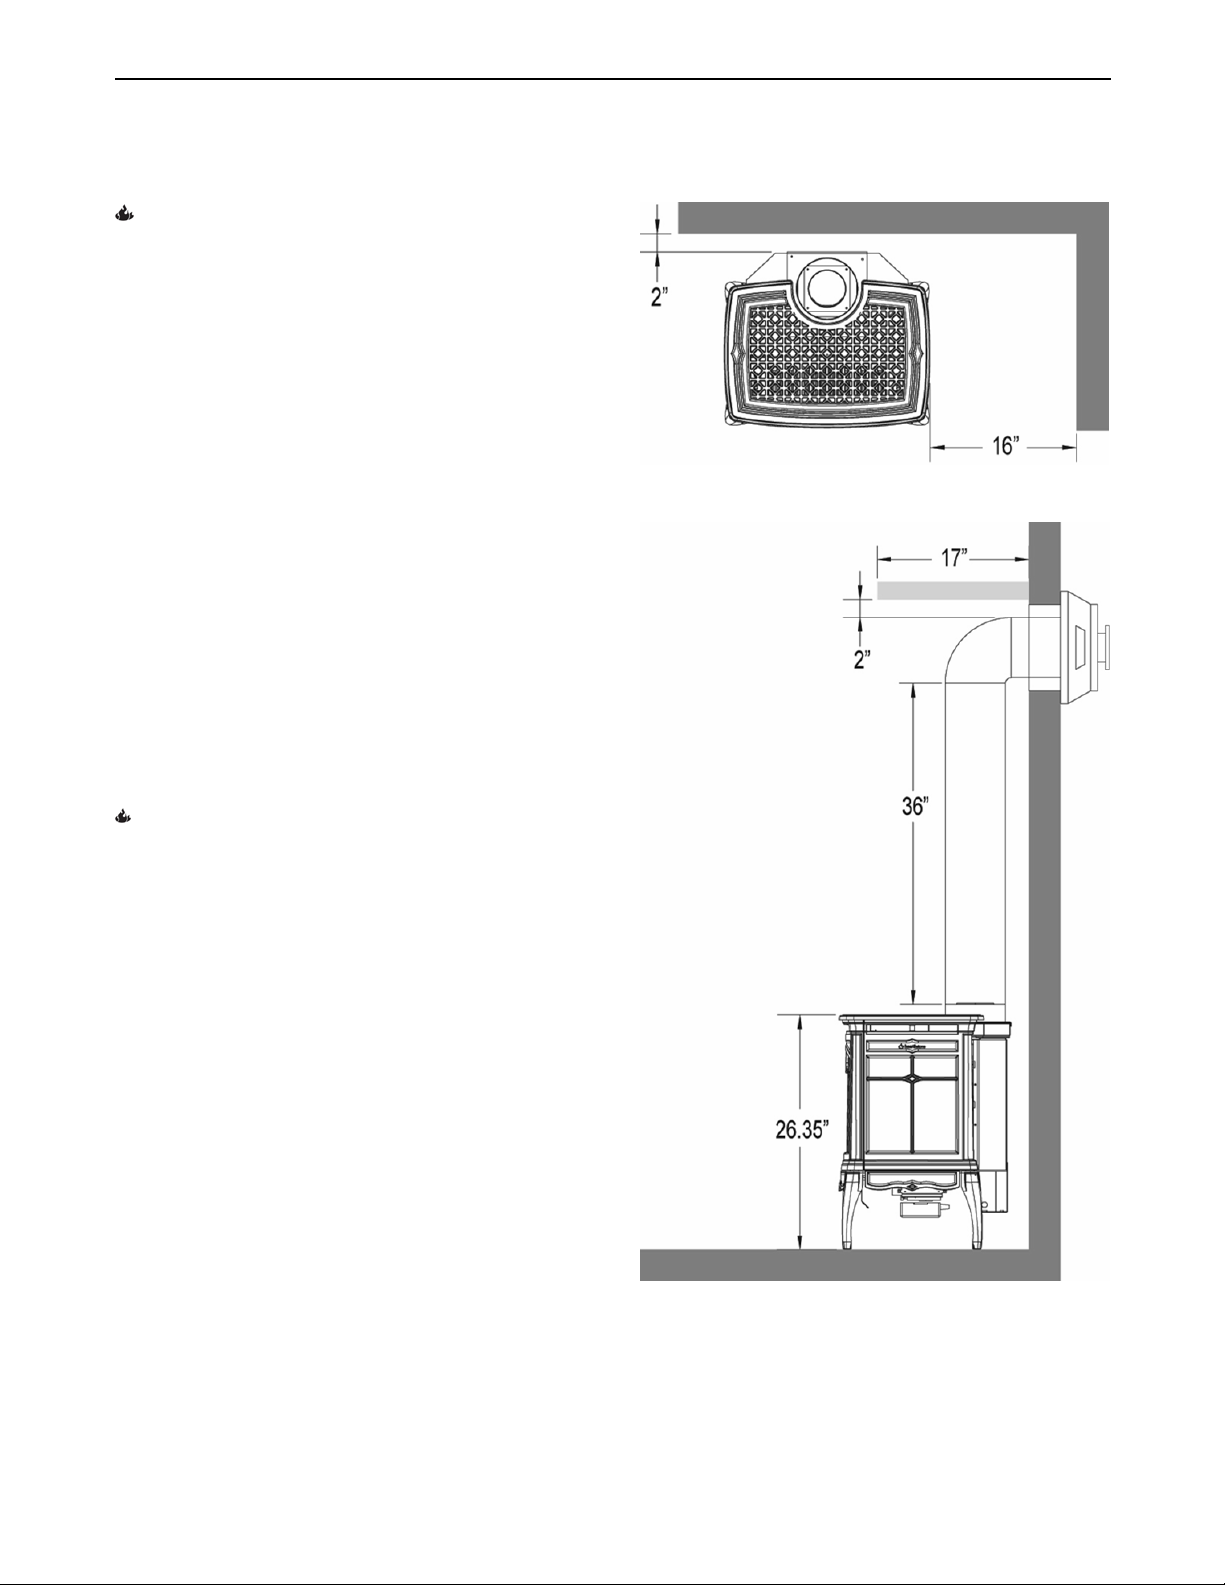
Minimum clearances to combustibles must be
maintained as shown in Figures 15 - 17.
Note: The rear clearance to combustibles is
determined by either the unit’s or the vent pipe’s
minimum clearance, depending on whether the
installation calls for vertical rise within the room or a
rear exit, through-the-wall vent pipe.
Figure 15 - Minimum Wall Clearances
Ensure you consider the need for access to the gas
control valve access door on the front of the unit as
well as full access for periodic cleaning and
servicing. Also consider clearance for the blower
assembly if present, or planned in the future.
CAUTION: THESE CLEARANCES REPRESENT
MINIMUM DISTANCES IN ALL CASES, WHICH,
THROUGH TESTING IN AN INDEPENDENT
LABORATORY TO ANSI AND CSA STANDARDS,
WILL PREVENT FIRE OR SPONTANEOUS
COMBUSTION. WE DO NOT CONTROL THE
COMBUSTIBLE MATERIALS EXPOSED TO HEAT
BY THIS PRODUCT; THEREFORE, AN
ASSESSMENT MUST BE MADE BY THE
INSTALLER TO PREVENT CONSEQUENTIAL
DAMAGE OF WALLS AND FLOORING.
Hearth Requirement/Floor
Protection
You can place the Bristol directly on any noncombustible surface or on a wood floor. When
placing the Bristol on any other type of combustible
surface you must install a panel made of metal,
wood, stone, or glass under the appliance. The
panel must extending the full width and depth of the
appliance. Installations must meet all local codes.
Figure 16 - Horizontal Vent Mantle Clearance
16
Page 17
Hearthstone Quality Home Heating Products, Inc. Bristol DX Model 8762
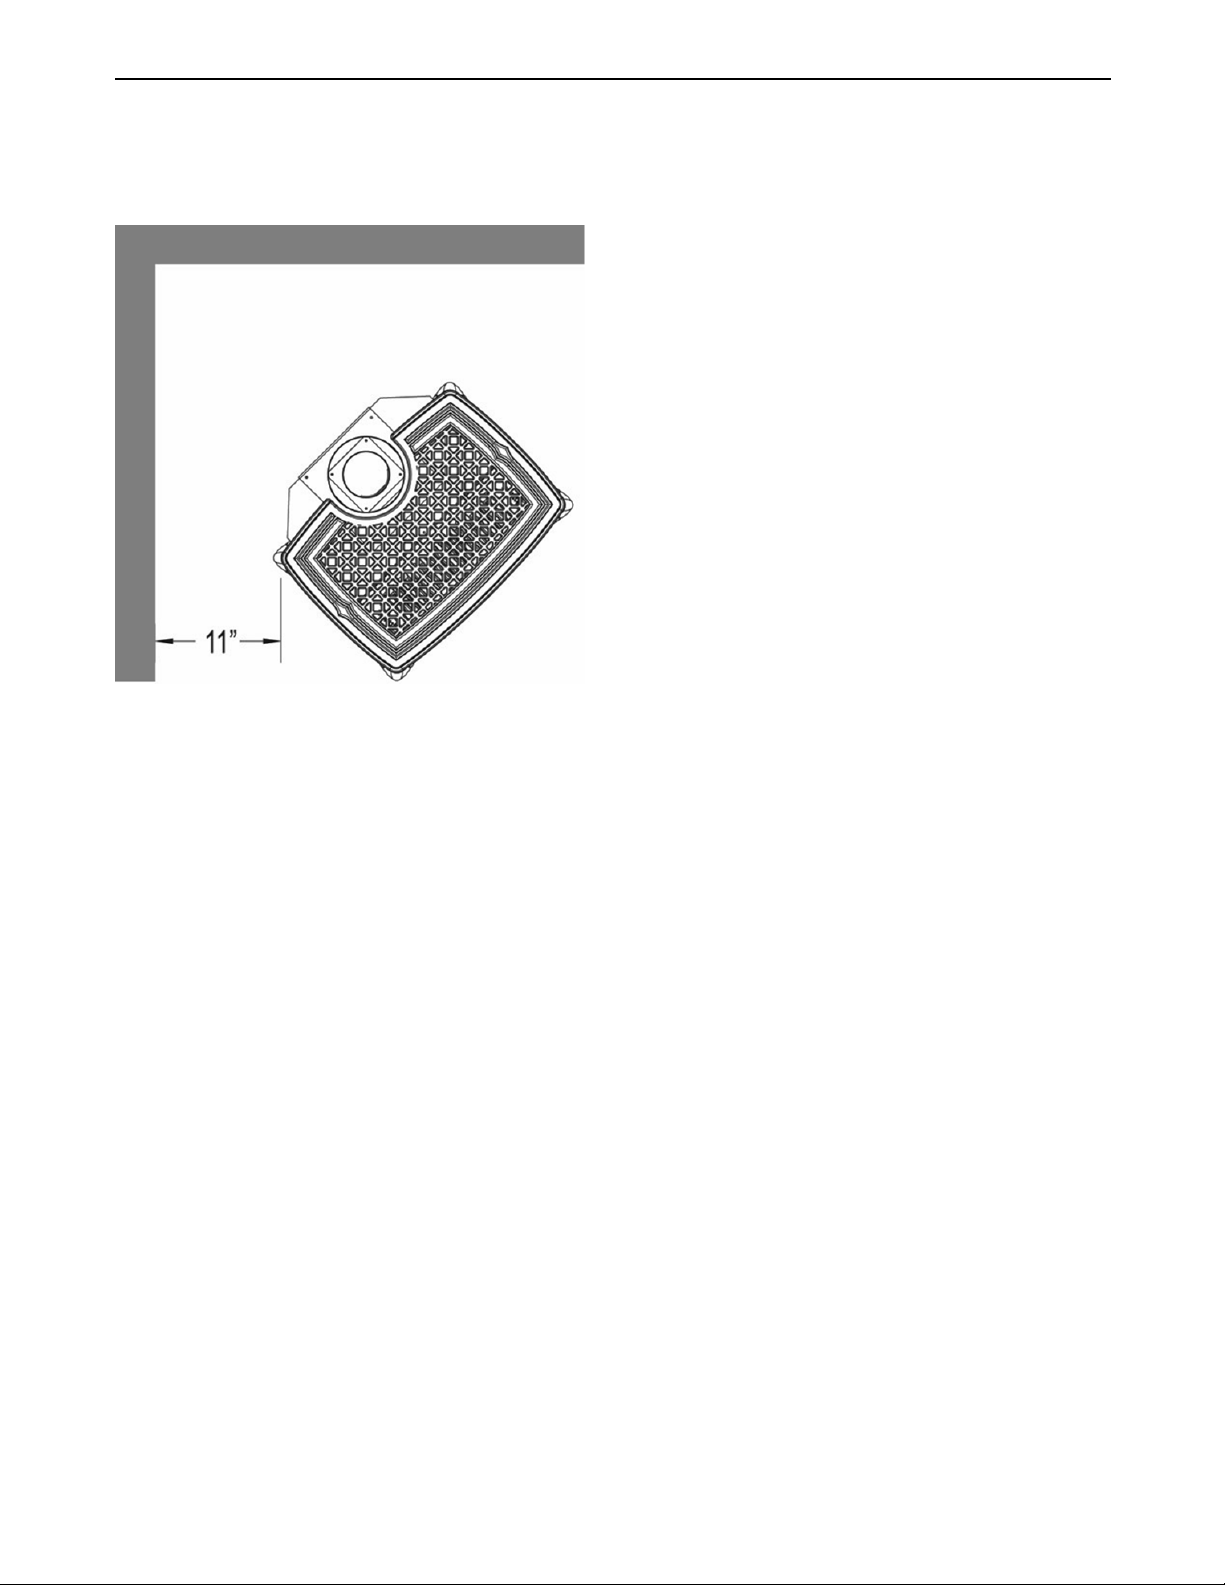
The corner clearance for the Bristol 8762 is 11”,
measured from the edge of the top castings, to the
adjacent wall.
Figure 17 - Corner Clearance
17
Page 18

Hearthstone Quality Home Heating Products, Inc. Bristol DX Model 8762
Venting Information
Venting Components
Starter collar is installed by Hearthstone.
Use the following instructions along with the pipe
manufacturer’s instructions to complete the
installation. Do not mix vent components from
different manufacturers within the same venting
system.
Approved Venting Manufacturers
The Bristol Direct Vent (8762) is approved for
installation only with the venting components
provided by manufactures listed on this page.
Simpson Dura-Vent, Inc.
P.O. Box 1510
Vacaville, CA 95696-1510 800-835-4429
American Metal Products (AmeriVent)
8601 Hacks Cross Rd.
Olive Branch, MS 38654 800-423-4270
Selkirk Corporation
1301 W. President George Bush Hwy, Suite 330
Richardson, TX 75080-1139 800-992-8368
Security Chimneys International Ltd (Secure Vent)
2125 Monterey, Laval, Quebec
Canada, H7L 3T6 450-973-9999
ICC, Inc.
400 J-F Kennedy, St. Jerome, Quebec
Canada, J7Y 4B7 450-565-6336
Metal-Fab, Inc.
P.O. Box 1138
Wichita, Kansas 67201 316-943-2351
Venting Terminations
The Bristol cannot be vented jointly with any other
solid fuel or gas appliance. It must be vented directly
to the outside of the building using a proper
termination as listed in this manual. After
determining the venting configuration for your stove,
select the vent system that will best accommodate
your installation.
CAUTION: ENSURE ALL STOVE AND
TERMINATION CAP CLEARANCES ARE
OBSERVED PER THIS OWNER’S MANUAL.
CAUTION: ENSURE THERE IS NO WIRING OR
PLUMBING IN THE CHOSEN LOCATION.
CAUTION: DO NOT RECESS VENTING
TERMINALS INTO A WALL OR SIDING.
Approved Venting Configurations
WARNING: IN HIGH WIND AREAS AND
PARTICULARLY COLD CLIMATES IT MAY BE
NECESSARY TO HEAT YOUR VENT SYSTEM
WITH THE PILOT PRIOR TO IGNITION OF THE
MAIN BURNER. IN THESE INSTANCES IT IS
RECOMMENDED THAT YOU LEAVE THE PILOT
RUNNING FOR 5 MINUTES PRIOR TO IGNITING
THE MAIN BURNER. THIS WILL ALLOW FOR
PROPER START UP AND IGNITION OF ALL
PORTS ON THE BURNER.
There are two types of venting configurations
approved for use with this appliance:
Vertical Venting/Vertical Termination
Vertical Venting/Horizontal Termination
Pipe Clearances to combustibles:
1" to vertical runs
1" below and to the side of horizontal runs
2" from the top of horizontal runs
Vertical Venting and Termination
The Bristol 8762 is approved for venting vertically
through a roof or ceiling. When installing a vertical
vent and/or vertical terminations you must adhere to
the following requirements:
When terminating vertically you must have at
least 10’ of vertical pipe.
The restrictor must be in the closed position
above 10' vertical vent length.
Always maintain a minimum of 1” clearance from
all sides of the vent system to any combustible
material.
A listed fire stop is required at any floor
penetration. The opening must be framed in
according to the venting manufacturer’s
instructions.
Steep roofs, nearby trees, or predominantly
strong windy conditions can promote poor draft
or down draft conditions. In this event, an
increase to the height of the vent may improve
performance.
A maximum of two 90⁰ or four 45⁰ elbows may
be used in vertical terminations. Whenever
possible use 45⁰ elbows instead of 90⁰ elbows
as they offer less restriction to the flue gases.
Vertical terminations may require additional
restriction in order to perform as intended.
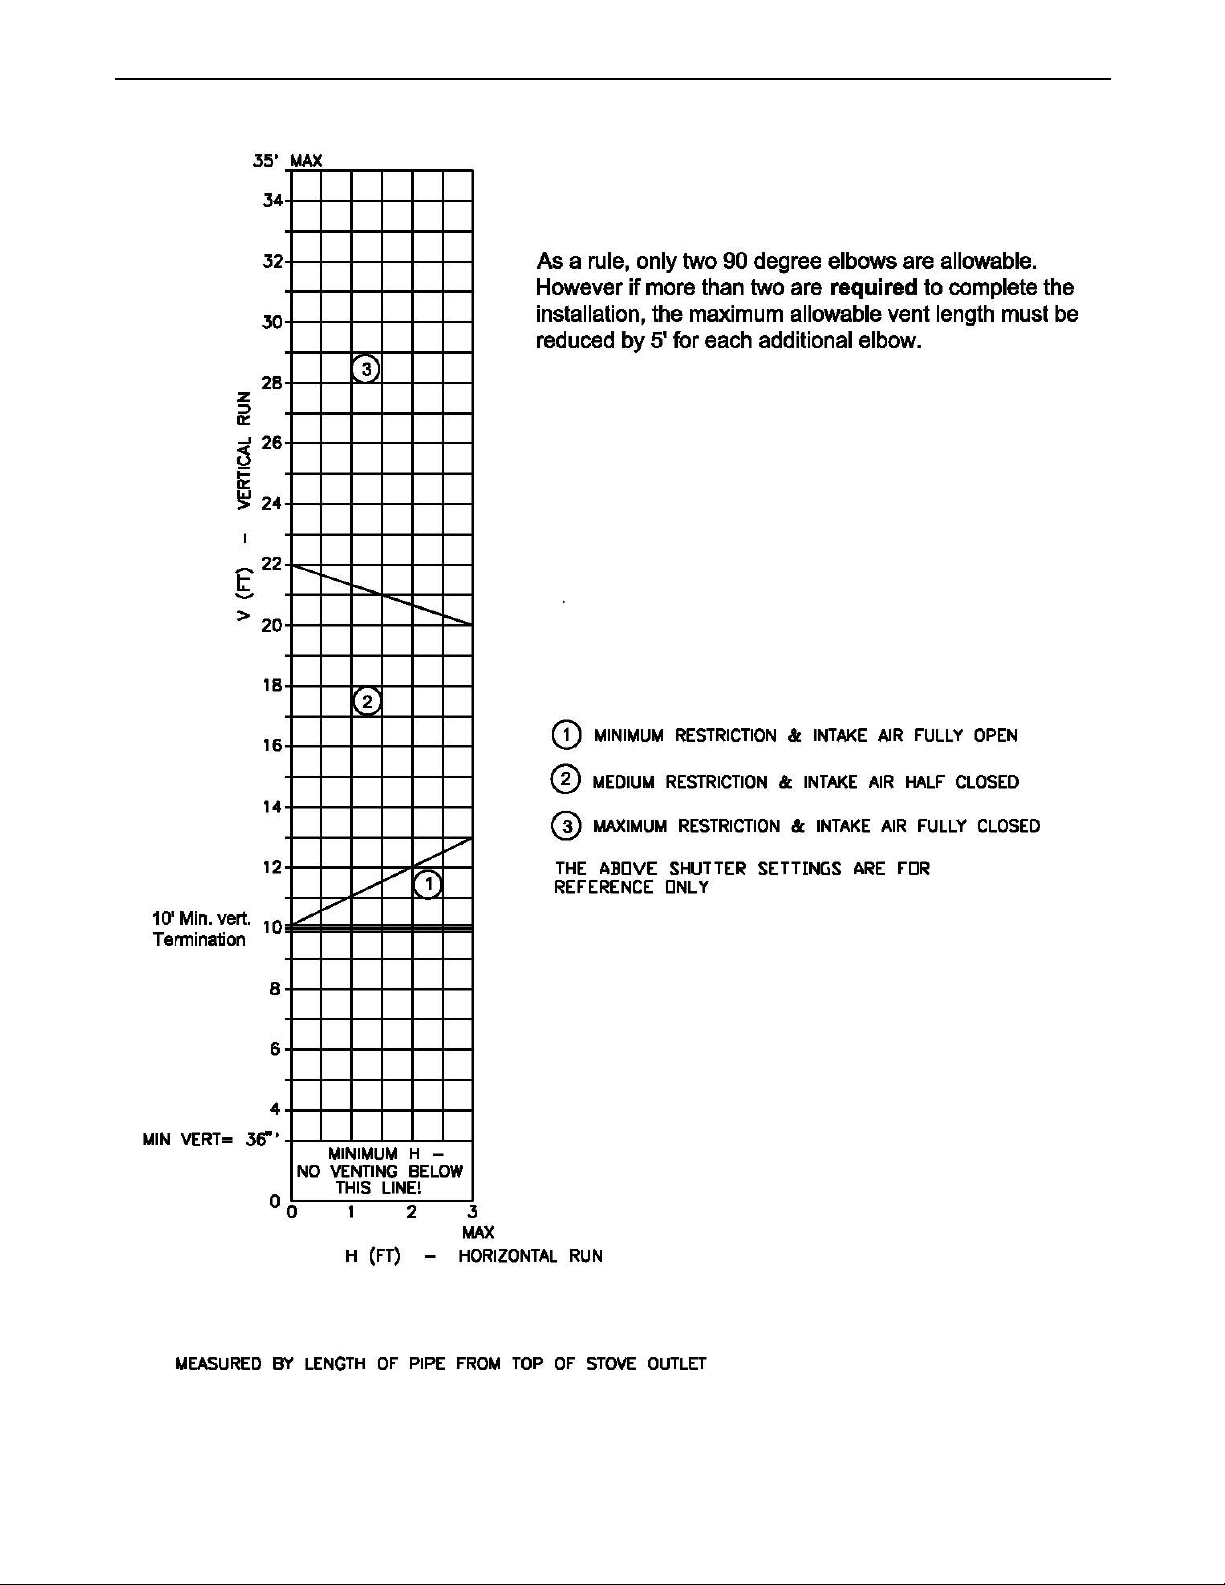
Please refer to Figures 22 - 24 to adjust your
vent restrictor accordingly
18
Page 19
Hearthstone Quality Home Heating Products, Inc. Bristol DX Model 8762
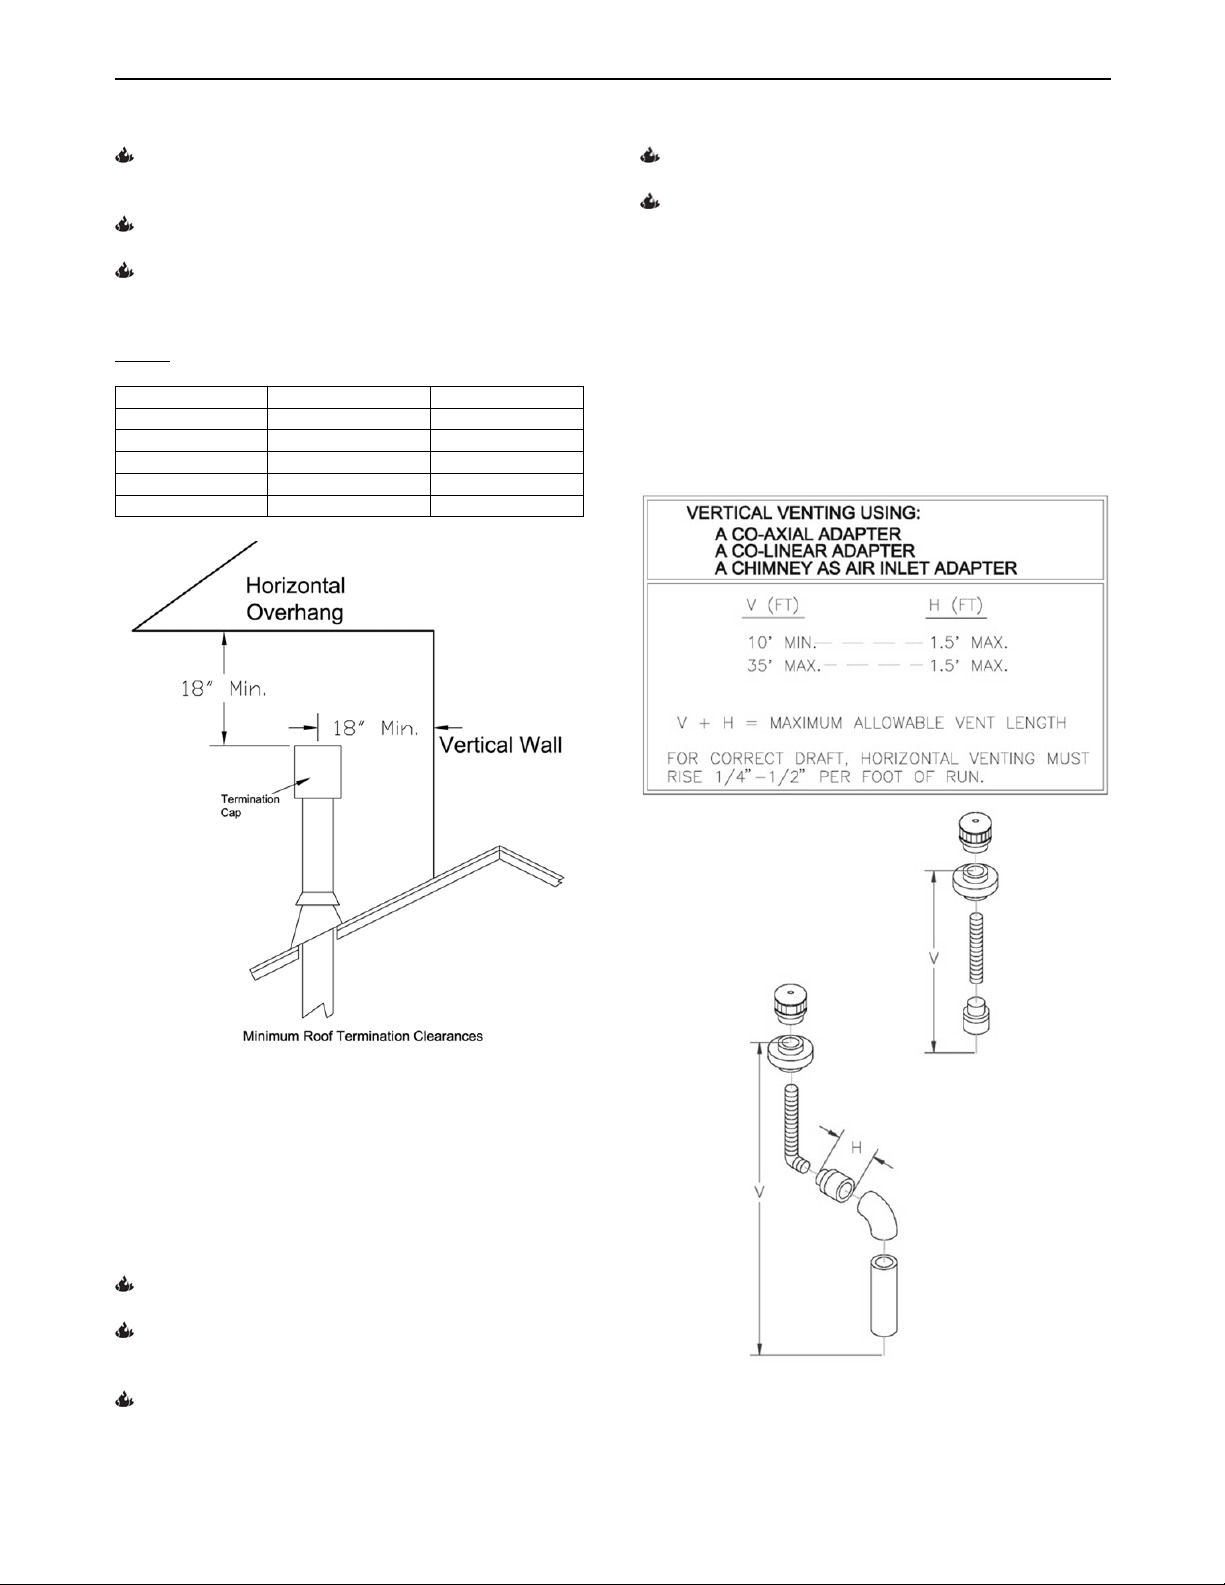
All termination caps must be no less than 18”
(457mm) horizontally from any roof or vertical
surface. See Figure 18.
The termination must fall within the chart in
Figure 24.
The maximum vertical run is 35’
The minimum vent/air intake termination clearances
above the high side of an angled roof are as follows:
Roof Pitch Feet Meters
Flat to 6/12 1 0.3
7/12 to 9/12 2 0.6
10/12 to 12/12 4 1.2
13/12 to 16/12 6 1.8
17/12 to 21/12 8 2.4
The liner must have an inside dimension or
diameter 6” or greater.
Prefabricated chimneys must be UL103 or ULC
S-629 listed and have a minimum INSIDE
diameter of 6”. Prefabricated chimneys must be
listed for the specific manufacturer’s conversion
kit.
The use of an existing chimney as an air intake is
not listed under the ANSI Z21.88-09-CSA 2.33-09
test methods; this installation has been tested and
approved by Intertek Testing Services with an
appropriate test. The code authority having
jurisdiction must be consulted prior to proceeding
with this installation method. See examples below.
Figure 18 - Termination Cap clearances
Prefabricated & Fireplace Chimney
Installations
The Bristol 8762 is approved for use with direct vent
chimney conversion kits in m asonry or prefabrica ted
solid fuel listed chimneys. The following installation
requirements must be followed:
The termination must fall within the chart shown
in Figure 24.
In a masonry chimney, a fireclay liner or listed
steel liner, must be present the entire length of
the chimney.
The maximum vertical length of vent is 35’.
Figure 19 – Existing Chimney Venting Options
19
Page 20

Hearthstone Quality Home Heating Products, Inc. Bristol DX Model 8762
Horizontal Termination
The termination must fall within the area shown
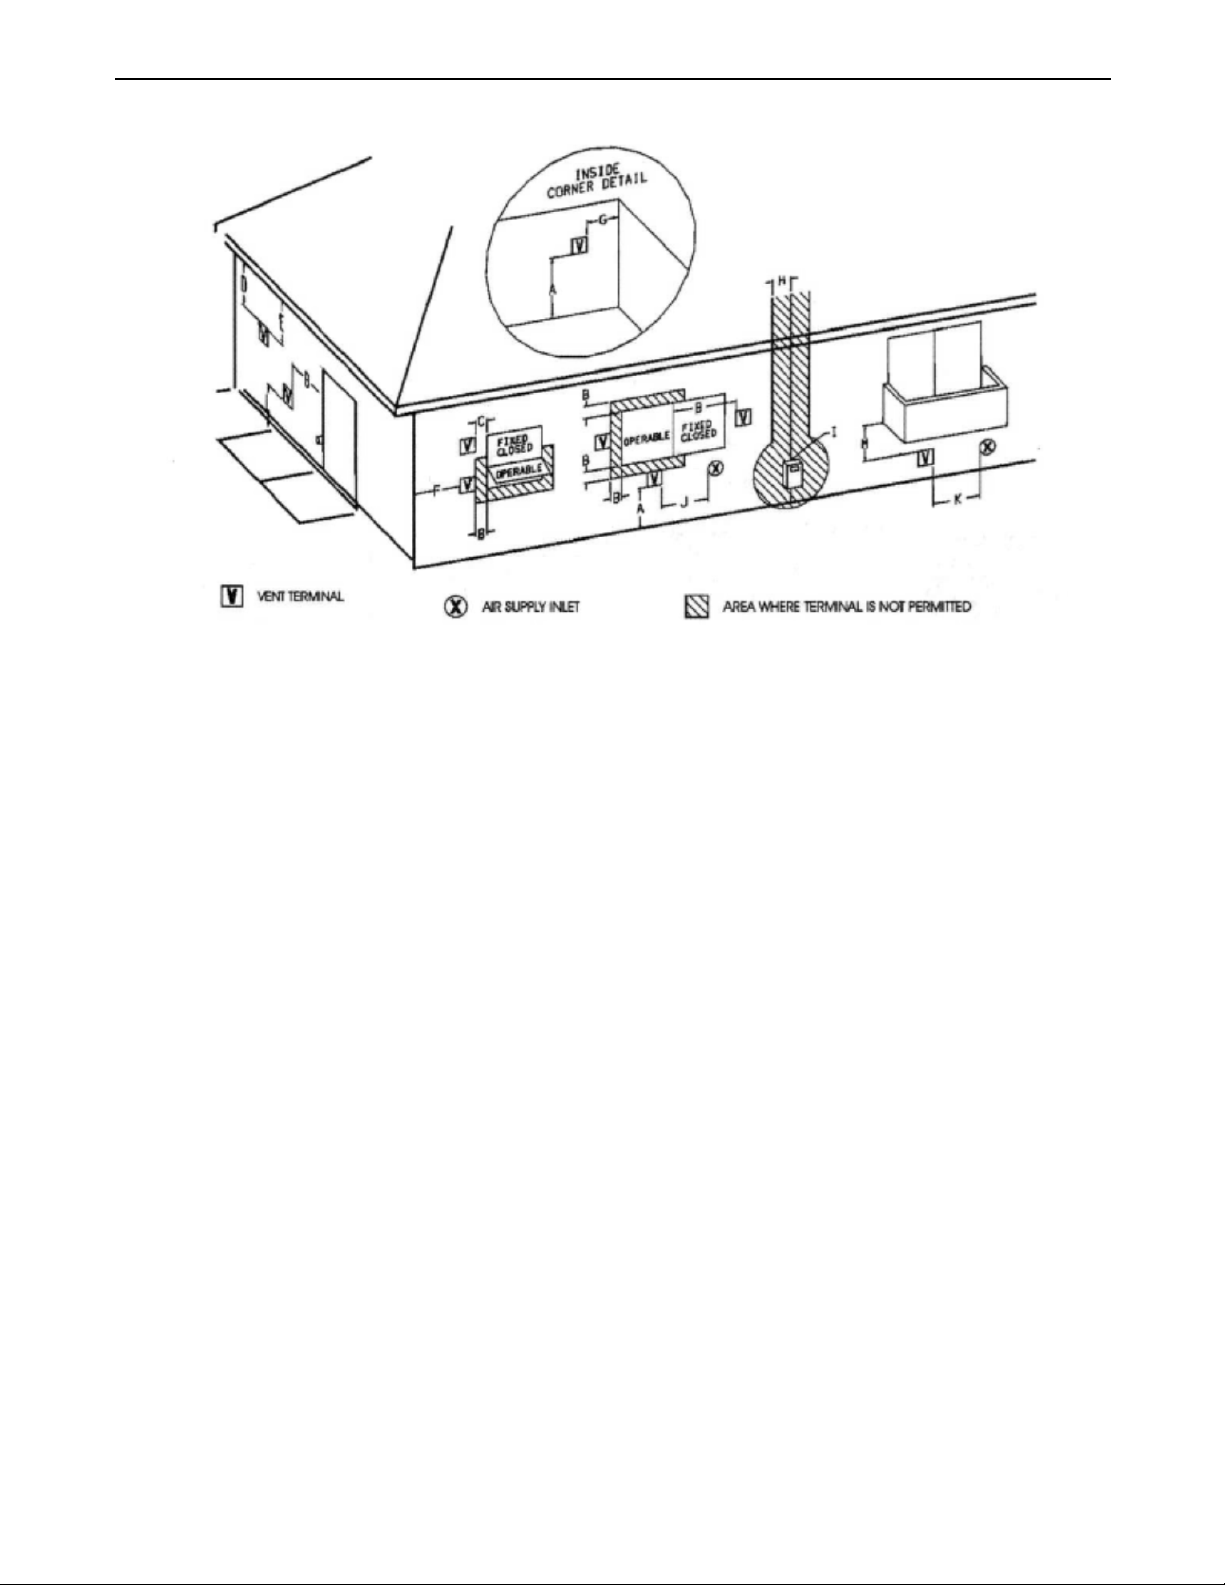
in Figures 18 & 20.
A minimum of 36" rise is required either directly
off the heater or with the use of a minimum of a
36” snorkel.
Use a vinyl siding Stand-Off when installing
against vinyl siding. The termination cap must
not be recessed into the wall or siding. Do not fill
air spaces with any type of insulation material.
A minimum 10” x10” square hole is necessary
for proper pipe clearance through a wall,
provided the vent is positioned to maintain 2”
minimum clearance at the top. A 1” minimum
clearance must be maintained to combustible
materials around the other sides.
All horizontal terminations must also comply with
the clearance specifications to adjacent
structures outlined in Figures 18 and 20.
Horizontal sections require a 1/4" rise every 12"
of horizontal run.
NOTE: For each 90 0 elbow after 2, remove 5' from
the allowable horizontal run. For Canadian
installations: remove 4' from the allowable
horizontal run.
At the minimum vertical rise of 36”, maximum
horizontal run is 3’. (If a 36” snorkel termination
is used a maximum horizontal run of 3’ is also
applicable.)
WARNING: FAILURE TO USE ONLY PARTS
SPECIFICALLY APPROVED FOR USE WITH THIS
APPLIANCE MAY RESULT IN PROPERTY
DAMAGE OR PERSONAL INJURY.
20
Page 21
Hearthstone Quality Home Heating Products, Inc. Bristol DX Model 8762
Figure 20 - Acceptable Direct Vent Terminal Vent Cap Locations
A = Clearance above grade, veranda, porch, deck,
or balcony: 12 inches (30cm) minimum.
B = Clearance to window or door that may be
opened: **Min. 9 inches U.S./*12 inches (30cm)
CAN. We recommend 12 in, minimum to prevent
condensation on the window.
C = Clearance to permanently closed window: **Min.
9 inches, U.S./*12 inches (30cm) CAN.
We recommend 12 in. minimum to prevent
condensation on the window.
D = Vertical clearance to ventilated soffit located
above the termination within a horizontal distance of
2 feet (60cm) from the center line of the termination:
18 inches (46cm) minimum.
E = Clearances to unventilated soffit: 12 inches
(30cm) minimum.
F = Clearance to outside corner: **Min. 9 inches,
U.S./12 inches (30cm) CAN. We strongly
recommend 12 inches, particularly where windy
conditions prevail.
G = Clearance to inside corner: **Min. 6 inches,
U.S./12 inches (30cm) CAN. We strongly
recommend 12 inches, particularly where strong
winds prevail.
H = *Not to be installed within 15 feet (4.5m) above
a meter/regulator assembly within 3 feet (91cm)
horizontally from the center line of the regulator.
I = Clearance to service regulator vent: 3 feet (91cm)
J = Clearance to non-mechanical air supply inlet to
building or the combustion air inlet to any other
appliance: 12inches (30cm) minimum.
K = Clearance to a mechanical air supply inlet:
**Min. 3 feet (91cm) above if within 10 feet
horizontally, U.S./*6 feet (1.83m) CAN minimum.
L = ¹Clearance above paved sidewalk or a paved
driveway located on public property: 7 feet (2.1m)
minimum.
M = ²Clearance under veranda, porch, deck, or
balcony: 12 inches (30cm) minimum.
*In accordance with CSA B149 Installation codes.
**In accordance with the current ANSI Z223.1/NFPA 54,
National Fuel Gas Code. Note: Local Codes and
Regulations may require different clearances.
¹A vent shall not terminate directly above a sidewalk or
driveway which is located between two single family
dwellings and serves both dwellings
²Only permitted if veranda, porch, deck or balcony, is fully
open on a minimum of two sides beneath the floor.*
21
Page 22
Hearthstone Quality Home Heating Products, Inc. Bristol DX Model 8762
Minimum Venting Installation
Instructions
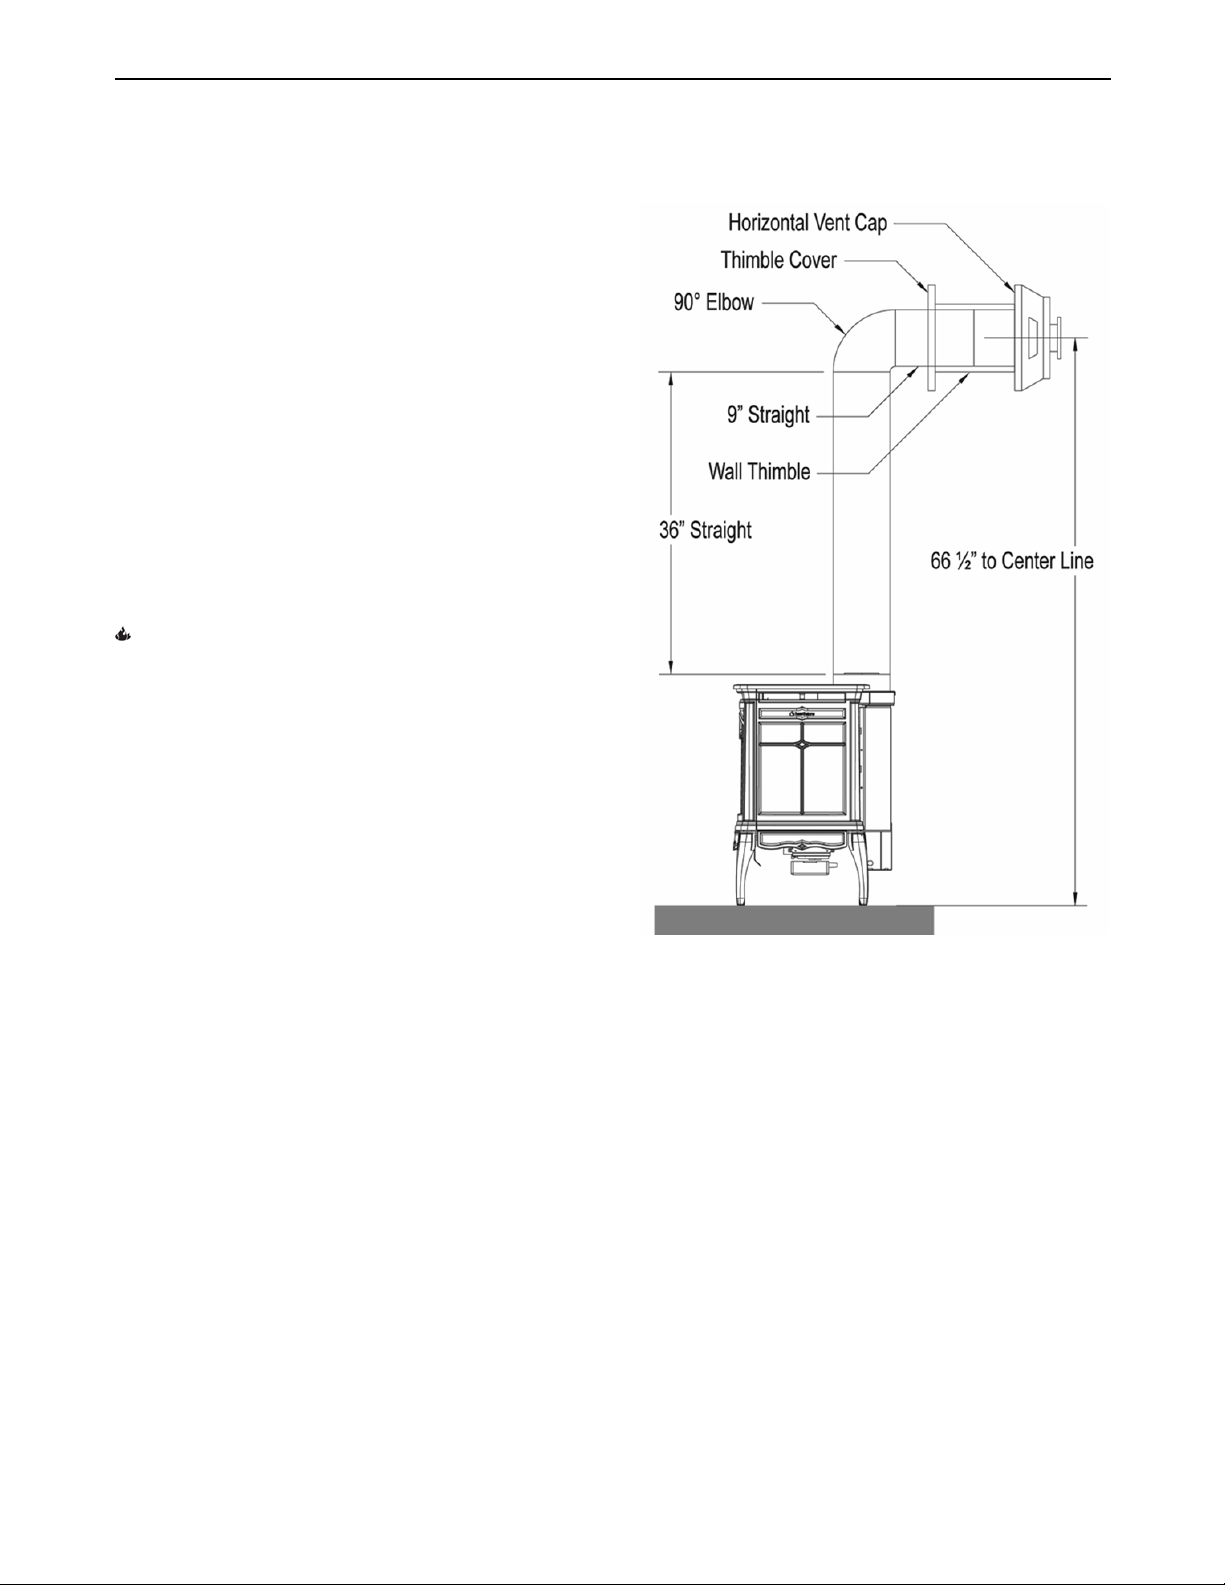
1. Install the 36” pipe section onto the starter collar
by fully inserting it and turning approximately ¼
turn clockwise, until the 2 sections are fully
locked. Install the 90º elbow in similar fashion.
2. Move the stove and pipe assembly back until the
90º elbow is flush to the wall. The 36” vertical
pipe should be parallel to the wall. Draw a circle
around the pipe. Use the center of this circle as
the center point of the 10” x 10” square wall
pass through. Cut and frame the wall pass
through.
3. Place the interior wall thimble into the 10” x 10”
wall pass through. Secure it with 4 screws (not
provided). Install the exterior portion of the
thimble in similar fashion, overlapping the 2
sections.
CAUTION: FOR BUILDINGS WITH VINYL SIDING,
INSTALL A VINYL SIDING STANDOFF BETWEEN
THE VENT CAP AND THE EXTERIOR WALL.
4. Install the horizontal vent termination on the
outside of the wall. Ensure both of the retaining
straps extend through interior wall thimble.
Before attaching the vent termination to the
outside of the house, run a bead of nonhardening mastic around its’ outside edges, so
as to make a seal between it and the wall. The
arrow on the end cap should point up. Secure
the cap to the wall with the appropriate screws.
5. Place the thimble cover onto the 90º elbow. Put
the 9” pipe into the horizontal vent cap, (the vent
pipe must extend into the horizontal vent cap a
minimum of 1-1/4”). Move the stove and vent
pipe into position, insert the 9” pipe into the 90º
elbow and twist to lock it. Secure the straps from
the horizontal vent termination to the interior
pipe with 2 sheet metal screws, keeping the
screws as close to wall thimble as possible.
Bend or cut the excess strapping so that the
thimble cover will fit properly. Screw the thimble
cover to the wall.
Figure 21 - Typical Minimum Horizontal Venting
Installation Components
Centerlines shown are approximate. Ensure you dry
fit your venting and take a measurement. Pipe
dimensions will vary by manufacturer and supplier.
These dimensions are using typical Simpson DuraVent GS components. See installation instructions
on this page (22).
22
Page 23
Hearthstone Quality Home Heating Products, Inc. Bristol DX Model 8762
Restrictor Plate
The restrictor plate is used to control excess draft if
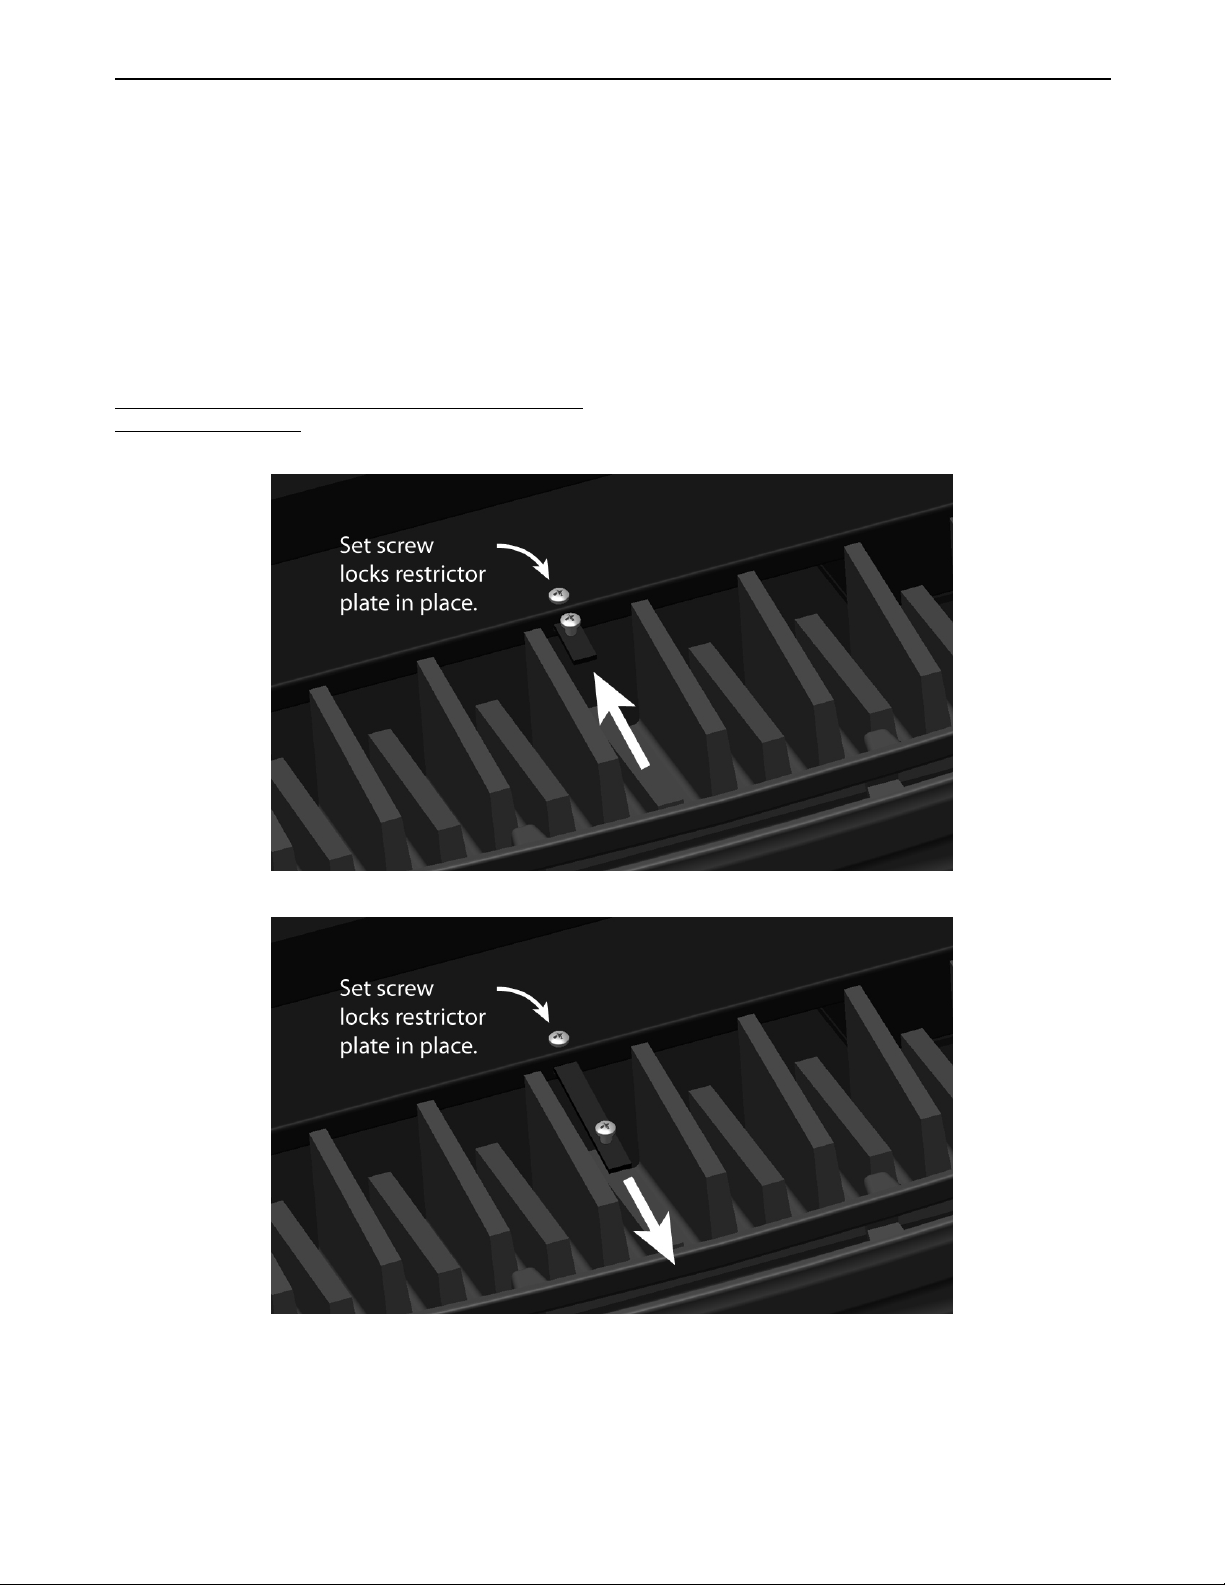
necessary. Controlling the draft also changes the
aesthetics of the flame. The restrictor plate has an
unlimited range of settings (see Figures 22 & 23).
The adjustment point is on the top, center of the
firebox, accessible with the top casting removed.
Restrictor Plate Position
The restrictor plate is factory set in the fully opened
position for shipping. This ensures proper flames for
a wide variety of vent configurations and efficiency.
The restrictor consists of a sliding plate just below
the venting starter collar on the top rear of the
firebox. Depending on your vent configuration, you
may need to adjust the restrictor plate position to
reduce draft.
Restrictor Plate Adjustment
Loosen the screw and position the restrictor plate in
the desired location. Tighten the screw to lock in
place.
Figure 22 - Restrictor Fully Closed
Figure 23 - Restrictor Fully Opened (no restriction)
23
Page 24
Hearthstone Quality Home Heating Products, Inc. Bristol DX Model 8762
Figure 24 - Venting Termination Diagram
24
Page 25
Hearthstone Quality Home Heating Products, Inc. Bristol DX Model 8762
Electrical System Information
CAUTION: LABEL ALL WIRES PRIOR TO DISCONNECTION WHEN SERVICING CONTROLS. WIRING ERRORS
CAN CAUSE IMPROPER AND DANGEROUS OPERATION. VERIFY PROPER OPERATION AFTER SERVICING.
(ATTENTION: AU MOMENT DE L’ENTRETIEN DES COMMANDES, ÉTIQUETEZ TOUS LES FILS AVANT LE
DÉBRANCHEMENT. DES ERREURS DE CÂBLAGE PEUVENT ENTRAÎUN FONCTIONNEMENT INADEQUATE ET
DANGEREUX.)
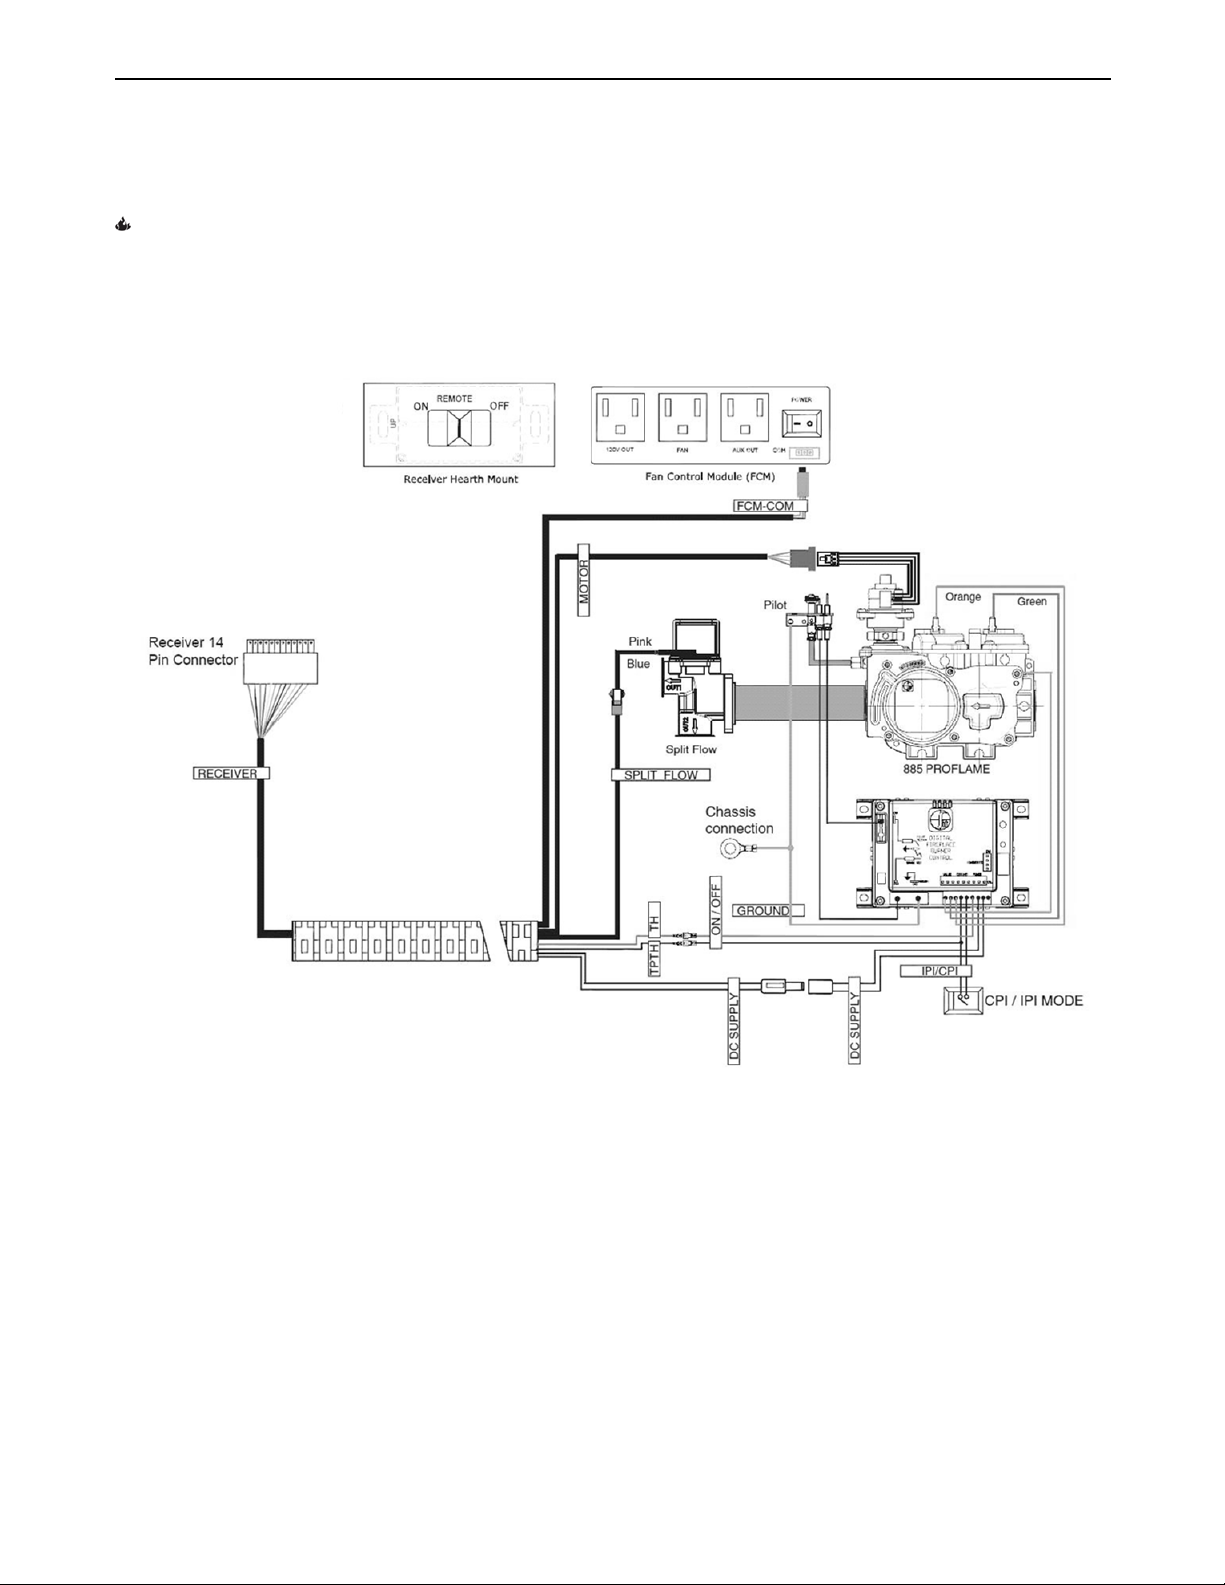
The proper location of wire connections is shown in the following figure.
Figure 25 - Bristol 8762 Wiring Diagram
25
Page 26
Hearthstone Quality Home Heating Products, Inc. Bristol DX Model 8762
Gas Supply & Connections
NOTE: Ensure the gas line is installed as close to the floor as possible to avoid interference or conflict with
a blower assembly installation.
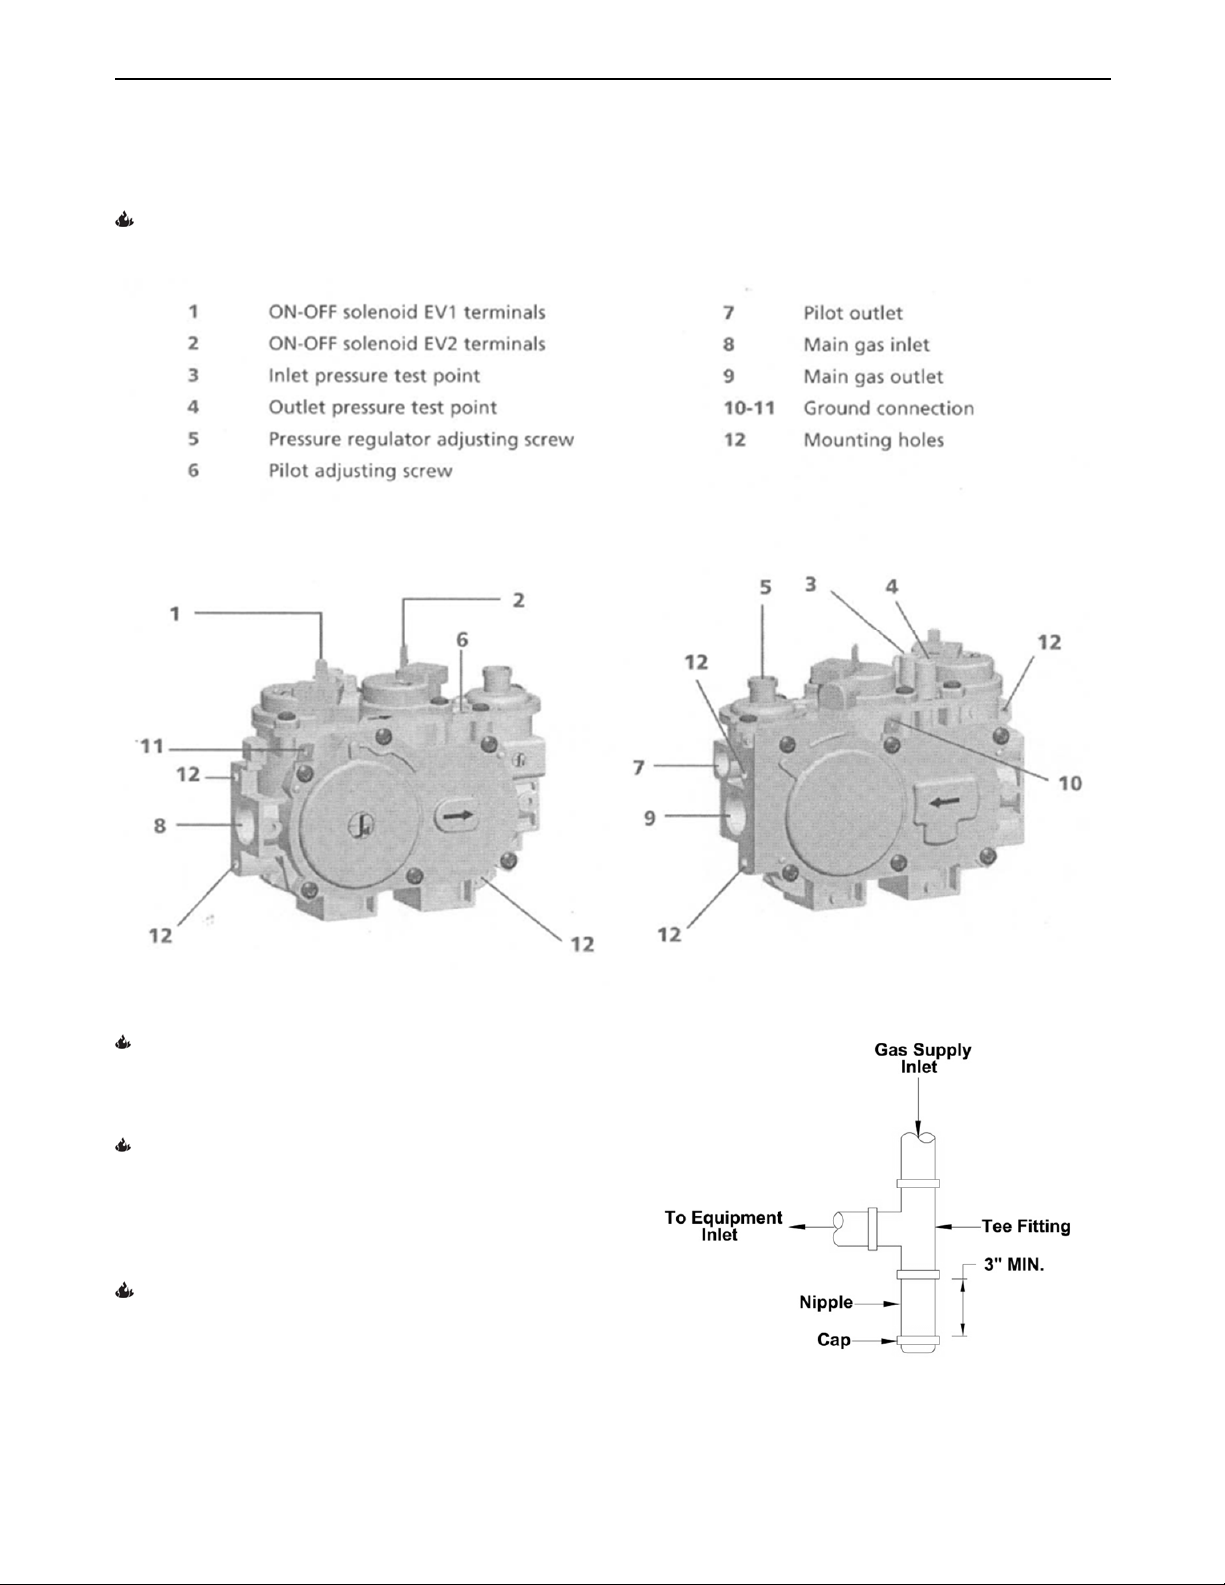
Figure 26 - Gas Control Valve
NOTICE: A QUALIFIED TECHNICIAN MUST
CONNECT THE HEATER TO THE GAS SUPPLY
AND LEAK TEST THE UNIT BEFORE IT IS
APPROVED FOR USE. CONSULT ALL CODES.
WARNING: THE UNIT MUST BE INSTALLED AND
CONNECTED IN ACCORDANCE WITH LOCAL
CODES, OR IN THE ABSENCE OF LOCAL CODES,
WITH THE MOST CURRENT EDITION OF THE
NATIONAL FUEL GAS CODE ANSI Z223.1 (NFPA
54) OR CAN/CGA B149 INSTALLATION CODE.
NFPA Code and Hearthstone require the use of
a dedicated sediment trap just upstream of the
unit. Damage to the valve, or other components
due to the lack of a sediment trap are not
covered by warranty (see figure 27).
26
Figure 27 - Sediment Trap (Typical)
Page 27
Hearthstone Quality Home Heating Products, Inc. Bristol DX Model 8762
Gas Connections
The gas supply connection is made to the Bristol’s
gas control valve under the bottom left center of the
unit using a 3/8” male NPT fitting. The supply line
should be ½” diameter, or appropriately sized to
provide a sufficient gas supply to meet the maximum
demand of the unit without undue loss of pressure.
We recommend a flexible line to avoid undue
mechanical load on the valve and to ease thread
alignment, but refer to local codes.
CAUTION: CHECK FUEL GAS TYPE!
The Bristol is factory equipped to use natural gas
(NG) and requires conversion for use with propane
(LP). You must purchase and install a propane (LP)
fuel conversion kit if required for your installation.
Use kit 97-56621. Contact your Hearthstone dealer.
Gas Supply
This appliance and its individual shutoff valve must
be disconnected from the gas supply piping system
during any pressure testing of that system at test
pressures in excess of ½ psig. The Bristol must be
isolated from the gas supply piping system by
closing its individual manual shutoff valve during any
pressure testing of the gas supply piping system at
test pressures equal to or greater than ½ psig.
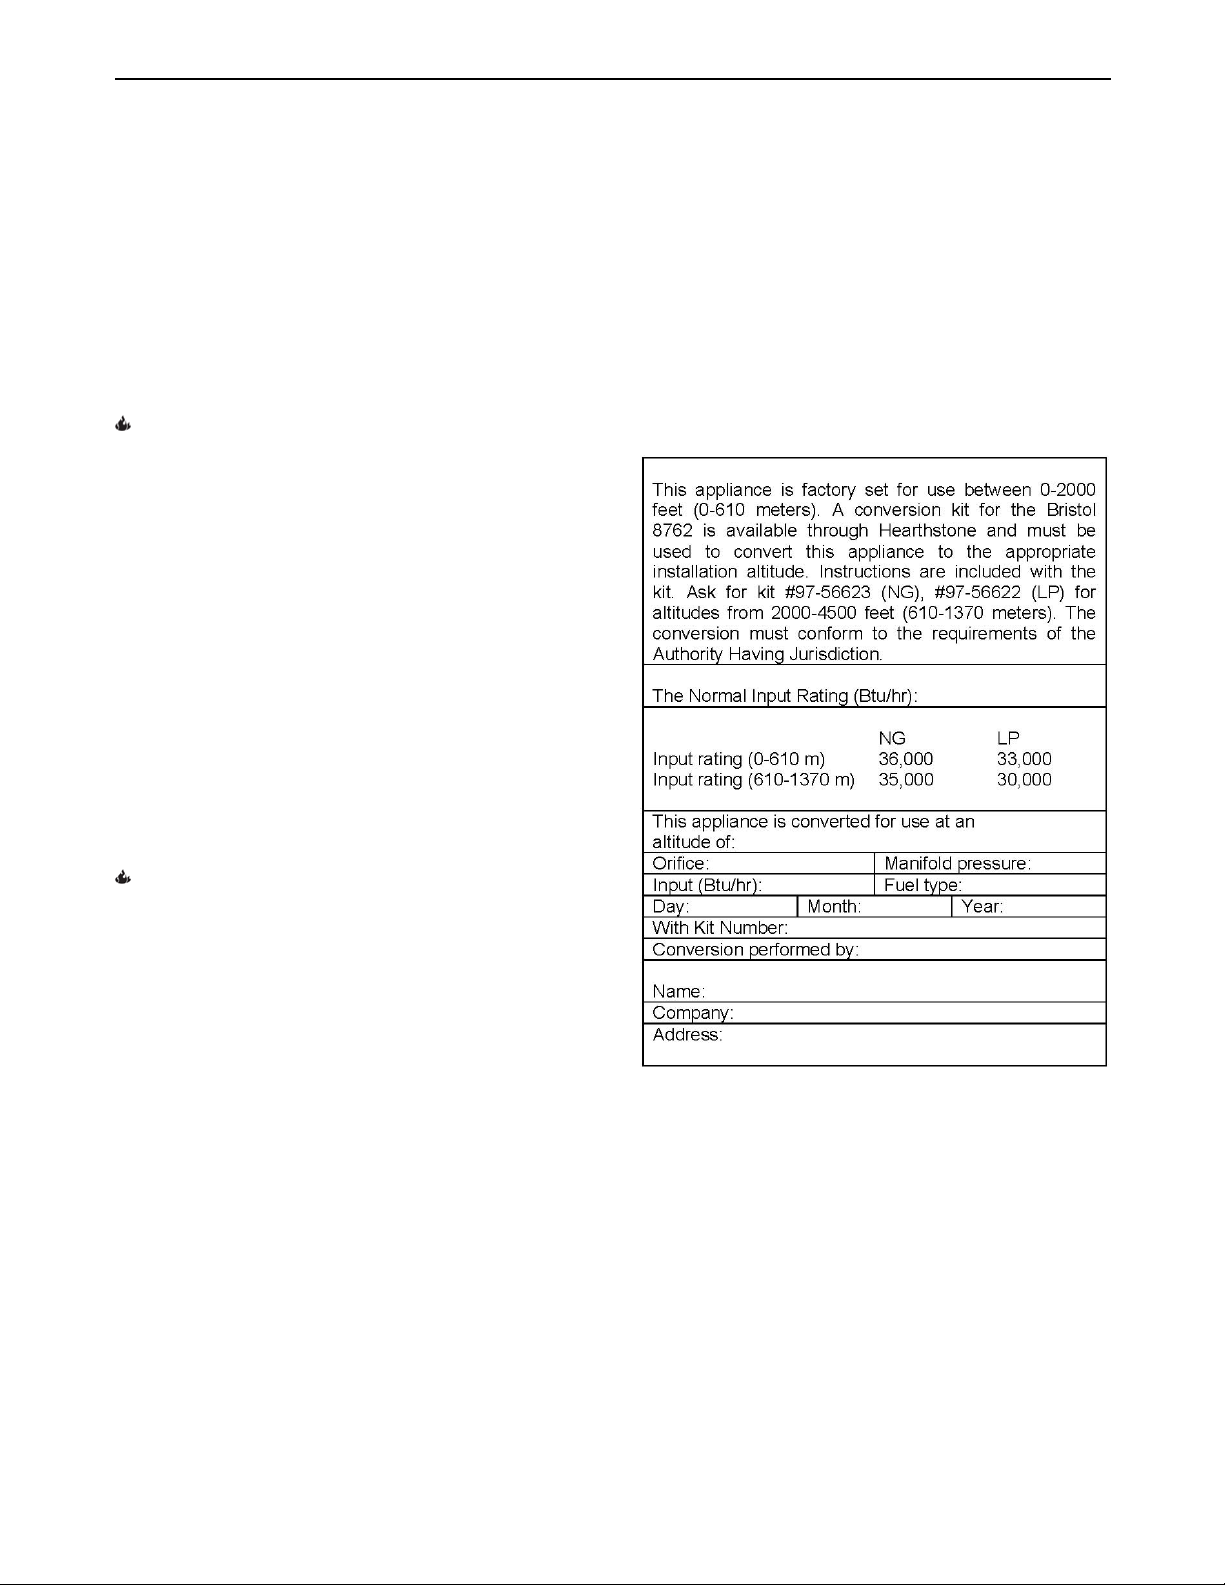
If the installer must convert the unit to adjust for
varying altitudes, the information sticker (similar to
the one shown in Figure 28) must be filled out by
the installer and adhered to the appliance at the time
of conversion. For installations from 2000 – 4500
feet (610-1370 meters) use the Front/Rear orifice
sizes (DMS) 43/47 for NG and 55/59 for LP. See
the rating label for more information.
This appliance is factory equipped for use at 0-2000
feet (0-610 meters) altitude. (Cet appareil est
equipe pour des altitudes compries entre 0 et
2000pieds (0-610m) seulment).
Gas Pressure Adjustment
NOTE: A QUALIFIED TECHNICIAN MUST
PERFORM THIS PROCEDURE!
Once connected to the gas supply, the supply line
and manifold gas pressures must be tested. The
supply line pressure is tested to ensure it meets the
minimum gas supply pressure as listed in the
specifications for the type of fuel in use (NG or LP).
Test by connecting a manometer to the supply line
and adjusting the incoming pressure if necessary to
meet the required supply line pressure as listed in
specifications. The manifold pressure tap on the gas
control valve, refer to Figure 26 for location.
High Altitude Installations
For high altitude installations consult the local gas
distributer or the authority having jurisdiction for
proper rating methods.
The decreased atmospheric pressure at higher
altitudes affects the heat value of fuel gases. Gas
suppliers typically derate the gas intended for use at
elevations above 2000 feet (610 meters). Check with
your gas supplier before derating this appliance.
Figure 28 - Sample Information Sticker
27
Page 28
Hearthstone Quality Home Heating Products, Inc. Bristol DX Model 8762
Log Set, & Screen Placement
CAUTION: FRAGILE! HANDLE LOG SET WITH
CARE. ALWAYS WEAR GLOVES AND SAFETY
GOGGLES WHILE HANDLING THE LOG SET.
WARNING: Failure to position the burner and logs
in accordance with these diagrams or failure to
use only parts specifically approved with this
appliance may result in property damage or
personal injury.
Place only the ceramic log set supplied with the unit
in the firebox. Do not place any other ceramic logs,
wood logs, or other materials in the firebox. If the
log set is damaged or broken contact your dealer for
replacement. The ceramic logs will last a long time;
however, they will break if subjected to rough or
improper handling. Exact positioning of the log set
is required in order to obtain a pleasing flame
pattern and efficient combustion. Incorrect log
placement may cause carbon build-up; excess
thermal stress on the log set and stove parts,
reduced efficiency, and high levels of carbon
monoxide. If the log set does not fit into the firebox
exactly as outlined, contact your dealer for
assistance.
Installation of the Log Set
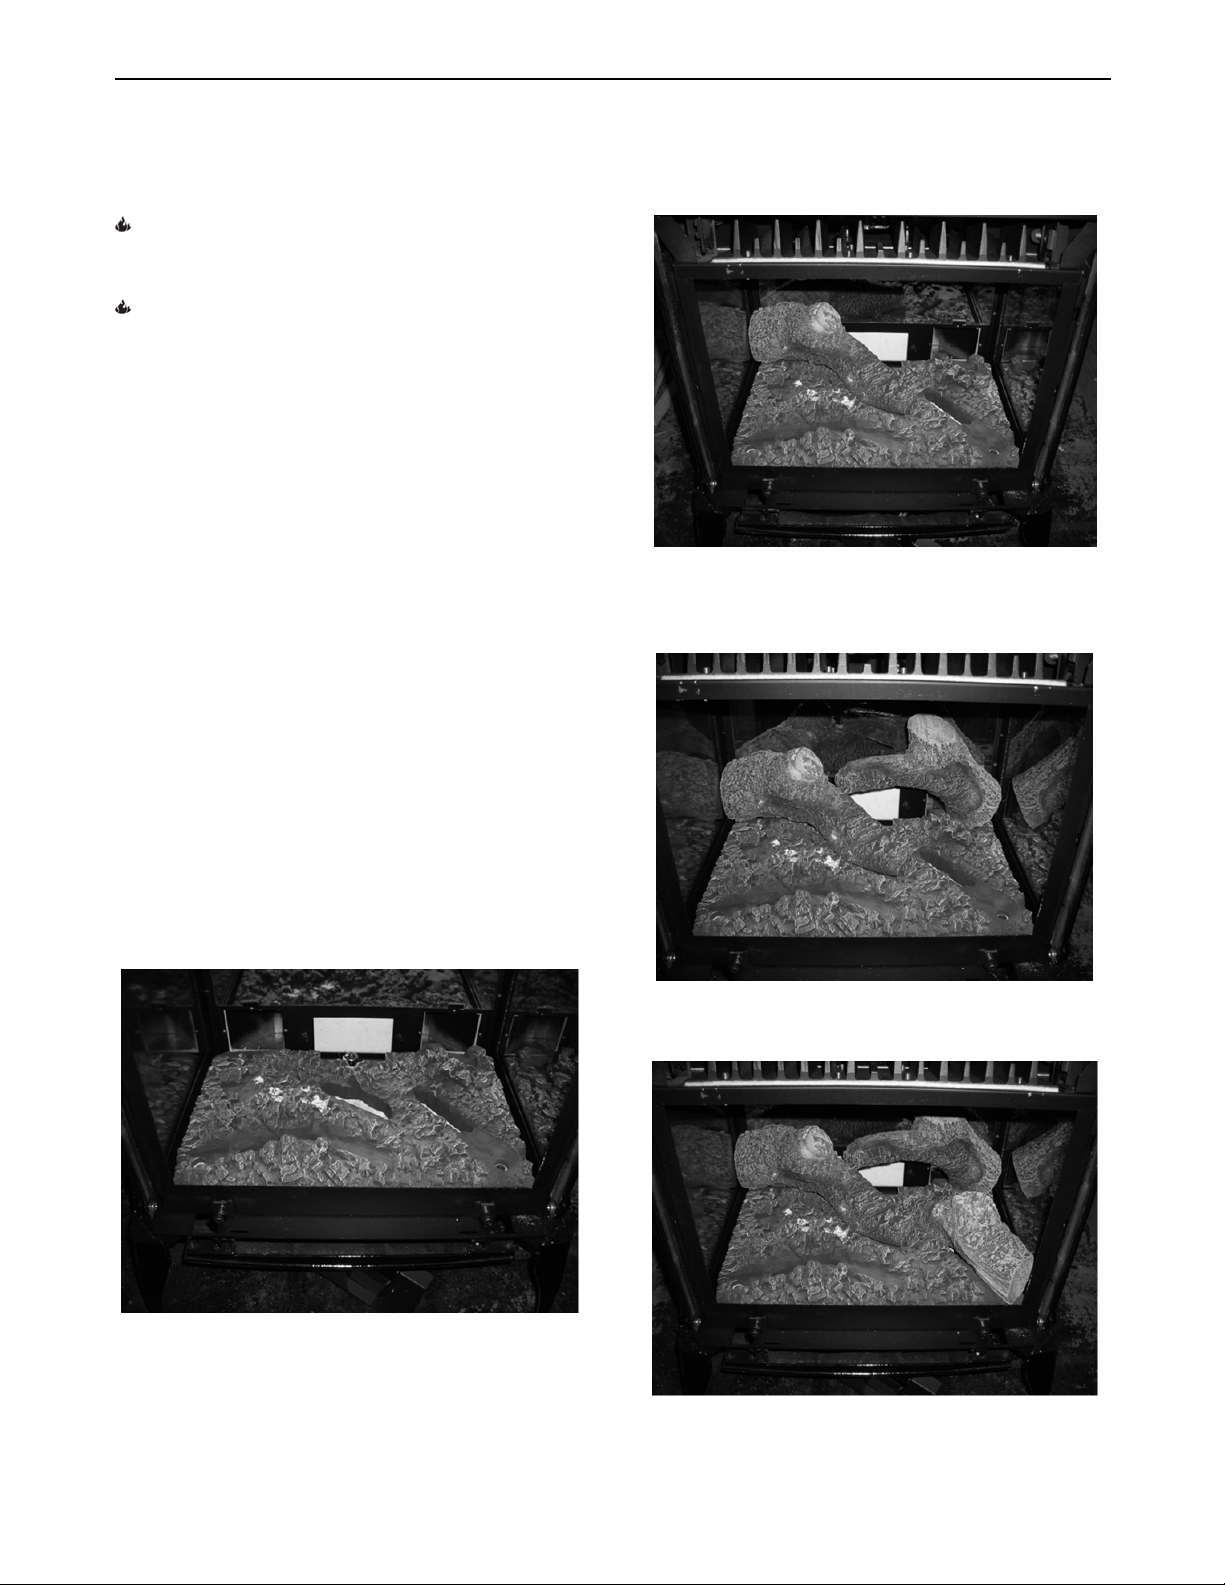
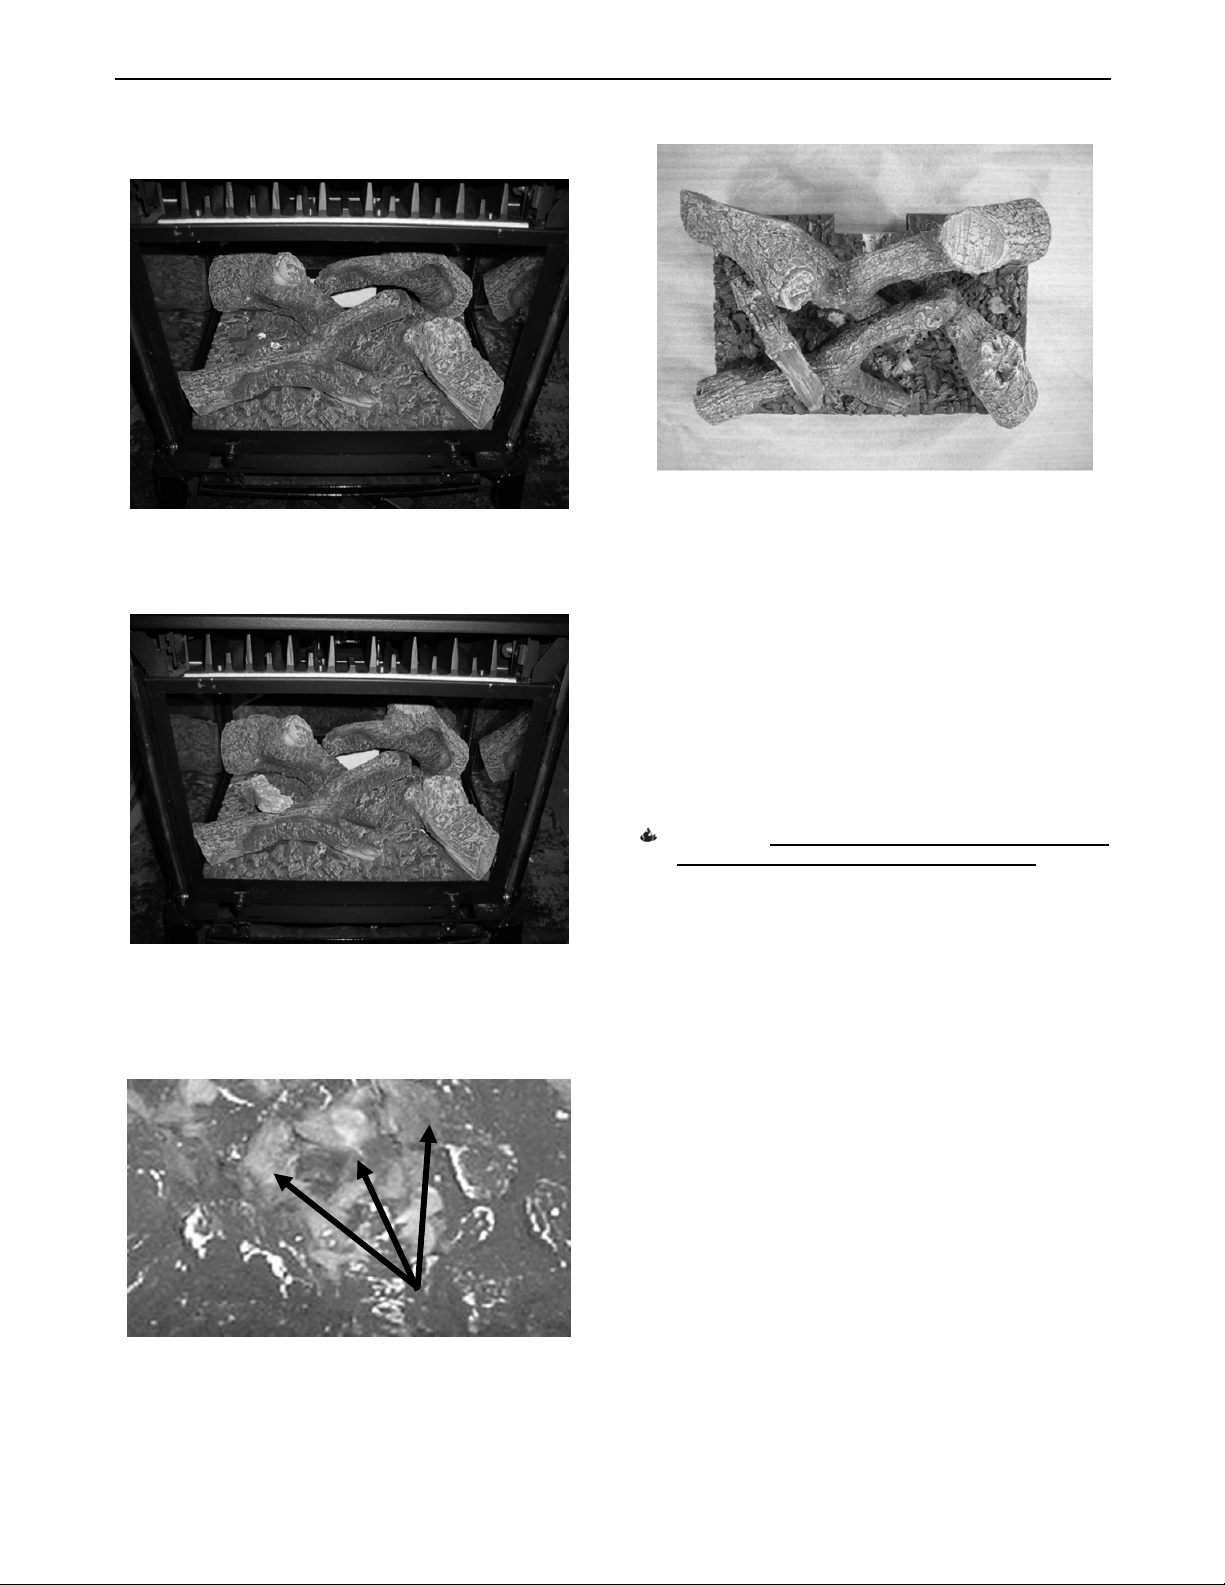
(Refer to the following images in this section for log
set assembly)
1. Remove the packaging material around the log
set assembly. Be careful not to damage the log
set when unpacking.
3. Place Log 2 into the channel in the burner with
the narrow end resting on log 1as shown.
1
Photo 2 – Log 1 in Position
2
1
Photo 3 – Log 2 in Position
Photo 1 – Burner Without Log Set Detail
2. Place log 1 on burner in its channel as shown.
4. Place log 3 as shown.
2
1
3
Photo 4 – Log 3 in Position
28
Page 29
Hearthstone Quality Home Heating Products, Inc.
5. Place log 4 on top of logs 1 as shown.
Bristol DV Model 8762
1
2
4 3
Photo 5 – Log 4 in Position
6. Gently place Log 5 in the indentation on the
burner and rest it on log 4 as shown.
1
2
5
4
3
1
5
2
3
4
Photo 8 – Log Set Detail, Top View
Installation of the Optional
Screens
To install the optional screens (Kit 97-59100), you
must have access to the glass frames. Removal of
the top casting is all that is necessary to install the
screens (for access instructions see page 15).
Hang each screen by its folded lip on top of each
glass frame.
Removal of Log Set
CAUTION: THE LOG SET, BURNER, AND EMBERS
RETAIN HEAT AND CAN BE VERY HOT! ALLOW
2 TO 3 HOURS TO COOL AFTER PILOT LIGHT IS
TURNED OFF FOR SAFE HANDLING.
Photo 6 – Log 5 in Position
7. Place small tufts of the Platinum Bright Embers
on the burner and log surfaces for additional
glow as desired – do not block burner ports.
Photo 7 –Platinum Bright Embers
Detail)
(Enlarged to Show
To remove the log set, follow the Installation of Log
Set instructions in the reverse order.
Completing the Installation
1. Close the firebox – reverse the firebox
access procedure outlined on page 15.
2. Install any batteries as necessary.
Synchronize the Remote Transmitter and
Receiver (see page 35).
Ceramic Burner Fissures
The ceramic burner may develop surface fissures at
or after the initial burn. These fissures are normal,
and have no effect on the operation, or safety of the
stove.
However, if a crack is found that penetrates into the
fuel accumulation area below the ceramic surface;
discontinue operation until the stove is checked by a
qualified technician.
29
Page 30

Hearthstone Quality Home Heating Products, Inc. Bristol Model 8762
Lighting & Operation
WARNING: IF YOU DO NOT FOLLOW THESE
INSTRUCTIONS EXACTLY, A FIRE OR
EXPLOSION MAY RESULT CAUSING PROPERTY
DAMAGE, PERSONAL INJURY OR LOSS OF LIFE.
CAUTION: LIGHTING THE BRISTOL FOR THE
FIRST TIME AND ADJUSTMENTS TO THE UNIT
SHOULD BE PERFORMED BY QUALIFIED
SERVICE PERSONNEL.
Lighting Instructions
Use a gas sniffer device or smell all around the
appliance area for gas. Be sure to che ck next to the
floor because some gases are heavier than air
(propane). If you do not detect or smell gas, proceed
with the lighting procedure. If you do detect or smell
gas, DO NOT proceed with the lighting procedure.
Instead, immediately refer to the What To Do If
You Smell Gas Warning, on the cover of this
manual.
Pilot Light Warning
Do not attempt to light the unit with a match or by
any means other than the ignition system supplied
with the unit.
To Light the Stove:
Connect the power cord from the Fan Control
Module to the nearest 120V electrical outlet.
1. Open the gas supply to the valve.
2. Slide the ON/ REMOTE/OFF switch to the
ON position.
3. Switch the pilot to CPI mode
The control system will beep several times when
lighting the unit for the first time until all air in the gas
line is purged. The pilot will ignite automatically
when the air is purged. The split main burners
should ignite seconds later.
Using the Remote:
The Remote and Receiver must be synchronized
before initial use, and after every battery change (for
instructions, see page 35).
Odors and Impurities
A heater of this type may produce odors during
heater operation at any time due to impurities that
may exist in the immediate area around the unit.
Sources of impurities can be cleaning solvents, paint
solvents, cigarettes, candles, smoke, pet hair, dust,
adhesives, new carpet, and/or textiles. Such odors
will eventually dissipate. However, opening a
window or otherwise providing additional ventilation
to the area can alleviate the condition sooner. If any
odor persists, find and remove the cause, or contact
your dealer or an authorized service technician.
Initial Adjustments
Once the Bristol is set in place, connected and
assembled as described in the Clearances To
Combustibles, Venting Components &
Configurations, Electrical Connections, and Gas
Supply and Connections sections of this manual, the
unit is ready to be lit and adjusted to its particular
installation. Hearthstone tests each unit prior to
shipment, so ignition should take place without
failure. However, a number of small adjustments
may be necessary to compensate for variations in
gas pressure, altitude, and other factors particular to
each installation.
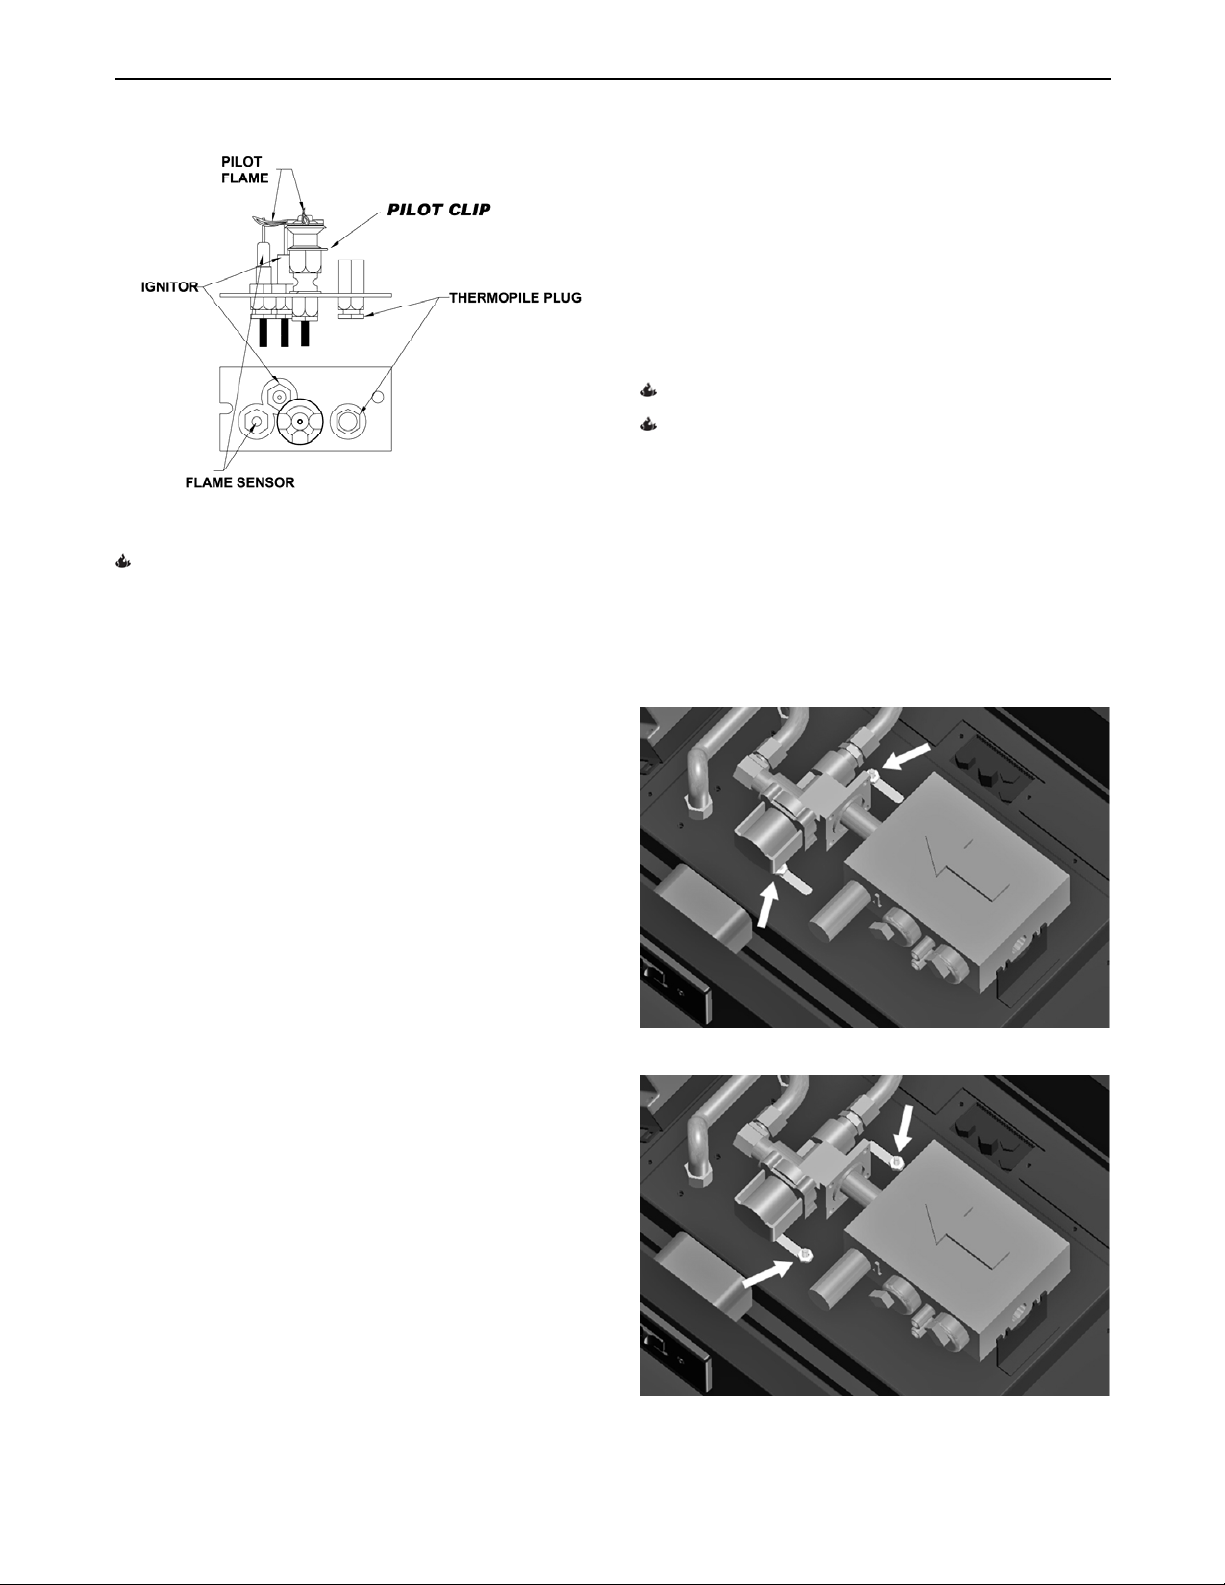
Pilot Adjustment
The pilot light is preset by the manufacturer and
should not need adjustment. The pilot light flame
should be large enough to engulf the sensor (refer to
Figure 30) and to reach the light off ports on the
burner but not so large as to create excessive noise
or consume excessive gas. However, it can be
adjusted by means of the pilot light adjustment
screw located on the gas control valve. Controlling
the Bristol may become erratic, nonexistent, or the
unit may go out, if the pilot flame is too small or
misdirected away from the flame sensor.
Smoke and Fumes Warning
When lit for the first time, the Bristol will emit some
smoke and fumes. This is normal “off-gassing” of
the paints and oils used in the manufacturing and
assembly of the unit. Open windows to vent the
room if necessary. The off gassing and fumes will
subside after several hours of operation.
30
Page 31
Hearthstone Quality Home Heating Products, Inc.
Figure 29 - Pilot Flame Pattern
WARNING: THE CONTROL HAS AN INTERLOCK
DEVICE. IF THE STOVE HAS BEEN LIT, IT WILL
NOT RELIGHT AGAIN IMMEDIATELY. AFTER
SHUTTING OFF ALL GAS FLOW, THE PILOT
BURNER CANNOT BE RELIT UNTIL THE FLAME
SENSOR HAS COOLED, ALLOWING THE
ELECTROMAGNET TO BE RELEASED (APPROX.
60 SEC.).
Bristol Model 8762
Some conditions cannot be corrected through air
shutter adjustment; an adjustment must be made to
the gas supply pressure or by changing the
restriction plate setting. Qualified service personnel
must perform supply line/manifold gas line pressure
adjustments and restrictor plate adjustments. Do not
attempt to complete any part of the installation or
adjustment of this unit unless technically qualified.
Air Shutter Adjustments
WARNING: THE ADJUSTING STUDS ARE HOT!
WARNING: THE AIR SHUTTERS ARE FACTORY
SET AND ONLY A QUALIFIED GAS TECHNICIAN
SHOULD MAKE ADJUSTMENTS.
The air shutters are adjustable while the stove is
burning. Loosen the set nut of the specific shutter
that needs adjustment (located on the bottom of the
stove). Move the shutter left or right to adjust the
flame pattern. See Figures 30 and 31. Move the
shutter towards the valve to open the air shutter, and
away to close the shutter. When the flame pattern is
correct, tighten the set nut without letting the shutter
move.
Air Shutters
The air shutters are used to regulate the air-to-gas
combustion mixture of each burner, which in turn
influences the size and color of the flames. The air
shutters are factory positioned in the general
location needed for testing the unit with natural gas
(NG) and minimum venting. However, if the unit is
not burning as well as it should in your installation,
then the air shutters may need adjusting.
To determine if an air shutter needs adjustment, it is
necessary to view the flame pattern with the burner
output set at its highest setting. Allow the unit to
operate for at least 10 minutes to allow the entire
unit to reach temperature, and for the flame pattern
to stabilize. Generally, the more air (open shutter) in
the mixture, the bluer the flame. Less air (closed
shutter) results in a more yellow flame, but too little
air will result in incomplete combustion, low
efficiency and a dirty burn. There are two simple
guidelines to aid in determining the correct flame
pattern:
1. If the flame just above the surface of the
burner or at the base of the logs is
completely blue, the air shutter may be open
too far;
Figure 30 - Air Shutters Closed
2. If the flame is dirty, sooty, or licks the top of
the firebox, the air shutter may be closed too
far.
31
Figure 31 - Air Shutters Opened
Page 32
Hearthstone Quality Home Heating Products, Inc.
Bristol Model 8762
Note: Very little movement is needed to substantially
change the burn and flame patterns. Some
conditions cannot be corrected through air shutter
adjustment; an adjustment must be made to the gas
supply pressure. Supply line/manifold gas line
pressure adjustments must be performed by
qualified service personnel. Do not attempt to
complete any part of the installation or adjustment of
this unit unless technically qualified to do so.
Burner Flame Appearance
Once the unit is lit, observe the flame pattern and
adjust as necessary. Also, a periodic visual check of
the burner flame should be performed. The burner
flames can be adjusted by means of the air shutter.
To determine if the burner flame needs adjustment,
it is necessary to view the flame pattern with the
valve output at its highest setting. Allow the unit to
operate for 10 minutes enabling the entire unit to
reach temperature and for the flame pattern to
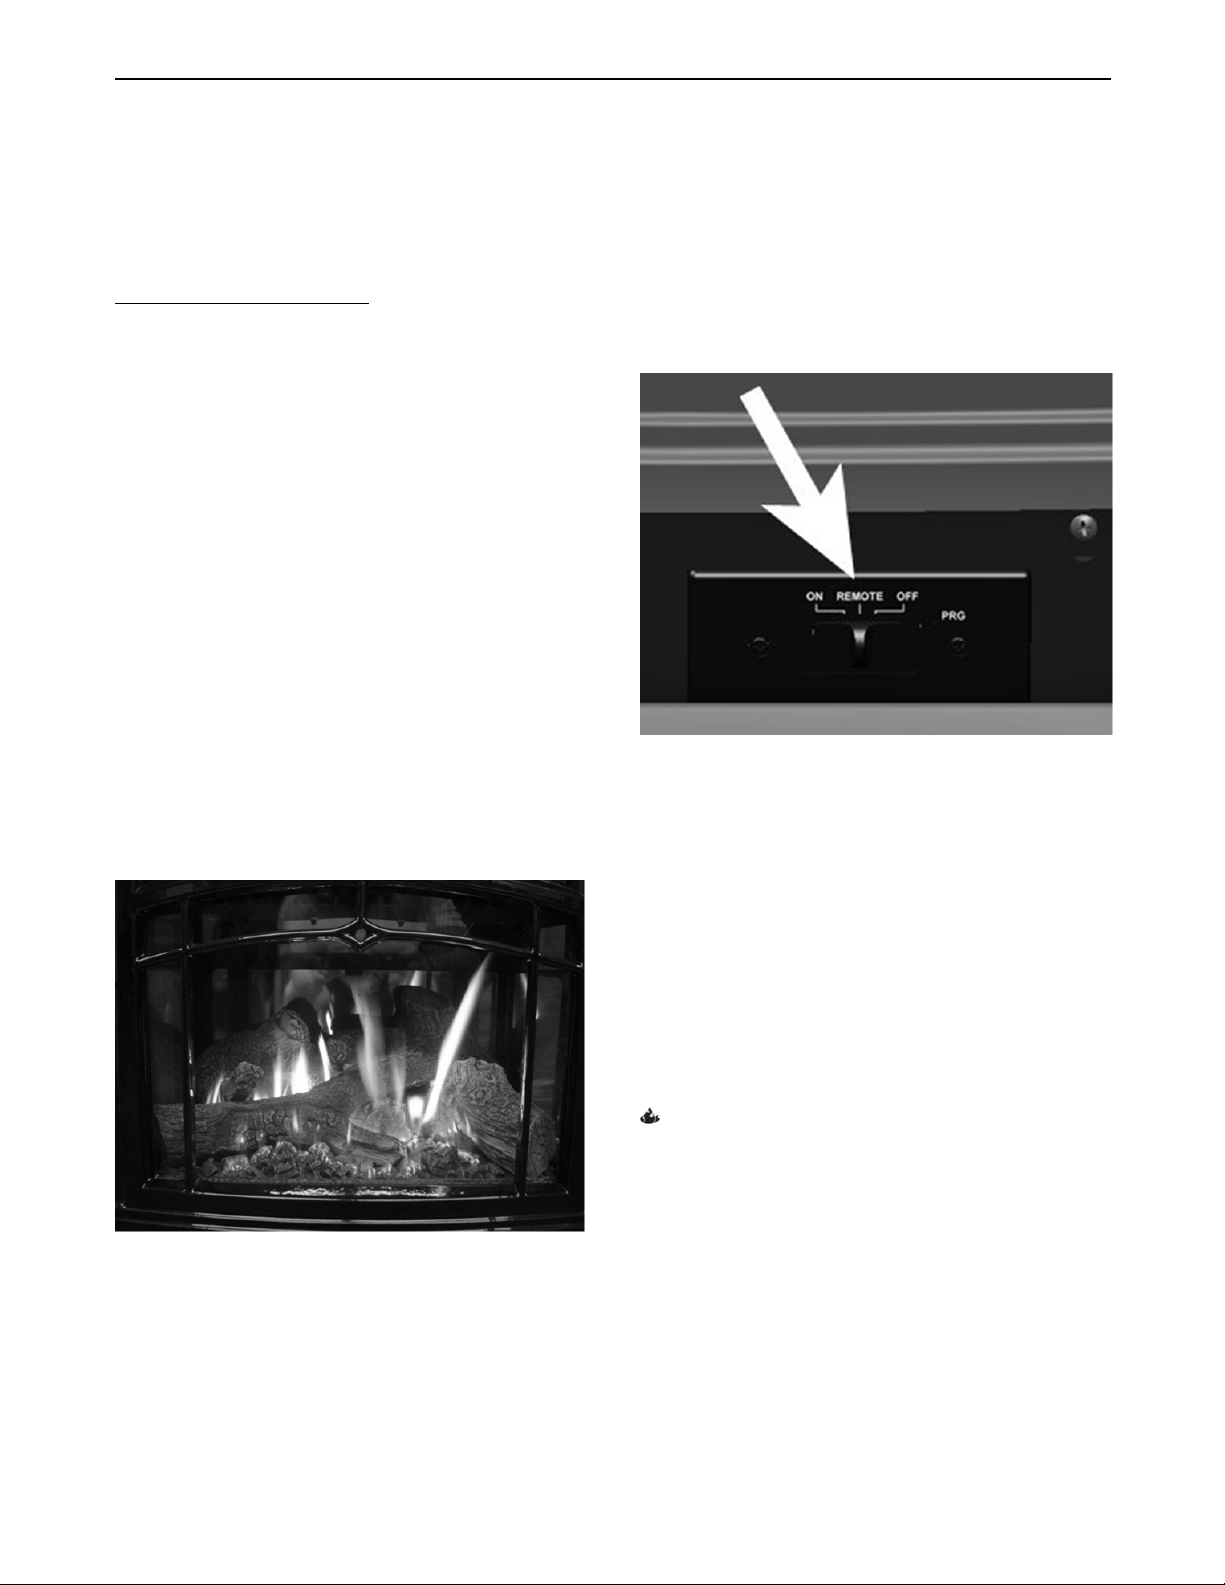
stabilize. The flame pattern should be similar to the
one shown in Photo 9. There are several guidelines
to aid in determining if the flame pattern is correct:
1. The flame should not be dirty, smoky, sooty, or
lick the top of the stove.
2. The flame should not rise off the burner; this is
called “lifting”.
3. Flames should not impinge heavily on the log
set. They should “fit” through the pre-formed
spaces designed in the log set.
ON/REMOTE/OFF switch on the Receiver or by the
Remote Control.
With the Receiver switch set to ‘REMOTE’ you have
the option of setting the thermostat on the remote
control to the desired room temperature and the unit
will cycle on and off as required. Or you can set the
switch on the Receiver to ‘ON’ and the burner will
light and remain on High until you turn it off.
Figure 32 - Receiver Switch
You can adjust the flame height via the remote
control, or use the ‘Smart’ mode to let the system
automatically adjust it for you. See the Proflame
GTMFS use and installation instructions included
with the Remote transmitter for detailed system
operation instructions.
Photo 9 – Typical Burner Flame Appearance
Daily Operation
Your Bristol gas-fired heater is easily operated once
installed and adjusted by qualified service
personnel. The unit is controlled via the
During the summer non-heating season, switch the
unit “OFF”, and flip the pilot switch to Intermittent
(IPI). This will improve the overall efficiency of the
unit as the heat from the pilot is not wasted. When
putting the unit back into service, replace any
batteries with fresh ones, and refer to the lighting
instructions on page 30.
Note: the unit will produce odors for a short
time when lit after a long period of non-use.
A thorough cleaning of the unit to remove
dust will minimize this effect. Open a window
briefly to help quickly dissipate the odors.
When the unit is first lit, especially when cool, it is
normal to experience some condensation on the
inside of the window glass. This condensation will
burn off within the first few minutes of operation. If
continuous condensation on the window glass or
dripping water from any part of the unit or venting
system (chimney) is noted, immediately discontinue
operation of the unit and contact qualified service
personnel.
32
Page 33

Hearthstone Quality Home Heating Products, Inc. Bristol Model 8762
To Turn off Gas and Shut Down the
Appliance:
1. Close the shut-off in the gas supply to
the valve.
2. Set the thermostat to the “OFF” position
or turn the ON/OFF/T-STAT or
ON/REMOTE/OFF switch to the “OFF”
position.
3. Switch the Pilot mode switch to IPI
mode.
33
Page 34

Hearthstone Quality Home Heating Products, Inc. Bristol Model 8762
Routine Maintenance & Care
Your Bristol requires minimal routine maintenance
and care. Ensure the unit is cool and off when
cleaning, or servicing.
WARNING: DO NOT SUBSTITUTE MATERIALS.
For replacement parts, or for information about parts
or service, contact your local Hearthstone dealer.
Cleaning
WARNING: DO NOT CLEAN THE UNIT WHEN HOT.
The unit should receive regular cleaning on, under,
and around the stove to prevent the buildup of dust
and lint. You can clean the exterior surfaces of the
unit using soap, water, and a soft cloth. Do not use
abrasive or chemical cleaners and take care not to
scratch the glass or enamel finish (if so equipped)
when cleaning the unit. The use of chemical wax
based cleaners or polishes are not recommended
due to the potential for discoloration of the castings,
or enamel when the residue of the cleaners or
polishes is exposed to heat. Excessive buildup of
dust, spider webs, or room air contamination will
cause odors when the stove is hot.
Monthly (or as needed):
Glass Cleaning
As fuel gas may contain some impurities; it will be
necessary to clean the inside of the glass
occasionally. Do not use abrasive cleaners.
Scratching the glass will weaken the integrity of the
glass. Do not clean the glass when hot! Allow the
glass to cool and apply a mild window cleaning fluid.
Special gas appliance window cleaner is available
from your local Hearthstone dealer.
Do not abuse, or strike the glass.
WARNING: DO NOT OPERATE THIS APPLIANCE
WITH ANY GLASS PANEL REMOVED, CRACKED,
OR BROKEN. DO NOT SUBJECT ANY GLASS OR
ITS FRAME TO ABUSE, SUCH AS STRIKING OR
BENDING. REPLACEMENT OF ANY GLASS
PANEL SHOULD BE DONE BY A LICENSED OR
QUALIFIED SERVICE PERSON.
NOTE: If the venting system is disassembled for
any reason, re-install per the instructions
provided in the venting section of this manual.
Annually:
Clean Firebox, Pilot, & Burner Assembly
The firebox requires periodic cleaning to prevent the
accumulation of dust, lint, and other debris. To clean
the firebox, set the switch to the “OFF” position, and
turn off the gas supply to the valve. When the unit is
cool, remove the front panel and glass (see page 15
for Firebox Access instructions) and carefully
remove the decorative ceramic log set, taking care
not to damage the logs or chip the enamel cast iron.
Remove all ember material. Clean the firebox,
ceramic burner, and carefully vacuum the entire
surface of the log set with a soft brush attachment.
Thoroughly vacuum the ports (holes) along the top
of the burner, and the pilot assembly.
With the decorative ceramic logs out of the firebox,
reseal the firebox and briefly light the unit according
to the lighting instructions described on page 30.
Check to ensure a proper flame is burning from each
burner port. The pilot flame should be burning
properly as shown in Figure 29.
NOTE: Do not operate the unit for more than
1-2 minutes without the log set in place. Turn
the unit off by setting the switch to “OFF”,
and turning off the gas supply to the valve.
Allow the unit to cool.
Check and clean any burner ports that are not
burning, or not burning properly. Clean burner ports
using a soft brush or vacuum cleaner. If the pilot
flame height needs adjustment, it should be adjusted
by qualified service personnel as described on page
30.
Complete the cleaning procedure by carefully
placing the log set within the firebox as described on
page 27. Reattach the glass and front panel to seal
the firebox. Turn on the gas, light the unit and check
for proper operation. Flame patterns should look
similar to the flames in Photo 9. Regularly check to
ensure the area around the Bristol is kept free from
combustible materials, gasoline, and other
flammable vapors and liquids. Check that the flow of
combustion and ventilation air is not obstructed.
34
Page 35
Hearthstone Quality Home Heating Products, Inc. Bristol Model 8762
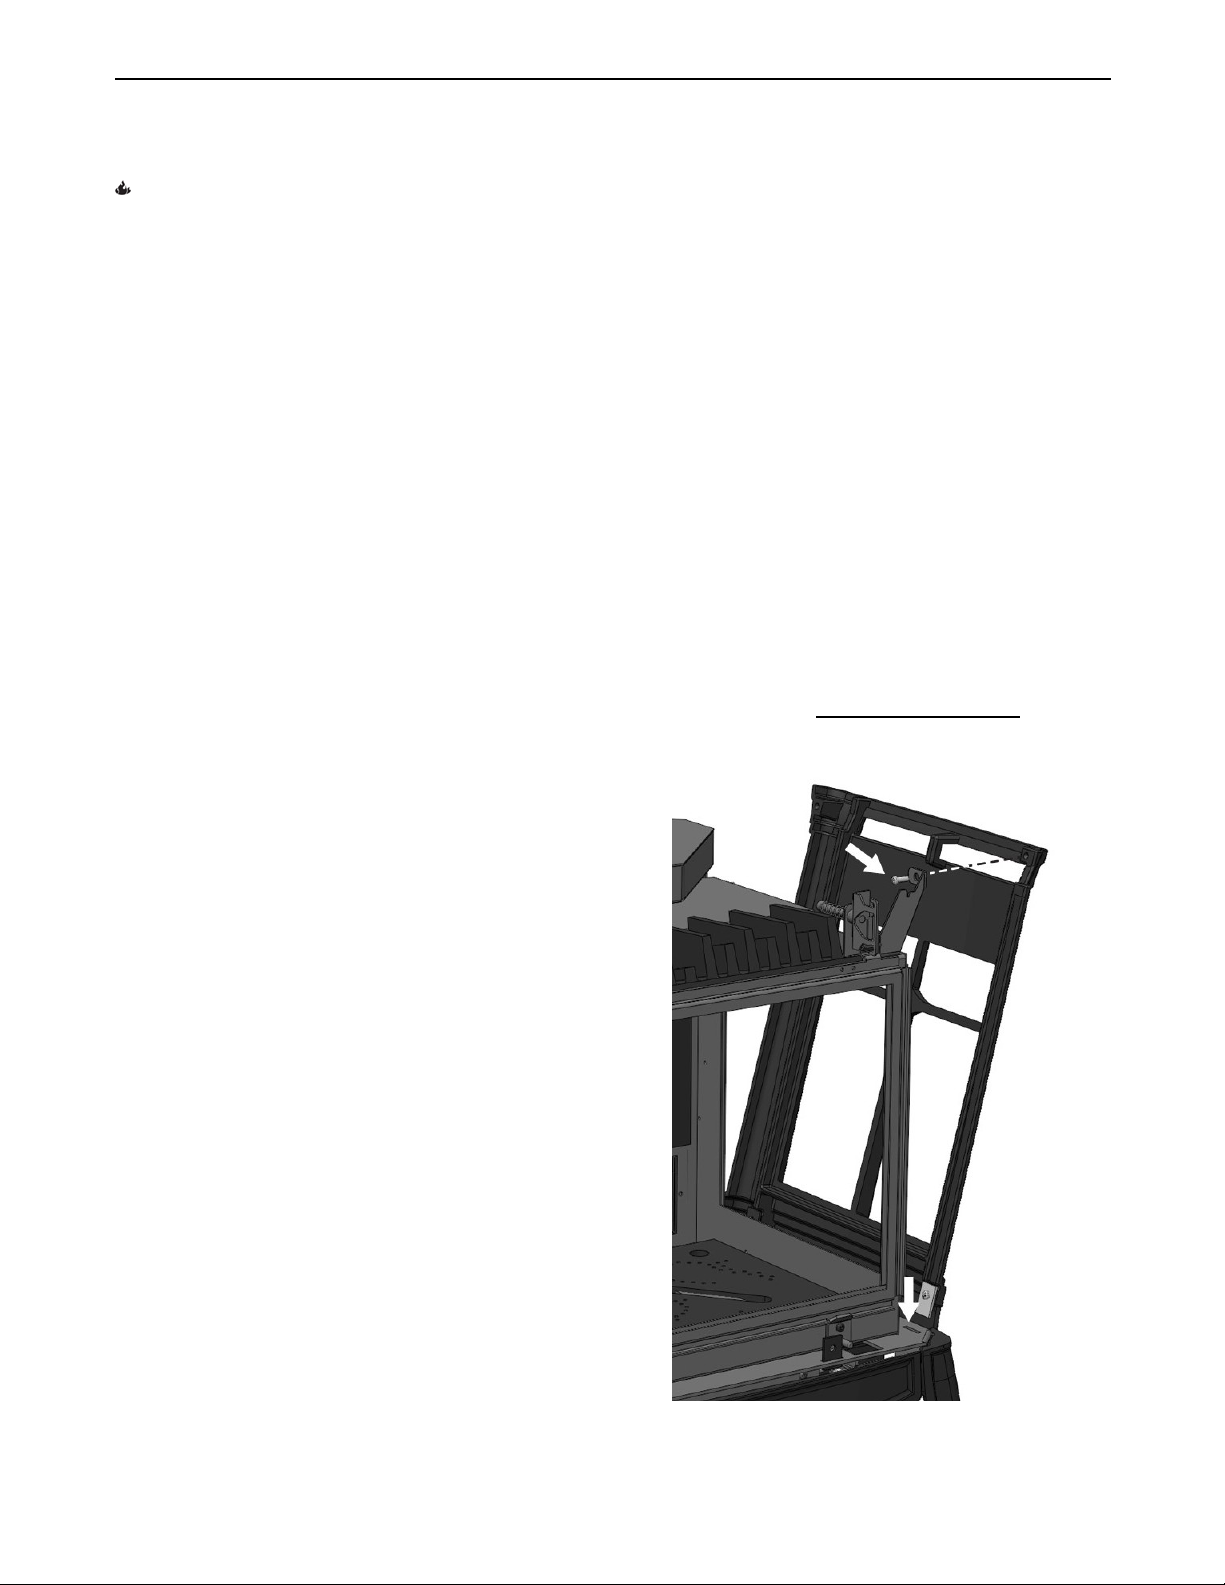
Battery Replacement
WARNING: DISCONNECT POWER TO THE UNIT
AND SHUT OFF THE GAS SUPPLY TO THE
VALVE BEFORE REPLACING ANY BATTERIES.
Hearthstone recommends replacing all batteries at
least every season. Keep a supply of good quality
rechargeable batteries on hand to ensure
functionality during power outages, and to give the
environment a break.
Remote Transmitter Battery Replacement
You can easily change the Remote Transmitter
batteries by accessing the rear cover plate. Ensure
you orient the batteries correctly as indicated in the
battery compartment.
Receiver Battery Replacement
1. Move the switch to the OFF position. Remove
the cover plate screws and pry the entire plate
with the switch off the receiver’s battery
compartment.
2. Install four new AA batteries. Ensure you orient
the batteries correctly as indicated on the battery
compartment cover.
3. Ensure the switch is still in the OFF position,
align the slider with switch stem and snap the
cover plate back onto the battery compartment.
4. Replace the cover plate screws.
instructions provided in this manual, or by the
specific venting manufacturer.
As Needed:
Glass and Gasket Replacement
In the event that you need to repair or replace a
cracked or broken glass or worn gasketing, use the
following instructions to replace the components. For
a broken front glass ask for kit 97-58620, for side
glass ask for kit 97-58621 from your Authorized
Hearthstone Dealer. Your Bristol uses a folded flat
fiberglass gasket to make a tight seal between the
glass frame and the firebox. In time, the gasket can
become brittle and compressed and should be
replaced. New gasket material is also available from
your Authorized Hearthstone Dealer. Protect your
hands with work gloves, and wash up later.
1. Allow the Bristol to cool completely. Dismount
the front façade, and the side panels.
2. To dismount the side panels, first remove the
top and front façade. Remove the top front
machine screw while holding the panel, and then
lift the side panel off the stove (See figure 33).
Initializing the Remote Control
Whenever you replace the batteries, you must
synchronize communication between the Receiver
and the Remote Control transmitter.
1. Place the slider switch in the REMOTE position.
2. Insert the end of a paper clip into the hole
marked PRG on the Receiver cover. The
Receiver will beep three times to indicate it is
ready to synchronize with the Remote Control.
3. Install three AAA batteries in the Remote
Control, and push the ON button. The Receiver
will beep four times to indicate the Remote’s
command is accepted and is set to the particular
code of that Remote. The system is now
initialized.
Professional Inspection
Once a year, have the unit, and venting system
inspected by qualified service personnel to ensure
that they are clean, free of obstruction, safe, and in
good working order. If service or maintenance is
required, have qualified service personnel perform it.
If the vent-air exhaust/intake system is disassembled
for cleaning, or any reason, reinstall per the
Figure 33 – Side Panel Mounting Detail
35
Page 36

Hearthstone Quality Home Heating Products, Inc. Bristol Model 8762
3. Dismount the front glass assembly by releasing
the upper spring clips – then lift the frame up
and out of the lower mounting points.
4. Dismount the side glass assemblies by
removing the six screws (retain for reassembly)
securing the frame to the firebox. Ensure the
glass doesn’t fall out of the frame during
removal.
5. Remove the glass from the front glass frame by
drilling out the four 1/8” rivets on the upper glass
clips. Push the top of the glass slightly away
from the frame and lift it up above the lower
clips, and then out of the frame, set it aside.
6. Remove the glass from the side frames by lifting
the frame off the glass. You may have to hold
the glass down while pulling up on the frame. Do
this as evenly as possible to avoid bending the
frame, or breaking the glass.
7. Remove the existing gasket from each piece of
glass by grasping one end and pulling firmly.
Clean off as much of the hanging fiber “hairs” as
possible
8. Locate the three pieces of 1” x1/8” flat tape
gasket. Use the two shorter pieces for the side
glass. Peel the adhesive protecting paper away
from one end. Starting at the middle of the
bottom edge of the glass apply the gasket
centered on the edge of the glass. Continue to
wrap the gasket loosely around the edge until
you meet at the starting point. Adjust the gasket
so the ends do not overlap. If the gasket length
is too long, trim the excess. Do not leave ends
with ragged edges.
9. Firmly and evenly, fold the gasket around the
edges of the glass so it lies flat on the surface.
There should be no folds at the corners.
10. Place each gasketed glass back in its frame.
With four new 1/8” rivets reinstall the 2 glass
clips on the front glass frame. The glass
assemblies are now ready to remount on the
unit.
36
Page 37

Hearthstone Quality Home Heating Products, Inc. Bristol Model 8762
Parts List
Part # Description Part # Description
27XX-740 Top 5710-307 Pilot Shield
27XX-730 Front 5710-305 Firebox Bottom Pan
27XX-725 Right Side 5710-304 Firebox
27XX-720 Left Side 5710-303 Base Plate
27XX-710 Control Door 5710-279 Glass Handle, Spring Hook
27XX-700 Foot 5710-250 Lower Mount Bracket
27XX-487 Heat Exchanger 5710-224 Control Door Hinge, Left
3030-066 Firebox Mirror 5710-222 Control Door Hinge, Right
3160-227 Air Shutter Slider Gasket 5710-211 DFC Board Mounting Plate
3160-225 Flue Inlet Gasket 7000-394 Remote Control Receiver
3160-220 Inlet Collar Plate Gasket 7000-393 Remote Control Transmitter
3160-215 Air Inlet Plenum Gasket 7100-1200 Blower Assembly
3160-210 Exhaust Collar Gasket 7200-467 NG Burner Orifice #46
3160-207 Orifice Block Gasket 7200-466 NG Burner Orifice #43
3160-205 Burner Tray Gasket 7211-610 Ember Burner
3160-200 Exhaust Manifold Gasket 7211-395 IPI (NG)Pilot Burner Assembly
3160-157 Flue Exhaust Gasket 7211-355 Solenoid Valve, Split Flow
3160-152 Pilot Gasket 7211-163 NG Pilot Orifice .62mm
3160-150 Heat Exchanger Gasket 7211-110 NG Valve, Stepper
3160-108 Delayed Ignition Relief Gasket (Top) 7211-105 Fan Control Module
3160-105 Delayed Ignition Relief Gasket (Rear) 7211-103 GTMFS Wire Harness
3160-081 ¾”x 1/8” Gasket Tape 7211-102 DFC Wire Harness
3170-150 Platinum Bright Embers 7211-101 DFC Board
5240-139 Air Shutter Spring 7211-056 Gas Manifold
5240-136 Front Latch Spring 4500-2977 1/4-20 x 1” oval tip set screw
5701-927 4” Exhaust Collar
5701-926 6-5/8” Inlet Collar
5710-630 Front Glass Frame Kits:
5710-350 Side Glass Frame 97-59100 Optional Screen Kit
5710-340 Rear Shroud 97-67500 Log Set
5710-320 Inlet Collector 97-58621 Side Glass Assembly
5710-318 Valve Mounting Bracket 97-58620 Front Glass Assembly
5710-317 Burner Support 97-56623 NG High Altitude Conversion Kit
5710-316 Burner Mounting Bracket 97-56622 LP High Altitude Conversion Kit
5710-314 Air Shutter Slider 97-56621 LP Conversion Kit
5710-313 Air Shutter 97-56620 NG Conversion Kit
5710-312 Restrictor Slider Arm
5710-311 Restrictor Plate
5710-310 Exhaust Collector
5710-308 Modesty Panel
Key: XX = Finish (e.g. 10 = Matte Black Paint) – Specify finish required when ordering parts
WARNING: DO NOT SUBSTITUTE MATERIALS. FOR REPLACEMENT PARTS, OR FOR INFORMATION ABOUT
PARTS OR SERVICE, CONTACT YOUR AUTHORIZED HEARTHSTONE RETAILER.
For the name of the authorized retailer nearest to you, visit our website www.hearthstonestoves.com or write:
Hearthstone Quality Home Heating Products, Inc.
317 Stafford Ave.
Morrisville, Vermont 05661-8695
37
Page 38

Hearthstone Quality Home Heating Products, Inc. Bristol Model 8762
Troubleshooting
Symptom Possible Cause Corrective Action
1. Pilot will not light.
A. Power supply not plugged in
and/or batteries are dead.
B. Insufficient gas pressure, air in
the pilot line, or dirty or kinked gas
line.
C. Pilot orifice plugged.
D. Defective or misaligned
electrode in pilot assembly.
E. Defective ignitor.
F. After sitting for "off" season
(summer), pilot assembly may be
dirty.
A. Ensure power supply is plugged in and receiving 120V
AC. Ensure power supply output is 6V DC. Replace all
batteries with known good batteries.
B. Allow time for system to purge air in line. Check the inlet
gas pressure. Make sure it is within the Min/Max. allowable
pressures.
C. Clean or replace the pilot assembly.
D. If a flame lights the pilot, check the electrode gap and
location. The gap should be 1/8" in the flame area.
E. Check for a good connection between ignitor and
electrode. Check wire insulation. If everything is properly
connected and still no spark, replace the DFC Ignition
Module.
F. Clean or replace the pilot assembly.
2. Pilot in CPI mode but
will not stay lit after
carefully following lighting
instructions.
3. Pilot burning, no gas to
one or both burners,
ON/REMOTE/OFF switch
in the "ON" position.
4. Pilot and burner come
on, but go out after some
warm-up.
A. Low or too high gas pressure
B. Faulty connections.
C. Pilot dirty or plugged.
A. Switch, Remote thermostat,
Receiver, DFC Ignition Module,
split burner solenoid, or wires
defective.
B. No power and batteries may be
dead.
C. Plugged burner orifice.
A. Inconsistent or insufficient
flame on flame rectification
sensor.
B. Insufficient gas pressure.
C. Excessive draft.
A. Check for proper inlet pressure for the fuel gas in use.
B. Check connections on the valve.
C. Clean or replace the pilot assembly.
A. Check wiring for proper connections. Check components
for proper operation. Place jumper wire across terminals at
thermostat if present. If burner comes on, replace defective
thermostat. If not OK, place jumper across thermostat wires
at gas valve. If burner comes on, tighten connections, or
replace faulty wires.
B. Restore 120V service. Check for proper output of FCM,
check solenoid operation – replace unit if defective. Replace
or charge batteries in remote and receiver.
C. Remove and check burner orifices - clean or replace.
Note: do not use any metal cleaning device, as this may
damage the orifice.
A. Adjust pilot flame size and assure that the flame is aimed
directly at the rectification sensor.
B. Check line pressure to ensure that the correct inlet
pressure is present for the type of gas being used. If propane
pressure is inconsistent, check for water condensation at the
regulator.
C. Check Restriction settings per this manual.
38
Page 39

Hearthstone Quality Home Heating Products, Inc. Bristol Model 8762
Symptom Possible Cause Corrective Action
5. Frequent pilot outage
problem in CPI mode.
A. Pilot flame may be too low or
blowing, (high), causing the pilot
safety to drop out.
B. Excessive draft
A. Clean and/or adjust the pilot flame for maximum
impingement on the rectification sensor.
B. Check Restriction settings per this manual.
6. Glass fogs A. A normal result of gas
combustion in a cold stove.
7. Blue Flames
8. Floating flames, lazy ill-
defined, quiet flames,
which roll around,
sometimes completely off
of the port, sometimes
with overly, yellow tips.
Possible sooting. Usually
accompanied by the odor
of aldehydes.
9. Burner flashback. Air-
gas mixture ignites inside
the burner near the orifice,
usually creating a roaring
noise like a blowtorch. The
problem is an imbalance
of gas flow velocity and
burning speed pattern.
10. Delayed ignition
(makes a sudden
"whoosh" noise as the
burner lights). This is a
buildup of gas prior to
ignition. This is more
prevalent with propane
(LP) fuel.
11. Surface fissures form
in ceramic burner surface.
A. A normal result during the first
10 to 20 minutes.
A. Potentially dangerous
incomplete combustion due to
incorrect air to fuel ratio (lack of
combustion air or excessive fuel
delivery I.e. excessive gas
pressure, overrating of appliance).
B. Incorrect air intake/exhaust flow
system. Causes may be:
B1. Blocked burner.
B2. Blocked primary air
B3. Blocked secondary air inlets
C. Incorrect air shutter position.
A. Excessive primary air.
B. Burner input underrated.
C. Valve leak if flashback occurs
with burner valve in off position.
D. Improper gas pipe size.
A. Incorrect air-to-fuel ratio.
A1. Primary air incorrect.
A2. Burner ports plugged.
B. Improper log placement.
C. Pilot shield not installed
properly.
A. Normal occurrence during the
first few hours of operation.
A1. After the heater has warmed up, the glass should clear.
A2. Leave pilot in CPI mode to keep stove warmer.
A. Flames should begin to turn more yellowish after 20
minutes of burning.
B. If the blue color stays; adjust the air shutter for a proper
burn.
A. Check the appliance input rate and reduce if necessary.
The air intake/exhaust flow system may be too restrictive or
blocked (the rate at which the exhaust leaves [draft]
determines the rate at which the combustion air is delivered).
Poor draft results in insufficient air delivery or a restricted
exhaust. Correct air intake/exhaust flow system.
B1. Clear ports.
B2. Clear obstructions.
B3. Clear obstructions.
C. If gas pressures are correct and the flames stay the same,
adjust the air shutter(s) for a proper burn.
A. Adjust the air shutter(s) for a proper burn.
B. Check input rate. Check input pressure using a
manometer. Confirm correct gas pressure at house meter or
tank (call gas company). Confirm burner orifice size.
C. Replace valve. If above corrections do not eliminate
flashback, replace burner.
D. Correct plumbing.
A1. Adjust the air shutter for a proper burn.
A2. Open ports to allow for proper travel of flames.
B. Reposition logs to eliminate interference with flame travel.
C. Ensure the pilot shield is installed in the proper position (if
present).
A. None. Fissures may form at the first firing – then remain
stable for the life of the burner.
39
Page 40
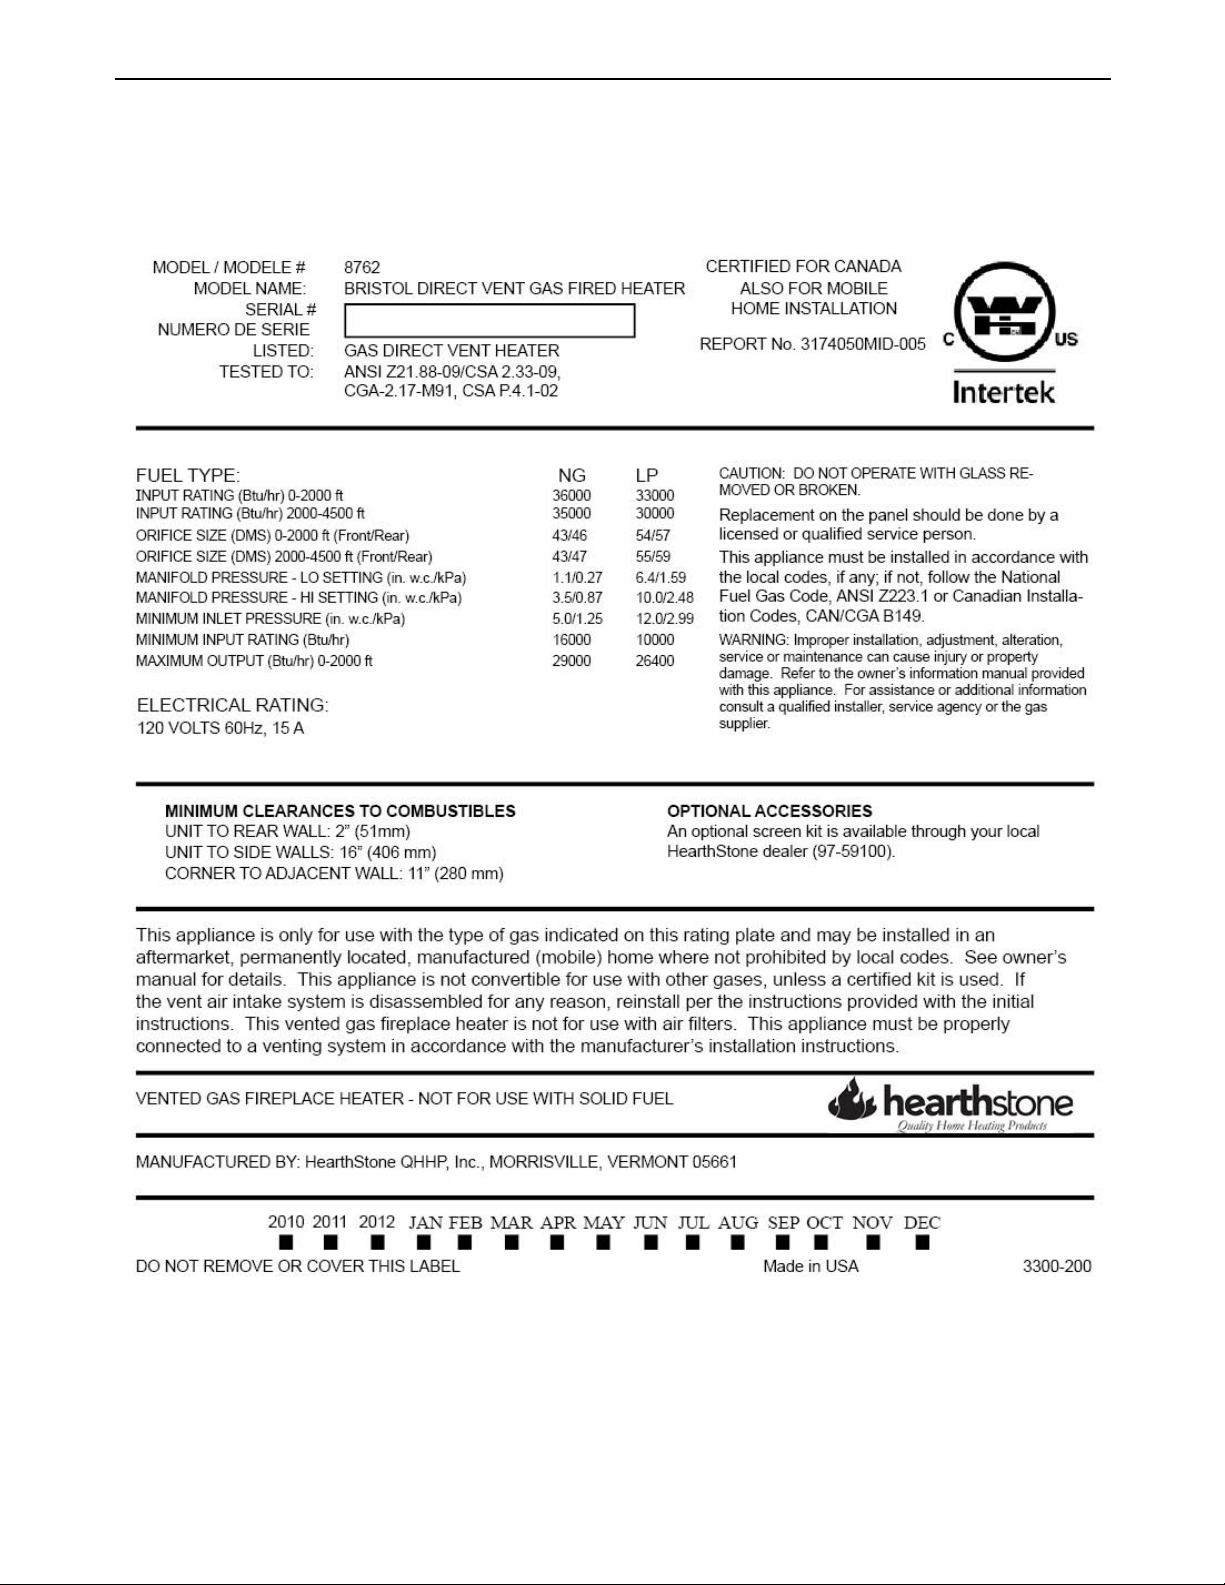
Hearthstone Quality Home Heating Products, Inc. Bristol Model 8762
Rating Label
40
Page 41

Hearthstone Quality Home Heating Products, Inc. Bristol Model 8762
WARRANTY REGISTRATION
The Original Purchaser can complete their warranty registration on our website at www.hearthstonestoves.com,
or send a completed and signed Warranty Registration Form, which is enclosed in the Gas Stove warranty
packet, to the following address:
Hearthstone Quality Home Heating Products, Inc.
Warranty Department
317 Stafford Avenue
Morrisville, VT 05661
NOTE: SENDING IN THE SIGNED WARRANTY REGISTRATION FORM IS NOT REQUIRED AS A
CONDITION OF WARRANTY COVERAGE OR HEARTHSTONE’S PERFORMANCE.
41
 Loading...