

HearthStone 8012 Owner's Manual

Mansfield
Woodstove
(Model 8012)
Owner's Manual
Installation &
Operating Instructions
PLEASE READ THIS ENTIRE OWNER’S MANUAL BEFORE YOU INSTALL AND USE
YOUR NEW Mansfield WOOD STOVE. To reduce the risk of fire, follow the installation
instructions. Failure to follow these instructions may result in property damage,
bodily injury, or even death.
SAVE THESE INSTRUCTIONS FOR FUTURE REFERENCE!
CONTACT LOCAL AUTHORITIES HAVING JURISDICTION (BUILDING DEPARTMENT or
FIRE OFFICIALS) ABOUT PERMITS REQUIRED, RESTRICTIONS AND INSTALLATION
INSPECTION IN YOUR AREA.
Mansfield 2: 6400-40484
Rev 0: 06/04/2012

Intentionally Blank
2

Table of Contents
Introduction ............................................................................................................................ 4
Safety Information ................................................................................................................. 5
Codes .................................................................................................................................................................. 5
Periodic Checklist................................................................................................................................................ 6
Thermo-Ceramic Baffle System .......................................................................................................................... 6
Emergency Procedures ...................................................................................................................................... 6
Specifications ........................................................................................................................ 7
Installation.............................................................................................................................. 8
Unpacking ........................................................................................................................................................... 8
Installing Your Stove ........................................................................................................................................... 8
Clearances to NFPA 211 Protected Surfaces .................................................................................................... 8
Hearth Requirements & Floor Protection ............................................................................................................ 8
Outside Air Supply .............................................................................................................................................. 8
Clearances To Combustibles ............................................................................................................................ 10
Venting Components & Configuration .............................................................................. 13
Components of a Venting System .................................................................................................................... 13
Installing a Venting System ............................................................................................................................... 13
Connecting Your Wood Stove ........................................................................................................................... 14
Installing In a Mobile Home ............................................................................................................................... 17
Operation.............................................................................................................................. 18
Controls & Features .......................................................................................................................................... 18
Choosing Firewood ........................................................................................................................................... 19
Building A Fire ................................................................................................................................................... 20
Breaking In Your Wood Stove ........................................................................................................................... 20
Normal Operation .............................................................................................................................................. 21
Removal & Disposal of Ashes ........................................................................................................................... 22
Maintenance ......................................................................................................................... 23
Monitoring Stove Temperatures ........................................................................................................................ 23
Creosote Formation & Need for Removal ......................................................................................................... 23
Gaskets ............................................................................................................................................................. 23
Glass ................................................................................................................................................................. 23
Stone ................................................................................................................................................................. 24
Cast Iron ............................................................................................................................................................ 24
Troubleshooting ................................................................ ................................ .................. 25
Troubleshooting Guide ...................................................................................................................................... 26
Replacement Parts & Optional Accessories ..................................................................................................... 27
Safety Label ......................................................................................................................... 28
3

Introduction
Congratulations! You have just invested in a most
unique wood burning stove – the Mansfield Wood
Burning Stove from Hearthstone Quality Home
Heating Products Inc®. The Mansfield, model 8012,
is one of our largest and one of the cleanest burning,
EPA certified, non-catalytic wood burning stoves. At
3.2 cubic feet firebox capacity and a low 2.8 grams
per hour of particulate emissions you can be proud
to join the Hearthstone family with our Premier Wood
Burning Stove. The generous depth allows for
straight in loading of wood up to 20 inches long!
Your purchase ensures years of clean, comfortable
heat with minimal maintenance. You will receive the
benefits of the most advanced technology in wood
burning without the cost and maintenance
requirements of a catalytic stove. The Mansfield
blends modern technology with the unique beauty
and heating qualities of soapstone (traditionally
renowned for its even heat production and long heat
retaining ability). We trust that you will appreciate
the quality of our handcrafted product.
Please read this manual in its entirety. Its purpose
is to familiarize you with your stove's safe
installation, proper break-in, operation and
maintenance. It contains information that will be
useful to you now and in years to come, so keep it
handy and refer to it as needed.
recommend that you do not locate your stove in an
uninsulated basement. The amount of radiant
energy required to heat concrete basement walls is
so great that most of the usable heat is absorbed by
them and lost.
SAFETY NOTICE: A HOUSE FIRE MAY
RESULT IF THIS STOVE IS NOT INSTALLED
PROPERLY. FOR YOUR SAFETY,
CAREFULLY FOLLOW THE INSTALLATION
DIRECTIONS. CONTACT LOCAL BUILDING
OR FIRE OFFICIALS ABOUT RESTRICTIONS
AND INSTALLATION INSPECTION IN YOUR
AREA.
The performance of your stove depends on many
variables. Since all installations are unique, the
general information and operating procedures
presented here can only serve as useful guidelines
rather than hard and fast rules. Should you have
any questions, do not hesitate to contact your dealer
for additional information.
This stove is manufactured and warranted by:
Hearthstone Quality Home Heating Products, Inc®
317 Stafford Ave.
Morrisville, VT. 05661
Use these instructions as well as national, state, and
local building codes to install your stove. Be sure to
maintain the designated stovepipe and stove
clearances to walls, ceilings, hearth, and other
combustible surfaces. This will help reduce the risk
of fire. Failure to follow these instructions can result
in property damage, bodily injury, and even death.
Locate your stove in a safe, convenient, open area;
away from traffic flow, doors, and hallways; and near
a chimney and chimney connector. Review the
proper clearance measurements from combustible
surfaces. You can safely reduce required clearances
in most cases with a special connector pipe and
special wall coverings as specified by this manual,
the NFPA 211 codes, and your local authorities
having jurisdiction.
Keep furniture, drapes, curtains, wood, paper, and
other combustibles far away from the stove. Never
install the stove in a location where gasoline,
kerosene, charcoal lighter fluid or other flammable
liquids are used or stored.
Locate the stove centrally in your living area to allow
the heat to travel naturally to distant rooms. We
4

Safety Information
Read and understand this Owner's Manual
thoroughly before installing and using this
stove.
Codes
When you install your Mansfield wood stove, it is
imperative that you adhere to all local codes, which
can be obtained from either of the following two
National sources:
American National Standards Institute, Inc. (ANSI)
1430 Broadway
New York, NY 10018
National Fire Protection Association, Inc. (NFPA)
Battery March Park
Quincy, MA 02269
If you are installing your Mansfield in a mobile home,
follow the guidelines described in the Manufactured
Home Construction and Safety Standard, Title 24
CFR, Part 3280 (United States).
Make sure to install your stove:
According to the manufacturer's
recommendations.
In accordance with all applicable codes.
With the proper sized chimney.
When using your stove:
Warn children and others unfamiliar with
woodstoves of the danger of touching hot,
radiating surfaces of your stove. For your
additional safety, obtain hearth and stove guards
through your local dealer.
Follow recommended break-in procedure as
outlined in this manual.
Burn natural wood only. Higher efficiencies and
lower emissions result when burning air-dried,
seasoned wood, as compared to green or
freshly cut wood.
Use caution when loading firewood into a hot
stove.
Follow these safety precautions:
Never modify this stove in any way, especially
the primary air control system.
Never burn kiln dried wood, painted or treated
wood, solvents, trash, plywood, colored or
glossy paper, artificial logs, cardboard, coal,
garbage or driftwood. Especially, do not burn
coal in this stove.
Never Use gasoline type fuel, kerosene,
charcoal lighter fluid, or other liquid fuels or solid
fire starters to start or invigorate the fire. These
fuels can possibly generate carbon monoxide,
which can deplete the supply of oxygen. Keep
all such materials away from the stove.
Never use the stove if the ash pan door is open,
damaged, not in place, or not sealing.
Never use a wood grate or other device to
elevate the fire.
Do Not allow logs to rest against or otherwise
come in contact with the glass when the door is
closed.
Do Not slam the door or use it to force wood in
to the stove.
Never over-fire your stove. (See page 21)
Never put articles of clothing or candles on a hot
stove.
Do Not connect the stove to a flue that is
serving another appliance. (See page 14)
Other safety guidelines
Keep all combustible items such as furniture,
drapes, clothing, and other items, at least 36"
(0.92 m) from the stove (See page 10)
Install a smoke detector, preferably in an area
away from your wood stove.
Keep a fire extinguisher handy. We recommend
the type rated "A B C."
Dispose of ashes properly. (See page 22)
Keep the ash pan tray fully inserted and the ash
door closed tightly.
Inspect the stove pipe, chimney connector and
chimney, as recommended.
Ensure the removable ash lip is in place while
using the stove. If the ash lip is not installed
properly, the hearth may exceed safe
temperatures.
Keep children and pets away from the stove;
they could be burned by touching a hot stove.
Clean your chimney system as needed. (See
page 18)
5

Periodic Checklist
Perform each of these tasks at the specified
intervals.
At the End of Every Week:
Empty ashes from the firebox and ash pan,
sooner if the firebox or the ash pan begin to fill
up.
At the Beginning of Every Other Month:
A visual inspection of the chimney connector
and chimney for creosote is recommended
depending upon the use of your stove. (Please
see page 18-Creosote Formation and Need For
Removal)
Check door seals using the "dollar bill test." -
When the fire is out and the stove is cool, shut
the door on a dollar bill. If the bill pulls out
without any resistance, then your stove’s door
isn't sealed properly. To tighten the seal,
change the door gasket. (Refer to page 18 –
Gaskets)
At the End of Every Season:
Dismantle the chimney connector and clean it
thoroughly. Replace any pieces that show signs
of rust or deterioration.
Inspect and, if necessary, clean your chimney.
Thoroughly clean out the inside of the stove.
Inspect all door gasket material and replace if
worn, frayed, cracked or extremely hard.
punctured, it will cause the stove to function
improperly. You must replace the board through a
qualified Hearthstone dealer.
Emergency Procedures
If you have a stovepipe or chimney fire, follow these
instructions:
1. Call the fire department – immediately!
2. If the fire is too threatening, leave the area and
wait for the fire department. If not, perform the
next three steps.
3. Close the primary air control. (see page 14)
4. Close the stovepipe damper (if present).
5. Keep the stove front, and ash doors closed!
WARNING: DO NOT ATTEMPT TO PUT OUT A
STOVEPIPE OR CHIMNEY FIRE BY THROWING
WATER ONTO THE STOVE, STOVEPIPE, OR
CHIMNEY. THE EXTREMELY HIGH
TEMPERATURE ASSOCIATED WITH SUCH FIRES
CAN CAUSE INSTANTANEOUS STEAM AND
SERIOUS BODILY HARM.
Once the chimney fire expires, leave the primary air
control closed and let the fire in the stove die out
completely. Do not fire the stove again until the
stove, stovepipe, and chimney are all thoroughly
inspected for any sign of damage. You must correct
any damage before using your stove again.
Thermo-Ceramic Baffle System
To enhance the combustion efficiency and reduce
the emissions of the fire in your stove Hearthstone
developed an advanced THERMO-CERAMIC baffle
system. This system uses a lightweight, durable
ceramic material above the burner tubes to maintain
the high temperatures in the secondary combustion
area and maintain the low emission – high efficiency
combustion you desire. This new technology will not
corrode, rust dissolve or lose its strength, however it
is vulnerable to puncture or cracking due to rough
handling.
PLEASE EXERCISE CARE WHEN LOADING
WOOD OR CLEANING YOUR STOVE, NOT TO
DAMAGE THE THERMO-CERAMIC BAFFLE
Located directly above the burner tubes in the
firebox, this gray sheet of material will break if wood
or cleaning brushes impact it. Be careful when
loading and cleaning your stove to not break this
material. If this piece has been fractured or a hole is
6
Specifications
Maximum Output: 80,000 BTUs per hour of
cordwood (based on
independent laboratory test
results).
Size Of Heated Area: Up to 2,500 square feet.
Firebox Capacity: 3.2 cubic feet (.091 cubic
meters) or 64 pounds of
wood (The amount and
weight of wood contained
per cubic foot of firebox
volume can vary from 15 to
36 lbs. per cubic foot
depending on type of wood,
moisture content, packing
density and other factors.
As a constant for
comparison and test
purposes, we are assuming
20 lbs. of seasoned
hardwood per cubic foot of
firebox volume).
Maximum Log Length: 21" (533 mm) – logs
Soapstone Finish: 1 Polished gray soapstone
Castings Finish: Painted black matte and
porcelain enamel colors
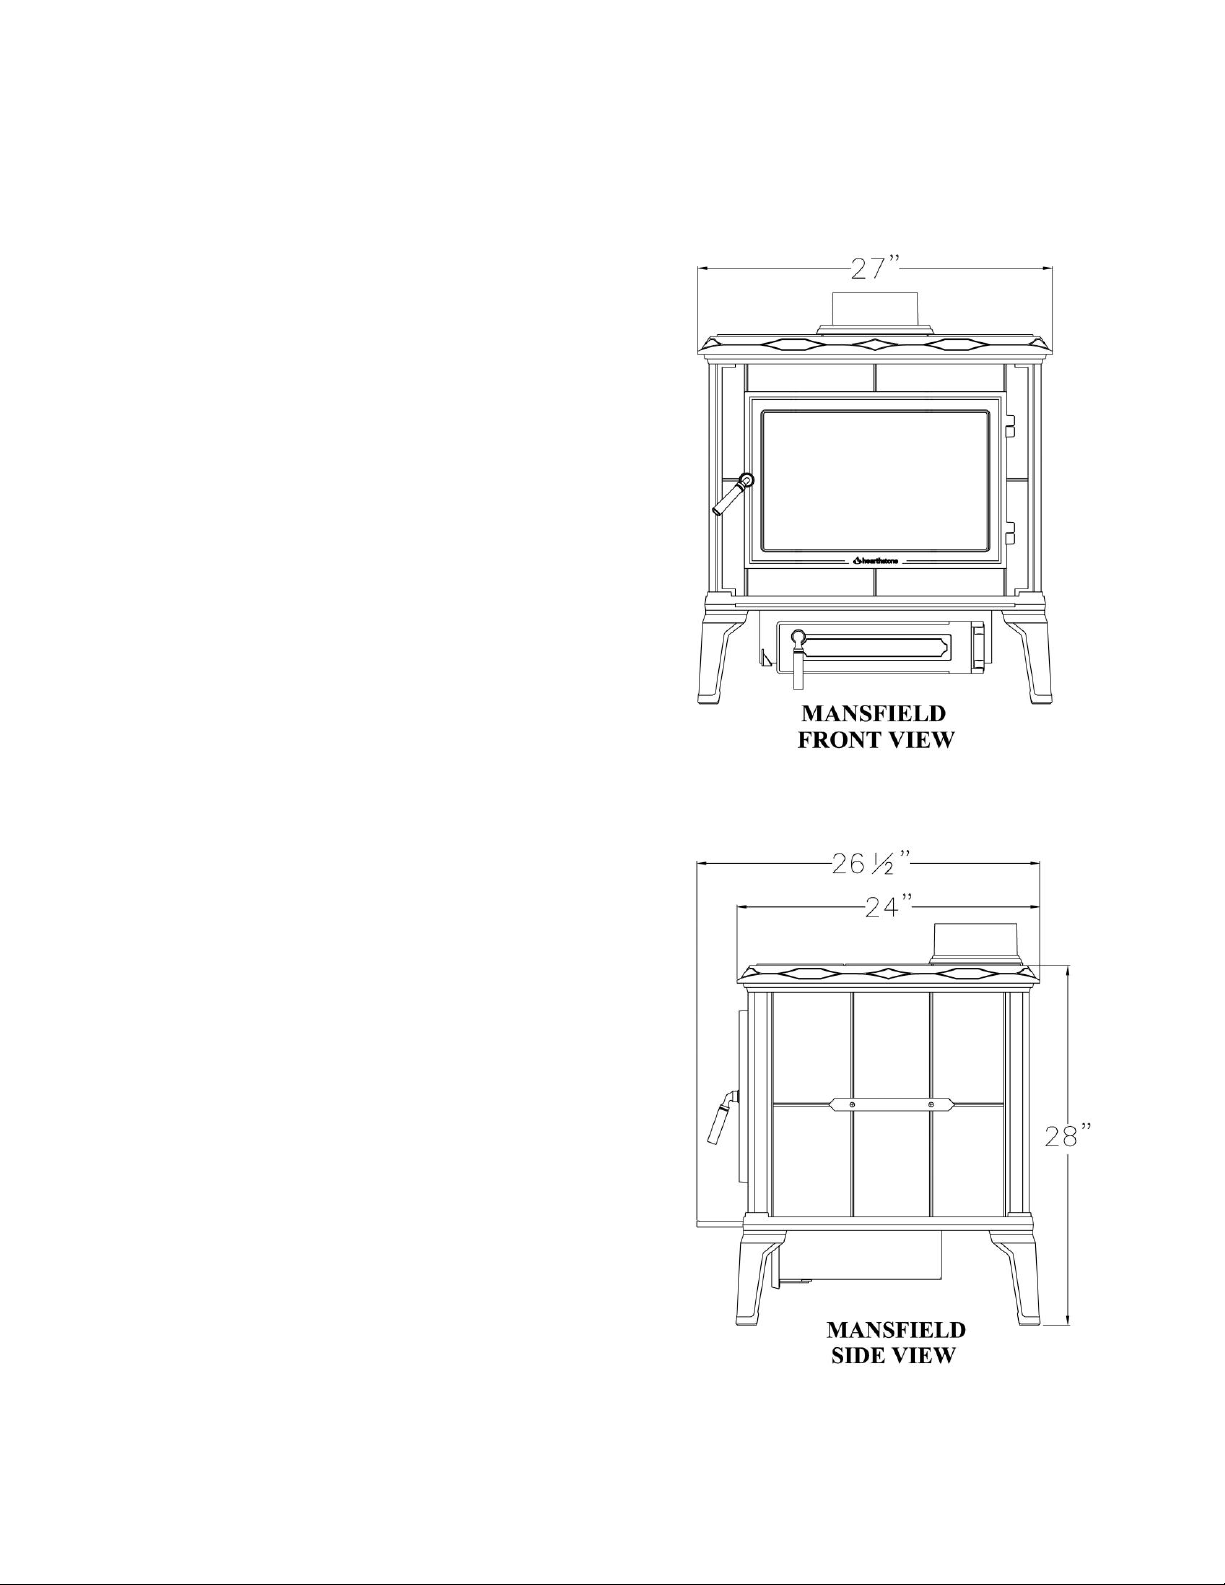
Dimensions:
Figure 1
Height: 28" (71.1 cm) (not including
flue collar)
Width: 27" (68.6 cm)
Depth: 26 ½” (67.3 cm)
Front Door Size: 18" wide x 12" high
(45.7 x 30.5cm)
Stovepipe Size: 6" (152 mm) diameter
Metal Chimney: 6" (152 mm) inside diameter
Masonry Chimney: 8" x 8" (203 x 203 mm)
(square flue)
Flue Exit: Top exit only
Actual Weight: 550 pounds
Shipping Weight: 585 pounds
Optional Equipment: Outside Air Adapter,
Blower, Rear Heat Shield
1
Polished gray soapstone varies from gray to gray-blue, according
to natural composition.
Figure 2
7
Installation
Unpacking
Hearthstone packages your Mansfield stove with the
greatest care, so that it ships safely. Under certain
circumstances, however, damage can still occur
during transit and handling. When you receive your
stove, unpack it carefully, inspecting your stove and
all parts for damage. Also, ensure that all parts are
included. If any parts are damaged or missing,
please contact your dealer immediately.
Installing Your Stove
First you must decide where your stove will reside.
After choosing an appropriate spot, inspect this
location to ensure that the stove will have enough
clearance to combustible materials that would
surround the stove. These combustibles can include
walls, floor, ceiling, fireplace, and chimney. You
must carefully consider the clearances to all of these
combustibles before actually connecting your stove.
When considering these clearances, also decide the
kind of floor the stove will rest on. Depending on
your floor, you can install your stove as it is, or use a
floor protector.
National Fire Protection Agency
Batterymarch Park
Quincy, MA 02269
1-800-344-3555
1-617-770-3000
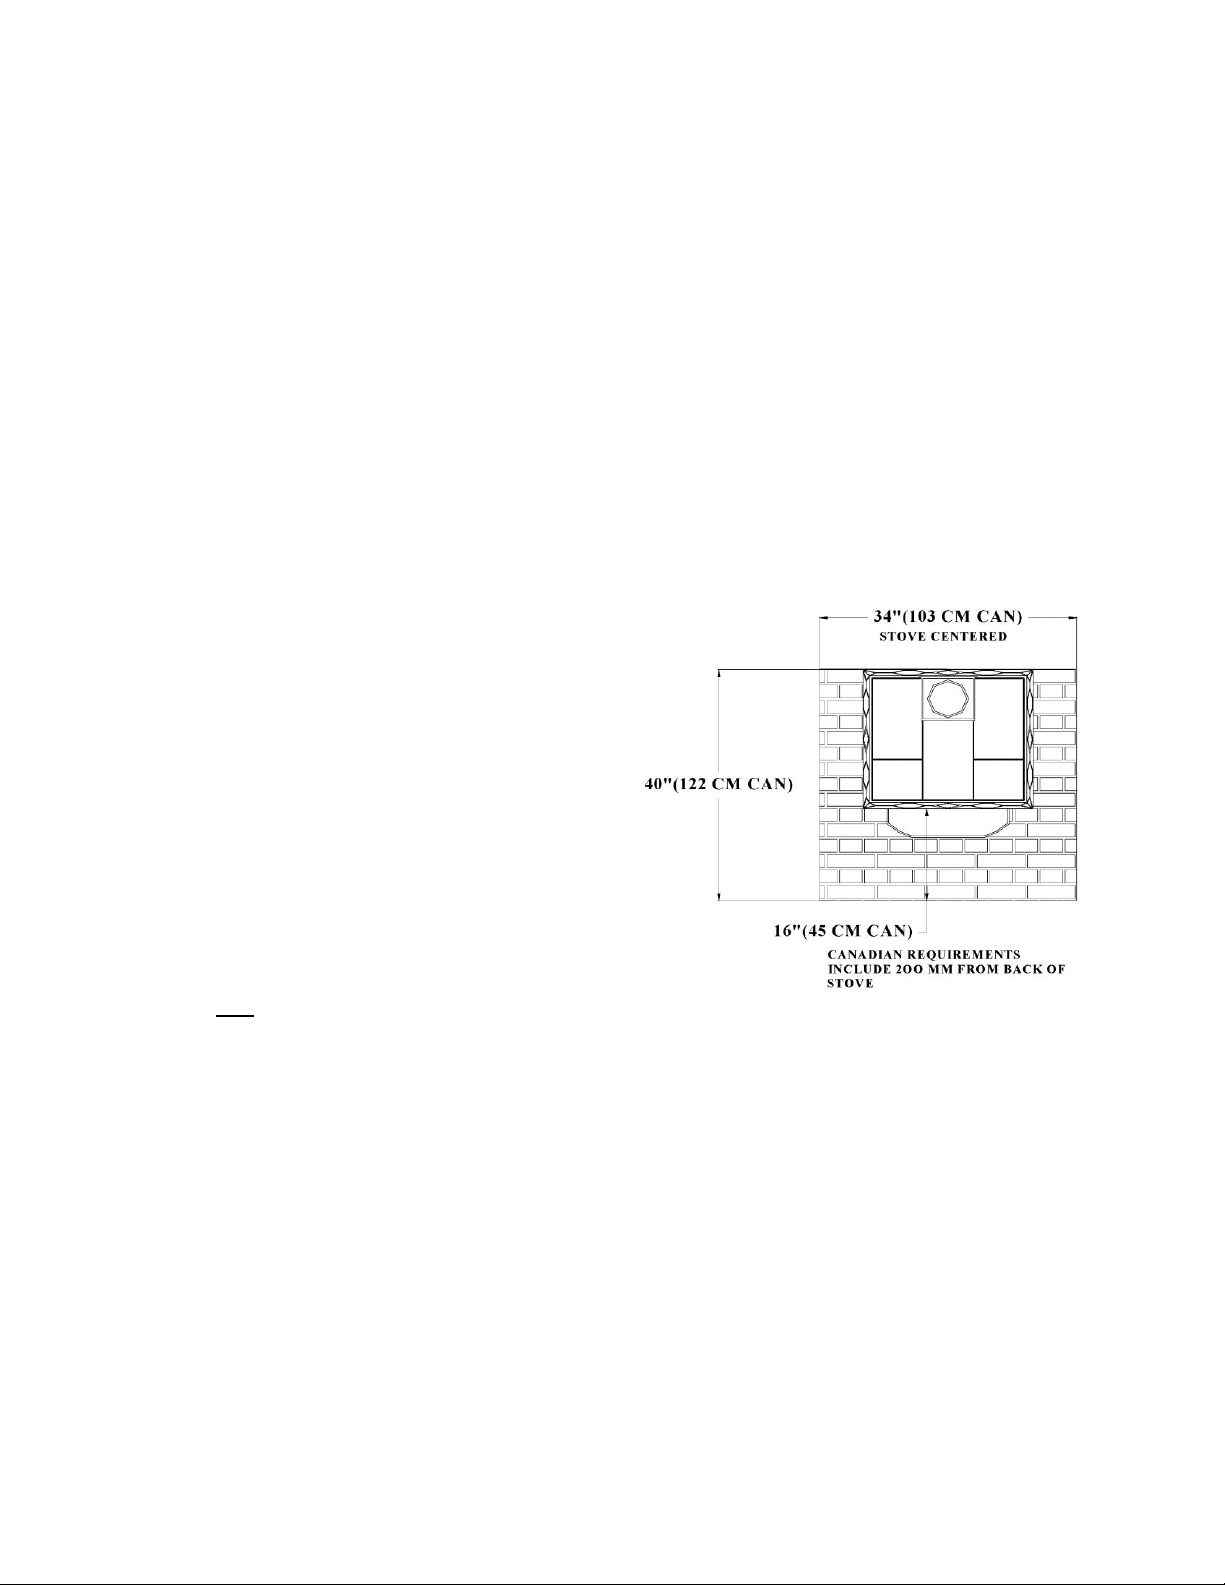
Hearth Requirements & Floor
Protection
If the floor is wood or other combustible flooring, the
stove must be placed on non-combustible floor
protection that extends 16 inches to the front and 8
inches to either side of the front door opening (US).
The floor protector for the stove must have minimum
dimensions of 34” x 40” (864 x 1016 mm) and must
be placed as illustrated here:
Use this section to plan how to locate your stove in
your particular location. Consider both the
clearances of the stovepipe and the stove itself to
the surrounding combustibles.
Read this chapter to obtain a sound understanding
of how to properly install your stove.
If you use a close clearance connector pipe, it must
be tested to UL standards and listed. Check the
listing for your pipe for actual clearances. The
diagrams in this manual represent typical
installations, but are specific to the Simpson DuraVent DVL brand. Clearances cannot be reduced
without the use of close clearance connector pipe
and/or by protecting the surfaces per NFPA 211
standards.
Clearances to NFPA 211 Protected
Surfaces
You can reduce the clearances to combustible
surfaces by using any National Fire Protection
Agency (NFPA) approved wall protection system.
Please refer to NFPA 211 for specifications and
complete details. You can obtain this information
directly from NFPA.
Figure 3
*An example of a non-combustible floor protector would be a
hearth constructed with a continuous layer of a listed backer
board (such as Wonder-Board or Durock) used for ember
protection with a tile, brick, slate, or another noon-combustible
facing.
The chimney connector must also have floor
protection under it, and extending 2 inches (50 mm)
beyond each side.
Outside Air Supply
An outside air source may be connected directly to
this stove using the optional outside air kit (PN 90-
53002). The advantage of providing outside air
directly to the stove is that the air used by the stove
for combustion is taken from outside of the
residence rather than from within the room where
8
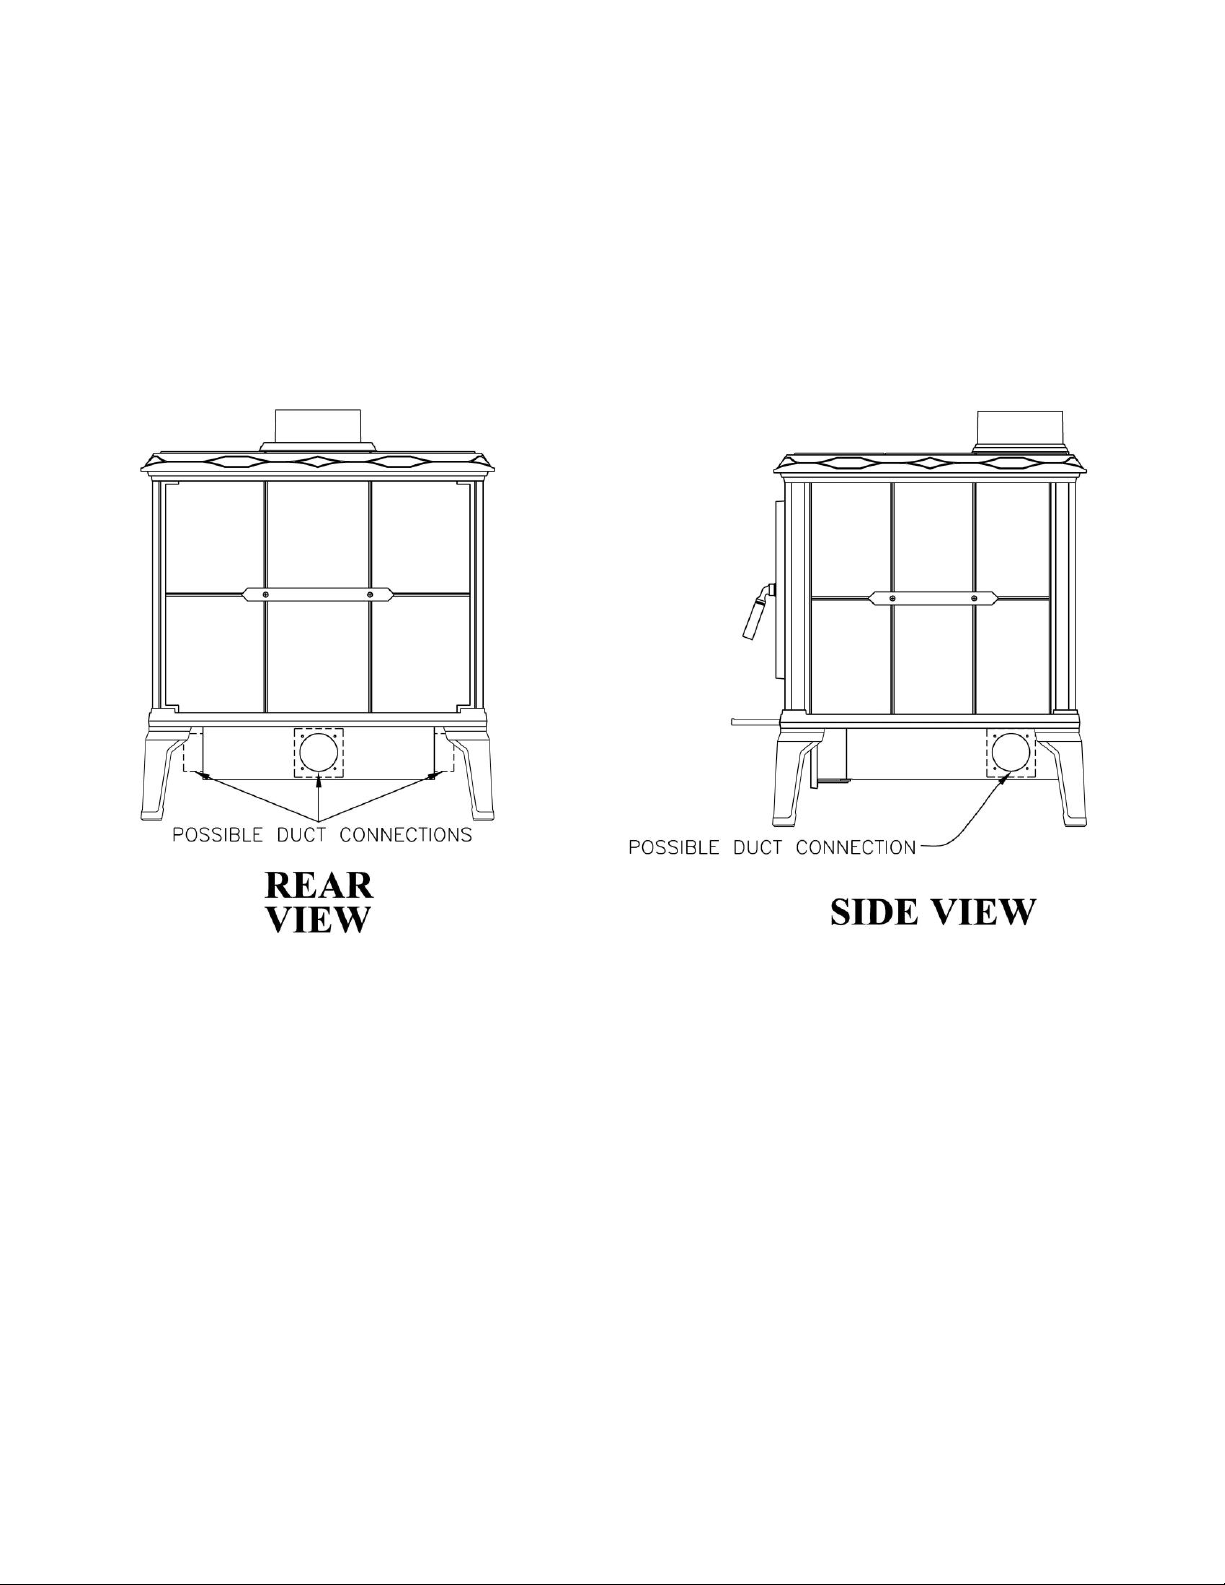
the stove is located. With outside air supplied
directly to the stove, drafts within the room and air
infiltration within the building are reduced. Use of
the outside air kit may also improve stove
performance in a particularly air-tight house.
The outside air kit for this stove allows for the direct
connection of the stove's air intake to a minimum 3"
(76 mm) diameter duct (supplied by others) which
leads to the outside of the house. When considering
placement of the duct from the outside of the house
to the hearth, keep in mind the need to avoid wiring
and structural members in the wall.
See the following illustrations for all connection
options. Choose the one most convenient. Locate
the termination of the duct on the outside wall of the
structure in such a manner so as to preclude the
possibility of obstruction by snow, leaves or other
material. Screen the opening against animals and
insects (any screen, duct, clamps, and hood
supplied by others).
Figure 4
9
 Loading...