

Hearthland Memphis Pro Owner's Manual
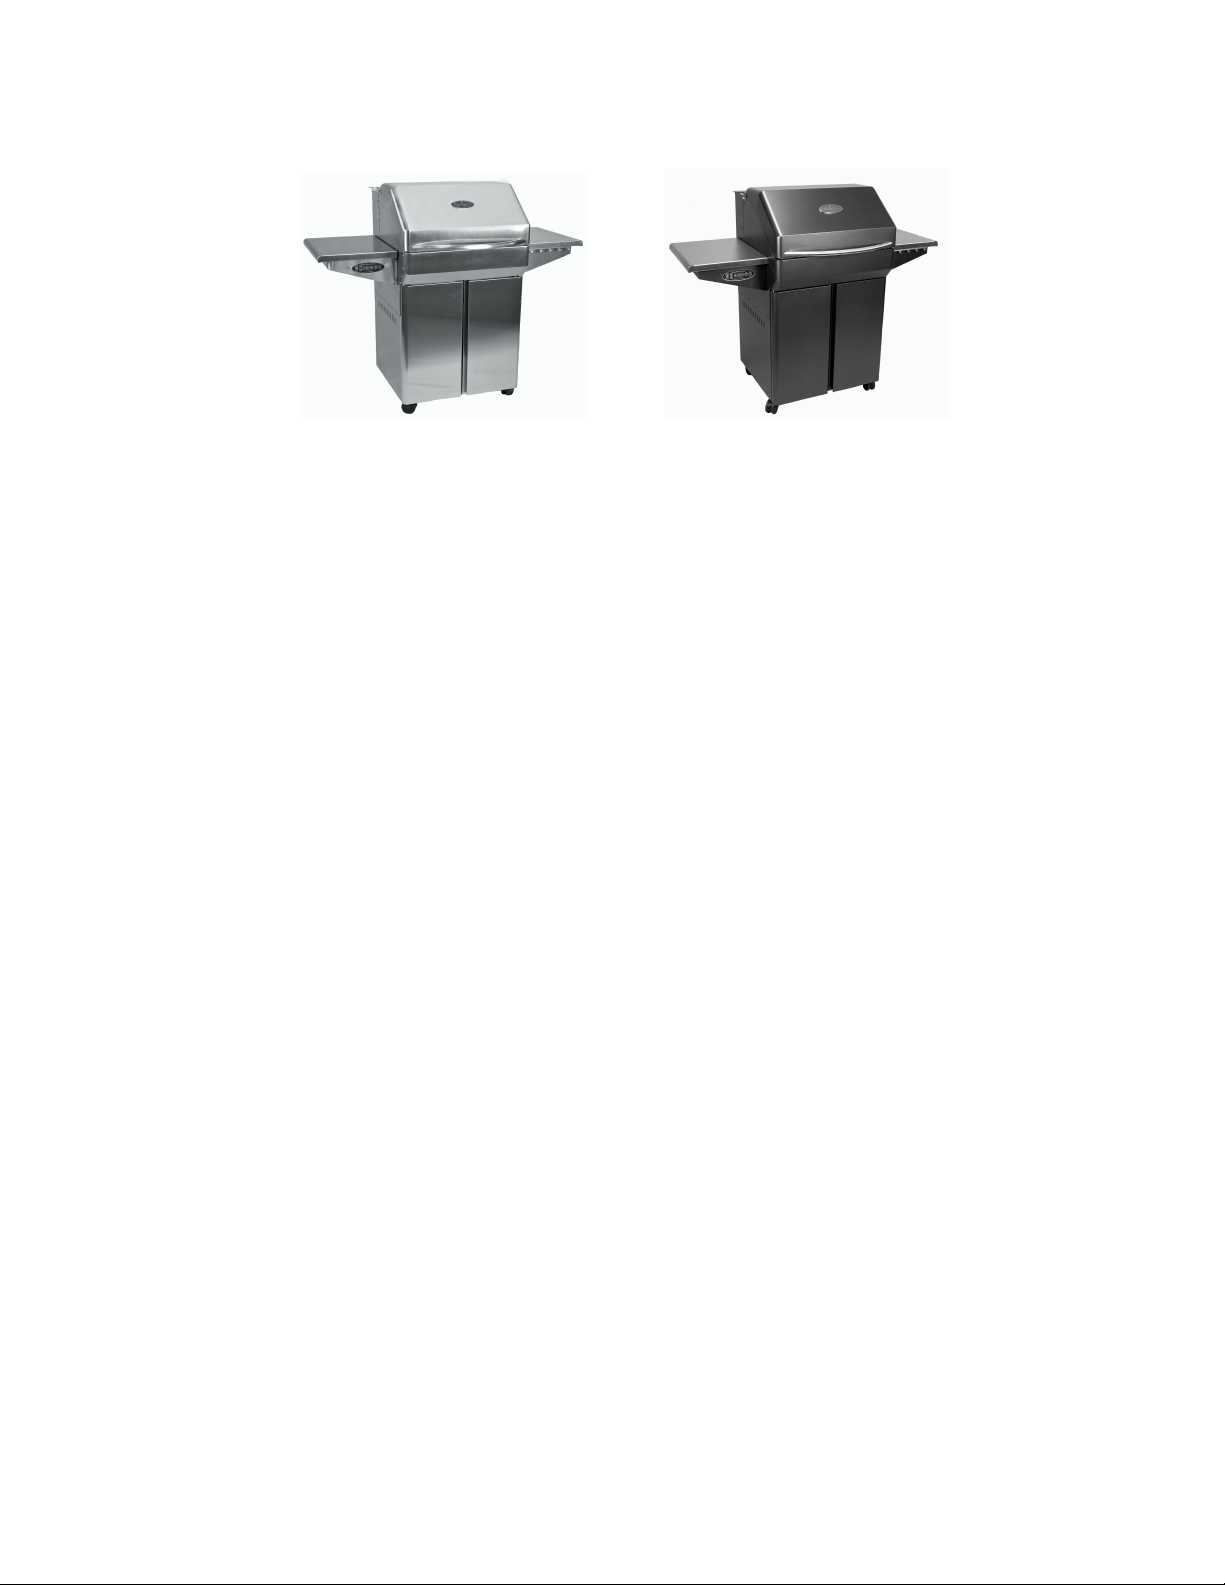
Memphis Pro Wood Fire Pellet Grill
Owner's Manual and User’s Guide
Congratulations on your purchase of the Memphis Wood Fire Pellet Grill. With proper care and
maintenance, your grill will give you years of trouble free operation. Please review the following
information carefully for useful tips and information that will help you utilize your grill’s extensive features
and benefits.
Keep in mind that your Memphis Wood Fire Pellet Grill is so much more than a grill. It's a double walled,
true Convection Oven, featuring a unique Intelligent Temperature Control (ITC) which automatically
adjusts for outside ambient conditions. The result is a simple "set it and forget it", way to Cook, Bake,
Roast, Sear or Low and Slow Smoke; whether it's 30° or 90° outside, just set the desired temperature
and sit back and enjoy.
We all have our favorite recipes and cooking tricks. We suggest you experiment with your new grill to
discover just how many ways it adds to your outdoor cooking experience. With little time and effort, you'll
amaze your friends and family with your impressive culinary skills. Like many of us you'll find that your
Memphis Wood Fired Convection Grill will become your cooking appliance of choice; eliminating heat and
odors from cooking indoors while giving you unbeatable results.
Before you get started, take a few moments to register your grill and write your model and serial
number in the space provided. This will register your warranty and make it quick and easy to reference
this information in the future. Your model and serial number are located on the sticker under the hopper
lid.
Thank you for choosing Memphis Wood Fire Pellet Grill!
Model_________________________________________________________________________________
Serial Number:______09VG0001 S P -___________________________________________________
Date of Purchase_______________________________________________________________________
Dealer________________________________________________________________________________

Index
Page
Welcome Page 1
Index 2
Safety Information 3
Unpacking and Assembling Your Memphis Wood Fired Convection Grill 4
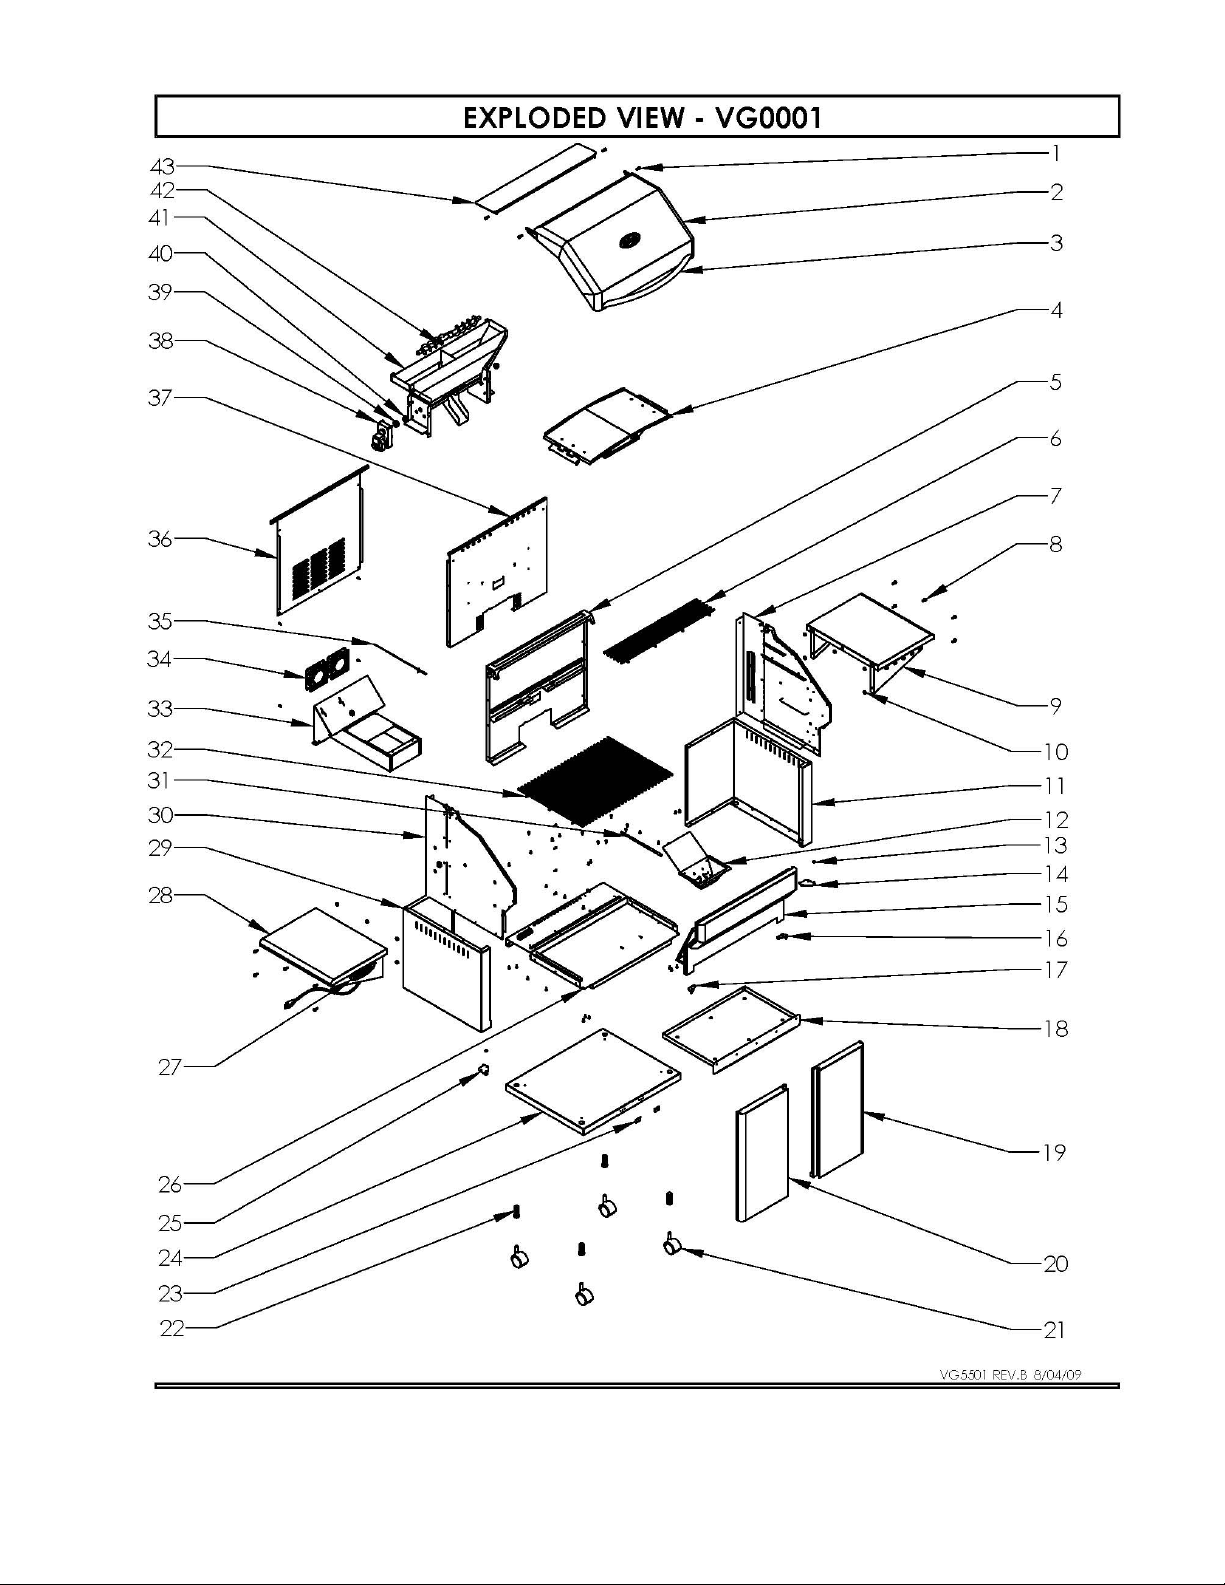
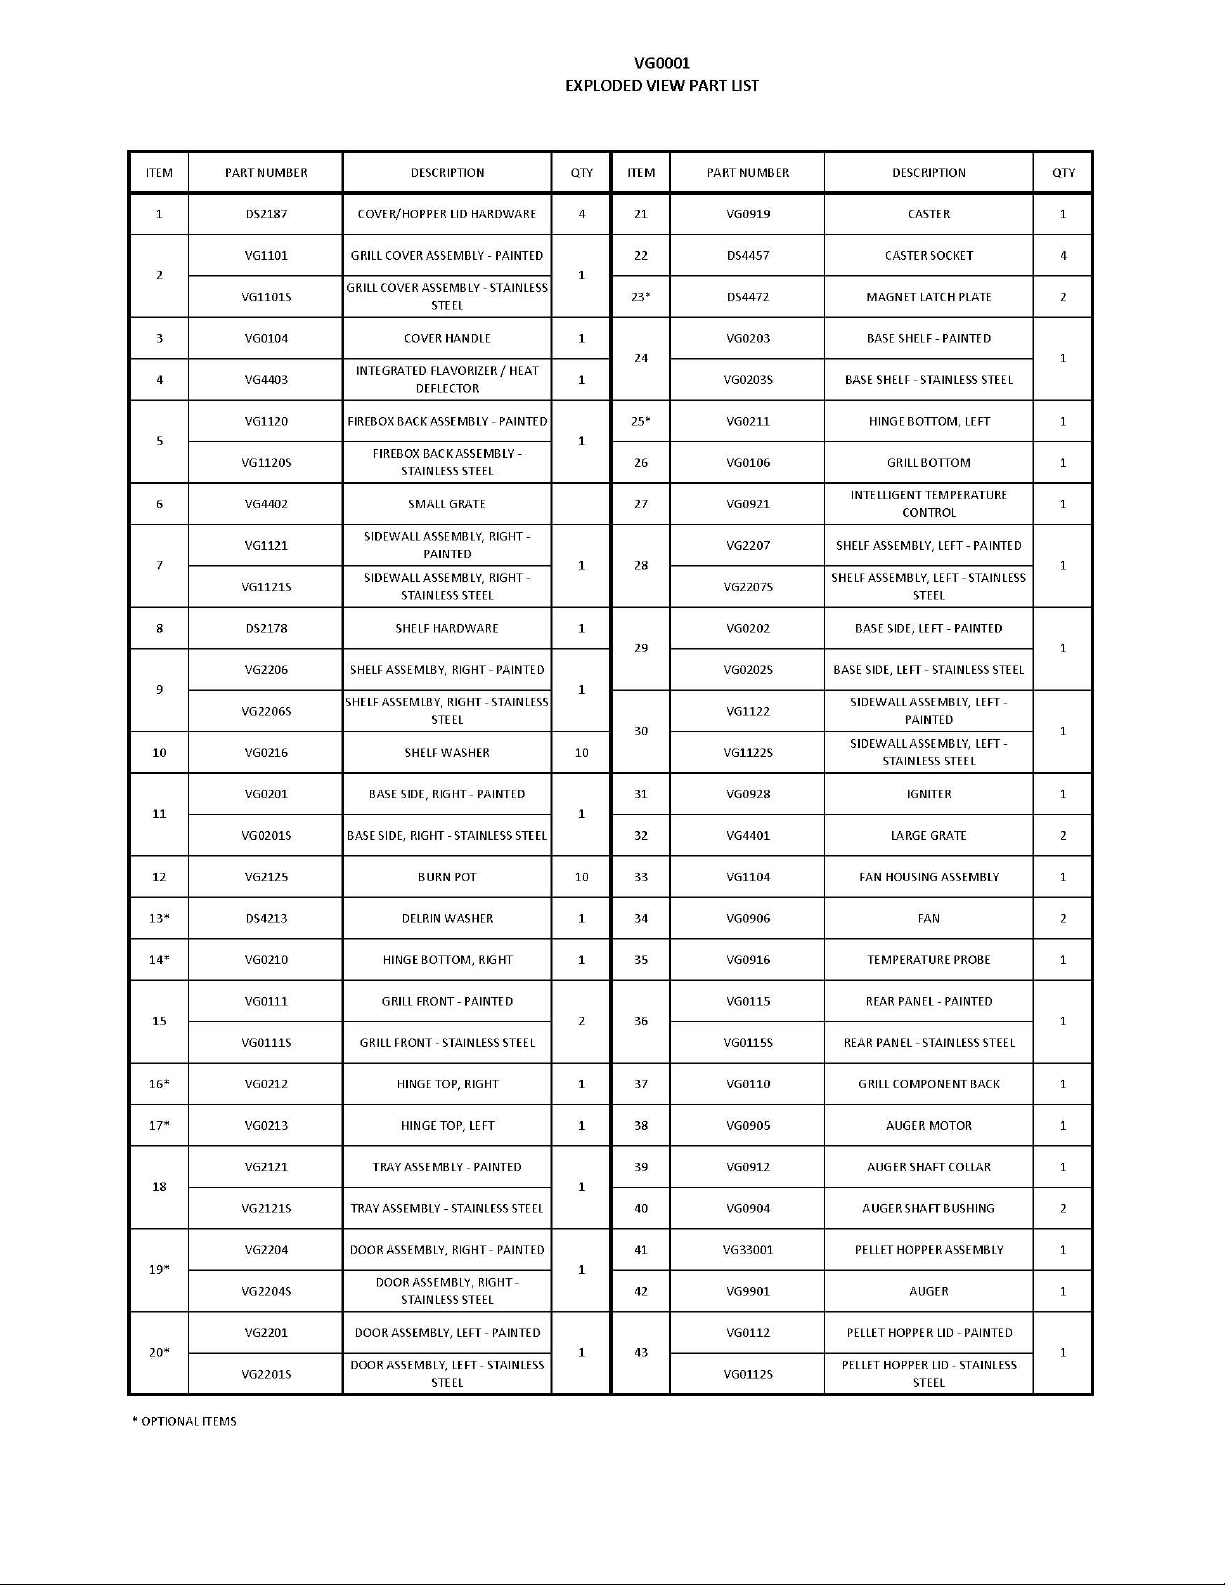
Memphis Parts – Exploded View and Part List 5-6
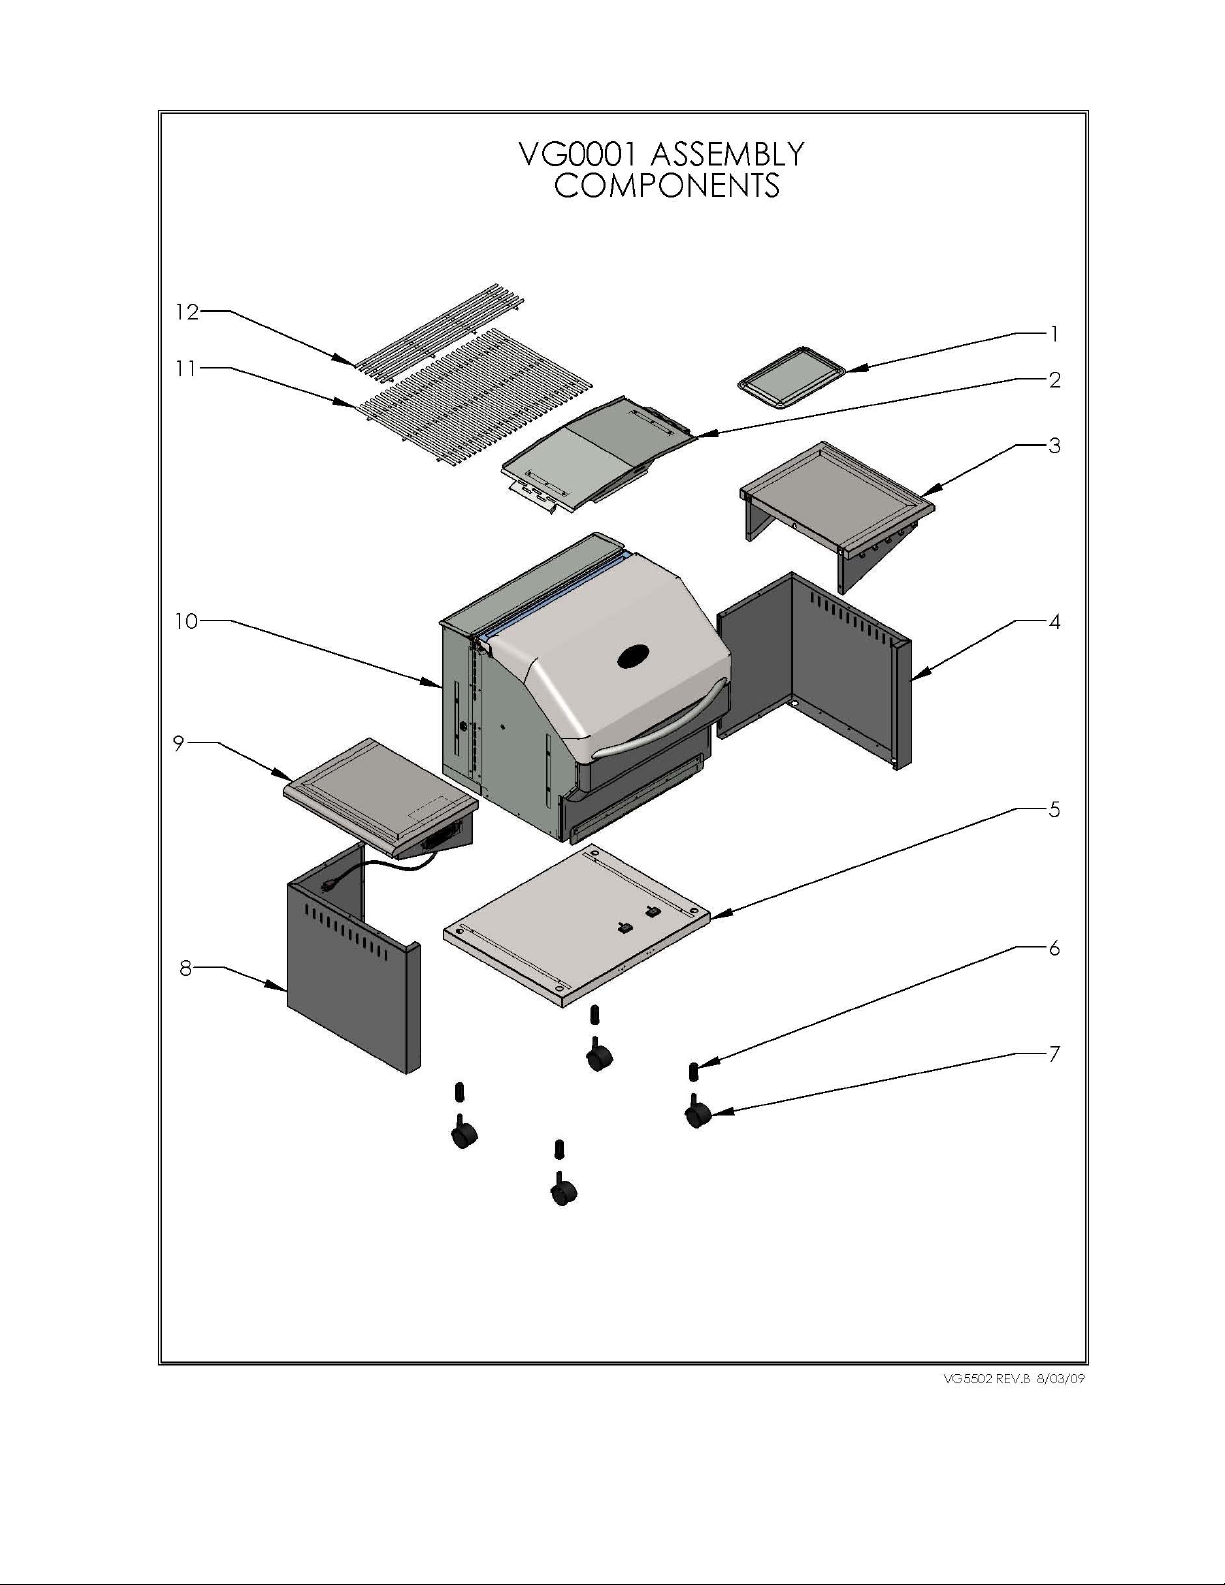
Assembly Component Identification and Part Numbers 7-8
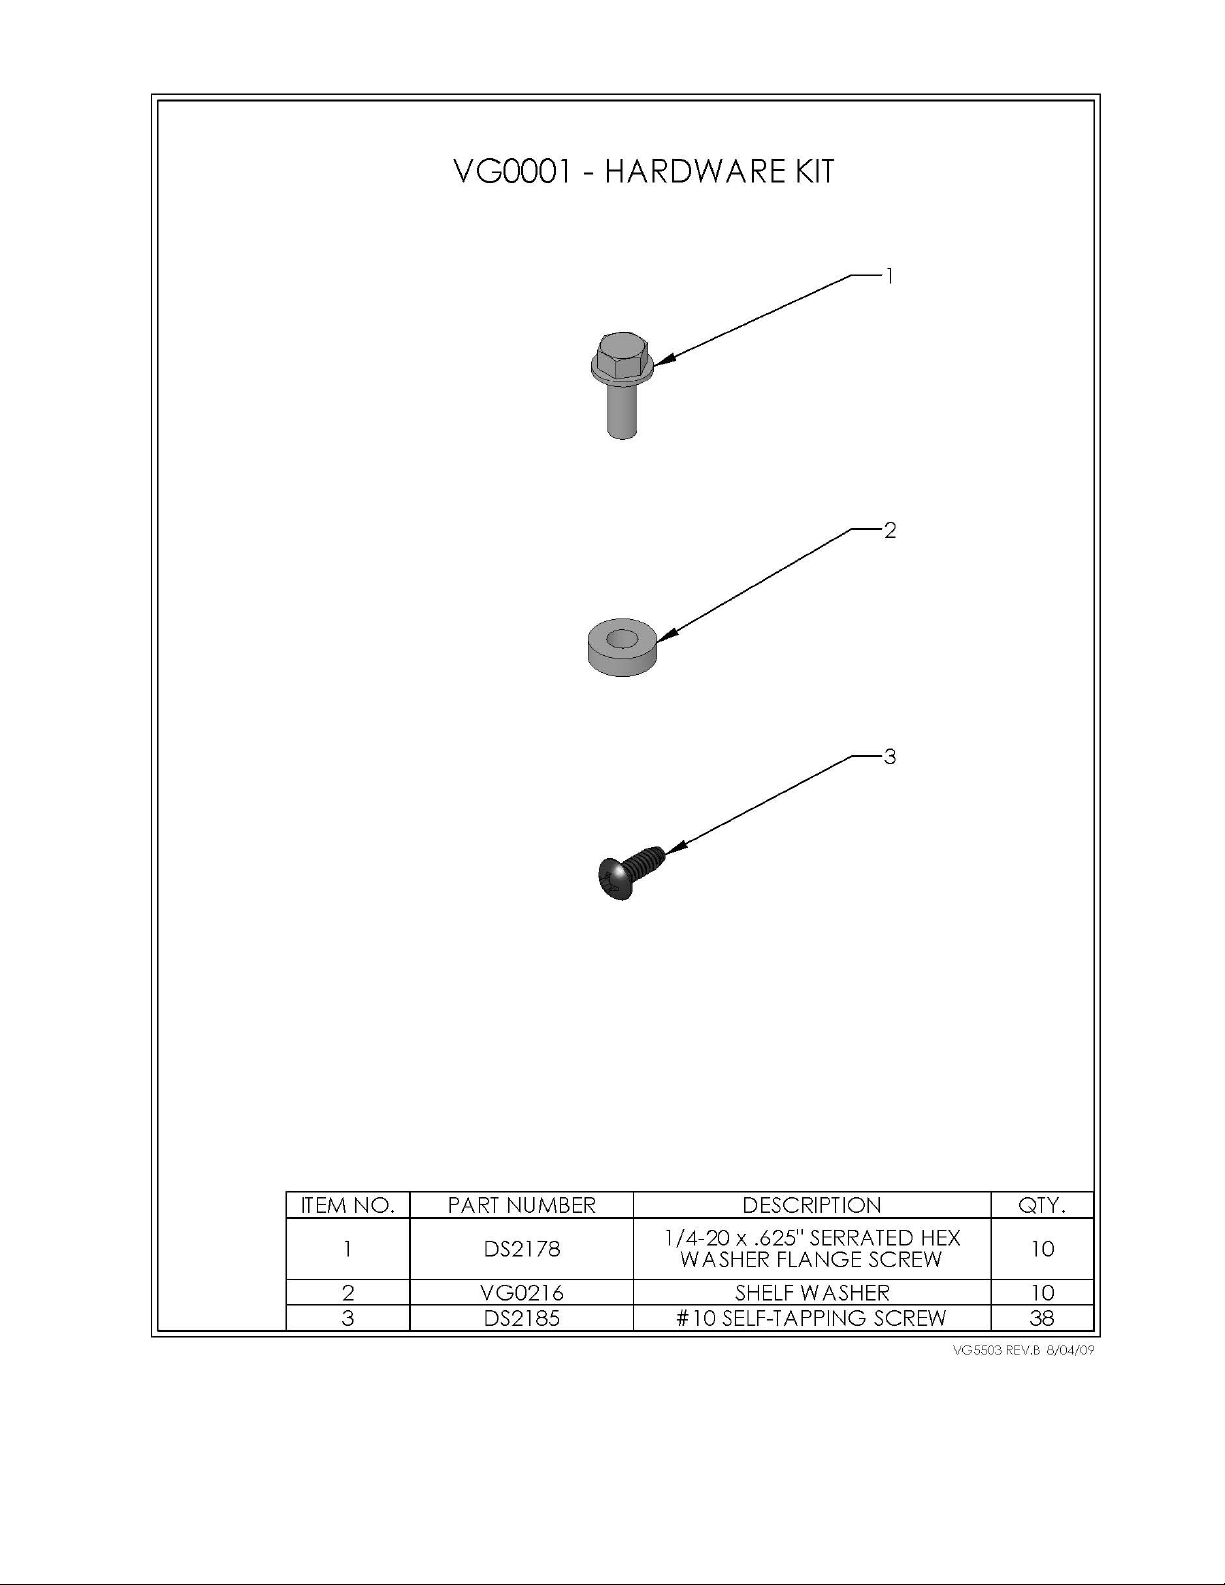
Grill Hardware Kit Identification 9
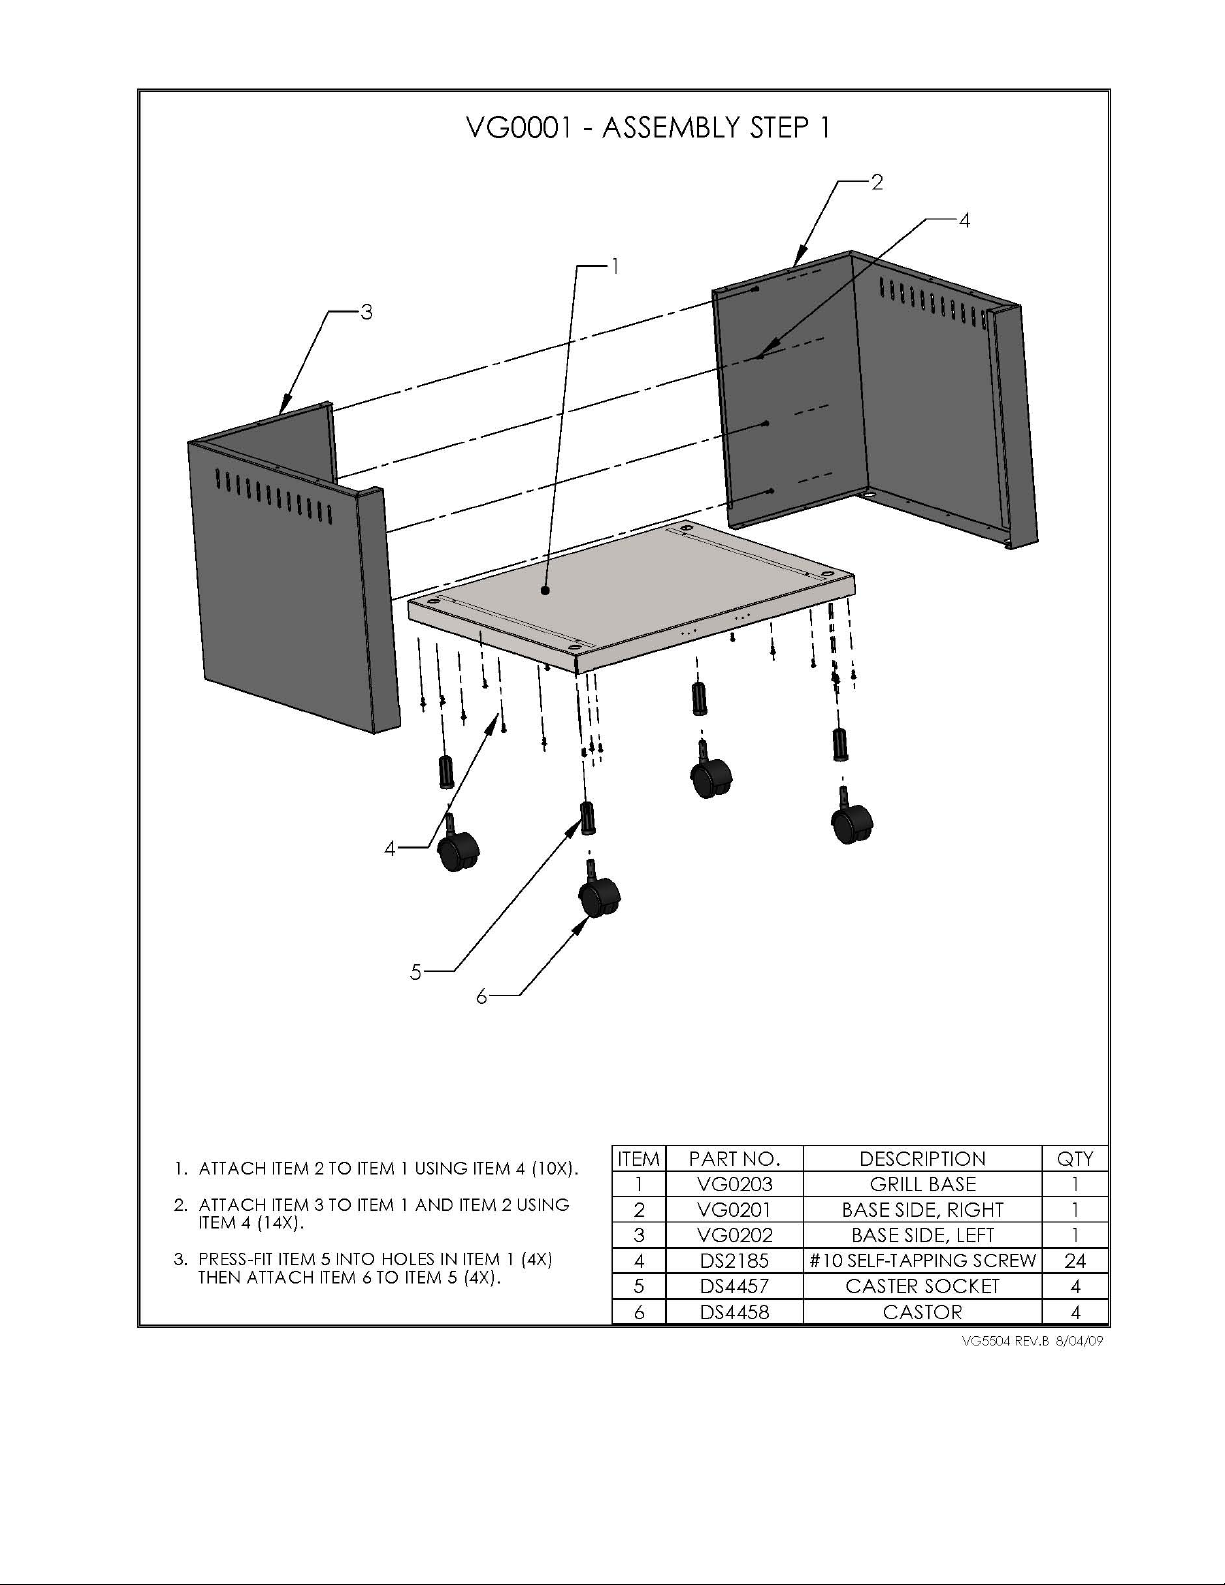
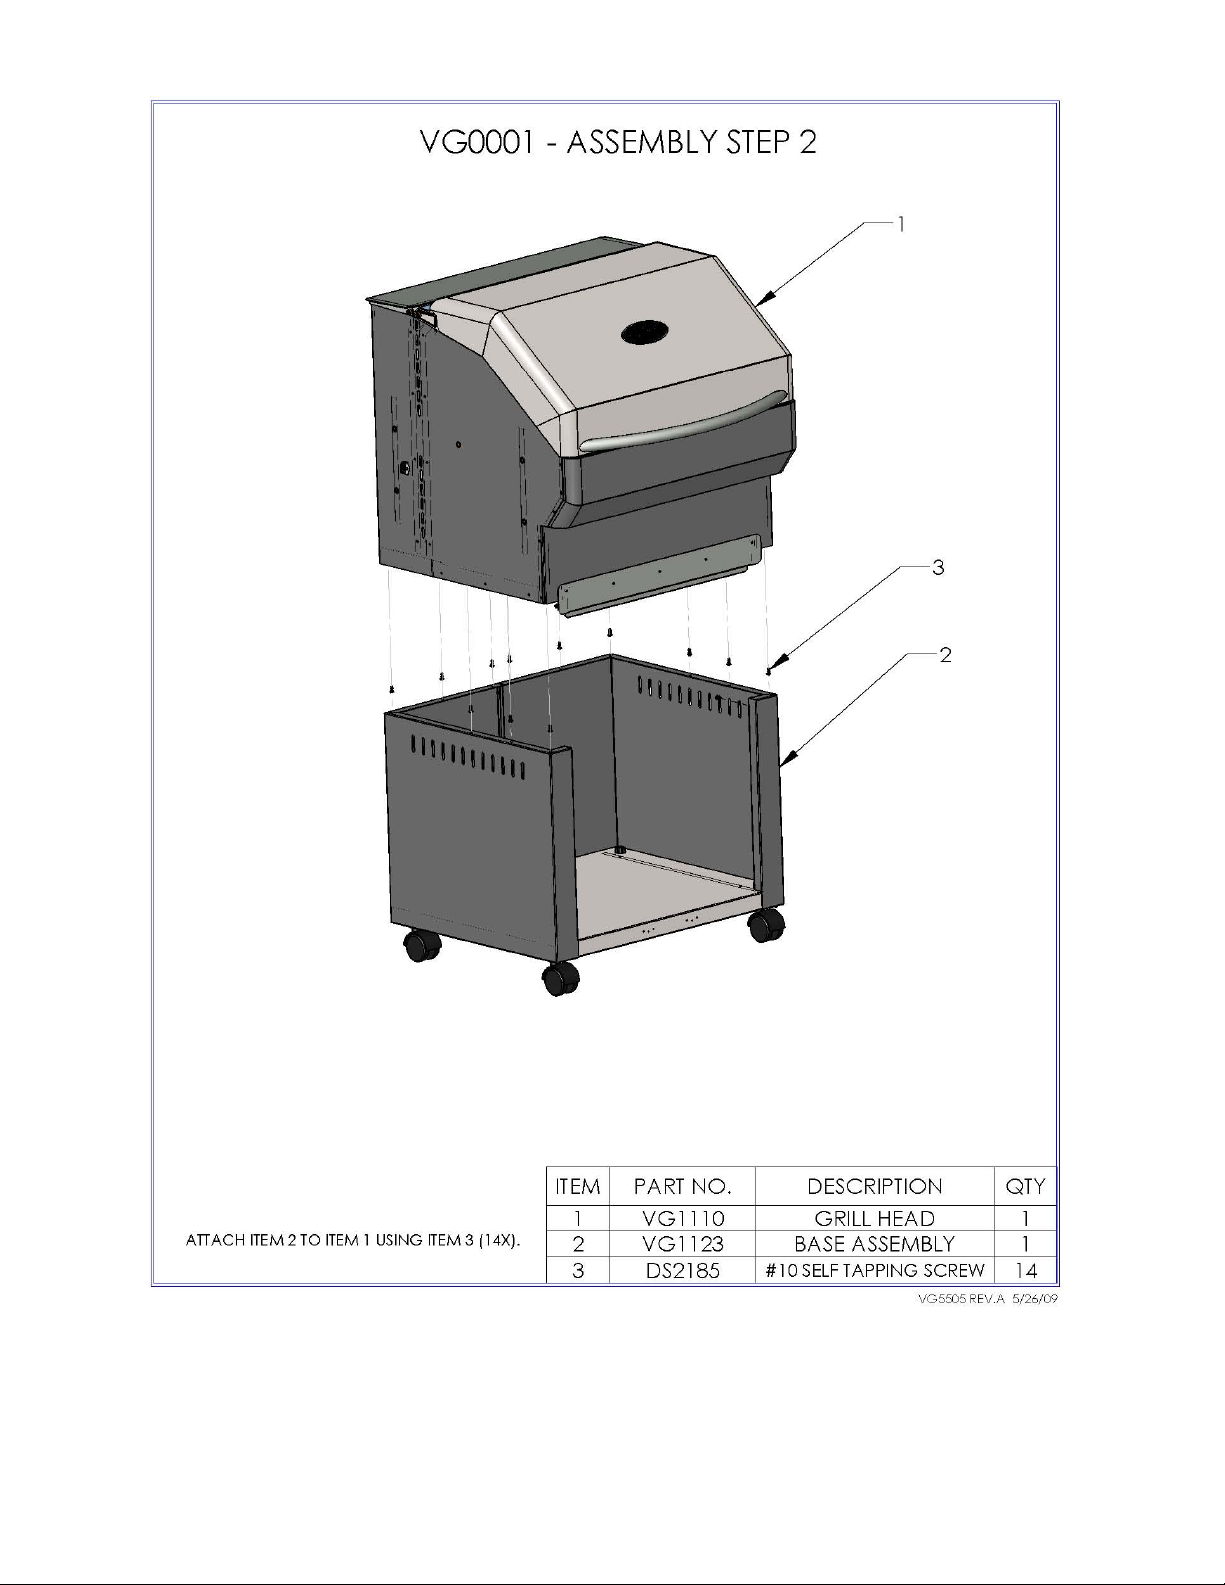
Grill Assembly Instructions 10-15
Optional Doors - Hardware Kit Identification 16
Optional Door Assembly Instructions 17
How your Memphis Grill Works 18
Read Prior to Lighting 19
Intelligent Temperature Control – Overview 20-21
Using your Memphis Grill 22
Operating Instructions 23-25
Information about BBQ Cooking Pellets 26
Periodic Grill Maintenance 26-27
Recommended Grilling Accessories 27-28
Food Handling and Safety 29
Appendix A – Approximate Grilling Times 30-31
Appendix B – Approximate Smoking Times 32
Wiring Diagram 33
Limited Warranty 34-35
Blank Page 36
Warranty Registration 37

Warning: Read all Safety Information Prior to Operating Grill
• For outdoor use only. Do not use in any enclosed area.
• Keep grill 24” or more from any combustible surface.
• To prevent Grease Fires, clean your grill on a regular basis. This includes the
flavorizer and grease tray.
Should a grease fire occur, turn off the grill,
unplug the grill and leave lid closed until the fire is out. When cooking
exceptionally greasy foods, put a foil pan below the food to catch the grease.
• Do not put anything flammable in the storage area under the grill.
• Never operate the grill without the rear panel on and fastened. The rear
panel must be fastened to ensure proper cooling of the pellet hopper and
mechanical cabinet.
• Keep rear panel louvers clear of obstructions.
• Before each use, your Memphis Grill should be checked for burn grate
obstructions to make sure proper air flow is maintained. See cleaning
instructions in this manual for correct procedures.
• Accessible parts of the grill are very hot. Keep young children away while in
use.
• Exercise reasonable care when operating your grill. It will be hot during
cooking or cleaning and should be attended if children are present.
• Do not use lava rocks or charcoal in your grill.
• To avoid the chance of serious burns, never lean over an open grill or place
hands or fingers on the front edge of the cooking box.
• Use heat-resistant barbeque mitts or gloves when operating this unit.
• Do not move your Memphis Wood Fired Grill while operating or while the grill
is hot. Make sure the fire is completely out and that the grill is completely
cold before transporting the grill.

Unpacking and Assembling Your Memphis Wood Fired Convection Grill.
Read all Safety Information Prior to Operating Grill!
*Grill requires (2) two people for safe assembly*
Please note that during shipping some movement may have taken place, so a complete visual inspection
is required. Be sure to inspect entire grill after removing the protective shipping carton. Report any
damage to your local dealer immediately. Shipping damage is not covered under warranty. Some surfaces
may be sharp so wear gloves when assembling. Do not plug in the grill until it's fully assembled, the
plastic protective film is removed from all stainless steel surfaces, and you're ready to cook. See: “start up
procedure” for more details.
Your carton will contain the following:
• 1- pre-assembled grill head lower cabinet assembly
• 2- large cooking grates
• 1- small cooking / warming grate
• 1- Integrated flavorizer / flame deflector
• 1- right shelf (without ITC)
• 1- left shelf with ITC and wiring harness
• 1- hardware bag with owners manual
• Note: Optional purchased doors and hardware are packaged in a separate box.
Tools Required
• 3/8” open end wrench for side shelf assembly
Unpack and Identify Primary Components and Hardware (see supporting diagrams)
• 10- ¼-20 X1”bolts for side shelves
• 10- .5” diameter washers for grill/shelf standoff
Optional Door Kit Includes:
• 1- left hand door
• 1- right hand door
• 4- hinges (upper left, upper right, lower left, lower right)
• 4- #10 sheet metal screws (black for painted grill, stainless steel for stainless grill)
• 2- plastic washers for lower hinge pins
• 2- door striker plates
• 2- door striker plate screws
• 2- door magnetic latches
Procedure for Assembly – See Diagrams on following pages. Note: Optional Door Kit
installation is also contained in this section.
CAUTION: Remove ALL protective plastic film from stainless steel surfaces before starting
the grill. It will melt and adhere to the SS!


 Loading...